Prusa
  • SHOP
    • Latest products
    BY CATEGORY
    • 3D printersnew
    • 3D printer upgradesnew
    • Materials
    • Accessories
    • Spare parts
    • Courses
    • Merch
    • Get a price quote
    QUICK LINKS
    • Shipping & delivery
    • Returns & refunds
    • Payment & financing
    • Warranty
    • VAT & Customs fees
    • FAQ

    0 item in your cartitems in your cart

    Your cart is empty

    Go to cartShop 3D printers

    My profile

    Log in to see orders, saved items

    My profile

    Signed in as

    • Orders
    • Logout
  • 3D PRINTING
    • Explore 3D printing
    FOR BEGINNERS
    • 3D printing 101
    • How FDM printing works
    • Buying your first printer
    • 3D model catalog
    BY APPLICATION
    • Rapid prototyping
    • Manufacturing
    • Engineering
    • Research
    • Arts & design
    GO DEEPER
    • Materials guide
    • Courses
    • Webinars
    • Case studies
    • Custom 3D printing
  • 3D PRINTERS
    • All 3D printers
    FOR
    • Home or garageHobbyists, tinkerers and home printing
    • BusinessIn-house production for small teams
    • EnterpriseFleets, security and scale
    • Which Prusa is right for me
    SHOP & BROWSE
    • CORE One+new
    • CORE One+ INDXnew
    • CORE One L+new
    • CORE One L+ INDXnew
    • XL+new
    • MK4S
    • Prusa Pro HT90
    • Prusa Pro AFS
    • Prusa Pro SLX
    MORE FROM PRINTERS
    • Parts & upgradesnew
    • Critical infrastructure
    • Case studies
    • Signature Oak
    • Kits
  • MATERIALS
    • All materials
    BY USE
    • Every-day & design
    • Functional engineering
    • Composites
    • Pro speciality
    • SLA resins
    PRUSAMENT
    • PLA
    • PETG
    • ASA
    • PC
    • PA11
    • Flex
    • TPU
    MORE FROM MATERIALS
    • Materials guide
    • We make material in house
    • Sustainability
    • Order on the store
  • SOFTWARE
    • All software
    PREPARE THE PRINT
    • PrusaSlicer 3.0New
    PRINT & MONITOR
    • Prusa Connect
    • EasyPrint
    • iOS & Android app
    • Prusa Farm
    GET STARTED
    • Download & install
    • Knowledge base
    MORE FROM SOFTWARE
    • 3D model catalog
  • SUPPORT
    • Explore support
    FIND ANSWERS
    • Knowledge base
    • Troubleshooting
    • Courses
    • Webinars
    GET HELP
    • Contact us
    • Livechat
    • Shipping & delivery
    • Warranty
    • Returns & refunds
    • Service & spare parts
    • Service & Repair
    COMMUNITY
    • Forum
    • Reddit
    • Printables
  • TRUST CENTER
    • Trust Center overview
    BY TOPIC
    • GDPR
    • Certificates
    • Security
    • Compliance
    COMMITMENTS
    • Sustainability report
    TALK TO US
    • Contact the security team
  • COMPANY
    • About Prusa
    GET TO KNOW US
    • Our story
    • How we make printers
    • Open source
    • Brand & media kit
    NEWS
    • Blog
    • Newsroom
    • Events
    TRUST & PARTNERS
    • Sustainability
    • Resellers & distributors
    • Affiliate program
    • Contact
    • English
    • Čeština
    • Deutsch
    • Español
    • Français
    • Italiano
    • Polski
    • 日本語
  • Signed in as

    • Orders
    • Address
    • In-stock Alerts
    • My Courses
    • Subscription
    • Edit Account
    • Logout

Log in to see orders, saved items

Signed in as
  • Orders
  • Address
  • In-stock Alerts
  • My Courses
  • Subscription
  • Edit Account
  • English
  • Čeština
  • Deutsch
  • Español
  • Français
  • Italiano
  • Polski
  • 日本語
Shop

0 item in your cartitems in your cart

Your cart is empty

Go to cartShop 3D printers

My profile

Log in to see orders, saved items

My profile

Signed in as

  • Orders
  • Logout
SHOP
  • Latest products
BY CATEGORY
  • 3D printersnew
  • 3D printer upgradesnew
  • Materials
  • Accessories
  • Spare parts
  • Courses
  • Merch
  • Get a price quote
QUICK LINKS
  • Shipping & delivery
  • Returns & refunds
  • Payment & financing
  • Warranty
  • VAT & Customs fees
  • FAQ

Featured products

    Popular categories

      Trending searches

        Articles

          Blog

            Products

              Categories

                Suggested searches

                  Searching…
                  No results
                  Something went wrong.
                  ↑↓ Select↵ OpenEsc Close search
                  1. Support
                  2. Original Prusa MK4
                  3. Printer maintenance
                  4. Adjusting belt tension (MK4/S, MK3.9/S, MK3.5/S, MK3/S/+)
                   

                  Contents

                  • Checking belt tension
                  • X-axis belt
                  • Y-axis belt

                  Blog

                  • Prusament Pellets: Raw material batches for large-format 3D printing or small-scale polymer research & development
                  • Print colorful and glowing Halloween decorations with our spooky offer
                  • Factorio Has Arrived on Printables

                  Newsletter

                  Signup and get our monthly squeeze on updates, blog, printables and much more.

                  By clicking, you agree to receive our newsletter.

                  This site is protected by reCAPTCHA Enterprise and the Google Privacy Policy and Terms of Service apply.

                  Heavy Duty Keyboard Holder (No Supports)
                  E-shop
                  • 3D Printers
                  • Printer Upgrades
                  • Filaments
                  • Accessories
                  • Prusa Merchandise
                  Prusa

                  © Prusa Research a.s.

                  Printables
                  • 3D Models
                  • Store
                  • Clubs
                  • 3D Design Contests
                  • Brands
                  Community
                  • World Map
                  • Forum
                  • User Groups
                  • Events
                  Help
                  • Prusa Help
                  • Prusa Academy
                  • 3D Printing Calculators
                  Software
                  • PrusaSlicer
                  • Prusa.app
                  • Prusa Connect
                  • Drivers and Software
                  Company
                  • About Us
                  • Blog
                  • Official Prusa Resellers
                  • Contact Us
                  • Certified for ISO 9001, ISO 14001, ISO 45001
                  • General Terms and Conditions
                  • General Terms and Conditions of Use of the PRUSA Websites
                  • Privacy Policy
                  • Information about cookies
                  • Customer Complaints Policy
                  • Status Page
                  • Do Not Sell or Share My Personal Information
                  • Supplemental Statements
                  Prusa
                  • General Terms and Conditions
                  • General Terms and Conditions of Use of the PRUSA Websites
                  • Privacy Policy
                  • Information about cookies
                  • Customer Complaints Policy
                  • Status Page
                  • Do Not Sell or Share My Personal Information
                  • Supplemental Statements

                  © Prusa Research a.s.

                  JOSEF PRUSA®, PRUSA RESEARCH®, PRUSA POLYMERS®, PRUSA ORANGE®, PRUSA 3D ® AND PRUSAMENT® are registered trademarks of Prusa Development a.s. used by Prusa Research a.s. under licence from Prusa Development a.s.

                  Adjusting belt tension

                  (MK4/S, MK3.9/S, MK3.5/S, MK3/S/+)

                  Relevant for

                  MK4 family
                  MK3 family
                  MK3.5 family
                  MK3.9 family
                  OLD PRODUCTS
                  75 comments
                  Article is also available in following languages
                  English
                  Čeština
                  Polski
                  Deutsch
                  Français
                  Español
                  Italiano
                  日本語

                  Loose belts would cause a printer to malfunction and prevent proper printing. It can cause Layer shifting, Ghosting, or other print abnormalities like getting an irregular shape instead of a perfect circle when printing a cylinder. The Y-axis belt is located under the heatbed, X-axis belt moves the print head. All adjustments are done with the 2.5mm Allen key. 

                  Checking belt tension

                  New procedure - Belt tuner app

                  Follow the instructions in the video below, to adjust the belt tightness using our belt tuner. 

                  Old procedure

                  On MK3/S/+, it is possible to check the Belt Status numbers via LCD Menu -> Support -> Belt Status. 

                  While there is not a precise ideal value, from our experience, the best approximate value is around 250 on the X-axis, and 275 on the Y-axis, with an optimal range at +-15 from these values on either axis. 

                  The value does not represent a physical quantity, but an arbitrary number inversely proportional to the motor load. The values are with the consideration that the assembly is good and that the parts are in good condition and properly lubricated. Values may not be accurate if there are other problems. 

                  • If your value is under (or close to) 240, you need to loosen the belt
                  • If your value is over (or close to) 290, you need to tighten the belt
                  • The values are updated every time you run the Selftest or run the belt test in LCD menu -> Calibration -> Belt test. 

                  Other MK-series models do not have the belt status option. The clue we can give you is that the belt should sound roughly like a low bass string when plucked. It should be possible to pinch the two sides together with your thumb and index finger, but you should feel a little bit of resistance.

                  The plastic parts holding the belts can get loose over time.

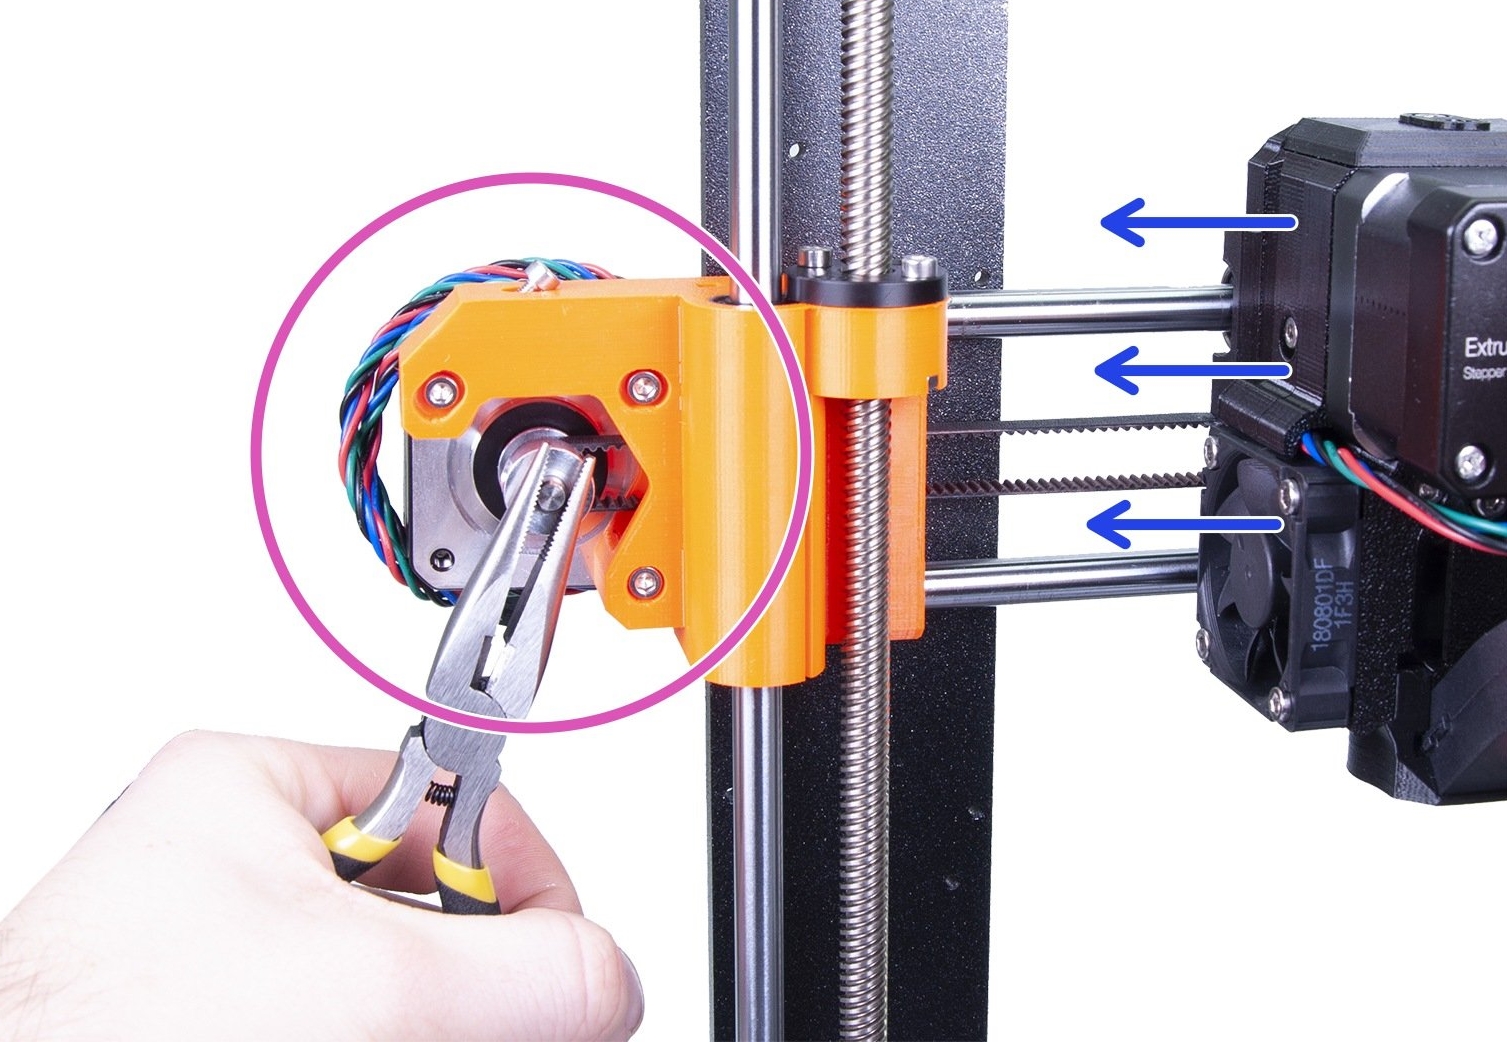
                  Another way is to use the technique described in this step of the assembly manual to test if the pulley is correctly tightened and if the belt is not too loose. Hold the X-axis motor shaft with pliers (take advantage of the flat part of the shaft) to fix it in place (purple circle), then try to move the extruder by hand. You should see no slack on the belt as a result of pushing on the extruder. The same procedure can be applied to test the Y-axis pulley and belt.
                  X-axis belt

                  Slight adjustments MK3S

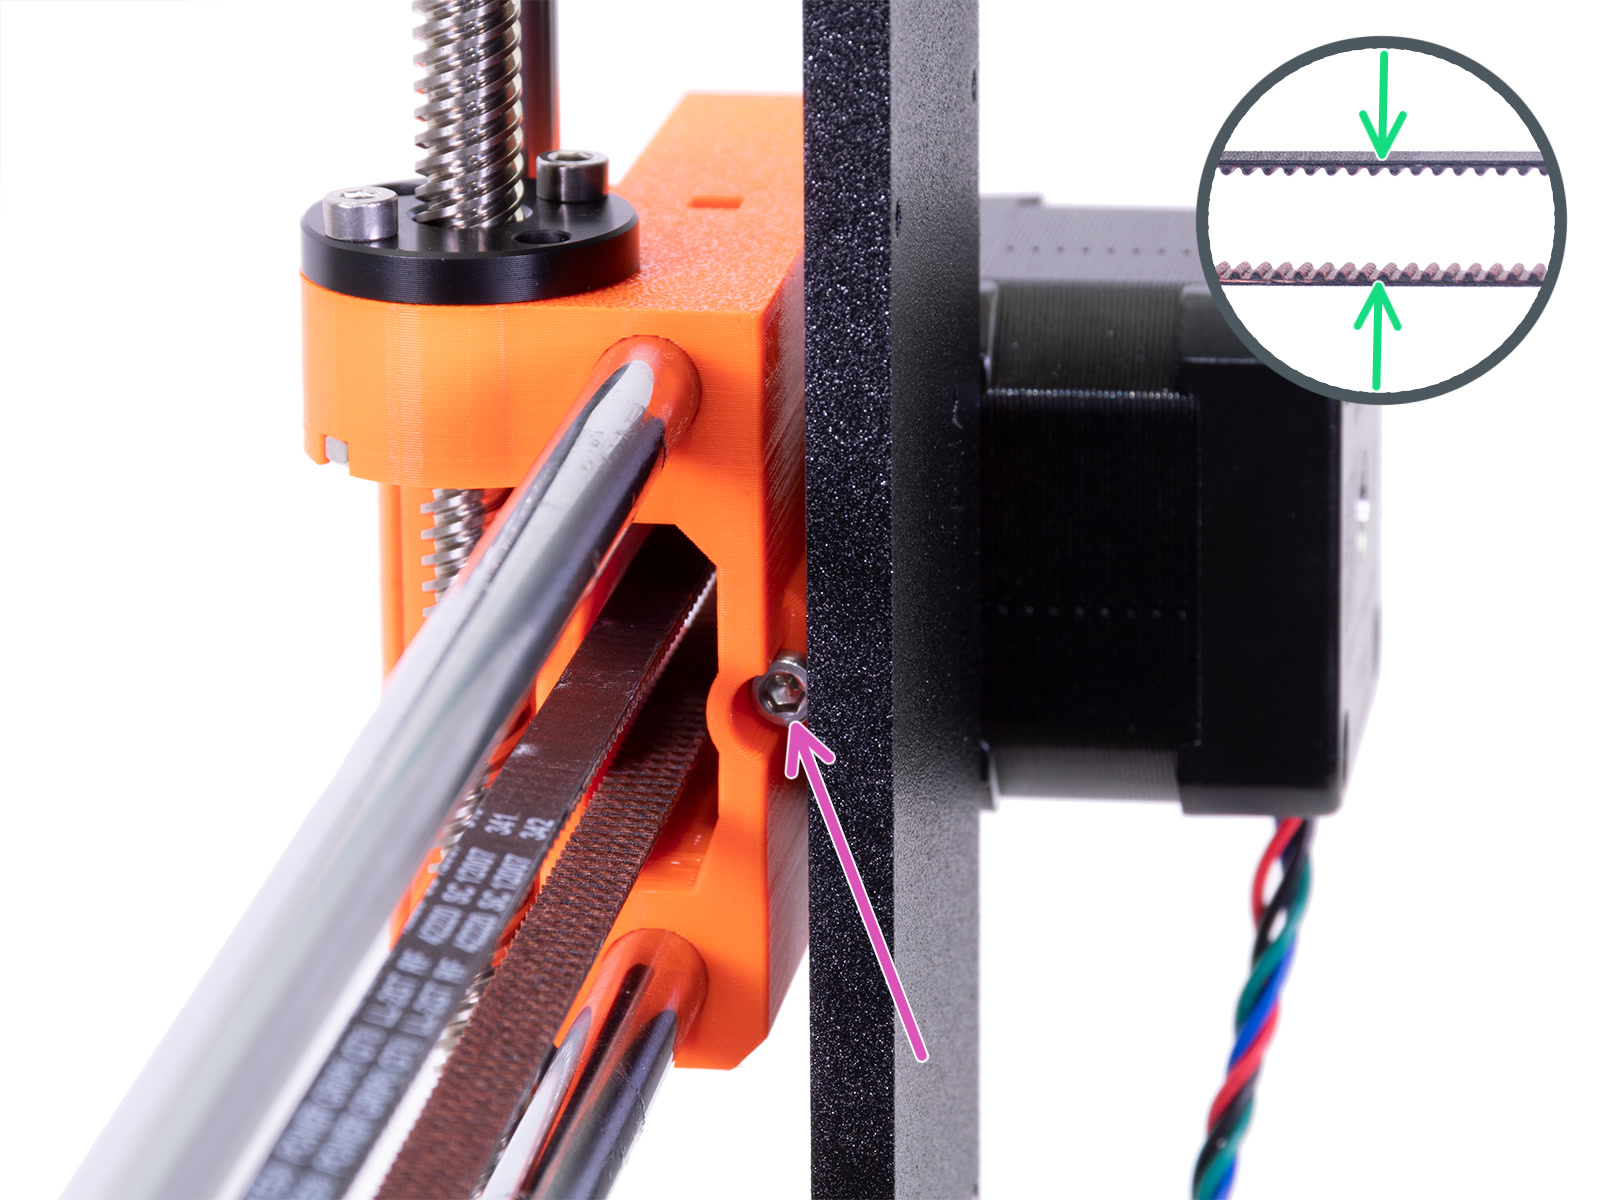
                  Loosen the two front-facing screws and make sure they have space to their right to move (yellow circles). While assisting with the rotation of the motor with your hand, tighten the M3x18 screw on top of the X-end-motor (purple arrow).

                  After each turn or two check the tension in the belt by pressing them together. For optimal performance, the belt must need some force to press together with your fingers (green arrows). Move the extruder all the way to the X-end-idler and try the belt tension in the middle of the X-axis.
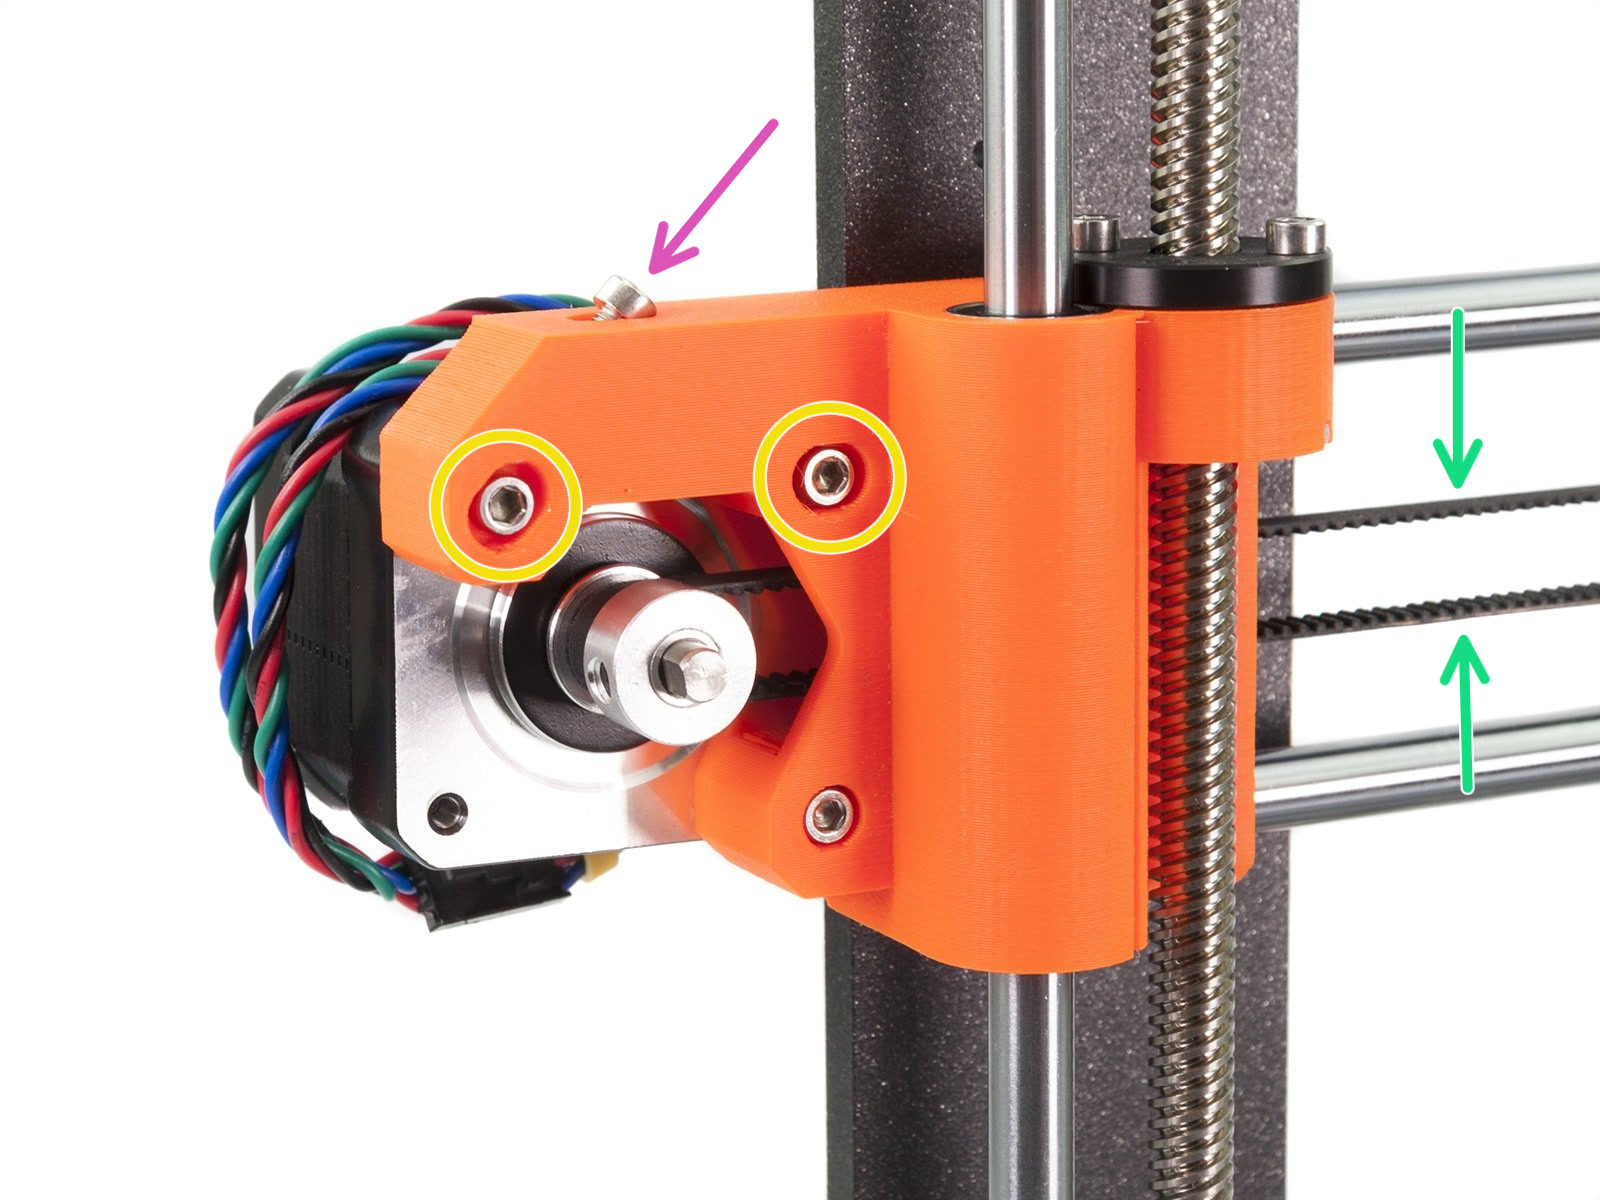
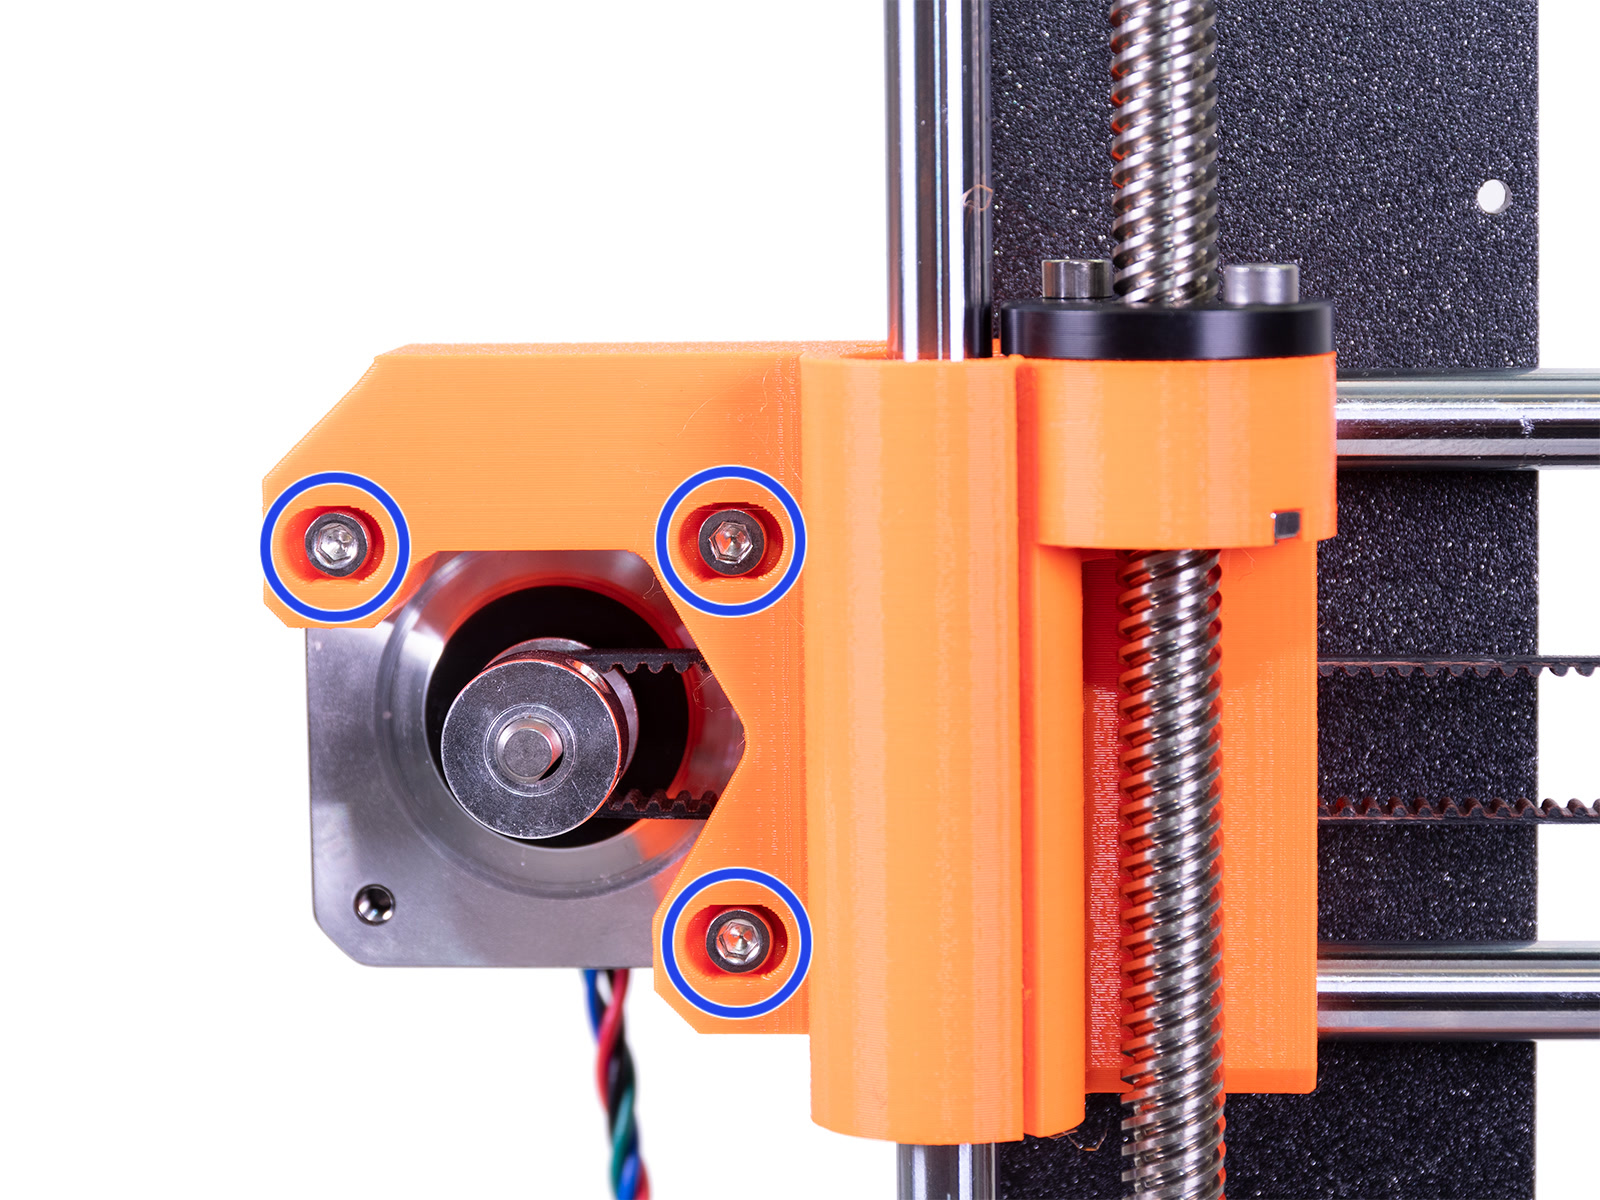
                  Slight adjustments MK3S+, MK3.5/S, MK3.9/S, MK4/S

                  1. Slightly release all the screws holding the motor, otherwise, the "tensioner" won't work as the motor must be able to move (left picture).
                  2. Using the ball end of the Allen key, start tightening the screw on the rear side of the X-end-motor, but after each turn or two check the tension in the belt (right picture).
                  3. When you achieve optimal tension, please tighten the screws again (left picture).

                  Large adjustments MK3/S/+ or MK3.5/S

                  If a slight adjustment is not sufficient you must adjust it at the belt holder. This is found on the back of the extruder and requires a little disassembly.

                  First, remove the two top screws from the motor-holder to let the belt have some slack in order to easier manipulate the belt.
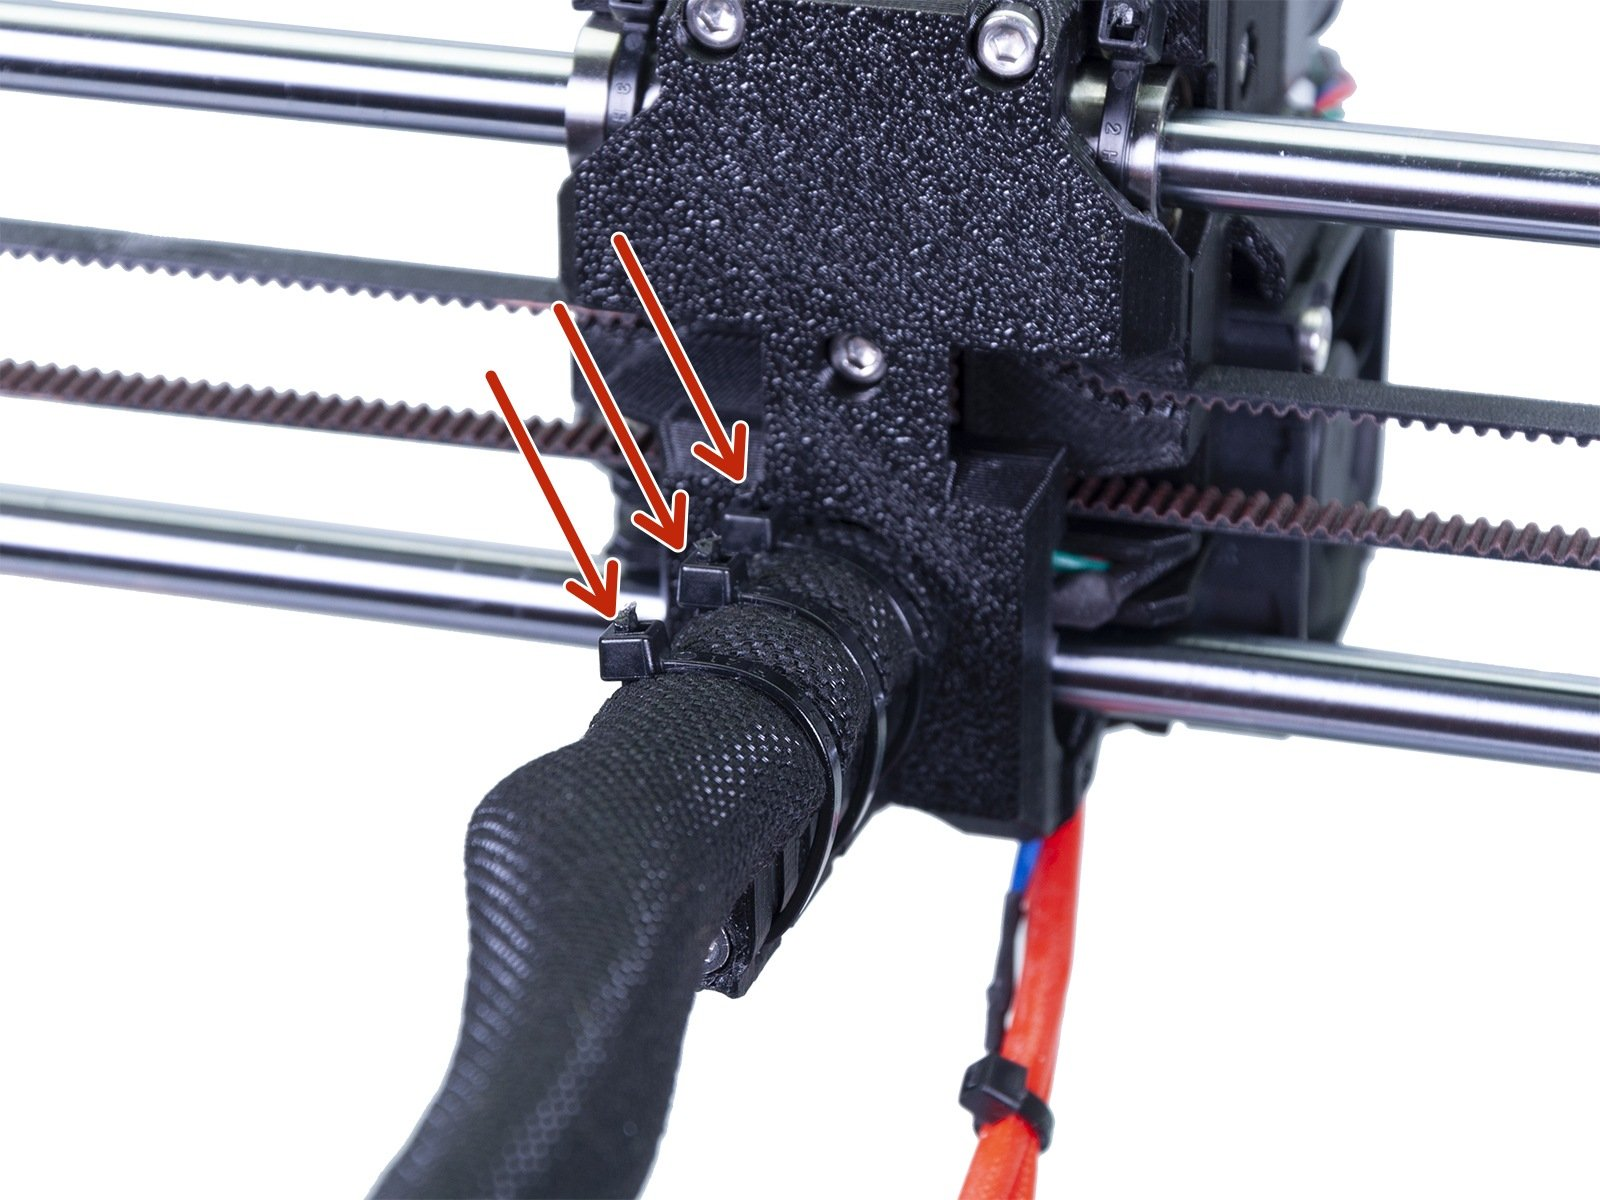
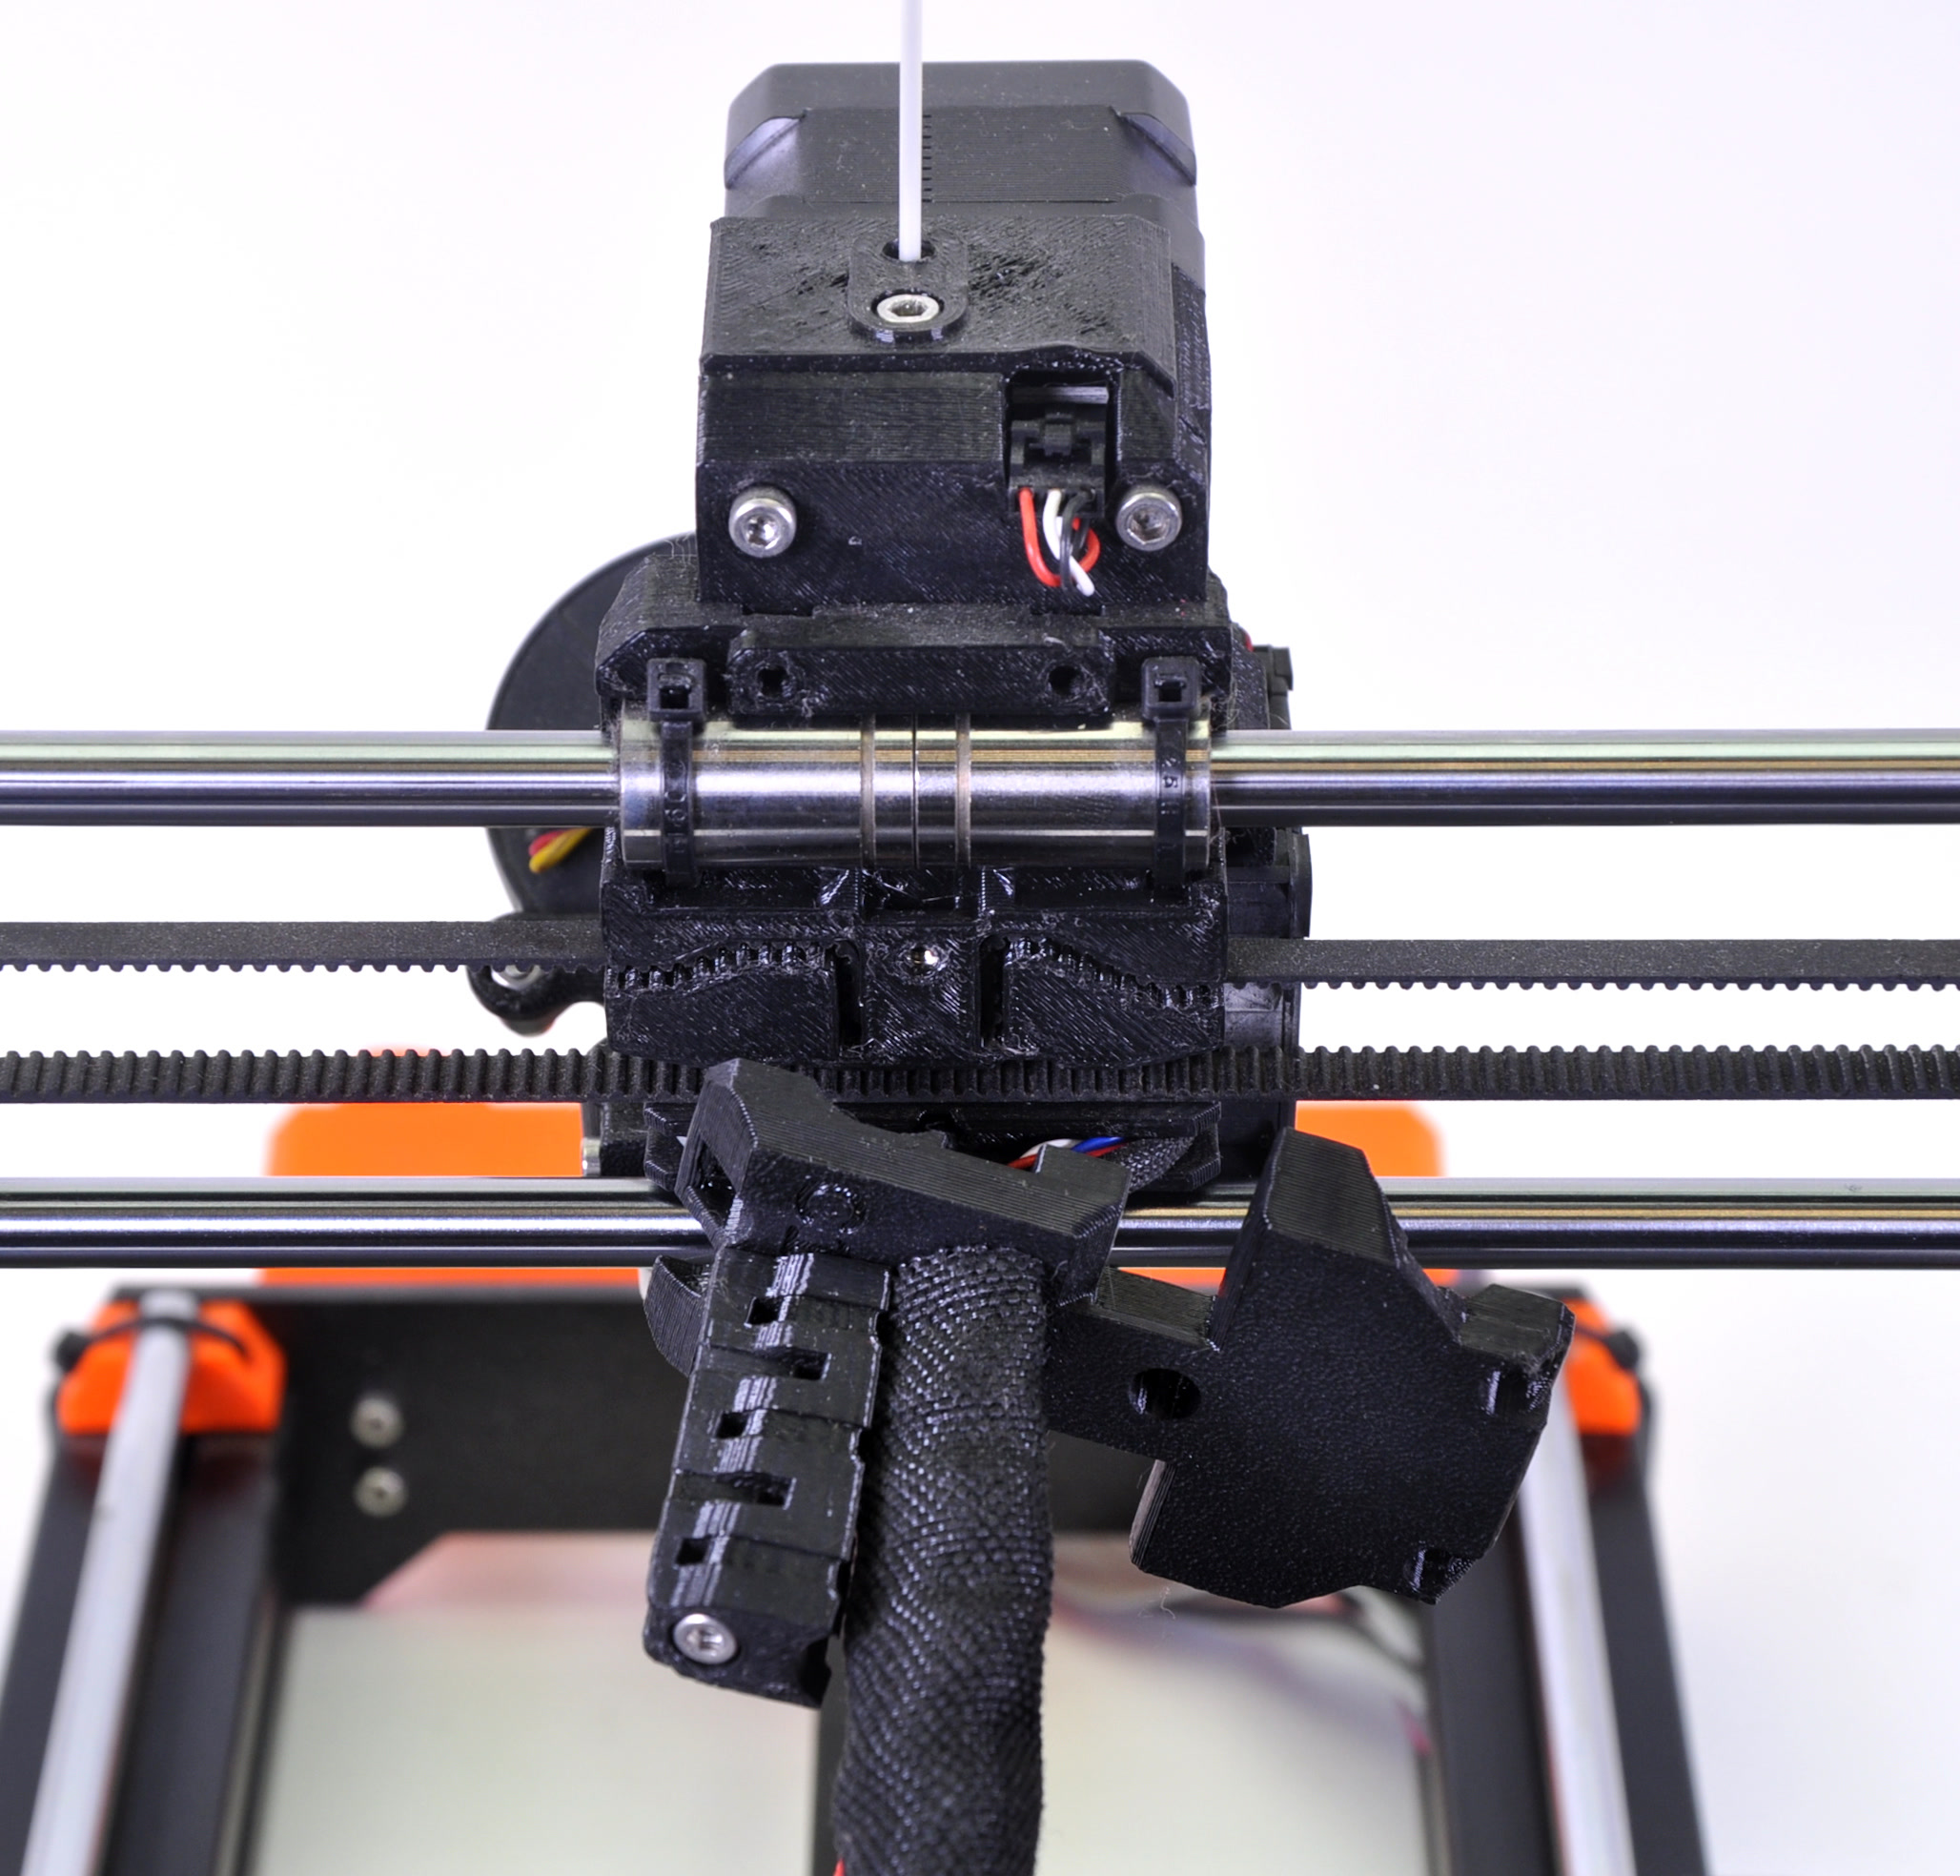
                  1. Snip the zip-ties on the back of the extruder (red arrows), which are securing the hotend wires and the ones securing the cable wrap.

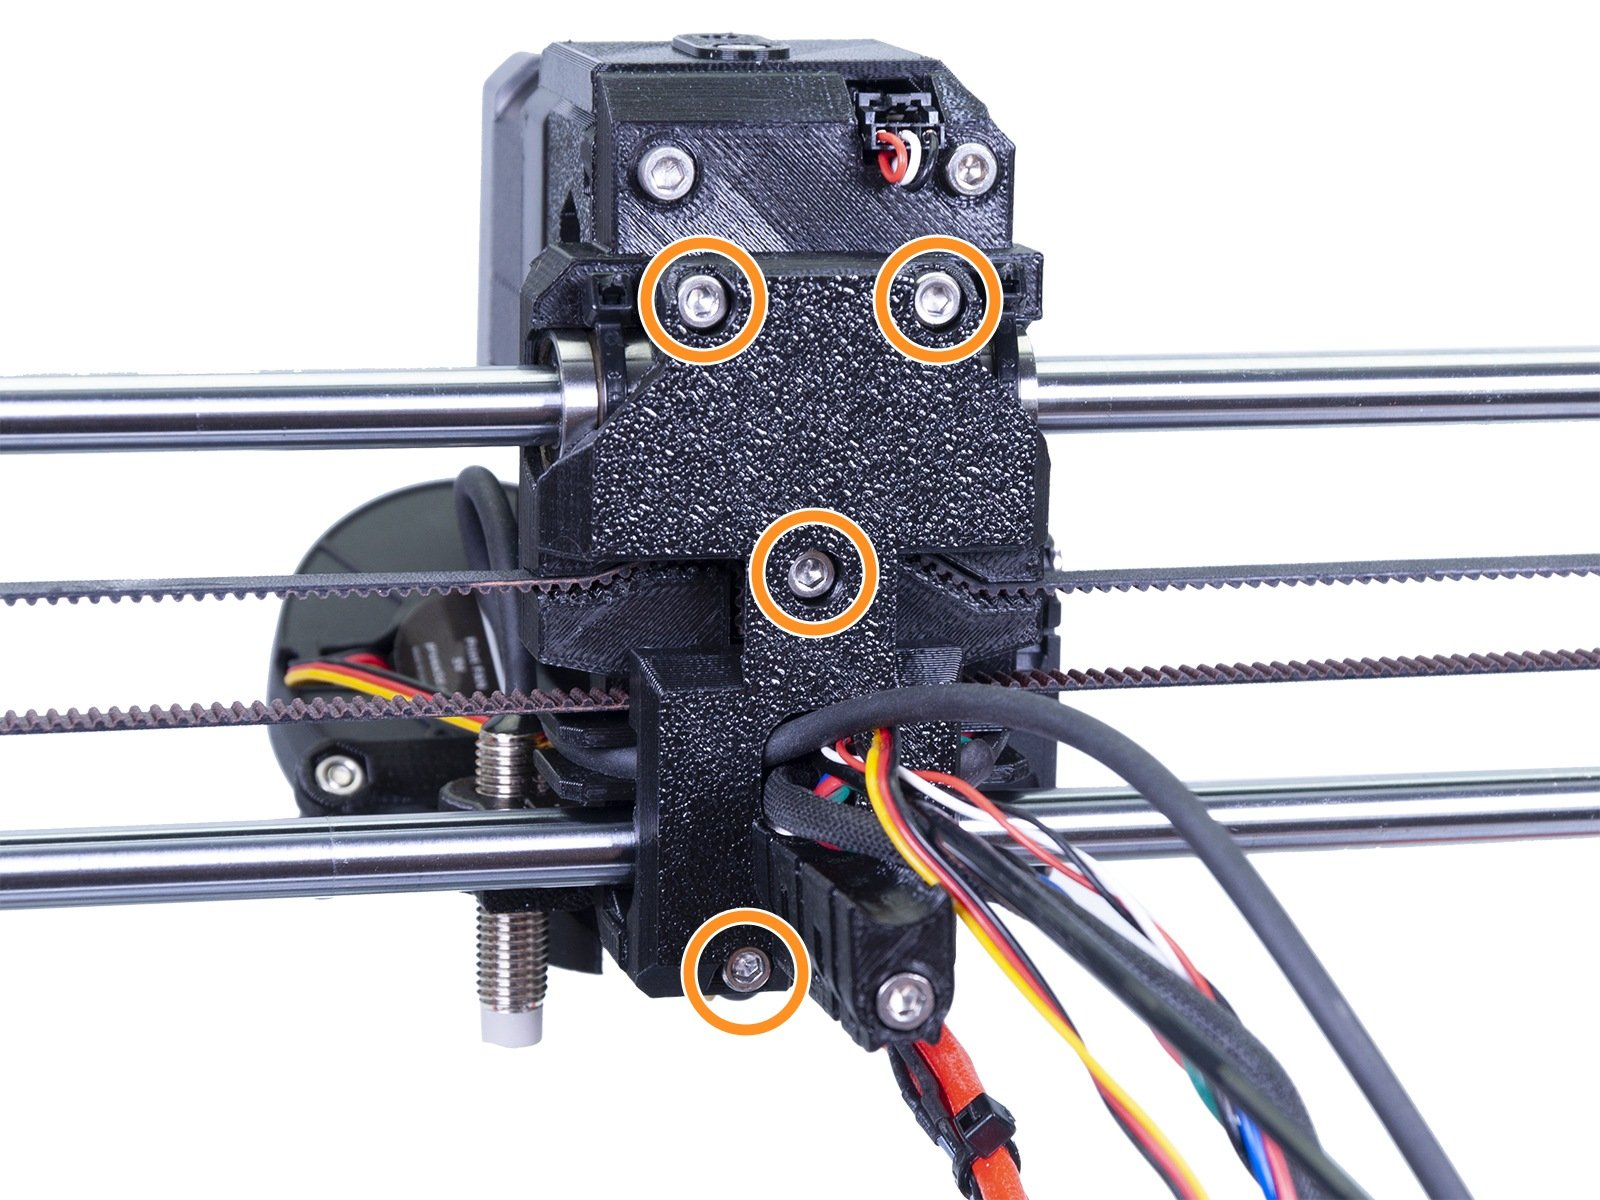
                  1. Unscrew the 4 screws circled in the picture below.

                  1. Carefully pull the back plate loose, making sure the wires are safe, and turn the whole plate to the left or right.

                  1. You now have access to where you mount the belts. Put a mark on the belt with a pen or marker as close to the plastic part as possible, so you know how it was adjusted. Now, take out the belt from the mount and move it in 1-2 teeth.
                  It may be necessary to cut off the last tooth of the belt.
                  1. Place the back plate back on, secure the screws, starting with the center one for alignment, then put on new zip-ties.
                  2. Re-tighten the screws on the x-motor, securing it. Adjust it tighter if needed.

                  Large adjustments MK4/S, MK3.9/S

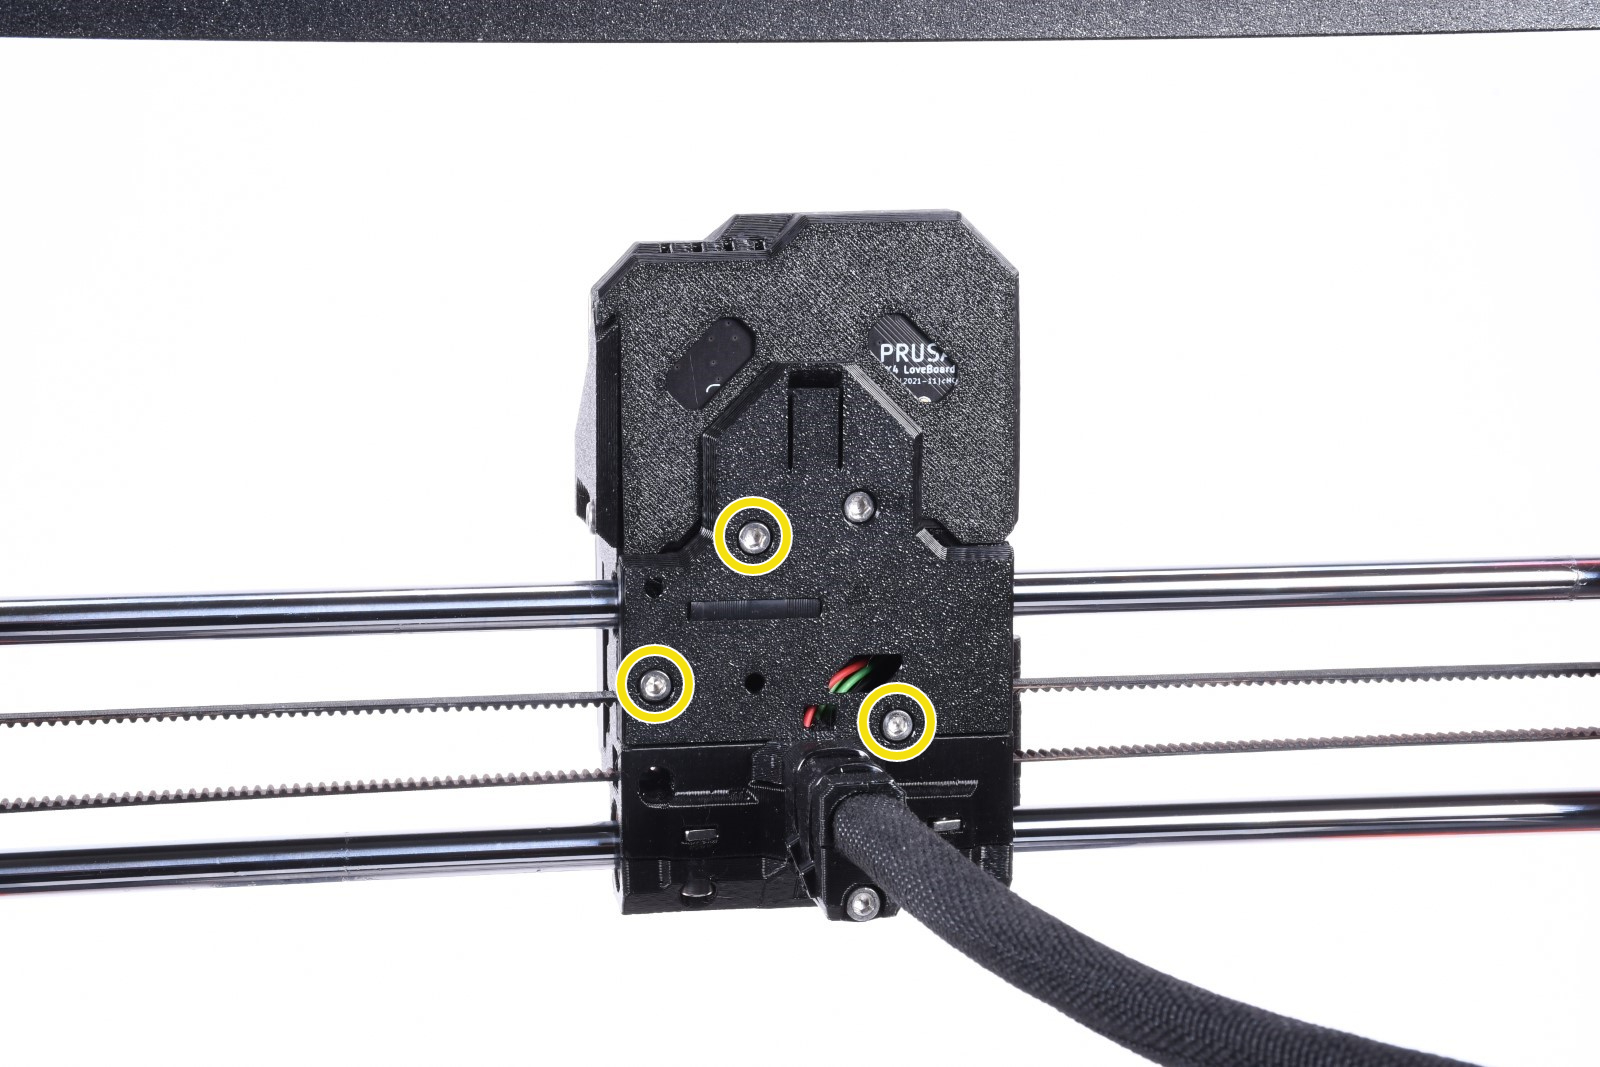
                  1. Loosen the three indicated screws covering the X-carriage. Carefully take out the X-cover-back.

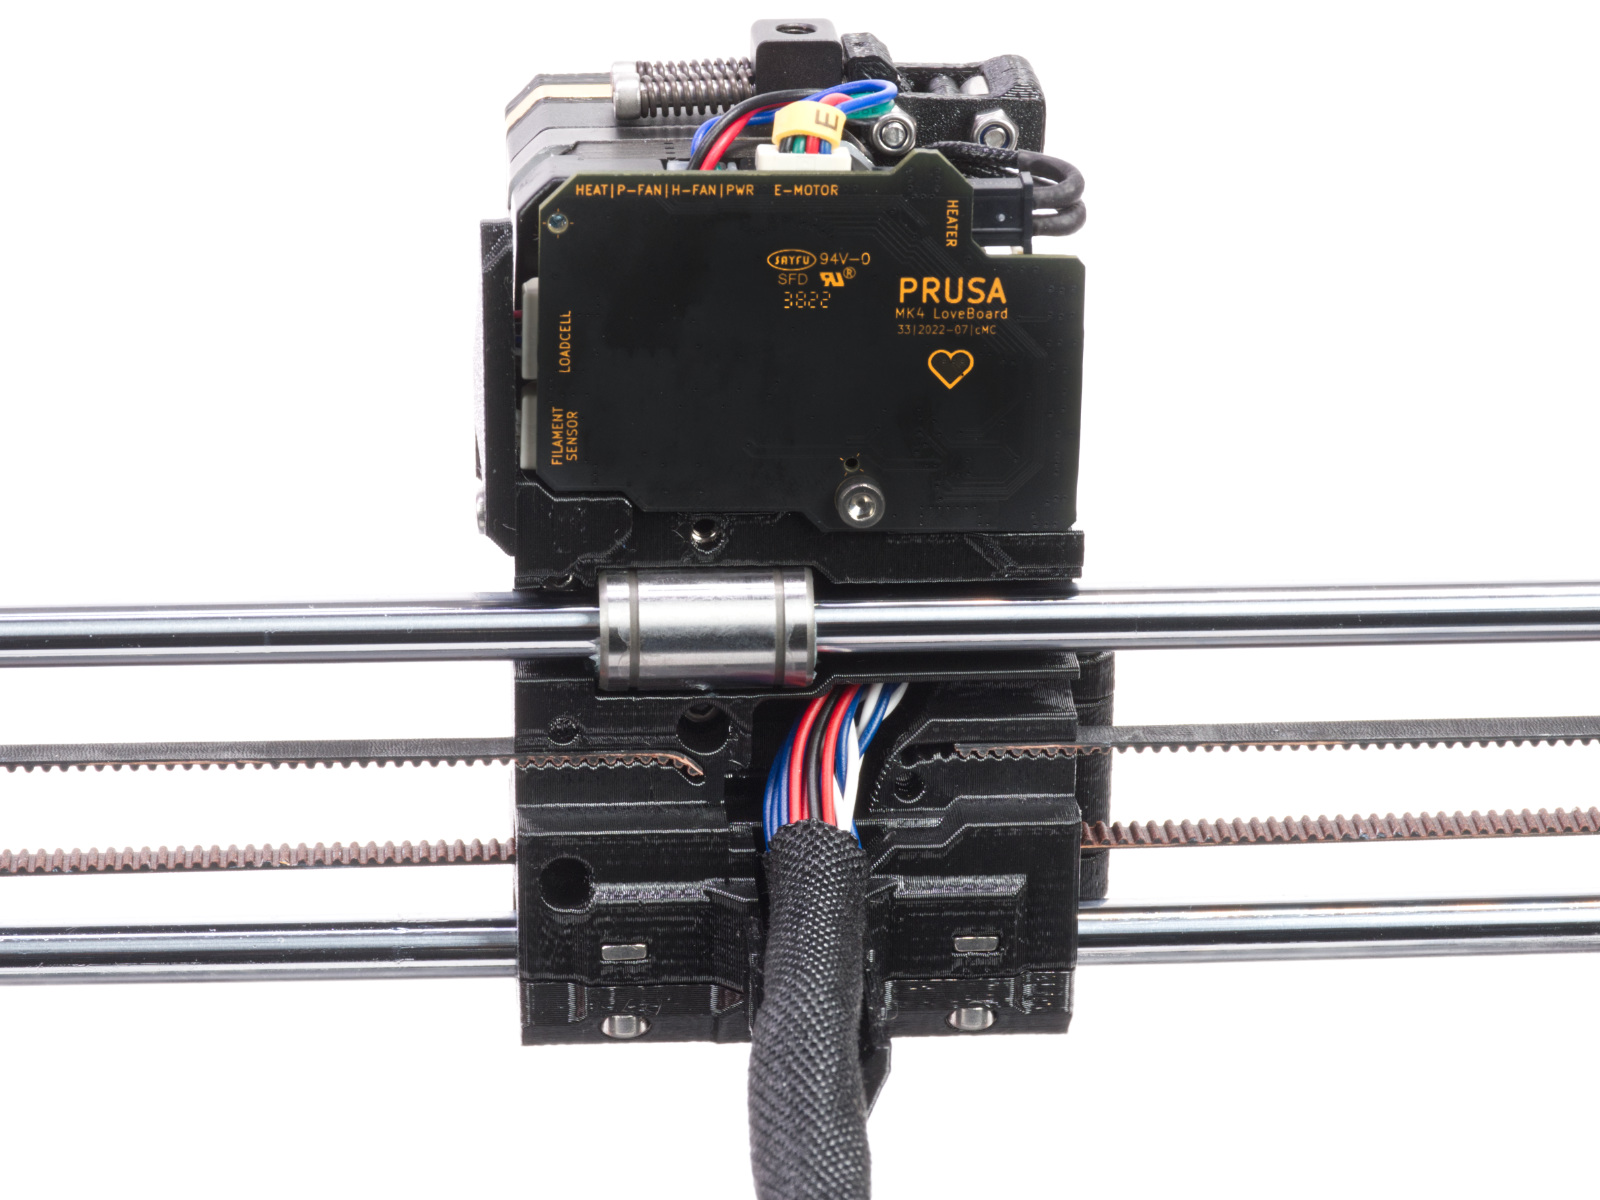
                  2. You now have access to where you mount the belt. Put a mark on the belt with a pen or marker as close to the plastic part as possible, so you know how it was adjusted. Now, take out the belt from the mount and move it in 1-2 teeth.

                  Y-axis belt

                  Slight adjustments

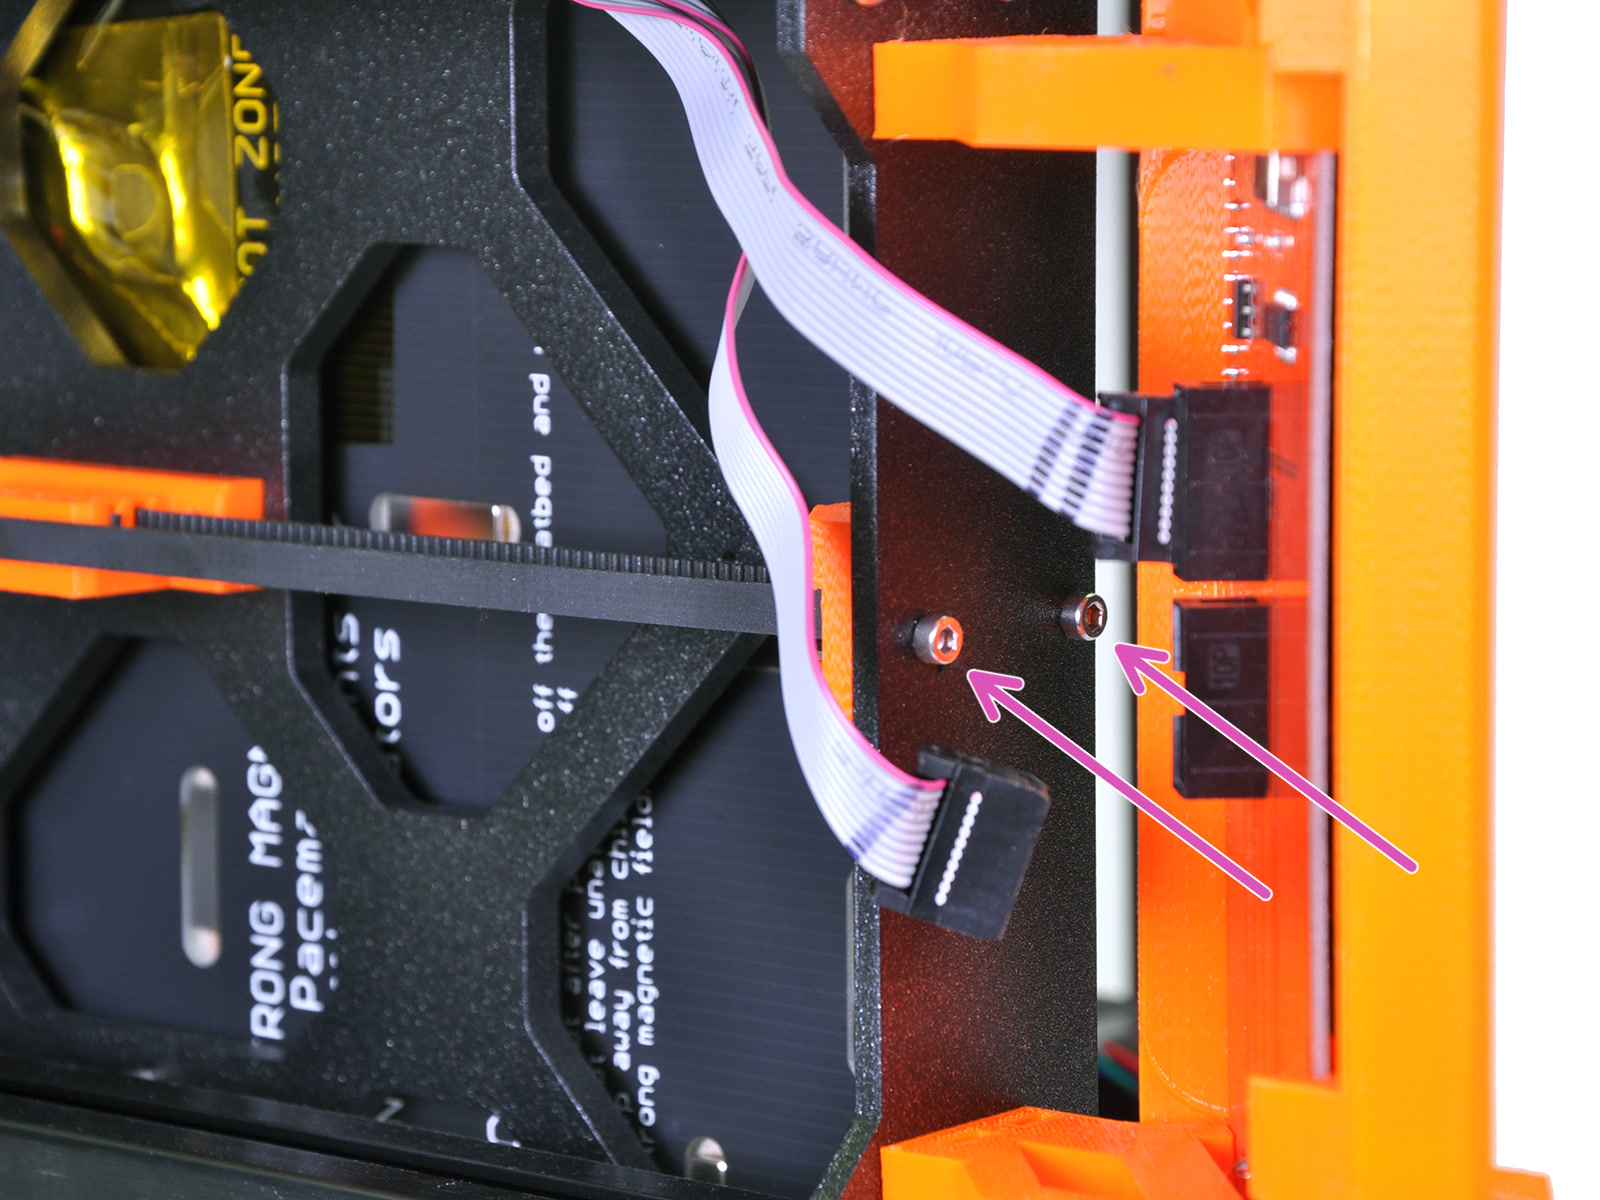
                  On the front plate of the printer's frame, behind the LCD module, you will find the printed Y-axis belt idler. This is held by two M3X10 screws (purple arrow), going through the front plate.

                  If you have a gap between the idler part and the front plate of the frame (blue arrows) you can tighten the belt by using your 2.5 mm Allen key to turn the screws clockwise (purple arrow), closing the gap.

                  The easiest way to access the screws is from below, by moving the printer to the edge of its table, with the LCD module sticking out. You now have access to the bolts from below the LCD module.
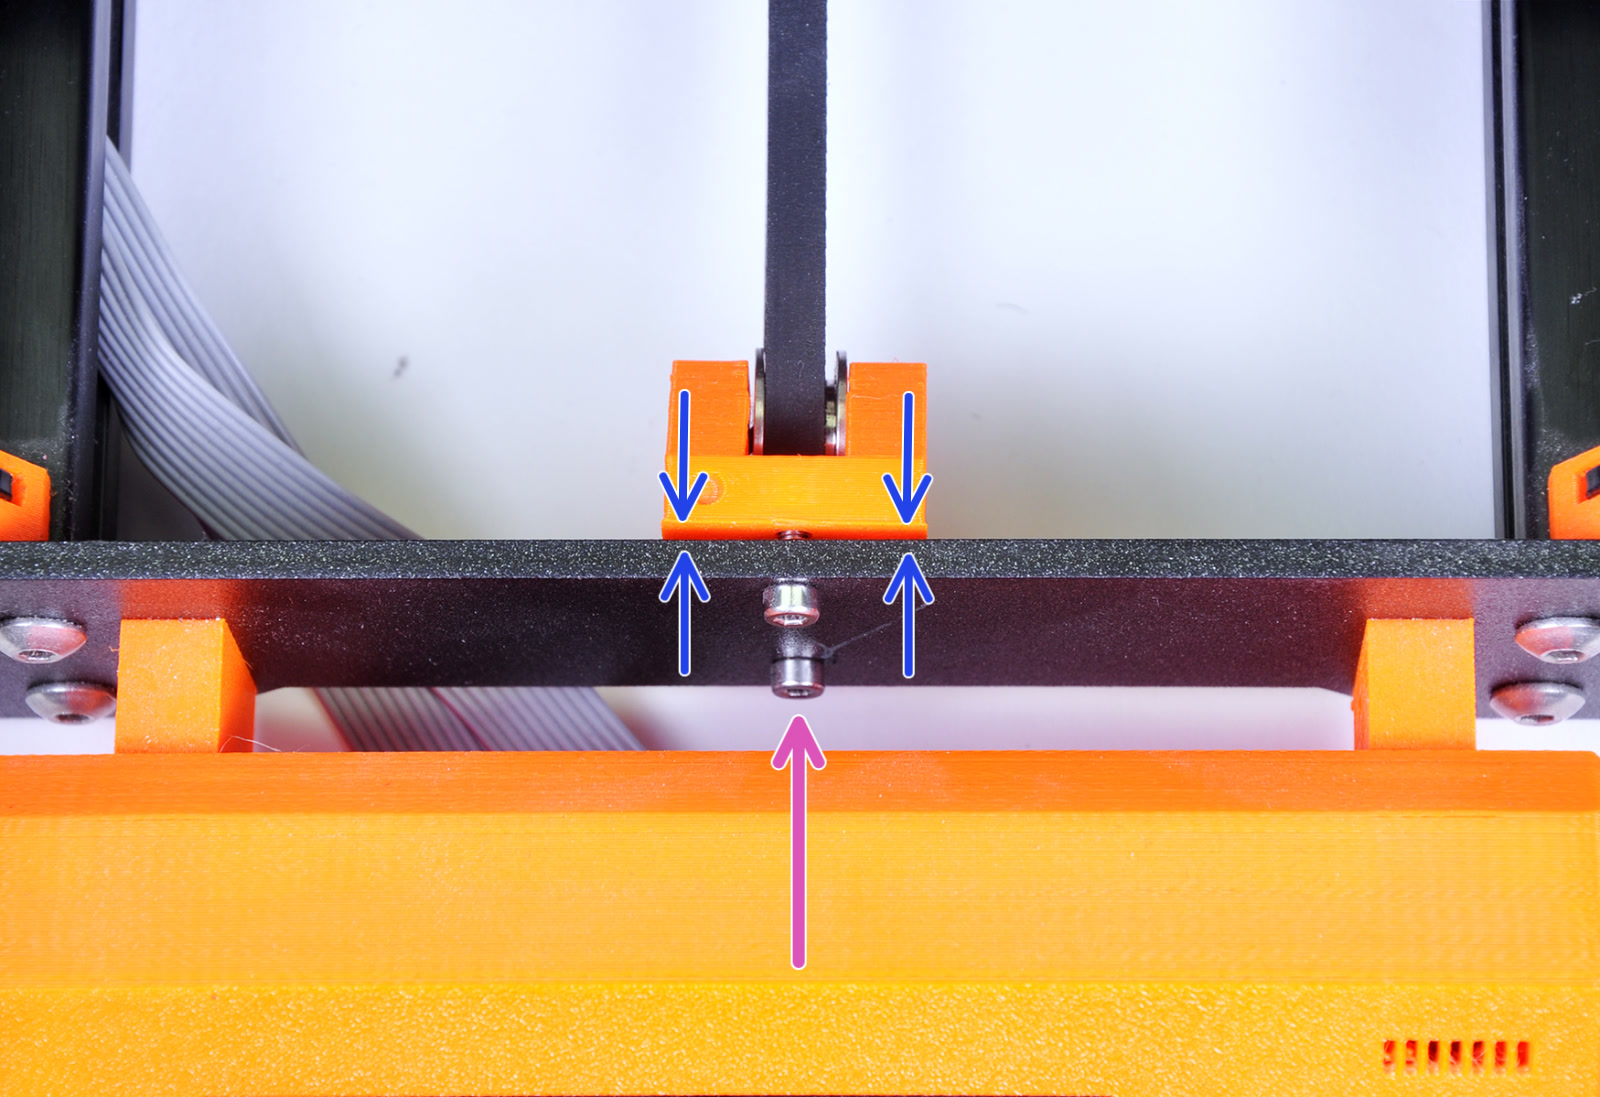
                  Large adjustments

                  If a slight adjustment is not sufficient you must adjust it at the belt holder. There are two main types of the Y-axis belt holder, one adjustable and one fixed. The adjustable belt holder was introduced in the first quarter of 2019, with the S-upgrade for the Original Prusa MK3, and is also featured on the Original Prusa MK4. Adjustments for this are explained in 'Method 1'. For an earlier Original Prusa MK3, follow 'Method 2', for the fixed belt holder.
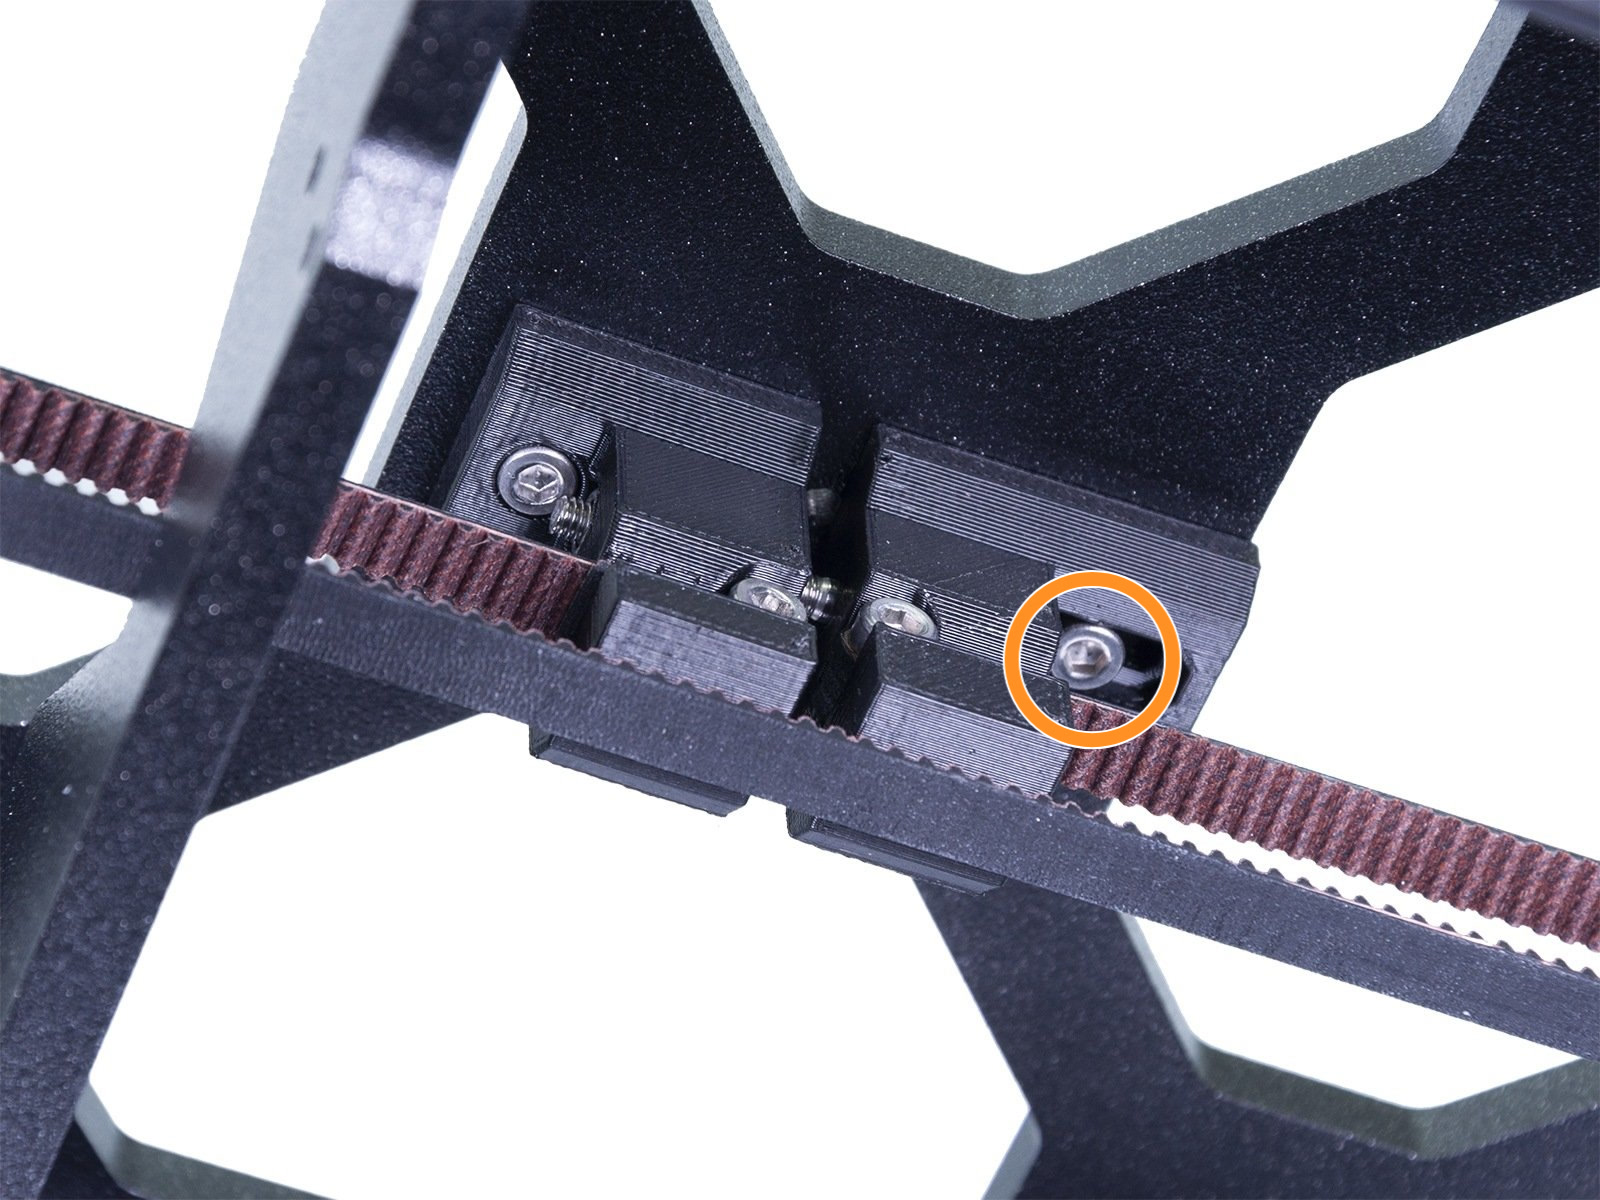
                  Method 1 - Adjustable belt holder

                  The Original Prusa MK4/S has a different design than in the pictures, but the procedure is the same. 
                  1. Unplug the printer and lay it over on the side of the PSU.
                  2. Below the bed carriage, you will find the belt holder. Loosen the right screw by turning it counterclockwise (orange circle left picture).
                  3. Turn the screw going through the two halves of the belt holder (purple arrow right picture). Turn clockwise to tighten the belt, moving the two halves together (blue arrows).
                  4. When at the correct tension, secure the right half of the belt holder again by turning the screw from step 2 clockwise (orange circle left picture).

                  Method 2 - Fixed belt holder

                  1. Unplug the printer and lay it over on the side of the PSU.
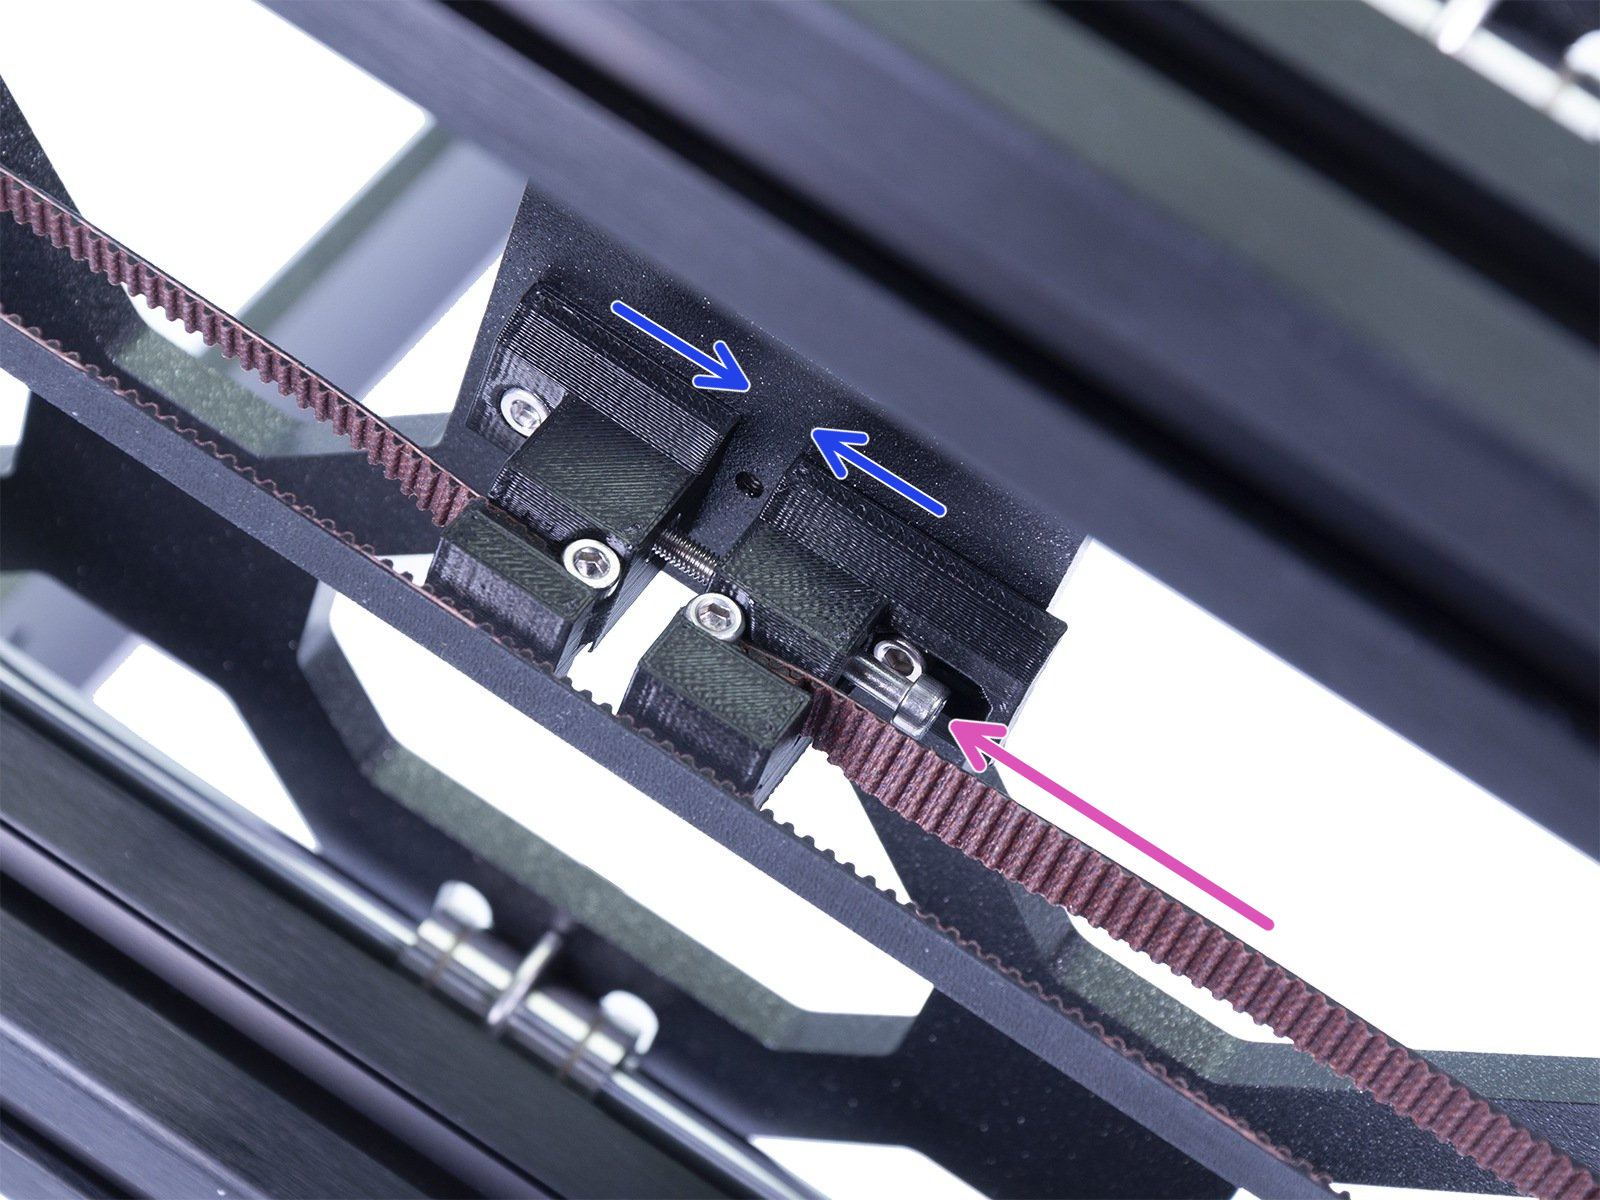
                  2. Detach the belt-idler in order to easier manipulate the belt (purple arrows). Detaching the idler completely may not be necessary, but will make it easier to adjust the belt in the next step.

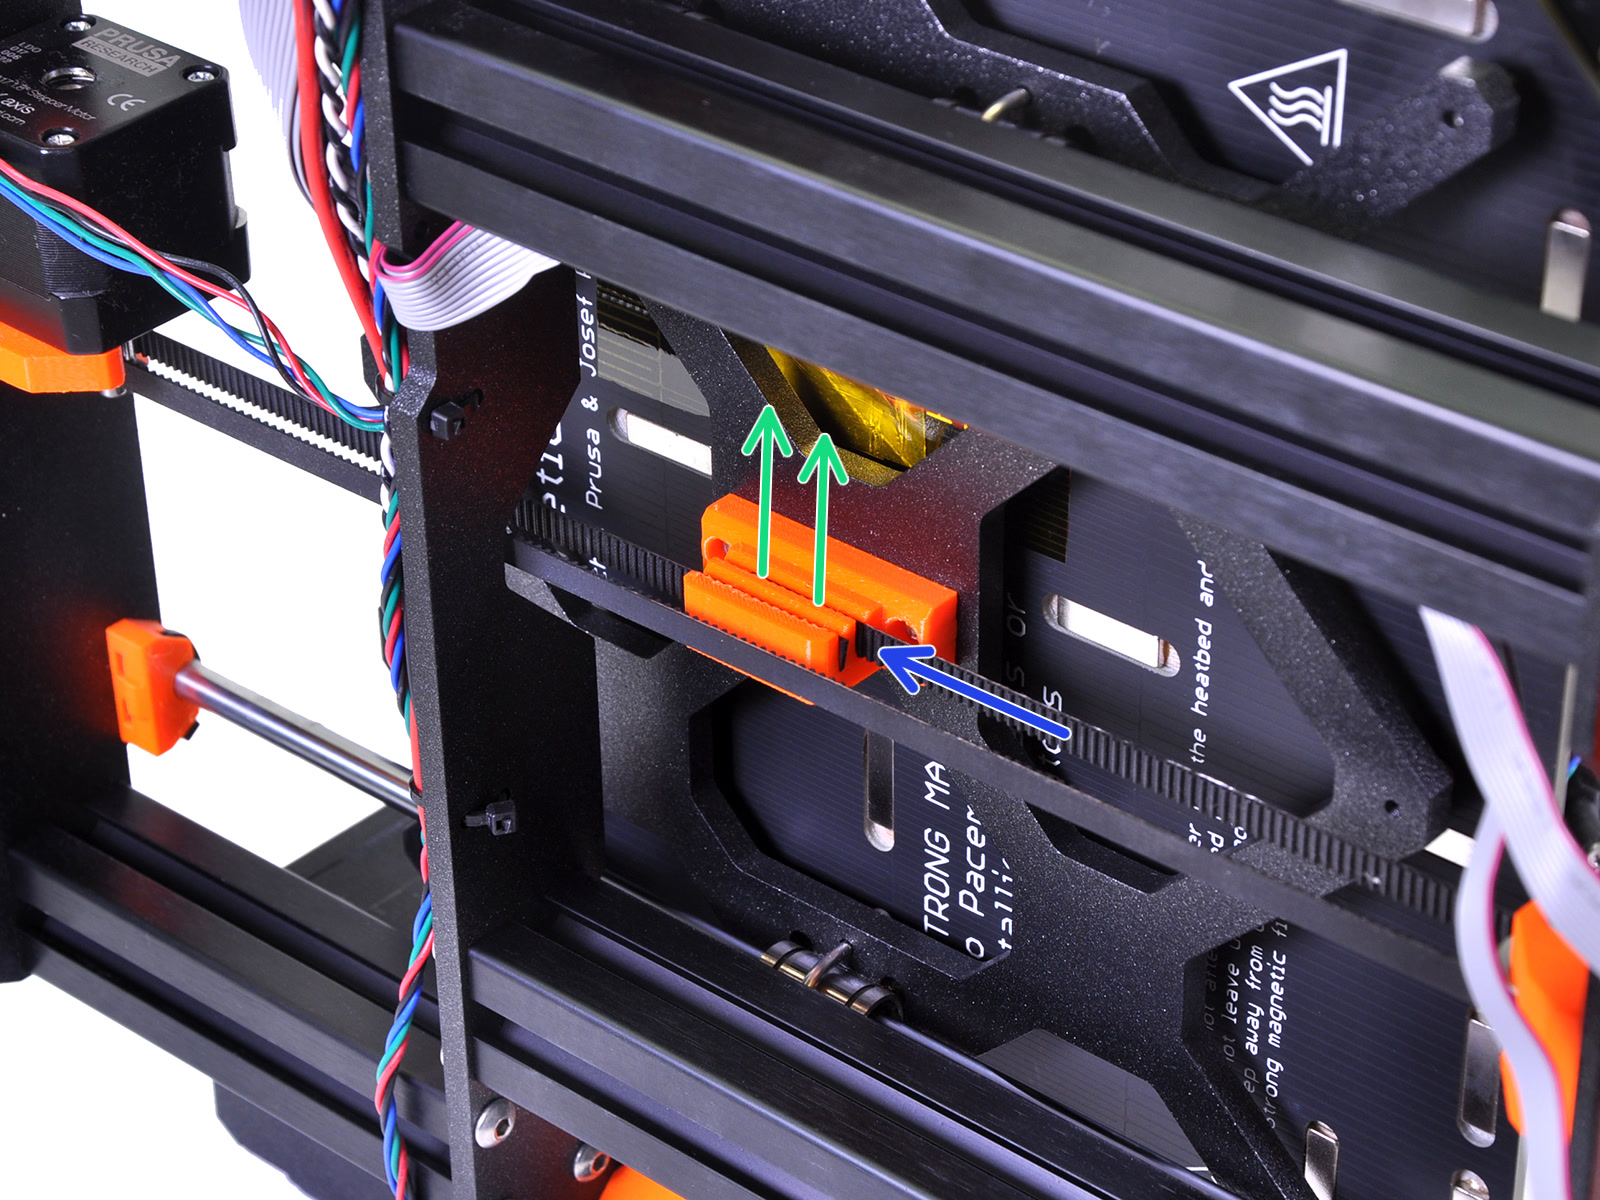
                  1. Set a mark on the belt so you know how much you are moving it. Now take out the belt of the top slot, and move it in 1-2 teeth (blue arrow) before pushing it back into the slot (green arrows).

                  Your belt mount may look slightly different, being another iteration, but the procedure remains the same.

                  1. Re-attach the belt-idler with its two M3x10 screws through the frame (purple arrow). Leave a gap with the frame, for slight adjustments (blue arrows). 

                  Was this article helpful?
                  This action is available only to registered users. Please log-in.

                  Topics

                  • Using the printer
                    • Printer maintenance
                      • How to rebuild the Nextruder Hotend
                      • How to replace a hotend heatsink (MK4S / MK3.9S)
                      • Changing or replacing the Prusa Nozzle
                      • Installing or changing the Nextruder V6 Nozzle Adapter
                      • Changing or replacing the nozzle (MK2.5/S, MK3/S/+, MK3.5/S)
                      • i3 Printer Regular Maintenance
                      • Testing safety features (MK3/MK3S)
                      • How to update firmware (MK3S+/MK3S/MK3)
                      • How to replace a heatbreak/heaterblock/heatsink (MK3/MK2.5)
                      • How to remove a stripped screw
                      • SD cards and USB drives
                      • Adjusting belt tension (MK4/S, MK3.9/S, MK3.5/S, MK3/S/+)
                      • Hotend disassembly & heatbreak stuck in the heatsink
                      • Removing filament from extruder manually
                      • How to replace a hotend thermistor (MK3S/MK3S+)
                      • Checking/re-aligning the Bondtech gear (MK3.5/S, MK3S/+, MK2.5S)
                      • Firmware updating (MK2.5S/MK2S)
                      • How to replace a print fan (MK3S/MK3S+)
                      • How to replace a hotend (MK3S/MK3S+)
                      • How to replace an IR-sensor (MK3S/MK3S+)
                      • How to replace a P.I.N.D.A. sensor (MK3S)
                      • How to replace SuperPINDA (MK3S/MK3S+)
                      • How to replace bearings on the Y-axis (MK3S+)
                      • How to replace bearings on the X-axis (MK3S+)
                      • How to replace a hotend heater (MK3S/MK3S+)
                      • Community translations
                      • Filament Guide addon (MK4S/MK4)
                      • How to install the Nextruder V6 Nozzle Adapter (MK4/MK3.9)
                      • Regular printer maintenance (MK4/S, MK3.9/S)
                      • How to replace the Prusa Nozzle (MK4/MK3.9)
                      • How to replace Loveboard (MK4S/MK4/MK3.9S/MK3.9)
                      • How to replace the silver PSU with the black PSU
                      • How to replace a hotend heater (MK4/MK3.9)
                      • How to replace a hotend thermistor (MK4/MK3.9)
                      • How to replace a hotend fan (MK4 / MK3.9)
                      • How to replace the xBuddy board (MK4/MK3.9/MK3.5)
                      • How to replace a print fan (MK4 / MK3.9)
                      • How to replace a hotend assembly (MK4 / MK3.9)
                      • How to replace a Heatbed Thermistor (MK4/S, MK3.9/S, MK3.5/S)
                      • Print surface preparation
                      • How to replace a hotend heatsink (MK4 / MK3.9)
                      • How to replace xLCD (MK4/MK3.9/MK3.5)
                      • Regular printer maintenance (MK3.5/S)
                      • How to replace the Prusa Nozzle (MK4S/MK3.9S)
                      • How to use accelerometer (MK3.5/S)
                      • How to replace a hotend assembly (MK4S / MK3.9S)
                      • Changing or replacing the Nextruder Hotend
                      • How to install the Nextruder V6 Nozzle Adapter (MK4S/MK3.9S)
                      • Maintenance warning #31117 (CORE One) #26117 (MK4S) #13117 (MK4) #27117 (MK3.9S) #21117 (MK3.9) #28117 (MK3.5S) #23117 (MK3.5)
                      • How to replace a heatbreak/heatsink/heaterblock (MK3S+/MK3S/MK2.5S/MMU2S)
                      • How to replace a PTFE tube (MK3/MK2.5)
                      • How to trim PTFE tube - Multi Material
                      • How to replace a print fan (MK4S / MK3.9S)
                      • Cold pull (MK3/S/+, MK2.5/S, MK3.5/S)
                      • How to post-process the printed parts
                      • How to replace a heatbed thermistor (MK3S+/MK3S/MK2.5S/MK2S)
                      • How to replace PSU on MK3 printers
                      • How to replace a hotend PTFE tube (MK3S+/MK3S/MK2.5S/MMU2S)
                      • How to replace a hotend thermistor (MK2S)
                      • How to trim PTFE tube - Original Prusa printers
                      • Maintenance tips
                      • Replacing the PEI sheet on the (MK3S/MK3/MK2.5S/MK2.5)
                      • MK3 Series Hotend Guide
                    • 3D models
                    • Material guide
                    • Slicing
                    • Prusa Connect & PrusaLink

                  42 comments

                  Log in  to post a comment
                  flyingahull
                  •
                  For the y-axis "slight" adjustment, I would propose a design that contains intentional shims inserted between the holder and frame. Later removing a shim would be a much easier way to restore tension than going underneath.
                  Reply
                  Da9L
                  •
                  This belt tuner is simply not reliable to be usable imo. I adjusted my x axis belts yesterday. so that the app reported they were good. Then today i thought it was a bit loose, and tried the app again. Same exact procedure, same phone and same placement of phone, but this time the app either reports the belt being too lose and too tight. Unusable
                  Reply
                  barney15e
                  •
                  I've found the belt tuner to be very sensitive to background noise. I have to make sure the Air conditioner, fans, music, etc. are all off. Even noise from an adjacent room seems to affect it.
                  Reply
                  Will McL
                  •
                  This is an extremely poor design for maintainability. We need to design something so we don't have to remove the faceplate to access the small adjustment screws. Even using the recommended procedure is difficult, if not impossible. Perhaps use hex head screws vs socket cap screws, or move the faceplate further away from the frame. For the large adjustment, the "orange" screw cannot be loosened without twisting the belt or cutting down an allen key. The actual tension control screw is difficult to access. (Mine is completely covered, but either way, it is in a bad spot.) The orange screw should be horizontal so you can access it without distorting the belt. The adjustment screw should be longer. (I would completely redesign the system such that the fine tuning procedure covers a wider range. Use slip-in shims if necessary to maintain structural integrity.)

                  Finally, the adjustment procedure should be modified to: First set the large adjustment such that you have a 2-3mm(?) gap between the idler and the frame, then fine tune using the fine tuning procedure.
                  Reply
                  MagnusVesper
                  •
                  Use spectroid, not the official app for measuring the sound. Spectroid shows a graph of every frequency and their volumes, so you can filter out any background noise just by looking for the tallest peak on the graph.
                  Reply
                  DubbaThony
                  •
                  This was actually very helpful. It just so happenes that when I strum my belt, it produces 2 peak frequencies. I guess maybe printer resonates or something. The app was catching wrong frequency peak and I could not tune the belt with the app to save my life. I just took the target hz from app and adjusted belt so that other peak hits the target, loo and behold, prusa app continues to claim its "just right" tensioned, as it was previously but now belt is significantly more tighter. And Ive solved my printing issue. And all that thanks to this comment.

                  Thank you good sir.
                  Reply
                  Cameron Roberts
                  •
                  For those having trouble - I used my headset microphone instead of my phones. Better quality. I closed the door to get rid of the hum of the AC and air purifier I run at home. Instead of using the suggested app, I used a frequency vs amplitude graph on a website called Compadre. You can see what the mic is picking up before you strum and seeing the different peaks will help you see if you're picking up extra noise from hitting the frame, the other belt, background noise etc. it'll also let you see any harmonic solutions (i.e. if 80hz is a frequency, 160hz is too) which can help if you're way off base.

                  This tool was pretty handy, though I did have to hover over the pause button with my mouse and carry the mouse over to the printer while I strummed.
                  Reply