The Prusa USS Drybox is designed to keep filament in a low-humidity environment during printing. It is designed to slow moisture absorption by the inserted filament spool, using desiccant silica gel packets.
The Drybox is a transparent, sealable polypropylene container compatible with the Prusa printers (except MINI/+ and MMU). Its main advantages are simplicity, lightweight design, secure sealing, and the option to mount it directly onto the printer.
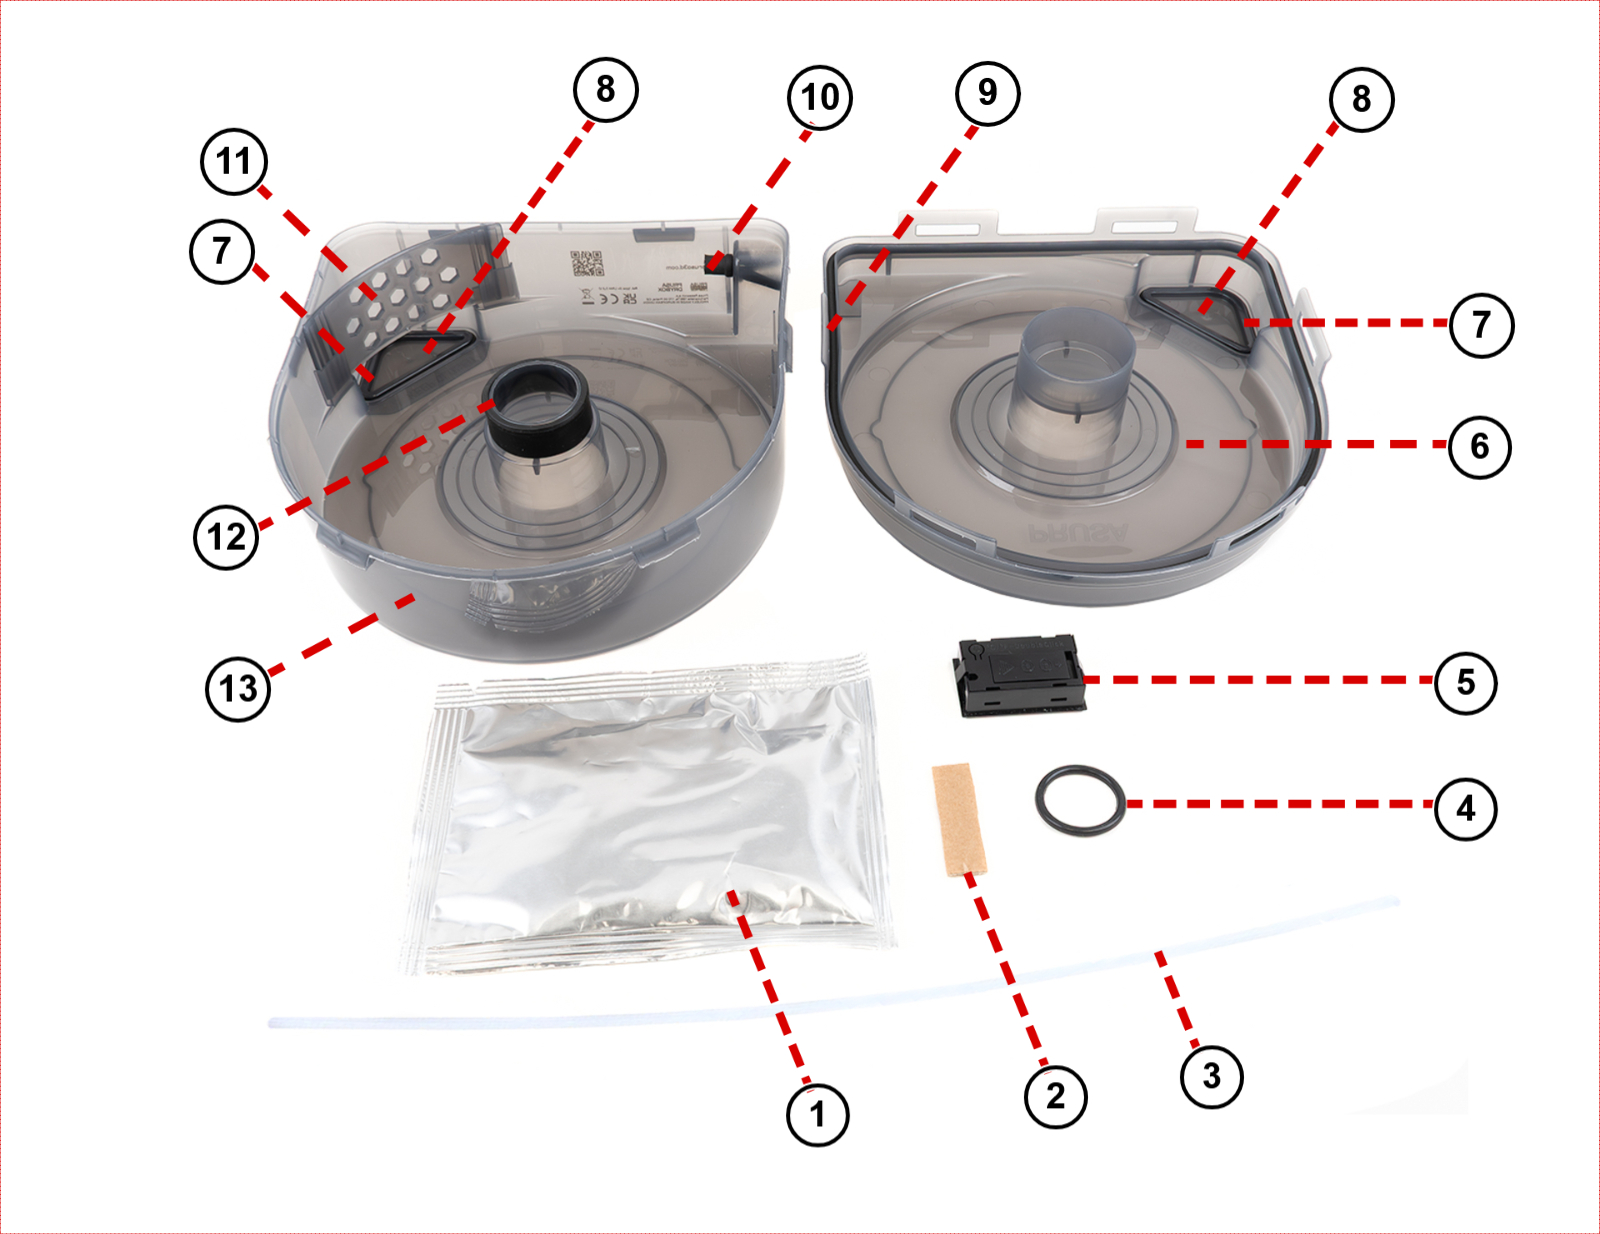
Components
The drybox is made of the following parts:
| 1. Dessicant in an aluminium sealed pack | 8. Removable caps |
| 2. Material labels | 9. Outer seal (do not remove) |
| 3. PTFE tube | 10. Grommet (do not remove) |
| 4. O-ring for printed spoolholder | 11. Rib (do not remove) |
| 5. TPM40 hygrometer | 12. Inside seal (do not remove) |
| 6. Top | 13. Bottom |
| 7. O-ring seal for caps |
Managing humidity
The Prusa USS Drybox uses silica gel to maintain low internal humidity. You can monitor the humidity level using the built-in digital hygrometer or an optional indicator card (purchased separately).
- Monitoring: The hygrometer shows internal temperature and relative humidity (RH).
- Maintenance: Silica gel absorbs moisture and should be replaced or regenerated if the relative humidity (RH) exceeds the maximum recommended value for the material.
- Stabilization: Note that the humidity value may take some time to decrease and stabilize (up to 1 hour).
- Manual rotation: There are small covers on both sides of the Prusa USS Drybox that allow manual spool rotation without opening the lid. Use them only when necessary and avoid keeping them open for extended periods. Always ensure they are properly closed afterward, as improper or frequent opening increases internal humidity.
- Sealing: Improper sealing can lead to increased internal humidity. We recommend visually inspecting the seal each time. Avoid unnecessary opening to maintain stable humidity.
| Filament type | Maximum recommended RH (%) (measured on the hygrometer) |
|---|---|
| PLA | Below 30% RH (short-term tolerance up to 40%) |
| ABS | Below 30% RH (ideally below 15%) |
| ASA | Below 30% RH (ideally below 10%) |
| PETG | Below 20% RH |
| TPU | Below 20% RH (ideally <15%) |
| PVA | Below 20% RH |
| PC | Below 20% RH |
| BVOH | Below 20% RH |
Setup and first use
To assemble the USS Drybox, follow the instructions in the dedicated article First setup and filament loading (USS Drybox).
When the filament is not in use, seal the filament guide using the included grommet.
Installation on printer and PTFE tube cutting
Before starting, adjust the PTFE tube length to the size recommended for your printer.
To cut the PTFE tube, we recommend using any tool that slices cleanly. Avoid tools that crush, deform, or slip during cutting, such as scissors or cutting pliers, as they may deform the tube and increase filament friction. We recommend using a sharp box cutter or knife for a clean, straight cut.
If you are unable to make a straight cut manually, you can use a dedicated PTFE cutting guide available on Printables.com.
The Prusa USS Drybox should be mounted directly on the printer using dedicated holders available on Printables. These holders are specific to various printer models and utilize a puck-and-bayonet system for easy attachment.
Choose your printer for specific installation instructions:
- CORE One L and CORE One+ (identical installation procedure)
- CORE One
- XL
- HT90
- MK series
Maintenance
- Replace silica gel when needed.
- Clean with low-pressure compressed air only.
- Inspect seals before each use.
- Do not expose components to extreme conditions or sunlight.
- Remove batteries if unused for long periods.
- Replace batteries (2x LR44) if the hygrometer stops working.
TPM40 Hygrometer specifications
- Temperature range: -50 °C to +70 °C
- Humidity range: 10%–99% RH
- Accuracy: +/-1 °C, +/-3% RH
- Power: 2x LR44 batteries
- Battery life: ~2 years
Battery installation:
- Open battery cover.
- Insert 2x LR44 batteries (correct polarity).
- Device powers on automatically.
Compatible filament spools
Prusament spools are fully compatible with the Prusa USS Drybox out of the box. This includes both the new spool design featuring the Open Print Tag and the older design without it.
Buddy3D spools are also fully compatible and require no adjustments.
Spools from third-party manufacturers (such as Polymaker, Elegoo, Sunlu, Hatchbox, Fillamentum, and others) may require adapters, especially cardboard spools. For these cases, we recommend the printable parametric spool adapters created by community member Dave G., available on Printables.
13 comments
I ordered a spoolholder, but there is no O-Ring with the spoolholder...instead the o-ring is included with the drybox...which does not need the O-Ring.
Quite confusing and strange choice from Prusa.
As for the PTFE TUBE, it comes with each Drybox and it needs quickconnects which are not included in the drybox kit. In my opinion Prusa, Put the O-Ring in the spoolholder kit and the quickconnects in the drybox kit.
So i ended up downloading the quickconnects stls and printed them myself. They are not quickconnect, you need to be the incredible Hulk to twist them easily. Once they are attached to the Core One you simply have no space to apply strenght to "Un-Quickconnect" the PTFE tube.
Maybe a quickconnect with magnets would be a better fit because i ended up simply discarding them and the PTFE tube.
I use the drybox without PTFE/Quickconnect because they are just clumsy and not practical. Plus the Drybox PTFE HOLE and the Printer PTFE Hole are at a weird angle which make it hard to use the quickconnect.
Nope, not my best upgrade.
The O-ring is included for people that printed the new spoolholder. Ordering a spoolholder you are buying just a plastic part and in the description is stated, what you are recieving.
Quick connect is not necessity and is most useful for CORE series printers, but if you decide to purchase the Drybox for different printer, you might not need it. But it is a few minutes print if you want it :-)
The locking mechanism should be firm, but not hard to lock/unlock. Try checking your printer settings. We liked that design, because it does not need anything else (like the mentioned magnets) and you can just print it within a few minutes.
They state that each USS comes with one so you don't need to hunt around hardware stores if you need to make the spool holder. Useful for MK/XL owners, or Core One owners who have the MMU/INDX.
It connects the two halves of the spool holder and acts as both a friction fit to stop it coming loose and to stop any vibrations between the parts
It's under the PTFE Add-ons folder on this Printables page!
Toolhead 1 in the picture provided has the smallest length of PTFE 25cm
Toolhead 3 has the longest length of 45cm
Same with Toolhead 4 and 5 looks to be switched.
Toolhead 1: PTFE 45 cm
Toolhead 2: PTFE 35 cm
Toolhead 3: PTFE 25 cm
Toolhead 4: PTFE 45 cm
Toolhead 5: PTFE 35 cm