Prusa
  • SHOP
    • Latest products
    BY CATEGORY
    • 3D printersnew
    • 3D printer upgradesnew
    • Materials
    • Accessories
    • Spare parts
    • Courses
    • Merch
    • Get a price quote
    QUICK LINKS
    • Shipping & delivery
    • Returns & refunds
    • Payment & financing
    • Warranty
    • VAT & Customs fees
    • FAQ

    0 item in your cartitems in your cart

    Your cart is empty

    Go to cartShop 3D printers

    My profile

    Log in to see orders, saved items

    My profile

    Signed in as

    • Orders
    • Logout
  • 3D PRINTING
    • Explore 3D printing
    FOR BEGINNERS
    • 3D printing 101
    • How FDM printing works
    • Buying your first printer
    • 3D model catalog
    BY APPLICATION
    • Rapid prototyping
    • Manufacturing
    • Engineering
    • Research
    • Arts & design
    GO DEEPER
    • Materials guide
    • Courses
    • Webinars
    • Case studies
    • Custom 3D printing
  • 3D PRINTERS
    • All 3D printers
    FOR
    • Home or garageHobbyists, tinkerers and home printing
    • BusinessIn-house production for small teams
    • EnterpriseFleets, security and scale
    • Which Prusa is right for me
    SHOP & BROWSE
    • CORE One+new
    • CORE One+ INDXnew
    • CORE One L+new
    • CORE One L+ INDXnew
    • XL+new
    • MK4S
    • Prusa Pro HT90
    • Prusa Pro AFS
    • Prusa Pro SLX
    MORE FROM PRINTERS
    • Parts & upgradesnew
    • Critical infrastructure
    • Case studies
    • Signature Oak
    • Kits
  • MATERIALS
    • All materials
    BY USE
    • Every-day & design
    • Functional engineering
    • Composites
    • Pro speciality
    • SLA resins
    PRUSAMENT
    • PLA
    • PETG
    • ASA
    • PC
    • PA11
    • Flex
    • TPU
    MORE FROM MATERIALS
    • Materials guide
    • We make material in house
    • Sustainability
    • Order on the store
  • SOFTWARE
    • All software
    PREPARE THE PRINT
    • PrusaSlicer 3.0New
    PRINT & MONITOR
    • Prusa Connect
    • EasyPrint
    • iOS & Android app
    • Prusa Farm
    GET STARTED
    • Download & install
    • Knowledge base
    MORE FROM SOFTWARE
    • 3D model catalog
  • SUPPORT
    • Explore support
    FIND ANSWERS
    • Knowledge base
    • Troubleshooting
    • Courses
    • Webinars
    GET HELP
    • Contact us
    • Livechat
    • Shipping & delivery
    • Warranty
    • Returns & refunds
    • Service & spare parts
    • Service & Repair
    COMMUNITY
    • Forum
    • Reddit
    • Printables
  • TRUST CENTER
    • Trust Center overview
    BY TOPIC
    • GDPR
    • Certificates
    • Security
    • Compliance
    COMMITMENTS
    • Sustainability report
    TALK TO US
    • Contact the security team
  • COMPANY
    • About Prusa
    GET TO KNOW US
    • Our story
    • How we make printers
    • Open source
    • Brand & media kit
    NEWS
    • Blog
    • Newsroom
    • Events
    TRUST & PARTNERS
    • Sustainability
    • Resellers & distributors
    • Affiliate program
    • Contact
    • English
    • Čeština
    • Deutsch
    • Español
    • Français
    • Italiano
    • Polski
    • 日本語
  • Signed in as

    • Orders
    • Address
    • In-stock Alerts
    • My Courses
    • Subscription
    • Edit Account
    • Logout

Log in to see orders, saved items

Signed in as
  • Orders
  • Address
  • In-stock Alerts
  • My Courses
  • Subscription
  • Edit Account
  • English
  • Čeština
  • Deutsch
  • Español
  • Français
  • Italiano
  • Polski
  • 日本語
Shop

0 item in your cartitems in your cart

Your cart is empty

Go to cartShop 3D printers

My profile

Log in to see orders, saved items

My profile

Signed in as

  • Orders
  • Logout
SHOP
  • Latest products
BY CATEGORY
  • 3D printersnew
  • 3D printer upgradesnew
  • Materials
  • Accessories
  • Spare parts
  • Courses
  • Merch
  • Get a price quote
QUICK LINKS
  • Shipping & delivery
  • Returns & refunds
  • Payment & financing
  • Warranty
  • VAT & Customs fees
  • FAQ

Featured products

    Popular categories

      Trending searches

        Articles

          Blog

            Products

              Categories

                Suggested searches

                  Searching…
                  No results
                  Something went wrong.
                  ↑↓ Select↵ OpenEsc Close search
                  1. Support
                  2. Printer troubleshooting
                  3. Selftest failed (CORE One/+)
                   

                  Contents

                  • Selftest procedure checks
                  • Selftest results
                  • Fan testing
                  • Door sensor calibration
                  • Y and X axes test
                  • Z Alignment Calibration
                  • Loadcell test
                  • Heaters test
                  • Filament sensor

                  Blog

                  • Print colorful and glowing Halloween decorations with our spooky offer
                  • Factorio Has Arrived on Printables
                  • Prusament PLA Lightweight: 65% lighter than regular PLA. Perfect choice for aircraft, cosplay, and more.

                  Newsletter

                  Signup and get our monthly squeeze on updates, blog, printables and much more.

                  By clicking, you agree to receive our newsletter.

                  This site is protected by reCAPTCHA Enterprise and the Google Privacy Policy and Terms of Service apply.

                  Factorio Transport Belts
                  E-shop
                  • 3D Printers
                  • Printer Upgrades
                  • Filaments
                  • Accessories
                  • Prusa Merchandise

                  © Prusa Research a.s.

                  Printables
                  • 3D Models
                  • Store
                  • Clubs
                  • 3D Design Contests
                  • Brands
                  Community
                  • World Map
                  • Forum
                  • User Groups
                  • Events
                  Help
                  • Prusa Help
                  • Prusa Academy
                  • 3D Printing Calculators
                  Software
                  • PrusaSlicer
                  • Prusa.app
                  • Prusa Connect
                  • Drivers and Software
                  Company
                  • About Us
                  • Blog
                  • Official Prusa Resellers
                  • Contact Us
                  • Certified for ISO 9001, ISO 14001, ISO 45001
                  • General Terms and Conditions
                  • General Terms and Conditions of Use of the PRUSA Websites
                  • Privacy Policy
                  • Information about cookies
                  • Customer Complaints Policy
                  • Status Page
                  • Do Not Sell or Share My Personal Information
                  • Supplemental Statements
                  • General Terms and Conditions
                  • General Terms and Conditions of Use of the PRUSA Websites
                  • Privacy Policy
                  • Information about cookies
                  • Customer Complaints Policy
                  • Status Page
                  • Do Not Sell or Share My Personal Information
                  • Supplemental Statements

                  © Prusa Research a.s.

                  JOSEF PRUSA®, PRUSA RESEARCH®, PRUSA POLYMERS®, PRUSA ORANGE®, PRUSA 3D ® AND PRUSAMENT® are registered trademarks of Prusa Development a.s. used by Prusa Research a.s. under licence from Prusa Development a.s.

                  Selftest failed

                  (CORE One/+)

                  Relevant for

                  CORE One
                  CORE One+
                  30 comments
                  Article is also available in following languages
                  English
                  Čeština
                  Polski
                  Deutsch
                  Français
                  Español
                  Italiano
                  日本語

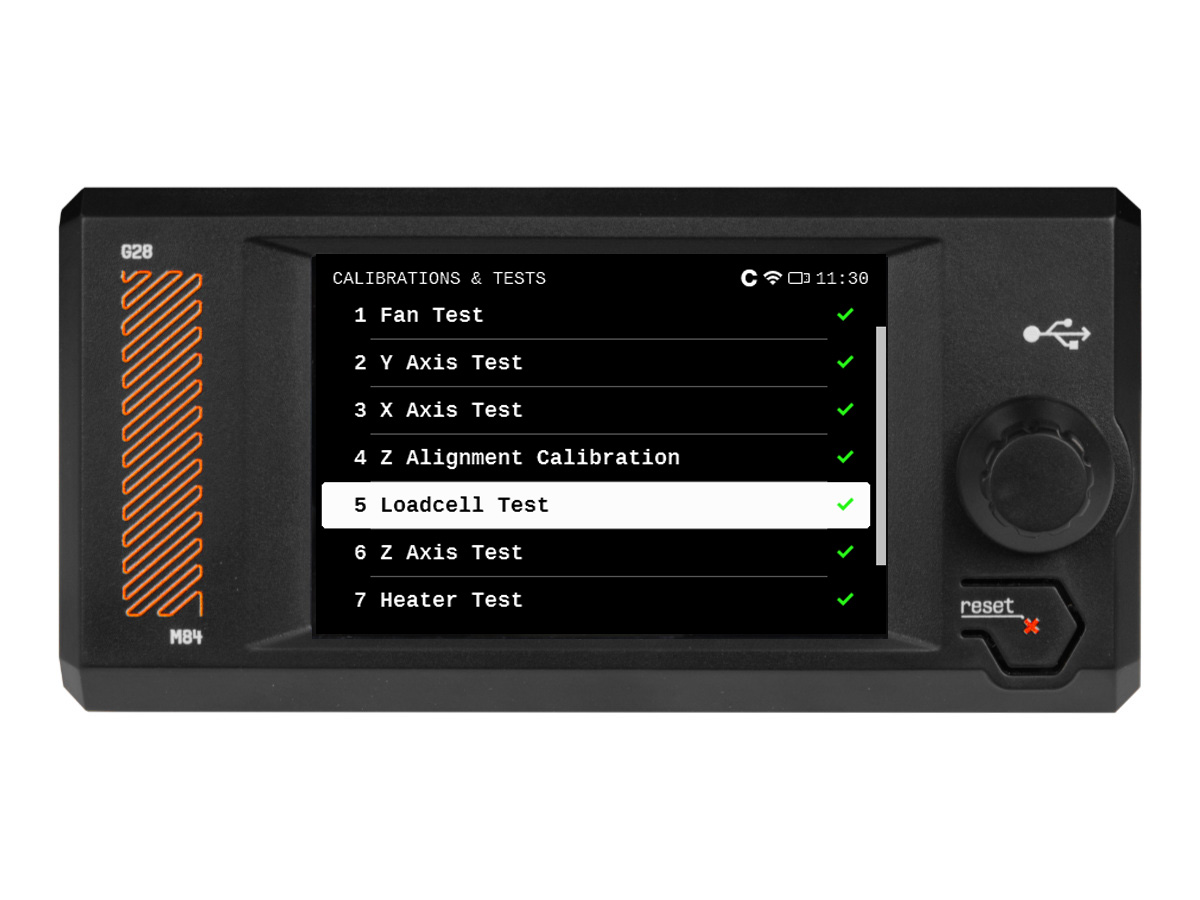
                  On the Prusa CORE One/+, the selftest checks for issues in the printer's assembly, wiring, and electronic components. It is the first part of the Calibration Wizard, which is prompted automatically when you turn on the printer for the first time or after a factory reset. After the initial calibration is completed, each step of the selftest can be initiated under LCD Menu -> Control -> Calibrations & tests.

                  Note that if the printer is placed on an unstable surface or if there is another running 3D printer next to it, it may negatively affect the calibration. The printer should be placed on a stable surface. 

                  During the selftest, do not manipulate or touch the printer, unless the printer prompts an action with instructions on the display.

                  Selftest procedure checks

                  • Fan Test
                  • Door Sensor
                  • Y Axis Test
                  • X Axis Test
                  • Z Alignment Calibration
                  • Loadcell test
                  • Z Axis Test
                  • Heater Test
                  • Gears Calibration (non-mandatory, meant for kits)
                  • Filament Sensor Calibration

                  Selftest results

                  During the selftest, its results are shown on the screen, indicating success or failure for each point.
                  Fan testing

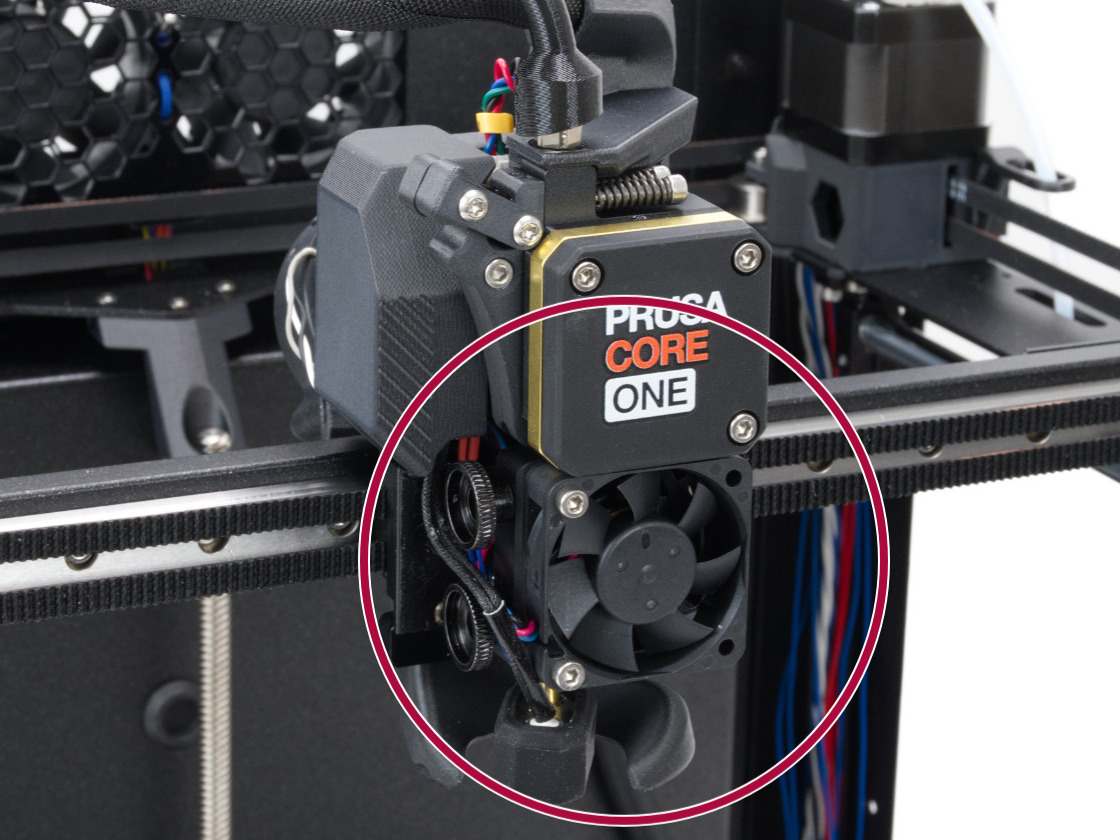
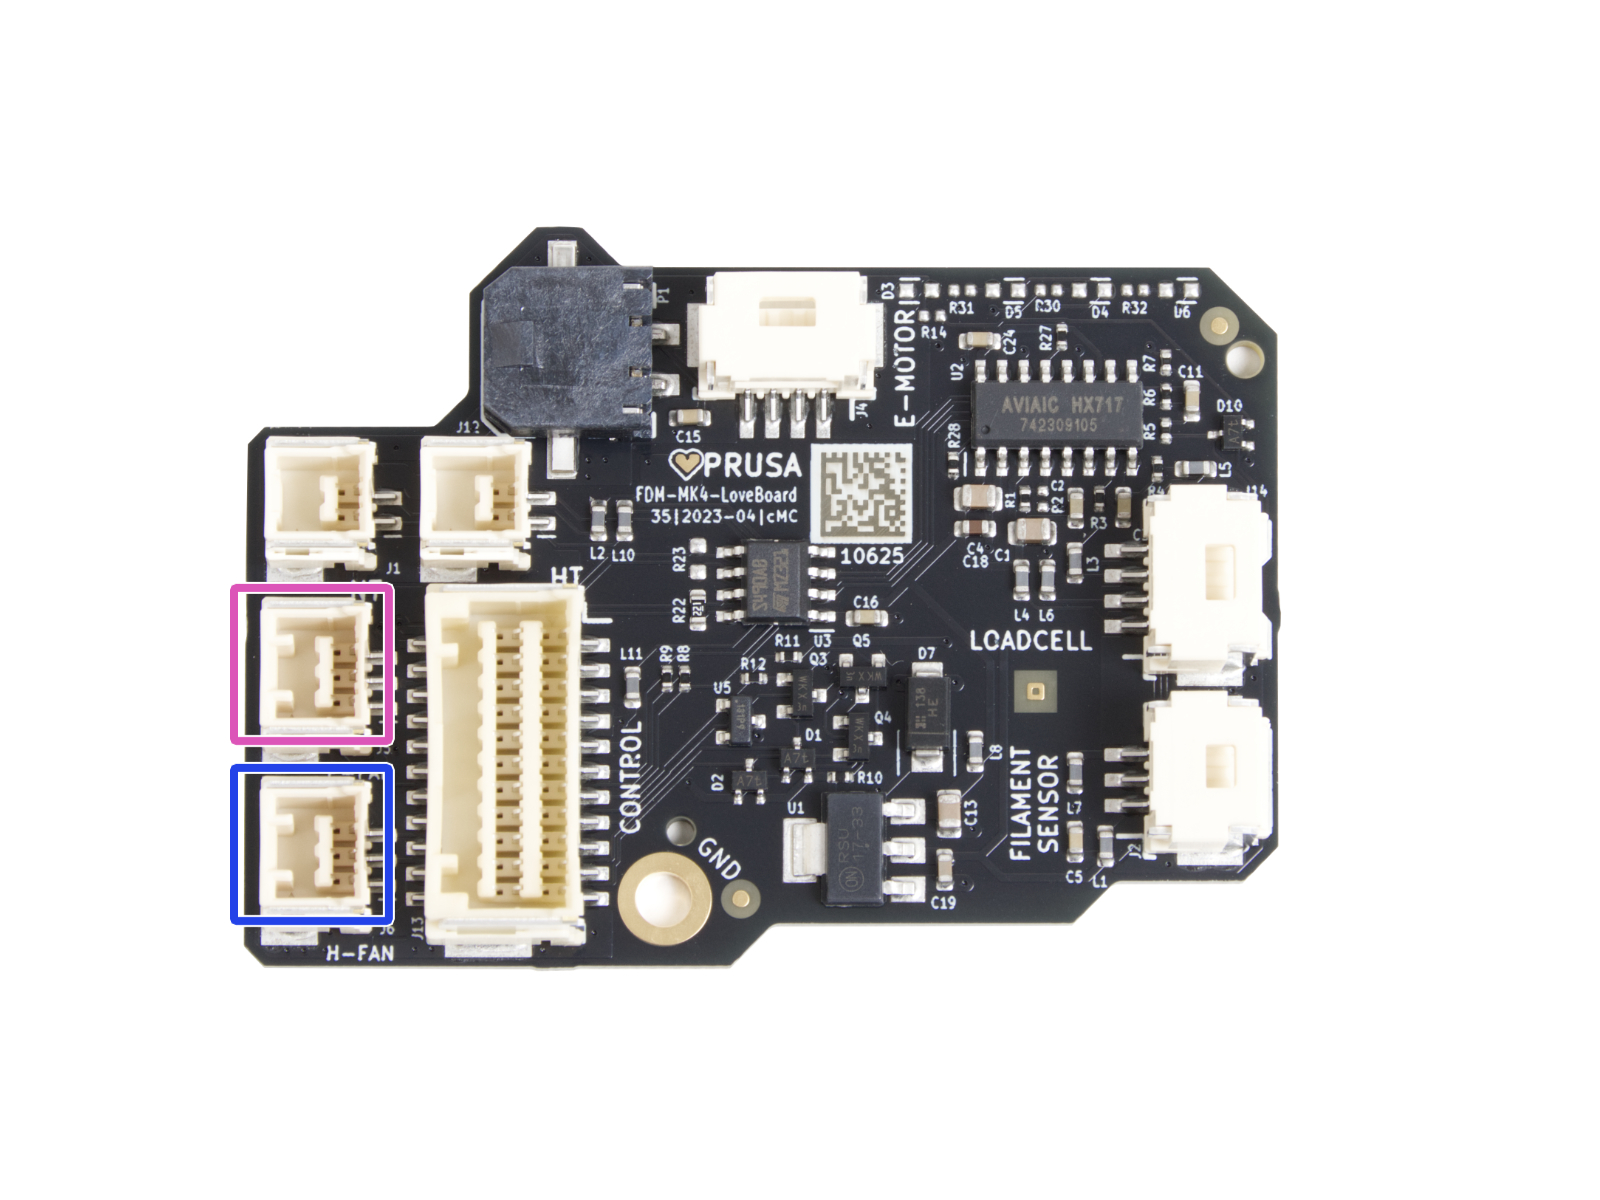
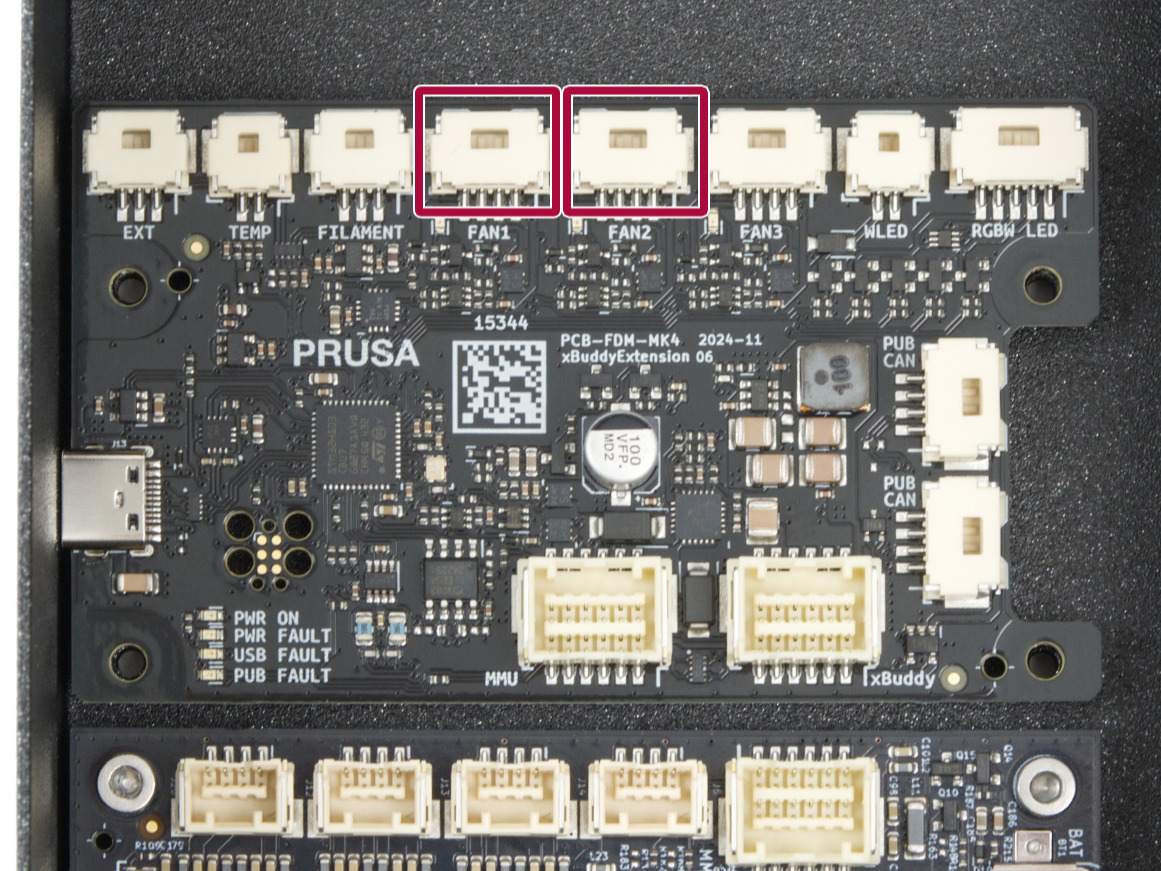
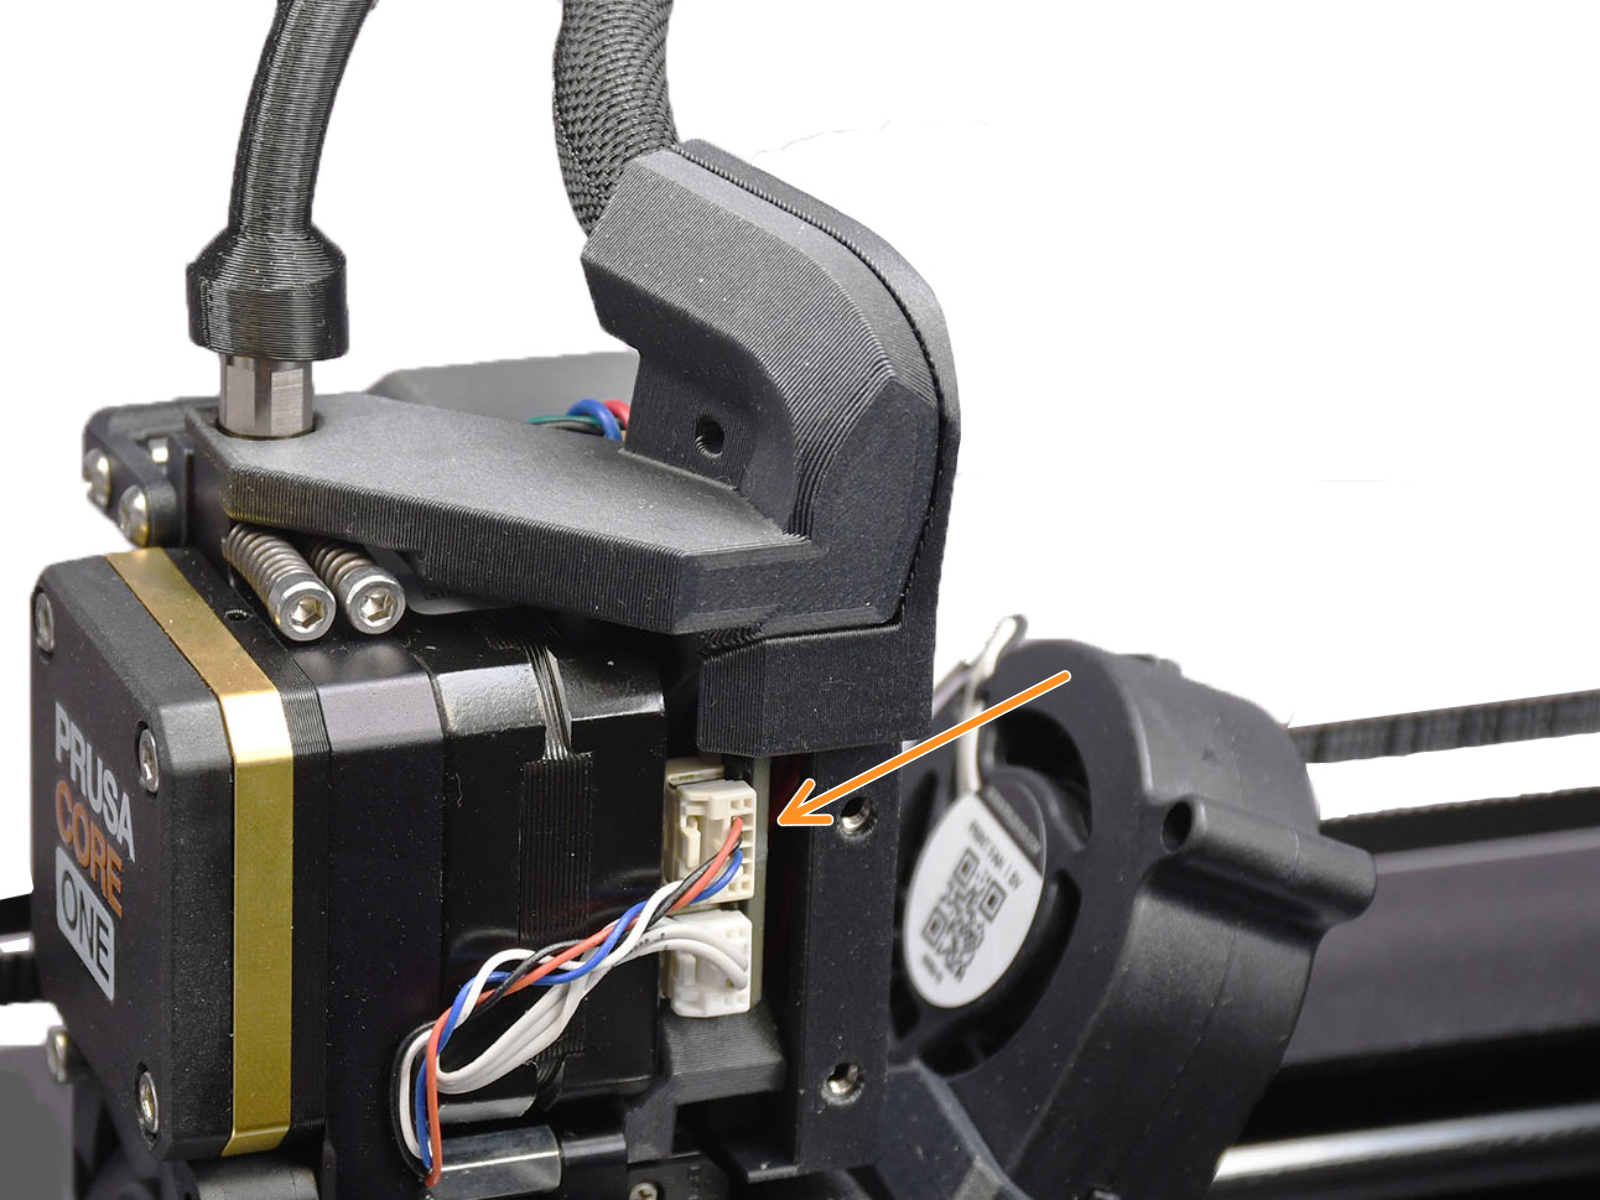
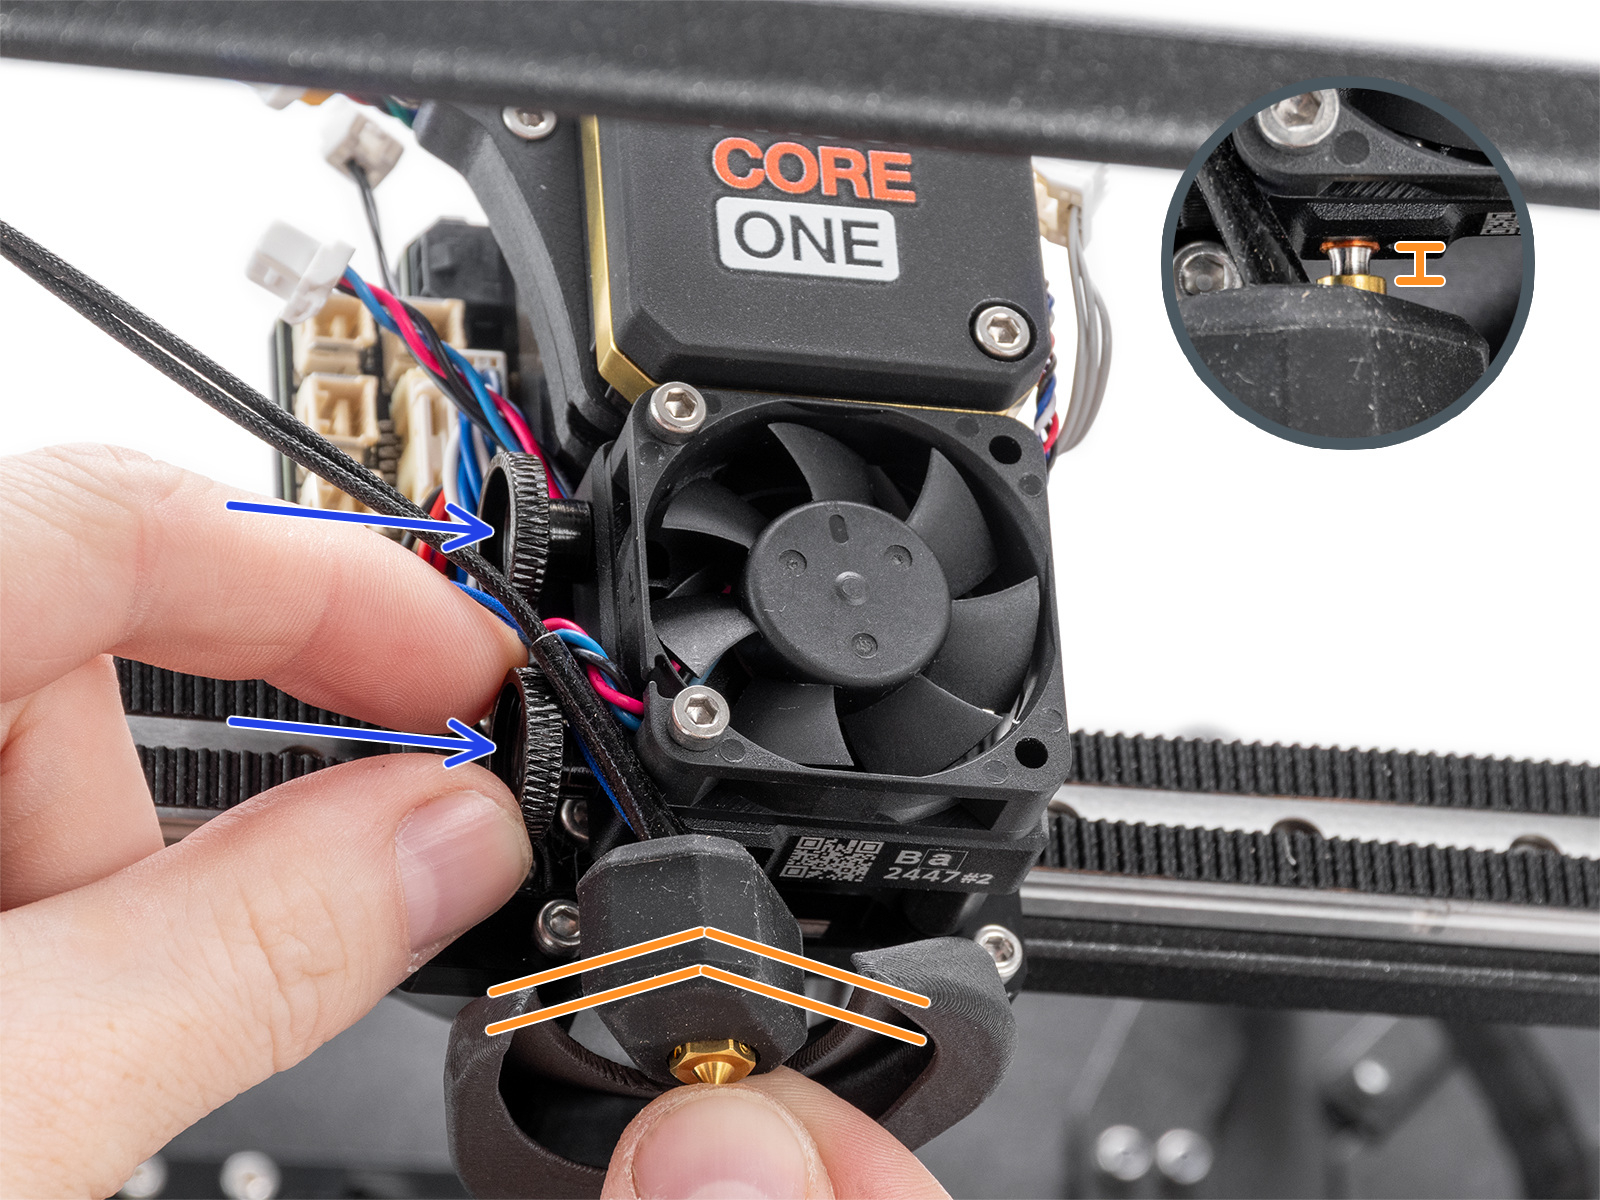
                  The Prusa CORE One/+ selftest procedure will test the hotend fan, the print fan, and the chamber fans. If this issue shows, check:

                  • Check for any obstruction that could prevent the fan from spinning.
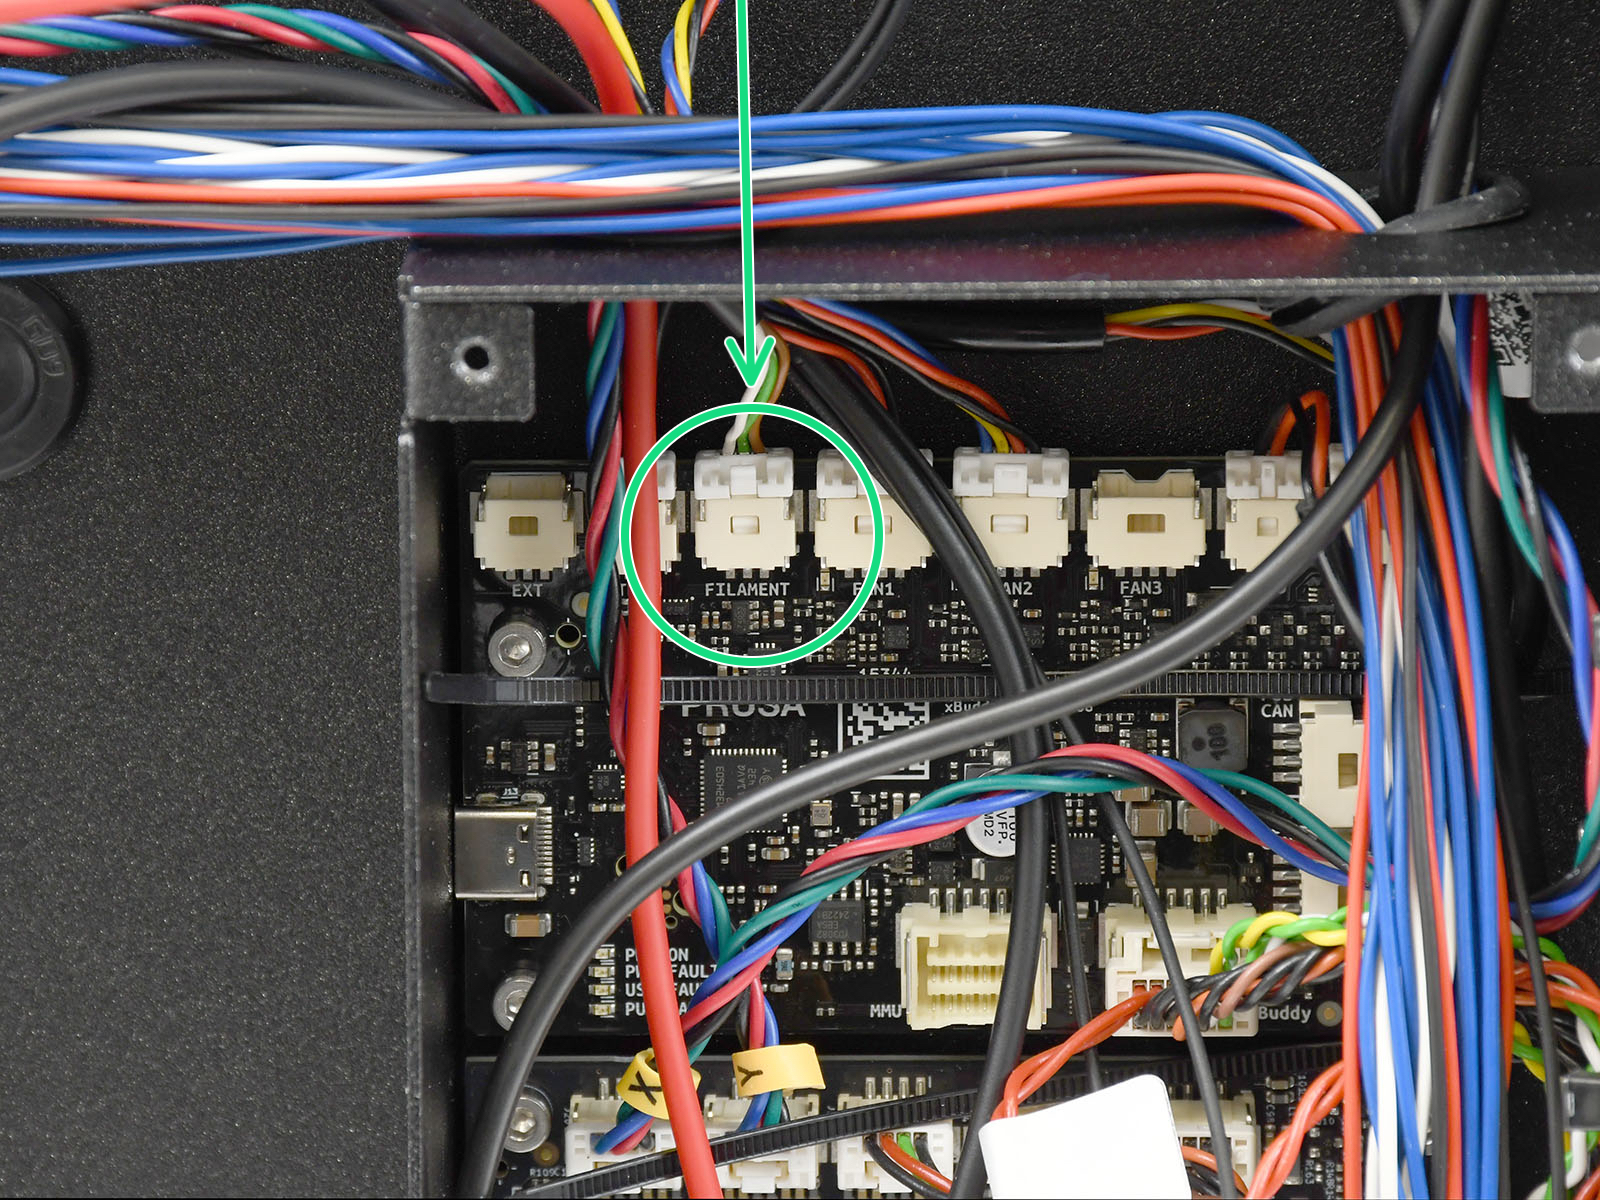
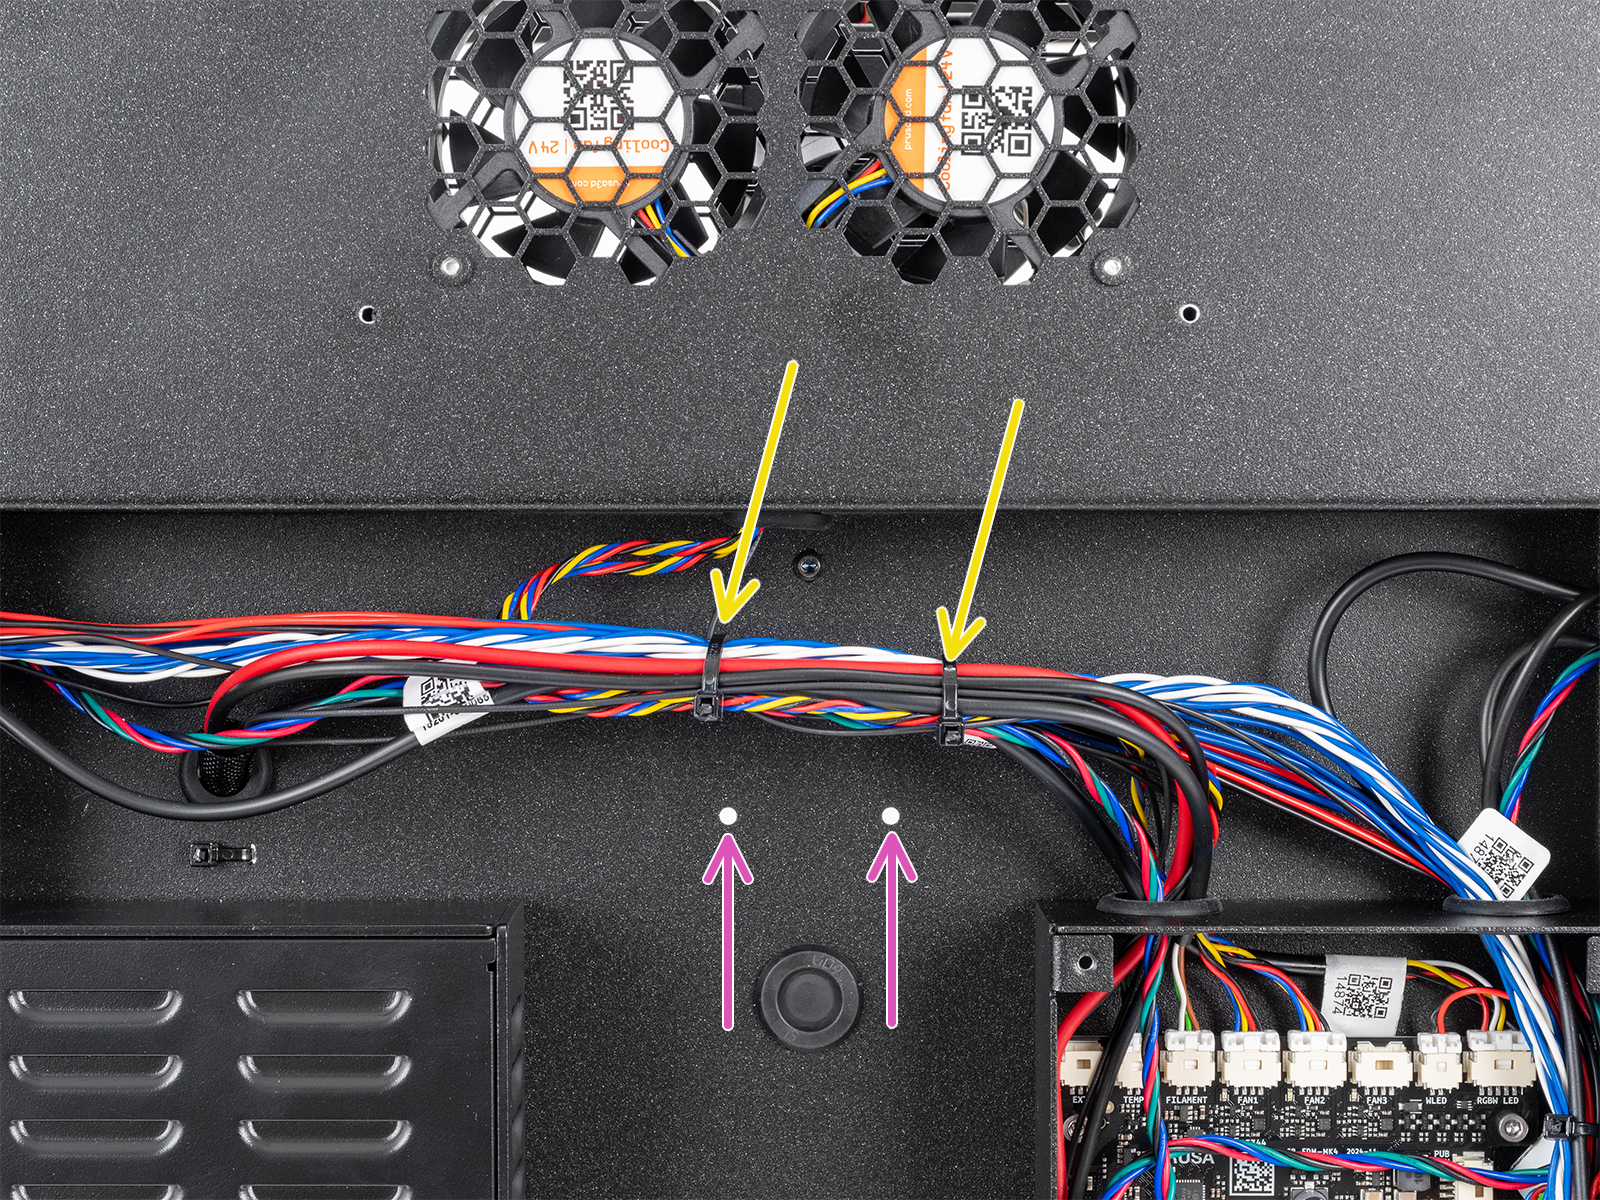
                  • Ensure that the fans are correctly connected to the LoveBoard or the xBuddy extension board.
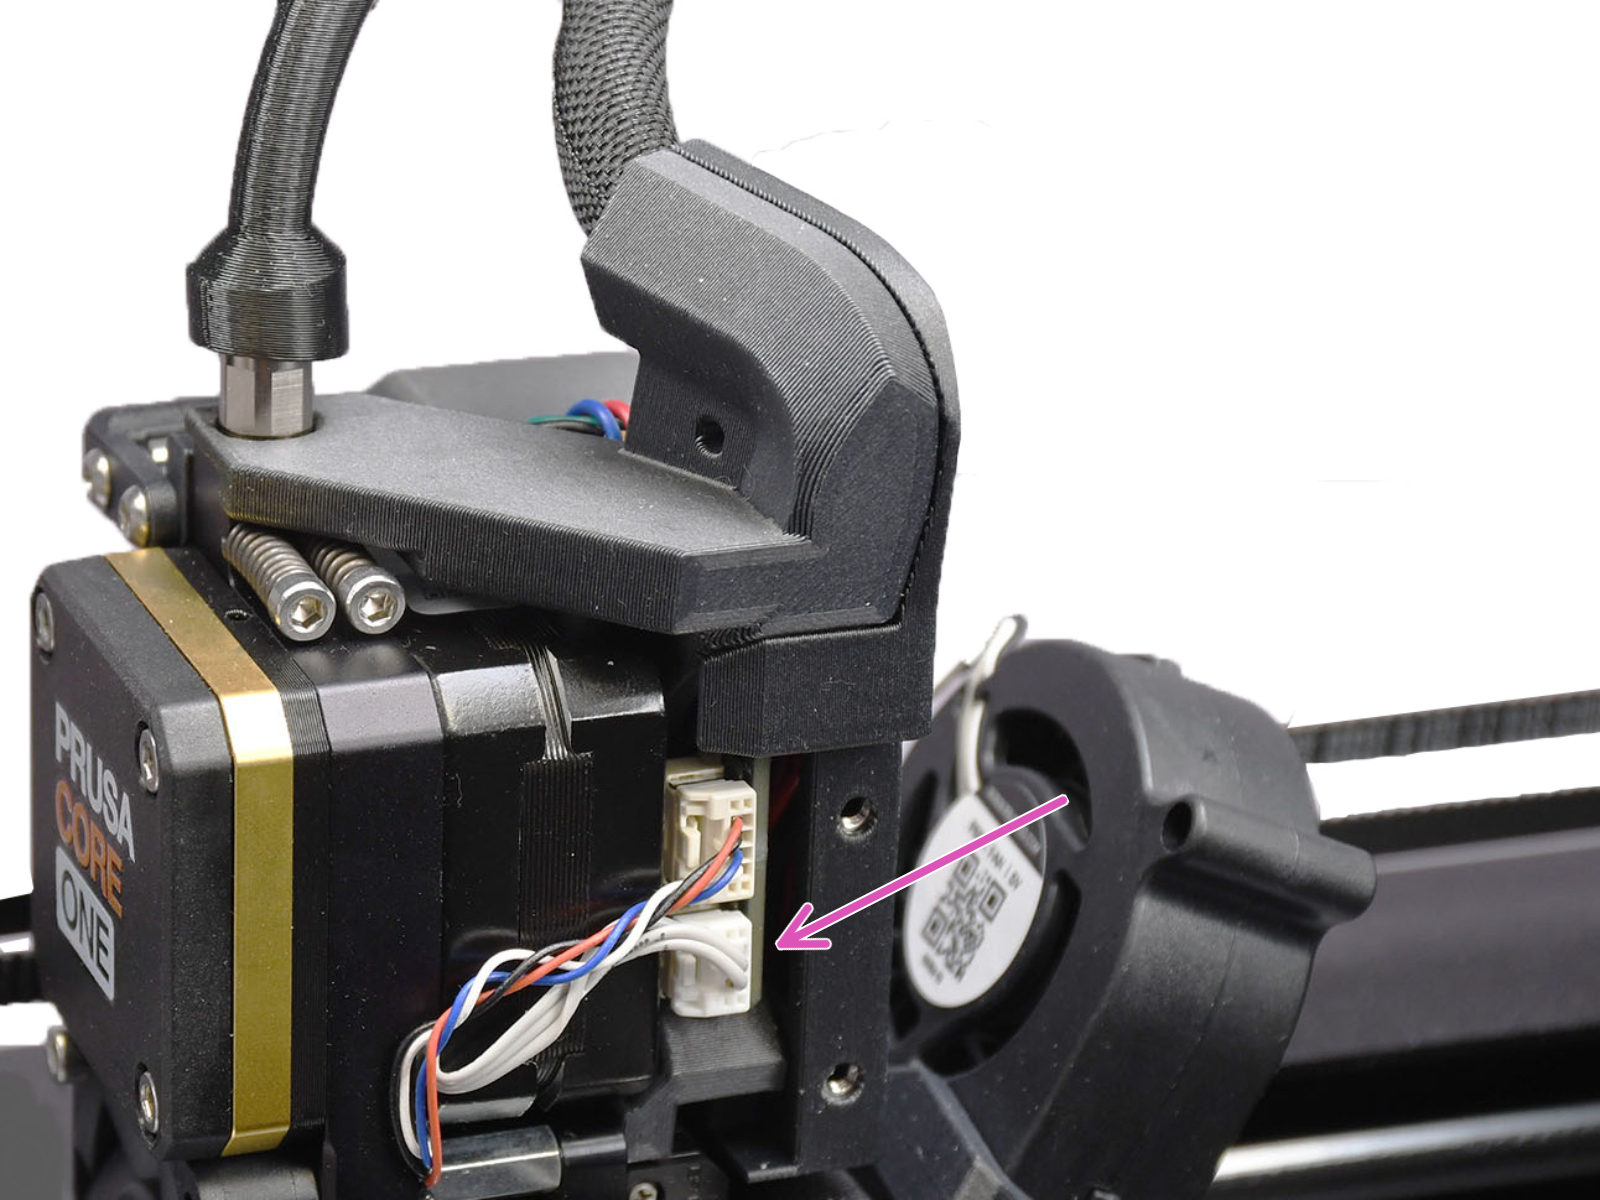
                  • If the error is on the hotend fan, make sure that it is installed in the correct position and orientation as shown in the image below.
                  • For the print fan and chamber fans, go to the printer menu to Control -> Temperature, and set the fan to be tested to 100%. See if the fan spins or if it shows any errors.

                  The printer might show the message "Fan not spinning" instead of a failed selftest. This can also be considered a failed selftest.
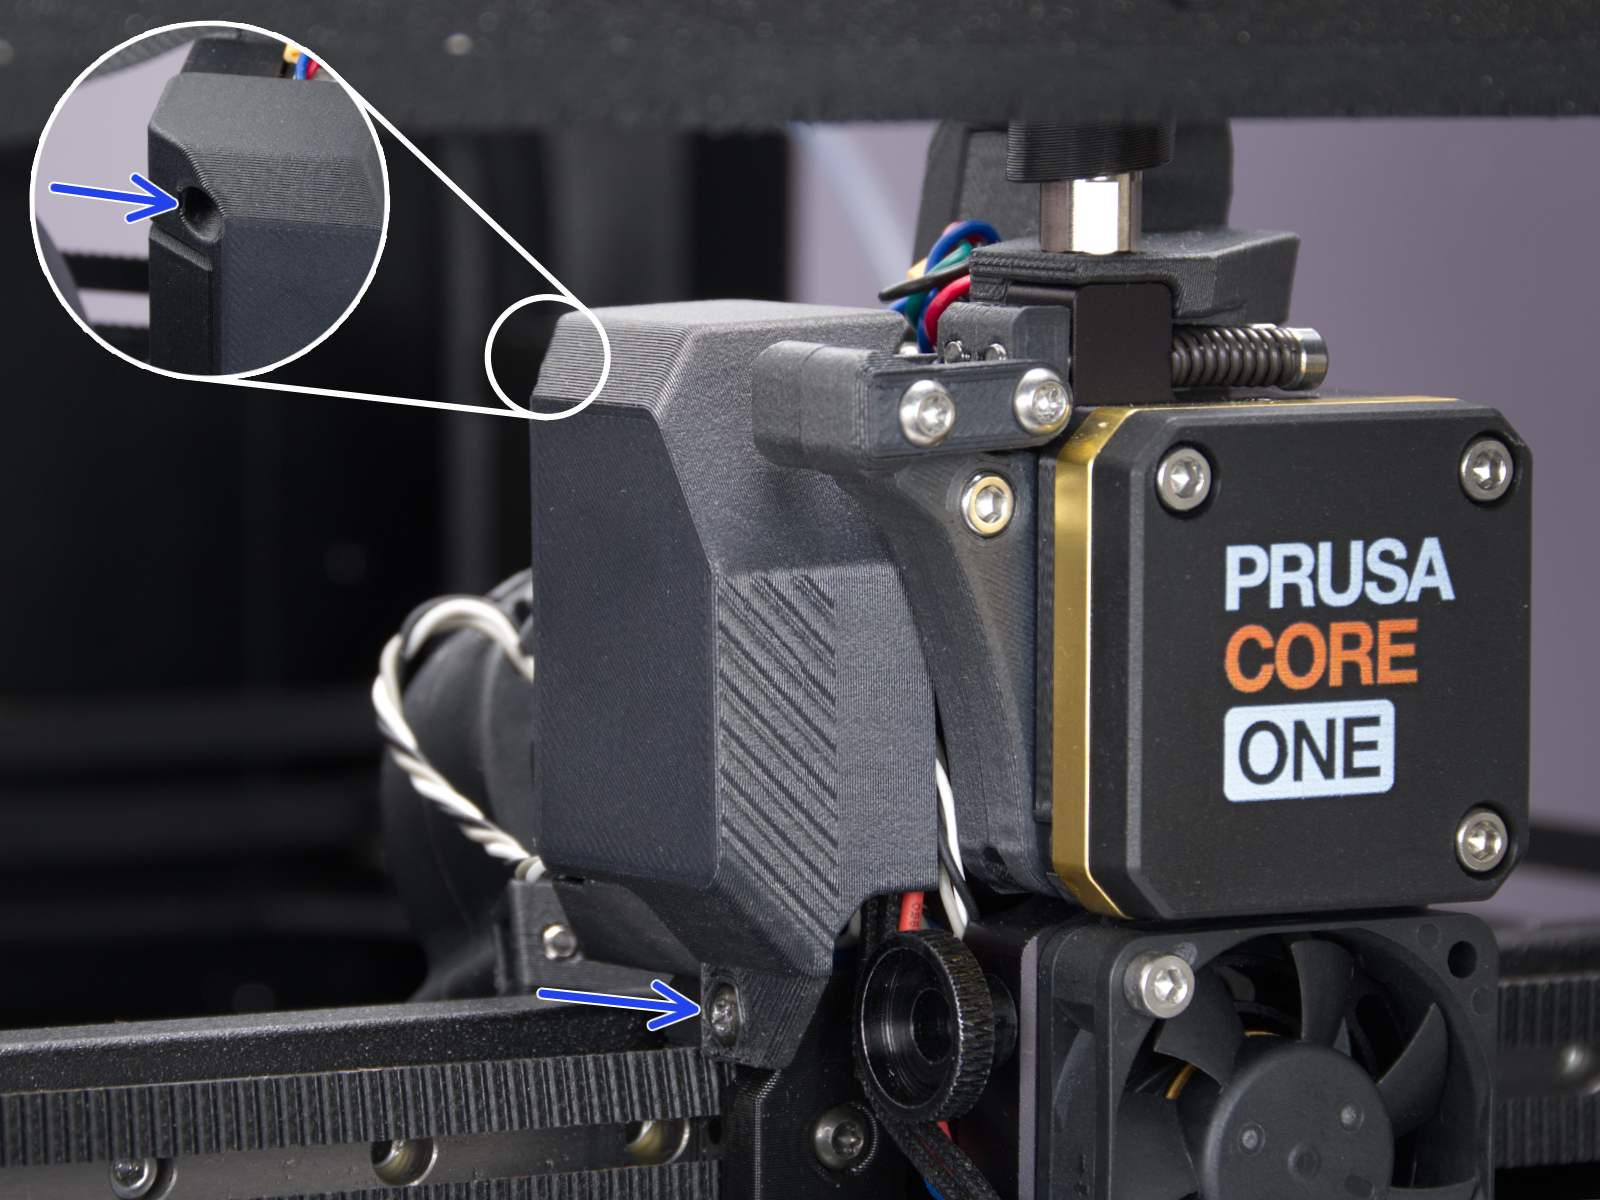
                  Print fanHotend fan
                  Print fan and hotend fan connectorsChamber fan connectors

                  Door sensor calibration

                  In case the sensor behaves differently from what is expected in the door sensor calibration, it is necessary to check if the sensor is working. Go to the printer menu to Info -> Sensor Info -> Door sensor. Then, try opening and closing the door and see if the sensor is triggered. If the door does not trigger the sensor, try it by pressing the latch with your finger.

                  If the sensor shows the correct status, go back to the calibration by going to Control -> Calibrations & tests -> Door sensor, and follow the instructions to tighten or loosen the screws.
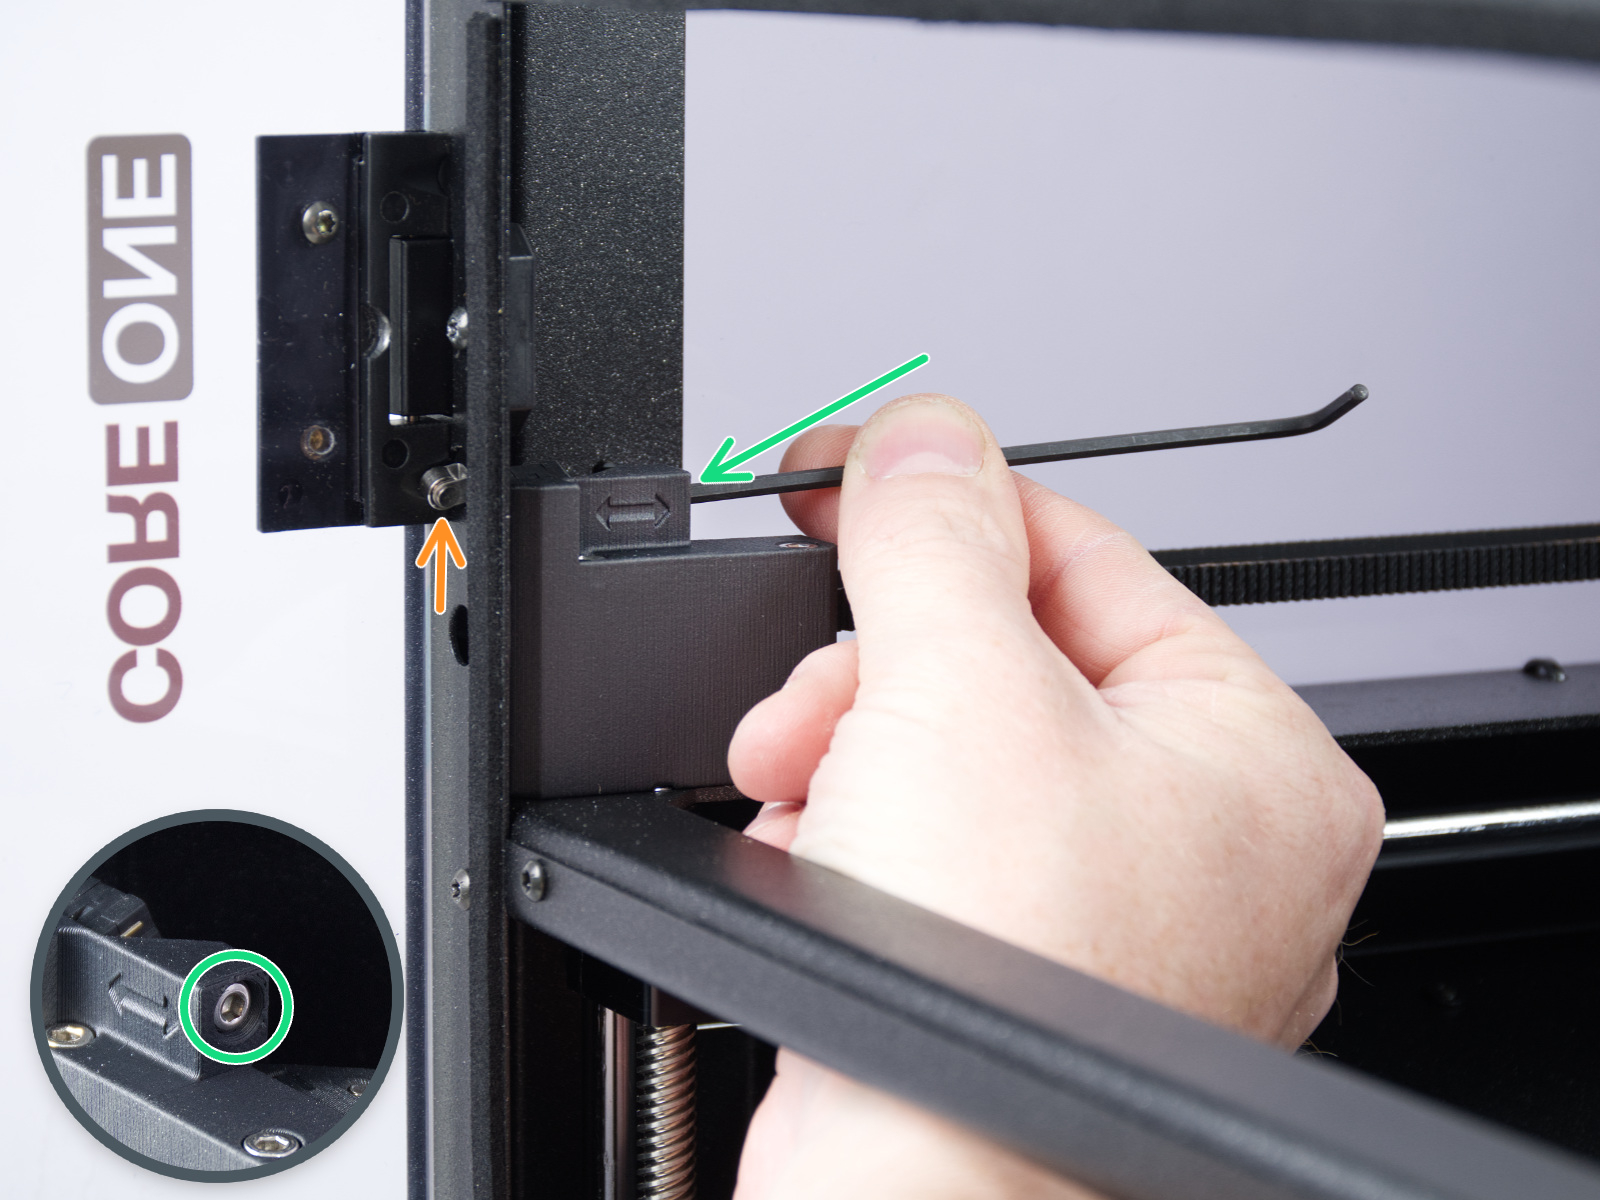
                  On the last part of the calibration, the printer prompts you to place your fingers between the door and the frame. This is meant to prevent injury. If there is an issue with this test, you can keep the door completely open to pass the test.

                  If the door sensor does not work, check the cable length and connection.

                  Y and X axes test

                  The printer can determine if the components are moving correctly along each axis.

                  In case of an issue on the X-axis or the Y-axis, make sure that there is no obstacle to the movement, and readjust the belt tension.

                  Also, test the printer movement with the stepper motors temporarily disabled (LCD Menu -> Control -> Disable Motors), moving along both XY diagonals.

                  Move the X-Axis to the front of the CoreXY, and check if both sides are touching the front at the same time. If the sides are not aligned but the belts have the correct tension, do the following procedure:

                  1. Loosen the belts completely. Be careful so that the square nuts do not fall off the plastic parts when removed.
                  2. Check which side sits against the front end (tight side) and which one has to be pushed towards it to touch it (loose side).
                  3. Put a universal wrench or anything with similar thickness between the tight side and the front end. Slightly pull the loose side to correct the skew.
                  4. Check the alignment again and repeat if needed. In case the tight and loose sides switched, repeat the process from the other side, but apply a smaller amount of pressure.
                  5. Tighten the belts again.
                  6. For Y-axis errors, check if the side filament sensor cable is not blocking the axis movement.

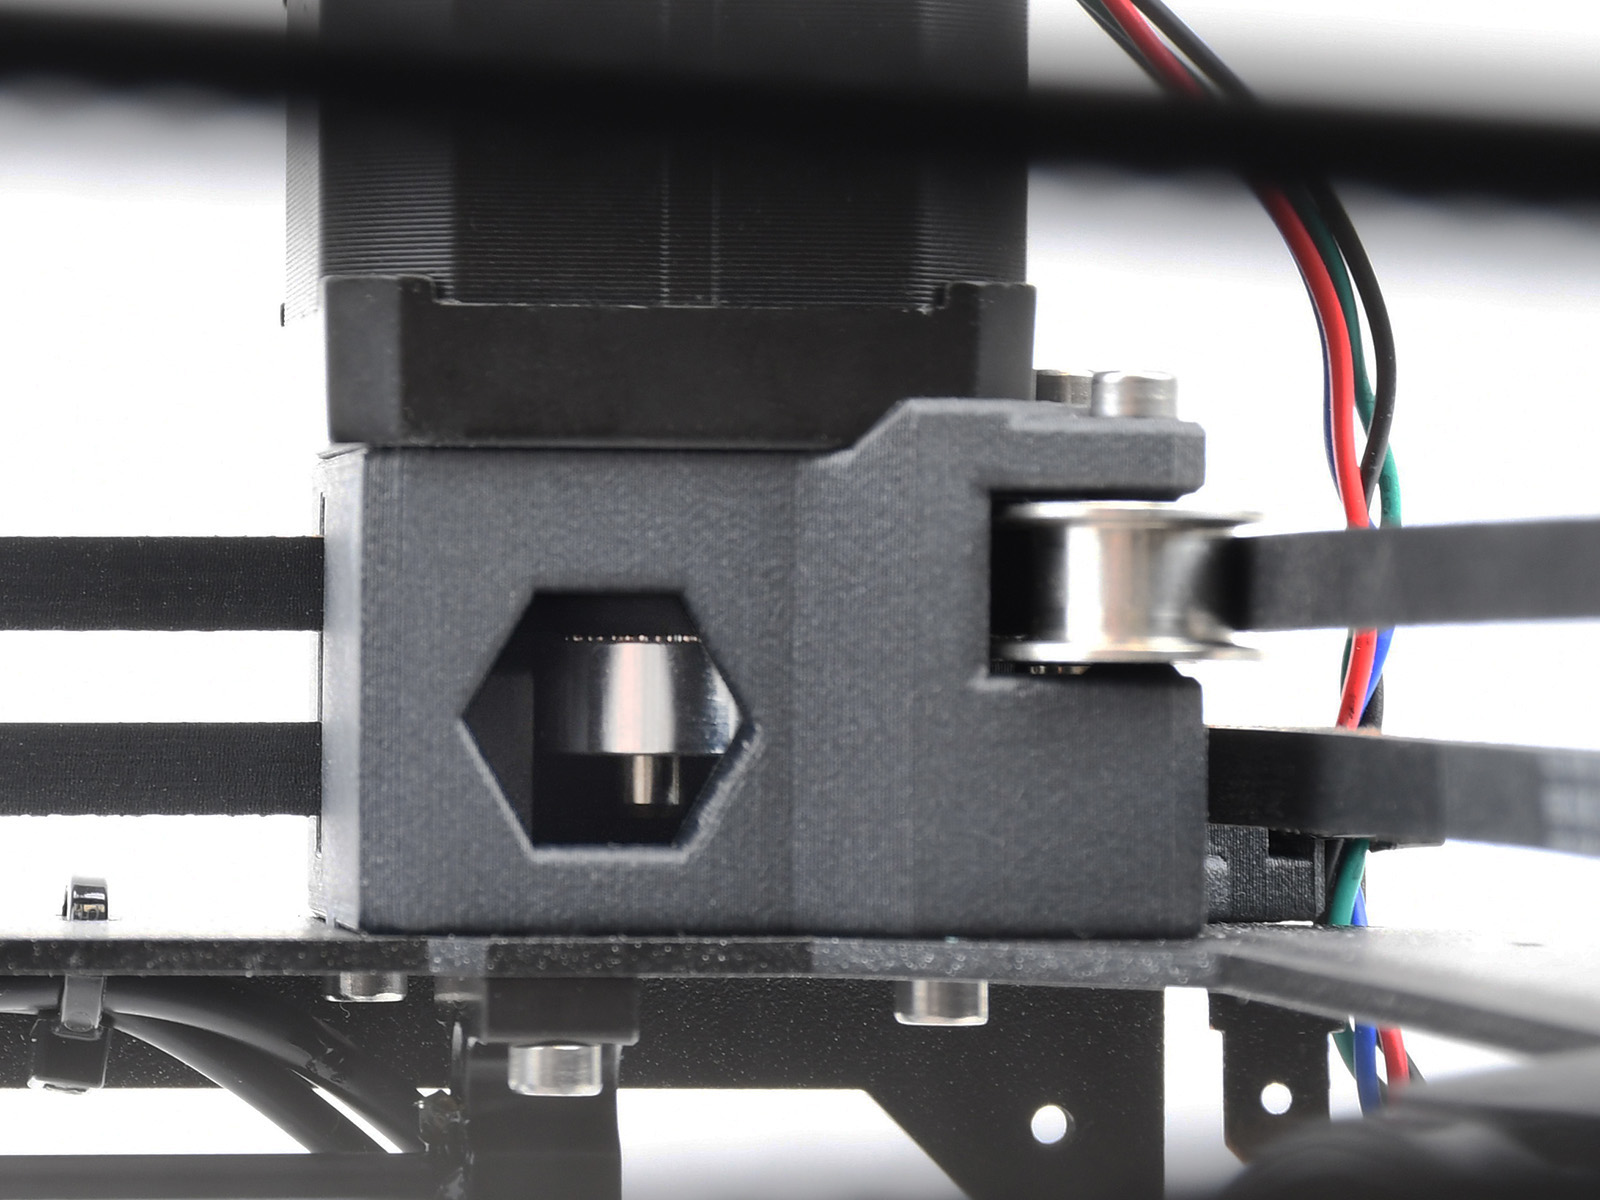
                  If the issue persists, look through the openings on the plastic parts under the CoreXY motors. You will be able to see the motor pulleys. Make sure that they are in the correct orientation, that both set screws are firmly tightened, and that one of them is tightened over the flat part of the motor shaft.
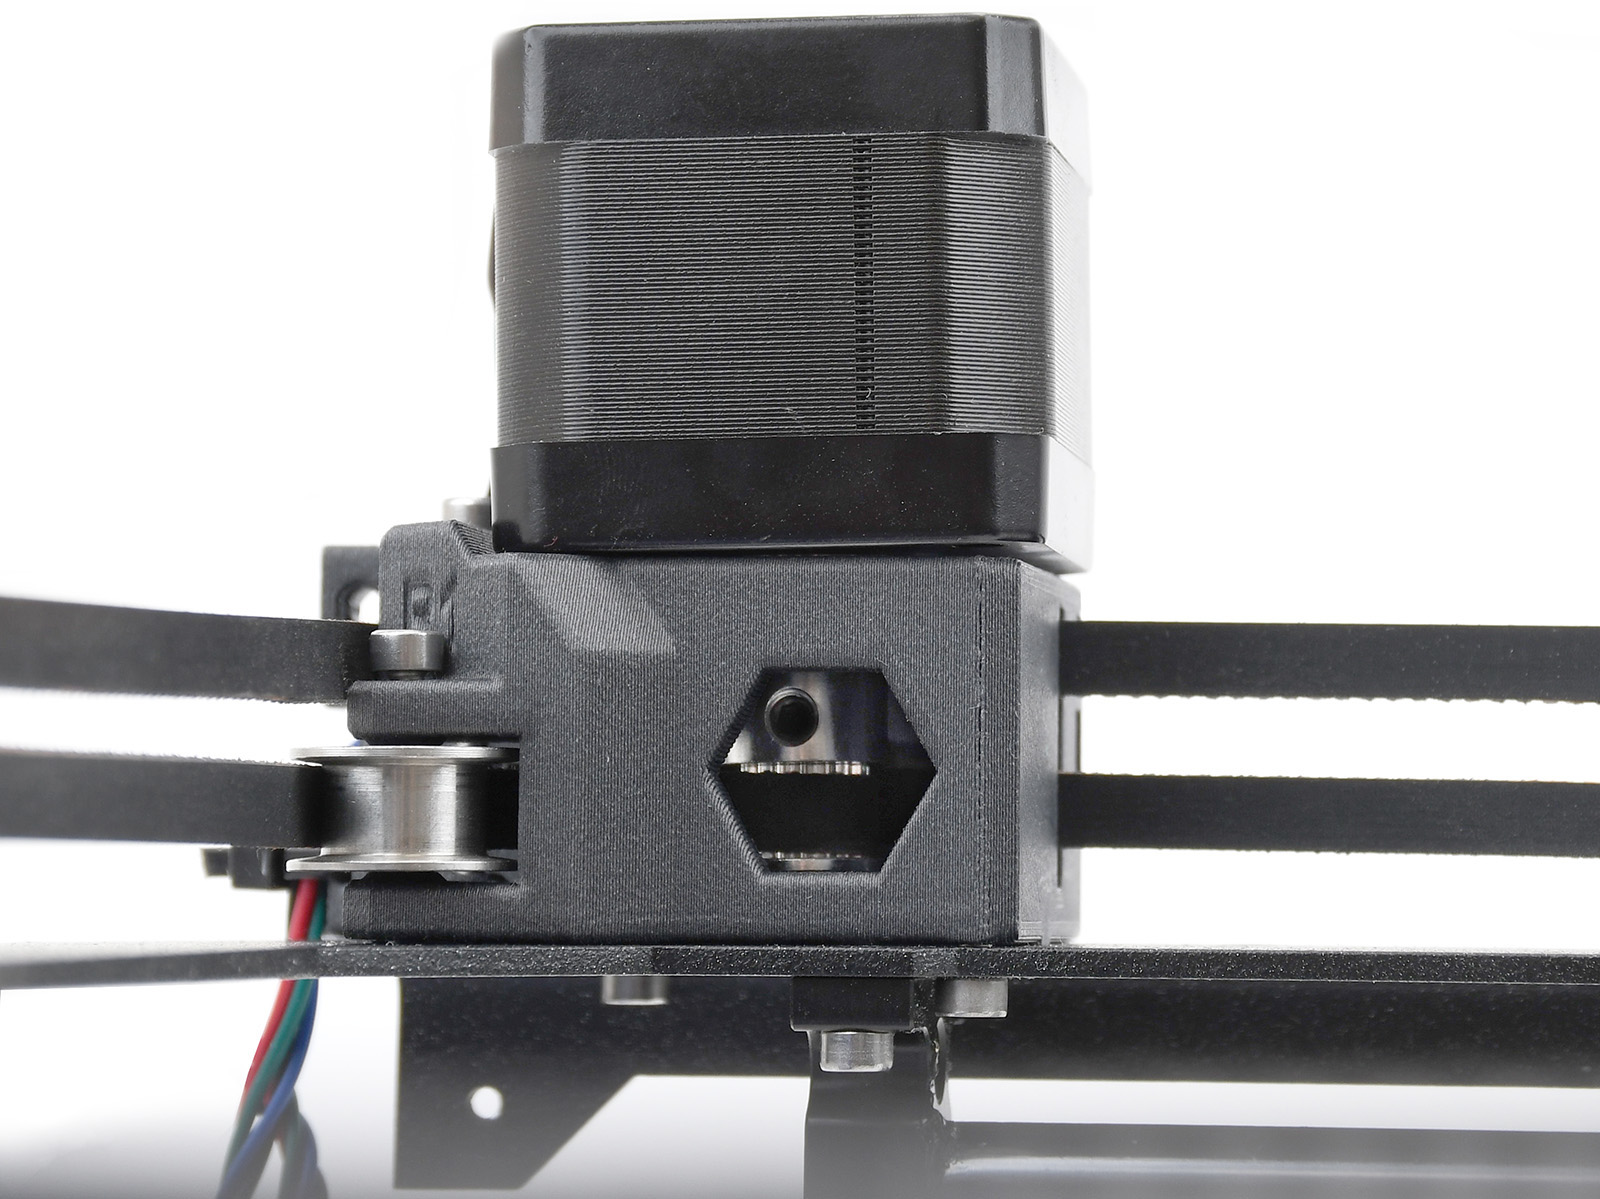
                  Y-motor pulleyX-motor pulley

                  If none of the items mentioned help, loosen the six screws holding the X-axis linear rails slightly (one to two turns), let the rail drop down, and tighten them again in the correct order.
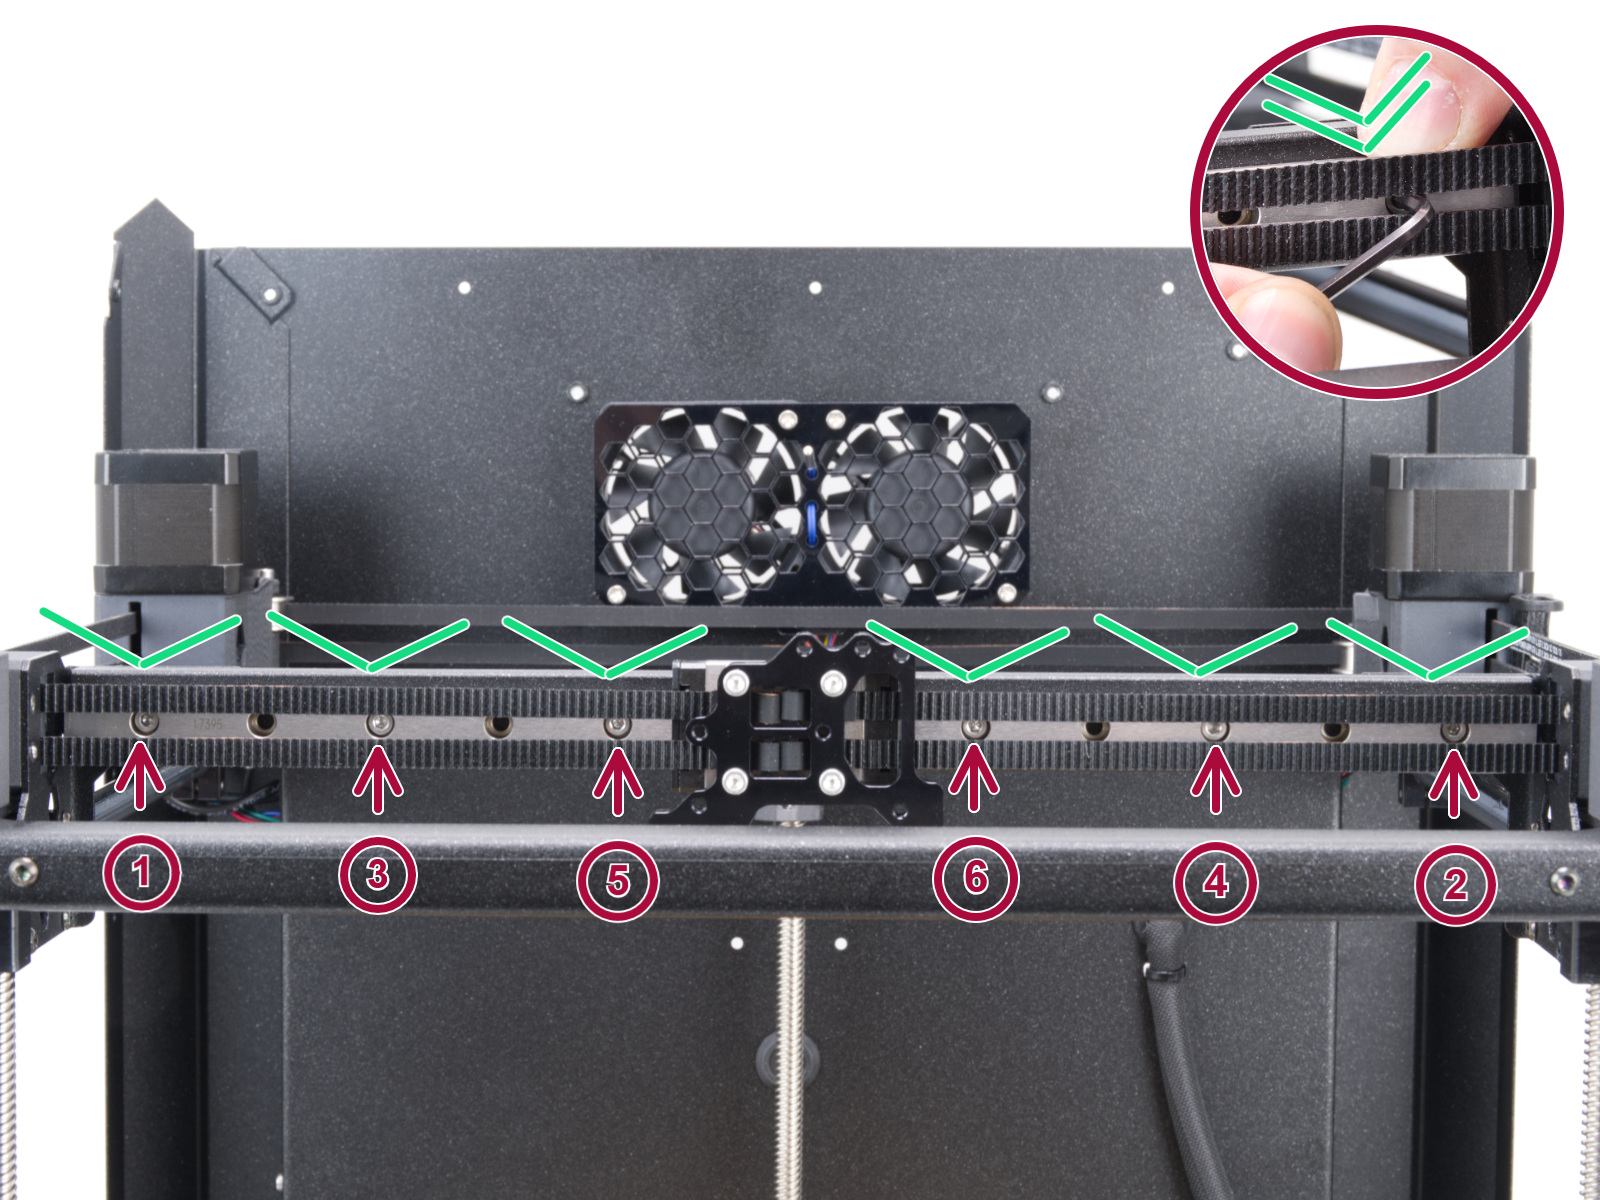
                  Z Alignment Calibration

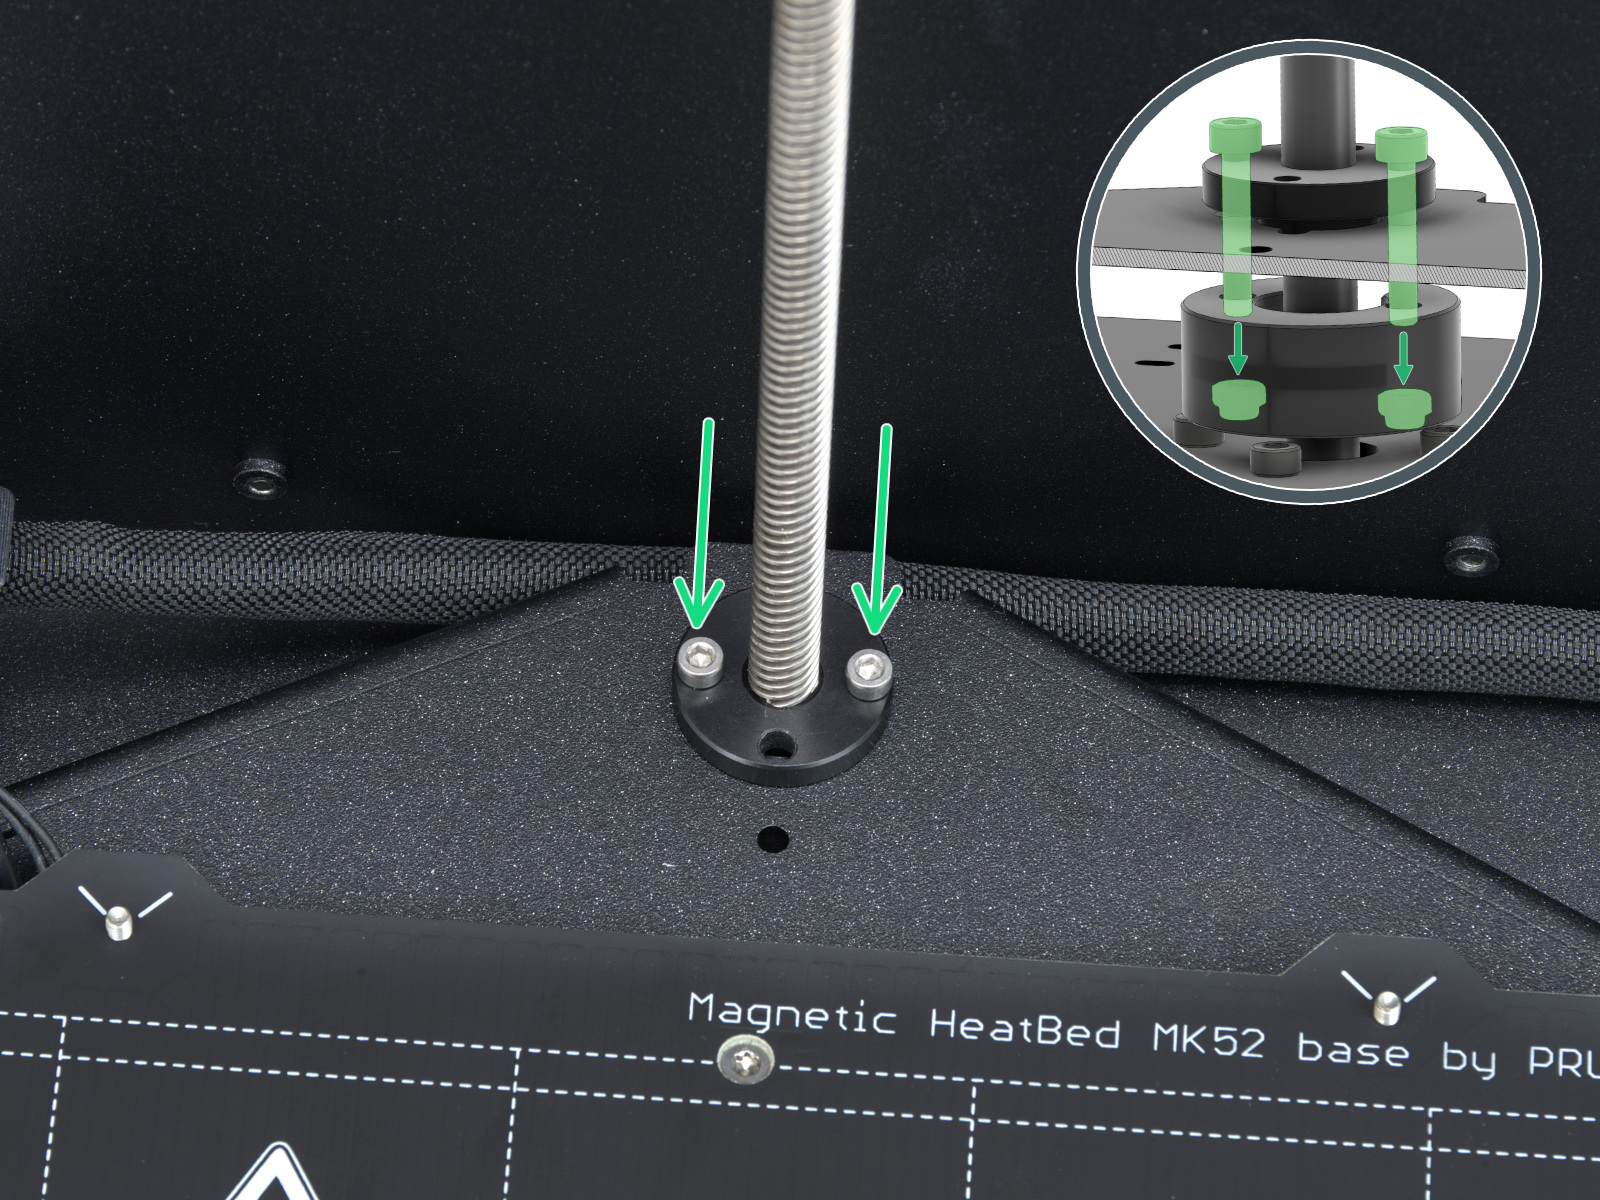
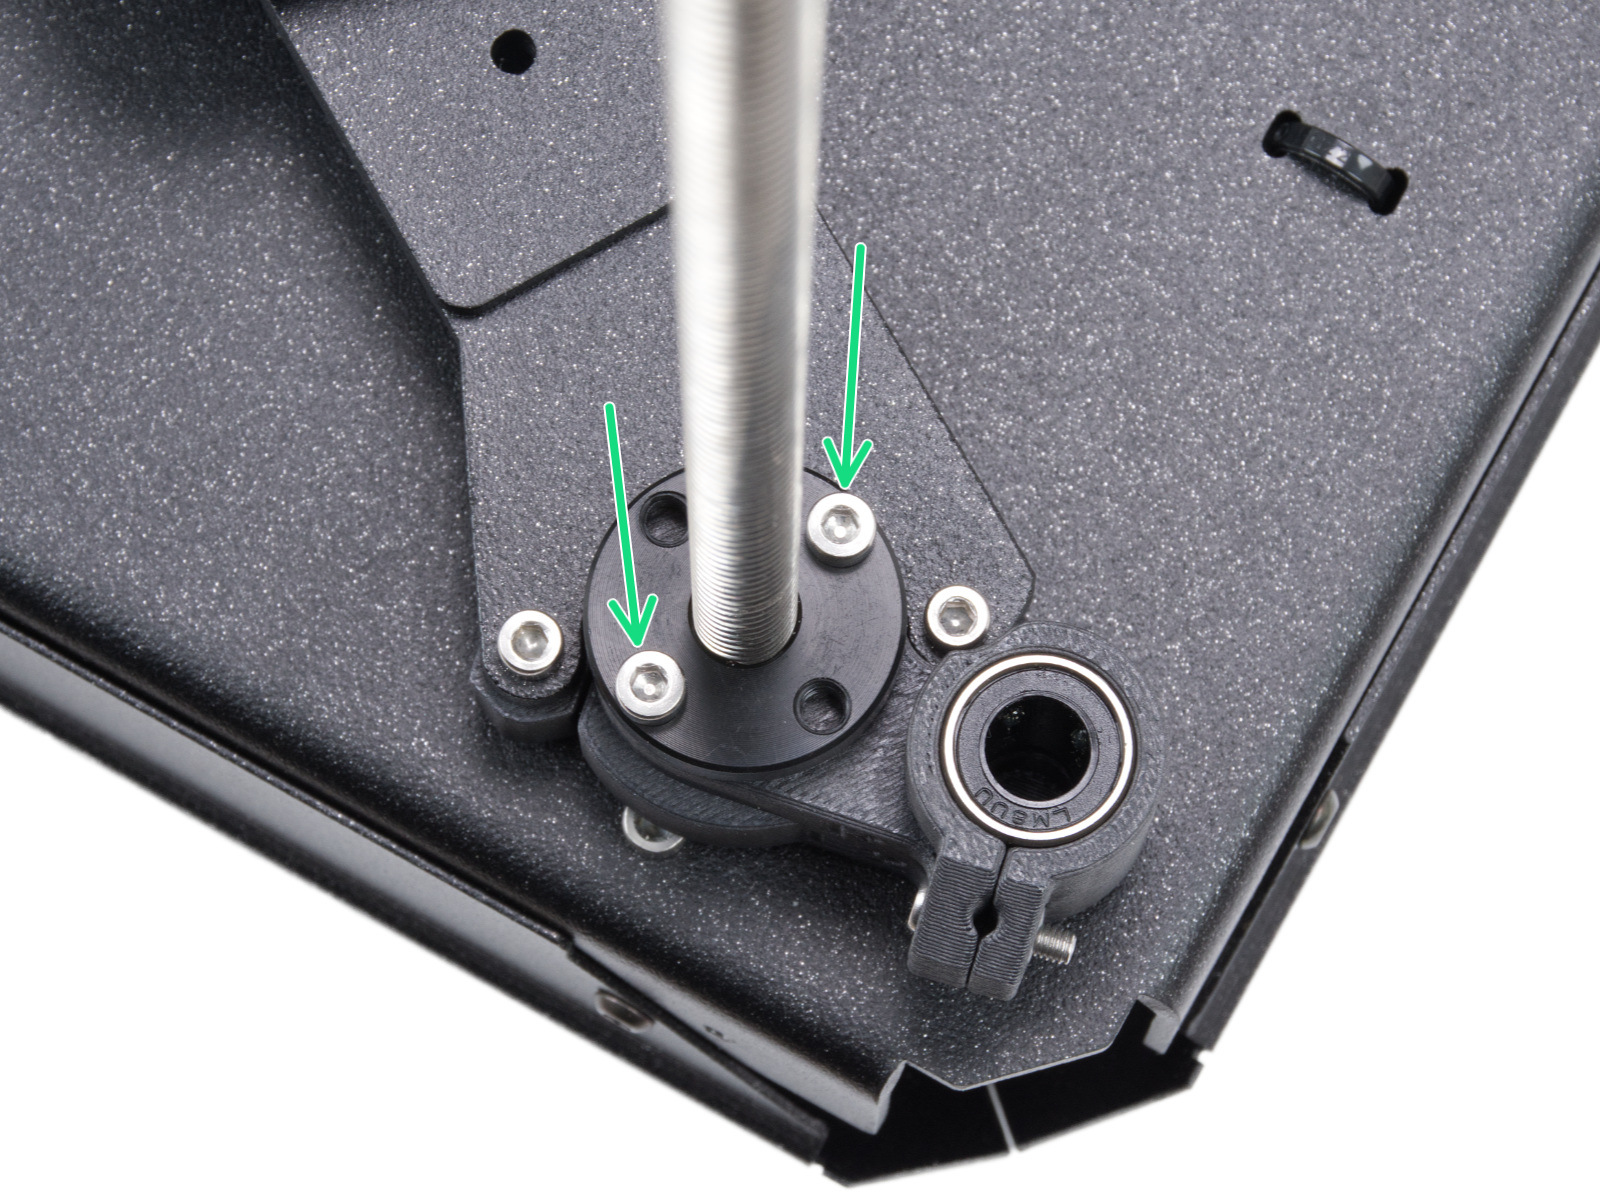
                  This part of the calibration will move to align the three motors on the z axis so that the heatbed is level. In case of any errors on this test, check the trapezoidal nuts on the motor threaded rods. For that, move the bed all the way down either by the menu in Control -> Move axis -> Move Z, or by turning the threaded rods on the z motors. Unscrew and remove the screws indicated in the image below. Move the nut along the threaded rod and see if the movement is smooth or not. When the trapezoid nut is still loose, try moving the motor threaded rod by hand (the printer needs to be powered off for that), and see if it turns easily.
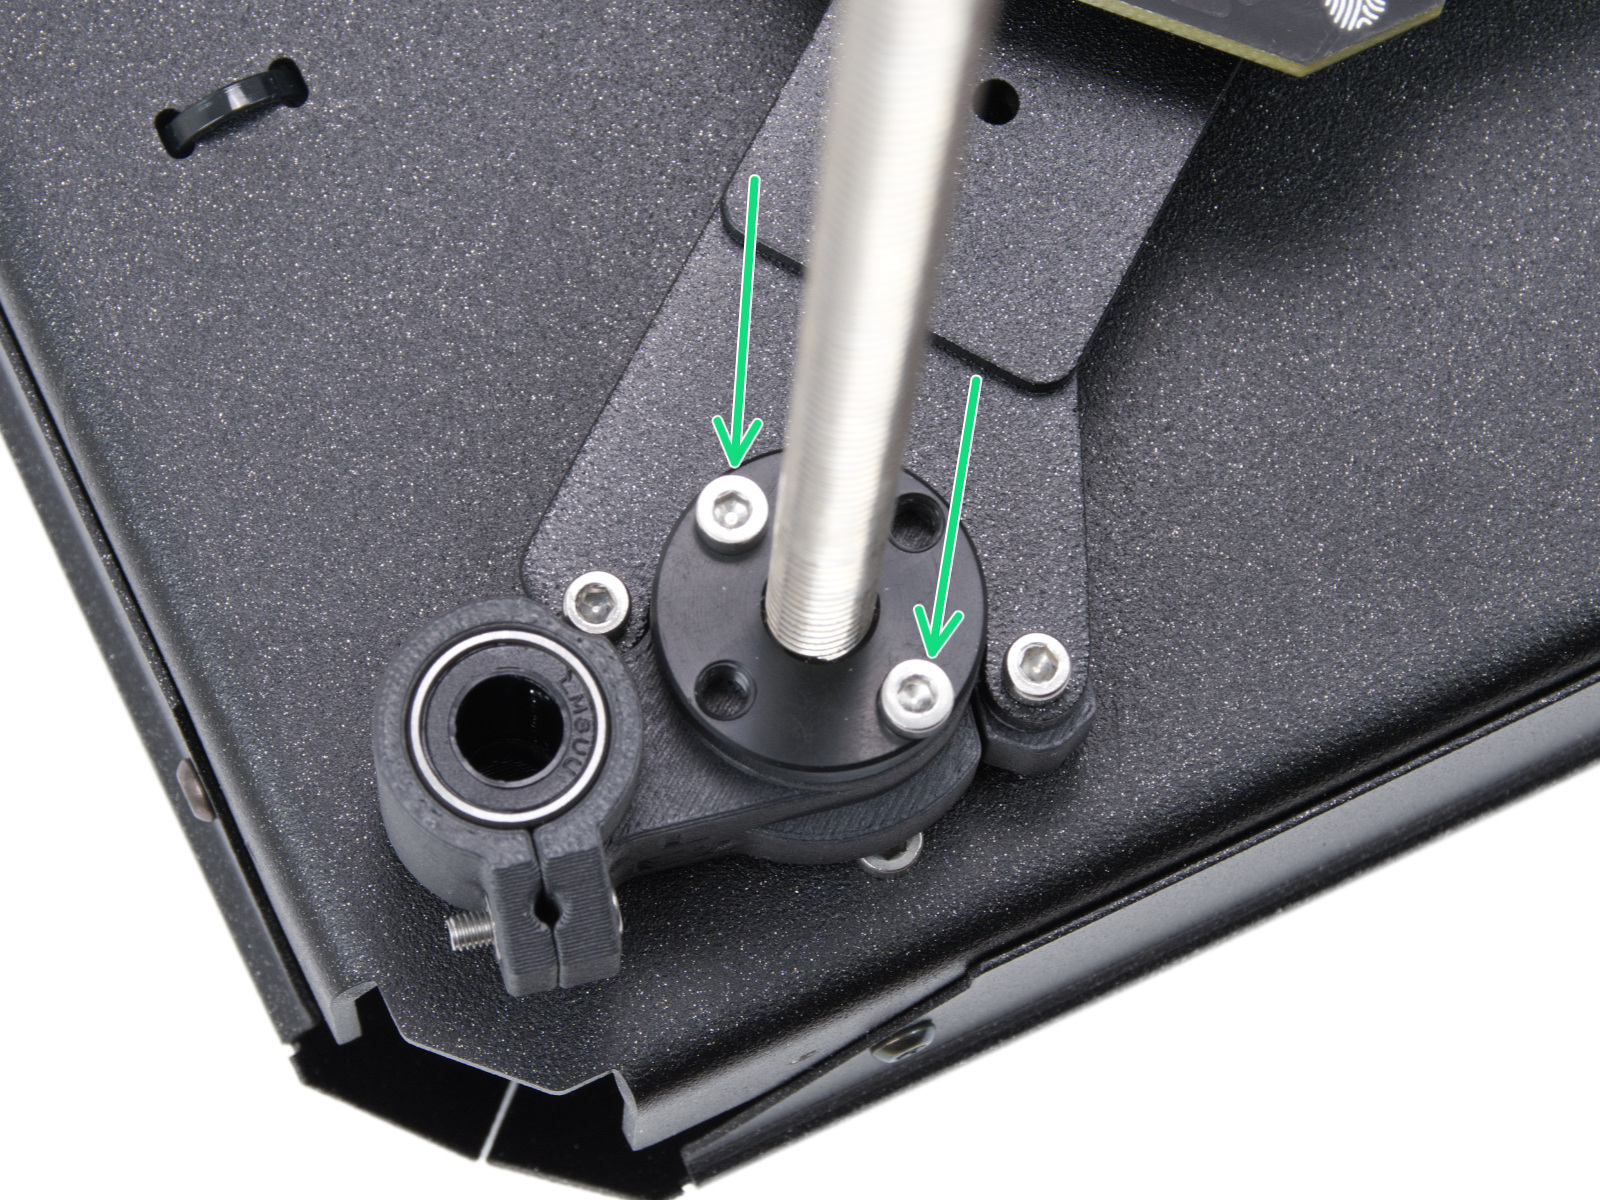
                  Left side trapezoidal nutRear motor trapezoidal nutRight side trapezoidal nut

                  Loadcell test

                  A functioning loadcell is fundamental for the Prusa CORE One/+ to detect that the nozzle is close enough to the steel sheet for printing, and to avoid damage that would be caused by the nozzle digging into the steel sheet.

                  • Make sure that the loadcell is correctly connected to the LoveBoard.
                  • Make sure that the surface the printer is on is as stable as possible: any form of vibration propagated to the surface under the printer, or a not fully stable surface under the printer, might cause a false reading on the loadcell, causing it to fail the selftest.
                  • Check if the hotend is not moving and is inserted all the way.

                  Heaters test

                  The selftest can determine a fault during the heating of a component, and the affected component.

                  Heat the affected component under LCD Menu -> Control -> Temperature, heat up the part that failed the selftest, and see if any error appears. If it does, the error should have a QR code that redirects to the article that describes how to troubleshoot that particular error.

                  Filament sensor

                  The Prusa CORE One/+ is equipped with two filament sensors: the first one is located on the side, close to the input of the PTFE tube where you feed the filament. The second one is located in the Nextruder.

                  Both filament sensors are necessary for the correct filament retraction. When the sensor on the side detects that the filament has run out, the filament will be retracted in time.

                  To show the sensor status on the bottom of the screen during normal use, go to Settings -> User Interface -> Footer.

                  The printer prompts you to load the filament into the extruder to test the sensors. During the selftest, the two sensors is shown on the bottom of the screen. In case either of the sensors is not triggered:

                  • Make sure that the extruder filament sensor is correctly connected to the LoveBoard.
                  • Make sure that the side filament sensor is correctly connected to the xBuddy extension board.
                  • Check the cable of the side filament sensor for any damage.
                  • If the side sensor is presenting an issue, check if the lever is not overtightened.
                  Was this article helpful?
                  This action is available only to registered users. Please log-in.

                  Topics

                  • Troubleshooting
                    • Printer troubleshooting
                      • Multimeter usage
                      • Bed thermal runaway #31203 (CORE One) #35203 (CORE One L) #36203 (CORE One INDX) #26203 (MK4S) #13203 (MK4) #27203 (MK3.9S) #21203 (MK3.9) #28203 (MK3.5S) #23203 (MK3.5) 
                      • Hotend thermal runaway #31204 (CORE One) #35204 (CORE One L) #26204 (MK4S) #13204 (MK4) #27204 (MK3.9S) #21204 (MK3.9)
                      • Bed mintemp error #31207 (CORE One) #35207 (CORE One L) #36207 (CORE One INDX) #26207 (MK4S) #13207 (MK4) #27207 (MK3.9S) #21207 (MK3.9) #28207 (MK3.5S) #23207 (MK3.5)
                      • Bed maxtemp error #31205 (CORE One) #35205 (CORE One L) #36205 (CORE One INDX) #26205 (MK4S) #13205 (MK4) #27201 (MK3.9S) #21201 (MK3.9) #28201 (MK3.5S) #23201 (MK3.5)
                      • Heatbed Port Overcurrent #31309 (CORE One) #35309 (CORE One L) #26309 (MK4S) #13309 (MK4) #27309 (MK3.9S) #21309 (MK3.9) #28309 (MK3.5S) #23309 (MK3.5) #12309 (MINI) #36309 (INDX)
                      • MMU Overcurrent #31310 (CORE One) #35310 (CORE One L) #26310 (MK4S) #13310 (MK4) #27310 (MK3.9S) #21310 (MK3.9) #28310 (MK3.5S) #23310 (MK3.5)
                      • I2C Send failed #31311 (CORE One) #35311 (CORE One L) #36311 (CORE One INDX) #26311 (MK4S) #13311 (MK4) #27311 (MK3.9S) #21311 (MK3.9) #28311 (MK3.5S) #23311 (MK3.5) #12311 (MINI/+)
                      • Loadcell Bad Configuration #31527 (CORE One) #35527 (CORE One L) #36527 (CORE One INDX) #26527 (MK4S) #13527 (MK4) #27527 (MK3.9S) #21527 (MK3.9)
                      • Loadcell Timeout #31528 (CORE One) #35528 (CORE One L) #26528 (MK4S) #36528 (CORE One INDX) #13528 (MK4) #27528 (MK3.9S) #21528 (MK3.9)
                      • Heatbreak MINTEMP Error #31211 (CORE One) #35211 (CORE One L) #26211 (MK4S) #13211 (MK4) #27211 (MK3.9S) #21211 (MK3.9)
                      • Nextruder filament sensor (CORE One, CORE One L, MK4/S, MK3.9/S, XL/+)
                      • Blue Screen of Death (BSOD) #31538 (CORE One) #35538 (CORE One L) #36538 (CORE One INDX) #26538 (MK4S) #13538 (MK4) #27538 (MK3.9S) #17538 (XL) #21538 (MK3.9) #28538 (MK3.5S) #23538 (MK3.5) #12538 (MINI)
                      • Stuck filament detection #31101 (CORE One) #35101 (CORE One L) #26101 (MK4S) #13101 (MK4) #27101 (MK3.9S) #21101 (MK3.9) #17108 (XL)
                      • Heatbed temp not matching #31209 (CORE One) #35209 (CORE One L) #26209 (MK4S) #13209 (MK4) #27209 (MK3.9S) #21209 (MK3.9) #28209 (MK3.5S) #23209 (MK3.5)
                      • Under-extrusion (Nextruder printers)
                      • Nozzle Timeout #31819 (CORE One) #35819 (CORE One L) #36819 (CORE One INDX) #26819 (MK4S) #13819 (MK4) #27819 (MK3.9S) #21819 (MK3.9) #28819 (MK3.5S) #23819 (MK3.5) #17819 (XL) #12819 (MINI)
                      • Uneven bed #31111 (CORE One) #35111 (CORE One L) #36111 (CORE One INDX)
                      • Filament sensor stuck #31113 (CORE One) #35113 (CORE One L) #36113 (CORE One INDX) #17113 (XL) #26113 (MK4S) #13113 (MK4) #27113 (MK3.9S) #21113 (MK3.9) #28113 (MK3.5S) #23113 (MK3.5) #12113 (MINI/+)
                      • Chamber MAXTEMP error #31214 (CORE One) #35214 (CORE One L) #36214 (CORE One INDX)
                      • Puppy error #31511 (CORE One) #35511 (CORE One L) #36511 (CORE One INDX)
                      • Puppy error #31513 (CORE One) #35513 (CORE One L) #36513 (CORE One INDX)
                      • Fil. sensor troubleshooting #31114 (CORE One) #26114 (MK4S) #13114 (MK4) #27114 (MK3.9S) #21114 (MK3.9) #28114 (MK3.5S) #23114 (MK3.5)
                      • Chamber Mintemp error #31215 (CORE One) #35215 (CORE One L) #36215 (CORE One INDX)
                      • MCU in Buddy is overheated #31825 (CORE One) #35825 (CORE One L) #26825 (MK4S) #27825 (MK3.9S) #28825 (MK3.5S) #13825 (MK4) #21825 (MK3.9) #23825 (MK3.5) #17825 (XL) #12825 (MINI)
                      • The heatbed cooled down during the power outage #31808 (CORE One) #35808 (CORE One L) #26808 (MK4S) #27808 (MK3.9S) #28808 (MK3.5S) #13808 (MK4) #21808 (MK3.9) #23808 (MK3.5) #17808 (XL) 
                      • The G-code isn't fully compatible #31803 (CORE One) #26803 (MK4S) #27803 (MK3.9S) #28803 (MK3.5S) #13803 (MK4) #21803 (MK3.9) #23803 (MK3.5) #17803 (XL) #12803 (MINI)
                      • Filament not detected #31804 (CORE One) #35804 (CORE One L) #26804 (MK4S) #27804 (MK3.9S) #28804 (MK3.5S) #13804 (MK4) #21804 (MK3.9) #23804 (MK3.5) #17804 (XL) #12804 (MINI)
                      • Print preview unfinished selftest #31801 (CORE One) #35801 (CORE One L) #26801 (MK4S) #27801 (MK3.9S) #28801 (MK3.5S) #13801 (MK4) #21801 (MK3.9) #23801 (MK3.5) #17801 (XL) #12801 (MINI)
                      • Crash recovery axis long #31809 (CORE One) #35809 (CORE One L) #26809 (MK4S) #13809 (MK4) #27809 (MK3.9S) #21809 (MK3.9) #28809 (MK3.5S) #23809 (MK3.5) #17809 (XL) #12809 (MINI)
                      • Crash recovery repeated crash #31811 (CORE One) #35811 (CORE One L) #26811 (MK4S) #13811 (MK4) #27811 (MK3.9S) #21811 (MK3.9) #28811 (MK3.5S) #23811 (MK3.5) #17811 (XL) #12811 (MINI)
                      • Crash recovery axis short #31810 (CORE One) #35810 (CORE One L) #26810 (MK4S) #13810 (MK4) #27810 (MK3.9S) #21810 (MK3.9) #28810 (MK3.5S) #23810 (MK3.5) #17810 (XL) #12810 (MINI)
                      • Crash recovery home fail #31812 (CORE One) #35812 (CORE One L) #26812 (MK4S) #13812 (MK4) #27812 (MK3.9S) #21812 (MK3.9) #28812 (MK3.5S) #23812 (MK3.5) #17812 (XL) #12812 (MINI)
                      • Loading obstruction #31119 (CORE One) #35119 (CORE One L) #17119 (XL)
                      • Homing calibration needed #31118 (CORE One) #35118 (CORE One L) #36118 (CORE One INDX)#17118 (XL)
                      • Calibrate homing from menu #31120 (CORE One) #35120 (CORE One L) #36120 (CORE One INDX) #17120 (XL)
                      • Selftest failed (CORE One/+)
                      • Clogged nozzle (CORE One, CORE One L, XL, MK4/S, MK3.9/S)
                      • Adjusting belt tension (CORE One/+, CORE One INDX, CORE One L/+)
                    • Diagnostics
                    • Print Quality Troubleshooting
                    • QR Error codes
                    • Print Error Messages

                  15 comments

                  Log in  to post a comment
                  Gene
                  •
                  Remeber to remove the Silicon Sock when doing the Netxtruder calibrations.
                  Reply
                  AngryMech
                  •
                  Nozzle Heater Test Failure. Just a heads up for anyone that has this happen. After assembling my Core One + It would instantly fail the nozzle heater test with no QR code to guide you to a trouble shooting page. After a bunch of confusion I figured out I had somehow inadvertently mixed up the NTC thermistor and nozzle thermistor plugs in the Loveboard. Hope this helps.
                  Reply
                  CTFrank
                  •
                  Thanks very much for this article. I had the exact same problem and also found the the same two cables were reversed!
                  Reply
                  Hans
                  •
                  Hi, I just purchased a pre-assembled Core One+. During the selftest, the Y-axis test fails. I switched the machine on/off a few times but this does help. Also, I do not think there is a blockage. When I received the machine 2 days ago, there was certification notice that apparently, after manufacturing, the machine passed all tests. Any suggestions what I can do?
                  Reply
                  Mary Elbabaa
                  •
                  Help, help help,, I have adjusted the x,y axis several times they are testing ok but I cannot get the printer to pass the homing test. What am doing wrong? please tell me what I need to adjuist to get it to home. I had it homing during first attemp after completing the build, but prints were all bad. belts are within range, alignment is correct, nothing obstructing the gantry. I am at wits end. I would really like to speak to someone in support. How do I do that?
                  Reply
                  Jan Kratochvíl
                  •
                  Hello. The best option is Livechat (There should be a small "Chat now" window on the bottom right corner of your screen), or you can send usd email to [email protected].
                  Reply
                  Mary Elbabaa
                  •
                  I have just finished my core 1+ assembly and passed all the calibration tests printed 3 test prints which all failed in that the print shifted mid print and other malfunctions. I quit for the nite then got a firmware upgrade notice so I flashed the new firmware and then I re-checked the belts for tightness and when I started the calibration tests again I am failing the y axis, the x axis and when I follow the guide it tells you what it should be doing but not what to do if it is not doing that. example there is no direction as to what is failing just an x that it failed. I verified all the steps above and eventually found that my belts were too loose after manually recalibrating. I eventually tightened the tensions on the 2 belts until they had very little play then it passed the x,y and z axis test but still fails the homing test. I am baffled.
                  Reply
                  Jan Kratochvíl
                  •
                  Hello. Try contacting our support team.
                  Reply