Prusa
  • SHOP
    • Latest products
    BY CATEGORY
    • 3D printersnew
    • 3D printer upgradesnew
    • Materials
    • Accessories
    • Spare parts
    • Courses
    • Merch
    • Get a price quote
    QUICK LINKS
    • Shipping & delivery
    • Returns & refunds
    • Payment & financing
    • Warranty
    • VAT & Customs fees
    • FAQ

    0 item in your cartitems in your cart

    Your cart is empty

    Go to cartShop 3D printers

    My profile

    Log in to see orders, saved items

    My profile

    Signed in as

    • Orders
    • Logout
  • 3D PRINTING
    • Explore 3D printing
    FOR BEGINNERS
    • 3D printing 101
    • How FDM printing works
    • Buying your first printer
    • 3D model catalog
    BY APPLICATION
    • Rapid prototyping
    • Manufacturing
    • Engineering
    • Research
    • Arts & design
    GO DEEPER
    • Materials guide
    • Courses
    • Webinars
    • Case studies
    • Custom 3D printing
  • 3D PRINTERS
    • All 3D printers
    FOR
    • Home or garageHobbyists, tinkerers and home printing
    • BusinessIn-house production for small teams
    • EnterpriseFleets, security and scale
    • Which Prusa is right for me
    SHOP & BROWSE
    • CORE One+new
    • CORE One+ INDXnew
    • CORE One L+new
    • CORE One L+ INDXnew
    • XL+new
    • MK4S
    • Prusa Pro HT90
    • Prusa Pro AFS
    • Prusa Pro SLX
    MORE FROM PRINTERS
    • Parts & upgradesnew
    • Critical infrastructure
    • Case studies
    • Signature Oak
    • Kits
  • MATERIALS
    • All materials
    BY USE
    • Every-day & design
    • Functional engineering
    • Composites
    • Pro speciality
    • SLA resins
    PRUSAMENT
    • PLA
    • PETG
    • ASA
    • PC
    • PA11
    • Flex
    • TPU
    MORE FROM MATERIALS
    • Materials guide
    • We make material in house
    • Sustainability
    • Order on the store
  • SOFTWARE
    • All software
    PREPARE THE PRINT
    • PrusaSlicer 3.0New
    PRINT & MONITOR
    • Prusa Connect
    • EasyPrint
    • iOS & Android app
    • Prusa Farm
    GET STARTED
    • Download & install
    • Knowledge base
    MORE FROM SOFTWARE
    • 3D model catalog
  • SUPPORT
    • Explore support
    FIND ANSWERS
    • Knowledge base
    • Troubleshooting
    • Courses
    • Webinars
    GET HELP
    • Contact us
    • Livechat
    • Shipping & delivery
    • Warranty
    • Returns & refunds
    • Service & spare parts
    • Service & Repair
    COMMUNITY
    • Forum
    • Reddit
    • Printables
  • TRUST CENTER
    • Trust Center overview
    BY TOPIC
    • GDPR
    • Certificates
    • Security
    • Compliance
    COMMITMENTS
    • Sustainability report
    TALK TO US
    • Contact the security team
  • COMPANY
    • About Prusa
    GET TO KNOW US
    • Our story
    • How we make printers
    • Open source
    • Brand & media kit
    NEWS
    • Blog
    • Newsroom
    • Events
    TRUST & PARTNERS
    • Sustainability
    • Resellers & distributors
    • Affiliate program
    • Contact
    • English
    • Čeština
    • Deutsch
    • Español
    • Français
    • Italiano
    • Polski
    • 日本語
  • Signed in as

    • Orders
    • Address
    • In-stock Alerts
    • My Courses
    • Subscription
    • Edit Account
    • Logout

Log in to see orders, saved items

Signed in as
  • Orders
  • Address
  • In-stock Alerts
  • My Courses
  • Subscription
  • Edit Account
  • English
  • Čeština
  • Deutsch
  • Español
  • Français
  • Italiano
  • Polski
  • 日本語
Shop

0 item in your cartitems in your cart

Your cart is empty

Go to cartShop 3D printers

My profile

Log in to see orders, saved items

My profile

Signed in as

  • Orders
  • Logout
SHOP
  • Latest products
BY CATEGORY
  • 3D printersnew
  • 3D printer upgradesnew
  • Materials
  • Accessories
  • Spare parts
  • Courses
  • Merch
  • Get a price quote
QUICK LINKS
  • Shipping & delivery
  • Returns & refunds
  • Payment & financing
  • Warranty
  • VAT & Customs fees
  • FAQ

Featured products

    Popular categories

      Trending searches

        Articles

          Blog

            Products

              Categories

                Suggested searches

                  Searching…
                  No results
                  Something went wrong.
                  ↑↓ Select↵ OpenEsc Close search
                  1. Support
                  2. Printer maintenance
                  3. Changing or replacing the nozzle (MK2.5/S, MK3/S/+, MK3.5/S)
                   

                  Contents

                  • Why change the nozzle?
                  • Tools necessary
                  • Procedure
                  • Final inspection

                  Blog

                  • Print colorful and glowing Halloween decorations with our spooky offer
                  • Factorio Has Arrived on Printables
                  • Prusament PLA Lightweight: 65% lighter than regular PLA. Perfect choice for aircraft, cosplay, and more.

                  Newsletter

                  Signup and get our monthly squeeze on updates, blog, printables and much more.

                  By clicking, you agree to receive our newsletter.

                  This site is protected by reCAPTCHA Enterprise and the Google Privacy Policy and Terms of Service apply.

                  Factorio Transport Belts
                  E-shop
                  • 3D Printers
                  • Printer Upgrades
                  • Filaments
                  • Accessories
                  • Prusa Merchandise

                  © Prusa Research a.s.

                  Printables
                  • 3D Models
                  • Store
                  • Clubs
                  • 3D Design Contests
                  • Brands
                  Community
                  • World Map
                  • Forum
                  • User Groups
                  • Events
                  Help
                  • Prusa Help
                  • Prusa Academy
                  • 3D Printing Calculators
                  Software
                  • PrusaSlicer
                  • Prusa.app
                  • Prusa Connect
                  • Drivers and Software
                  Company
                  • About Us
                  • Blog
                  • Official Prusa Resellers
                  • Contact Us
                  • Certified for ISO 9001, ISO 14001, ISO 45001
                  • General Terms and Conditions
                  • General Terms and Conditions of Use of the PRUSA Websites
                  • Privacy Policy
                  • Information about cookies
                  • Customer Complaints Policy
                  • Status Page
                  • Do Not Sell or Share My Personal Information
                  • Supplemental Statements
                  • General Terms and Conditions
                  • General Terms and Conditions of Use of the PRUSA Websites
                  • Privacy Policy
                  • Information about cookies
                  • Customer Complaints Policy
                  • Status Page
                  • Do Not Sell or Share My Personal Information
                  • Supplemental Statements

                  © Prusa Research a.s.

                  JOSEF PRUSA®, PRUSA RESEARCH®, PRUSA POLYMERS®, PRUSA ORANGE®, PRUSA 3D ® AND PRUSAMENT® are registered trademarks of Prusa Development a.s. used by Prusa Research a.s. under licence from Prusa Development a.s.

                  Changing or replacing the nozzle

                  (MK2.5/S, MK3/S/+, MK3.5/S)

                  Relevant for

                  MK3 family
                  MK3.5 family
                  OLD PRODUCTS
                  123 comments
                  Article is also available in following languages
                  English
                  Čeština
                  Polski
                  Deutsch
                  Français
                  Español
                  Italiano
                  日本語

                  The Original Prusa MK2.5/S, MK3/S/+, and MK3.5/S use the E3D V6 Hotend. Any nozzle that is compatible with the E3D V6 Hotend can be installed on it. The stock nozzle that accompanies the printer is an E3D V6 0.4 mm brass nozzle, but other types and diameters can be used as well. The following procedure applies to all nozzles, except the Olsson Ruby.

                  To replace the Olsson Ruby nozzle, follow the instructions on the official 3DVERKSTAN website. Otherwise, you could damage it!

                  Why change the nozzle?

                  There might be two main reasons for replacing the nozzle:

                  • The nozzle is worn out and needs a replacement.
                  • You want to print using a different nozzle type, and/or diameter.
                  Unless you print abrasive materials with a brass nozzle, the stock brass nozzle will last you many hundreds of printing hours. Changing a relatively new nozzle to resolve a clog is not the solution!
                  The stock 0.4mm Nozzle installed on the Original Prusa i3 printers can be found in the eshop. We also offer an alternative 0.4mm nozzle compatible with i3 and MINI/+ printers.

                  Tools necessary

                  • 2.5 mm Allen key (Included with assembled printers and kits)
                  • 7 mm spanner/socket or pliers (7 mm spanner/socket not included with assembled printers and kits)
                  • 17 mm spanner (not included with assembled printers and kits)
                  • Small plate or aluminium foil (not included with assembled printers and kits)

                  Procedure

                  The following procedure assumes that a firmware version from 3.12.0 or above is installed. In case your printer has a previous firmware version, we recommend upgrading to the latest version. If you did not flash a newer firmware version, follow the procedure, except for "Step 3 alternative" instead of step 3.

                  Follow this procedure exactly! Omitting steps can cause leaking and extrusion issues outlined at the end of this article.
                  1. Unload the filament, if it is loaded, from LCD Menu -> Unload Filament. Optionally, perform a Cold pull (MK3/S/+, MK2.5/S, MK3.5/S).
                  2. On MK2.5/S and MK3/S/+, navigate to LCD Menu -> Settings -> HW Setup -> Nozzle Change.
                    1. The printer will display a message with a link to this guide.
                    2. Click the LCD encoder: the printer will auto-home, and subsequently move the Z axis to the topmost position, and the X axis to the center. In the meantime, the printer will automatically heat the nozzle to 280 °C. Heating the nozzle is essential for this process.
                    3. Once the nozzle is at 280 °C, the printer screen will display the following message: "Hotend at 280C! Nozzle changed and tightened to specs?". Do not click on the LCD encoder for now. 

                      On MK3.5/S, gain better access to the nozzle by moving the extruder as high as possible, go to LCD Menu -> Control -> Move Axis -> Move Z. Spin the Knob to adjust the height. Once this is done, preheat the nozzle to 280 °C from LCD Menu -> Control -> Temperature -> Nozzle Temperature. 

                  CAUTION: Heated parts can cause severe burns!
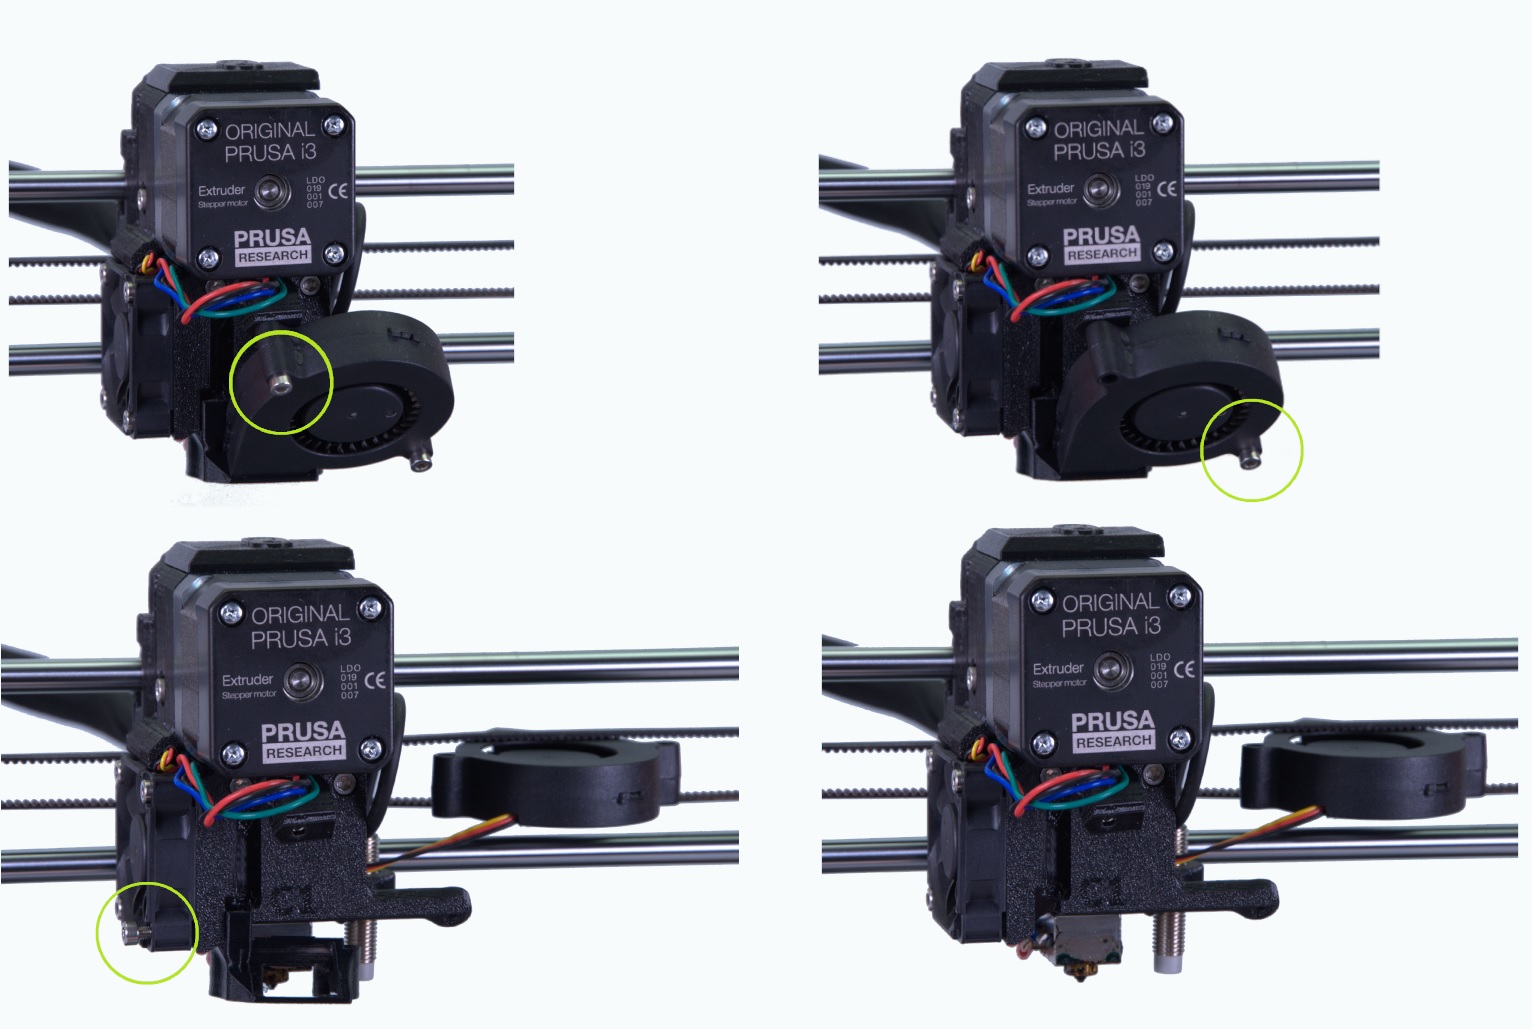
                  1. Unscrew the two screws on the print fan and the single screw securing the fan shroud. Remove both parts (picture below).

                  1. Hold the heater block with a 17 mm spanner (M10) or adjustable wrench.
                  Be extra careful around the fragile hotend heater and thermistor wires. You can break them off or short-circuit the heater with your spanner!
                  1. Unscrew the nozzle using the supplied pliers. If you are using the E3D nozzles from our online store, use a 7mm spanner (M4) or 7 mm socket. Be careful, the nozzle is still hot! Place it out of the way on your non-flammable surface.
                  2. Make sure that the printer is still on the screen described in step 3c, and that the set temperature (280 °C) didn't change. Holding the heater block with your spanner, carefully screw the new nozzle in and tighten it gently, but firmly. Do not use excessive force!
                  Our service and assembly teams use a torque wrench rated for 1 - 5 N m and tighten the nozzle with a force of 2.5 N m (Newton Meter).

                  Final inspection

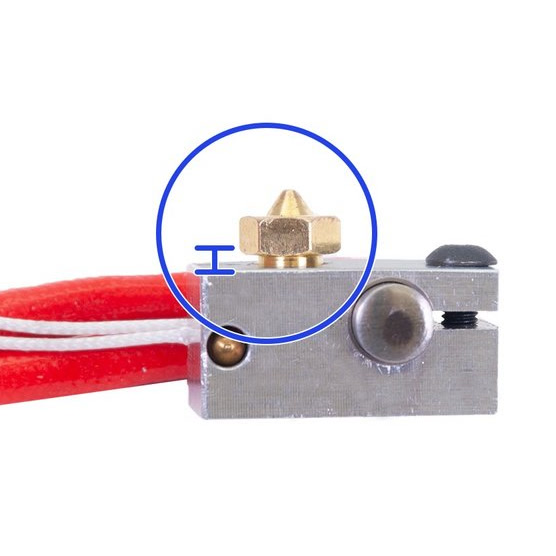
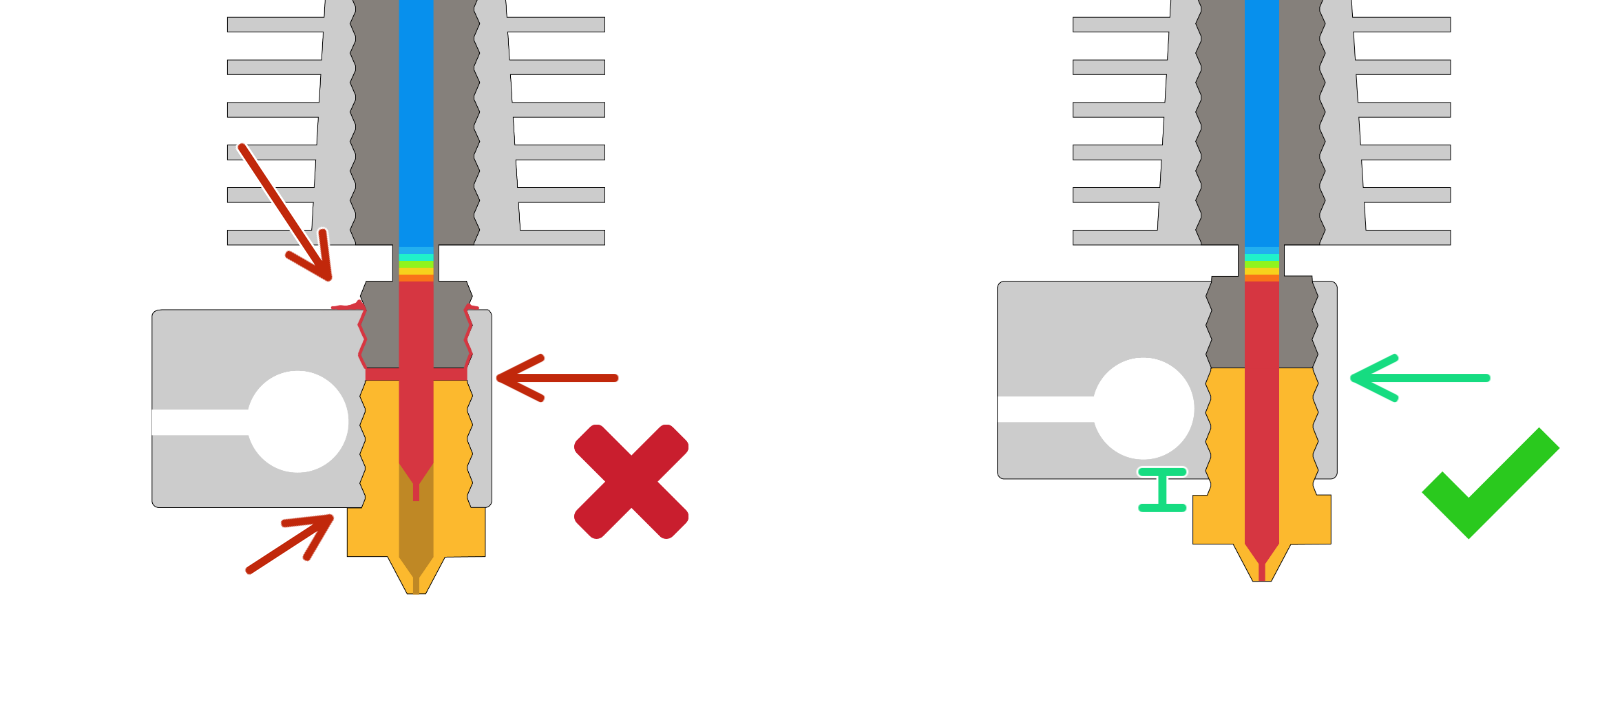
                  There must always be a gap (~0.5 mm) between the nozzle and the heater block (left picture). The nozzle must be tightened/secured in the heater block, and locked against the heat break while heated (right picture). Failing to do so will cause leaks (center picture).

                  It is necessary to redo the First Layer Calibration (i3) after replacing the nozzle. If you installed a nozzle with a diameter other than 0.4 mm (0.25, 0.6, 0.8 mm), please see Different nozzle types.
                  You can find this procedure as a video on our YouTube channel. Be aware that some steps may differ slightly from the procedure outlined here, and printed parts of the extruder may look a little different than yours.
                  Was this article helpful?
                  This action is available only to registered users. Please log-in.

                  Topics

                  • Using the printer
                    • Printer maintenance
                      • Changing or replacing the nozzle (MK2.5/S, MK3/S/+, MK3.5/S)
                      • i3 Printer Regular Maintenance
                      • Testing safety features (MK3/MK3S)
                      • How to update firmware (MK3S+/MK3S/MK3)
                      • How to replace a heatbreak/heaterblock/heatsink (MK3/MK2.5)
                      • How to remove a stripped screw
                      • SD cards and USB drives
                      • Adjusting belt tension (MK4/S, MK3.9/S, MK3.5/S, MK3/S/+)
                      • Hotend disassembly & heatbreak stuck in the heatsink
                      • Removing filament from extruder manually
                      • How to replace a hotend thermistor (MK3S/MK3S+)
                      • Checking/re-aligning the Bondtech gear (MK3.5/S, MK3S/+, MK2.5S)
                      • Firmware updating (MK2.5S/MK2S)
                      • How to replace a print fan (MK3S/MK3S+)
                      • How to replace a hotend (MK3S/MK3S+)
                      • How to replace an IR-sensor (MK3S/MK3S+)
                      • How to replace a P.I.N.D.A. sensor (MK3S)
                      • How to replace SuperPINDA (MK3S/MK3S+)
                      • How to replace bearings on the Y-axis (MK3S+)
                      • How to replace bearings on the X-axis (MK3S+)
                      • How to replace a hotend heater (MK3S/MK3S+)
                      • Community translations
                      • How to replace the xBuddy board (MK4/MK3.9/MK3.5)
                      • How to replace a Heatbed Thermistor (MK4/S, MK3.9/S, MK3.5/S)
                      • Print surface preparation
                      • How to replace xLCD (MK4/MK3.9/MK3.5)
                      • Regular printer maintenance (MK3.5/S)
                      • How to use accelerometer (MK3.5/S)
                      • Maintenance warning #31117 (CORE One) #26117 (MK4S) #13117 (MK4) #27117 (MK3.9S) #21117 (MK3.9) #28117 (MK3.5S) #23117 (MK3.5)
                      • How to replace a heatbreak/heatsink/heaterblock (MK3S+/MK3S/MK2.5S/MMU2S)
                      • How to replace a PTFE tube (MK3/MK2.5)
                      • How to trim PTFE tube - Multi Material
                      • Cold pull (MK3/S/+, MK2.5/S, MK3.5/S)
                      • How to post-process the printed parts
                      • How to replace a heatbed thermistor (MK3S+/MK3S/MK2.5S/MK2S)
                      • How to replace PSU on MK3 printers
                      • How to replace a hotend PTFE tube (MK3S+/MK3S/MK2.5S/MMU2S)
                      • How to replace a hotend thermistor (MK2S)
                      • How to trim PTFE tube - Original Prusa printers
                      • Maintenance tips
                      • Replacing the PEI sheet on the (MK3S/MK3/MK2.5S/MK2.5)
                      • MK3 Series Hotend Guide
                    • 3D models
                    • Material guide
                    • Slicing
                    • Prusa Connect & PrusaLink

                  57 comments

                  Log in  to post a comment
                  pdxprinter
                  •
                  Why is the 3.5 community left with no menu option to trigger a swap and automatically update the configuration for the new nozzle size? It would have been trivial to add this similar to a "Change Filament" menu setting.

                  "Change Nozzle"
                  - unload filament
                  - adjust print bed to back
                  - center print head and raise to top Z
                  - prompt user for new nozzle size
                  Reply
                  Chromatic
                  •
                  Where's the "Step 3 alternative"?
                  Reply
                  aidtopia
                  •
                  What if you cannot satisfy all the constraints?

                  "Gently but firmly" and "must always be a gap" are at odds. There's no resistance until the nozzle is in full contact with heater block. What to do if there's absolutely no resistance until the nozzle is in full contact with the heater block. I wouldn't even call it finger tight (not that I'm using my fingers with a nozzle at 280C). If I were to back it out even 1/4 turn to ensure there's a gap, the nozzle would be able to spin freely and it probably would work its way back out.

                  And how do you know whether it's "locked against the heat break"? (Given how loosely it fits, I strongly suspect it's not at all against the heat break.)
                  Reply
                  mr beeps
                  •
                  You can. If your nozzle is in contact with your heat block when you fully tighten it down that means your heat break is not threaded far enough down into the heat block from the top. You'll have to disassemble your hotend to adjust it.
                  Reply
                  Revolt
                  •
                  The linked "Different nozzle types" page doesn't mention how to configure the printer for the new nozzle diameter.
                  Reply
                  Revolt
                  •
                  It would be helpful to explicitly specify when to confirm the prompt from step 3c.
                  Reply