Prusa
  • SHOP
    • Latest products
    BY CATEGORY
    • 3D printersnew
    • 3D printer upgradesnew
    • Materials
    • Accessories
    • Spare parts
    • Courses
    • Merch
    • Get a price quote
    QUICK LINKS
    • Shipping & delivery
    • Returns & refunds
    • Payment & financing
    • Warranty
    • VAT & Customs fees
    • FAQ

    0 item in your cartitems in your cart

    Your cart is empty

    Go to cartShop 3D printers

    My profile

    Log in to see orders, saved items

    My profile

    Signed in as

    • Orders
    • Logout
  • 3D PRINTING
    • Explore 3D printing
    FOR BEGINNERS
    • 3D printing 101
    • How FDM printing works
    • Buying your first printer
    • 3D model catalog
    BY APPLICATION
    • Rapid prototyping
    • Manufacturing
    • Engineering
    • Research
    • Arts & design
    GO DEEPER
    • Materials guide
    • Courses
    • Webinars
    • Case studies
    • Custom 3D printing
  • 3D PRINTERS
    • All 3D printers
    FOR
    • Home or garageHobbyists, tinkerers and home printing
    • BusinessIn-house production for small teams
    • EnterpriseFleets, security and scale
    • Which Prusa is right for me
    SHOP & BROWSE
    • CORE One+new
    • CORE One+ INDXnew
    • CORE One L+new
    • CORE One L+ INDXnew
    • XL+new
    • MK4S
    • Prusa Pro HT90
    • Prusa Pro AFS
    • Prusa Pro SLX
    MORE FROM PRINTERS
    • Parts & upgradesnew
    • Critical infrastructure
    • Case studies
    • Signature Oak
    • Kits
  • MATERIALS
    • All materials
    BY USE
    • Every-day & design
    • Functional engineering
    • Composites
    • Pro speciality
    • SLA resins
    PRUSAMENT
    • PLA
    • PETG
    • ASA
    • PC
    • PA11
    • Flex
    • TPU
    MORE FROM MATERIALS
    • Materials guide
    • We make material in house
    • Sustainability
    • Order on the store
  • SOFTWARE
    • All software
    PREPARE THE PRINT
    • PrusaSlicer 3.0New
    PRINT & MONITOR
    • Prusa Connect
    • EasyPrint
    • iOS & Android app
    • Prusa Farm
    GET STARTED
    • Download & install
    • Knowledge base
    MORE FROM SOFTWARE
    • 3D model catalog
  • SUPPORT
    • Explore support
    FIND ANSWERS
    • Knowledge base
    • Troubleshooting
    • Courses
    • Webinars
    GET HELP
    • Contact us
    • Livechat
    • Shipping & delivery
    • Warranty
    • Returns & refunds
    • Service & spare parts
    • Service & Repair
    COMMUNITY
    • Forum
    • Reddit
    • Printables
  • TRUST CENTER
    • Trust Center overview
    BY TOPIC
    • GDPR
    • Certificates
    • Security
    • Compliance
    COMMITMENTS
    • Sustainability report
    TALK TO US
    • Contact the security team
  • COMPANY
    • About Prusa
    GET TO KNOW US
    • Our story
    • How we make printers
    • Open source
    • Brand & media kit
    NEWS
    • Blog
    • Newsroom
    • Events
    TRUST & PARTNERS
    • Sustainability
    • Resellers & distributors
    • Affiliate program
    • Contact
    • English
    • Čeština
    • Deutsch
    • Español
    • Français
    • Italiano
    • Polski
    • 日本語
  • Signed in as

    • Orders
    • Address
    • In-stock Alerts
    • My Courses
    • Subscription
    • Edit Account
    • Logout

Log in to see orders, saved items

Signed in as
  • Orders
  • Address
  • In-stock Alerts
  • My Courses
  • Subscription
  • Edit Account
  • English
  • Čeština
  • Deutsch
  • Español
  • Français
  • Italiano
  • Polski
  • 日本語
Shop

0 item in your cartitems in your cart

Your cart is empty

Go to cartShop 3D printers

My profile

Log in to see orders, saved items

My profile

Signed in as

  • Orders
  • Logout
SHOP
  • Latest products
BY CATEGORY
  • 3D printersnew
  • 3D printer upgradesnew
  • Materials
  • Accessories
  • Spare parts
  • Courses
  • Merch
  • Get a price quote
QUICK LINKS
  • Shipping & delivery
  • Returns & refunds
  • Payment & financing
  • Warranty
  • VAT & Customs fees
  • FAQ

Featured products

    Popular categories

      Trending searches

        Articles

          Blog

            Products

              Categories

                Suggested searches

                  Searching…
                  No results
                  Something went wrong.
                  ↑↓ Select↵ OpenEsc Close search
                  1. Support
                  2. PrusaSlicer
                  3. Advanced features
                  4. Modifiers
                   

                  Contents

                  • Height range modifier
                  • Modifier meshes

                  Blog

                  • Print colorful and glowing Halloween decorations with our spooky offer
                  • Factorio Has Arrived on Printables
                  • Prusament PLA Lightweight: 65% lighter than regular PLA. Perfect choice for aircraft, cosplay, and more.

                  Newsletter

                  Signup and get our monthly squeeze on updates, blog, printables and much more.

                  By clicking, you agree to receive our newsletter.

                  This site is protected by reCAPTCHA Enterprise and the Google Privacy Policy and Terms of Service apply.

                  Factorio Transport Belts
                  E-shop
                  • 3D Printers
                  • Printer Upgrades
                  • Filaments
                  • Accessories
                  • Prusa Merchandise

                  © Prusa Research a.s.

                  Printables
                  • 3D Models
                  • Store
                  • Clubs
                  • 3D Design Contests
                  • Brands
                  Community
                  • World Map
                  • Forum
                  • User Groups
                  • Events
                  Help
                  • Prusa Help
                  • Prusa Academy
                  • 3D Printing Calculators
                  Software
                  • PrusaSlicer
                  • Prusa.app
                  • Prusa Connect
                  • Drivers and Software
                  Company
                  • About Us
                  • Blog
                  • Official Prusa Resellers
                  • Contact Us
                  • Certified for ISO 9001, ISO 14001, ISO 45001
                  • General Terms and Conditions
                  • General Terms and Conditions of Use of the PRUSA Websites
                  • Privacy Policy
                  • Information about cookies
                  • Customer Complaints Policy
                  • Status Page
                  • Do Not Sell or Share My Personal Information
                  • Supplemental Statements
                  • General Terms and Conditions
                  • General Terms and Conditions of Use of the PRUSA Websites
                  • Privacy Policy
                  • Information about cookies
                  • Customer Complaints Policy
                  • Status Page
                  • Do Not Sell or Share My Personal Information
                  • Supplemental Statements

                  © Prusa Research a.s.

                  JOSEF PRUSA®, PRUSA RESEARCH®, PRUSA POLYMERS®, PRUSA ORANGE®, PRUSA 3D ® AND PRUSAMENT® are registered trademarks of Prusa Development a.s. used by Prusa Research a.s. under licence from Prusa Development a.s.

                  Modifiers

                  Relevant for

                  MMU family
                  MINI family
                  MK3 family
                  OLD PRODUCTS
                  SLA family
                  +
                  40 comments
                  Article is also available in following languages
                  English
                  Čeština
                  Polski
                  Deutsch
                  Français
                  Español
                  Italiano
                  日本語

                  In some cases, you might want to change some settings just for a specific section of your model. For example, you might want part of your model to have denser infill or more perimeters for increased rigidity. But you don’t want to adjust these settings globally, because that would waste a lot of material and increase the print time.

                  There are multiple ways to specify which section of the model should be affected by the custom settings. You can use a height range modifier, a simple modifier mesh primitive (e.g. cube), or a custom model modifier mesh.


                  Height range modifier 

                  Right-click on a model and pick Height range modifier from the context menu.

                  A new menu will appear on the bottom right of the page called Height Ranges. Here you set intervals, between which you can apply different settings. When you set an interval, it will appear in the Object list above.

                  You can add or remove intervals with the orange plus and minus icons.
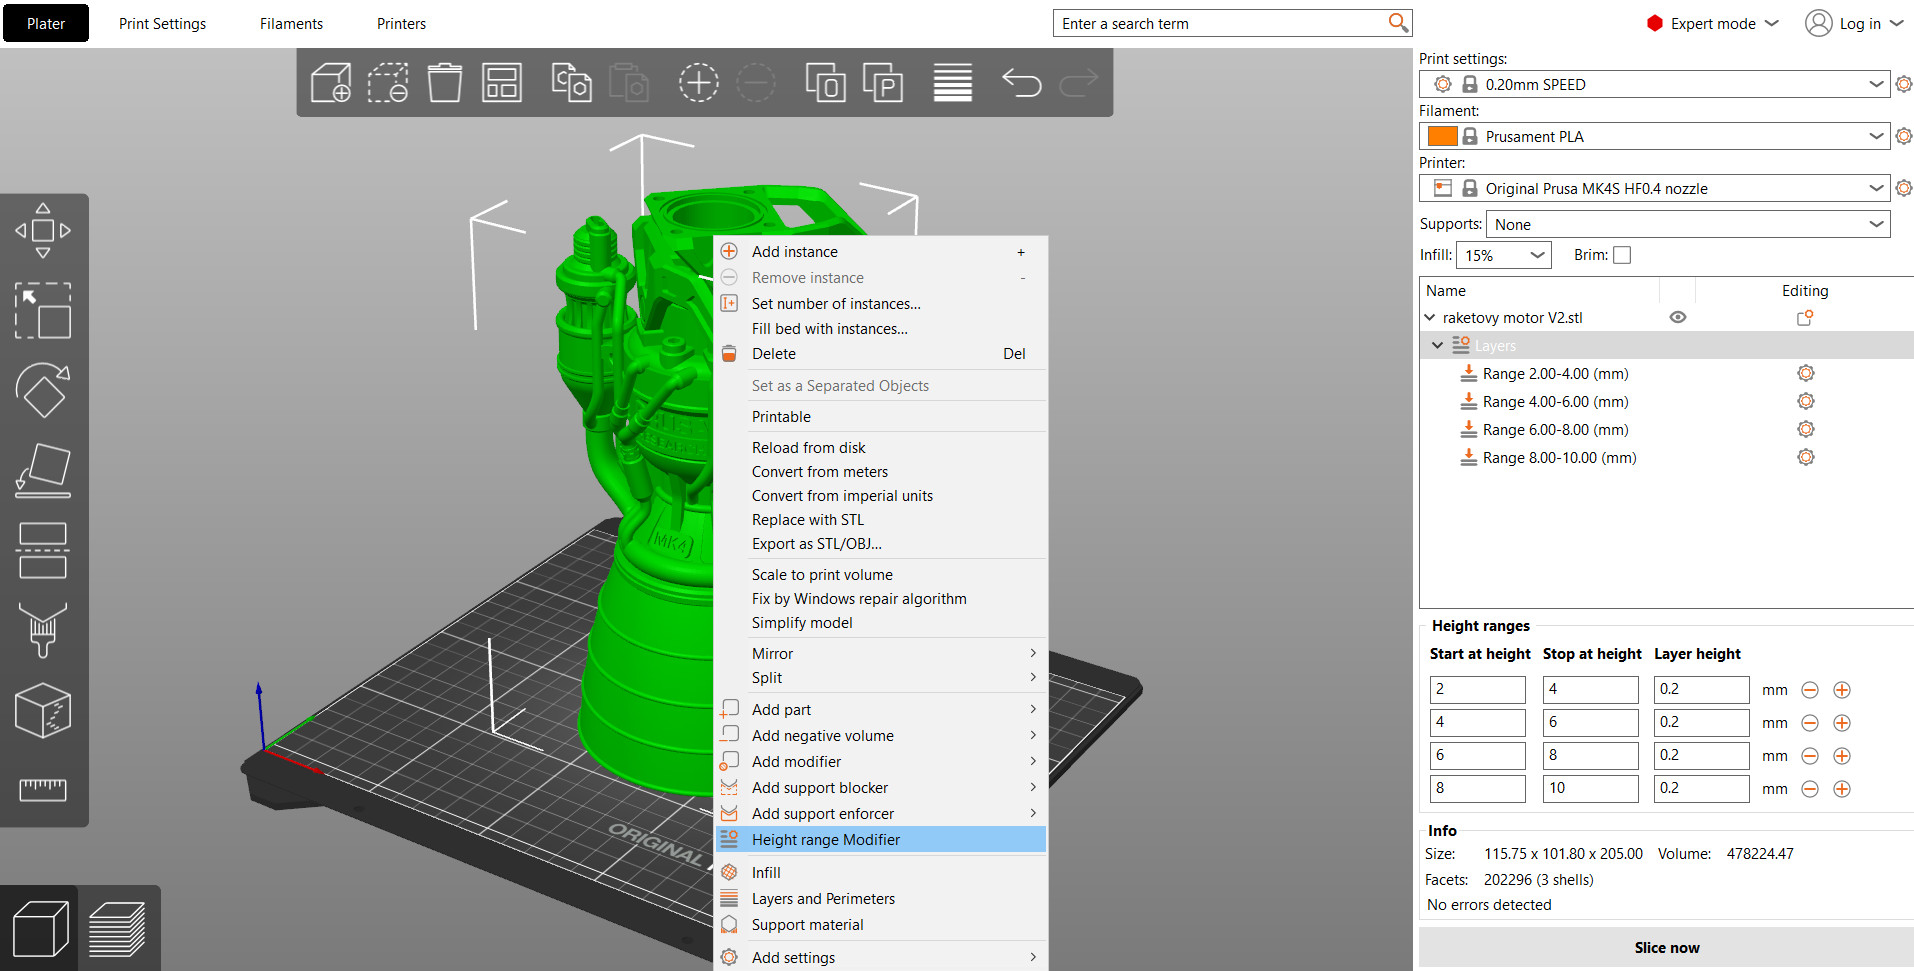
                  When you click on the gear icon next to the interval, you can choose to set up:

                  Normal mode - custom Infill and Layers and perimeters

                  Expert mode - custom Infill and Layers and perimeters, and in the Add settings it is also possible to choose Speed, Ironing, Fuzzy Skin, Extrusion Width, and Advanced

                  The interval setting also features a layer height input. By default, the global layer setting is used, but you can choose to slice the model at a different layer height and only the interval will be affected by this change. Keep in mind that if you set up a different layer height for the entire model, on the height interval it will be overridden by this value.

                  Modifier meshes

                  Modifier meshes apply custom settings to the intersection of the modifier mesh and the model.

                  Right-click on a model and pick Add modifier - [Select modifier type]. Alternatively, you can right-click on the gear icon in the Object list panel. It is possible to choose four primitive shapes (box, cylinder, sphere, and slab), add text, add SVG, or add a modifier from the Program gallery. In expert mode, it is also possible to Select Load and add a custom shape as a modifier mesh.

                  When you pick the modifier shape (e.g. cube) it will appear in the 3D view and the Object list in the right panel. You can use the Move, Rotate, Scale tools to transform the modifier mesh.
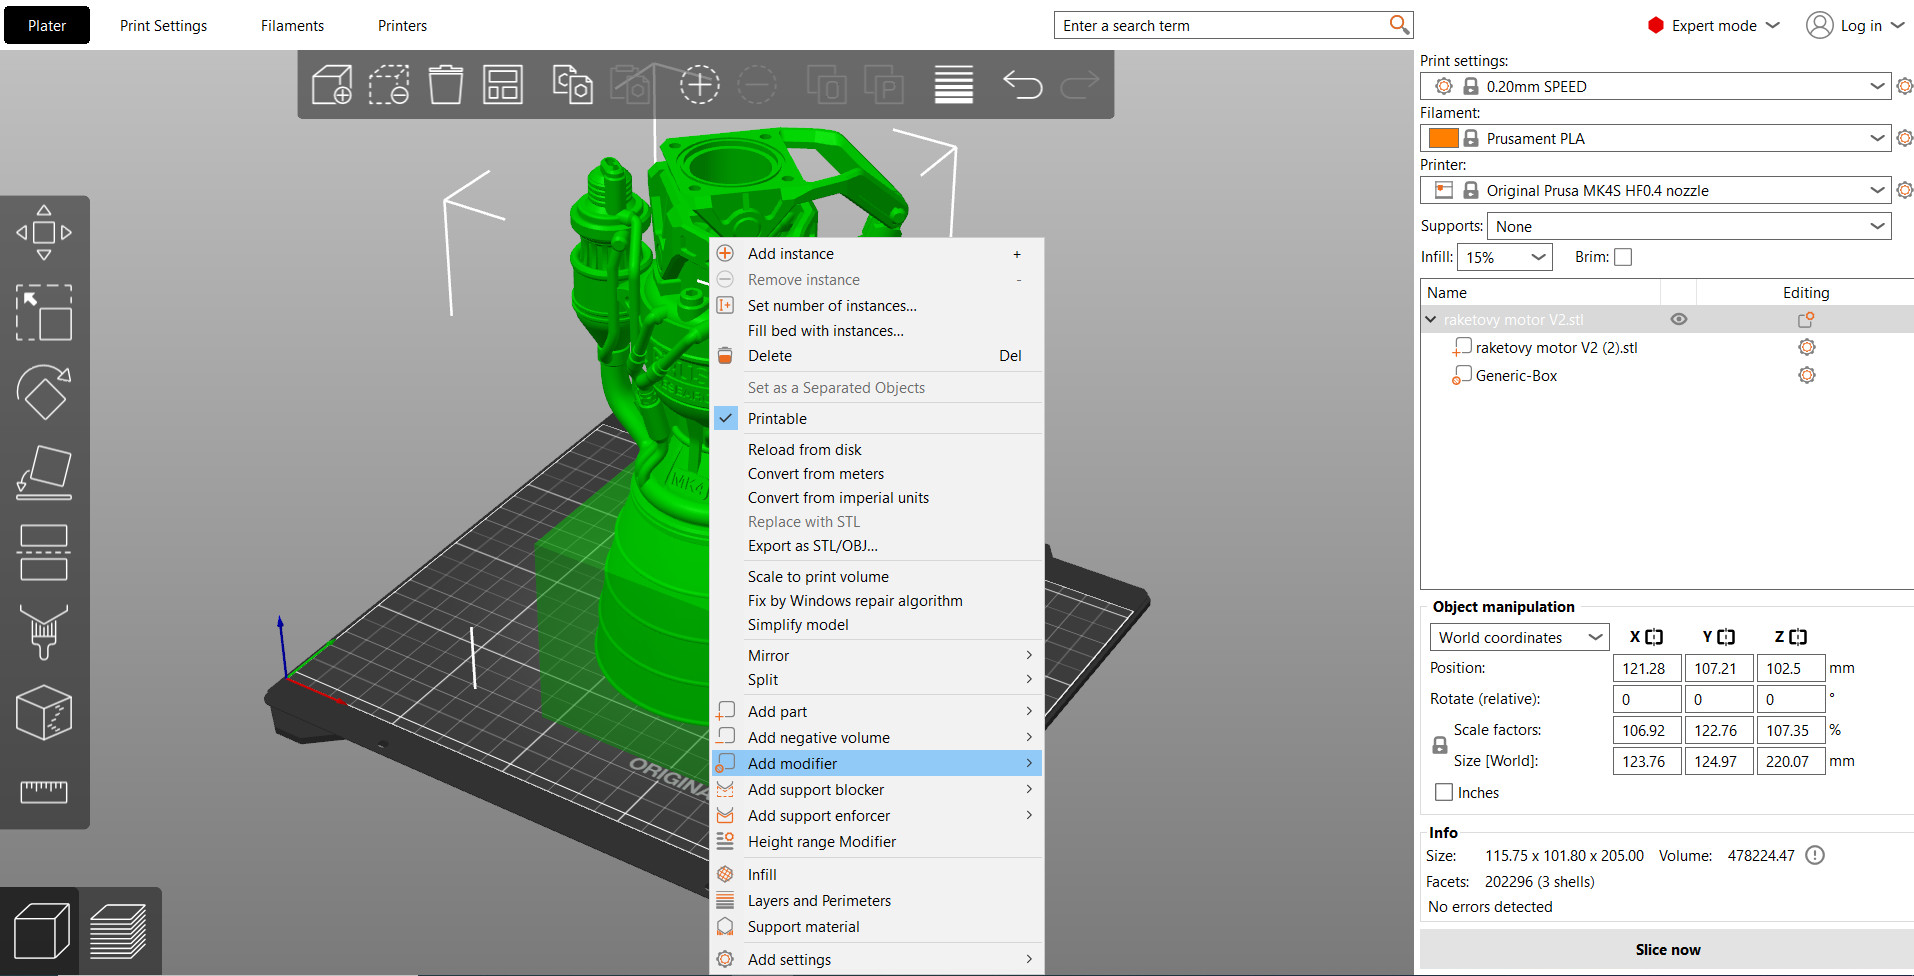
                  Changing settings for the modifier mesh

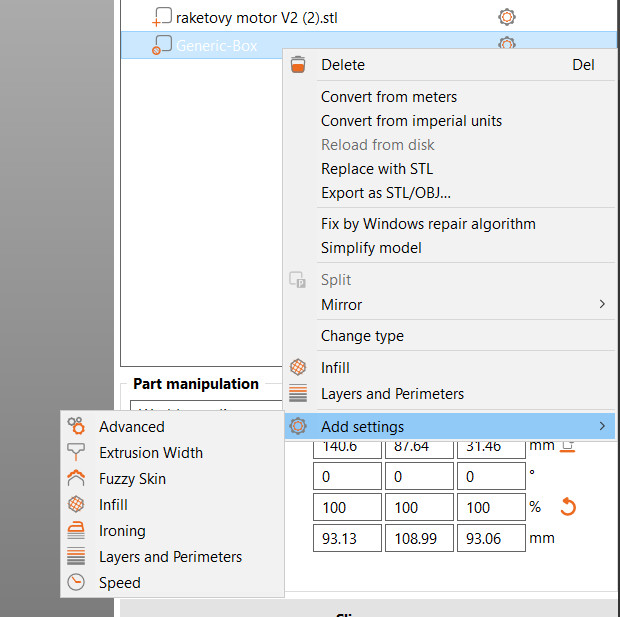
                  You can either right-click on the modifier in the 3D view or click on the gear icon in the Object list panel to select:

                  Normal mode - custom Infill and Layers and perimeters

                  Expert mode - custom Infill and Layers and perimeters, and in the Add settings it is also possible to choose Speed, Ironing, Fuzzy Skin, Extrusion Width, and Advanced
                  If you scale the model then both model and modifier-mesh will scale. Modifier-mesh will retain its size and position relative to the model. It is possible to reach many different looks for the same printer with the modifiers.
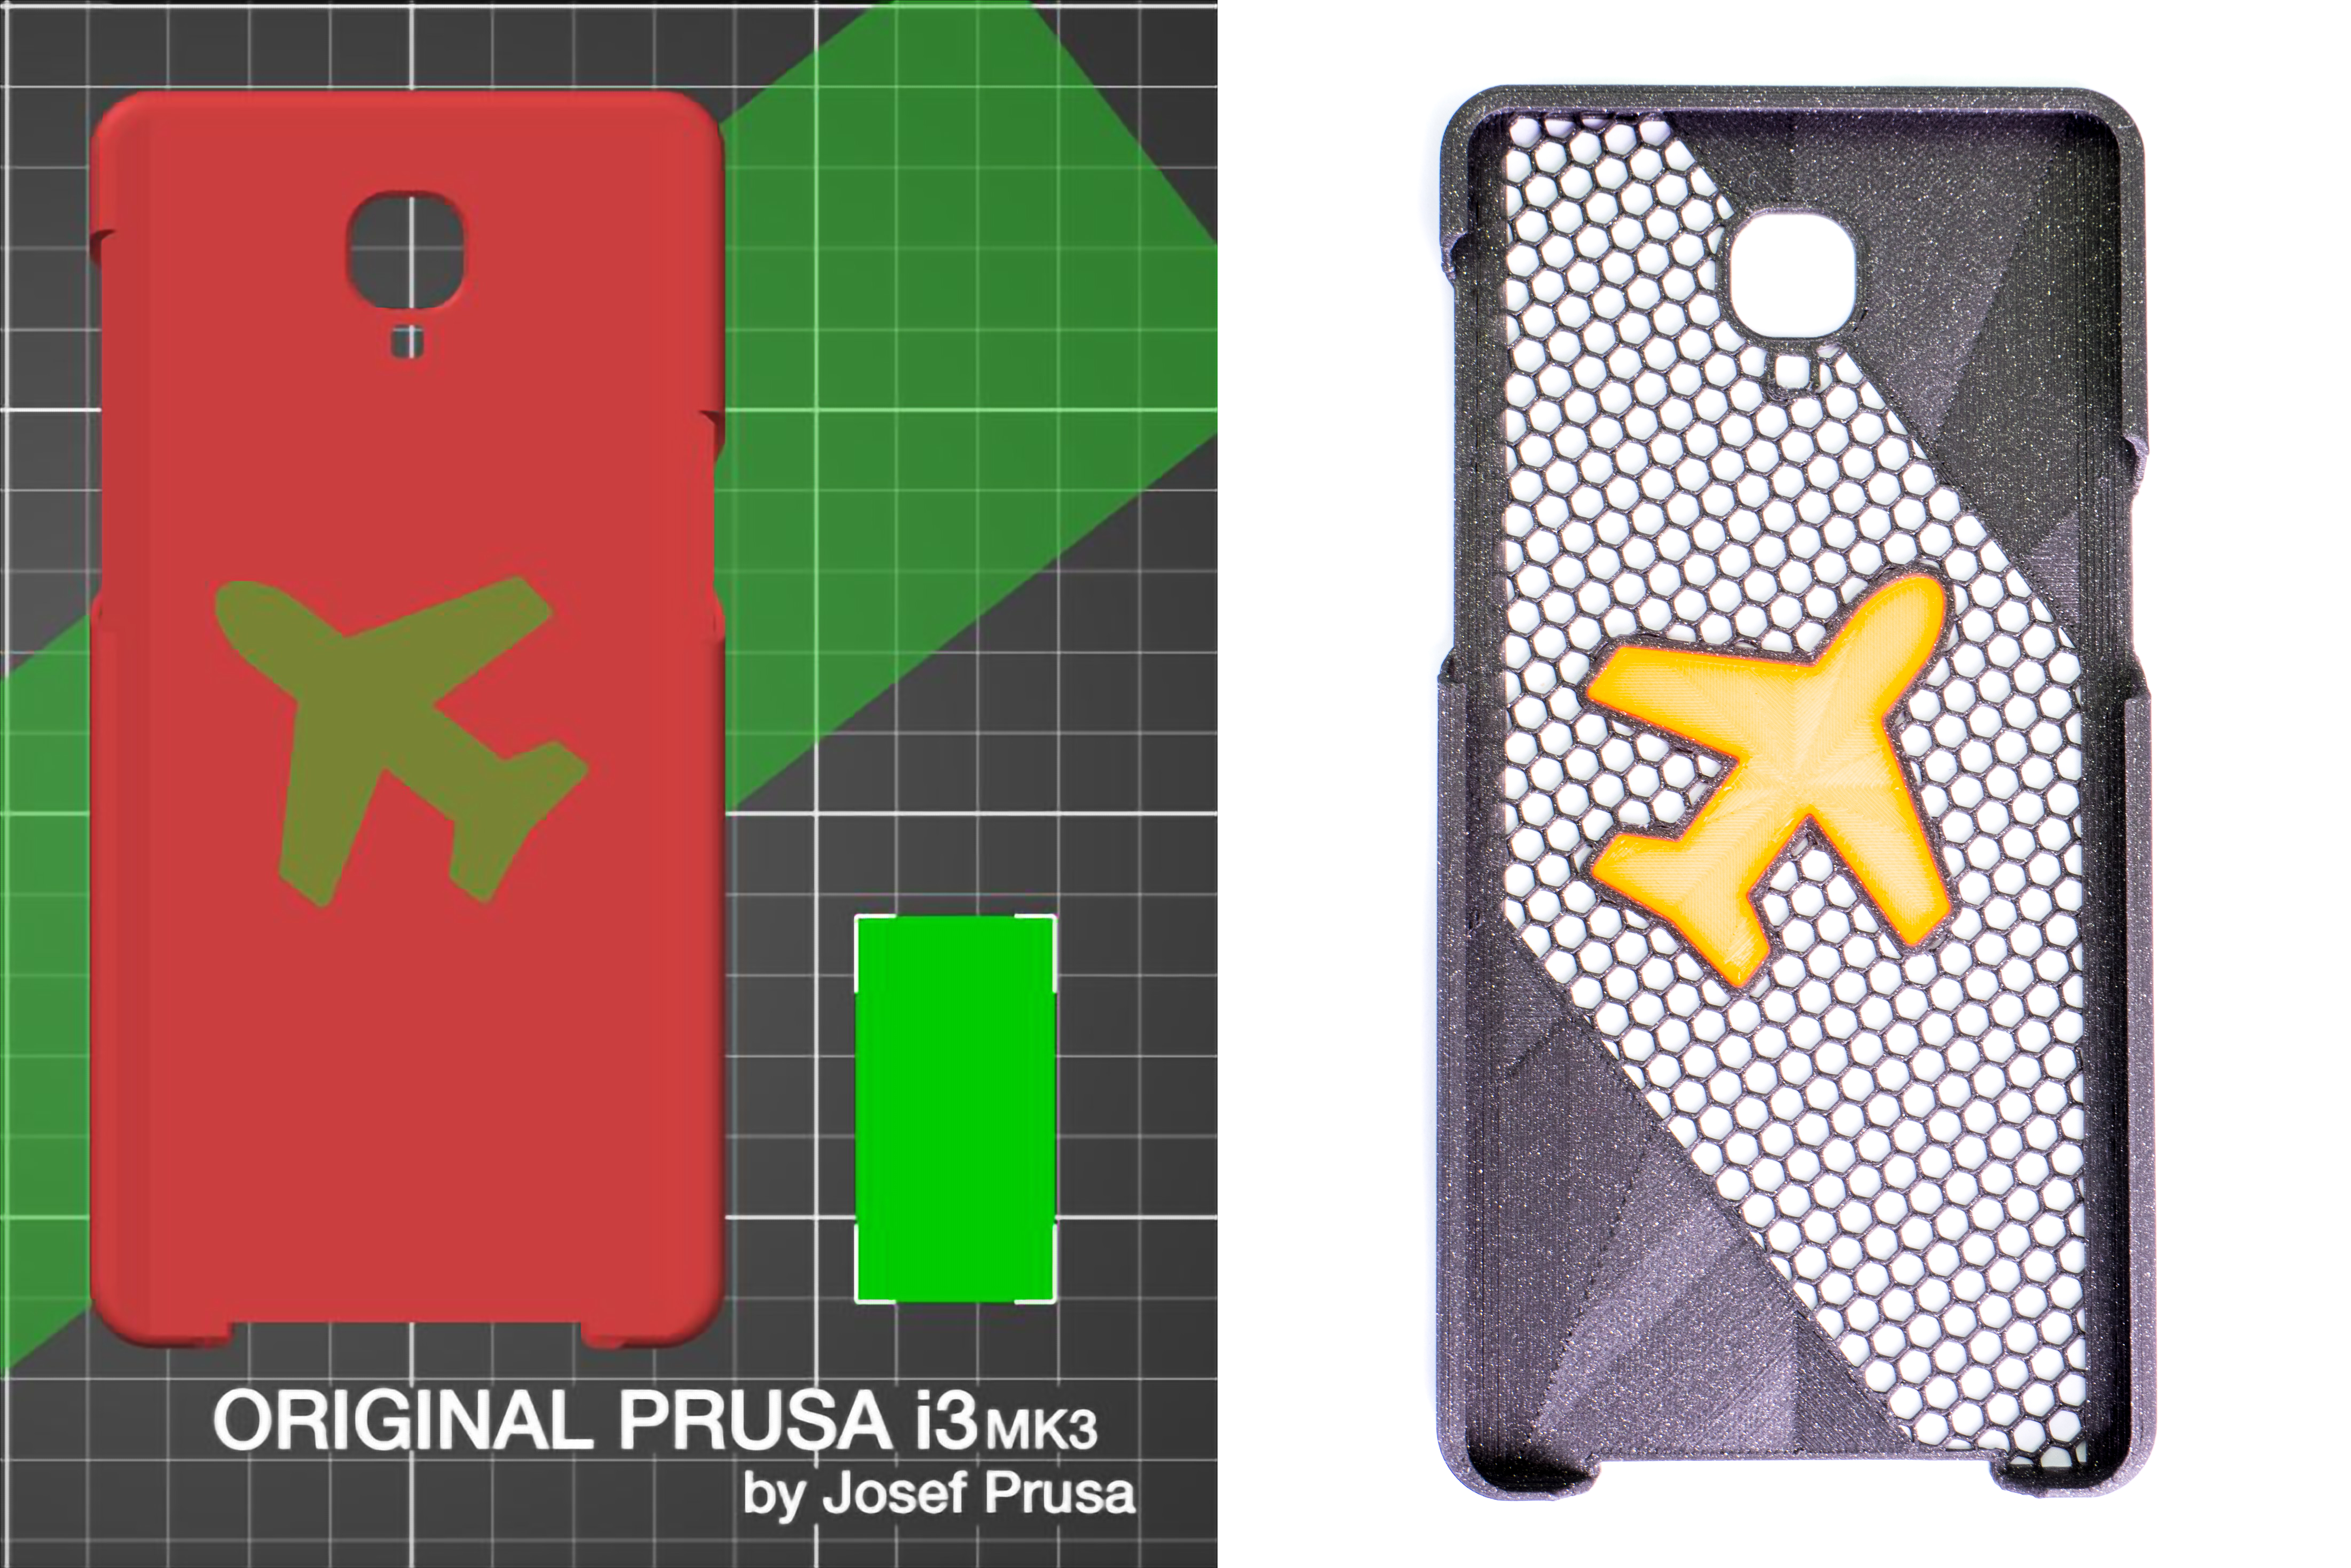
                  A modifier mesh in the shape of a rectangle that removes top and bottom solid layers and another one in the shape of a plane that turns them back on and changes the extruder to number 2 (printed with the MMU2S)

                  Place modifier on bed

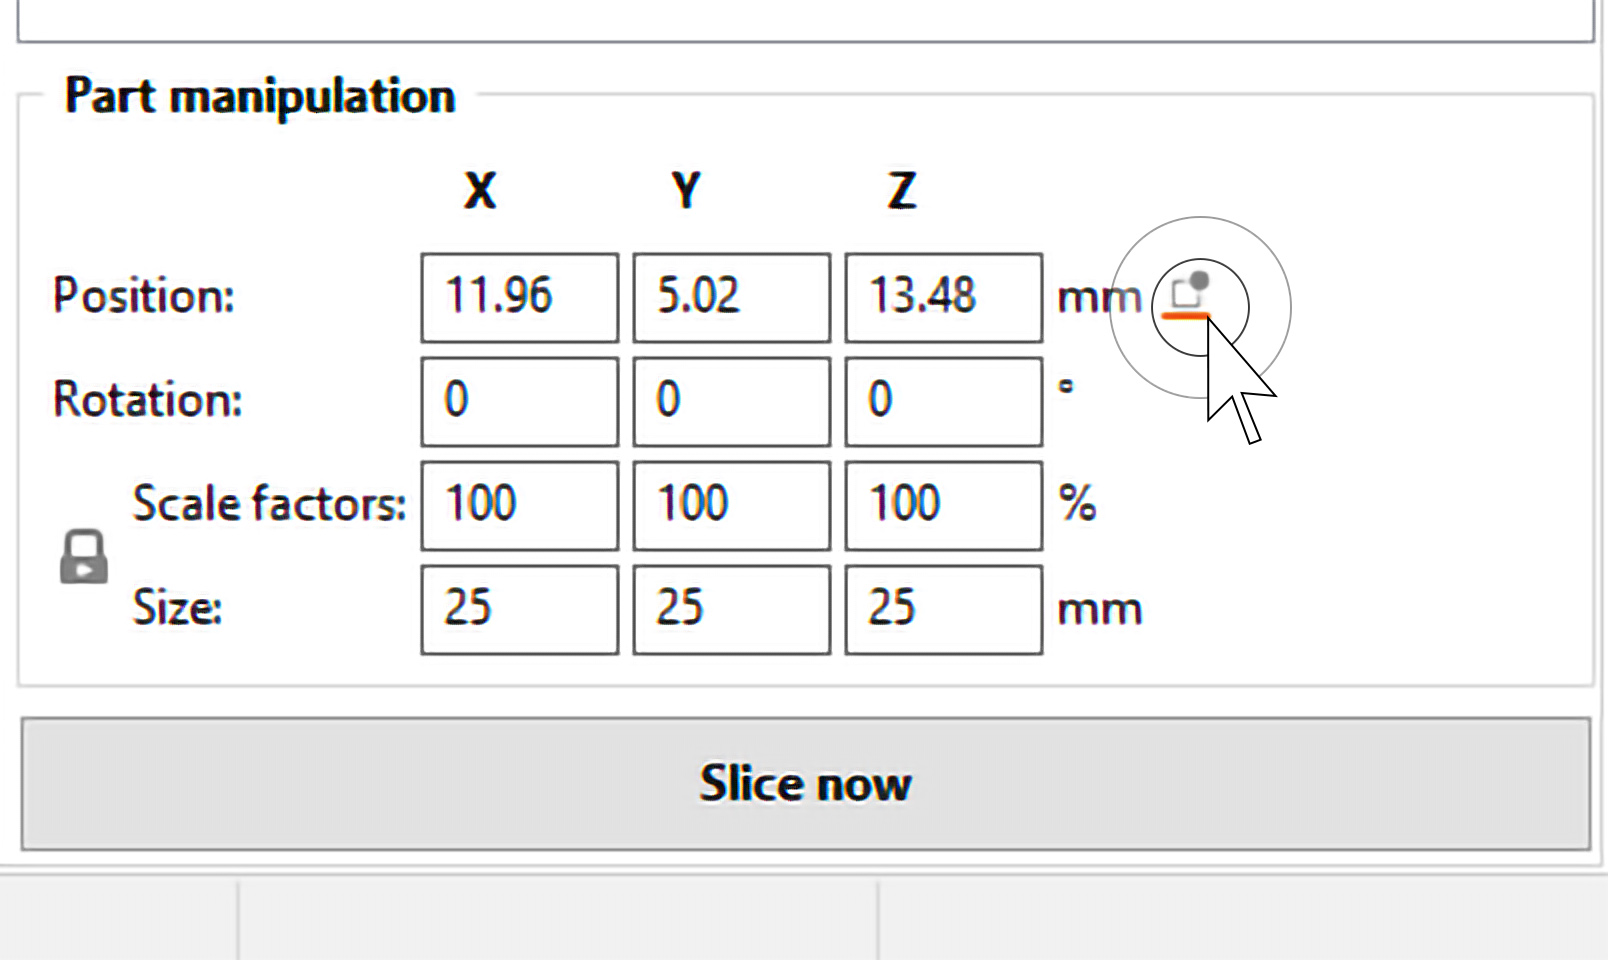
                  If you moved a modifier above the print bed you can use the button in the Part manipulation panel to place it back down.
                  Was this article helpful?
                  This action is available only to registered users. Please log-in.

                  Topics

                  • PrusaSlicer 2.9 (Legacy)
                    • Advanced features
                      • Per model settings
                      • Color change
                      • Modifiers
                      • Reload from disk
                      • Insert pause or custom G-code at layer
                      • Negative volume
                      • Simplify mesh
                      • Post-processing scripts
                      • Shape Gallery
                      • Compare presets
                      • G-code substitutions
                      • Text tool
                      • SVG embossing tool
                      • Pressure Advance
                    • About PrusaSlicer
                    • Configuration and profiles
                    • User interface
                    • Input/output
                    • Left toolbar
                    • Top toolbar
                    • Print settings
                    • Filament settings
                    • Printer settings
                    • Multi-material slicing
                    • SLA slicing
                    • Other (PrusaSlicer)

                  21 comments

                  Log in  to post a comment
                  Dan82
                  •
                  When using the Height Range Modifier (HRM), it seems as though the "First Layer Thickness" value in slicer's global setting supersedes any value you put in the HRM for layer 0 to x.  Can anyone comment?  Also, the sentence that says: "Keep in mind that if you set up a different layer height for the entire model, on the height interval it will be overridden by this value" is a bit confusing.  The words: "this value" should be replaced with: "the HRM Value..."  just to be very clear.  Lastly, there is a question regarding the layer values of, say, 0 to 5 in that it refers to 0 to 5 mm (not layers).  If that's the case, and you specify, say, 0 to 5mm and select a layer height of, say, 0.15mm; 0.15mm doesn't divide into 0.5mm evenly. So what actually happens relative to actual height at that 5mm mark?
                   
                  Reply
                  Marshall
                  •
                  Regarding the fact that height range modifier layer height overrides the global setting-- I think this is pretty non-intuitive behavior. In fact I wish you could NOT specify a layer height for the height range modifier, and have it default to the global setting. Normally I want to change something else with the modifier - like the infill % - and want the layer height to just follow whatever the global print settings say. Currently, I have to remember to update the modifier layer height if I decide to try a different global layer height.
                  Reply
                  Cole Davidson
                  •
                  Is it possible to bump the temperature up or down a few degrees for a certain height range? I don't see a temperature modifier but is there another way?
                  Reply
                  Avinash
                  •
                  I have found a way to do so. Take a look at this link: every time you change the temp this way, that layer and the layers above will remain that temp until changed again.
                  https://all3dp.com/2/prusaslicer-temperature-tower/
                  Reply
                  Paul D
                  •
                  Bonjour, Après avoir disposé des cylindres permettant de modifier le nombre de parois ainsi que son remplissage, j'ai remarqué que la pièce finale est imprimé en deux temps (la pièce initiale dans un premier temps puis les cylindres générique). Cependant, la pièce requiert des caractéristiques mécanique importantes qui pourraient etre compromises a cause de ça. Est-ce possible de fusionner la pièce avec les modificateurs afin que les périmetres de la pièce initiale et des cylindres soient imprimées en une seule fois ?Merci
                  Reply
                  MartinD
                  •
                  I'm printing a tube (essentially a hollow cylinder). How would I increase the perimeter count on the inside wall of the tube? I added a modifier cylinder. I placed and sized it so the only perimter it intersects is the inside wall of the tube. I set perimeter count to 2. 
                  When I slice the model, I do get 2 perimters on the inside wall of the tube as I wanted, but I also get 4 perimeters at the boundary of the modifier shape (the modifier cylinder).
                  Is this how modifiers are supposed to work?  I expected that the modifier would only change perimeter count where there was already an existing perimeter. In my case, the modifier is adding a perimeter which happens to be inside the shape.
                  Reply
                  Marina Curzi - Official Prusa CS
                  •

                  Please contact our technical support and send them the 3mf file of your project to check how to proceed.

                  Reply
                  leors
                  •
                  I am having the same problem. I have a model to put a beer can inside, as the model has large walls, I want to make a hole to put water inside and freeze.
                  The problem is: instead the modifier remove the perimeter wall (I put 0), it moves the wall to the shape of modifier cilinder and closes the hole. It's acting as a negative volume, instead of modifier.
                  Reply
                  Bruce Labitt
                  •
                  Is there a way to create a hollow cylindrical modifier?  I'd like to create an infill density that roughly depends on the radial distance.  If there was a way to create a cylindrical shell it would be useful to me.  In my case, I'd like minimal density towards the center and maximal density at some radius r.
                  Reply
                  ktmom
                  •
                  I think you just want to use a custom mesh that you create and import.
                  "Additionally, in the expert mode, you can use a custom shape as a modifier mesh by selecting Load … in the mesh selection. This mesh is typically something you’ve modeled beforehand in a 3D modeling program."
                  Reply
                  pcmdanb
                  •
                  A parametric annular object would be pretty useful for setting extended 100% infill around holes. It wouldn't be as simple as just scaling a cylinder's size, so I'm not sure how you'd have to set up the interface for it, but if there's any "standard" "custom" object to build into the program itself, that would certainly be it.
                  Reply