AA

Featured products

    Popular categories

      Trending searches

        Articles

          Blog

            Products

              Categories

                Suggested searches

                  Searching…
                  No results
                  Something went wrong.
                  ↑↓ Select↵ OpenEsc Close search
                  • English
                  • Čeština
                  • Deutsch
                  • Español
                  • Français
                  • Italiano
                  • Polski
                  • 日本語
                  • Orders
                  • Address
                  • In-stock Alerts
                  • My Courses
                  • Subscription
                  • Edit Account
                  • 3D printers9+▾

                    3D printersnew

                    newPrusa CORE One L+Learn more
                    newPrusa CORE One+ (Gen 2)Learn more
                    newPrusa CORE One L+ INDX 8-ToolnewPrusa CORE One+ (Gen 2) INDX 8-ToolPrusa CORE One L+: Critical InfrastructureOriginal Prusa MK4SnewOriginal Prusa XL+Original Prusa XL+: Critical Infrastructure

                    Printer upgrades

                    newINDX Conversion KitsnewPrusa CORE One L to CORE One L+ upgradenewPrusa CORE One+ to Prusa CORE One+ (Gen 2)newPrusa XL to Prusa XL+ Upgrade
                    Prusa Reward ProgramLove your Prusa printer? Share your experience and earn $30 Prusa e-shop vouchers.
                    How to Choose a 3D Printer?We’ll walk you through the basics to find the exact machine for your space, budget, and ideas.
                    Free E-bookDownload a free e-book Basics of 3D Printing with Josef Prusa and make your first steps in 3D printing world
                    Original Prusa Printable PartsCollections of printable spare parts for Original Prusa 3D printers and upgrades.
                    Shipping informationRegularly updated info about the current manufacturing capacity and delivery times of our printers.
                    Custom 3D PrintingProfessional custom 3D printing from various materials according to your requirements.
                  • Materials▾

                    Filaments

                    PrusamentPLAPETGASA / ABSPC (Polycarbonate)PA (Nylon)FlexCompositesSpecialMaterials clearance sale

                    Resin

                    Prusament ResinResin Cleaner
                    Filament GuideCheck my Prusament Spool
                    Prusament.com
                  • Parts & Accessories▾

                    Accessories

                    EnclosuresNozzlesPrint SheetsEssential AccessoriesCameras & AddonsTools & CraftingAdhesives

                    Spare parts

                    Merchandise

                    Spare parts - All PrintersCORE OneMK4/S & MK3.9/SMK3/S/+XL
                    Merch
                  • For Business▾
                    Prusa Pro HT90Prusa Pro SLXPrusa Pro AFSPrusa Pro Medical OneOriginal Prusa XLOriginal Prusa XL: Critical Infrastructure
                    Prusa CORE One+Learn more
                    Prusa CORE One LLearn more
                    Prusa CORE One L: Critical Infrastructure Edition

                    3D Printing for

                    Manufacturing and R&DAutomotive IndustryHealthcareEducation and Academic ResearchArchitects and DesignersFilm IndustryCritical Infrastructure

                    3D Printing Stories

                    • How 3D printing started: About Rep-rap and open-source with Adrian Bowyer
                    • Teaching mathematics redefined with 3D printing at JKU Linz
                    • The story behind the LTT screwdriver
                    • Victoria Hand Project: Changing Prosthetic Care with 3D Printing
                    Official Prusa Resellers
                    Sustainability
                    Prusa Education
                    Contact and Inquiry
                    Custom 3D Printing
                    ISO Certified
                  • Software▾
                    PrusaSlicer

                    PrusaSlicerPrusaSlicer

                    PrusaSlicer is an open-source, feature-rich, frequently updated tool that contains everything you need to export the perfect print files for your 3D printer.

                    WindowsMacOSLinux
                    Prusa Connect

                    Prusa Connect

                    Prusa Connect is a cloud service enabling remote control and monitoring of your 3D printers, offering secure data handling, easy setup, and support for managing multiple printers from anywhere.

                    Log in to Connect
                    Prusa.app

                    Prusa.app

                    Control your printer/s remotely from anywhere using the Prusa Connect technology behind. Prusa.app brings a new level of Prusa printer experience to Android and iOS phones.

                    Try it now!
                    Drivers & FirmwareDownload the latest firmware and drivers for your 3D printer.
                    PrusaSlicer Support
                    Prusa Connect Support
                  • 3D Models▾
                    3D PrintersArt & DesignHobby & MakersHouseholdTabletop MiniaturesToys & GamesPrintables Store

                    Popular 3D models

                    • Strong garden hose holder
                    • Prusa Spool Bot
                    • Build Tray — Modular Organizer for Assembly, Disassembly and Maintenance
                    • Broom Holder
                    • Octagon Fabric
                    • Prusa CORE One ? (Mimic Skin)

                    Design Contests

                    • De Prototipo a Producto: Accesorios para Cámaras8/1/2026 – 9/14/2026
                    • Vuelta al Cole 20268/21/2026 – 9/6/2026
                  • Community▾

                    Upcoming Events

                    • Maker Faire Tokyo 20269/5/2026 – 9/6/2026 · Tokyo, Japan · Prusa Team
                    • IFA 20269/4/2026 – 9/8/2026 · Berlin, Germany · Prusa Team
                    • 3D Printopia 20269/26/2026 – 9/27/2026 · Pennsylvania, United States · Prusa Team
                    • Maker Faire Bay Area9/25/2026 – 9/27/2026 · Kalifornie, United States · Prusa Team

                    Prusa Forum

                    • Vent doesn't close for an ASA print
                    • Alignment tool?
                    • Is this spam?
                    Prusa World MapPrusa World MapFind local 3D printing users and explore the community around you.
                  • Help▾
                    Guides & TutorialsPrusaSlicerPrusa ConnectMaterials

                    Printer Model

                    CORE One INDXCORE One LCORE One+CORE One

                    Hardware Troubleshooting

                    • Selftest failed (CORE One/+)
                    • Clogged nozzle (CORE One, CORE One L, XL, MK4/S, MK3.9/S)
                    • Adjusting belt tension (CORE One/+, CORE One INDX, CORE One L/+)
                    • Prusa Connect and PrusaLink explained

                    Drivers & Firmware

                    INDX familyCORE One familyMK4 familyXL familyMMU familyPRO family
                  • Courses▾

                    Become an expert in 3D printing

                    Prusa Academy offers online courses on various 3D printing related topics. Each course features:

                    • easy-to-read text with many pictures and short videos
                    • links for inspiration and further study
                    • quizzes for testing your knowledge along the way
                    • certificate of completion
                    Browse all coursesMy courses library
                    • 3D Modeling in Autodesk Fusion
                    • PrusaSlicer Masterclass – Beginner to Advanced
                    • Complete Guide to 3D Print Postprocessing, Painting, and Detailing
                    • Airbrush Your 3D Prints: From Basics to Advanced Tricks
                  • Blog▾
                    • PrusaSlicer 3.0 Preview – Built for the Future of 3D Printing
                    • Prusa CORE One+ (Gen 2) INDX, Shipping Has Started, Complete Printers Open for Orders
                    • Better Prints, Easier Use: Prusa XL+, CORE One L+ and CORE One+ (Gen 2), Our Big Product Upgrade
                    E-Book: Basics of 3D Printing
                  • Company▾

                    About Prusa Research

                    We are the largest maker of 3D printers in Europe and the United States.

                    Founded as a one-man startup in 2012 by Josef Prusa, a Czech hobbyist, maker, and inventor. In just 15 years, we've grown into a company of more than 1,200 people. Every month, we design, build, and ship over 10,000 innovative and secure 3D printers from our headquarters in Prague, Czech Republic, and Delaware, USA, to users in more than 160 countries.

                    Watch a video and find out how Prusa Research was born and what we achieved within only 10 years!

                    About UsTimelineSustainabilityOpen-source
                    About Us
                    Contact Us
                    Logo and Photos
                    ISO Certified
                  1. Support
                  2. Original Prusa MINI+
                  3. Print settings
                  4. Layers and perimeters
                   

                  Contents

                  • Layer height
                  • First layer height
                  • Perimeters
                  • Spiral vase
                  • Recommended thin wall thickness
                  • Solid layers - top/bottom
                  • Extra perimeters if needed
                  • Ensure vertical shell thickness
                  • Avoid crossing perimeters
                  • Detect thin walls
                  • Thick bridges
                  • Detect bridging perimeters
                  • External perimeters first
                  • Fill gaps
                  • Perimeter generator
                  • Only one perimeter

                  Blog

                  • PrusaSlicer 3.0 Preview – Built for the Future of 3D Printing
                  • Prusa CORE One+ (Gen 2) INDX, Shipping Has Started, Complete Printers Open for Orders
                  • Better Prints, Easier Use: Prusa XL+, CORE One L+ and CORE One+ (Gen 2), Our Big Product Upgrade

                  Newsletter

                  Signup and get our monthly squeeze on updates, blog, printables and much more.

                  By clicking, you agree to receive our newsletter.

                  This site is protected by reCAPTCHA Enterprise and the Google Privacy Policy and Terms of Service apply.

                  Strong garden hose holder
                  E-shop
                  • 3D Printers
                  • Printer Upgrades
                  • Filaments
                  • Accessories
                  • Prusa Merchandise

                  © Prusa Research a.s.

                  Printables
                  • 3D Models
                  • Store
                  • Clubs
                  • 3D Design Contests
                  • Brands
                  Community
                  • World Map
                  • Forum
                  • User Groups
                  • Events
                  Help
                  • Prusa Help
                  • Prusa Academy
                  • 3D Printing Calculators
                  Software
                  • PrusaSlicer
                  • Prusa.app
                  • Prusa Connect
                  • Drivers and Software
                  Company
                  • About Us
                  • Blog
                  • Official Prusa Resellers
                  • Contact Us
                  • Certified for ISO 9001, ISO 14001, ISO 45001
                  • General Terms and Conditions
                  • General Terms and Conditions of Use of the PRUSA Websites
                  • Privacy Policy
                  • Information about cookies
                  • Customer Complaints Policy
                  • Status Page
                  • Do Not Sell or Share My Personal Information
                  • Supplemental Statements
                  • General Terms and Conditions
                  • General Terms and Conditions of Use of the PRUSA Websites
                  • Privacy Policy
                  • Information about cookies
                  • Customer Complaints Policy
                  • Status Page
                  • Do Not Sell or Share My Personal Information
                  • Supplemental Statements

                  © Prusa Research a.s.

                  JOSEF PRUSA®, PRUSA RESEARCH®, PRUSA POLYMERS®, PRUSA ORANGE®, PRUSA 3D ® AND PRUSAMENT® are registered trademarks of Prusa Development a.s. used by Prusa Research a.s. under licence from Prusa Development a.s.

                  Layers and perimeters

                  Relevant for

                  MMU family
                  MINI family
                  MK3 family
                  OLD PRODUCTS
                  SLA family
                  +
                  70 comments
                  Article is also available in following languages
                  English
                  Čeština
                  Polski
                  Deutsch
                  Français
                  Español
                  Italiano
                  日本語
                  Some options will only appear when Expert mode is selected.

                  Layer height

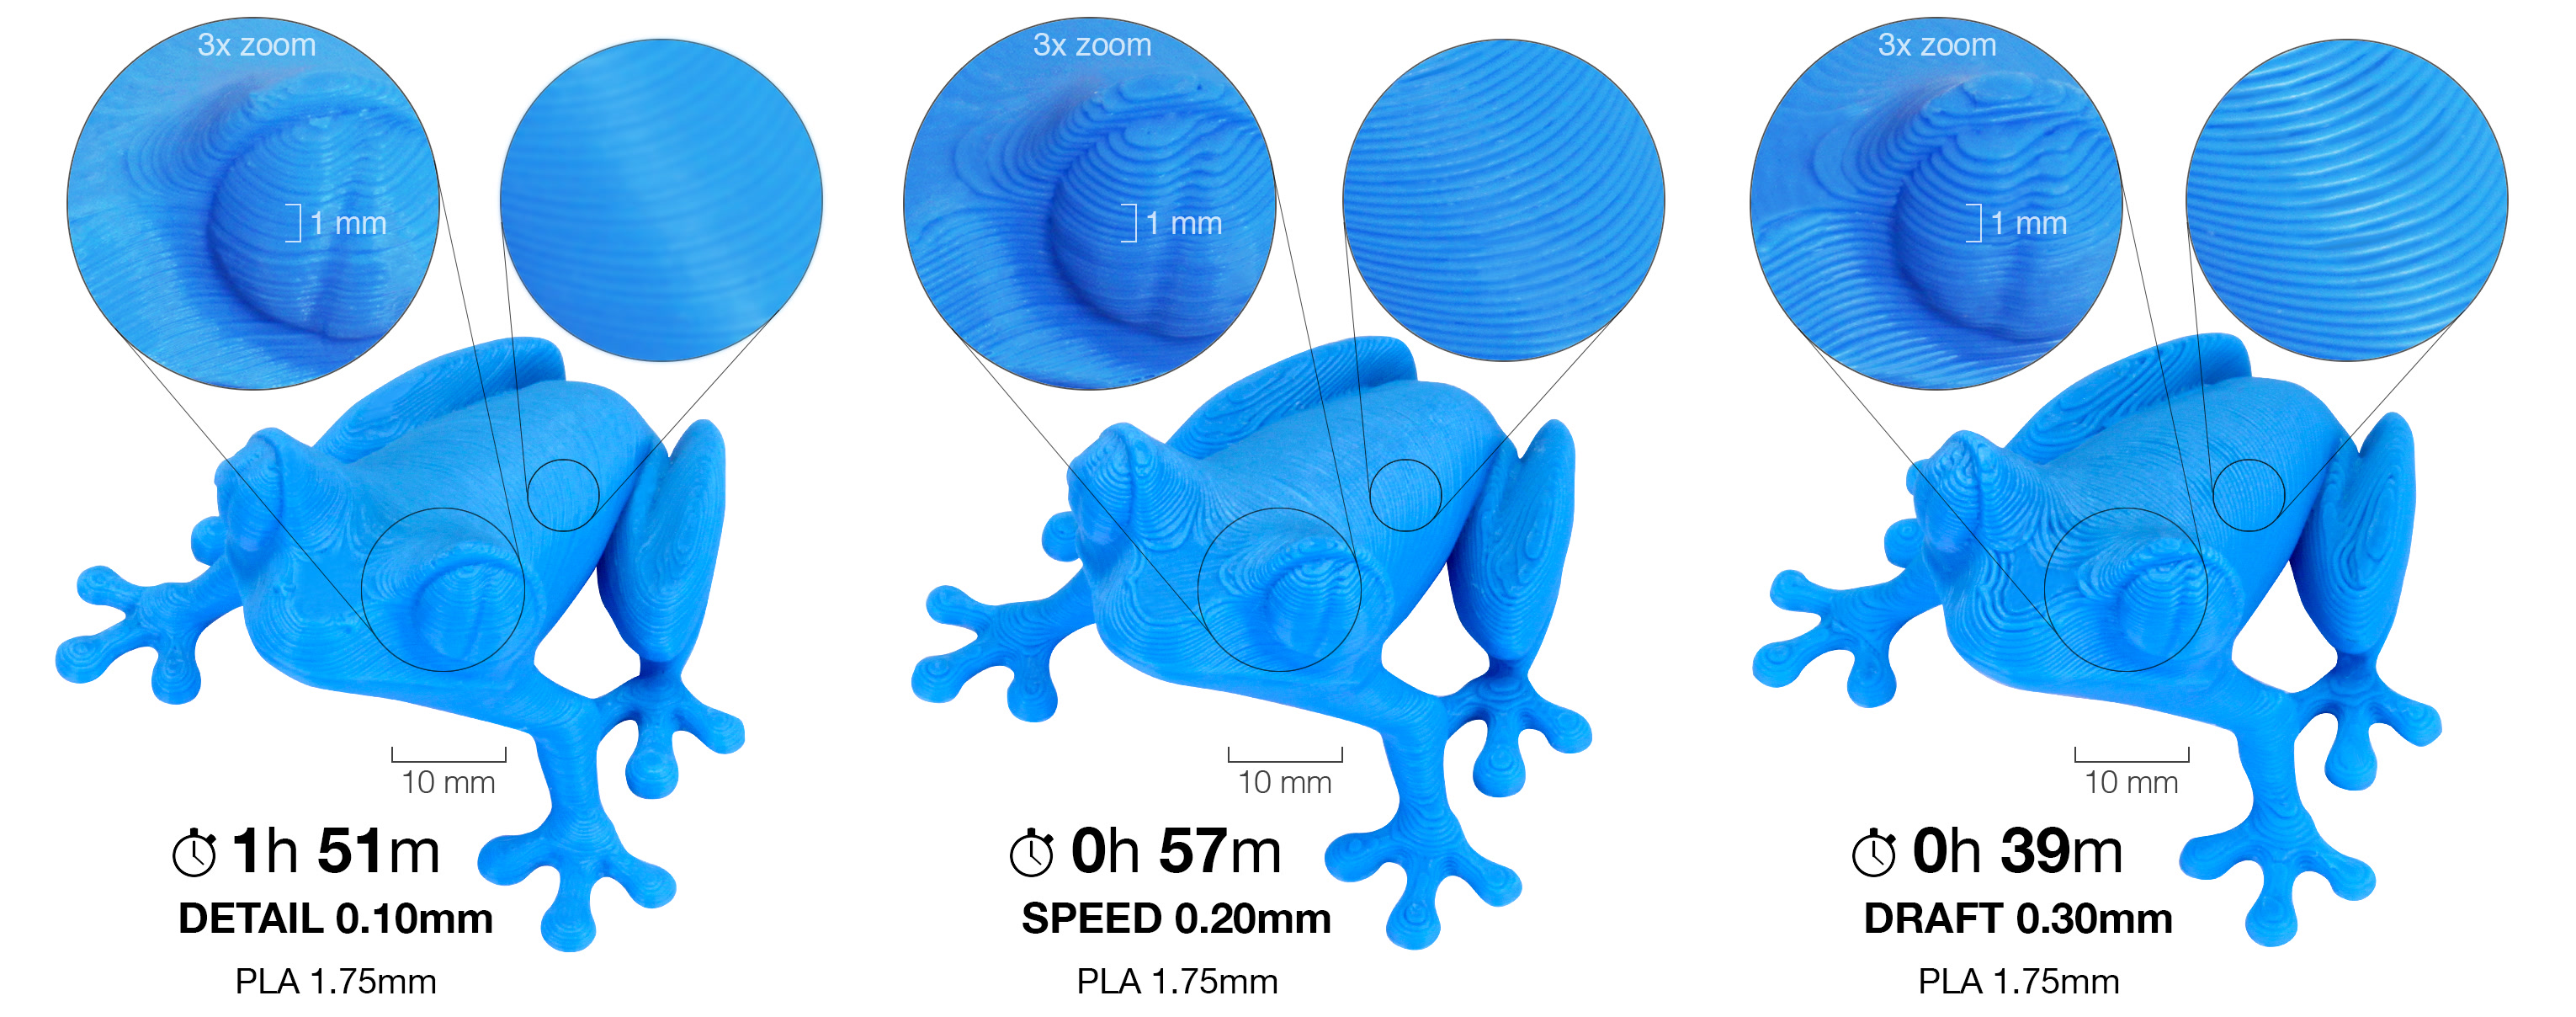
                  Height of the individual slices/thickness of each layer. Layer height is the main factor affecting both:

                  • print time
                  • vertical resolution

                  By choosing taller layer heights you can significantly shorten the print time at the cost of more visible layers. On the other hand, choosing a small layer height (e.g. 0.10 mm) will result in extra detail at the cost of longer print times.

                  Generally, we do not suggest going lower than 0.10 mm as the improvement in print quality with 0.07 or 0.05 mm layers is relatively minor with significantly longer print times.

                  Keep in mind, that layer height changes only the vertical resolution. For example, an embossed text parallel with the print bed will look the same regardless of the layer height. If you’re looking for increased resolution in the XY plane, check nozzles with a different diameter.

                  The layer height should be below 80% of the nozzle diameter (e.g. the maximum layer height with a 0.4 mm nozzle is about 0.32 mm). The layer height cannot be higher than the nozzle diameter, PrusaSlicer will display an error message if you try to input such a value.

                  You can also consider using the Variable layer height function.
                  First layer height

                  When printing with low layer heights you might still want to print a thicker first layer to increase adhesion to the print bed. Original Prusa print profiles always use 0.20 mm as the first layer height.

                  You can express this as an absolute value (e.g. 0.20 mm) or a percentage of the default layer height (e.g. 150%).

                  Changing the first layer height will most likely require adjusting the calibration of the first layer on your printer.

                  Perimeters

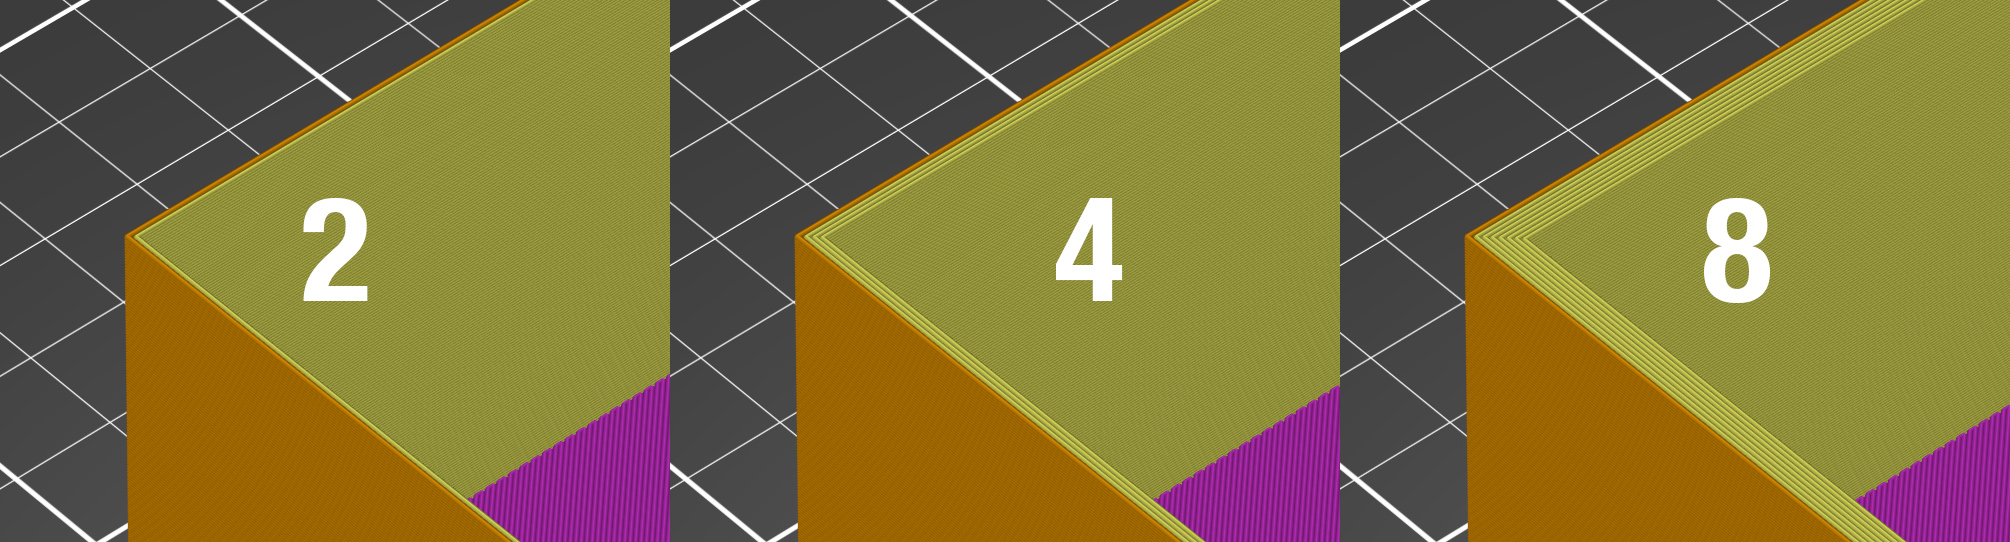
                  Defines the minimum number of outlines that form the wall of a model. Original Prusa profiles always use a minimum of two perimeters.

                  The strength of a model is mostly defined by the number of perimeters (not the infill). If you want a stronger print, increase the number of perimeters.
                  Spiral vase

                  Creates a continuous single outline container, gradually increasing the Z height.

                  When printing anything with a single-perimeter wall, there is always a small flaw where the printer advances to the next layer. This spot, where the printer stops and finishes the perimeter, raises the Z height by the layer height and starts a new perimeter, creates an unsightly ‘scar’ running up the side of the model. This scar is also a weak point of the print.

                  the spiral vase does not have any such point where the layer changes, except the first N bottom solid layers. Instead, the height is increasing gradually all the time, until the top of the print is reached.

                  When the vase mode is activated, PrusaSlicer automatically sets related settings accordingly:

                  • one perimeter
                  • 0% infill
                  • disabled top solid layers
                  • disabled supports
                  • disabled "ensure vertical shell thickness"
                  Keep in mind that simply changing these settings and not enabling the vase mode is not the same as true vase mode, as the object won’t be printed continuously.

                  You can still adjust the number of bottom solid layers. Furthermore, you can adjust the External perimeters Extrusion width in the Advanced menu to get a thicker/stronger/watertight vase (e.g. from 0.45 to 0.6).

                  The model should be defined as a solid. Otherwise, PrusaSlicer will try (and fail) to create both inside and outside surfaces, so model the outside dimensions only.

                  Only one object at a time can be printed in the vase mode. If you had multiple objects on the print bed, it would be impossible to print them continuously. You can get around this limitation by enabling Sequential printing.

                  Recommended thin wall thickness

                  For a selected number of perimeters and layer height, PrusaSlicer calculates the optimal thin wall thickness. If you go back to your CAD drawing and change the wall thickness to this exact value, you will eliminate unnecessary perimeter overlap and your print will have a perfect wall surface finish.

                  Normally you get recommendations for an even number of perimeters (2,4,6…). If you enable Detect thin walls, you will also get a recommendation for an odd number of perimeters (1,3…).

                  You may think, that when the extrusion width for a perimeter is 0.45 mm, two perimeters will be 0.90 mm wide (2x0,45). However, if you look at the recommendation for a 0.2 mm layer height, you will find that this is not true and the suggested value is 0.86 mm.

                  In order to understand how this number is calculated, we need to take a look at the perimeter cross-section. PrusaSlicer assumes that the cross-section of an extrusion is a rectangle with semicircular ends. Note that the extrusion width includes the two semicircular ends.
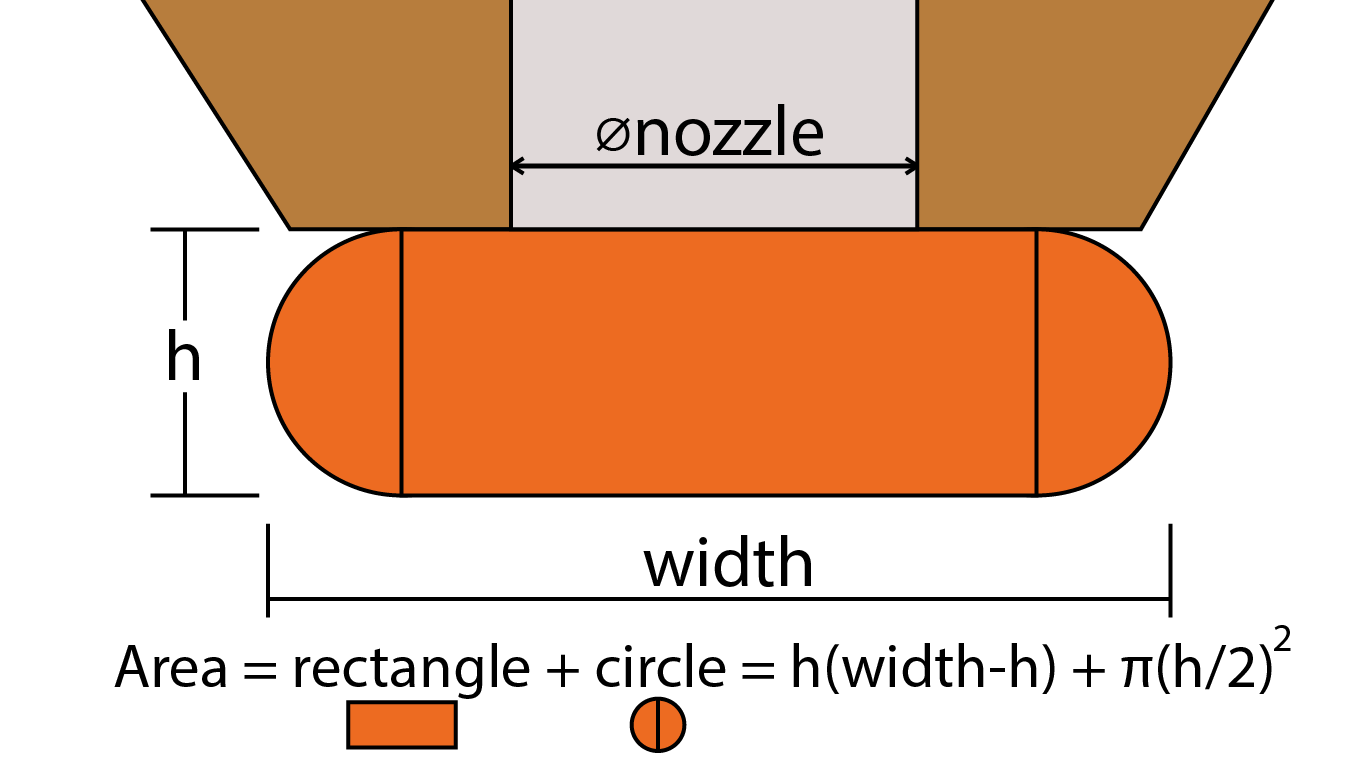
                  (This image is a re-draw of the original source: https://manual.slic3r.org/advanced/flow-math)

                  Now let’s add a second extrusion/perimeter. If we suppose no overlap (tangent paths), there would be empty space (yellow). In order to fill the empty space and bond the perimeters together, PrusaSlicer slightly overlaps the perimeters. This is essentially why you can’t just multiply the number of perimeters by the width of a single perimeter to get the ideal wall thickness.
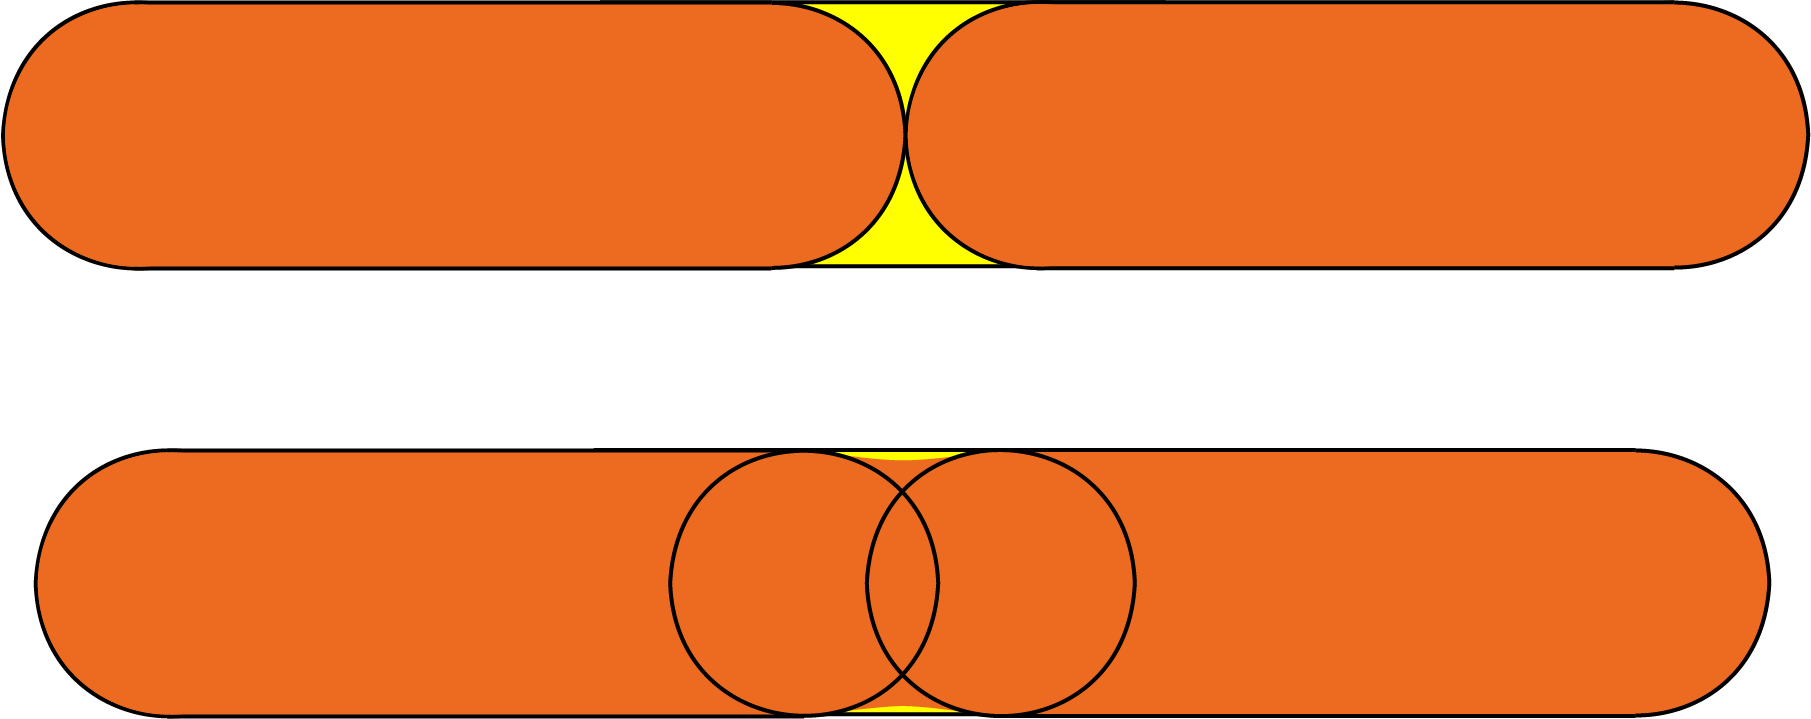
                  (This image was heavily inspired by the original source: https://manual.slic3r.org/advanced/flow-math)

                  Note that the layer height (h) is used in the calculation and the implication this has - if you change the layer height, your ideal wall thickness will change as well!

                  For more information, check the Slic3r Flow math page (parts of this text are sourced from the same page).

                  Solid layers - top/bottom

                  The bottom and top parts of models are usually filled with solid layers (100% infill).

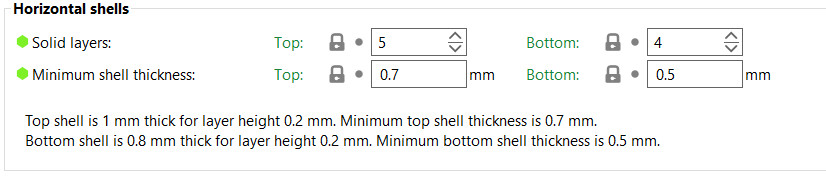
                  You can set how many top and bottom layers you wish to print. You can also set a minimum wall thickness, which is especially useful when using the variable layer height function. The tooltip below these settings will update with every change, giving you a better idea of the resulting top/bottom wall thickness.

                  Setting the top or bottom solid layers to 0 overrides the minimum wall thickness. So you don't have to set the minimum wall thickness to 0 as well to get top or bottom layers.
                  The top solid infill is essentially bridging over the infill pattern. Because of that, you’ll almost always see some sag in the first few solid infill lines. The lower the infill, the longer the bridging distance, and as a result the bigger the sag. This can be counteracted by simply increasing the number of solid layers - we suggest at least 3 top layers. You can further reduce this behavior with a modifier mesh, which increases the infill for the last few layers before the solid infill.
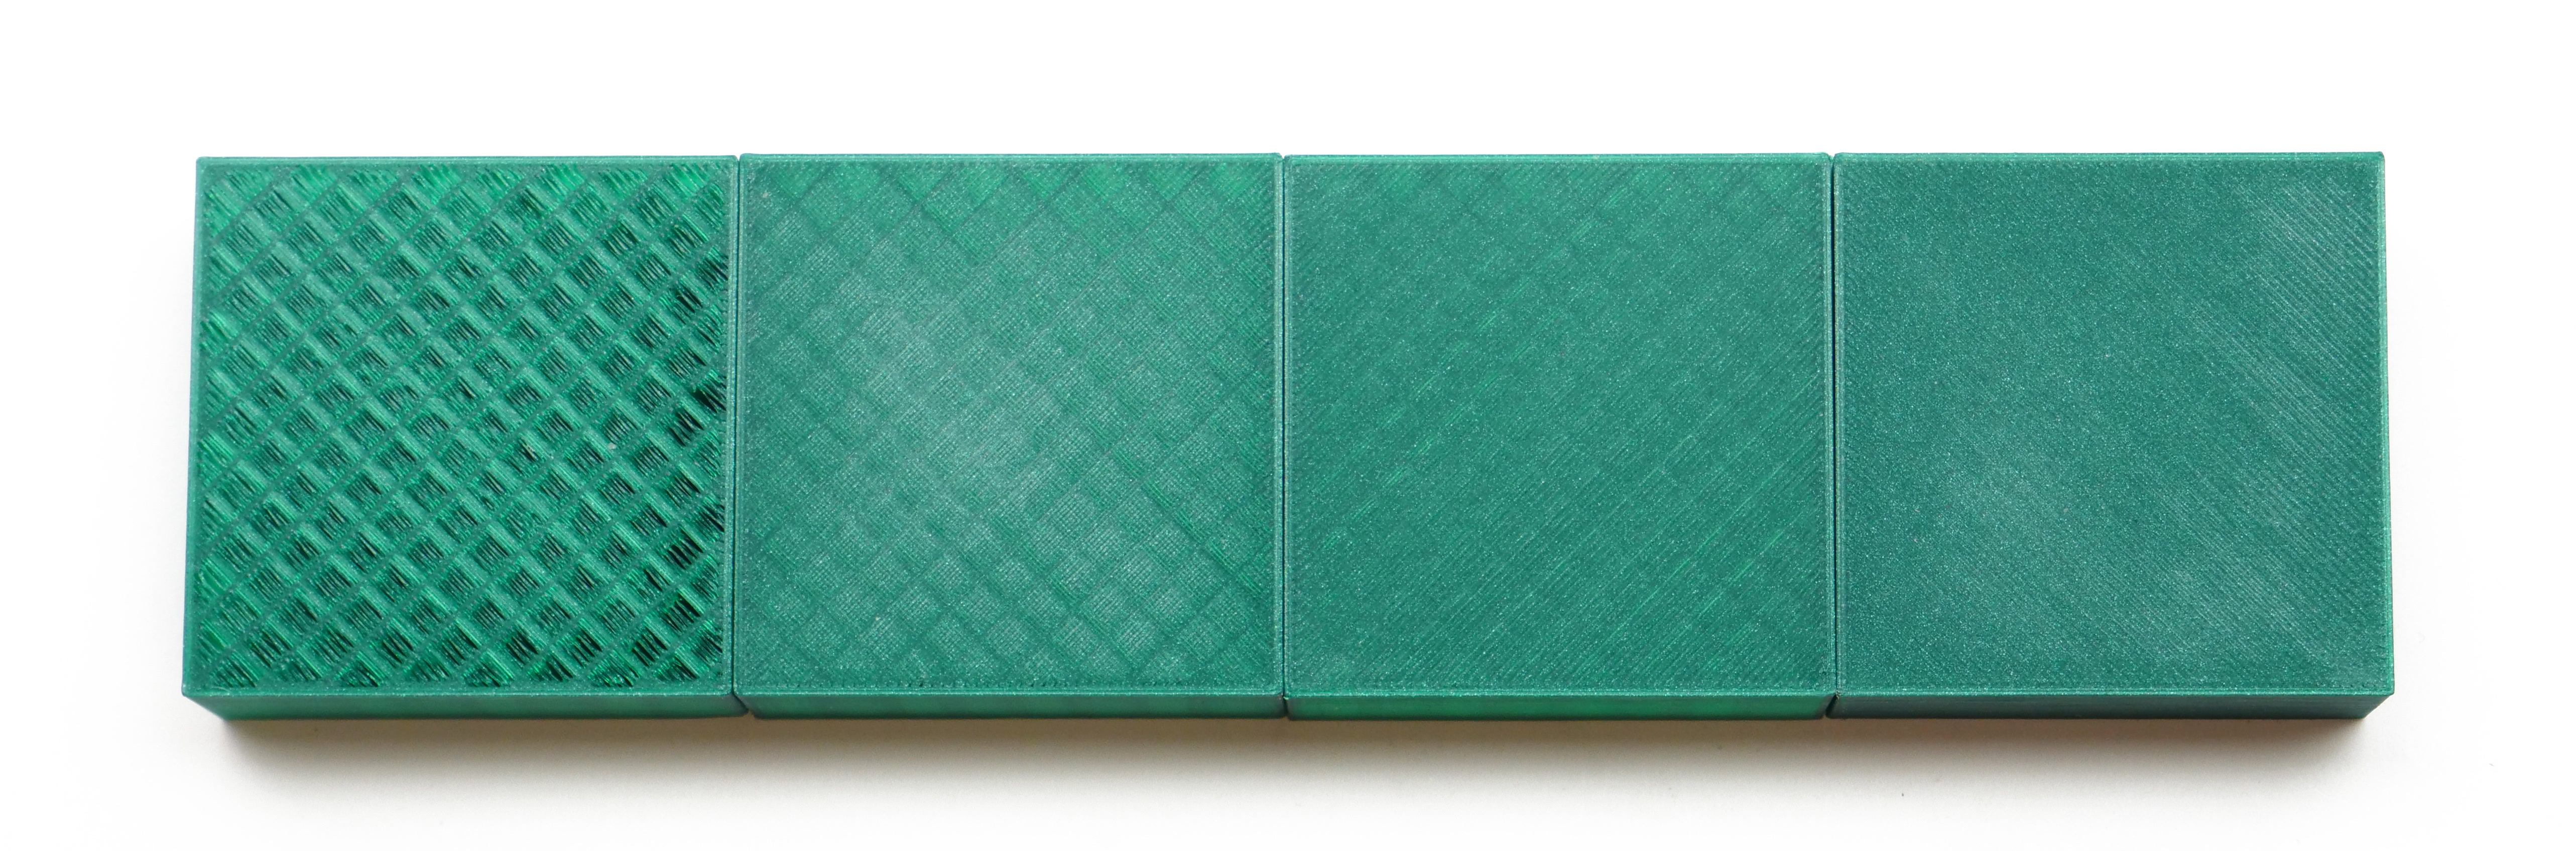
                  From left to right, 1, 2, 3, and 5 top layers, printed at 0.1 mm layer height.

                  Note that when printing at low layer heights, you will need more solid layers to achieve the same top/bottom wall thickness (e.g. with 0.3 mm layer height use 3 top layers, with 0.1 mm layer height use 9 top layers).

                  The default solid infill pattern is rectilinear, however, there are several other patterns to choose from.

                  Extra perimeters if needed

                  A legacy option that as far as we know, doesn't do anything anymore. Let us know if you find a case where this changes anything.

                  Ensure vertical shell thickness

                  This option is not available between versions 2.6.0 and 2.8.1. 

                  This function solves one of the biggest issues of older slicers, holes between the perimeters on a slanted surface. This was typical when printing busts and other organic-looking models. Such objects typically had a few holes on top of the head. With this function enabled, PrusaSlicer ensures it lays down the needed (internal) supports for perimeters in an upcoming layer.
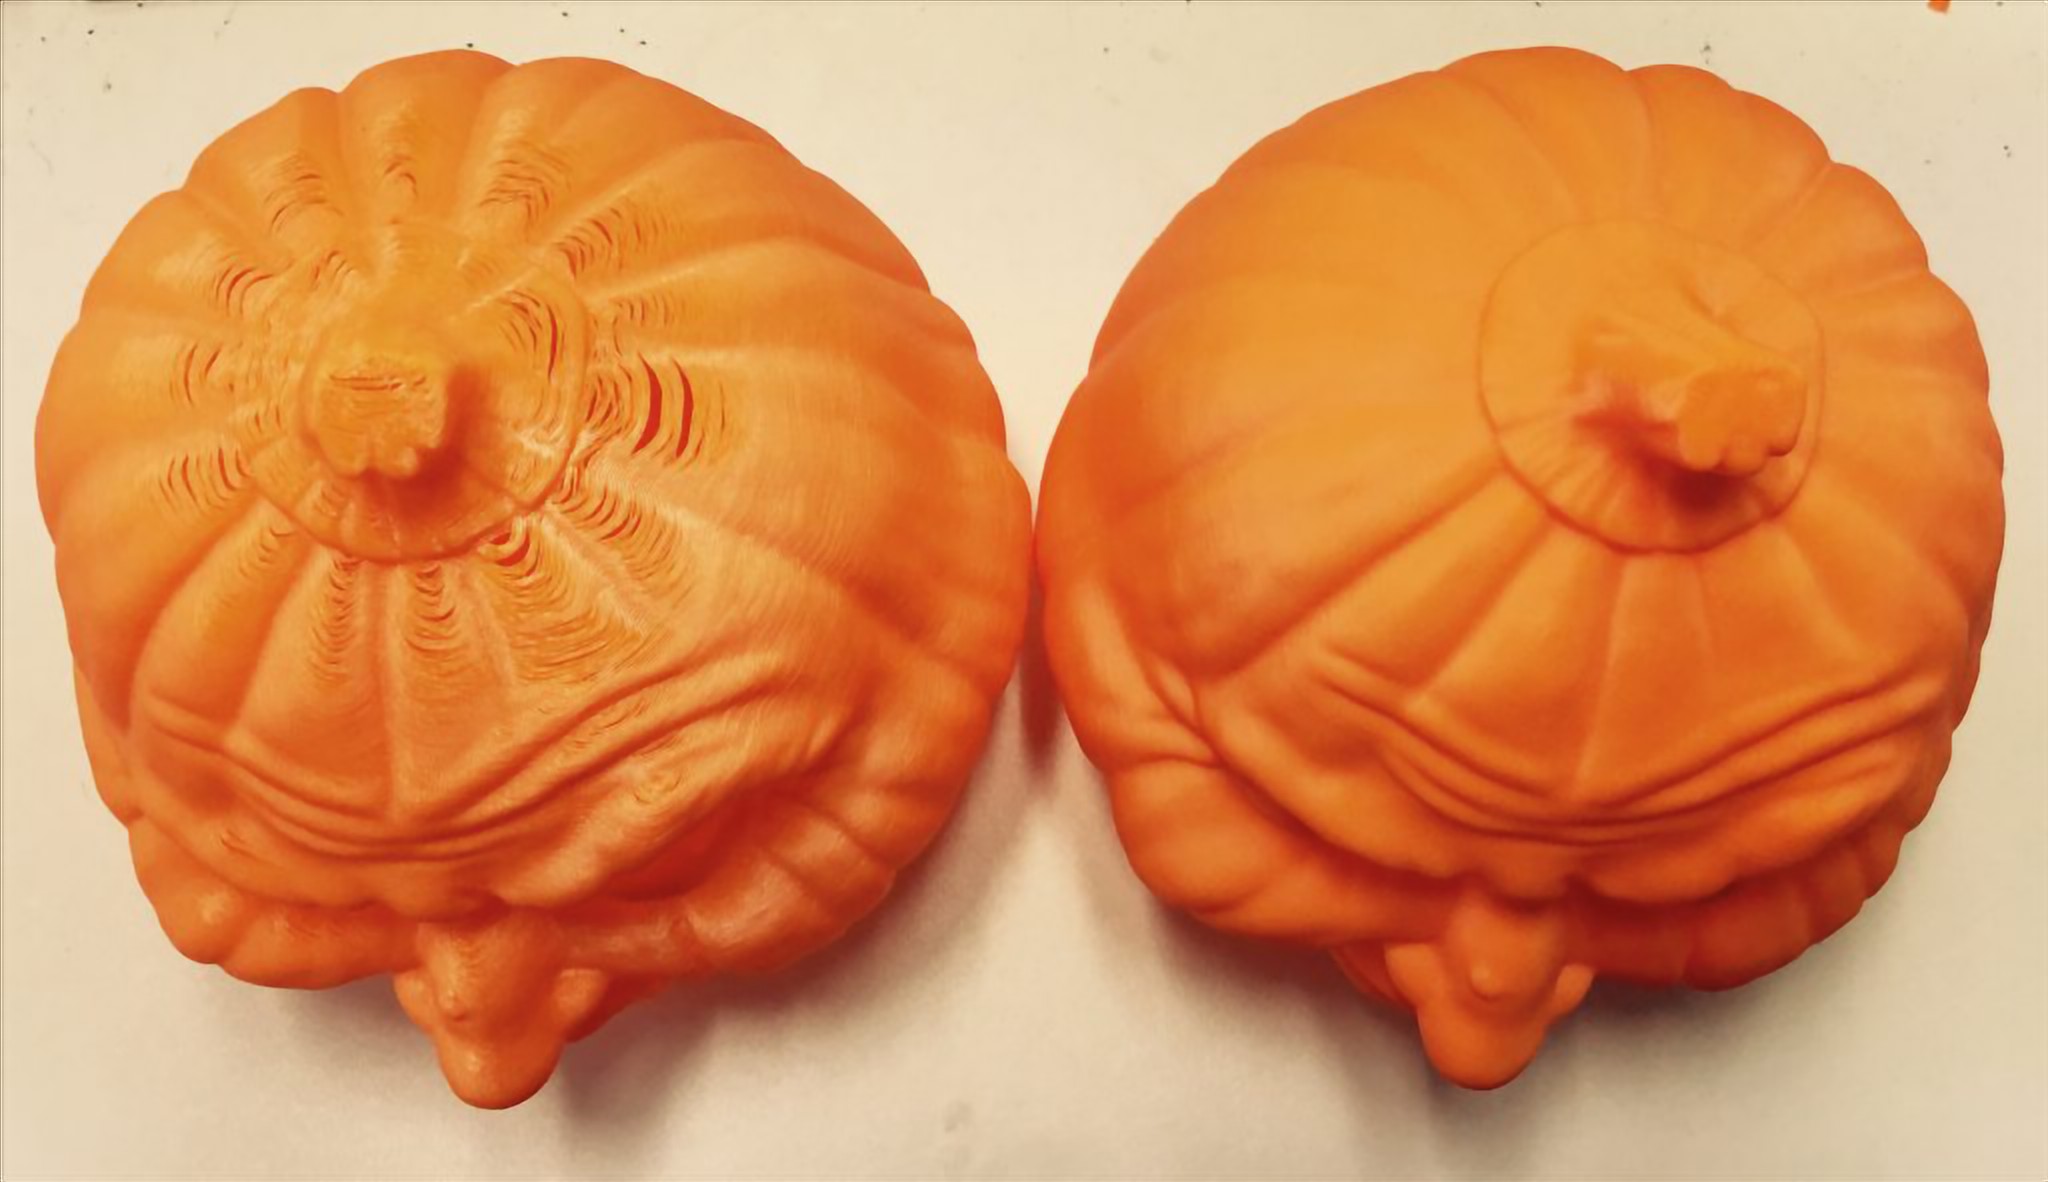
                  • Disabled: Produces additional extrusion only to support top layers. Choosing this option may cause your print to fail.
                  • Partial: Provides partial support to vertical shells without fully enforcing the required thickness.
                  • Enabled: Standard setting. Enables the addition of solid infill near sloping surfaces to guarantee the vertical shell thickness. It is applied to the top and bottom solid layers.

                  Avoid crossing perimeters

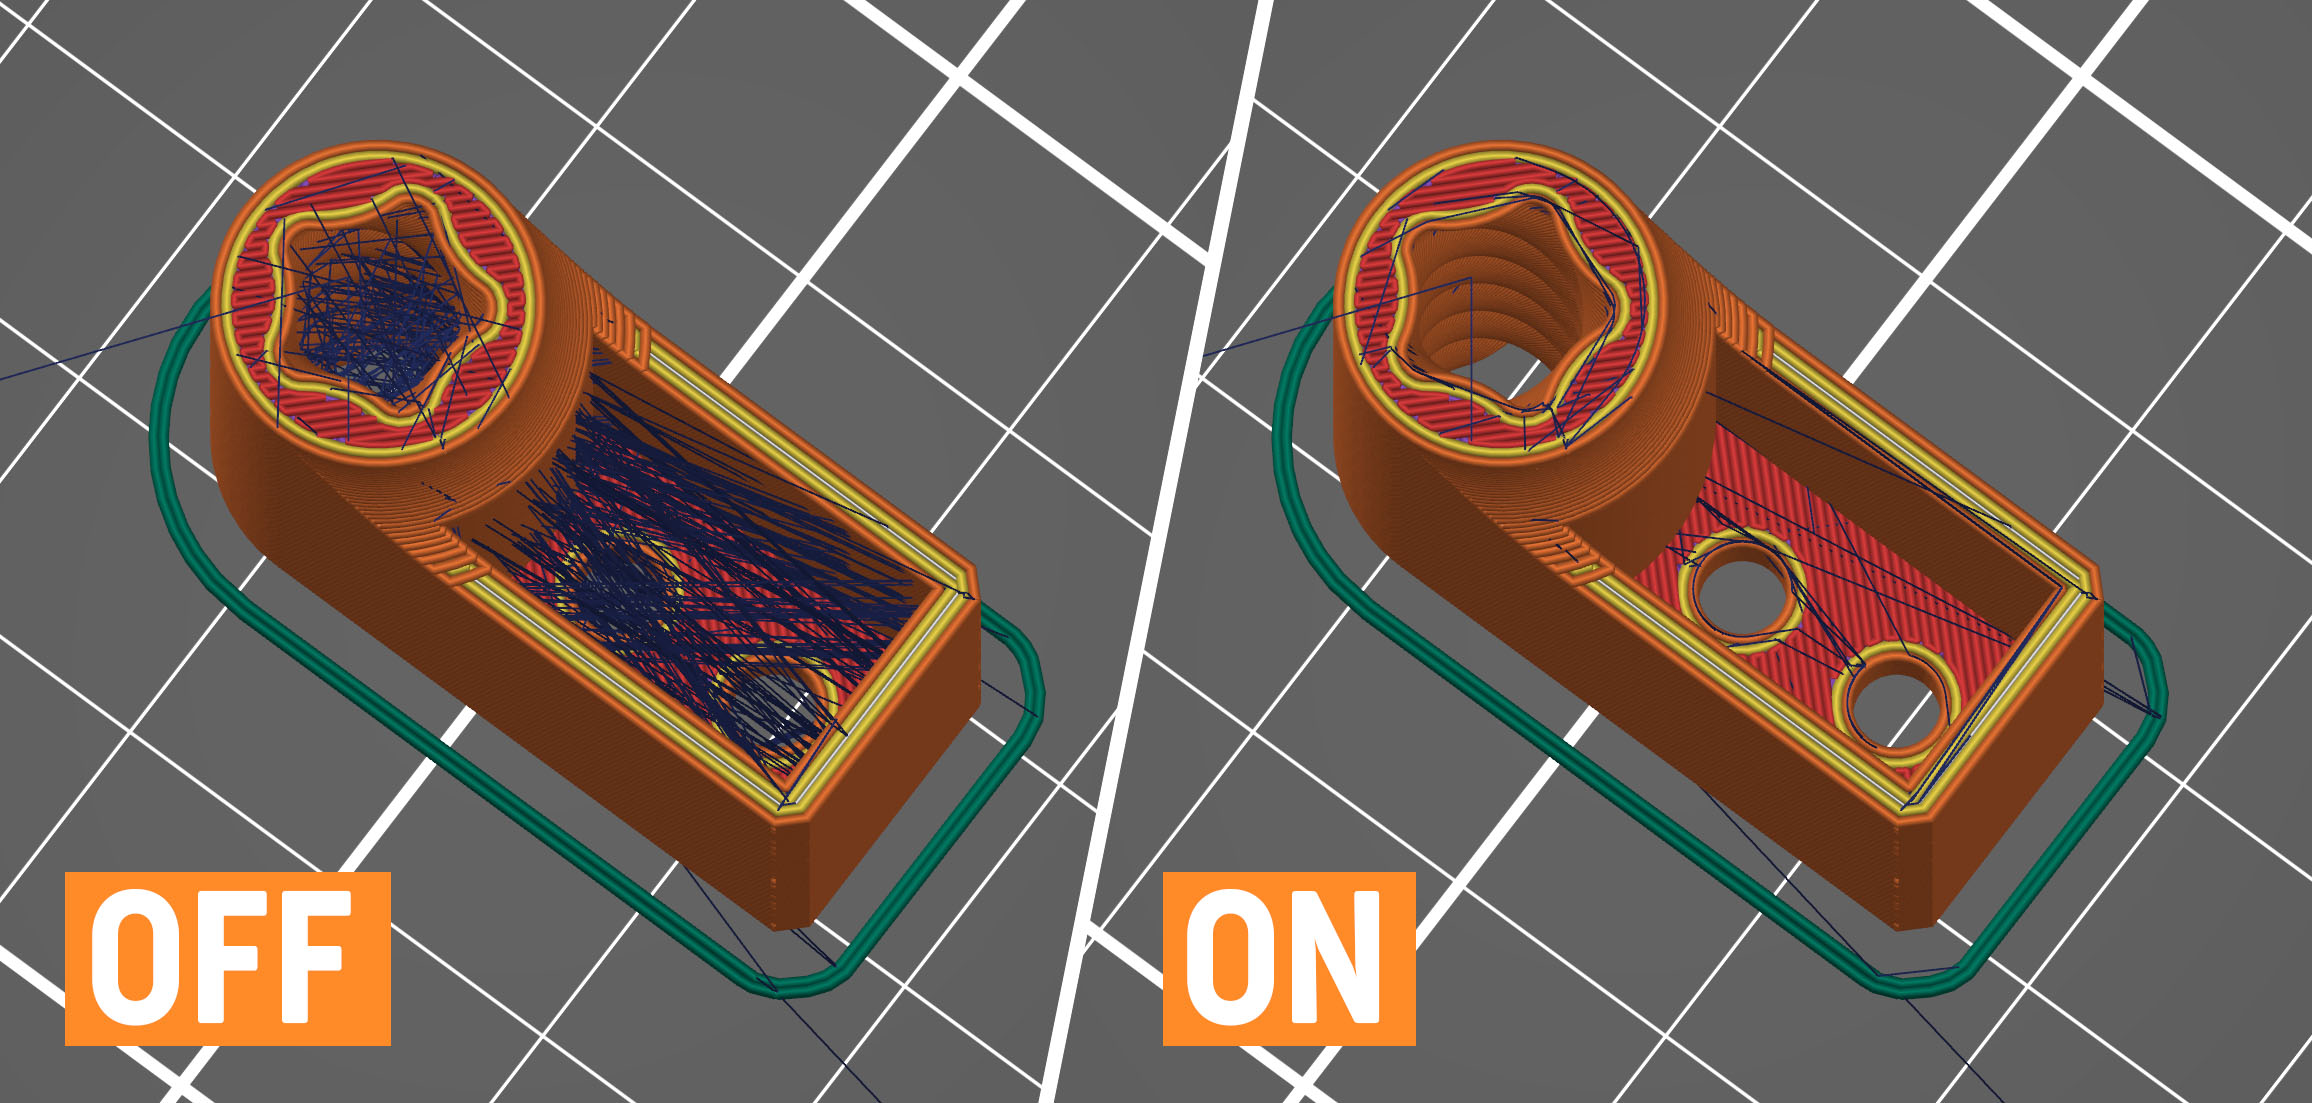
                  Avoid crossing perimeters is an algorithm to minimize crossings of external perimeters during travel moves, which reduces stringing (especially with Bowden extruders) and improves overall print quality. 

                  Enabling this feature slows down the G-code generation and increases print time somewhat (time increase varies between models).

                  This feature was significantly improved in PrusaSlicer 2.3. The new algorithm tries to route a travel path inside object islands with the shortest path while avoiding holes and concavities, while it takes the shortest path when traveling between islands.

                  If the detour is longer than the Max detour length, avoid crossing perimeters will not be applied for this travel move. You can use absolute values in millimeters, a percentage of the travel move, or set it to 0 to disable Max detour length check.
                  Detect thin walls

                  By default, every wall consists of outside and inside perimeters (a minimum of two perimeters for thin walls). If there is enough space, an infill pattern fills the void between these inside/outside perimeters. 

                  Enabling Detect thin walls lets PrusaSlicer generate a single perimeter that works as both an inside & outside shell. This will help to capture tiny details. However, walls thinner than a single perimeter extrusion width will likely still be ignored.

                  This feature is automatically disabled if the Arachne perimeter generator is active, as it already automatically adjusts for thin walls.

                  Thick bridges

                  For historical reasons, PrusaSlicer used to print bridges with extremely thick lines. This makes bridging very reliable and lets you bridge longer distances, but they didn’t look good. The new default behavior uses your current layer height for bridging, making bridging reliable for shorter distances but looking significantly better. This is the strategy that most modern slicers use. You can switch to the old behavior by enabling the Thick Bridges option. Since the first solid layer above supports uses the bridging settings, this change also has a big impact on how supported overhangs look.
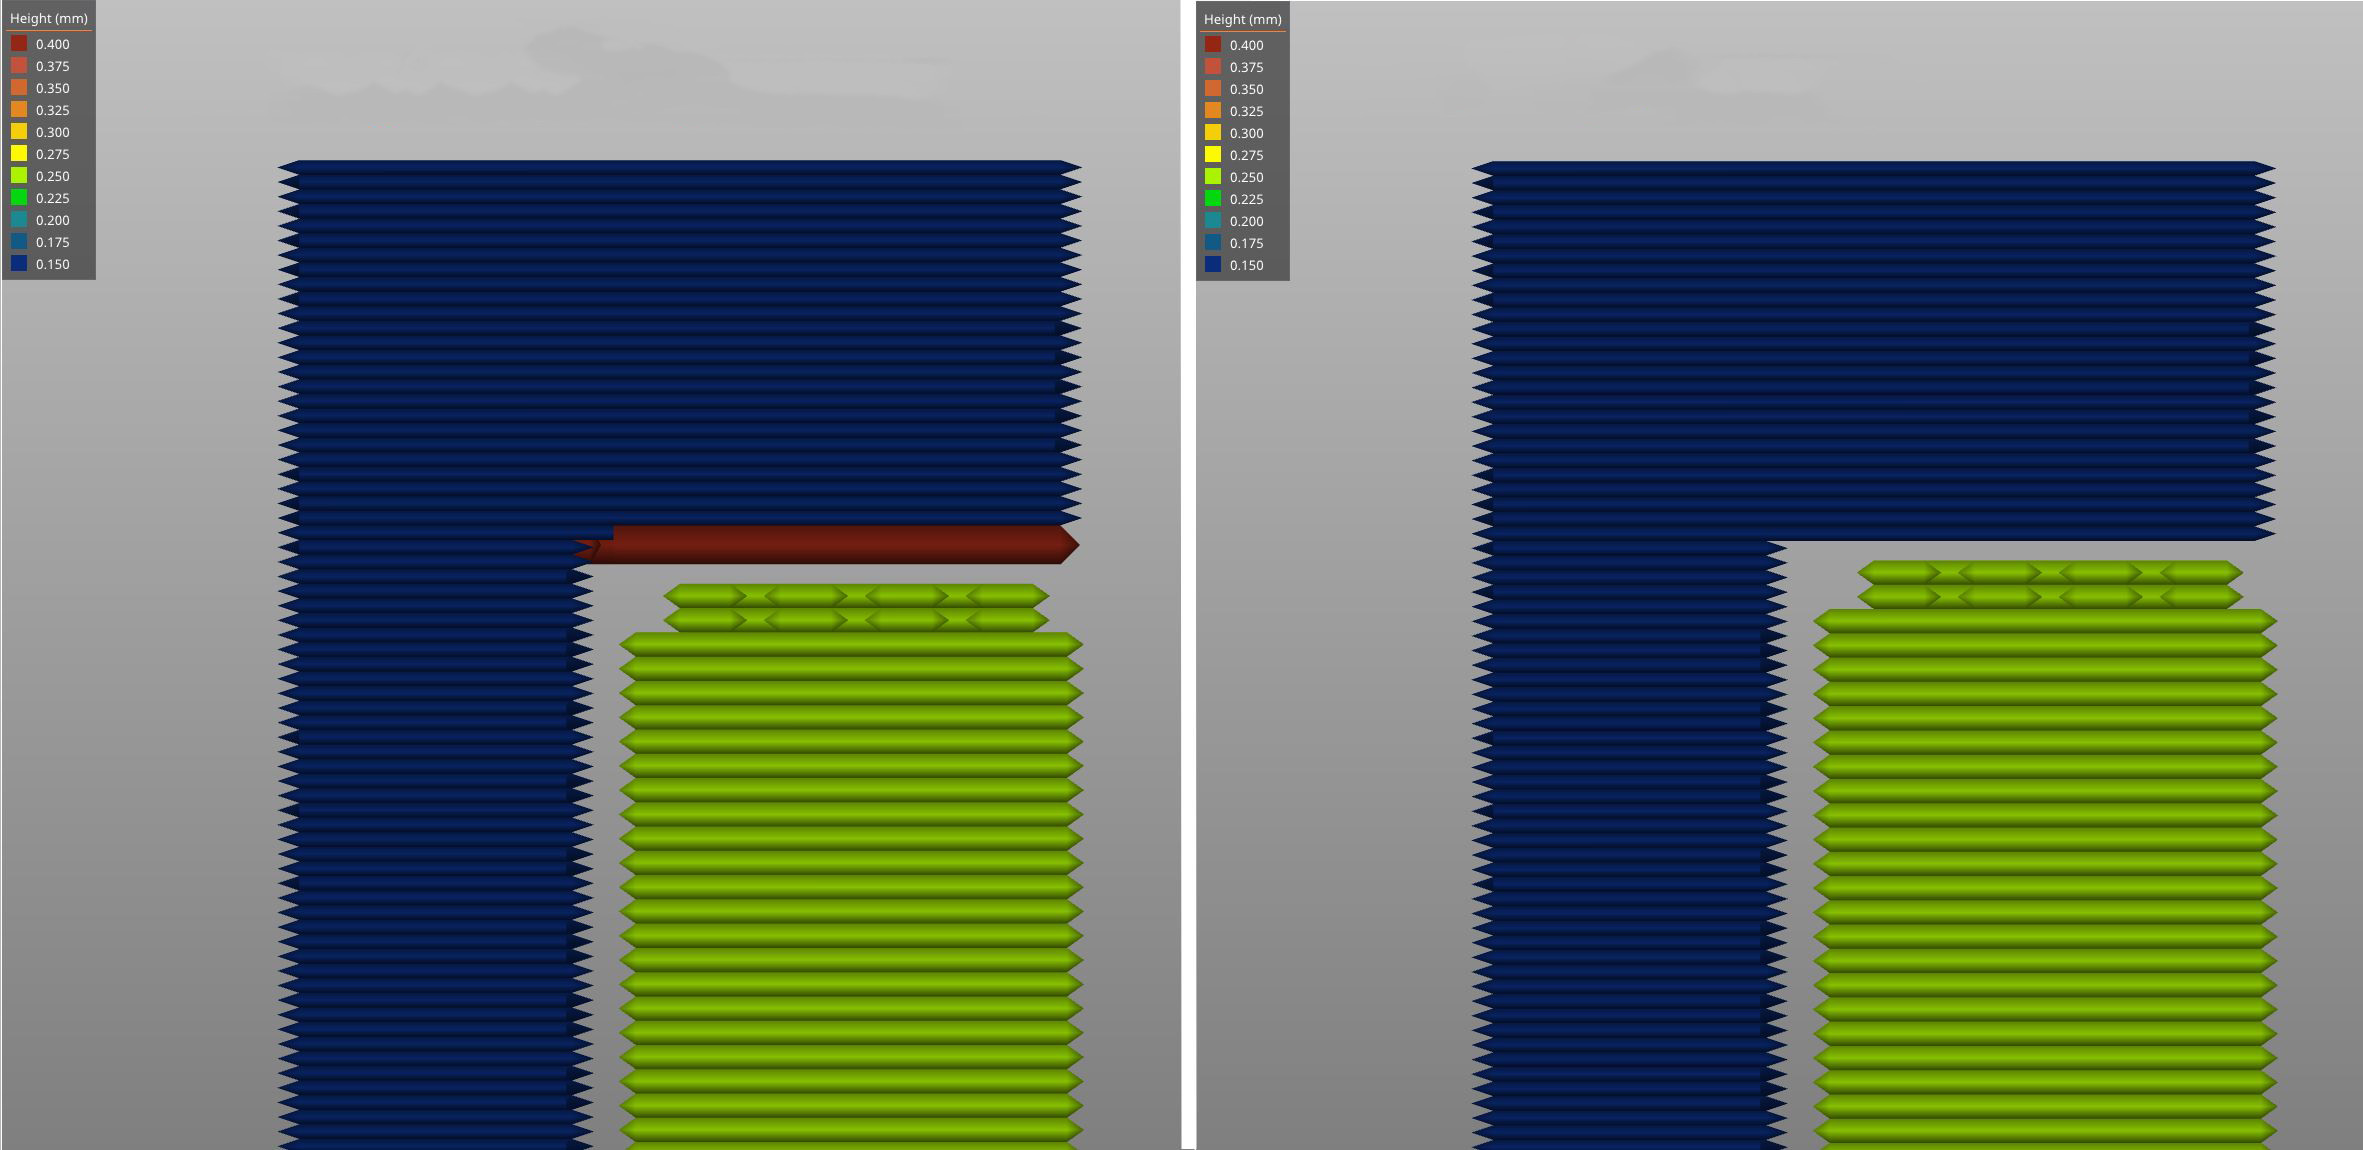
                   Left: Thick bridges enabled, Right: Thick bridges disabled

                  Detect bridging perimeters

                  Enables bridging flow for overhangs and turns on the fan. 

                  For the seam settings check Seam position

                  External perimeters first

                  Perimeters will be printed from the outermost to the innermost ones instead of in the inverse order.

                  This parameter may help with dimensional accuracy since the outer perimeter is laid down first and any extra filament extruded when printing following perimeters is pressed back away from the outer wall. On the other hand, the surface may be slightly less smooth.

                  Fill gaps

                  Enables filling of gaps between individual perimeters and between the innermost perimeter and infill.

                  Perimeter generator

                  This setting lets you switch between the Arachne (default) and the Classic perimeter generator. The Arachne perimeter generator automatically adjusts the extrusion width of perimeters as needed. For most prints, the Arachne perimeter generator is superior, but for some functional prints where the accuracy of concave corners is important, the classic perimeter generator may be better.

                  For the fuzzy skin settings, check Fuzzy skin.

                  Only one perimeter

                  This option forces a single perimeter on top or first layers to achieve a cleaner, more uniform aesthetic finish without sacrificing the object's structural rigidity. The top and bottom layers can be controlled separately in Print Settings -> Layers and perimeters -> Only one perimeter.
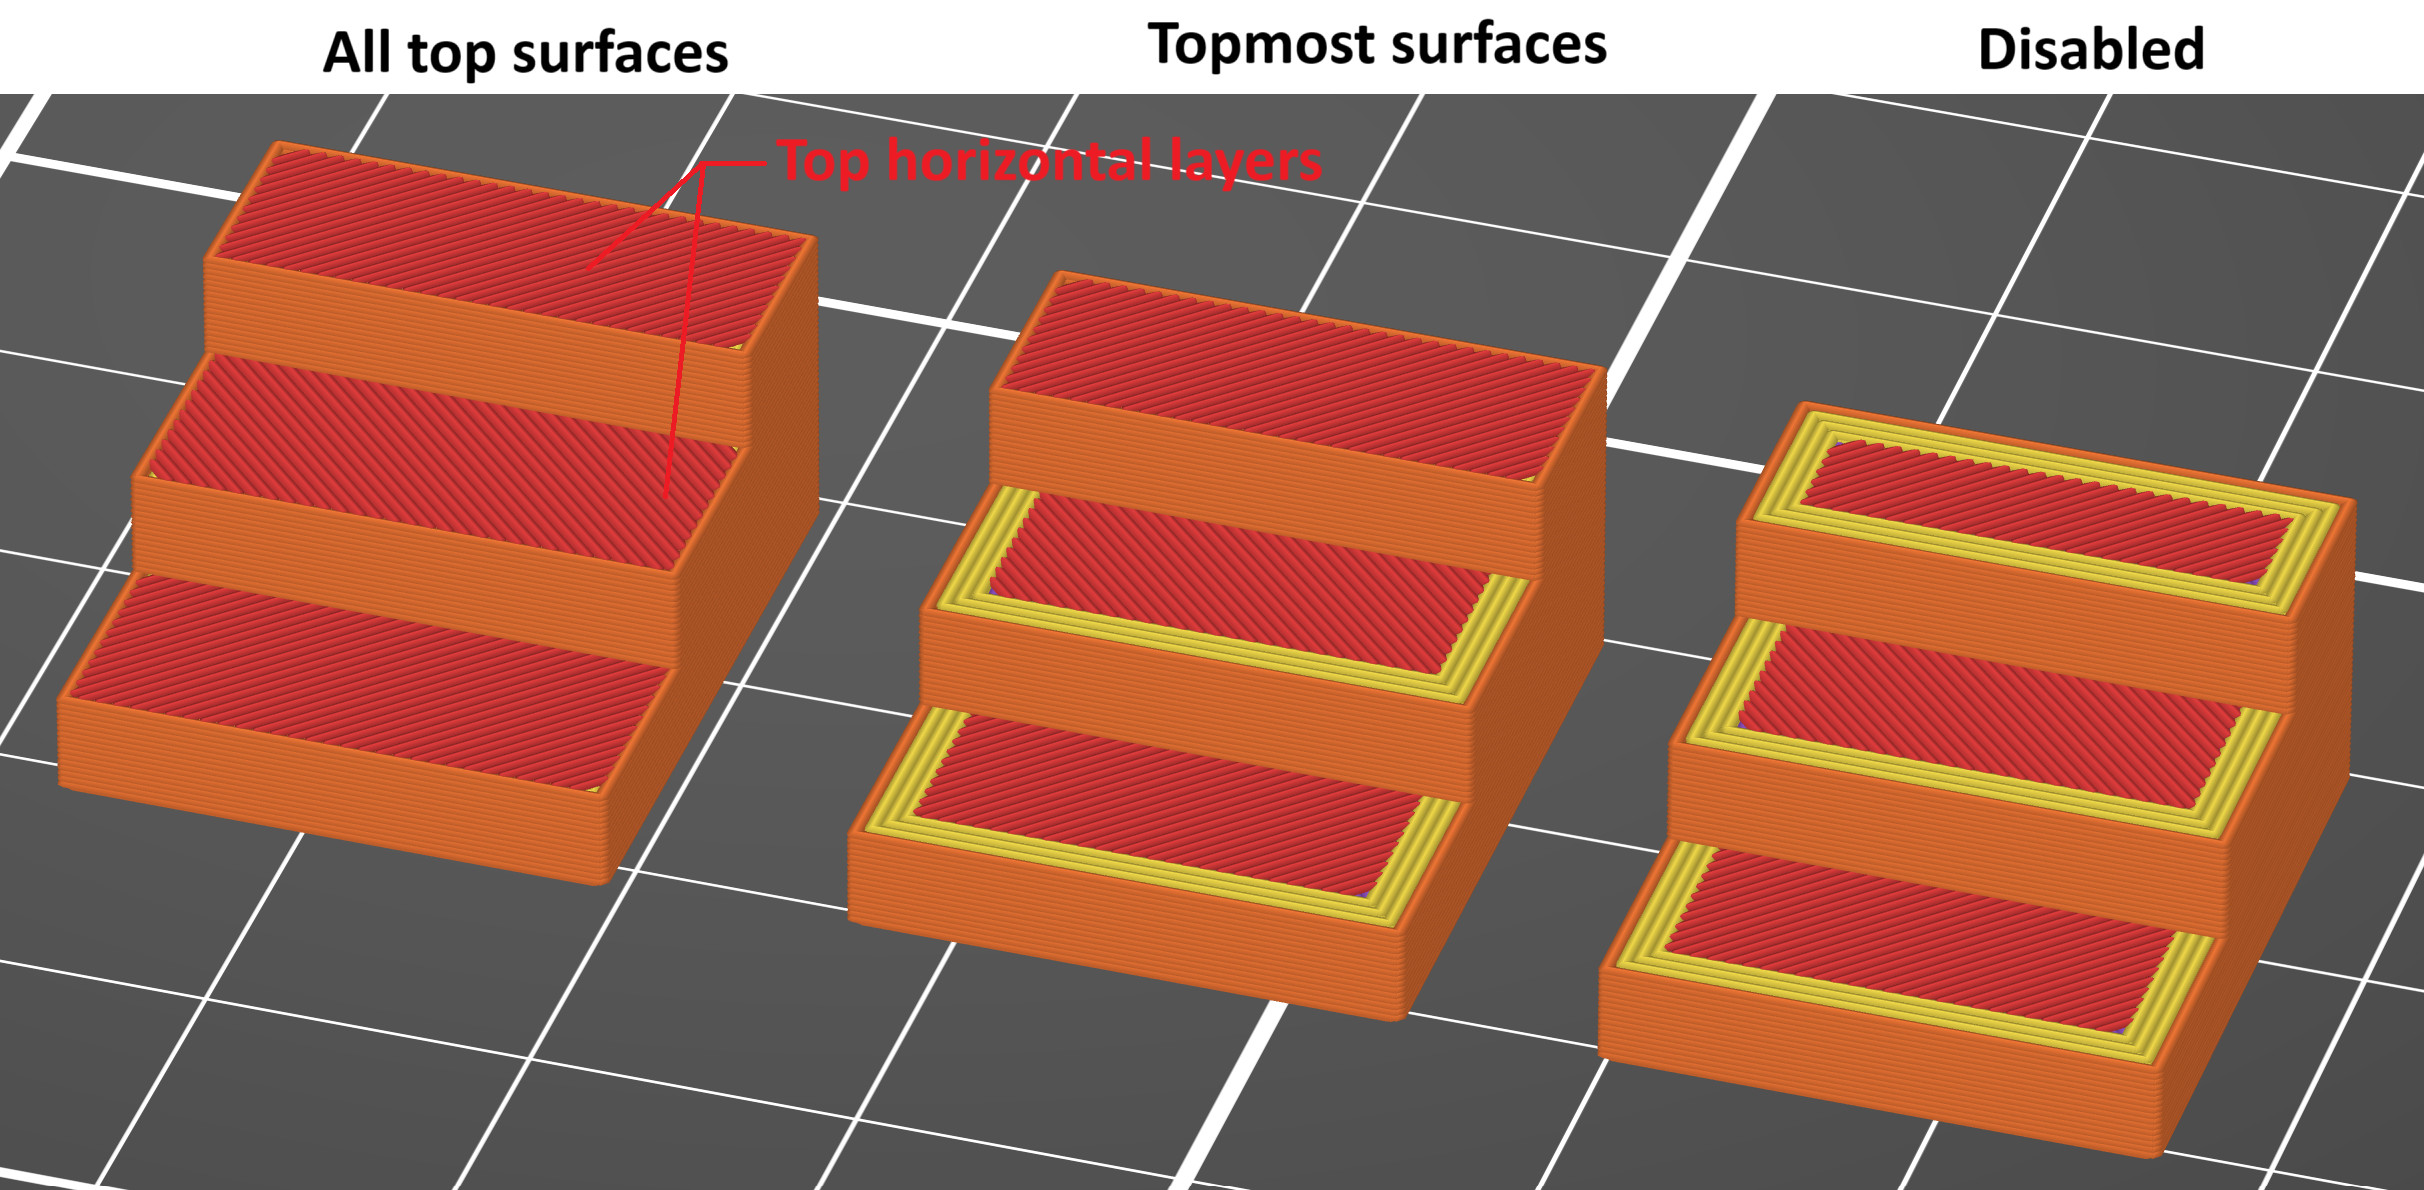
                  Single perimeter on top surfaces

                  • Disabled Standard: perimeter settings are applied to the top layers.
                  • All top surfaces: A single perimeter is applied to all horizontal top layers.
                  • Topmost surface only: A single perimeter is selectively applied only to the final visible top model surface.

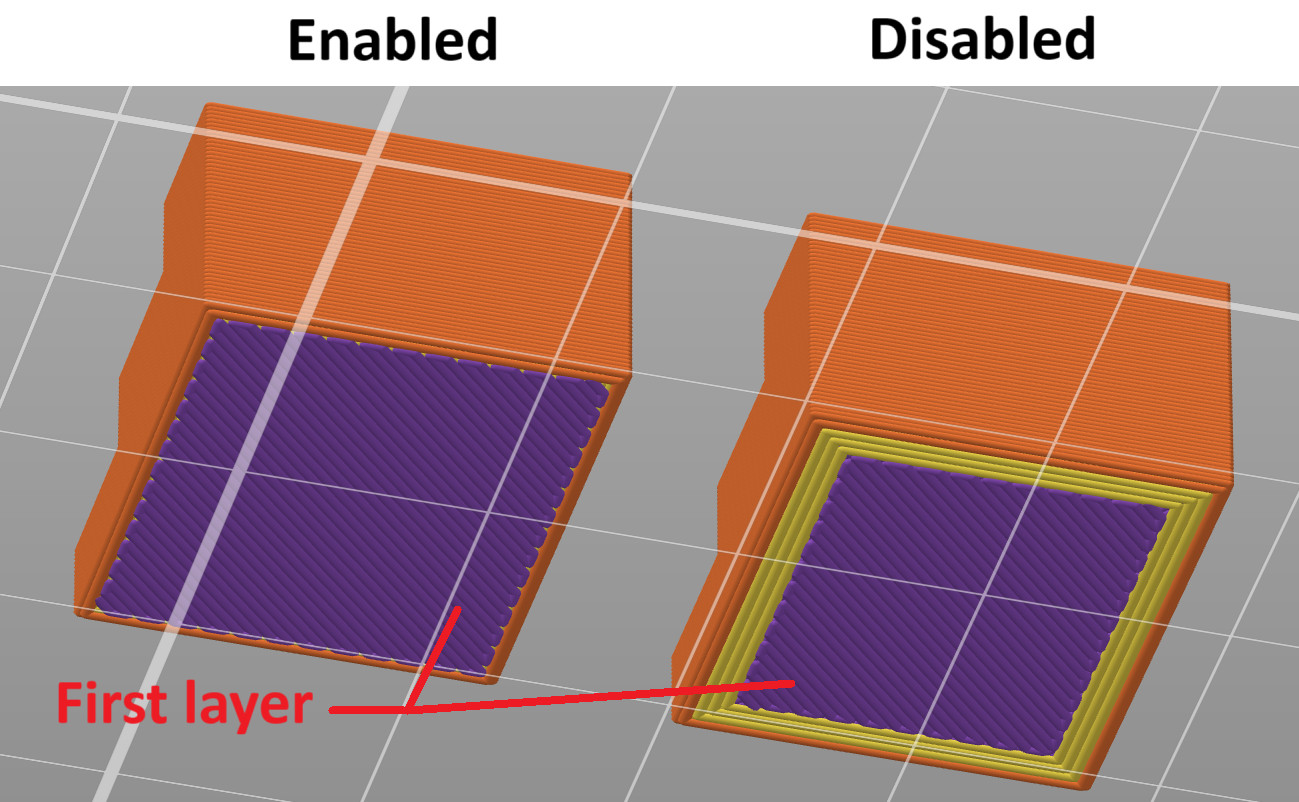
                  Only one perimeter on the first layer

                  This setting can be either enabled or disabled to force a single perimeter specifically on the first layer.
                  Was this article helpful?
                  This action is available only to registered users. Please log-in.

                  Topics

                  • PrusaSlicer 2.9 (Legacy)
                    • Print settings
                      • Infill
                      • Support material
                      • Layers and perimeters
                      • Elephant foot compensation
                      • Sequential printing
                      • Max volumetric speed
                      • Skirt and Brim
                      • Ironing
                      • Fuzzy skin
                      • Slicing mode / 3DLabPrint airplanes
                      • Pressure equalizer
                      • Arachne perimeter generator
                      • Organic Supports
                      • Speed settings
                      • Infill patterns
                      • Seam position
                    • About PrusaSlicer
                    • Configuration and profiles
                    • User interface
                    • Input/output
                    • Left toolbar
                    • Top toolbar
                    • Filament settings
                    • Printer settings
                    • Advanced features
                    • Multi-material slicing
                    • SLA slicing
                    • Other (PrusaSlicer)

                  38 comments

                  Log in  to post a comment
                  Carl A
                  •
                  Have an XL with 5 Nextruders. Have the following Printer Settings available (and more):
                  .15 Speed.20 Structural.20 Speed.20 Breakaway Full.20 Breakaway Interface.20 Soluble Fill.20 Soluble Interface.
                  Where do I find information on when to use these? Link.
                  I started with .20 Speed but had a problem once so changed to .20 Structural. Does the .20 Speed require a full flow nozzle or does it work with any nozzle?
                  Reply
                  magicproducer
                  •
                  Just as information: the section "Only one perimeter" is missing in the german version of this text.
                  Reply
                  gjktaylor
                  •
                  Is there any way to force "Internal perimeters first"? In my case I am trying to print a hollow ball without supports and as the print gets close to the top the external perimeters keep getting laid down first even though I don't have that option selected.
                  Reply
                  AGriggs191
                  •
                  Internal perimeters first is the default. Just make sure "external perimeters first" is not checked in expert settings.
                  Reply
                  Kellthan
                  •
                  If "Extra perimeters if needed" is a legacy option that doesn't do anything anymore, why is it even in the current versions of the slicer program?
                  Reply
                  Entropy
                  •
                  From PrusaSlicer, Staggered Inner Seams points to this page, but should point to the Seam Position page instead, https://help.prusa3d.com/article/seam-position_151069.
                  Reply
                  JinPrints
                  •
                  Came here looking for that, thanks!
                  Reply
                  wolfwood
                  •
                  same issue. thanks!
                  Reply
                  lazydba247
                  •
                  same issue... Thanks!
                  Reply