Prusa
  • SHOP
    • Latest products
    BY CATEGORY
    • 3D printersnew
    • 3D printer upgradesnew
    • Materials
    • Accessories
    • Spare parts
    • Courses
    • Merch
    • Get a price quote
    QUICK LINKS
    • Shipping & delivery
    • Returns & refunds
    • Payment & financing
    • Warranty
    • VAT & Customs fees
    • FAQ

    0 item in your cartitems in your cart

    Your cart is empty

    Go to cartShop 3D printers

    My profile

    Log in to see orders, saved items

    My profile

    Signed in as

    • Orders
    • Logout
  • 3D PRINTING
    • Explore 3D printing
    FOR BEGINNERS
    • 3D printing 101
    • How FDM printing works
    • Buying your first printer
    • 3D model catalog
    BY APPLICATION
    • Rapid prototyping
    • Manufacturing
    • Engineering
    • Research
    • Arts & design
    GO DEEPER
    • Materials guide
    • Courses
    • Webinars
    • Case studies
    • Custom 3D printing
  • 3D PRINTERS
    • All 3D printers
    FOR
    • Home or garageHobbyists, tinkerers and home printing
    • BusinessIn-house production for small teams
    • EnterpriseFleets, security and scale
    • Which Prusa is right for me
    SHOP & BROWSE
    • CORE One+new
    • CORE One+ INDXnew
    • CORE One L+new
    • CORE One L+ INDXnew
    • XL+new
    • MK4S
    • Prusa Pro HT90
    • Prusa Pro AFS
    • Prusa Pro SLX
    MORE FROM PRINTERS
    • Parts & upgradesnew
    • Critical infrastructure
    • Case studies
    • Signature Oak
    • Kits
  • MATERIALS
    • All materials
    BY USE
    • Every-day & design
    • Functional engineering
    • Composites
    • Pro speciality
    • SLA resins
    PRUSAMENT
    • PLA
    • PETG
    • ASA
    • PC
    • PA11
    • Flex
    • TPU
    MORE FROM MATERIALS
    • Materials guide
    • We make material in house
    • Sustainability
    • Order on the store
  • SOFTWARE
    • All software
    PREPARE THE PRINT
    • PrusaSlicer 3.0New
    PRINT & MONITOR
    • Prusa Connect
    • EasyPrint
    • iOS & Android app
    • Prusa Farm
    GET STARTED
    • Download & install
    • Knowledge base
    MORE FROM SOFTWARE
    • 3D model catalog
  • SUPPORT
    • Explore support
    FIND ANSWERS
    • Knowledge base
    • Troubleshooting
    • Courses
    • Webinars
    GET HELP
    • Contact us
    • Livechat
    • Shipping & delivery
    • Warranty
    • Returns & refunds
    • Service & spare parts
    • Service & Repair
    COMMUNITY
    • Forum
    • Reddit
    • Printables
  • TRUST CENTER
    • Trust Center overview
    BY TOPIC
    • GDPR
    • Certificates
    • Security
    • Compliance
    COMMITMENTS
    • Sustainability report
    TALK TO US
    • Contact the security team
  • COMPANY
    • About Prusa
    GET TO KNOW US
    • Our story
    • How we make printers
    • Open source
    • Brand & media kit
    NEWS
    • Blog
    • Newsroom
    • Events
    TRUST & PARTNERS
    • Sustainability
    • Resellers & distributors
    • Affiliate program
    • Contact
    • English
    • Čeština
    • Deutsch
    • Español
    • Français
    • Italiano
    • Polski
    • 日本語
  • Signed in as

    • Orders
    • Address
    • In-stock Alerts
    • My Courses
    • Subscription
    • Edit Account
    • Logout

Log in to see orders, saved items

Signed in as
  • Orders
  • Address
  • In-stock Alerts
  • My Courses
  • Subscription
  • Edit Account
  • English
  • Čeština
  • Deutsch
  • Español
  • Français
  • Italiano
  • Polski
  • 日本語
Shop

0 item in your cartitems in your cart

Your cart is empty

Go to cartShop 3D printers

My profile

Log in to see orders, saved items

My profile

Signed in as

  • Orders
  • Logout
SHOP
  • Latest products
BY CATEGORY
  • 3D printersnew
  • 3D printer upgradesnew
  • Materials
  • Accessories
  • Spare parts
  • Courses
  • Merch
  • Get a price quote
QUICK LINKS
  • Shipping & delivery
  • Returns & refunds
  • Payment & financing
  • Warranty
  • VAT & Customs fees
  • FAQ

Featured products

    Popular categories

      Trending searches

        Articles

          Blog

            Products

              Categories

                Suggested searches

                  Searching…
                  No results
                  Something went wrong.
                  ↑↓ Select↵ OpenEsc Close search
                  1. Support
                  2. Original Prusa MK3.5
                  3. Print settings
                  4. Infill patterns
                   

                  Contents

                  • Infill types and their properties
                  • Types of top (bottom) layer infill

                  Blog

                  • Print colorful and glowing Halloween decorations with our spooky offer
                  • Factorio Has Arrived on Printables
                  • Prusament PLA Lightweight: 65% lighter than regular PLA. Perfect choice for aircraft, cosplay, and more.

                  Newsletter

                  Signup and get our monthly squeeze on updates, blog, printables and much more.

                  By clicking, you agree to receive our newsletter.

                  This site is protected by reCAPTCHA Enterprise and the Google Privacy Policy and Terms of Service apply.

                  Factorio Transport Belts
                  E-shop
                  • 3D Printers
                  • Printer Upgrades
                  • Filaments
                  • Accessories
                  • Prusa Merchandise

                  © Prusa Research a.s.

                  Printables
                  • 3D Models
                  • Store
                  • Clubs
                  • 3D Design Contests
                  • Brands
                  Community
                  • World Map
                  • Forum
                  • User Groups
                  • Events
                  Help
                  • Prusa Help
                  • Prusa Academy
                  • 3D Printing Calculators
                  Software
                  • PrusaSlicer
                  • Prusa.app
                  • Prusa Connect
                  • Drivers and Software
                  Company
                  • About Us
                  • Blog
                  • Official Prusa Resellers
                  • Contact Us
                  • Certified for ISO 9001, ISO 14001, ISO 45001
                  • General Terms and Conditions
                  • General Terms and Conditions of Use of the PRUSA Websites
                  • Privacy Policy
                  • Information about cookies
                  • Customer Complaints Policy
                  • Status Page
                  • Do Not Sell or Share My Personal Information
                  • Supplemental Statements
                  • General Terms and Conditions
                  • General Terms and Conditions of Use of the PRUSA Websites
                  • Privacy Policy
                  • Information about cookies
                  • Customer Complaints Policy
                  • Status Page
                  • Do Not Sell or Share My Personal Information
                  • Supplemental Statements

                  © Prusa Research a.s.

                  JOSEF PRUSA®, PRUSA RESEARCH®, PRUSA POLYMERS®, PRUSA ORANGE®, PRUSA 3D ® AND PRUSAMENT® are registered trademarks of Prusa Development a.s. used by Prusa Research a.s. under licence from Prusa Development a.s.

                  Infill patterns

                  Relevant for

                  MK4 family
                  XL family
                  MMU family
                  MINI family
                  MK3 family
                  +
                  51 comments
                  Article is also available in following languages
                  English
                  Čeština
                  Polski
                  Deutsch
                  Français
                  Español
                  Italiano
                  日本語

                  PrusaSlicer offers many infill patterns to choose from. When choosing an infill pattern, these are the main things to consider:

                  • Print speed
                  • Density per material used (better support for top layers with less material)
                  • Visuals
                  • Support for top layers
                  • Flexibility (for TPU/TPE prints)

                  Different infill patterns are used for some, but usually not all, applications:

                  • low-density filling of the inside of a model
                  • filling the top layers
                  • filling the bottom layers
                  • generating support material

                  Infill types and their properties

                  Gyroid infill

                  The Gyroid is our favorite and one of the best infills. It’s one of the few 3D structures that provide great support in every direction. Plus, it prints relatively quickly, saves material, doesn’t self-intersect on a single layer, and looks great. The special shape of this infill allows it to be filled with resin or another liquid.
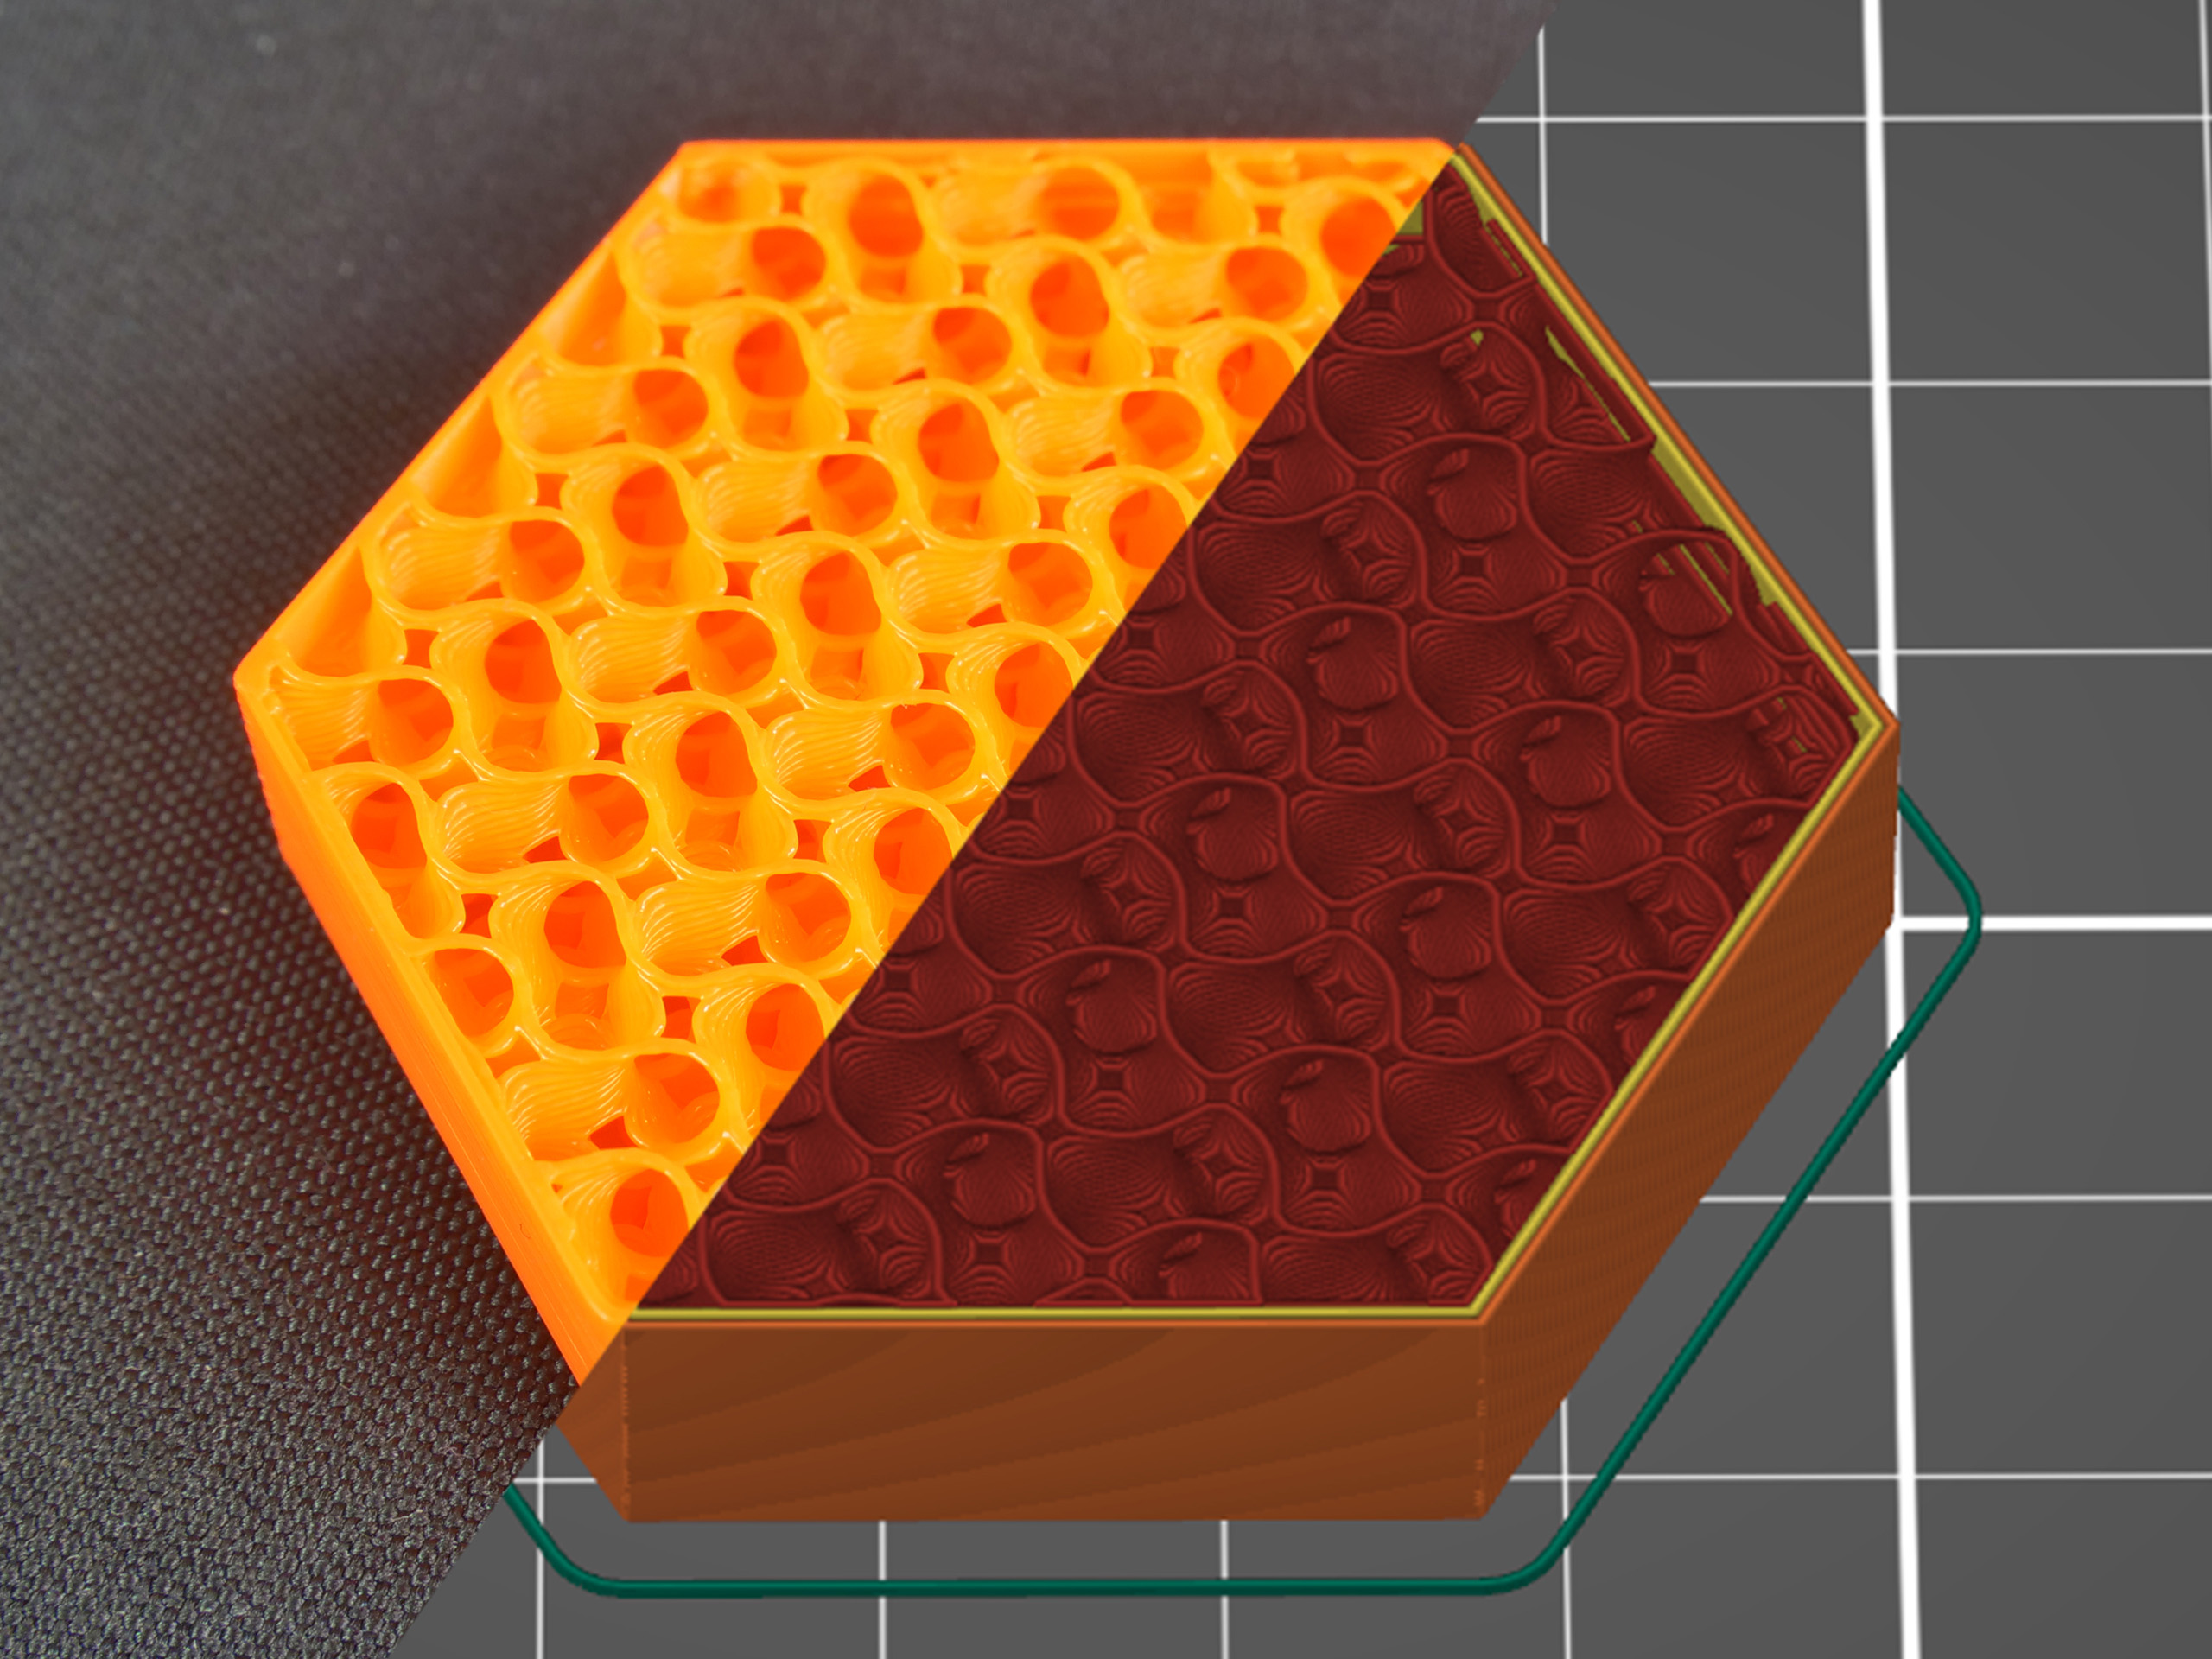
                  • It's 3-dimensional, giving it equal strength in all directions
                  • It can be printed fairly quickly
                  • It doesn't cross itself in the same layer
                  • It has a good strength/weight ratio
                  • It allows filling it with resin or another liquid
                  • (We think) It looks really neat

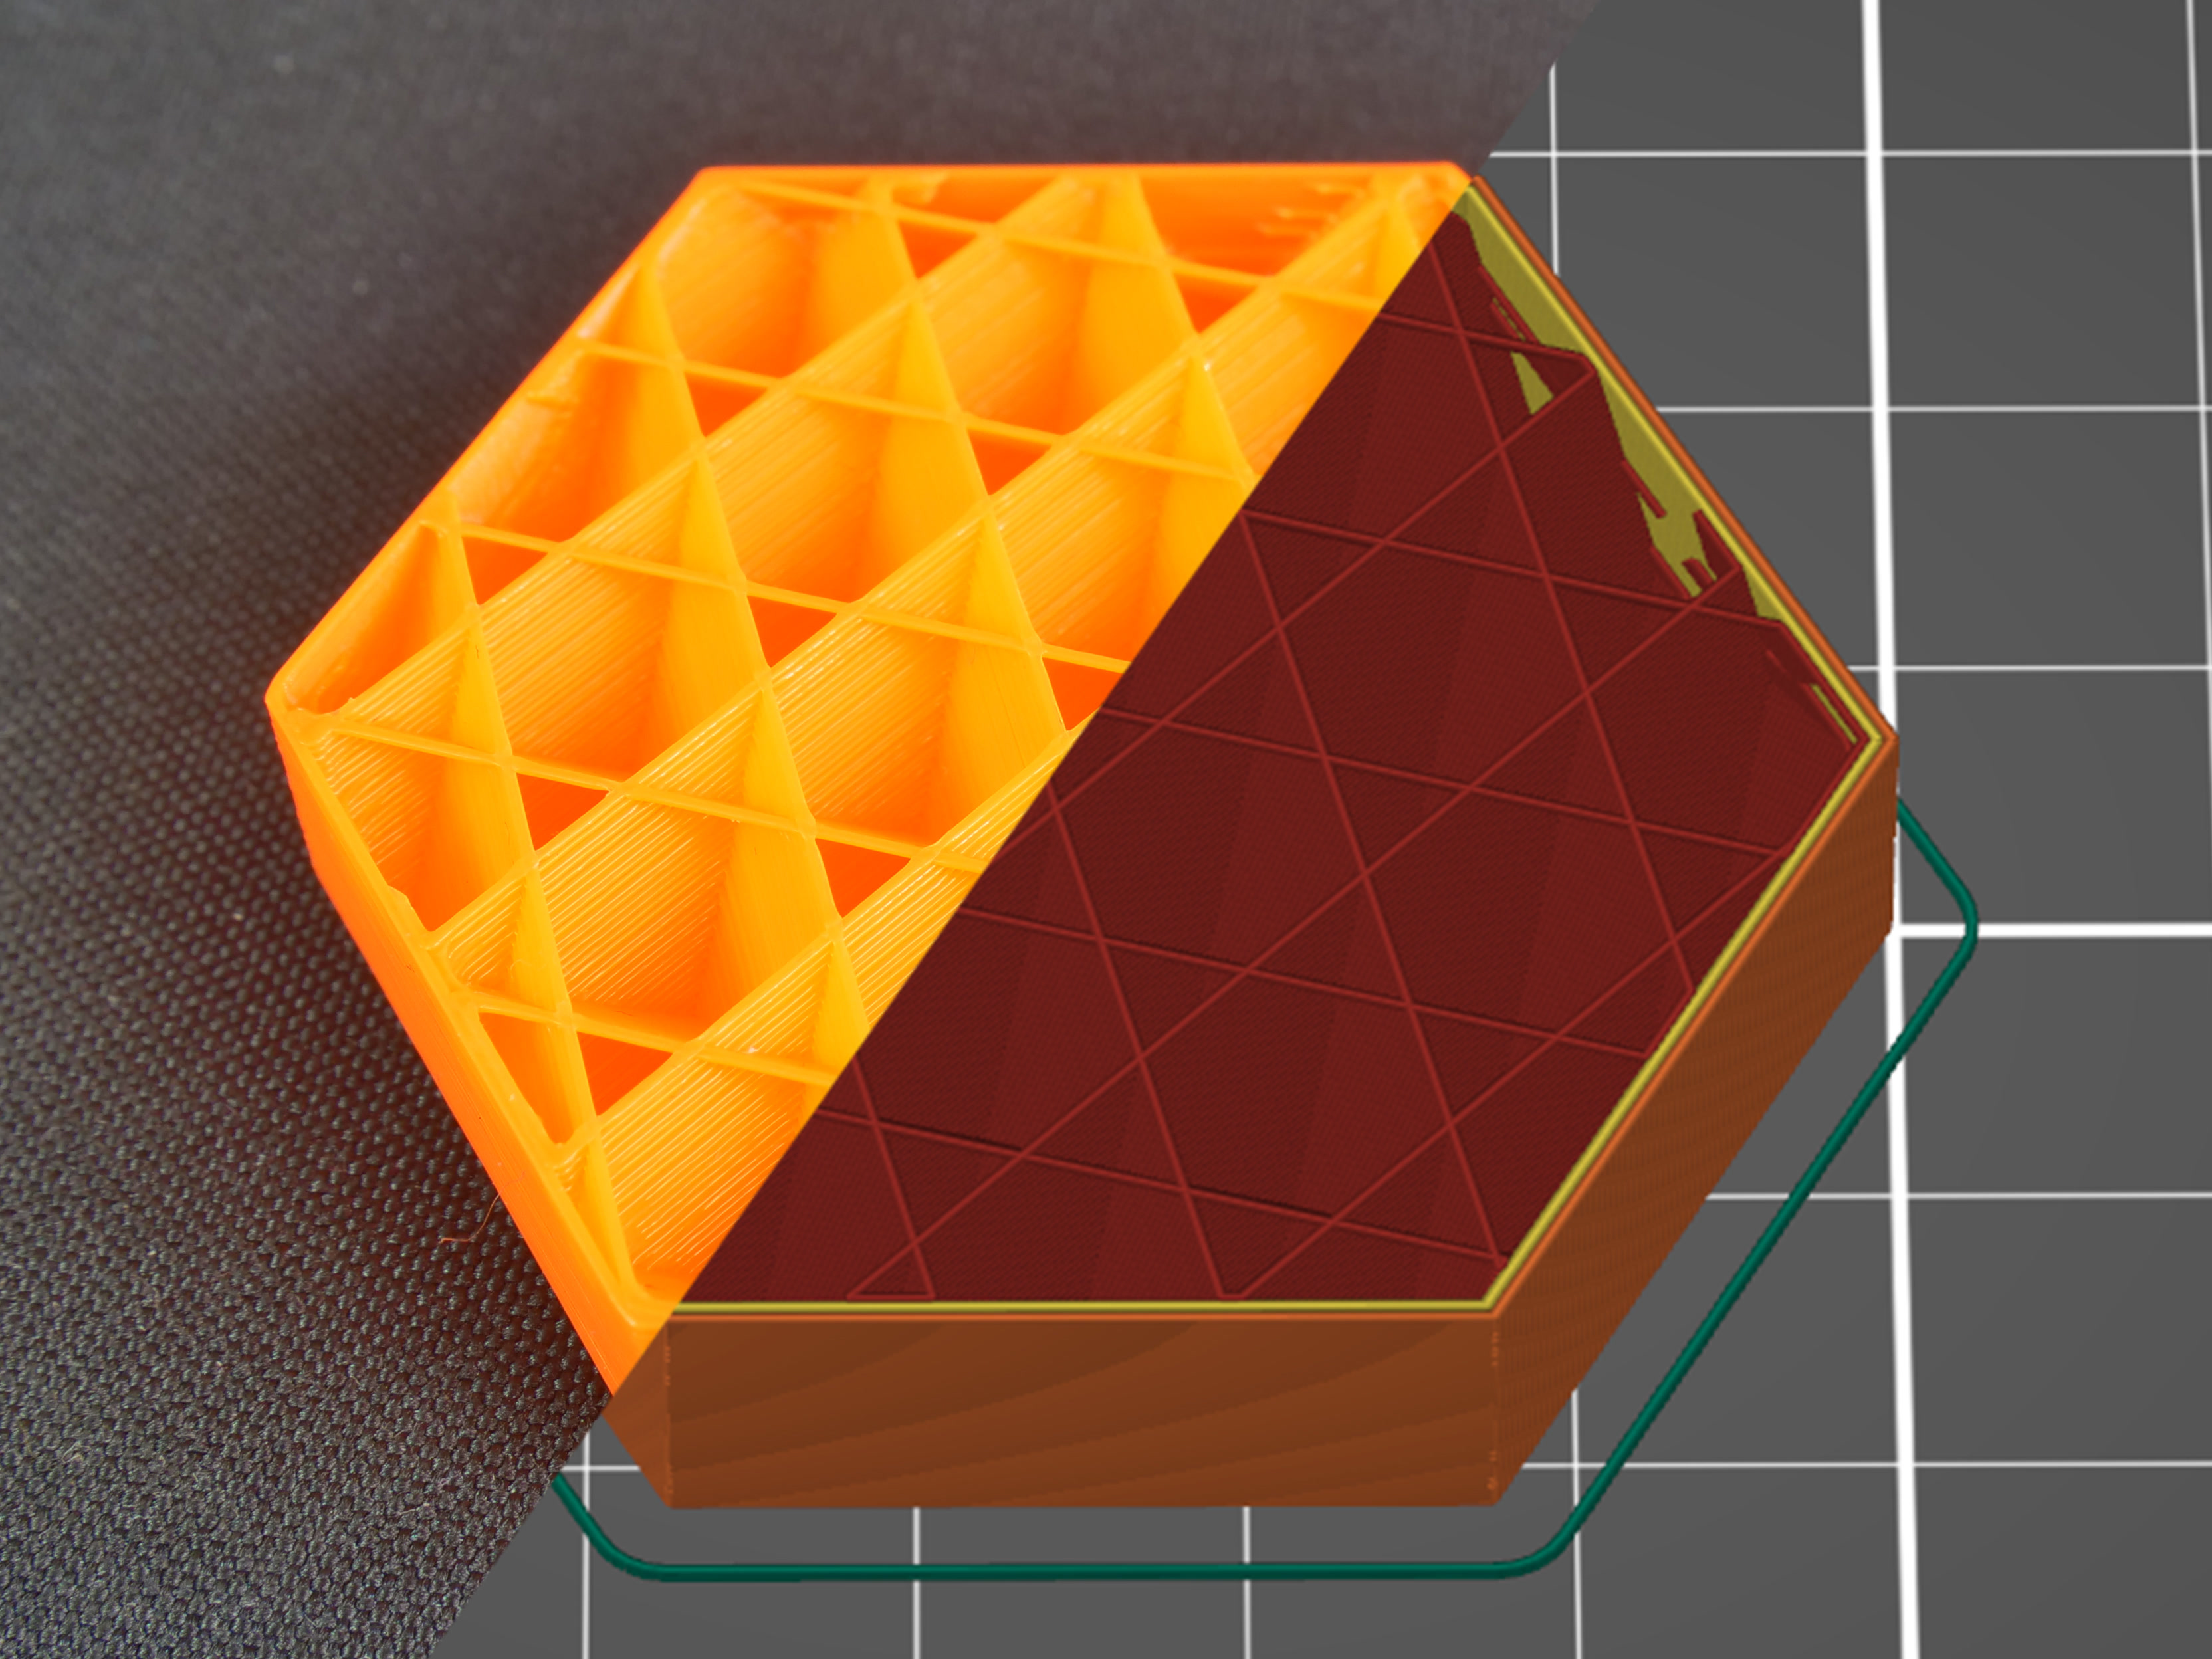
                  Cubic

                  This is an infill with paths that cross each other within one layer. It creates cubes oriented with one corner facing down. This way, it makes numerous air pockets that might serve as heat insulation or cause the object to float on water (with waterproof filaments such as PETG). Print time and filament consumption do not differ from the previous infills.
                  Adaptive cubic infill

                  The Adaptive cubic infill works on the same principle as the cubic. It consists of cubes oriented corner-down where lines cross themselves in one layer. Unlike simple cubic infill, this infill gets automatically more or less dense, depending on the distance to the nearest wall, leaving large cavities in the middle. This is especially useful for large prints with a big internal volume. The print will have denser infill at the top, bottom, and around all sides, but it will have lower density near the center of the volume. The result is shorter print time and lower filament consumption while maintaining great support for top layers and similar mechanical properties. Material consumption is approx. 1/4 less than the rectilinear infill.
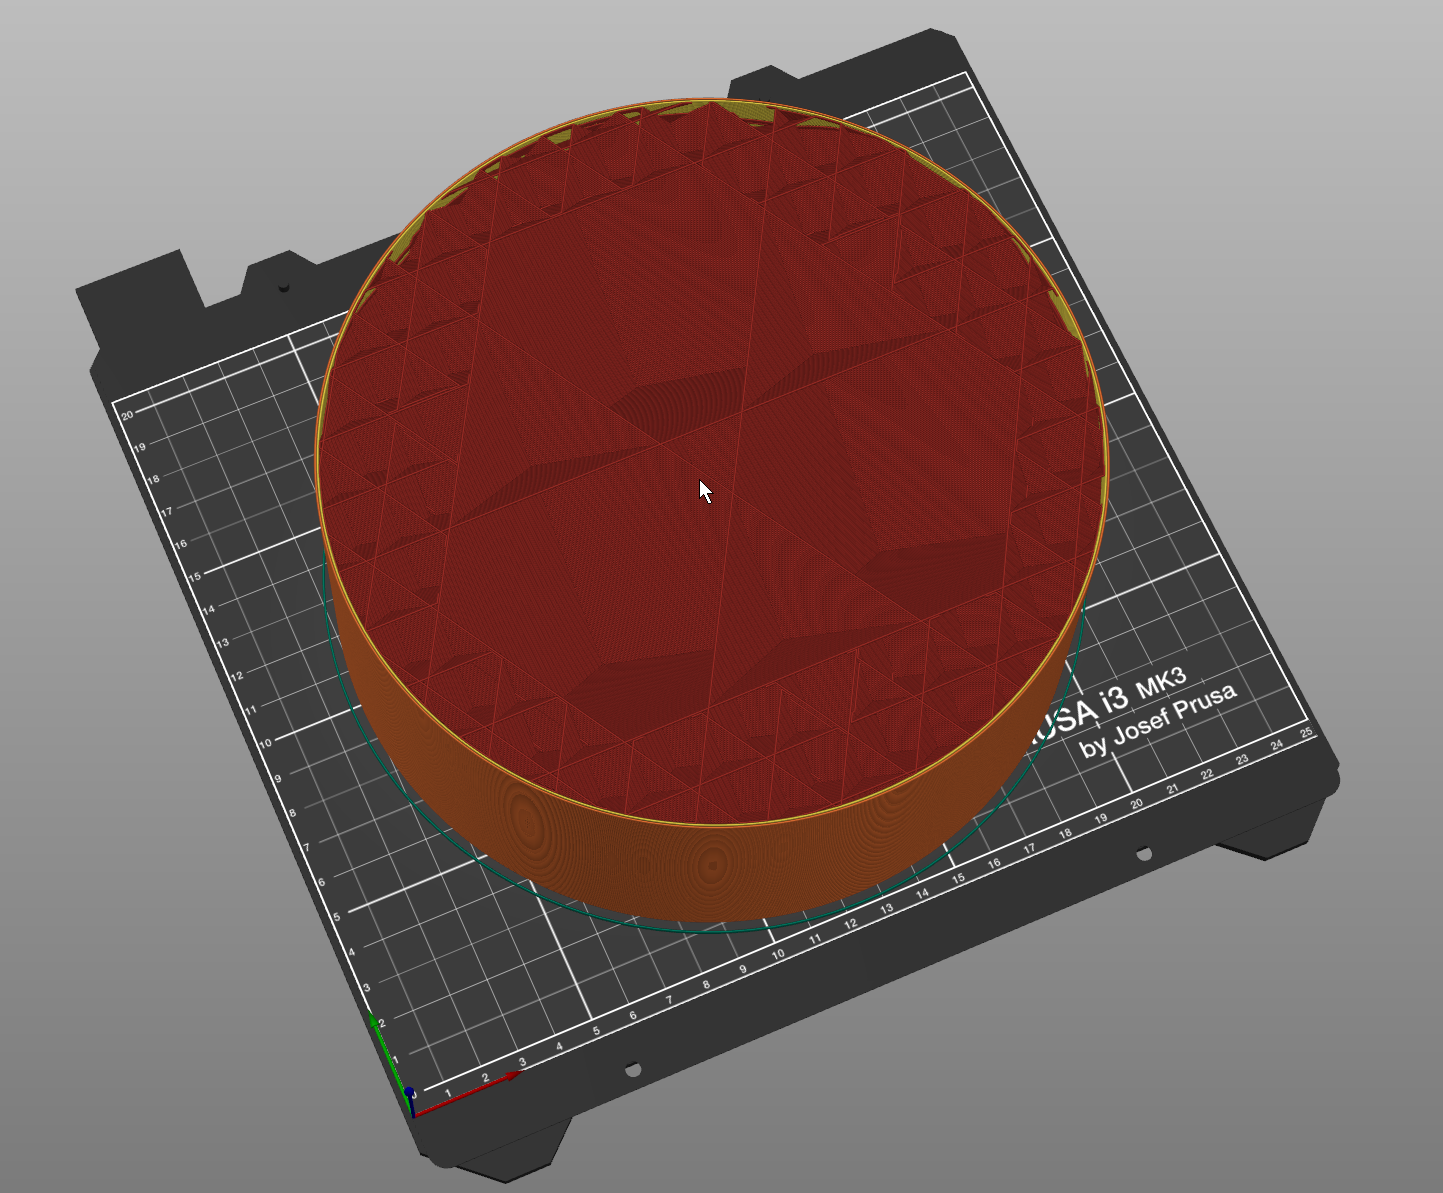
                  The Adaptive Cubic infill works by refining those cells of an octree that contain any object triangle. Anchors are added to each infill line. This makes the infill sturdier, and it stabilizes the extrusion flow at the start of an infill line.

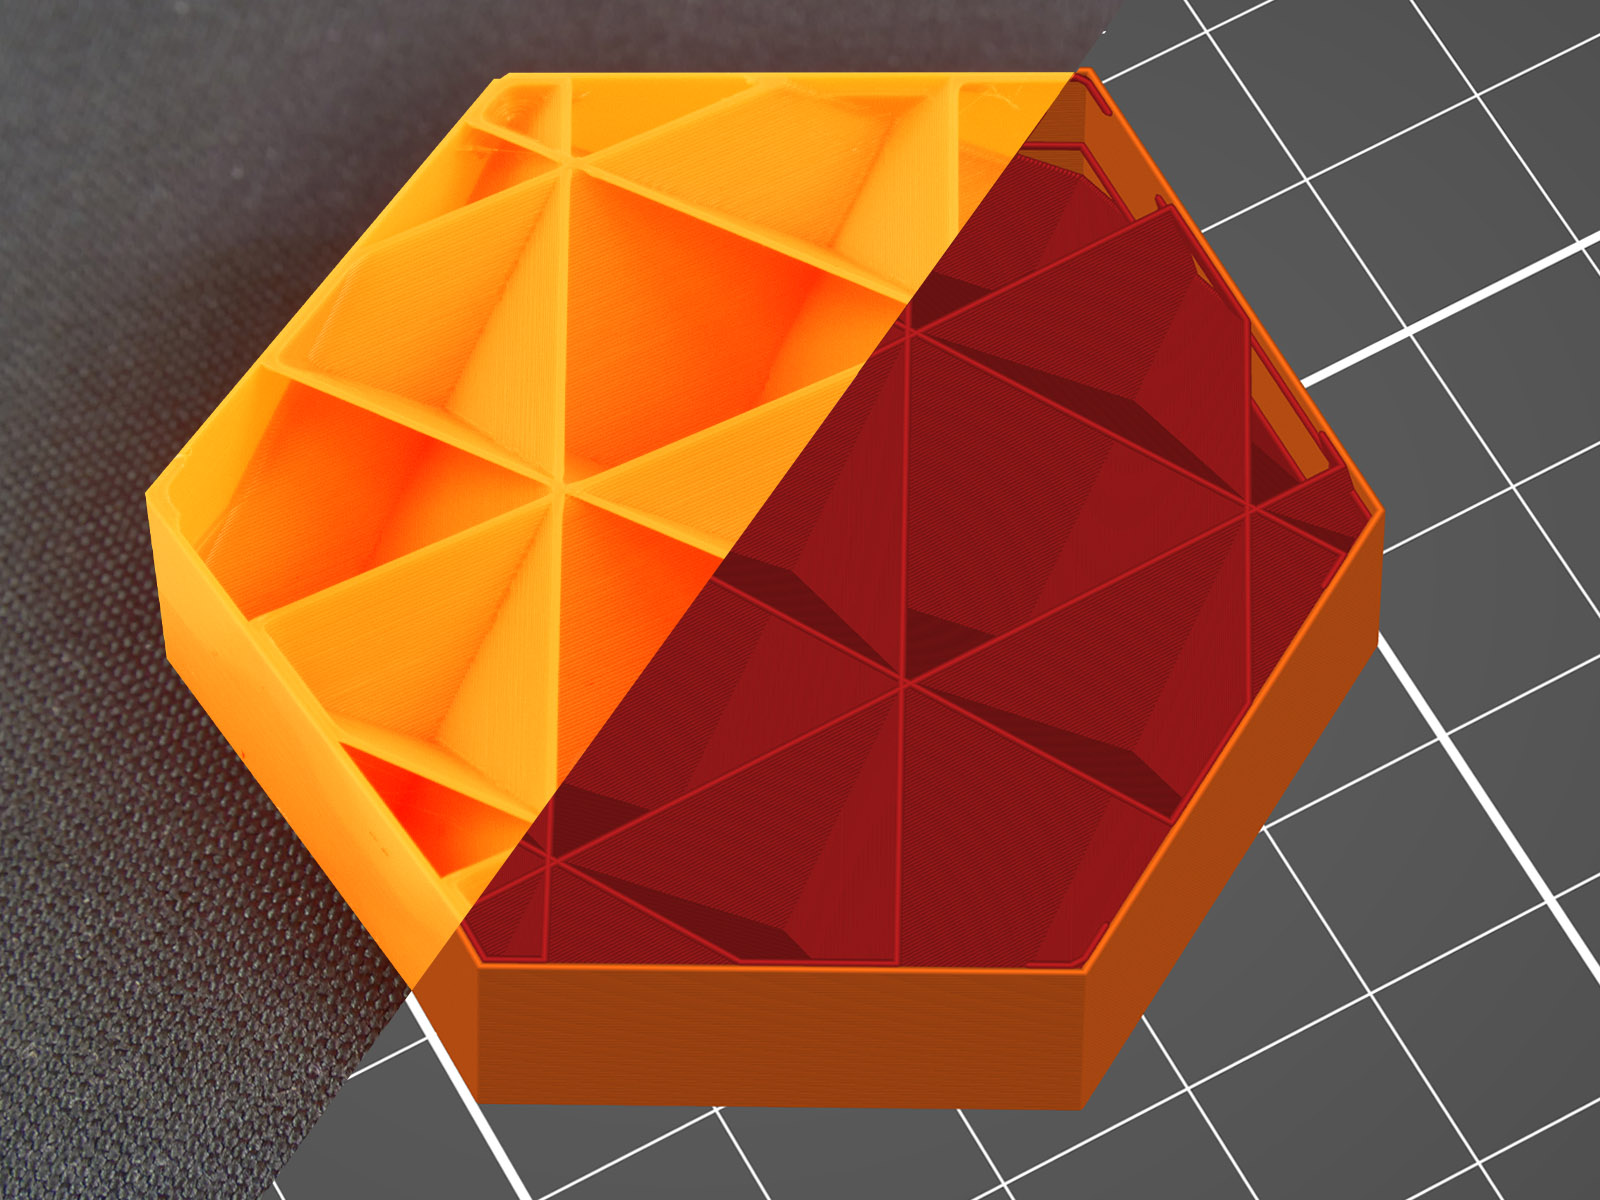
                  Support cubic infill

                  This infill gets automatically denser depending on the distance to the nearest top layer (the infill density increases only in the Z-axis). Its primary function is to support the top layers by saving as much material as possible. It doesn’t improve any mechanical qualities of the model. Material consumption and print time of this infill are by far the lowest of all the supported infills.
                  Rectilinear

                  Rectilinear is one of the basic infill patterns. It creates a rectilinear grid by printing one layer in one direction, the next layer rotated by 90°, etc. This way, it saves filament and doesn’t accumulate material at crossings (unlike the grid). It’s one of the fastest printed infills.

                  Compared to the Grid pattern, Rectilinear has double the support for top layers using the same amount of material.

                  This type of infill is the only one recommended for 100% infill printing. If you have another infill type set in your profile and change the infill percentage to 100% density, PrusaSlicer will automatically switch the infill type to rectilinear.
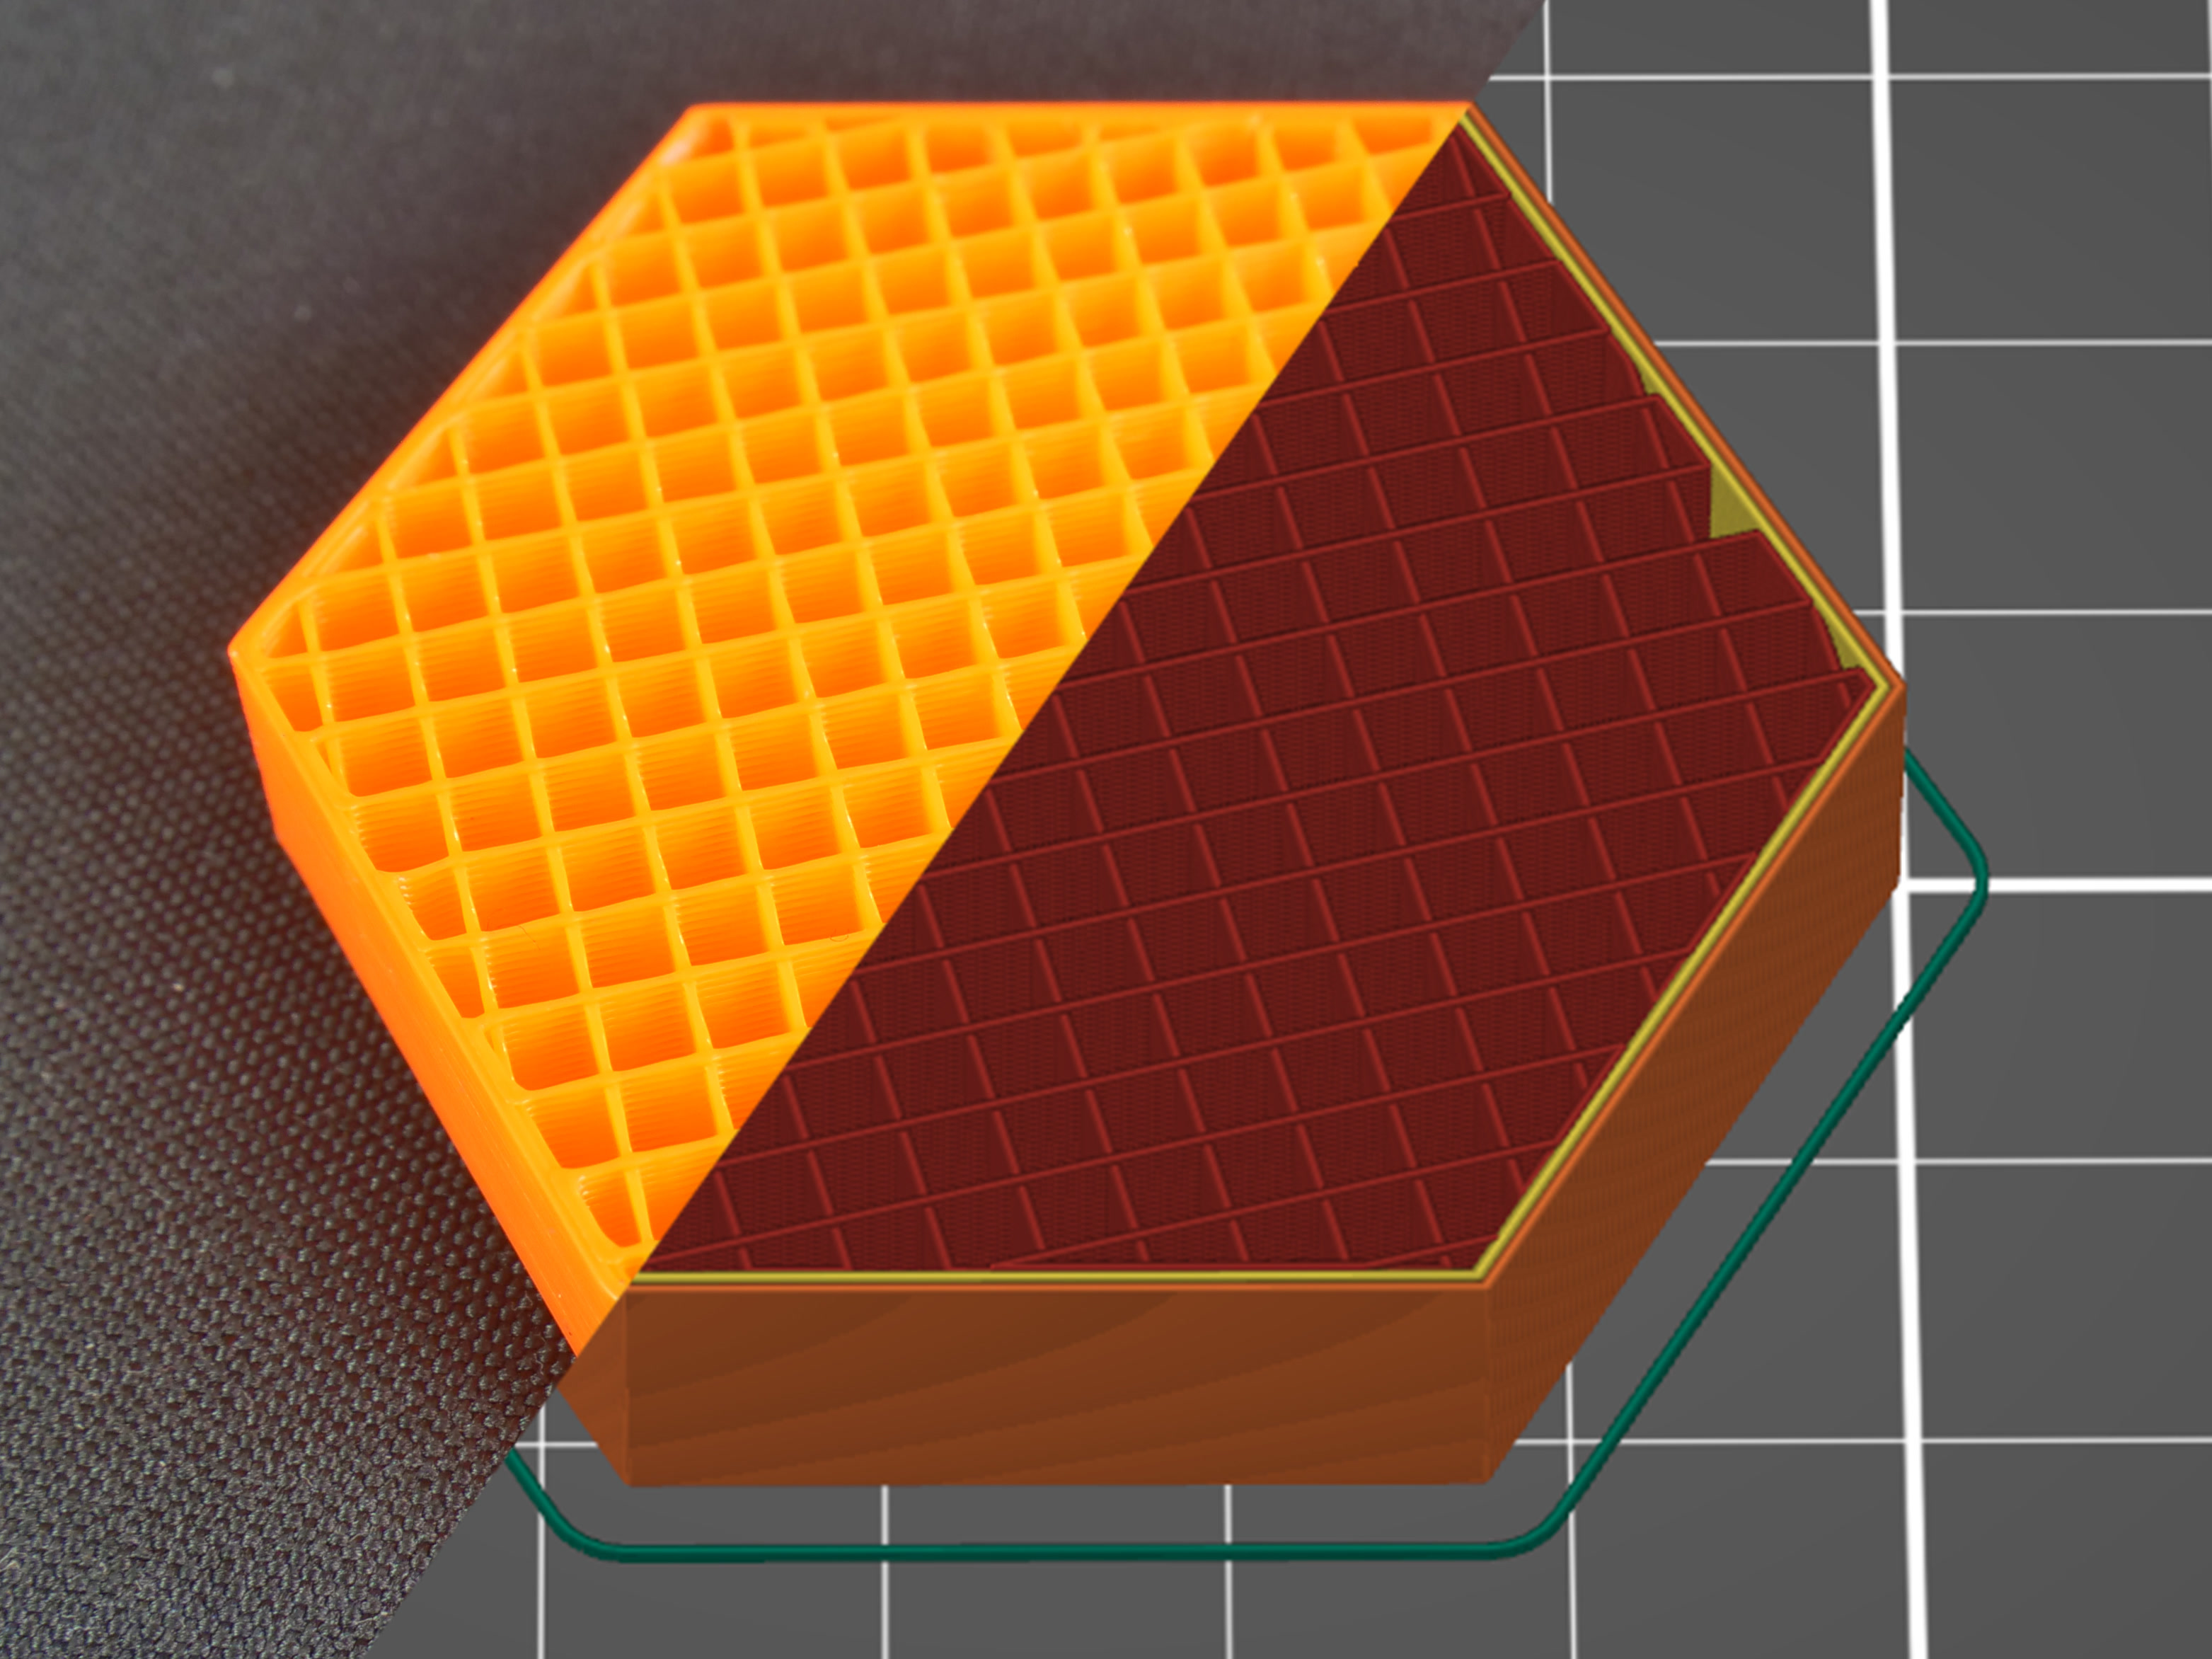
                  Aligned rectilinear

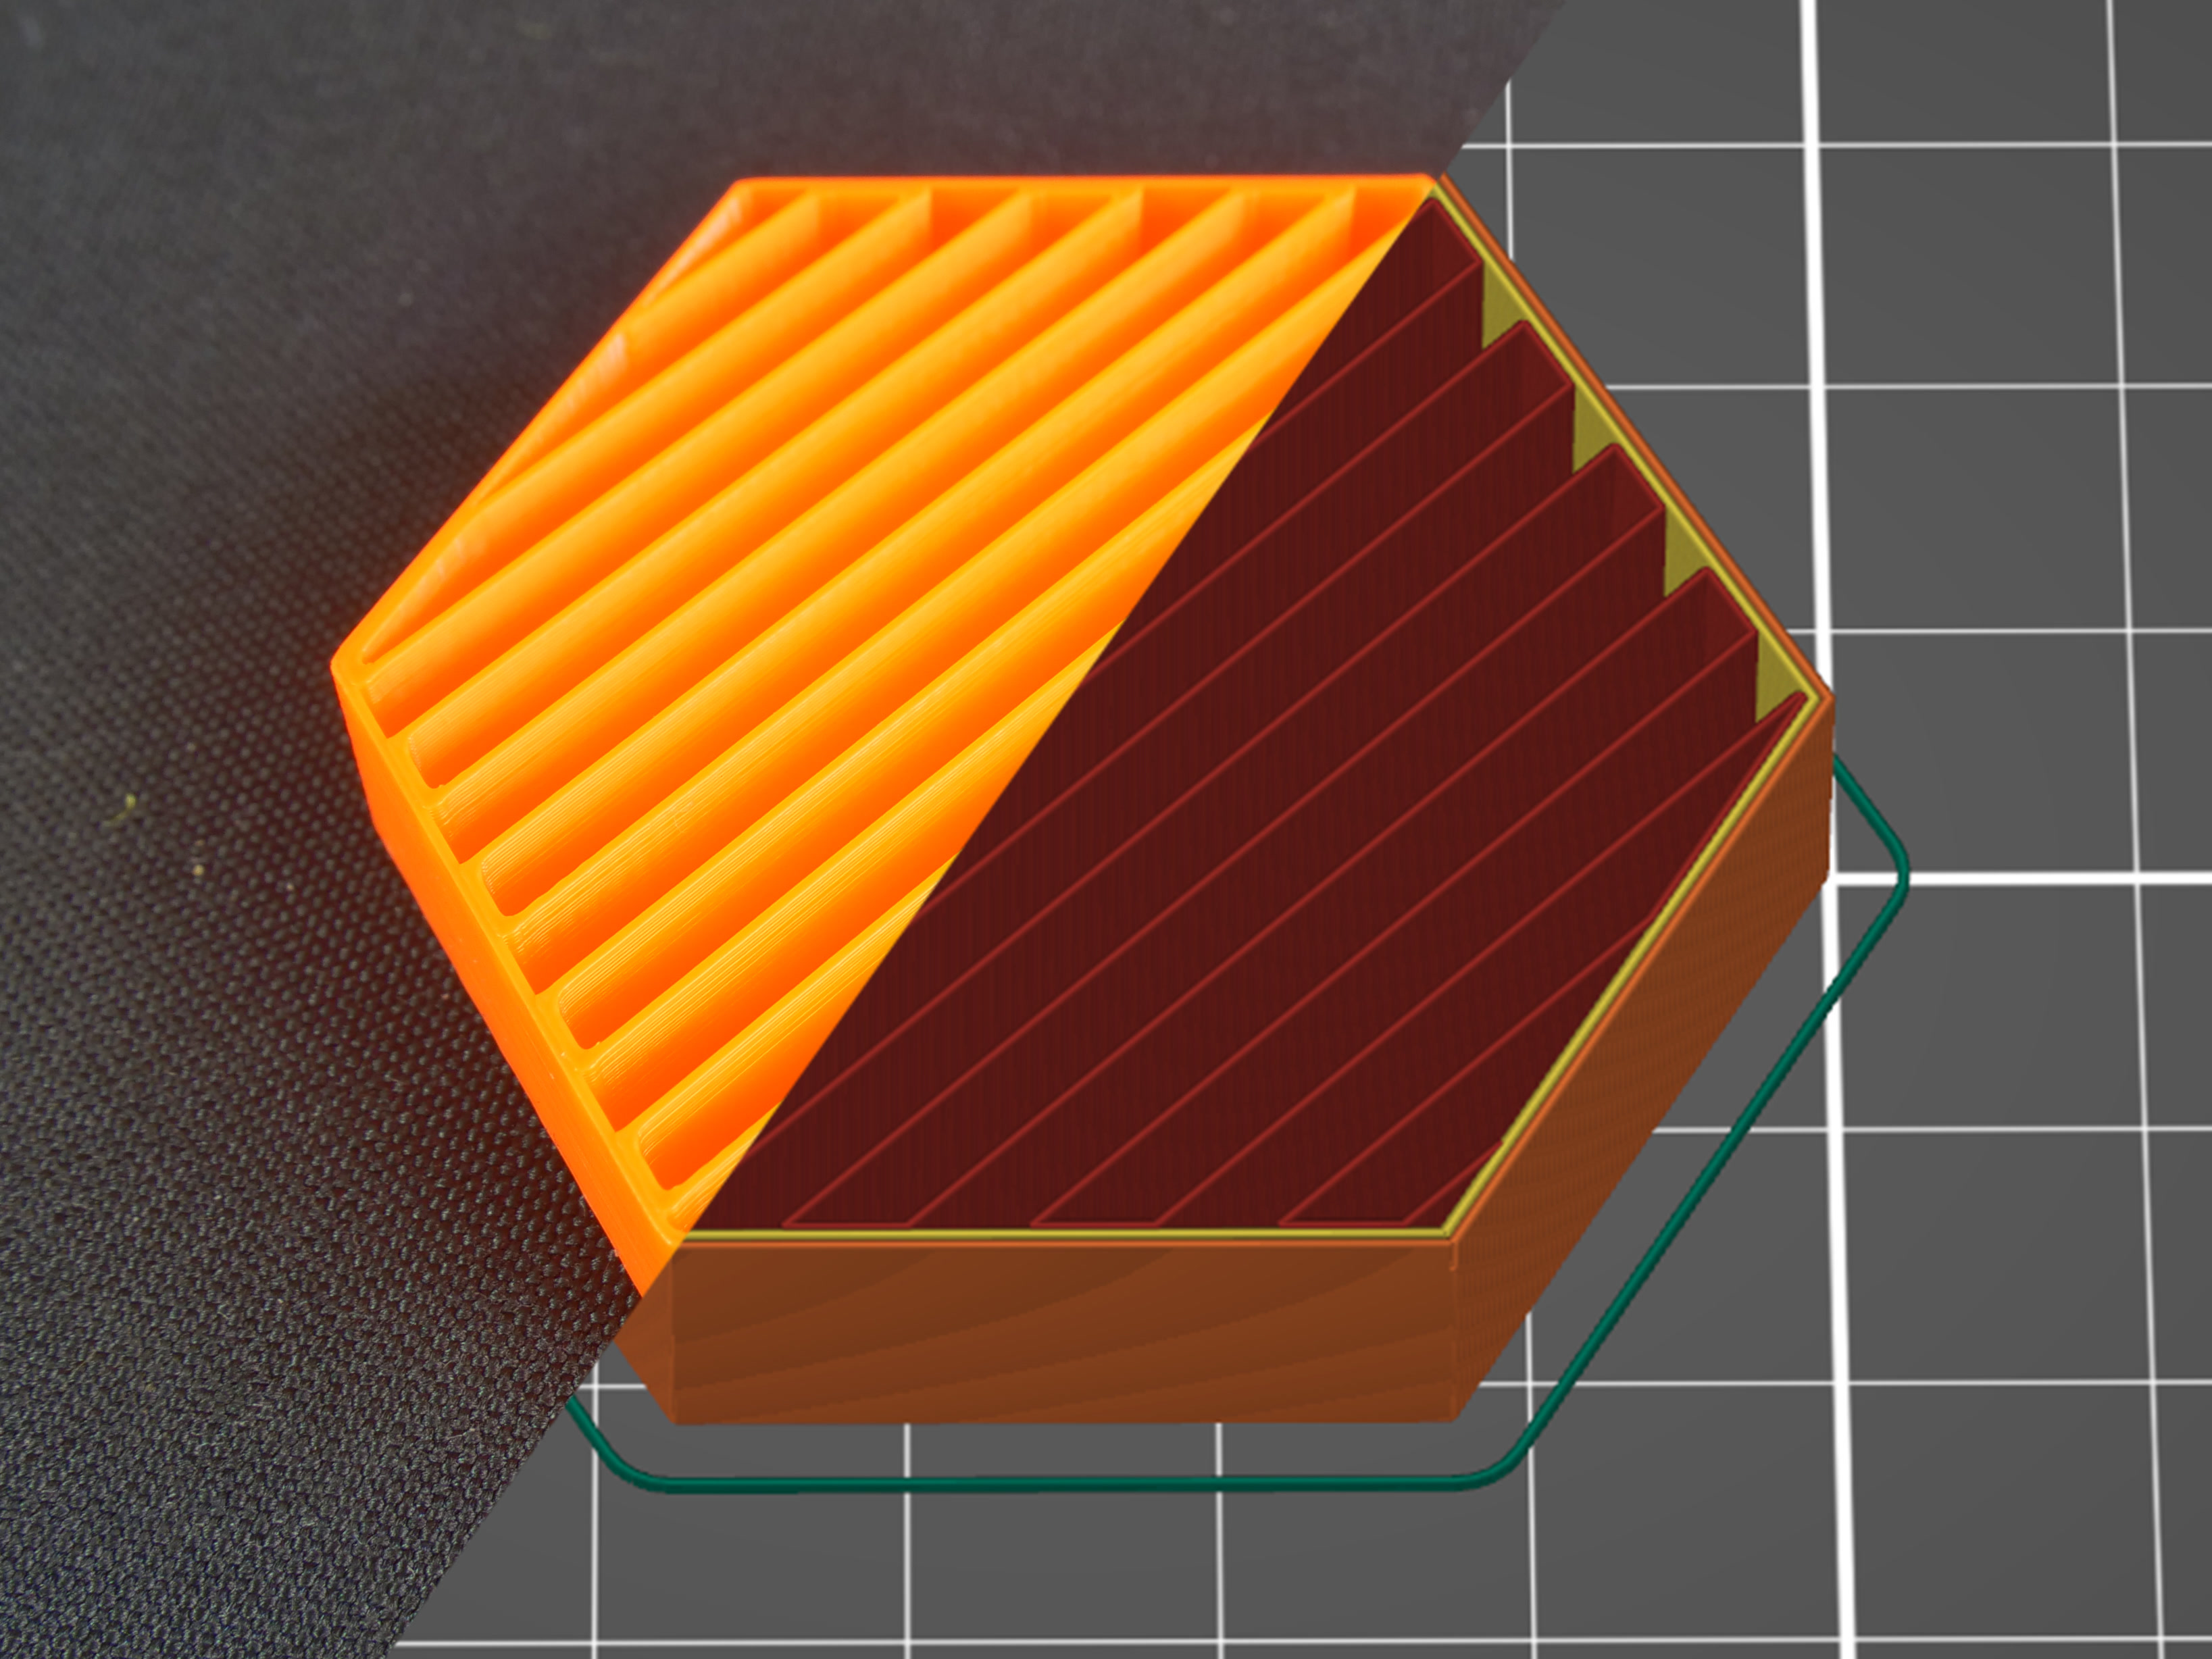
                  This infill is formed by parallel lines drawn within the model that resemble the exterior support structures. Similar to the previous type, this infill saves time, has average material consumption, plus it doesn’t accumulate material at crossings. However, using this infill might cause some trouble when the direction of the lines in the infill is the same as in the infill of the first top solid layer – if they are perfectly parallel, the top layers might have issues with bridging.
                  Grid

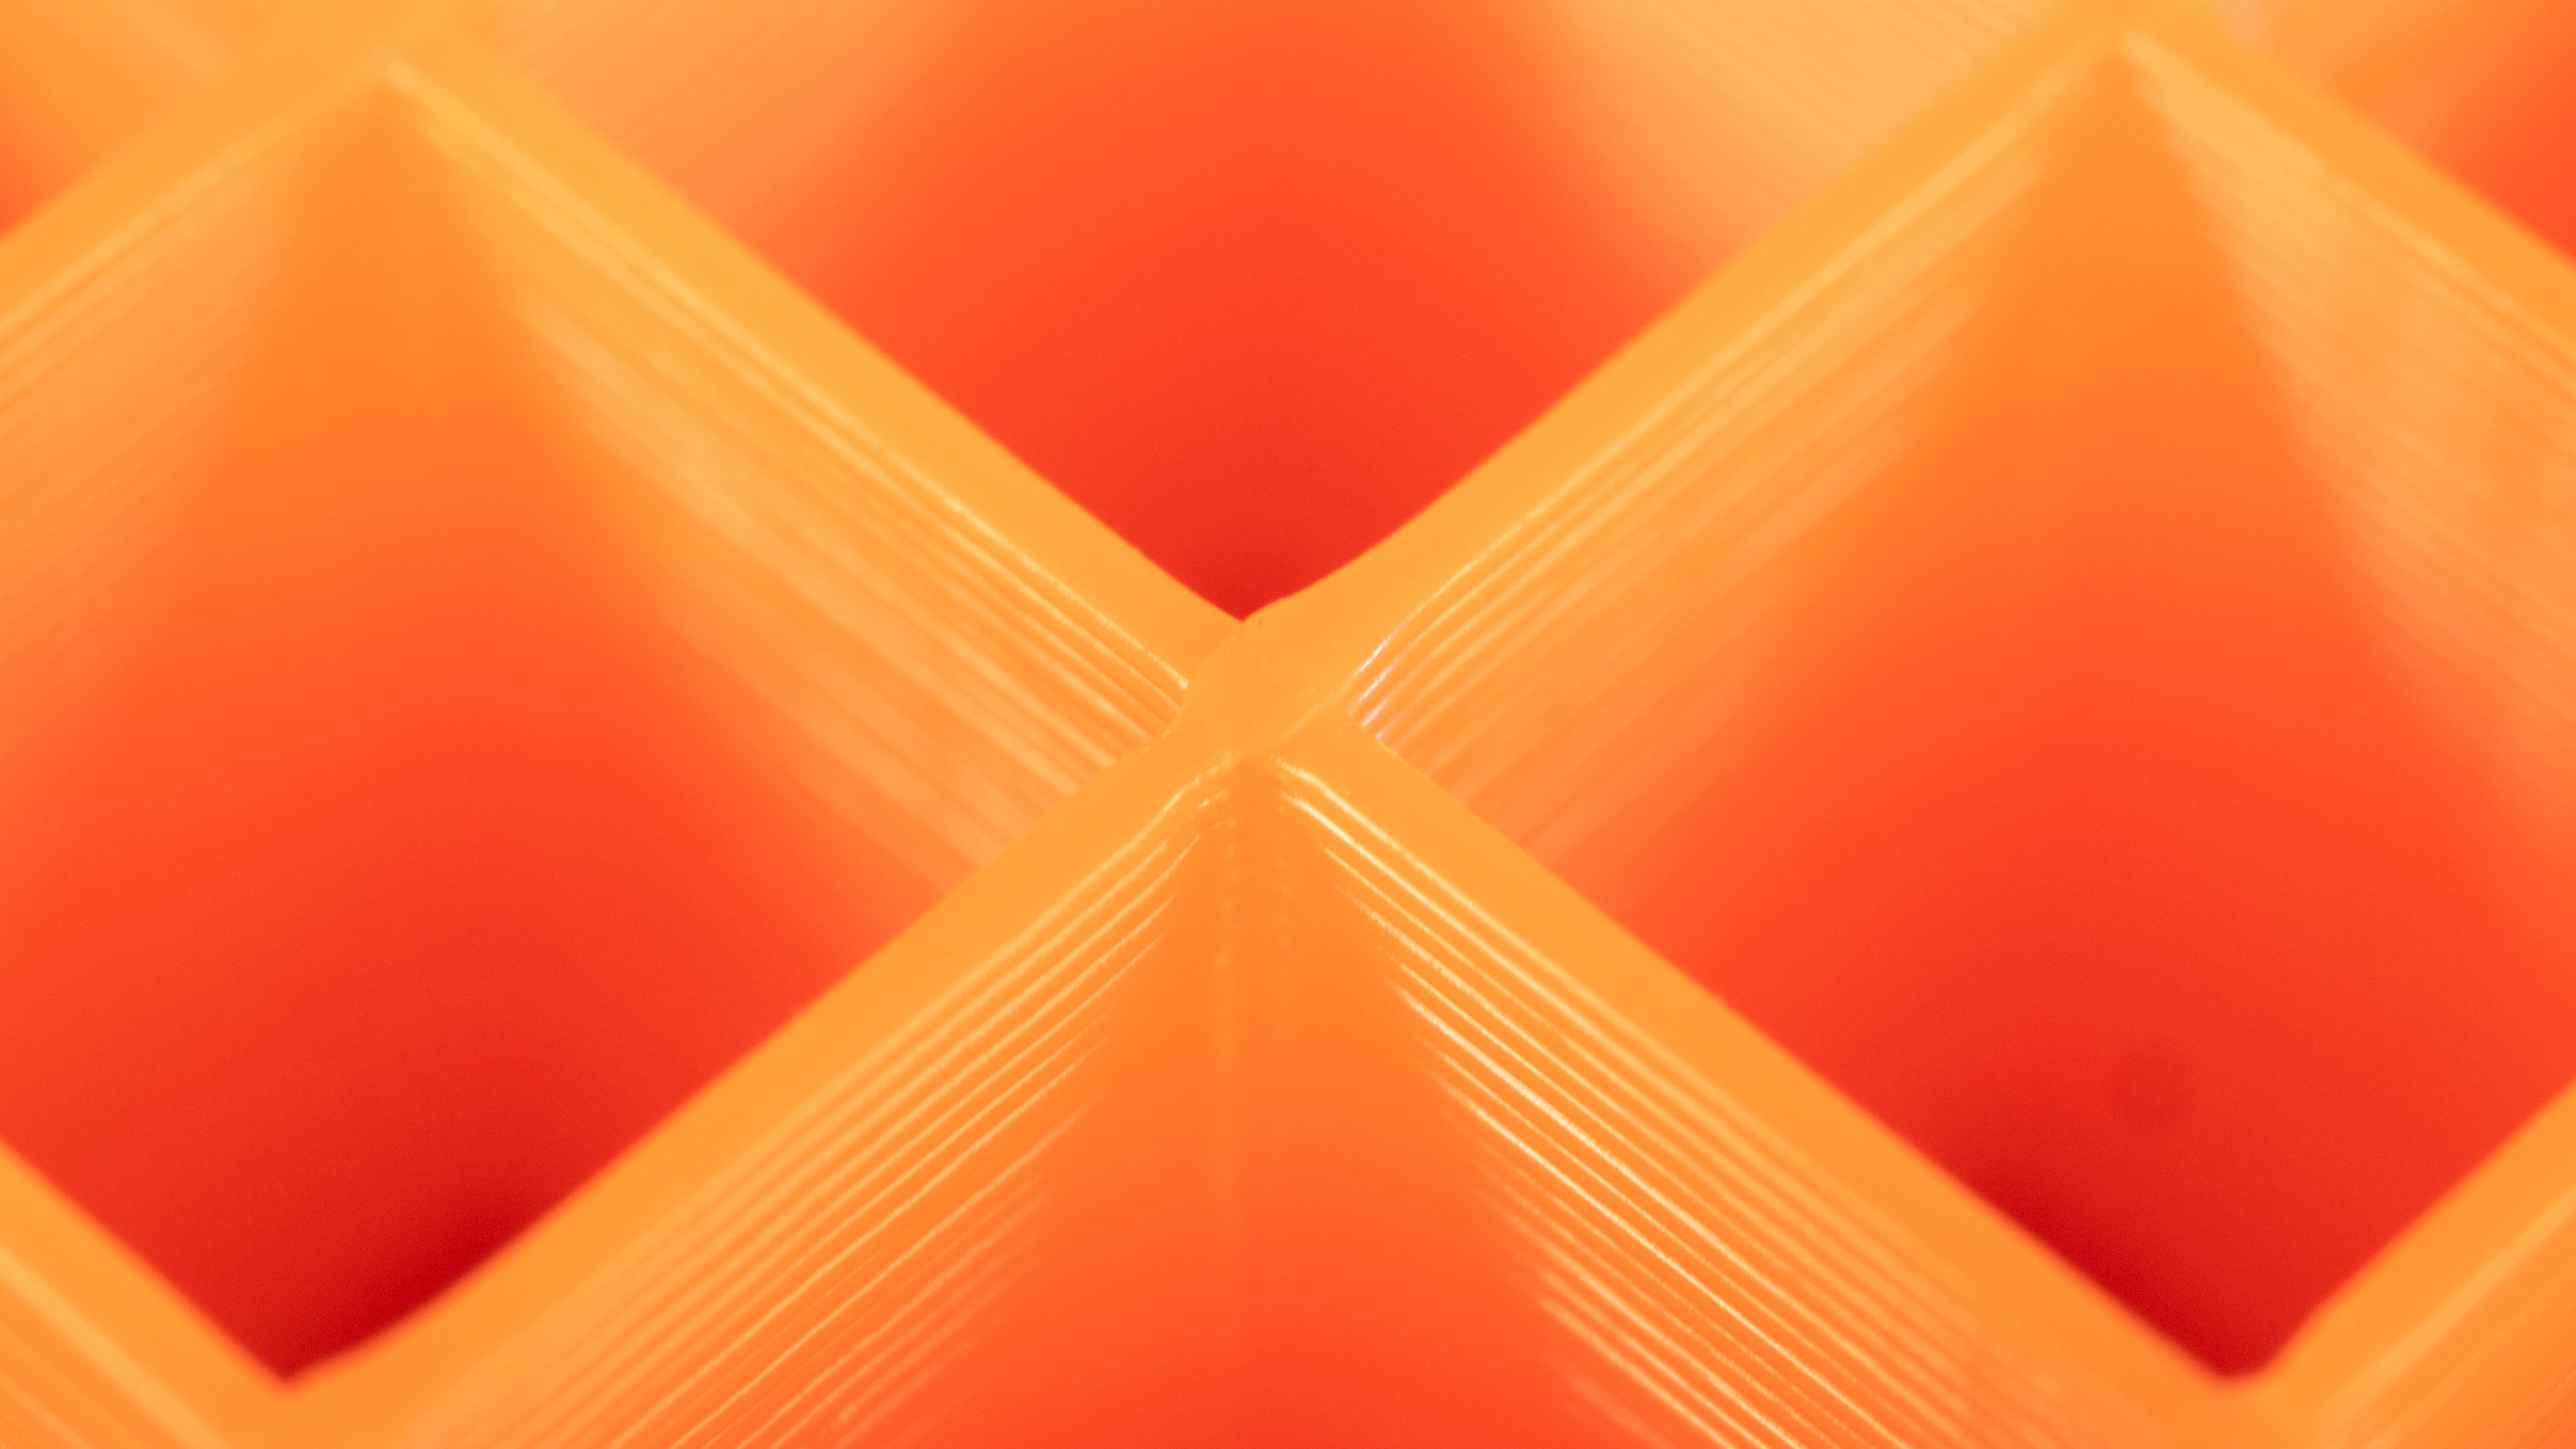
                  This is one of the simplest and fastest infill variants. Unlike rectilinear, it’s printed in both directions (rotated by 90°) in each layer. This way, material accumulates where the paths cross. The grid infill is more solid (and has better layer adhesion) than the rectilinear infill. However, it can sometimes cause annoying noise or even a print failure due to the nozzle going over the crossings where material accumulates.
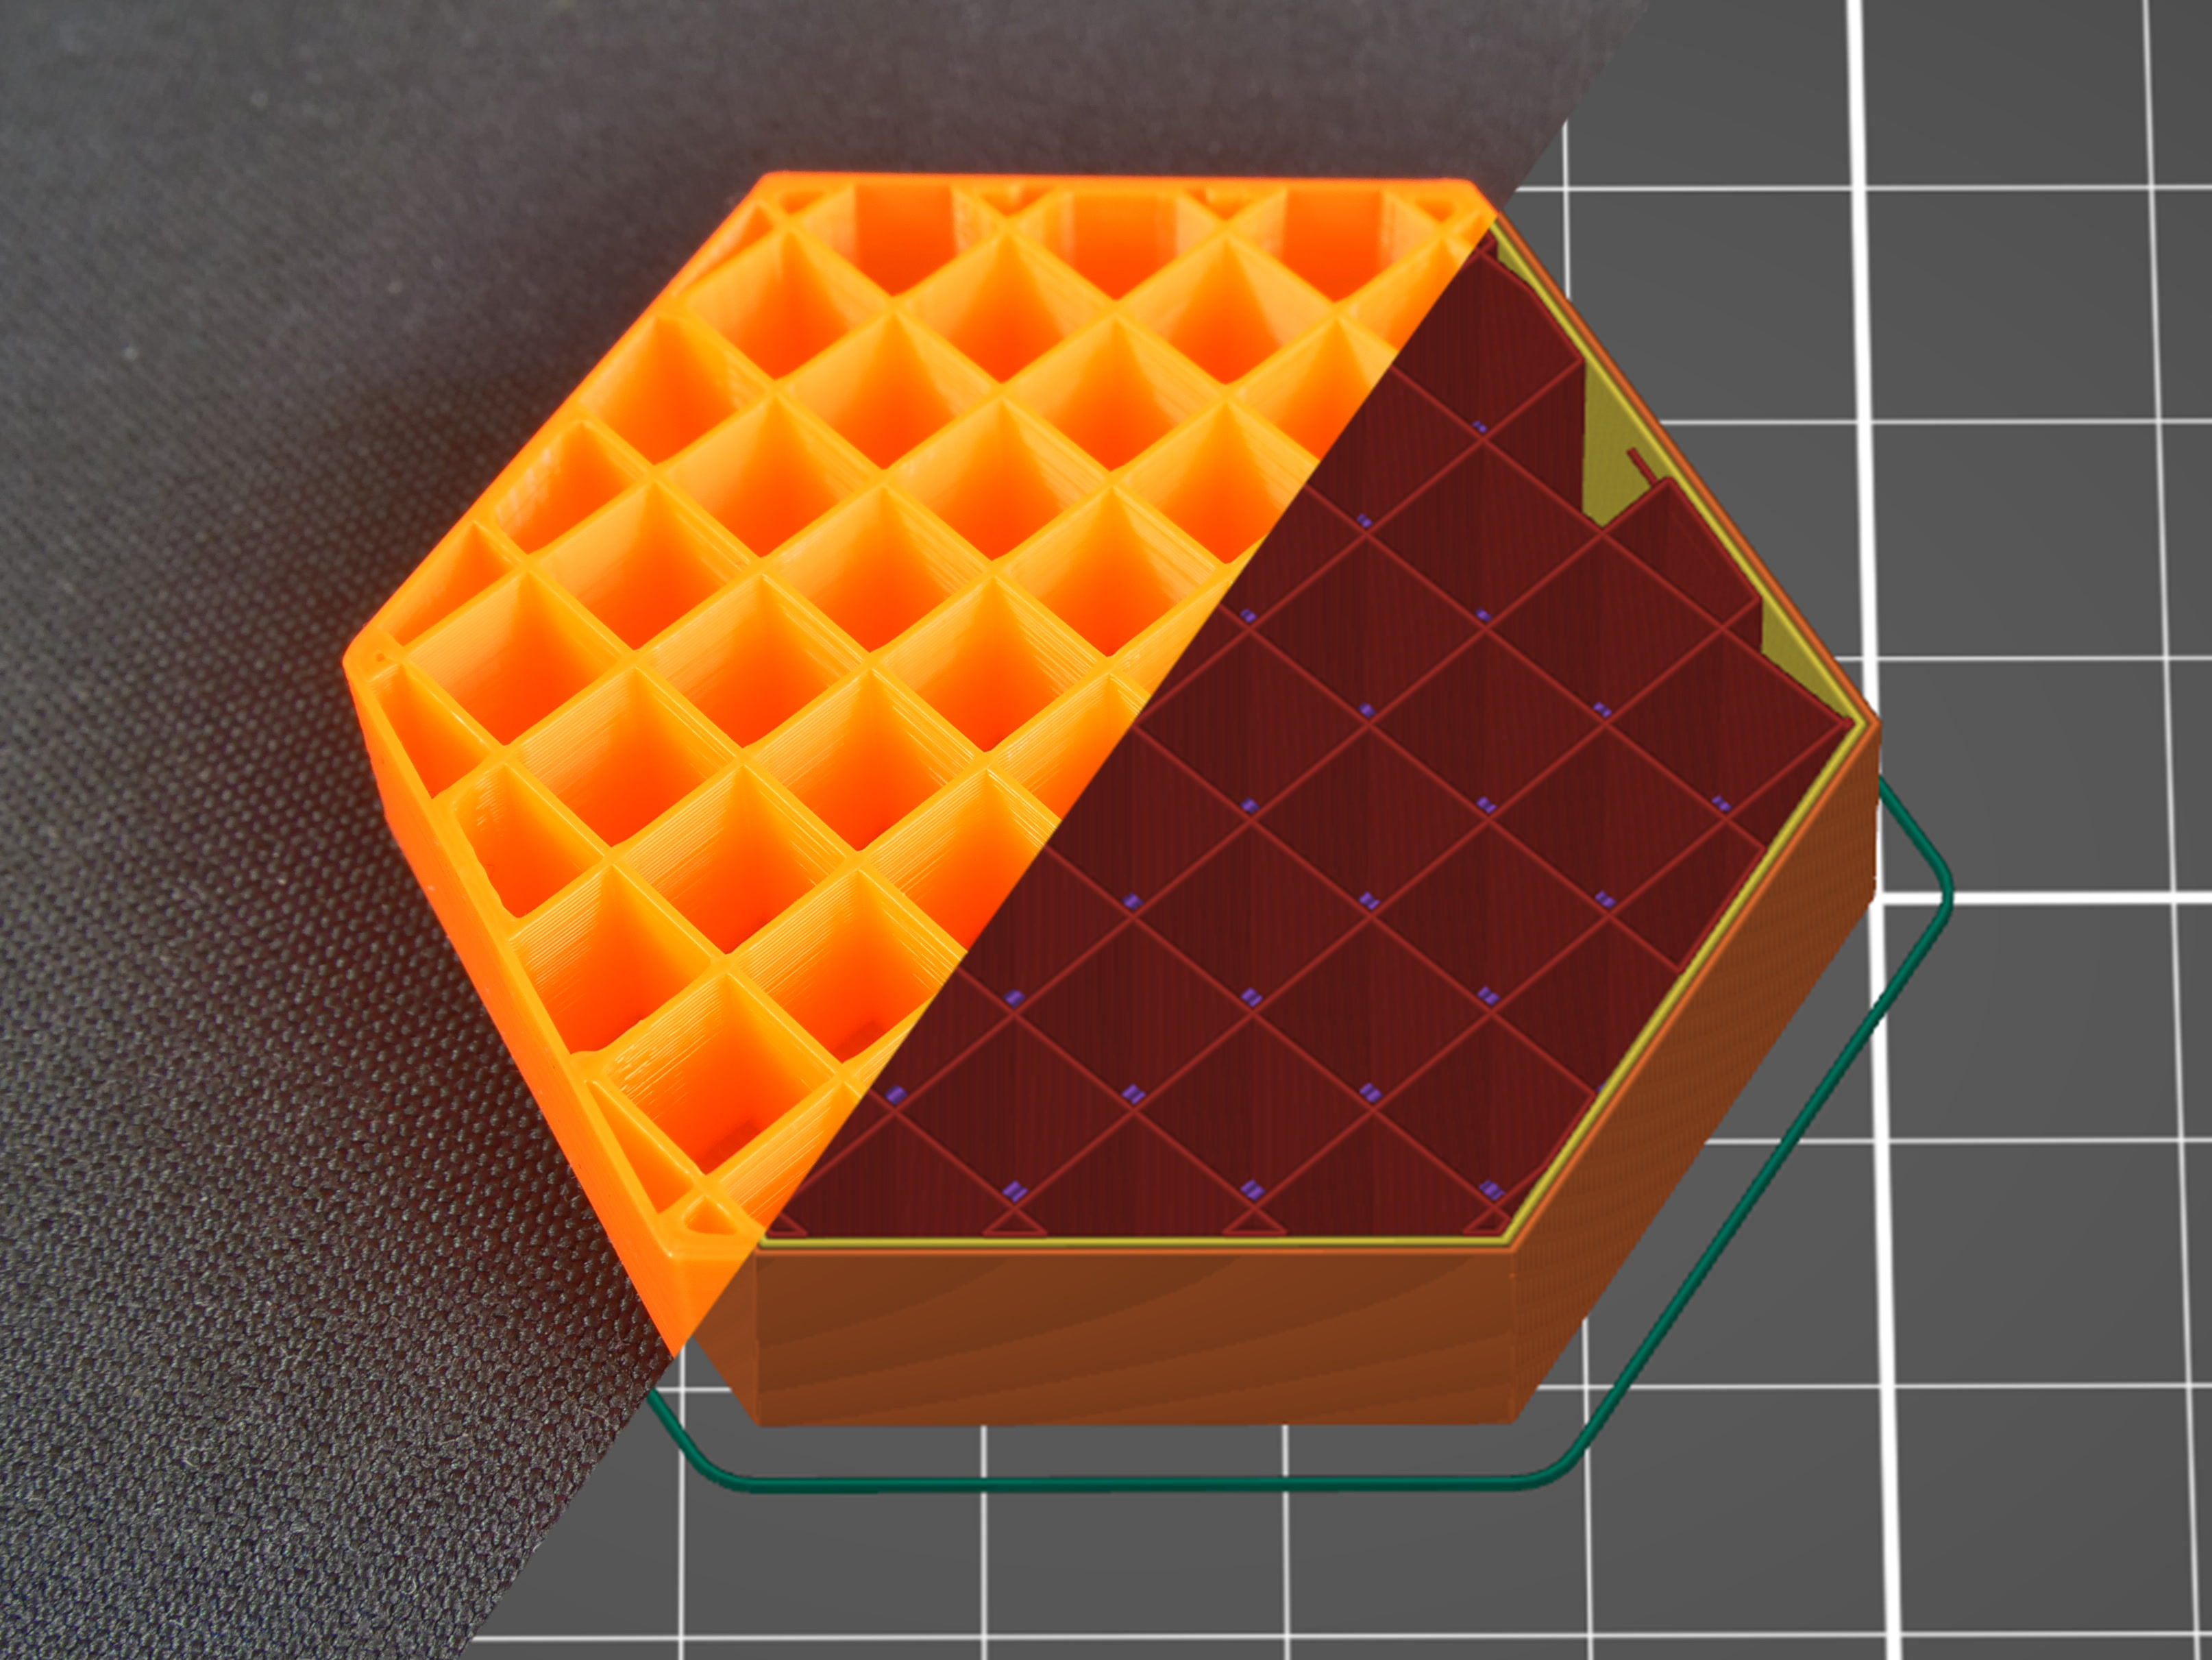
                  Due to the way this infill is printed, the paths cross and cause the material to accumulate in these spots. You may hear a specific noise as the nozzle hits these parts. This may even lead to a failed print.
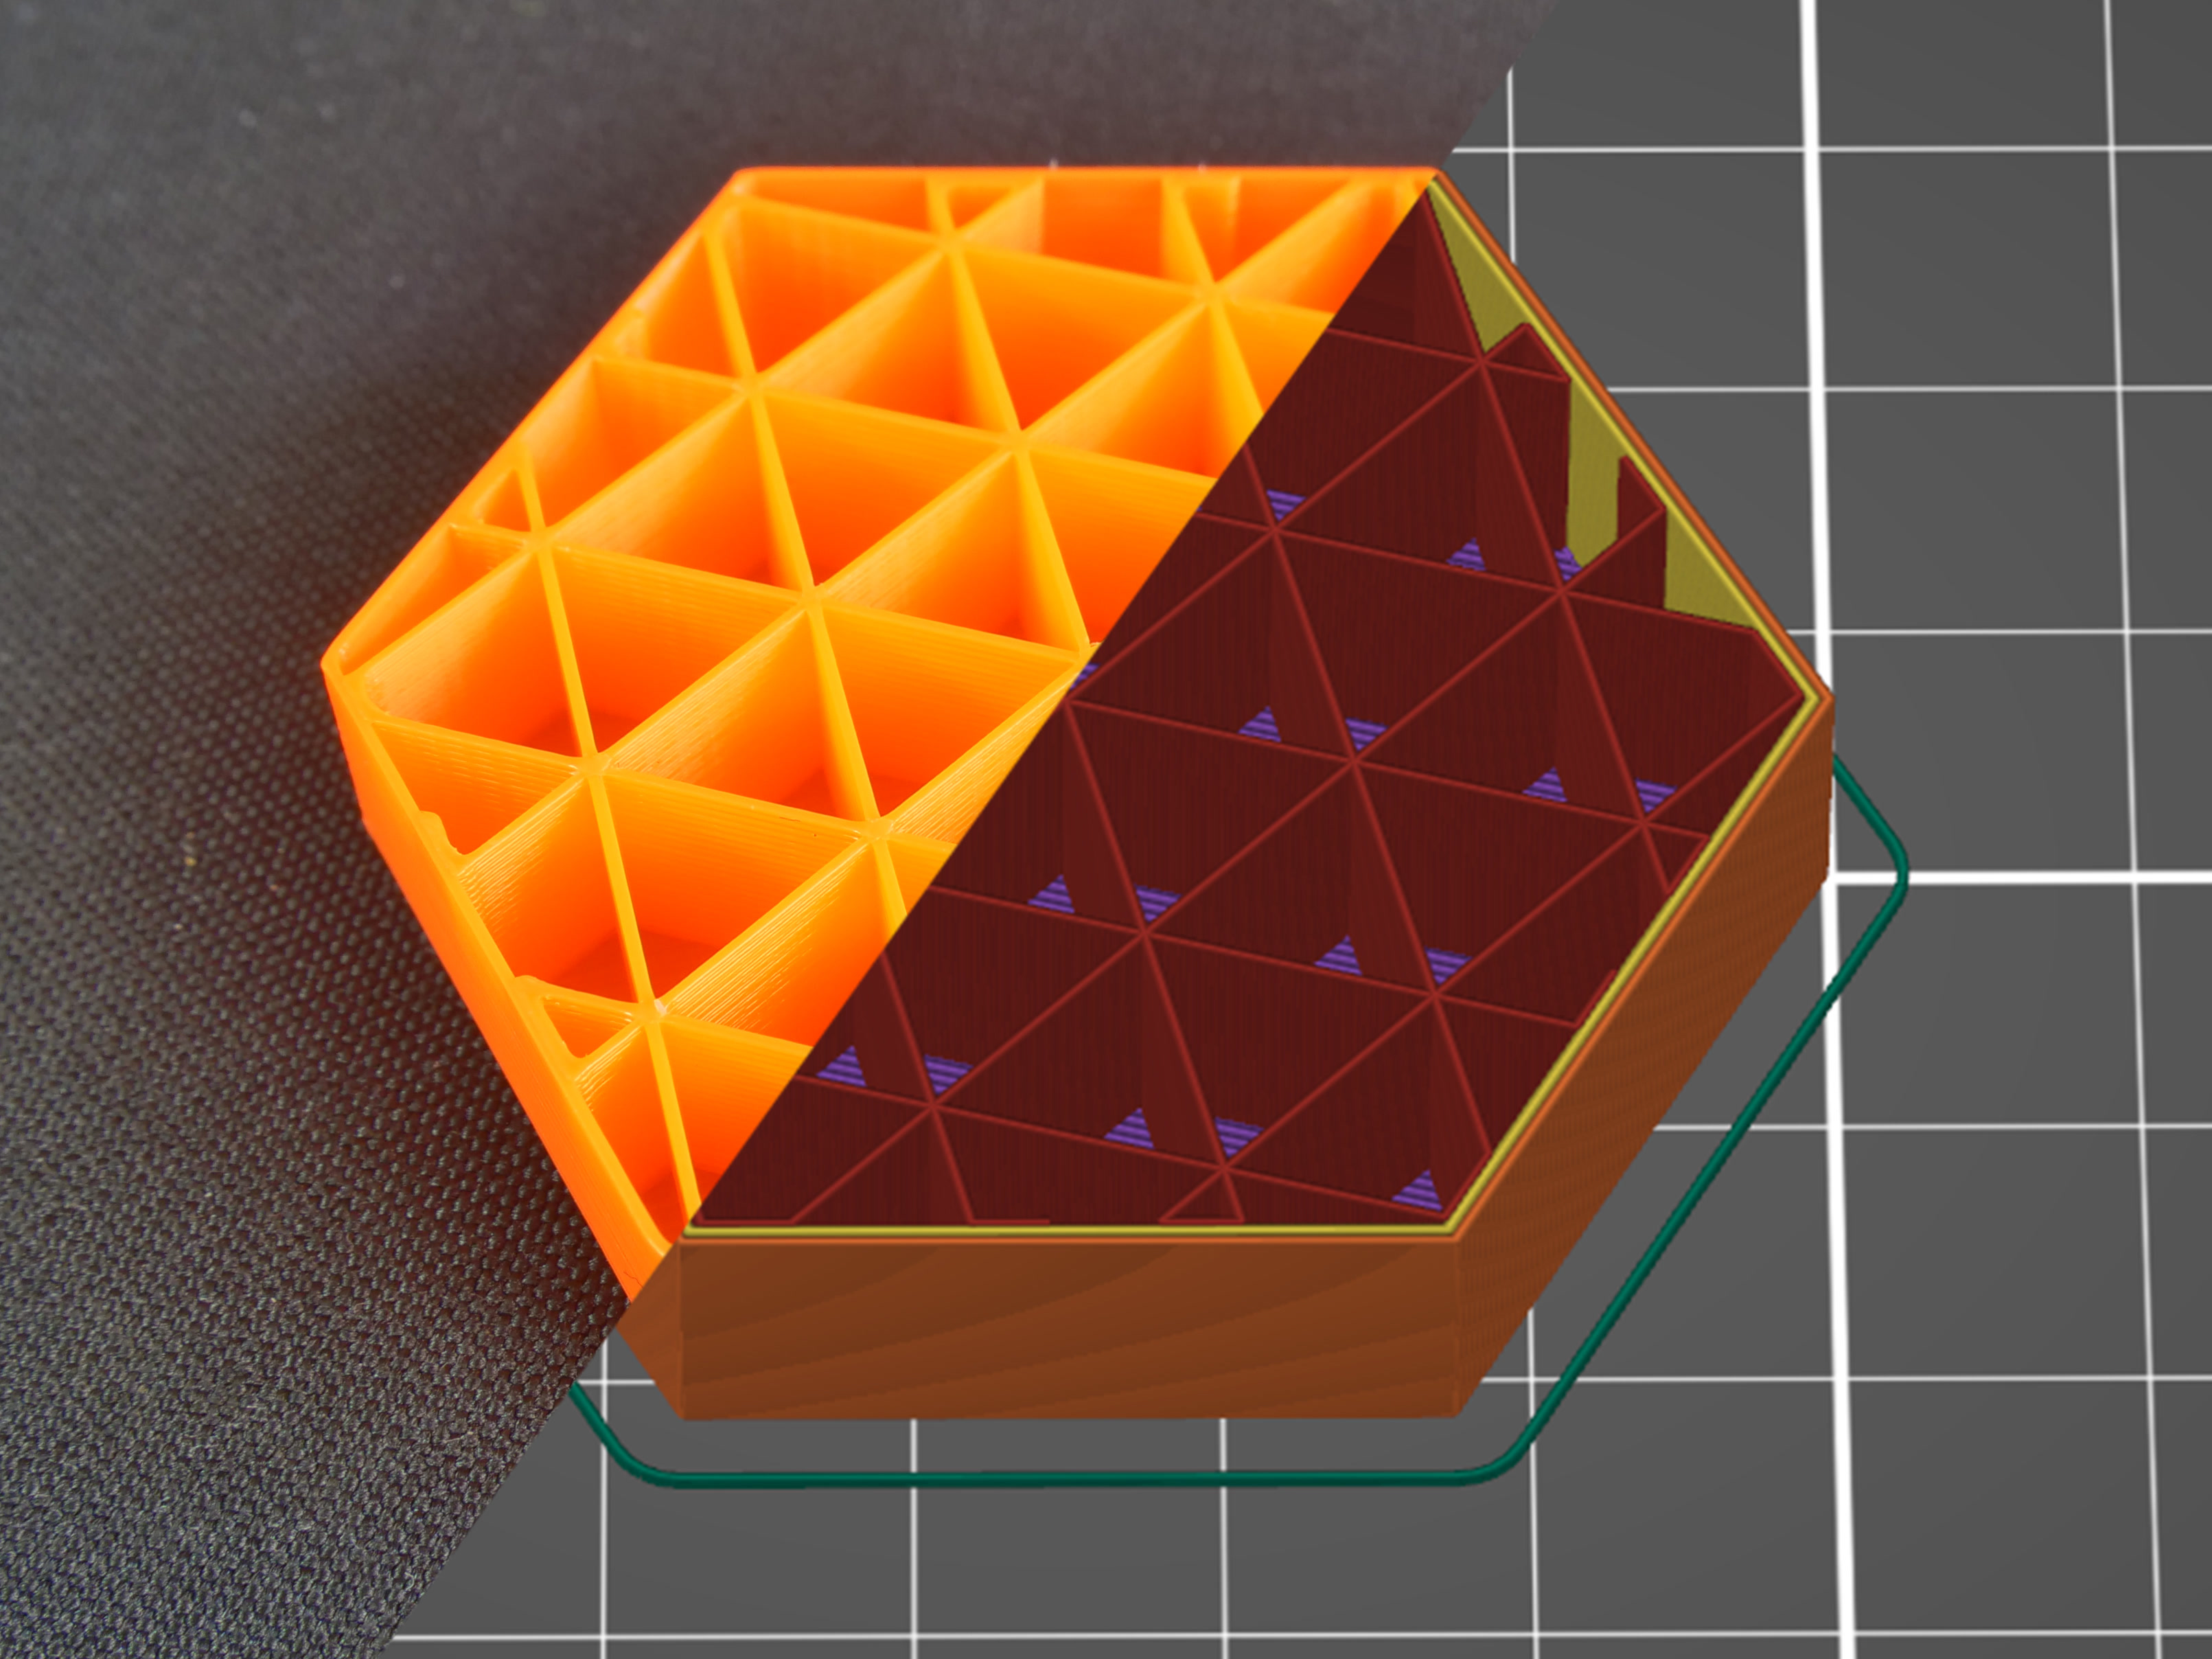
                  Triangles

                  This infill works similarly to the grid infill – the paths cross in one layer. However, this time they are printed in three directions and form a triangle structure. Material and time consumption are almost identical to the grid.
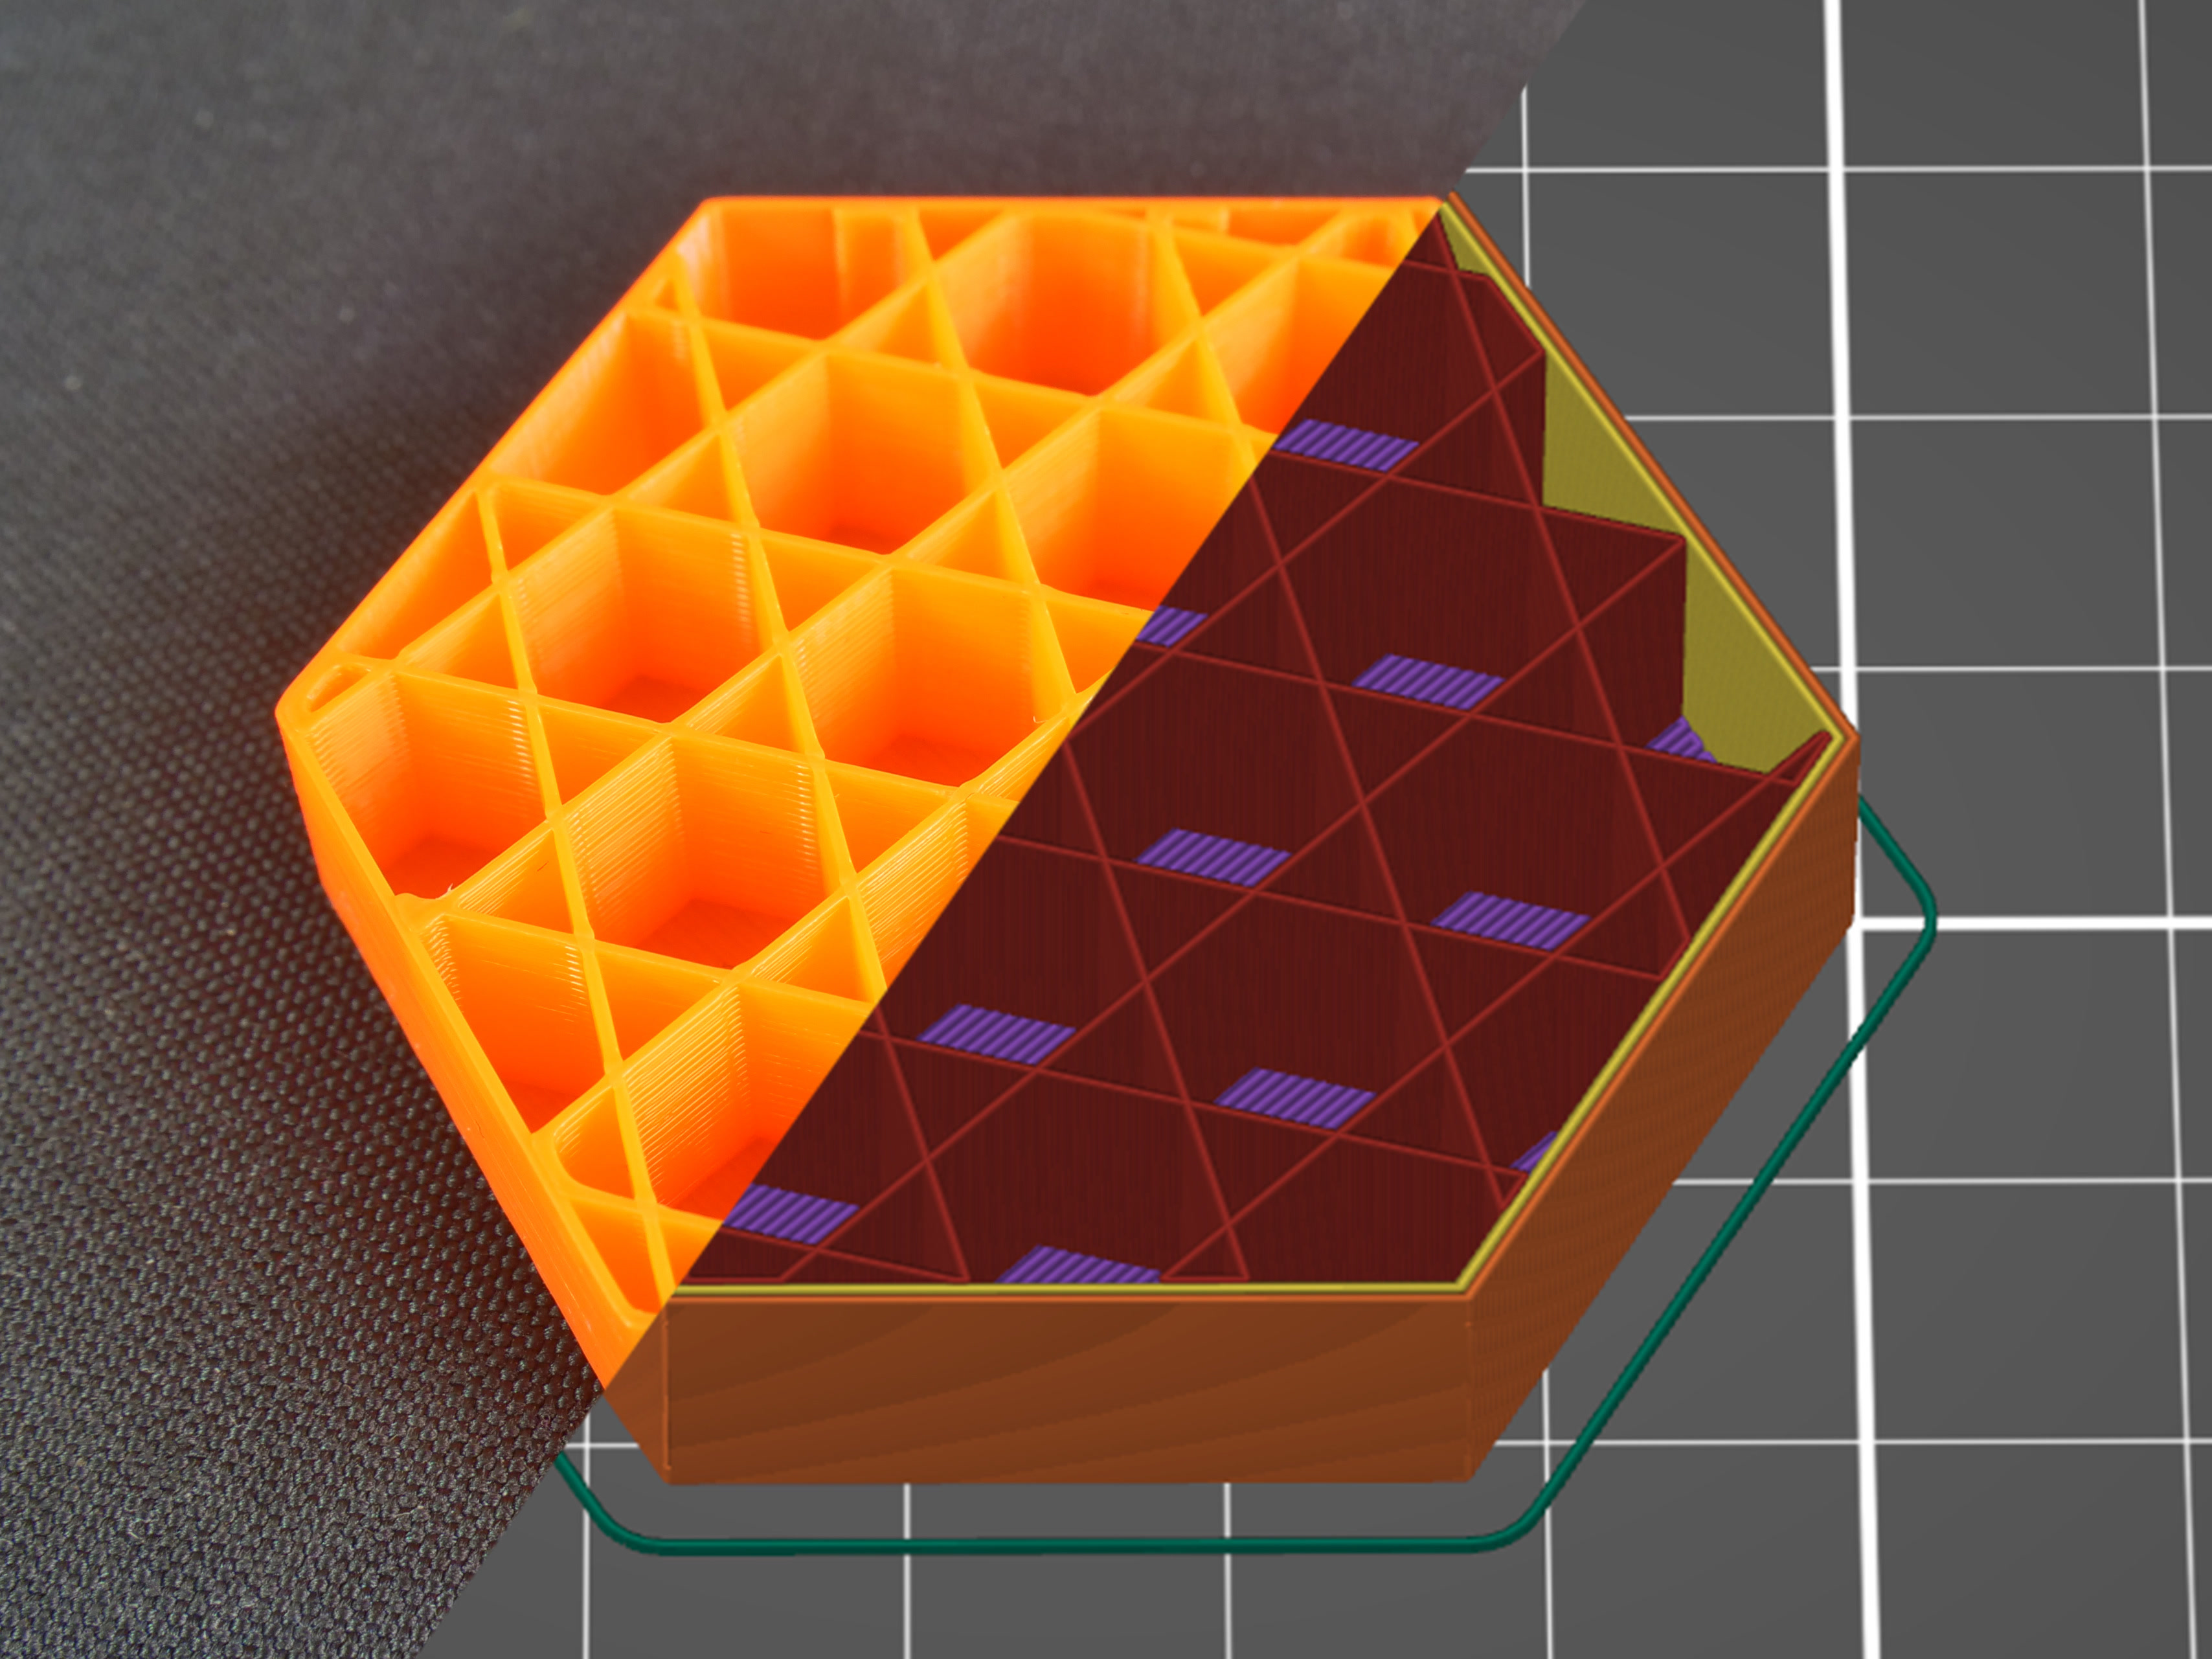
                  Stars

                  The Stars infill is based on triangles, but paths are shifted to make six-pointed stars. Again, this infill is created by lines that cross each other within a single layer. Material and time consumption are similar to the previous infill.
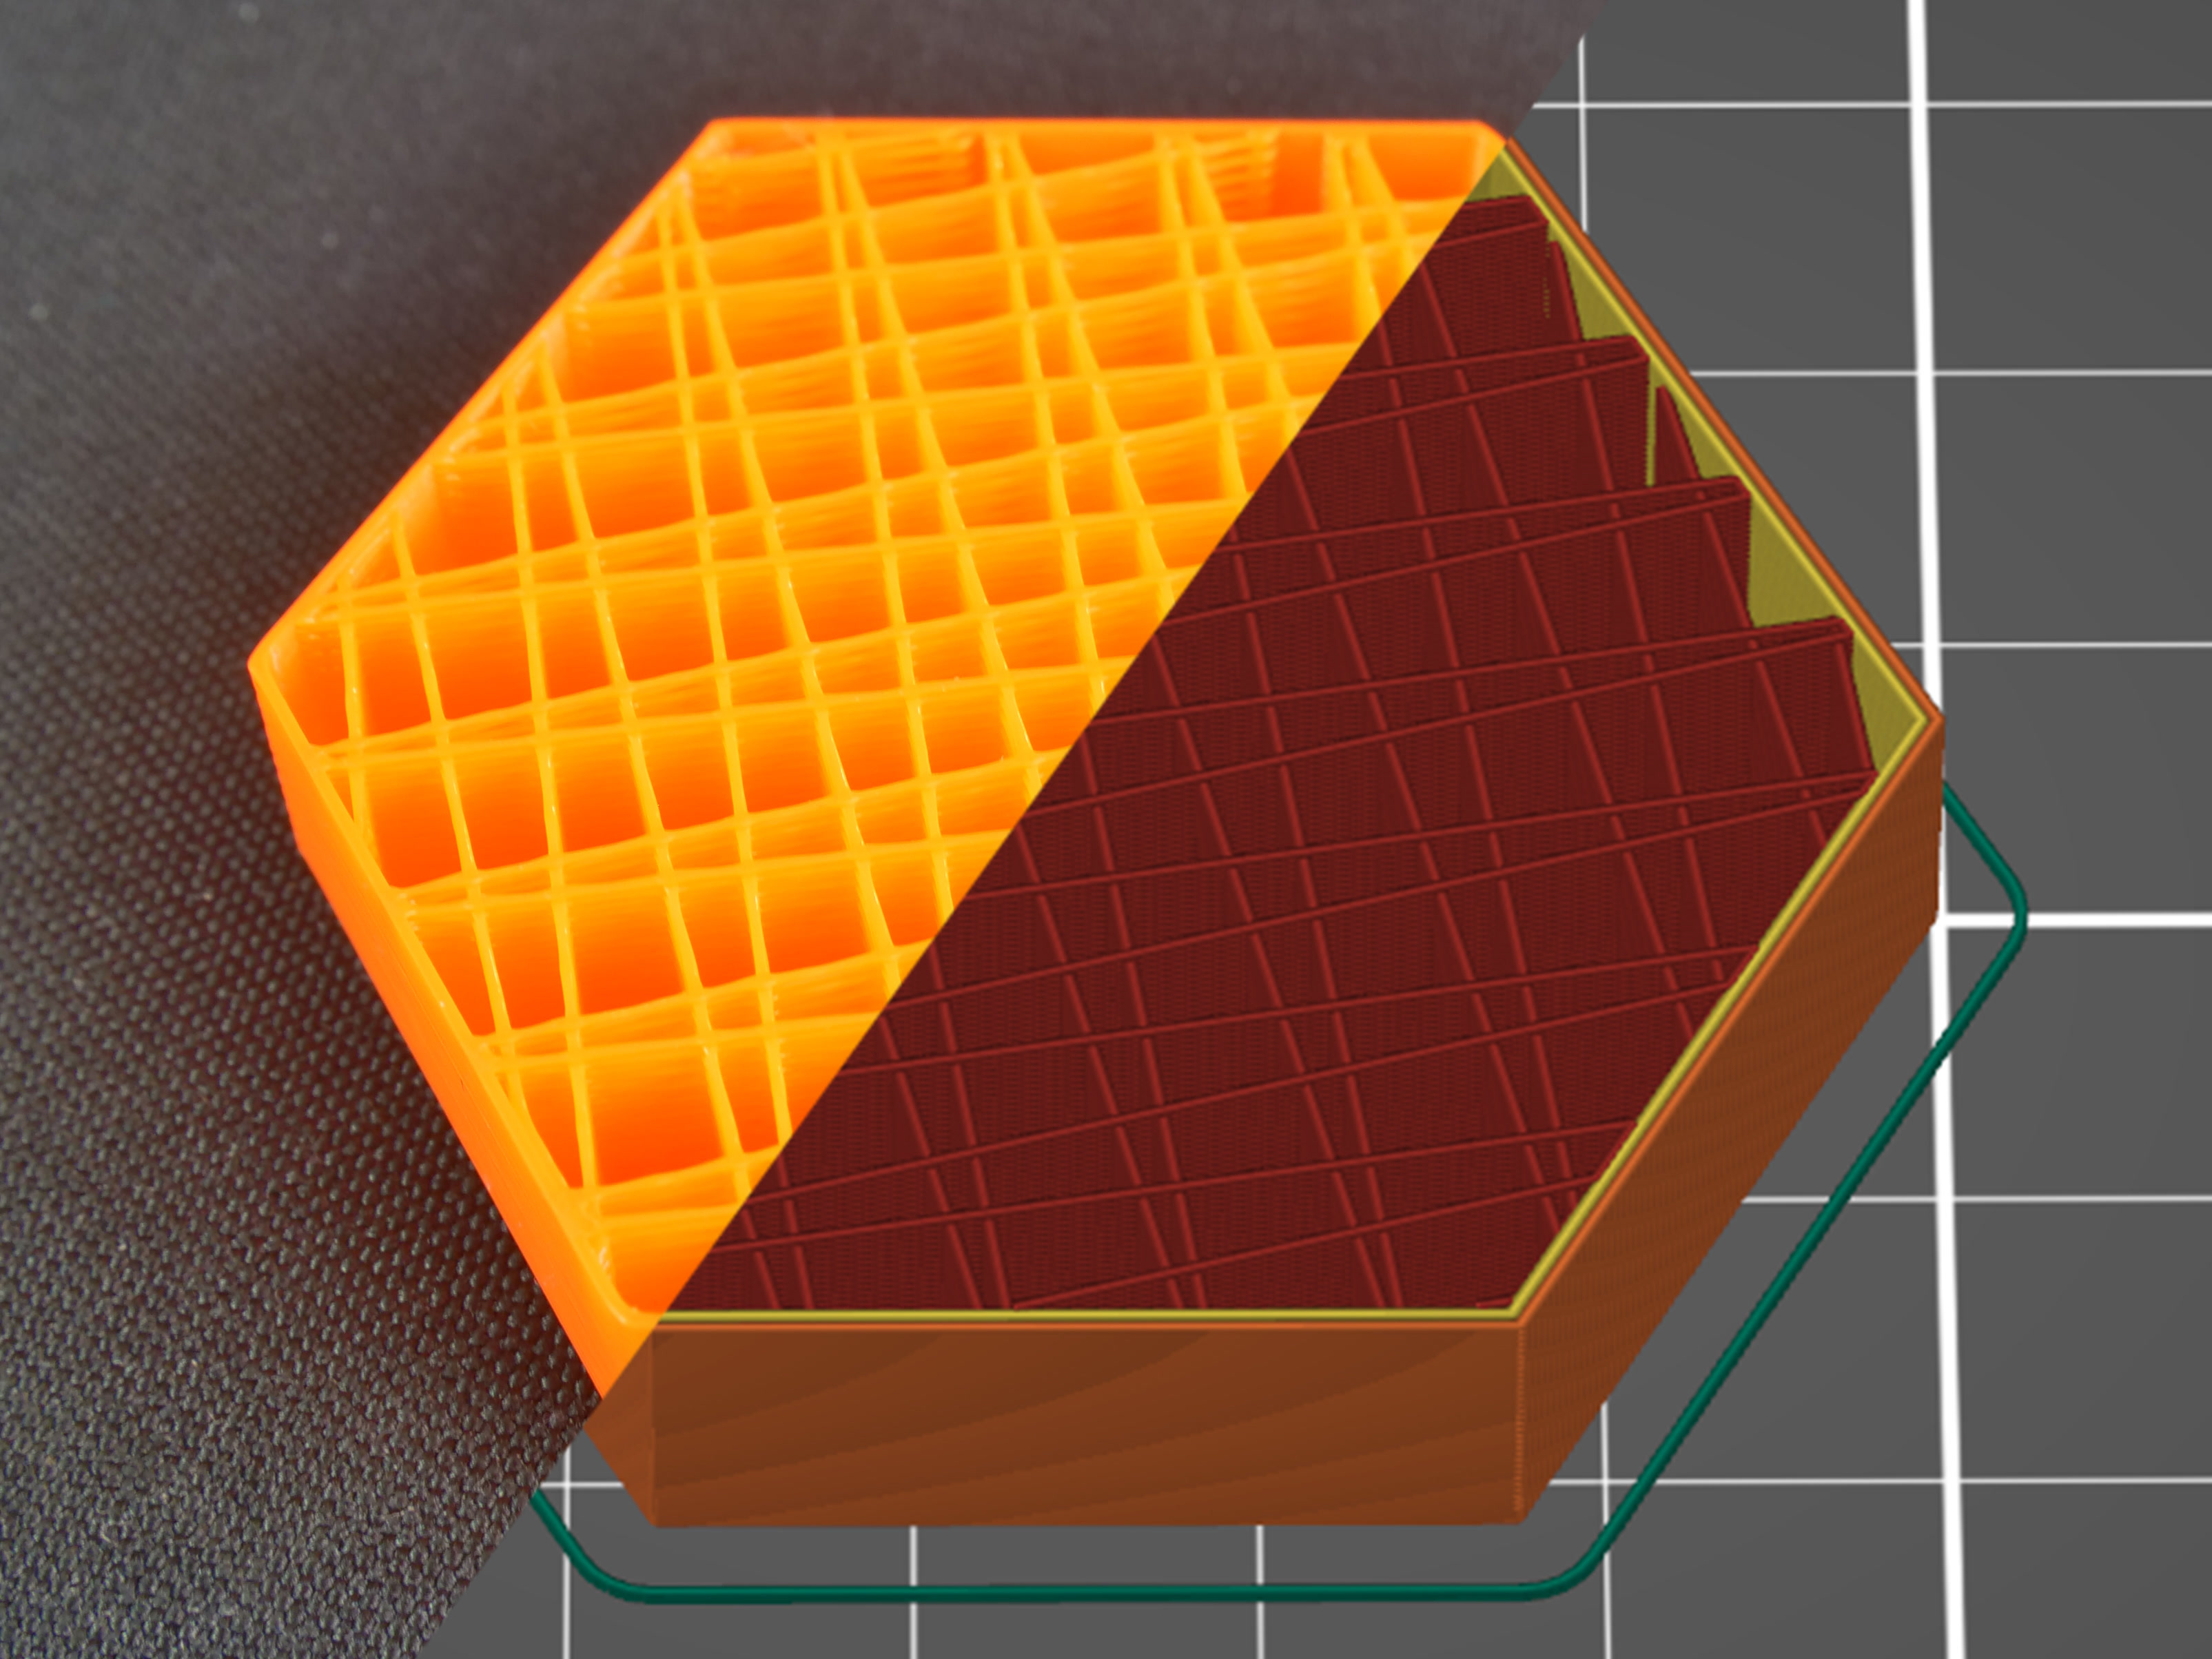
                  Line

                  The Line is one of the infills that don’t feature any crossing paths in one layer. Its paths are similar to the rectilinear infill, but they are not parallel to each other. Instead, they are printed at an acute angle. Unsurprisingly, this infill is similar to rectilinear when it comes to printing time and material consumption.
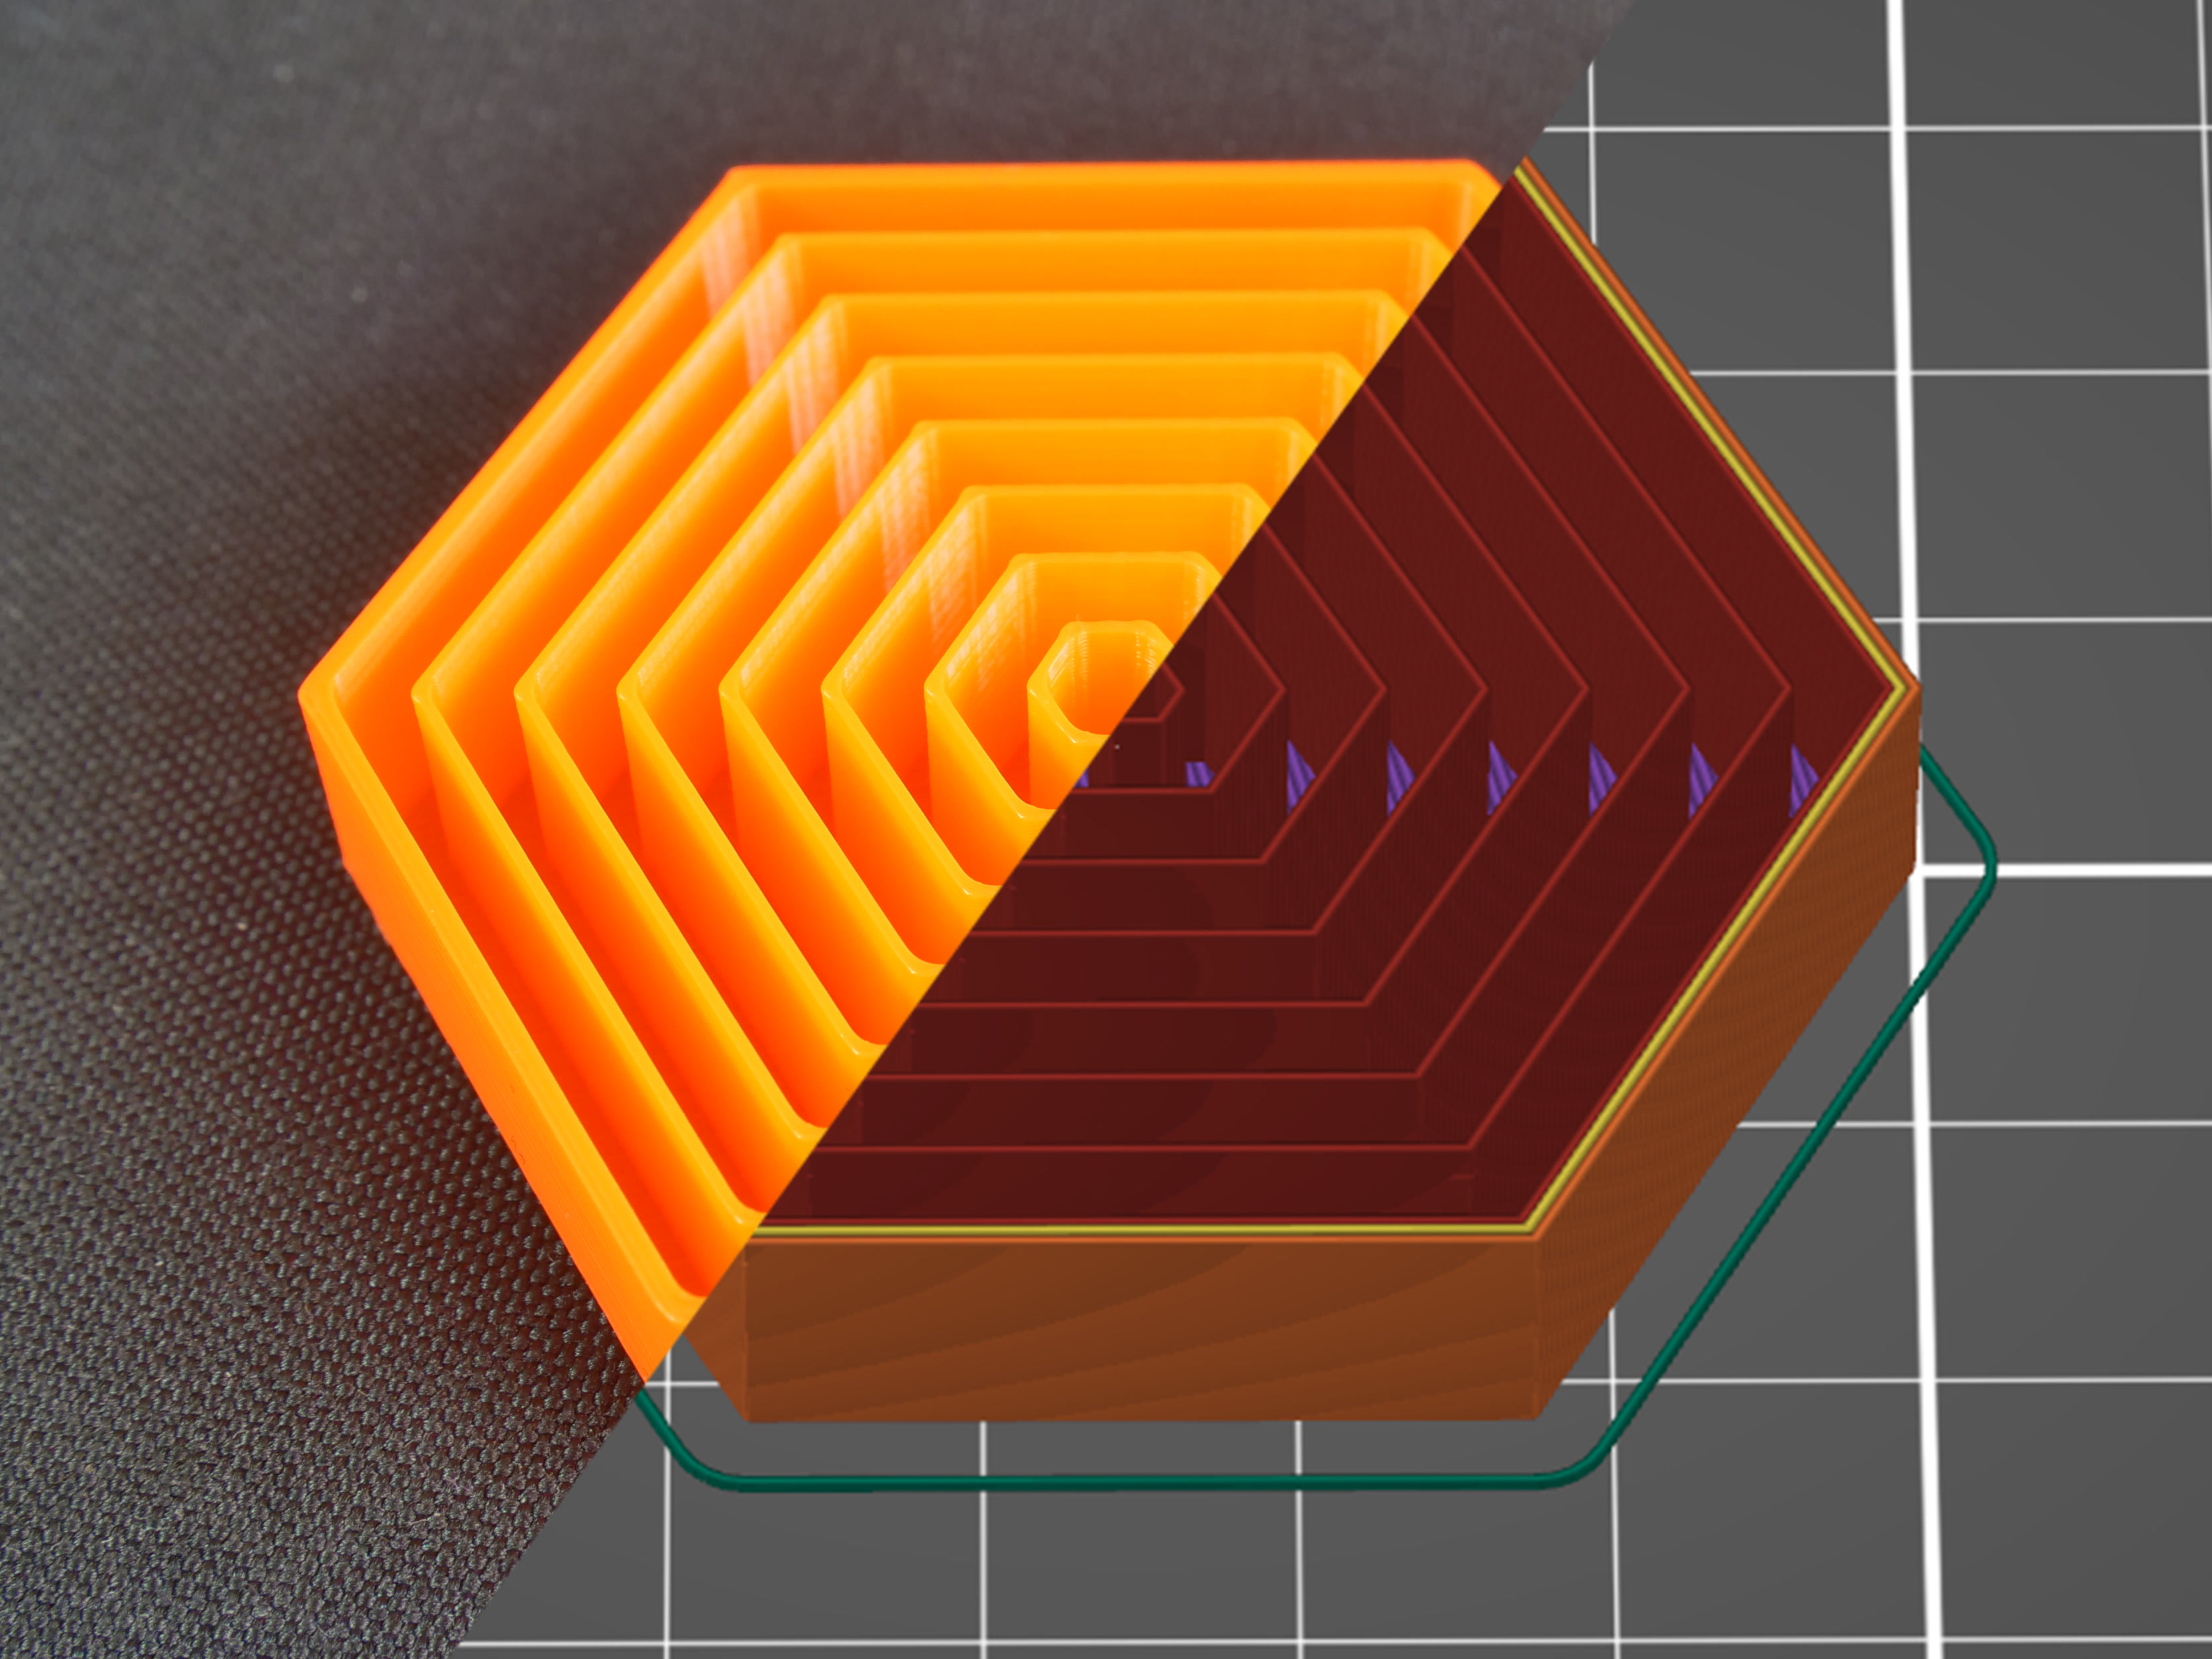
                  Concentric

                  The concentric infill traces the model perimeter lines and makes them smaller towards the center. In other words, if you print a cylinder, the concentric infill will create concentric circles inside that cylinder. This can be useful with transparent parts or flexible models (RC tires, for example). The main disadvantage is the time spent printing. Material consumption is not higher than previous types of infill patterns.
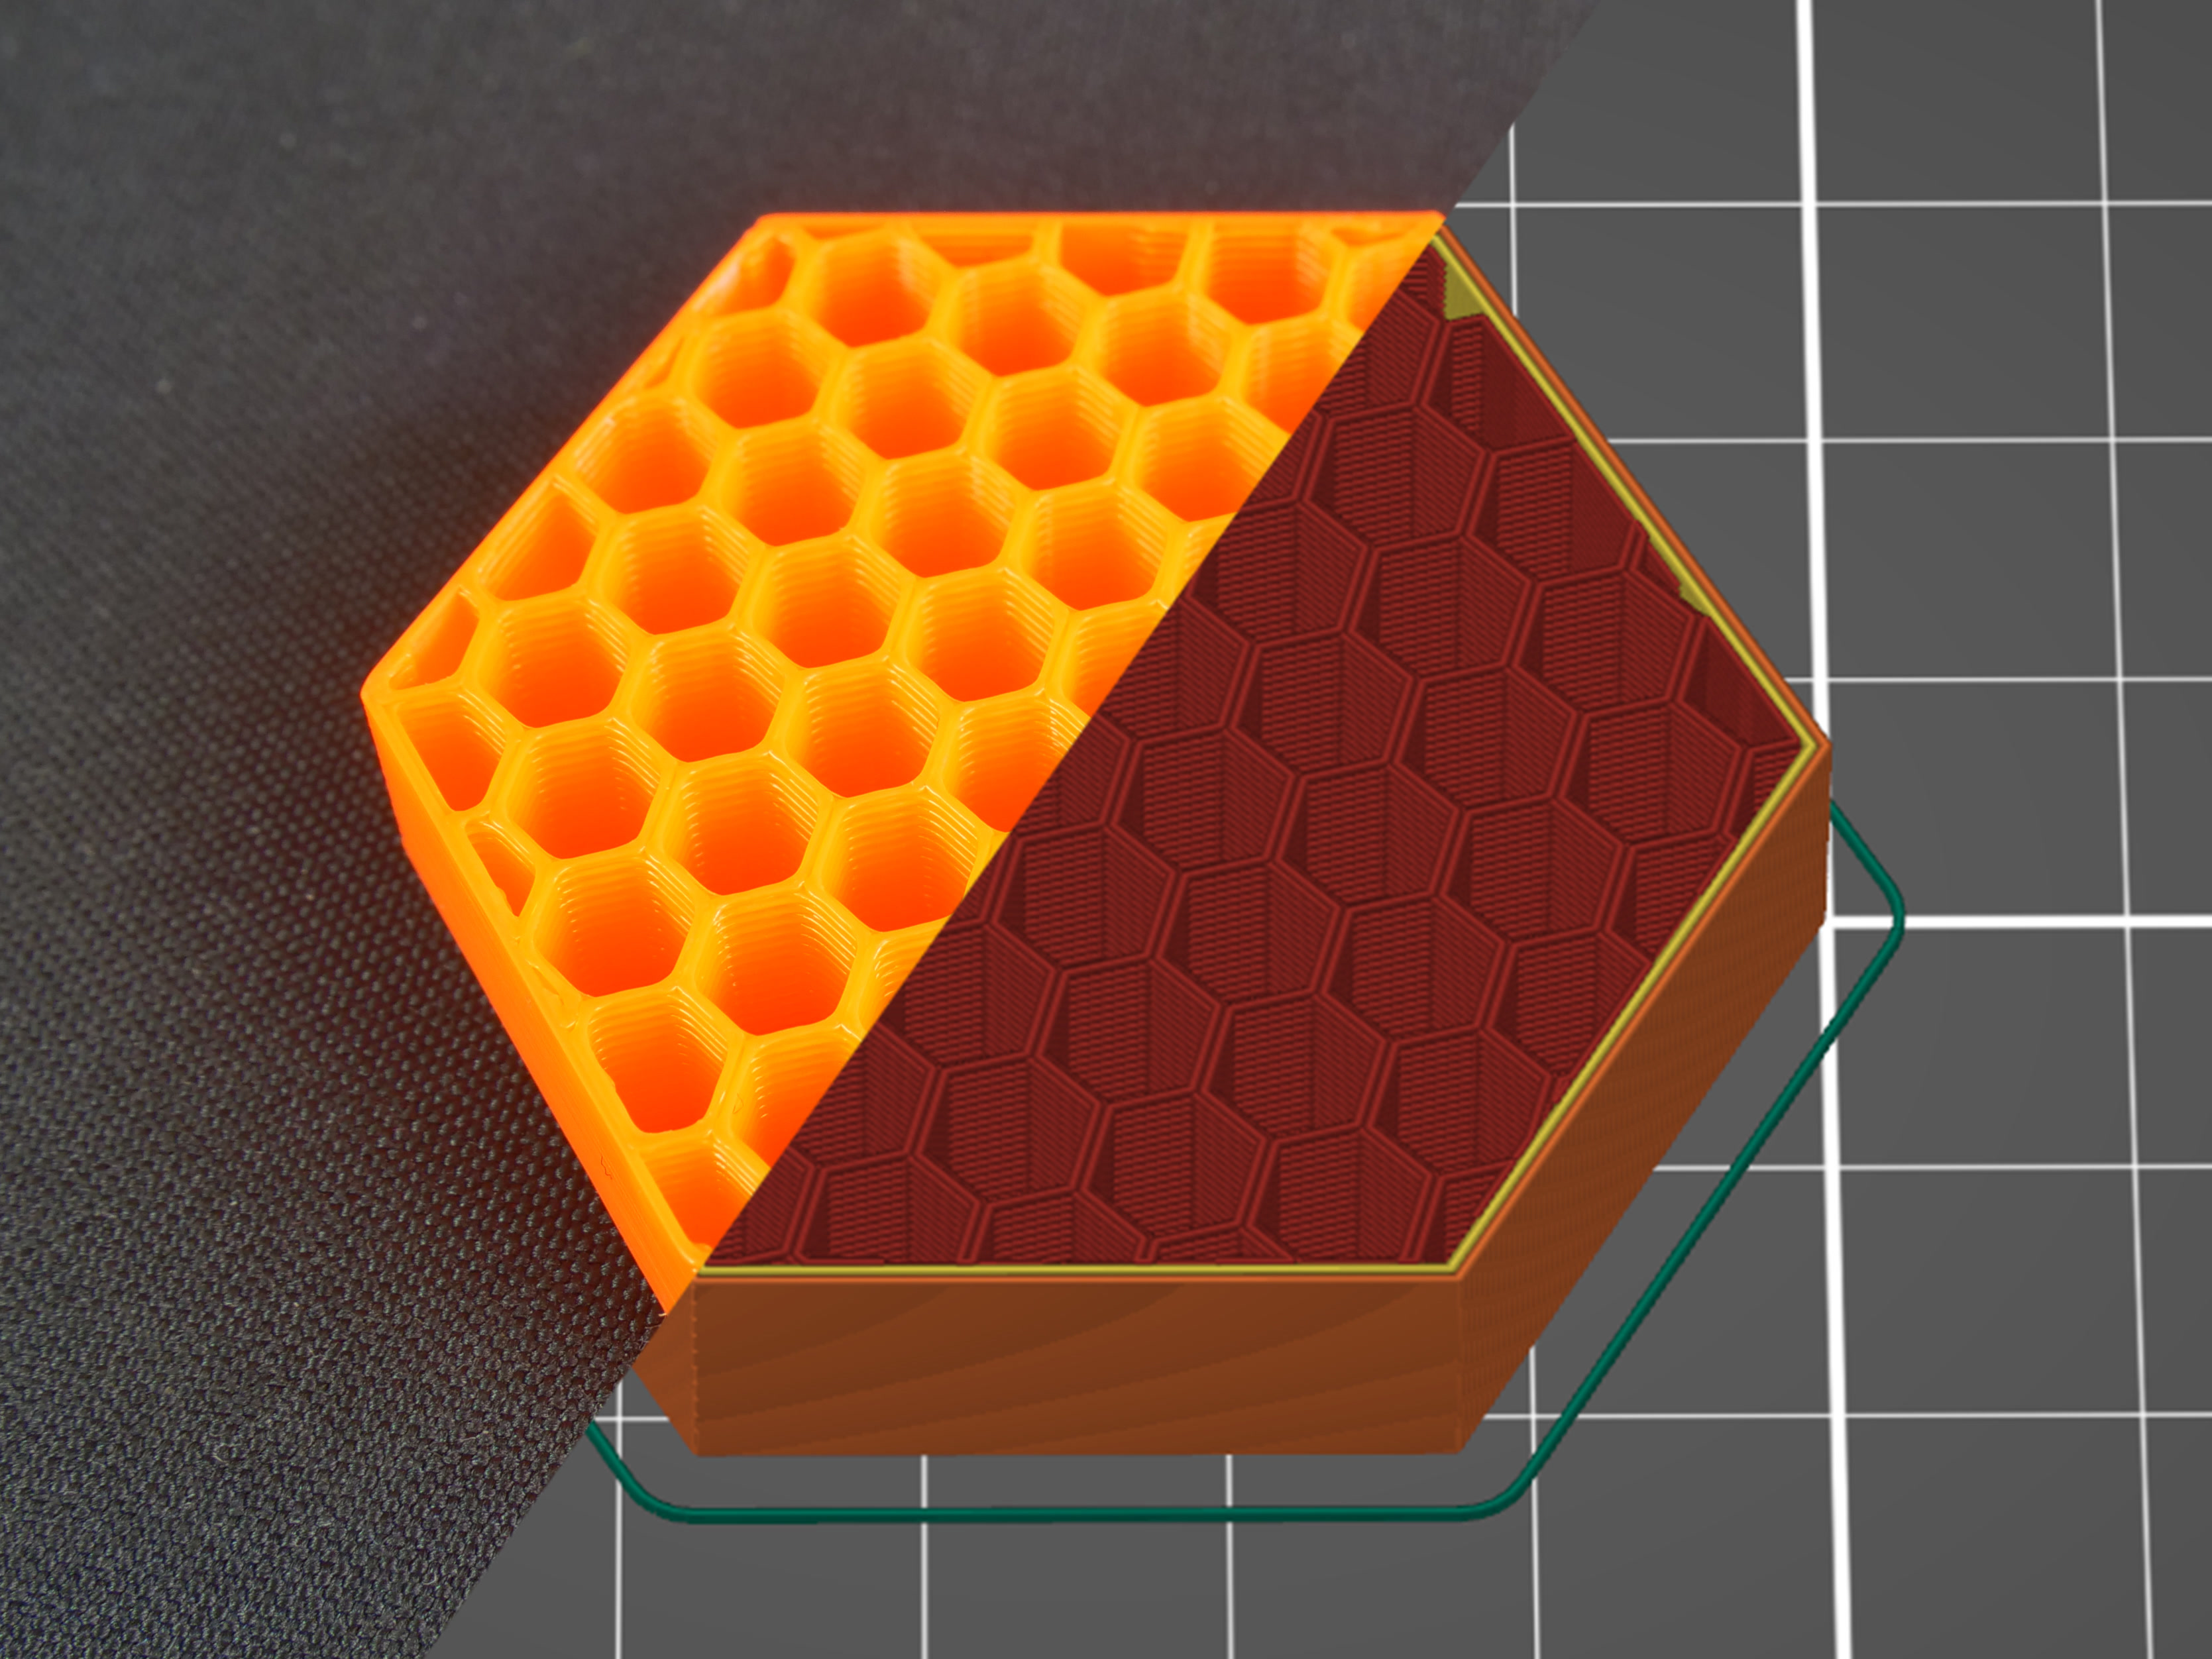
                  Honeycomb

                  This infill prints a grid made of hexagons. Its main advantage is mechanical resistance and optimal paths without crossings. The main disadvantages are higher material consumption (approx. 25% more) compared to other infills, and print time that can take up to twice the time of previously described options.
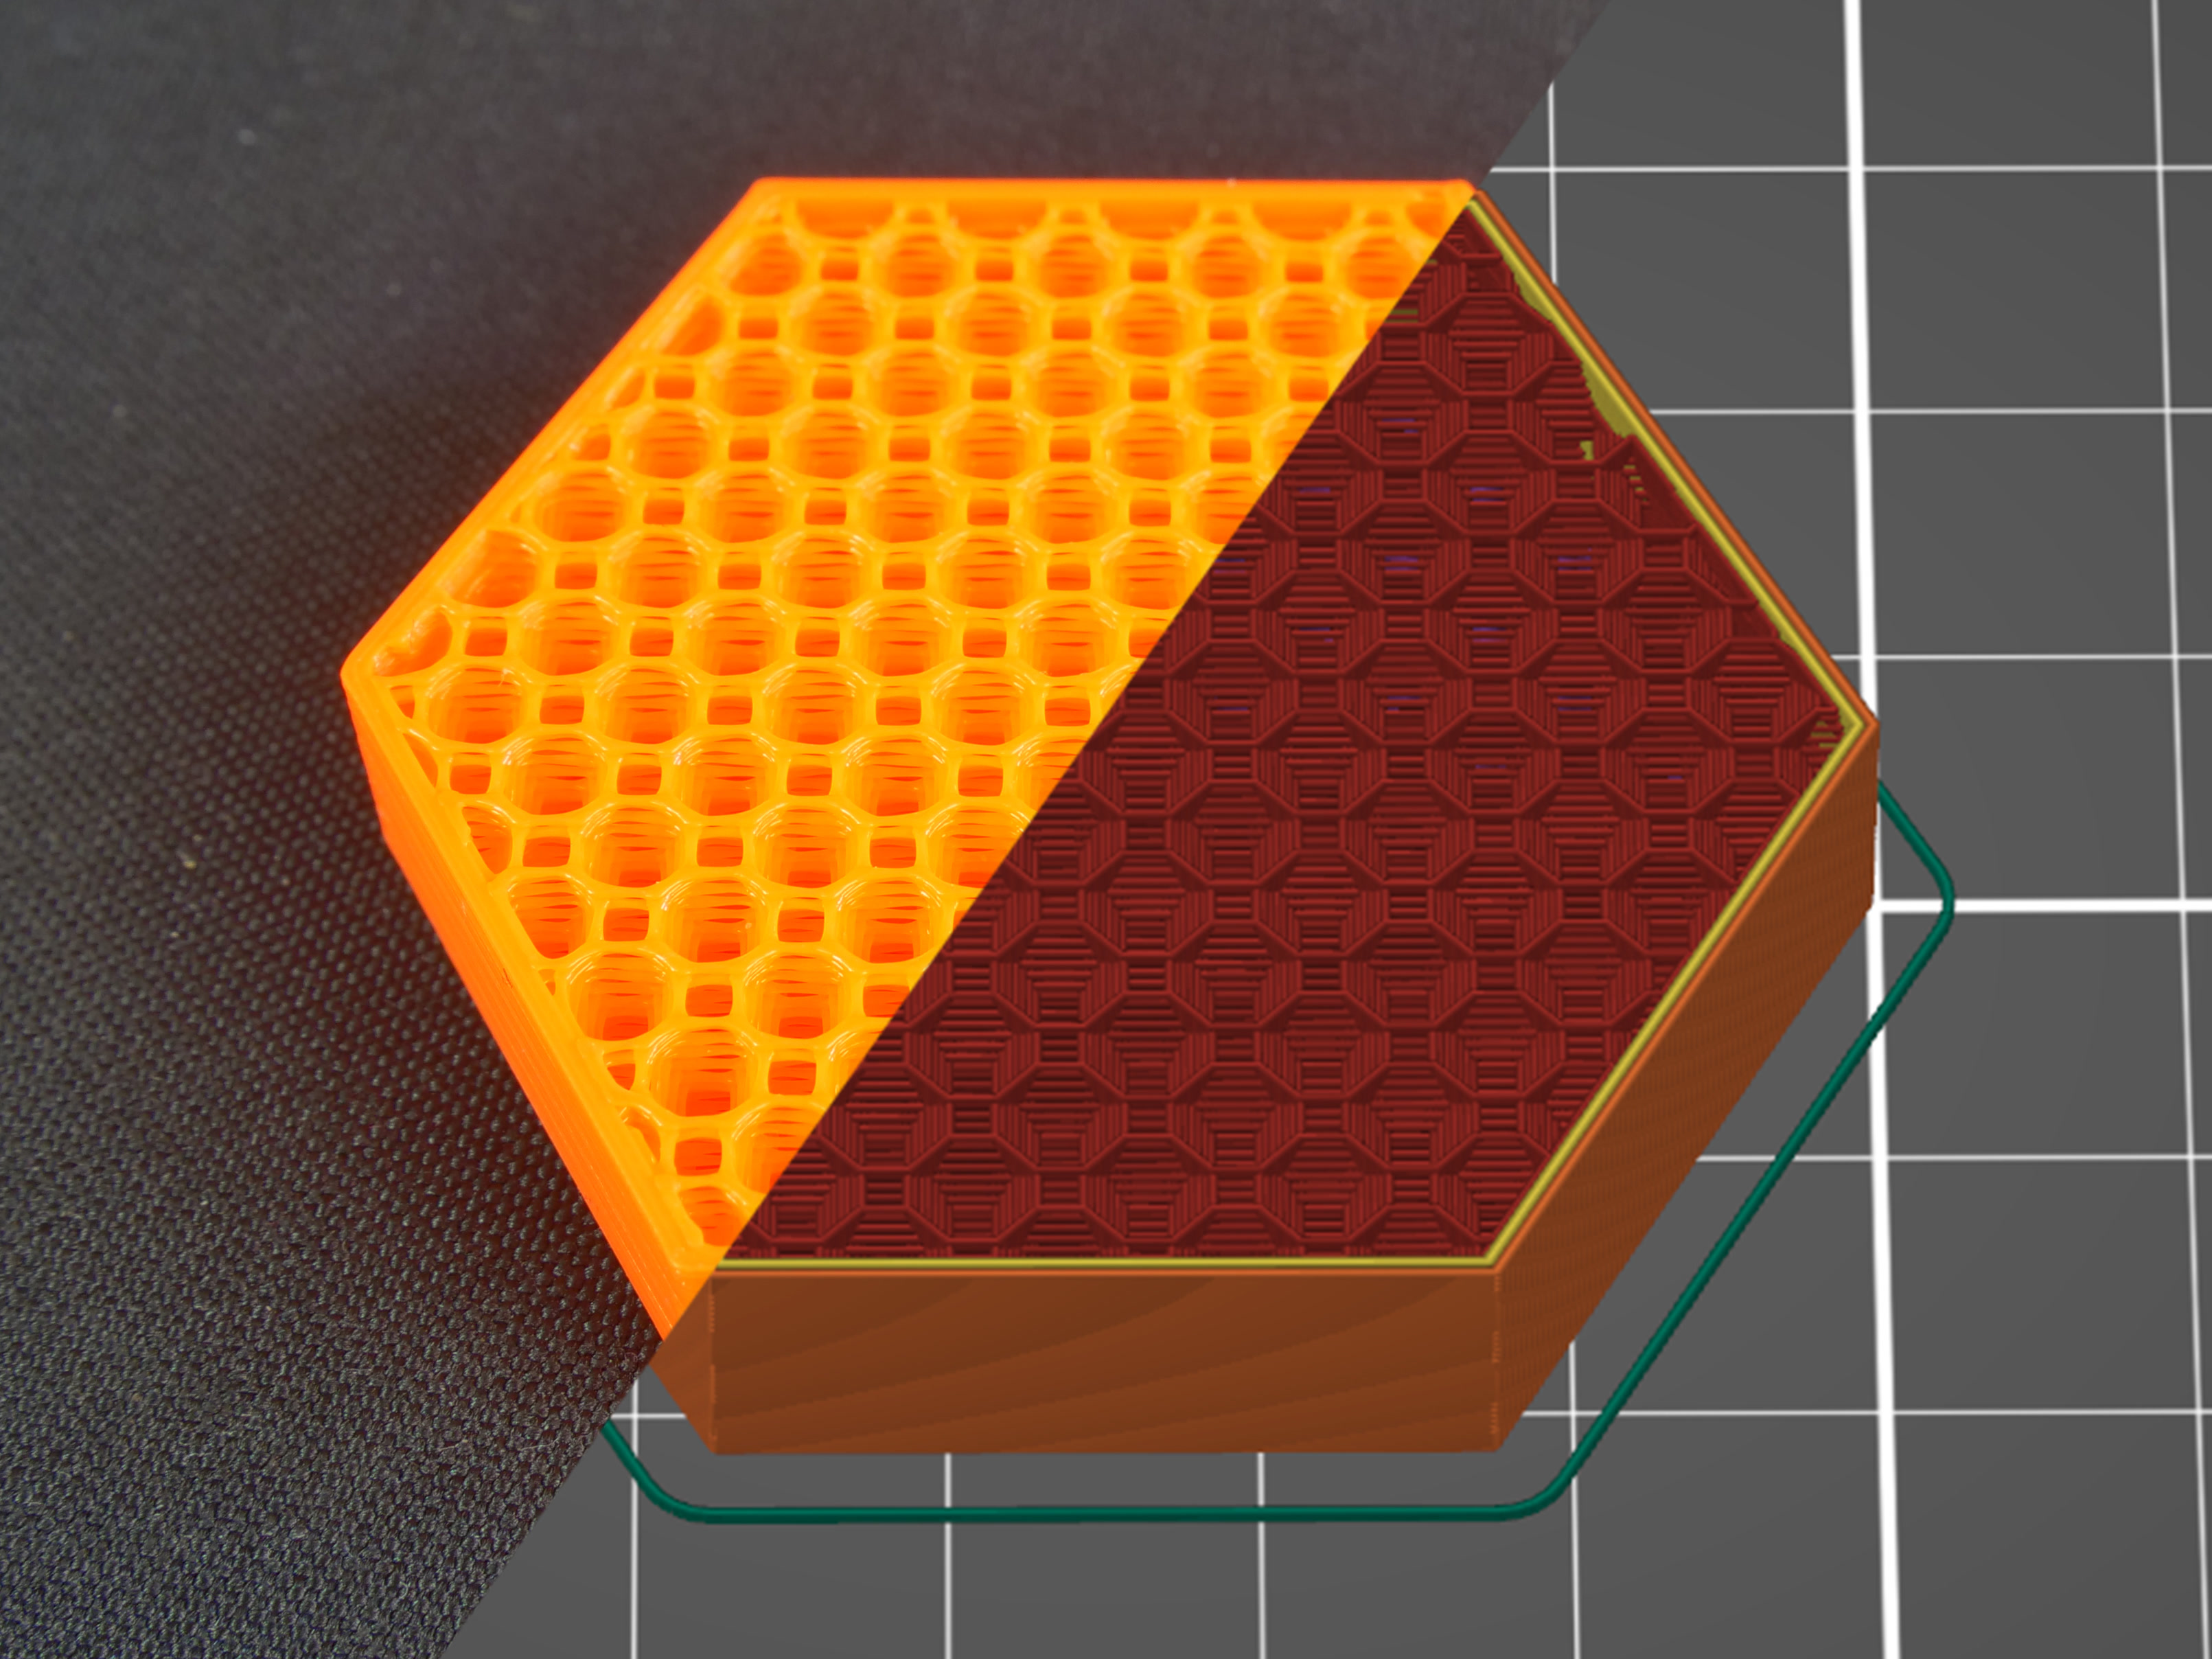
                  3D honeycomb

                  3D honeycomb prints bigger and smaller squares and octagons to create columns of periodically increasing and decreasing thickness. Again, this infill doesn’t have crossing lines in one layer. However, due to the way it lays out the paths, it creates small gaps between layers. Material consumption and print time are slightly worse compared to the regular honeycomb pattern.
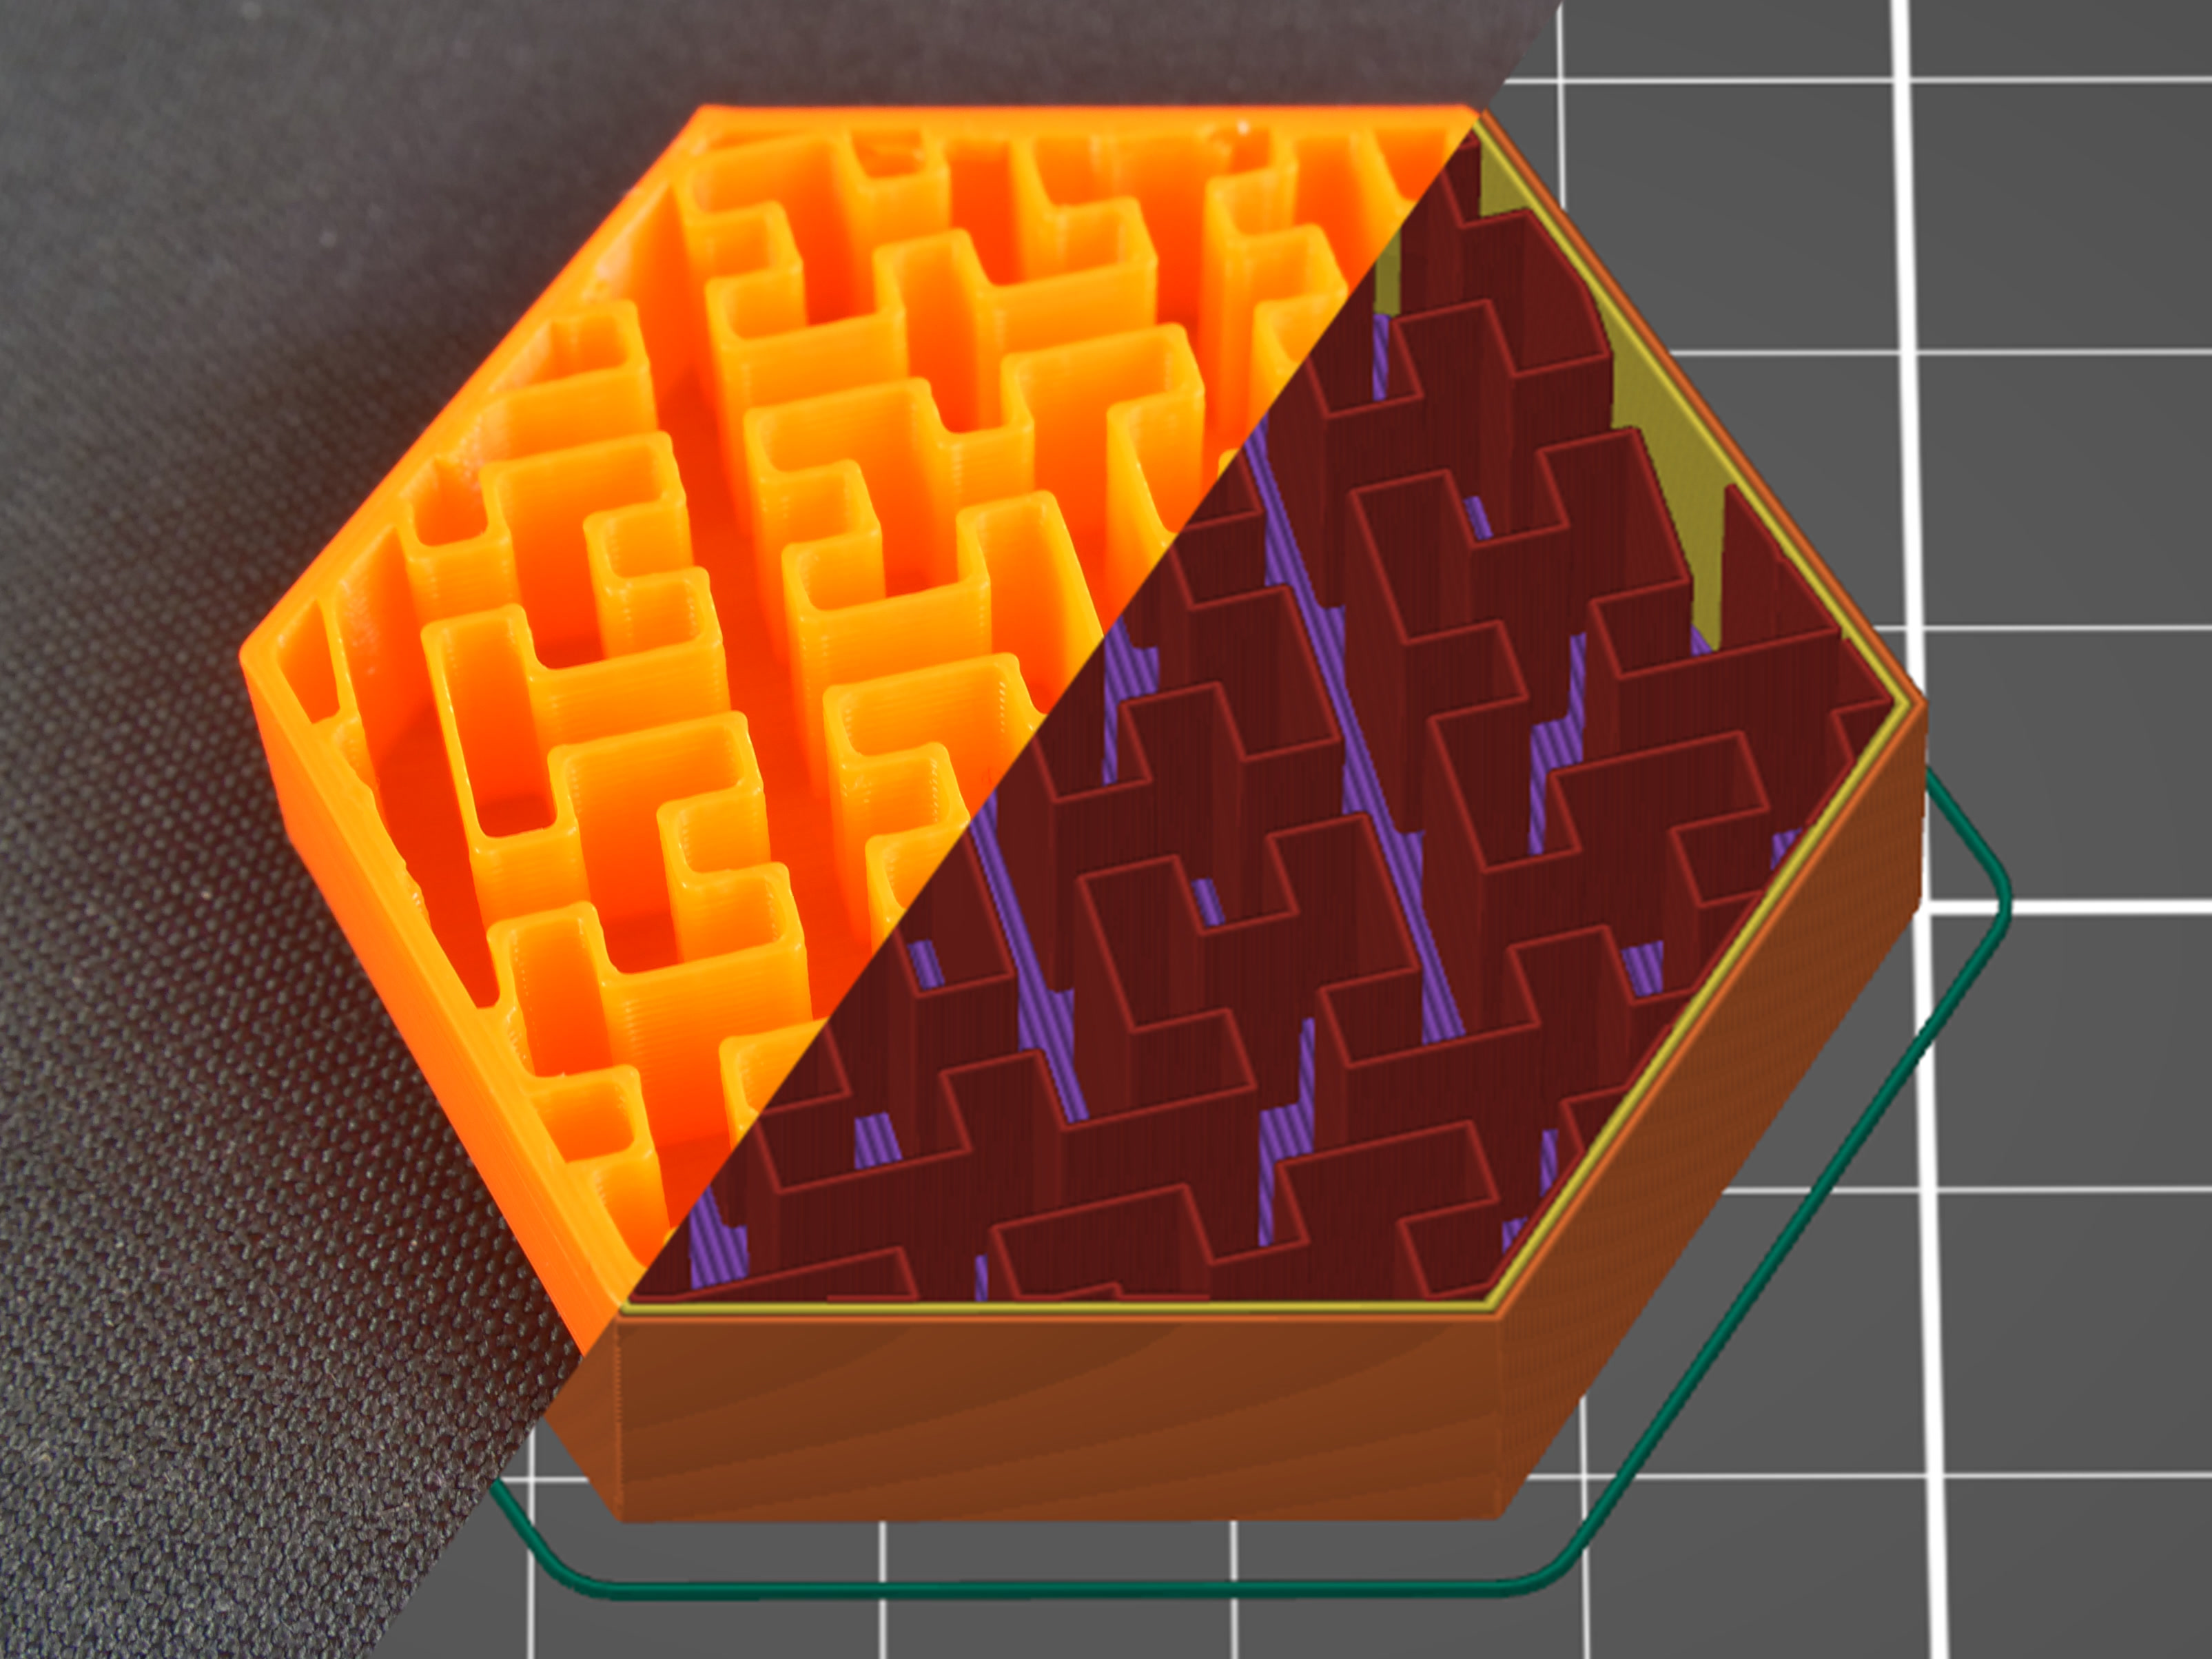
                  Hilbert curve

                  The Hilbert curve creates a rectangular labyrinth inside the model. The main advantage of this infill is its non-traditional look, plus it can be pretty easily filled with epoxy resin or another liquid – the model is split into several large cavities, instead of several small “bubbles”. The main disadvantage of this infill is increased print time, which sits somewhere between honeycomb and rectilinear infills. The material consumption of the Hilbert curve is similar to that of the rectilinear.
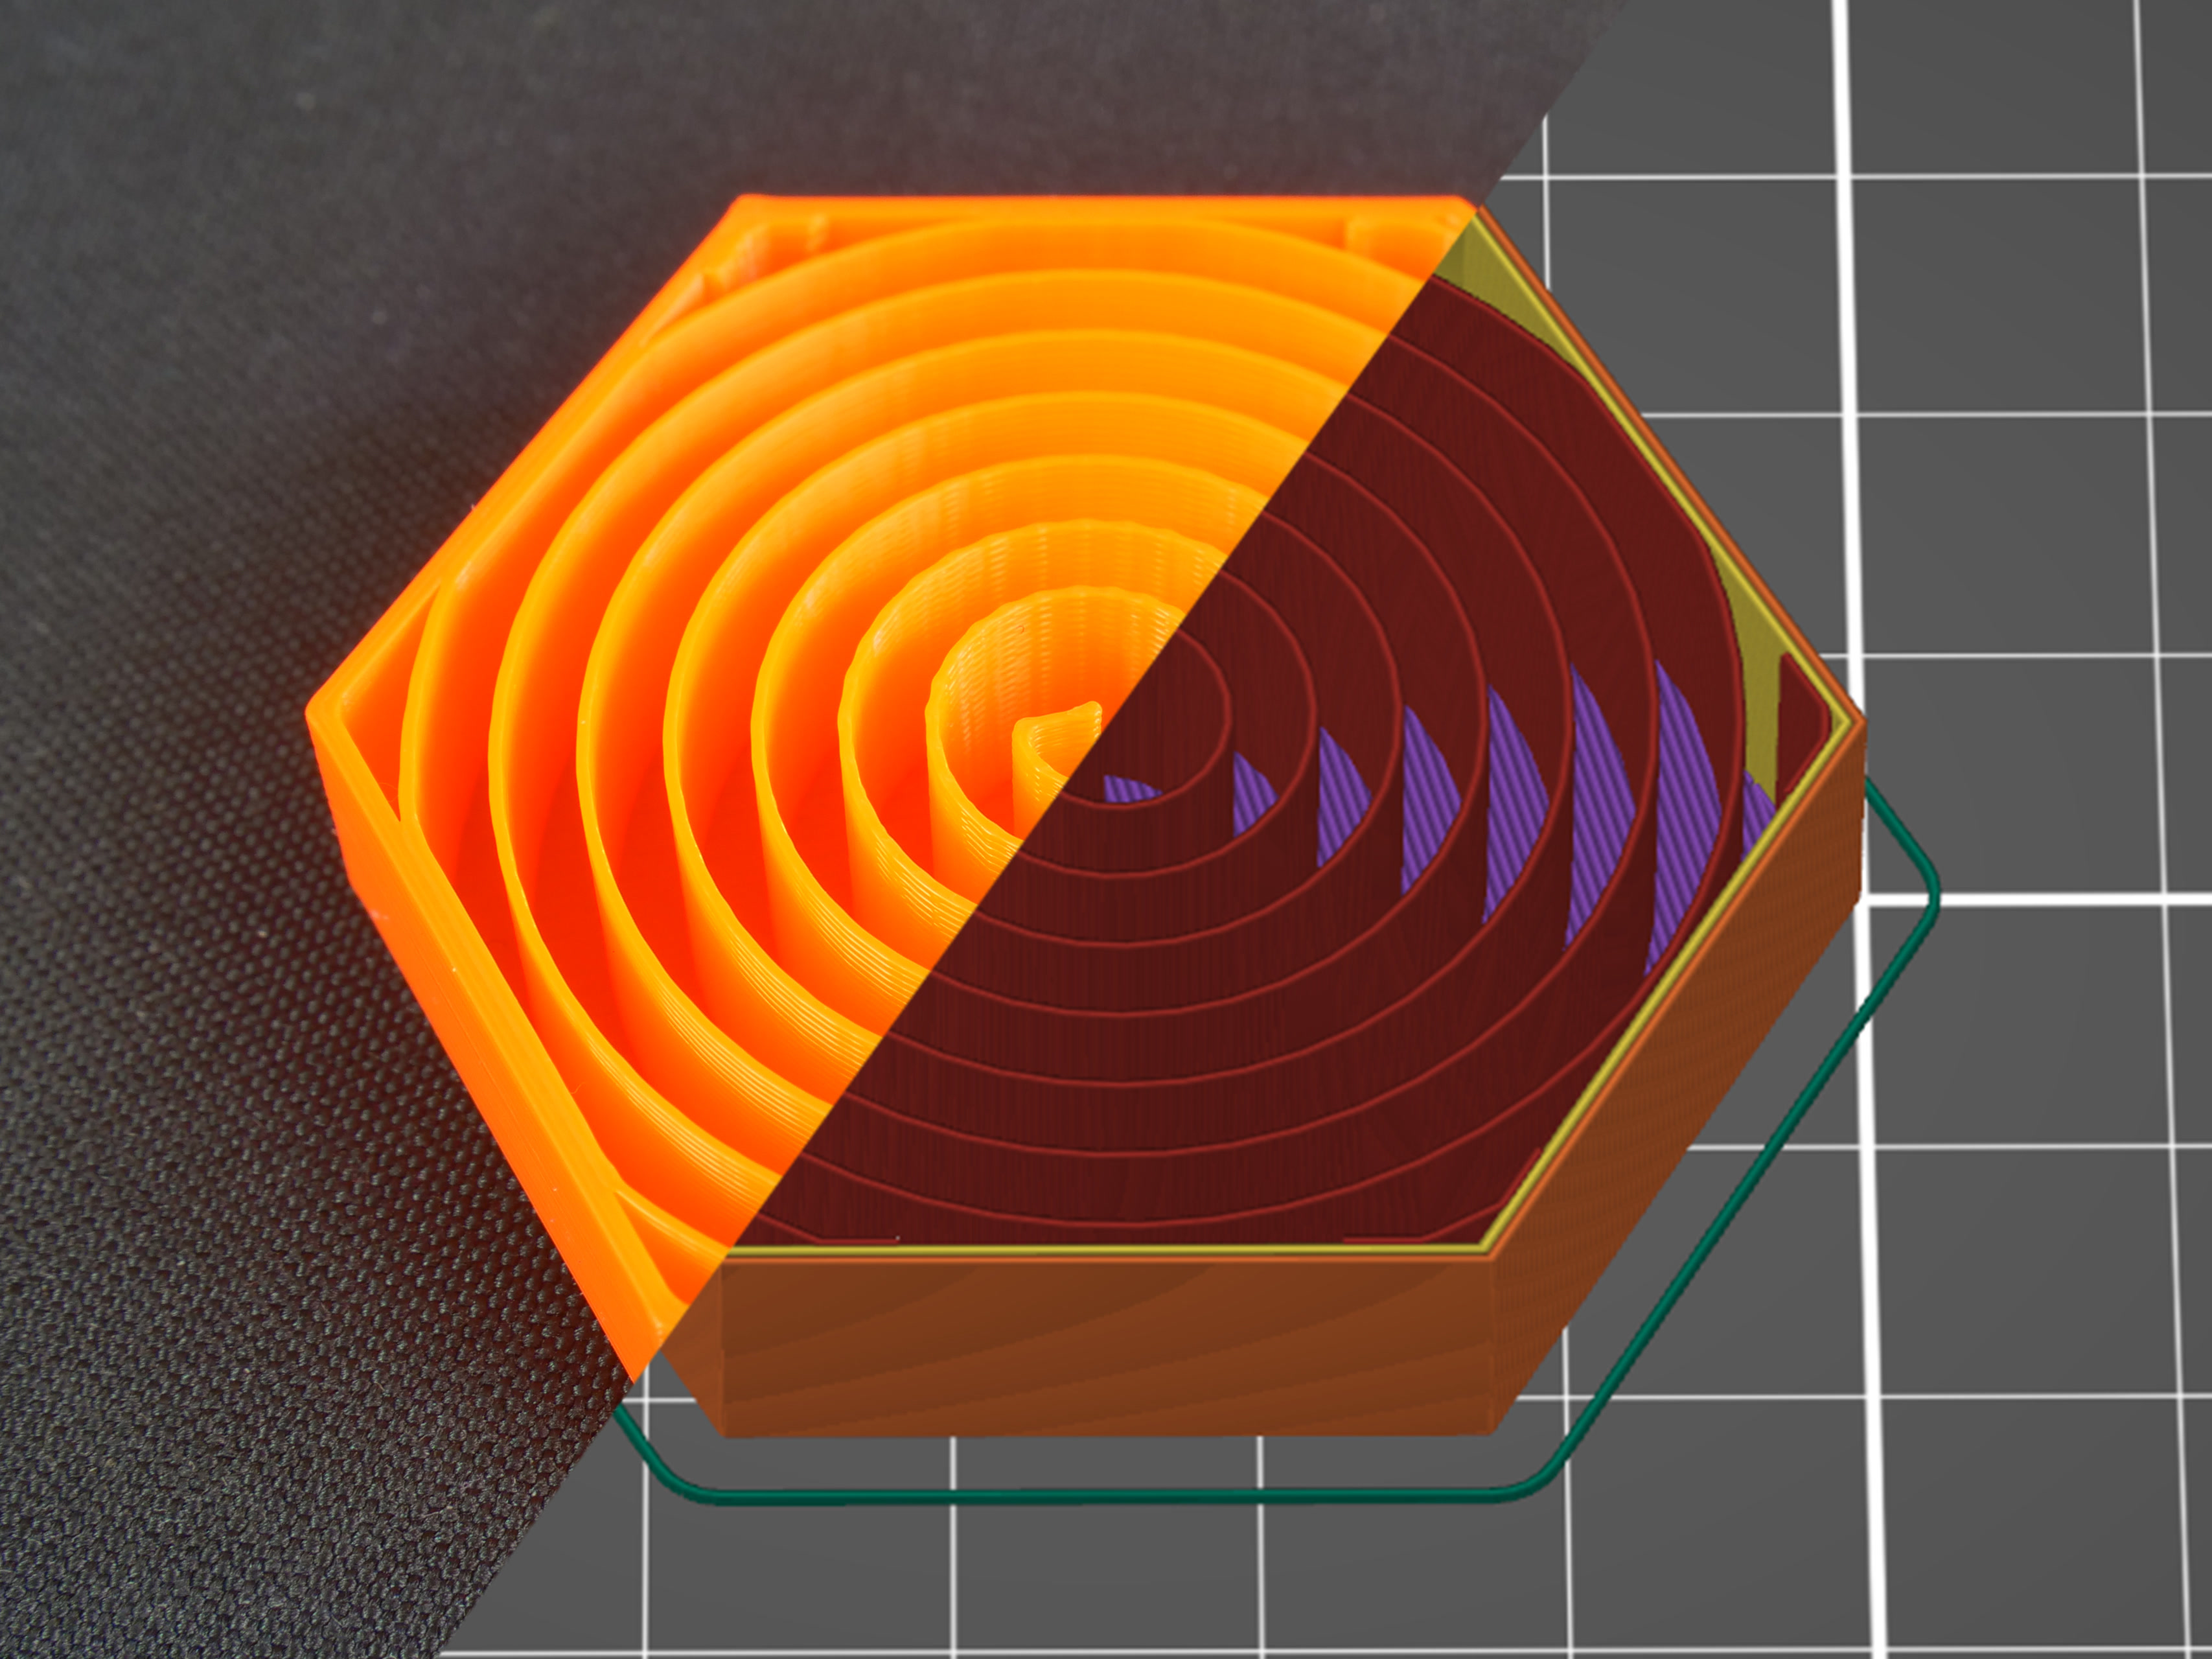
                  Archimedean chords

                  Again, this spiral-twisted infill allows easier filling with liquid. This simple shape saves material and time (compared to the rectilinear infill). Similar to the concentric infill, the Archimedean chords help with model flexibility if you print it with flexible filament.
                  Octagram spiral

                  Octagram spiral allows filling the object with liquid easily due to the larger compartments made with this type of infill. An Octagram spiral might also help with flexibility for certain models. But mostly it’s for aesthetic purposes and top-layer support. Material consumption is similar to Archimedean chords, but print time is slightly longer.
                  Lightning

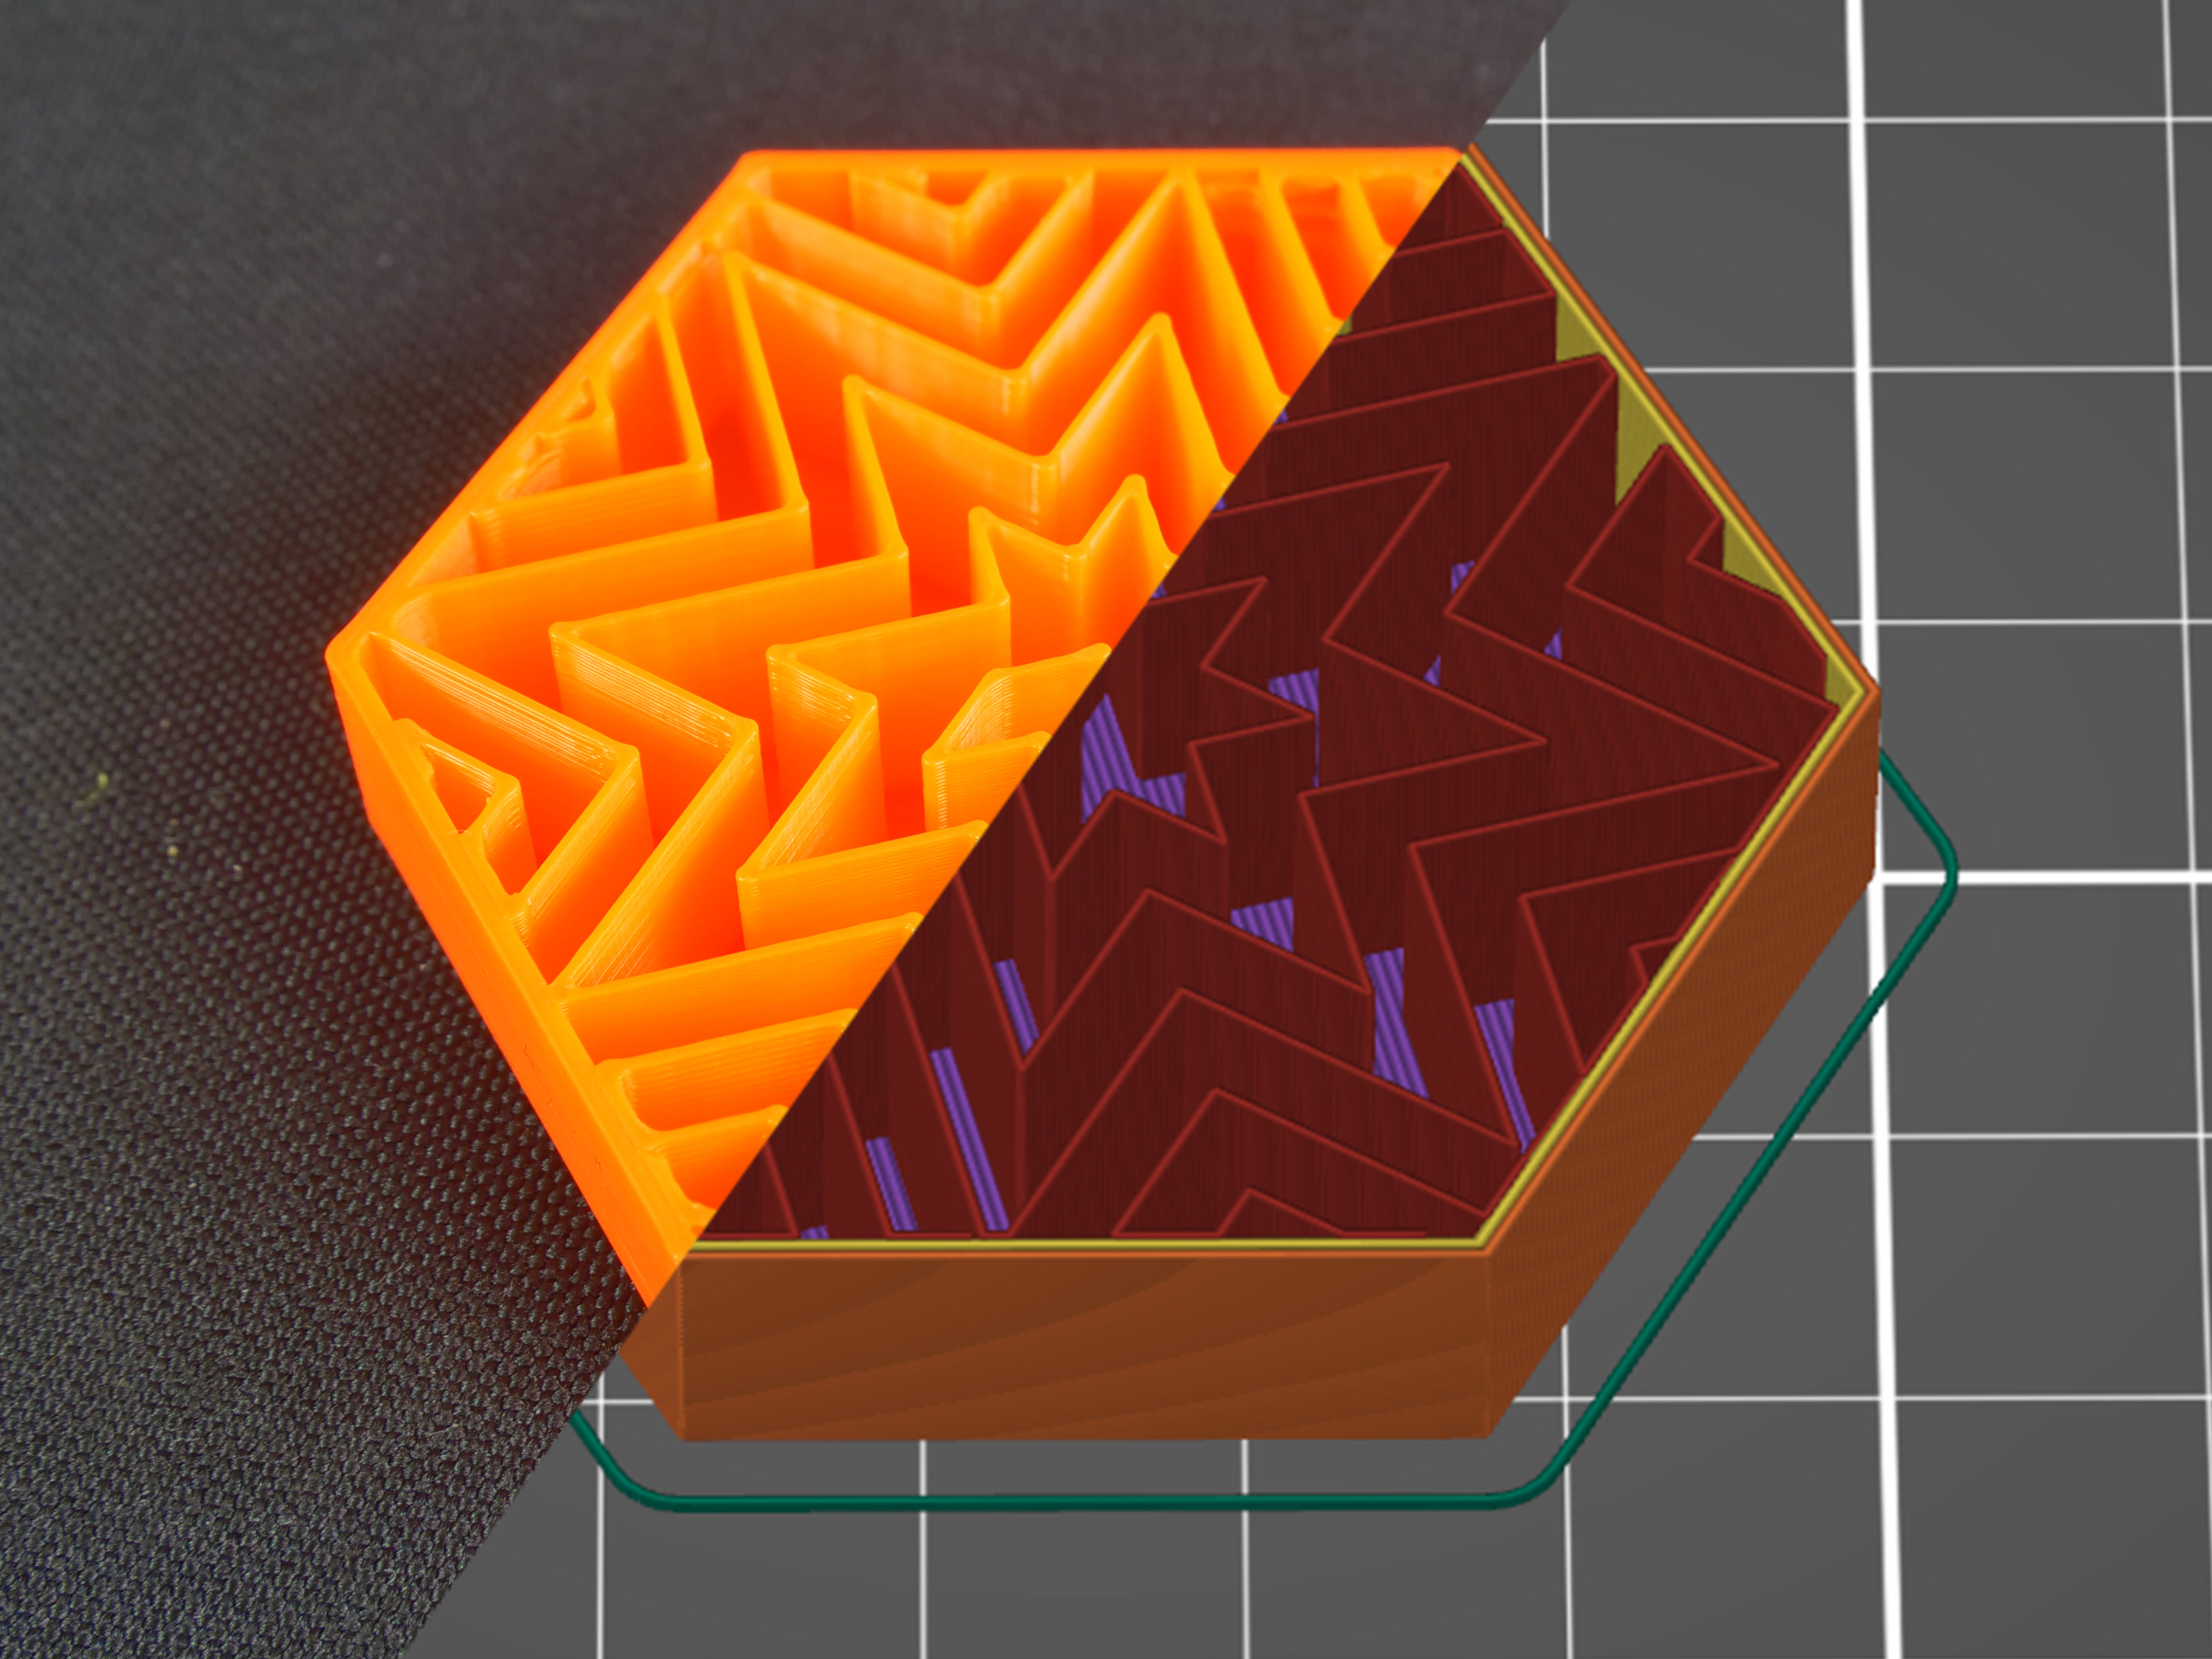
                  The lightning infill generates a branching structure that gets progressively denser towards the top surfaces to support them reliably. It saves even more material compared to the Support cubic infill. The lightning infill is based on paper and ported from Cura. Our thanks go to the Cura team for keeping it open-source.
                  Zig Zag

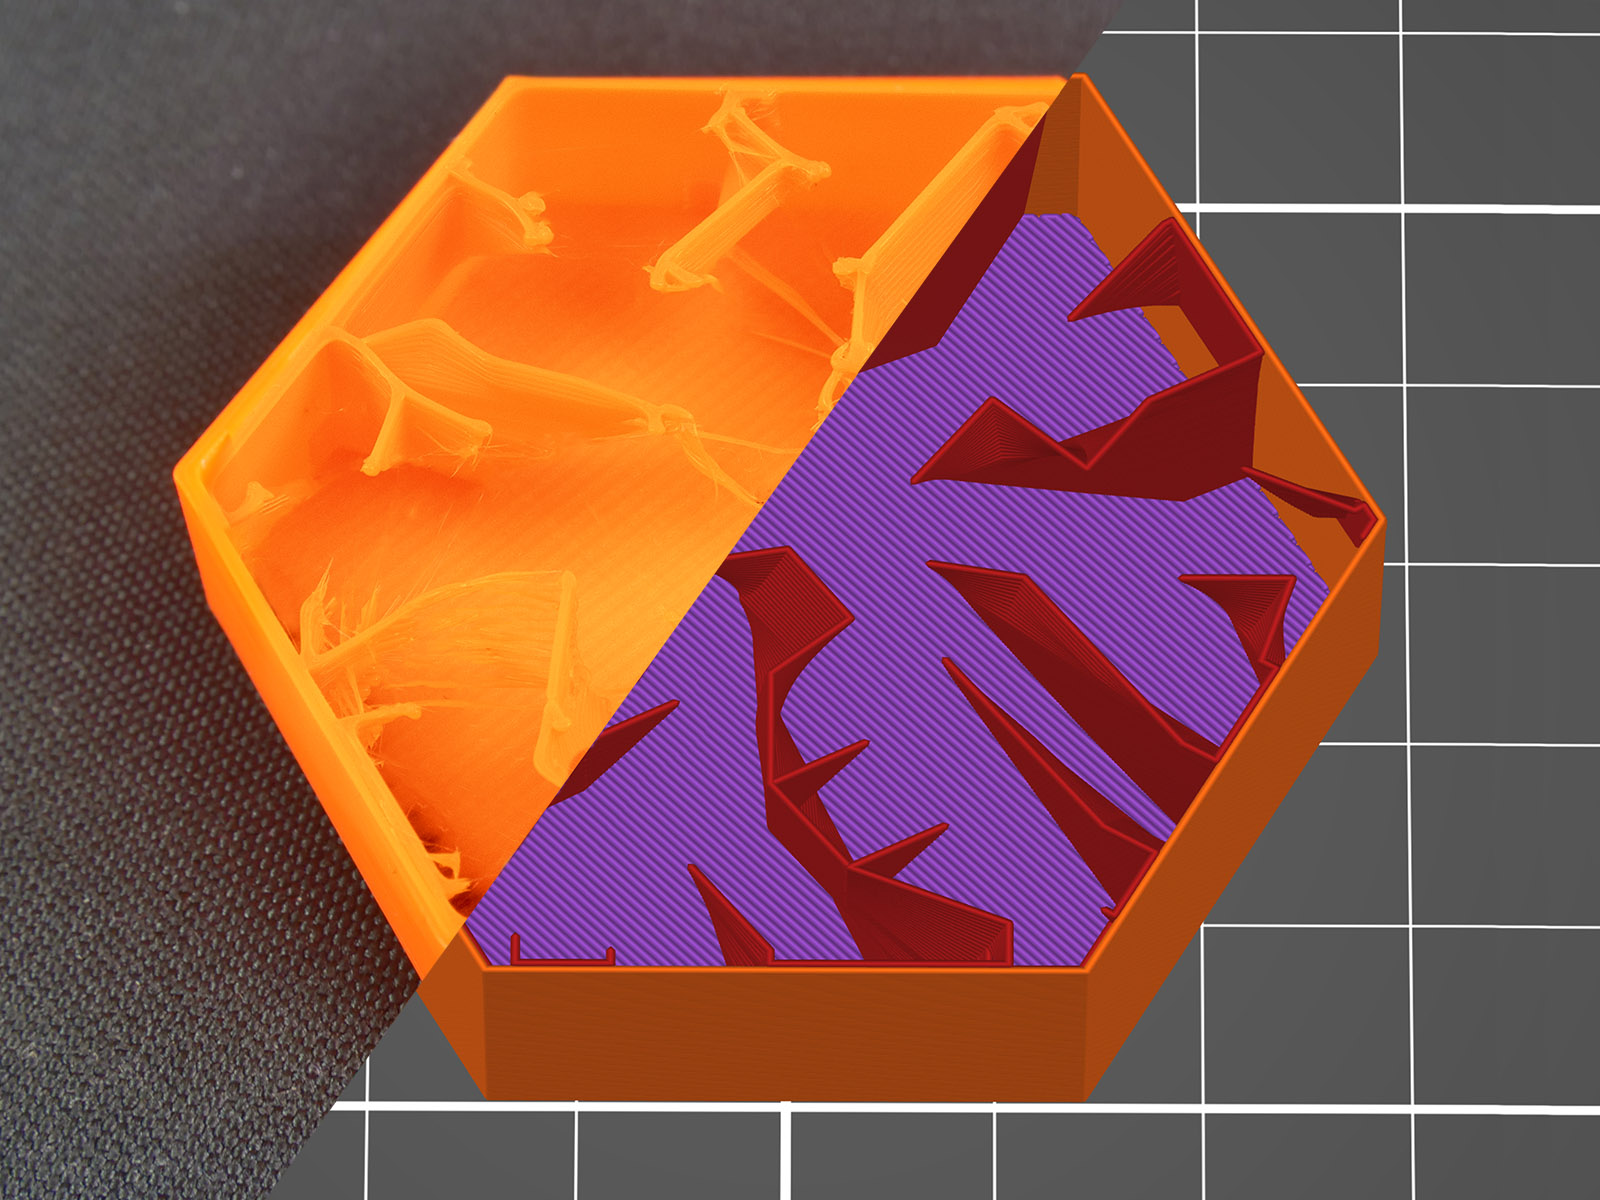
                  Like the Rectilinear infill, the Zig Zag prints each infill with a pattern between layers, but prints a continuous line in a back-and-forth motion, in a way that the nozzle does not lift between lines. This creates a faster print with less retraction.

                  Types of top (bottom) layer infill

                  Editing infill doesn’t end with choosing an infill type for the internal parts of the object. You can also change the top and bottom layer infill types to get some interesting results. These can be adjusted in the Print settings -> Infill -> Top/Bottom fill pattern tab.
                  Rectilinear

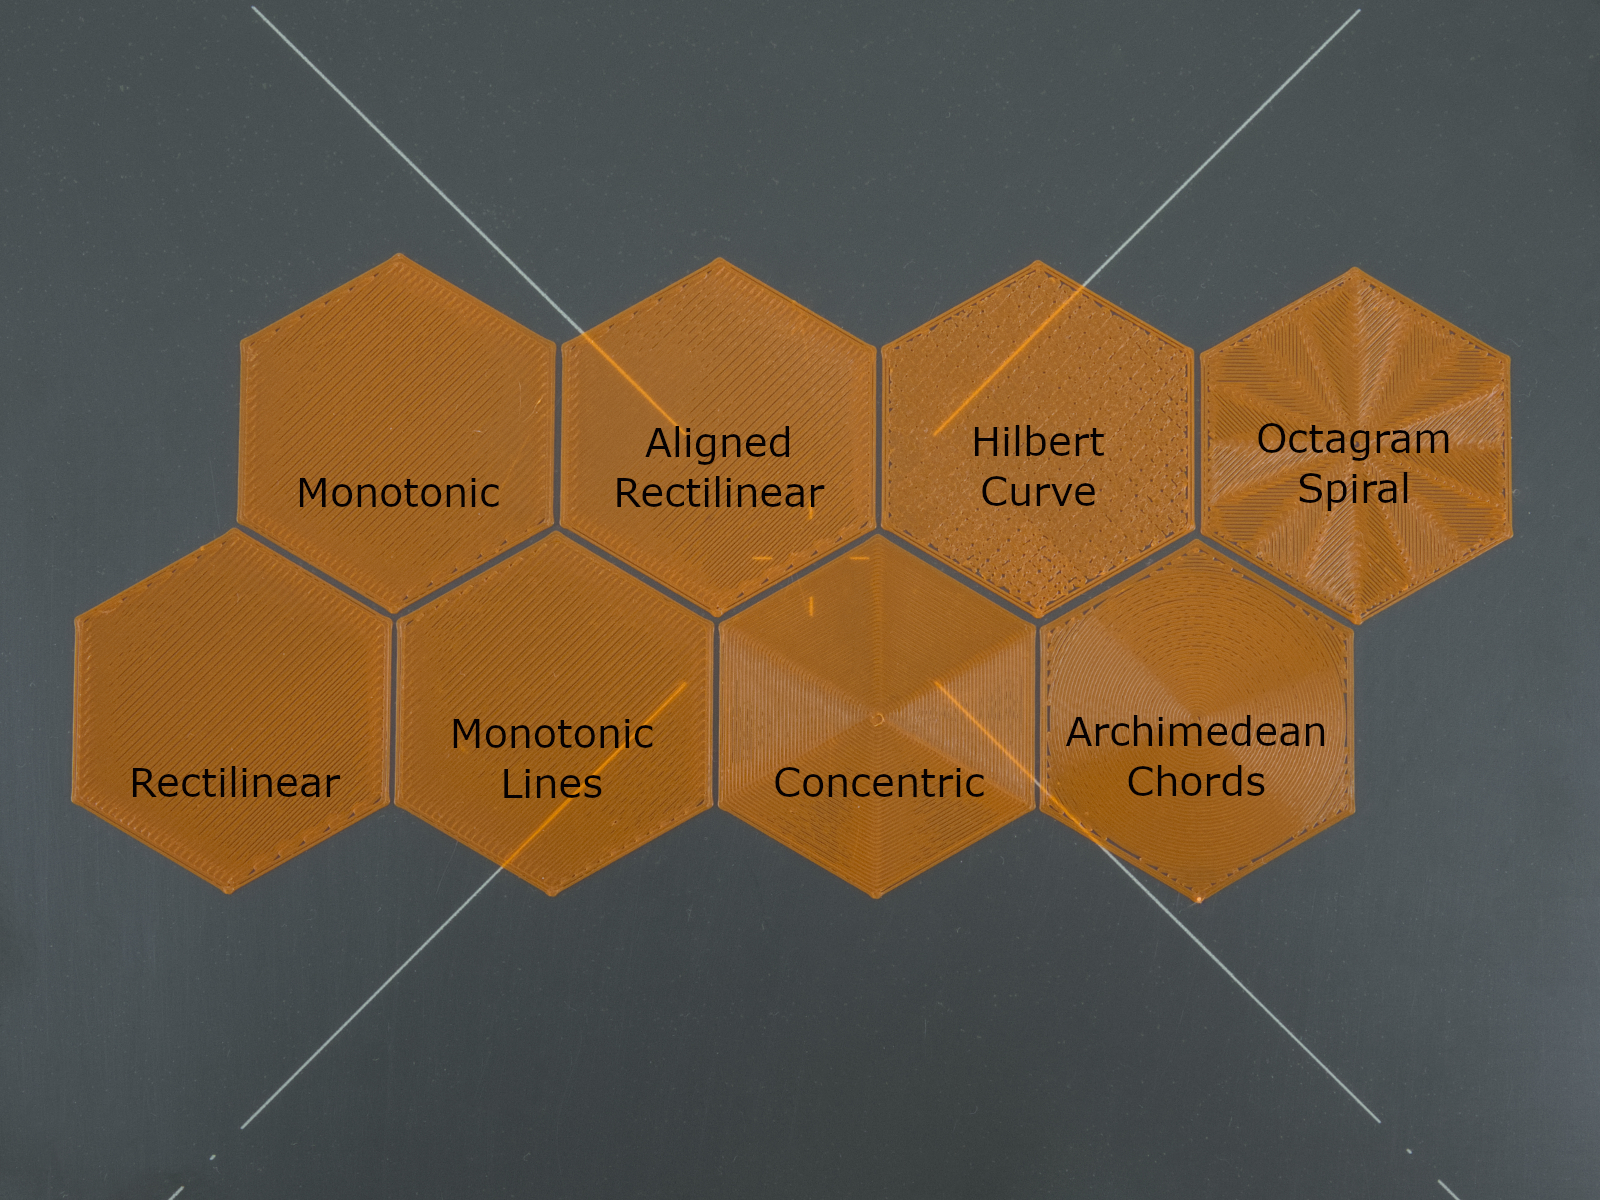
                  Again, this is one of the most common (and basic) types of top infill. The print paths are oriented in a zigzag pattern across the whole layer. This pattern can result in artifacts where toolpaths change direction.

                  Monotonic infill

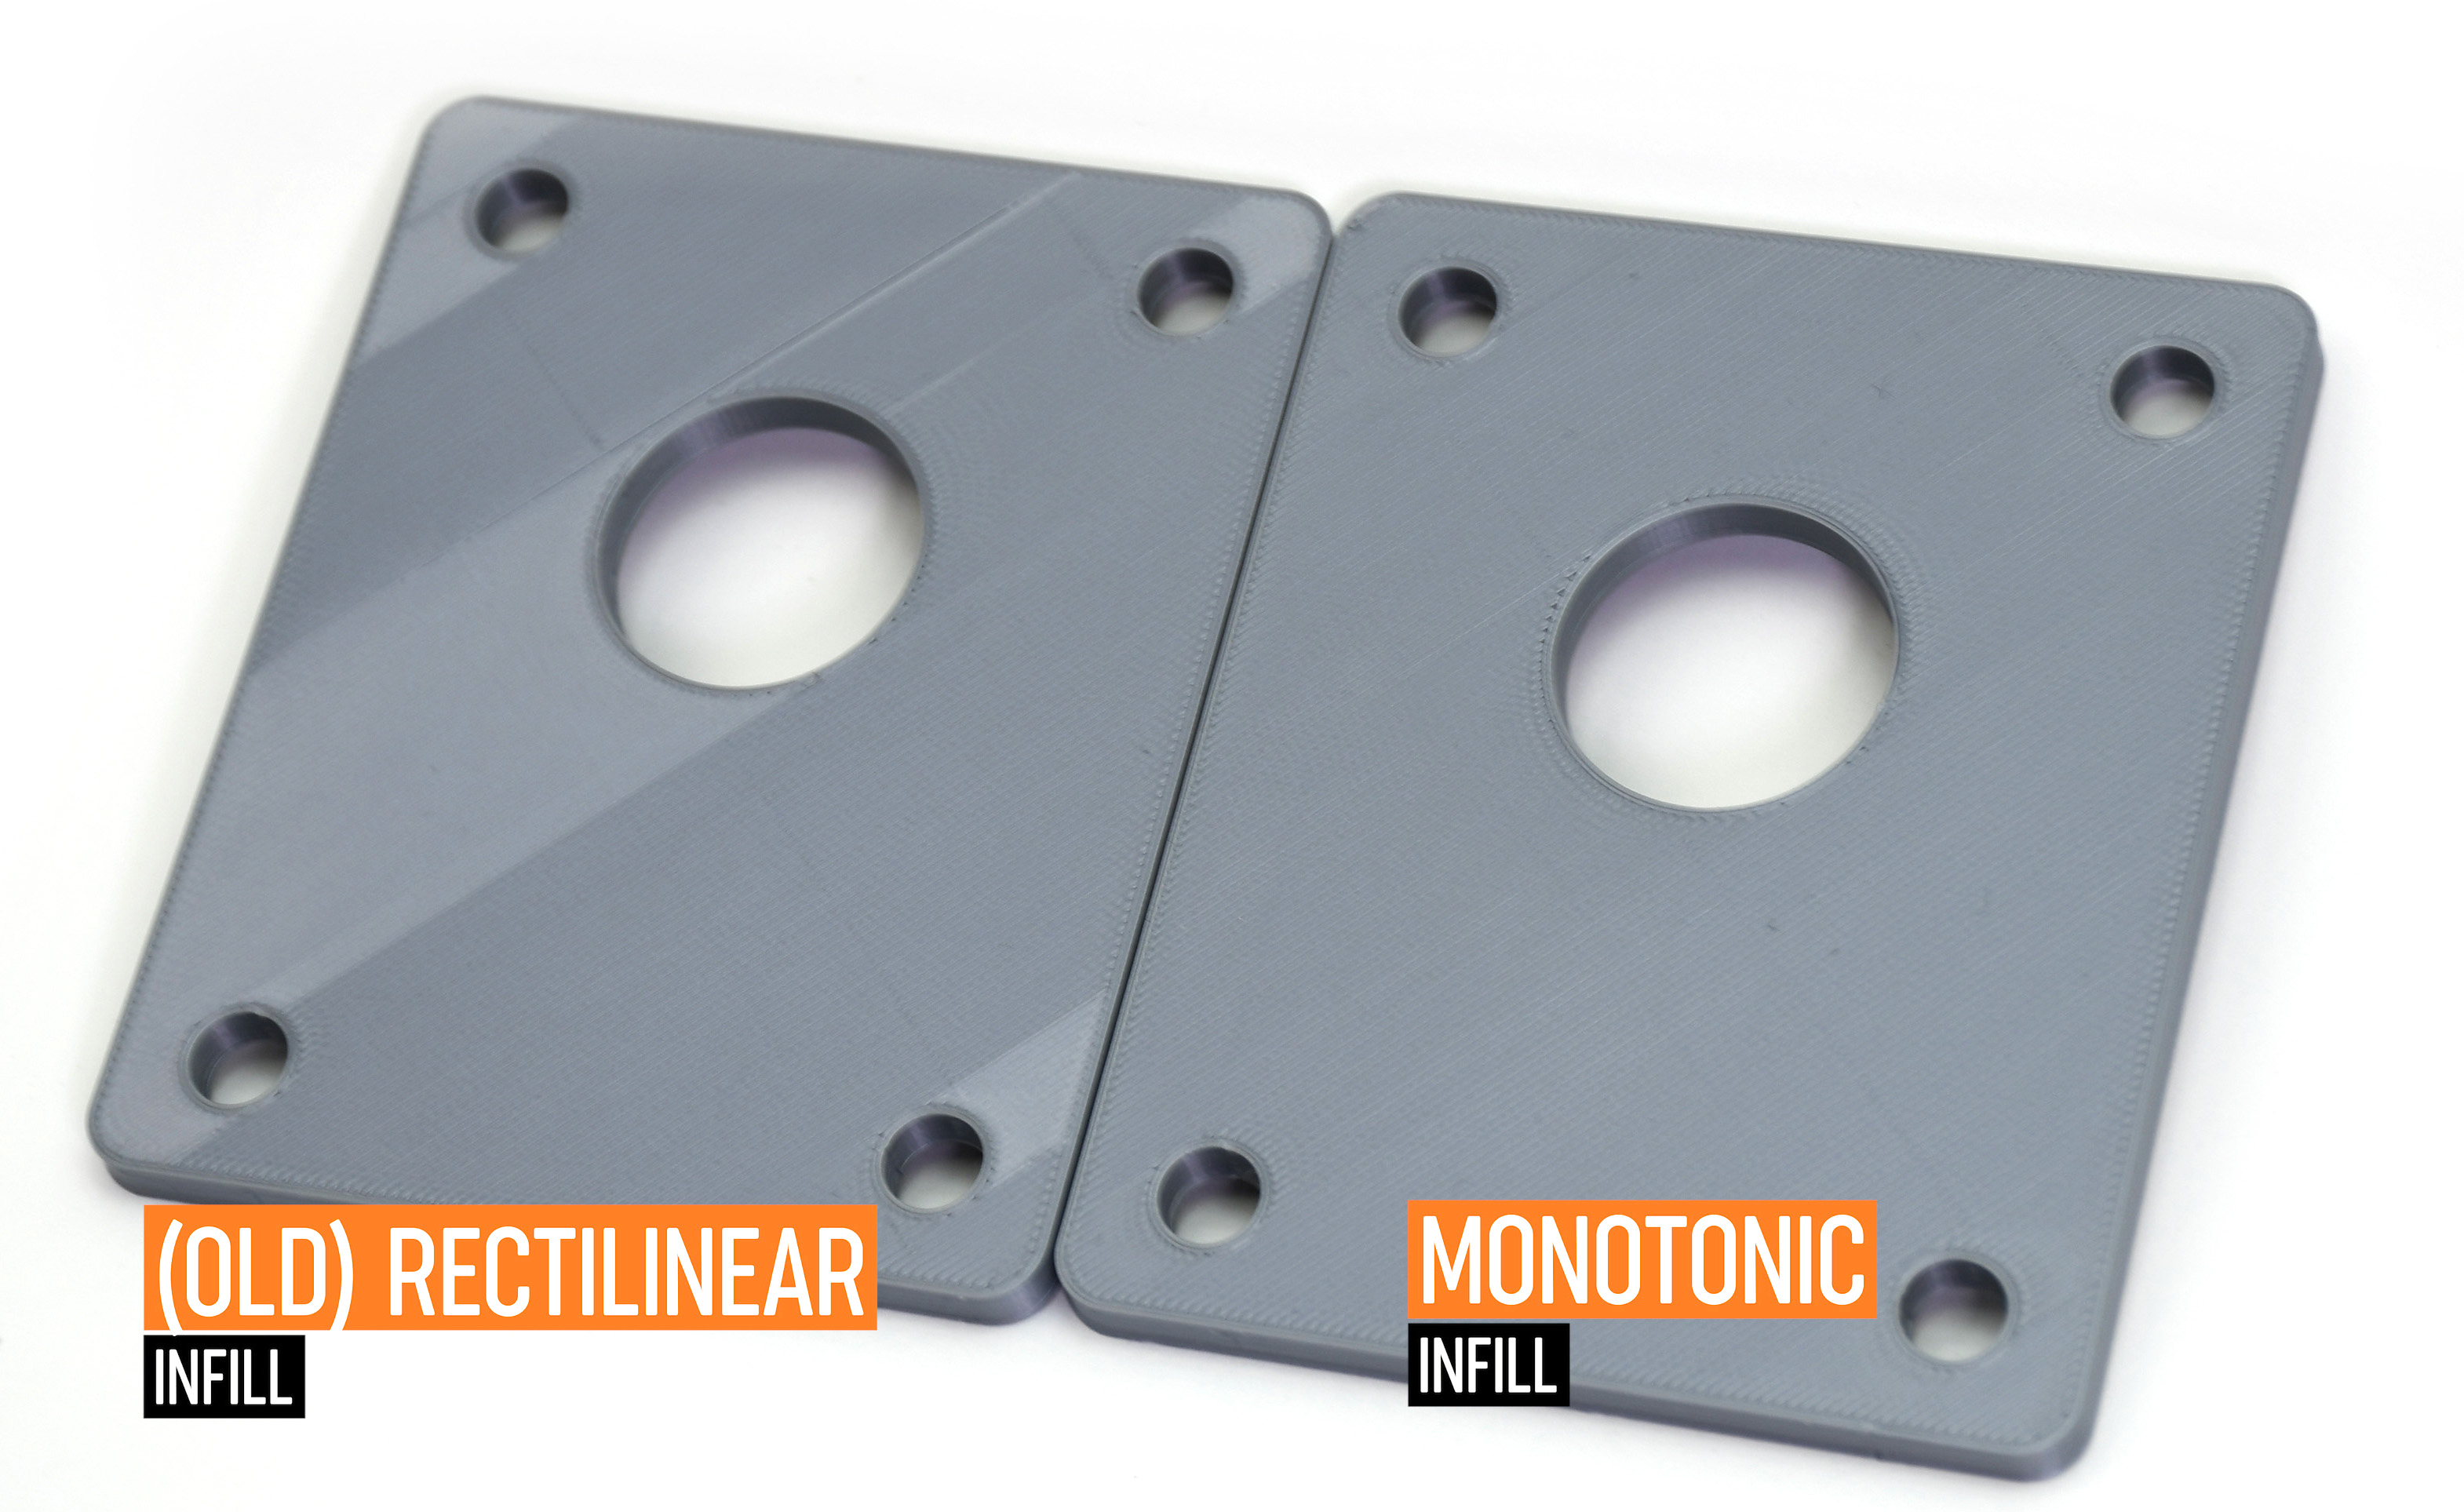
                  The "monotonic" infill is essentially a rectilinear infill with modified path planning. The infill lines are extruded left to right monotonically. A line is never extruded to the left of an already extruded infill line. This strikingly simple strategy yields a uniform texture without ugly ridges. Ridges are often created when the left-to-right extrusions meet with right-to-left extrusions in the center of an infill area, while printing left to right only leads to a homogeneous shine.

                  The seemingly simple left-to-right strategy is surprisingly difficult to implement optimally. We have implemented a variant of the Ant Colony System as described by Raad Salman.
                  Monotonic lines

                  Like the Monotonic, the Monotonic lines infill prints in a consistent order to create a uniform look, but avoids overlap with the perimeter. This reduces excess material and creates a smoother-looking surface. Note that this infill increases print time and may make seams visible.

                  Aligned rectilinear

                  This infill pattern works similarly to the rectilinear infill, but the last layers on all top surfaces are aligned in the same direction. This can help create a homogeneous top-layer pattern for models that have top layers in different heights (imagine a staircase model).

                  Concentric

                  The concentric infill pattern copies perimeter shapes. If you print a cylinder, it will create concentric circles on top of the model.

                  Hilbert curve

                  This is mostly an aesthetic infill. If it’s printed inside, the Hilbert Curve creates rectangular shapes, while the topmost layer looks more like a wicker basket. Some people say that it looks “wormy”. This infill significantly increases the print time due to the complex shape.

                  Archimedean chords

                  The topmost layer of Archimedean chords is printed in a spiral. This infill can save time when printing certain models.

                  Octagram spiral

                  Similar to the Octagram spiral infill. It’s good mainly for aesthetic purposes, but due to the complex shape, it prolongs the print time.

                  Was this article helpful?
                  This action is available only to registered users. Please log-in.

                  Topics

                  • PrusaSlicer 2.9 (Legacy)
                    • Print settings
                      • Infill
                      • Support material
                      • Layers and perimeters
                      • Elephant foot compensation
                      • Sequential printing
                      • Max volumetric speed
                      • Skirt and Brim
                      • Ironing
                      • Fuzzy skin
                      • Slicing mode / 3DLabPrint airplanes
                      • Pressure equalizer
                      • Arachne perimeter generator
                      • Organic Supports
                      • Speed settings
                      • Infill patterns
                      • Seam position
                    • About PrusaSlicer
                    • Configuration and profiles
                    • User interface
                    • Input/output
                    • Left toolbar
                    • Top toolbar
                    • Filament settings
                    • Printer settings
                    • Advanced features
                    • Multi-material slicing
                    • SLA slicing
                    • Other (PrusaSlicer)

                  29 comments

                  Log in  to post a comment
                  thallam08
                  •
                  I was directed here from PrusaSlicer for information about Lightning infill. It'd be nice if the person who created the link and message checked that the page linked to actually contained details about the thing they were refering to. Not much help if the linked page is out of date like this one is.
                  Reply
                  Blaub
                  •
                  mydude, but it is on the page. Just search for Lightning...
                  Reply
                  ga
                  •
                  It would be nice to know which infill pattern gives the most rigid support in all directions -- to prevent twisting / warping. In particular, a comparison of gyroid with honeycomb would be good.
                  DMartin's request for a chart would be good. I would like a chart with ratings 1-10 in various categories for easy comparison.
                  My version of PrusaSlicer (2.9.4) does not have a way to set top and bottom infill; at least I don't see it under PrintSettings/Infill. Also don't see Monotonic listed. It would be nice to indicate the version of PrusaSlicer required to get any particular feature.
                  Reply
                  lflfm
                  •
                  I have 2.9.4 and I do see `top fill pattern` and `bottom fill pattern` under print settings -> infill -> infill. They are tagged as green - begginer, so they should always be available...
                  https://postimg.cc/bdJ0bxq3
                  Reply
                  Barnard
                  •
                  I want to print a monitor mount with Prusament ASA that can hold 4 monitors, each weighing up to 25 pounds. What infill settings do you recommend?

                  The design has a central pole and a curved horizontal bar (168 centimeters) at the top to hold the monitors. There will be 2 angled poles extending from each side of the central pole to the top bar for support.
                  Reply
                  Harris
                  •
                  Seems to me this article badly needs a table with the infill types listed along with their attributes for comparison purposes. Maybe even sketches too.
                  Reply
                  srocmapper
                  •
                  So how do I change it?
                  Reply
                  jfonzy316
                  •
                  1. In the top menu, select "Print Settings"
                  2. Click "Infill" in the left menu
                  3. Adjust the "Fill pattern" setting to the pattern you'd like
                  Reply