AA

Featured products

    Popular categories

      Trending searches

        Articles

          Blog

            Products

              Categories

                Suggested searches

                  Searching…
                  No results
                  Something went wrong.
                  ↑↓ Select↵ OpenEsc Close search
                  • English
                  • Čeština
                  • Deutsch
                  • Español
                  • Français
                  • Italiano
                  • Polski
                  • 日本語
                  • Orders
                  • Address
                  • In-stock Alerts
                  • My Courses
                  • Subscription
                  • Edit Account
                  • 3D printers9+▾

                    3D printersnew

                    newPrusa CORE One L+Learn more
                    newPrusa CORE One+ (Gen 2)Learn more
                    newPrusa CORE One L+ INDX 8-ToolnewPrusa CORE One+ (Gen 2) INDX 8-ToolPrusa CORE One L+: Critical InfrastructureOriginal Prusa MK4SnewOriginal Prusa XL+Original Prusa XL+: Critical Infrastructure

                    Printer upgrades

                    newINDX Conversion KitsnewPrusa CORE One L to CORE One L+ upgradenewPrusa CORE One+ to Prusa CORE One+ (Gen 2)newPrusa XL to Prusa XL+ Upgrade
                    Prusa Reward ProgramLove your Prusa printer? Share your experience and earn $30 Prusa e-shop vouchers.
                    How to Choose a 3D Printer?We’ll walk you through the basics to find the exact machine for your space, budget, and ideas.
                    Free E-bookDownload a free e-book Basics of 3D Printing with Josef Prusa and make your first steps in 3D printing world
                    Original Prusa Printable PartsCollections of printable spare parts for Original Prusa 3D printers and upgrades.
                    Shipping informationRegularly updated info about the current manufacturing capacity and delivery times of our printers.
                    Custom 3D PrintingProfessional custom 3D printing from various materials according to your requirements.
                  • Materials▾

                    Filaments

                    PrusamentPLAPETGASA / ABSPC (Polycarbonate)PA (Nylon)FlexCompositesSpecialMaterials clearance sale

                    Resin

                    Prusament ResinResin Cleaner
                    Filament GuideCheck my Prusament Spool
                    Prusament.com
                  • Parts & Accessories▾

                    Accessories

                    EnclosuresNozzlesPrint SheetsEssential AccessoriesCameras & AddonsTools & CraftingAdhesives

                    Spare parts

                    Merchandise

                    Spare parts - All PrintersCORE OneMK4/S & MK3.9/SMK3/S/+XL
                    Merch
                  • For Business▾
                    Prusa Pro HT90Prusa Pro SLXPrusa Pro AFSPrusa Pro Medical OneOriginal Prusa XLOriginal Prusa XL: Critical Infrastructure
                    Prusa CORE One+Learn more
                    Prusa CORE One LLearn more
                    Prusa CORE One L: Critical Infrastructure Edition

                    3D Printing for

                    Manufacturing and R&DAutomotive IndustryHealthcareEducation and Academic ResearchArchitects and DesignersFilm IndustryCritical Infrastructure

                    3D Printing Stories

                    • How 3D printing started: About Rep-rap and open-source with Adrian Bowyer
                    • Teaching mathematics redefined with 3D printing at JKU Linz
                    • The story behind the LTT screwdriver
                    • Victoria Hand Project: Changing Prosthetic Care with 3D Printing
                    Official Prusa Resellers
                    Sustainability
                    Prusa Education
                    Contact and Inquiry
                    Custom 3D Printing
                    ISO Certified
                  • Software▾
                    PrusaSlicer

                    PrusaSlicerPrusaSlicer

                    PrusaSlicer is an open-source, feature-rich, frequently updated tool that contains everything you need to export the perfect print files for your 3D printer.

                    WindowsMacOSLinux
                    Prusa Connect

                    Prusa Connect

                    Prusa Connect is a cloud service enabling remote control and monitoring of your 3D printers, offering secure data handling, easy setup, and support for managing multiple printers from anywhere.

                    Log in to Connect
                    Prusa.app

                    Prusa.app

                    Control your printer/s remotely from anywhere using the Prusa Connect technology behind. Prusa.app brings a new level of Prusa printer experience to Android and iOS phones.

                    Try it now!
                    Drivers & FirmwareDownload the latest firmware and drivers for your 3D printer.
                    PrusaSlicer Support
                    Prusa Connect Support
                  • 3D Models▾
                    3D PrintersArt & DesignHobby & MakersHouseholdTabletop MiniaturesToys & GamesPrintables Store

                    Popular 3D models

                    • Strong garden hose holder
                    • Prusa Spool Bot
                    • Build Tray — Modular Organizer for Assembly, Disassembly and Maintenance
                    • Broom Holder
                    • Octagon Fabric
                    • Prusa CORE One ? (Mimic Skin)

                    Design Contests

                    • Framework Laptop 12 Mainboard Re-Use9/1/2026 – 9/30/2026
                    • 🏆 Designer Challenge: Magic tricks!9/1/2026 – 9/22/2026
                    • Prototype to Product: Camera Accessories8/1/2026 – 9/14/2026
                  • Community▾

                    Upcoming Events

                    • Maker Faire Tokyo 20269/5/2026 – 9/6/2026 · Tokyo, Japan · Prusa Team
                    • IFA 20269/4/2026 – 9/8/2026 · Berlin, Germany · Prusa Team
                    • 3D Printopia 20269/26/2026 – 9/27/2026 · Pennsylvania, United States · Prusa Team
                    • Maker Faire Bay Area9/25/2026 – 9/27/2026 · Kalifornie, United States · Prusa Team

                    Prusa Forum

                    • Footprint needed for Core One + Gen2 INDX 8
                    • Bed overcurrent
                    • Printable parts for Core One + INDX?
                    Prusa World MapPrusa World MapFind local 3D printing users and explore the community around you.
                  • Help▾
                    Guides & TutorialsPrusaSlicerPrusa ConnectMaterials

                    Printer Model

                    CORE One INDXCORE One LCORE One+CORE One

                    Hardware Troubleshooting

                    • Selftest failed (CORE One/+)
                    • Clogged nozzle (CORE One, CORE One L, XL, MK4/S, MK3.9/S)
                    • Adjusting belt tension (CORE One/+, CORE One INDX, CORE One L/+)
                    • Prusa Connect and PrusaLink explained

                    Drivers & Firmware

                    INDX familyCORE One familyMK4 familyXL familyMMU familyPRO family
                  • Courses▾

                    Become an expert in 3D printing

                    Prusa Academy offers online courses on various 3D printing related topics. Each course features:

                    • easy-to-read text with many pictures and short videos
                    • links for inspiration and further study
                    • quizzes for testing your knowledge along the way
                    • certificate of completion
                    Browse all coursesMy courses library
                    • 3D Modeling in Autodesk Fusion
                    • PrusaSlicer Masterclass – Beginner to Advanced
                    • Complete Guide to 3D Print Postprocessing, Painting, and Detailing
                    • Airbrush Your 3D Prints: From Basics to Advanced Tricks
                  • Blog▾
                    • Back-to-School 2026 Deals Are Here!
                    • PrusaSlicer 3.0 Preview – Built for the Future of 3D Printing
                    • Prusa CORE One+ (Gen 2) INDX, Shipping Has Started, Complete Printers Open for Orders
                    E-Book: Basics of 3D Printing
                  • Company▾

                    About Prusa Research

                    We are the largest maker of 3D printers in Europe and the United States.

                    Founded as a one-man startup in 2012 by Josef Prusa, a Czech hobbyist, maker, and inventor. In just 15 years, we've grown into a company of more than 1,200 people. Every month, we design, build, and ship over 10,000 innovative and secure 3D printers from our headquarters in Prague, Czech Republic, and Delaware, USA, to users in more than 160 countries.

                    Watch a video and find out how Prusa Research was born and what we achieved within only 10 years!

                    About UsTimelineSustainabilityOpen-source
                    About Us
                    Contact Us
                    Logo and Photos
                    ISO Certified
                  1. Support
                  2. Printer troubleshooting
                  3. Clogged nozzle/hotend (MINI/MINI+)
                   

                  Contents

                  • How to spot clogged nozzle/hotend?
                  • How to fix the clogged printer?
                  • Disassembling the hotend
                  • After fixing the clog

                  Blog

                  • Back-to-School 2026 Deals Are Here!
                  • PrusaSlicer 3.0 Preview – Built for the Future of 3D Printing
                  • Prusa CORE One+ (Gen 2) INDX, Shipping Has Started, Complete Printers Open for Orders

                  Newsletter

                  Signup and get our monthly squeeze on updates, blog, printables and much more.

                  By clicking, you agree to receive our newsletter.

                  This site is protected by reCAPTCHA Enterprise and the Google Privacy Policy and Terms of Service apply.

                  Strong garden hose holder
                  E-shop
                  • 3D Printers
                  • Printer Upgrades
                  • Filaments
                  • Accessories
                  • Prusa Merchandise

                  © Prusa Research a.s.

                  Printables
                  • 3D Models
                  • Store
                  • Clubs
                  • 3D Design Contests
                  • Brands
                  Community
                  • World Map
                  • Forum
                  • User Groups
                  • Events
                  Help
                  • Prusa Help
                  • Prusa Academy
                  • 3D Printing Calculators
                  Software
                  • PrusaSlicer
                  • Prusa.app
                  • Prusa Connect
                  • Drivers and Software
                  Company
                  • About Us
                  • Blog
                  • Official Prusa Resellers
                  • Contact Us
                  • Certified for ISO 9001, ISO 14001, ISO 45001
                  • General Terms and Conditions
                  • General Terms and Conditions of Use of the PRUSA Websites
                  • Privacy Policy
                  • Information about cookies
                  • Customer Complaints Policy
                  • Status Page
                  • Do Not Sell or Share My Personal Information
                  • Supplemental Statements
                  • General Terms and Conditions
                  • General Terms and Conditions of Use of the PRUSA Websites
                  • Privacy Policy
                  • Information about cookies
                  • Customer Complaints Policy
                  • Status Page
                  • Do Not Sell or Share My Personal Information
                  • Supplemental Statements

                  © Prusa Research a.s.

                  JOSEF PRUSA®, PRUSA RESEARCH®, PRUSA POLYMERS®, PRUSA ORANGE®, PRUSA 3D ® AND PRUSAMENT® are registered trademarks of Prusa Development a.s. used by Prusa Research a.s. under licence from Prusa Development a.s.

                  Clogged nozzle/hotend

                  (MINI/MINI+)

                  Relevant for

                  MINI
                  MINI+
                  93 comments
                  Article is also available in following languages
                  English
                  Čeština
                  Polski
                  Deutsch
                  Français
                  Español
                  Italiano
                  日本語

                  A clogged nozzle or hotend is a common issue for the FFF/FDM printers. If there are no issues, the filament is pushed in the hotend, melted, and then extruded through the nozzle. However, if the PTFE tube is damaged (scarred, distorted) or there are impurities in the filament it might get stuck in the hotend, clogging the printer.

                  How to spot clogged nozzle/hotend?

                  Visual check

                  • Is the filament reaching the nozzle? Check the long Bowden PTFE tube.
                  • Is the filament coming out of the nozzle? Pay attention when loading filament.
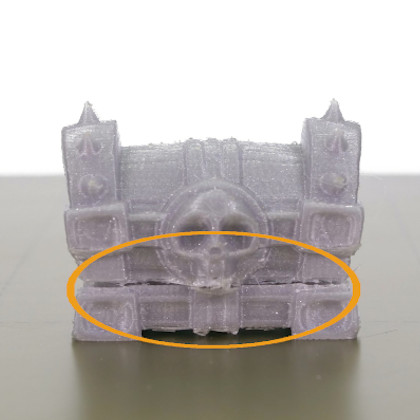
                  • Partial clog - gaps and missing layers
                  • Partial clog - filament curling up and sticking to the nozzle

                   Soundcheck

                  • Clicking noise from the extruder

                  Missing layers can be a sign of a partially clogged nozzle

                  Partial clog

                  Sometimes the clog is partial, meaning that the printer is able to push some filament through, but it is not enough to print the object properly, leading to visible gaps and missing layers. An early sign of a clogged nozzle is that the filament is not extruded consistently, curls up, and sticks to the nozzle.

                  Extruder clicking

                  The hotend or the nozzle is partially or fully clogged and the internal resistance against the flow of the filament is greater than what the gears are able to push. As a result, the gears are skipping leading to the “clicking” noise and in most scenarios also to grinding of the filament.

                  It is important to note, that the clogs can happen in multiple places across the filament path and each requires a slightly different approach. For example, changing the nozzle, while the clogs are happening due to the damaged PTFE tube, won’t solve the issue. 

                  How to fix the clogged printer?

                  Choosing the right method depends on whether you are able to at least partially load/unload the filament or the printer is fully jammed and refusing the move the filament even a little.

                  Before you start fixing the printer, try unloading the filament and removing it completely. If you are unable to do it, it might indicate a more serious problem, but we will deal with this one as well.

                  Also, move the print head up from LCD Menu - Settings - Move Axis - Z-axis or by long-pressing the control knob, this way you will get better access to the parts, which are clogged.

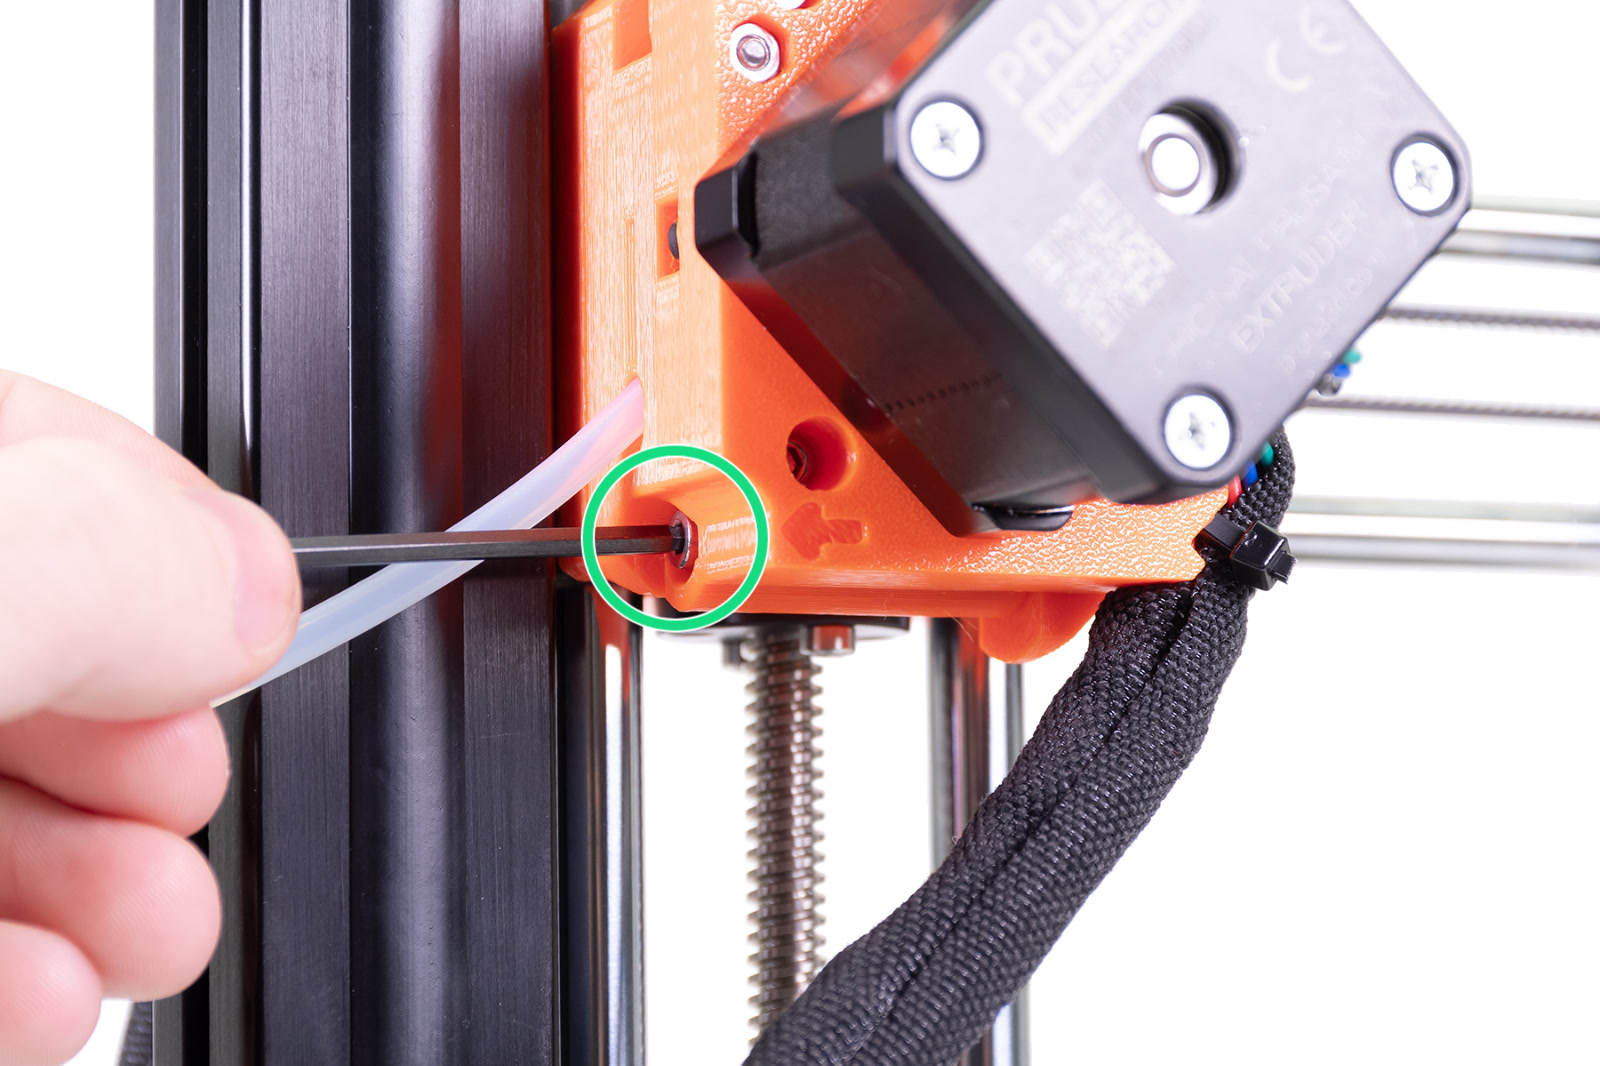
                  Extruder idler screw

                  The idler screw is located right below the PTFE tube where you load the filament (left picture). This adjusts the pressure of the filament onto the filament pulley.
                   
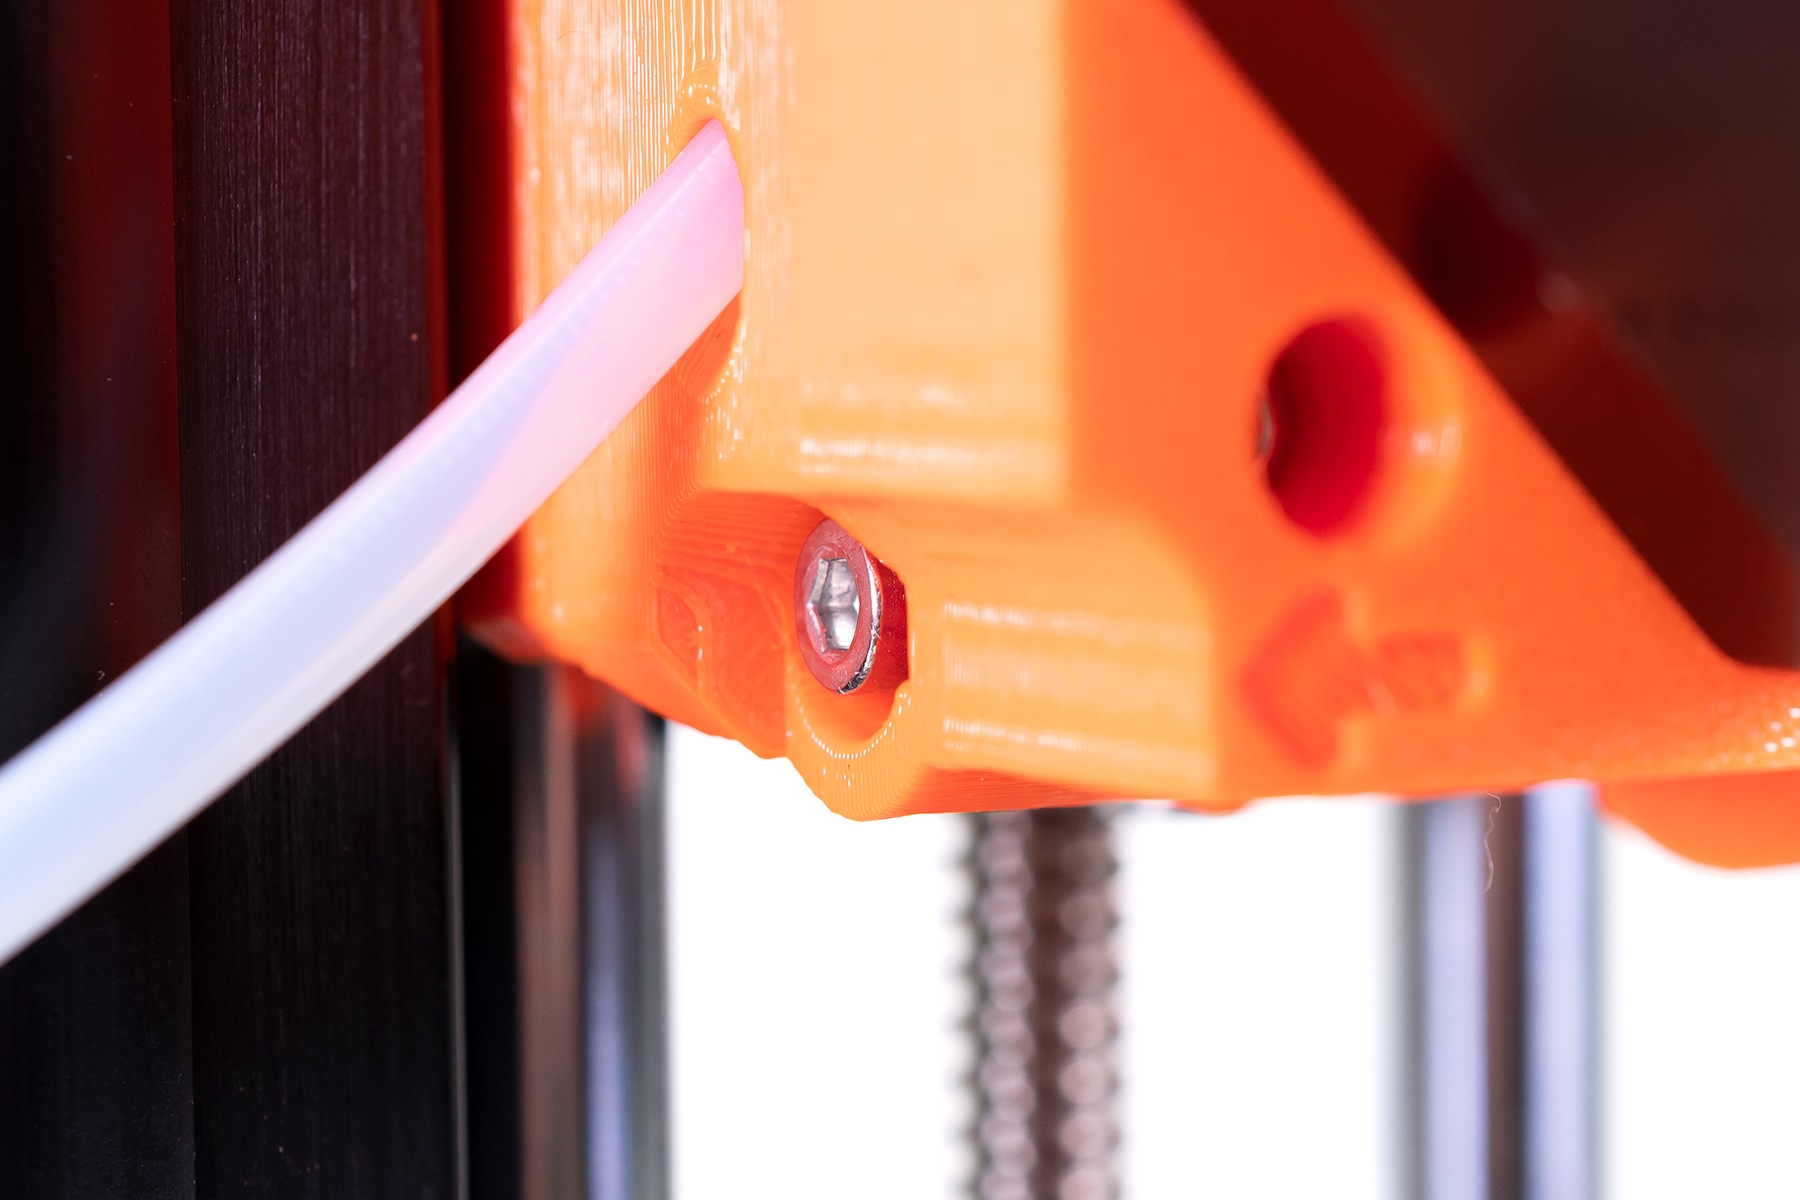
                  If you find that the extruder filament pulley is full of plastic residue, the idler screw may have been adjusted too tight. It can be adjusted with the 2.5 mm Allen key. The head of the screw should be flush to just within the printed plastic part of the extruder when the filament is not loaded.
                   

                  The idler screw should be about flush with the plastic part, when the filament is NOT loaded.

                  Cold pull (load/unload possible)

                  If you are able to load and unload the filament, yet still experiencing partial clogs, try this technique first, which uses a partly melted filament to pick up the debris inside the hotend and pull it out. We have prepared a detailed article about Cold pull (MINI).

                  Once you finish, head to the point in this article to learn how to check for a dirty Extruder pulley.

                  Forcing the clog out (load impossible)

                  Sometimes the gears are not able to push the filament through, but it doesn’t mean that you need to immediately start with the disassembly. By raising the temperature further above the melting point, you might be able to remove the clog together with the debris.

                  Try the following:

                  1. Go to LCD Menu - Settings - Temperature - Nozzle and raise the temperature about 40-50 °C above the normal print temperature (for PLA use 260 °C, for PETG use 280 °C).
                  2. After the nozzle reaches the required temperature, wait for about 2-3 minutes - the filament should fully melt and start dripping out.
                  3. Use the bundled acupuncture needle (0.3 mm) and push it in the nozzle from below. Push it in and out several times, in multiple directions. Then remove it and try loading the filament again.
                  4. If the needle didn’t help, remove the Bowden PTFE from the print head and push the filament in manually. Don’t forget to hold the end of the X-axis with the other hand, or you might skew the axis.
                  5. If the filament clog happened with PLA, you can try loading a material that melts at a higher temperature, such as ASA, ABS, PC.
                  6. The last resort is a rigid metal wire (1.5 mm diameter, 100 mm length). Insert it from the top instead of the filament. Push it down, through the hotend, but be careful and gentle. You might accidentally scratch the PTFE tube.
                  7. Once ready with the clog, head to the last chapter, check for dirty Extruder pulley
                  8. If you are unable to push the filament nor the wire through, you have to disassemble the hotend and find the place, where the filament is stuck. See the next method.

                  Disassembling the hotend

                  (load/unload impossible)

                  Some clogs can’t be removed easily and require you to partially disassemble the hotend. The filament is either stuck in the PTFE tube or in the nozzle. The filament can also be stuck due to a damaged or worn-out PTFE tube. If this is your case, we recommend replacing the PTFE tube for a new one. For disassembly and an inspection, we have outlined the procedure below.

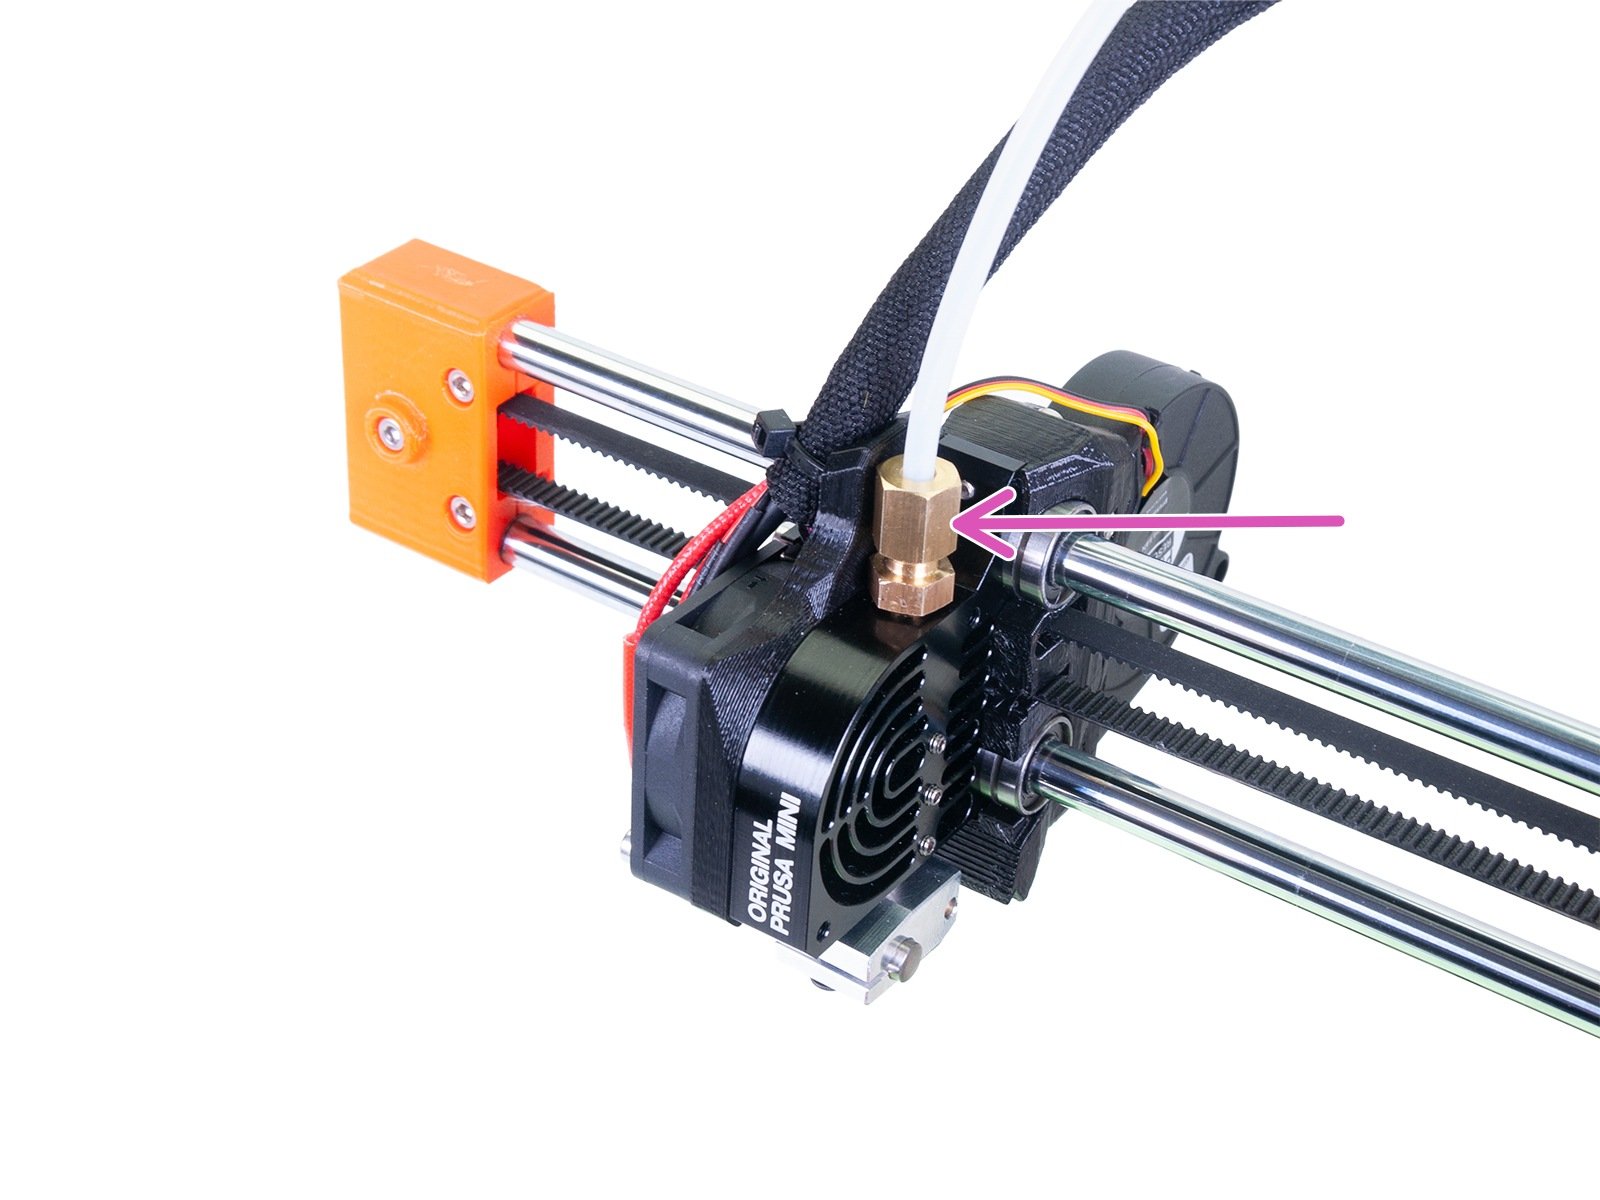
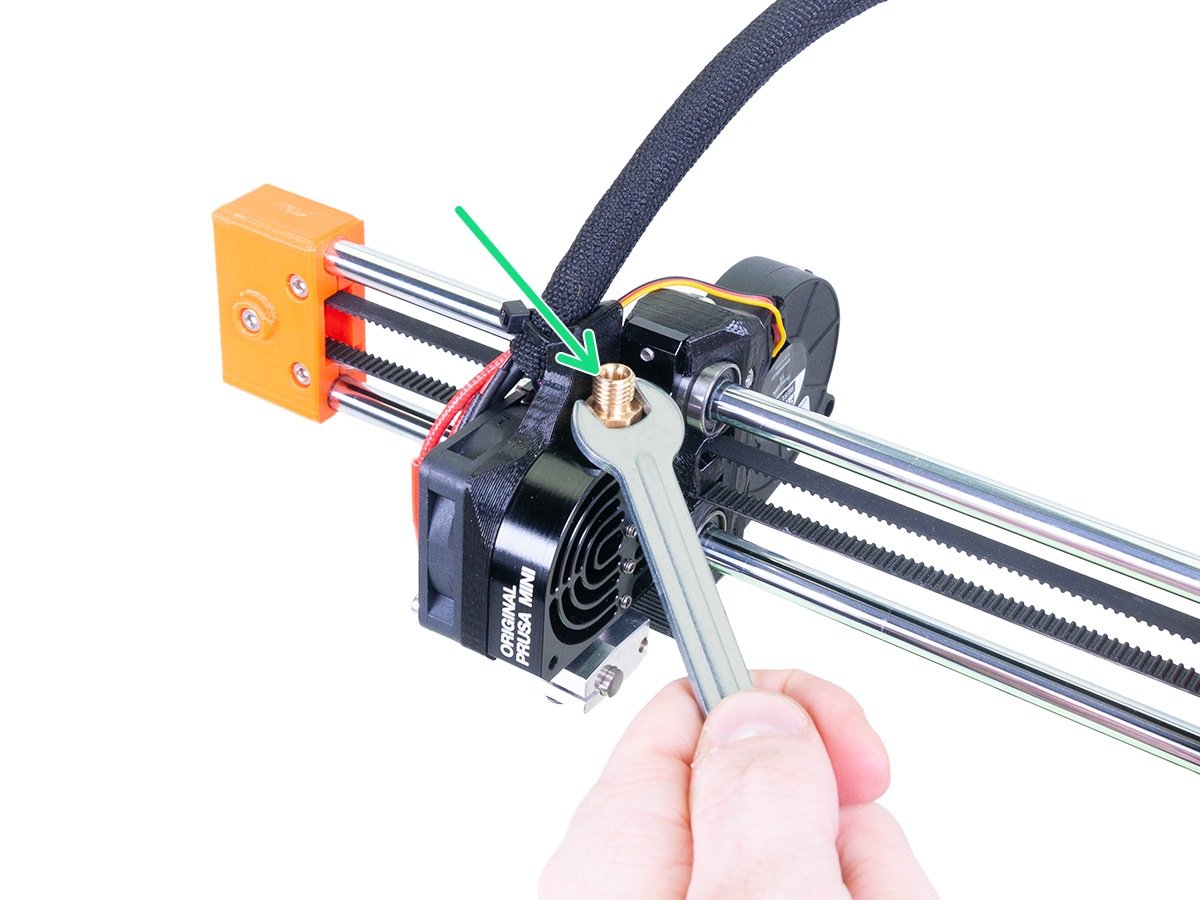
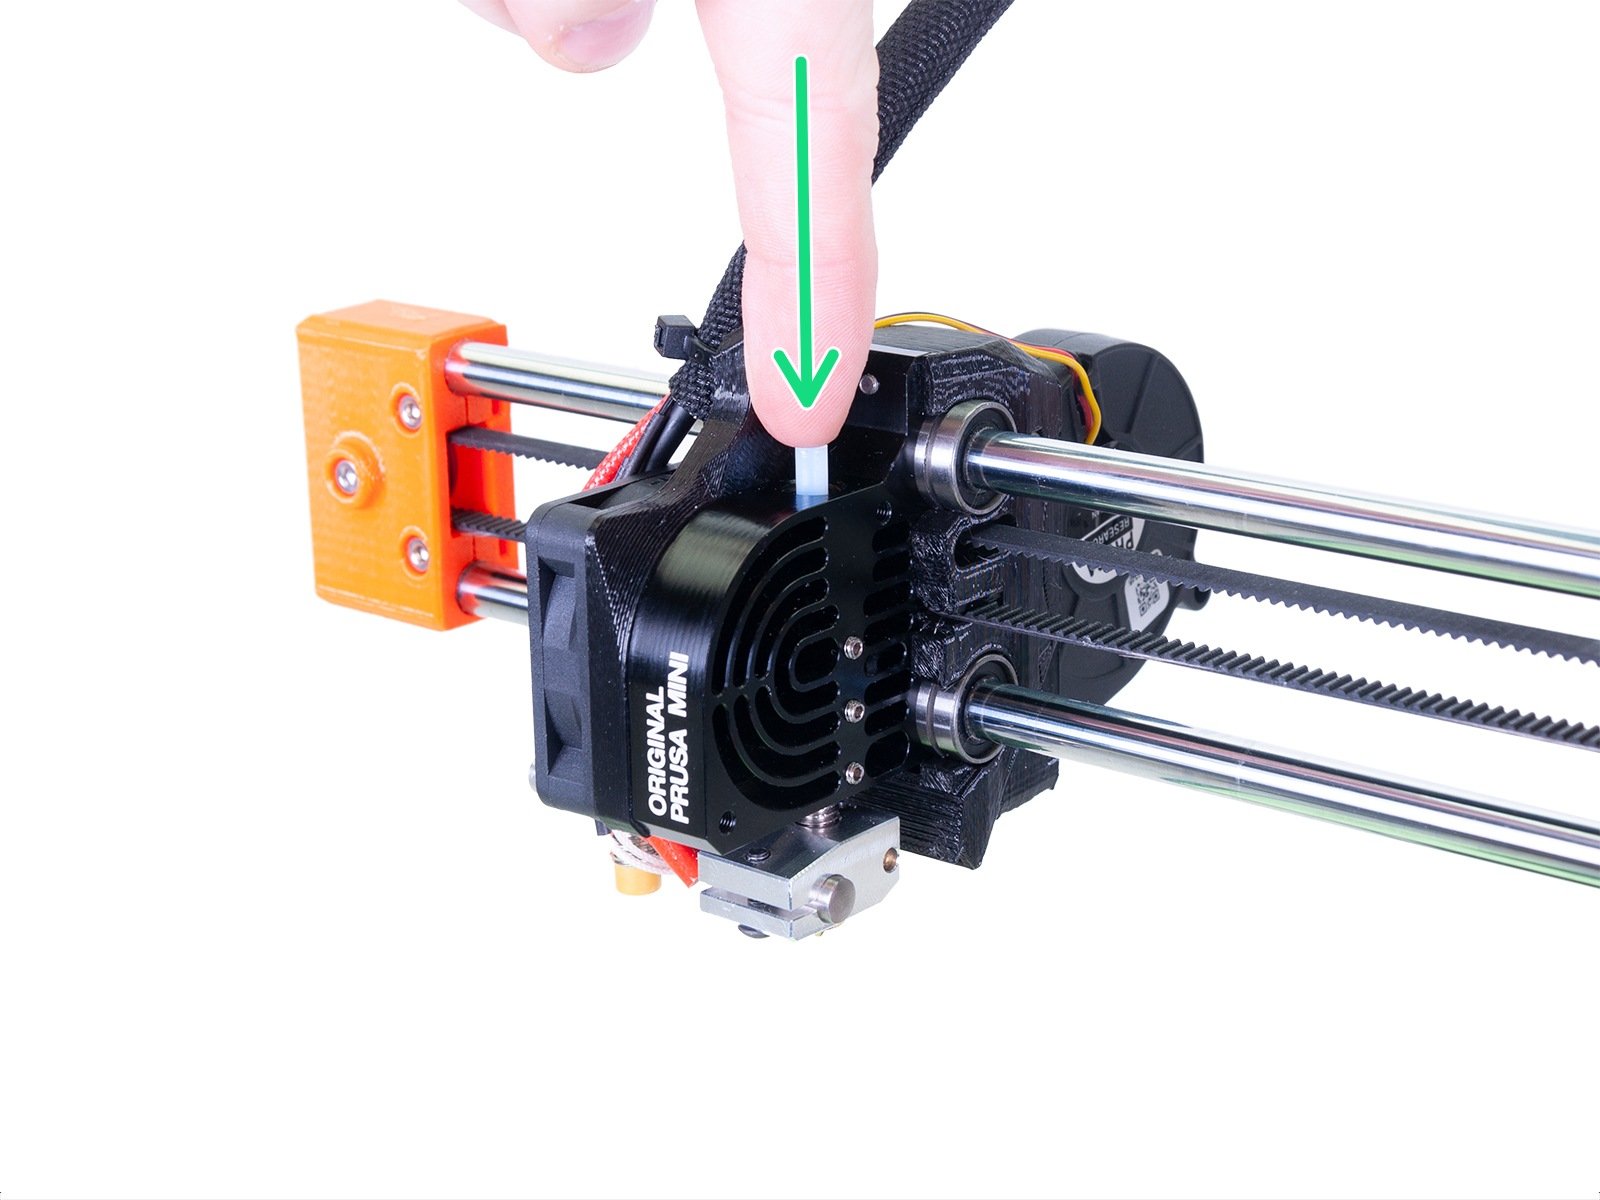
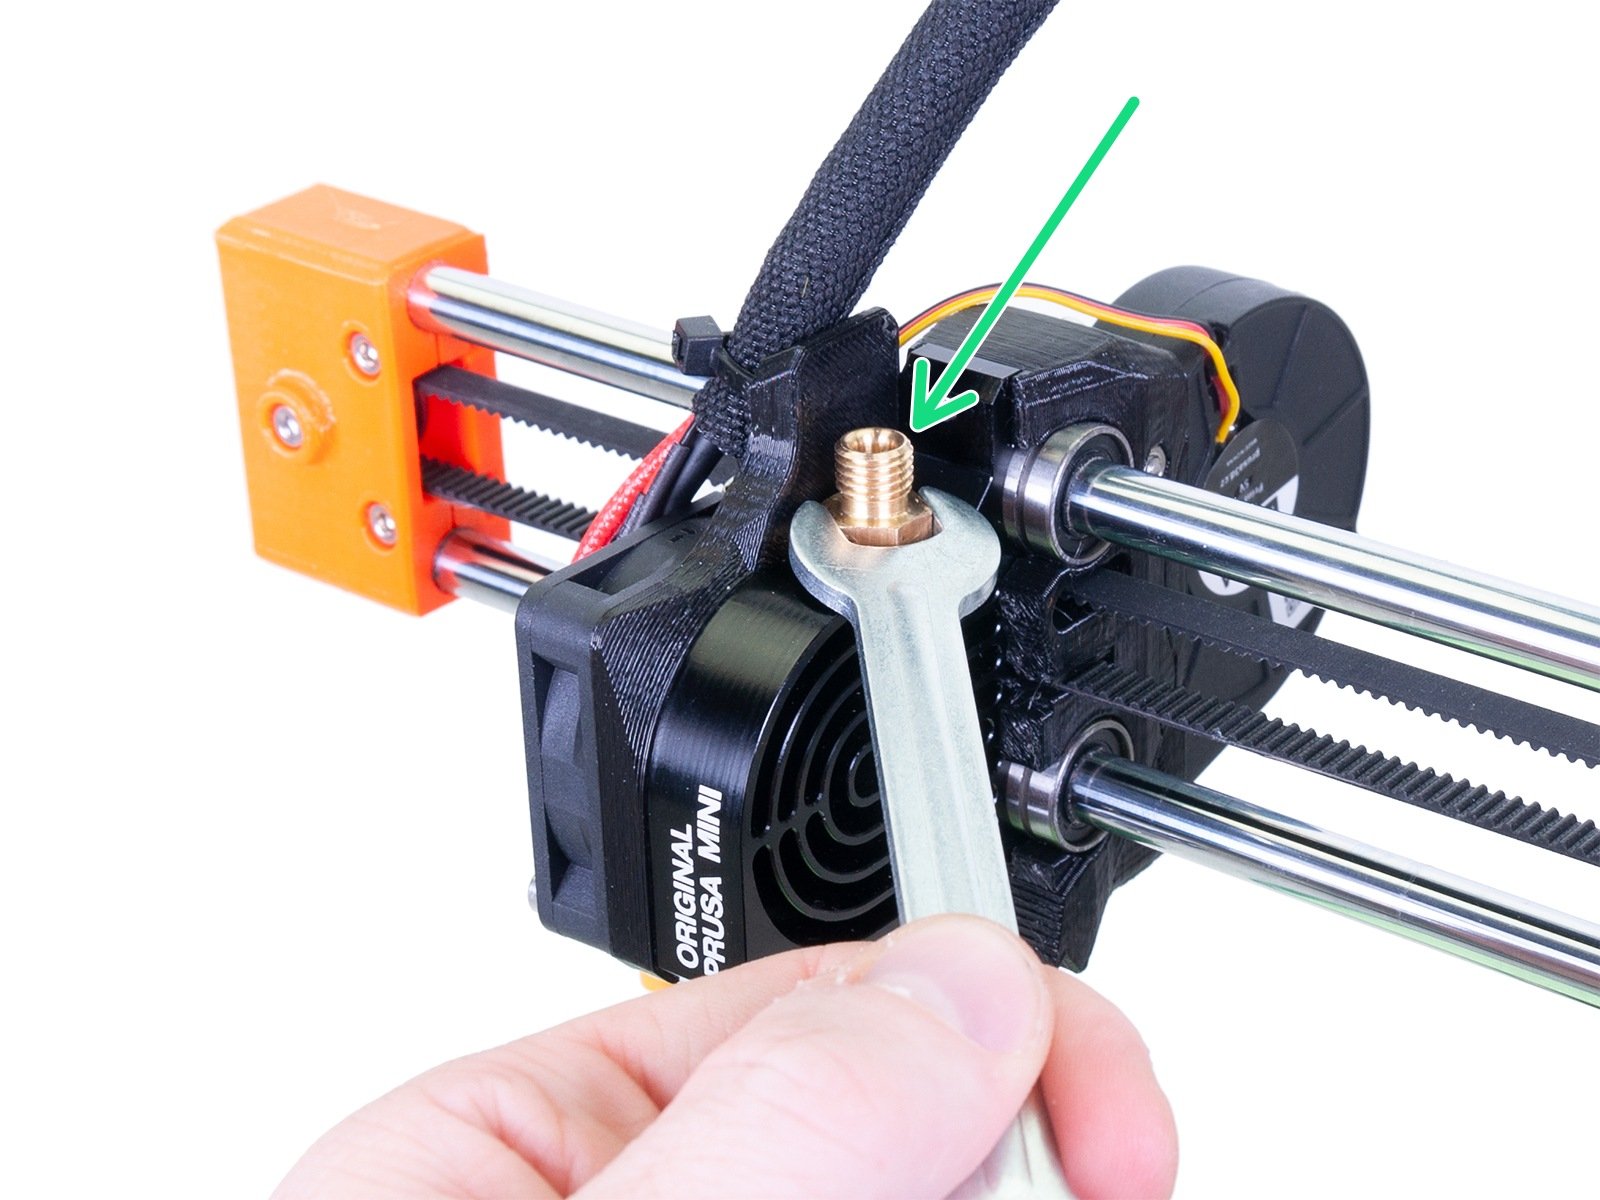
                  1. Remove the Bowden tube coming from the extruder and the brass fitting securing the PTFE tube using your 10 mm wrench. If the nozzle is heated up you will now be able to pull out any filament together with the Bowden tube.
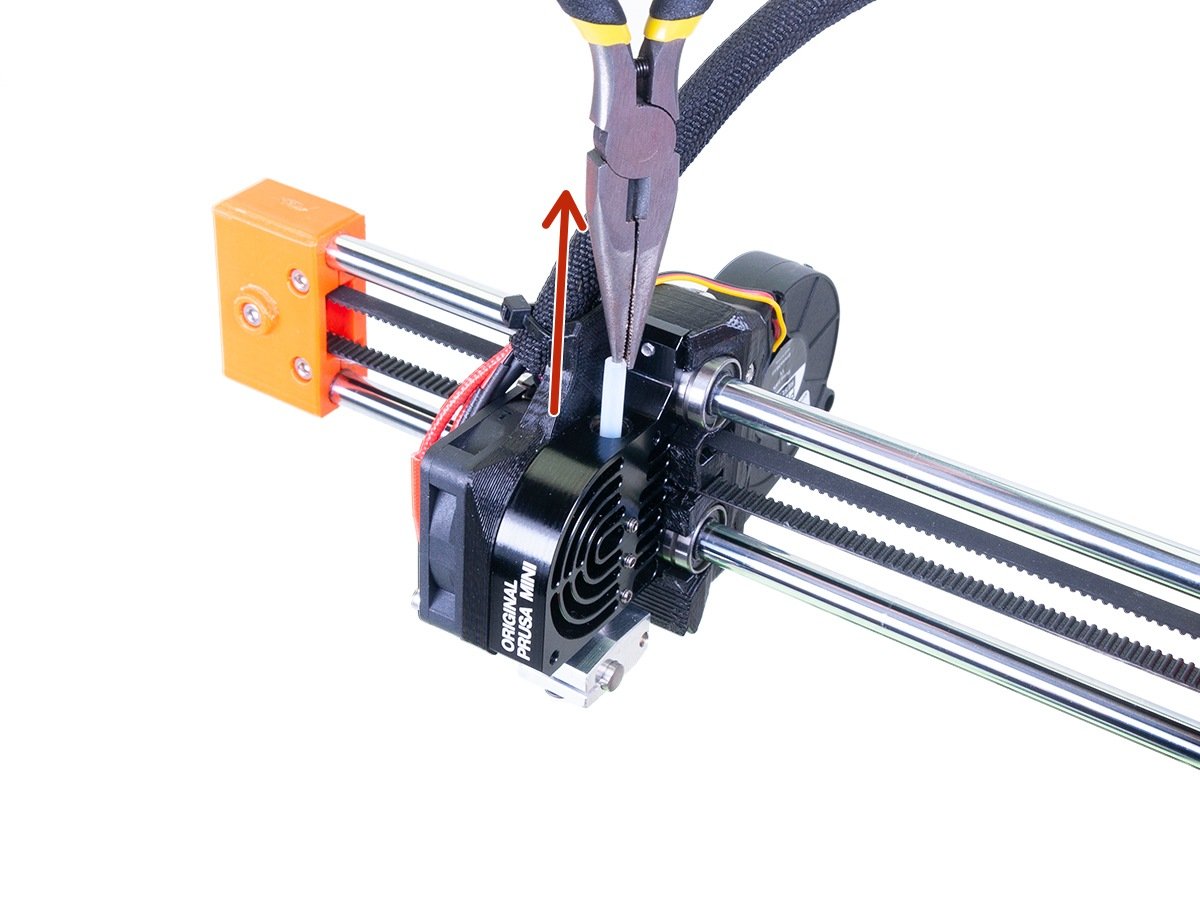
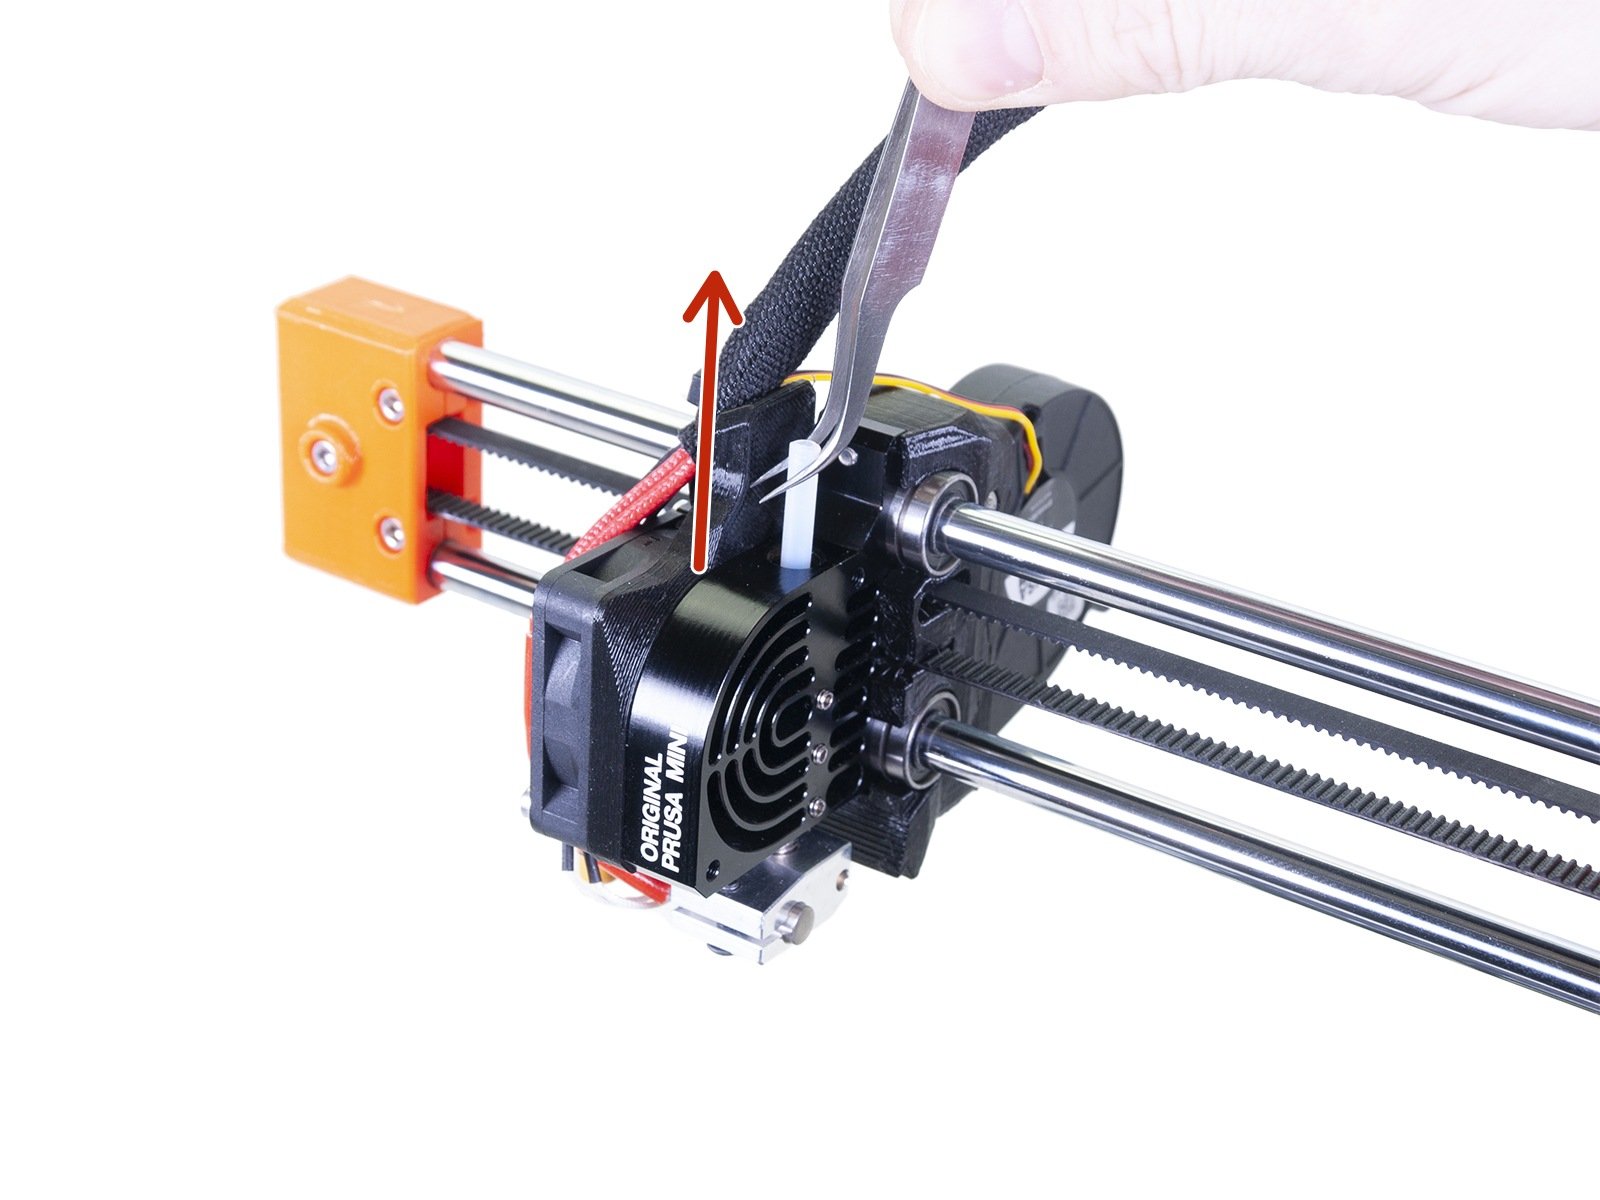
                  1. Carefully pull out the old PTFE tube from the heatsink using pliers or tweezers.
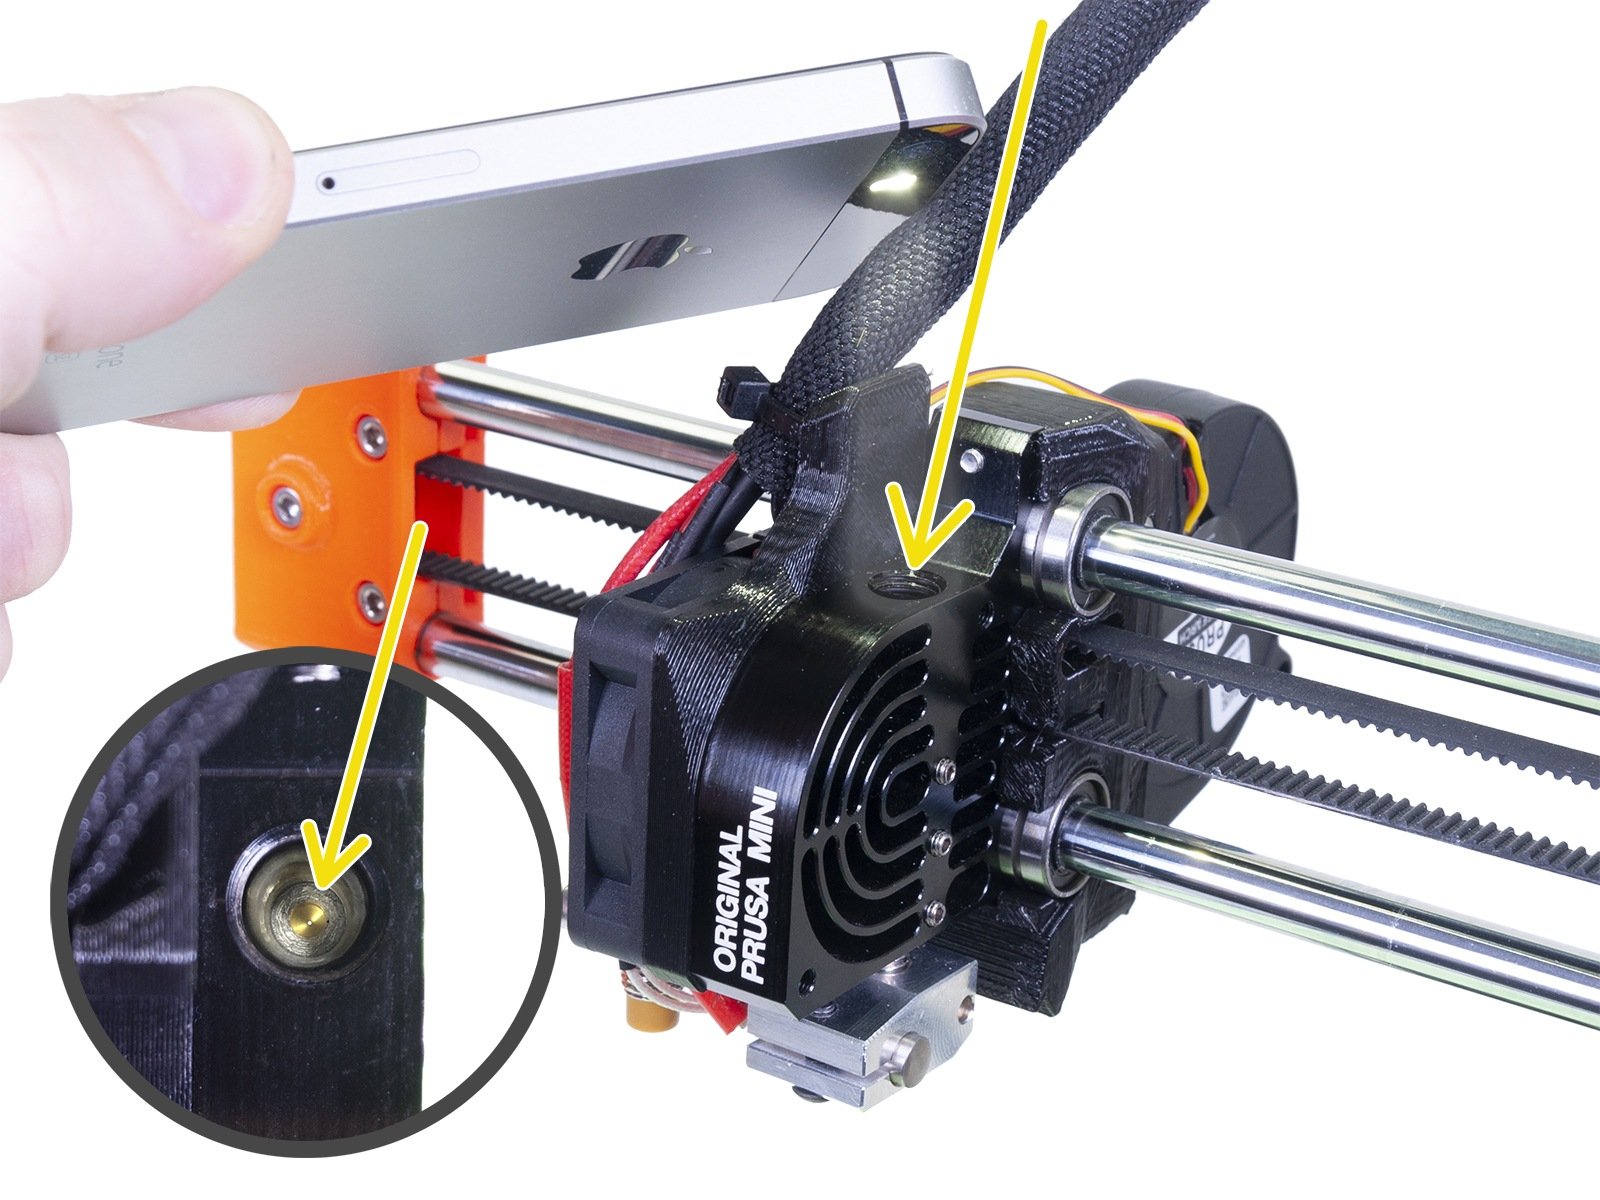
                  1. Investigate the PTFE tube. Check the PTFE tube for possible damage, and if needed, replace it for a new one. A spare PTFE is included with the printer. 
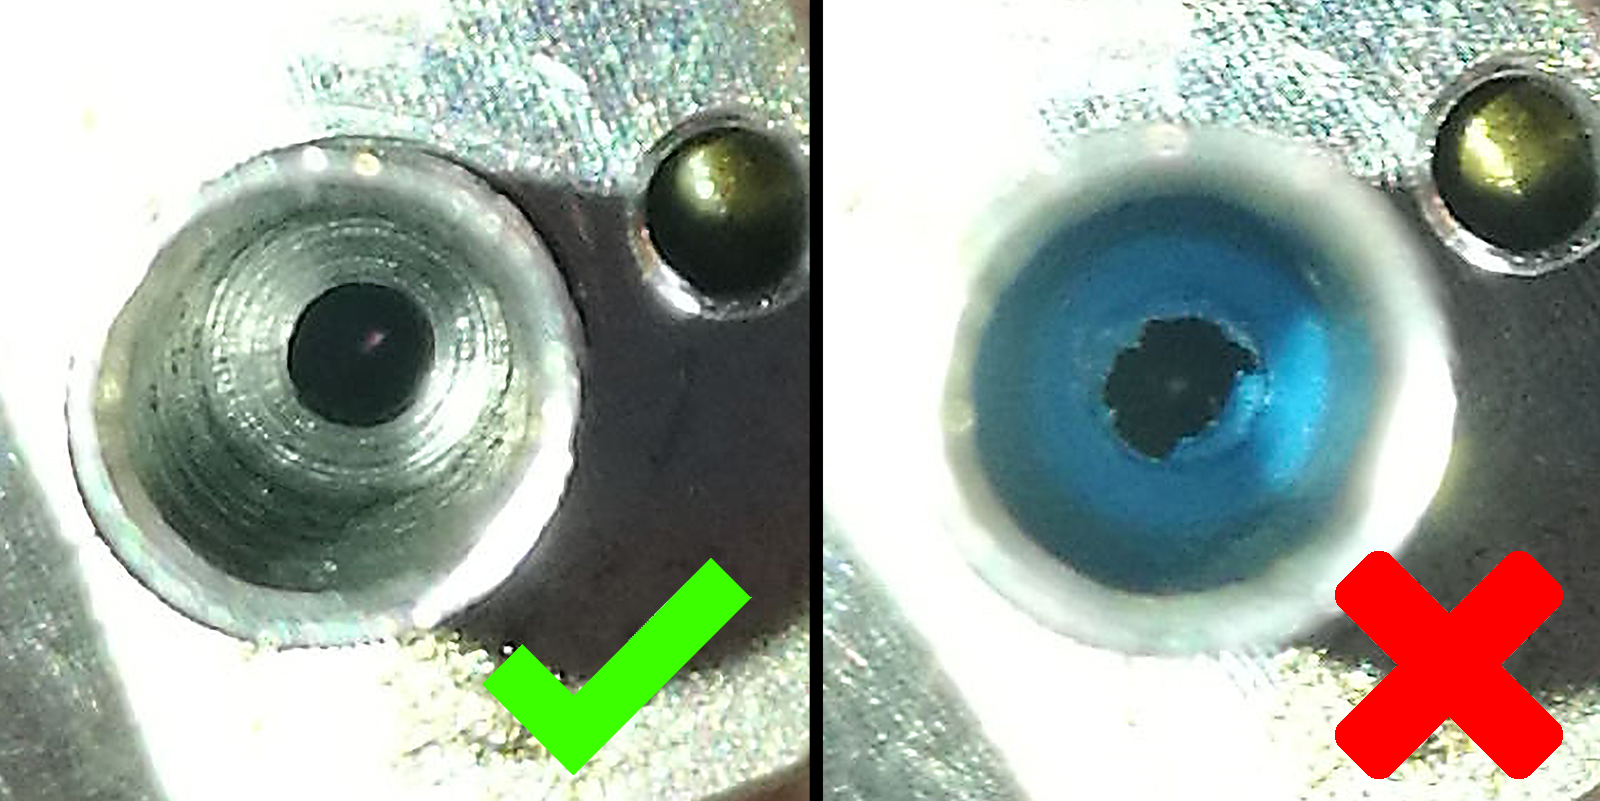
                  2. Clean any remains of filament from the hotend. The bottom of the heat break should be clean and shiny. You can remove any filament by doing a cold pull without the PTFE tube installed.
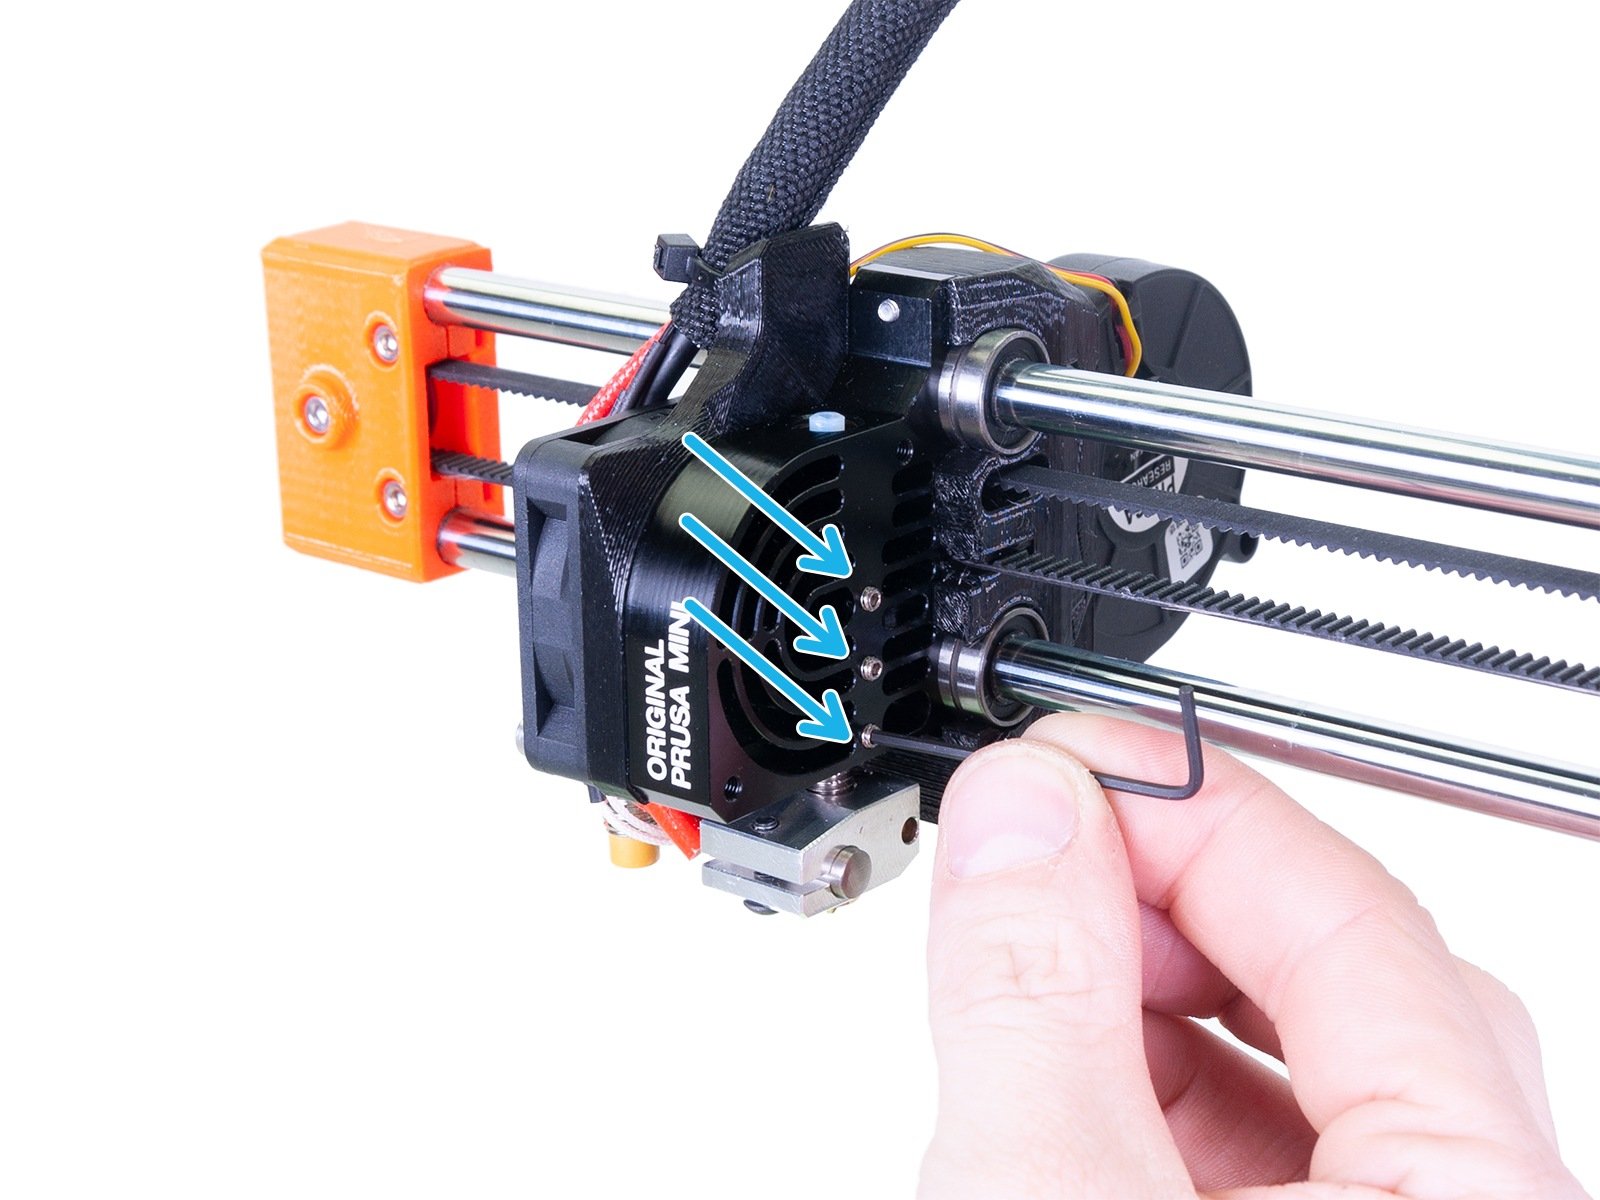
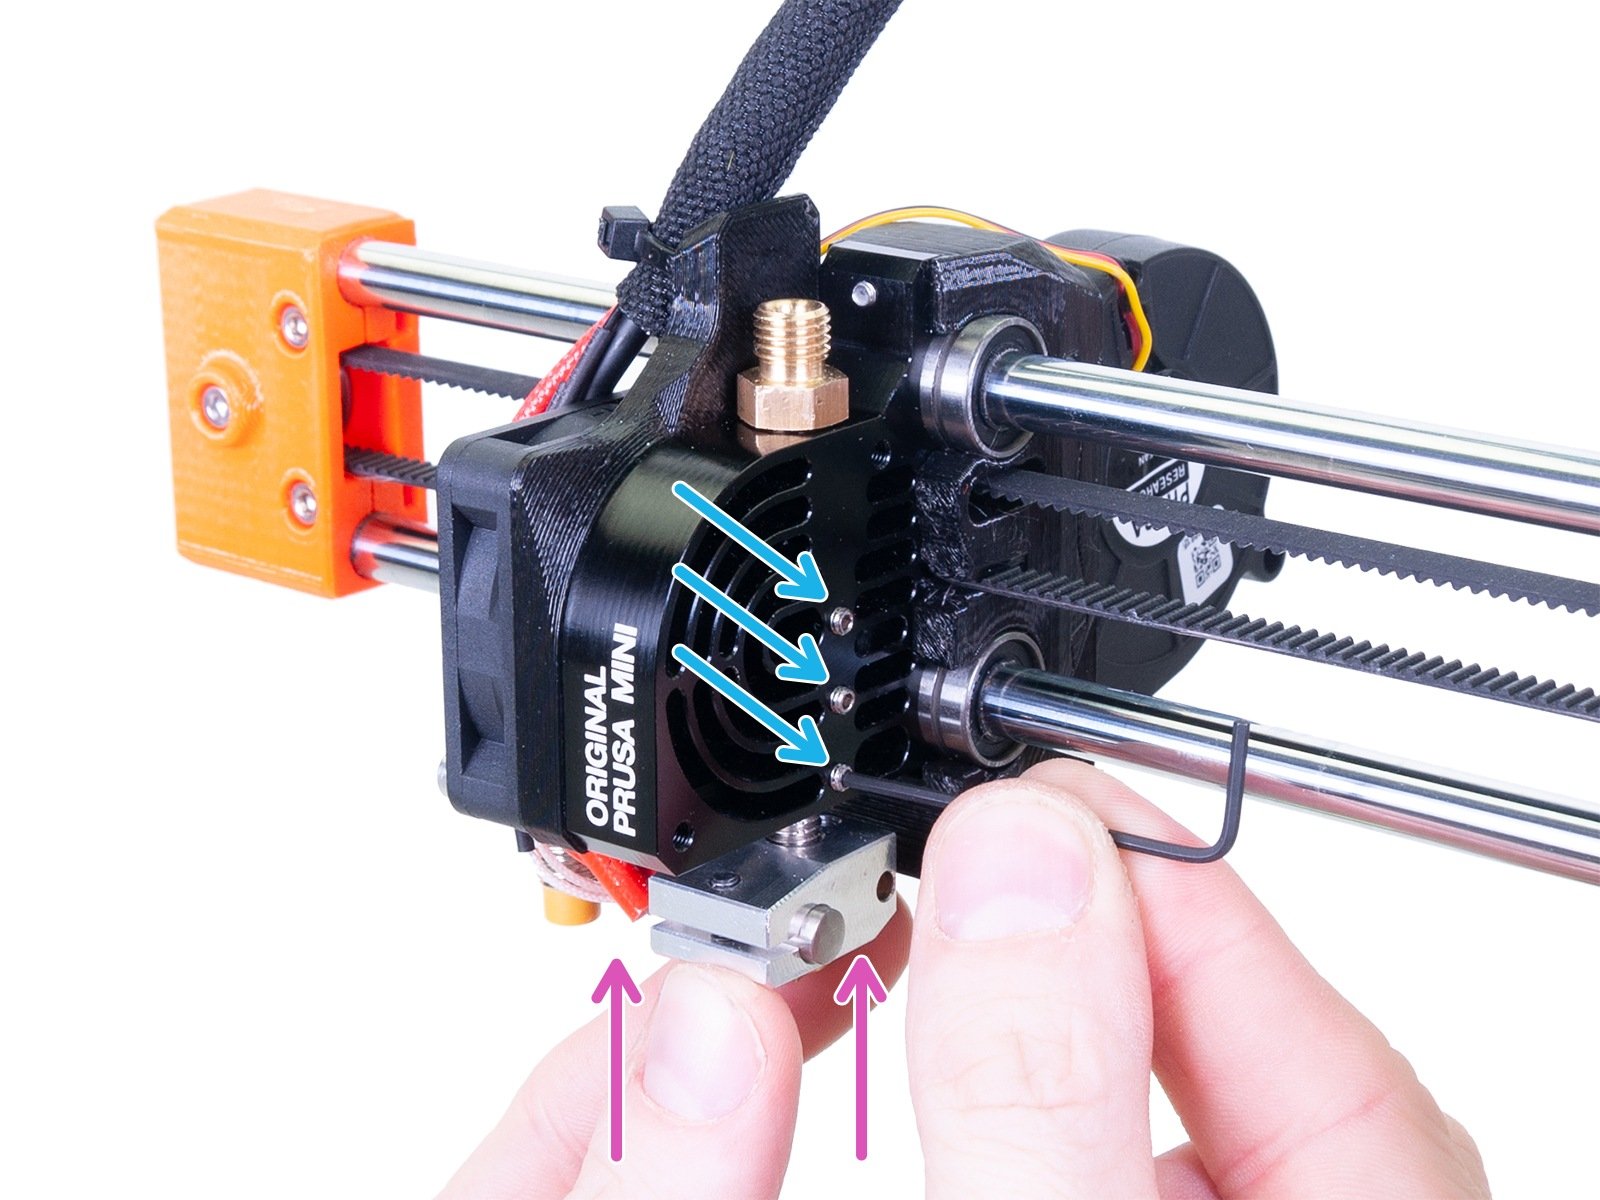
                  1. Insert the PTFE tube back into the heatbreak again. Loosen the three set screws on the side of the heatsink with a 1.5 mm Allen key.
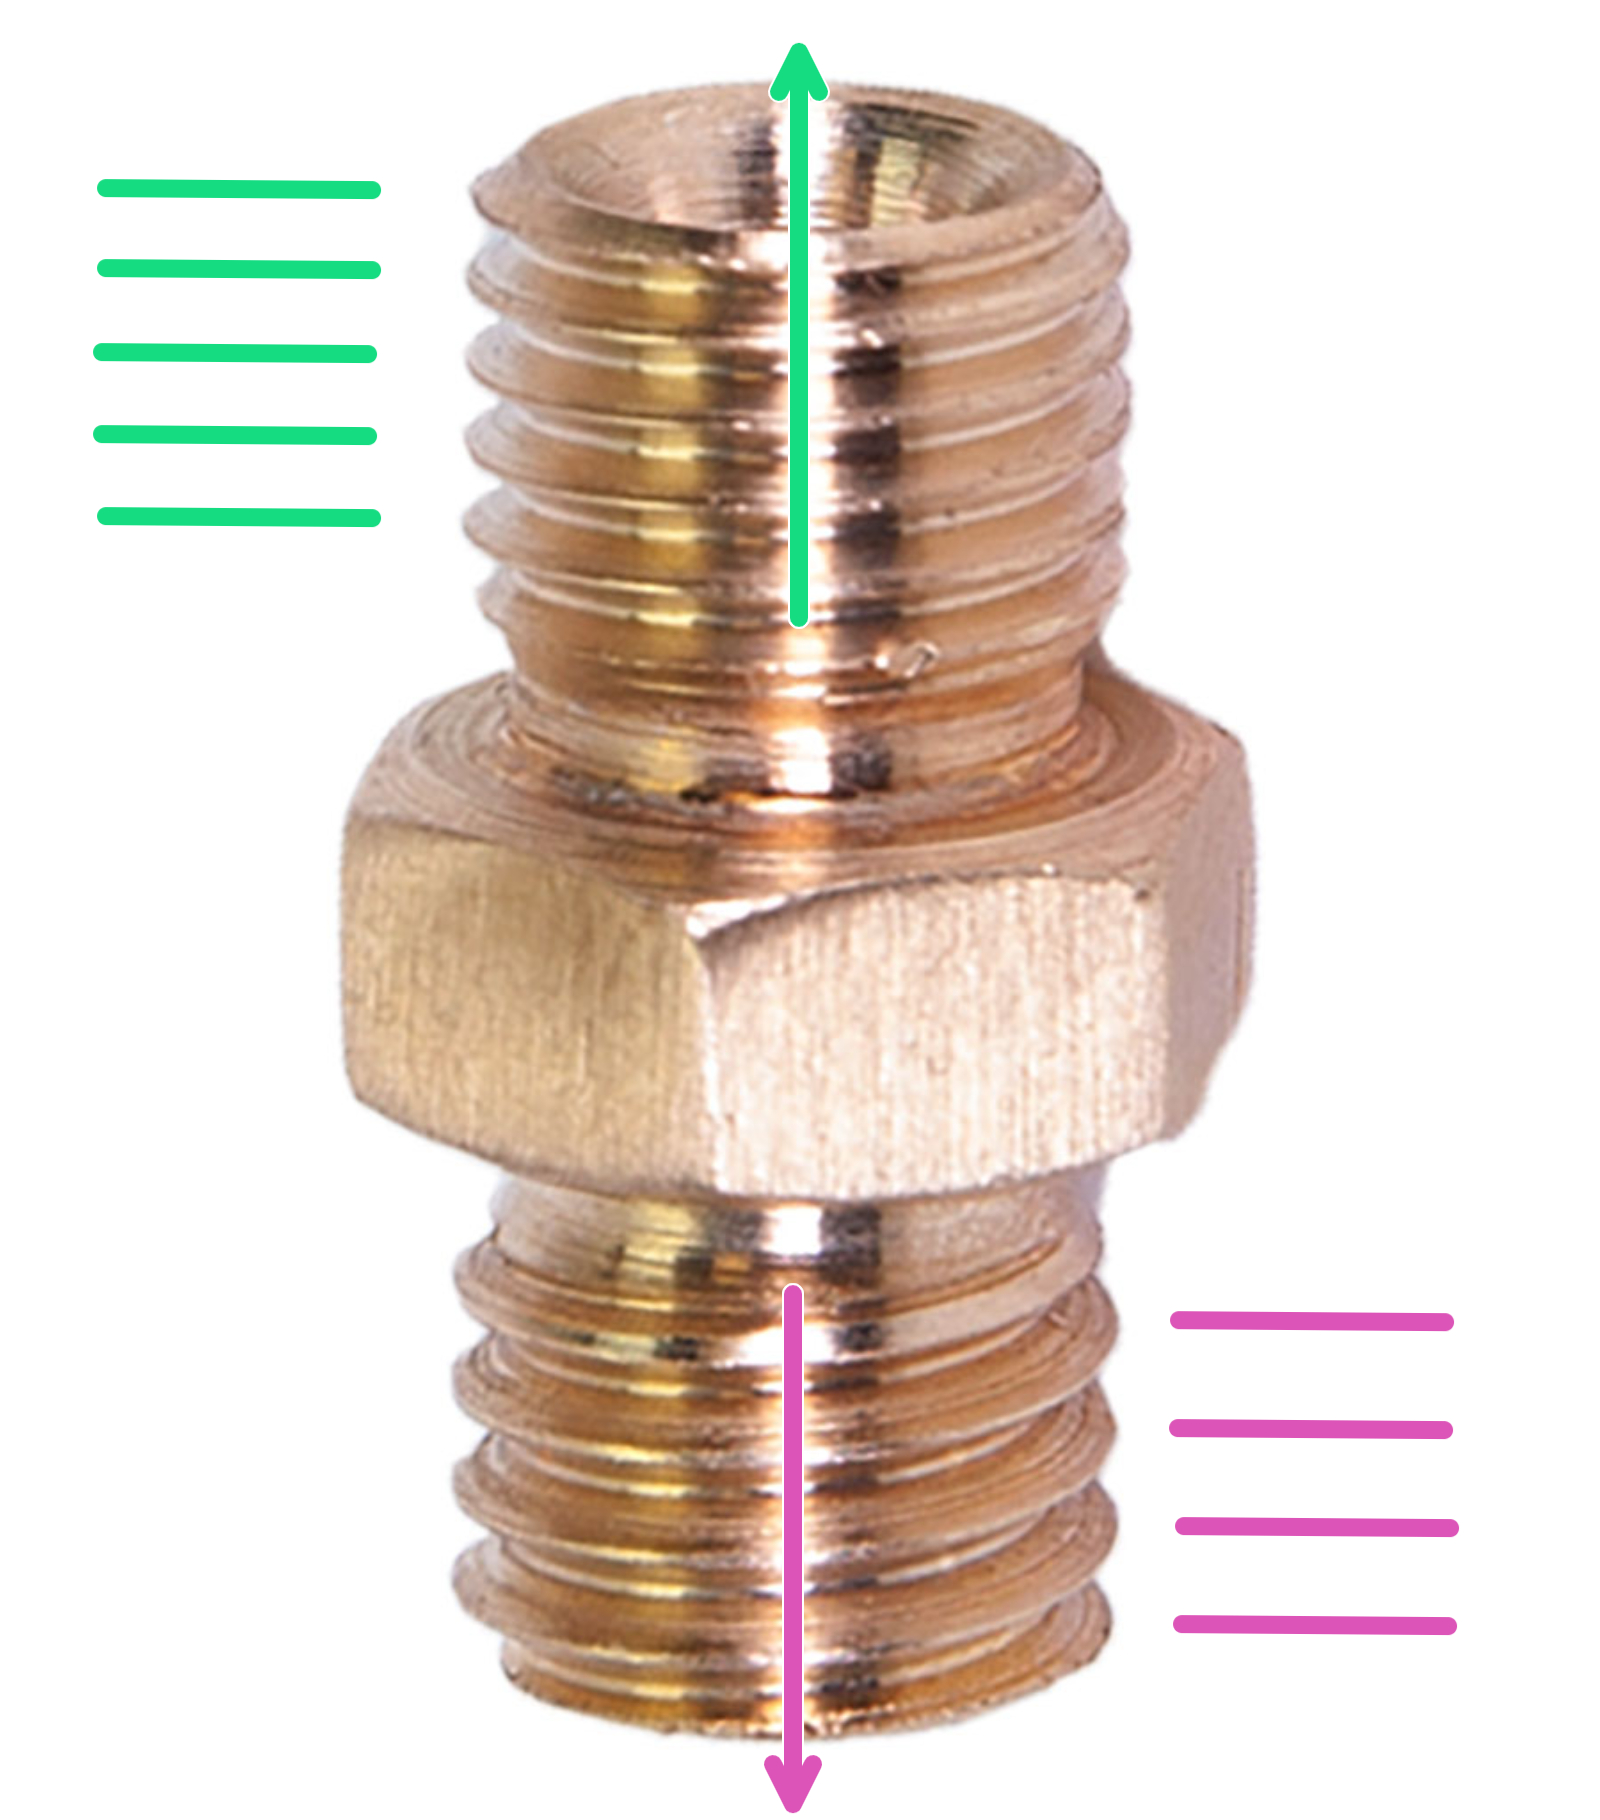
                  1. Screw the brass fitting into the top of the heatsink all the way in, then loosen it by a full turn (360 °). The side with the fewest threads goes into the heatsink (purple arrows and lines). We will compress the PTFE tube in the next step to ensure proper operation. If you have done this already with the same PTFE tube before, you might need to replace the PTFE tube with a new one.
                    In some scenarios, it might be enough to clean up the hotend, reseat the PTFE, and tighten the fitting properly to fix clogs.
                  Orientation of brass fittings.The end with the least threads into the heatsink.
                  1. Press the heater block upwards with a reasonable force. While maintaining the slight upwards pressure on it, tighten up the three set screws on the side of the heatsink.
                  2. Then tighten the fitting on top of the heat sink completely (a full turn), which will compress the hotend PTFE tube.
                  Make sure the nozzle and heater block are cold before touching them!

                  You can now reattach the Bowden tube that leads to the extruder. Before testing the printer we recommend checking the last two points below.

                  After fixing the clog

                  First layer calibration

                  After doing maintenance on the print head we recommend doing a new First layer calibration, as hardware can slightly shift during the procedure. For more info, please see First Layer Calibration (i3).

                  Cleaning the extruder pulley

                  All the issues mentioned above can participate in the filament being ground between the pulley and the bearing. Once the teeth on the pulley get full of filament debris, the extruder won’t be able to load the filament properly.

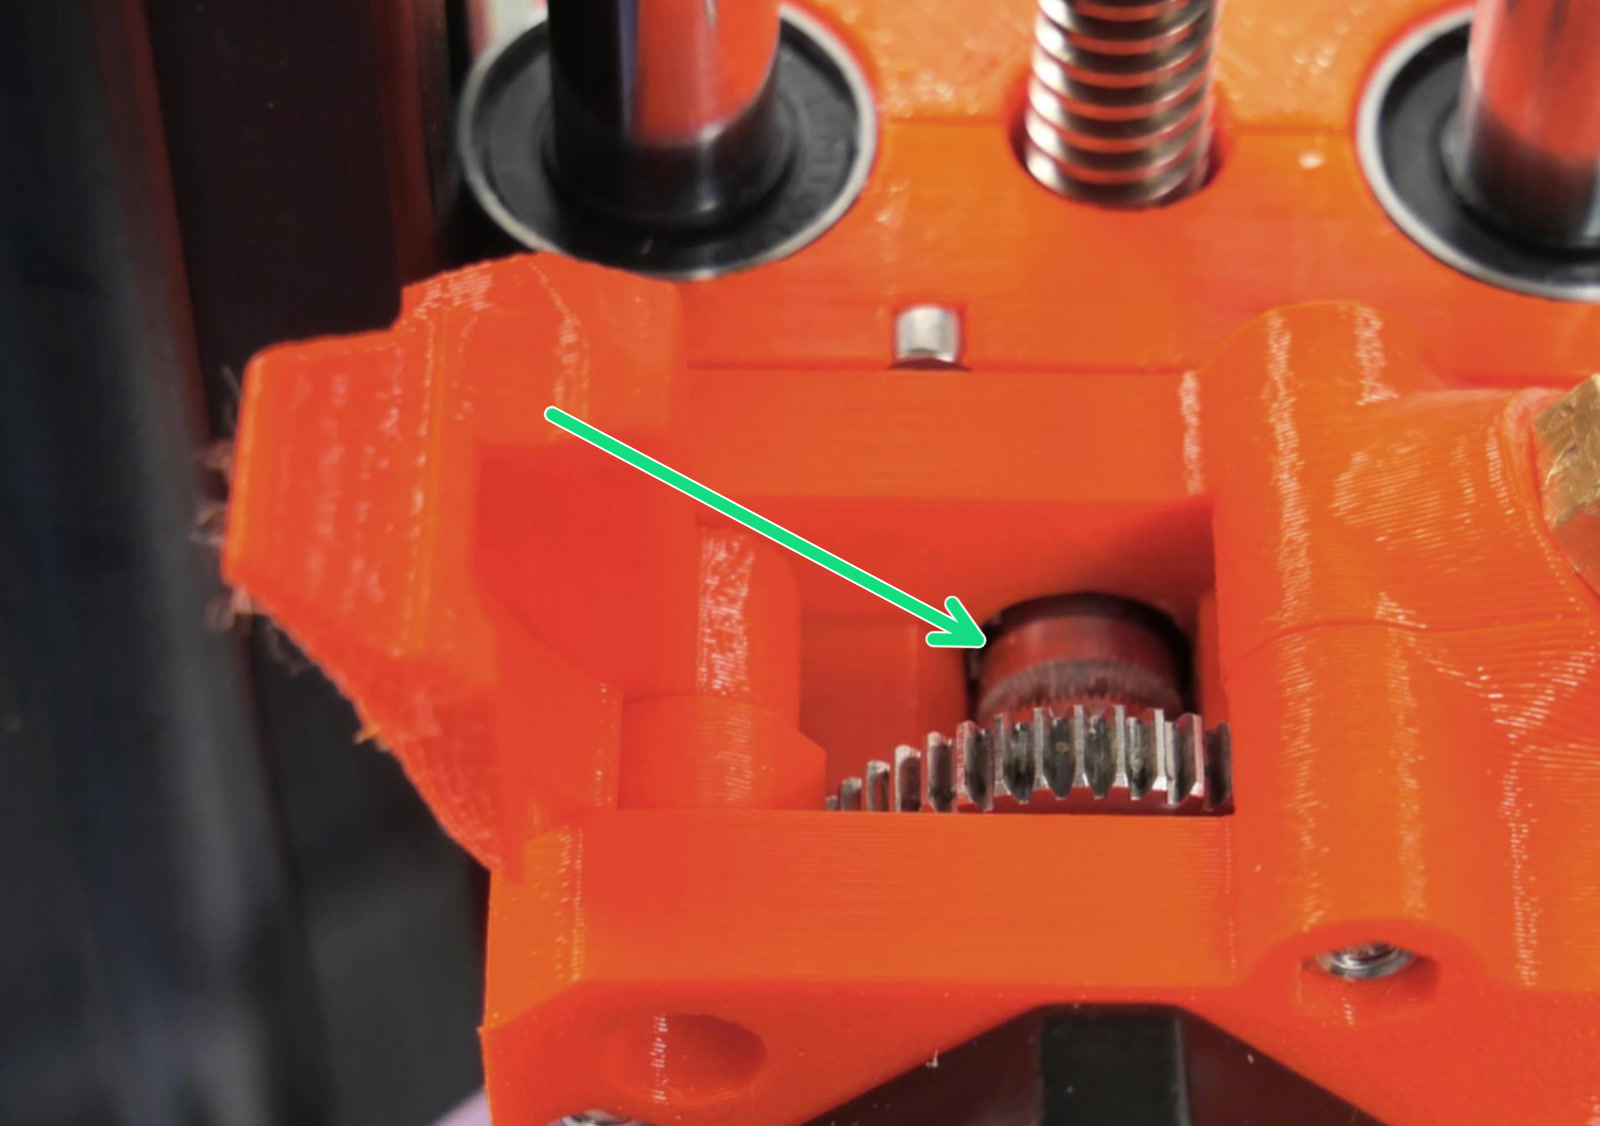
                  You can either use the inspection door (see the picture below) to check whether the pulley is clean. Use compressed air to get rid of the dust, for a more thorough cleaning, follow this guide How to access and clean the extruder-pulley (MINI/MINI+).

                  Use the inspection door to check the pulley

                  Was this article helpful?
                  This action is available only to registered users. Please log-in.

                  Topics

                  • Troubleshooting
                    • Printer troubleshooting
                      • Spaghetti monster
                      • Extruder blob
                      • Extruder noises
                      • Print fan is not spinning
                      • Clogged nozzle/hotend (MINI/MINI+)
                      • Preheat error bed #12201 (MINI)
                      • M.I.N.D.A./SuperPINDA sensor testing (MINI/MINI+)
                      • Preheat error print head #12202 (MINI)
                      • Thermal runaway bed #12203 (MINI)
                      • Thermal runaway print head #12204 (MINI)
                      • Maxtemp error bed #12205 (MINI)
                      • Maxtemp error print head #12206 (MINI)
                      • Mintemp error bed #12207 (MINI)
                      • Mintemp error print head #12208 (MINI)
                      • Squaring your MINI
                      • Factory reset (MINI)
                      • Blown Fuse (MINI)
                      • IR Filament Sensor Troubleshooting (MINI/MINI+)
                      • Filament failed to unload (MINI/MINI+)
                      • Temp not matching print head #12210 (MINI/MINI+)
                      • PrusaLink Troubleshooting
                      • Homing Error #12301 (MINI)
                      • USB not connected #12602 (MINI/MINI+)
                      • No file on USB #12604 (MINI/MINI+)
                      • Signature verification failed #12606 (MINI/MINI+)
                      • Hash verification failed #12607 (MINI/MINI+)
                      • Unsupported printer type #12610 (MINI/MINI+)
                      • Unsupported printer version #12611 (MINI/MINI+)
                      • Flash erase error #12605 (MINI/MINI+)
                      • Temp not matching heatbed #12209 (MINI/MINI+)
                      • No FW in internal flash #12612 (MINI/MINI+)
                      • Invalid FW size on USB #12603 (MINI/MINI+)
                      • File system error #12613 (MINI/MINI+)
                      • Unsupported BBF version #12614 (MINI/MINI+)
                      • Tangled filament
                      • Emergency stop #12510 (MINI)
                      • Connect Registration Failed
                      • Connect Registration Failed #12401 (MINI)
                      • Blue Screen of Death (BSOD) #31538 (CORE One) #35538 (CORE One L) #36538 (CORE One INDX) #26538 (MK4S) #13538 (MK4) #27538 (MK3.9S) #17538 (XL) #21538 (MK3.9) #28538 (MK3.5S) #23538 (MK3.5) #12538 (MINI)
                      • Homing error Y #12305 (MINI/MINI+)
                      • Homing error X #12304 (MINI/MINI+)
                      • Troubleshooting the MINI/MINI+ assembly
                      • Firmware in the internal flash corrupted! #12608 (MINI)
                      • SD cards and USB drives
                    • Print Quality Troubleshooting
                    • QR Error codes
                    • Print Error Messages

                  45 comments

                  Log in  to post a comment
                  Cole Hamel
                  •
                  "Loosen the three set screws on the side of the heatsink with a 1.5 mm Allen key."

                  I tried this as mine looks far lower than most videos I have seen and stripped 2/3 of them. I'm starting to believe this "user friendly" and "beginners" printer is absolutely more involved than is led to believe.


                  I'm not even sure I have the energy to ask for help anymore. I've owned this printer for 9 months, spent at least 6 of my days off from work reading through threads and watching videos. its never printed anything nice for me. I got the base layer to look good. That is it.


                  Things I've attempted to adjust to make the printer work prior to stripping the 1.5mm Allen keys on the heat sink:

                  -extended ptfe tubing approximately 1.5mm at the nozzle to prevent over pour
                  -lowered the nozzle sensor as instructed from a you tube video
                  -printed 2 half whistles by manually increasing the z-axis during the print
                  -discovered
                  -leveled bed numerous times
                  -first print layer perfected
                  -wash with iso and microfiber cloth pre print every time
                  -updted latest firmware twice

                  * I did notice I do not have the prusa wizard option though


                  Any suggestions would be entertained and appreciated, though I'm under the impression i broke the smallest component and now the unit can't be fine tuned as needed.


                  Why doesn't it show up functional?
                  Reply
                  soet451
                  •
                  Hey,

                  I can't help much with the overall problems you have, but I do want to say that I thought I stripped those little screws as well, but t turns out that the Allen keys from prusa are really bad and that was what was rounded off. So I recommed getting a proper allen key and trying it with that. Hopefully that helps a lill.
                  Reply
                  JK
                  •
                  How to get temp above 170 deg? Always freezes there. I know Prusa says is safety feature, reduces blobs, iproves levleing, whatever. But none of that applies to cold pull or trying to clear with temp > filament recom,ended. 
                  Reply
                  JK
                  •
                  I was trying to use Menu: Pre-heat. Settings / temp will get it over 170, no problem.
                  Reply
                  hmk
                  •
                  The instructions say that you can move the Z-axis by "long-pressing the control knob", which sound convenient. But no effect when I tried this!?
                  Reply
                  Shane
                  •

                  Without knowing which firmware version you have, I woudl suggest to make sure you have the most current, updated firmware and try again. 

                  Reply
                  Chris W
                  •
                  Better, alternative method for Step 7: When my Mini+ started developing heat creep issues and I finally linked heat creep with the symptoms I was experiecing (clicking, underextrusion, complete blocks), I followed this procedure. It didn't work the first time. Then on Reddit I read about a better way than described in Step 7 to get a real tight fit of the PTFE tube: Instead of screwing in the brass fitting first, push the heater block up all the way, then lock it in place with the three hex screws. Only then insert the PTFE tube and screw in the brass fitting all the way. This method finally resolved my long-standing heat creep issues. It seems a really strong press fit is required for the PTFE tube, and it is probably impractical for most regular folks to create that pressure by pushing up the heater block AFTER the brass fitting has been inserted.
                  Reply
                  Bassadin
                  •
                  After having tried the above steps three times and still getting clogs/blocks, I tried this and it seems to work for now! Will update, should it fail again.
                  Reply
                  DrunkMikey
                  •
                  There is an error in step 1 of the "Disassembling the hotend (load/unload impossible)" section. The first part of step 1 is fine, removing the main nut securing the long/external PTFE tube.
                   
                  The second part of step 1, removing the nut from the hot end assembly to remove the internal short PTFE tube is wrong. You first need to remove the screw holding in the cable holder. Otherwise you can't spin the brass fitting.
                   
                  I believe this is only the case for the MINI+.
                  Reply
                  mathewroberson
                  •
                  I didn't have to remove the cable holder. I was able to simply twist it slightly to move it out of the way of the brass fitting.
                  Reply