AA

Featured products

    Popular categories

      Trending searches

        Articles

          Blog

            Products

              Categories

                Suggested searches

                  Searching…
                  No results
                  Something went wrong.
                  ↑↓ Select↵ OpenEsc Close search
                  • English
                  • Čeština
                  • Deutsch
                  • Español
                  • Français
                  • Italiano
                  • Polski
                  • 日本語
                  • Orders
                  • Address
                  • In-stock Alerts
                  • My Courses
                  • Subscription
                  • Edit Account
                  • 3D printers9+▾

                    3D printersnew

                    newPrusa CORE One L+Learn more
                    newPrusa CORE One+ (Gen 2)Learn more
                    newPrusa CORE One L+ INDX 8-ToolnewPrusa CORE One+ (Gen 2) INDX 8-ToolPrusa CORE One L+: Critical InfrastructureOriginal Prusa MK4SnewOriginal Prusa XL+Original Prusa XL+: Critical Infrastructure

                    Printer upgrades

                    newINDX Conversion KitsnewPrusa CORE One L to CORE One L+ upgradenewPrusa CORE One+ to Prusa CORE One+ (Gen 2)newPrusa XL to Prusa XL+ Upgrade
                    Prusa Reward ProgramLove your Prusa printer? Share your experience and earn $30 Prusa e-shop vouchers.
                    How to Choose a 3D Printer?We’ll walk you through the basics to find the exact machine for your space, budget, and ideas.
                    Free E-bookDownload a free e-book Basics of 3D Printing with Josef Prusa and make your first steps in 3D printing world
                    Original Prusa Printable PartsCollections of printable spare parts for Original Prusa 3D printers and upgrades.
                    Shipping informationRegularly updated info about the current manufacturing capacity and delivery times of our printers.
                    Custom 3D PrintingProfessional custom 3D printing from various materials according to your requirements.
                  • Materials▾

                    Filaments

                    PrusamentPLAPETGASA / ABSPC (Polycarbonate)PA (Nylon)FlexCompositesSpecialMaterials clearance sale

                    Resin

                    Prusament ResinResin Cleaner
                    Filament GuideCheck my Prusament Spool
                    Prusament.com
                  • Parts & Accessories▾

                    Accessories

                    EnclosuresNozzlesPrint SheetsEssential AccessoriesCameras & AddonsTools & CraftingAdhesives

                    Spare parts

                    Merchandise

                    Spare parts - All PrintersCORE OneMK4/S & MK3.9/SMK3/S/+XL
                    Merch
                  • For Business▾
                    Prusa Pro HT90Prusa Pro SLXPrusa Pro AFSPrusa Pro Medical OneOriginal Prusa XLOriginal Prusa XL: Critical Infrastructure
                    Prusa CORE One+Learn more
                    Prusa CORE One LLearn more
                    Prusa CORE One L: Critical Infrastructure Edition

                    3D Printing for

                    Manufacturing and R&DAutomotive IndustryHealthcareEducation and Academic ResearchArchitects and DesignersFilm IndustryCritical Infrastructure

                    3D Printing Stories

                    • How 3D printing started: About Rep-rap and open-source with Adrian Bowyer
                    • Teaching mathematics redefined with 3D printing at JKU Linz
                    • The story behind the LTT screwdriver
                    • Victoria Hand Project: Changing Prosthetic Care with 3D Printing
                    Official Prusa Resellers
                    Sustainability
                    Prusa Education
                    Contact and Inquiry
                    Custom 3D Printing
                    ISO Certified
                  • Software▾
                    PrusaSlicer

                    PrusaSlicerPrusaSlicer

                    PrusaSlicer is an open-source, feature-rich, frequently updated tool that contains everything you need to export the perfect print files for your 3D printer.

                    WindowsMacOSLinux
                    Prusa Connect

                    Prusa Connect

                    Prusa Connect is a cloud service enabling remote control and monitoring of your 3D printers, offering secure data handling, easy setup, and support for managing multiple printers from anywhere.

                    Log in to Connect
                    Prusa.app

                    Prusa.app

                    Control your printer/s remotely from anywhere using the Prusa Connect technology behind. Prusa.app brings a new level of Prusa printer experience to Android and iOS phones.

                    Try it now!
                    Drivers & FirmwareDownload the latest firmware and drivers for your 3D printer.
                    PrusaSlicer Support
                    Prusa Connect Support
                  • 3D Models▾
                    3D PrintersArt & DesignHobby & MakersHouseholdTabletop MiniaturesToys & GamesPrintables Store

                    Popular 3D models

                    • Strong garden hose holder
                    • Prusa Spool Bot
                    • Build Tray — Modular Organizer for Assembly, Disassembly and Maintenance
                    • Broom Holder
                    • Octagon Fabric
                    • Prusa CORE One ? (Mimic Skin)

                    Design Contests

                    • De Prototipo a Producto: Accesorios para Cámaras8/1/2026 – 9/14/2026
                    • Vuelta al Cole 20268/21/2026 – 9/6/2026
                  • Community▾

                    Upcoming Events

                    • Maker Faire Tokyo 20269/5/2026 – 9/6/2026 · Tokyo, Japan · Prusa Team
                    • IFA 20269/4/2026 – 9/8/2026 · Berlin, Germany · Prusa Team
                    • 3D Printopia 20269/26/2026 – 9/27/2026 · Pennsylvania, United States · Prusa Team
                    • Maker Faire Bay Area9/25/2026 – 9/27/2026 · Kalifornie, United States · Prusa Team

                    Prusa Forum

                    • Vent doesn't close for an ASA print
                    • Alignment tool?
                    • Is this spam?
                    Prusa World MapPrusa World MapFind local 3D printing users and explore the community around you.
                  • Help▾
                    Guides & TutorialsPrusaSlicerPrusa ConnectMaterials

                    Printer Model

                    CORE One INDXCORE One LCORE One+CORE One

                    Hardware Troubleshooting

                    • Selftest failed (CORE One/+)
                    • Clogged nozzle (CORE One, CORE One L, XL, MK4/S, MK3.9/S)
                    • Adjusting belt tension (CORE One/+, CORE One INDX, CORE One L/+)
                    • Prusa Connect and PrusaLink explained

                    Drivers & Firmware

                    INDX familyCORE One familyMK4 familyXL familyMMU familyPRO family
                  • Courses▾

                    Become an expert in 3D printing

                    Prusa Academy offers online courses on various 3D printing related topics. Each course features:

                    • easy-to-read text with many pictures and short videos
                    • links for inspiration and further study
                    • quizzes for testing your knowledge along the way
                    • certificate of completion
                    Browse all coursesMy courses library
                    • 3D Modeling in Autodesk Fusion
                    • PrusaSlicer Masterclass – Beginner to Advanced
                    • Complete Guide to 3D Print Postprocessing, Painting, and Detailing
                    • Airbrush Your 3D Prints: From Basics to Advanced Tricks
                  • Blog▾
                    • PrusaSlicer 3.0 Preview – Built for the Future of 3D Printing
                    • Prusa CORE One+ (Gen 2) INDX, Shipping Has Started, Complete Printers Open for Orders
                    • Better Prints, Easier Use: Prusa XL+, CORE One L+ and CORE One+ (Gen 2), Our Big Product Upgrade
                    E-Book: Basics of 3D Printing
                  • Company▾

                    About Prusa Research

                    We are the largest maker of 3D printers in Europe and the United States.

                    Founded as a one-man startup in 2012 by Josef Prusa, a Czech hobbyist, maker, and inventor. In just 15 years, we've grown into a company of more than 1,200 people. Every month, we design, build, and ship over 10,000 innovative and secure 3D printers from our headquarters in Prague, Czech Republic, and Delaware, USA, to users in more than 160 countries.

                    Watch a video and find out how Prusa Research was born and what we achieved within only 10 years!

                    About UsTimelineSustainabilityOpen-source
                    About Us
                    Contact Us
                    Logo and Photos
                    ISO Certified
                  1. Support
                  2. Original Prusa MINI+
                  3. Print settings
                  4. Seam position
                   

                  Contents

                  • Seam Position
                  • Seam gap distance
                  • Staggered inner seams
                  • Scarf joint placement
                  • Scarf joint only on smooth perimeters
                  • Scarf start height
                  • Scarf joint around entire perimeter
                  • Scarf joint length
                  • Max scarf joint segment length
                  • Scarf joint on inner perimeters
                  • How to reduce the visibility of the seam

                  Blog

                  • PrusaSlicer 3.0 Preview – Built for the Future of 3D Printing
                  • Prusa CORE One+ (Gen 2) INDX, Shipping Has Started, Complete Printers Open for Orders
                  • Better Prints, Easier Use: Prusa XL+, CORE One L+ and CORE One+ (Gen 2), Our Big Product Upgrade

                  Newsletter

                  Signup and get our monthly squeeze on updates, blog, printables and much more.

                  By clicking, you agree to receive our newsletter.

                  This site is protected by reCAPTCHA Enterprise and the Google Privacy Policy and Terms of Service apply.

                  Strong garden hose holder
                  E-shop
                  • 3D Printers
                  • Printer Upgrades
                  • Filaments
                  • Accessories
                  • Prusa Merchandise

                  © Prusa Research a.s.

                  Printables
                  • 3D Models
                  • Store
                  • Clubs
                  • 3D Design Contests
                  • Brands
                  Community
                  • World Map
                  • Forum
                  • User Groups
                  • Events
                  Help
                  • Prusa Help
                  • Prusa Academy
                  • 3D Printing Calculators
                  Software
                  • PrusaSlicer
                  • Prusa.app
                  • Prusa Connect
                  • Drivers and Software
                  Company
                  • About Us
                  • Blog
                  • Official Prusa Resellers
                  • Contact Us
                  • Certified for ISO 9001, ISO 14001, ISO 45001
                  • General Terms and Conditions
                  • General Terms and Conditions of Use of the PRUSA Websites
                  • Privacy Policy
                  • Information about cookies
                  • Customer Complaints Policy
                  • Status Page
                  • Do Not Sell or Share My Personal Information
                  • Supplemental Statements
                  • General Terms and Conditions
                  • General Terms and Conditions of Use of the PRUSA Websites
                  • Privacy Policy
                  • Information about cookies
                  • Customer Complaints Policy
                  • Status Page
                  • Do Not Sell or Share My Personal Information
                  • Supplemental Statements

                  © Prusa Research a.s.

                  JOSEF PRUSA®, PRUSA RESEARCH®, PRUSA POLYMERS®, PRUSA ORANGE®, PRUSA 3D ® AND PRUSAMENT® are registered trademarks of Prusa Development a.s. used by Prusa Research a.s. under licence from Prusa Development a.s.

                  Seam position

                  Relevant for

                  MMU family
                  MINI family
                  MK3 family
                  OLD PRODUCTS
                  SOFTWARE
                  29 comments
                  Article is also available in following languages
                  English
                  Čeština
                  Polski
                  Deutsch
                  Français
                  Español
                  Italiano
                  日本語

                  Unless you're printing in the Spiral vase mode, each perimeter loop has to start and end somewhere. This start/endpoint creates a potentially visible vertical seam on the side of the object. It's also commonly called zits, layer seams, or scars.

                  This seam will be obvious if the object's shape is cylindrical, without any sharp corners.

                  To hide the seam as much as possible, there are several seam placement options available in
                  Print settings -> Layers and perimeters -> Seam position. Note that some options will only appear when Expert mode is selected.
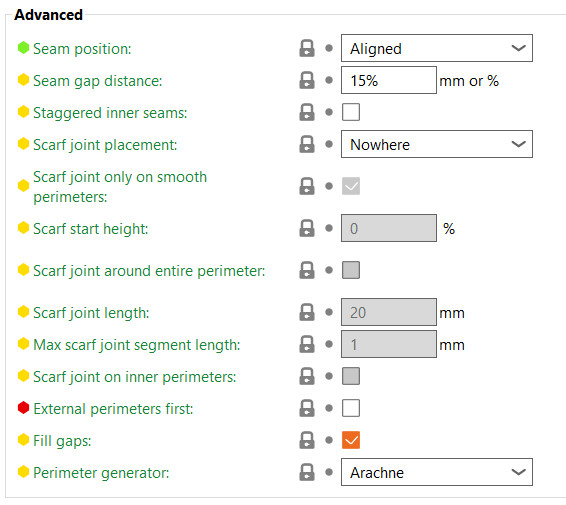
                  Starting with PrusaSlicer 2.3, you can use the Seam painting tool to have detailed control over the seam placement.

                  Seam Position

                  Nearest

                  Attempts to place the seam on the nearest edge of the current layer. If your model has sharp corners, this will make the seam effectively invisible.

                  To be precise, this will try to choose a concave non-overhang vertex so that the seam is hidden inside the concave angle. If no concave non-overhang vertices are available, it will choose a convex non-overhang vertex. If none are available, it will choose a non-overhang vertex. The choice among the candidates is made so that the start point is the nearest to the previous extruder position. So this option is optimized for speed, low travel, and acceptable strength.
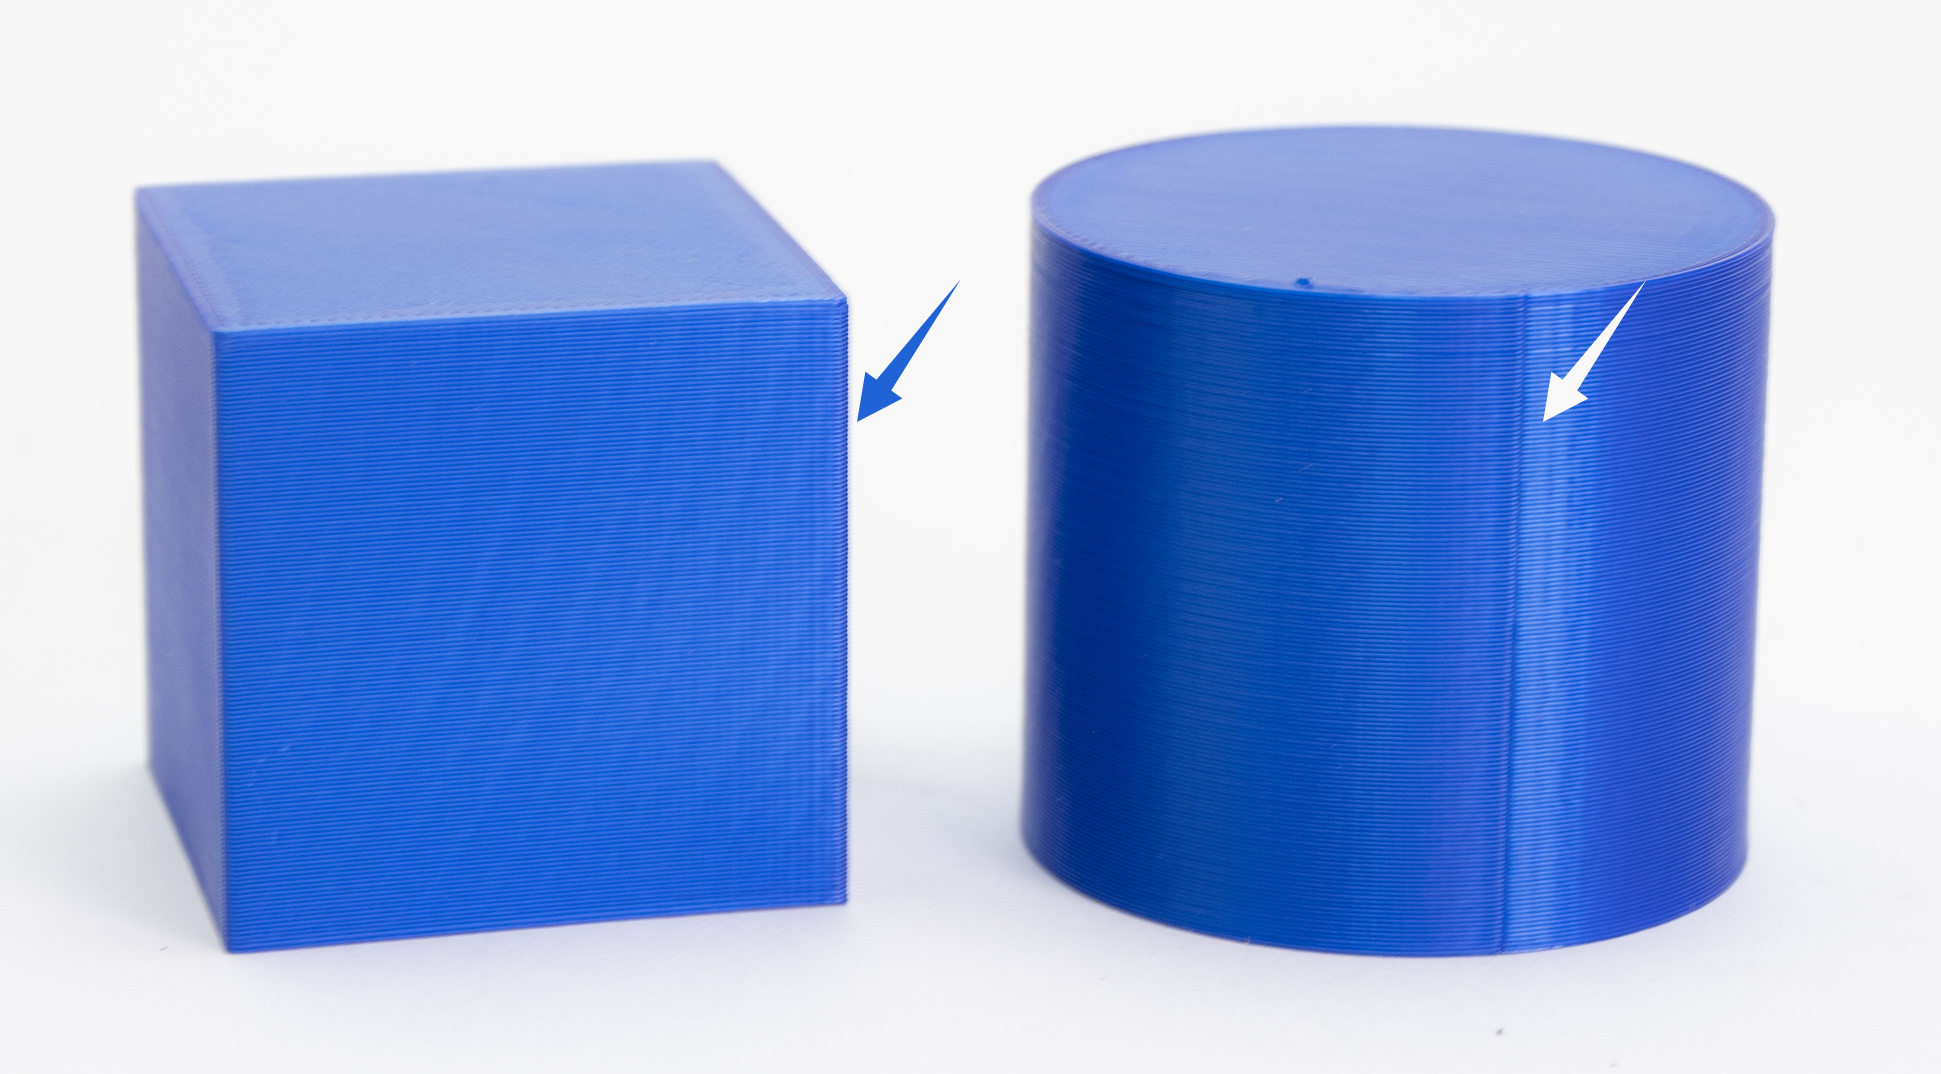
                  Aligned

                  This will use the same logic as the Nearest for finding the candidates, but it will choose the one that is nearest to the start point of the previous layer. This will ensure the seam is mostly aligned throughout the whole object. 
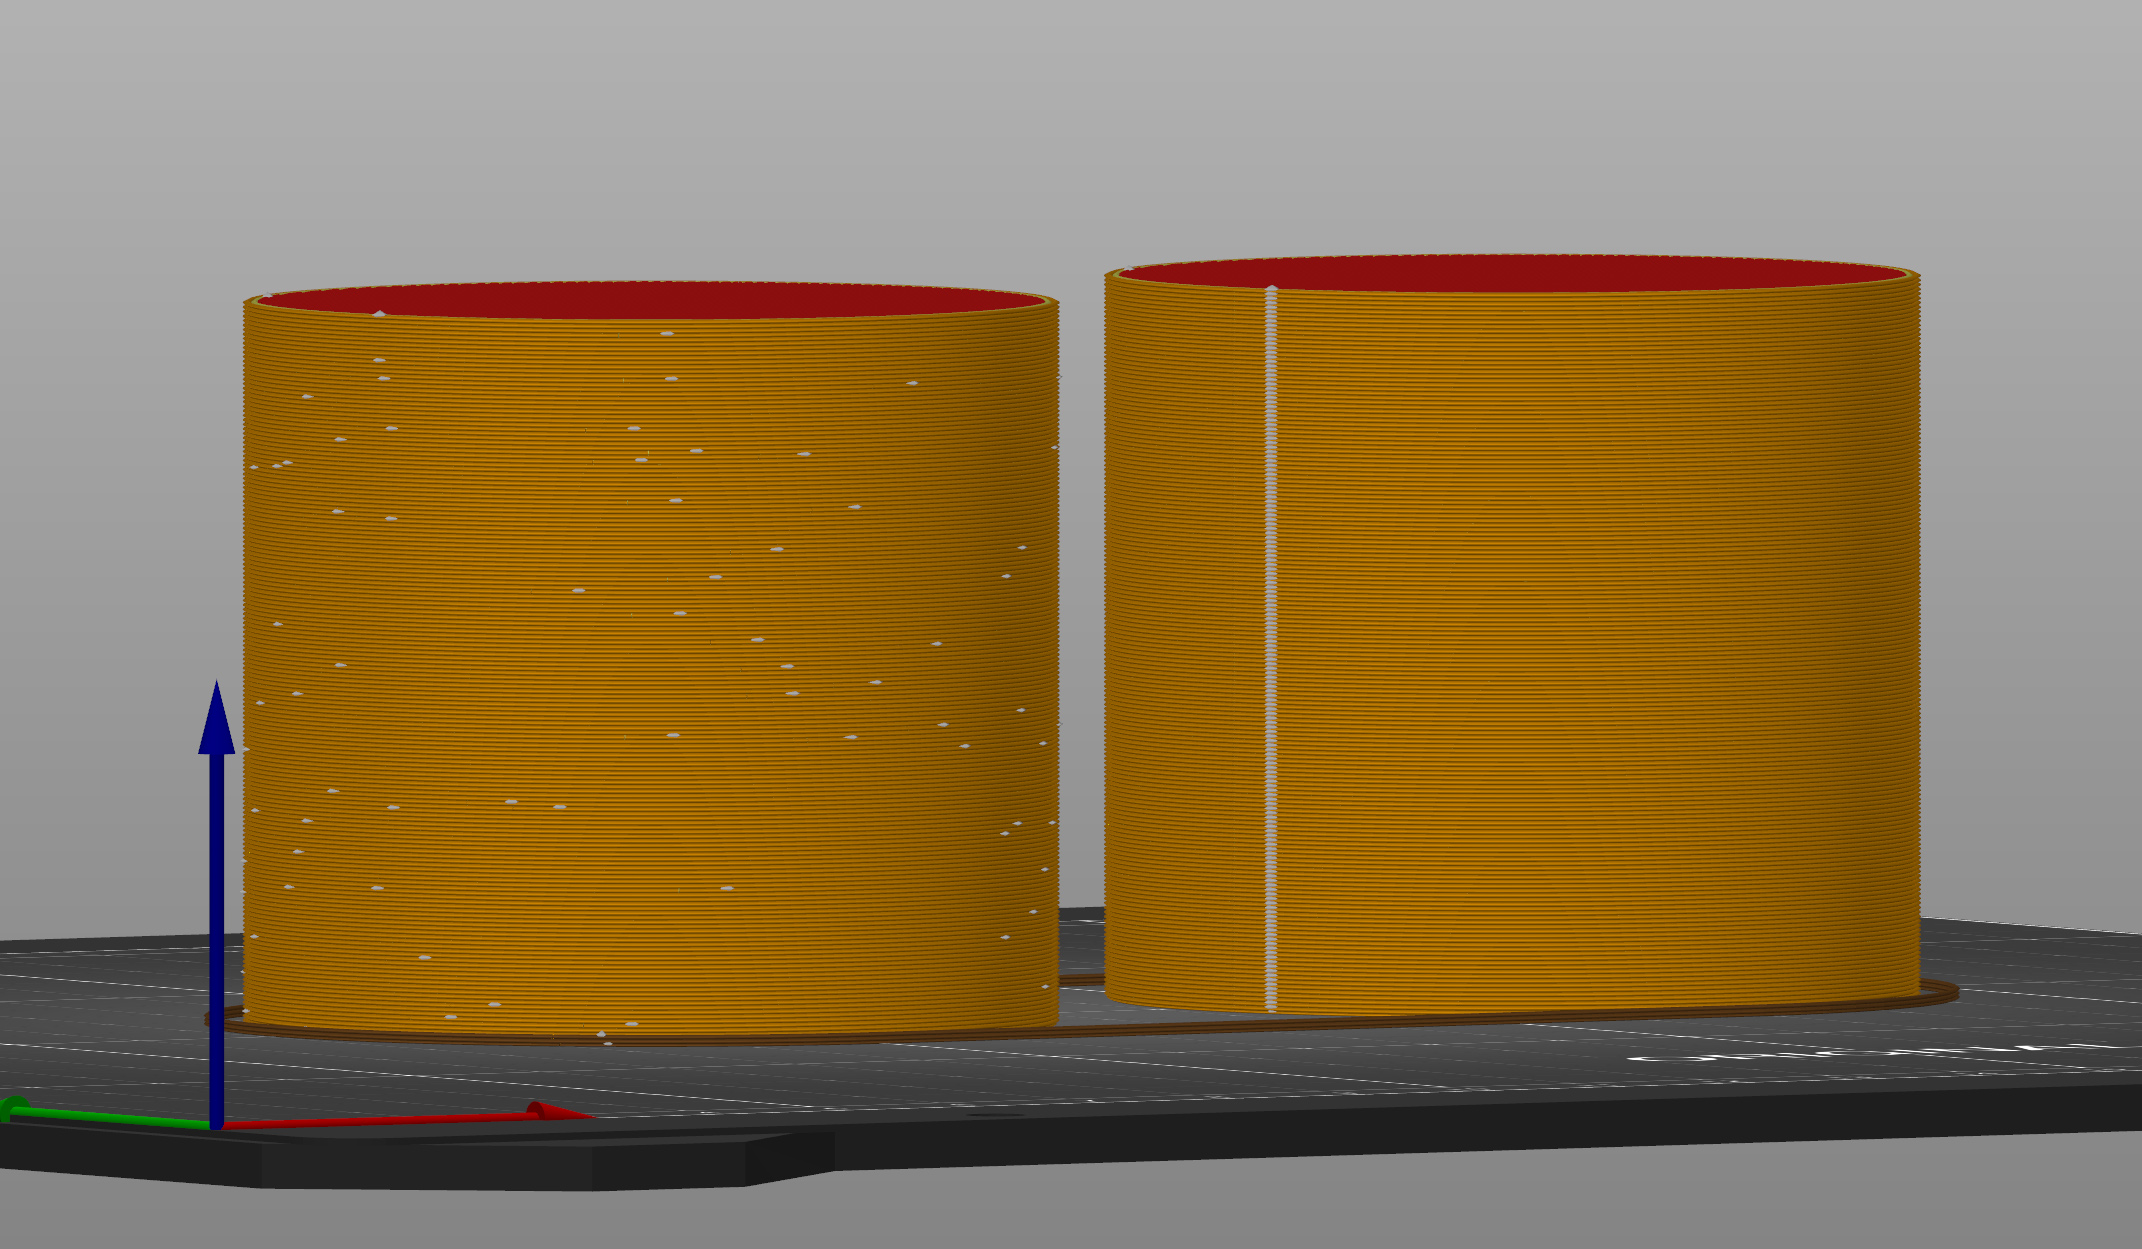
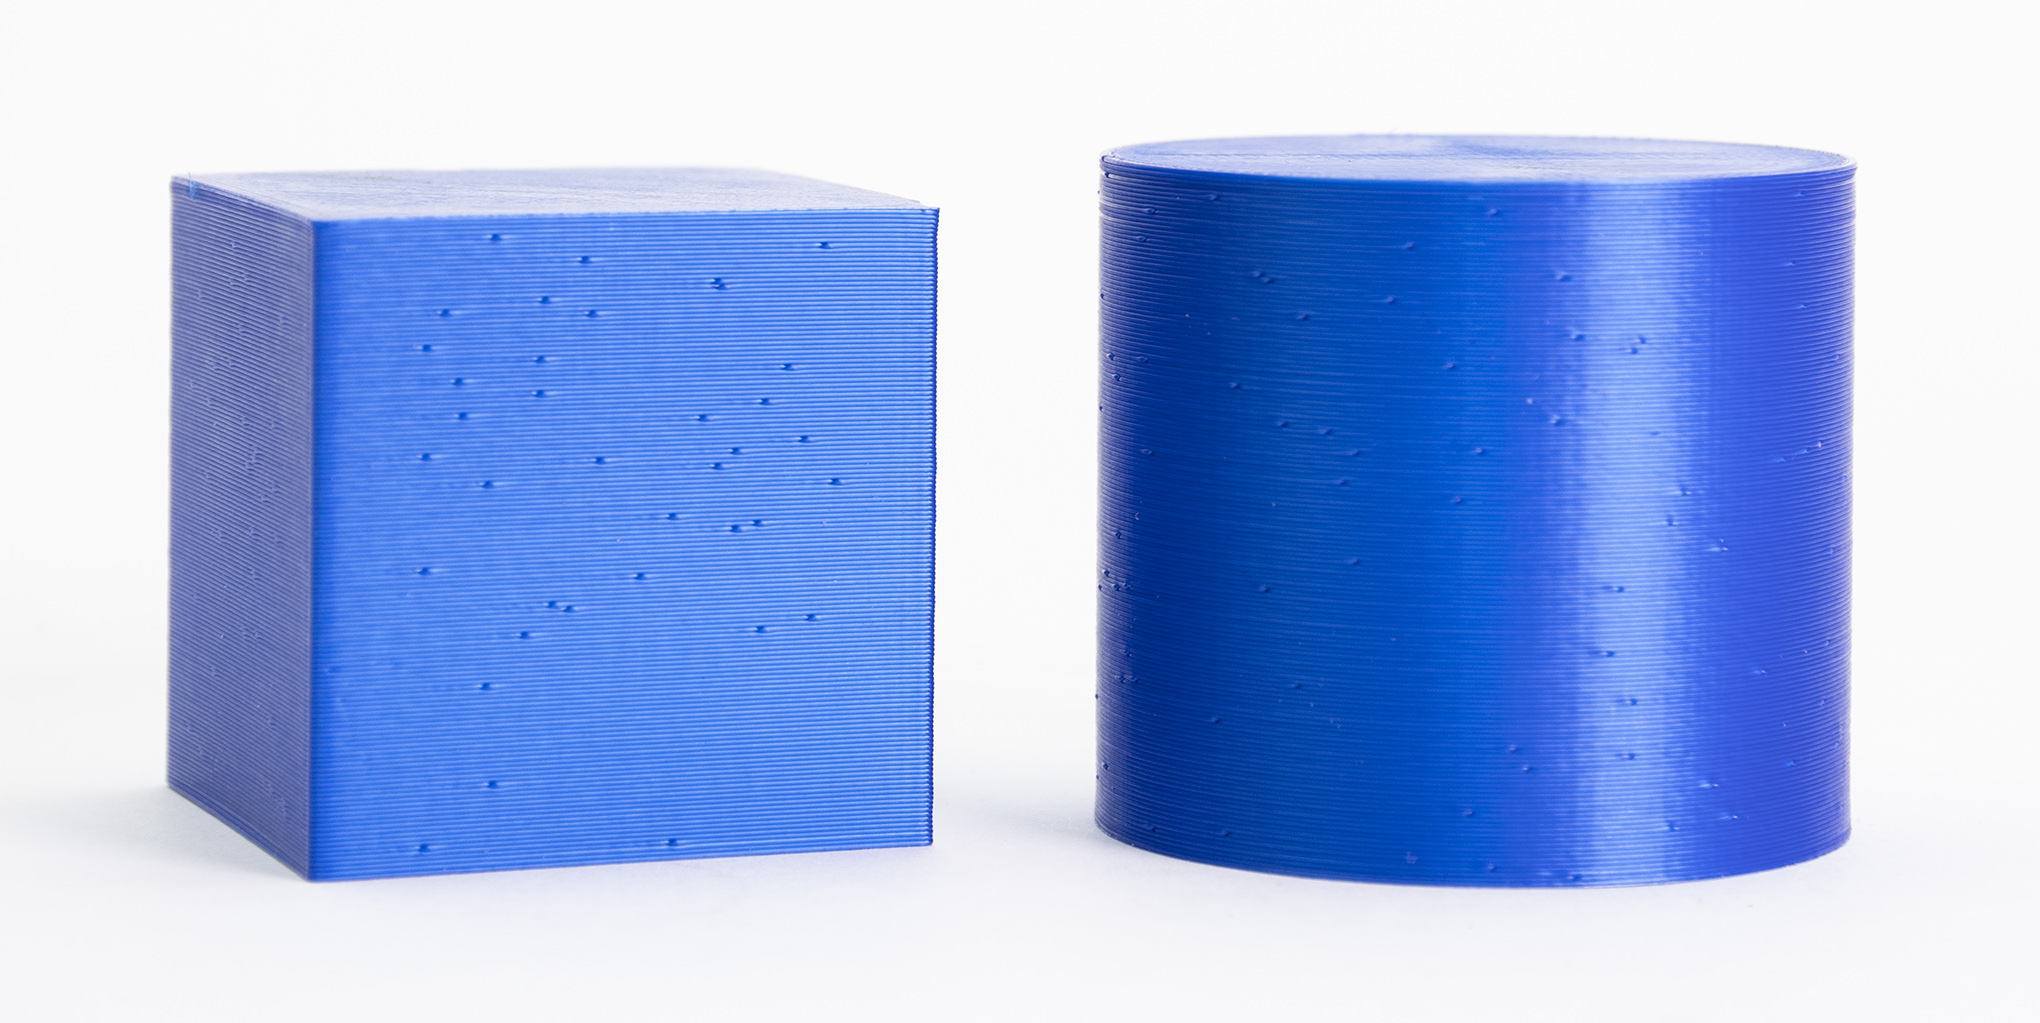
                  Random (left) vs Aligned (right) seam position

                  Random

                  This will choose a different point for each layer, making the seam less noticeable at the cost of a less smooth surface (small zits scattered across the surface). This option increases the overall strength of the print.

                  It makes little sense to use Random seam position on models with corners/sharp edges; it's much better to use Nearest or Aligned in such cases. On the other hand, when printing cylindrical shapes without any sharp edges, the Random seam position is a viable option. 
                  Rear

                  The Rear position works similarly to Aligned, but it will try to position the seam close to max Y (rear of the print bed). It still tries to avoid overhangs and tries to put the seams in the corners. This option is useful for objects that will be displayed with a specific orientation.

                  Seam gap distance

                  The distance between the endpoints of a closed loop perimeter. Positive values will shorten and interrupt the loop slightly to reduce the seam. Negative values will extend the loop, causing the endpoints to overlap slightly. When percents are used, the distance is derived from the nozzle diameter. Set to zero to disable this feature.

                  Staggered inner seams

                  This option causes the inner seams to be shifted backward based on their depth, forming a zigzag pattern. Having the inner seam not aligned with the perimeter seam makes the part stronger, as the seams are weak spots for the prints.

                  Scarf joint placement

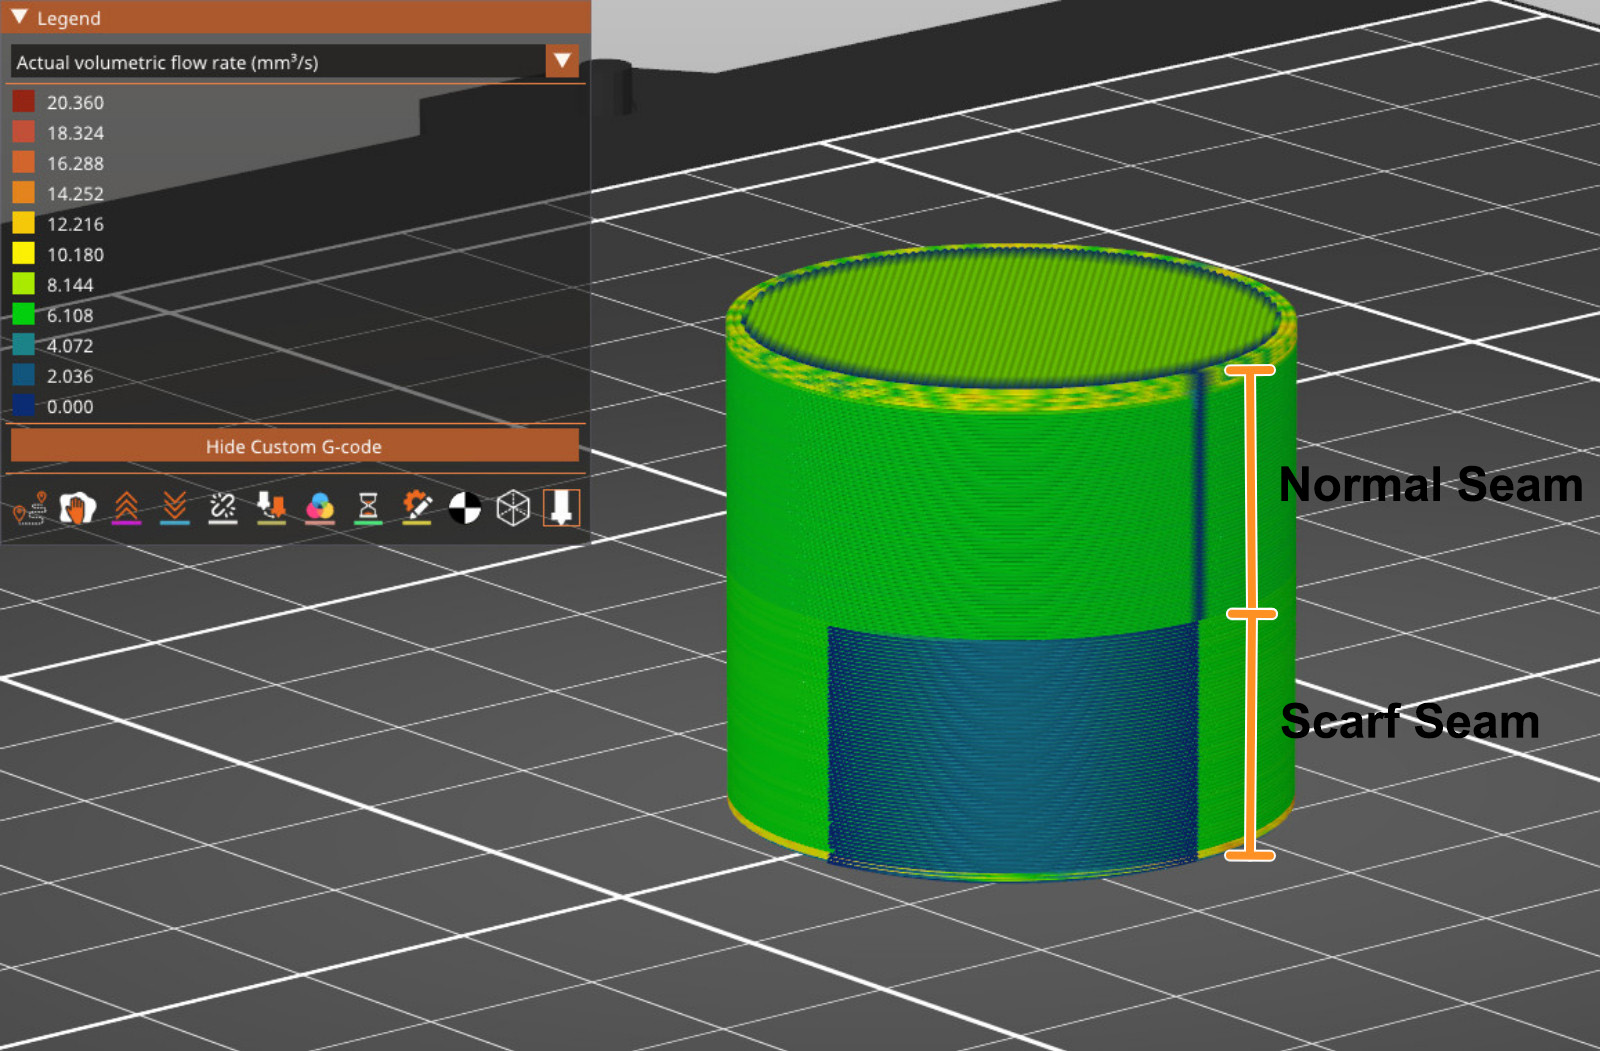
                  The Scarf seams overlap extrusions at the end and start of the perimeter loop, hiding visible seams on smooth perimeters. You can visualize the seams in the printer preview using the Volumetric flow rate (mm³/s) or Actual volumetric flow rate (mm³/s) options in the preview legend.

                  This setting reduces visible z seams, which is especially useful in curved surfaces, and improves overall part strength.

                  Note that using scarf seams increases print time, and is less effective in sharp corners and overhangs.
                  Nowhere

                  The function is disabled.

                  Contour

                  The scarf seams will only be applied to the contour of the object.

                  Everywhere

                  The scarf seams will be applied on the outer perimeter and inner walls surrounding holes within the part.

                  Scarf joint only on smooth perimeters

                  This is the standard option in case the Scarf joint is enabled. The scarf joint is not applied on non-smooth surfaces as the seam can be hidden on curves and corners of the object. If this option is unchecked, the scarf joint will also be applied to these non-smooth surfaces.

                  Scarf start height

                  Defines the vertical offset for the start of the scarf ramp, specified as a fraction of the current layer. A value of 0 means the scarf begins at the same height as the current layer and ramps up to the full layer height over the scarf length.

                  Scarf joint around entire perimeter

                  Extend the scarf around the entire perimeter. 

                  Scarf joint length

                  Change the horizontal length of the scarf ramp transition. Using 0 in this setting disables the scarf joint.

                  Max scarf joint segment length

                  This setting defines how the scarf is divided. The Z-height change is applied every 1 mm by default. If you use a larger value, there will be fewer points where the Z-height changes.

                  Scarf joint on inner perimeters

                  The scarf seams are usually only added to external perimeters. Checking this option adds the scarf seam on the inner perimeters.

                  How to reduce the visibility of the seam

                  With the FFF/FDM technology, it is not possible to eliminate the seam. It will always be somewhat visible. However, with well-tuned settings, it shouldn't be too noticeable.

                  Settings that affect the visibility of the seam are Linear Advance and Extrusion multiplier calibration. Original Prusa profiles have these settings already tuned, but if you're fine-tuning a custom profile, you can try lowering the extrusion multiplier and calibrating the linear advance value to lower the visibility of the seam.

                  You can use the Vase mode to avoid the seam, but then you'll be limited to using only one perimeter and no infill.

                  Was this article helpful?
                  This action is available only to registered users. Please log-in.

                  Topics

                  • PrusaSlicer 2.9 (Legacy)
                    • Print settings
                      • Infill
                      • Support material
                      • Layers and perimeters
                      • Elephant foot compensation
                      • Sequential printing
                      • Max volumetric speed
                      • Skirt and Brim
                      • Ironing
                      • Fuzzy skin
                      • Slicing mode / 3DLabPrint airplanes
                      • Pressure equalizer
                      • Arachne perimeter generator
                      • Organic Supports
                      • Speed settings
                      • Infill patterns
                      • Seam position
                    • About PrusaSlicer
                    • Configuration and profiles
                    • User interface
                    • Input/output
                    • Left toolbar
                    • Top toolbar
                    • Filament settings
                    • Printer settings
                    • Advanced features
                    • Multi-material slicing
                    • SLA slicing
                    • Other (PrusaSlicer)

                  17 comments

                  Log in  to post a comment
                  bphillip2
                  •
                  "Max scarf joint segment length
                  Maximal length of any scarf joint segment."
                  Thanks for that.
                  Reply
                  DMartin
                  •
                  The article jumps into "scarf seams" without explaining what they are, if they are good or bad, if they are default or optional, and where and when to use (or not use) them. More explaination needed please Prusa.
                  Reply
                  Ousema Zayati
                  •
                  For all of you who were also confused by the "Max scarf joint segment length" tooltip, it is more or less the inverse of OrcaSlicer's Scarf Steps seen here: https://github.com/SoftFever/OrcaSlicer/wiki/quality_settings_seam#scarf-steps

                  TL;DR: It's resolution.

                  An individual scarf transition is like two stacked wedges. Imagine creating a rectangular block by stacking two door stops on top of each other. Or whichever right triangular prism is easiest for you to visualize.

                  Each wedge is made up of small steps where the slicer gradually changes the amount of filament that is extruded in each step. This segment length setting is the maximum length that each line of g-code is allowed to define, or maximum length of each step. The effect is that this setting becomes the resolution of the wedge.

                  I do not know how necessary it is for you, the reader, because I do not know whether your printer can interpolate extrusion multipliers from one command to the next, either by design or by an inability to change extrusion rate fast enough.

                  For you CNC-heads out there, the material extrusion rate in a perfect scarf matches the MRR that you would see at the beginning and end of a contour pass with a linear ramp. However, MRR is as continuous as your machine's linear interpolation can achieve in XYZ (discounting the nuance from chip load/vibration/etc), whereas E doesn't seem to have interpolation for continuously changing "MER," so it would be defined it in steps.
                  Reply
                  Itsik
                  •
                  I did not know that this issue is addressed in the slicer and overcome it by splitting the sensitive surface in the CAD model to many small surfaces. This had the same effect of changing the seam point from layer to layer.
                  Reply
                  Miëtek Bak
                  •
                  "Scarf joint around entire perimeter
                  Extend the scarf around the entire perimeter.

                  Scarf joint length
                  Change the length of the scarf joint

                  Max scarf joint segment length
                  Maximal length of any scarf joint segment."

                  These explanations are not helpful. A helpful explanation would describe what are the pros and cons of using an option, and what are the situations in which an option should or should not be used.
                  Reply
                  Finalfill
                  •
                  Agree. When should I extend the scarf around the entire perimeter? I assume there's a max perimeter length to line height ratio. Needs more detail.
                  Reply
                  jdelisle
                  •
                  Truly worthless documentation.

                  UI checkbox: "Enable feature XYZ"

                  Docs: "Checking this box enables the XYZ feature"

                  Well no shit... How about some guidance???
                  Reply