AA

Featured products

    Popular categories

      Trending searches

        Articles

          Blog

            Products

              Categories

                Suggested searches

                  Searching…
                  No results
                  Something went wrong.
                  ↑↓ Select↵ OpenEsc Close search
                  • English
                  • Čeština
                  • Deutsch
                  • Español
                  • Français
                  • Italiano
                  • Polski
                  • 日本語
                  • Orders
                  • Address
                  • In-stock Alerts
                  • My Courses
                  • Subscription
                  • Edit Account
                  • 3D printers9+▾

                    3D printersnew

                    newPrusa CORE One L+Learn more
                    newPrusa CORE One+ (Gen 2)Learn more
                    newPrusa CORE One L+ INDX 8-ToolnewPrusa CORE One+ (Gen 2) INDX 8-ToolPrusa CORE One L+: Critical InfrastructureOriginal Prusa MK4SnewOriginal Prusa XL+Original Prusa XL+: Critical Infrastructure

                    Printer upgrades

                    newINDX Conversion KitsnewPrusa CORE One L to CORE One L+ upgradenewPrusa CORE One+ to Prusa CORE One+ (Gen 2)newPrusa XL to Prusa XL+ Upgrade
                    Prusa Reward ProgramLove your Prusa printer? Share your experience and earn $30 Prusa e-shop vouchers.
                    How to Choose a 3D Printer?We’ll walk you through the basics to find the exact machine for your space, budget, and ideas.
                    Free E-bookDownload a free e-book Basics of 3D Printing with Josef Prusa and make your first steps in 3D printing world
                    Original Prusa Printable PartsCollections of printable spare parts for Original Prusa 3D printers and upgrades.
                    Shipping informationRegularly updated info about the current manufacturing capacity and delivery times of our printers.
                    Custom 3D PrintingProfessional custom 3D printing from various materials according to your requirements.
                  • Materials▾

                    Filaments

                    PrusamentPLAPETGASA / ABSPC (Polycarbonate)PA (Nylon)FlexCompositesSpecialMaterials clearance sale

                    Resin

                    Prusament ResinResin Cleaner
                    Filament GuideCheck my Prusament Spool
                    Prusament.com
                  • Parts & Accessories▾

                    Accessories

                    EnclosuresNozzlesPrint SheetsEssential AccessoriesCameras & AddonsTools & CraftingAdhesives

                    Spare parts

                    Merchandise

                    Spare parts - All PrintersCORE OneMK4/S & MK3.9/SMK3/S/+XL
                    Merch
                  • For Business▾
                    Prusa Pro HT90Prusa Pro SLXPrusa Pro AFSPrusa Pro Medical OneOriginal Prusa XLOriginal Prusa XL: Critical Infrastructure
                    Prusa CORE One+Learn more
                    Prusa CORE One LLearn more
                    Prusa CORE One L: Critical Infrastructure Edition

                    3D Printing for

                    Manufacturing and R&DAutomotive IndustryHealthcareEducation and Academic ResearchArchitects and DesignersFilm IndustryCritical Infrastructure

                    3D Printing Stories

                    • How 3D printing started: About Rep-rap and open-source with Adrian Bowyer
                    • Teaching mathematics redefined with 3D printing at JKU Linz
                    • The story behind the LTT screwdriver
                    • Victoria Hand Project: Changing Prosthetic Care with 3D Printing
                    Official Prusa Resellers
                    Sustainability
                    Prusa Education
                    Contact and Inquiry
                    Custom 3D Printing
                    ISO Certified
                  • Software▾
                    PrusaSlicer

                    PrusaSlicerPrusaSlicer

                    PrusaSlicer is an open-source, feature-rich, frequently updated tool that contains everything you need to export the perfect print files for your 3D printer.

                    WindowsMacOSLinux
                    Prusa Connect

                    Prusa Connect

                    Prusa Connect is a cloud service enabling remote control and monitoring of your 3D printers, offering secure data handling, easy setup, and support for managing multiple printers from anywhere.

                    Log in to Connect
                    Prusa.app

                    Prusa.app

                    Control your printer/s remotely from anywhere using the Prusa Connect technology behind. Prusa.app brings a new level of Prusa printer experience to Android and iOS phones.

                    Try it now!
                    Drivers & FirmwareDownload the latest firmware and drivers for your 3D printer.
                    PrusaSlicer Support
                    Prusa Connect Support
                  • 3D Models▾
                    3D PrintersArt & DesignHobby & MakersHouseholdTabletop MiniaturesToys & GamesPrintables Store

                    Popular 3D models

                    • Strong garden hose holder
                    • Prusa Spool Bot
                    • Build Tray — Modular Organizer for Assembly, Disassembly and Maintenance
                    • Broom Holder
                    • Octagon Fabric
                    • Prusa CORE One ? (Mimic Skin)

                    Design Contests

                    • De Prototipo a Producto: Accesorios para Cámaras8/1/2026 – 9/14/2026
                    • Vuelta al Cole 20268/21/2026 – 9/6/2026
                  • Community▾

                    Upcoming Events

                    • Maker Faire Tokyo 20269/5/2026 – 9/6/2026 · Tokyo, Japan · Prusa Team
                    • IFA 20269/4/2026 – 9/8/2026 · Berlin, Germany · Prusa Team
                    • 3D Printopia 20269/26/2026 – 9/27/2026 · Pennsylvania, United States · Prusa Team
                    • Maker Faire Bay Area9/25/2026 – 9/27/2026 · Kalifornie, United States · Prusa Team

                    Prusa Forum

                    • Vent doesn't close for an ASA print
                    • Alignment tool?
                    • Is this spam?
                    Prusa World MapPrusa World MapFind local 3D printing users and explore the community around you.
                  • Help▾
                    Guides & TutorialsPrusaSlicerPrusa ConnectMaterials

                    Printer Model

                    CORE One INDXCORE One LCORE One+CORE One

                    Hardware Troubleshooting

                    • Selftest failed (CORE One/+)
                    • Clogged nozzle (CORE One, CORE One L, XL, MK4/S, MK3.9/S)
                    • Adjusting belt tension (CORE One/+, CORE One INDX, CORE One L/+)
                    • Prusa Connect and PrusaLink explained

                    Drivers & Firmware

                    INDX familyCORE One familyMK4 familyXL familyMMU familyPRO family
                  • Courses▾

                    Become an expert in 3D printing

                    Prusa Academy offers online courses on various 3D printing related topics. Each course features:

                    • easy-to-read text with many pictures and short videos
                    • links for inspiration and further study
                    • quizzes for testing your knowledge along the way
                    • certificate of completion
                    Browse all coursesMy courses library
                    • 3D Modeling in Autodesk Fusion
                    • PrusaSlicer Masterclass – Beginner to Advanced
                    • Complete Guide to 3D Print Postprocessing, Painting, and Detailing
                    • Airbrush Your 3D Prints: From Basics to Advanced Tricks
                  • Blog▾
                    • PrusaSlicer 3.0 Preview – Built for the Future of 3D Printing
                    • Prusa CORE One+ (Gen 2) INDX, Shipping Has Started, Complete Printers Open for Orders
                    • Better Prints, Easier Use: Prusa XL+, CORE One L+ and CORE One+ (Gen 2), Our Big Product Upgrade
                    E-Book: Basics of 3D Printing
                  • Company▾

                    About Prusa Research

                    We are the largest maker of 3D printers in Europe and the United States.

                    Founded as a one-man startup in 2012 by Josef Prusa, a Czech hobbyist, maker, and inventor. In just 15 years, we've grown into a company of more than 1,200 people. Every month, we design, build, and ship over 10,000 innovative and secure 3D printers from our headquarters in Prague, Czech Republic, and Delaware, USA, to users in more than 160 countries.

                    Watch a video and find out how Prusa Research was born and what we achieved within only 10 years!

                    About UsTimelineSustainabilityOpen-source
                    About Us
                    Contact Us
                    Logo and Photos
                    ISO Certified
                  1. Support
                  2. Original Prusa MINI+
                  3. Print settings
                  4. Ironing
                   

                  Contents

                  • What is Ironing and how does it work?
                  • Downsides
                  • When to use ironing
                  • When not to use ironing
                  • How to turn Ironing on
                  • For the selected model
                  • Modifiers
                  • Ironing type
                  • Flow rate
                  • Spacing between ironing passes
                  • Speed
                  • Calibration
                  • Different materials
                  • History

                  Blog

                  • PrusaSlicer 3.0 Preview – Built for the Future of 3D Printing
                  • Prusa CORE One+ (Gen 2) INDX, Shipping Has Started, Complete Printers Open for Orders
                  • Better Prints, Easier Use: Prusa XL+, CORE One L+ and CORE One+ (Gen 2), Our Big Product Upgrade

                  Newsletter

                  Signup and get our monthly squeeze on updates, blog, printables and much more.

                  By clicking, you agree to receive our newsletter.

                  This site is protected by reCAPTCHA Enterprise and the Google Privacy Policy and Terms of Service apply.

                  Strong garden hose holder
                  E-shop
                  • 3D Printers
                  • Printer Upgrades
                  • Filaments
                  • Accessories
                  • Prusa Merchandise

                  © Prusa Research a.s.

                  Printables
                  • 3D Models
                  • Store
                  • Clubs
                  • 3D Design Contests
                  • Brands
                  Community
                  • World Map
                  • Forum
                  • User Groups
                  • Events
                  Help
                  • Prusa Help
                  • Prusa Academy
                  • 3D Printing Calculators
                  Software
                  • PrusaSlicer
                  • Prusa.app
                  • Prusa Connect
                  • Drivers and Software
                  Company
                  • About Us
                  • Blog
                  • Official Prusa Resellers
                  • Contact Us
                  • Certified for ISO 9001, ISO 14001, ISO 45001
                  • General Terms and Conditions
                  • General Terms and Conditions of Use of the PRUSA Websites
                  • Privacy Policy
                  • Information about cookies
                  • Customer Complaints Policy
                  • Status Page
                  • Do Not Sell or Share My Personal Information
                  • Supplemental Statements
                  • General Terms and Conditions
                  • General Terms and Conditions of Use of the PRUSA Websites
                  • Privacy Policy
                  • Information about cookies
                  • Customer Complaints Policy
                  • Status Page
                  • Do Not Sell or Share My Personal Information
                  • Supplemental Statements

                  © Prusa Research a.s.

                  JOSEF PRUSA®, PRUSA RESEARCH®, PRUSA POLYMERS®, PRUSA ORANGE®, PRUSA 3D ® AND PRUSAMENT® are registered trademarks of Prusa Development a.s. used by Prusa Research a.s. under licence from Prusa Development a.s.

                  Ironing

                  Relevant for

                  MK4 family
                  MMU family
                  MINI family
                  MK3 family
                  MK3.5 family
                  +
                  23 comments
                  Article is also available in following languages
                  English
                  Čeština
                  Polski
                  Deutsch
                  Français
                  Español
                  Italiano
                  日本語

                  What is Ironing and how does it work?

                  It is possible to use the Ironing tool starting from version 2.3.0 of Prusa Slicer. Ironing smooths flat top surfaces by running a special second infill phase at the same layer.

                  As the hot nozzle travels over the just printed top layer, it flattens any plastic that might have curled up. The nozzle also extrudes a small amount of filament to fill any holes in the top surface. The spacing between individual ironing passes is usually a fraction of the nozzle diameter. That means the nozzle will go over the same spot several times. Ironing is angled at a fixed 45 degrees compared to the first phase of normal top infill as this approach produces better results.
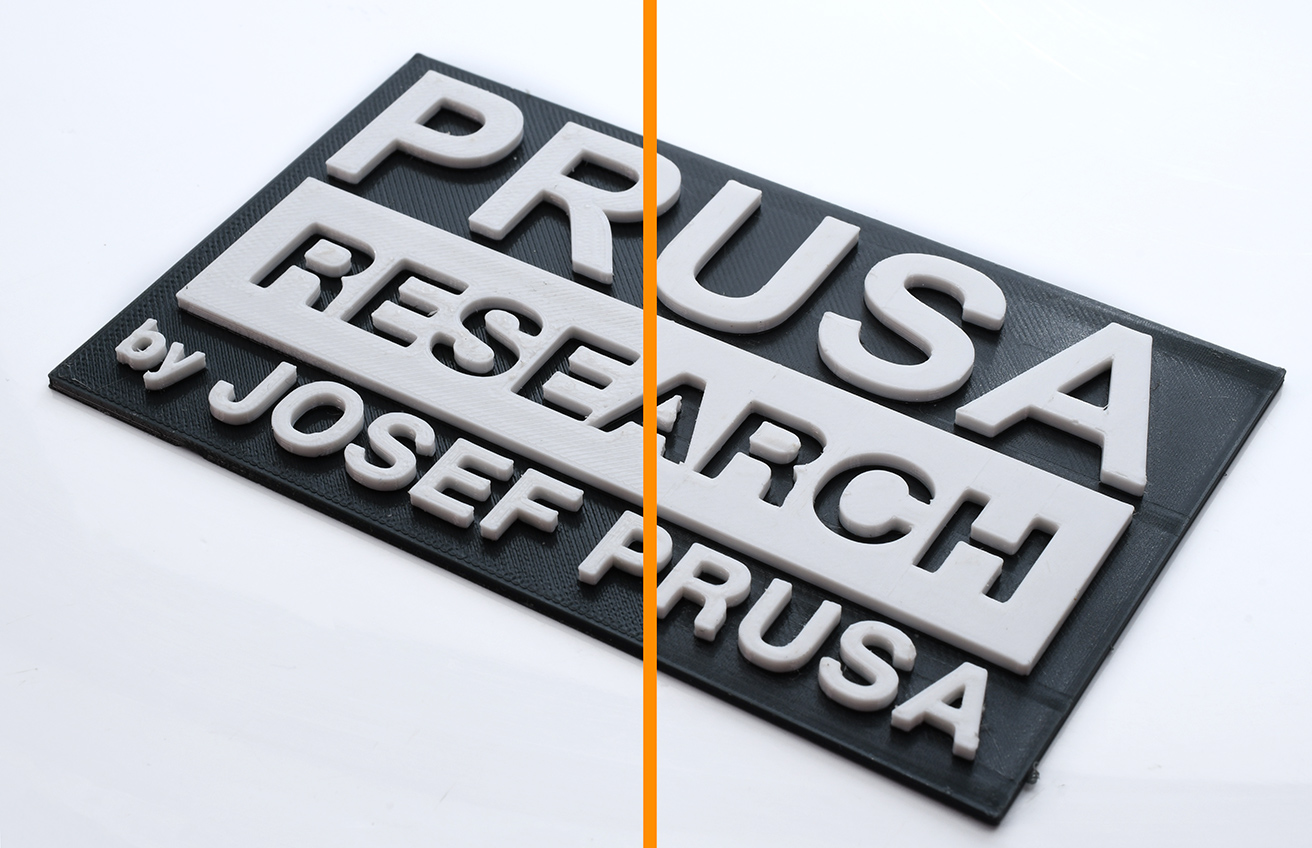
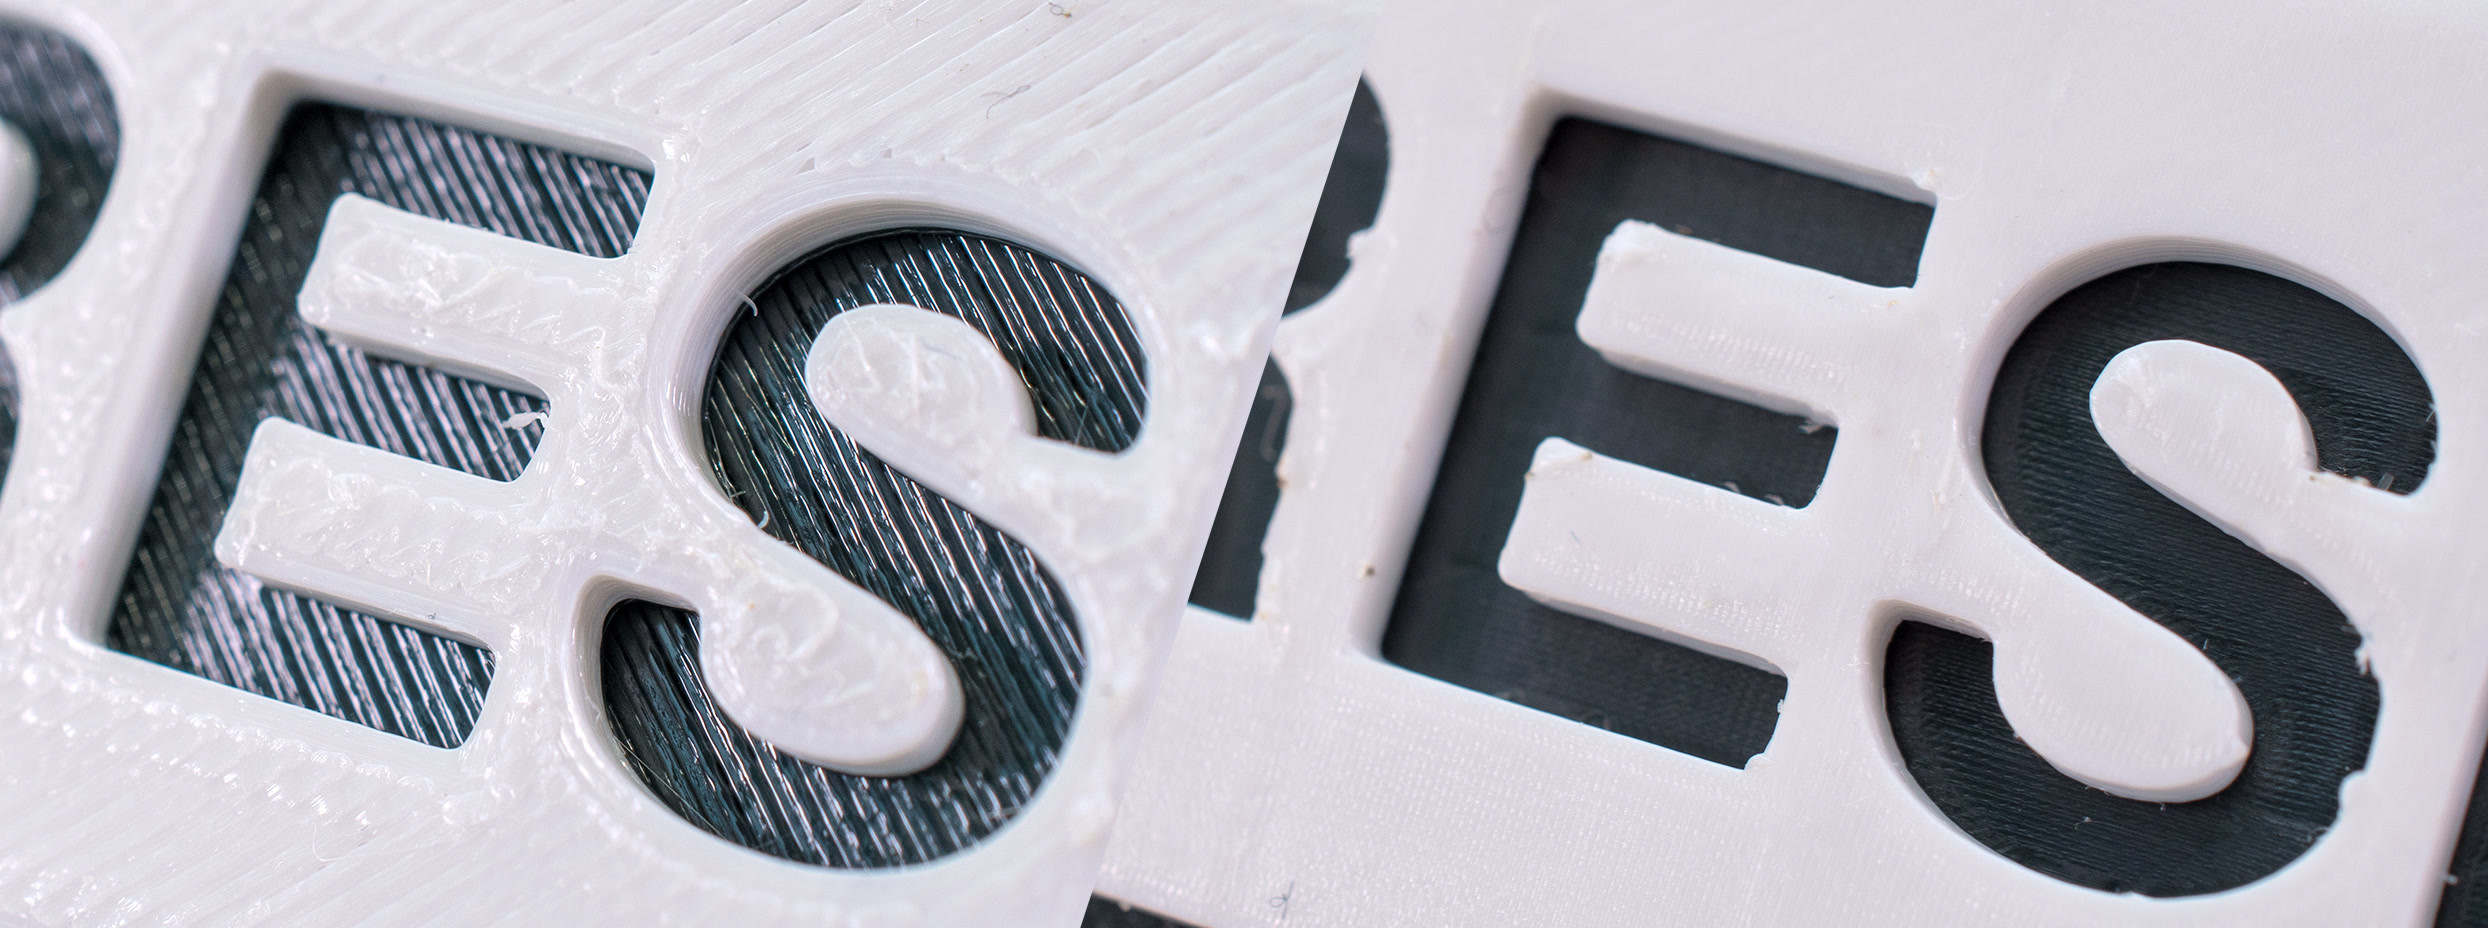
                  Ironing OFF (left), Ironing ON (right)
                  Macro comparison of Ironing OFF (left), Ironing ON (right)

                  Downsides

                  The main downside is increased print time as the second phase of the top infill is performed with very small spacing between ironing lines. In the preview, it is possible to find how much print time will be spent on ironing.

                  If you're ironing a big surface area, on some machines you might experience heat creep and eventually, a clogged hotend because the extrusion is small and slow during ironing. This might be a problem mainly when printing with PLA, because of its low-temperature resistance. The risk is increased during summer heatwaves.

                  Another downside is that the edges will be a tiny bit fuzzy or less sharp. The ironing toolpath is planned for a small extrusion, but the nozzle is physically still the same size, so some plastic will bleed over the edge.

                  When to use ironing

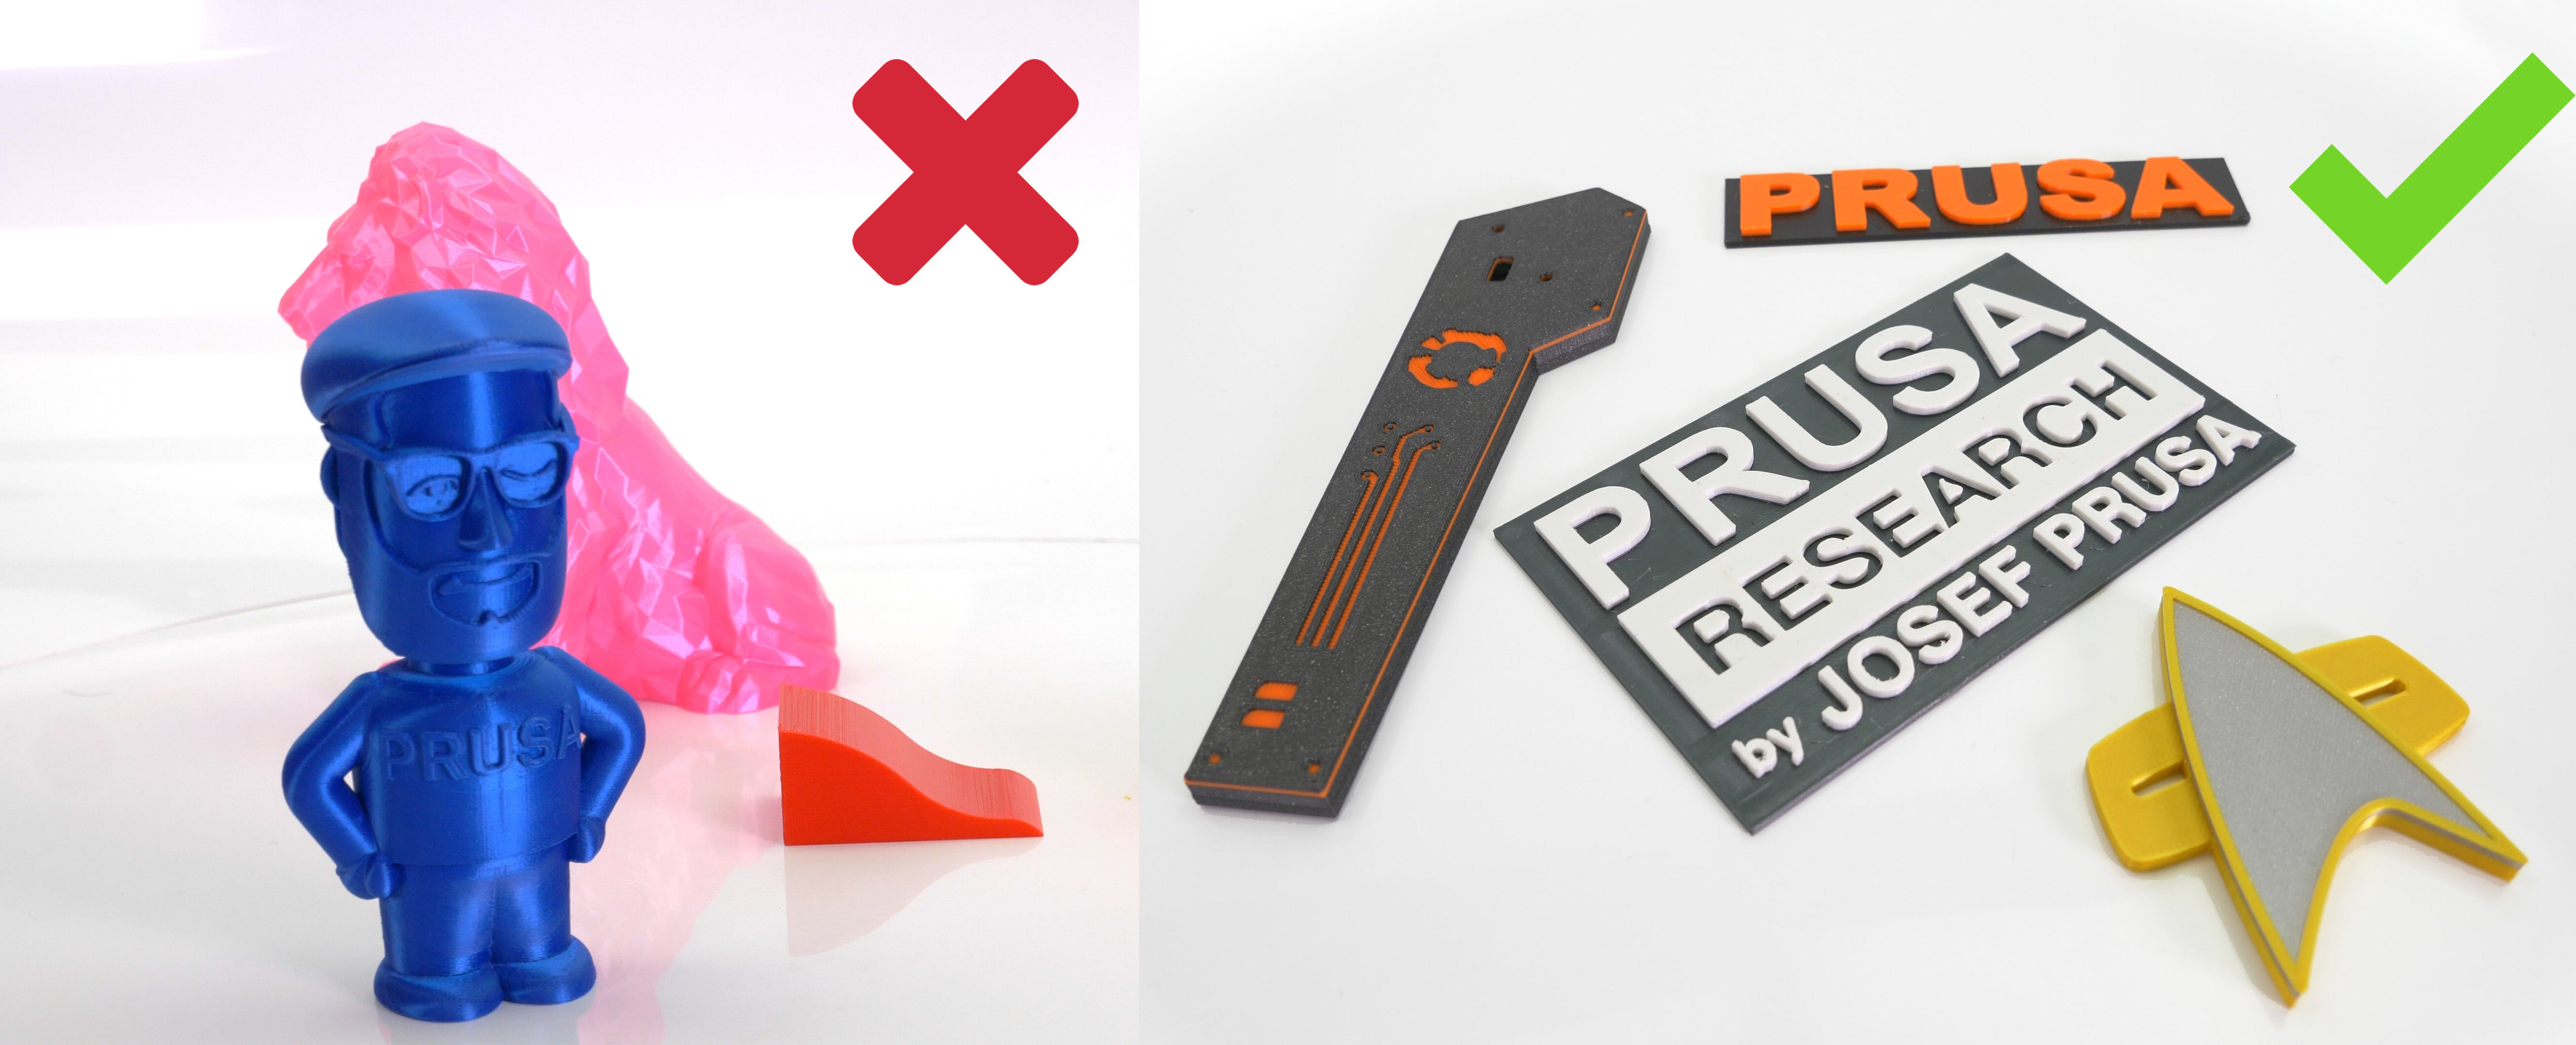
                  Ironing is useful for prints with flat top surfaces such as nameplates, logos, badges, boxes, lids, etc. 

                  Ironing can also be useful when you want to glue two pieces together and need the surfaces to be as flat as possible so that the gap between them is minimized.
                  When not to use ironing

                  Ironing is not useful for round objects, figures, and organic shapes in general. It's also not useful for objects that do have flat areas, but these flat areas are not aligned parallel to the print bed. With that said, ironing will not have a significant negative impact when printing such models, it will just unnecessarily increase the print time.
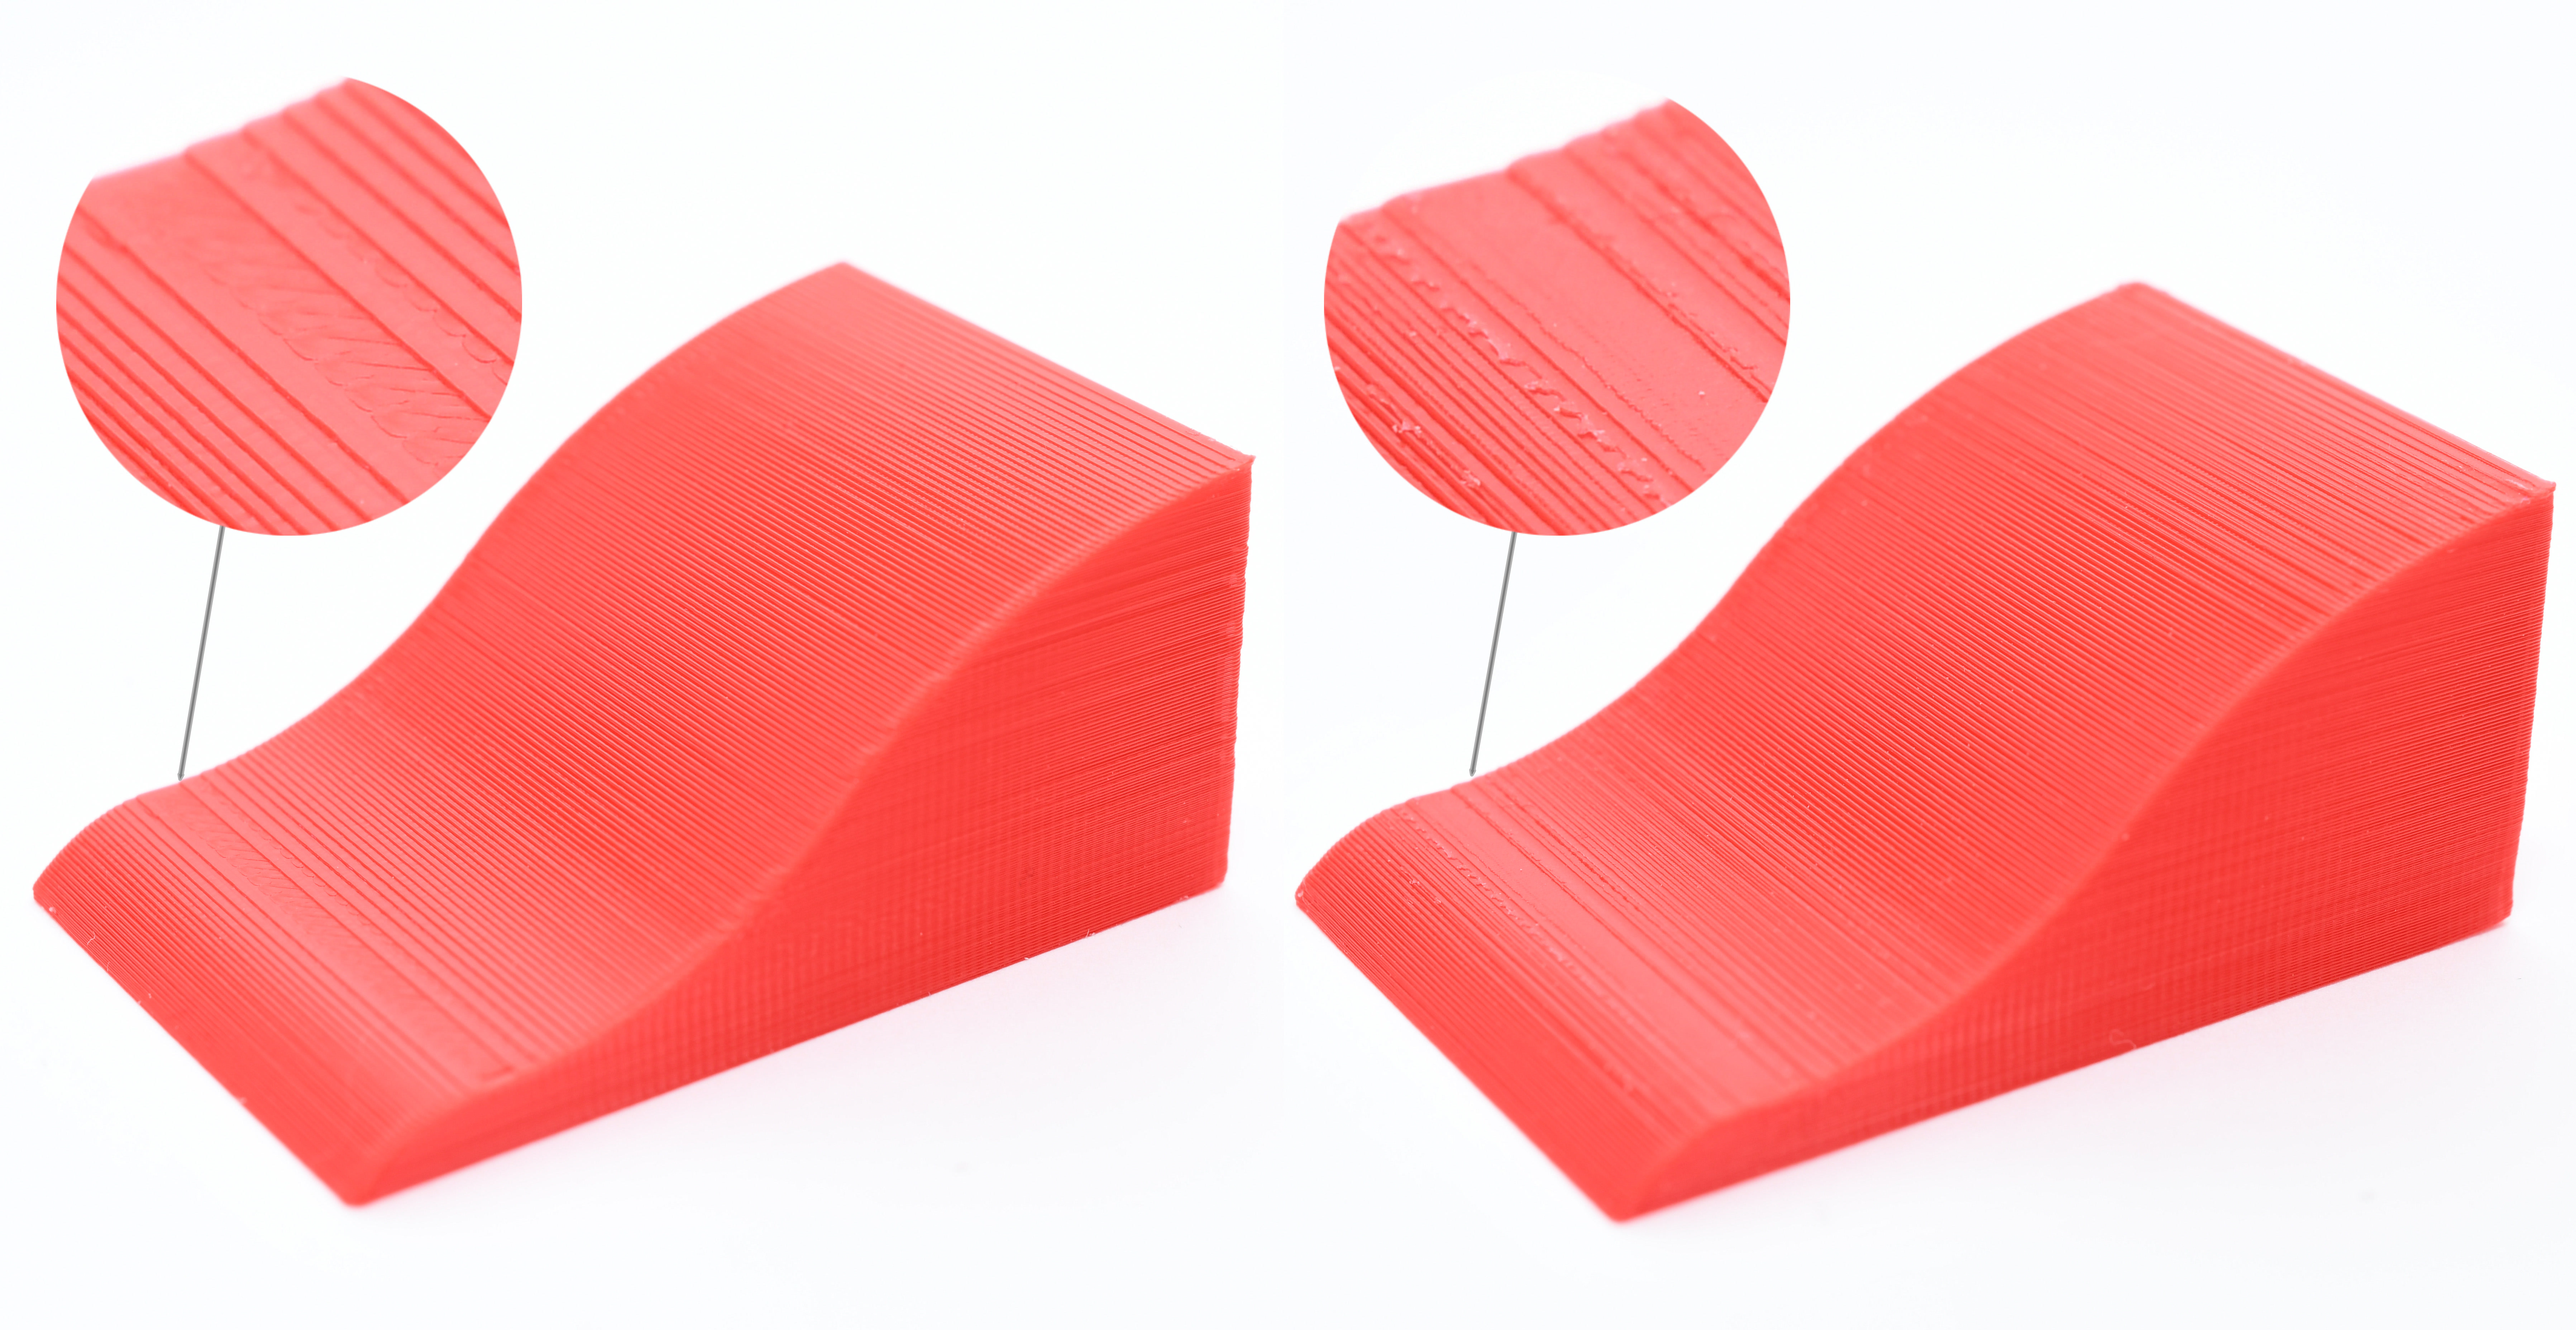
                  Ironing has little to no effect on non-flat surfaces, Ironing Off (left), Ironing On (right)

                  Some models can be printed upside down. The bottom layer printed on the build plate will typically be even smoother than an ironed top layer. And you can imprint a texture into the print, depending on the print sheet that you use.

                  Monotonic infill is another feature, which improves the quality of top layers. Use it in combination with Ironing to get the best results. Original Prusa profiles have Monotonic infill already set as the default top layer pattern.

                  How to turn Ironing on

                  For all models

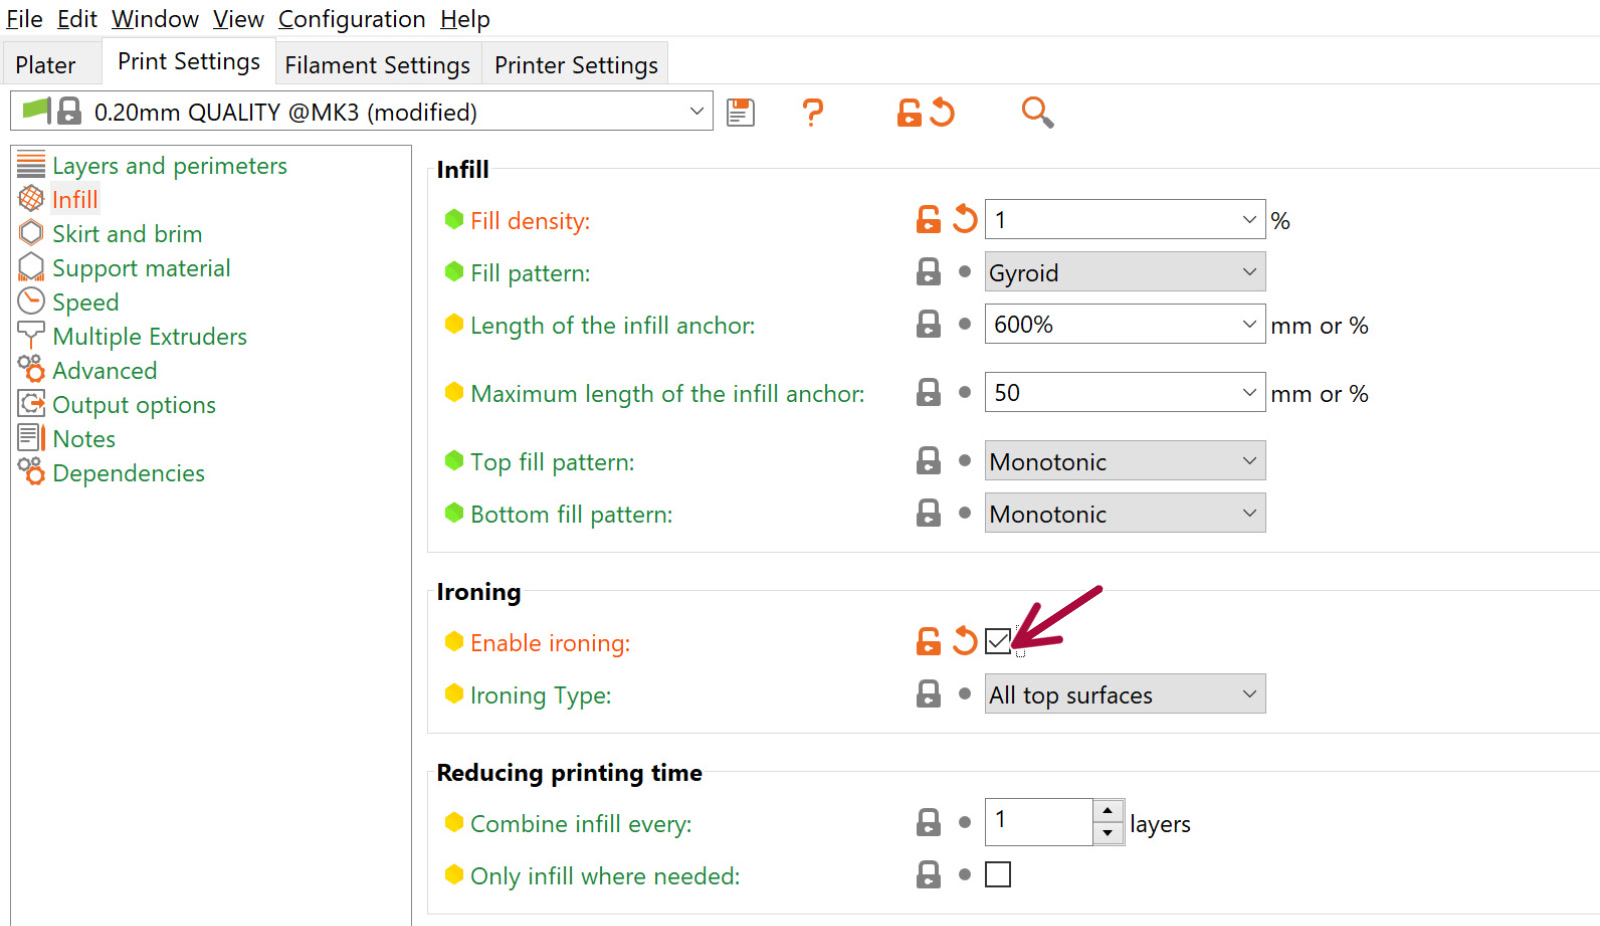
                  Ironing is not available in the Simple mode, so switch to Advanced or Expert mode. Then select Print settings -> Infill -> Ironing -> Enable Ironing.
                  For the selected model

                  First, switch to the Expert mode, ironing for individual models is only enabled in this mode. Right-click on a model and select Add settings - Ironing from the context menu. Tick Enable ironing, optionally you can also select the rest of the ironing settings in order to customize them on a model-per-model basis. You can now change the ironing settings for this model using the right panel.
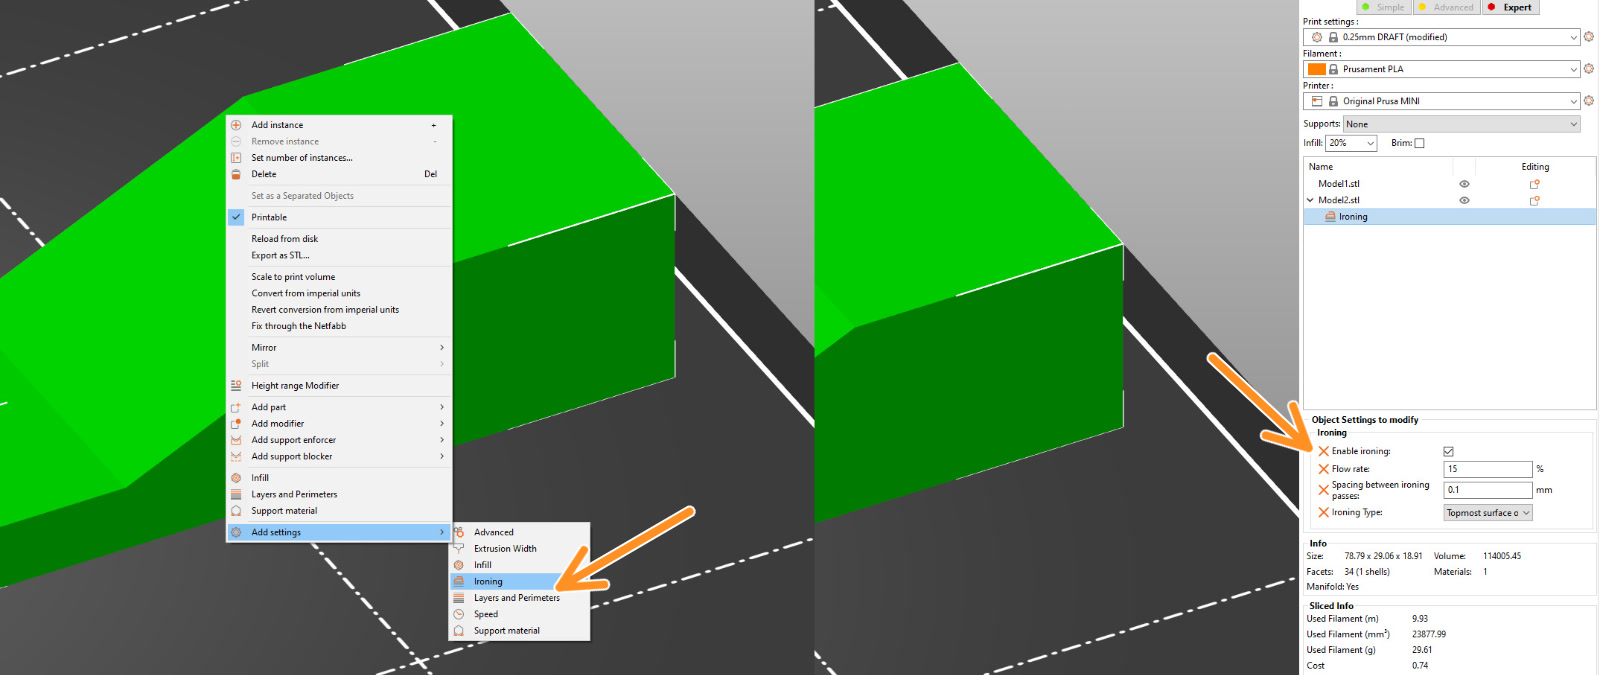
                  If you have several Instances of the same object on the build plate and you want to turn on Ironing just for one of them, you first have to right-click the model and pick Set as a separate object from the context menu. Otherwise, you'd turn it on for all instances, as they share all settings.

                  Modifiers

                  You can use Height range modifiers or Modifier meshes to turn on Ironing just for a part of a model (in the Expert mode).

                  Height range modifier

                  Because ironing works only on flat areas, it makes sense to use a height range modifier to specify a vertical interval, where ironing will be used.

                  1. Right-click a model and select Height range modifier.
                  2. Specify the Start height and Stop height in the right panel
                  3. Right-click the cogwheel next to the height range modifier in the right panel
                  4. Select Add settings - Ironing
                  5. Tick Enable ironing, you can now toggle ironing on just for this part in the right panel

                  Modifier mesh

                  1. Right-click a model and select Add modifier
                  2. You can either use a basic shape (box, cylinder) or use Load... to import custom mesh as a modifier
                  3. Position the modifier to overlap your desired part of a model
                  4. Right-click the cogwheel next to the modifier in the right panel
                  5. Select Add settings - Ironing
                  6. Tick Enable ironing, you can now toggle ironing on just for this part in the right panel


                  Ironing type

                  All top surfaces

                  The nozzle will iron the top layer of each surface (the last layer of each flat area).

                  Topmost surface only

                  Only the very last layer of the object will be ironed. This means that in the case of an embossed text (oriented parallel to the print bed), only the top of the letters will be ironed, but not the space between the letters.
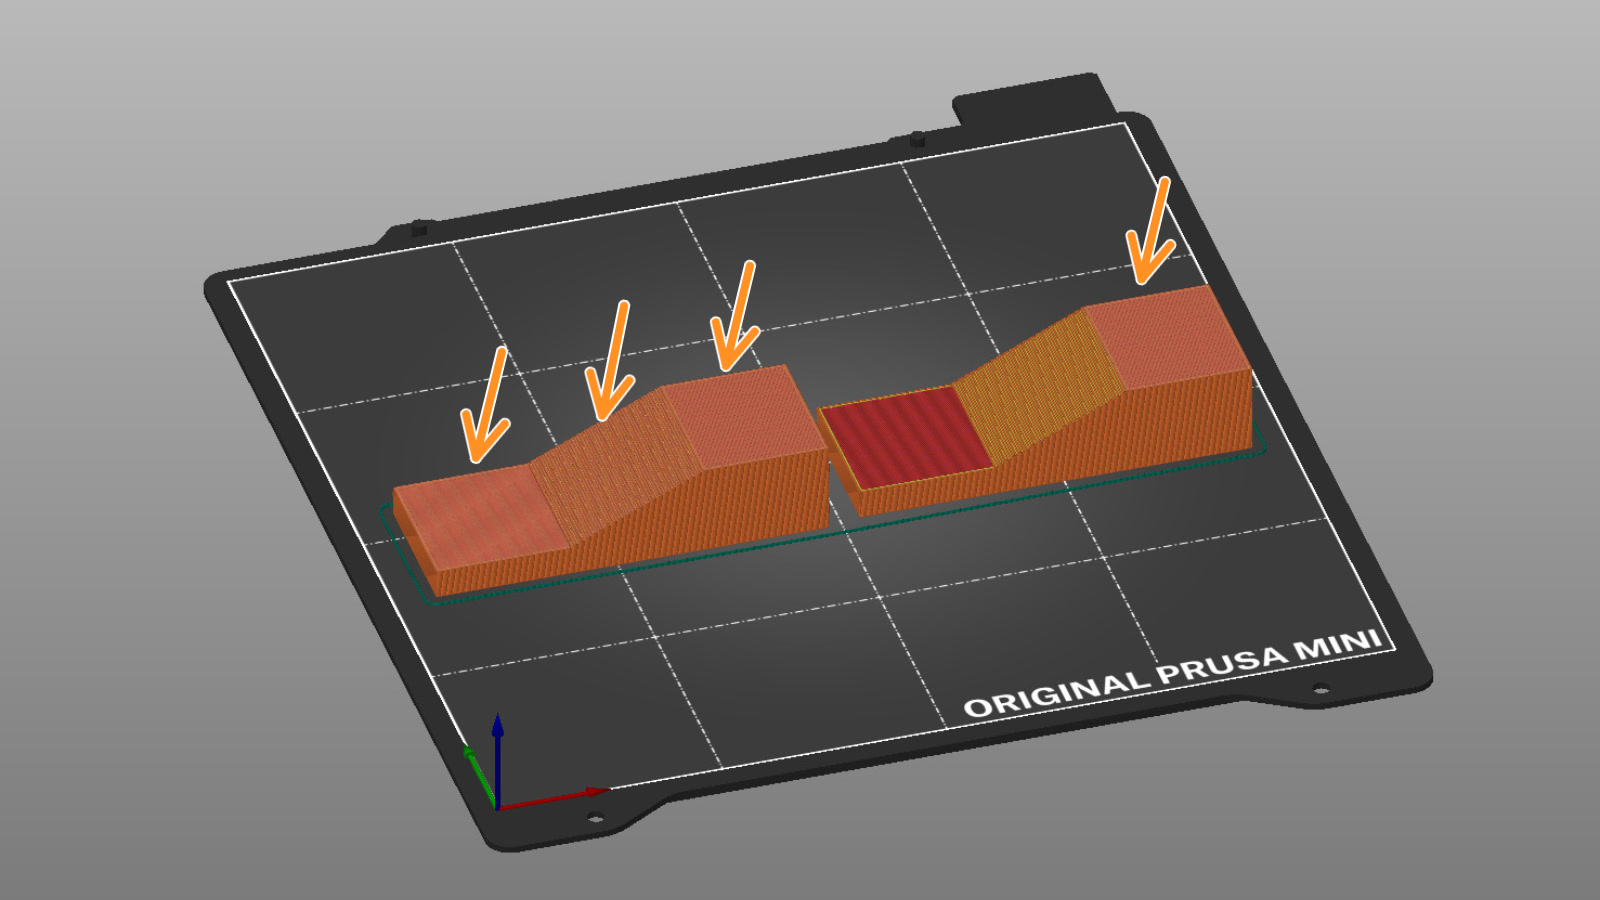
                  All top surfaces (left), Topmost surface only (right)

                  All solid surfaces

                  Every layer will get an ironing pass. This is an experimental feature meant to be used with 100% infill to create clearer transparent objects.

                  Flow rate

                  Percent of flow rate relative to the object's normal layer height.

                  Spacing between ironing passes

                  Distance between individual ironing lines. This value should be smaller than your nozzle diameter. Because of this, the nozzle will pass over the same spot several times.

                  Speed

                  This option is not grouped with the other Ironing settings. Instead, you'll find it in Print settings -> Speed -> Ironing. Feel free to experiment with this value, but generally, slower speeds work the best.

                  Calibration

                  Ironing is very sensitive to accurate extruder calibration. Too little and shiny groves will be visible at the top layer, which will not be ironed. Too much and the excess plastic will be dragged by the nozzle to the edges of the top surface. So calibrating is a matter of trial and error. One may experiment with the ironing flow, speed, and spacing to achieve the best results.

                  Different materials

                  As far as settings go, they don't differentiate between various materials. However, ironing does perform slightly differently depending on the filament used.

                  PLA irons very nicely, however, it is most prone to heat creep (depending on your printer and ambient temperature).

                  PETG irons well, but there's an increased risk of extra filament sticking to the nozzle. This plastic might accumulate on the nozzle, get dark as it's overheated, and eventually attach to the print. The same goes for FLEX, but much more pronounced.

                  ASA irons incredibly well, producing super smooth top surfaces.

                  When we tried ironing wood-filled filaments, but we didn't achieve good results. But your experience may vary.

                  History

                  The Ironing idea was first proposed by the user "Neotko" on the Ultimaker community forum. Neotko prototyped "Neosanding" - a smoothing of top surfaces in Simplify3D by running a second infill phase at the same print height with zero or a tiny extrusion rate perpendicularly to the first infill run. The "Neosanding" was later integrated by Ultimaker into their Cura slicer. Kisslicer integrated Ironing with a small twist: The second phase is not perpendicular to the first phase, but at 45 degrees, which Jonathan, the author of Kisslicer validated to produce better results. PrusaSlicer implements Neotko's "Neosanding" at 45 degrees as in Kisslicer.

                  You can see the ironing pass on the right cube

                  Was this article helpful?
                  This action is available only to registered users. Please log-in.

                  Topics

                  • PrusaSlicer 2.9 (Legacy)
                    • Print settings
                      • Infill
                      • Support material
                      • Layers and perimeters
                      • Elephant foot compensation
                      • Sequential printing
                      • Max volumetric speed
                      • Skirt and Brim
                      • Ironing
                      • Fuzzy skin
                      • Slicing mode / 3DLabPrint airplanes
                      • Pressure equalizer
                      • Arachne perimeter generator
                      • Organic Supports
                      • Speed settings
                      • Infill patterns
                      • Seam position
                    • About PrusaSlicer
                    • Configuration and profiles
                    • User interface
                    • Input/output
                    • Left toolbar
                    • Top toolbar
                    • Filament settings
                    • Printer settings
                    • Advanced features
                    • Multi-material slicing
                    • SLA slicing
                    • Other (PrusaSlicer)

                  12 comments

                  Log in  to post a comment
                  Phoenix
                  •
                  Can ironing also be applied to TPU? The text only discusses PLA, PETG and ASA.
                  Reply
                  Same Old Shane
                  •
                  Due to the nature of TPU and the settings for ironing, you could run into clogging issues when the ironing is in effect, so it is a try at your own risk sort of situation. 
                  Reply
                  Kayde1351
                  •
                  I have been having issues with petg clogging when running the ironing function....
                  any advice to help with that issue ?
                  Reply
                  Kayde1351
                  •
                  i am using a Stock Prusa I3 mk3 
                  Reply
                  Xavier Faraudo
                  •
                  FWIW, I have uploaded to Printables an ironing calibration test to help tune-up the three relevant settings (flow rate, spacing and speed), which BTW is basically mandatory if you're using a nozzle with a diameter other  than 0.4. 
                  The test is fully parametric and customizable (in OpenSCAD, no design skills required), outputs the required modifiers, and as a bonus can also add a recycling symbol for the material used. There's a tutorial bundled on how to use the test, and some tips on things to look at based on my experience (and any input is welcome!)
                  Reply
                  Cor
                  •
                  Well that downside is exactly what is going on with mine Mini XD after some time (ironing) there were no Ironing but nothing comming out... after upgrading my mini to Direct Drive and all metal Titanium heatbreak and Microswis nozzle (Nickeled  Brass) I was getting this stuff regularly... First thoughts FFFFFF I fucked it up (with Upgrades) FFFF Direct drive is to blame etc.... well it is not, all works perfectly fine and layer adheasion is perfect, no underextrusion, ghosting, shifting etc, problem is V6 hotend and small melting point which will creep up in to heatbreak and cause this to happen.... I am using Prusament PETG at 250-260C without Fan and as soon as I do Ironing it goes for a bit and then nothing is comming out... Last night I opened everything and cleaned heatbrake and changed tube for Capricorn one with fresh chamfer just in case (it was PITA to do...) Solution (the best one/easiest) for me is to heat the Nozzle to 280 (YES 280C) and then perform Unload (which will help with pooling out melted PETG from heatbreak. Then cut it again (sharp angle) and heat up the nozzle again to 280 and wait a min, then perform Load which will produce hard (fast) push in motion that will just push all PETG (from Heatbreak and between the nozzle and heatbrake) in to the nozzle. Look at at it as with cool pull just this time we are melting everything to the point that it must go down and when this fast motion is produced from extruder all goes down and out without any problems (with a small KkKkBooOOm when PETG is forcefully pushed out....) I can print again without disasemblying everything :D I might look in to another nozzle lenghts since this one is too short and my heatbrake must be screewd preety much to the poing where heater is (wich makes no bloody sense Prusa!!!) and it cancels the function of this small troath that should be a heatbreak between the two... I will be thinkering with this a bit and try to find/use nozzle with a bit longer tread if it exist xD
                  Reply
                  David
                  •

                  Hi! When changing the PTFE tube on MINI, make sure the PTFE is pre-stressed by one full rotation of the fitting on top of the heatsink. Also, there should be a distance at least about 4.5mm between the top of the heaterblock and the heatsink.

                  Reply
                  KimmoJ
                  •
                  I don't know exactly what differs between Cura and PrusaSlicer, but Cura does a considerably better job of ironing. There's a "zig zag" setting in Cura that produces vastly better results than I've gotten with PrusaSlicer - PrusaSlicer seems to literally sometimes miss an area and leaves it untouched, and the lines of it sweeping back and forth linearly over the print are quite obvious. Tried both 2.3.3 and 2.4 alpha. Neither produced a "showroom" result, but Cura came a lot closer.
                  Reply
                  FlyingPete
                  •
                  Has anyone tried or considered a nozzel with a greater amount of flat area around the exit hole? This would make the ironing surface to cover a greater area faster.You might be able to achieve this by carefully filing the tip of a nozzle.  My current nozzle is a plated type so unable to try this approach.
                  Reply
                  David
                  •

                  Hi Pete, a larger flat area in the nozzle may result in other print artifacts such as leaving strings and blobs of filament by the sides of the perimeters.

                  Reply