Prusa
  • SHOP
    • Latest products
    BY CATEGORY
    • 3D printersnew
    • 3D printer upgradesnew
    • Materials
    • Accessories
    • Spare parts
    • Courses
    • Merch
    • Get a price quote
    QUICK LINKS
    • Shipping & delivery
    • Returns & refunds
    • Payment & financing
    • Warranty
    • VAT & Customs fees
    • FAQ

    0 item in your cartitems in your cart

    Your cart is empty

    Go to cartShop 3D printers

    My profile

    Log in to see orders, saved items

    My profile

    Signed in as

    • Orders
    • Logout
  • 3D PRINTING
    • Explore 3D printing
    FOR BEGINNERS
    • 3D printing 101
    • How FDM printing works
    • Buying your first printer
    • 3D model catalog
    BY APPLICATION
    • Rapid prototyping
    • Manufacturing
    • Engineering
    • Research
    • Arts & design
    GO DEEPER
    • Materials guide
    • Courses
    • Webinars
    • Case studies
    • Custom 3D printing
  • 3D PRINTERS
    • All 3D printers
    FOR
    • Home or garageHobbyists, tinkerers and home printing
    • BusinessIn-house production for small teams
    • EnterpriseFleets, security and scale
    • Which Prusa is right for me
    SHOP & BROWSE
    • CORE One+new
    • CORE One+ INDXnew
    • CORE One L+new
    • CORE One L+ INDXnew
    • XL+new
    • MK4S
    • Prusa Pro HT90
    • Prusa Pro AFS
    • Prusa Pro SLX
    MORE FROM PRINTERS
    • Parts & upgradesnew
    • Critical infrastructure
    • Case studies
    • Signature Oak
    • Kits
  • MATERIALS
    • All materials
    BY USE
    • Every-day & design
    • Functional engineering
    • Composites
    • Pro speciality
    • SLA resins
    PRUSAMENT
    • PLA
    • PETG
    • ASA
    • PC
    • PA11
    • Flex
    • TPU
    MORE FROM MATERIALS
    • Materials guide
    • We make material in house
    • Sustainability
    • Order on the store
  • SOFTWARE
    • All software
    PREPARE THE PRINT
    • PrusaSlicer 3.0New
    PRINT & MONITOR
    • Prusa Connect
    • EasyPrint
    • iOS & Android app
    • Prusa Farm
    GET STARTED
    • Download & install
    • Knowledge base
    MORE FROM SOFTWARE
    • 3D model catalog
  • SUPPORT
    • Explore support
    FIND ANSWERS
    • Knowledge base
    • Troubleshooting
    • Courses
    • Webinars
    GET HELP
    • Contact us
    • Livechat
    • Shipping & delivery
    • Warranty
    • Returns & refunds
    • Service & spare parts
    • Service & Repair
    COMMUNITY
    • Forum
    • Reddit
    • Printables
  • TRUST CENTER
    • Trust Center overview
    BY TOPIC
    • GDPR
    • Certificates
    • Security
    • Compliance
    COMMITMENTS
    • Sustainability report
    TALK TO US
    • Contact the security team
  • COMPANY
    • About Prusa
    GET TO KNOW US
    • Our story
    • How we make printers
    • Open source
    • Brand & media kit
    NEWS
    • Blog
    • Newsroom
    • Events
    TRUST & PARTNERS
    • Sustainability
    • Resellers & distributors
    • Affiliate program
    • Contact
    • English
    • Čeština
    • Deutsch
    • Español
    • Français
    • Italiano
    • Polski
    • 日本語
  • Signed in as

    • Orders
    • Address
    • In-stock Alerts
    • My Courses
    • Subscription
    • Edit Account
    • Logout

Log in to see orders, saved items

Signed in as
  • Orders
  • Address
  • In-stock Alerts
  • My Courses
  • Subscription
  • Edit Account
  • English
  • Čeština
  • Deutsch
  • Español
  • Français
  • Italiano
  • Polski
  • 日本語
Shop

0 item in your cartitems in your cart

Your cart is empty

Go to cartShop 3D printers

My profile

Log in to see orders, saved items

My profile

Signed in as

  • Orders
  • Logout
SHOP
  • Latest products
BY CATEGORY
  • 3D printersnew
  • 3D printer upgradesnew
  • Materials
  • Accessories
  • Spare parts
  • Courses
  • Merch
  • Get a price quote
QUICK LINKS
  • Shipping & delivery
  • Returns & refunds
  • Payment & financing
  • Warranty
  • VAT & Customs fees
  • FAQ

Featured products

    Popular categories

      Trending searches

        Articles

          Blog

            Products

              Categories

                Suggested searches

                  Searching…
                  No results
                  Something went wrong.
                  ↑↓ Select↵ OpenEsc Close search
                  1. Support
                  2. Prusa CORE One
                  3. Printer maintenance
                  4. Regular printer maintenance (CORE One/+)
                   

                  Contents

                  • Useful tools
                  • Frequent maintenance
                  • Sporadic maintenance
                  • Annual maintenance

                  Blog

                  • Prusament Pellets: Raw material batches for large-format 3D printing or small-scale polymer research & development
                  • Print colorful and glowing Halloween decorations with our spooky offer
                  • Factorio Has Arrived on Printables

                  Newsletter

                  Signup and get our monthly squeeze on updates, blog, printables and much more.

                  By clicking, you agree to receive our newsletter.

                  This site is protected by reCAPTCHA Enterprise and the Google Privacy Policy and Terms of Service apply.

                  Heavy Duty Keyboard Holder (No Supports)
                  E-shop
                  • 3D Printers
                  • Printer Upgrades
                  • Filaments
                  • Accessories
                  • Prusa Merchandise
                  Prusa

                  © Prusa Research a.s.

                  Printables
                  • 3D Models
                  • Store
                  • Clubs
                  • 3D Design Contests
                  • Brands
                  Community
                  • World Map
                  • Forum
                  • User Groups
                  • Events
                  Help
                  • Prusa Help
                  • Prusa Academy
                  • 3D Printing Calculators
                  Software
                  • PrusaSlicer
                  • Prusa.app
                  • Prusa Connect
                  • Drivers and Software
                  Company
                  • About Us
                  • Blog
                  • Official Prusa Resellers
                  • Contact Us
                  • Certified for ISO 9001, ISO 14001, ISO 45001
                  • General Terms and Conditions
                  • General Terms and Conditions of Use of the PRUSA Websites
                  • Privacy Policy
                  • Information about cookies
                  • Customer Complaints Policy
                  • Status Page
                  • Do Not Sell or Share My Personal Information
                  • Supplemental Statements
                  Prusa
                  • General Terms and Conditions
                  • General Terms and Conditions of Use of the PRUSA Websites
                  • Privacy Policy
                  • Information about cookies
                  • Customer Complaints Policy
                  • Status Page
                  • Do Not Sell or Share My Personal Information
                  • Supplemental Statements

                  © Prusa Research a.s.

                  JOSEF PRUSA®, PRUSA RESEARCH®, PRUSA POLYMERS®, PRUSA ORANGE®, PRUSA 3D ® AND PRUSAMENT® are registered trademarks of Prusa Development a.s. used by Prusa Research a.s. under licence from Prusa Development a.s.

                  Regular printer maintenance

                  (CORE One/+)

                  Relevant for

                  CORE One
                  CORE One+
                  36 comments
                  Article is also available in following languages
                  English
                  Čeština
                  Polski
                  Deutsch
                  Français
                  Español
                  Italiano
                  日本語

                  It is recommended to regularly take some time to maintain your Prusa CORE One/+. This should be done even if the printer is working perfectly. 

                  Useful tools

                  Besides the usual tools, such as Allen keys, needle-nose pliers, and IPA (Isopropyl Alcohol) + paper towels, you might need:

                  • Compressed air: also known as canned air. Be sure not to hold it upside down while spraying - otherwise, you could damage any electronic components while trying to clean them.
                  • Brass Nozzle Brush: a small brass brush is useful for cleaning the heaterblock. If you don't have a brass brush, any brush with hard bristles will do the job.
                  • Prusa Lubricant: a tube of Prusa Lubricant is included with the Prusa CORE One. It is used to lubricate the smooth rods with linear bearings and to lubricate the Z-axis leadscrews. DO NOT use Prusa Lubricant on the linear rail! 
                  • Linear rail lubrication set: a set that includes Microlube GL 261, Dosing needle SSS15 2, Cartridge with manual piston 2/2,5mm, and two nitrile gloves. 
                  • Alcohol-free cleaner: used to clean the printer panels. DO NOT use alcohol products, including IPA, to clean the panels. 

                  Frequent maintenance 

                  The following points should be checked before every print. 

                  Keeping the printer clean

                  After several hours of printing, various kinds of debris may start to accumulate around the printer parts or under the heatbed - pieces of filament, dust, scraps, broken supports, etc. Always make sure that the parts of the printer are clean. You can use a brush, a small broom, or a vacuum to remove debris. 

                  Hotend cleaning 

                  CAUTION: Heated parts can cause severe burns!

                  It is fundamental for the hotend to be clean. Debris on the nozzle or heaterblock can cause printer failures, for example, with the residue falling onto the printed model while the print is in progress.

                  To clean the nozzle and heaterblock, heat the nozzle for three to five minutes at 250 °C, as the remains of the filament must be warmed up slightly so that they can be removed more easily.

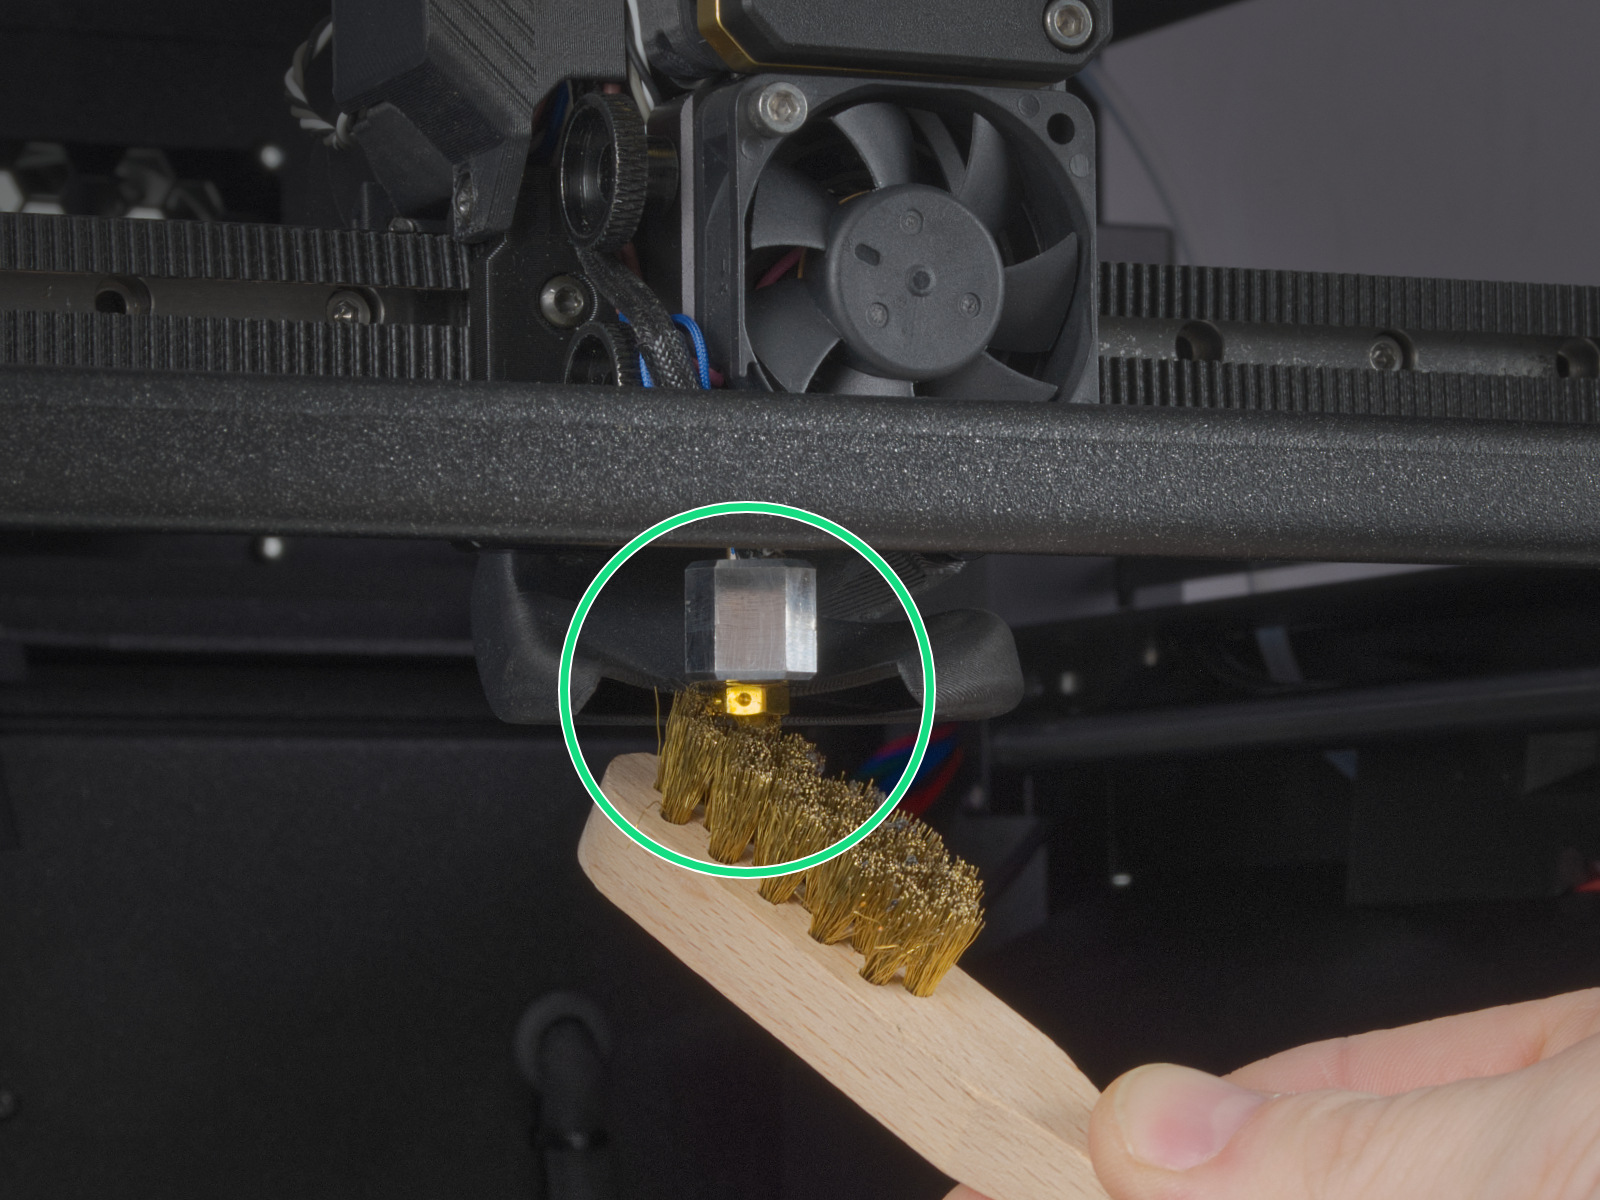
                  Use a small brass brush to clear away any old plastic stuck on the nozzle and heaterblock.

                  Avoid contact of the brush with the hotend cables, as this could cause a short circuit.

                  Caution: the printer is still at a high temperature! Wait until the hot parts have cooled down to ambient temperature. It takes approximately 10 minutes. Do not touch it! Always check the values on the display.
                  Flexible print sheet

                  Acetone should be used sparingly for cleaning and only be used on the Smooth print sheet! Never use acetone on the Textured or Satin print sheet, as the surface will be permanently damaged.

                  Never clean the special PA Nylon sheet with acetone, IPA (isopropyl alcohol), or other alcohol-based solvents (window cleaners, Windex, etc.)! This will damage the surface. 

                  All flexible print sheets should be cleaned regularly to ensure adhesion, but the exact methods and washing solutions can differ depending on your type of sheet.

                  You can find more information on how to take care of your flexible print sheet in this articlein this article.

                  Sporadic maintenance

                  The following checks should be done every 200 hours of printing time. 

                  Axes check - Linear Rail (X-axis)

                  Ensure that there is no debris or dust on the (X-axis) linear rail. If there is, clean it with a clean tissue or a clean cloth, no degreaser or chemicals, as these might damage the rubber in the carriage. 

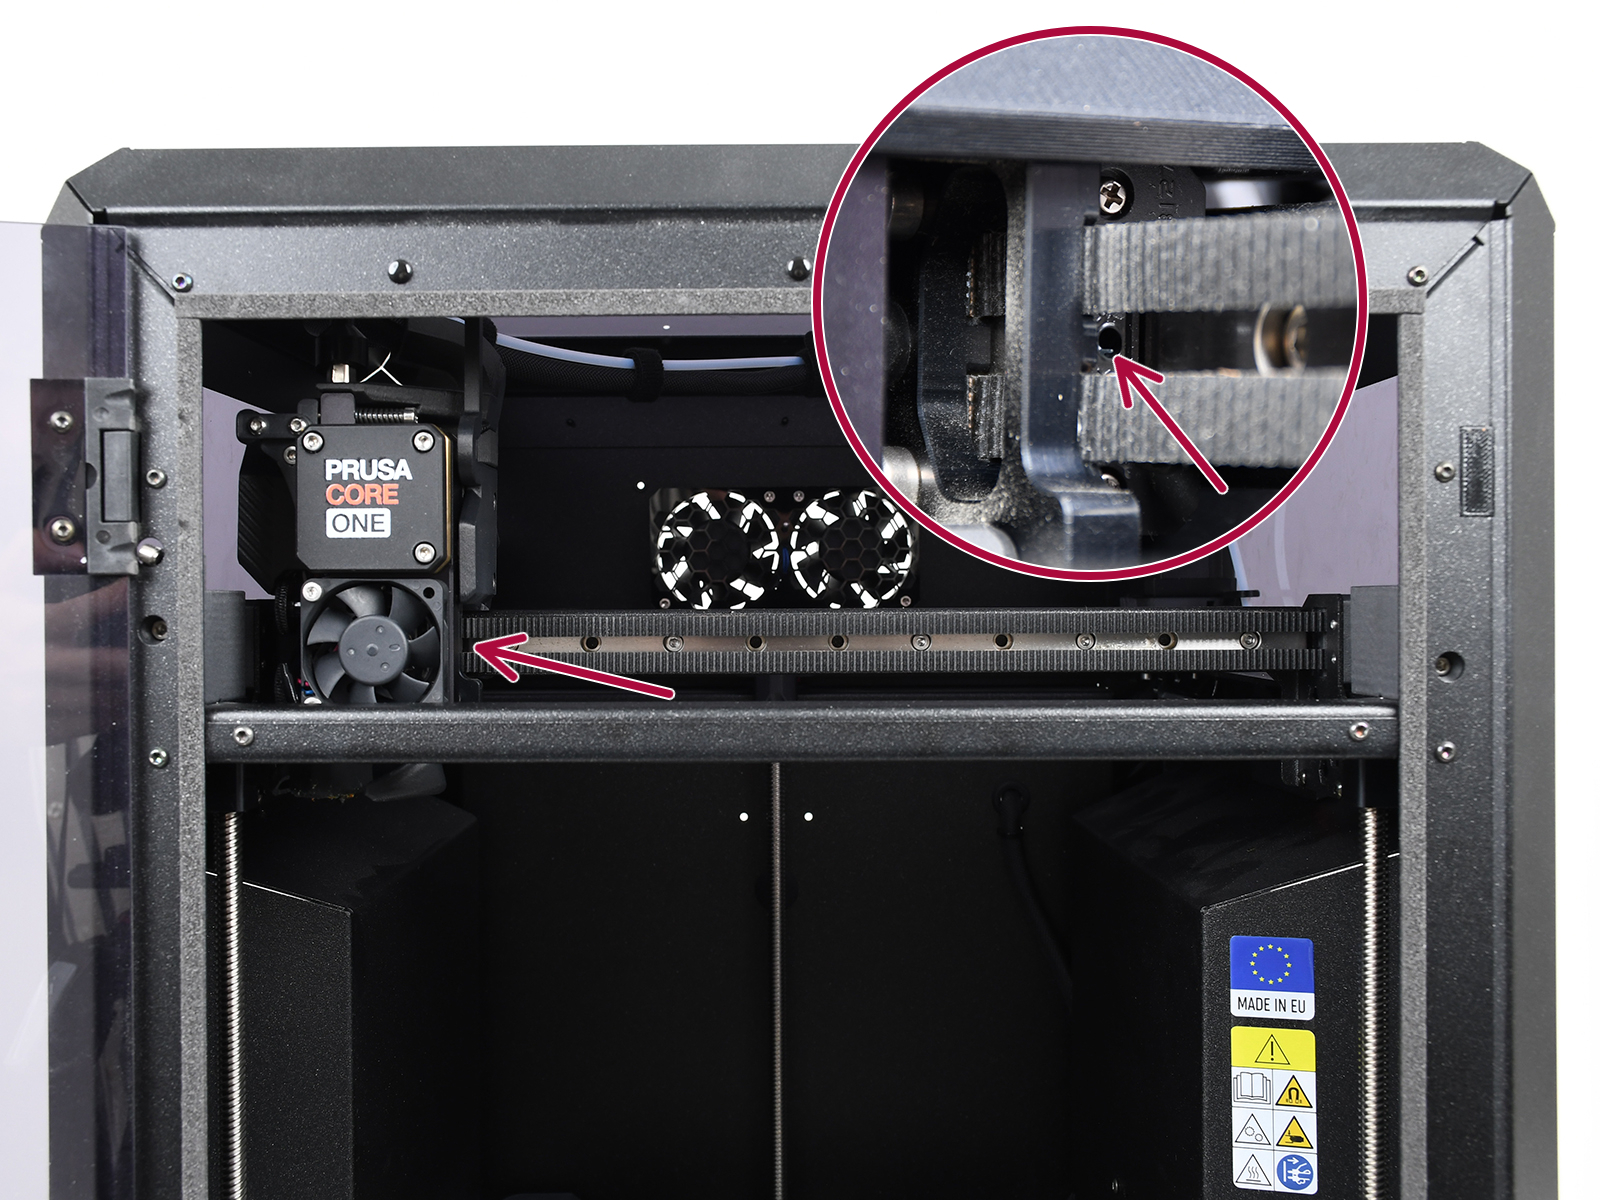
                  We recommend lubricating the linear rail every 3-6 months, using the dedicated linear rail lubrication set at the spots shown below.
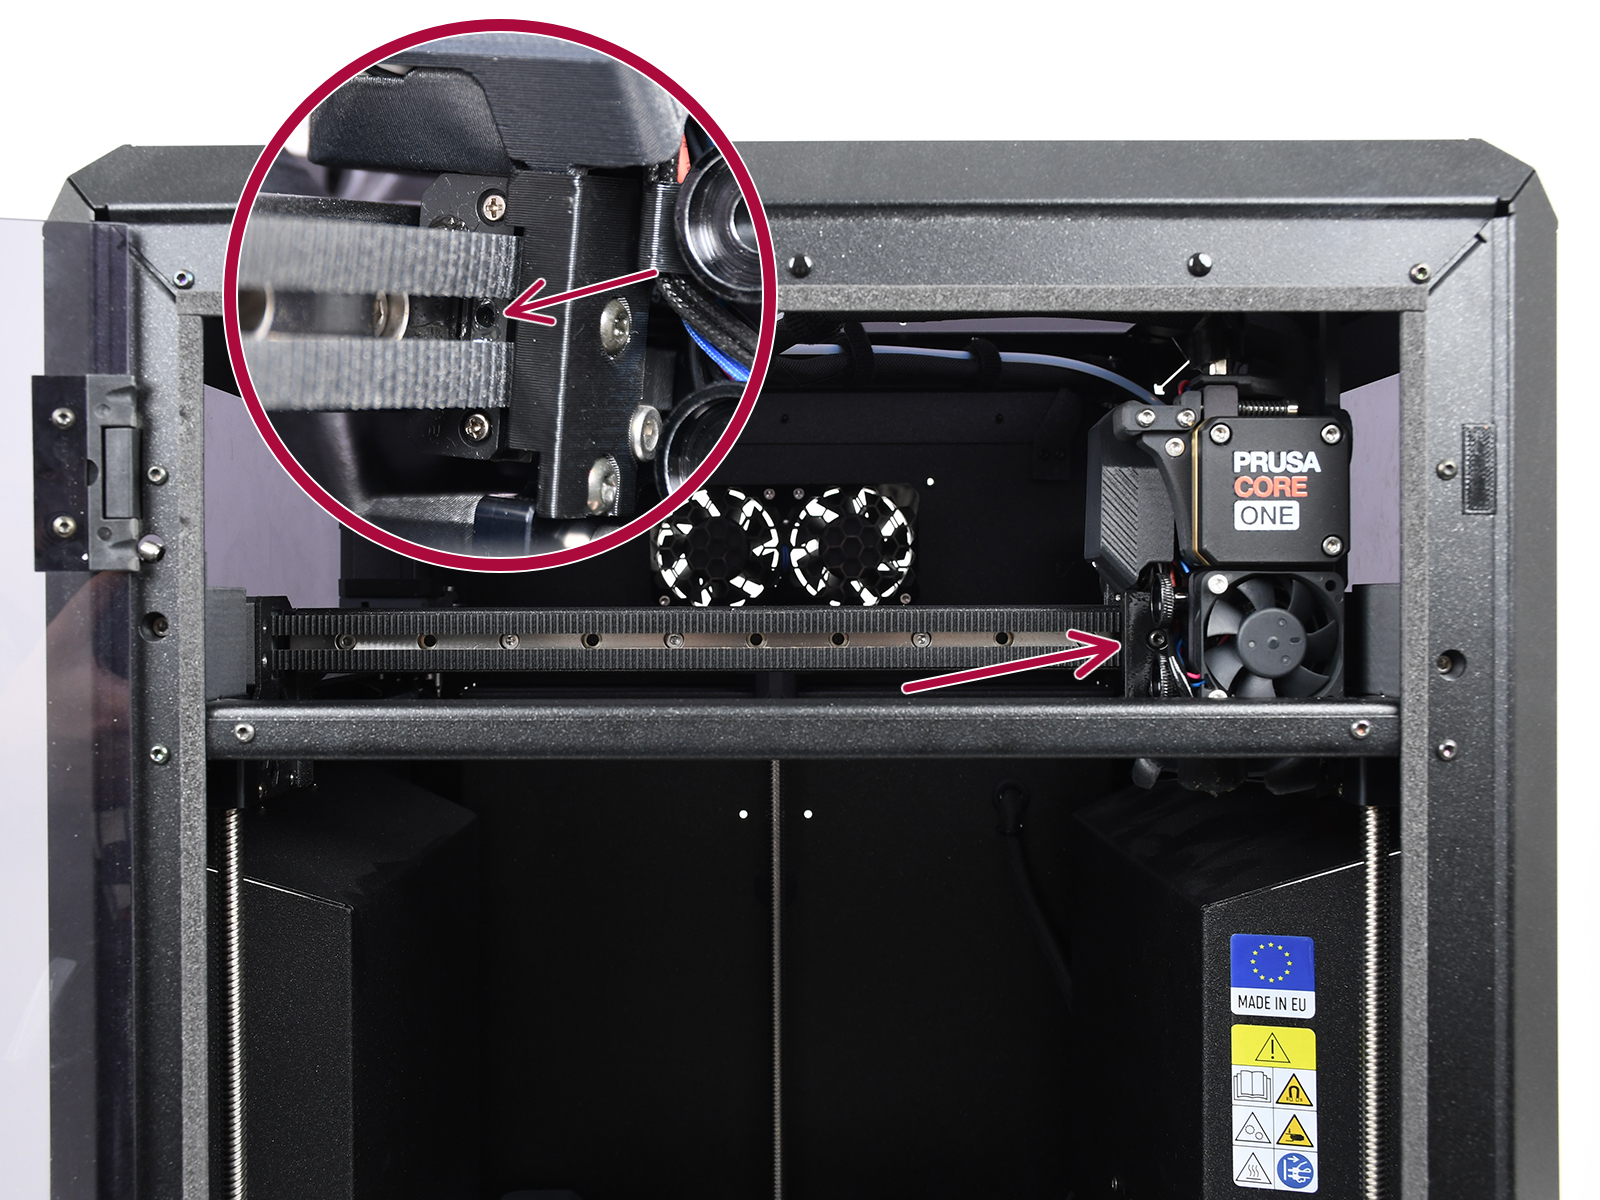
                  On linear rails, DO NOT use Prusa Lubricant or any products not part of the linear rails lubrication set. 

                  Axes check - Smooth Rods and Linear Bearings (Y-axis)

                  Clean the (Y-axis) smooth rods with a clean paper towel, and lubricate them using a small amount of Prusa Lubricant.

                  Only in case you feel the axis is not running smoothly anymore, even after recently cleaning and lubricating the smooth rods, the bearings can be taken out, cleaned with alcohol, and greased on the inside, still using a small amount of Prusa Lubricant. 

                  Axes check - Belt

                  Over a long printing time, the belt can slightly loosen, causing issues such as layer shifting or bad printing quality. The easiest way to check the belt tension is to print a circular object. If the result is not perfectly round, a belt adjustment is needed. 

                  Fans

                  The RPM (revolutions per minute) of both fans is constantly measured. This means that the printer will report an error if the fan suddenly slows down, for example, due to a piece of filament stuck in it.

                  In such a case, check and remove any dirt from the relevant fan. Do not try to bypass the RPM check, as this could damage the printer!

                  Both fans should be checked and cleaned after every few hundred hours of printing. Dust can be removed with compressed air in a spray can, and small plastic threads can be removed with tweezers. 

                  CAUTION: Do not blow compressed air on the running fan. 

                  Nextruder

                  Do not open the gearbox unless you have the PG-assembly-adapter that comes with the CORE One assembly kit. Doing this can result in misaligning the gearbox, causing print failures. 

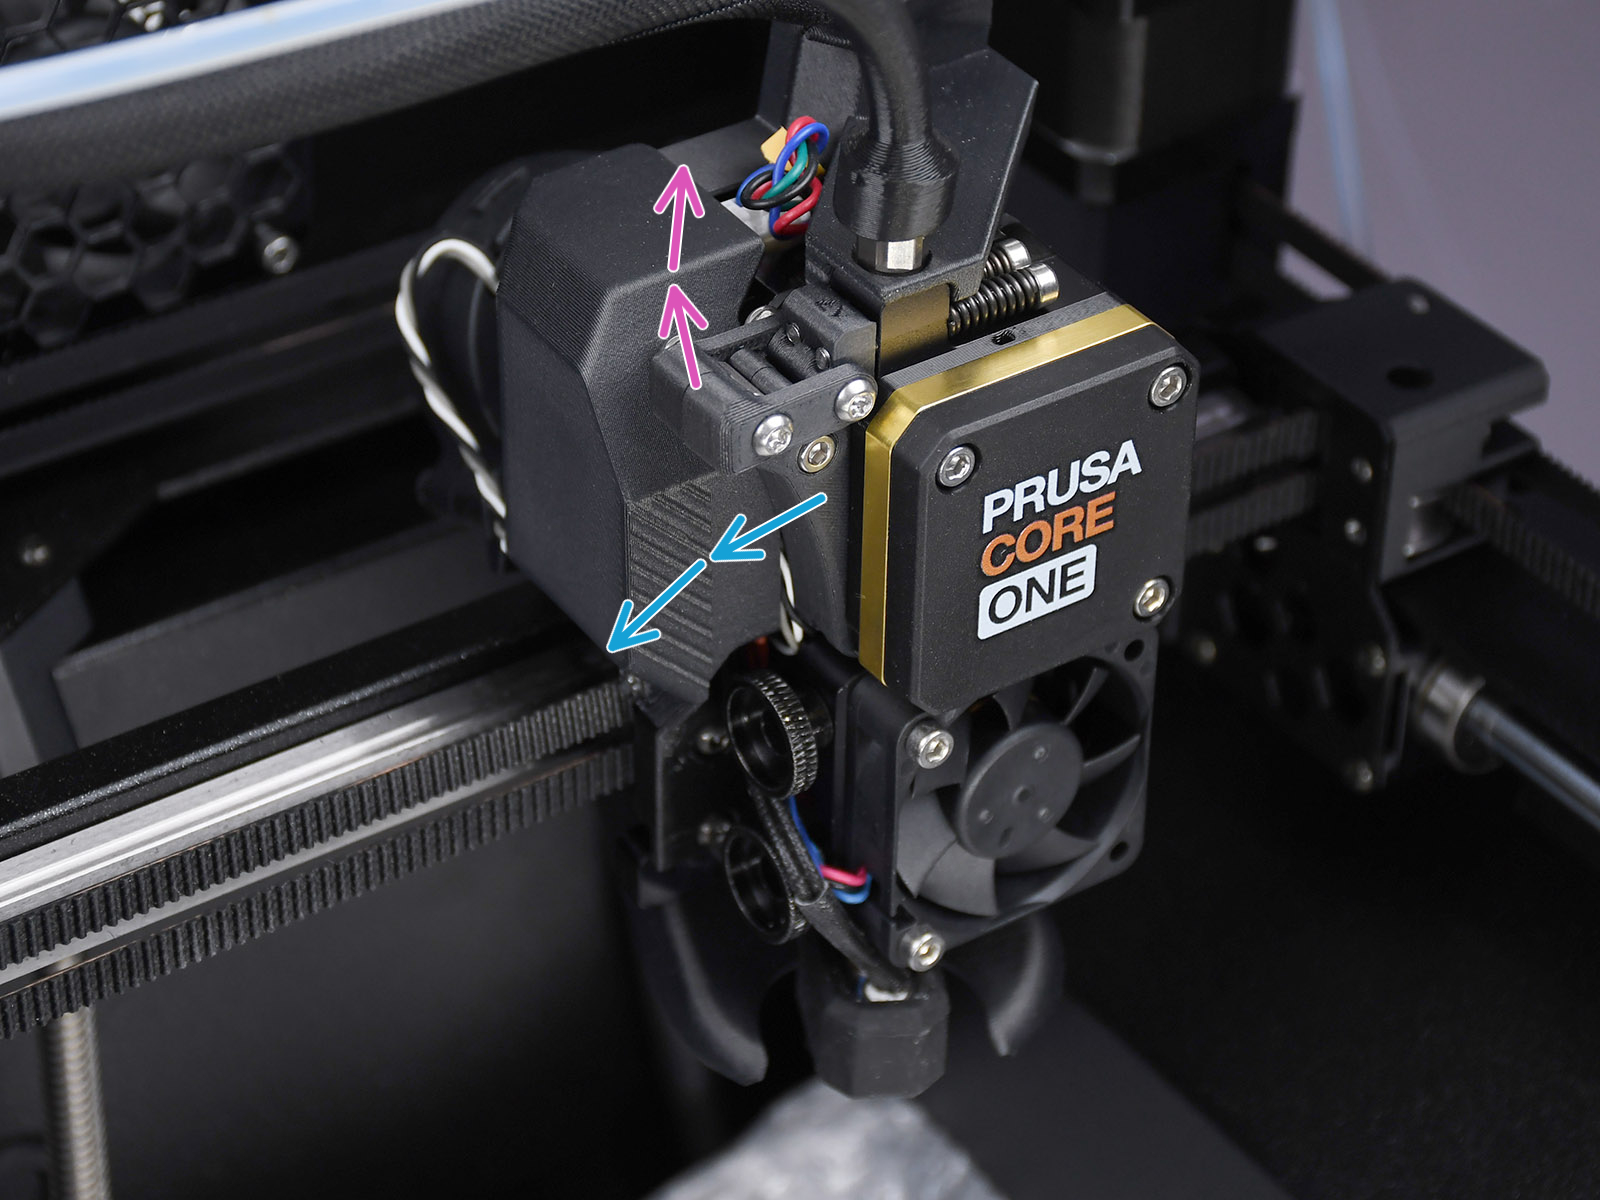
                  The primary gear and the bearings attached to the Idler Shaft in the extruder do not need any lubricant. Over time, a deposit of filament debris can form in the grooves of the primary gear, which then causes insufficient filament extrusion. Access the extruder by lifting the Idler Nut and then moving the Idler Shaft. You can blow away the dirt with compressed air, or use a brass brush or an ordinary toothpick. Use the access hole on the side of the extruder. 
                  Nextruder filament sensor

                  If you encounter problems with the Nextruder filament sensor, such as incorrect or random readings, make sure that everything in the Nextruder is correctly wired and that there is no debris in the filament path inside the extruder, either using tweezers or a can of compressed air. 

                  To access the right side of the LoveBoard, loosen two M3x6 bolts and remove the cover. 

                  To clean the Nextruder filament sensor, follow the dedicated article. 

                  Panels cleaning 

                  Use an alcohol-free cleaner or soapy water to clean the printer panels. 

                  DO NOT use products that contain alcohol, including IPA. Repeat exposure will weaken the panels, causing them to become brittle over time. 

                  Annual maintenance

                  Electronics

                  Before touching the electrical connections, please make sure that the printer is off, and unplugged from the main power source.

                  It is a good practice to check and optionally reconnect the electrical connectors on the xBuddy board, Loveboard, heatbed, PSU, and xLCD every 600-800 hours of printing. 

                  In particular, ensure that the screw-attached connectors are fully tightened, and the Molex-attached connectors are properly connected. 

                  CAUTION: for Molex-attached connectors, it is necessary to press the latch before disconnecting. Otherwise, the connector may get damaged. 

                  Was this article helpful?
                  This action is available only to registered users. Please log-in.

                  Topics

                  • Using the printer
                    • Printer maintenance
                      • How to replace chamber thermistor (CORE One/+)
                      • How to replace the main cable (CORE One/+)
                      • How to rebuild the Nextruder Hotend
                      • How to install HT Hotend Upgrade (CORE One/+, CORE One L/+)
                      • Changing or replacing the Prusa Nozzle
                      • Installing or changing the Nextruder V6 Nozzle Adapter
                      • How to update firmware (CORE One L, CORE One, CORE One INDX, MK4/S, MK3.9/S, MK3.5/S, XL)
                      • How to install the Nextruder V6 Nozzle Adapter (CORE One)
                      • How to replace Heatbed (CORE One)
                      • How to replace Heatbed Thermistor (CORE One)
                      • Buddy3D Camera for CORE One Installation
                      • How to use Prusament Refill 900g
                      • How to replace Z motors (CORE One)
                      • How to downgrade firmware (CORE One/+, MK4/S, MK3.9/S, MK3.5/S, XL)
                      • Changing or replacing the Nextruder Hotend
                      • How to replace the Prusa Nozzle (CORE One)
                      • How to reverse the door orientation (CORE One)
                      • How to pack the Prusa CORE One for return - Original Packing material
                      • Regular printer maintenance (CORE One/+)
                      • Maintenance warning #31117 (CORE One) #26117 (MK4S) #13117 (MK4) #27117 (MK3.9S) #21117 (MK3.9) #28117 (MK3.5S) #23117 (MK3.5)
                      • Maintenance failure warning #31116 (CORE One) #26116 (MK4S) #13116 (MK4) #27116 (MK3.9S) #21116 (MK3.9)
                      • How to install Advanced Filtration (CORE One)
                      • How to pack the Prusa CORE One for return - Custom Packing material
                      • How to replace the xBuddy board (CORE One)
                      • How to replace Hotend fan (CORE One)
                      • How to replace Nextruder Filament Sensor (CORE One)
                      • How to replace Heatsink NTC Thermistor (CORE One)
                      • How to replace Hotend Heatsink (CORE One)
                      • How to replace X and Y Motors (CORE One)
                      • How to replace the print fan (CORE One)
                      • How to replace the Heatbed Power Cables (CORE One)
                      • How to replace the Chamber fan (CORE One)
                      • How to replace a Hotend Thermistor (CORE One)
                      • How to replace a Hotend Heater (CORE One)
                      • How to replace the Belt Tensioner Pulley (CORE One)
                      • How to replace the Belt Tensioner Left (CORE One)
                      • How to replace the Belt Tensioner Right (CORE One)
                      • How to replace Loveboard (CORE One)
                      • How to replace a hotend assembly (CORE One)
                      • How to replace the door sensor (CORE One)
                      • How to replace the side filament sensor (CORE One)
                    • 3D models
                    • Material guide
                    • Slicing
                    • Prusa Connect & PrusaLink

                  17 comments

                  Log in  to post a comment
                  carchiba
                  •
                  Where is the "Axes check - Z-axis leadscrews" section?
                  Reply
                  Sean Glover
                  •
                  Prusa, could you please update this guide so it provides more clarity regarding maintaining the Z-axis leadscrews? I have now seen people recommending to both lubricate it after 500 hours, and others stating to not lubricate as the nuts have little friction. The top summary of this article states to use lubrication on the Z-axis leadscrews, but then there is no mention further in the article.

                  There have been a few comments asking in this article alone and even your built-in AI is getting confused as it has given me two different answers.
                  Reply
                  daftcashew
                  •
                  Where is the "Axes check - Z-axis leadscrews" section? That's the entire reason I came to this page, but it's missing...
                  Reply
                  SocialMisanthrope
                  •
                  Start here for the linear rail lubrication.
                  https://help.prusa3d.com/guide/how-to-lubricate-linear-bearing-rails-xl_384273

                  Basically get the lube kit, find the ports, inject PRECISELY .1 lube .
                  Reply
                  Keith Burns
                  •
                  You need a whole section purely on Nextruder maintenance. Its hard to adjust tension on the X axis rail without removing a lot of parts, and when wires are crimped, you lose sensors like the load cell...

                  That whole unit needs better docs other than reversing the install docs to work out how to do maint.
                  Reply
                  Robert Konigsberg
                  •
                  Particularly true for people who purchased pre-installed machines.
                  Reply