Prusa
  • SHOP
    • Latest products
    BY CATEGORY
    • 3D printersnew
    • 3D printer upgradesnew
    • Materials
    • Accessories
    • Spare parts
    • Courses
    • Merch
    • Get a price quote
    QUICK LINKS
    • Shipping & delivery
    • Returns & refunds
    • Payment & financing
    • Warranty
    • VAT & Customs fees
    • FAQ

    0 item in your cartitems in your cart

    Your cart is empty

    Go to cartShop 3D printers

    My profile

    Log in to see orders, saved items

    My profile

    Signed in as

    • Orders
    • Logout
  • 3D PRINTING
    • Explore 3D printing
    FOR BEGINNERS
    • 3D printing 101
    • How FDM printing works
    • Buying your first printer
    • 3D model catalog
    BY APPLICATION
    • Rapid prototyping
    • Manufacturing
    • Engineering
    • Research
    • Arts & design
    GO DEEPER
    • Materials guide
    • Courses
    • Webinars
    • Case studies
    • Custom 3D printing
  • 3D PRINTERS
    • All 3D printers
    FOR
    • Home or garageHobbyists, tinkerers and home printing
    • BusinessIn-house production for small teams
    • EnterpriseFleets, security and scale
    • Which Prusa is right for me
    SHOP & BROWSE
    • CORE One+new
    • CORE One+ INDXnew
    • CORE One L+new
    • CORE One L+ INDXnew
    • XL+new
    • MK4S
    • Prusa Pro HT90
    • Prusa Pro AFS
    • Prusa Pro SLX
    MORE FROM PRINTERS
    • Parts & upgradesnew
    • Critical infrastructure
    • Case studies
    • Signature Oak
    • Kits
  • MATERIALS
    • All materials
    BY USE
    • Every-day & design
    • Functional engineering
    • Composites
    • Pro speciality
    • SLA resins
    PRUSAMENT
    • PLA
    • PETG
    • ASA
    • PC
    • PA11
    • Flex
    • TPU
    MORE FROM MATERIALS
    • Materials guide
    • We make material in house
    • Sustainability
    • Order on the store
  • SOFTWARE
    • All software
    PREPARE THE PRINT
    • PrusaSlicer 3.0New
    PRINT & MONITOR
    • Prusa Connect
    • EasyPrint
    • iOS & Android app
    • Prusa Farm
    GET STARTED
    • Download & install
    • Knowledge base
    MORE FROM SOFTWARE
    • 3D model catalog
  • SUPPORT
    • Explore support
    FIND ANSWERS
    • Knowledge base
    • Troubleshooting
    • Courses
    • Webinars
    GET HELP
    • Contact us
    • Livechat
    • Shipping & delivery
    • Warranty
    • Returns & refunds
    • Service & spare parts
    • Service & Repair
    COMMUNITY
    • Forum
    • Reddit
    • Printables
  • TRUST CENTER
    • Trust Center overview
    BY TOPIC
    • GDPR
    • Certificates
    • Security
    • Compliance
    COMMITMENTS
    • Sustainability report
    TALK TO US
    • Contact the security team
  • COMPANY
    • About Prusa
    GET TO KNOW US
    • Our story
    • How we make printers
    • Open source
    • Brand & media kit
    NEWS
    • Blog
    • Newsroom
    • Events
    TRUST & PARTNERS
    • Sustainability
    • Resellers & distributors
    • Affiliate program
    • Contact
    • English
    • Čeština
    • Deutsch
    • Español
    • Français
    • Italiano
    • Polski
    • 日本語
  • Signed in as

    • Orders
    • Address
    • In-stock Alerts
    • My Courses
    • Subscription
    • Edit Account
    • Logout

Log in to see orders, saved items

Signed in as
  • Orders
  • Address
  • In-stock Alerts
  • My Courses
  • Subscription
  • Edit Account
  • English
  • Čeština
  • Deutsch
  • Español
  • Français
  • Italiano
  • Polski
  • 日本語
Shop

0 item in your cartitems in your cart

Your cart is empty

Go to cartShop 3D printers

My profile

Log in to see orders, saved items

My profile

Signed in as

  • Orders
  • Logout
SHOP
  • Latest products
BY CATEGORY
  • 3D printersnew
  • 3D printer upgradesnew
  • Materials
  • Accessories
  • Spare parts
  • Courses
  • Merch
  • Get a price quote
QUICK LINKS
  • Shipping & delivery
  • Returns & refunds
  • Payment & financing
  • Warranty
  • VAT & Customs fees
  • FAQ

Featured products

    Popular categories

      Trending searches

        Articles

          Blog

            Products

              Categories

                Suggested searches

                  Searching…
                  No results
                  Something went wrong.
                  ↑↓ Select↵ OpenEsc Close search
                  1. Support
                  2. Printer maintenance
                  3. Adjusting belt tension (MINI/MINI+)
                   

                  Contents

                  • Checking the belt tension
                  • Adjusting the X-axis belt
                  • Adjusting the Y-belt

                  Blog

                  • Print colorful and glowing Halloween decorations with our spooky offer
                  • Factorio Has Arrived on Printables
                  • Prusament PLA Lightweight: 65% lighter than regular PLA. Perfect choice for aircraft, cosplay, and more.

                  Newsletter

                  Signup and get our monthly squeeze on updates, blog, printables and much more.

                  By clicking, you agree to receive our newsletter.

                  This site is protected by reCAPTCHA Enterprise and the Google Privacy Policy and Terms of Service apply.

                  Factorio Transport Belts
                  E-shop
                  • 3D Printers
                  • Printer Upgrades
                  • Filaments
                  • Accessories
                  • Prusa Merchandise

                  © Prusa Research a.s.

                  Printables
                  • 3D Models
                  • Store
                  • Clubs
                  • 3D Design Contests
                  • Brands
                  Community
                  • World Map
                  • Forum
                  • User Groups
                  • Events
                  Help
                  • Prusa Help
                  • Prusa Academy
                  • 3D Printing Calculators
                  Software
                  • PrusaSlicer
                  • Prusa.app
                  • Prusa Connect
                  • Drivers and Software
                  Company
                  • About Us
                  • Blog
                  • Official Prusa Resellers
                  • Contact Us
                  • Certified for ISO 9001, ISO 14001, ISO 45001
                  • General Terms and Conditions
                  • General Terms and Conditions of Use of the PRUSA Websites
                  • Privacy Policy
                  • Information about cookies
                  • Customer Complaints Policy
                  • Status Page
                  • Do Not Sell or Share My Personal Information
                  • Supplemental Statements
                  • General Terms and Conditions
                  • General Terms and Conditions of Use of the PRUSA Websites
                  • Privacy Policy
                  • Information about cookies
                  • Customer Complaints Policy
                  • Status Page
                  • Do Not Sell or Share My Personal Information
                  • Supplemental Statements

                  © Prusa Research a.s.

                  JOSEF PRUSA®, PRUSA RESEARCH®, PRUSA POLYMERS®, PRUSA ORANGE®, PRUSA 3D ® AND PRUSAMENT® are registered trademarks of Prusa Development a.s. used by Prusa Research a.s. under licence from Prusa Development a.s.

                  Adjusting belt tension

                  (MINI/MINI+)

                  Relevant for

                  MINI
                  MINI+
                  15 comments
                  Article is also available in following languages
                  English
                  Čeština
                  Polski
                  Deutsch
                  Français
                  Español
                  Italiano
                  日本語

                  Loose belts would cause a printer malfunction and prevent proper printing. The easiest way to check is printing a round object - if any of the belts are not tightened properly the result is an irregular shape instead of a perfect circle. Y-axis belt is located under the heatbed, X-axis belt moves the print head.

                  Checking the belt tension

                  Belt tuner

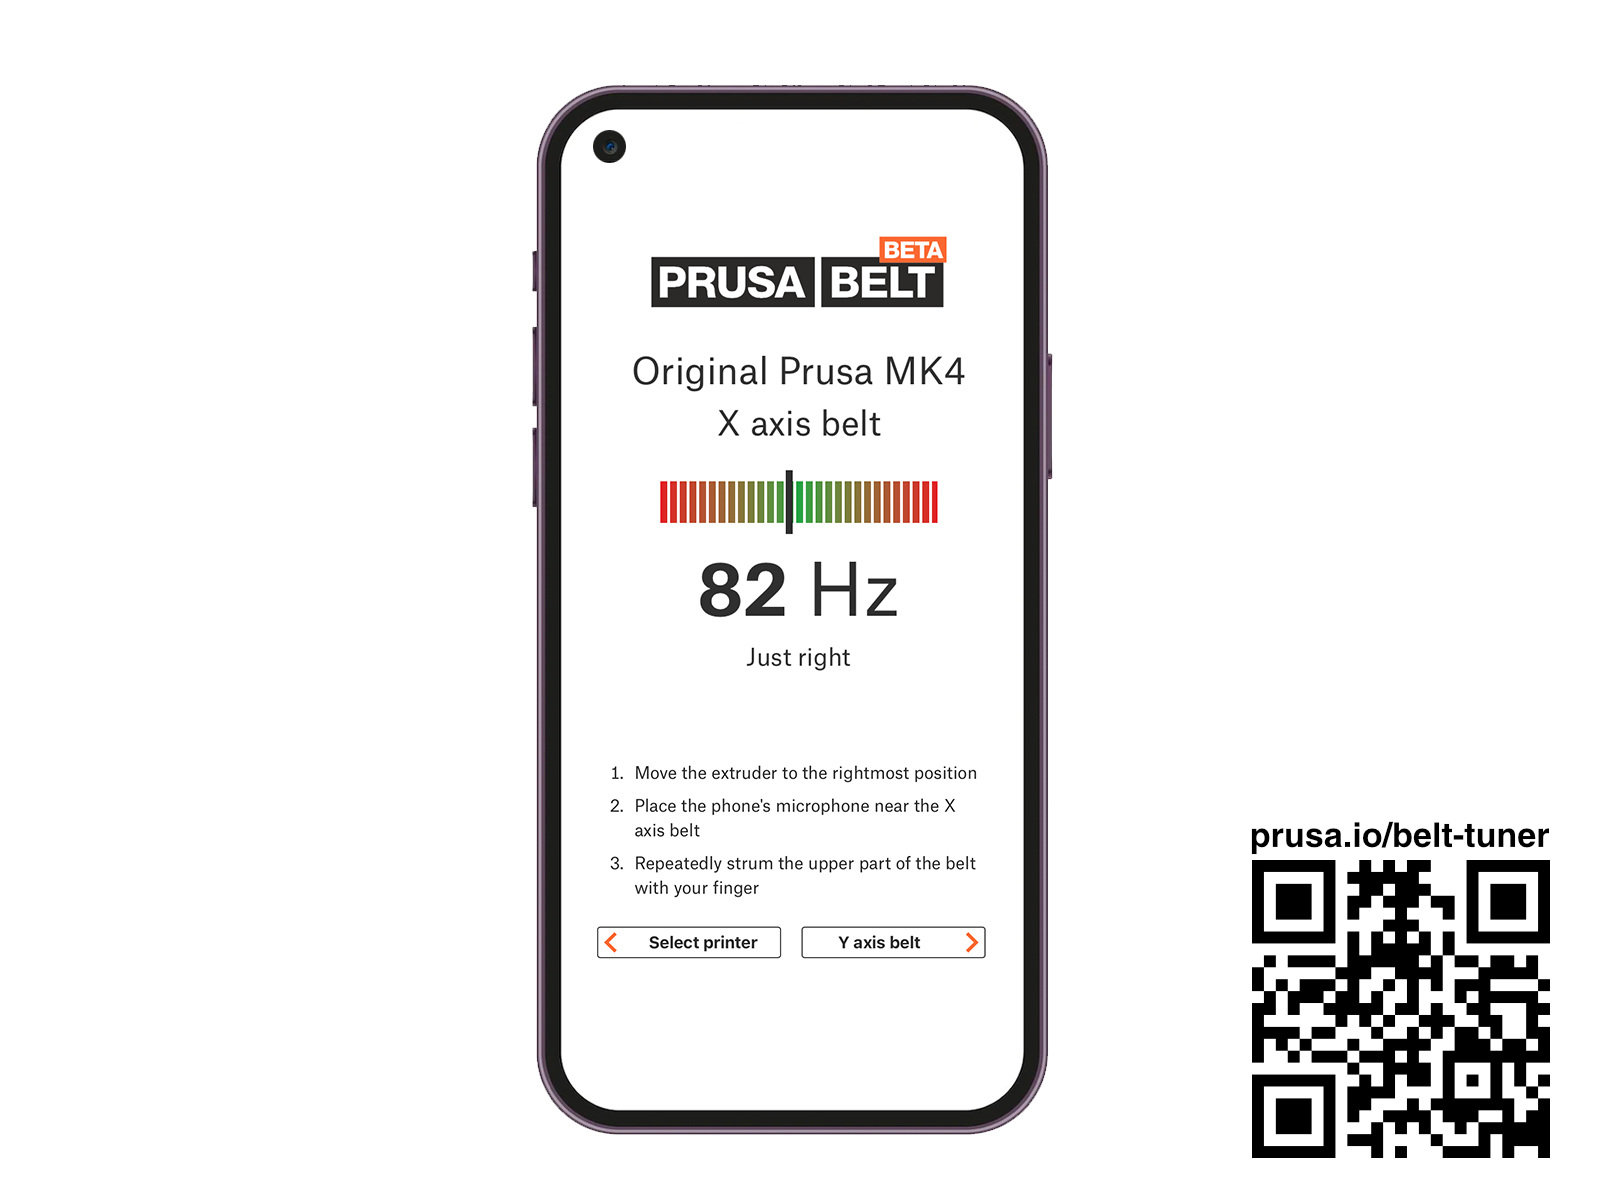
                  We have our own belt tuner app. The application determines the belt tension by measuring the frequency of the vibration generated by strumming it. 

                  Follow the instructions in the linked belt tuner app to adjust the belt tension. 
                  Belt tension test

                  If you move each axis to the far right or left, use a finger push the belt down in the center of the axis. Some force should be needed for bending the belt. Careful when pushing so you do not overstretch the belt, as you might damage the printer. Belts should be tight enough to sound like a low bass note when plucked. 

                  A great way to check whether your belt is at the correct tension is to prints this Tension Meter for the GT2 belts.

                  Adjusting the X-axis belt

                  Slight adjustments

                  Get out your 2.5 mm Allen key:

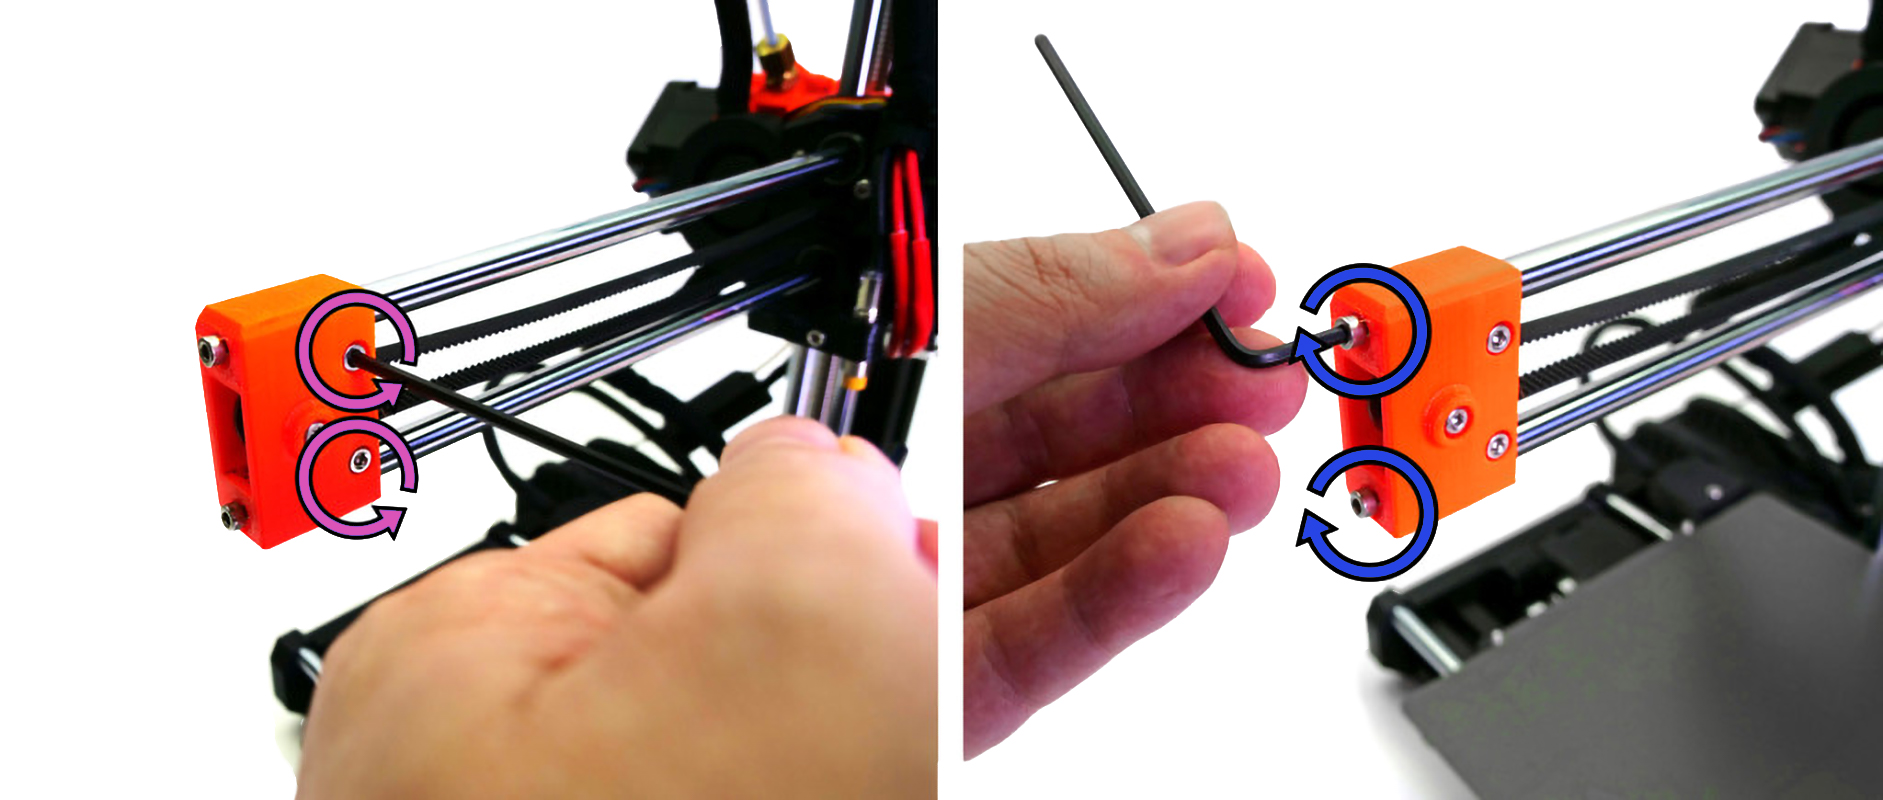
                  1. Loosen the two screws as depicted below by turning them counterclockwise (left picture).
                  2. Tighten the two screws at the very end of the X-axis by turning them clockwise (right picture). These push directly onto the ends of the smooth metal rods, moving the plastic part with the belt idler, tightening the belt.
                  Adjusting only one of the two end screws will create a skew in the XZ-axis. However, it can also correct a skew if already present.
                  1. Once the belt is tight, turn the two side screws clockwise to fix the plastic part holding the belt idler, in place.
                  Large adjustments

                  To access the X-axis belt holder you must remove the heat sink of the print head. This requires some disassembly.

                  1. Loosen the belt by following the method described above.
                  2. Follow the guide How to replace a heatsink (MINI/MINI+) to Step 10 to remove the heat sink.
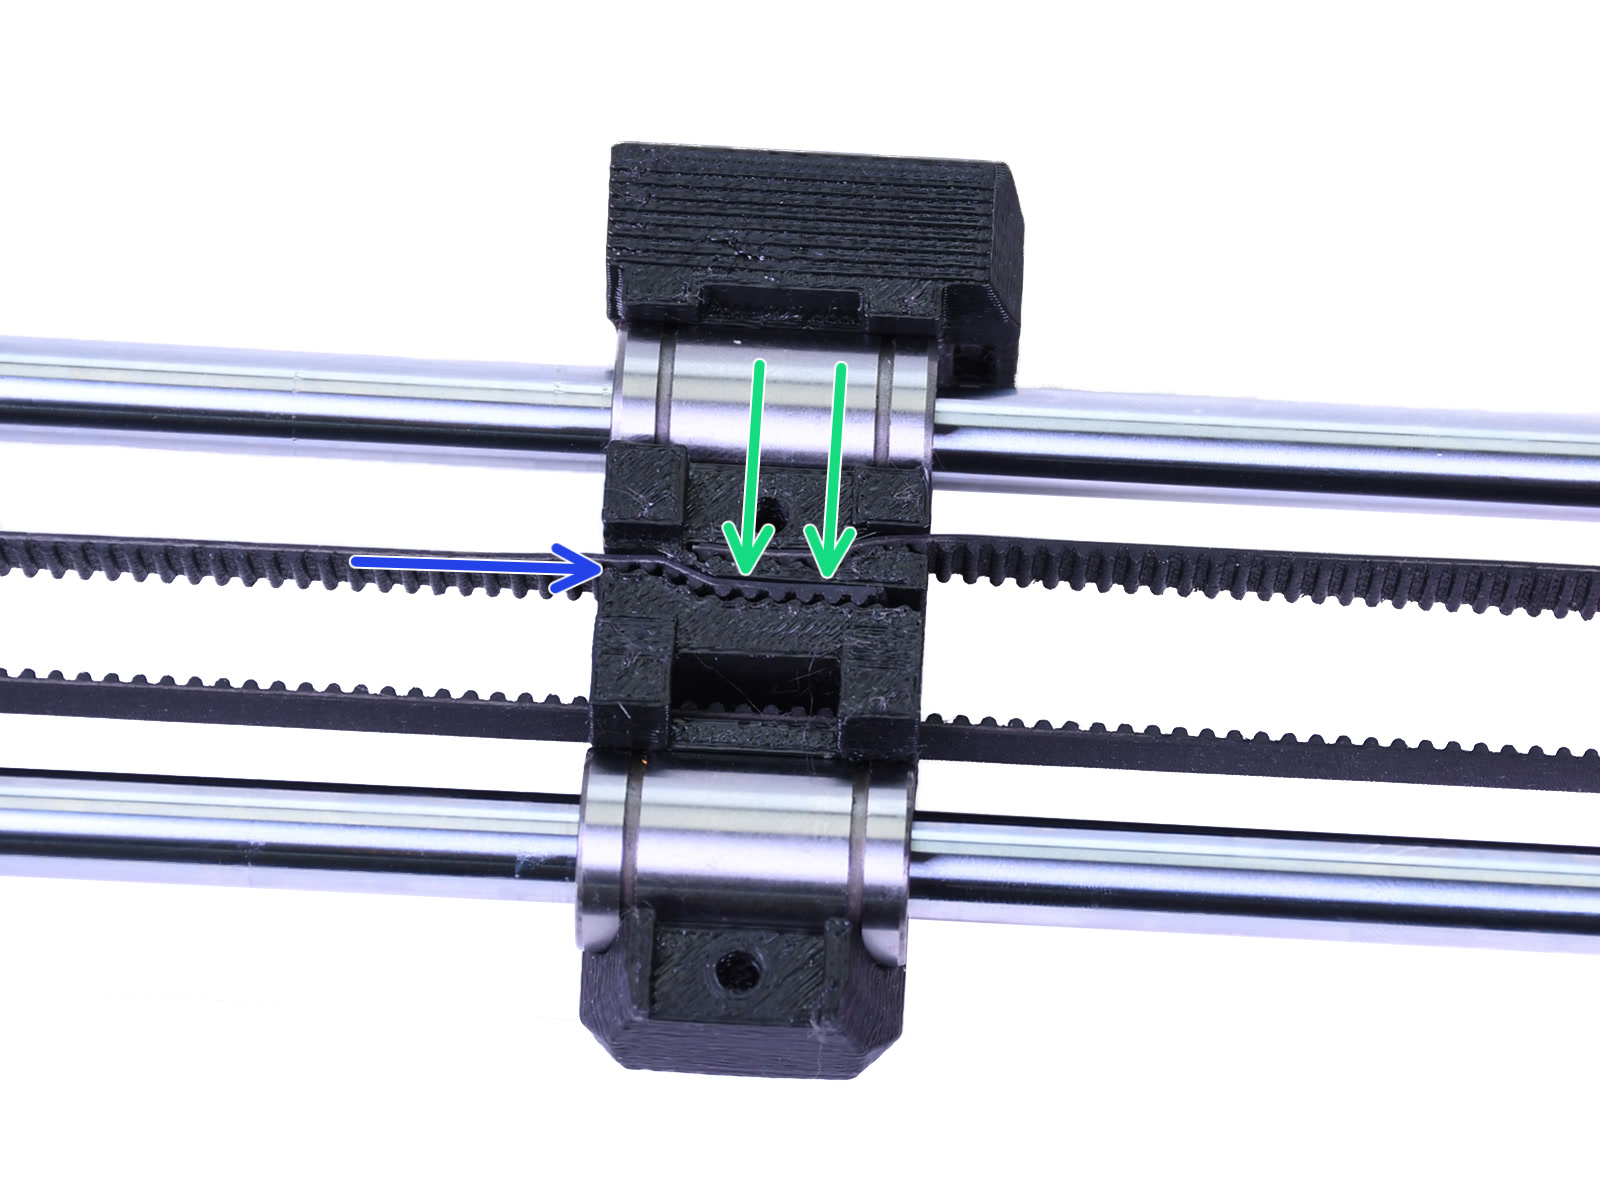
                  3. Remove the belt from the middle slot (green arrows), move it in 2 - 3 'teeth' (blue arrow), and push it back into the slot, using a 1.5 mm Allen key.
                  4. Follow the guide How to replace a heatsink (MINI/MINI+) backward from Step 10 to reassemble the print head.
                  5. Adjust the tension of the belt following the method above.
                  Adjusting the Y-belt

                  Slight adjustments

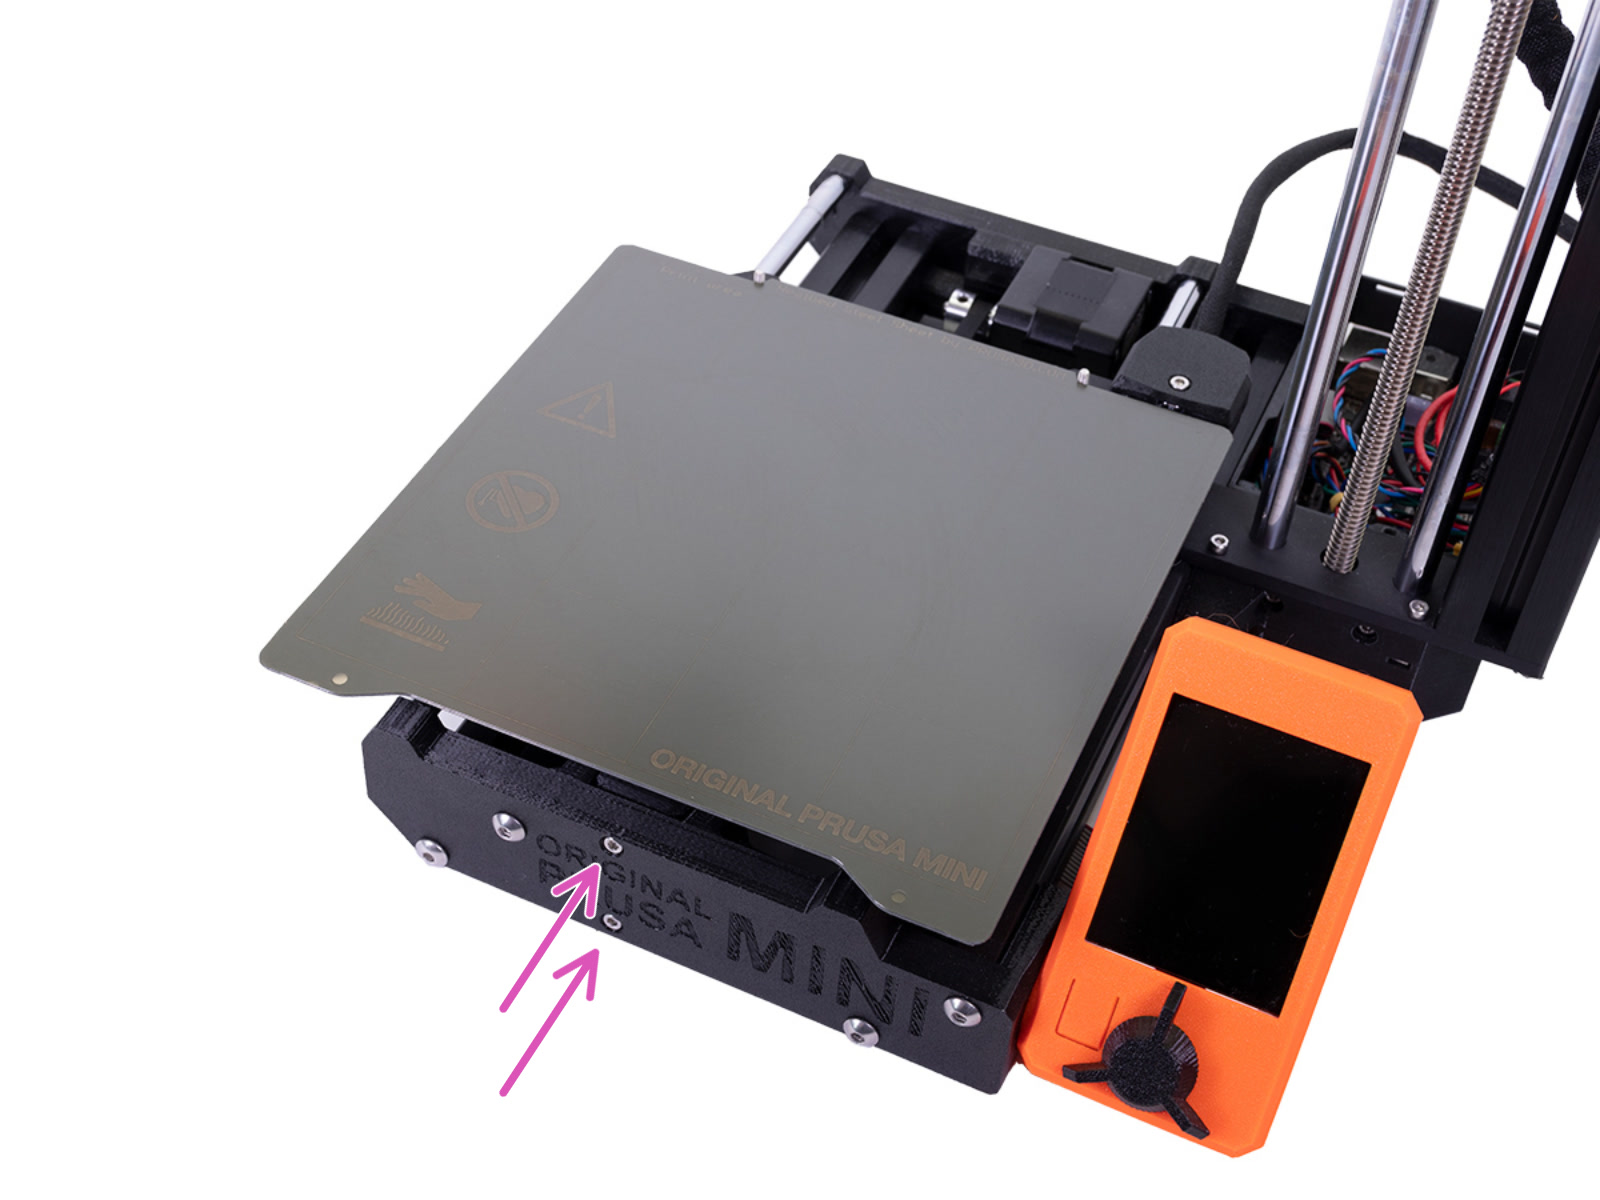
                  In the middle of the front plate of the heat bed assembly (purple arrows), you will find two screws that will adjust the tension of the Y-axis belt. Use the 2.5 mm Allen key and by turning them clockwise you will tighten the Y-axis belt.
                  Large adjustments

                  If the Y-axis belt is very loose you must move it in the Y-axis belt holder found beneath the bed carriage. 

                  1. Loosen the 2 screws in the picture above by turning them counterclockwise. Do not unscrew them completely.
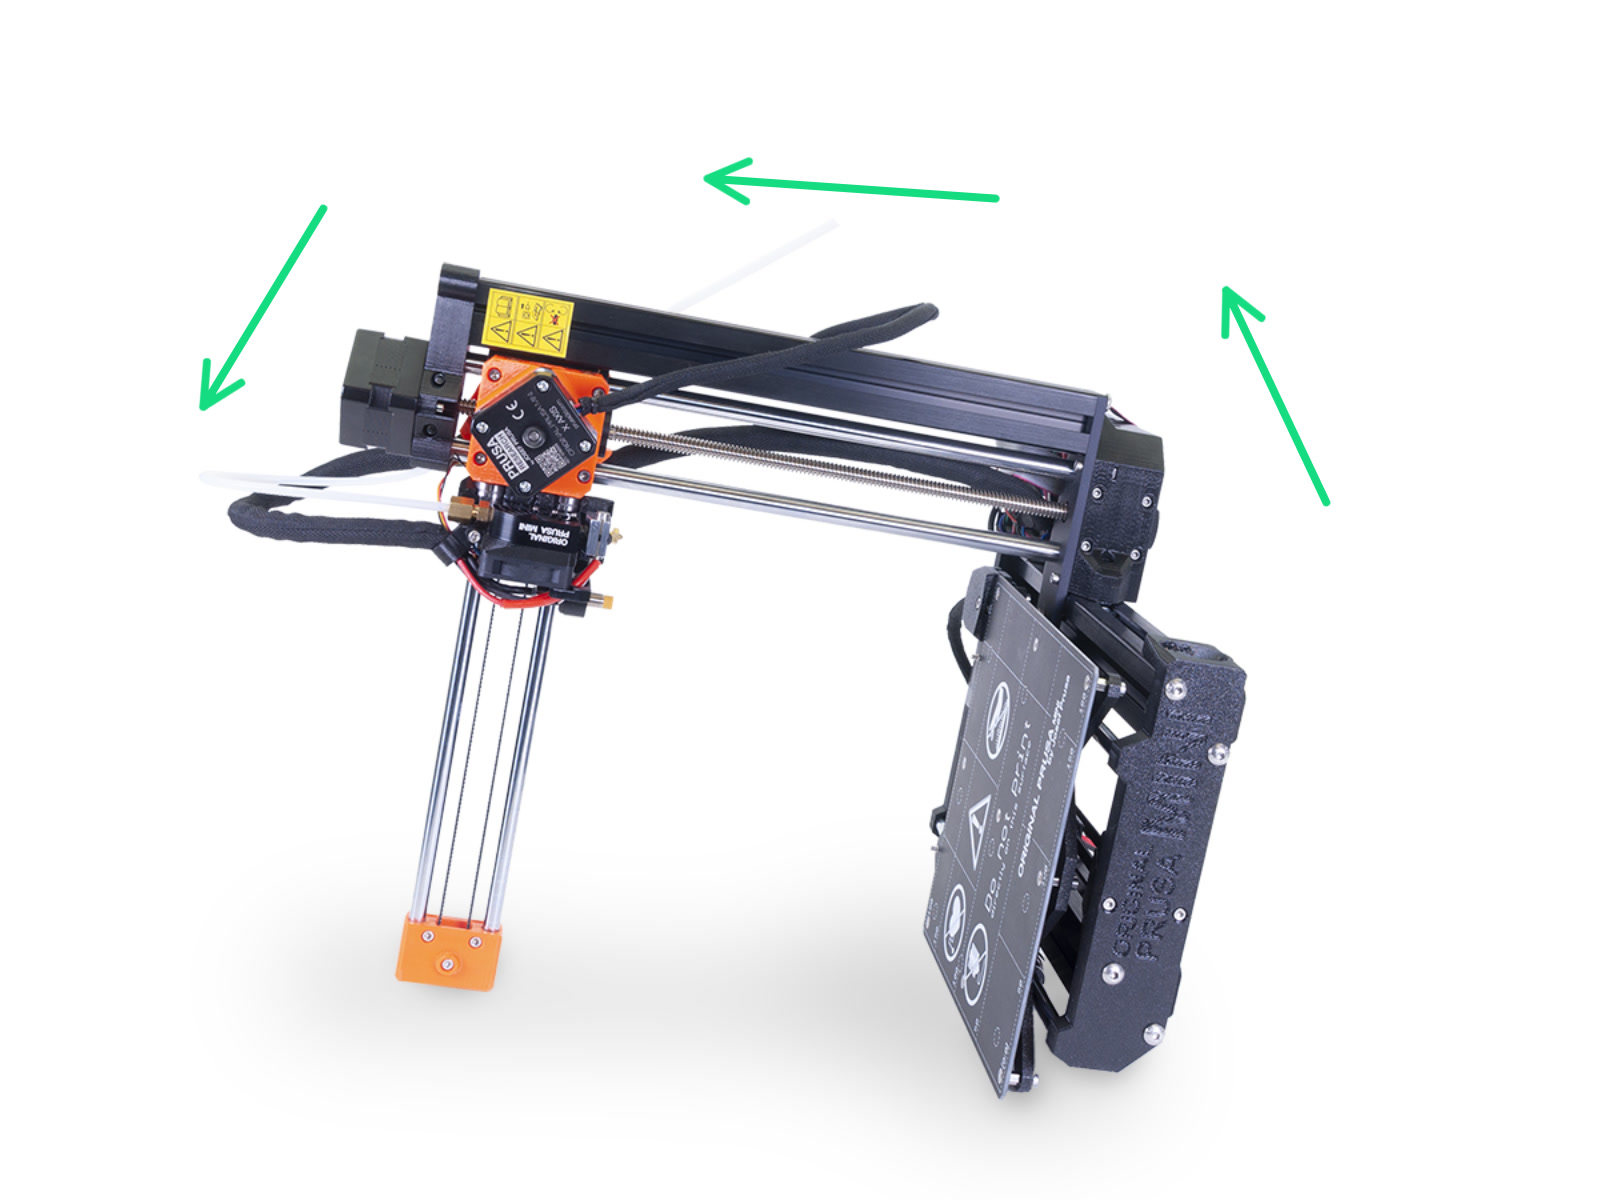
                  2. Turn the whole printer over to its side to access the bottom of the printer (left picture).
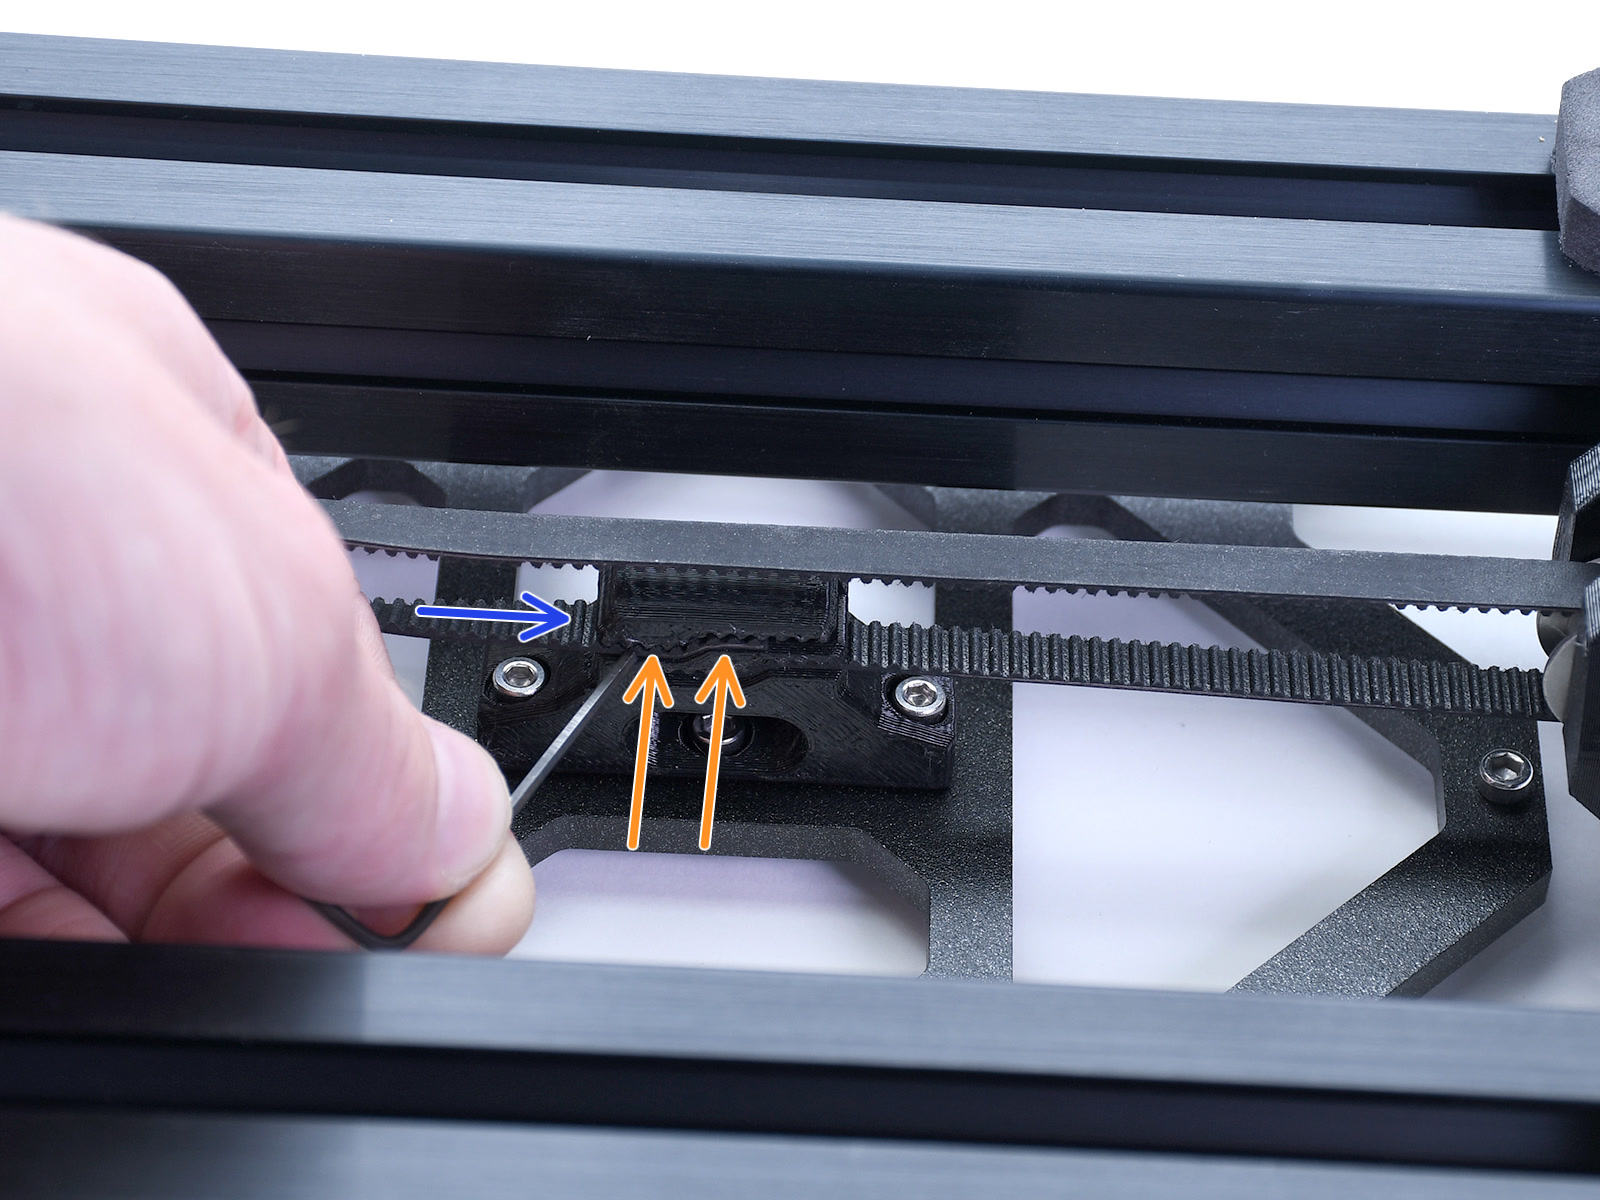
                  1. Slide one end of the belt out from the belt holder (right picture), move the belt in 2-3 'teeth'(blue arrow), and push it back into the slot using the 1.5 mm Allen key (orange arrows).
                  2. Turn the printer back right side up and fine adjust the belt tension with the two front screws (as described in the previous method).
                  Was this article helpful?
                  This action is available only to registered users. Please log-in.

                  Topics

                  • Using the printer
                    • Printer maintenance
                      • How to remove a stripped screw
                      • SD cards and USB drives
                      • How to replace a M.I.N.D.A. sensor (MINI)
                      • How to replace a print fan (MINI)
                      • How to replace a hotend PTFE tube (MINI/MINI+)
                      • How to replace a hotend fan (MINI)
                      • How to replace a heatsink (MINI/MINI+)
                      • How to replace a heaterblock/heatbreak (MINI/MINI+)
                      • How to replace a Buddy control board (MINI)
                      • Firmware updating (MINI/MINI+)
                      • Cold pull (MINI)
                      • How to access and clean the extruder-pulley (MINI/MINI+)
                      • Buddy electronics Wiring (MINI)
                      • How to update firmware (MINI/MINI+)
                      • Regular maintenance (MINI/MINI+)
                      • Changing/replacing the nozzle (MINI)
                      • How to replace a print head PTFE tube (MINI/MINI+)
                      • How to replace a heatbed thermistor (MINI/MINI+)
                      • How to replace a hotend thermistor (MINI/MINI+)
                      • Height adjustment of M.I.N.D.A./SuperPINDA sensor (MINI/+)
                      • How to replace a hotend heater (MINI/MINI+)
                      • How to replace a heatbed (MINI/MINI+)
                      • Adjusting belt tension (MINI/MINI+)
                      • How to replace an extruder motor (MINI/MINI+)
                      • How to replace SuperPINDA (MINI/MINI+)
                      • How to replace bearings on the X-axis (MINI/MINI+)
                      • How to replace bearings on the Y-axis (MINI/MINI+)
                      • Vibration/noise when printing (MINI/MINI+)
                      • How to replace a heatbed set (MINI/MINI+)
                      • How to post-process the printed parts
                      • How to trim PTFE tube - Original Prusa printers
                      • Replacing the PEI sheet on the (MK3S/MK3/MK2.5S/MK2.5)
                    • 3D models
                    • Material guide
                    • Slicing
                    • Prusa Connect & PrusaLink

                  9 comments

                  Log in  to post a comment
                  mrbunky13
                  •
                  Belt Tuner app with a smart phone produced very inconsistent results with each strum.
                  Switching to running the Belt Tuner on my PC and using a headset microphone produced much more consistent results. I use the Belt Tuner in conjunction with the Prusa Belt Tension meter, available on Printables: https://www.printables.com/model/46639-tension-meter-for-the-gt2-belts-of-i3-mk3s-or-prus

                  When they both agree, that seems to be as close to "right" as I get.
                  Reply
                  DDV
                  •
                  I followed the instructions on the Belt Tuner app and tightened the Y-belt of my Prusa Mini. It went allright for a while and then resulted in shifted Y-layers. Now I'm stuck with a broken Y-motor. The Belt Tuner app doesn't work anymore. It might be better to stay away from it and trust your gut feeling with a few test prints.
                  Reply
                  DKAS
                  •
                  I'm sorry to hear you're having these issues. Based on what you've described, it sounds like the problem might not be with the belt alone. If your Y-motor isn't turning even when the belt is loose or removed, please contact our customer support team. It seems like a motor issue, and our technicians will be able to help you.

                  However, if the motor turns freely by hand, then the issue is indeed with the belt tension. You don't have to use the Belt Tuner if you're not comfortable with it. You can try to fine-tune it by "feel" with the help of test prints to see if you're still getting layer shifts. There are also various printable tools available, like the "Tension Meter for the GT2 belts," which can help you set the tension. It's a slightly slower process, but it lets you dial it in exactly to your needs.
                  Reply
                  zim2dive
                  •
                  for dummies (me) can you verify that "loosening" will lower the frequency?
                  Reply
                  zim2dive
                  •
                  With me doing nothing (that I know of).. my Mini+ x-axis belt seemed to get overly tight, resulting in builds which shifted leftright. I watched this video: https://www.youtube.com/watch?v=Z5N9oDwrUu0&ab_channel=REVolutionXRC to see how to shift the belt by ~2 teeth. I was having no luck getting enough slack from just the tension screws shown above. HTH.
                  Reply
                  Felix91
                  •
                  Maybe to add here: make sure, the pulleys are tightly connected to the motor axis. Screw for Y-pulley is intuitive to reach. Screw for X-pulley not that intuitive but still easy. At the top side of the part where the X-axis motor is mounted there is a small hole (unfortunately ). Just insert the hex key and manually move the print head until the hex key slides into the screw.
                  This solved layer shifting at my printer whereas I originally thought the cause is wrong belt tension.
                  Reply