AA

おすすめ製品

    人気のカテゴリー

      急上昇ワード

        記事

          ブログ

            製品

              カテゴリー

                検索候補

                  検索中…
                  結果がありません
                  エラーが発生しました。
                  ↑↓ 選択↵ 開くEsc 検索を閉じる
                  • English
                  • Čeština
                  • Deutsch
                  • Español
                  • Français
                  • Italiano
                  • Polski
                  • 日本語
                  • 注文
                  • 住所
                  • 在庫ありのアラート
                  • 講座
                  • サブスクリプション
                  • アカウント編集
                  • 3Dプリンター9+▾

                    3Dプリンターnew

                    newPrusa CORE One Lさらに詳しく
                    newPrusa CORE One+さらに詳しく
                    newPrusa CORE One L+ INDX 8-ToolnewPrusa CORE One+ (Gen 2) INDX 8-ToolPrusa CORE One L: Critical InfrastructureOriginal Prusa MK4SnewOriginal Prusa XLOriginal Prusa XL:クリティカルインフラストラクチャー

                    プリンターのアップグレード

                    newCORE One/+ INDX Conversion KitnewMK3S/+ から MK4SnewXL - シリコンプリンティングツールヘッドnewMMU3 (Multi Material Upgrade)
                    Prusa 報酬プログラムシェアして、紹介して、特典をゲット。
                    3Dプリンターを選び方スペース・予算・用途に合わせて最適なマシンを選ぶための基本をご紹介します。
                    無料の電子書籍無料の電子ブック Basics of 3D Printing with Josef Prusa をダウンロードして、3Dプリンティングの世界への第一歩を踏み出しましょう。
                    Original Prusa のプリント可能なパーツOriginal Prusa 3Dプリンターとアップグレード用のプリント可能なスペアパーツコレクション。
                    配送情報プリンターの現在の生産量と納期に関する情報を定期的に更新しています。
                    カスタム3Dプリント様々な素材を使用したプロフェッショナルなカスタム3Dプリントサービス。
                  • マテリアル▾

                    フィラメント

                    PrusamentPLAPETGASA / ABSPCブレンドPA (Nylon)FlexComposites特別Materials clearance sale

                    レジン

                    Prusament Resin Tough柔軟性
                    フィラメントガイドプルサメントスプールをチェック
                    Prusament.com
                  • 部品 & アクセサリー▾

                    アクセサリー

                    エンクロージャーノズルスチールシート必須アクセサリーカメラ&アドオンツール&クラフト接着剤

                    補修部品

                    商品

                    スペアパーツ - すべてのプリンターCORE OneMK4/S & MK3.9/SMK3/MK3S/MK3S+XL
                    Merch
                  • 法人向け▾
                    Prusa Pro HT90Prusa Pro SLXPrusa Pro AFSPrusa Pro Medical OneOriginal Prusa XLOriginal Prusa XL:クリティカルインフラストラクチャー
                    Prusa CORE One+さらに詳しく
                    Prusa CORE One Lさらに詳しく
                    Prusa CORE One L: Critical Infrastructure Edition クリティカルインフラ版(高セキュリティ対応モデル)

                    3Dプリンティングの用途

                    製造と研究開発自動車産業ヘルスケア教育と学術研究建築家とデザイナー映画産業重要インフラ

                    3Dプリンティングのストーリー

                    No items yet.

                    プルサ正規販売代理店
                    サステナビリティ
                    Prusa Education
                    お問い合わせ・ご連絡
                    カスタム3Dプリント
                    ISO認証取得
                  • ソフトウェア▾
                    PrusaSlicer

                    PrusaSlicerPrusaSlicer

                    PrusaSlicer は、オープンソースで機能が豊富、頻繁に更新されるツールで、3Dプリンタ用の完璧なプリントファイルをエクスポートするために必要なものがすべて含まれています。ニュースやリリースログは Github で確認できます。

                    WindowsMacOSLinux
                    Prusa Connect

                    Prusa Connect

                    Prusa Connectは、3Dプリンターの遠隔操作と監視を可能にするクラウドサービスで、安全なデータの取り扱い、簡単なセットアップ、どこからでも複数のプリンターを管理できるサポートを提供します。

                    ログインして接続する
                    Prusa.app

                    Prusa.app

                    Prusa Connect技術を活用し、どこからでもリモートでプリンターを操作可能!Prusa.appは、AndroidおよびiOSデバイス向けに新たなPrusaプリンター体験を提供します。

                    今すぐお試しください!
                    ドライバー&ファームウェア3Dプリンタの最新のファームウェアとドライバをダウンロードしてください。
                    PrusaSlicer サポート
                    Prusa Connect サポート
                  • 3Dモデル▾
                    3Dプリンターアート&デザインホビー&メーカー日用雑貨テーブルトップミニチュアおもちゃ&ゲームPrintablesストア

                    人気の3Dモデル

                    • Strong garden hose holder
                    • Prusa Spool Bot
                    • Build Tray — Modular Organizer for Assembly, Disassembly and Maintenance
                    • Broom Holder
                    • Octagon Fabric
                    • Prusa CORE One ? (Mimic Skin)

                    デザインコンテスト

                    • Framework Laptop 12 Mainboard Wiederverwendung2026/9/1 – 2026/9/30
                    • 🏆 Designer Herausforderung: Zaubertricks!2026/9/1 – 2026/9/22
                    • Make-up Aufbewahrungslösungen2026/9/4 – 2026/9/20
                  • コミュニティ▾

                    イベント情報

                    • IFA 20262026/9/4 – 2026/9/8 · Berlin, Germany · Prusa Team
                    • Maker Faire Bay Area2026/9/25 – 2026/9/27 · Kalifornie, United States · Prusa Team
                    • 3D Printopia 20262026/9/26 – 2026/9/27 · Pennsylvania, United States · Prusa Team
                    • Hobby Messe2026/10/2 – 2026/10/4 · Sachsen, Germany · Prusa Team

                    プルサフォーラム

                    • multicolor import issues
                    • Gen 2 Upgrade Curiosity
                    • !!Caution!! "Complete Indivodual Objects" doesn't seem to account for tool docking
                    プルサワールドマッププルサワールドマップ地元の3Dプリントユーザーを見つけて、あなたの周りのコミュニティを探索してみてください。
                  • ヘルプ▾
                    ガイド & チュートリアルPrusaSlicerPrusa Connectマテリアル

                    プリンターモデル

                    CORE One INDXCORE One LCORE One+CORE One

                    ハードウェアのトラブルシューティング

                    • Selftest failed (CORE One/+)
                    • ホットエンドの詰まり (MK4)
                    • ベルトテンションの調整(CORE One L/CORE One)
                    • Prusa ConnectとPrusaLink について

                    ドライバー&ファームウェア

                    INDX familyCORE One familyMK4 familyXL familyMMU familyPRO family
                  • コース一覧▾

                    3Dプリンティングのエキスパートになろう

                    Prusa アカデミーでは、3Dプリンティングに関する様々なトピックのオンラインコースを提供しています。各コースの特徴:

                    • 多くの写真と短いビデオを含む読みやすいテキスト
                    • インスピレーションやさらなる学習のためのリンク
                    • 知識を試すためのテスト
                    • 修了証明書
                    Browse all coursesMy courses library
                    • 3D Modeling in Autodesk Fusion
                    • PrusaSlicerマスタークラス – 初心者から上級者まで
                    • Complete Guide to 3D Print Postprocessing, Painting, and Detailing
                    • Airbrush Your 3D Prints: From Basics to Advanced Tricks
                  • ブログ▾
                    • より高品質なプリントを、もっと簡単に:Prusa XL+、CORE One L+、CORE One+(Gen 2)― 大規模製品アップグレード
                    • Prusament PA11 Natural:極めて優れた機械的・耐薬品性を備えた素材 ギアや可動部品の造形に最適
                    • INDXの状況 ― 2026年7月アップデート:Founder’s Editionの出荷開始と今後の展開
                    電子書籍: 3Dプリンティングの基礎
                  • 会社概要▾

                    Prusa Research について

                    私たちは、ヨーロッパおよびアメリカ最大の3Dプリンターメーカーです。

                    Prusa Research は、チェコ出身のホビイスト/メイカー/発明家である Josef Prusa によって 2012 年に 1 人で立ち上げられました。そこからわずか 15 年で、従業員 1,200 名を超える企業へと成長しました。毎月、チェコ共和国プラハの本社および米国デラウェア州から、160 カ国以上のユーザーに向けて 10,000 台以上の革新的で安全な 3D プリンターを設計・製造・出荷しています。

                    動画をご覧になり、Prusa Research がどのように誕生し、わずか 10 年で何を達成したかをご確認ください!

                    Prusa Research についてタイムラインサステナビリティオープンソース
                    Prusa Research について
                    お問い合わせ
                    ロゴ・写真素材
                    ISO認証取得
                  1. サポート
                  2. プリンターメンテナンス
                  3. SL1/SL1S maintenance
                   

                  内容

                  • Regular Printer Maintenance
                  • Keeping the printer clean
                  • FEP film / Tank maintenance
                  • Printing platform maintenance
                  • Exposure screen maintenance
                  • Acrylic lid
                  • UV light and potential health risks
                  • Fan cleaning / Removing dust
                  • Carbon filter replacement
                  • Tower maintenance
                  • Tilt maintenance

                  ブログ

                  • より高品質なプリントを、もっと簡単に:Prusa XL+、CORE One L+、CORE One+(Gen 2)― 大規模製品アップグレード
                  • Prusament PA11 Natural:極めて優れた機械的・耐薬品性を備えた素材 ギアや可動部品の造形に最適
                  • INDXの状況 ― 2026年7月アップデート:Founder’s Editionの出荷開始と今後の展開

                  ニュースレター

                  ご登録いただくと、毎月 新しいファームウェア、PrusaSlicerの新バージョン、3Dプリントプロジェクトの一般的なヒントなど、役立つ情報をお届けします。

                  クリックして、ニュースレターを受け取る。

                  このサイトはreCAPTCHA Enterpriseによって保護されており、Googleのプライバシーポリシーと利用規約が適用されます。

                  Strong garden hose holder
                  E-shop
                  • 3Dプリンター
                  • プリンターのアップグレード
                  • フィラメント
                  • アクセサリー
                  • Prusa 商品

                  © Prusa Research a.s.

                  Printables
                  • 3Dモデル
                  • Store
                  • Clubs
                  • 3Dデザインコンテスト
                  • Brands
                  コミュニティ
                  • ワールドマップ
                  • フォーラム
                  • ユーザーグループ
                  • イベント
                  ヘルプ
                  • Prusa ヘルプ
                  • Prusa アカデミー
                  • 3Dプリンティング計算機
                  ソフトウェア
                  • PrusaSlicer
                  • Prusa.app
                  • Prusa Connect
                  • ドライバーとソフトウェア
                  会社概要
                  • 私たちについて
                  • Blog
                  • プルサ正規販売代理店
                  • お問い合わせ
                  • ISO 9001・ISO 14001・ISO 45001 認証取得済み
                  • 一般利用規約
                  • PRUSAウェブサイト利用のための一般利用規約
                  • プライバシーポリシー
                  • クッキーに関する情報
                  • お客様の苦情対応に関する方針
                  • Webサイトのステータスページ
                  • Cookie 設定
                  • 一般利用規約
                  • PRUSAウェブサイト利用のための一般利用規約
                  • プライバシーポリシー
                  • クッキーに関する情報
                  • お客様の苦情対応に関する方針
                  • Webサイトのステータスページ
                  • Cookie 設定

                  © Prusa Research a.s.

                  JOSEF PRUSA®、PRUSA RESEARCH®、PRUSA POLYMERS®、PRUSA ORANGE®、PRUSA 3D ® および PRUSAMENT® は、Prusa Development a.s. の登録商標であり、Prusa Research a.s. が Prusa Development a.s. からのライセンスに基づき使用しています。

                  SL1/SL1S maintenance

                  関連するもの

                  SL1
                  SL1S SPEED
                  記事 他の言語でもご覧になれます。
                  English
                  Čeština
                  Polski
                  Deutsch
                  Français
                  Español
                  Italiano
                  日本語

                  Regular Printer Maintenance

                  Although the Original Prusa SL1/SL1S has a number of smart sensors and has been carefully designed to be easy to use, it’s still a machine and requires regular maintenance and care. There are several key areas that require attention if you want to keep your printer in good shape for a long time.

                  Keeping the printer clean

                  The key to a trouble-free experience is first and foremost keeping the printer clean. Resins are liquids and they are easily spilled. Every time you use the printer, make sure you are not leaving drops or stains of liquid anywhere. A liquid resin will solidify even in regular daylight, making it much more difficult to remove compared to its liquid form.

                  When removing the printing platform / printed objects, use the black plastic tray to shield the printer from drops of resin. Always keep a bundle of soft paper towels near the printer, so you can wipe any spilled resin/resin drops immediately. To clean drops of resin more effectively, use a piece of cloth/paper towel dipped in isopropyl alcohol. Do not use alcohol or acetone on the FEP film! For more delicate surfaces (such as the display), use a mix of water and dishwashing product.

                  A good practice is to place a plastic tablecloth under the printer for easier cleaning. However, be careful - the tablecloth must not block the fan on the underside of the printer.

                  Do not wash the lid with any alcohol, acetone or chlorine! Also, do not use rough materials to clean the lid (e.g. sanding paper, rough sponges).

                  The lid is made of acrylic glass and it has a special surface finish to block UV light from reaching the printing chamber. You can clean it with standard products for cleaning glass, as long as it does not contain any alcohol, acetone or chlorine. It would damage the acrylic glass.

                  FEP film / Tank maintenance

                  Empty the resin tank after each print. The tank has one corner which has a different shape than the other three. Use it in combination with a funnel to pour the resin out of the tank into a bottle. Don’t mix used resin with unused liquid. Instead, use a new bottle.

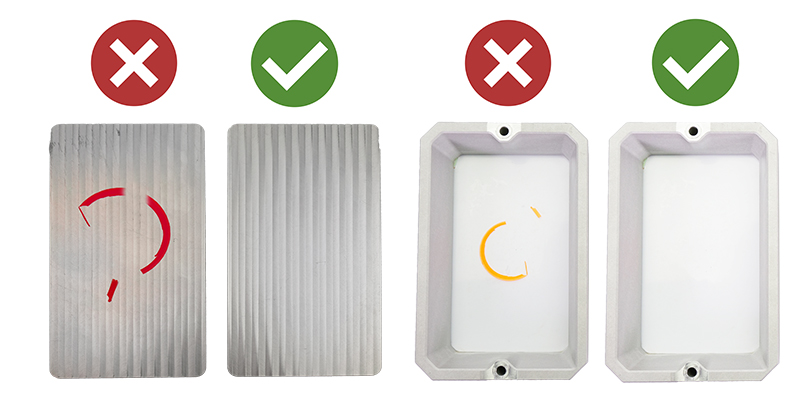
                  Inspect the resin tank bottom before and after each print. Look for any scratches, dents, or holes. If the FEP film is damaged, replace it immediately, otherwise, you’re risking a resin spillage.

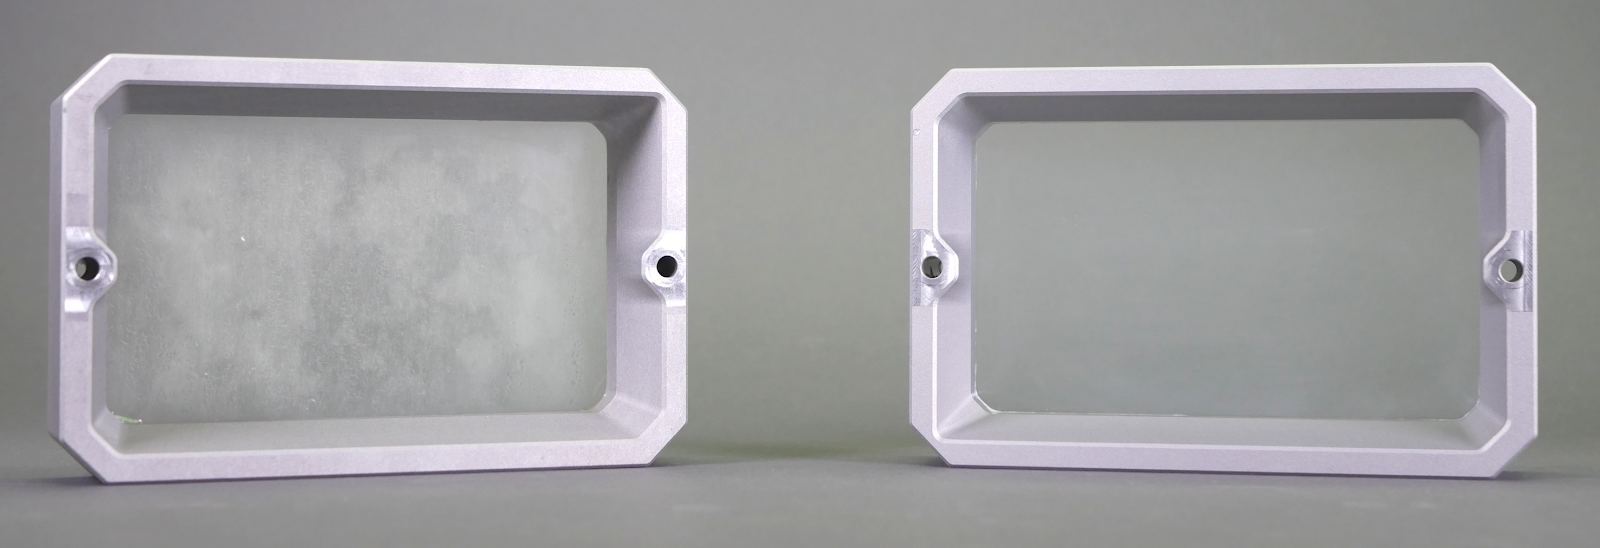
                  If the FEP film has a grey-ish tint, you can restore it to its original look by washing it with warm water with a bit of dishwashing soap (or even regular soap) before you start printing again. Don’t print with a dirty or damaged FEP film, as it will negatively impact the print quality. It may even lead to damage to your printer. NEVER use isopropyl alcohol to clean the FEP film!

                  Cleaning the FEP film - before and after.
                  Printing platform maintenance

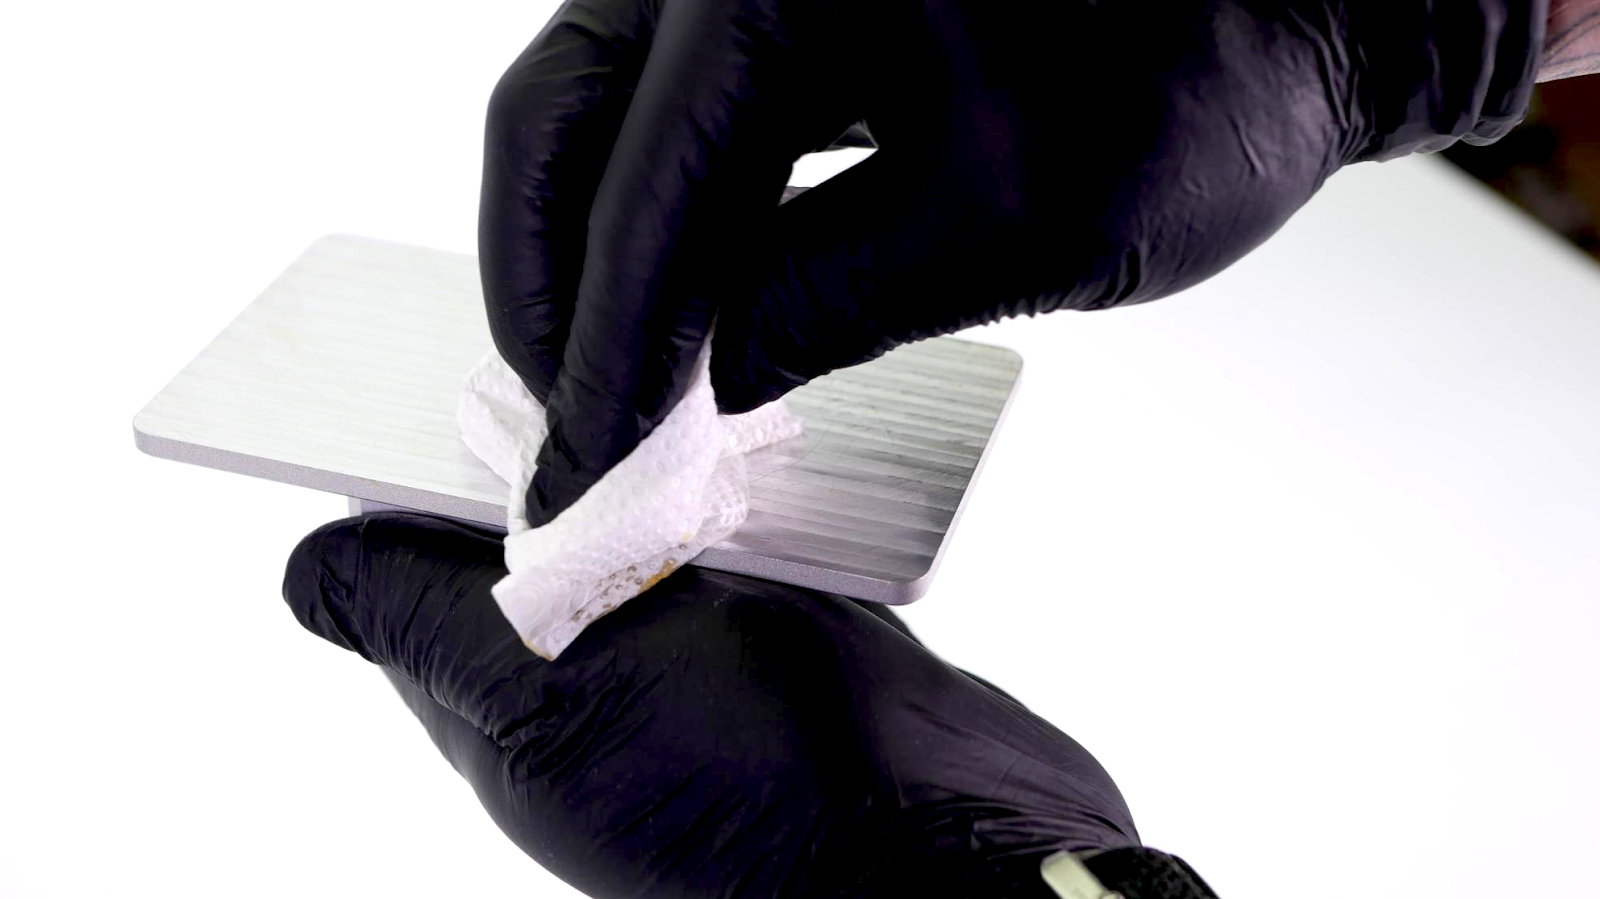
                  The platform should be cleaned thoroughly after every print - usually, there will be some leftover resin on the platform. Once a print finishes, place the black tray on the printer and use paper towels or a spatula to wipe the top of the platform clean, then proceed to remove the platform and the printed object.

                  Once the object is removed, use isopropyl alcohol and paper towels to clean the printing platform thoroughly. Leaving liquid resin on the platform for extended periods of time can lead to solidifying the material.

                  After removing an object, use a metal spatula to scrape any remnants of the previous print and use paper towels to wipe the underside of the printing platform clean - make sure that the printing platform is nice and shiny before you start the next print. Any leftovers on the printing platform (leftover supports, pads) could potentially damage the bottom of the resin tank or even the display. Surface scratches on the print platform won’t affect the quality of the print.

                  After you clean the printing platform with isopropyl alcohol, dry it thoroughly!

                  Exposure screen maintenance

                  Use a damp cloth or LCD cleaning spray to keep the glass / LCD display clean. Don’t use any rough materials (sanding paper) or low-quality paper towels, otherwise, you might scratch the surface. Make sure that the print display is clean before you start a print and that there are no smudges, stains, scratches, or cracks.

                  Do not use sharp objects, such as metal spatulas, knives, flat screwdrivers, and similar tools to remove dirt or resin from the protective glass. Instead, use IPA or dishwashing products in combination with soft paper towels to avoid scratching the display.

                  Acrylic lid

                  The lid has three major functions: it protects the printed model from potential damage, helps to contain resin fumes inside the box and blocks a significant amount of UV light so it doesn’t reach the printing chamber. Especially the last part is important - if you leave the resin in the tank and keep the lid open, it can start to solidify quickly depending on the environment.

                  The lid won’t stop 100% of UV light - do not place the 3D printer next to a window, otherwise, the sunlight might cure the resin in the tank.

                  This also means that you shouldn’t disable the cover check. It may be tempting to watch the print process, but for the sake of better results and safer operation, keep the lid closed during the print. You can, of course, open it for a quick check and then close it again.

                  Don’t run the printer with the lower case panels removed or with any parts missing. The case helps to contain the UV light.

                  Do not wash the lid with any alcohol, acetone or chlorine! Also, do not use rough materials to clean the lid (e.g. sanding paper, rough sponges).

                  UV light and potential health risks

                  Eyes are very sensitive to UV light and UV radiation because the cornea absorbs high amounts of UV light. Extended exposure to strong UV light may lead to corneal damage, macular degeneration, or cataracts - these conditions can ultimately lead to blindness.

                  This is why the Original Prusa SL1/SL1S is designed to contain the UV light inside, which means that when used according to the instructions in the manual, there are no health risks related to UV radiation during regular use.
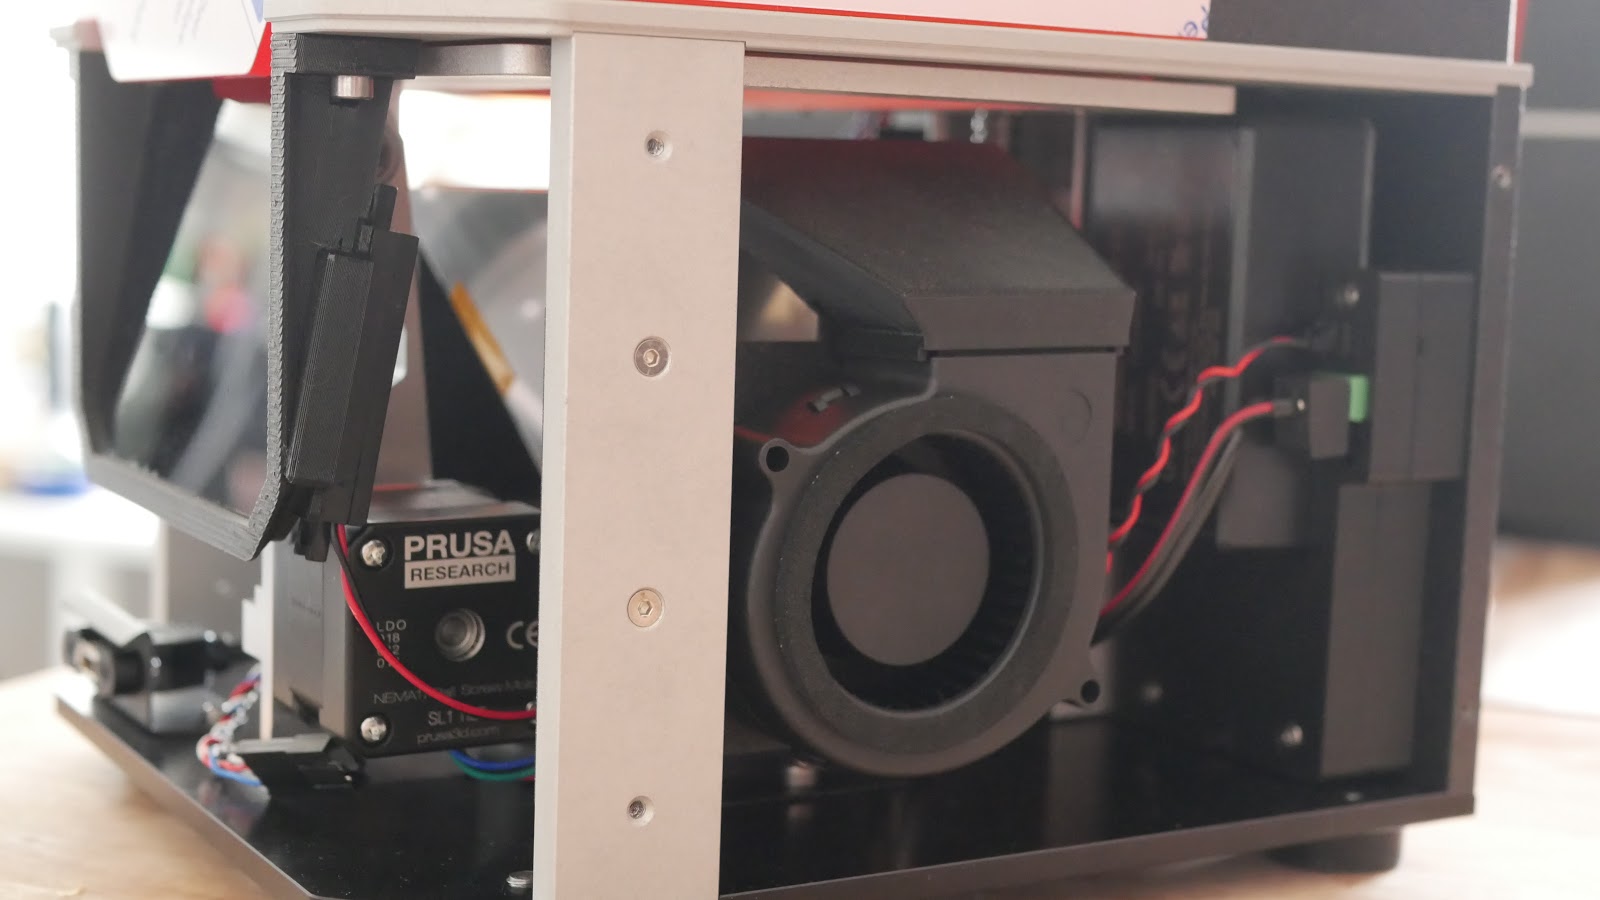
                  DO NOT LOOK DIRECTLY INTO THE UV LIGHT AND DO NOT PRINT WITH THE BODY COVER REMOVED! If you want to check the UV led panel, look at it through your phone camera app or take a photo, so you won’t look directly into the UV light.

                  Fan cleaning / Removing dust

                  It’s a good practice to clean the fans from time to time, especially if you have pets at home - the recommended time period will vary depending on the environment, in which the SL1/SL1S is used. In general, it’s good to inspect the printer every 6-8 weeks. There are three fans placed inside the printer. You can get to the side fan and bottom fan by removing the main body cover.

                  First, turn off the printer and disconnect it from the power source. Locate eight screws on the sides of the printer (four on each side) and remove them with an Allen key. Then carefully slide the body cover out. Be careful not to damage any cables which are attached to the power button. This will give you better access to two fans. Use a can of compressed air to clean the fans carefully.

                  The third fan is located on the backside of the printer. Locate two screws holding a small door closed and remove them. Open the door and use a can of compressed air to clean the fan.

                  Never blow compressed air on running fans!

                  Dust can also accumulate on the underside of the display and on the reflector. You can clean these parts carefully with compressed air. First, unscrew the eight screws holding the display in place, then slowly and carefully remove the display - be careful not to damage the display’s wires. Then, use compressed air from a distance of about 30 cm to clean out the dust particles gently. Do not use sharp or rough objects!

                  Carbon filter replacement

                  Check the carbon filter from time to time to ensure it is in good shape. The carbon filter is located on the backside of the printer under a small door. Use an Allen key to remove two screws holding the door shut. Open the door and remove the filter. Check if it is in good shape, and consider replacing it if it isn’t.

                  Tower maintenance

                  The tower (Z-axis consisting of the trapezoidal rod and the cantilever) requires little to no regular maintenance. In case the printer starts making unwanted noises when lifting or raising the platform, consider applying a lubricant on the trapezoidal rod - any good super lube will do the trick.

                  Tilt maintenance

                  The key to a long-lasting and smoothly running tilt bed is simple: keep it as clean as possible. Use the included plastic tray every time you manipulate the resin or the printing platform with the finished print. The tray will stop the resin from spilling over the tilt bed.
                  この記事は役に立ちましたか?
                  この操作は登録ユーザーのみが利用できます。ログインしてください。
                  ログイン してコメントを投稿する
                  コメントなし

                  トピックス

                  • このプリンターを使用
                    • プリンターメンテナンス
                      • 頭が潰れてしまったネジの外し方
                      • Firmware updating (SL1/SL1S)
                      • How to replace a blower fan (SL1)
                      • How to replace an optical sensor (SL1)
                      • How to replace the print display (SL1)
                      • How to replace the power button (SL1/SL1S)
                      • How to replace the A64 board (SL1)
                      • How to replace the USB connector (SL1/SL1S)
                      • How to replace the FEP film (SL1S)
                      • How to replace the print display (SL1S)
                      • How to replace a blower fan (SL1S)
                      • How to replace a UV LED fan (SL1S)
                      • プリントパーツの後処理方法
                      • How to replace UV LED assembly (SL1S)
                      • How to replace a UV LED assembly (SL1)
                      • How to replace a filter (SL1/SL1S)
                      • SL1/SL1S print removing
                      • FEP film replacement (SL1)
                      • SL1/SL1S maintenance
                    • 3Dモデル
                    • 材料ガイド
                    • スライス処理
                    • Prusa Connect [進行中の翻訳]