Prusa
  • SHOP
    • Latest products
    BY CATEGORY
    • 3D printersnew
    • 3D printer upgradesnew
    • Materials
    • Accessories
    • Spare parts
    • Courses
    • Merch
    • Get a price quote
    QUICK LINKS
    • Shipping & delivery
    • Returns & refunds
    • Payment & financing
    • Warranty
    • VAT & Customs fees
    • FAQ

    0 item in your cartitems in your cart

    Your cart is empty

    Go to cartShop 3D printers

    My profile

    Log in to see orders, saved items

    My profile

    Signed in as

    • Orders
    • Logout
  • 3D PRINTING
    • Explore 3D printing
    FOR BEGINNERS
    • 3D printing 101
    • How FDM printing works
    • Buying your first printer
    • 3D model catalog
    BY APPLICATION
    • Rapid prototyping
    • Manufacturing
    • Engineering
    • Research
    • Arts & design
    GO DEEPER
    • Materials guide
    • Courses
    • Webinars
    • Case studies
    • Custom 3D printing
  • 3D PRINTERS
    • All 3D printers
    FOR
    • Home or garageHobbyists, tinkerers and home printing
    • BusinessIn-house production for small teams
    • EnterpriseFleets, security and scale
    • Which Prusa is right for me
    SHOP & BROWSE
    • CORE One+new
    • CORE One+ INDXnew
    • CORE One L+new
    • CORE One L+ INDXnew
    • XL+new
    • MK4S
    • Prusa Pro HT90
    • Prusa Pro AFS
    • Prusa Pro SLX
    MORE FROM PRINTERS
    • Parts & upgradesnew
    • Critical infrastructure
    • Case studies
    • Signature Oak
    • Kits
  • MATERIALS
    • All materials
    BY USE
    • Every-day & design
    • Functional engineering
    • Composites
    • Pro speciality
    • SLA resins
    PRUSAMENT
    • PLA
    • PETG
    • ASA
    • PC
    • PA11
    • Flex
    • TPU
    MORE FROM MATERIALS
    • Materials guide
    • We make material in house
    • Sustainability
    • Order on the store
  • SOFTWARE
    • All software
    PREPARE THE PRINT
    • PrusaSlicer 3.0New
    PRINT & MONITOR
    • Prusa Connect
    • EasyPrint
    • iOS & Android app
    • Prusa Farm
    GET STARTED
    • Download & install
    • Knowledge base
    MORE FROM SOFTWARE
    • 3D model catalog
  • SUPPORT
    • Explore support
    FIND ANSWERS
    • Knowledge base
    • Troubleshooting
    • Courses
    • Webinars
    GET HELP
    • Contact us
    • Livechat
    • Shipping & delivery
    • Warranty
    • Returns & refunds
    • Service & spare parts
    • Service & Repair
    COMMUNITY
    • Forum
    • Reddit
    • Printables
  • TRUST CENTER
    • Trust Center overview
    BY TOPIC
    • GDPR
    • Certificates
    • Security
    • Compliance
    COMMITMENTS
    • Sustainability report
    TALK TO US
    • Contact the security team
  • COMPANY
    • About Prusa
    GET TO KNOW US
    • Our story
    • How we make printers
    • Open source
    • Brand & media kit
    NEWS
    • Blog
    • Newsroom
    • Events
    TRUST & PARTNERS
    • Sustainability
    • Resellers & distributors
    • Affiliate program
    • Contact
    • English
    • Čeština
    • Deutsch
    • Español
    • Français
    • Italiano
    • Polski
    • 日本語
  • Signed in as

    • Orders
    • Address
    • In-stock Alerts
    • My Courses
    • Subscription
    • Edit Account
    • Logout

Log in to see orders, saved items

Signed in as
  • Orders
  • Address
  • In-stock Alerts
  • My Courses
  • Subscription
  • Edit Account
  • English
  • Čeština
  • Deutsch
  • Español
  • Français
  • Italiano
  • Polski
  • 日本語
Shop

0 item in your cartitems in your cart

Your cart is empty

Go to cartShop 3D printers

My profile

Log in to see orders, saved items

My profile

Signed in as

  • Orders
  • Logout
SHOP
  • Latest products
BY CATEGORY
  • 3D printersnew
  • 3D printer upgradesnew
  • Materials
  • Accessories
  • Spare parts
  • Courses
  • Merch
  • Get a price quote
QUICK LINKS
  • Shipping & delivery
  • Returns & refunds
  • Payment & financing
  • Warranty
  • VAT & Customs fees
  • FAQ

Featured products

    Popular categories

      Trending searches

        Articles

          Blog

            Products

              Categories

                Suggested searches

                  Searching…
                  No results
                  Something went wrong.
                  ↑↓ Select↵ OpenEsc Close search
                  1. Support
                  2. Prusa CORE One L
                  3. Printer features
                  4. Nextruder filament sensor (CORE One, CORE One L, MK4/S, MK3.9/S, XL/+)
                   

                  Contents

                  • Check assembly (MK4/S, MK3.9/S)
                  • Nextruder with MMU3 modification
                  • How to clean the filament sensor

                  Blog

                  • Print colorful and glowing Halloween decorations with our spooky offer
                  • Factorio Has Arrived on Printables
                  • Prusament PLA Lightweight: 65% lighter than regular PLA. Perfect choice for aircraft, cosplay, and more.

                  Newsletter

                  Signup and get our monthly squeeze on updates, blog, printables and much more.

                  By clicking, you agree to receive our newsletter.

                  This site is protected by reCAPTCHA Enterprise and the Google Privacy Policy and Terms of Service apply.

                  Factorio Transport Belts
                  E-shop
                  • 3D Printers
                  • Printer Upgrades
                  • Filaments
                  • Accessories
                  • Prusa Merchandise

                  © Prusa Research a.s.

                  Printables
                  • 3D Models
                  • Store
                  • Clubs
                  • 3D Design Contests
                  • Brands
                  Community
                  • World Map
                  • Forum
                  • User Groups
                  • Events
                  Help
                  • Prusa Help
                  • Prusa Academy
                  • 3D Printing Calculators
                  Software
                  • PrusaSlicer
                  • Prusa.app
                  • Prusa Connect
                  • Drivers and Software
                  Company
                  • About Us
                  • Blog
                  • Official Prusa Resellers
                  • Contact Us
                  • Certified for ISO 9001, ISO 14001, ISO 45001
                  • General Terms and Conditions
                  • General Terms and Conditions of Use of the PRUSA Websites
                  • Privacy Policy
                  • Information about cookies
                  • Customer Complaints Policy
                  • Status Page
                  • Do Not Sell or Share My Personal Information
                  • Supplemental Statements
                  • General Terms and Conditions
                  • General Terms and Conditions of Use of the PRUSA Websites
                  • Privacy Policy
                  • Information about cookies
                  • Customer Complaints Policy
                  • Status Page
                  • Do Not Sell or Share My Personal Information
                  • Supplemental Statements

                  © Prusa Research a.s.

                  JOSEF PRUSA®, PRUSA RESEARCH®, PRUSA POLYMERS®, PRUSA ORANGE®, PRUSA 3D ® AND PRUSAMENT® are registered trademarks of Prusa Development a.s. used by Prusa Research a.s. under licence from Prusa Development a.s.

                  Nextruder filament sensor

                  (CORE One, CORE One L, MK4/S, MK3.9/S, XL/+)

                  Relevant for

                  CORE One family
                  MK4 family
                  XL family
                  MK3.9 family
                  60 comments
                  Article is also available in following languages
                  English
                  Čeština
                  Polski
                  Deutsch
                  Français
                  Español
                  Italiano
                  日本語

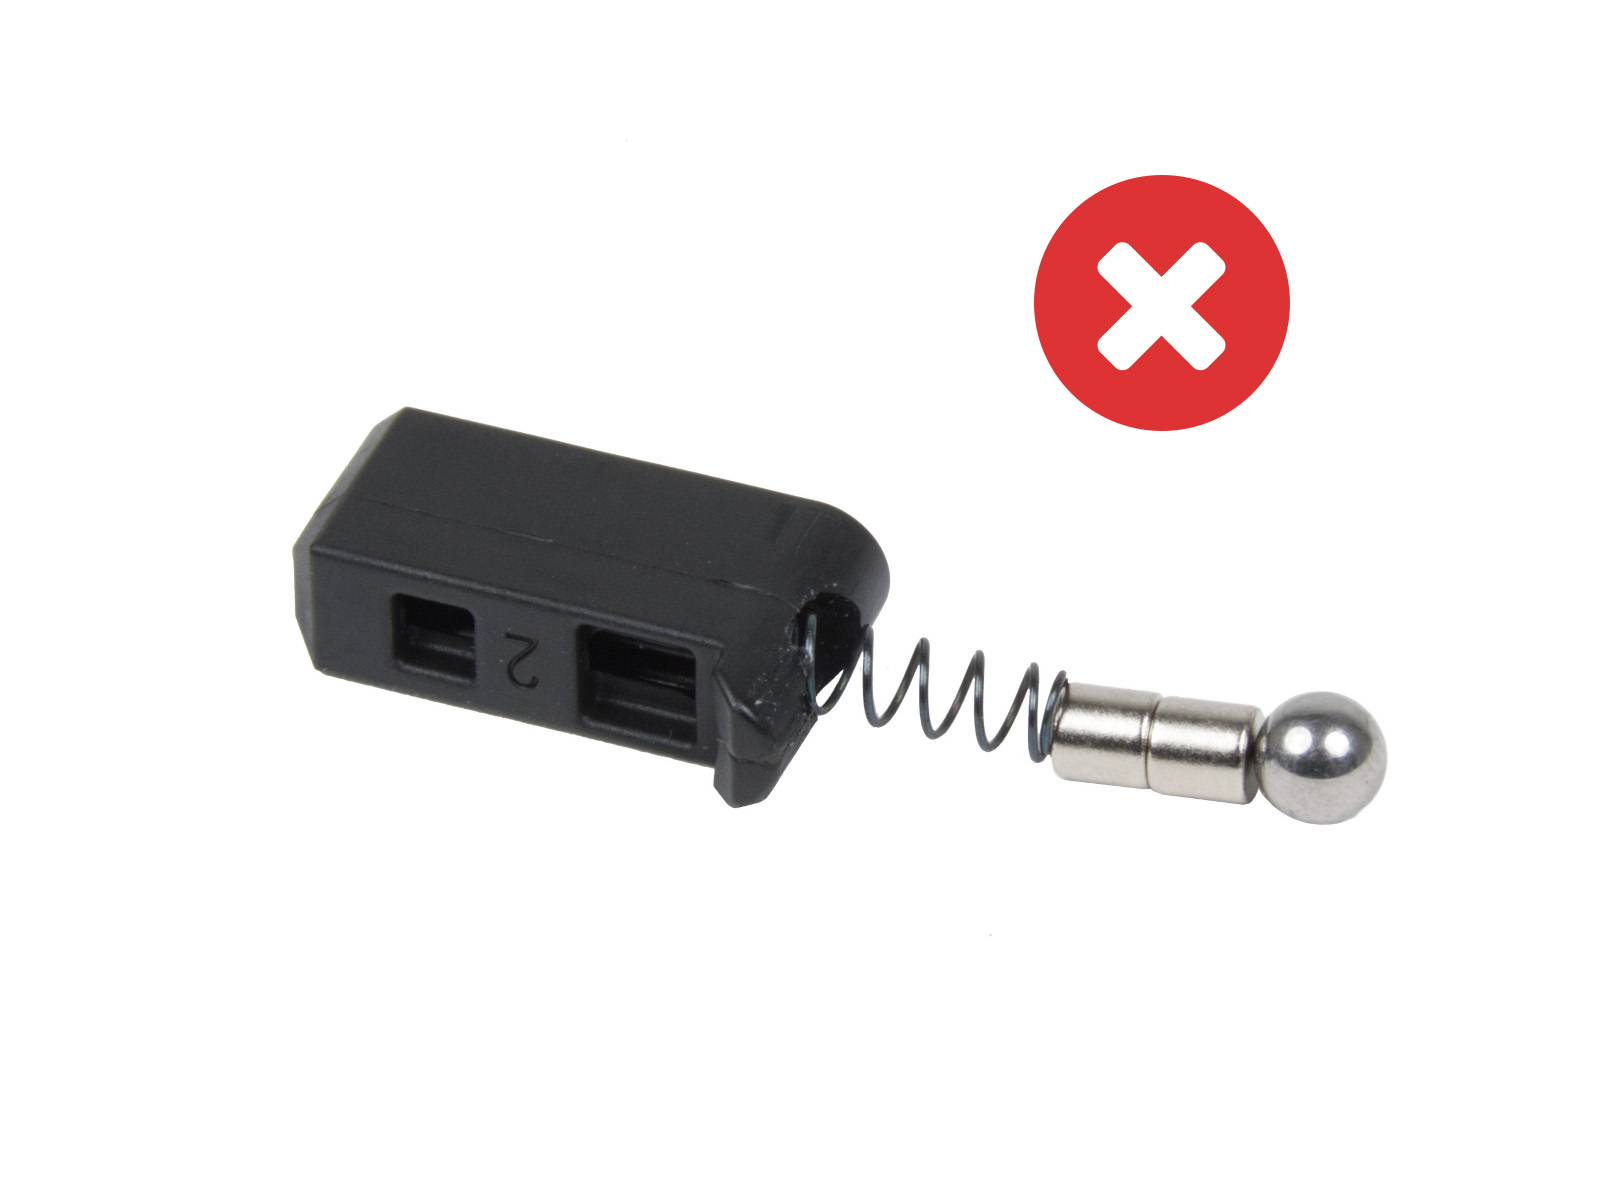
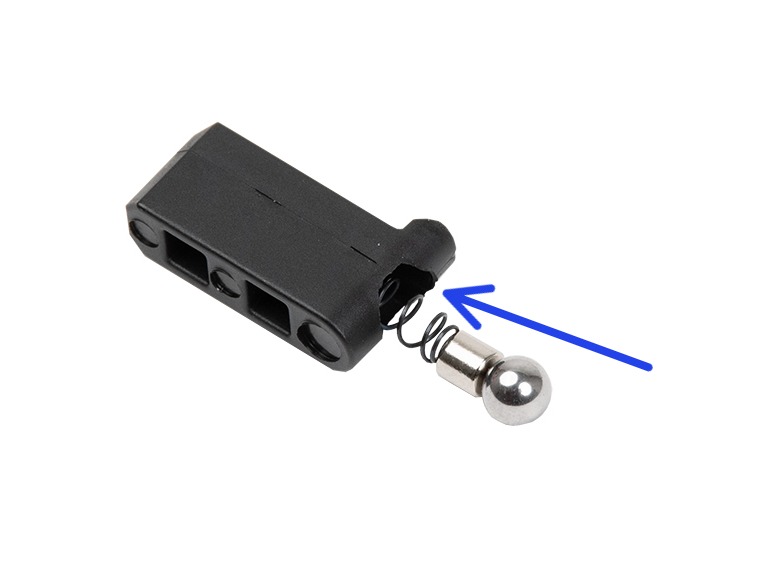
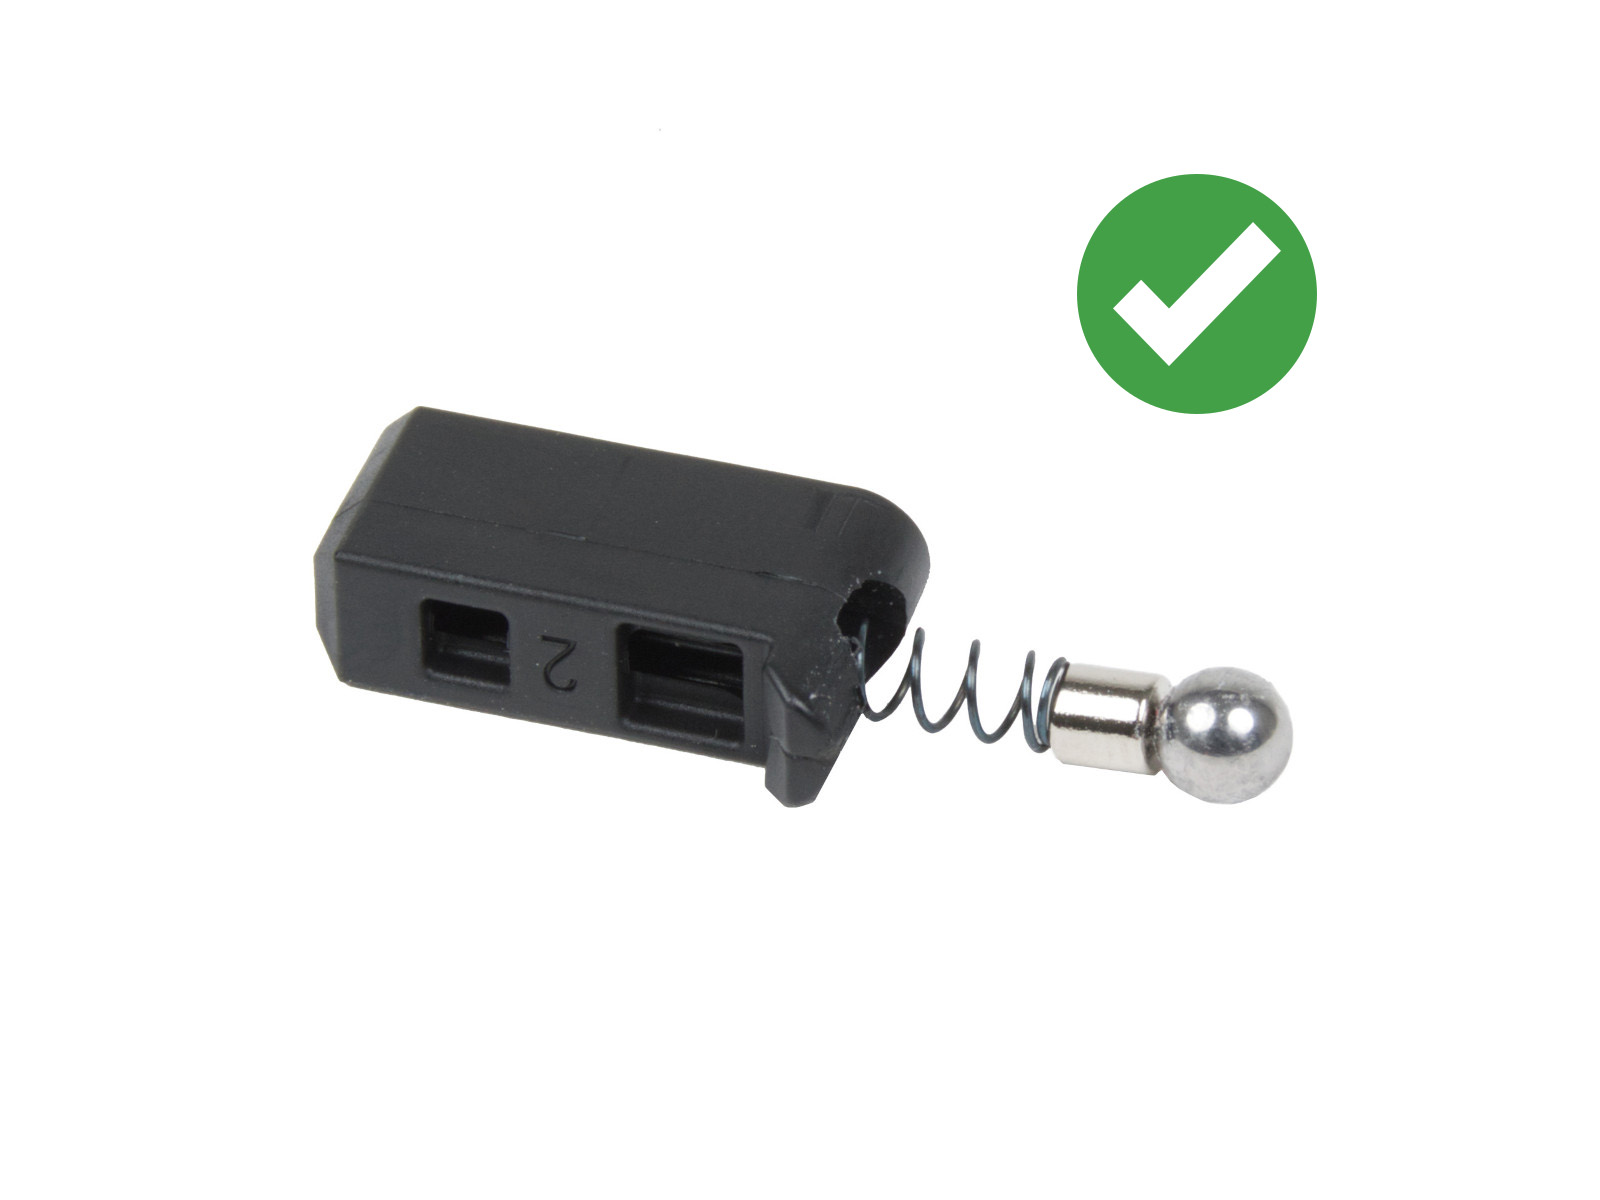
                  The filament sensor equipped on our Nextruder printers detects the presence of a filament and filament run-out. The sensor is a Hall sensor, triggered by a mechanism composed of a spring, a magnet, and a ball.

                  On printers upgraded to the Original Prusa MMU3, some of the Nextruder components are modified, including the mechanism that triggers the filament sensor. In these printer versions, the mechanism does not rely on a system of spring, magnet, and ball, but is based on the idler tension bolt.

                  Check assembly (MK4/S, MK3.9/S)

                  If your printer is an MK4 or MK3.9, you have received a package with magnets for the assembly. On MK4S and MK3.9S, as well as CORE One and XL, this subcomponent comes pre-assembled in the heatsink.

                  Note that two magnets are sent, but one is meant to be used in the assembly, and the other is a spare. If your filament sensor does not work, check if two magnets have not been added by accident.
                  Nextruder with MMU3 modification

                  When the MMU3 is installed on the MK3.9/S or MK4/S, the Prusa-ball-holder is replaced by a swivel assembly. If you have the MMU modification in your extruder, the steps below still apply, but are applied to the swivel assembly whenever the Prusa-ball-holder is mentioned.

                  How to clean the filament sensor

                  During usage, filament residue might build up around the sensor or its mechanism, possibly causing false readings and thus malfunctioning.

                  1) Compressed air

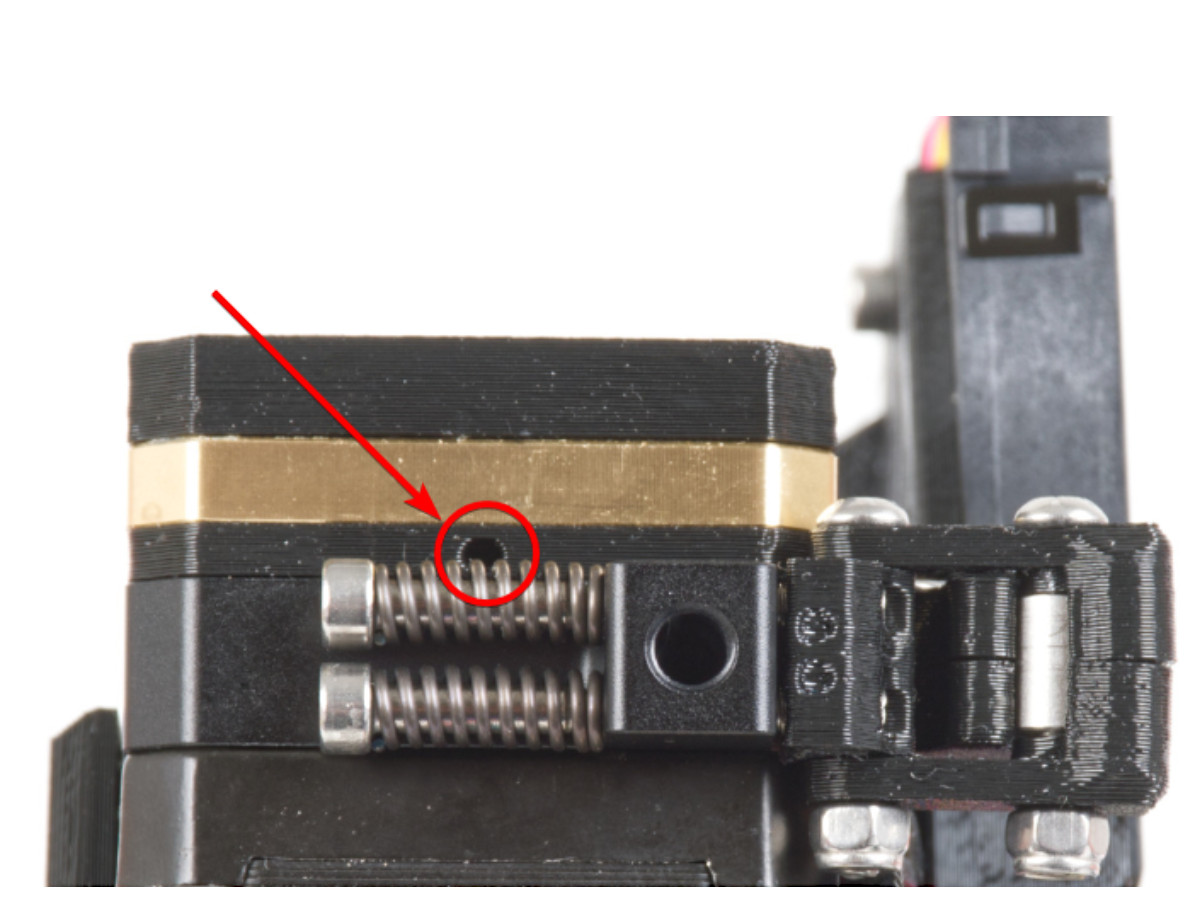
                  At the top of the extruder is a small hole, insert the tip of a compressed air can in the hole. With your free hand, prepare a bit of filament with a non-stringy tip. Repeatedly insert and remove the filament from the extruder, while blowing the compressed air. This will dislodge the build-up debris.
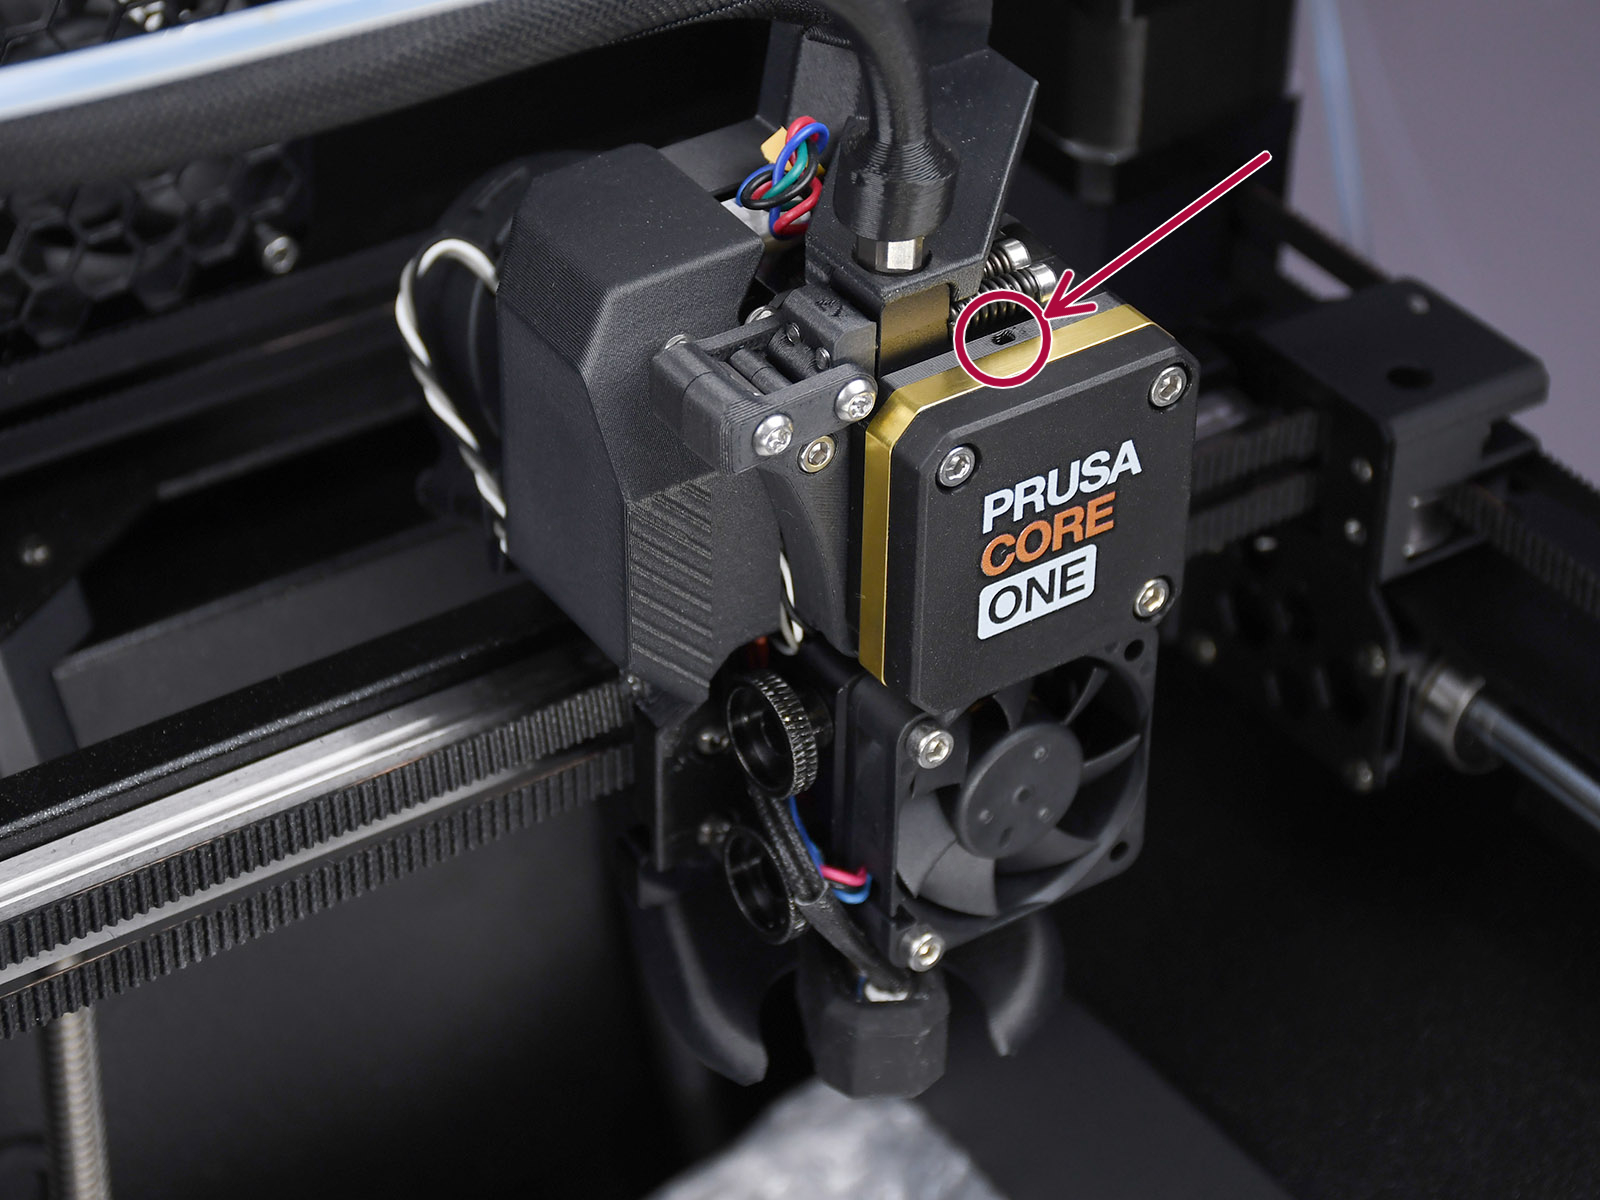
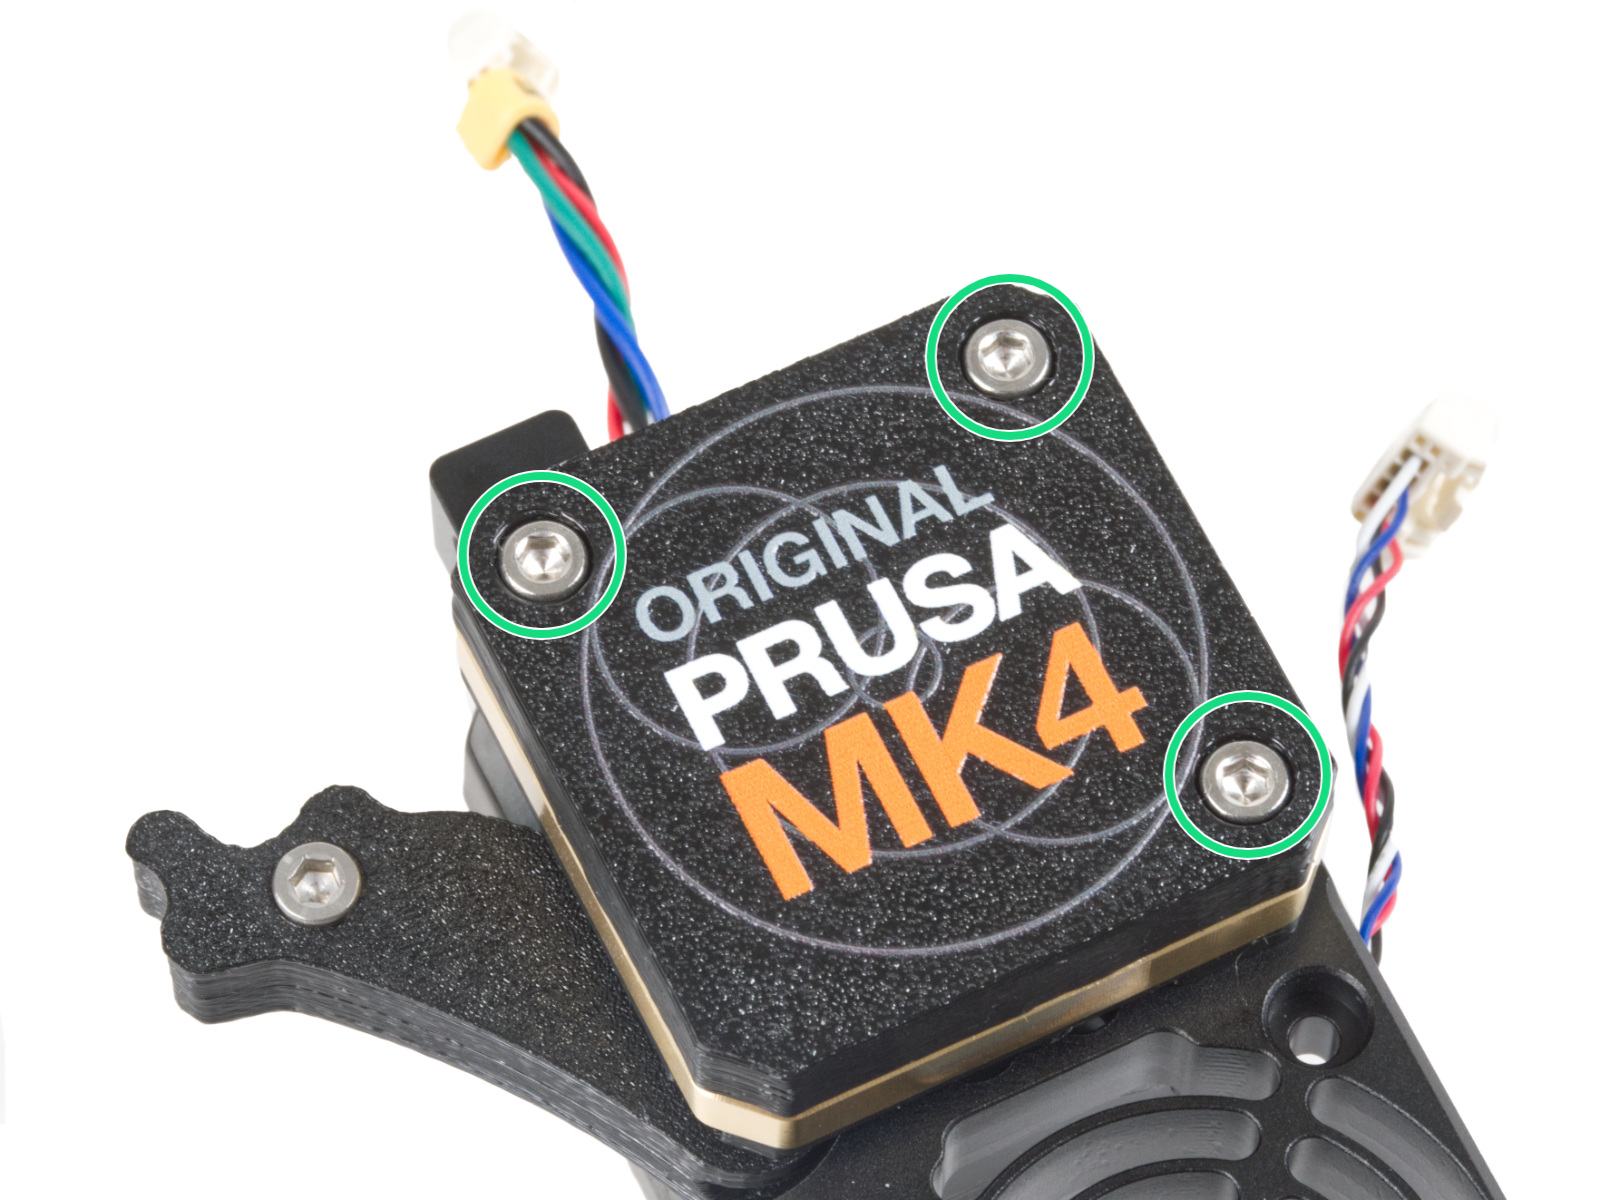
                  Top view of the CORE One (left) and MK4 (right) print head. The XL print head has a similarly positioned small hole.

                  2) Filament tip insertion

                  In case you don't have compressed air at hand, a similar procedure to the one above can be attempted.

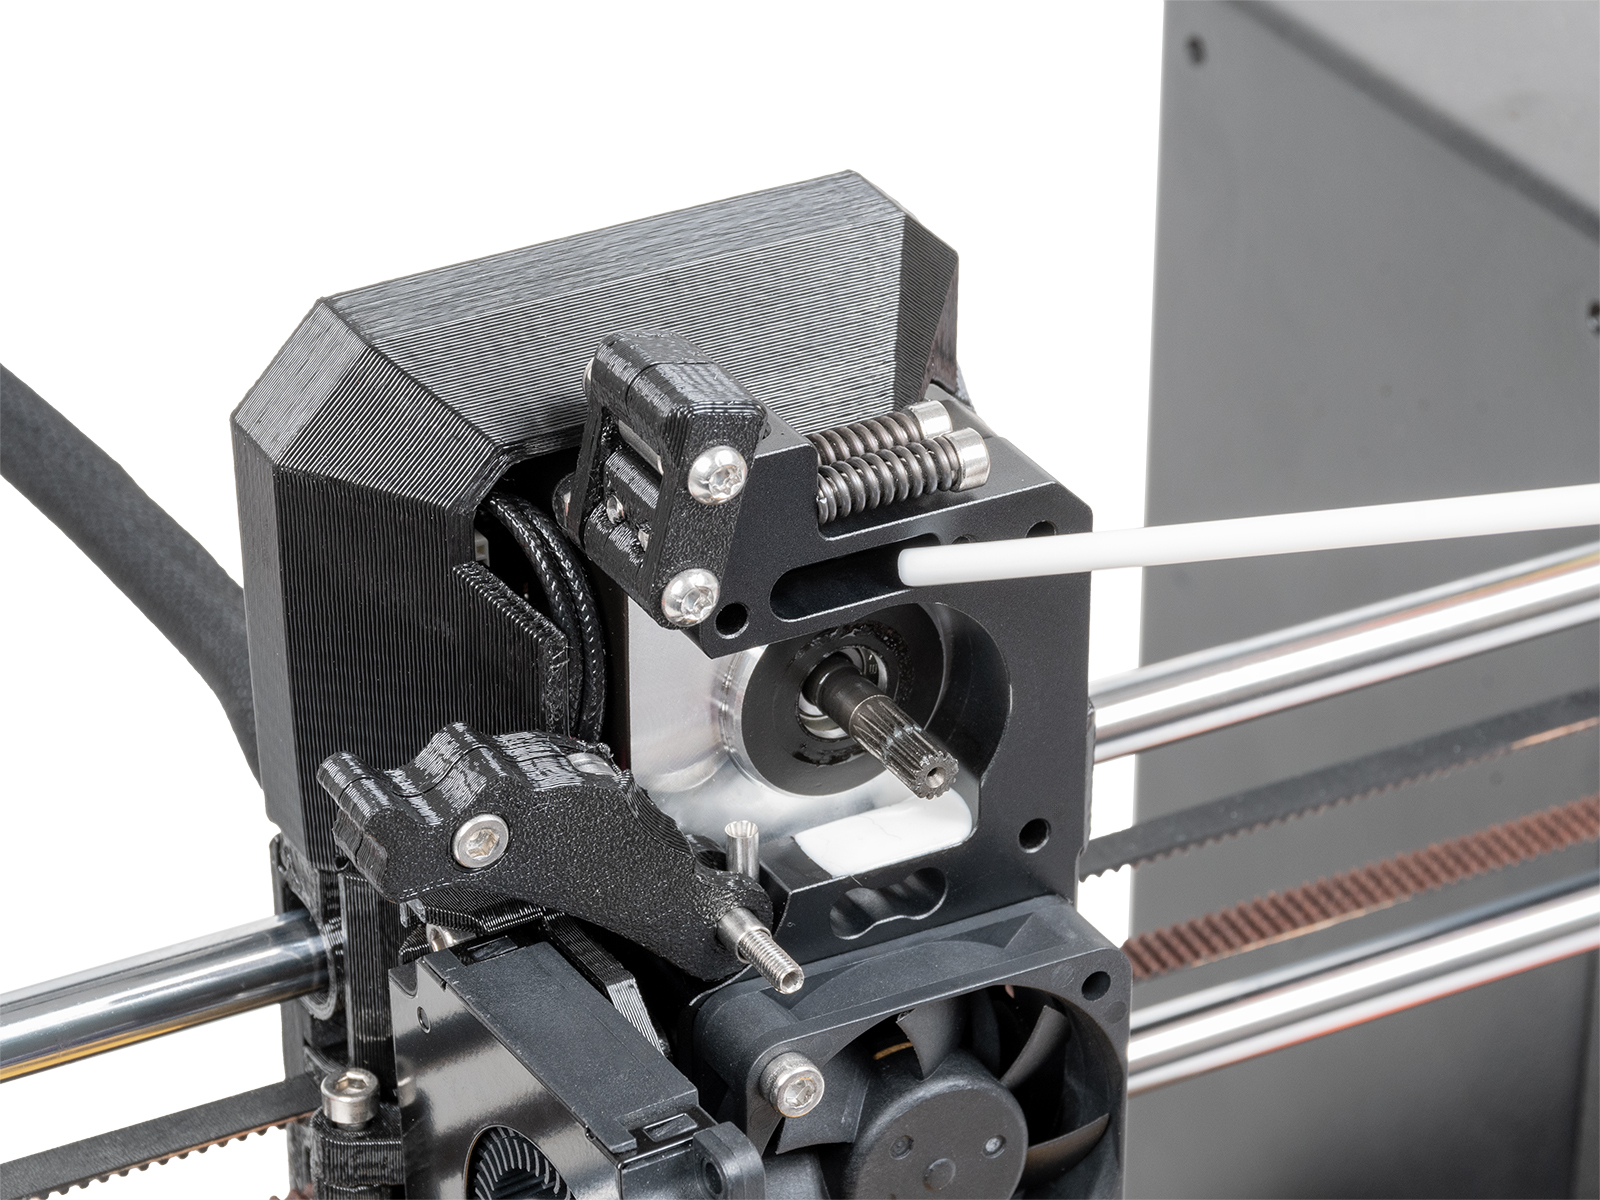
                  Prepare a bit of filament with a non-stringy tip. Repeatedly insert and remove the filament from the extruder. It will be necessary to insert and remove the bit of filament several times to achieve good cleaning, and the technique might not always be effective.

                  3) Removing the sensor 

                  If the previous techniques do not work, the filament sensor can be removed to be manually cleaned. This procedure requires partial disassembly of the Nextruder. 

                  On XL, make sure the firmware version is 6.4.0 or higher, to have access to the needed gearbox alignment procedure from the printer menu. The CORE One, MK4/S, and MK3.9/S have this procedure accessible on all firmware versions. 

                  Ensure to have the PG-assembly-adapter before continuing with the following procedure. If you do not have it, you can purchase it from our e-shop, or you can print it using the files below, depending on the printer you will use.
                  PG-assembly-adapter e-shop page
                  PG-assembly-adapter printed with CORE One, MK4/S, MK3.9/S, XL
                  PG-assembly-adapter printed with MK3/S/+, MK3.5/S
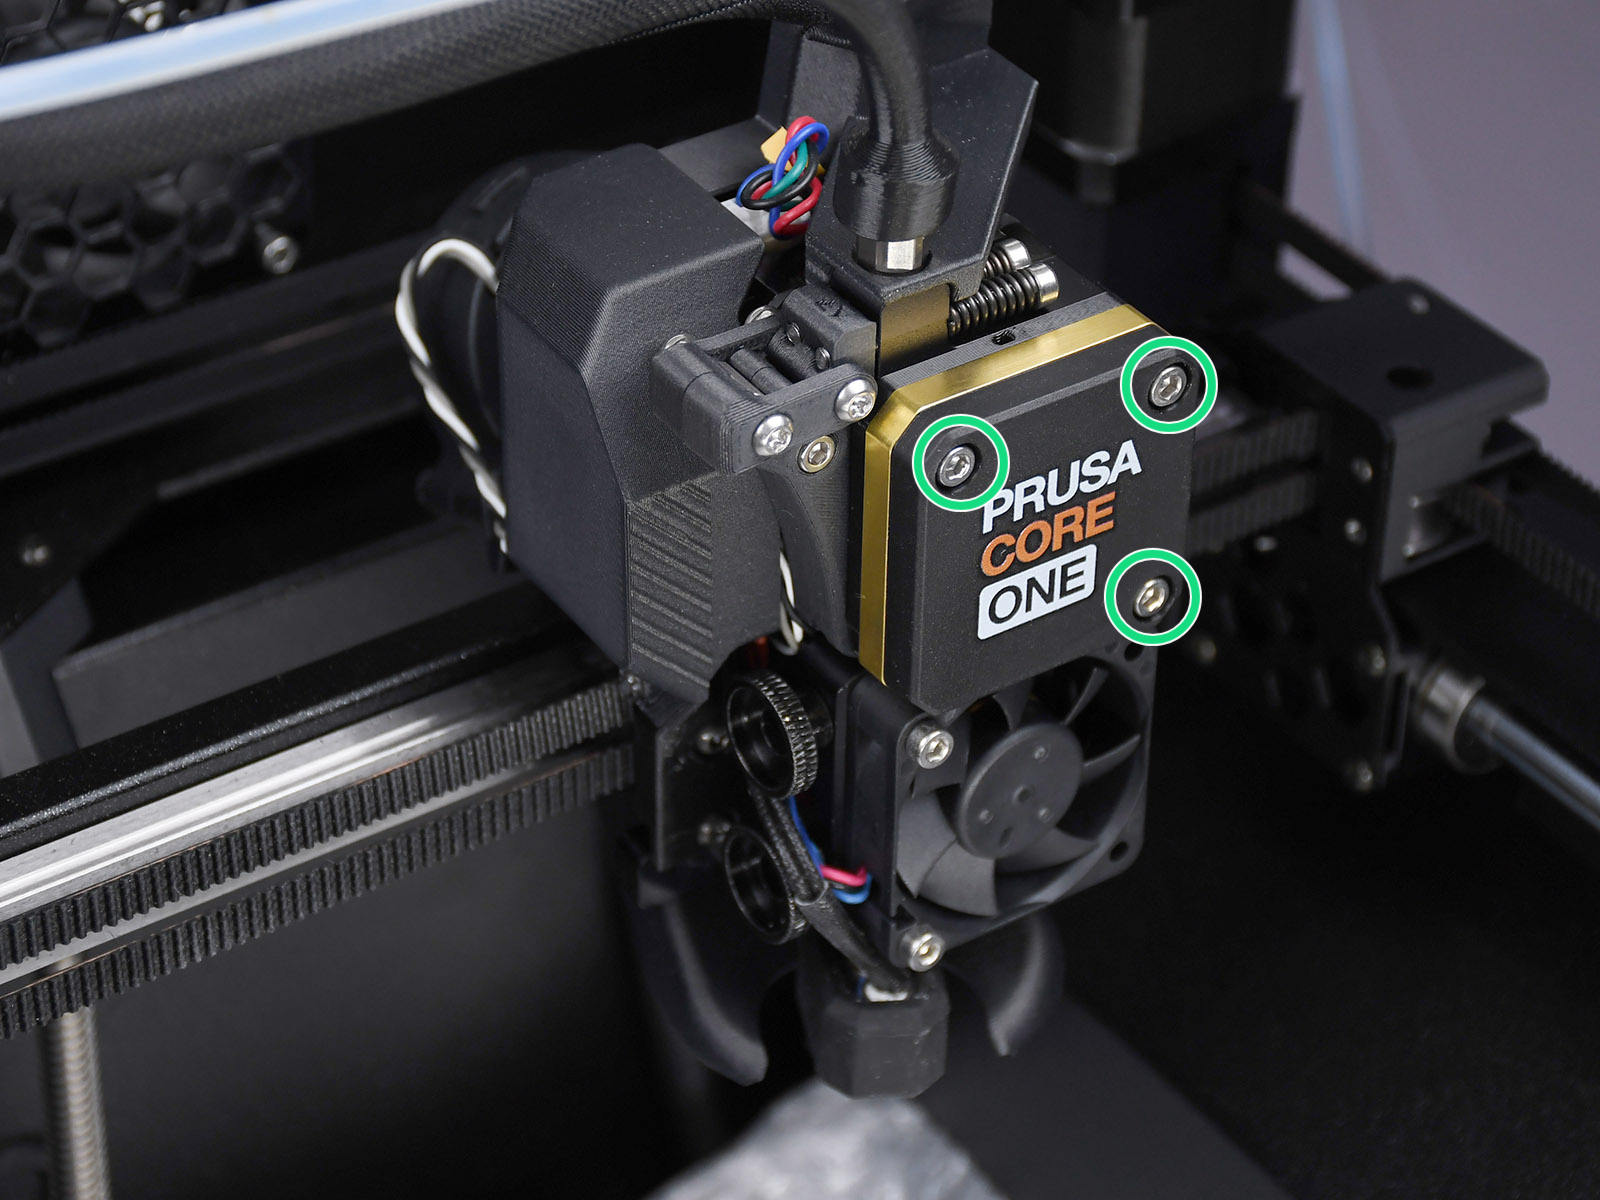
                  1. Unload the filament, then wait for the printer to fully cool down. After that, turn the printer off.
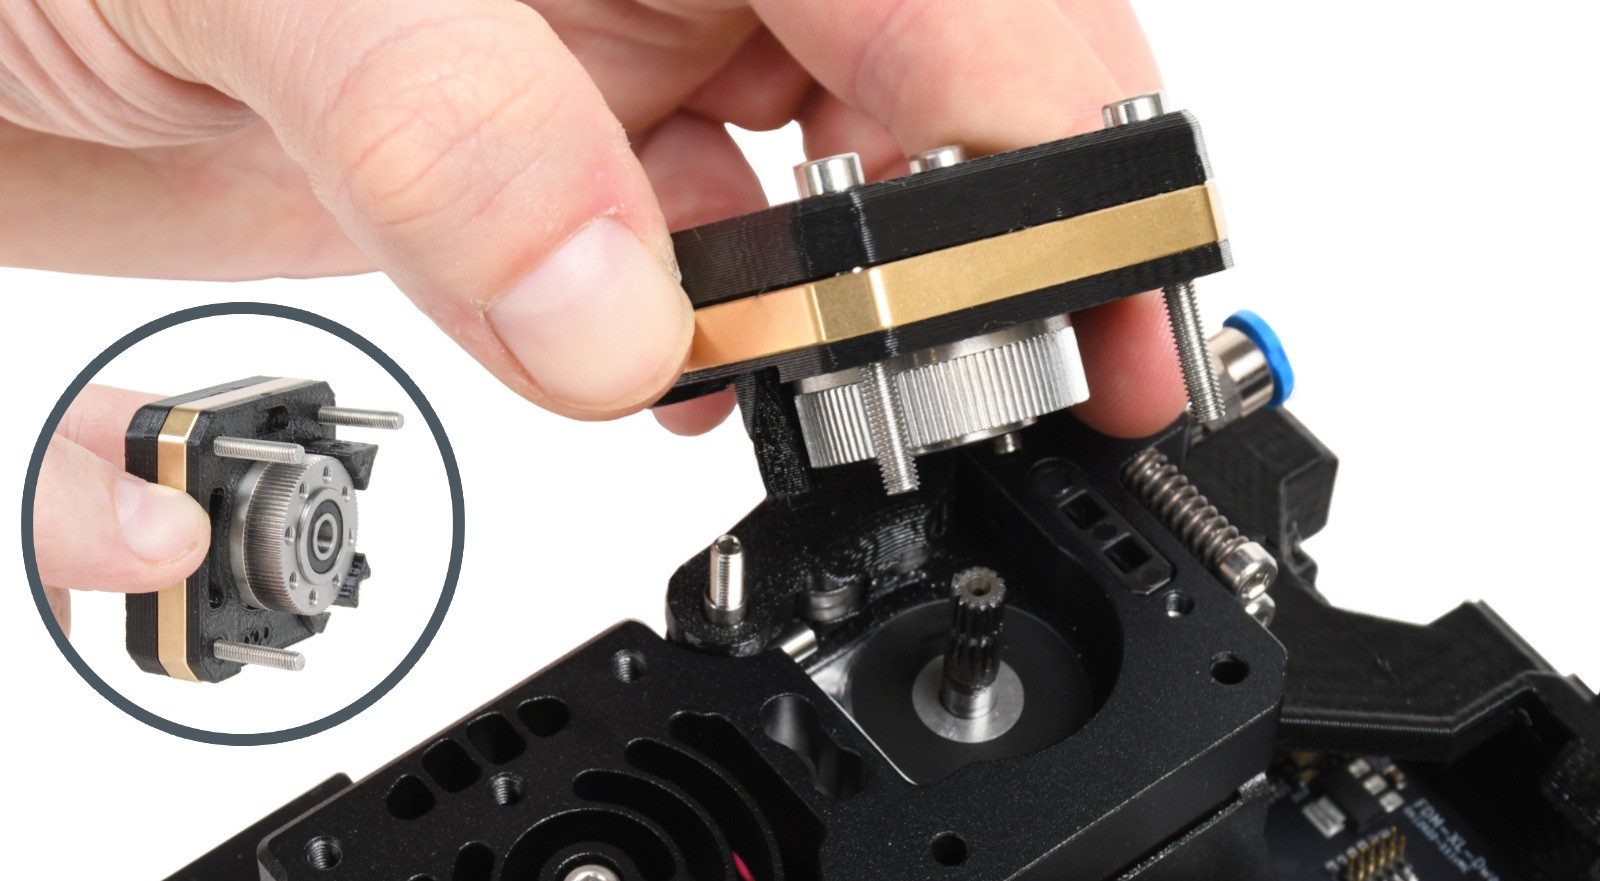
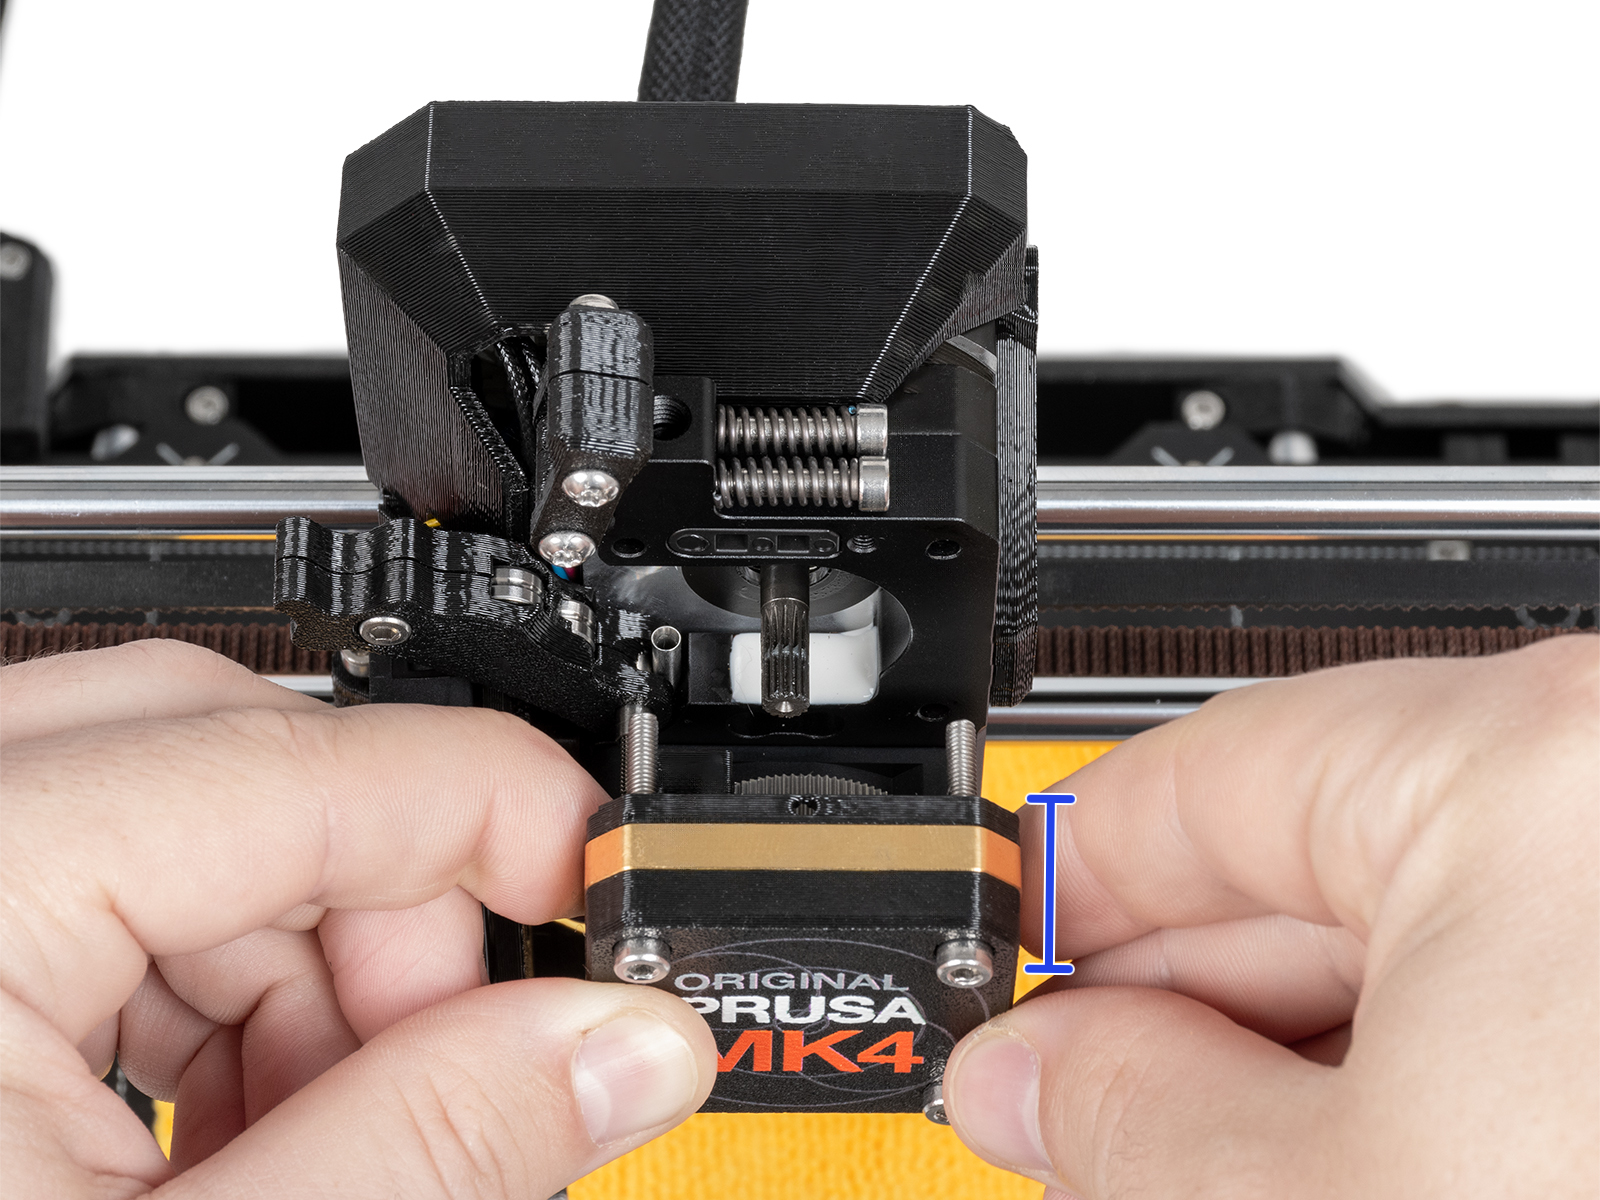
                  2. Remove the PG-case, together with the PG-ring, gearbox, and main plate. Remove all of these parts in one piece.
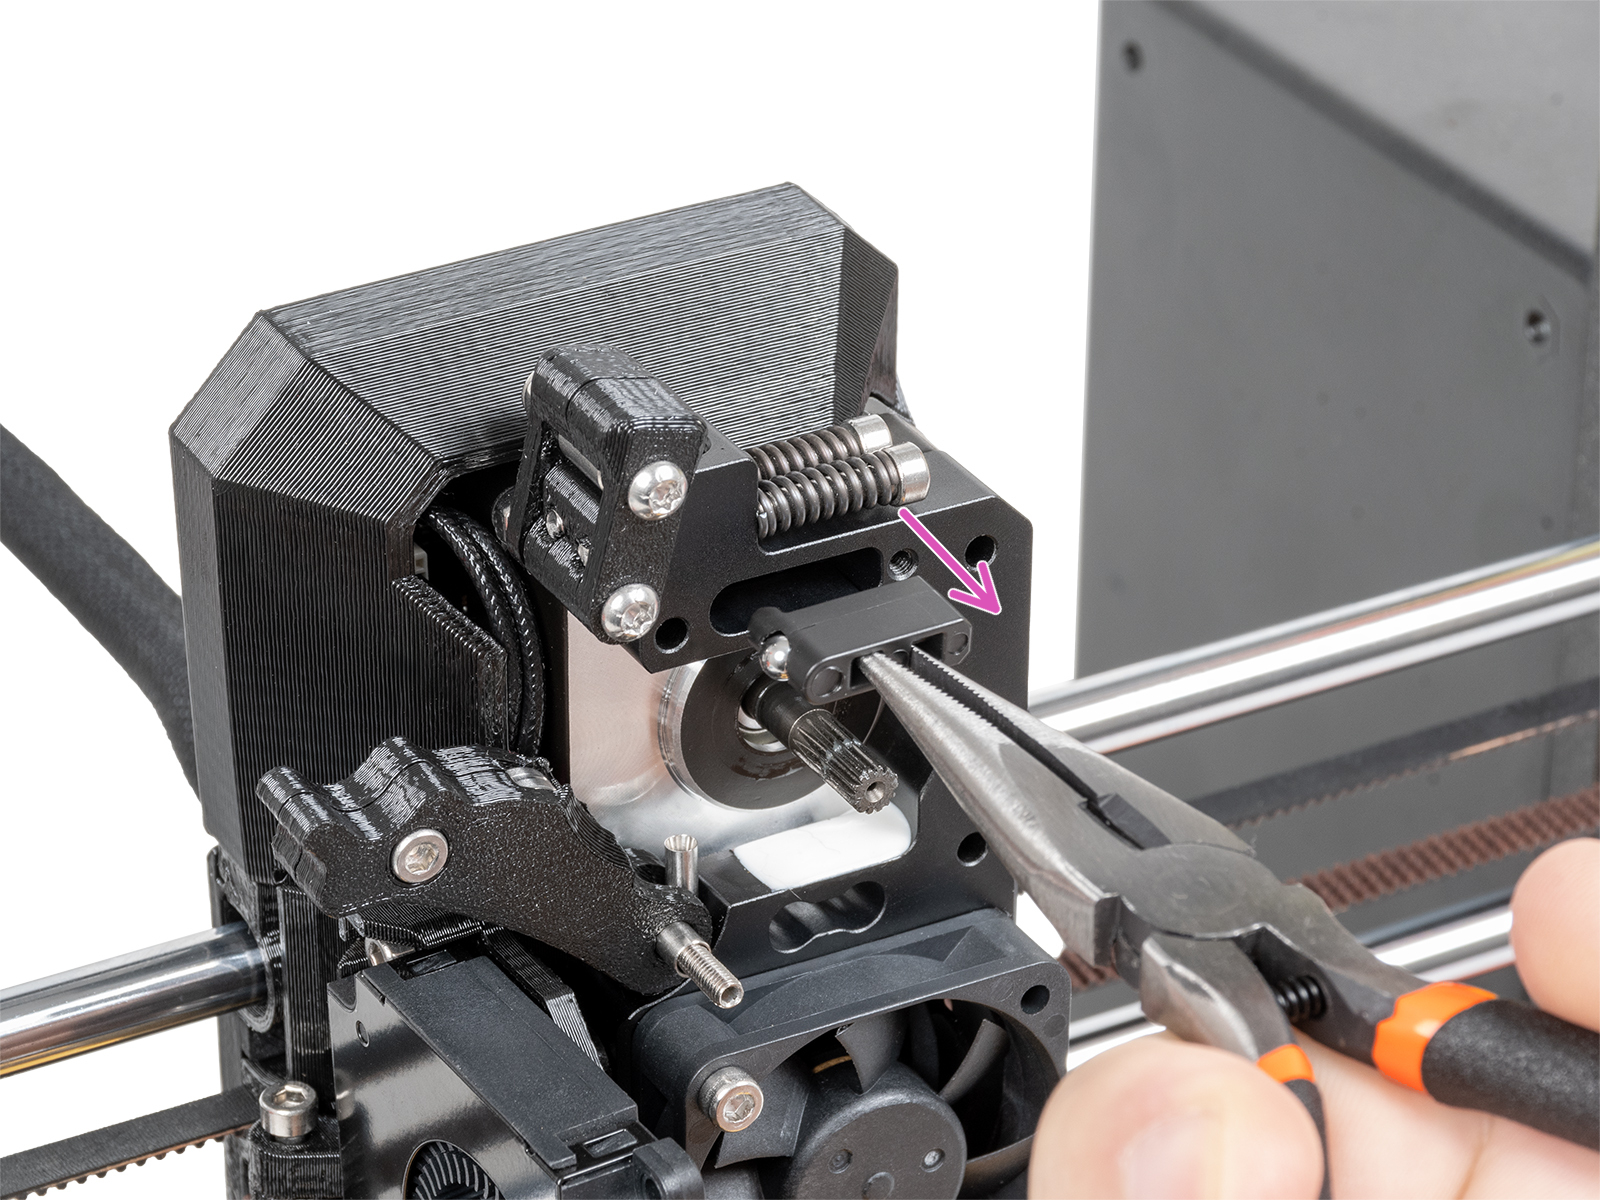
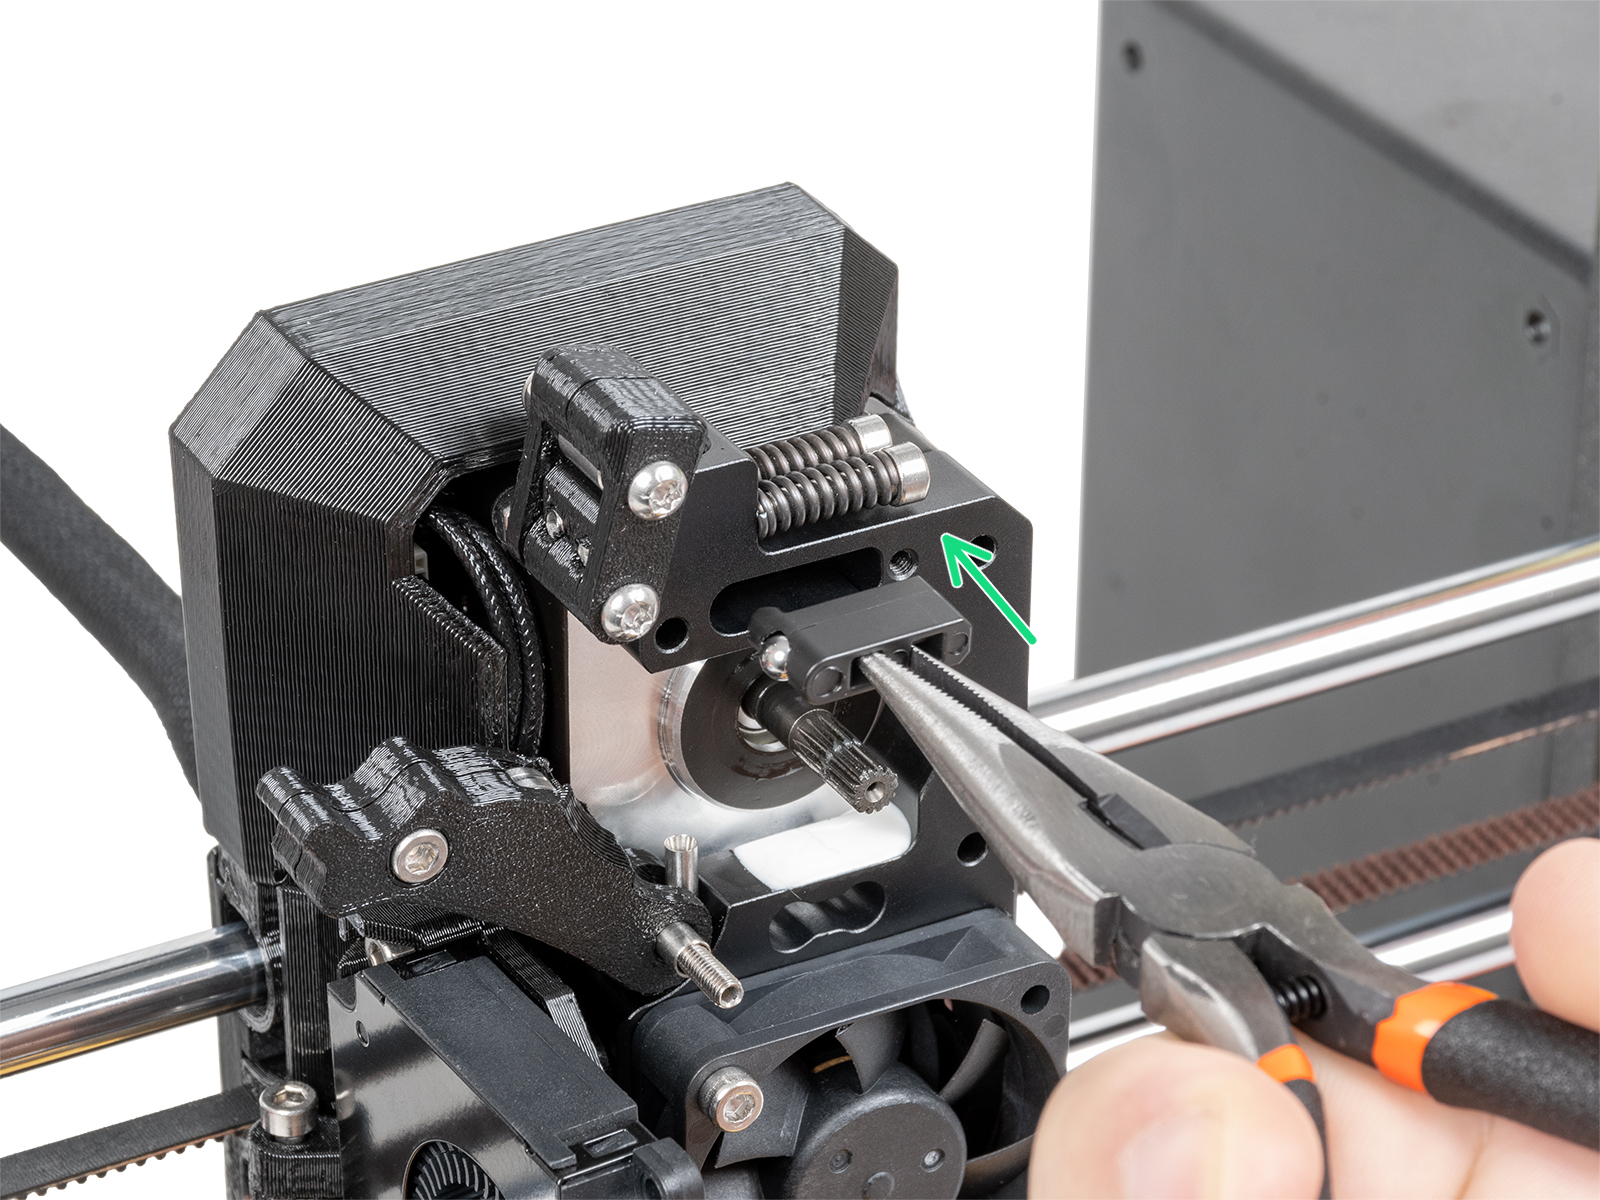
                  1. Remove the Prusa-ball-holder using pliers.

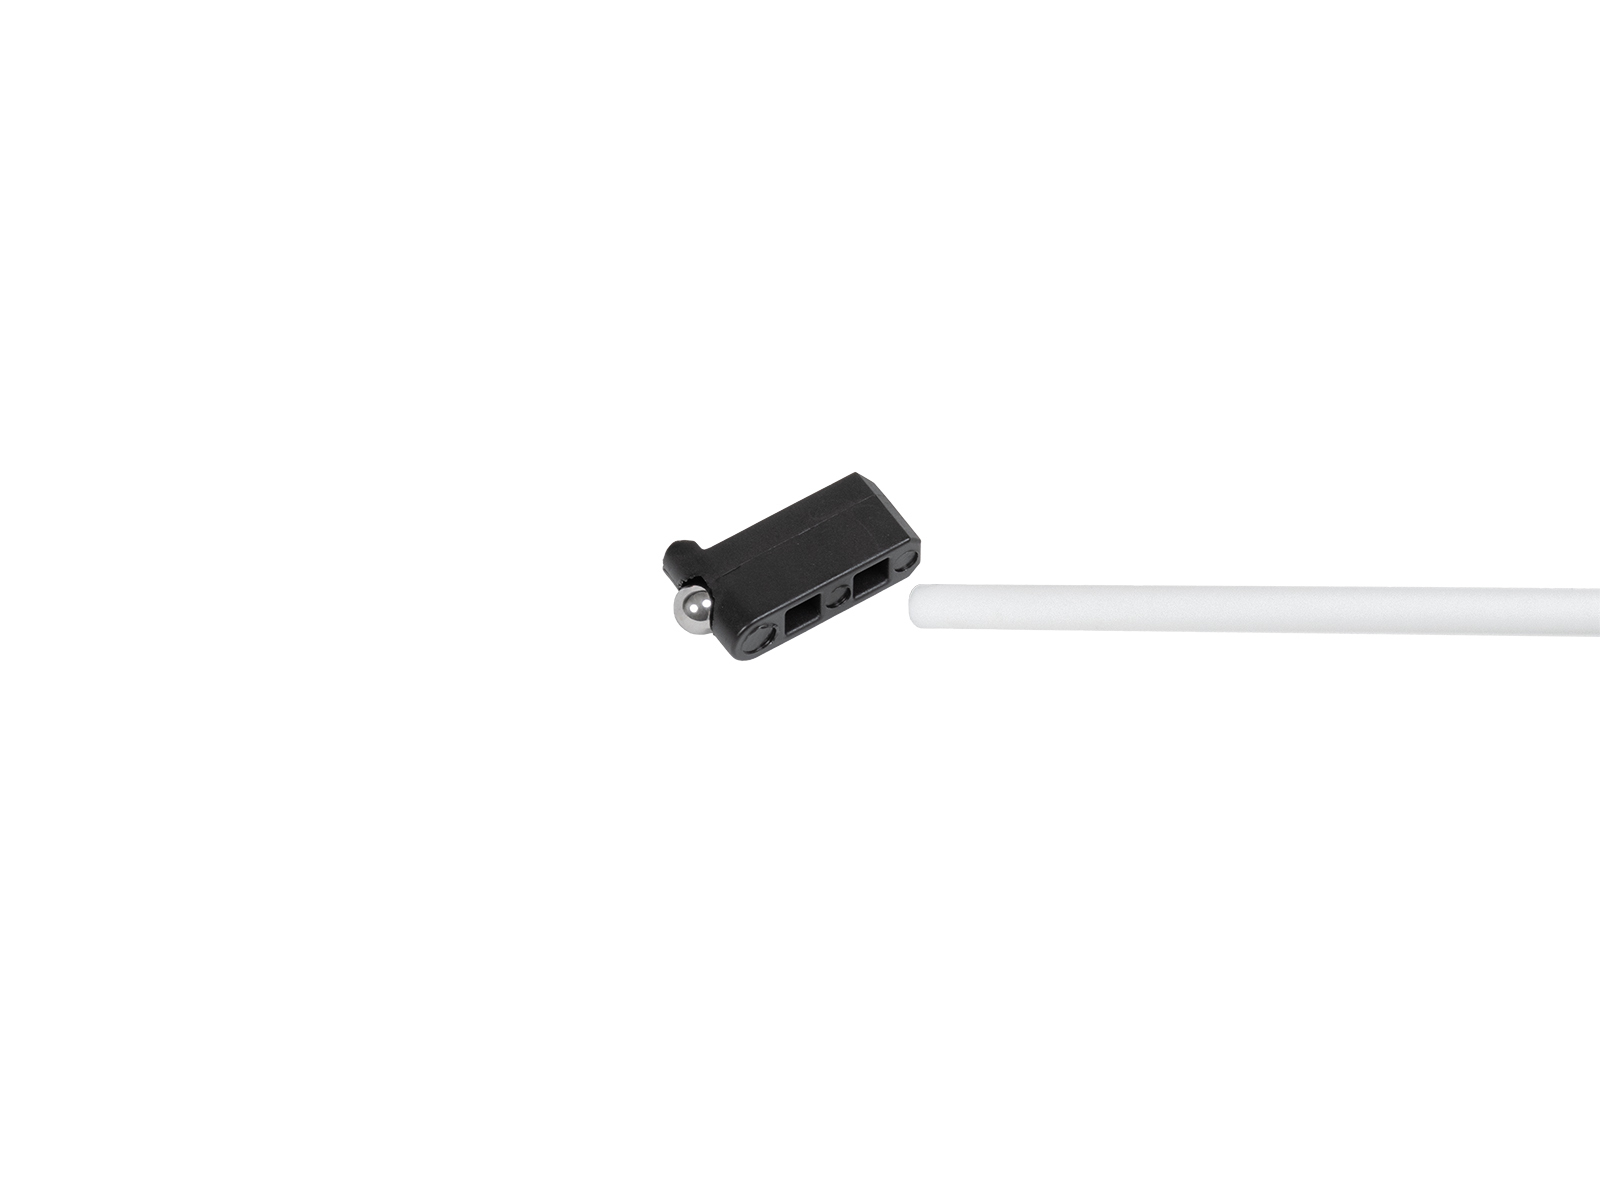
                  1. Carefully remove the ball-magnet-spring combo from the Prusa-ball-holder and clean any debris out of it. Clean also the slot on the heatsink.
                  1. Reassemble the Prusa-ball-holder in the following order: steel ball, magnet, and spring. Then, insert the assembled Prusa-ball-holder in the Nextruder.
                  1. Reassemble the block with PG-case, PG-ring, gearbox, and main plate. 

                  In case the disassembled parts in step 6 are not in one block, refer to the Nextruder chapter of the assembly guide of your printer model. 
                  1. Perform the gearbox alignment, following the procedure from the dedicated gearbox alignment article.
                  Was this article helpful?
                  This action is available only to registered users. Please log-in.

                  Topics

                  • About your printer
                    • Printer features
                      • Flexible steel sheets (guidepost)
                      • Power-modes
                      • Water-soluble materials (PVA/BVOH)
                      • Experimental settings (MK4/S, MK3.9/S, MK3.5/S, XL/+, MINI/+)
                      • Loadcell (MK4/S, MK3.9/S, XL/+)
                      • Status LED explained (MK4/S, XL/+)
                      • Nextruder filament sensor (CORE One, CORE One L, MK4/S, MK3.9/S, XL/+)
                      • Buddy firmware-specific G-code commands
                      • Nextruder silicone sock (CORE One/+, CORE One L/+, XL/+, MK4/S, MK3.9/S)
                      • Model preview
                      • Cancel Object (MK4/S, MK3.9/S, XL/+, CORE One+/GEN 2, MINI/+)
                      • Tools Mapping (XL)
                      • Support settings for the XL/+
                      • Touch screen (CORE One L, CORE One, MK4/S, MK3.9/S, MK3.5/S, XL/+)
                      • NFC antenna
                      • Accelerometer (CORE One, MK4/S, MK3.9/S)
                      • Tools Mapping and Filament Mapping (XL/+, INDX, MMU3)
                      • GPIO Module
                      • Network Connection (CORE One L, CORE One, MK4S, MK3.9S)
                      • MMU3 Prusa Nozzle vs. CHT nozzle
                      • Flashing custom firmware (CORE One L, CORE One, MK4/S, MK3.9/S, MK3.5/S)
                      • Safety and safety timer messages (CORE One, CORE One L, XL, MK4/S, MK3.9/S, MK3.5/S)
                      • Advanced filtration system for Prusa CORE One
                      • Prusa CORE One to CORE One+ upgrade (community version)
                      • MMU3 for CORE One L
                    • Printer description
                    • General Information

                  40 comments

                  Log in  to post a comment
                  Chase Flynn
                  •
                  I'm having trouble with my MK4 where prints will stop midstream and perform a filament change operation. The filament sensor calibration completes successfully. I've reprinted the idler parts in case there was warping. I've removed and cleaned the ball/magnet/spring/housing of the filament sensor. I also made sure there's only one magnet present. I've also replaced the filament sensor with a new one from Prusa. Prints complete fine with the filament sensor turned off, but I'd really like it on. Any ideas?
                  Reply
                  UweUE
                  •
                  Welchen Sensor muss ich nehmen, wenn ich vom MK4S auf den CoreOne+ aufrüsten will?
                  Die Angaben hier sind für mich nicht eindeutig.
                  Reply
                  Giuliano - Official Prusa CS
                  •
                  Hallo. Der Sensor wurde entfernts bei der Installierung der MMU3, nicht bei der Konvertion nach CORE One+.
                  Reply
                  BitSmith
                  •
                  SOLVED! For the Core One+ the problem is with the side sensor. The magnet on the rocker arm is too tall. When taking off the cover of the sensor assembly, you'll notice a cutout to compensate for the magnet. I used a Dremel and ground out some more space for the magnet to move. I reassembled and tested just this sensor (Info, Sensor Info, Side Sensor) will show INS or NINS (Not INSerted). Confirmed proper operation and reran the calibration. 👍

                  HEY PRUSA: Make the cover part have more room for the magnet. And instead of just "there's a problem" tell us WHICH sensor is having a problem and what is wrong.
                  Reply
                  BrittaB
                  •
                  Thank You! This solved my problem, I thought that the problem was at my Nextruder filament sensor and I have deassambled the Nextruder severeal times and clean ..... But this comment solved my problem and also the tips for testing just this sensor (INS or NINS) made me confirm that I was on my way. And now I rerun the calibration successfully.
                  Reply
                  BitSmith
                  •
                  Core One+ has two filament sensor. Calibration does not indicate which one (or both) is having a problem. How to diagnose?
                  Reply
                  koryphaee
                  •
                  I couldn't get Prusament TPU pushed through the sensor. There was too much flex inside the tube and the pointy end could not push the sensor ball aside. I solved this by fully compressing the spring using the pliers for about 10 seconds which reduced the length from 8.70 mm to 8.65 mm. This tiny change was enough to allow TPU to be pushed through.

                  Reattaching the cover only worked after moving the idler arm up otherwise the holes would not align.
                  Reply