Prusa
  • SHOP
    • Latest products
    BY CATEGORY
    • 3D printersnew
    • 3D printer upgradesnew
    • Materials
    • Accessories
    • Spare parts
    • Courses
    • Merch
    • Get a price quote
    QUICK LINKS
    • Shipping & delivery
    • Returns & refunds
    • Payment & financing
    • Warranty
    • VAT & Customs fees
    • FAQ

    0 item in your cartitems in your cart

    Your cart is empty

    Go to cartShop 3D printers

    My profile

    Log in to see orders, saved items

    My profile

    Signed in as

    • Orders
    • Logout
  • 3D PRINTING
    • Explore 3D printing
    FOR BEGINNERS
    • 3D printing 101
    • How FDM printing works
    • Buying your first printer
    • 3D model catalog
    BY APPLICATION
    • Rapid prototyping
    • Manufacturing
    • Engineering
    • Research
    • Arts & design
    GO DEEPER
    • Materials guide
    • Courses
    • Webinars
    • Case studies
    • Custom 3D printing
  • 3D PRINTERS
    • All 3D printers
    FOR
    • Home or garageHobbyists, tinkerers and home printing
    • BusinessIn-house production for small teams
    • EnterpriseFleets, security and scale
    • Which Prusa is right for me
    SHOP & BROWSE
    • CORE One+new
    • CORE One+ INDXnew
    • CORE One L+new
    • CORE One L+ INDXnew
    • XL+new
    • MK4S
    • Prusa Pro HT90
    • Prusa Pro AFS
    • Prusa Pro SLX
    MORE FROM PRINTERS
    • Parts & upgradesnew
    • Critical infrastructure
    • Case studies
    • Signature Oak
    • Kits
  • MATERIALS
    • All materials
    BY USE
    • Every-day & design
    • Functional engineering
    • Composites
    • Pro speciality
    • SLA resins
    PRUSAMENT
    • PLA
    • PETG
    • ASA
    • PC
    • PA11
    • Flex
    • TPU
    MORE FROM MATERIALS
    • Materials guide
    • We make material in house
    • Sustainability
    • Order on the store
  • SOFTWARE
    • All software
    PREPARE THE PRINT
    • PrusaSlicer 3.0New
    PRINT & MONITOR
    • Prusa Connect
    • EasyPrint
    • iOS & Android app
    • Prusa Farm
    GET STARTED
    • Download & install
    • Knowledge base
    MORE FROM SOFTWARE
    • 3D model catalog
  • SUPPORT
    • Explore support
    FIND ANSWERS
    • Knowledge base
    • Troubleshooting
    • Courses
    • Webinars
    GET HELP
    • Contact us
    • Livechat
    • Shipping & delivery
    • Warranty
    • Returns & refunds
    • Service & spare parts
    • Service & Repair
    COMMUNITY
    • Forum
    • Reddit
    • Printables
  • TRUST CENTER
    • Trust Center overview
    BY TOPIC
    • GDPR
    • Certificates
    • Security
    • Compliance
    COMMITMENTS
    • Sustainability report
    TALK TO US
    • Contact the security team
  • COMPANY
    • About Prusa
    GET TO KNOW US
    • Our story
    • How we make printers
    • Open source
    • Brand & media kit
    NEWS
    • Blog
    • Newsroom
    • Events
    TRUST & PARTNERS
    • Sustainability
    • Resellers & distributors
    • Affiliate program
    • Contact
    • English
    • Čeština
    • Deutsch
    • Español
    • Français
    • Italiano
    • Polski
    • 日本語
  • Signed in as

    • Orders
    • Address
    • In-stock Alerts
    • My Courses
    • Subscription
    • Edit Account
    • Logout

Log in to see orders, saved items

Signed in as
  • Orders
  • Address
  • In-stock Alerts
  • My Courses
  • Subscription
  • Edit Account
  • English
  • Čeština
  • Deutsch
  • Español
  • Français
  • Italiano
  • Polski
  • 日本語
Shop

0 item in your cartitems in your cart

Your cart is empty

Go to cartShop 3D printers

My profile

Log in to see orders, saved items

My profile

Signed in as

  • Orders
  • Logout
SHOP
  • Latest products
BY CATEGORY
  • 3D printersnew
  • 3D printer upgradesnew
  • Materials
  • Accessories
  • Spare parts
  • Courses
  • Merch
  • Get a price quote
QUICK LINKS
  • Shipping & delivery
  • Returns & refunds
  • Payment & financing
  • Warranty
  • VAT & Customs fees
  • FAQ

Featured products

    Popular categories

      Trending searches

        Articles

          Blog

            Products

              Categories

                Suggested searches

                  Searching…
                  No results
                  Something went wrong.
                  ↑↓ Select↵ OpenEsc Close search
                  1. Support
                  2. Prusa CORE One L+
                  3. Print Quality Troubleshooting
                  4. Layer shifting
                   

                  Contents

                  • Prusa CORE One
                  • Original Prusa MK-series
                  • Original Prusa MINI/+
                  • Original Prusa XL
                  • Print geometry and settings

                  Blog

                  • Print colorful and glowing Halloween decorations with our spooky offer
                  • Factorio Has Arrived on Printables
                  • Prusament PLA Lightweight: 65% lighter than regular PLA. Perfect choice for aircraft, cosplay, and more.

                  Newsletter

                  Signup and get our monthly squeeze on updates, blog, printables and much more.

                  By clicking, you agree to receive our newsletter.

                  This site is protected by reCAPTCHA Enterprise and the Google Privacy Policy and Terms of Service apply.

                  Factorio Transport Belts
                  E-shop
                  • 3D Printers
                  • Printer Upgrades
                  • Filaments
                  • Accessories
                  • Prusa Merchandise

                  © Prusa Research a.s.

                  Printables
                  • 3D Models
                  • Store
                  • Clubs
                  • 3D Design Contests
                  • Brands
                  Community
                  • World Map
                  • Forum
                  • User Groups
                  • Events
                  Help
                  • Prusa Help
                  • Prusa Academy
                  • 3D Printing Calculators
                  Software
                  • PrusaSlicer
                  • Prusa.app
                  • Prusa Connect
                  • Drivers and Software
                  Company
                  • About Us
                  • Blog
                  • Official Prusa Resellers
                  • Contact Us
                  • Certified for ISO 9001, ISO 14001, ISO 45001
                  • General Terms and Conditions
                  • General Terms and Conditions of Use of the PRUSA Websites
                  • Privacy Policy
                  • Information about cookies
                  • Customer Complaints Policy
                  • Status Page
                  • Do Not Sell or Share My Personal Information
                  • Supplemental Statements
                  • General Terms and Conditions
                  • General Terms and Conditions of Use of the PRUSA Websites
                  • Privacy Policy
                  • Information about cookies
                  • Customer Complaints Policy
                  • Status Page
                  • Do Not Sell or Share My Personal Information
                  • Supplemental Statements

                  © Prusa Research a.s.

                  JOSEF PRUSA®, PRUSA RESEARCH®, PRUSA POLYMERS®, PRUSA ORANGE®, PRUSA 3D ® AND PRUSAMENT® are registered trademarks of Prusa Development a.s. used by Prusa Research a.s. under licence from Prusa Development a.s.

                  Layer shifting

                  Relevant for

                  CORE One family
                  MK4 family
                  XL family
                  MMU family
                  PRO family
                  +
                  67 comments
                  Article is also available in following languages
                  English
                  Čeština
                  Polski
                  Deutsch
                  Français
                  Español
                  Italiano
                  日本語

                  Layer shifting is a printing issue that causes the layers of the printed object to shift from their intended positions. It is usually associated with an abnormal movement of the X-axis and/or the Y-axis, leading the extruder head to be misaligned mid-printing. 

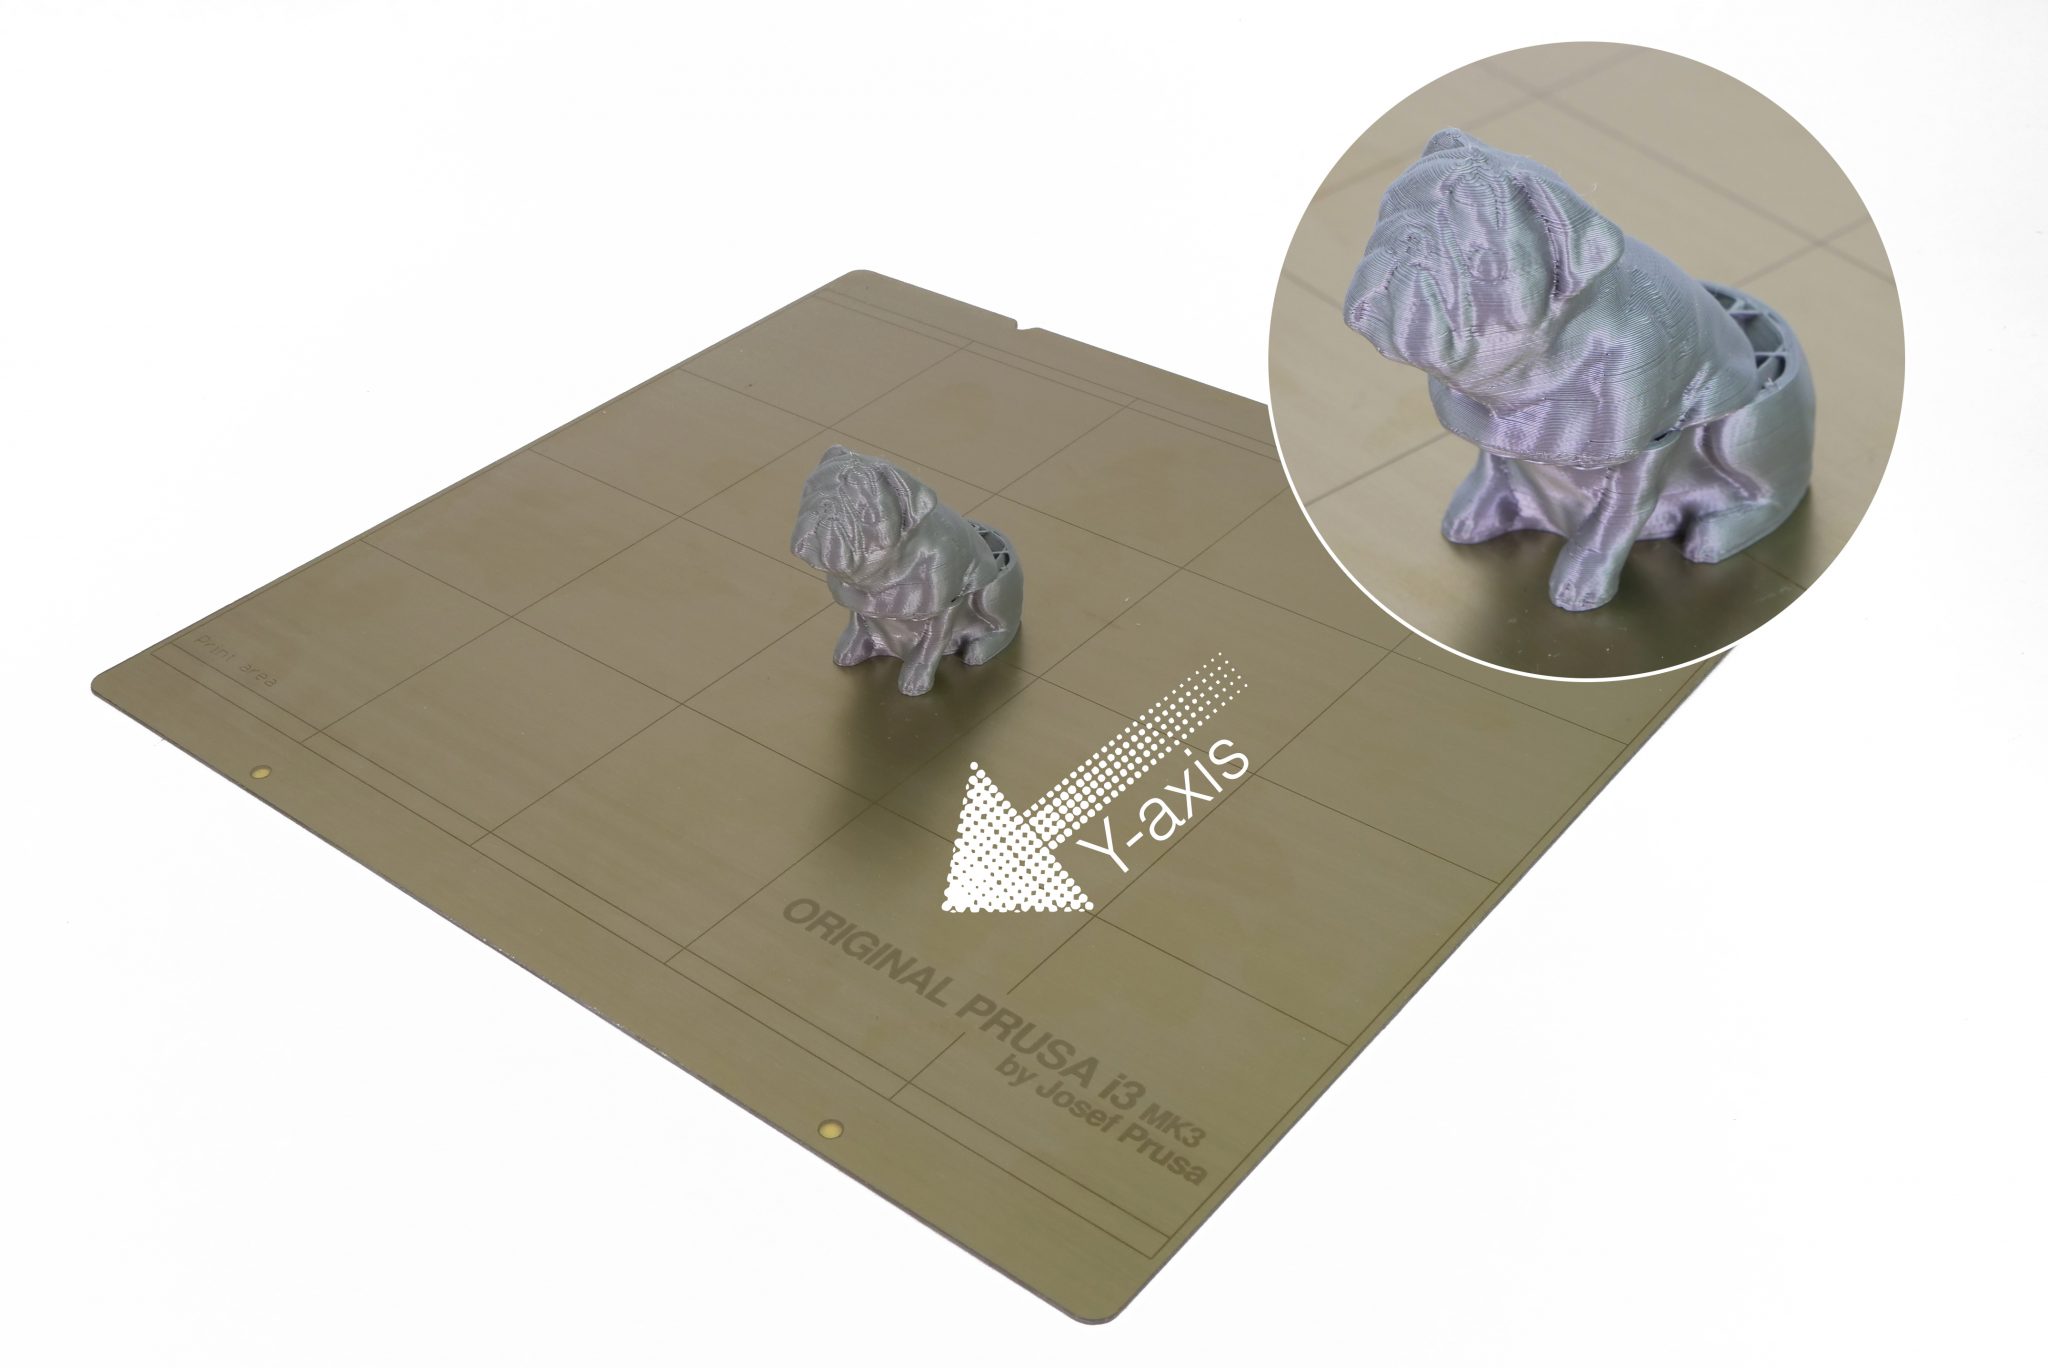
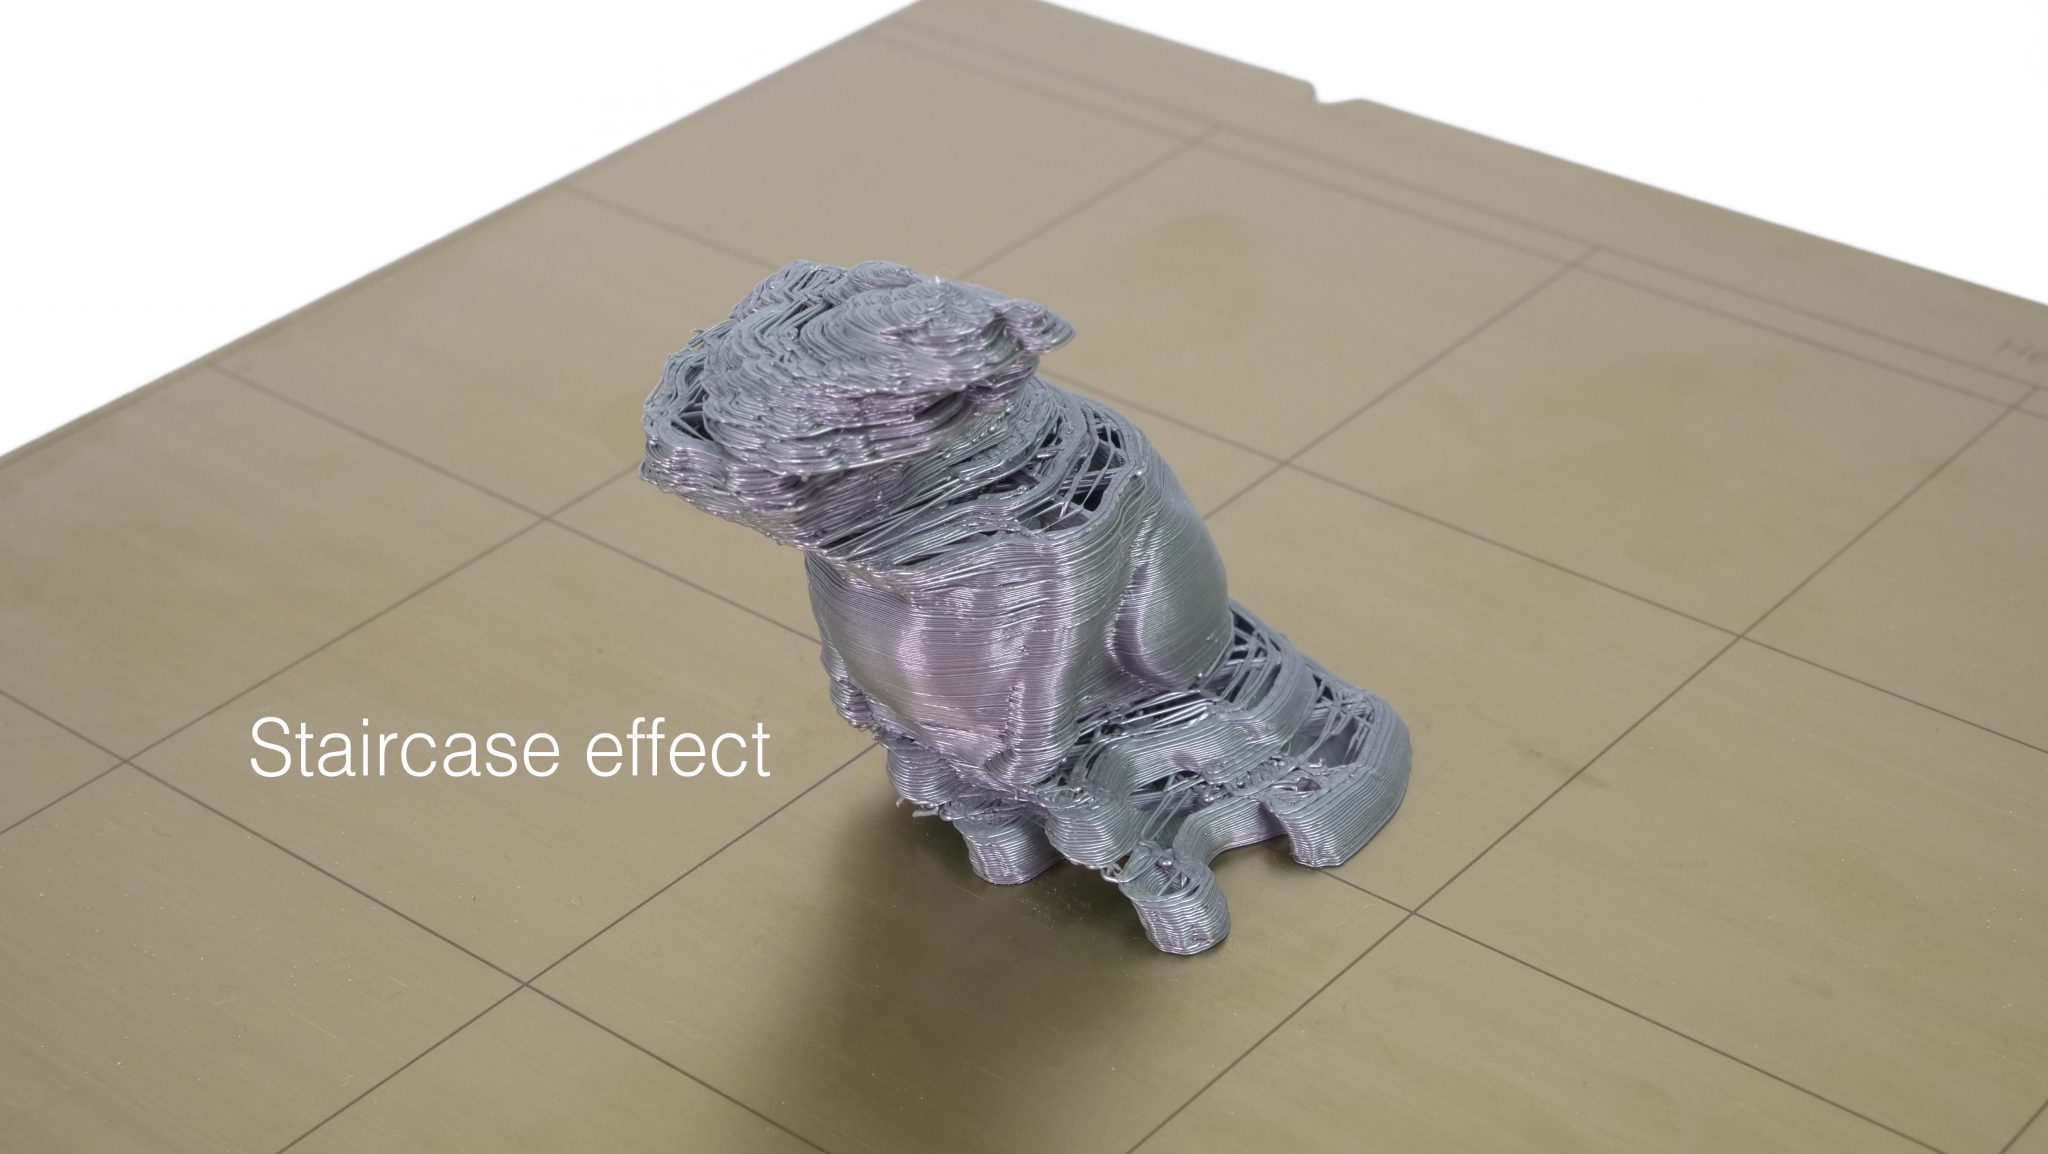
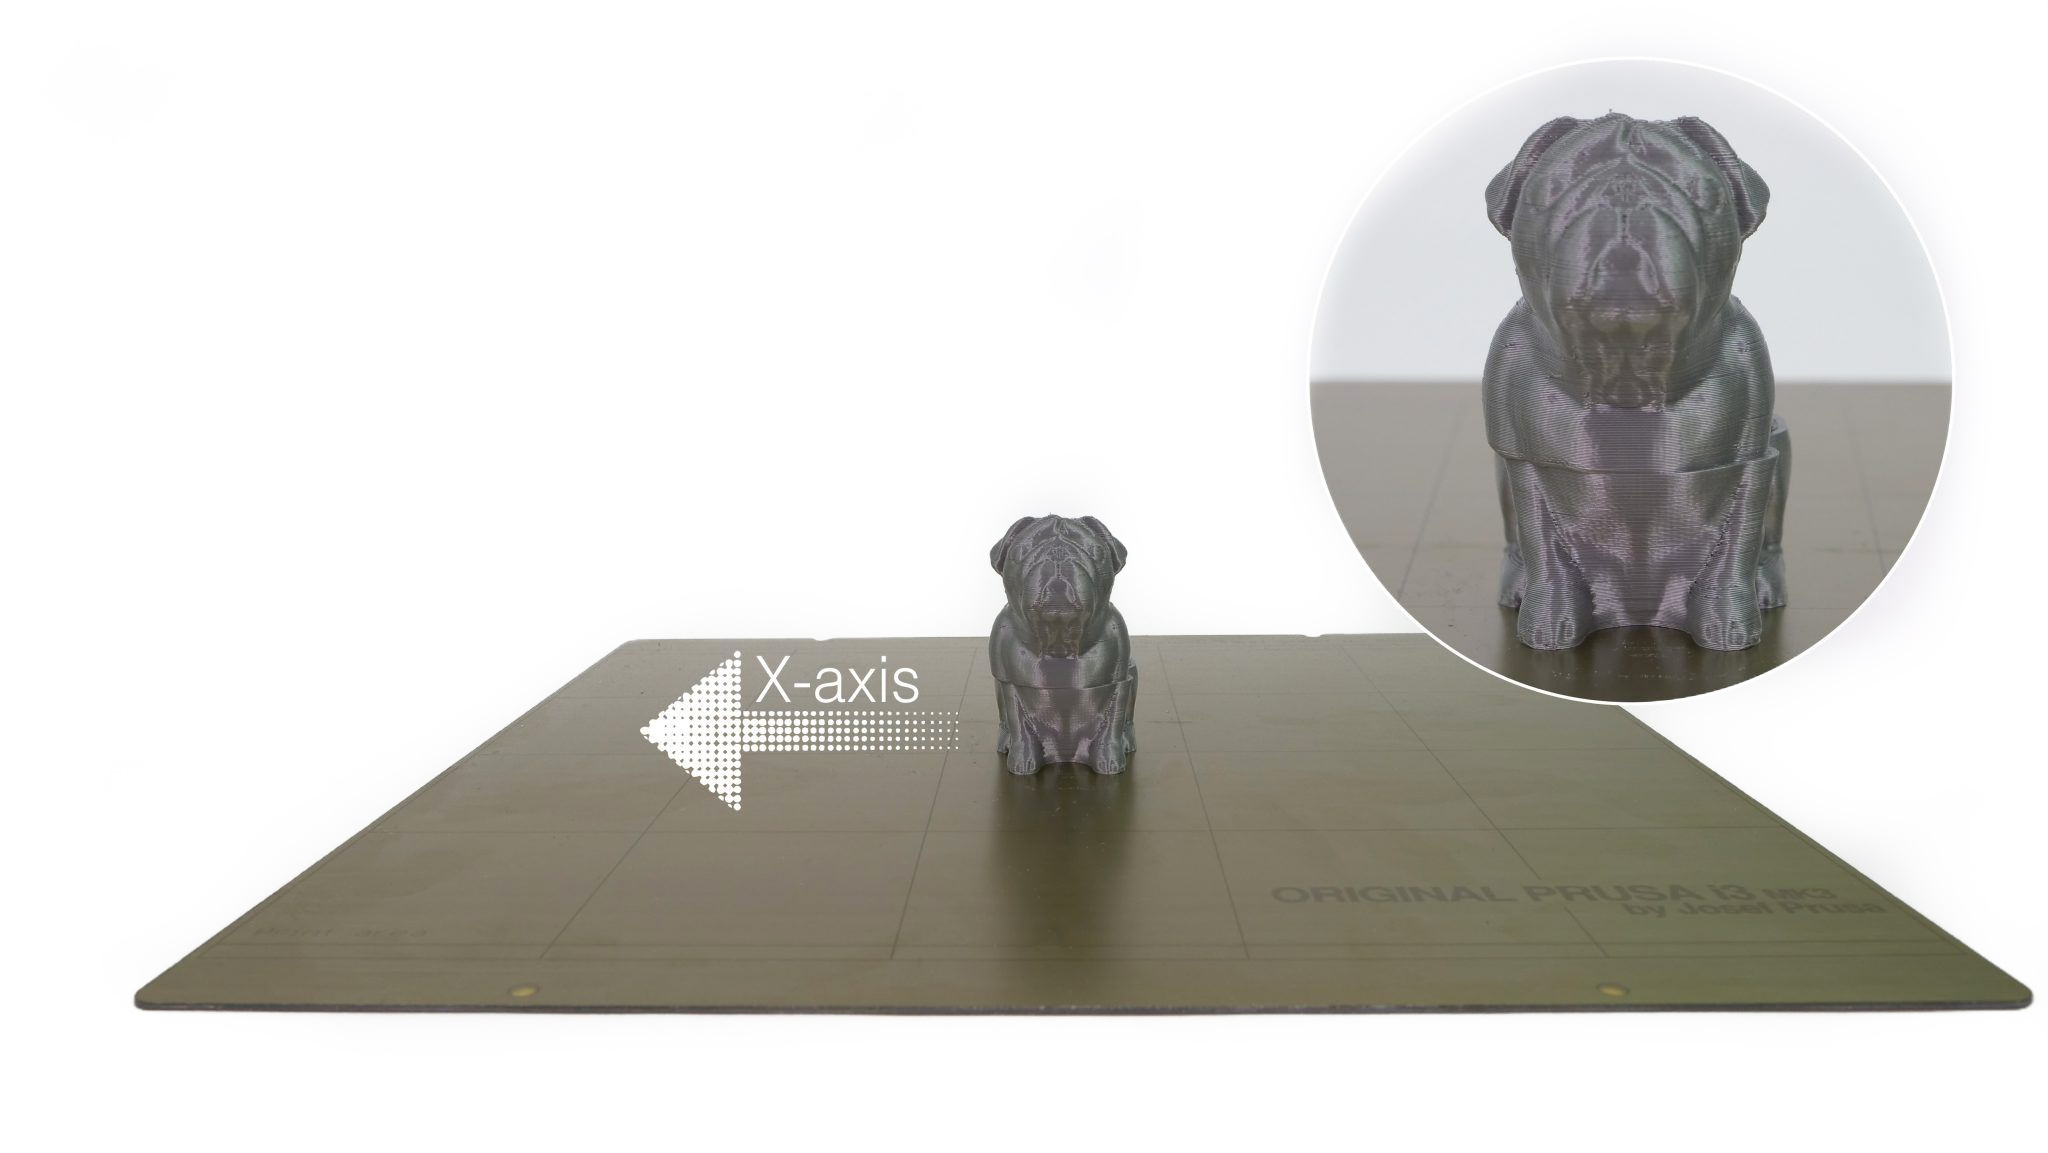
                  In order to troubleshoot the issue correctly, it is crucial to recognize in which axis the layers shifted. See the three photos below demonstrating three different kinds of layer shifts. Troubleshooting is the same for both axes. 

                  Layer shifts are most often caused by the wrong tension of the belts or pulleys not being secure. 
                  Prusa CORE One

                  Check your printer’s power mode

                  Run the printer in normal mode rather than in the stealth mode. You can change the power mode in LCD Menu -> Settings. 

                  The stealth mode is perfect for small and simple objects. For bigger or more complex prints, the normal mode is recommended. 

                  Check the XY axes movement and the belt tension

                  Test movements both from the printer menu (LCD Menu -> Control -> Move Axis), and with the printer cold and off, by hand. When testing the movements by hand, test both movements along the X and Y axes, and also along both diagonals. 

                  While an inconsistency in X or Y axis movement is most likely related to the belt tension, an inconsistent diagonal movement is related to the motor that controls that diagonal, or the pulley attached to it. 

                  To check and adjust the belt tension, follow the guidelines from the dedicated belt adjustment guide. When adjusting the belt tension, do not lose alignment of the CoreXY. 

                  Check your X/Y axis motors and pulleys

                  If one of the motor pulleys loosens over time, it will misalign and contribute to inconsistent movement. The pulleys are positioned differently on each of the two XY motors. Each motor pulley has two set screws, one of which has to be aligned with the flat part of the motor shaft. 
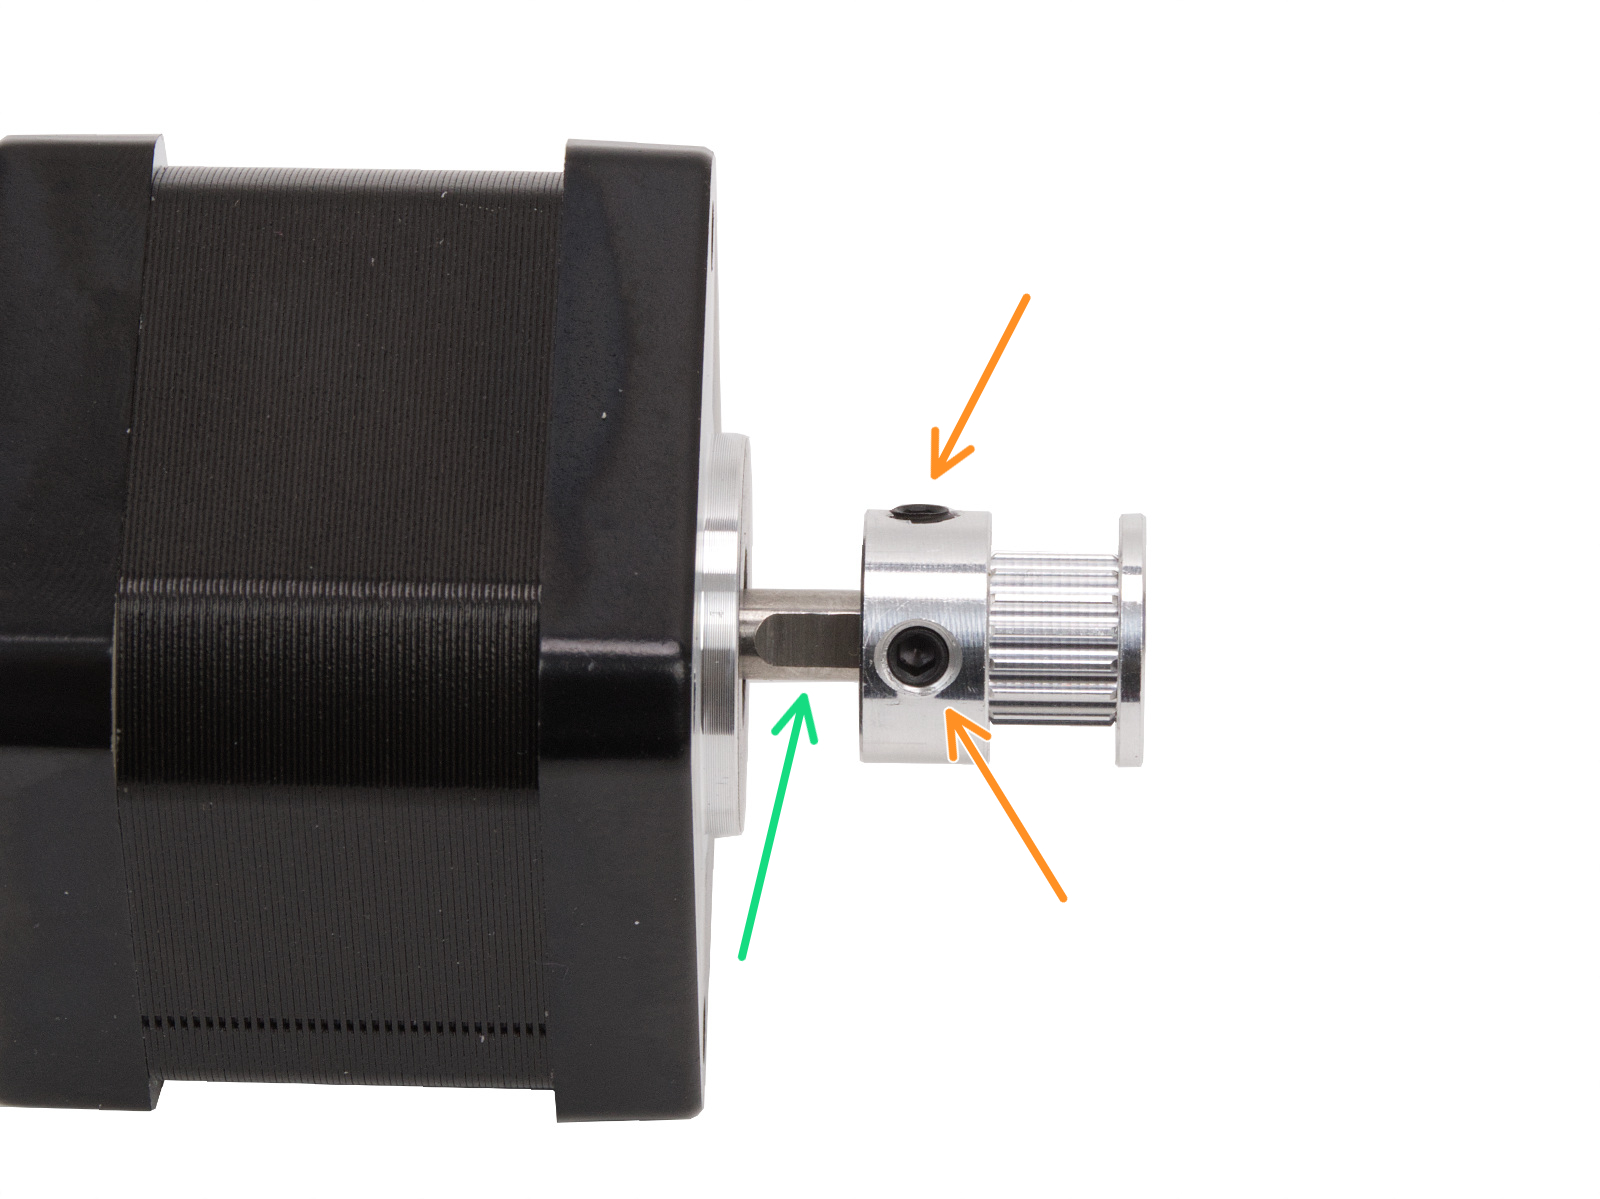
                  Looking from the front of the printer: 
                  • Left 
                    • The teeth for the belt are above the set screws. 
                  • Right
                    • The teeth for the belt are below the set screws. 

                  Original Prusa MK-series

                  Check your printer’s power mode

                  Run the printer in normal mode rather than in the stealth mode. You can change the power mode in LCD Menu -> Settings. 

                  The stealth mode is perfect for small and simple objects. For bigger or more complex prints, the normal mode is recommended. Also, note that in stealth mode, the Crash detection feature is not available. 
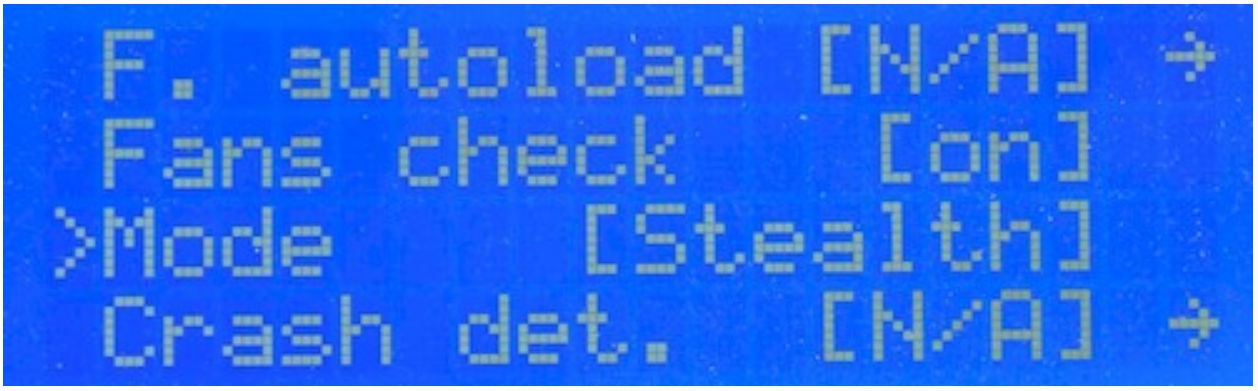
                  Original Prusa MK3/S/+Original Prusa MK4/S, MK3.9/S, MK3.5/S

                  Make sure the extruder and the heatbed can move freely

                  Make sure there are no obstructions in the path of the extruder or heatbed and their bearings. For example, there might be a piece of filament stuck around the belt (usually around the Y-axis pulley) from your previous prints. 
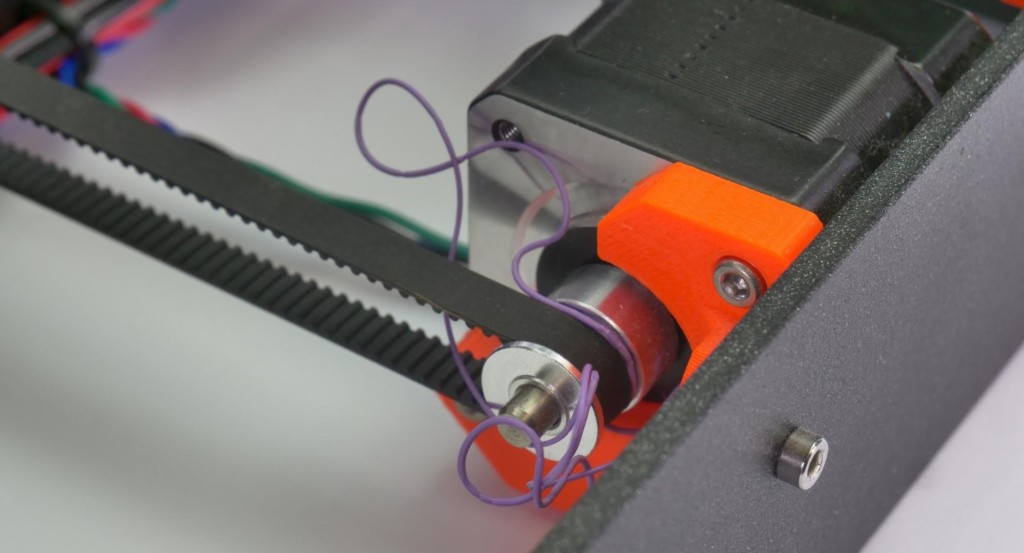
                  pulley obstructionPicture taken on an MK3/S/+

                  Another instance of obstruction is when the zip ties, or other parts of the extruder cable bundle, are not optimally positioned as indicated in their respective assembly guide. If the cables hit the frame before the extruder assembly (MK3 and higher) or before the X end-stop (on MK2/S or MK2.5) the printer detects an inaccurate end position. See the photo below and make sure the cables are arranged accordingly. 
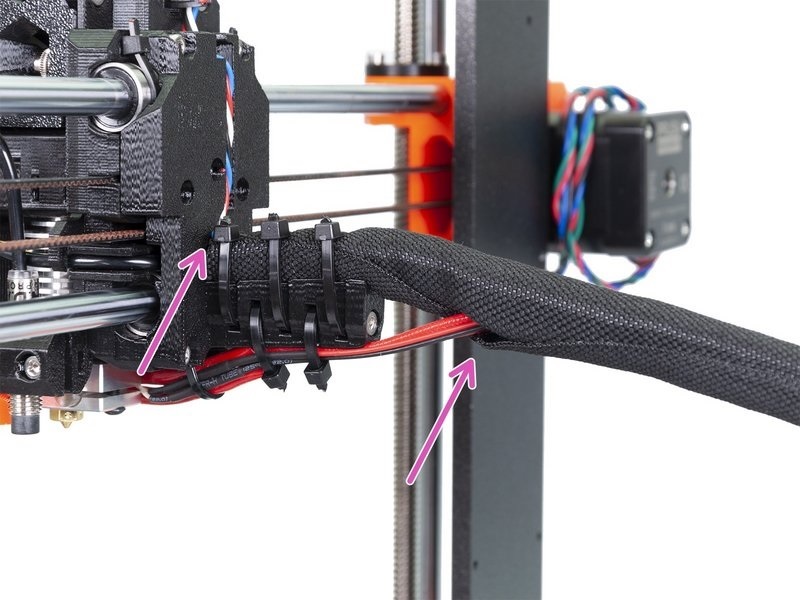
                  ziptiePicture taken on MK3, the same principles apply on other MK-series printers.

                  Verify if the smooth rods don't bear any deep scratches and if the bearings are properly lubricated. Clean the smooth rods with a clean paper towel before applying lubricant. 

                  The optimal lubricant is our Prusa Lubricant. A lithium-based, general-purpose grease also works well. 
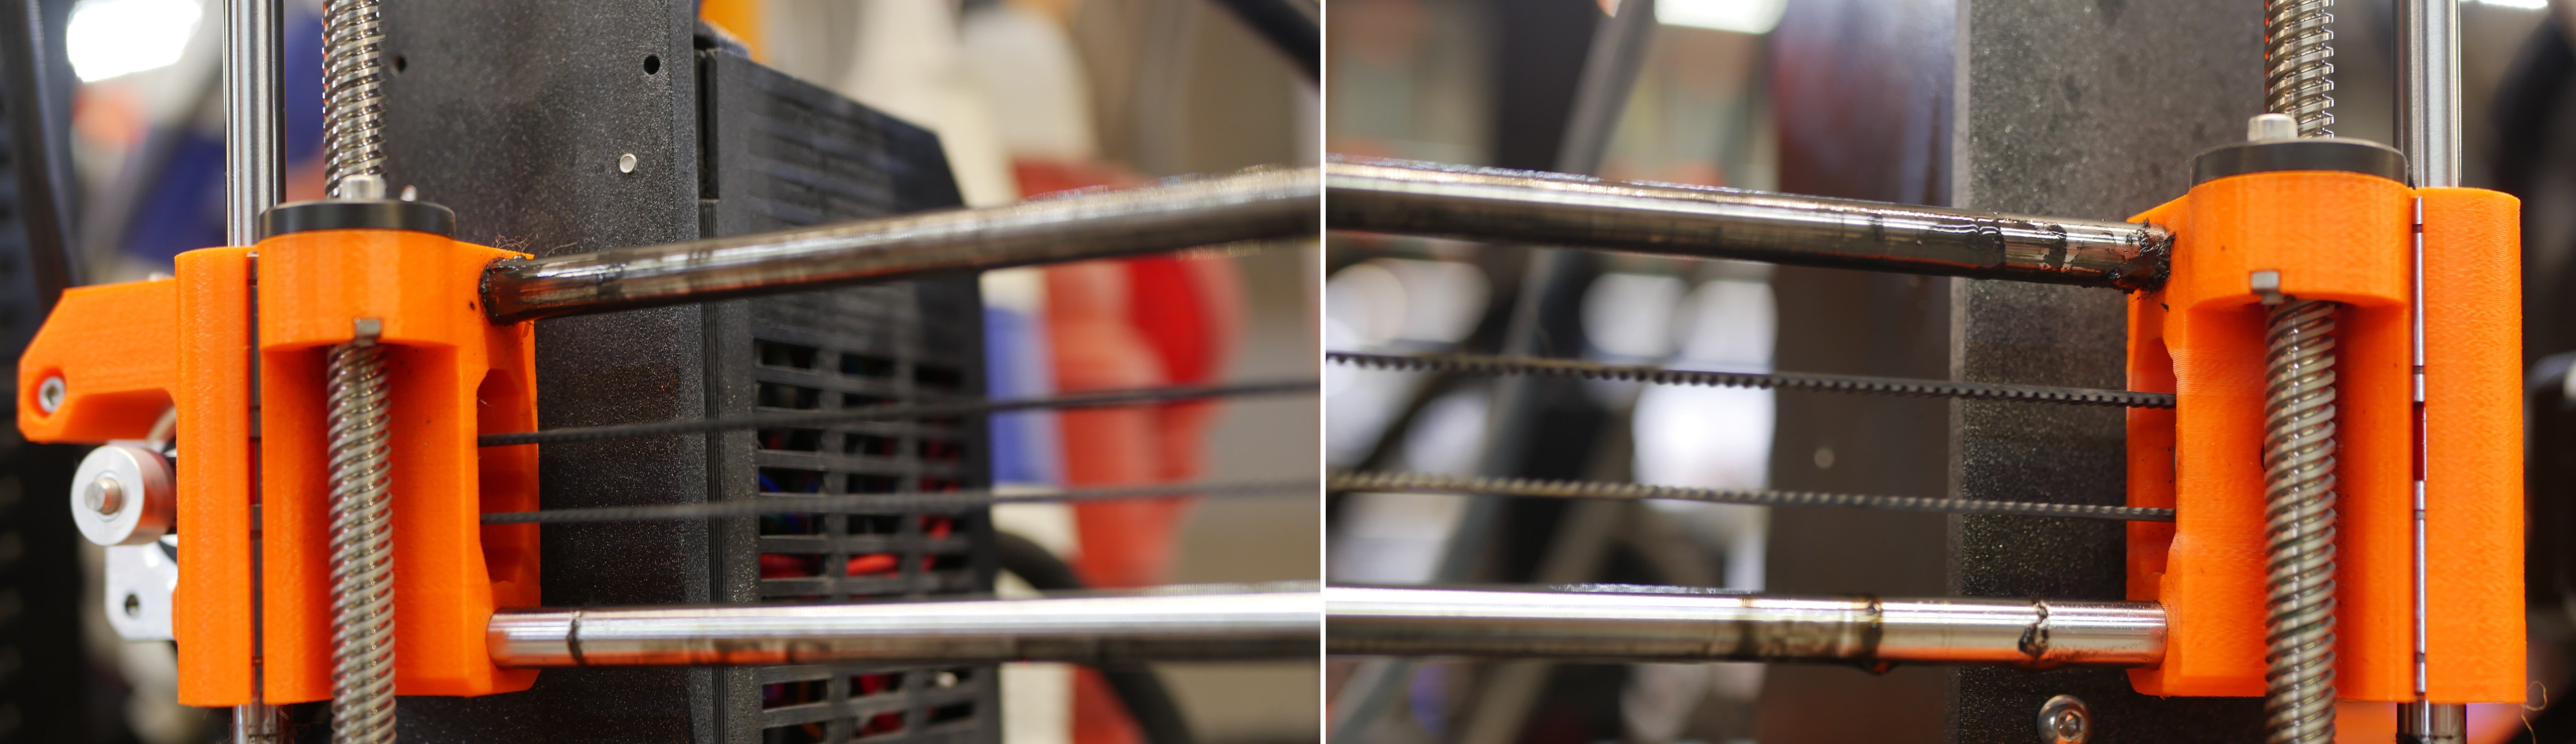
                  smooth rods

                  Check your X/Y axis motors and pulleys

                  Make sure the X and Y motors are tightened in the motor mount, that the pulley is secured on the motor shaft and aligned with the pulley on the opposite end, and that the pulley can move freely. Both grub screws need to be tight, one of them has to be tightened against the flat part of the motor shaft. A loose or misaligned pulley is usually the main cause of staircase layer shifts.
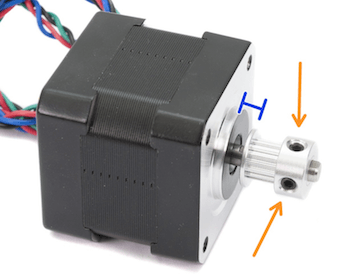
                  Both pulleys on both axes also have to be aligned, meaning the motor pulley has to be well centered and the belt has to be moving in a straight line, not traveling from right to left while the pulley is turning.

                  Check the tension of your belts

                  Check your belt tension.

                  On MK-series printers, a quick way to check it is using our belt tuner, with the instructions in the video below.

                  On MK3/S/+, it is possible to check the Belt Status numbers via LCD Menu -> Support -> Belt Status. 

                  While there is not a precise ideal value, from our experience, the best approximate value is around 250 on the X-axis, and 275 on the Y-axis, with an optimal range at +-15 from these values on either axis. 

                  The value does not represent a physical quantity, but an arbitrary number inversely proportional to the motor load. The values are with the consideration that the assembly is good and that the parts are in good condition and properly lubricated. Values may not be accurate if there are other problems. 

                  • If your value is under (or close to) 240, you need to loosen the belt
                  • If your value is over (or close to) 290, you need to tighten the belt
                  • The values are updated every time you run the Selftest or run the belt test in LCD menu -> Calibration -> Belt test. 

                  Other MK-series models do not have the belt status option. The clue we can give you is that the belt should sound roughly like a low bass string when plucked. It should be possible to pinch the two sides together with your thumb and index finger, but you should feel a little bit of resistance.

                  The plastic parts holding the belts can get loose over time.

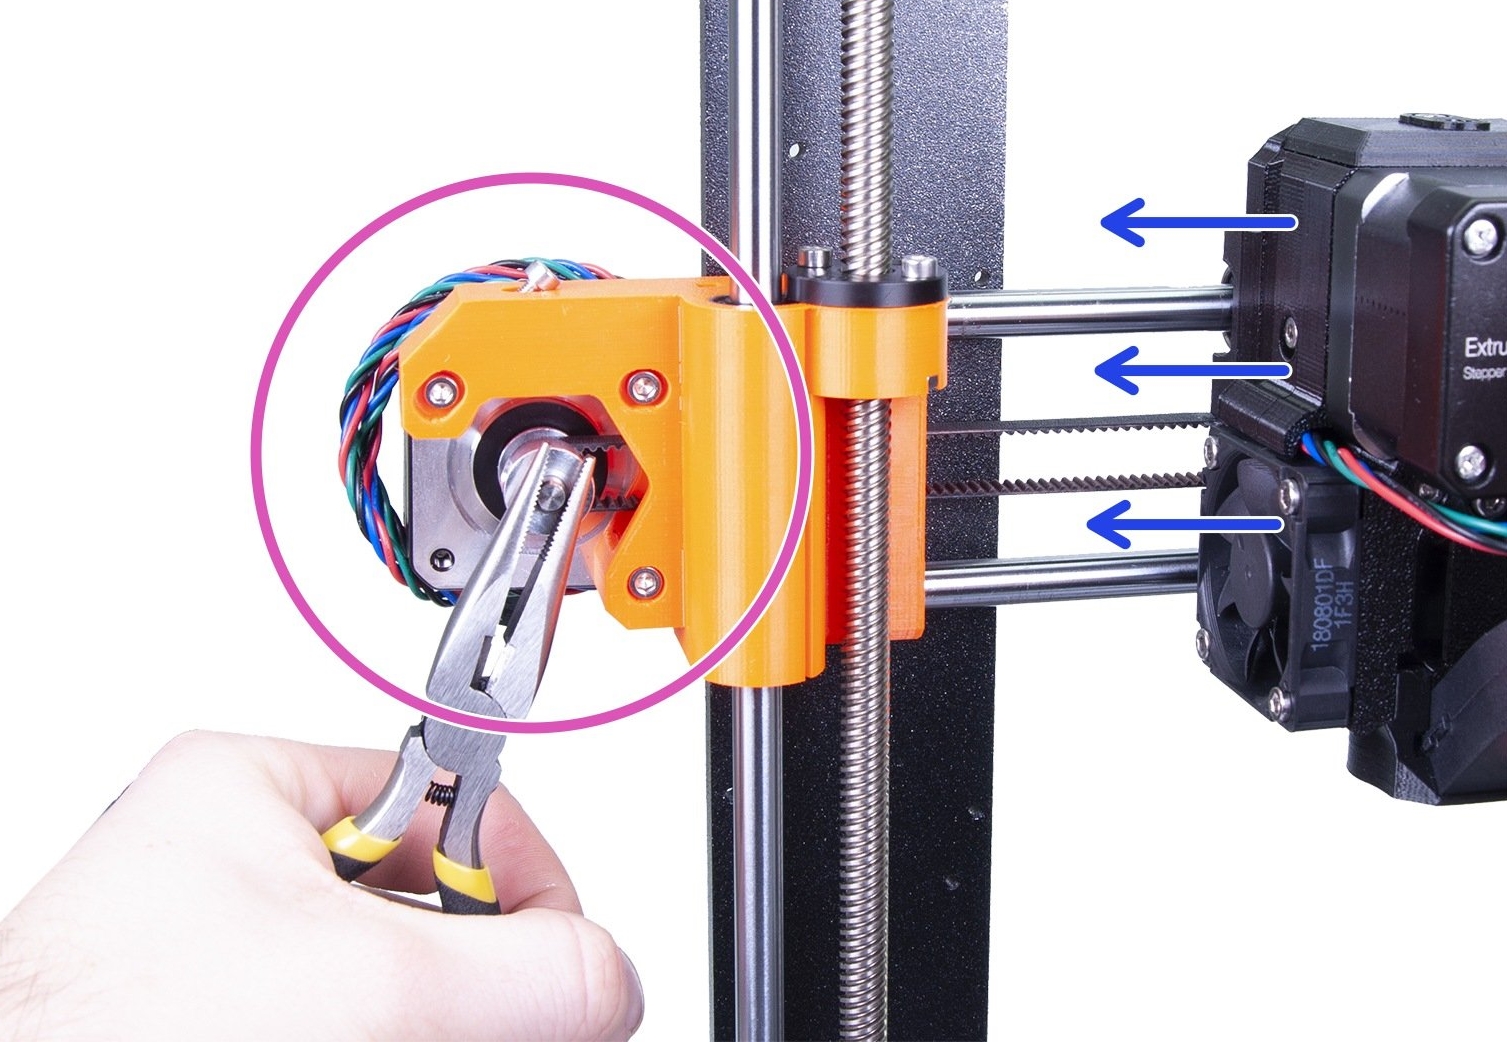
                  Use the following technique to test if the pulley is correctly tightened and if the belt is not too loose. Hold the X-axis motor shaft with pliers (take advantage of the flat part of the shaft) and try to move with the extruder. The same procedure can be applied to test the Y-axis pulley and belt. There should be no slack from the belt or any axis movement during the procedure, if there is, then the belt is too loose. 
                  Original Prusa MINI/+

                  Check your printer’s speed. 

                  When printing large objects, it’s recommended to decrease the printing speed. During a print, go to LCD Menu -> Tune -> Speed and decrease the number.

                  Check the X/Y belts.  

                  Make sure that belts are properly tightened. A quick to check this aspect is using our belt tuner, with the instructions in the video below. 

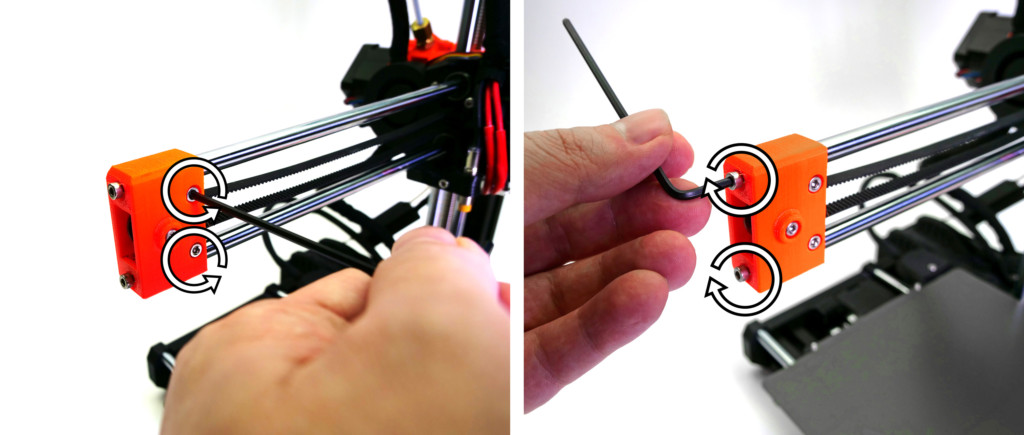
                  Belts should be tight enough to sound like a low bass note when plucked. If the belts are loose, tighten them first: first, loosen the two screws as depicted below. Then, tighten the two screws at the very end of the X-axis. They go directly against the metal rods, so the more tightened they are, the further you move the plastic part. Once you are done, tighten the first two screws again to fix the part in place.
                  Check X/Y axis pulleys. 

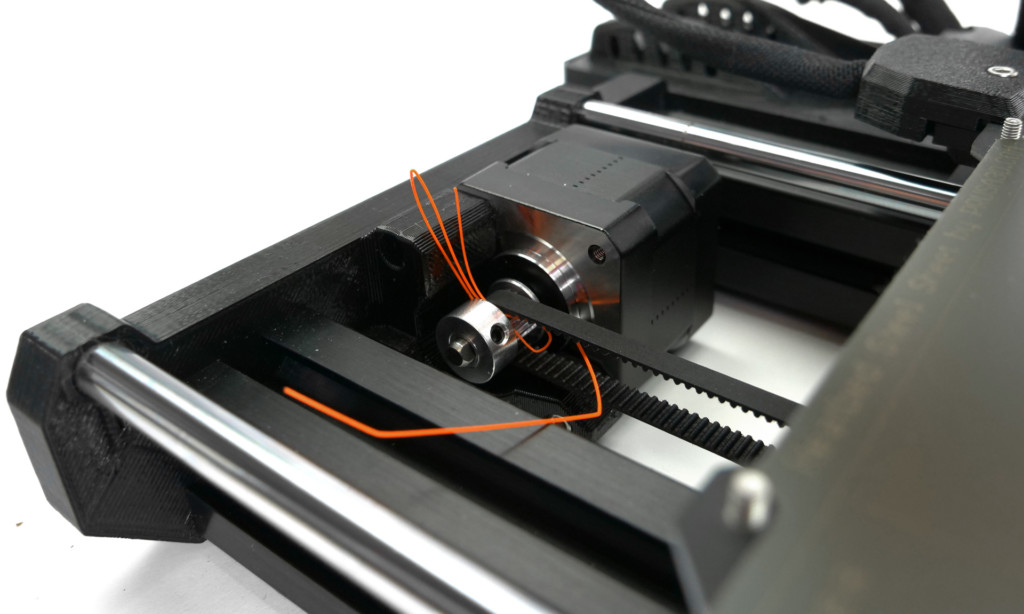
                  Both pulleys on both axes also have to be aligned, meaning the motor pulley has to be well centered and the belt should be perfectly straight. Check whether the X-axis belt is not brushing against printed parts.

                  Make sure nothing is blocking the movement of your axis – Check for any obstructions in the path of the bearings or any possible waste from previous printings stuck around the belt (usually around the Y-axis pulley).
                  Loose X/Y-axis belt pulley

                  If the set-screw on the belt pulley has come loose or it was not secured on the flat side of the motor shaft, it can slip and may cause issues with the axis not moving perfectly in tandem with the motor's rotation.

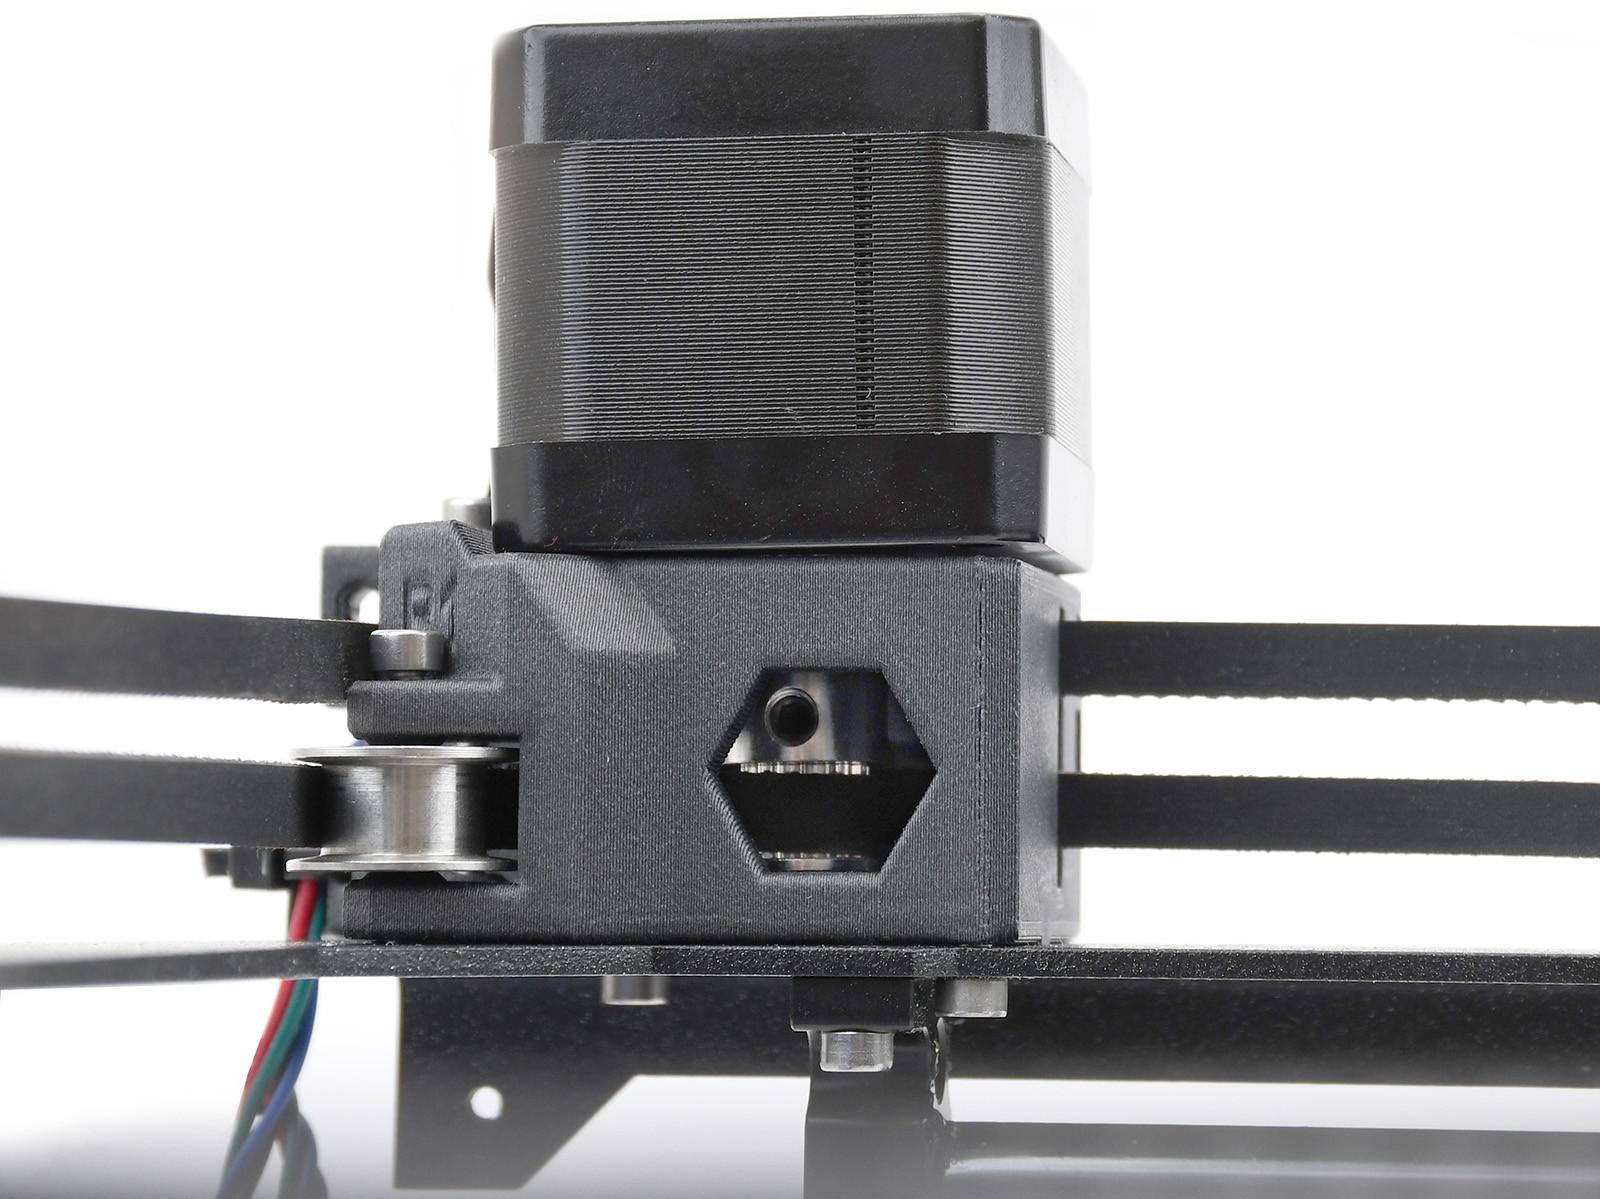
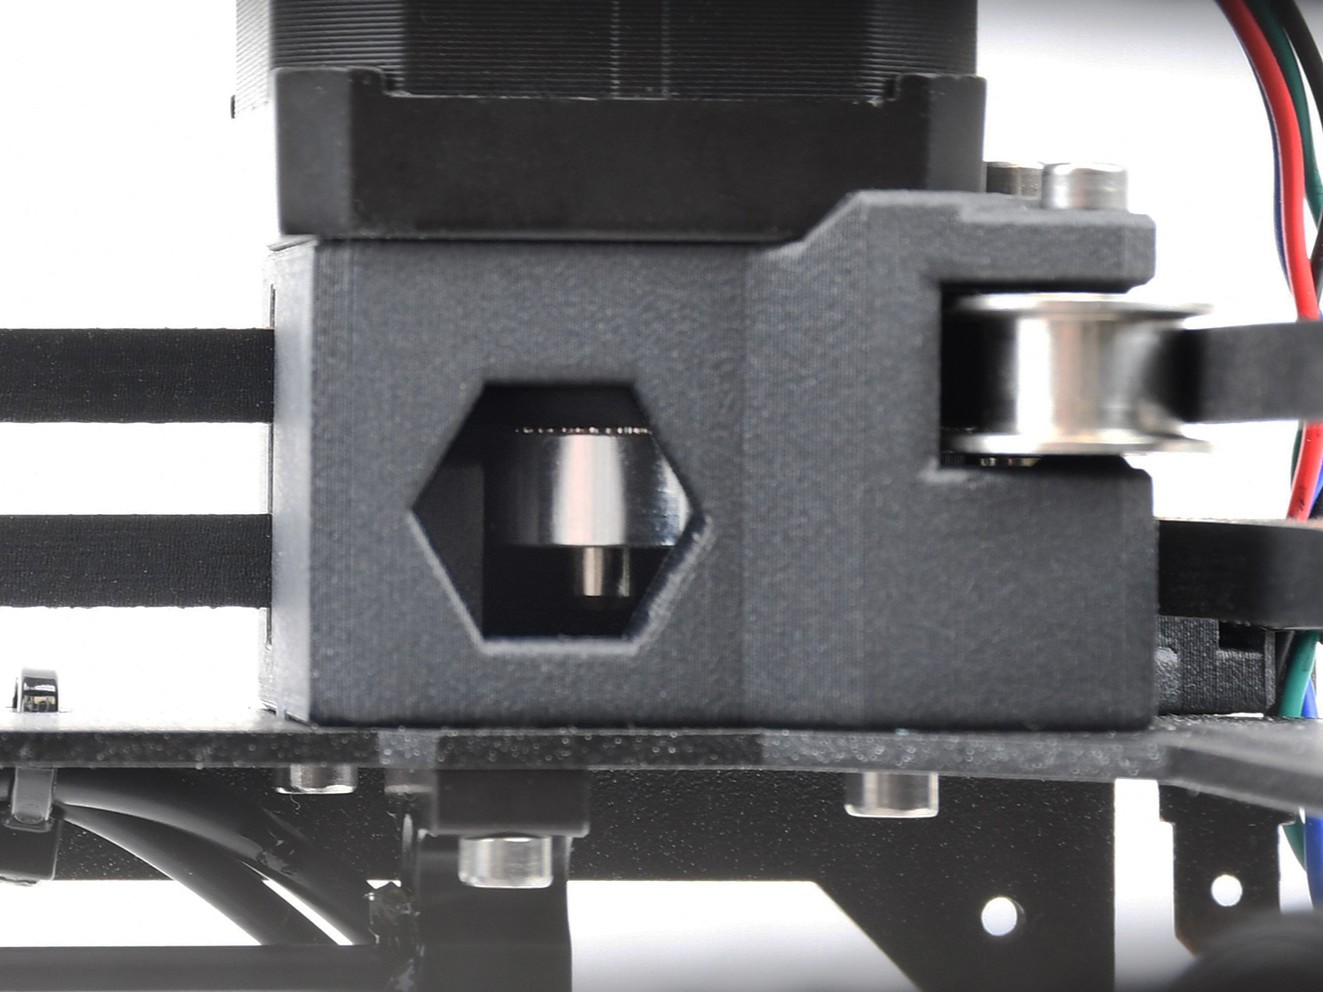
                  The set-screw for the Y-axis is easily accessed, being under the bed, but the X-axis is a bit more tricky. You can access the set-screw for the X-axis through a hole on the top of the extruder (picture below). You will not be able to see if the set screw is aligned with the flat side of the motor-rod and tightening it will only be a temporary fix, but it is a great way of knowing if this is the issue and what needs to be disassembled.

                  If you only see shiny metal in the hole, you must rotate the motor to reveal the set-screw. Even it is loose, it will move a little with the rotation of the motor, revealing the screw. Access Settings -> Move Axis -> Move X, on the LCD-menu, and rotate the knob to spin the motor.
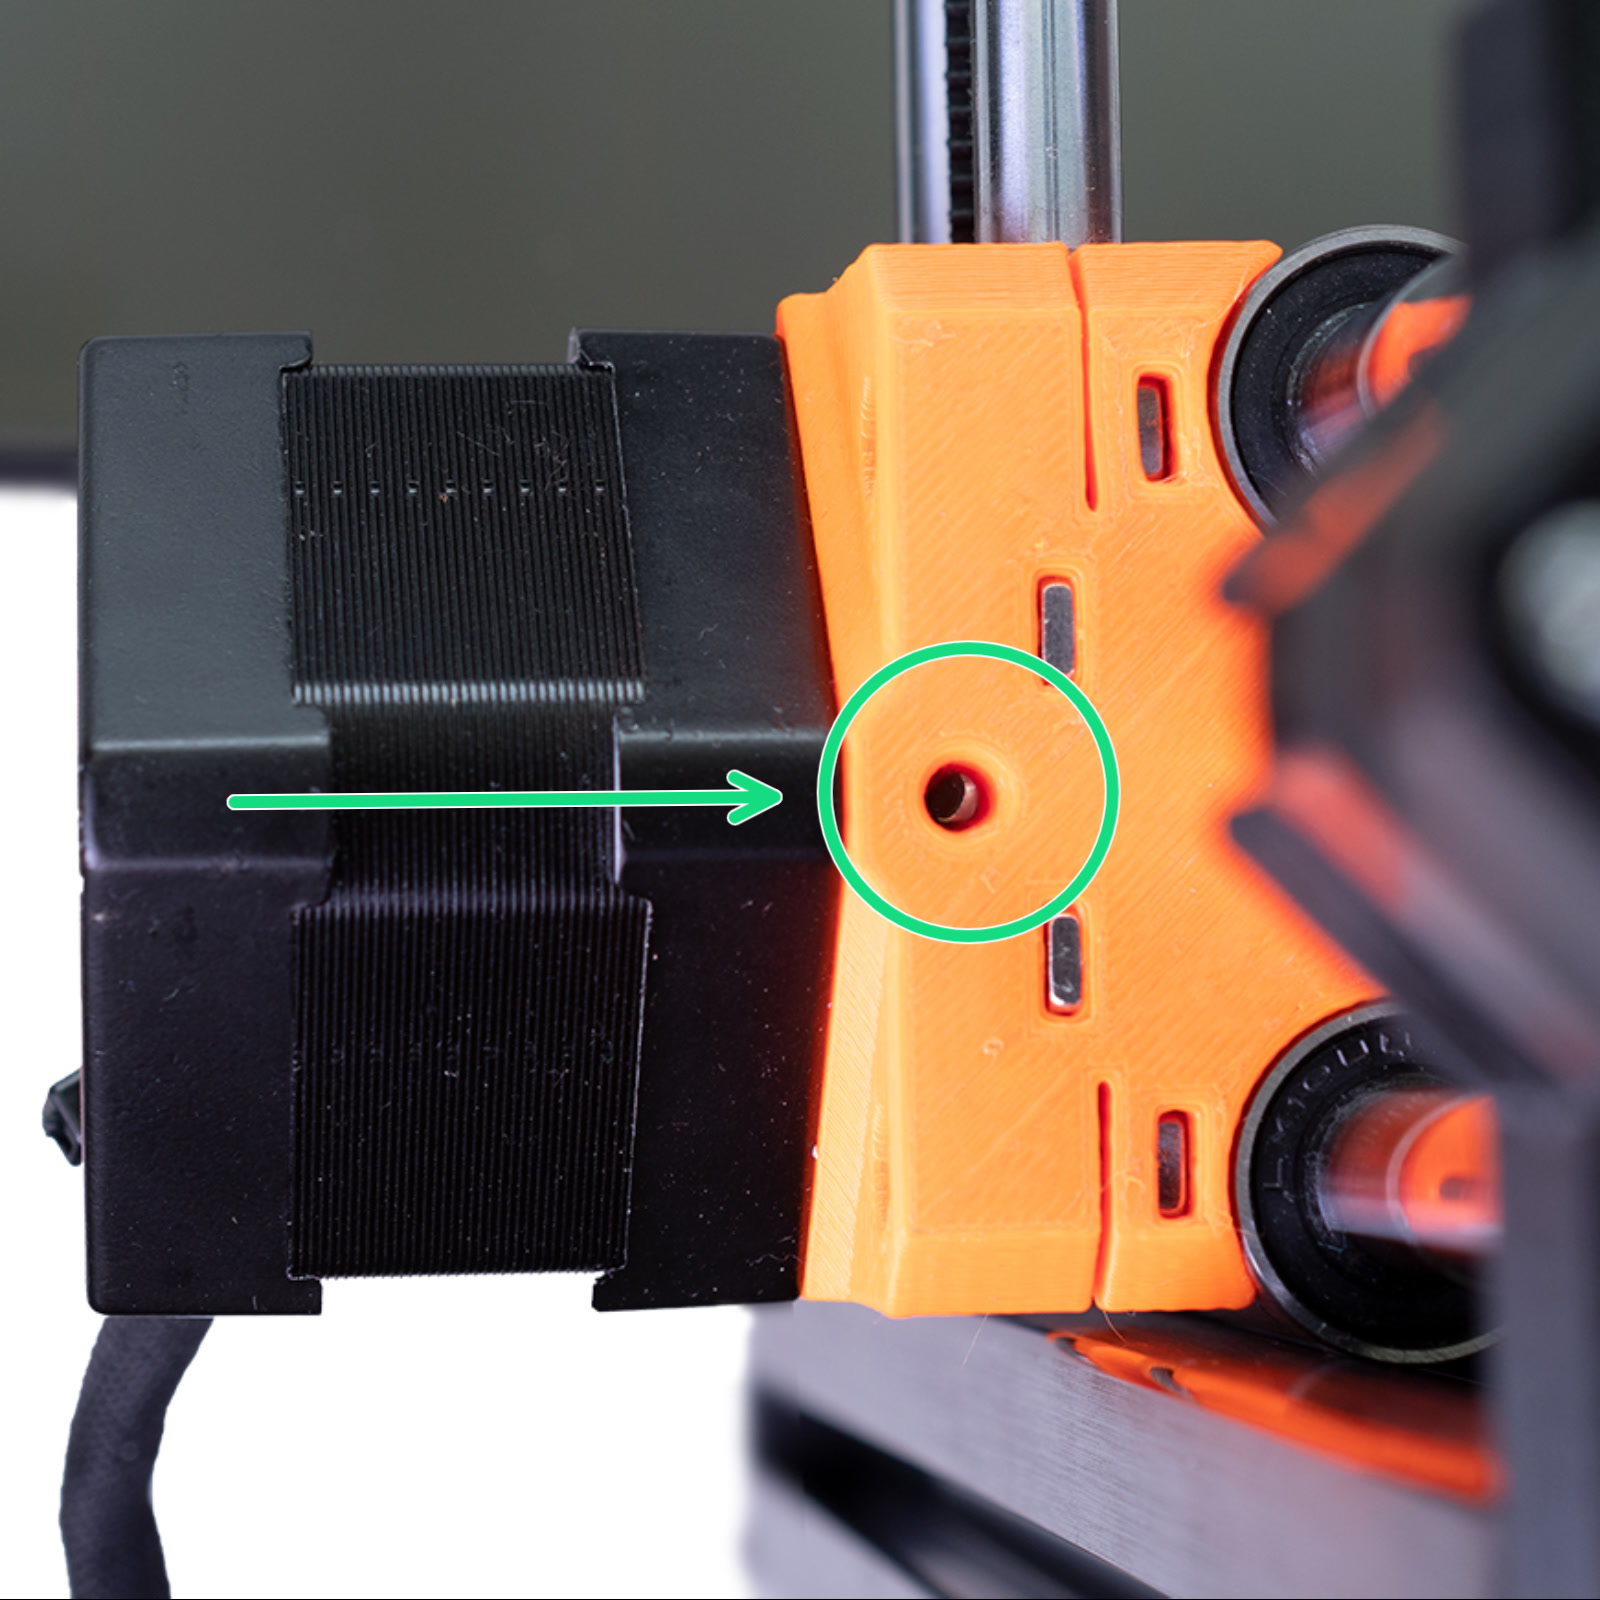
                  Use a 2 mm Allen key to tighten the set-screw of the pulleys.

                  Free movement of the axis

                  Make sure the print head (the part moving along the X-axis) can move freely in the entire range. Especially the cable bundle attached to the extruder should not prevent the print head from reaching the end of the axis.
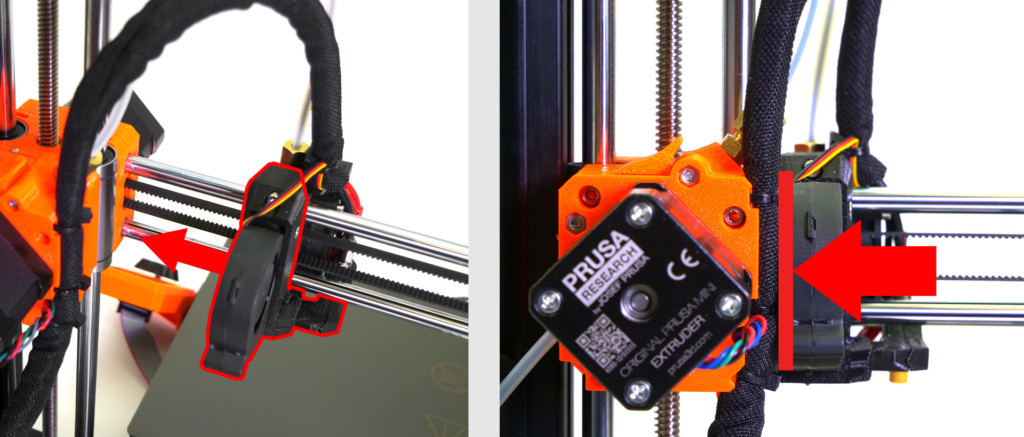
                  Also, verify if the smooth rods are not scratched and if the bearings are properly lubricated. Clean the smooth rods with a clean paper towel before applying lubricant. 

                  The optimal lubricant is our Prusa Lubricant. A lithium-based, general-purpose grease also works well. 

                  Original Prusa XL

                  Belt tension

                  Using the guidelines in the dedicated article, check the belt tension. 

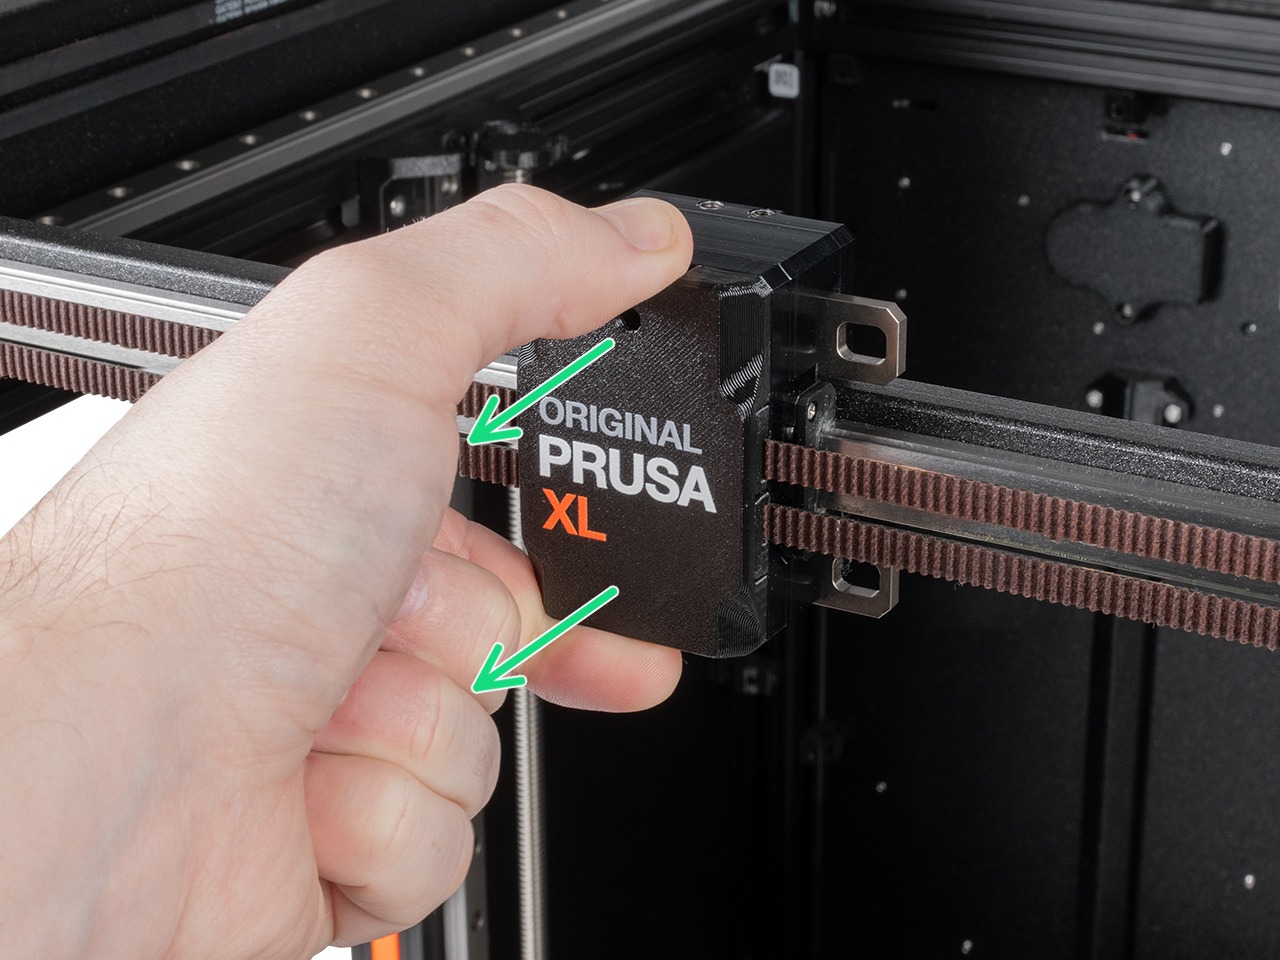
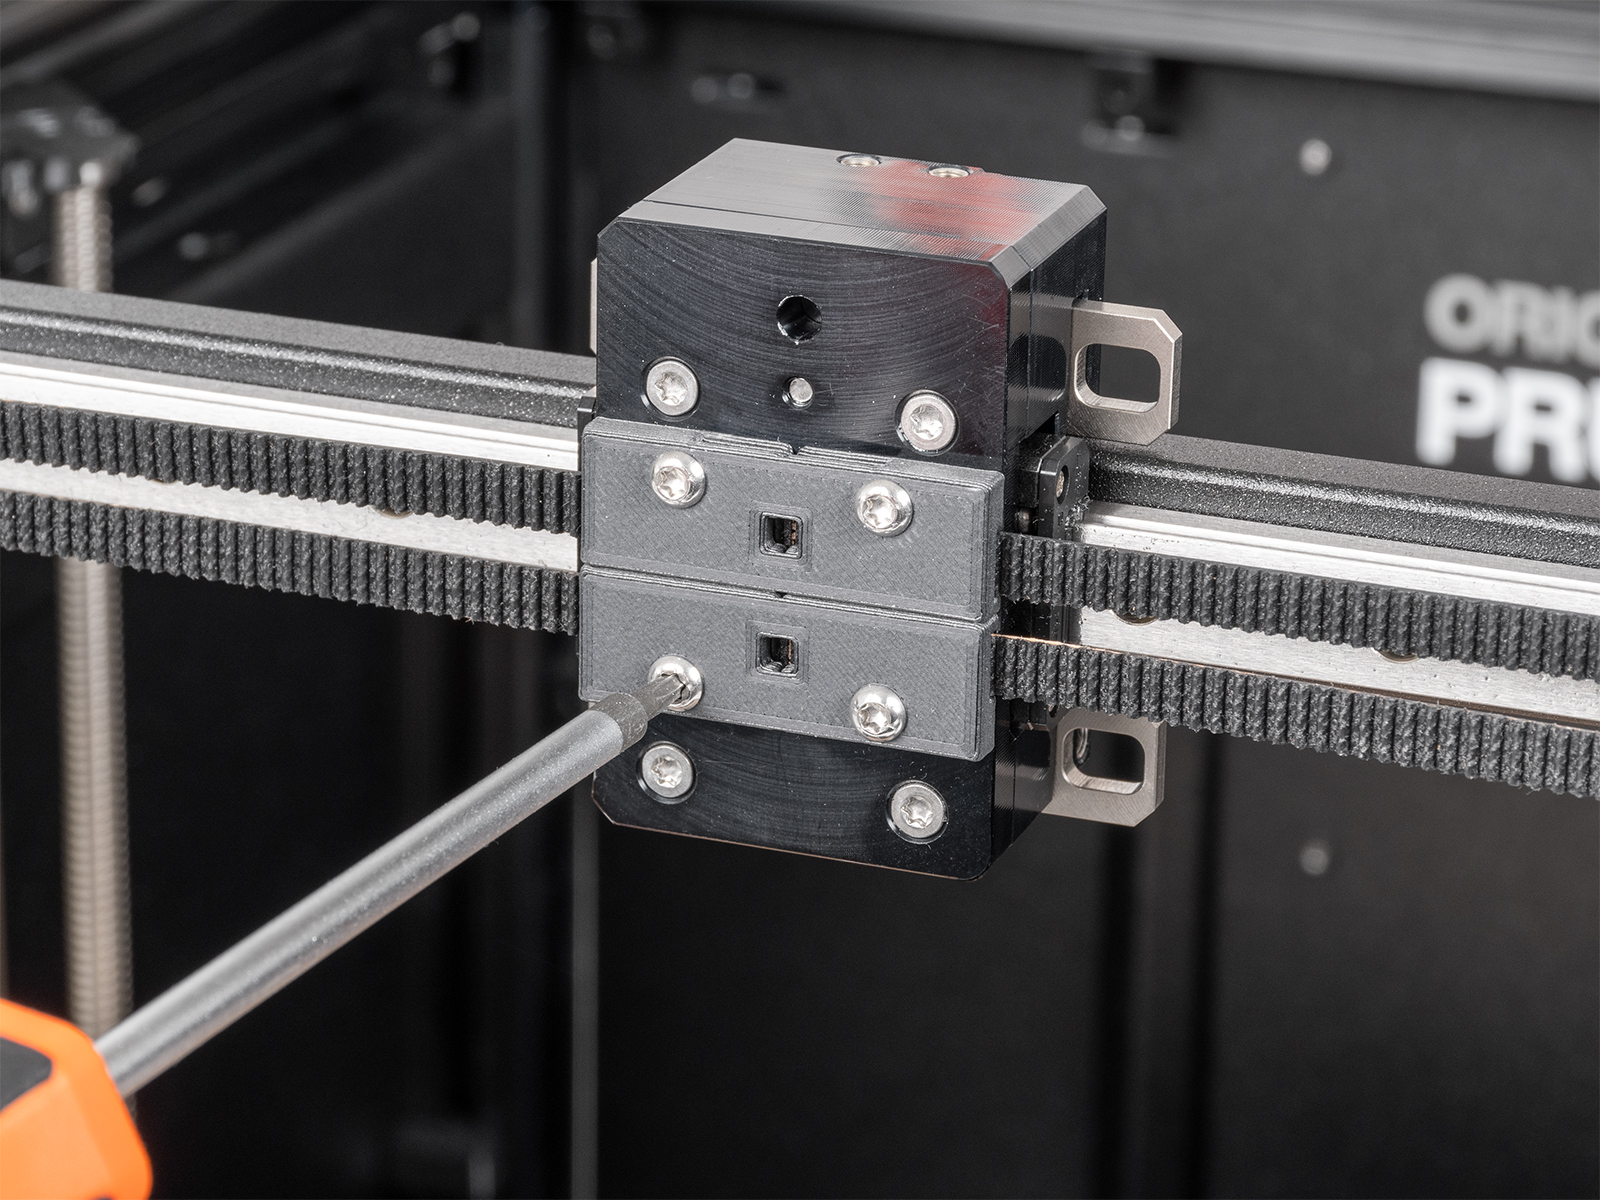
                  Ensure that the belt clamps are in good visible status. To access them, remove the front cover and check the clamps for visual damage. 
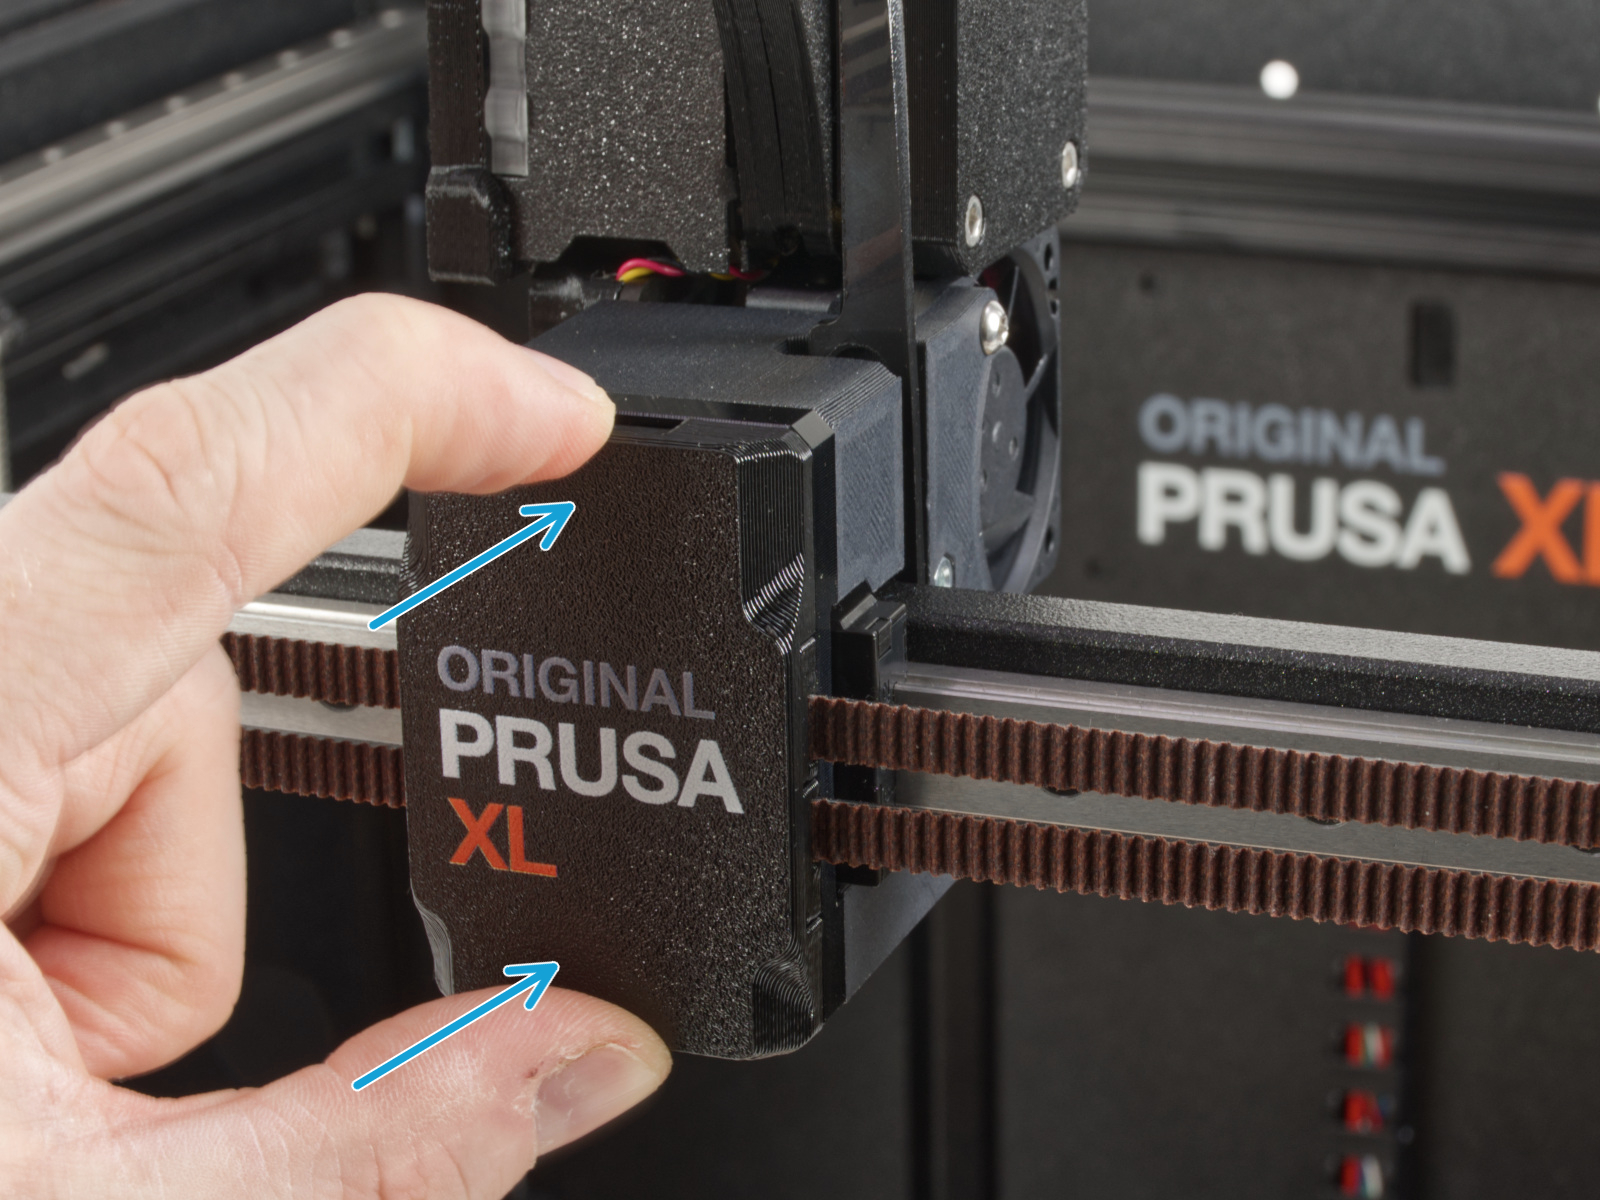
                  Single-tool XLMulti-tool XL

                  XY motor pulleys

                  Though rare, if one of the motor pulleys loosens over time, it will misalign and contribute to inconsistent movement. The pulleys are positioned differently on each of the two XY motors.
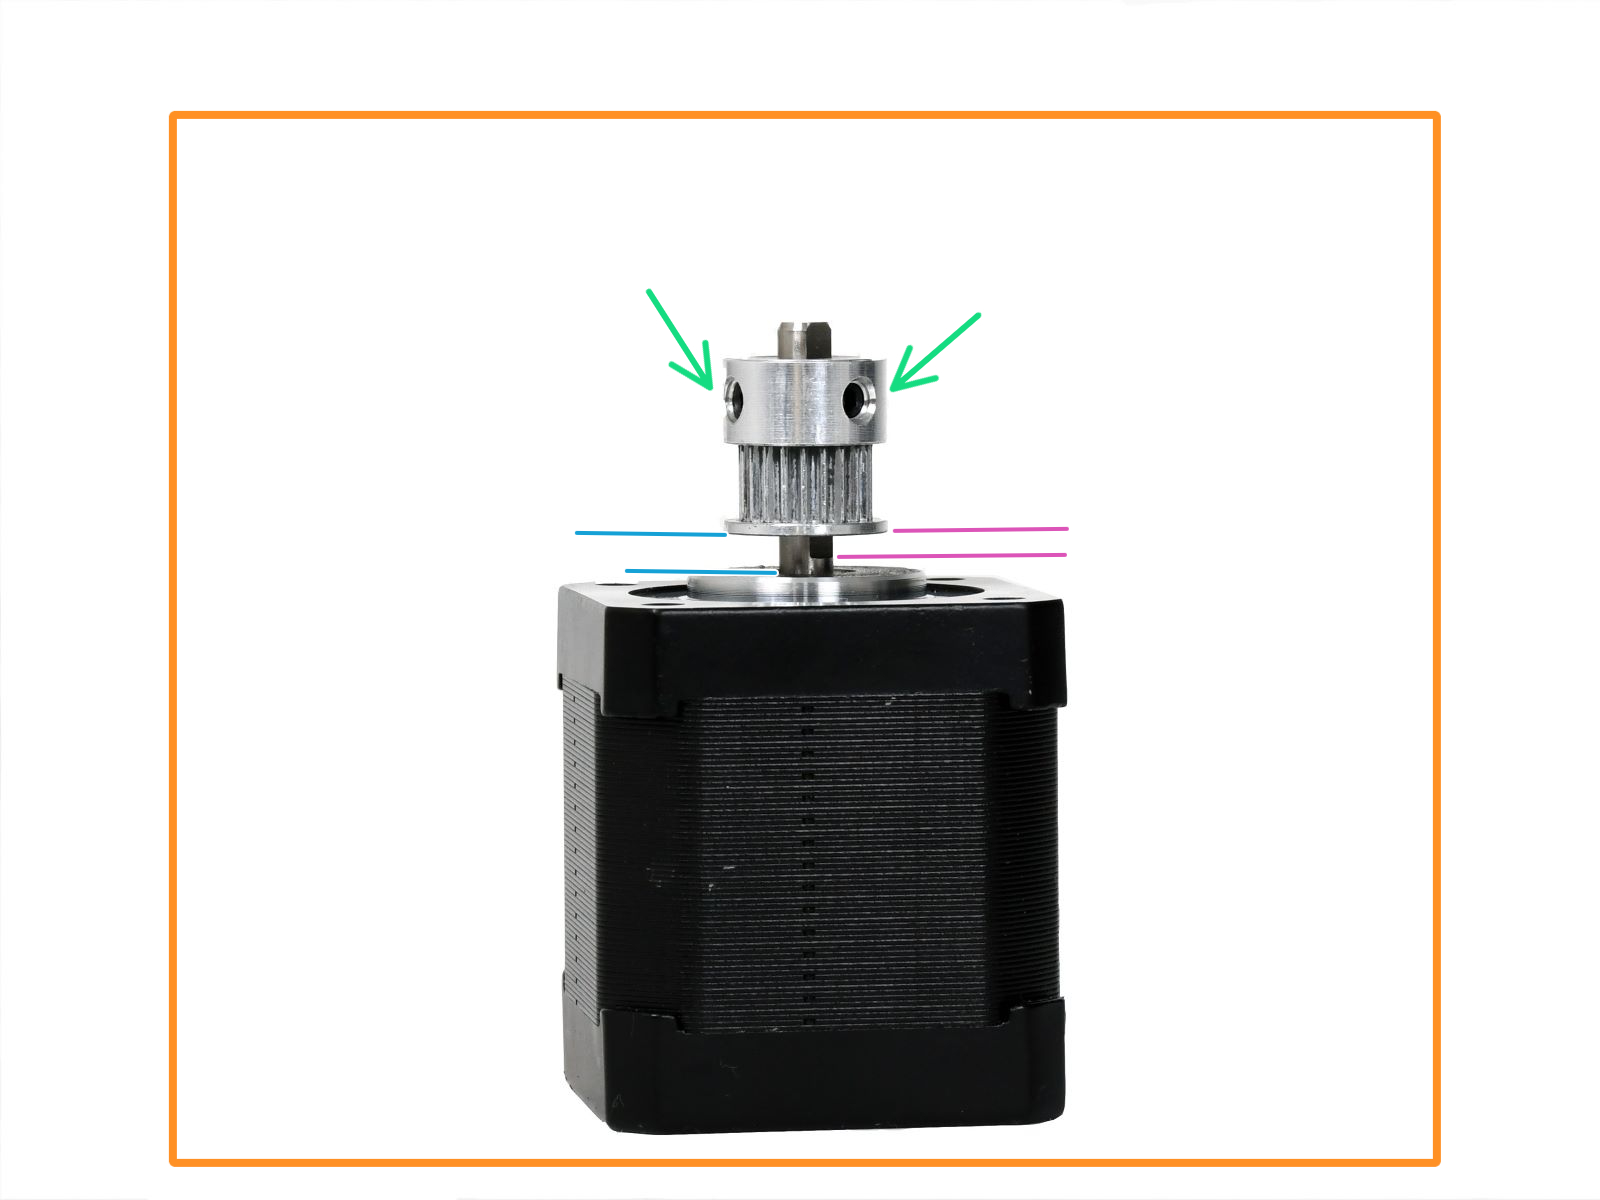
                  • Left
                    • Note the orientation of the pulley. The teeth for the belt are below the set screws.
                    • The pulley is 2.5mm higher than the start of the flat part of the motor shaft. Use the 2.5mm Allen key for reference.
                    • Alternatively, measure the distance between the beginning of the motor shaft and the pulley, 3.6mm.
                  • Right
                    • Note the orientation of the pulley. The teeth for the belt are above the set screws.
                    • The pulley is flush with the top edge of the motor shaft.

                  Print geometry and settings

                  Objects with overhangs are generally harder to print. Some overhangs might even warp upwards during the print, and the nozzle might crash into them. The same can happen in some cases if you choose a very small infill percentage when slicing the 3D model.

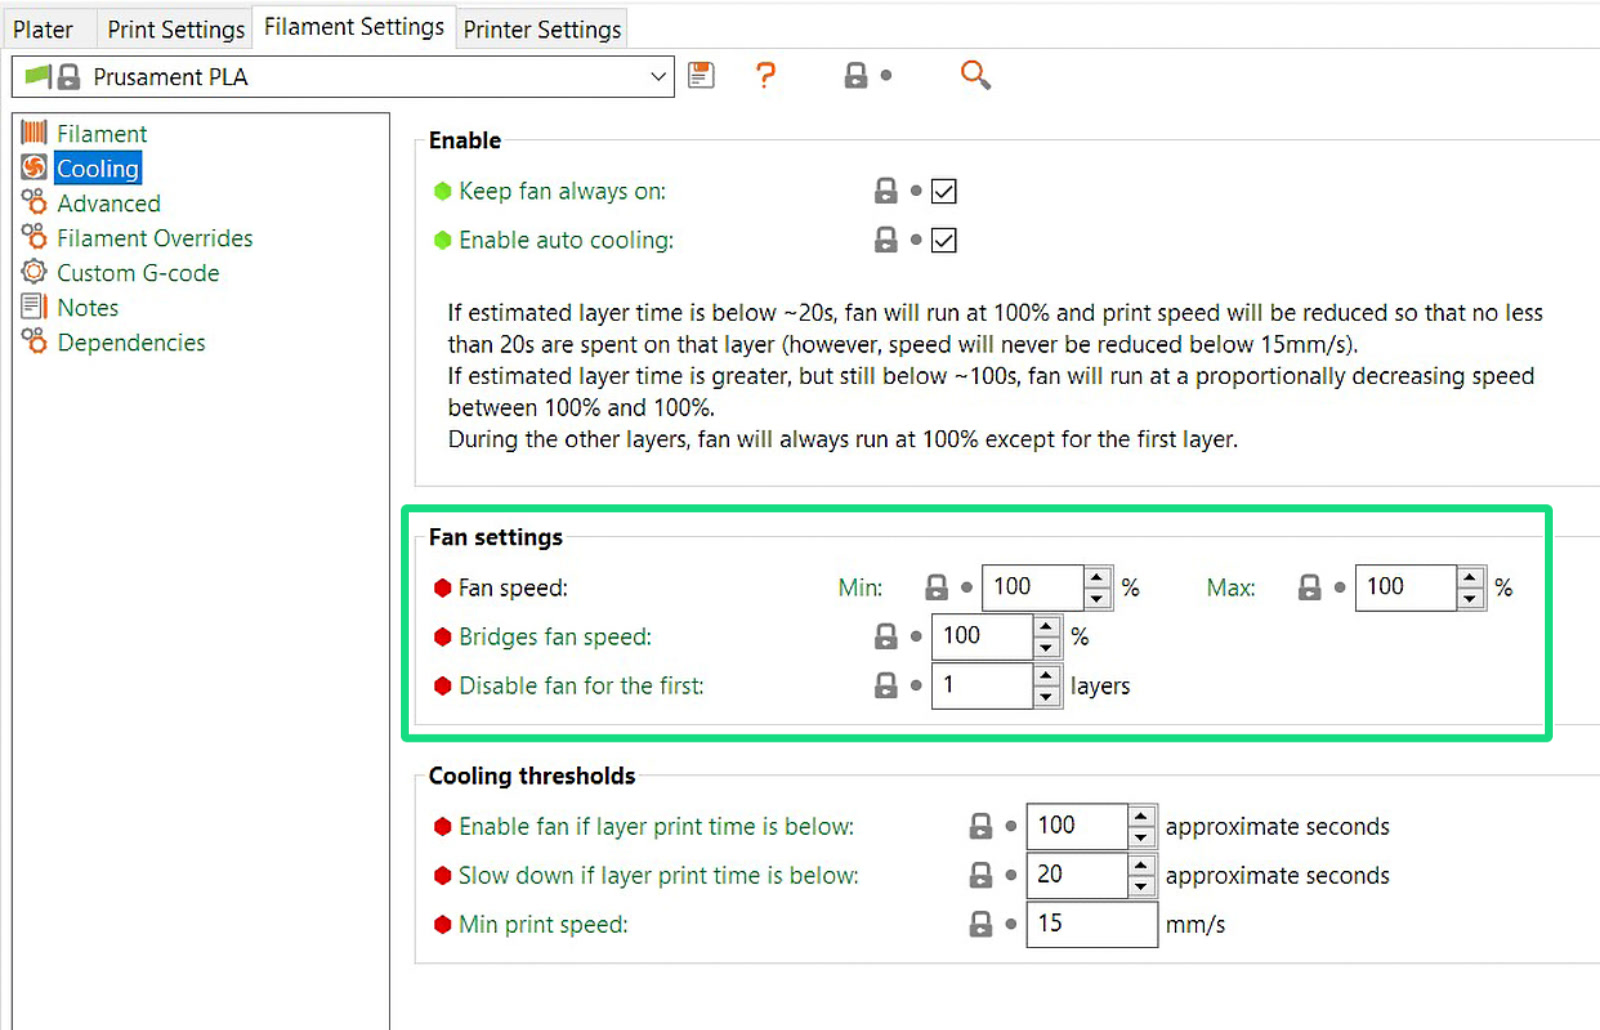
                  To prevent printing overhangs, you can cut the object (check out our article on the Cut tool). You can also try to increase the print fan speed or increase the retraction length in PrusaSlicer. Print fan speed is found in Filament settings -> Cooling and retraction length in Printer Settings -> Extruder 1.

                  screenshots
                  Was this article helpful?
                  This action is available only to registered users. Please log-in.

                  Topics

                  • Troubleshooting
                    • Print Quality Troubleshooting
                      • Ghosting
                      • Poor bridging
                      • Bad looking surface above supports
                      • First layer issues
                      • Stringing and oozing
                      • Layer separation and splitting FDM
                      • Failing supports
                      • Problems with infill
                      • Under-extrusion
                      • Warping
                      • Layer shifting
                      • Watertight prints
                      • The Benchy hull line
                    • Diagnostics
                    • QR Error codes
                    • Printer troubleshooting
                    • Print Error Messages

                  33 comments

                  Log in  to post a comment
                  Mox
                  •
                  Prusa core ONE solution:
                  Check your X/Y-axis motors and pulleys. This helped me!

                  Two screws on the left motor were loose and had fallen underneath the motor. At first, I was worried that I would have to find replacement screws, especially because they are not available on the Prusa Shop. Luckily, I found both of them underneath the motor.

                  Check whether all your screws are in place, and if they are, tighten them properly.
                  Reply
                  Easton Kesler
                  •
                  For small layer shifts that look like the picture titled x-axis at the top of the page, go to your LCD Menu > Settings > Crash Det. and change it to [Off].


                  -This works and is so easy.🦖
                  Reply
                  Alex
                  •
                  But why does crash detection cause this? I have had this happen once and it was my first "large" print using PETG, printing overnight. ~10 different pieces and all were shifted on the X axis at the same layer. I printed the same package in 3 separate runs and it worked fine.
                  Reply
                  YawningFox
                  •
                  I've been having issues with burnt filament blobs falling onto the print and causing this issue when the nozzle collides with them no matter what temp I print at (220 all the way to 260 tried in increments); I also cleaned the nozzle and hot inserted it for a allegedly leakproof seal, but it's still causing this issue. I'm working with the Core One with Clear Prusament PETG. Have any of you had experience with this that can possibly fix this issue? It's making this printer non-functional at this point, and I don't know what to do. Thank you for your help!!
                  Reply
                  skyevg
                  •
                  If you're still having this issue, try setting the Z offset to a small positive distance(0.05 was right for me) in PrusaSlicer; on at least my Core One, the blobbing was caused by the first layer being way too squished and the plastic having nowhere to go, and setting a small Z offset made the blobs disappear.
                  Reply
                  omegared13
                  •
                  I've been having issues with X axis layer shifts after a filament change, both configured in the slicer, and using the Tune menu feature, on my MK3S+ (firmware version 3.14.1-8237). When the shifts started, I checked belt alignment, tension, and cleaned/lubed the rods. I've done a XYZ calibration, tested multiple models, used different slicers (Prusa Slicer and Orca). No change after all of this.

                  If I do multiple filament swaps, it "almost" corrects itself on every other swap.

                  Any ideas on where to go from here? I don't get any layer shifts on a single color/material print, just filament changes.
                  Reply
                  Steph
                  •
                  This happened to me on a Core One when activating "Avoid crossing perimeters" in the slicer and from what I can see in forums, I am not alone. De-activating the option fixed the issue. According to one forum post, it "leads to two things: 1. A massive amount of extra commands for tiny movements, which can overload the processor and 2. Direction changes at full travel speed, without slowing down." (https://forum.prusa3d.com/forum/postid/755590/)

                  I think this should be mentioned first before sending people on a wild goose chase tightening pulleys and whatnot.
                  Reply
                  mesquitebear
                  •
                  Thank you so much man I was taking my brain why my printer was doing this. And it was that one setting. Thank you
                  Reply
                  Tuomas Lukka
                  •
                  YES! I saw this on the XL now, watching the printer go CLONK when it did something with no acceleration limits. Going to be turning that feature off...
                  Reply