関連するもの


EasyPrint is a cloud-based slicing utility that allows you to quickly prepare a model for 3D printing from your phone, tablet, or computer and send it to your printer via Prusa Connect. It is available entirely for free on the Printables website and within the Prusa App.
Unlike the powerful but complex PrusaSlicer, EasyPrint is, by design, limited in its scope. The user only has to select a few important settings, such as the print quality preset and filament material. The application automatically decides all of the other settings. The basic workflow is described below.
Technically speaking, EasyPrint is only a simplified front-end for PrusaSlicer installed on our servers that handles the actual slicing. You can also download your project file from EasyPrint as a 3MF file and open it on your computer in PrusaSlicer. This way, you can fine-tune the settings if needed, or just save the project for later use.
The screenshots below mainly show EasyPrint on a computer in a widescreen format. On a tablet or smartphone, the layout is slightly different to accommodate the smaller screen, but the overall functionality is the same. Everything can be accessed with touch controls only.
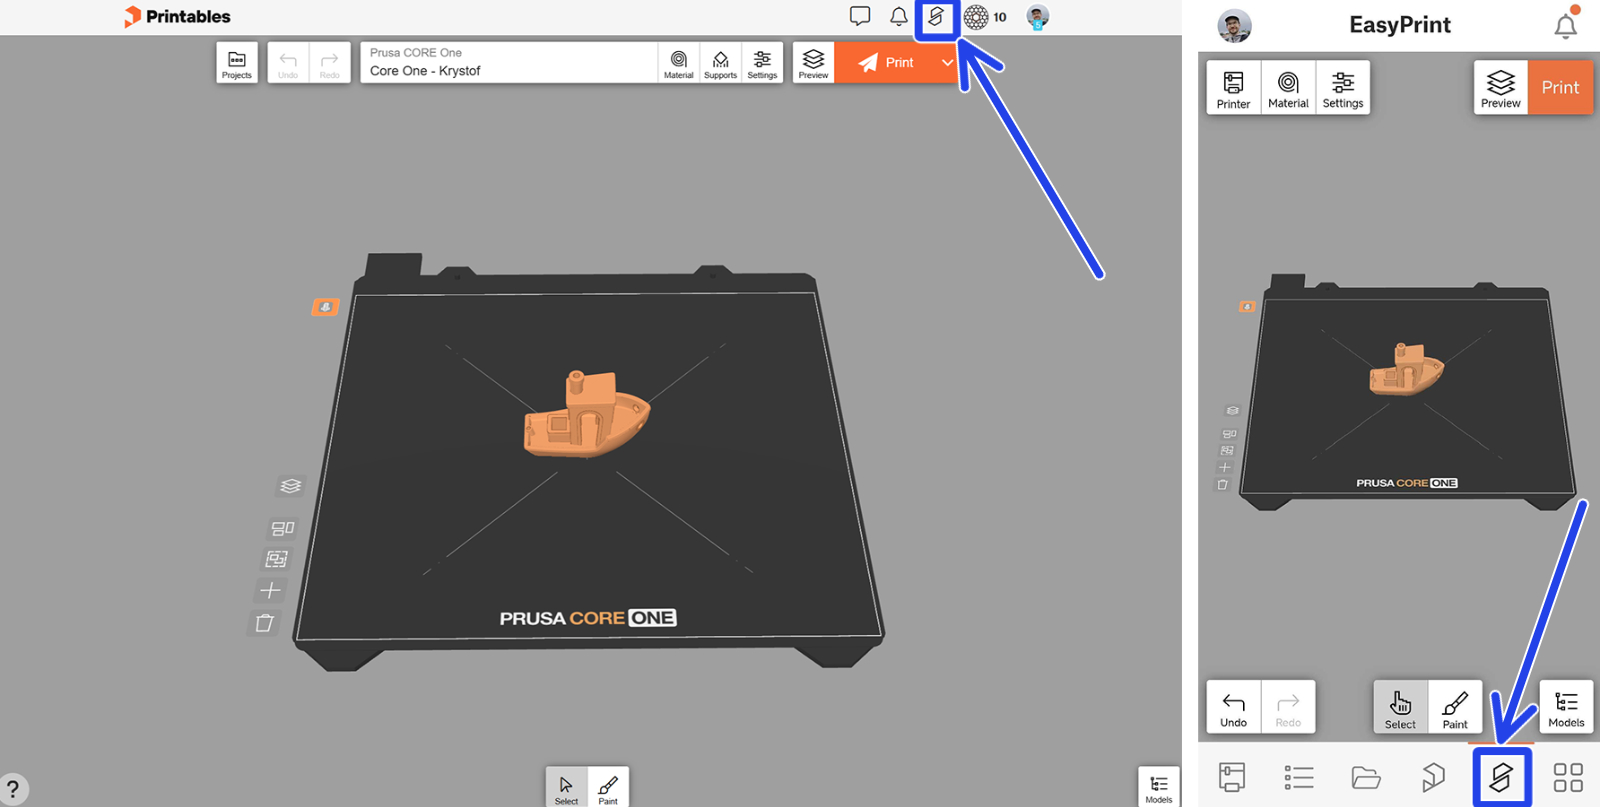
While browsing Printables, click the EasyPrint button in the top menu to open the EasyPrint interface. Within the Prusa App, this access button is located in the bottom menu.
The basic EasyPrint interface includes all the necessary tools.
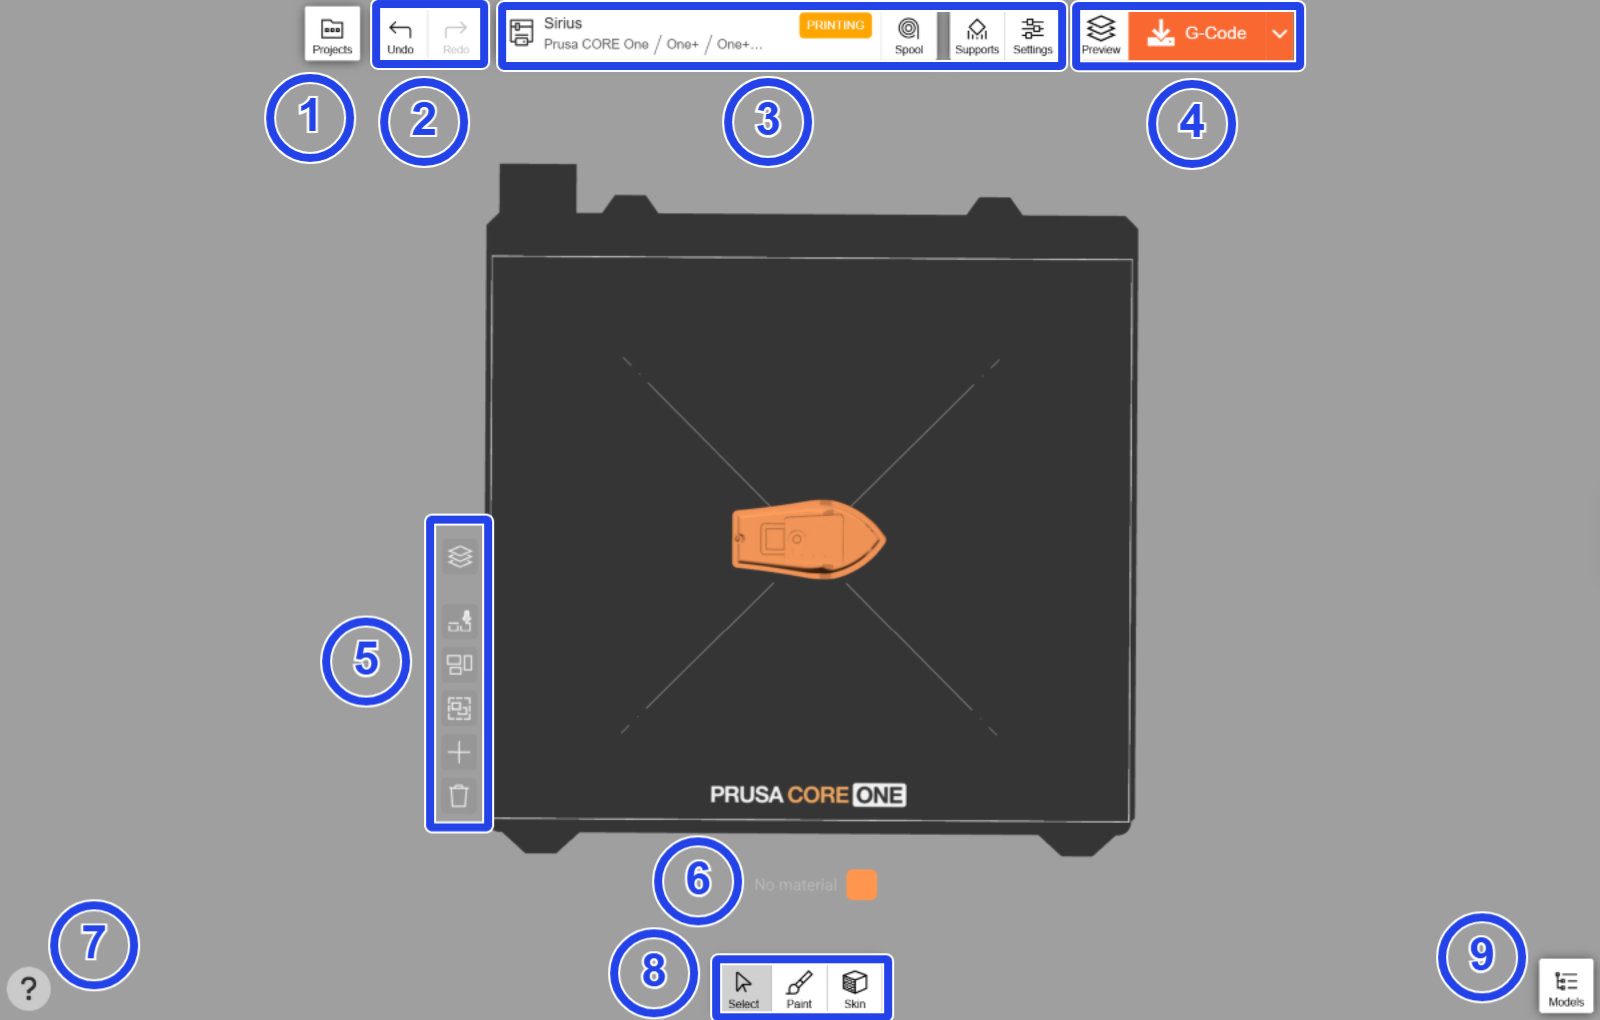
The main portion of the screen consists of a to-scale representation of the print sheet, where you can move and adjust the models you want to print.
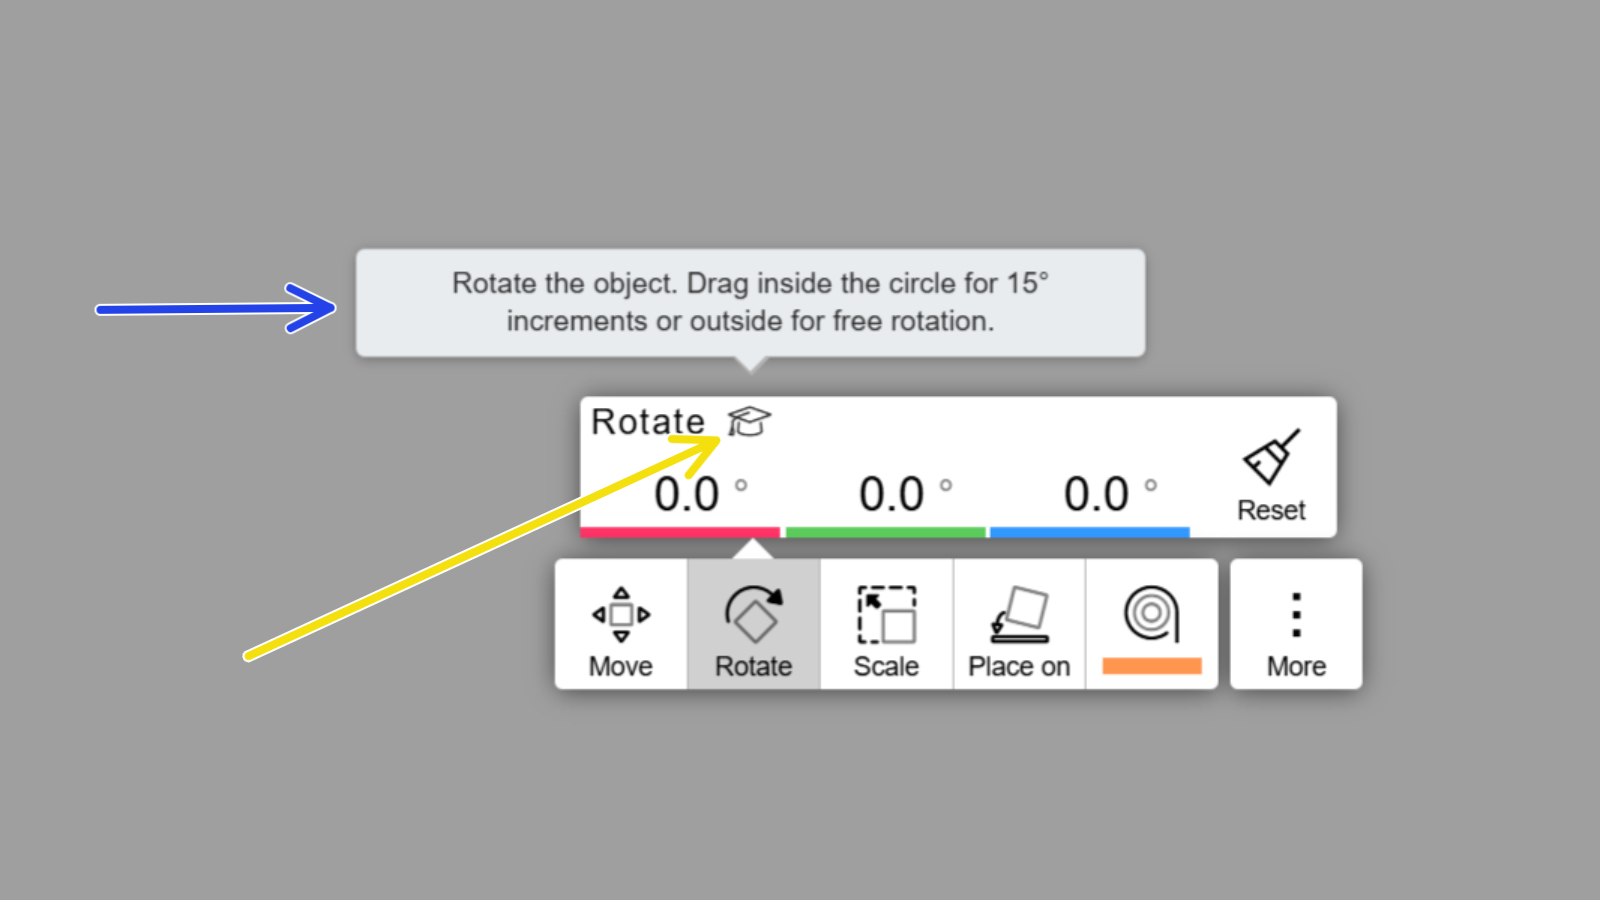
Most tools and settings in EasyPrint include quick tooltips represented by a graduation cap icon. Display the tooltip by hovering your mouse over the icon (on your computer), or by tapping the icon (on a mobile device).
When browsing Printables, all compatible models have the EasyPrint button displayed next to them. As of April 2026, STL and 3MF files are supported. Click the button to add that model to your Print list, which serves as a “shopping cart” for models you want to print.
Once you have all your models on your Print list, click continue to proceed to the slicing screen. All objects from your Print list will be automatically arranged on a virtual print bed.
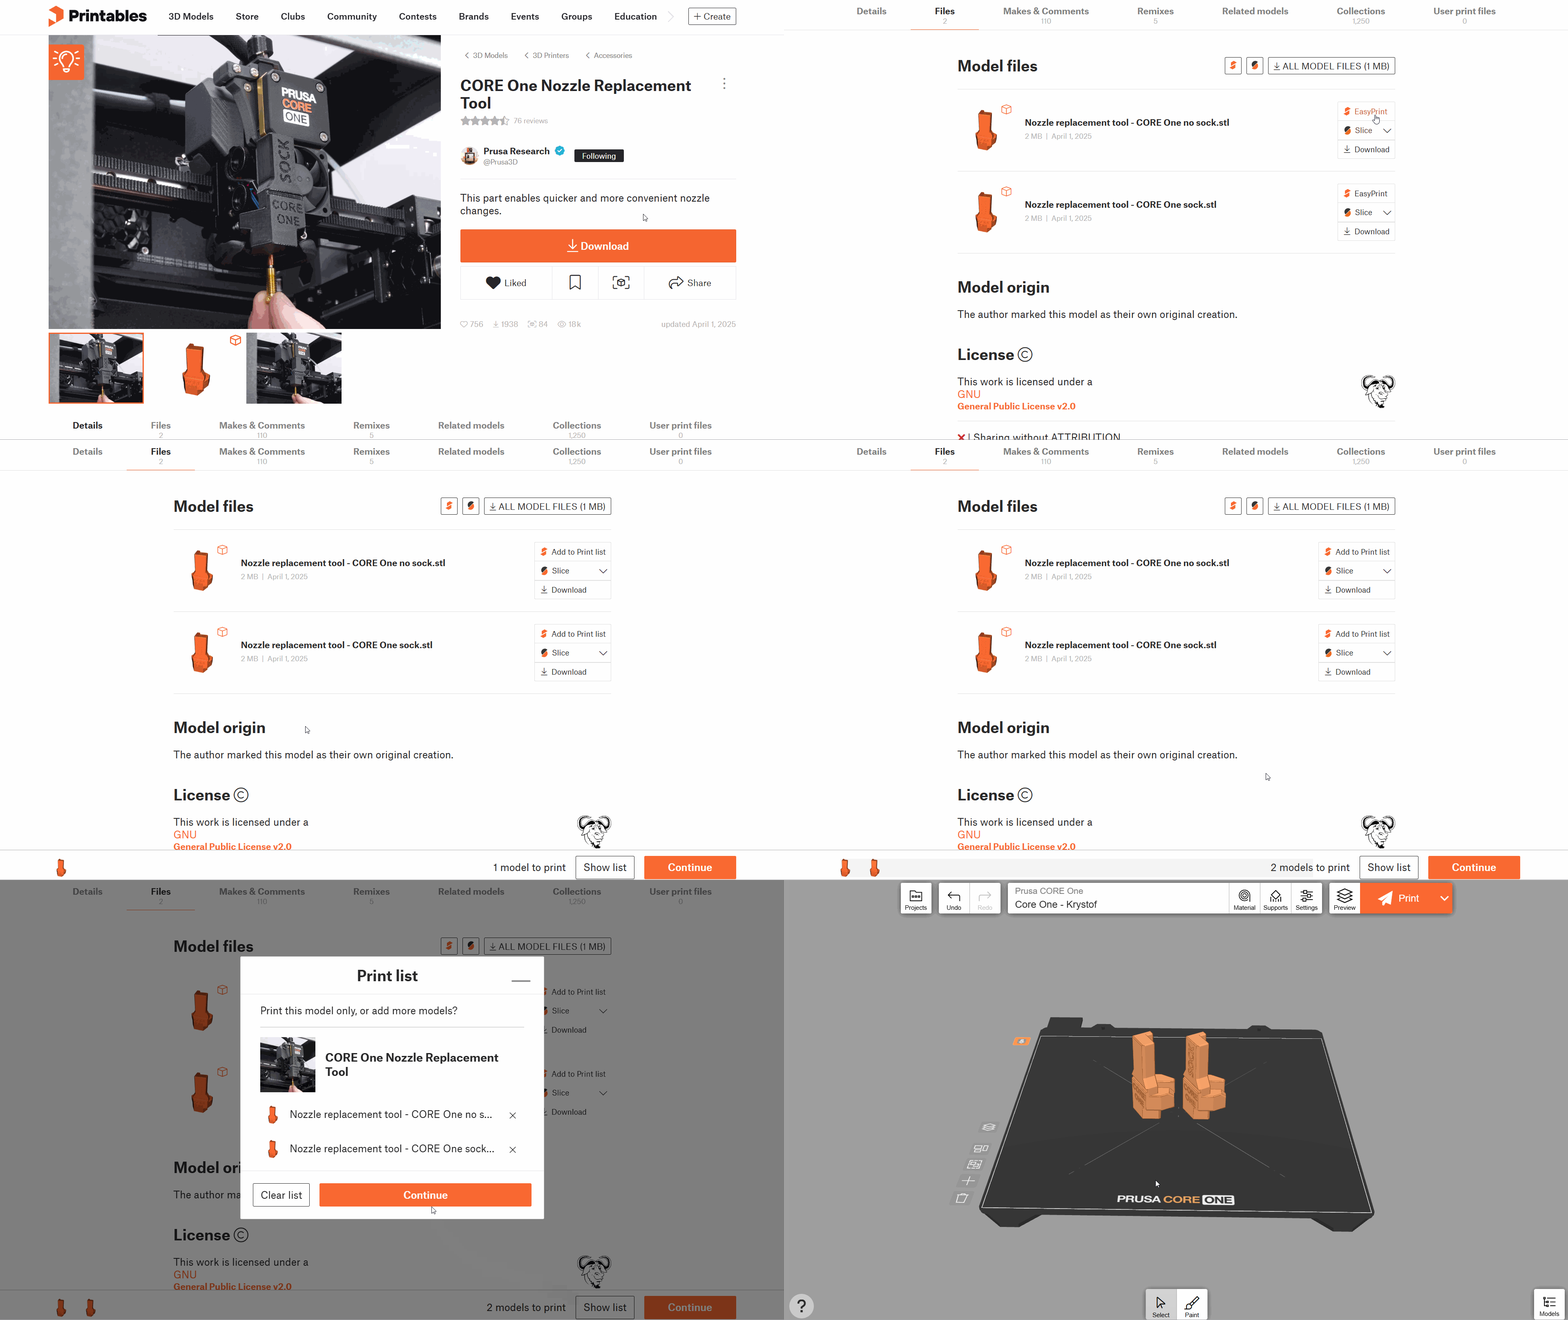
You can also upload models from your own device by clicking the Models button in the bottom-right corner, then Add… and Upload model. The same tab also allows you to search for and add other models from Printables. The "+" button on the left side of the print sheet can also be used to add models.
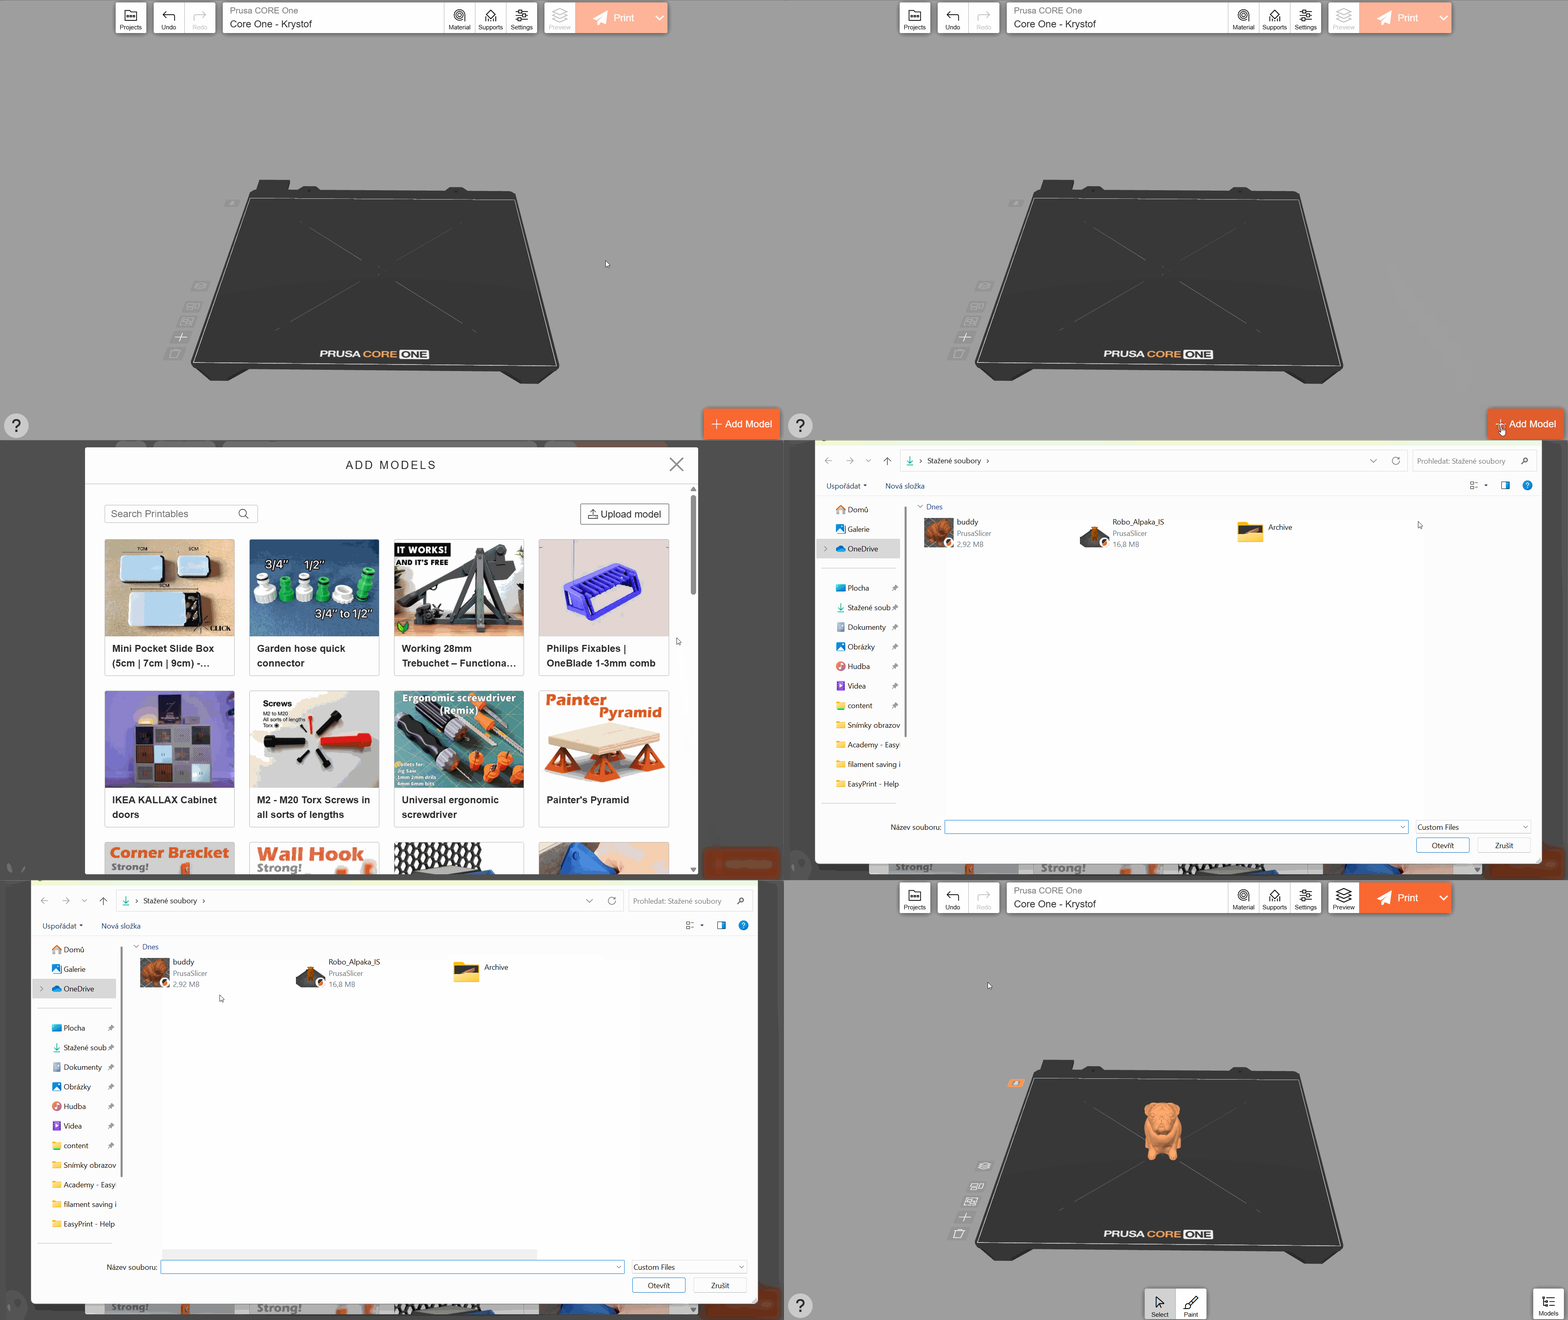
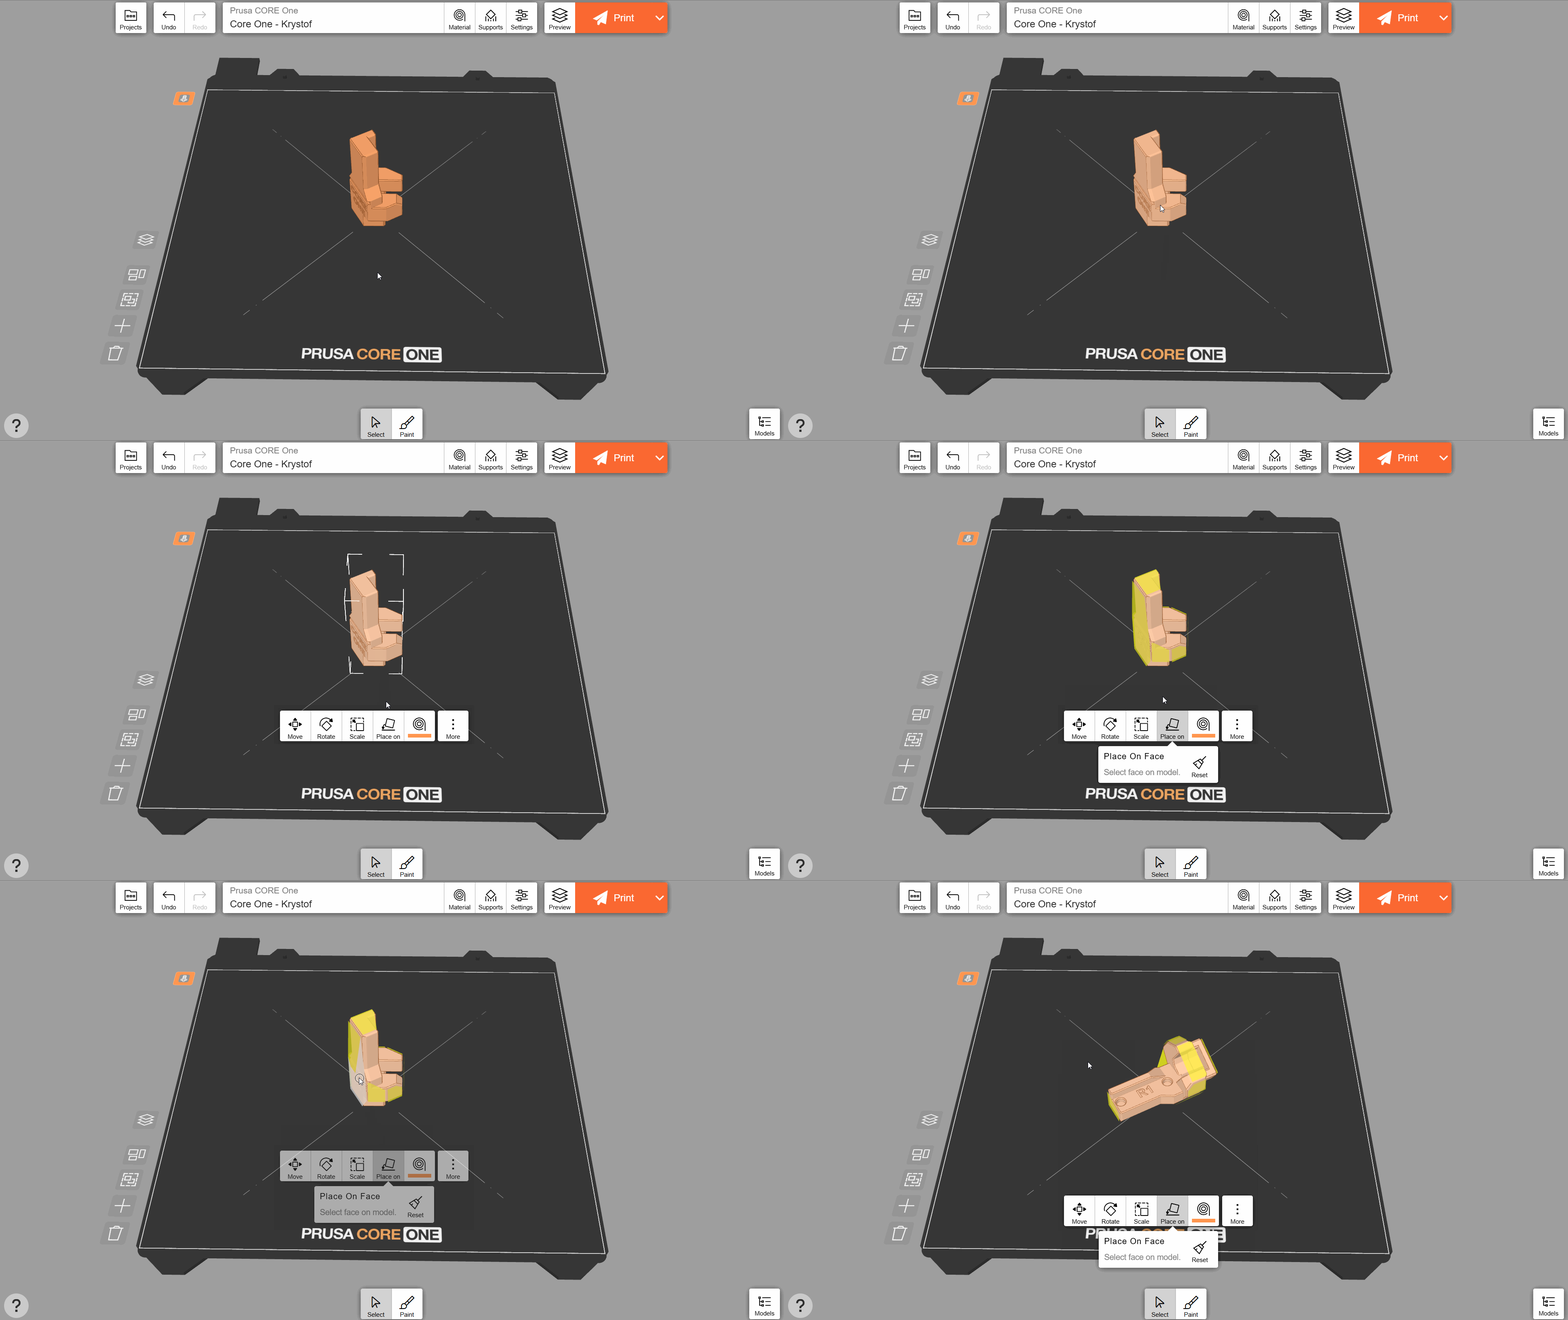
You might need to rotate the object to improve its printability (e.g., minimize the number of required supports). You can easily do this by tapping the object and using the Place on face function. Click one of the highlighted faces to align it with the print bed. Objects are typically printed with the largest face touching the plate.
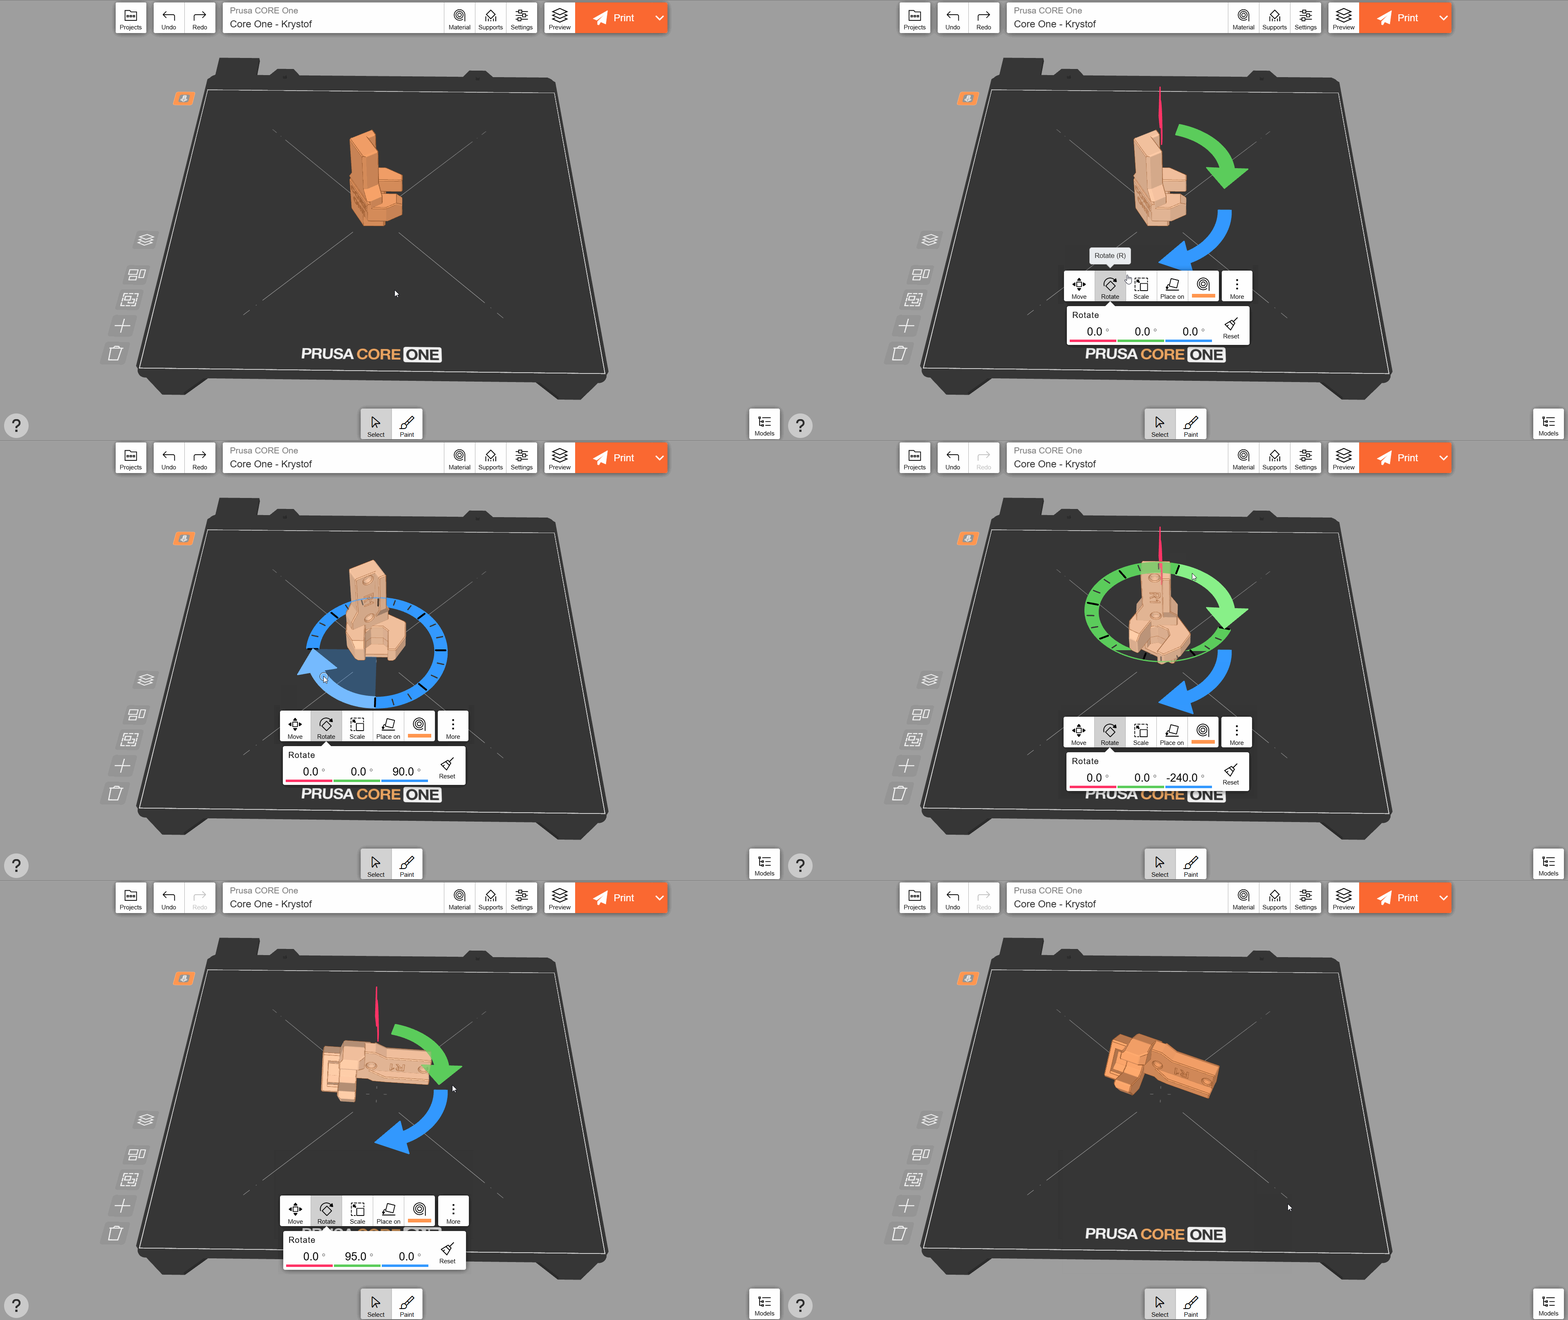
For some objects without a prominent flat face, the Place on face option might not be available. In that case, you can manually adjust the orientation with the Rotate tool. You can use the arrows to rotate the object along its three axes. Keeping your cursor/finger along the circle gizmo will snap the rotation angle to 15-degree increments. Alternatively, you can manually type in the rotation angles.
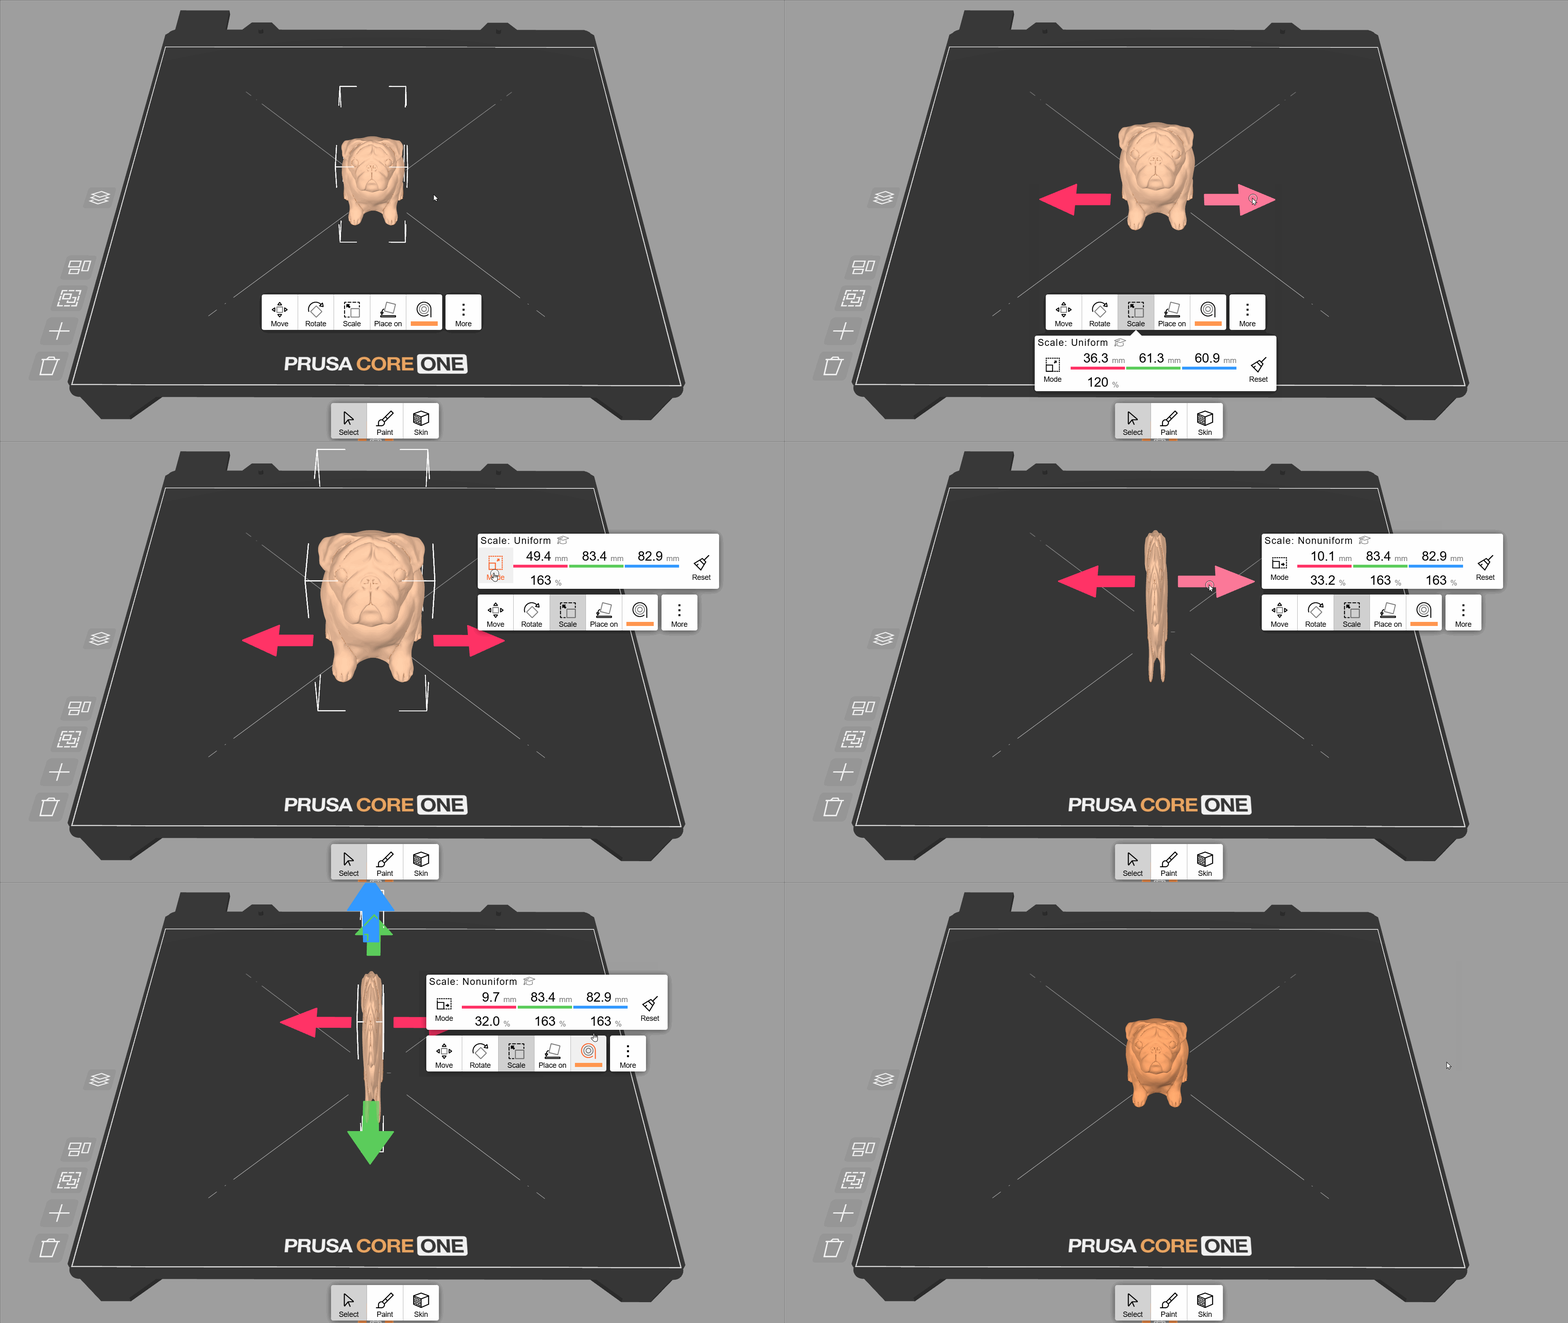
The Scale tool lets you resize the object by dragging the red arrow or typing in a precise value. By default, it scales uniformly, i.e., the object keeps its proportions. Press the Mode button to toggle Nonuniform scaling, which lets you scale the width, depth, and height separately. Press Reset to revert to the original scale.
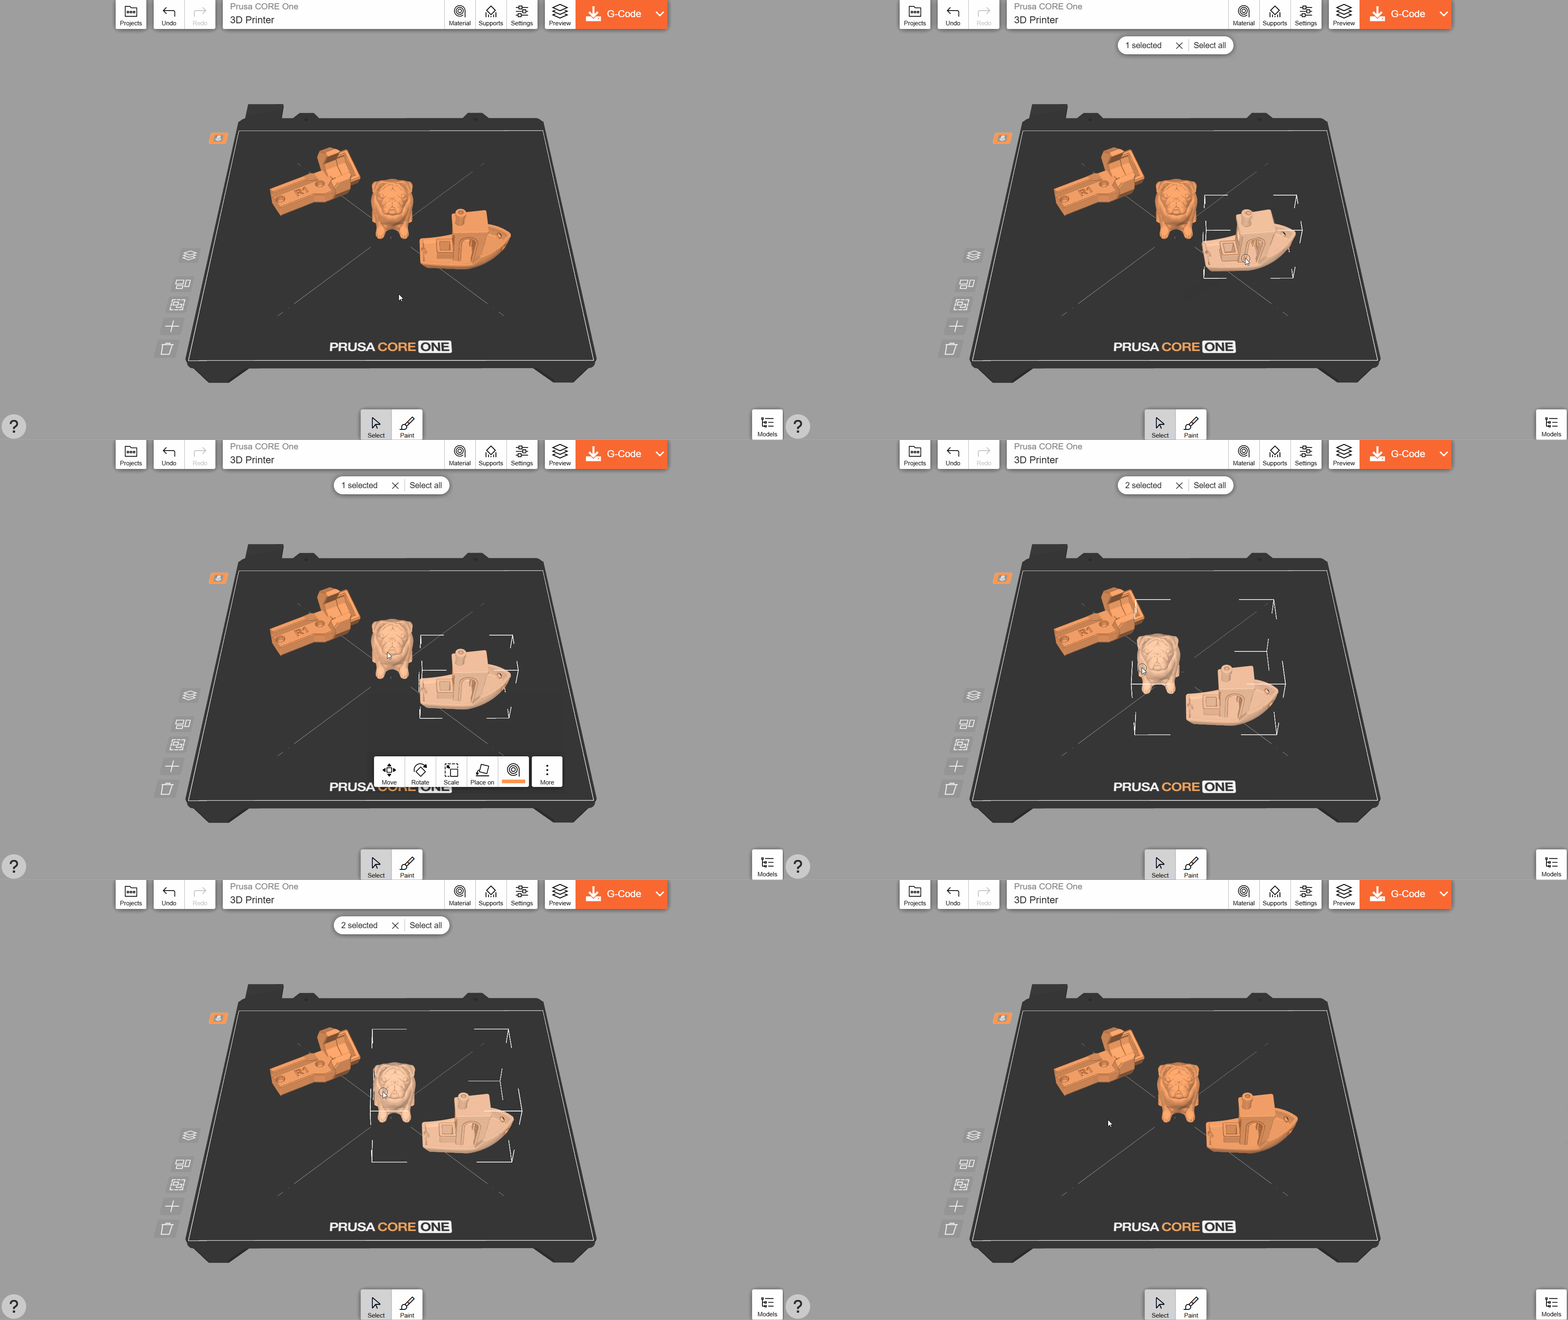
You can apply the Rotate, Move, and Scale tools to multiple objects at the same time. To make a multiple selection, click and hold the first object until it wiggles on the print bed. This means that the multiple selection mode is active. Click other objects to add them to the selection, or click again to remove them.
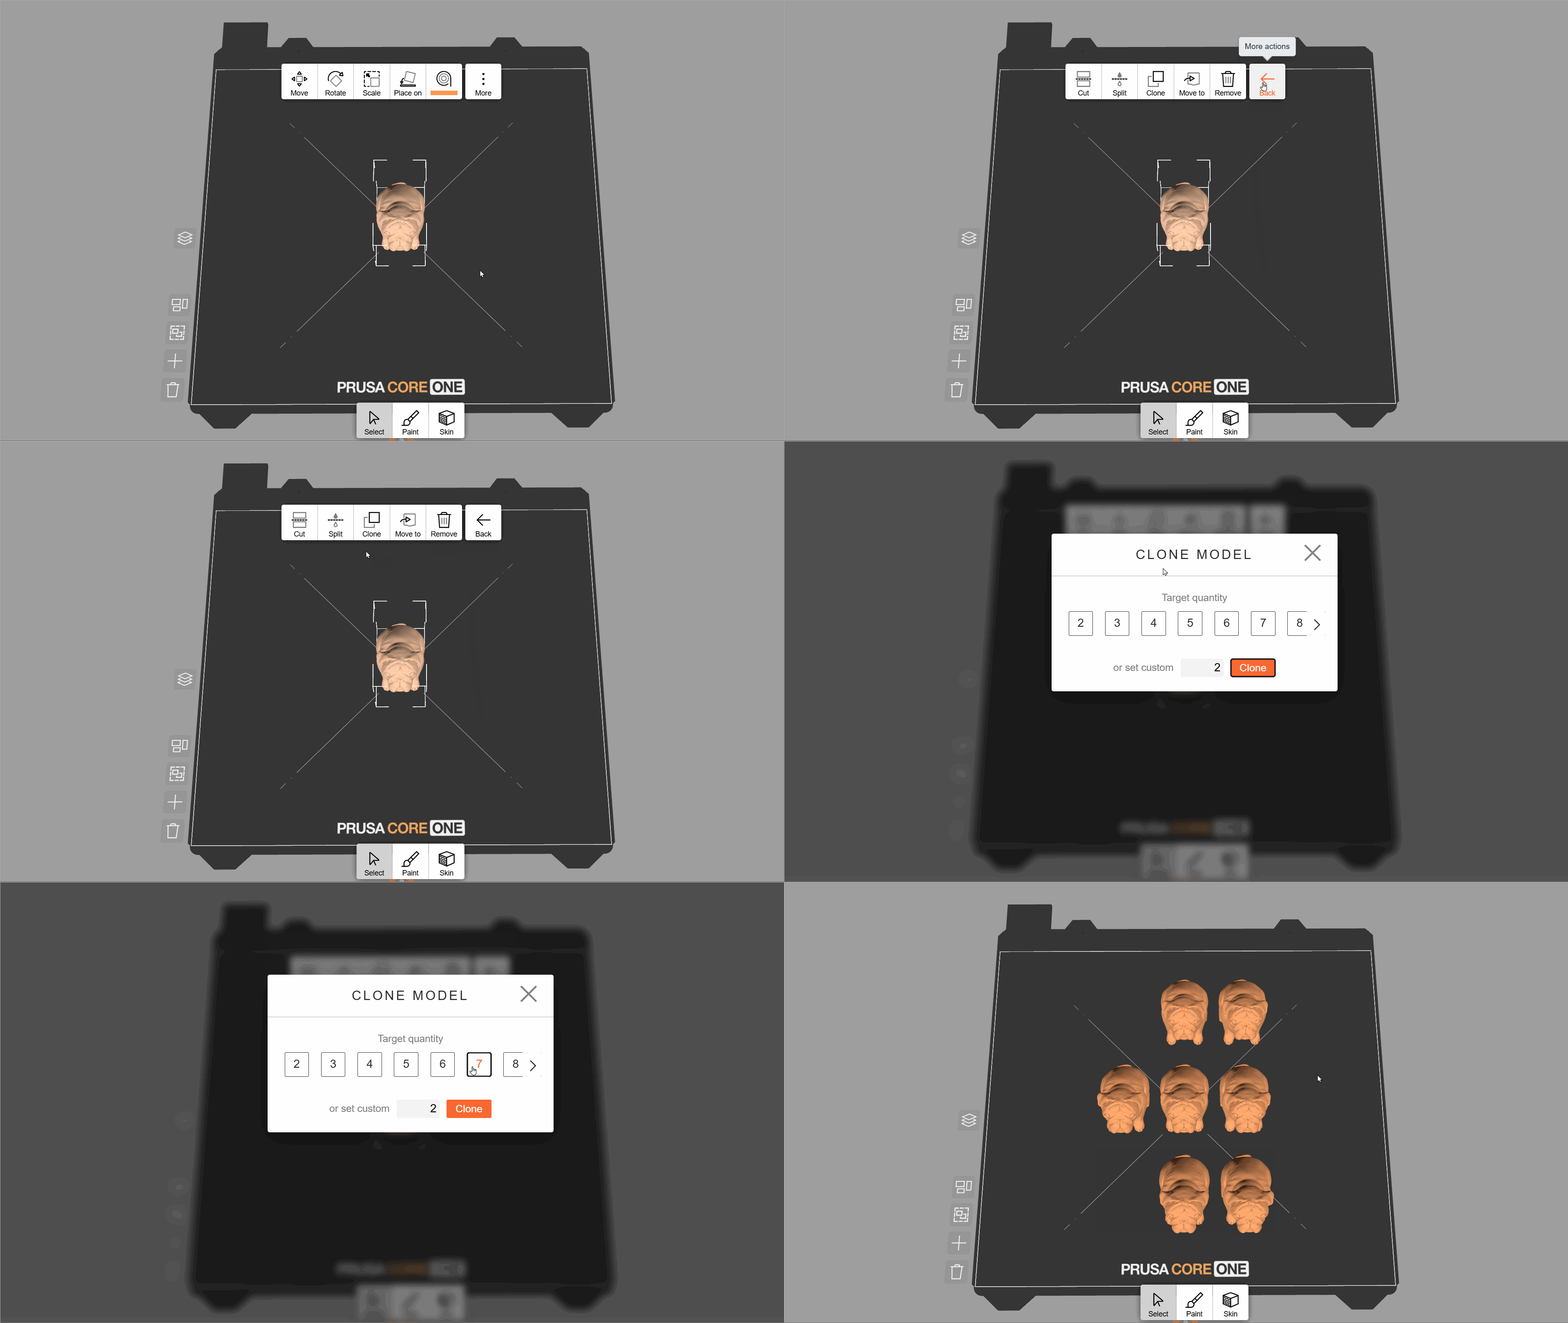
You can print several copies of the same object at once. Select the object and press More → Clone, then choose the target number of copies (including the original model). All copies will be automatically arranged on the bed (or multiple beds, if they would not fit).
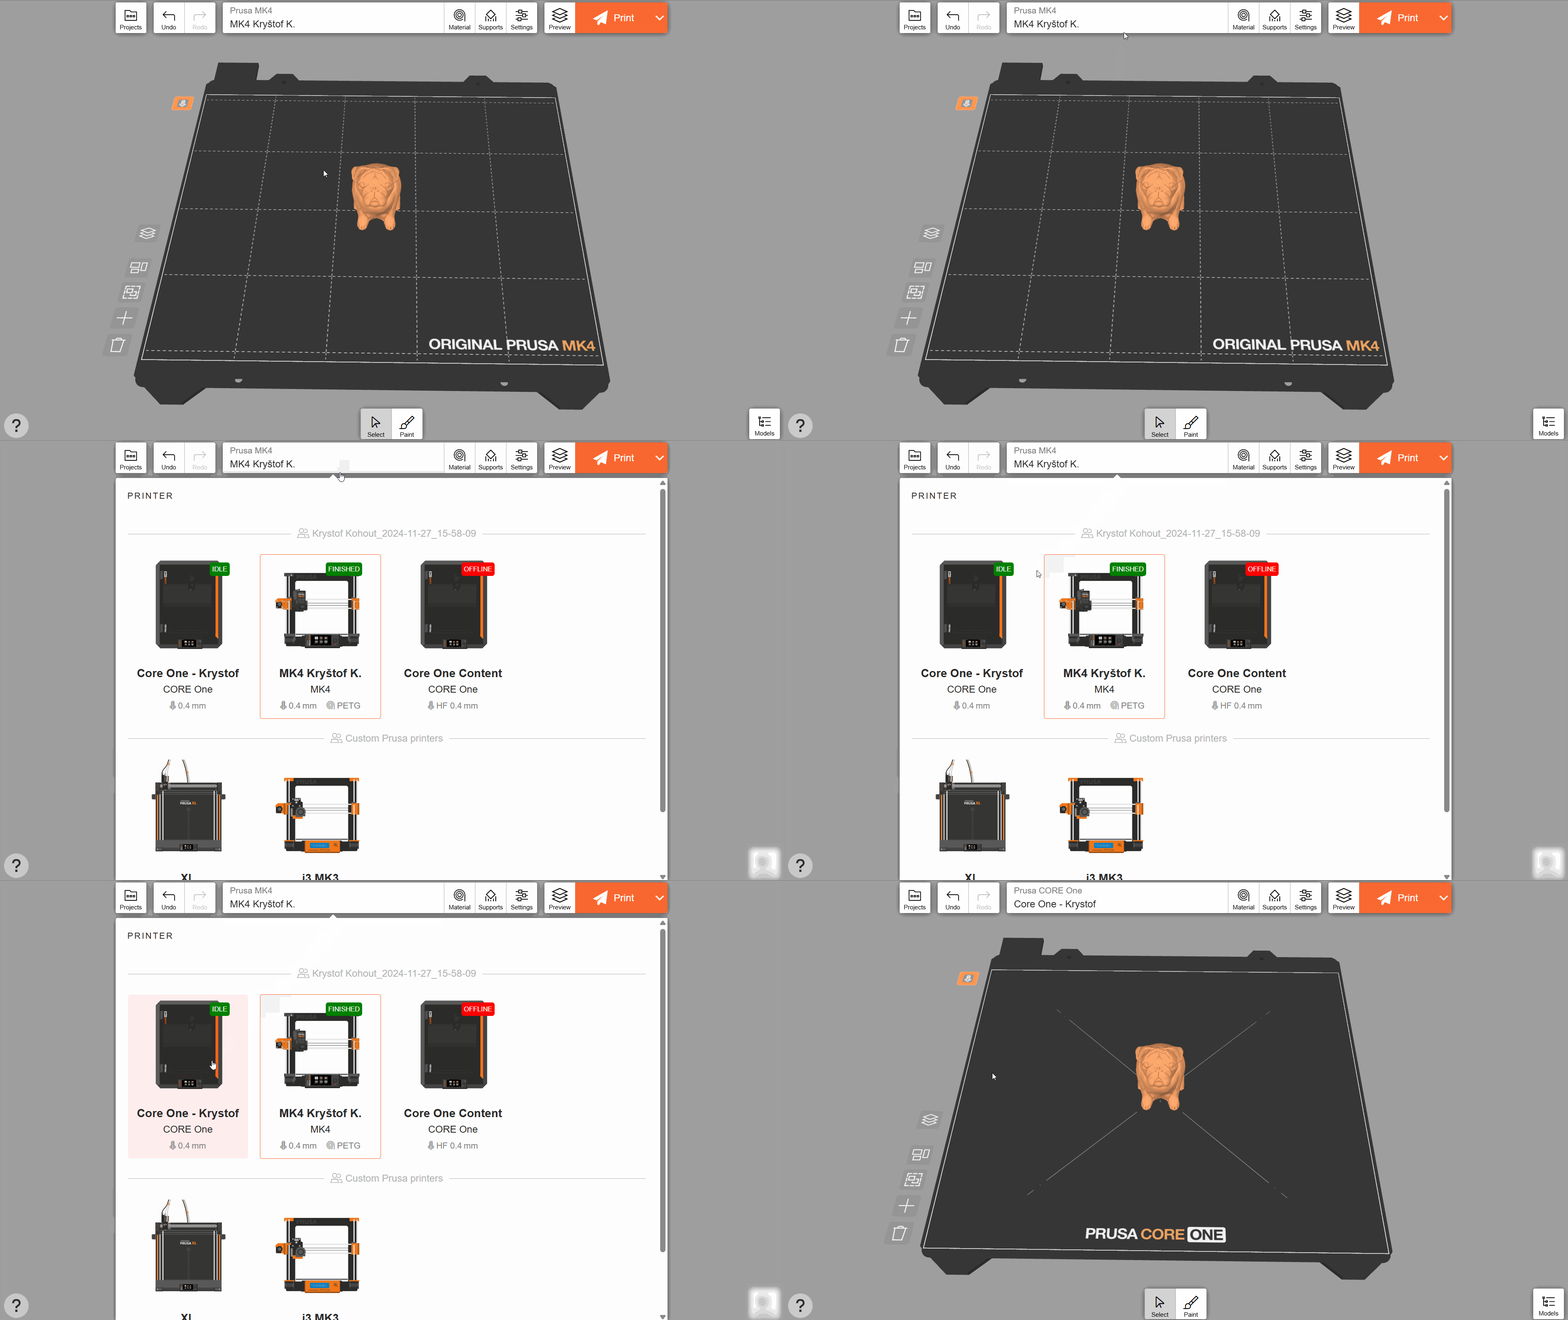
Click the Printer button in the top menu to display all printers you have added to Prusa Connect and their current status. You can use EasyPrint to send print files remotely to these printers.
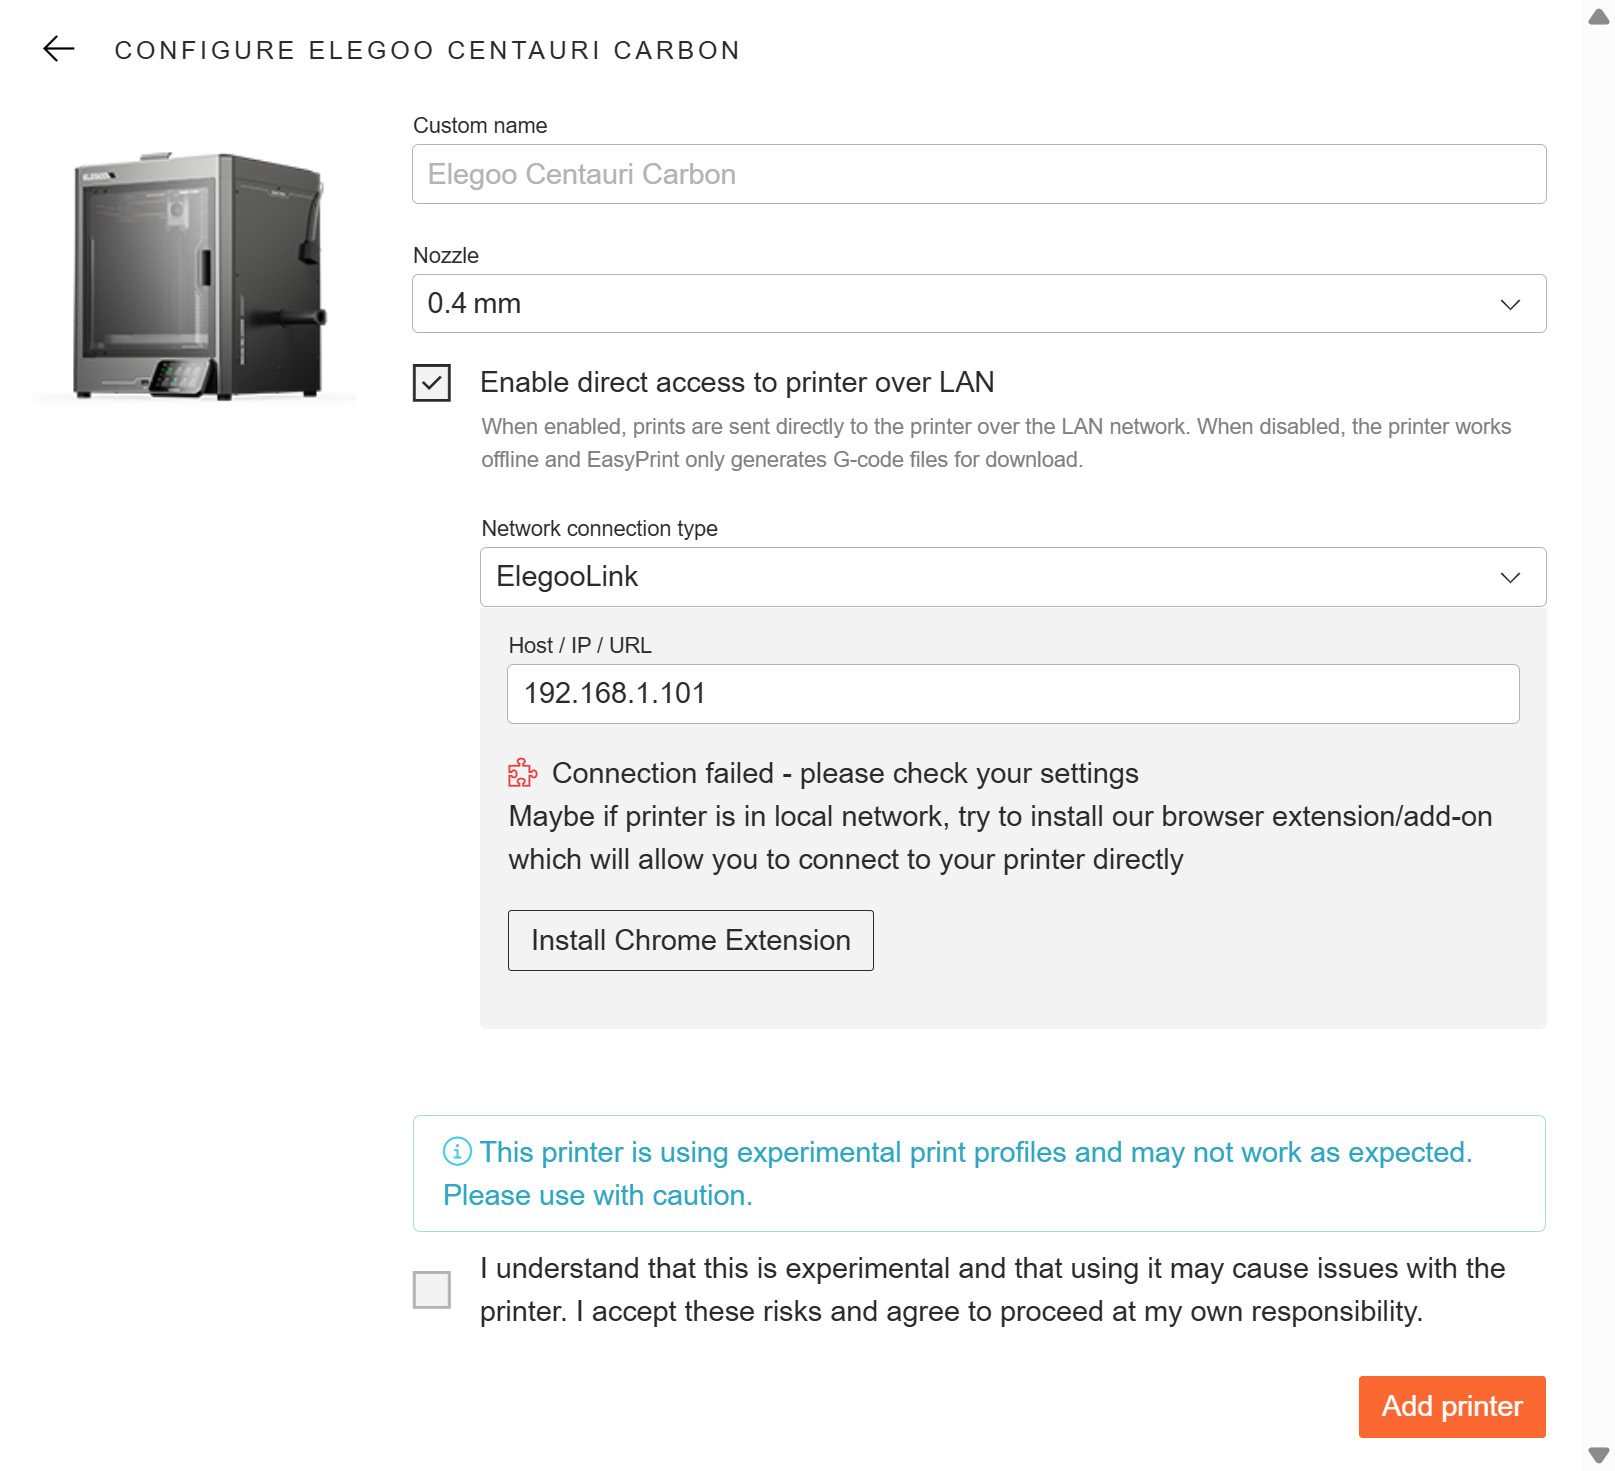
Using EasyPrint through a desktop, non-mobile browser, sending files remotely is also possible with non-Prusa printers, through LAN connection, by selecting the option "enable direct access to the printer over LAN" in the non-Prusa printer configuration.
In this case, it is necessary to select a network connection type, with the option to install our browser extension for direct connection to the printer on the browser - our configuration menu prompts this option.
You can also use EasyPrint for Prusa printers not registered with Prusa Connect, or non-Prusa printers in offline mode. Use the Add offline printer option to find the exact model of your printer within each family of products. If you are not using the default nozzle, change the nozzle diameter in the printer options.
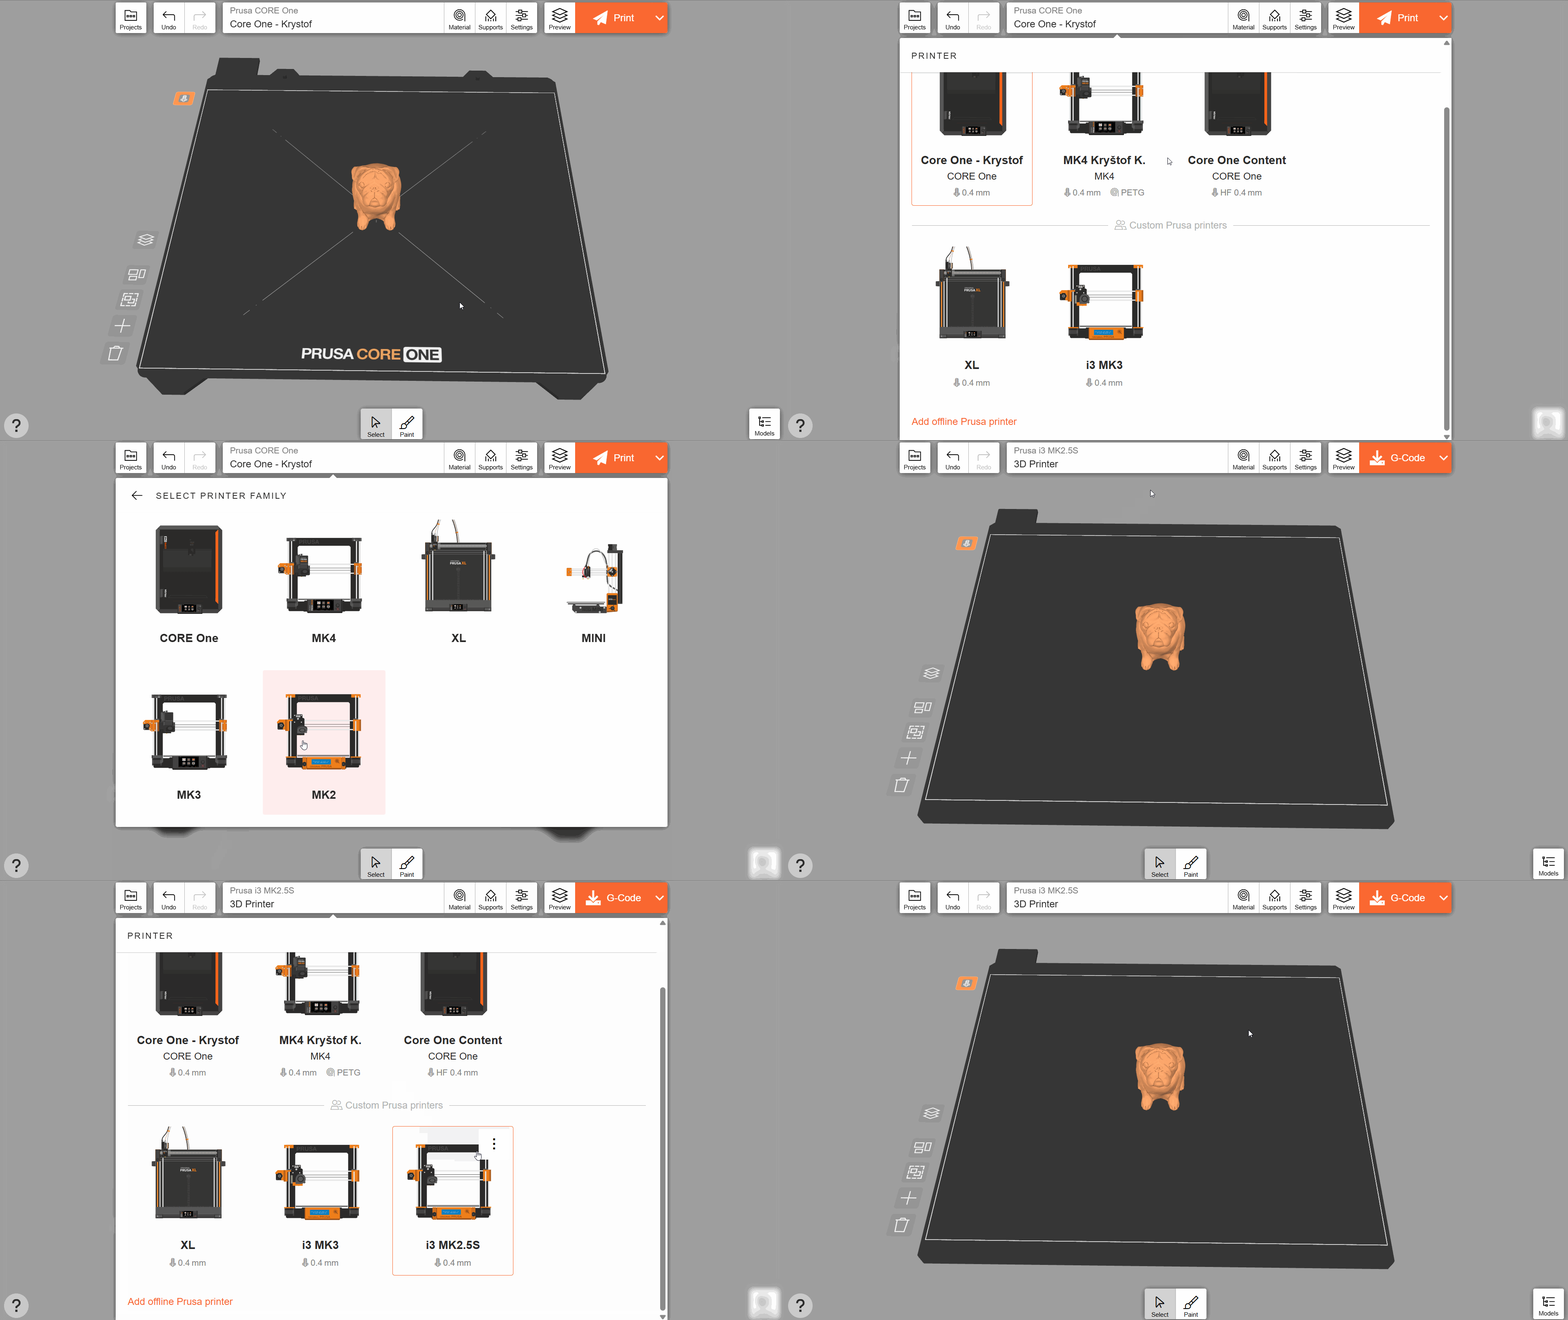
Optionally, you can use the Spools button at the top to select the specific filament spool loaded into the printer (including the manufacturer and the color). The fastest way is to start typing the name of the filament into the search bar. EasyPrint then uses the specified material information to automatically select the optimal print settings.
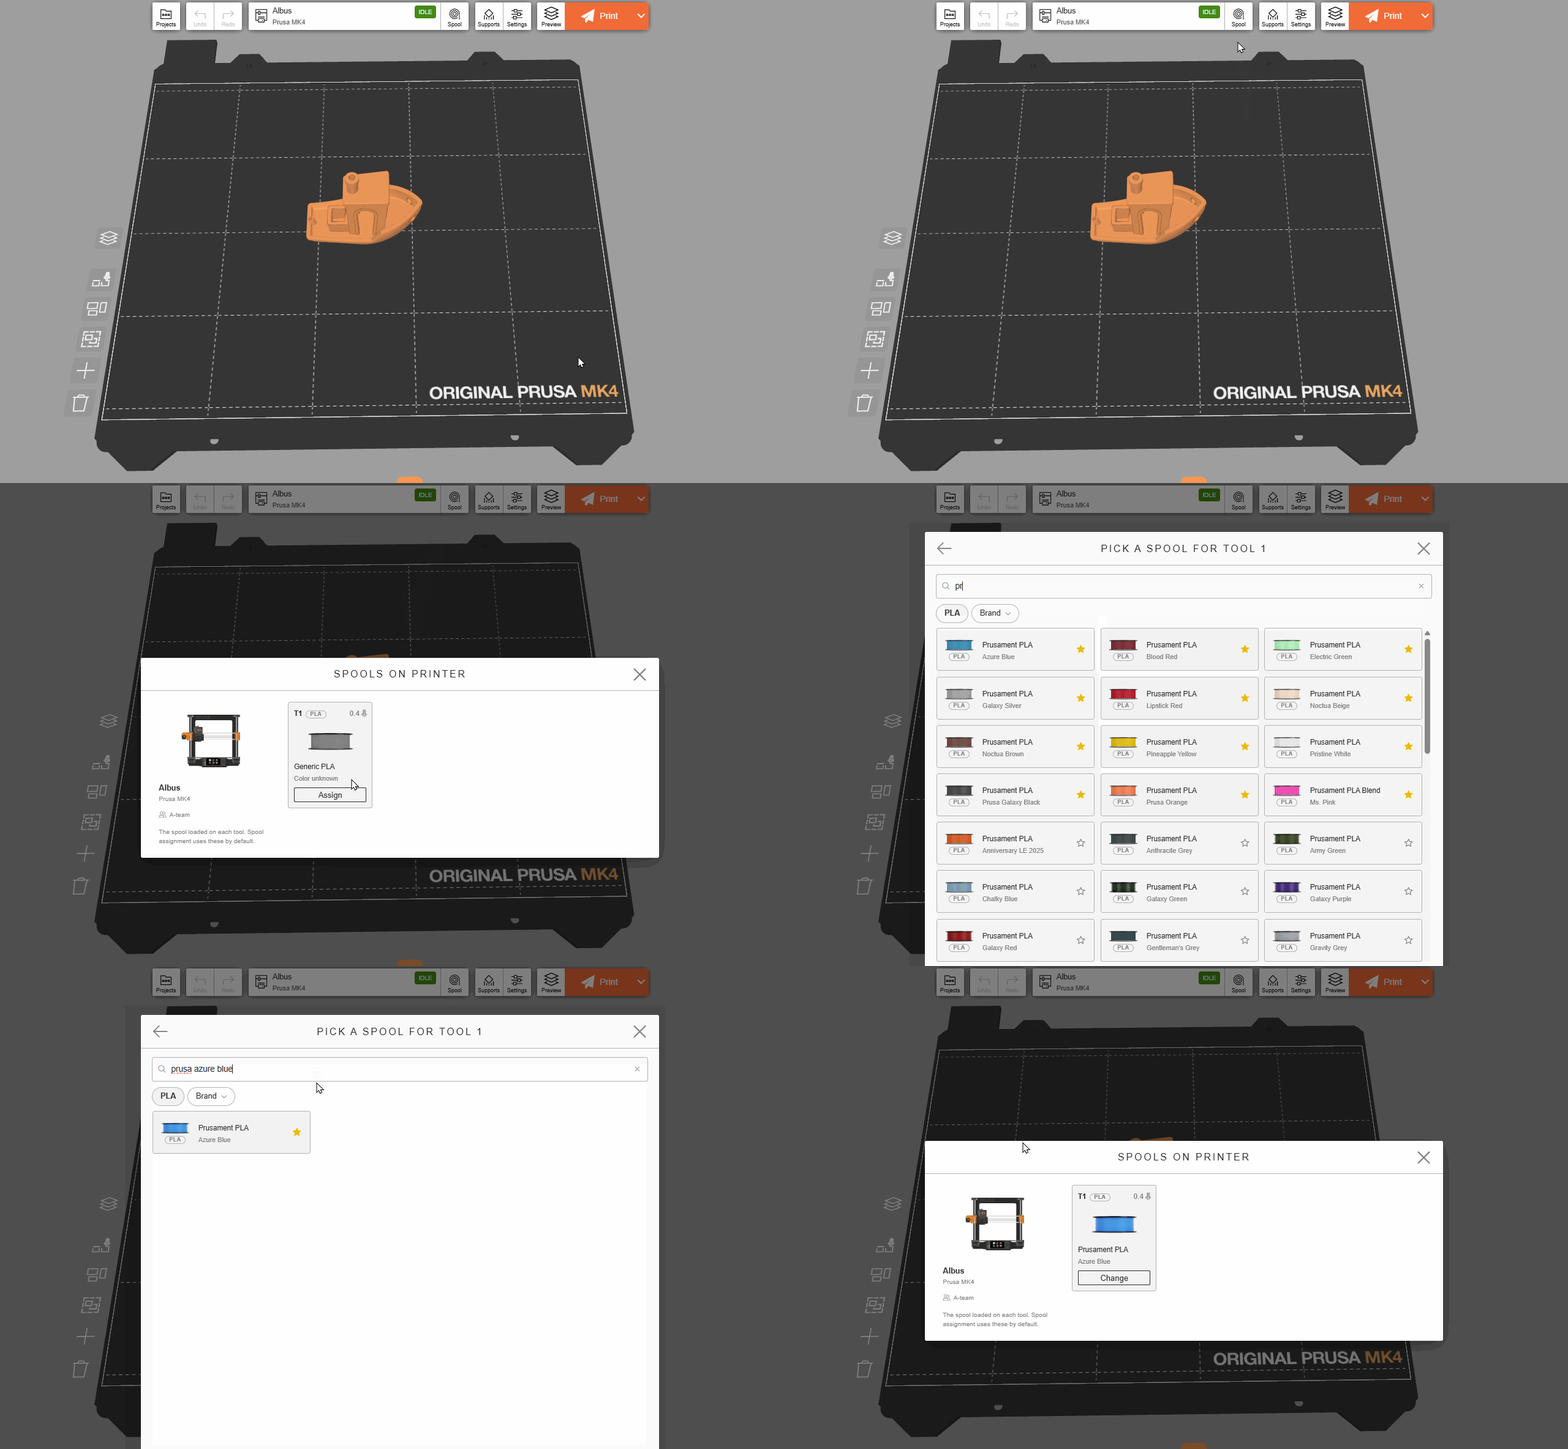
Setting colors this way is especially helpful for managing printers with multicolor capabilities (such as Prusa XL, CORE One INDX, etc.). EasyPrint can use the spool information to automatically assign objects to extruders with matching colors (see more information below in the Multicolor printing section).
The filament material (PLA, PETG, etc.) is filled in automatically because you must specify it when physically loading the material into the printer. If you change the filament on the printer, the Spool information reverts to the default, i.e., "Color unknown".
In the filament selection menu, you can use the Star icon to add or remove a specific filament spool from your favorites. Your favorite spools are then always displayed at the top.
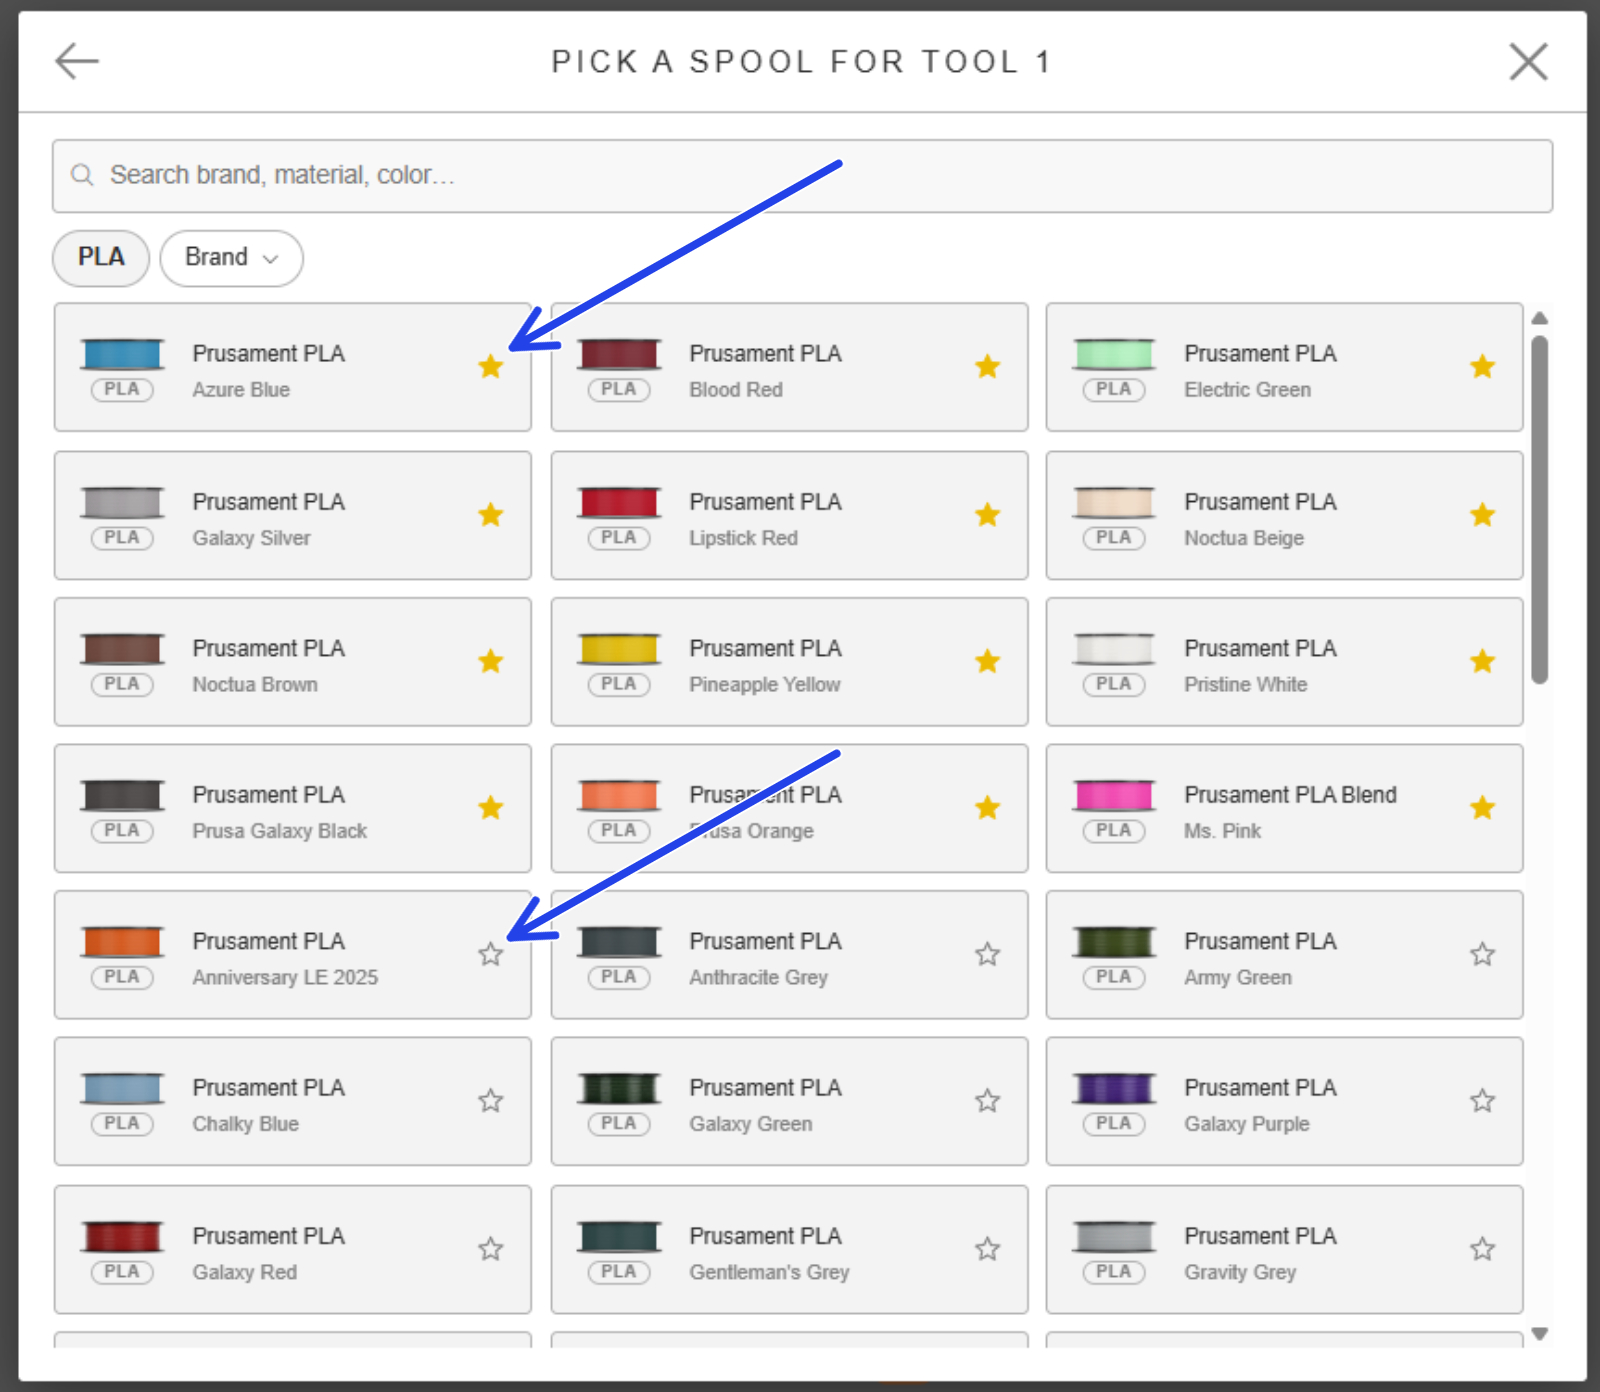
We recommend saving the filaments you have at home into your Favorites, because they are also used for automatic color assignment in multicolor printing.
Due to the nature of 3D printing technology, a support structure might be needed underneath parts that would otherwise be printed in mid-air. For a beginner, it might be difficult to decide when these supports are necessary. Generally, if you are unsure, the safest bet is to turn them on using the Everywhere - Organic option. Each option has a picture illustrating what type of supports it generates.
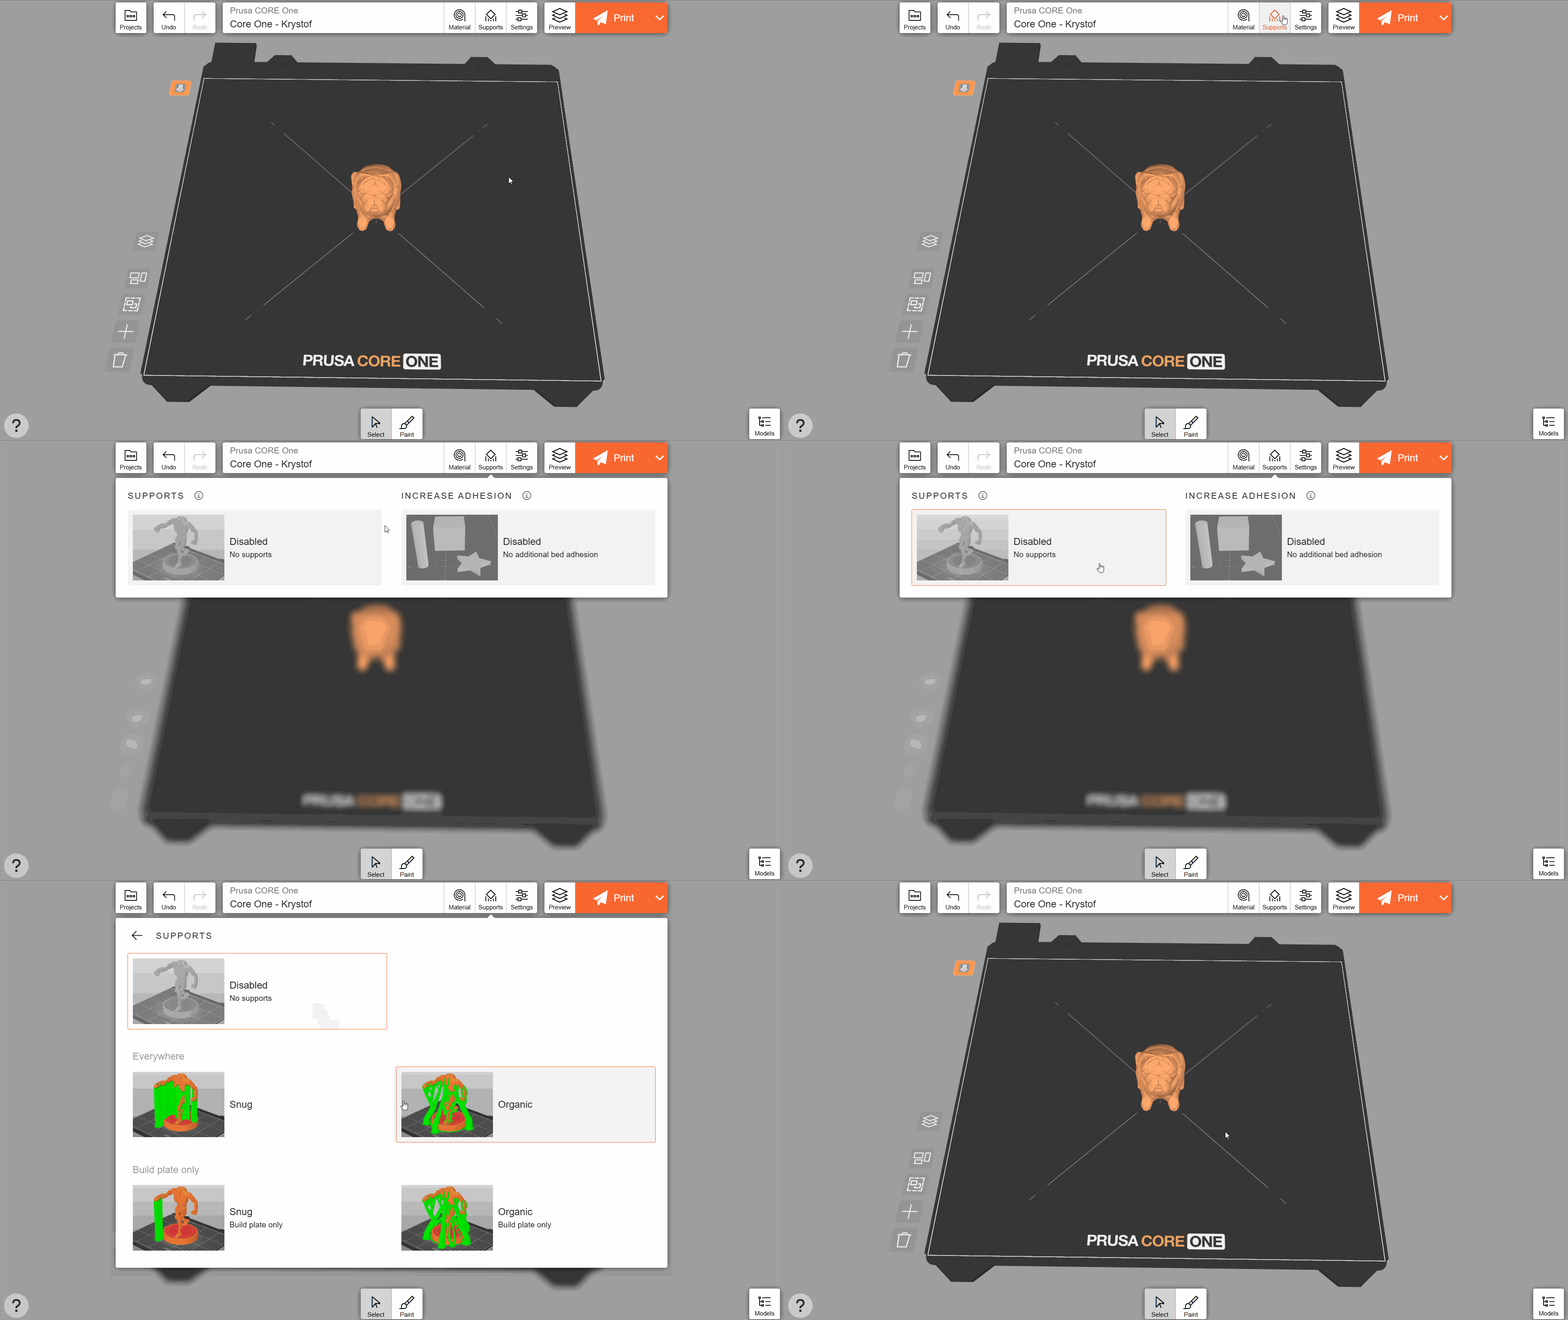
Many models specifically made for 3D printing are designed in such a way that supports are not needed. This is helpful because supports require extra printing time and material. Check the description of the specific model, where authors usually give tips about enabling supports.
Objects with a small base may accidentally get detached from the print sheet during printing. If you enable Increase adhesion - automatic, EasyPrint will automatically add small brims (i.e., a thin layer of material that can easily be removed after printing) for objects that need it.
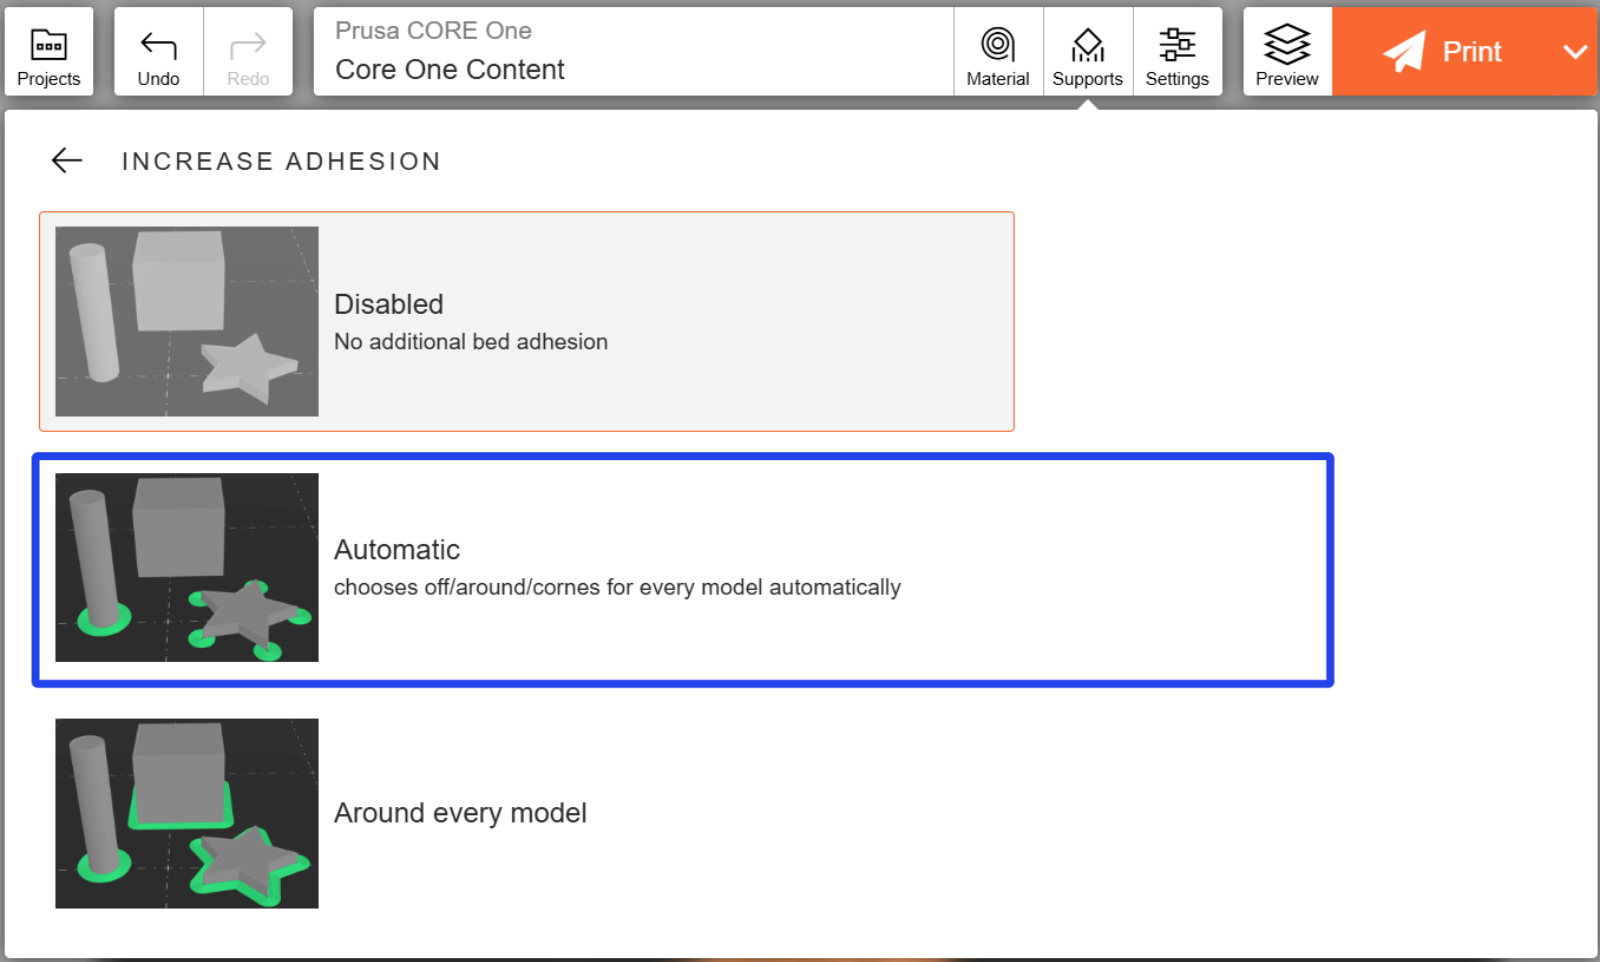
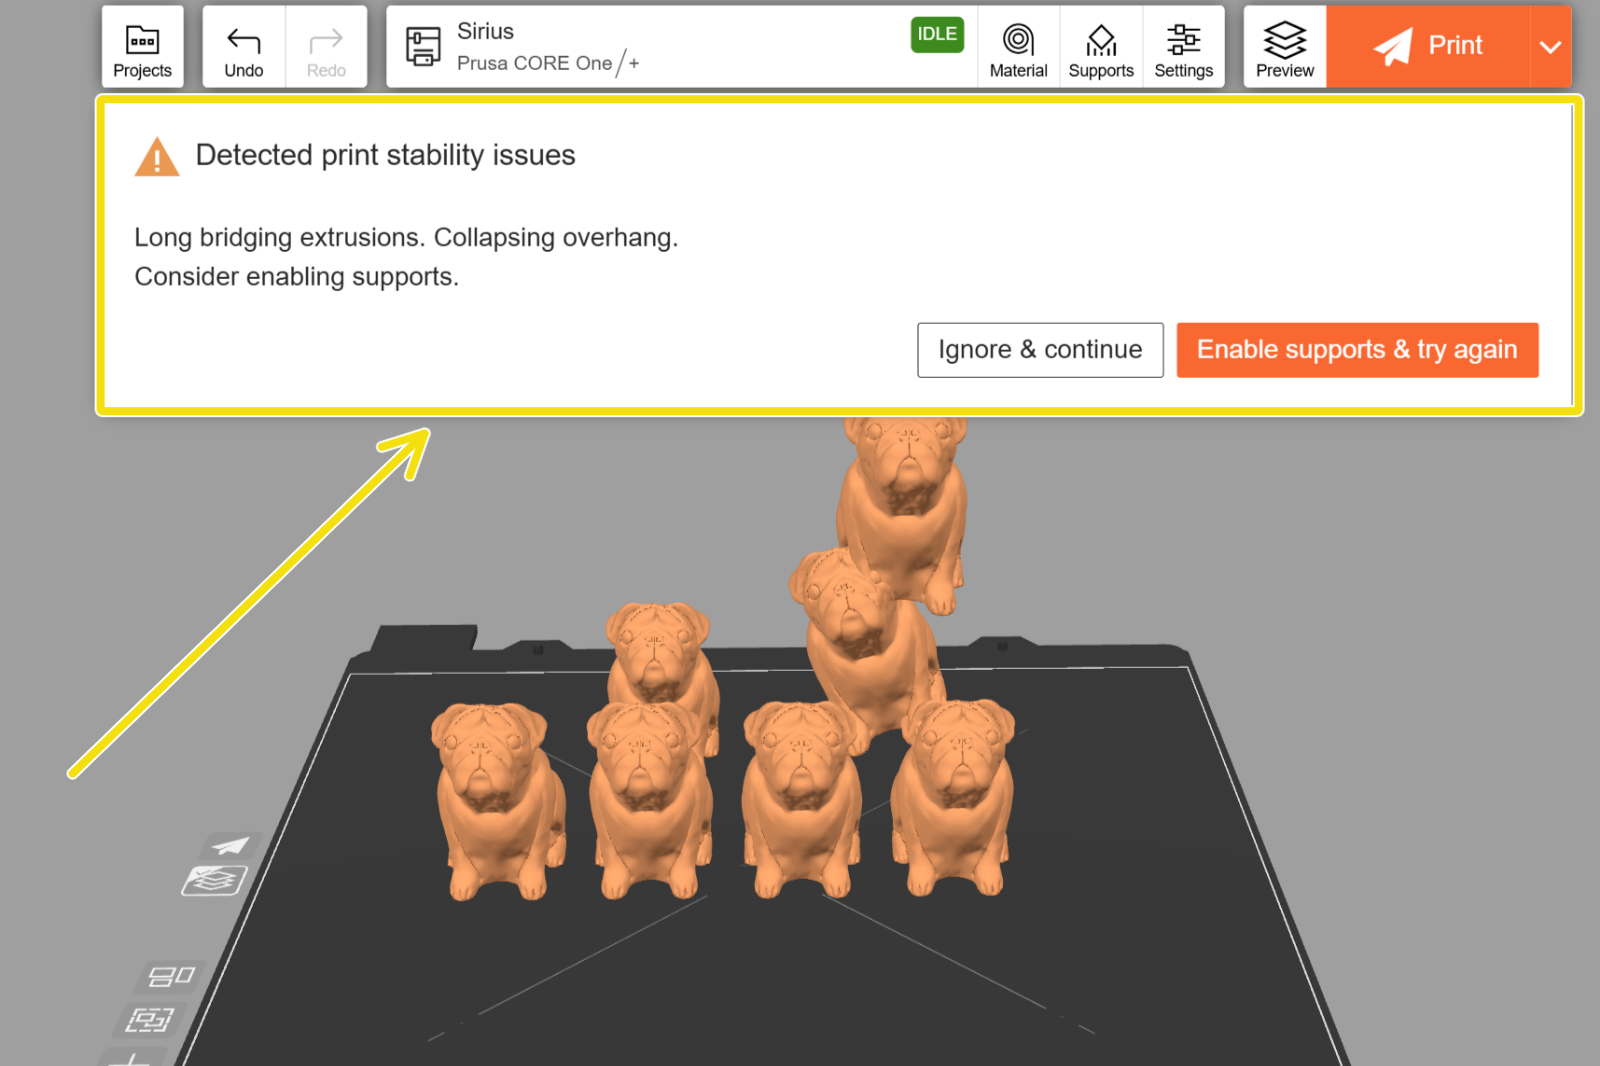
EasyPrint also automatically detects potential problems during the slicing process and suggests using supports and/or increased adhesion if they are not enabled.
In the Settings tab, select one of the Print profiles. The Balanced profile offers a good compromise between quality and print speed for most use cases.
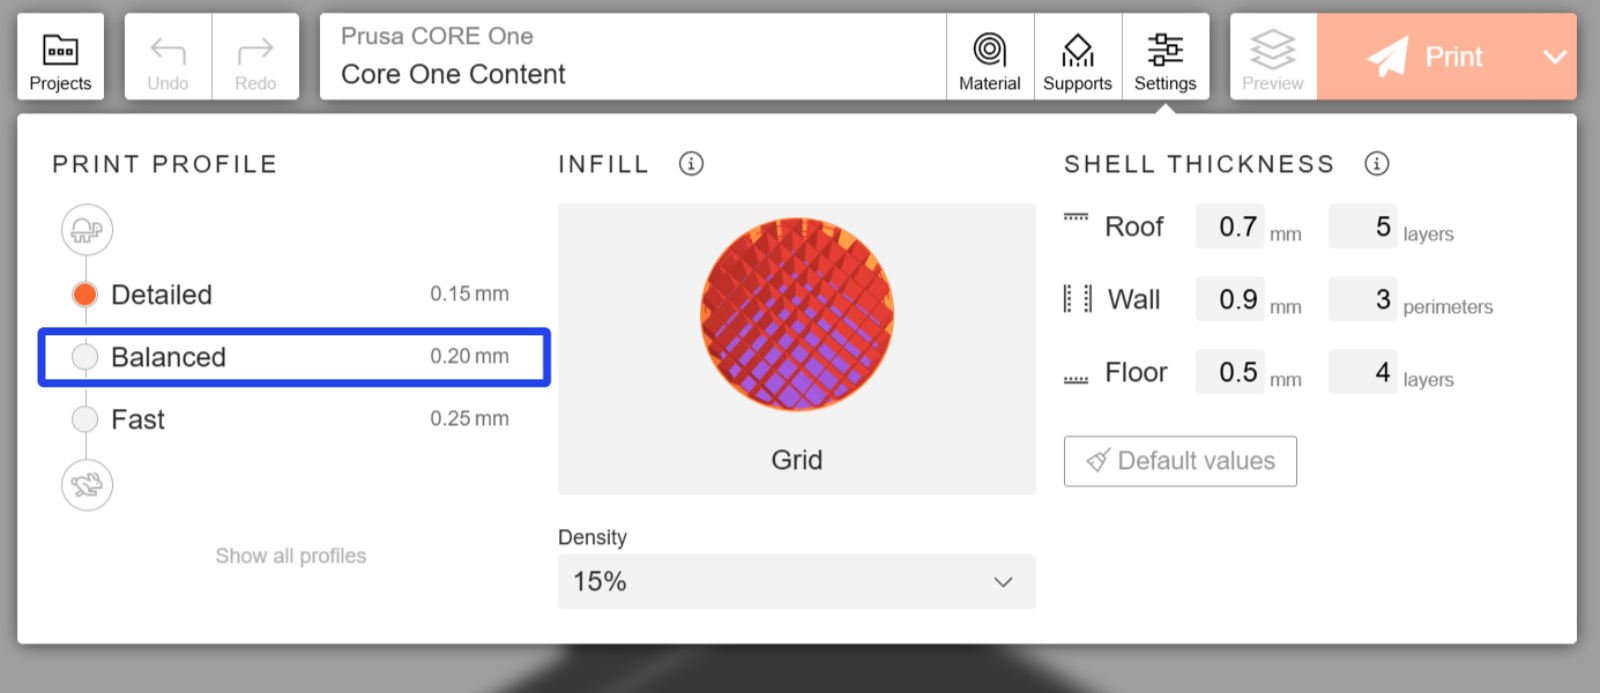
You can also fine-tune some settings, such as the Infill pattern (i.e., the inside structure of the printed model). The patterns are divided into several categories, based on their print speed or durability.
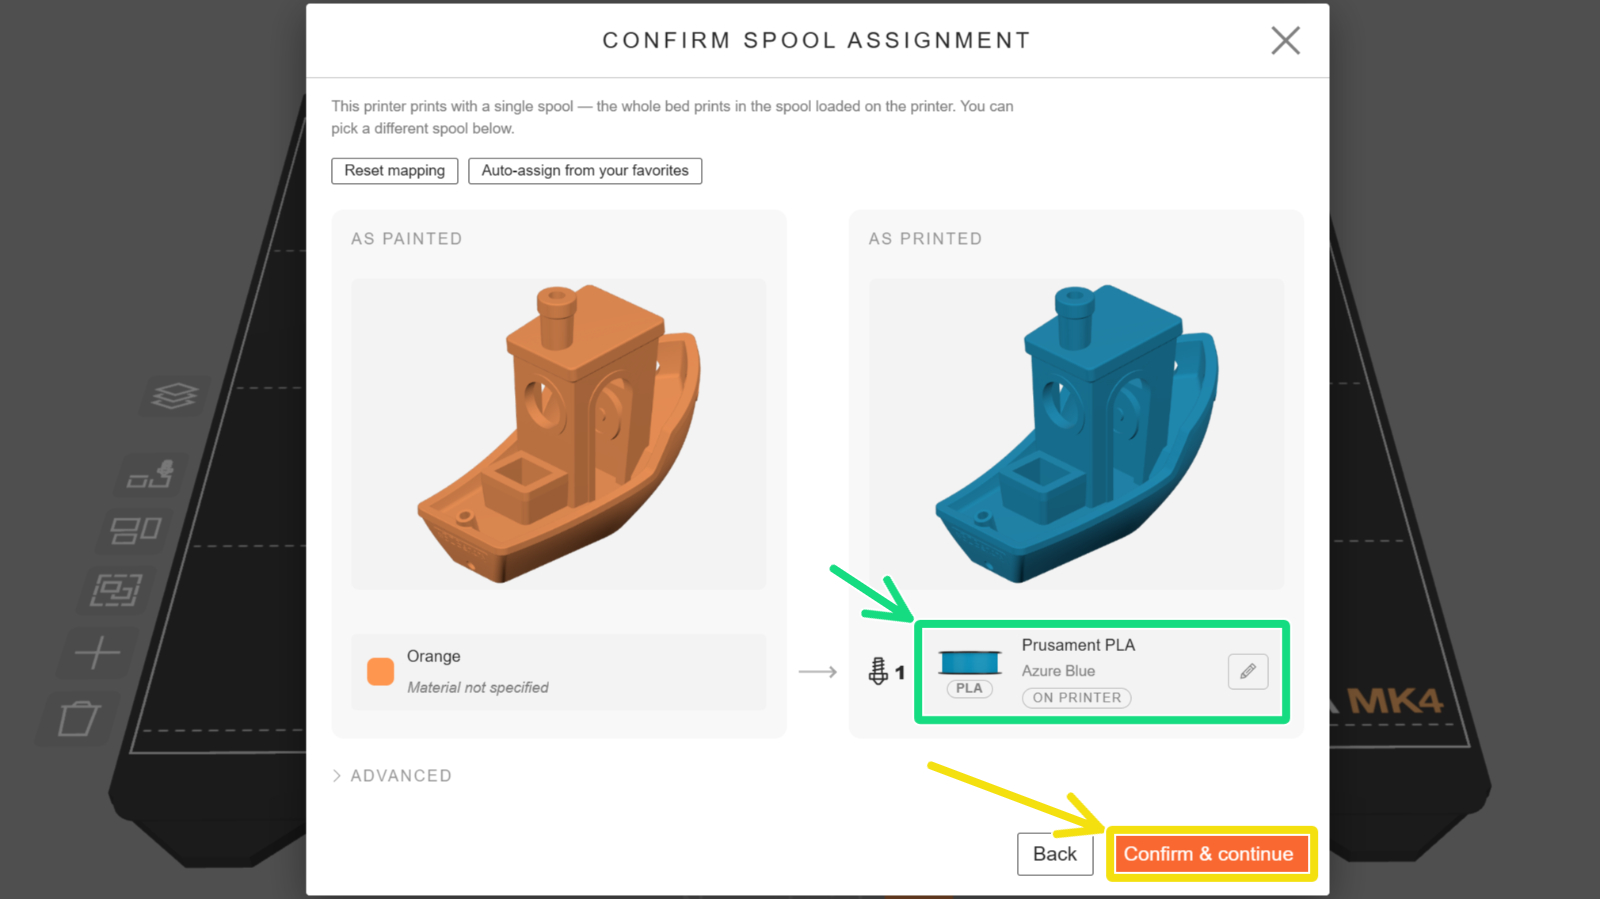
Once you have set everything, click Print. This will open the Spool assignment screen, which prompts you to check the print material. By default, the filament currently loaded on the printer is selected. To change the material, click the filament information. Otherwise, click Confirm & continue.
This will send your project for slicing to remote servers. Depending on the complexity of your project and the size of the queue, this might take a minute.
Once slicing is complete, the Print Overview screen will pop up, showing the print time and the grams and meters of filament the print will use. If your printer is currently Idle and has the correct material, you can start printing immediately. Otherwise, the G-code will be added to the Printer queue.
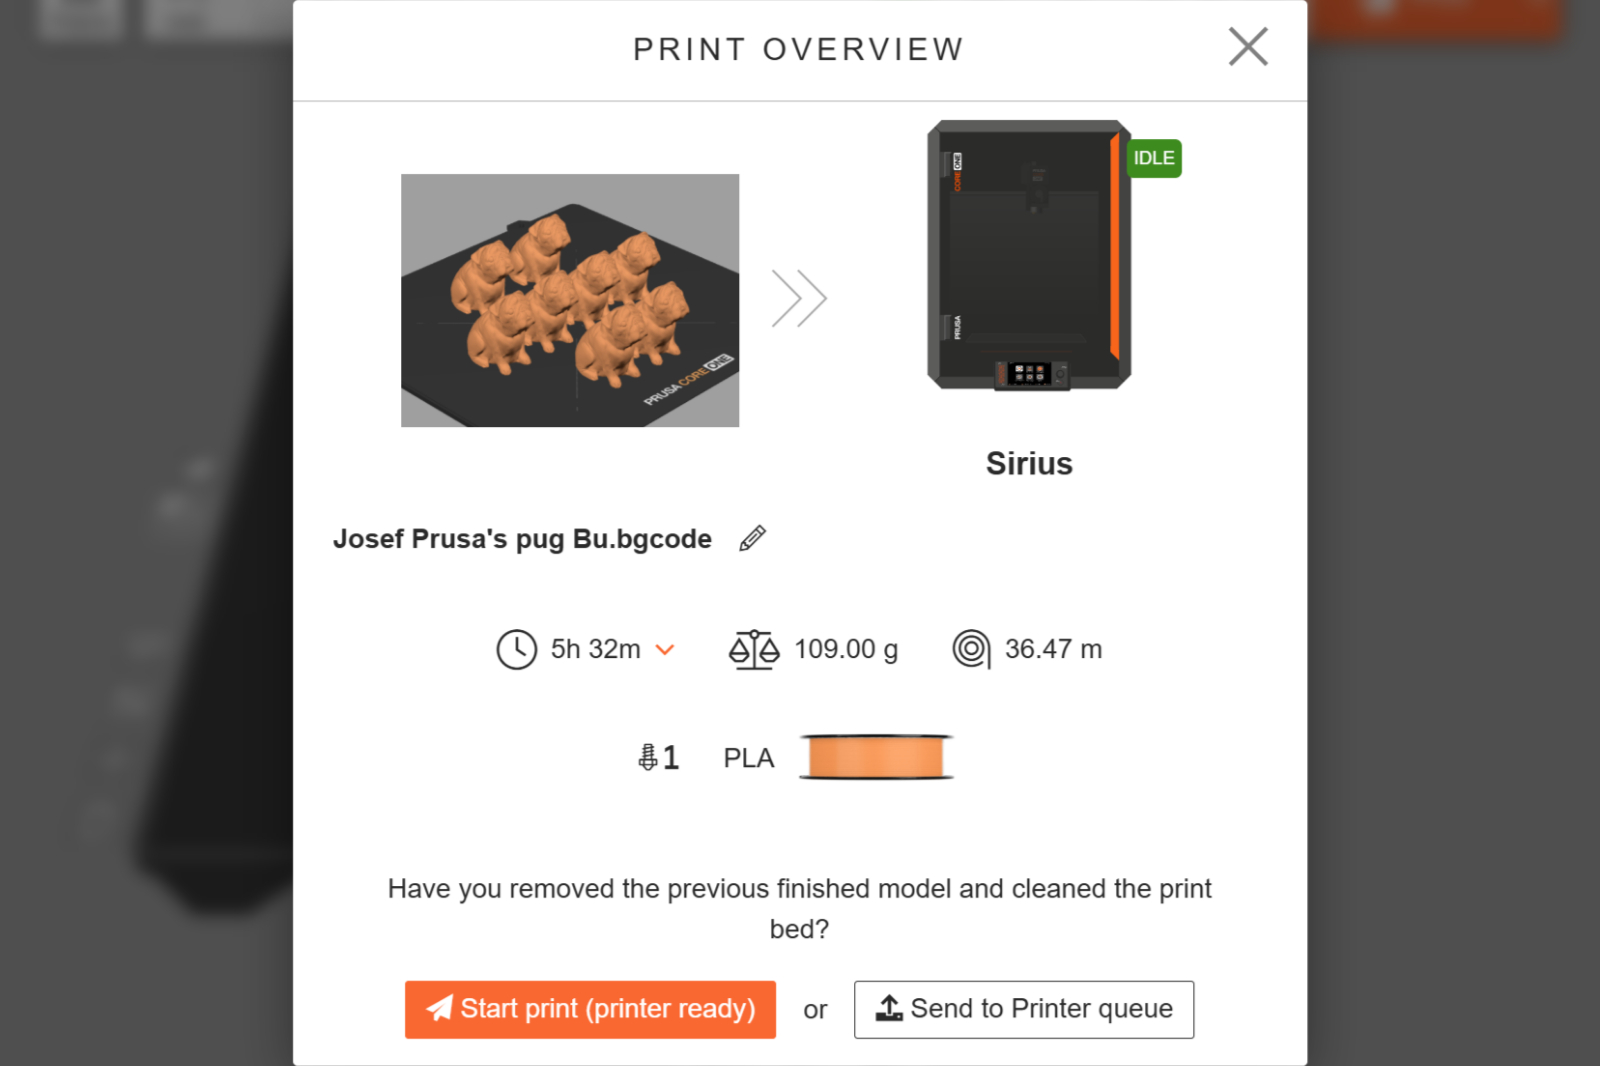
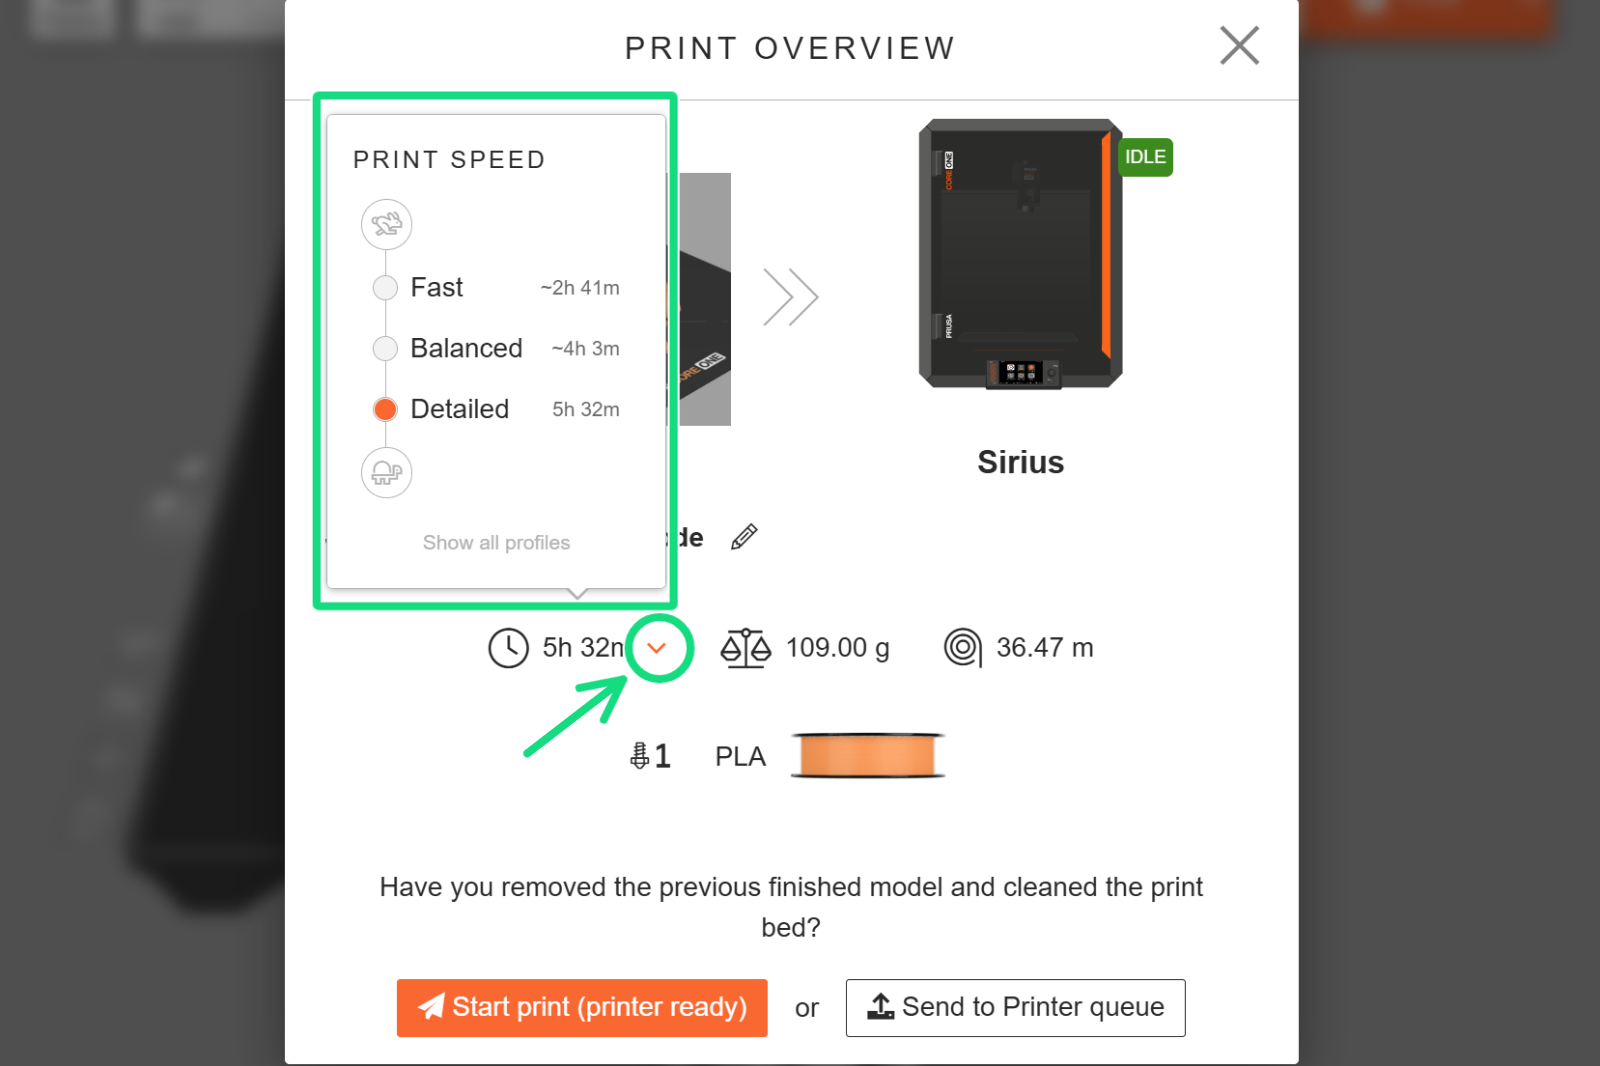
You can press the dropdown arrow next to the print time estimate to show a quick print time comparison with other print profiles. Select one of the profiles to re-slice the project.
When EasyPrint detects a possible issue with the print, it displays a warning screen describing the problem. Unless the model is specifically designed to be printed without supports, it's usually safer to select "Enable supports & try again" to re-slice. Alternatively, you can click Ignore & continue to proceed with the current settings.
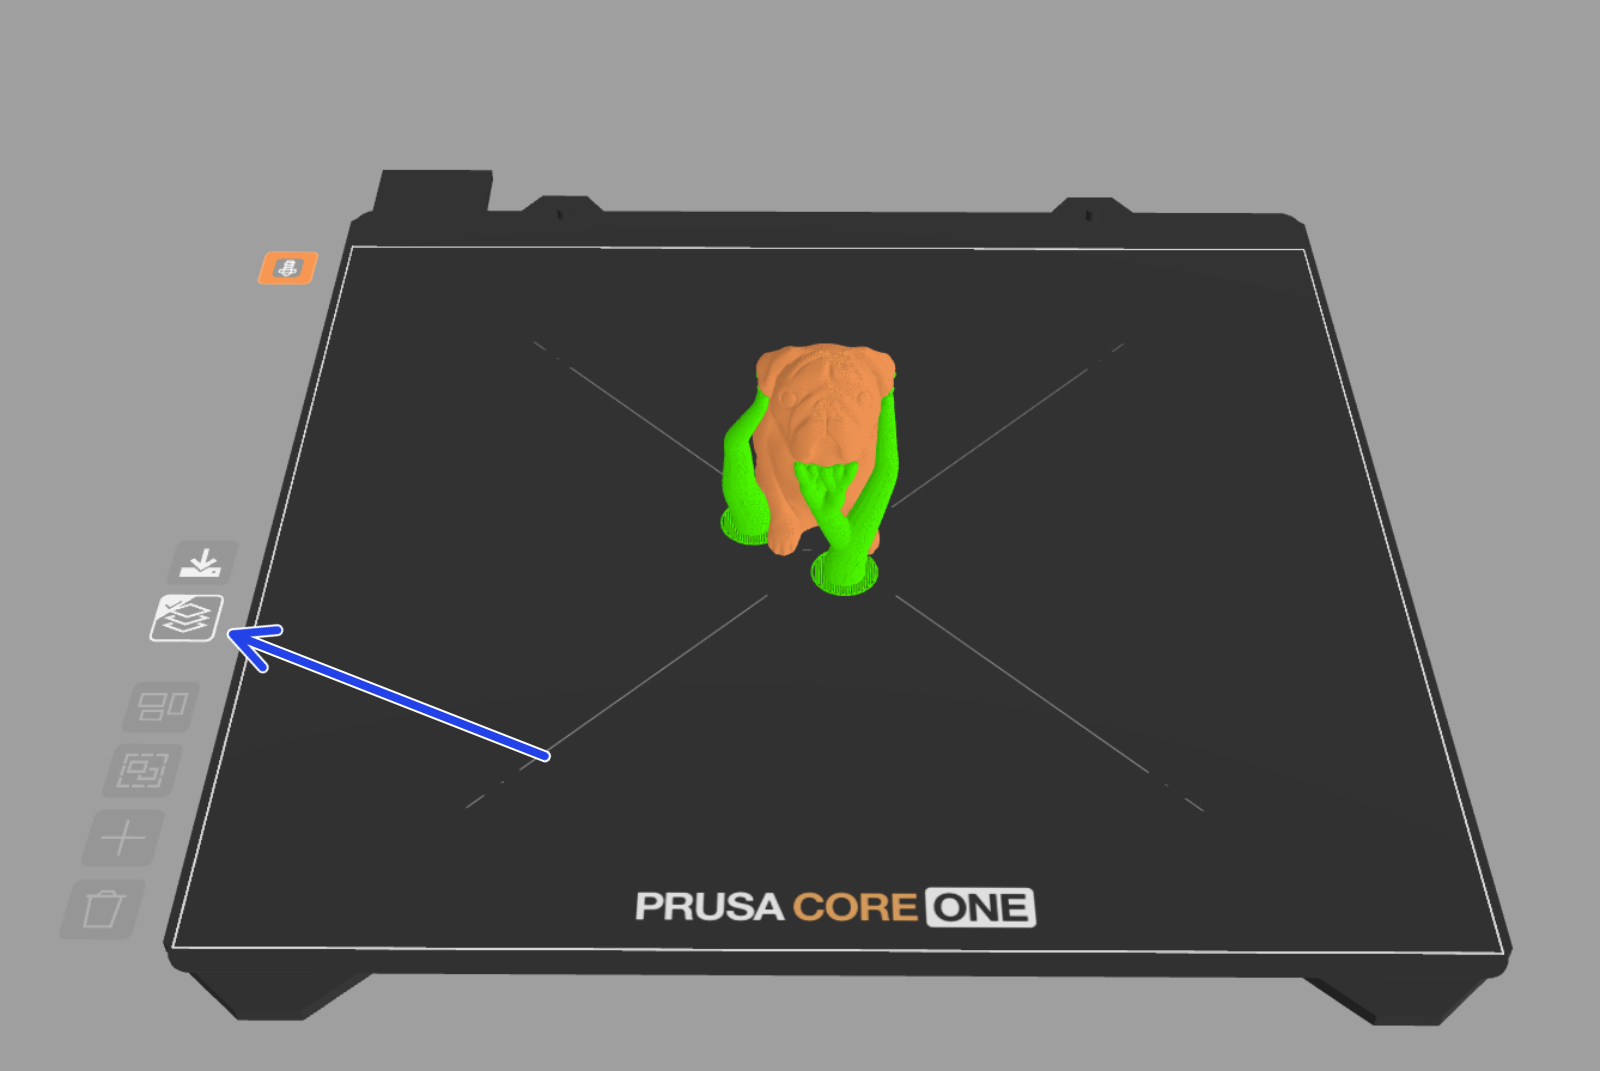
Optionally, you can display the preview of the G-code. The preview includes the generated supports (displayed in green) and is a good way to do a final check before printing.
To ensure fair use for all users, there is a 60-second time limit for slicing per bed, which should be sufficient for 95% of projects. For extremely complex jobs, you can either download the project file and slice it locally on your computer in PrusaSlicer or take advantage of the Prusa Subscription, which includes increased slicing limits.
When printing multiple objects, you can enable sequential printing, which changes your printer's default behavior: it prints one object from the first layer to the last, and only then starts printing the first layer of the next object. Sequential printing can reduce stringing or the chance of a single detached object ruining the whole print.
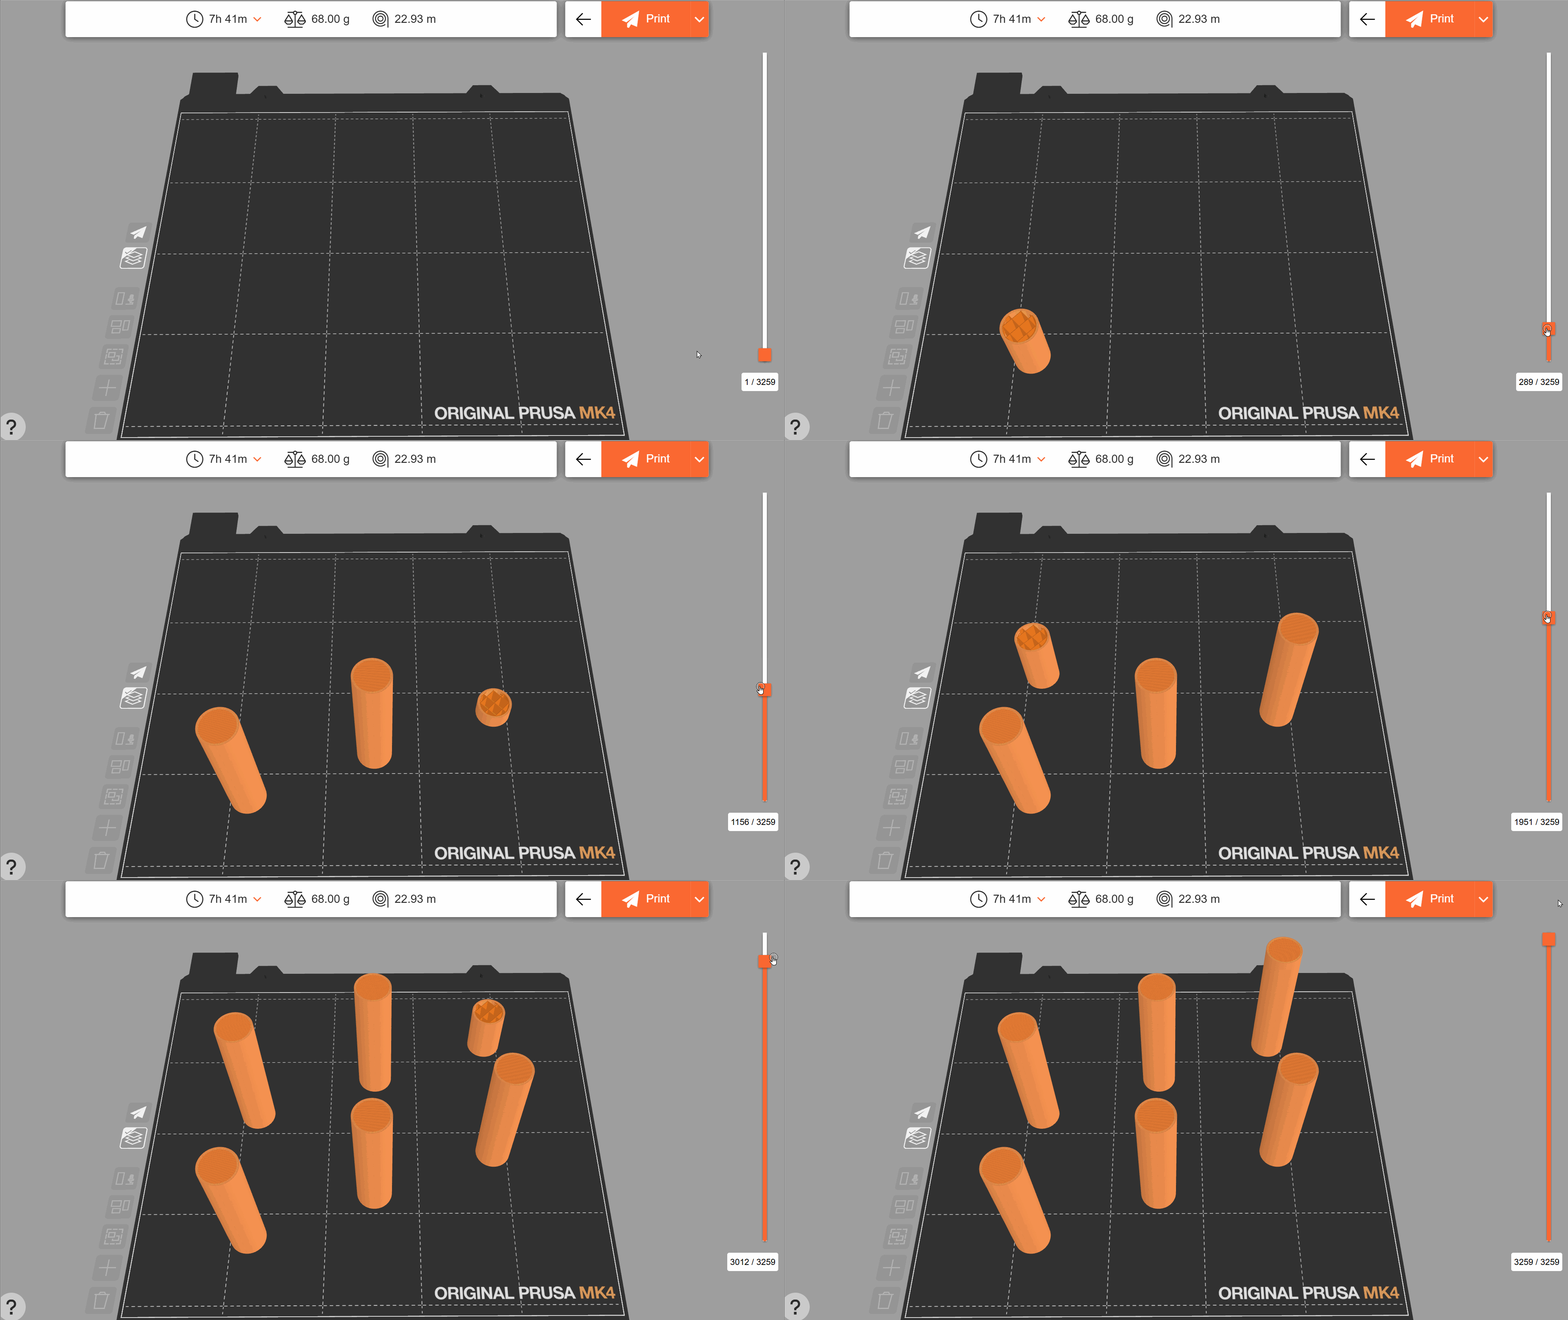
Enable sequential printing by clicking the button on the left side of the print bed. All objects will be automatically arranged to allow for sequential printing. The spaces between objects are much larger than usual, so the printer toolhead avoids bumping into objects that are already printed. The objects are printed in order from the front to the back of the plate.
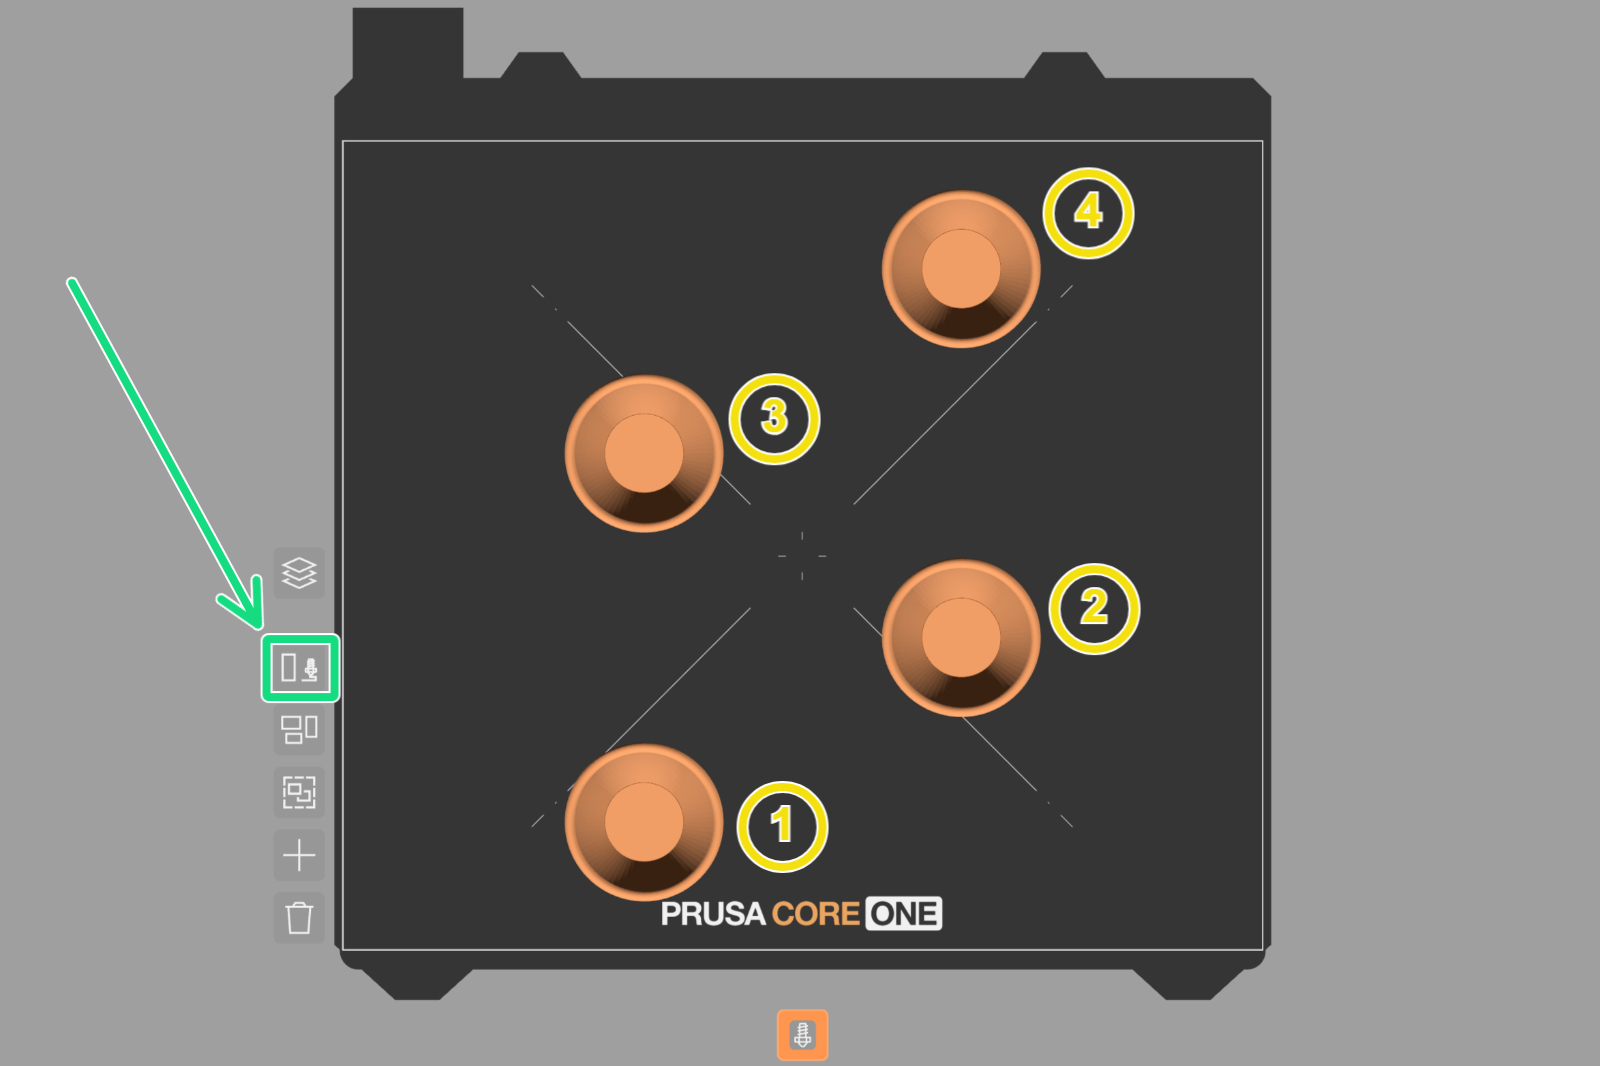
If there are too many objects or they are too large to print sequentially, they will be spread across multiple print beds instead.
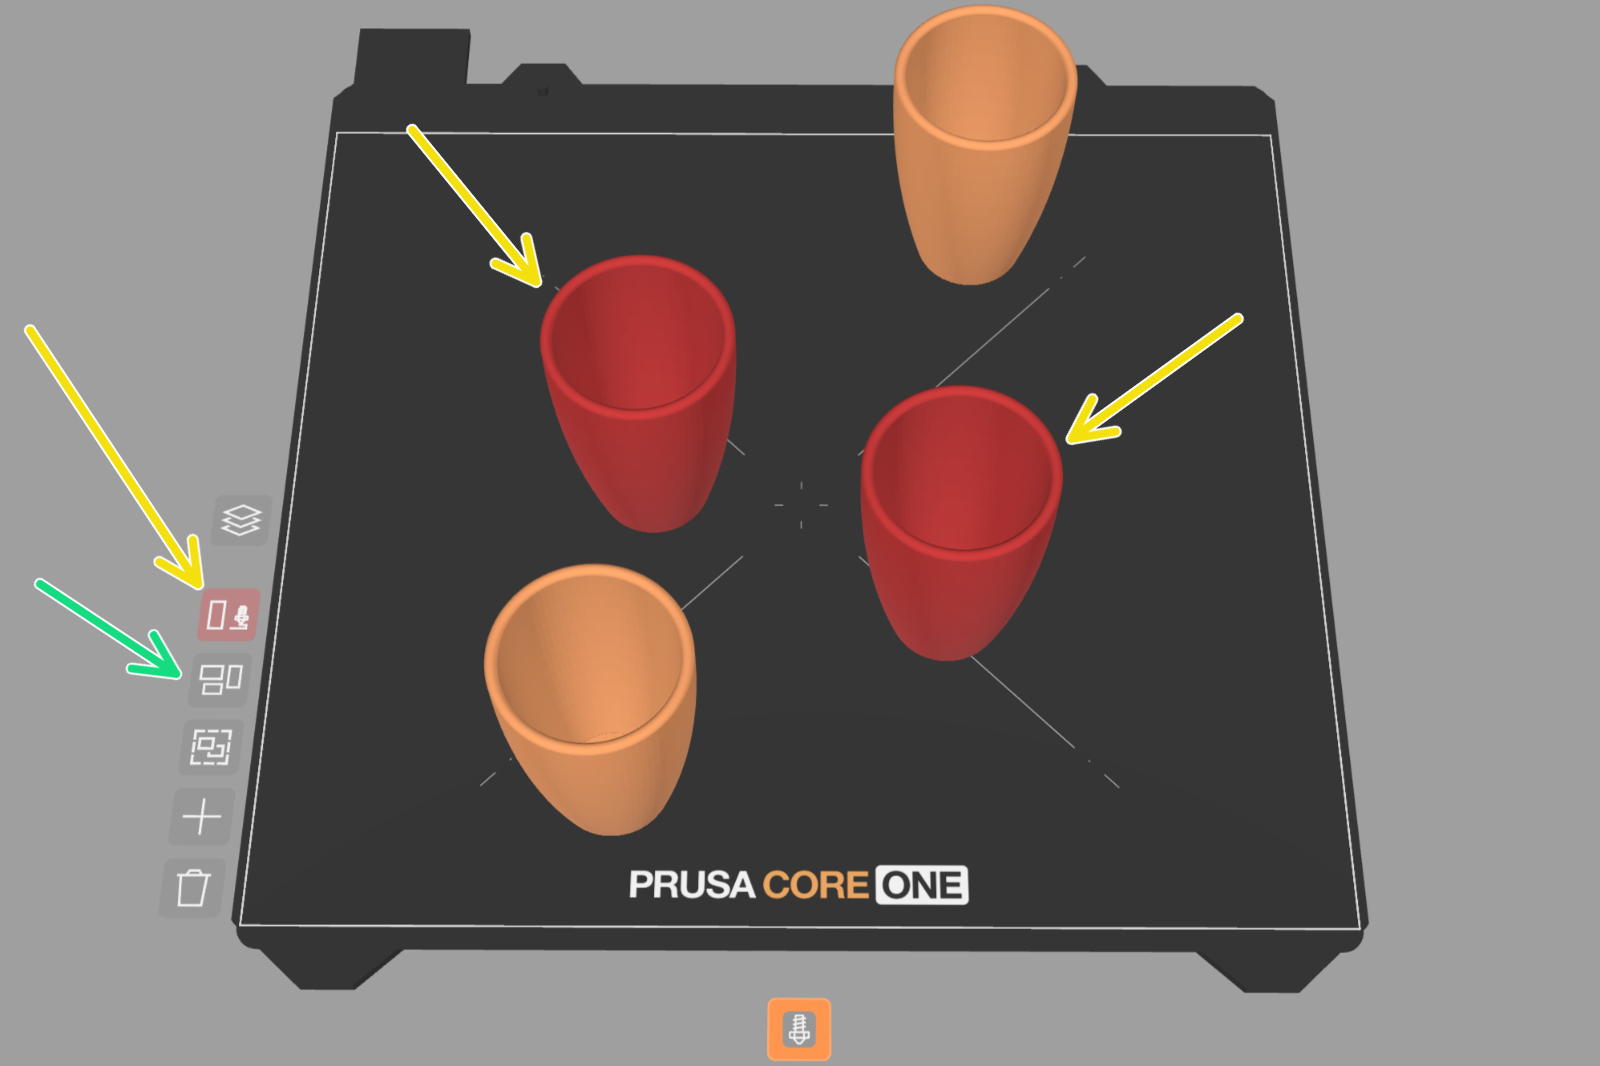
If you move any objects after they are automatically arranged, the sequential print button might turn red to indicate that the new position is invalid. The objects causing the issue will also be highlighted. Click the Arrange button (marked by the green arrow) to re-arrange the objects and fix the problem.
The Cut tool splits an object into two separate objects along a flat plane. This can be used to separate an oversized model into multiple pieces that would fit a smaller print bed; to create a flat base for printing; or to simply remove unnecessary parts of a model.
To use the tool, select an object and press More → Cut. This displays a transparent preview of a cutting plane. You can use your cursor to drag the plane up and down, or use the rounded arrows to rotate the plane. There is the option to either Split the model (which separates it into two objects, which are automatically arranged), or to cut In Place (the parts stay where they are, a part of one object group). Press Apply to confirm the cut.
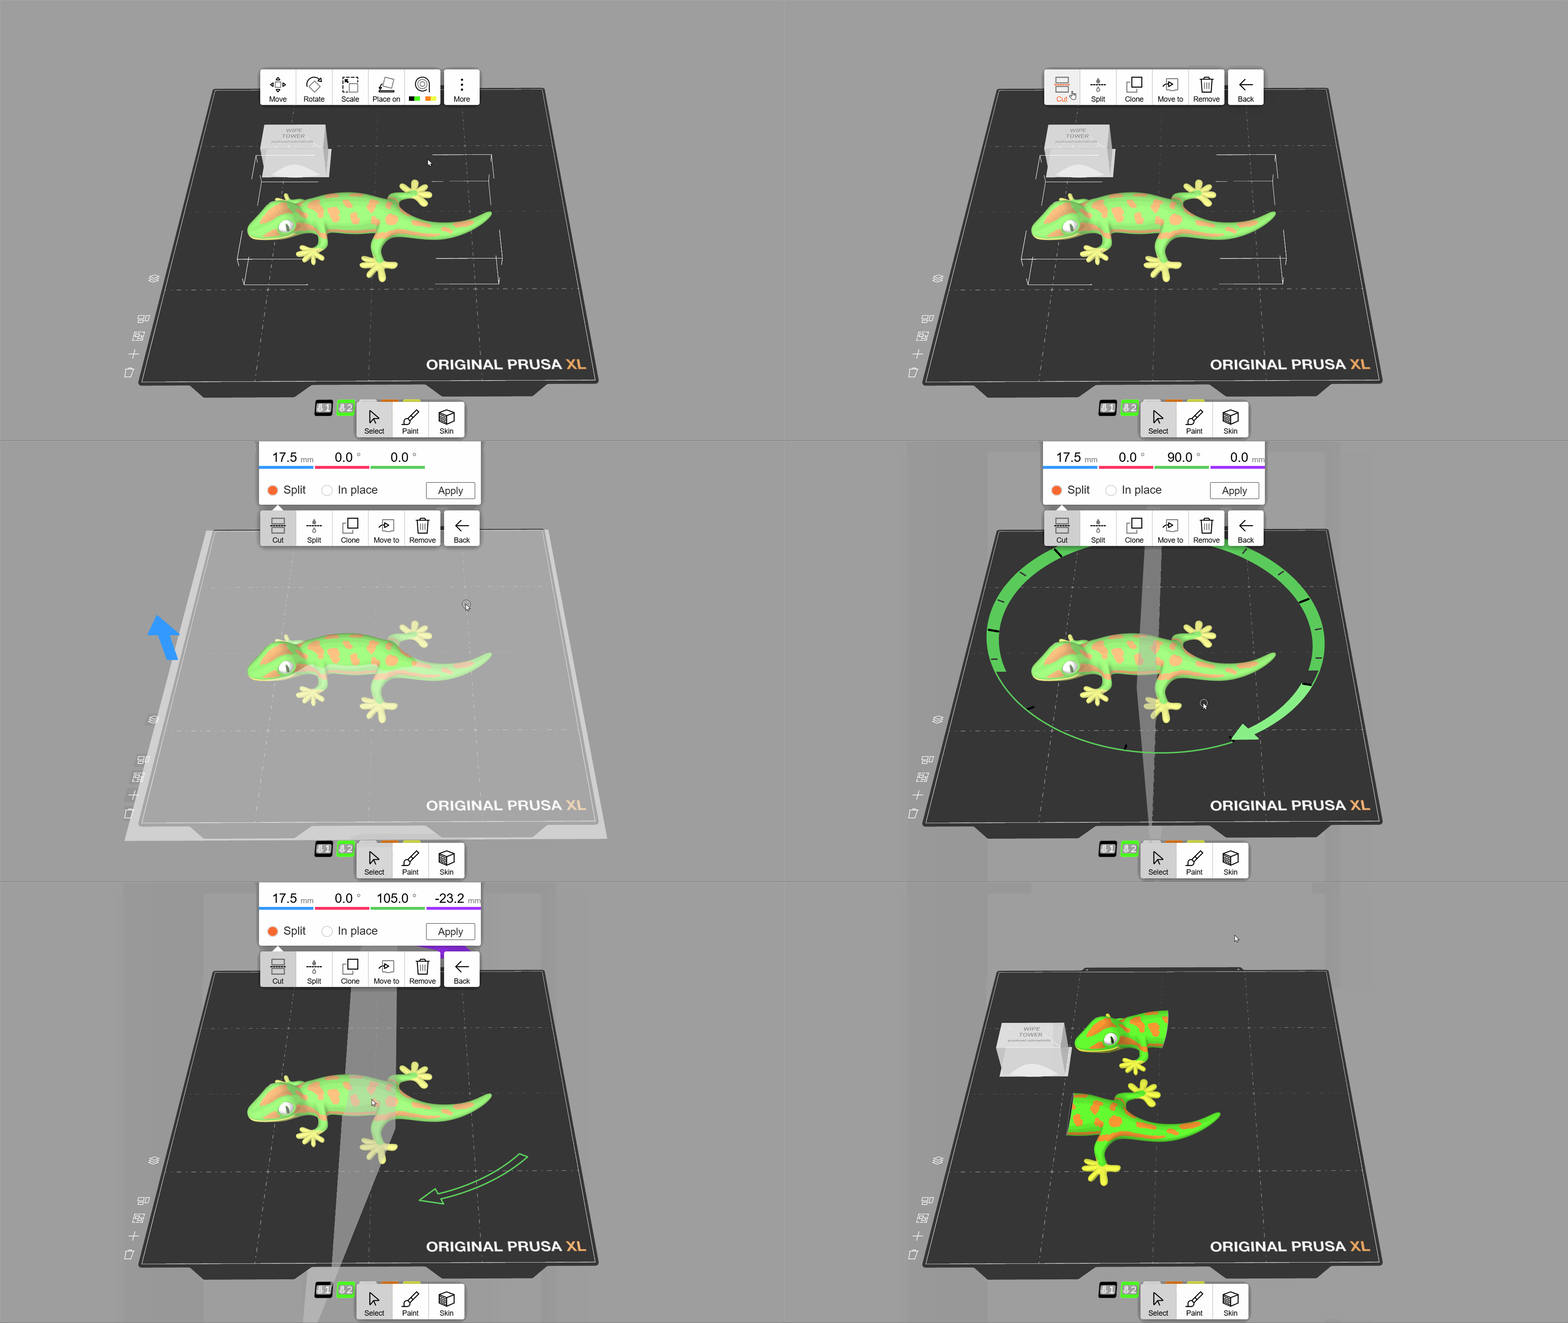
Unlike PrusaSlicer, the cut tool in EasyPrint preserves object properties such as color painting or fuzzy skin. However, PrusaSlicer's cut tool includes an option to add custom connectors to the cut, which is useful for the assembly of printed parts.
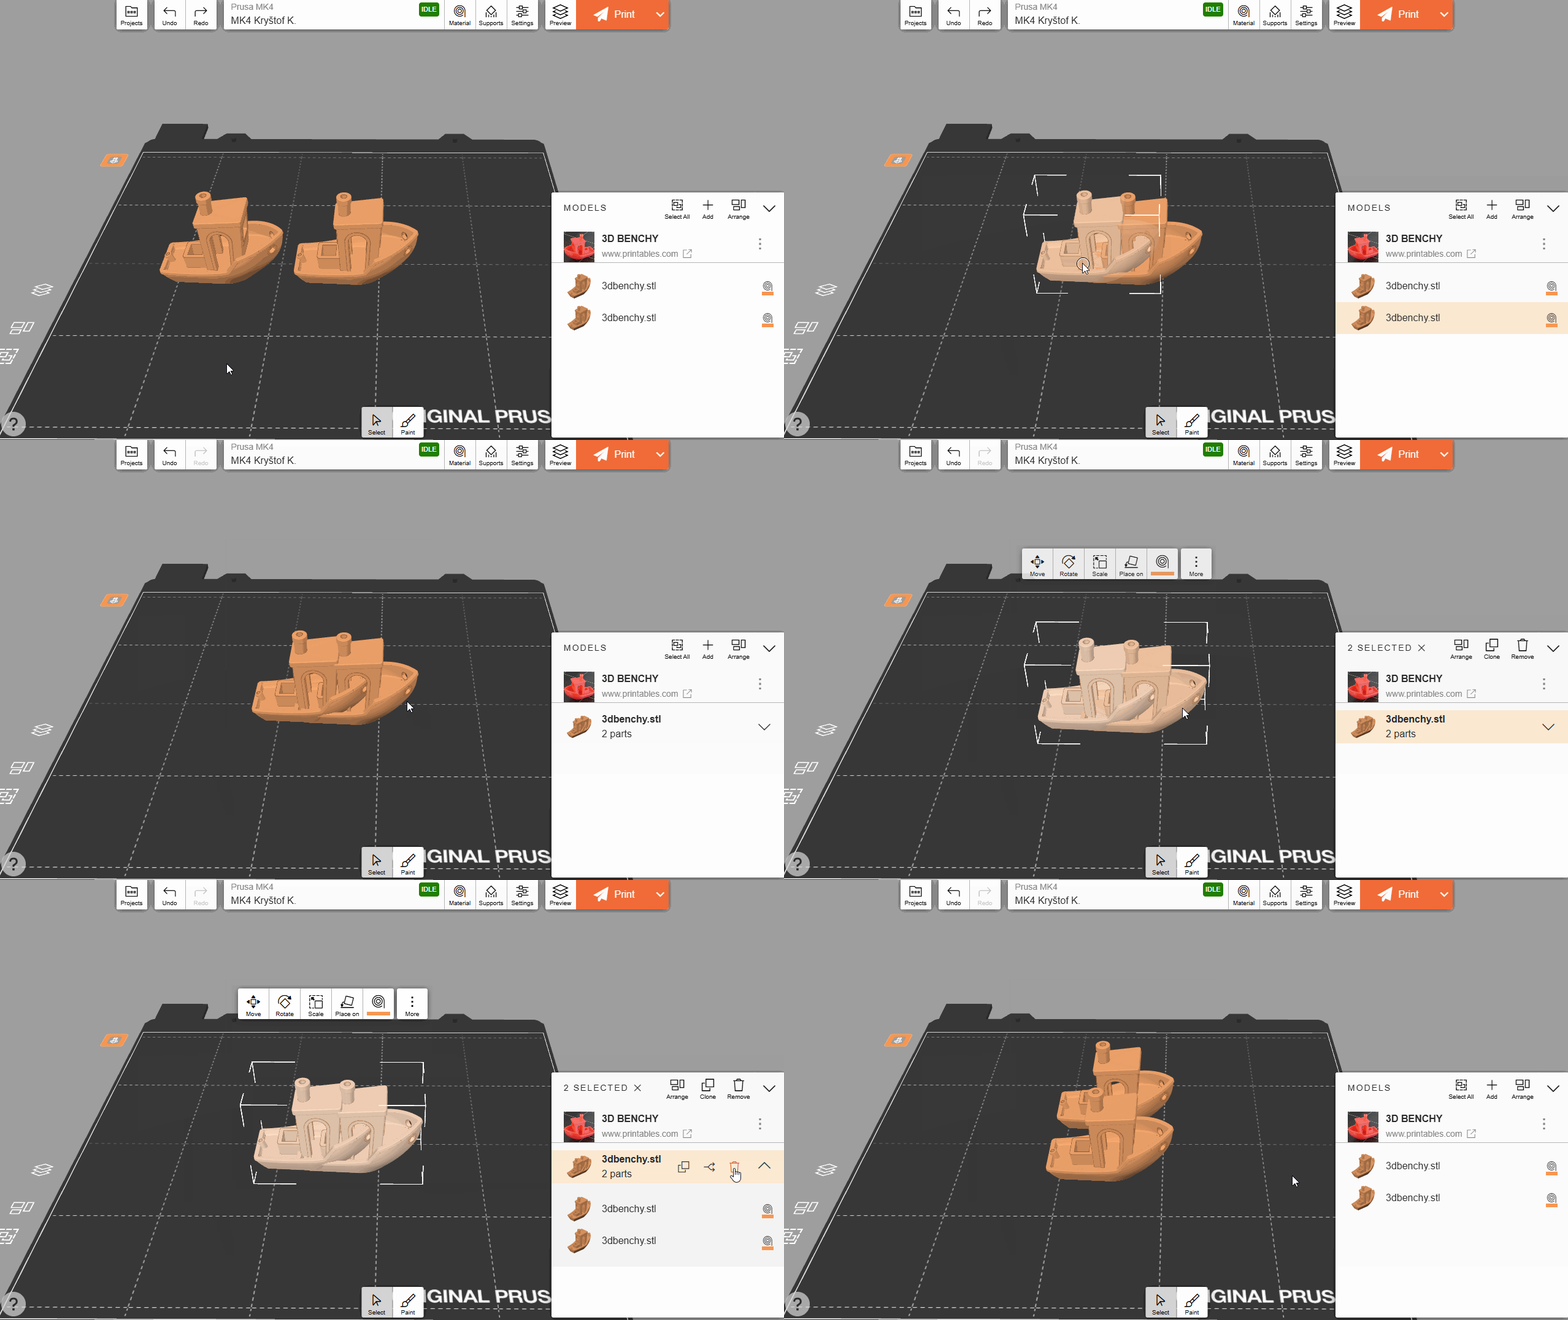
Models consisting of multiple parts (meshes) are loaded into EasyPrint as a group. All objects in the group will be moved, scaled, and sliced together as one object. In the Models panel, you can inspect the individual parts within the group. Each one can be individually removed from the group or deleted. Alternatively, you can double-click a part of a model on the print bed to manually separate it.
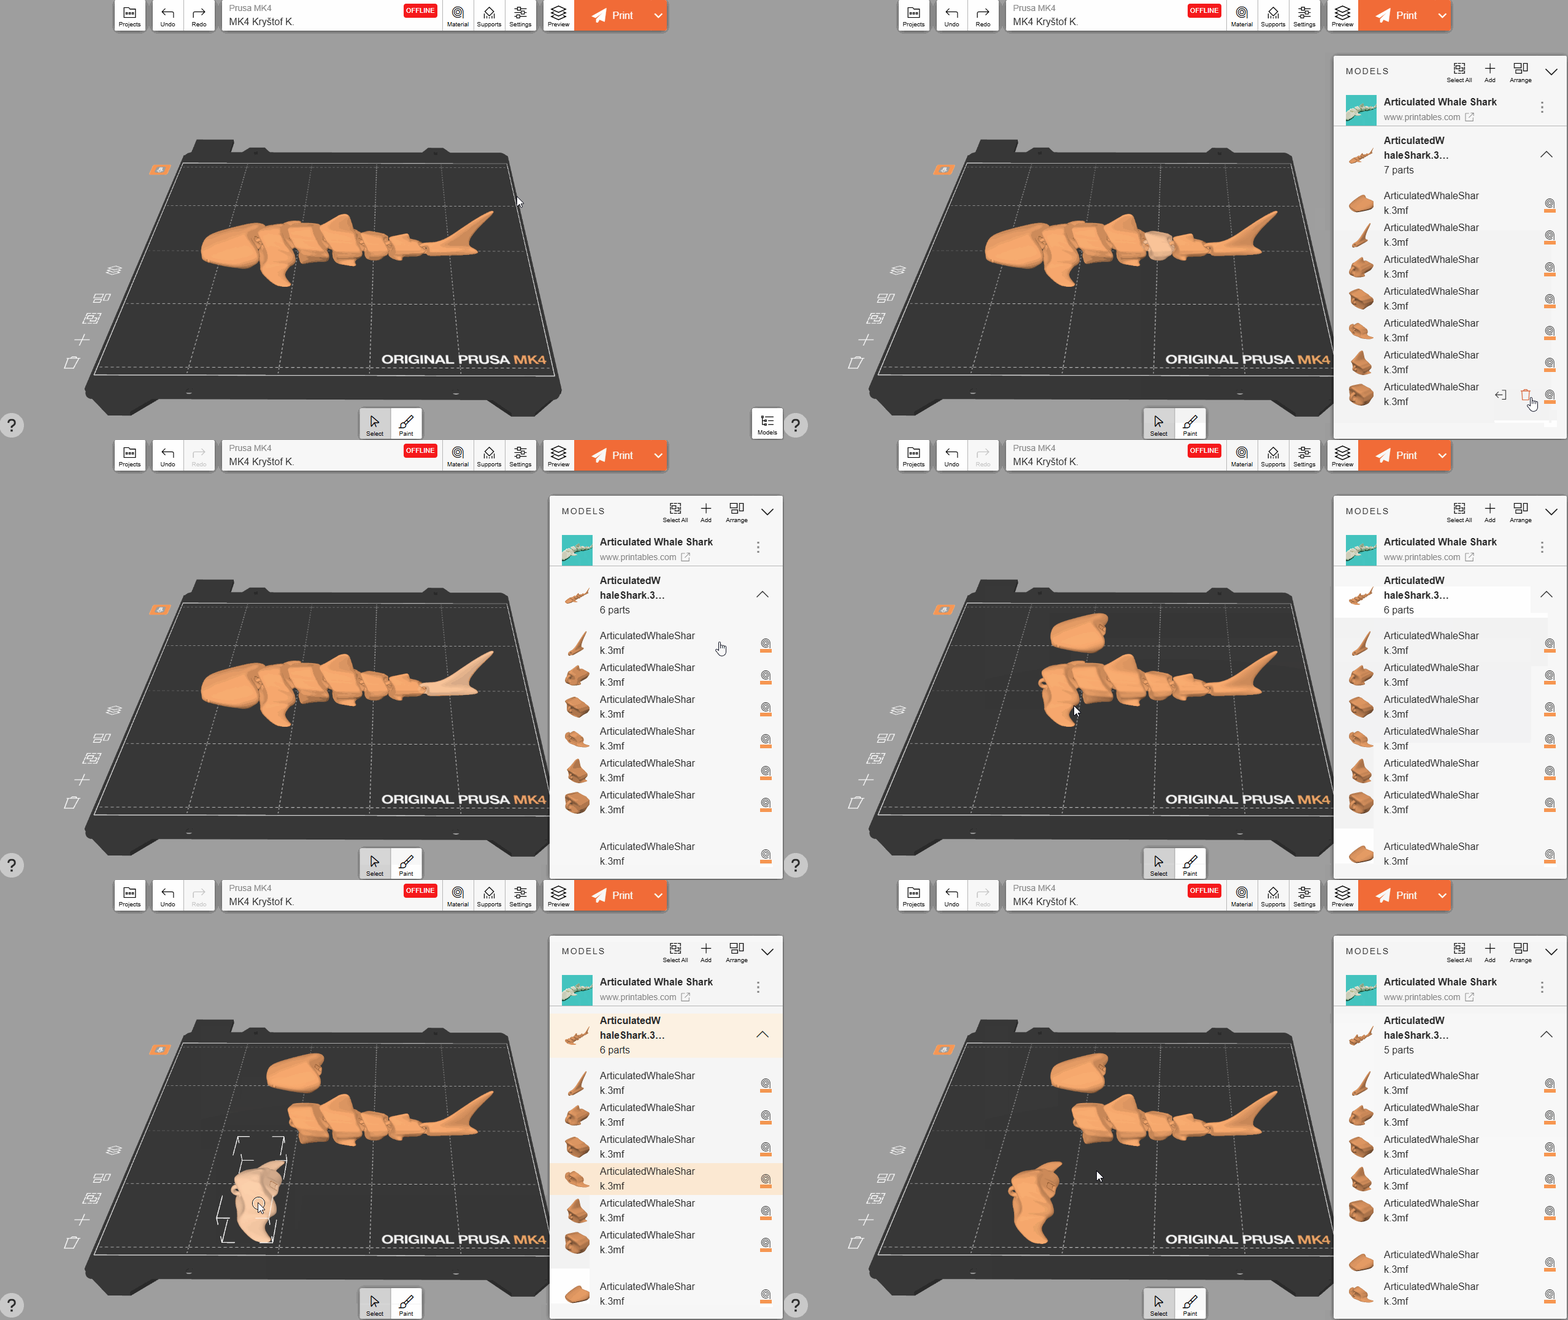
If you move an object so that it touches another object, they automatically merge into a group. You can disassemble the group in the Models panel.
An object within a group can be turned into a Hole, which deletes any intersecting geometry. This can be useful for creating small holes or removing parts of objects when the regular Cut tool would not work well.
Double-click an object within a group to select it. Then, in the Color assignment tab, select Hole. The 3D preview will update to show the object with transparent colors, and it will remove any intersecting parts. You can later turn the Hole into a normal object by using the Solid option within the Color assignment tab.
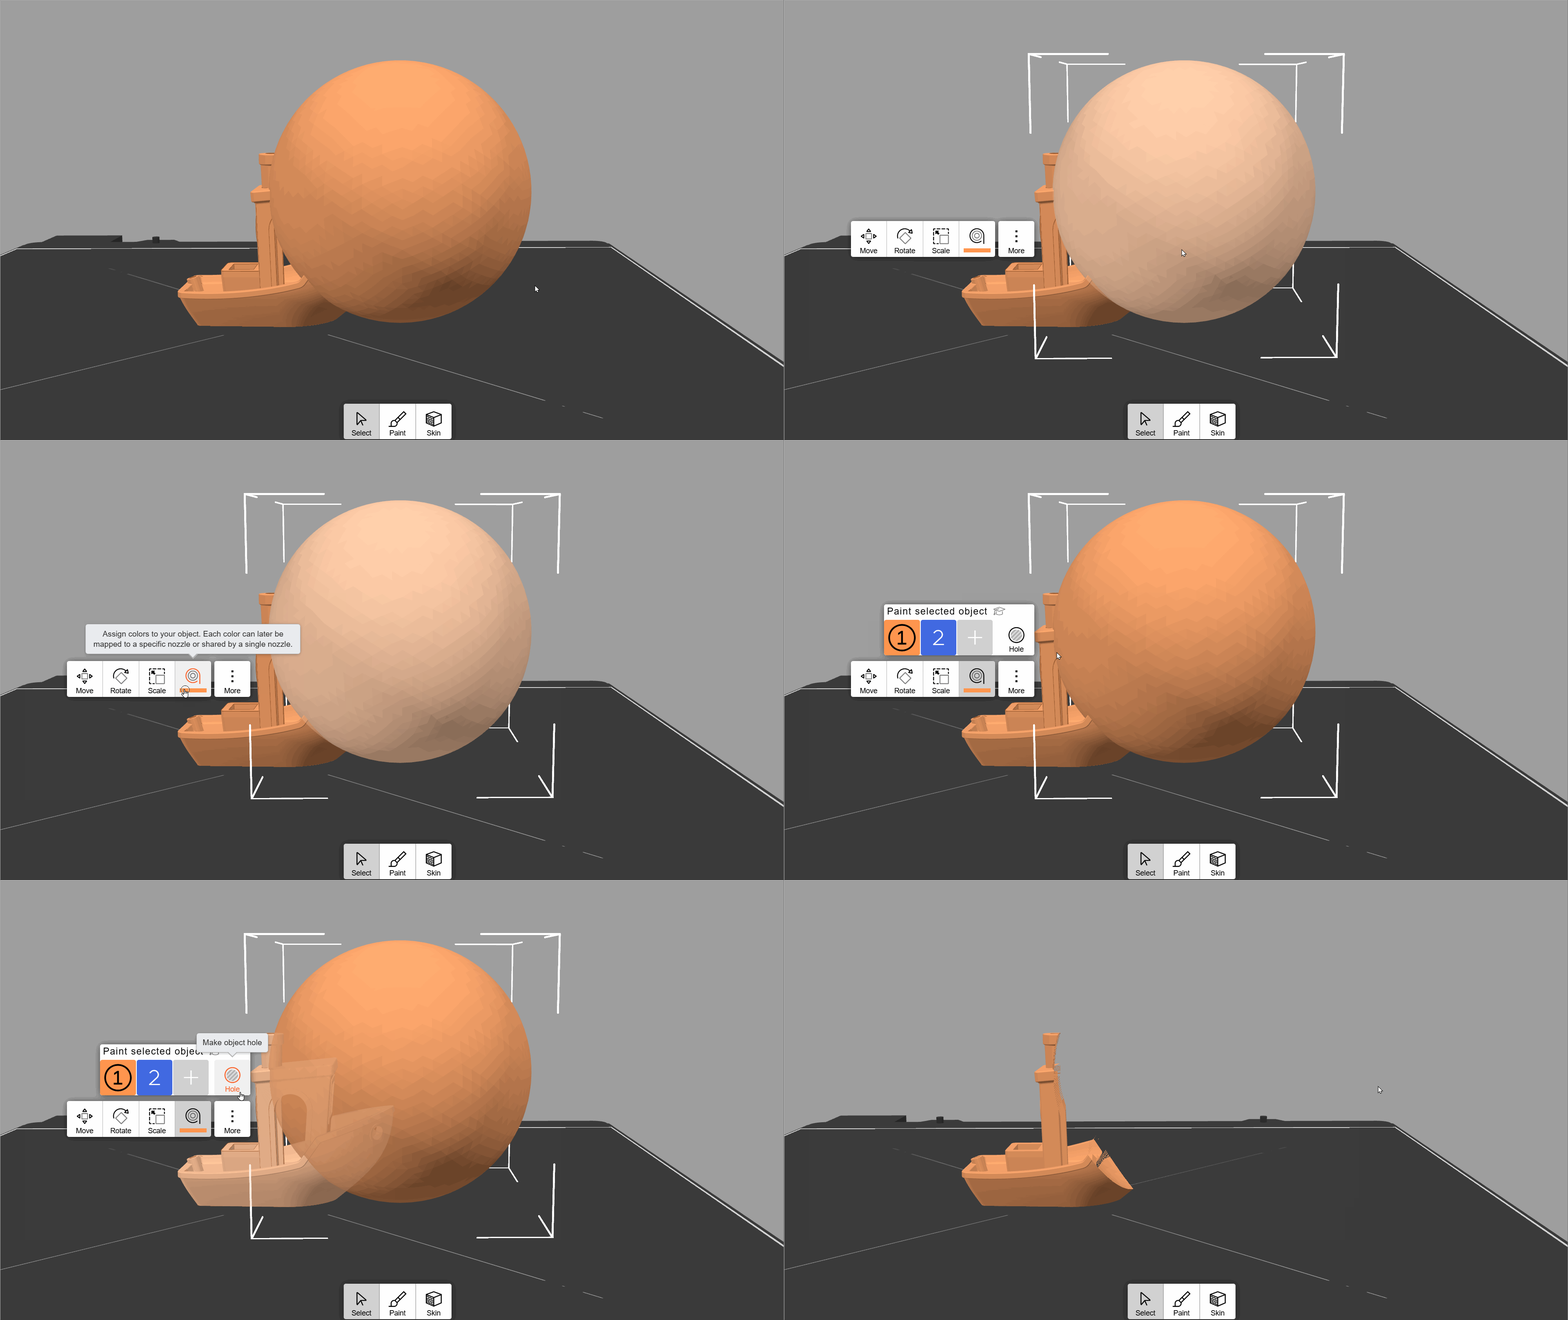
The Hole can be moved as any other object, and the preview will update in real time.
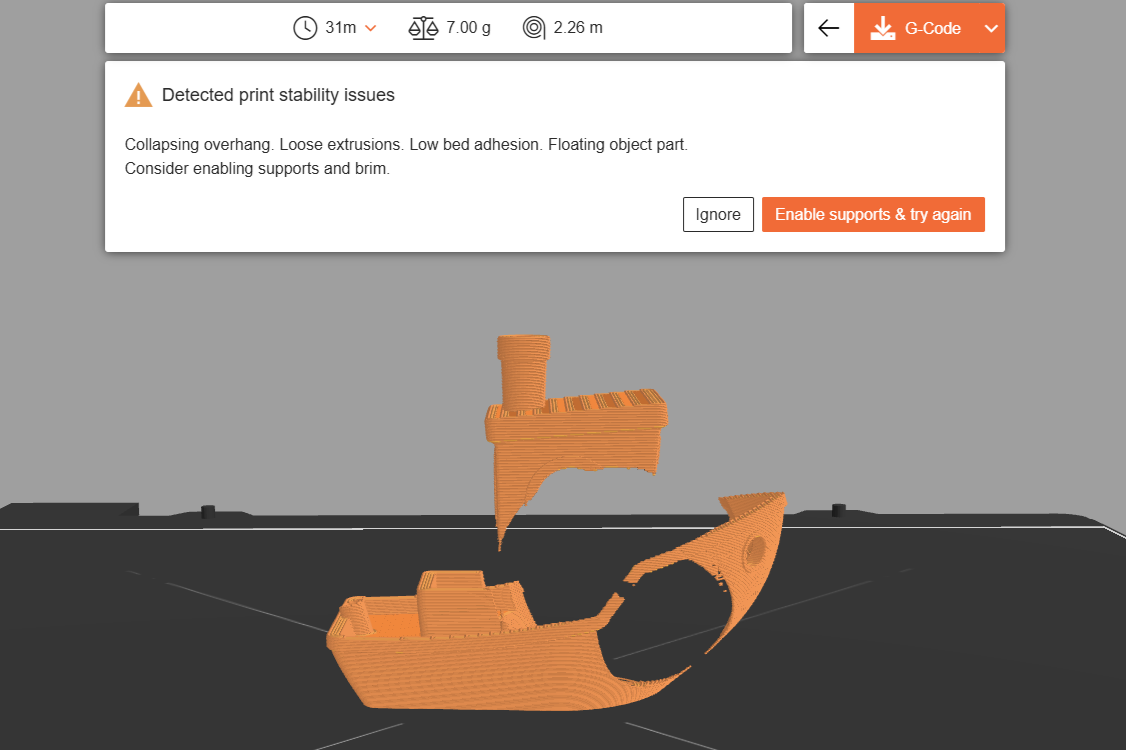
The Hole tool can sometimes create non-printable geometry. We recommend checking the G-Code preview to confirm that the object is actually printable. EasyPrint will also automatically detect major issues and give you a warning before printing.
You can seamlessly work with multiple virtual beds within EasyPrint. All beds share the same print settings, but each one is sliced separately and generates its own print file. This can be useful for large projects with too many parts. If the objects on your Print list would not fit onto a single bed, they will be automatically arranged on multiple beds.
Alternatively, you can drag any object into the empty space, and new beds will dynamically appear. Once you drop the object, the bed underneath will stay there.
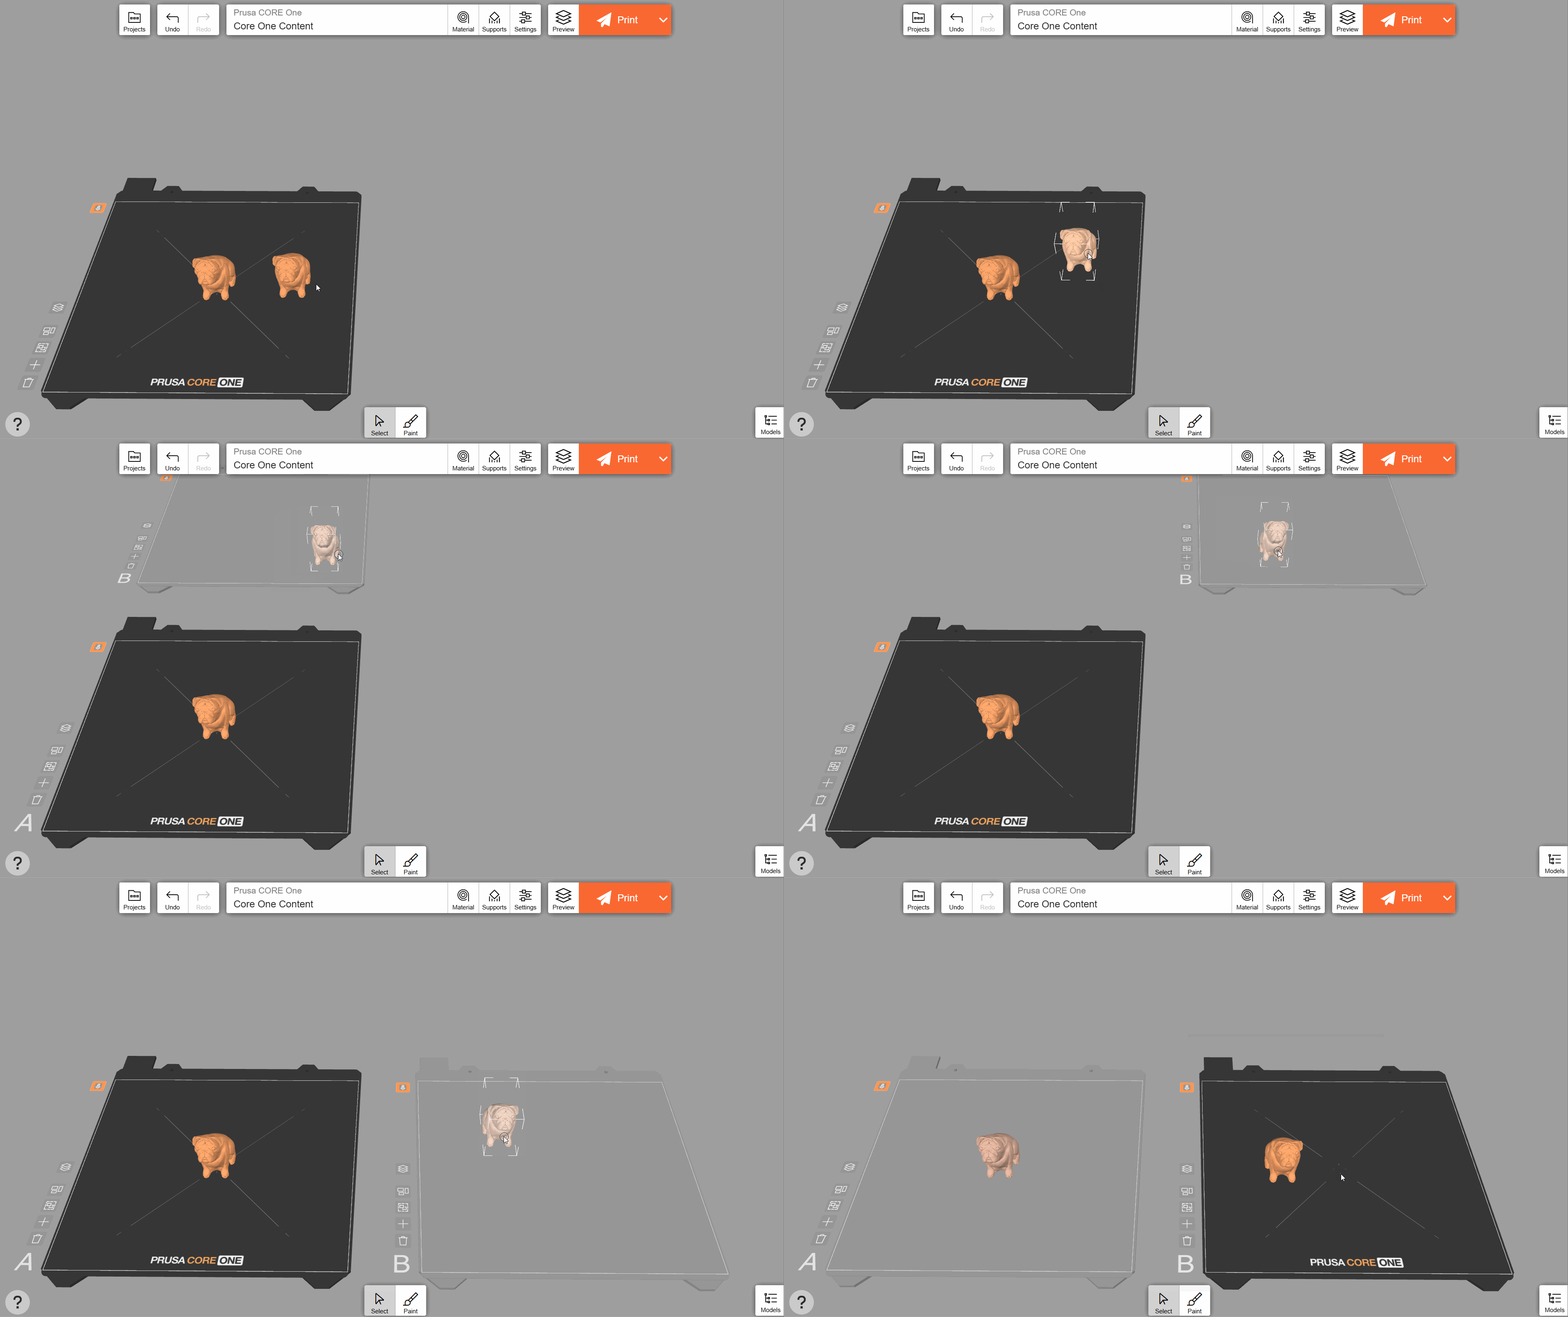
You can send an object to a specific other bed by selecting it, pressing More → Move to, and selecting the target bed. By default, objects on the target bed are auto-arranged; this can be disabled using the checkbox on this menu screen. "New bed" will spawn another empty bed for the object.
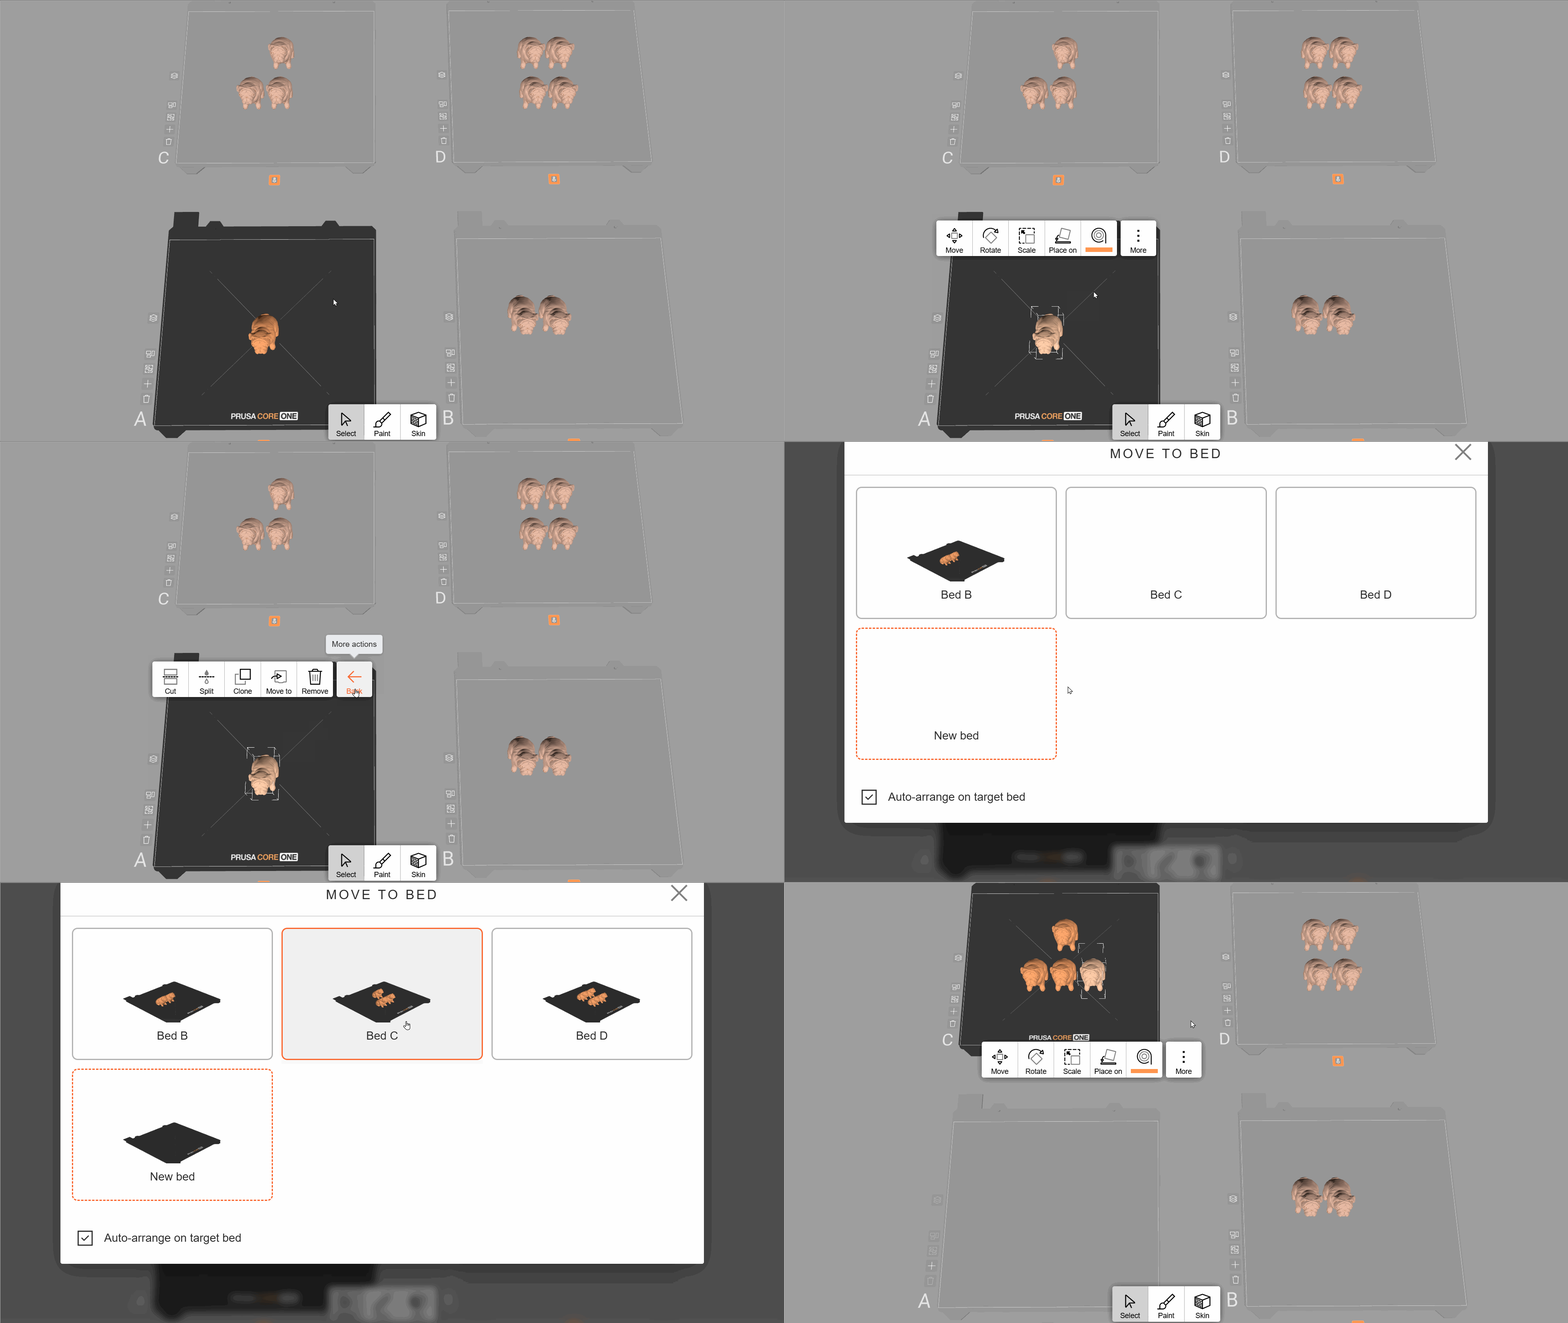
There is always one active bed, which you can tell by its solid color (the inactive beds are semi-transparent). Click an inactive bed to make it active. By opening the dropdown menu, you can choose to either print all beds or only the currently active one.
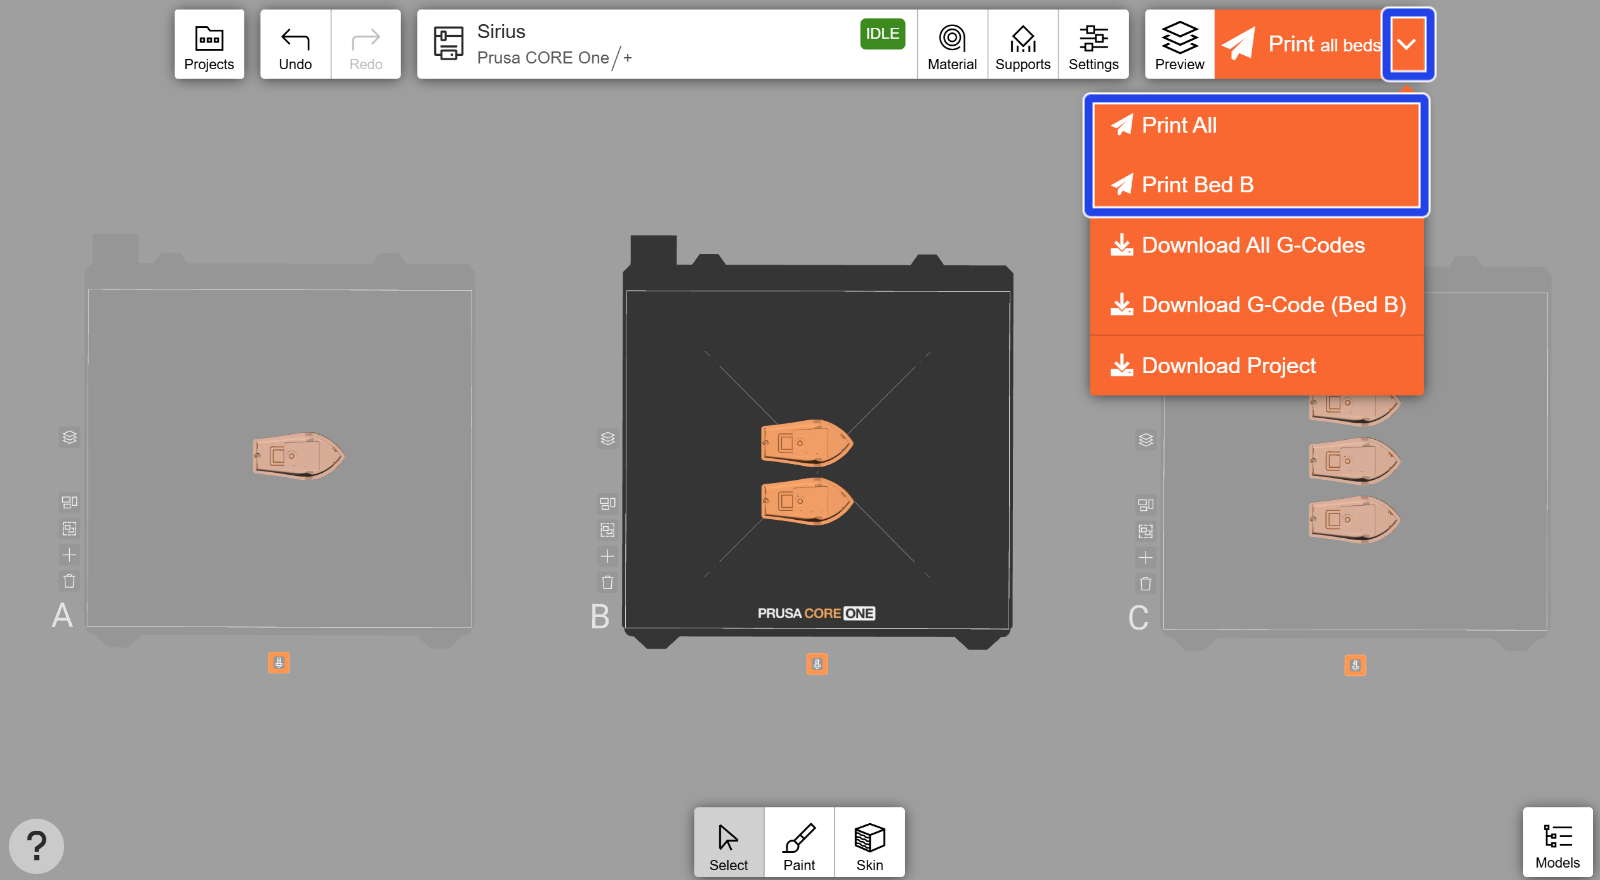
When you choose to slice all beds at once, they are sliced one after another. Accounts with active Prusa Subscription have access to parallel priority slicing.
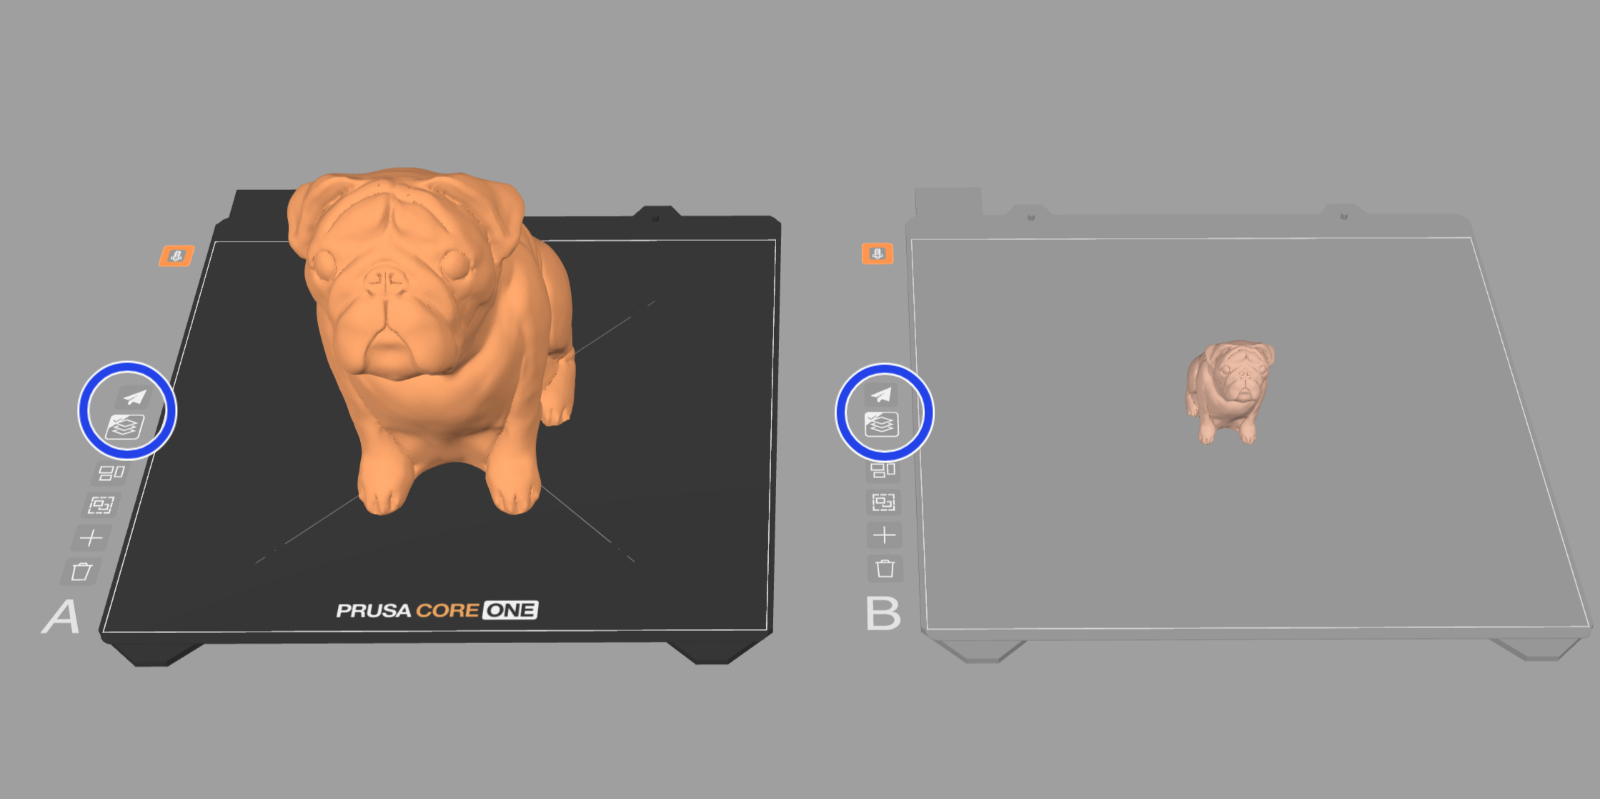
If the Preview icon on the left side of each bed shows a checkmark in its corner, it means the bed has already been sliced. The button above it allows you to quickly send the file to the Printer (or download the G-code, depending on your selected printer).
You can download the current project as a 3MF file using the orange drop-down menu. This might be useful if you want to fine-tune your project in PrusaSlicer or share it with someone else. You can also access previous projects using the dedicated Projects tab.
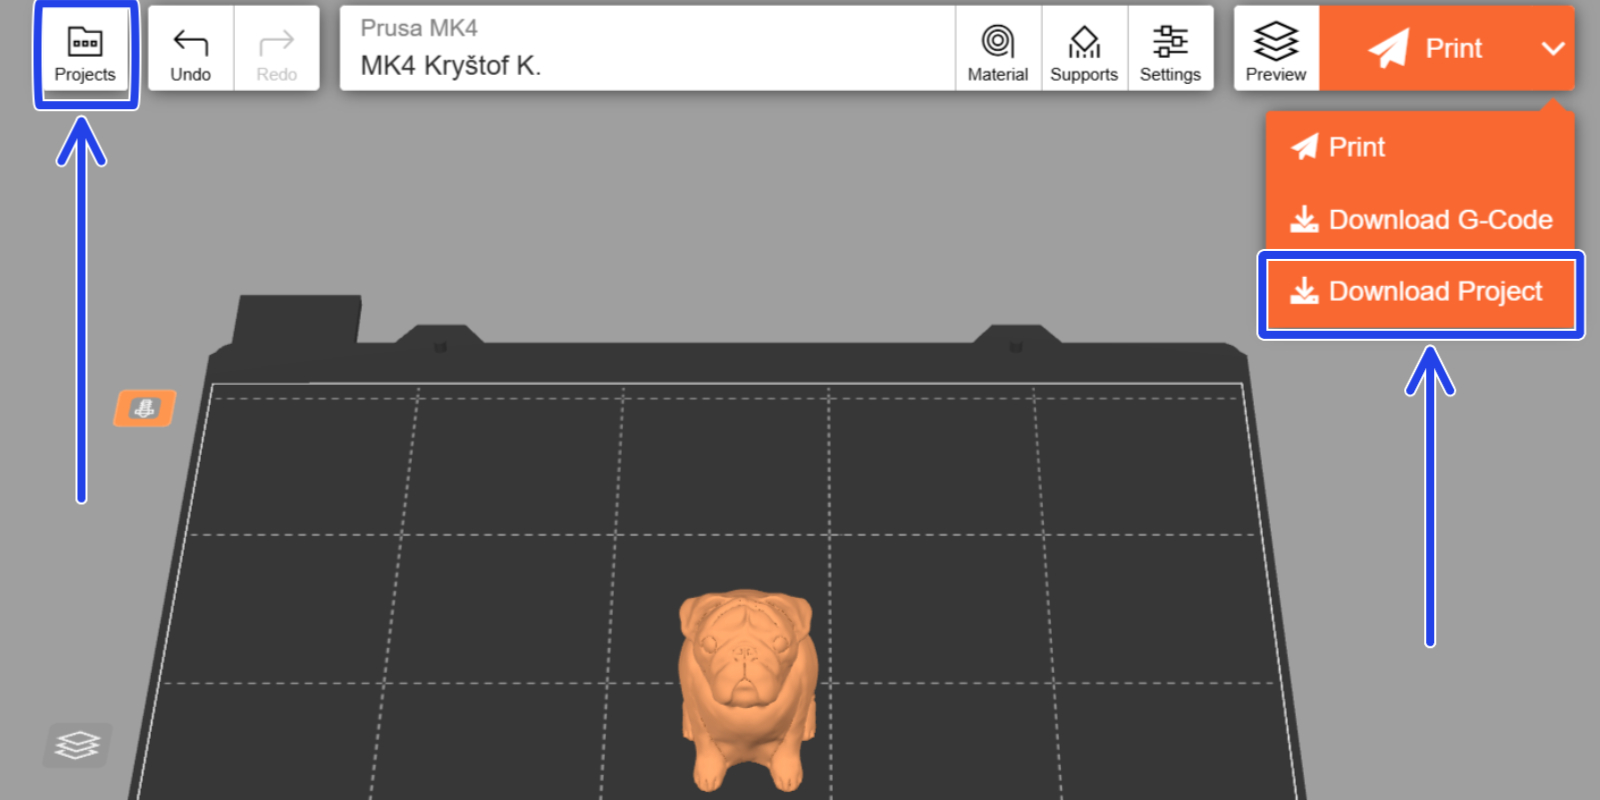
In the Projects tab, click the three dots to rename, open, duplicate, or delete a project. Deleted projects are kept for 30 days in the Deleted projects folder (accessed by clicking the Trashcan icon), unless manually removed.
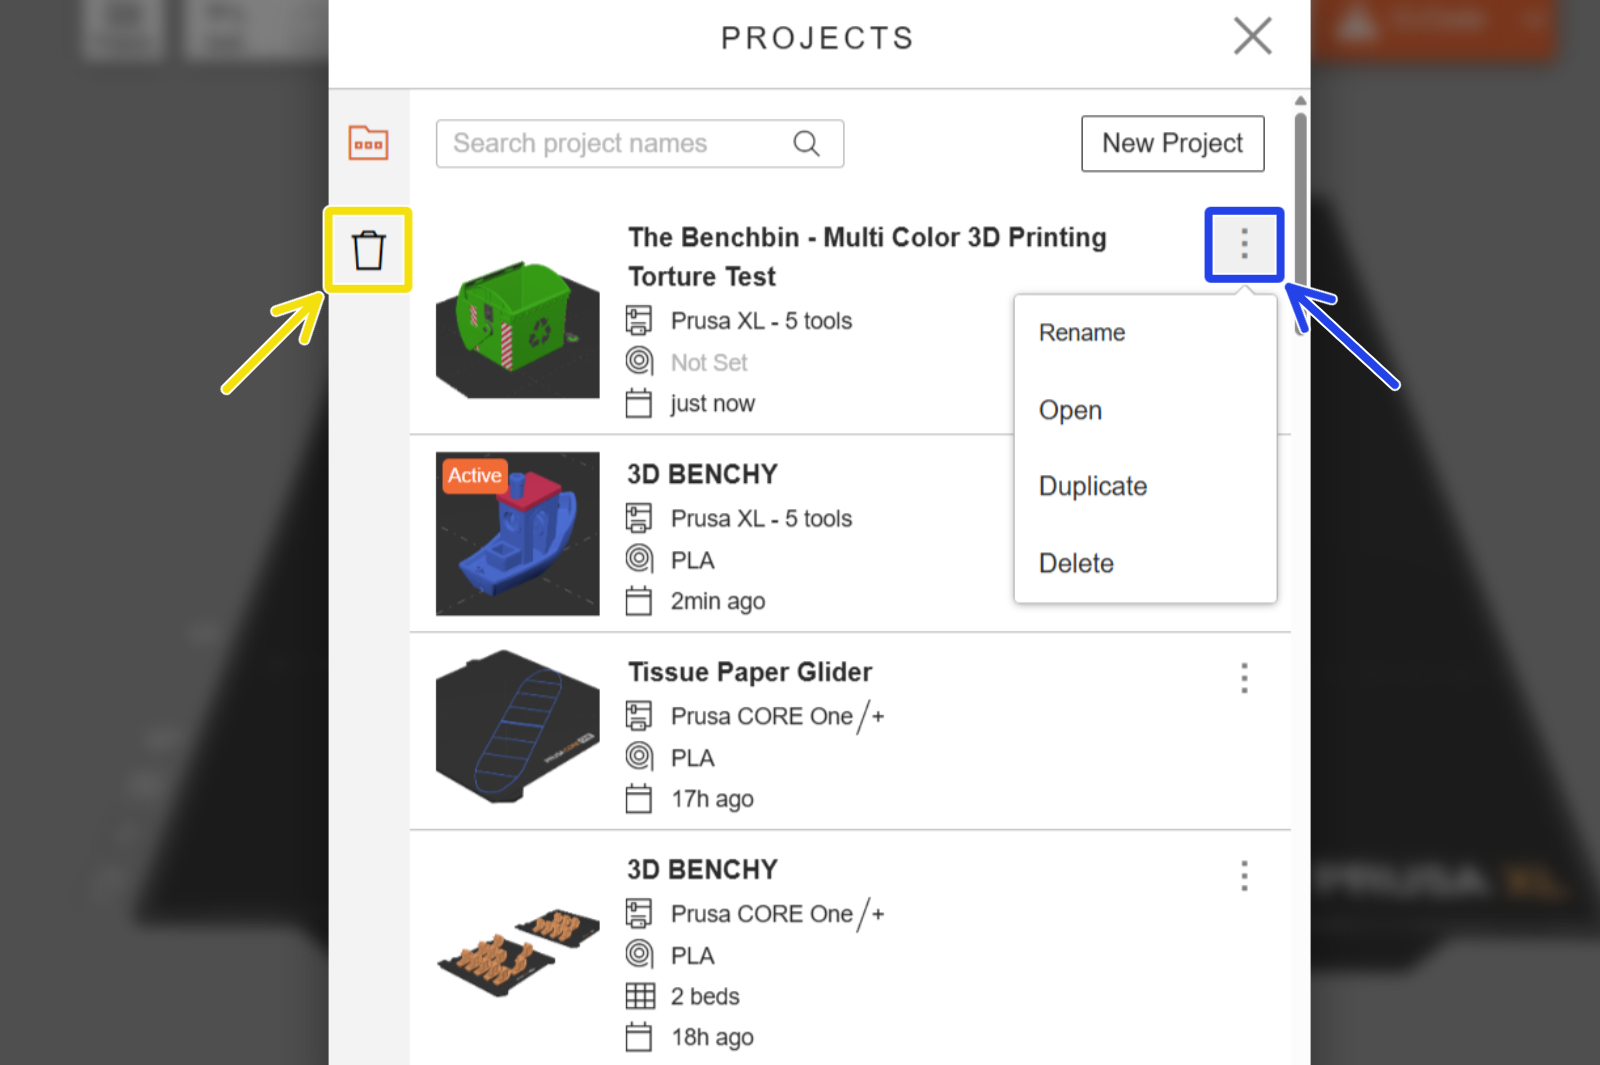
EasyPrint projects are automatically saved in cloud storage linked to your Prusa Account. You can start working on a project on one device, and it will be available on your other devices as well. Even if you have the same project open on two different devices at the same time (e.g., on your phone and on a PC), any change you make will be almost instantly reflected on the other device.
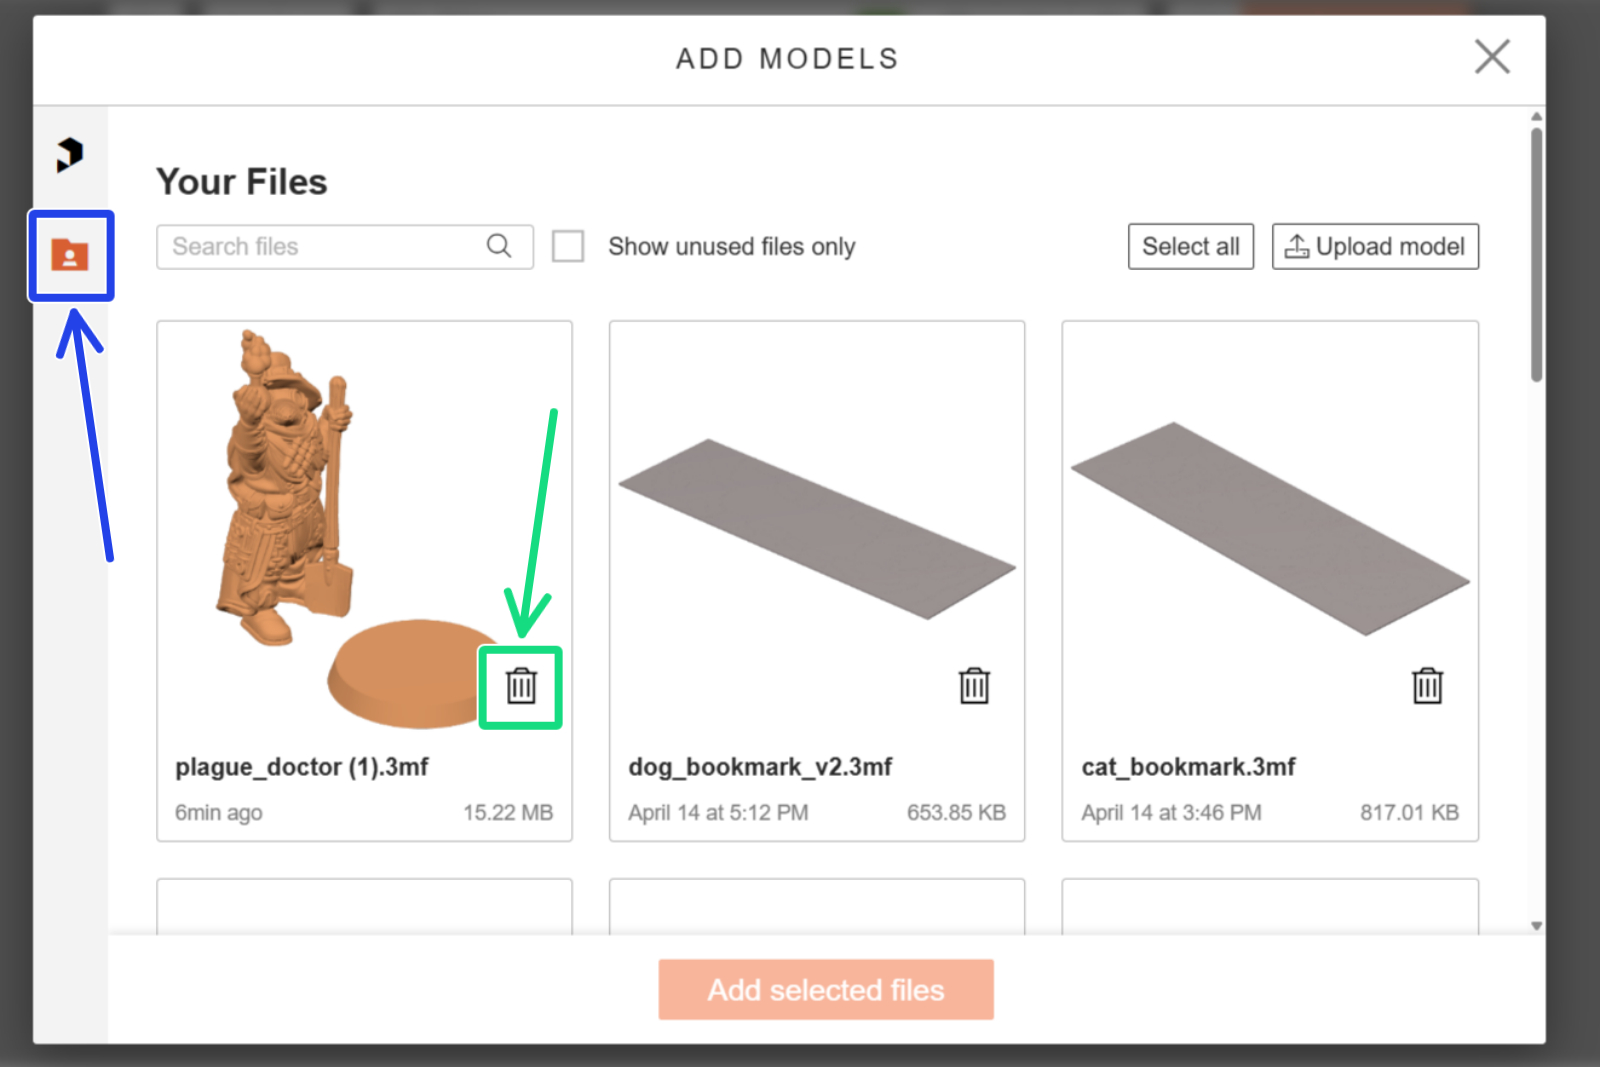
Similar to Projects, the files you upload to EasyPrint will be available across all devices. You can view these by selecting the folder icon in the Add models menu (the plus icon next to a print bed). You can reuse these files for any number of EasyPrint projects. The files stored this way count towards the cloud storage limit (see below). To free up storage space, you can delete some of your files using the trash can icon.
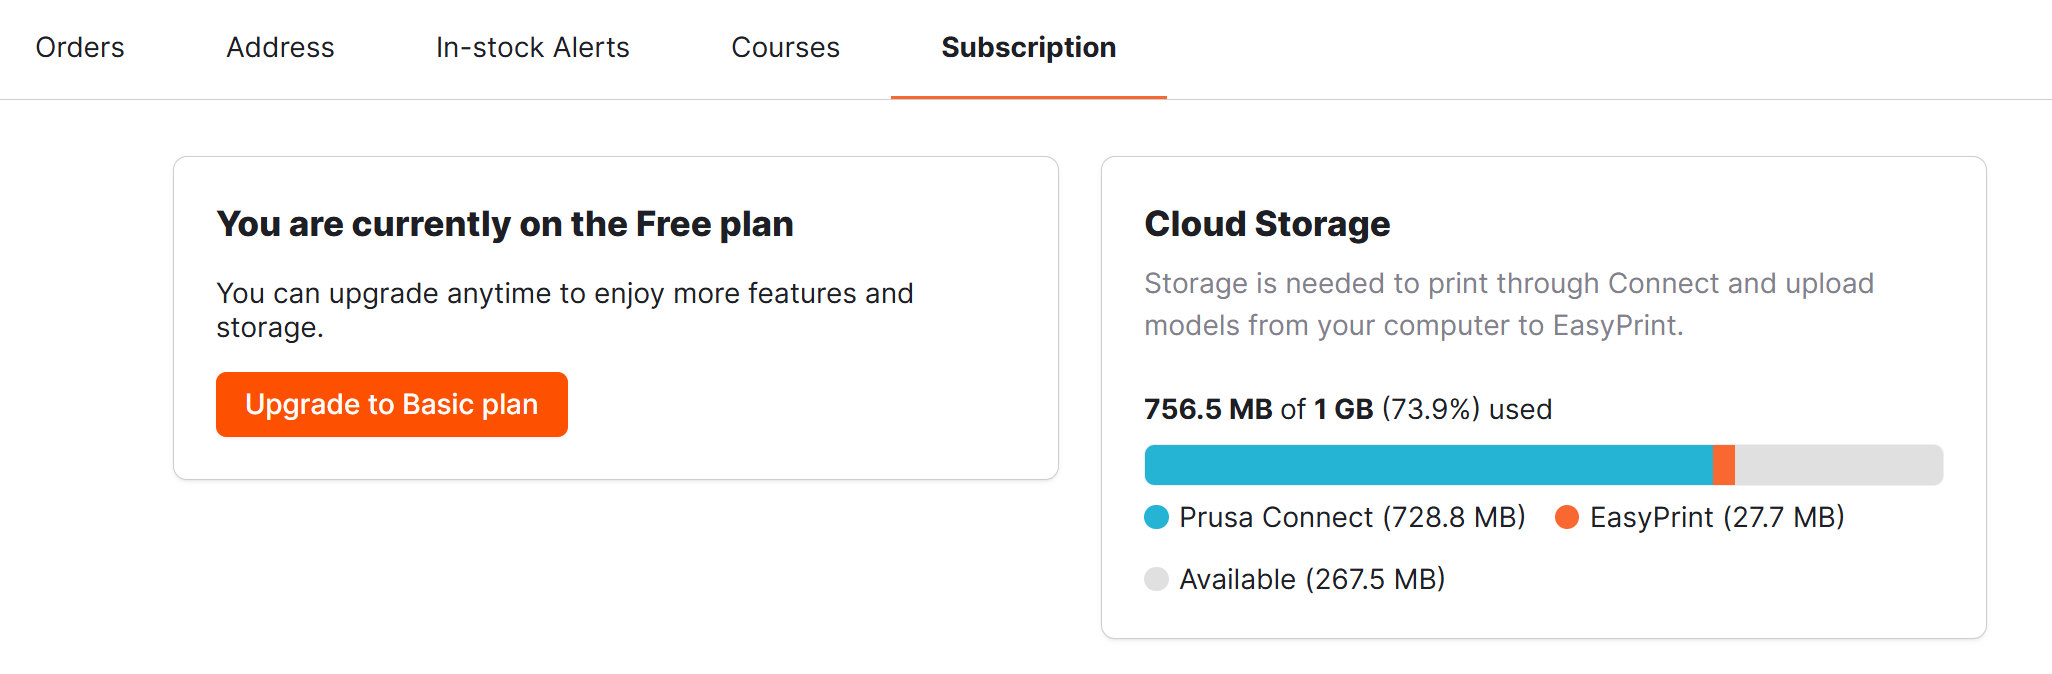
Each Prusa Account has access to 1GB of cloud storage, which is shared for both Prusa Connect and EasyPrint. EasyPrint storage is consumed by uploading models from your device. Projects using models from Printables do not count towards the storage limit. You can see the current usage in your Prusa Account overview.
EasyPrint can also generate multi-color print files for printers with multi-material capabilities (e.g., Original Prusa XL or Original Prusa MK4S with the MMU3 upgrade).
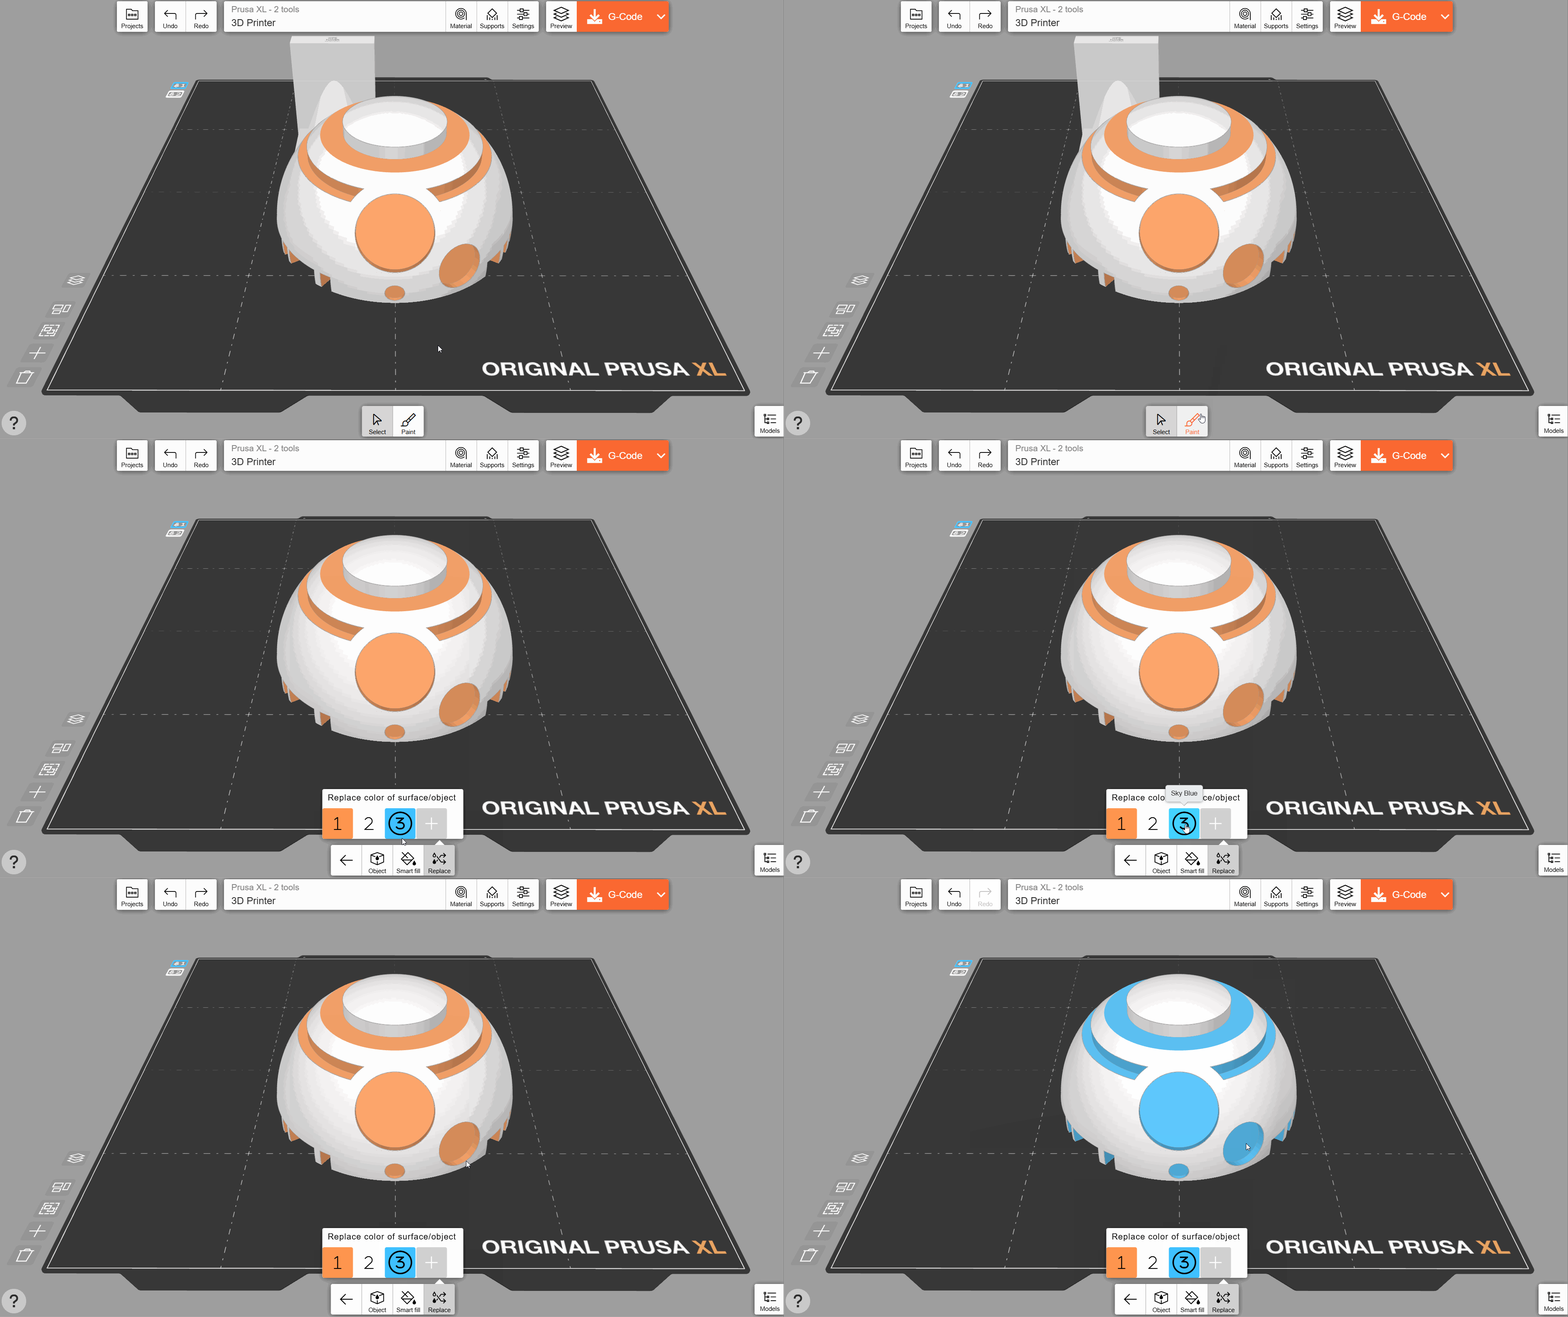
Select the Paint tool and add another material (color). If you click the object, the Smart fill tool will paint all surrounding areas until it reaches a sharp angle. If you click the painted area a second time, the threshold angle will be slightly lowered, expanding the current paint further.
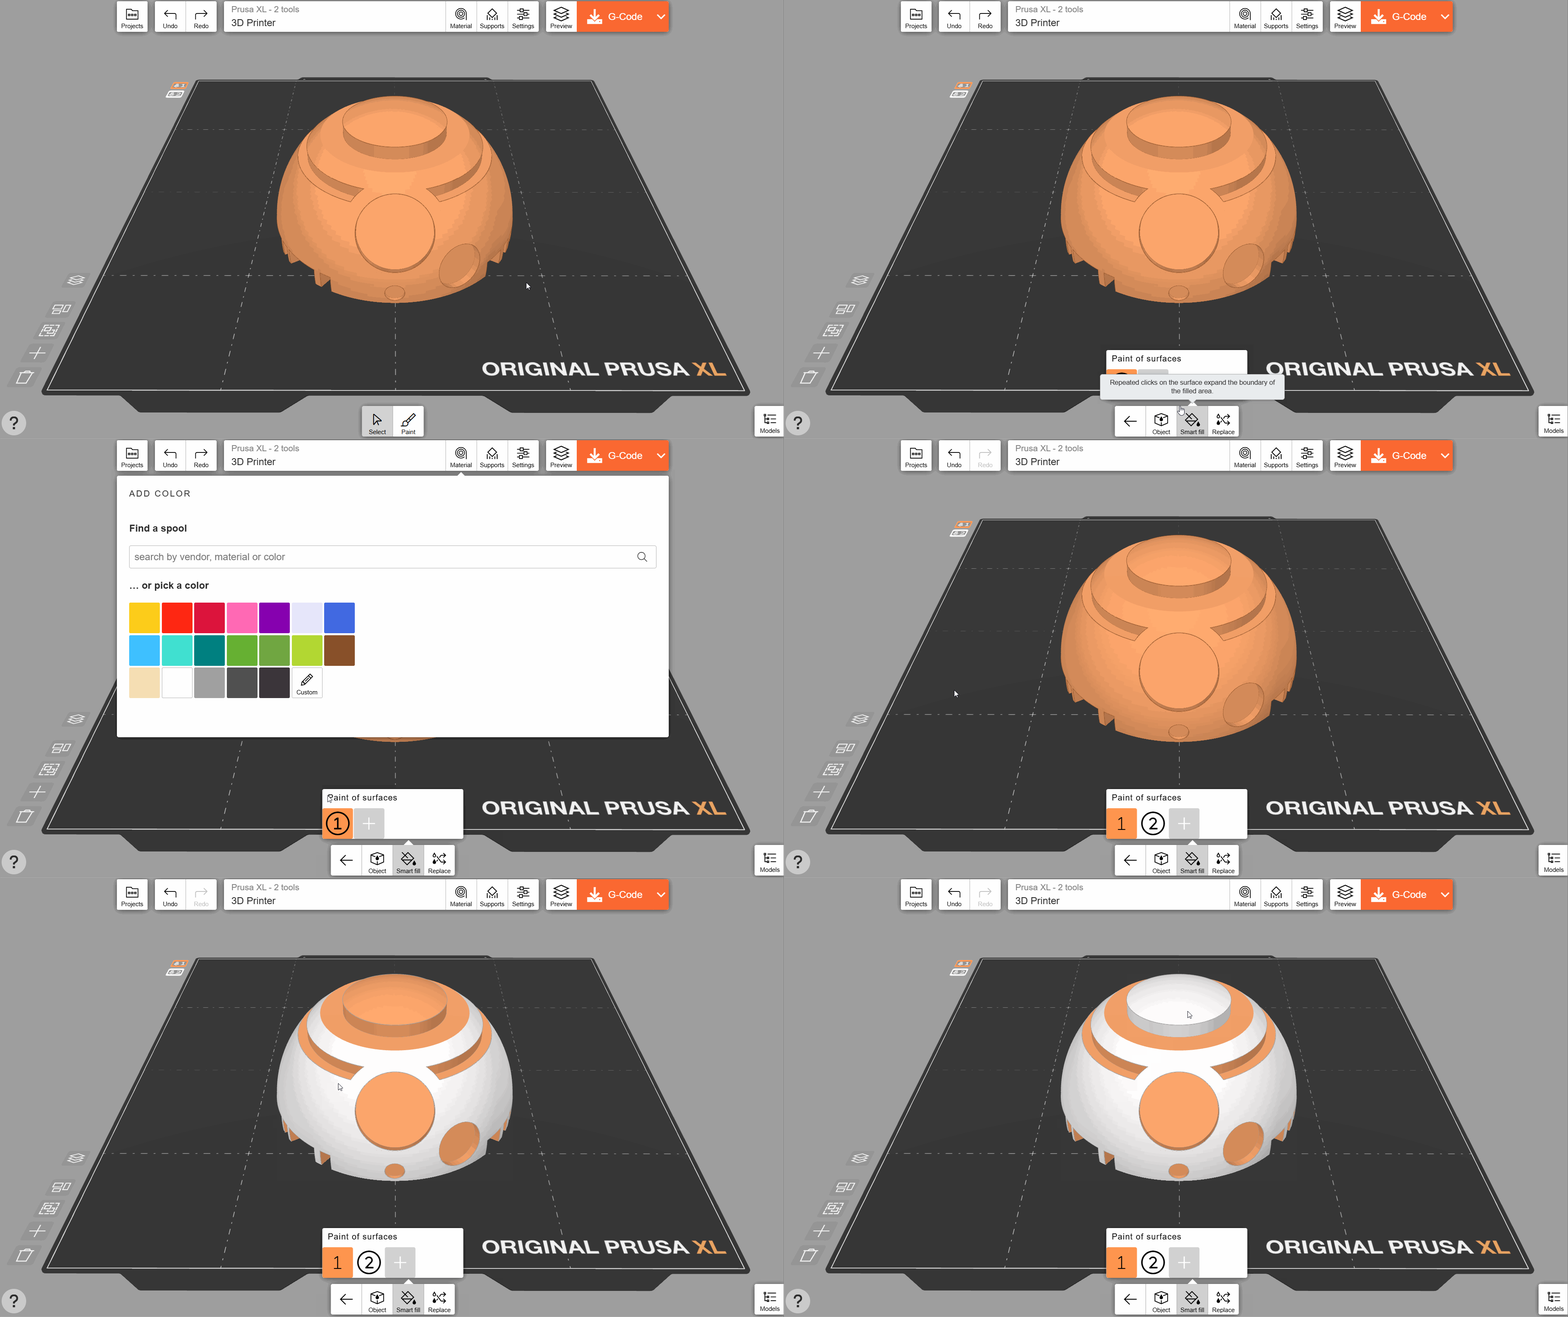
If you click any color with the Replace tool, all instances of that color in the object will be replaced with the currently active color.
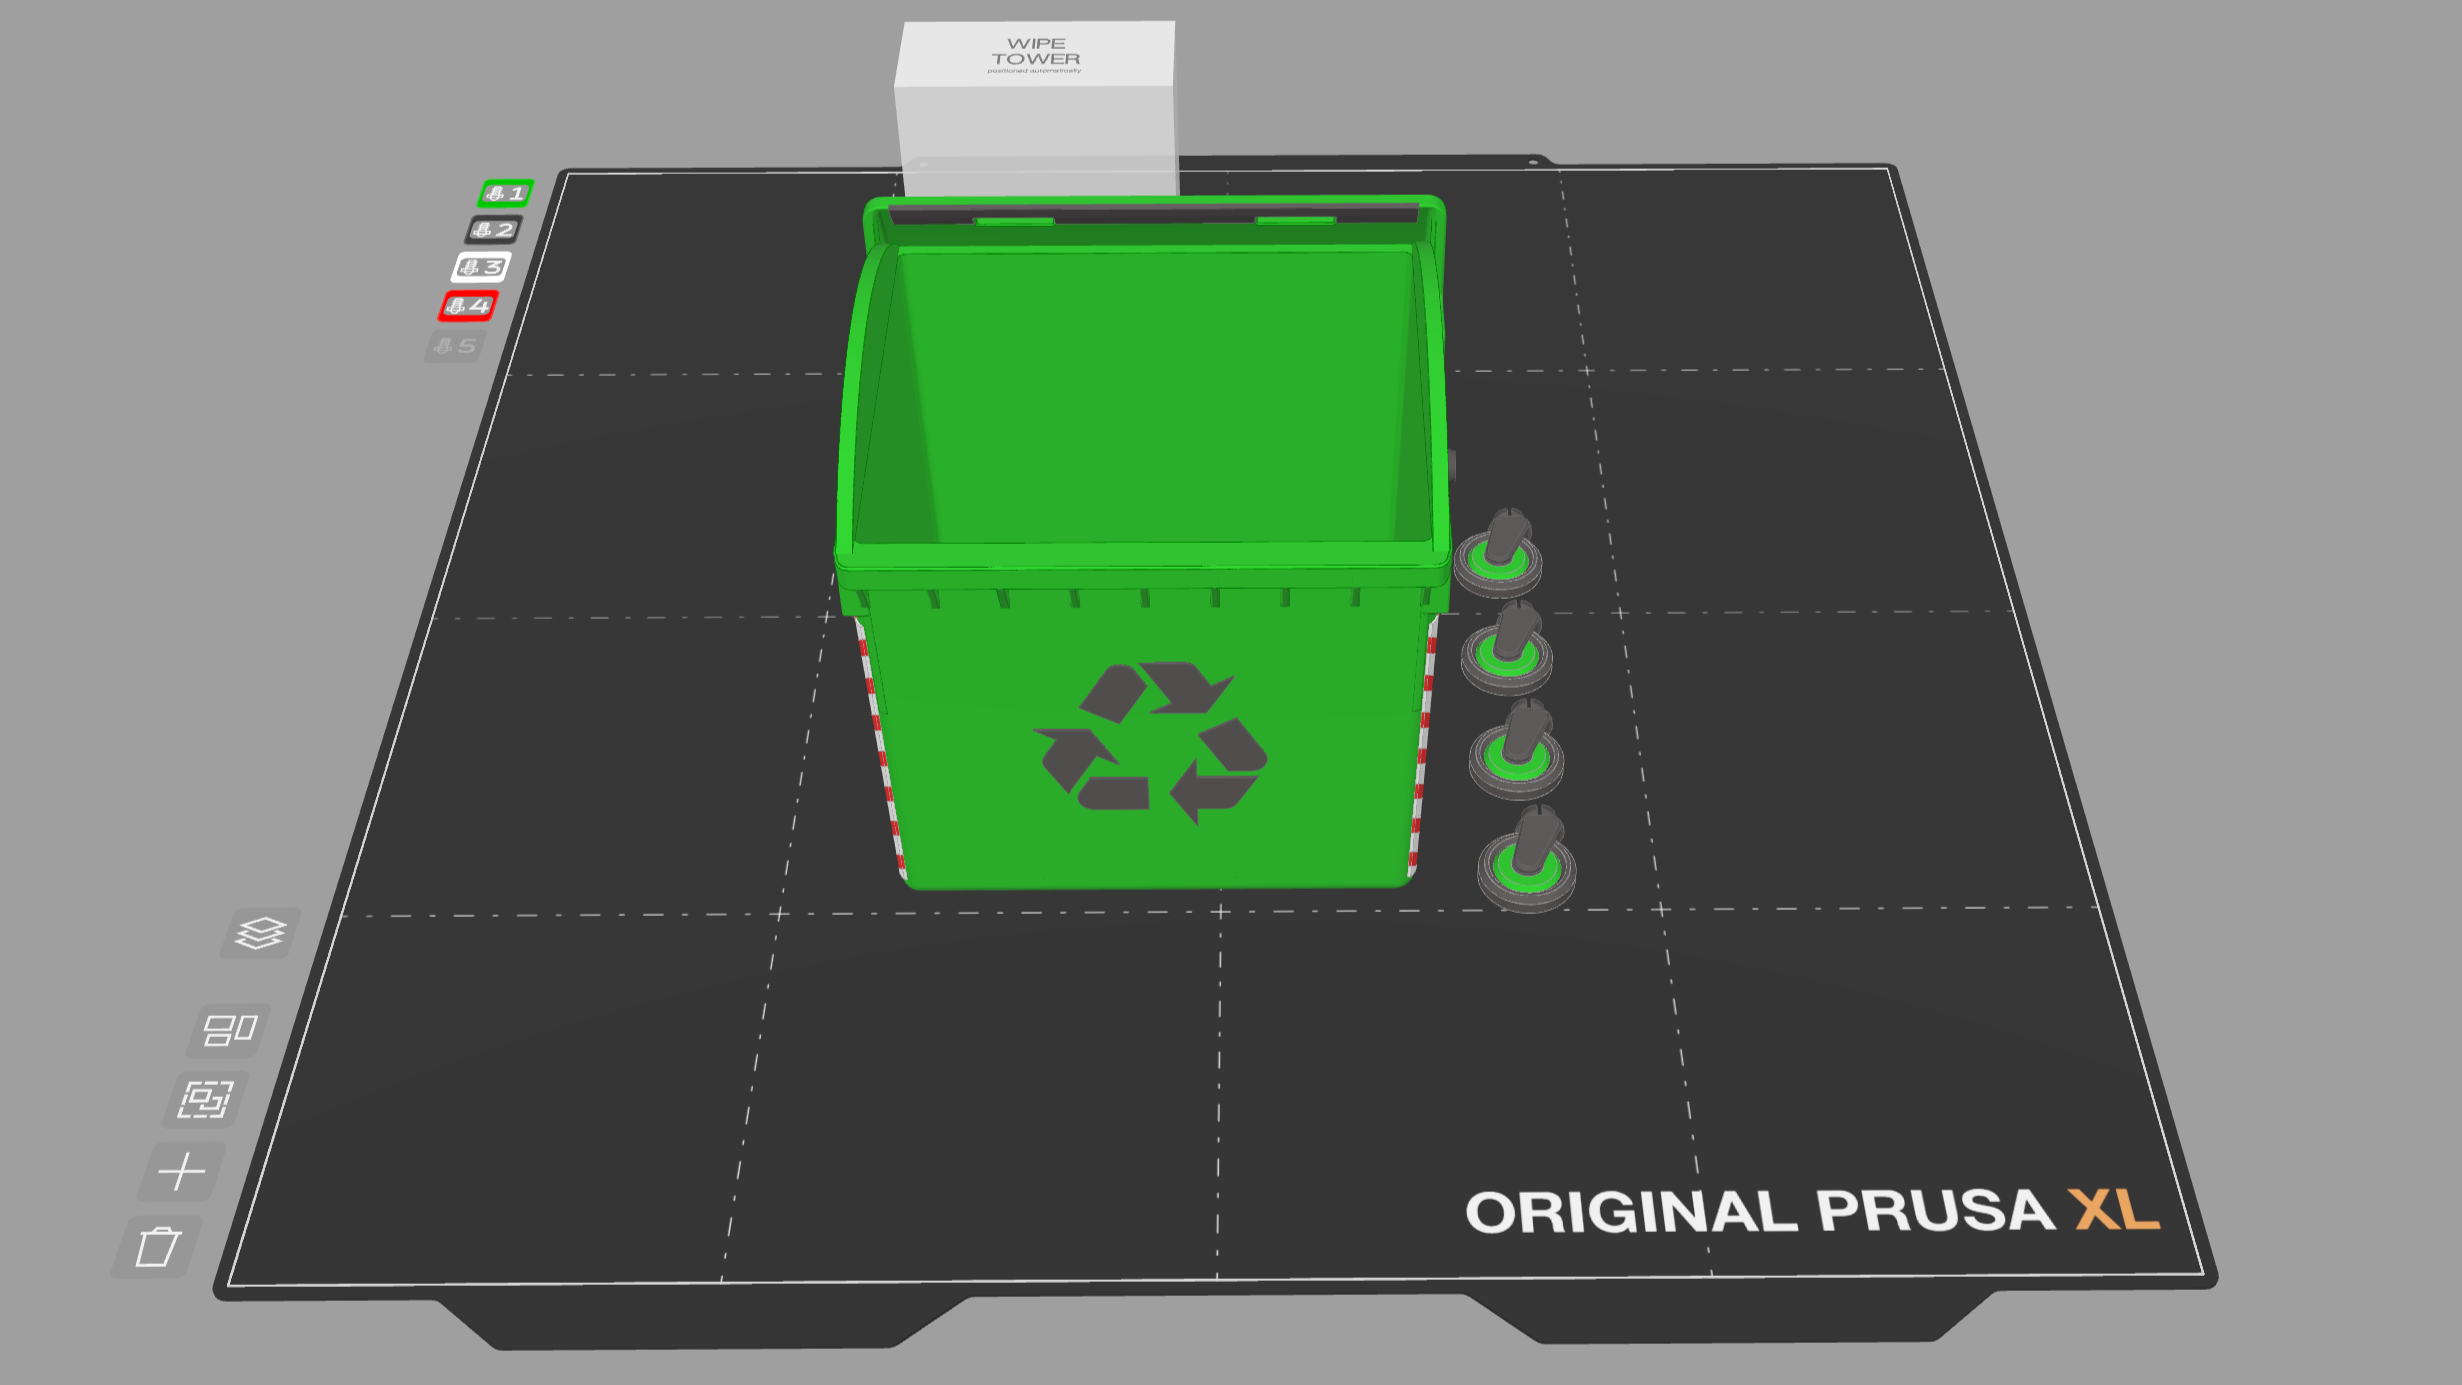
You can also import multi-color 3MF project files with multiple parts (meshes), such as the Benchbin. The colors assigned by the author will be preserved.
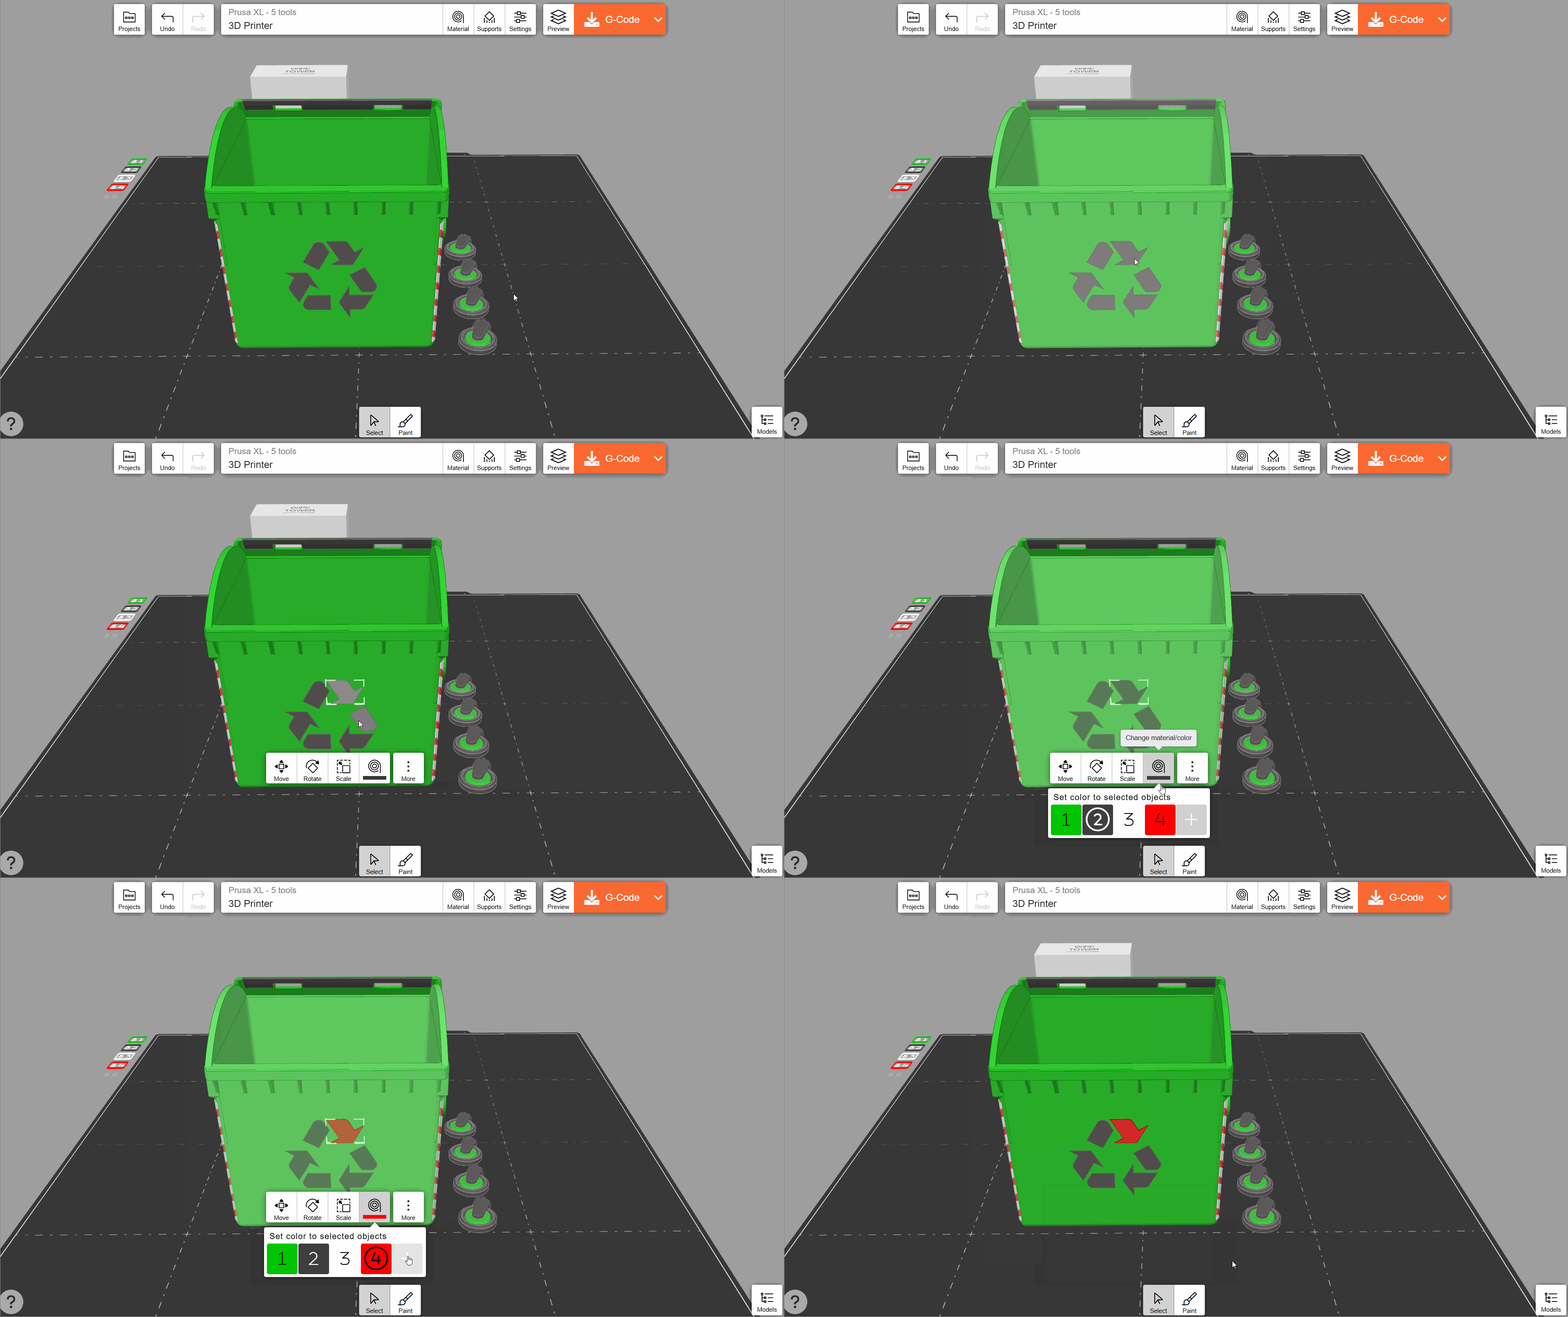
You can double-click a part of a multi-part object to assign it a color using the Change material/color button.
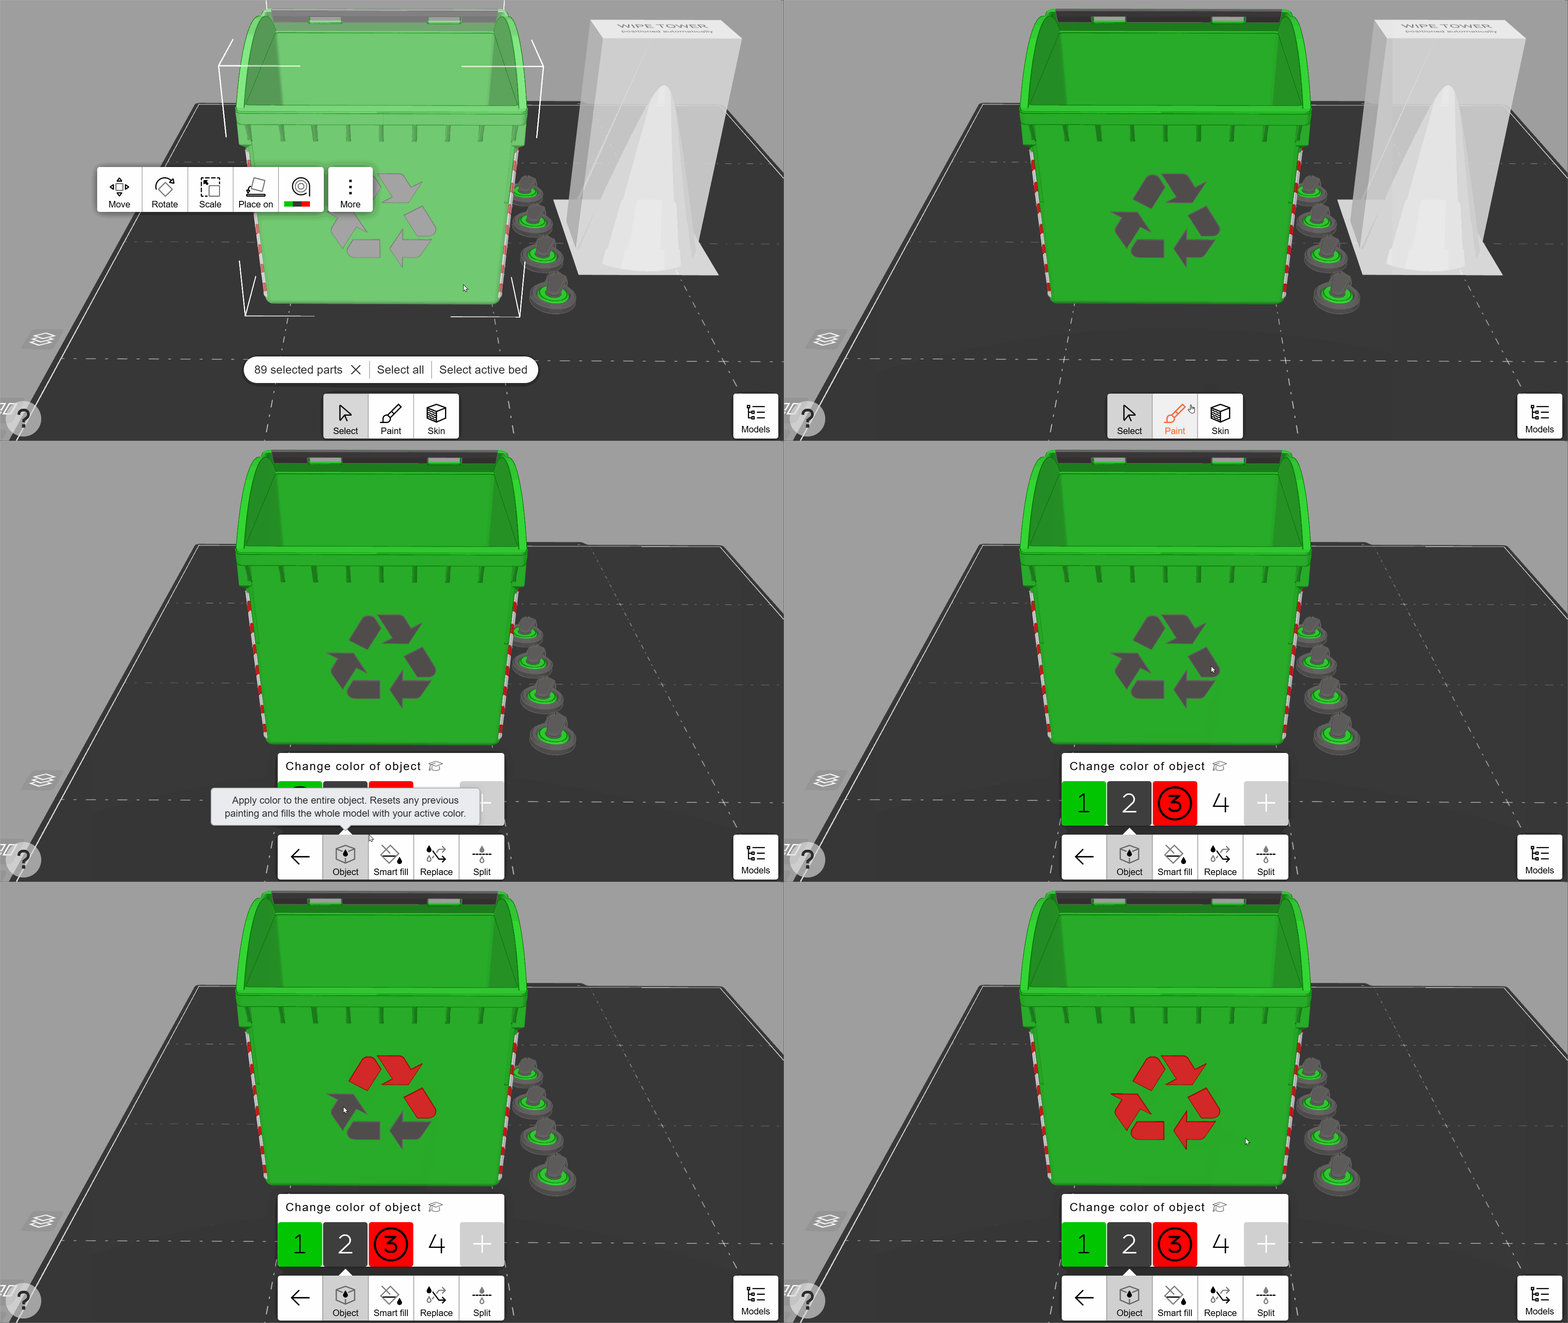
Use Paint → Object to quickly assign color to multiple objects.
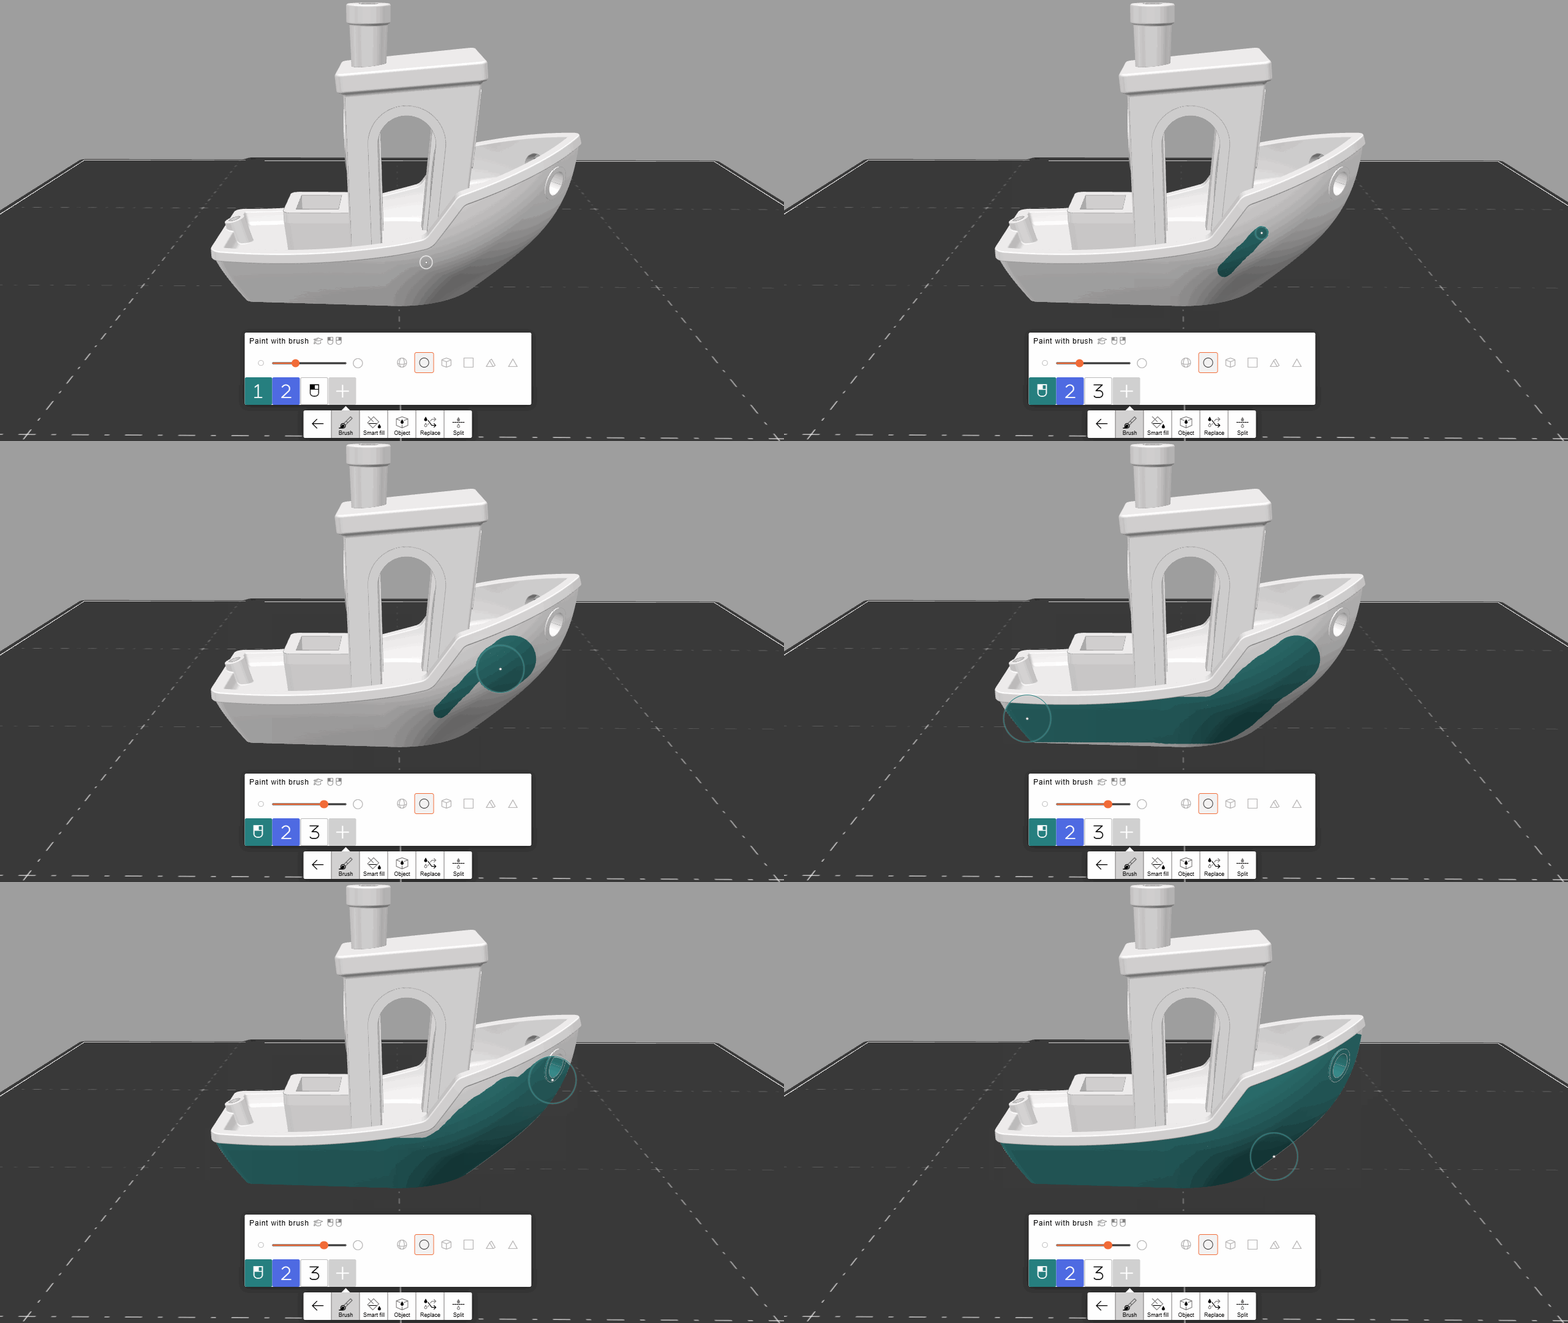
You can also paint in a completely free-form way using the Brush tool. The cursor acts like a virtual brush, painting the surface with the selected color. You can adjust the size and shape of the brush. On a computer, you can select a secondary color using the right mouse button. Right-clicking the object then uses the secondary color instead.
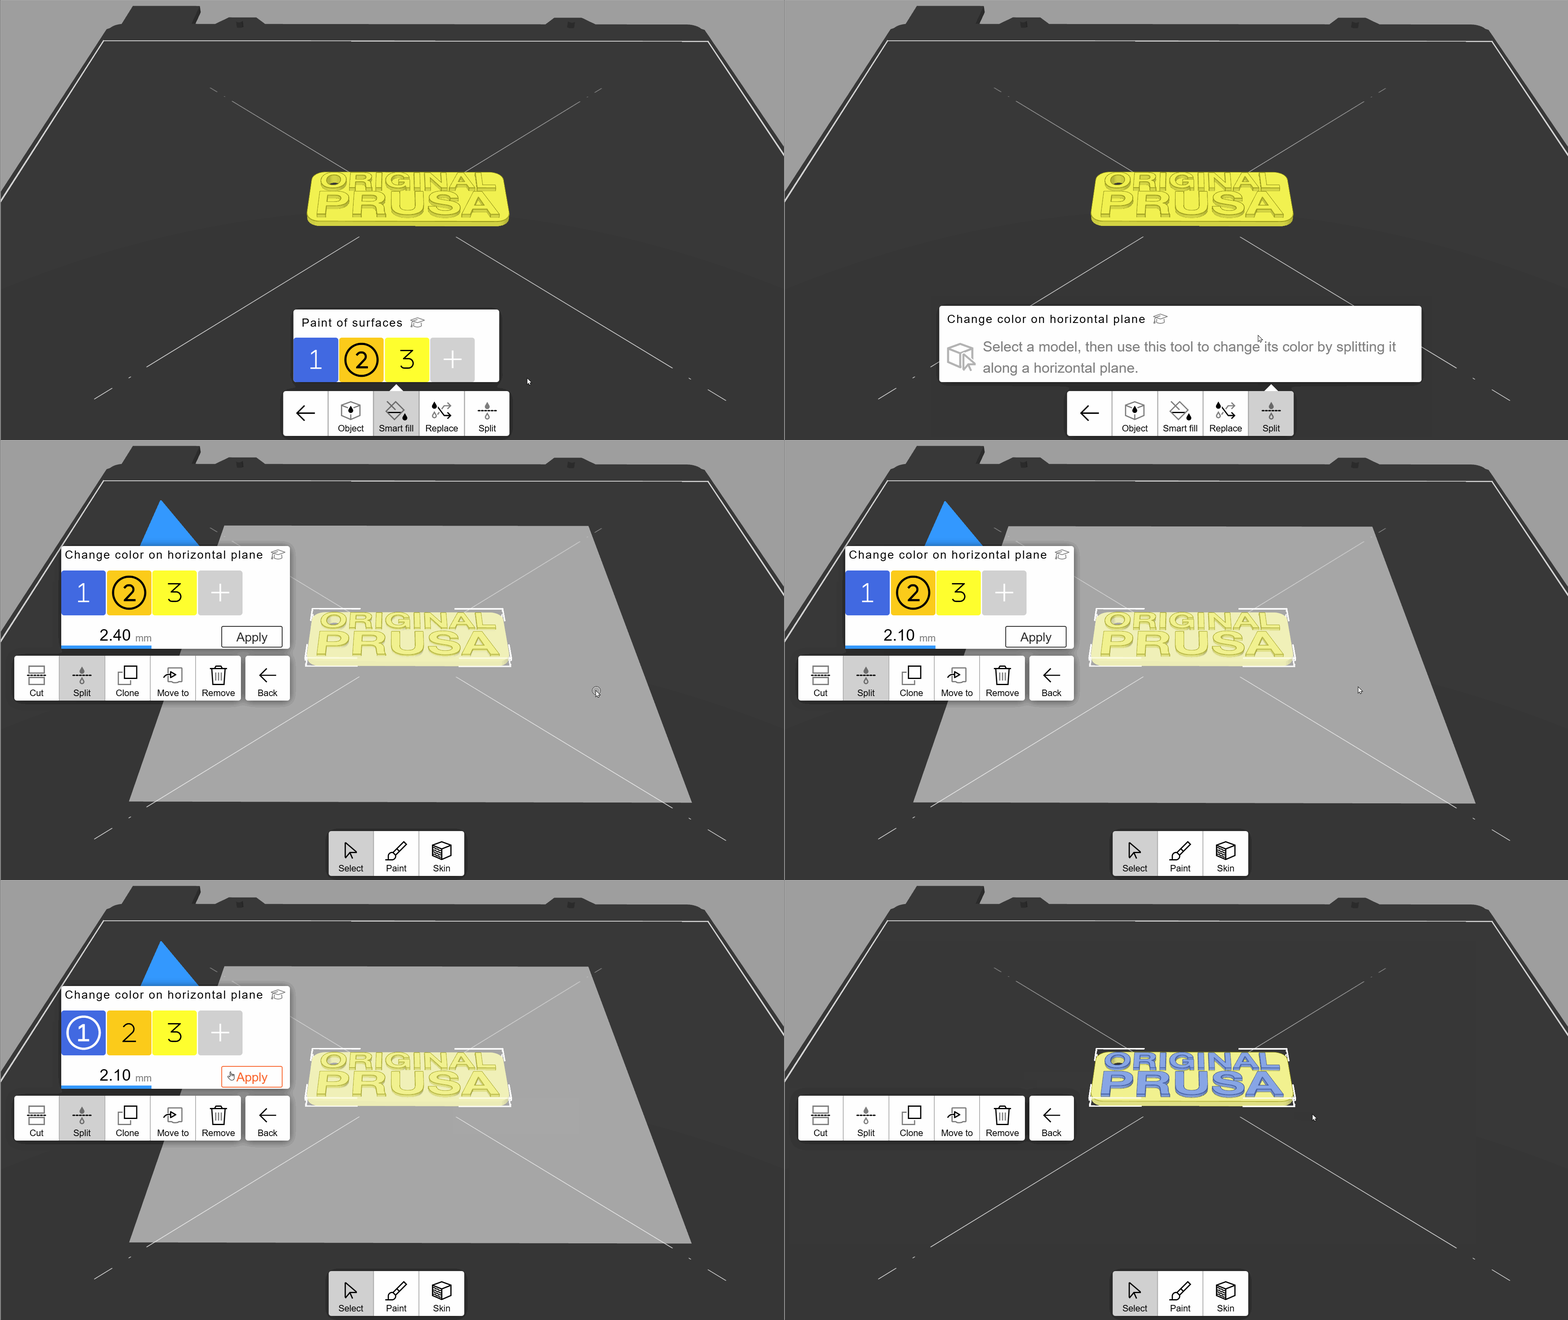
You can use EasyPrint to print in multiple colors on single-color printers. The printer will then pause between print layers and prompt you to change filament. This is why the color change can only happen along a perfectly horizontal plane (parallel to the print bed). This technique is useful for printing logos, signs, etc.
To apply the color change, use Paint → Split and select an object. Drag the horizontal plane to select the location for the color change. Then, select a color and press apply. The color will be applied above the horizontal plane.
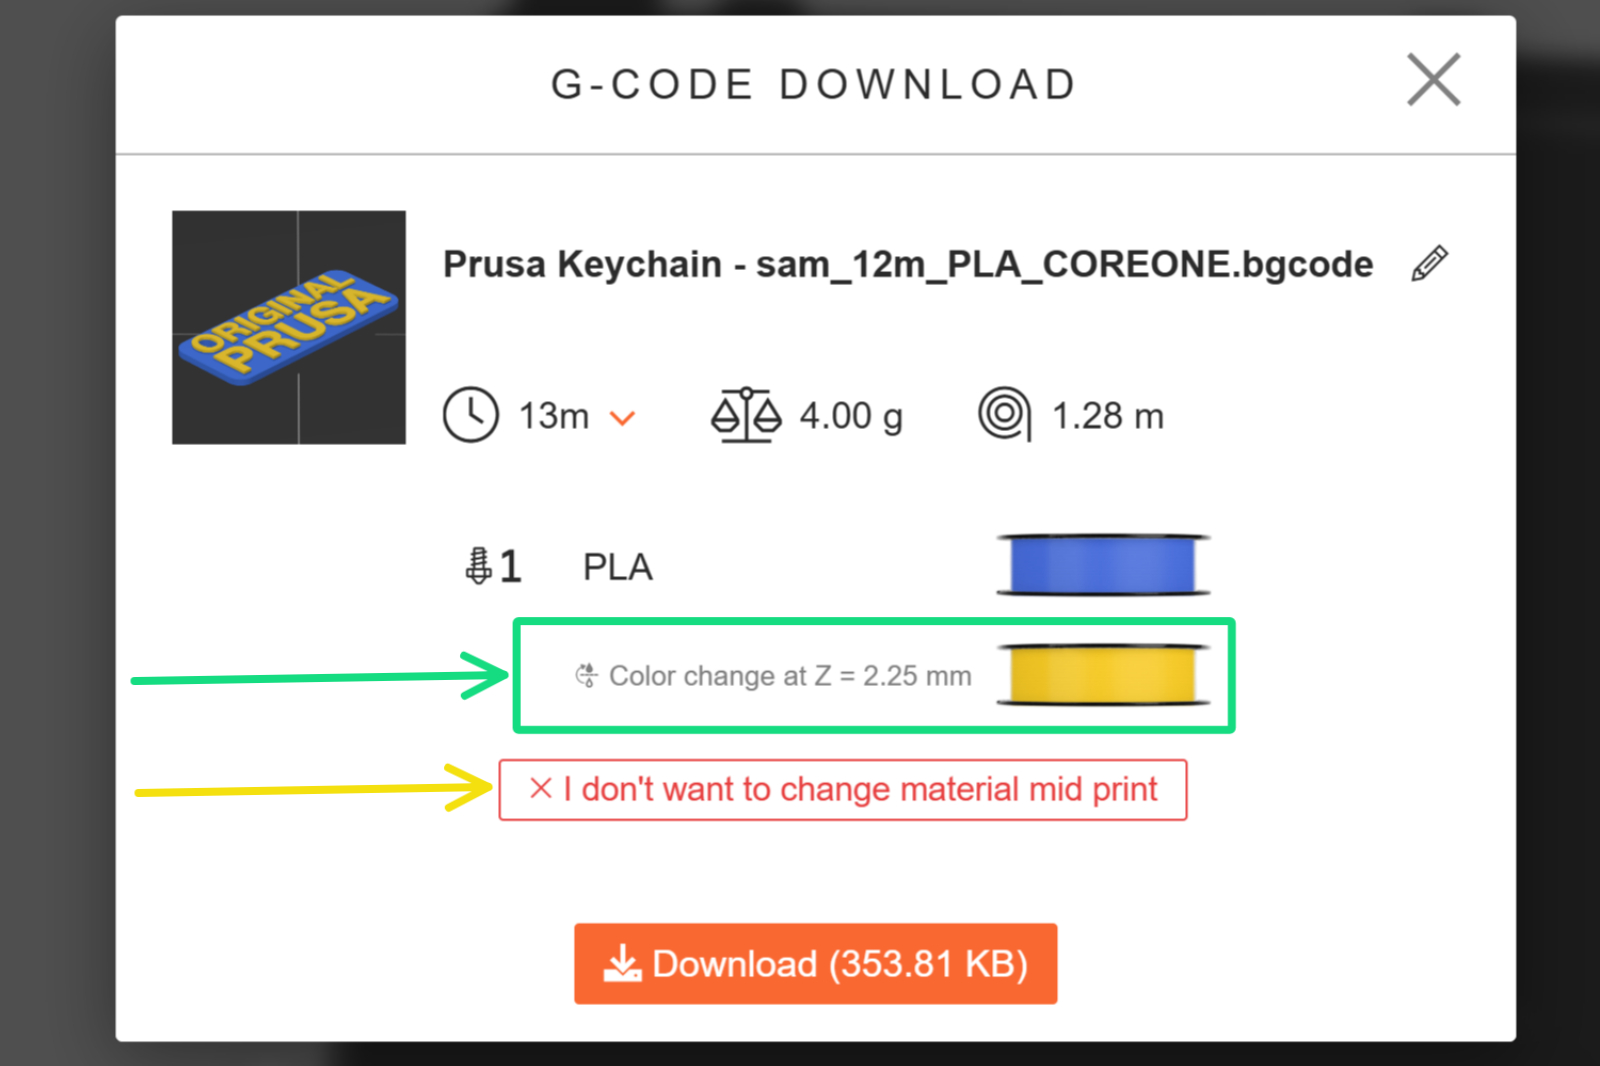
When exporting the G-code file, the confirmation screen will show the layer height at which the color change will happen. Make sure to be at your printer during printing to perform this color change. If you do not want to perform a color change, you can cancel it on this confirmation screen.
When printing on a multi-tool printer, the Spool assignment screen before slicing is more complex. Each color painted on the object must be assigned to an extruder on the target printer. If you have previously specified the filaments using the Spools menu, the model's colors (on the left) will be automatically assigned to the closest match among the loaded colors (on the right).
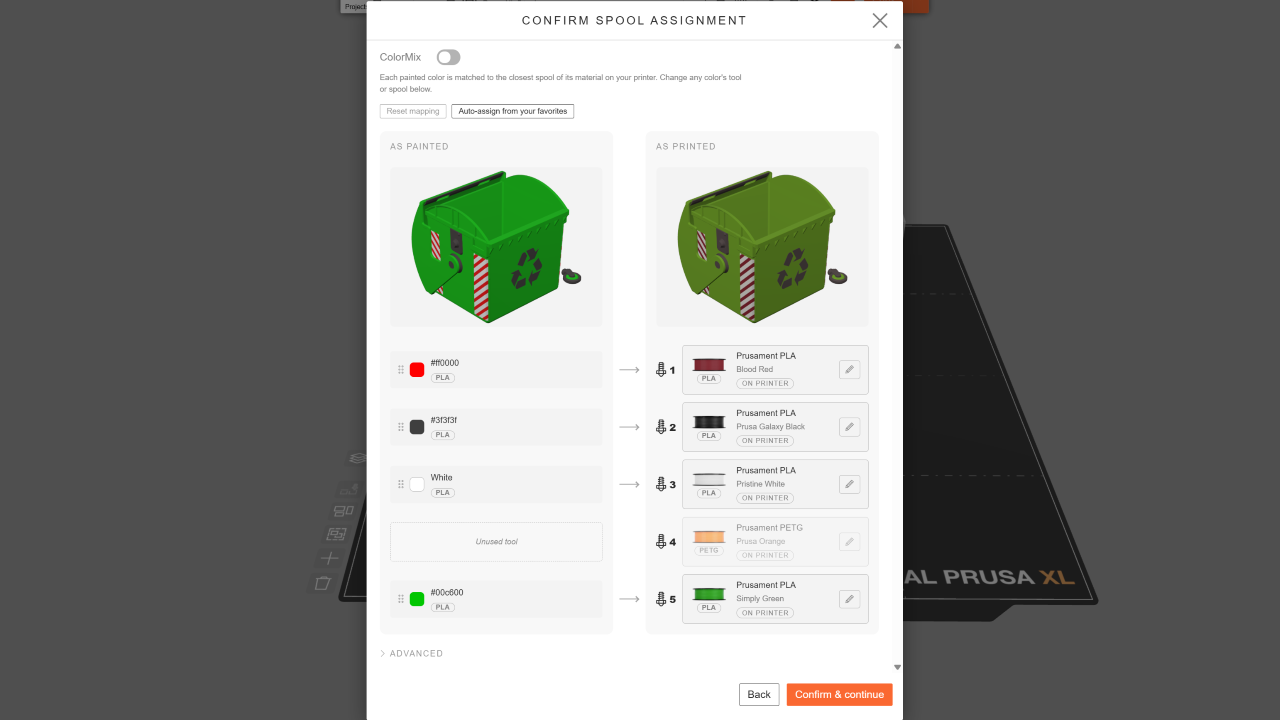
You can assign multiple colors to a single extruder, and they will all merge into one. The printer will then use the same tool to print all of those colors. This can be useful for quickly reducing the number of colors in a project. The model on the left of the mapping screen shows a preview of the colors after slicing.
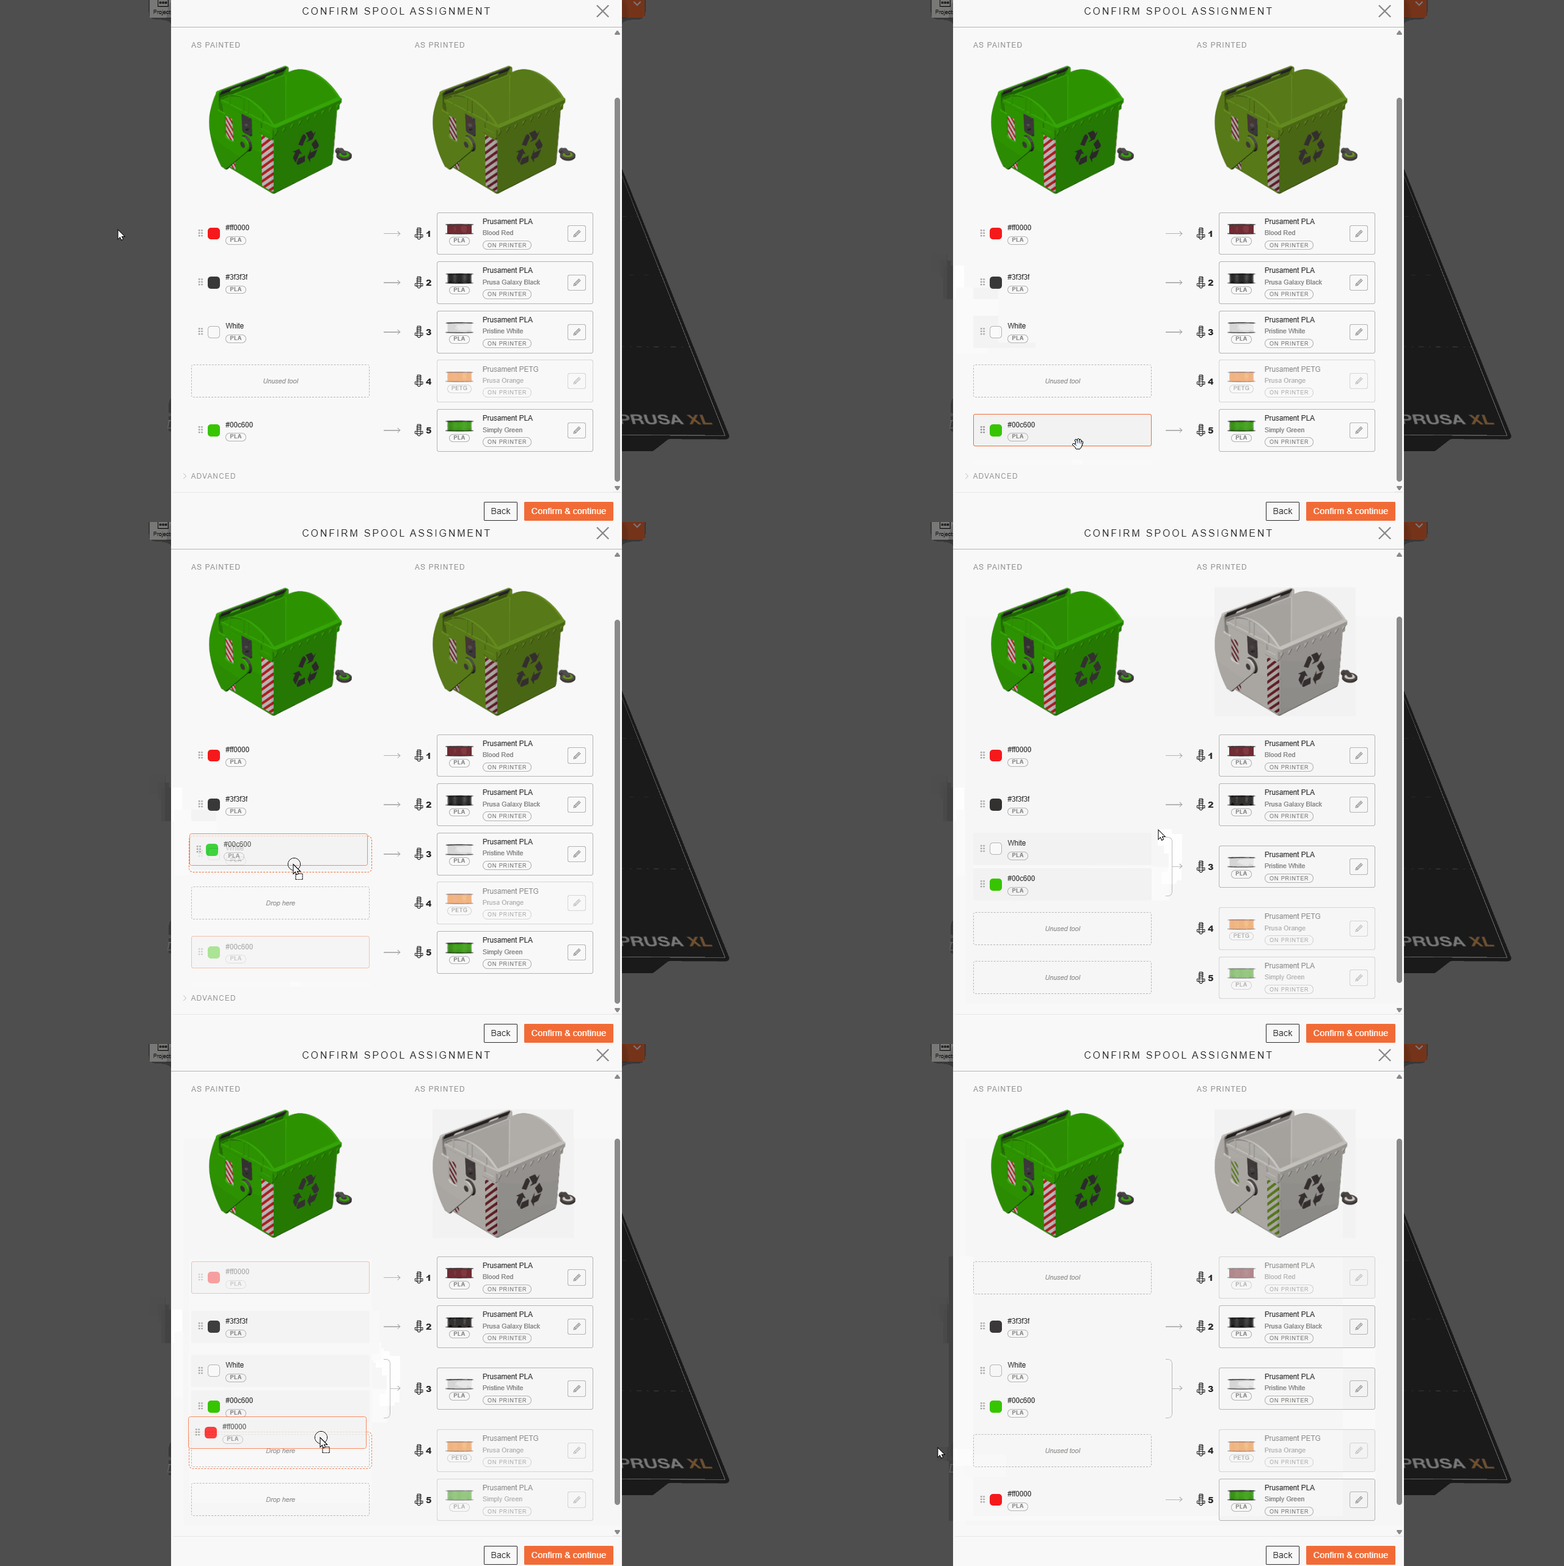
If you click "Auto-assign from your favorites" in the Spool assignment screen, EasyPrint will try to match the colors of a multi-color object to your spools. These are selected both from the spools currently loaded into the printer and your Favorite spools. If a spool from your Favorites is automatically picked this way, it will show the "Not Loaded" tag. To print the object with the correct colors, don't forget to physically load the recommended spools before printing.

You can load a model with more colors than you have extruders on your printer (or paint the additional colors yourself).
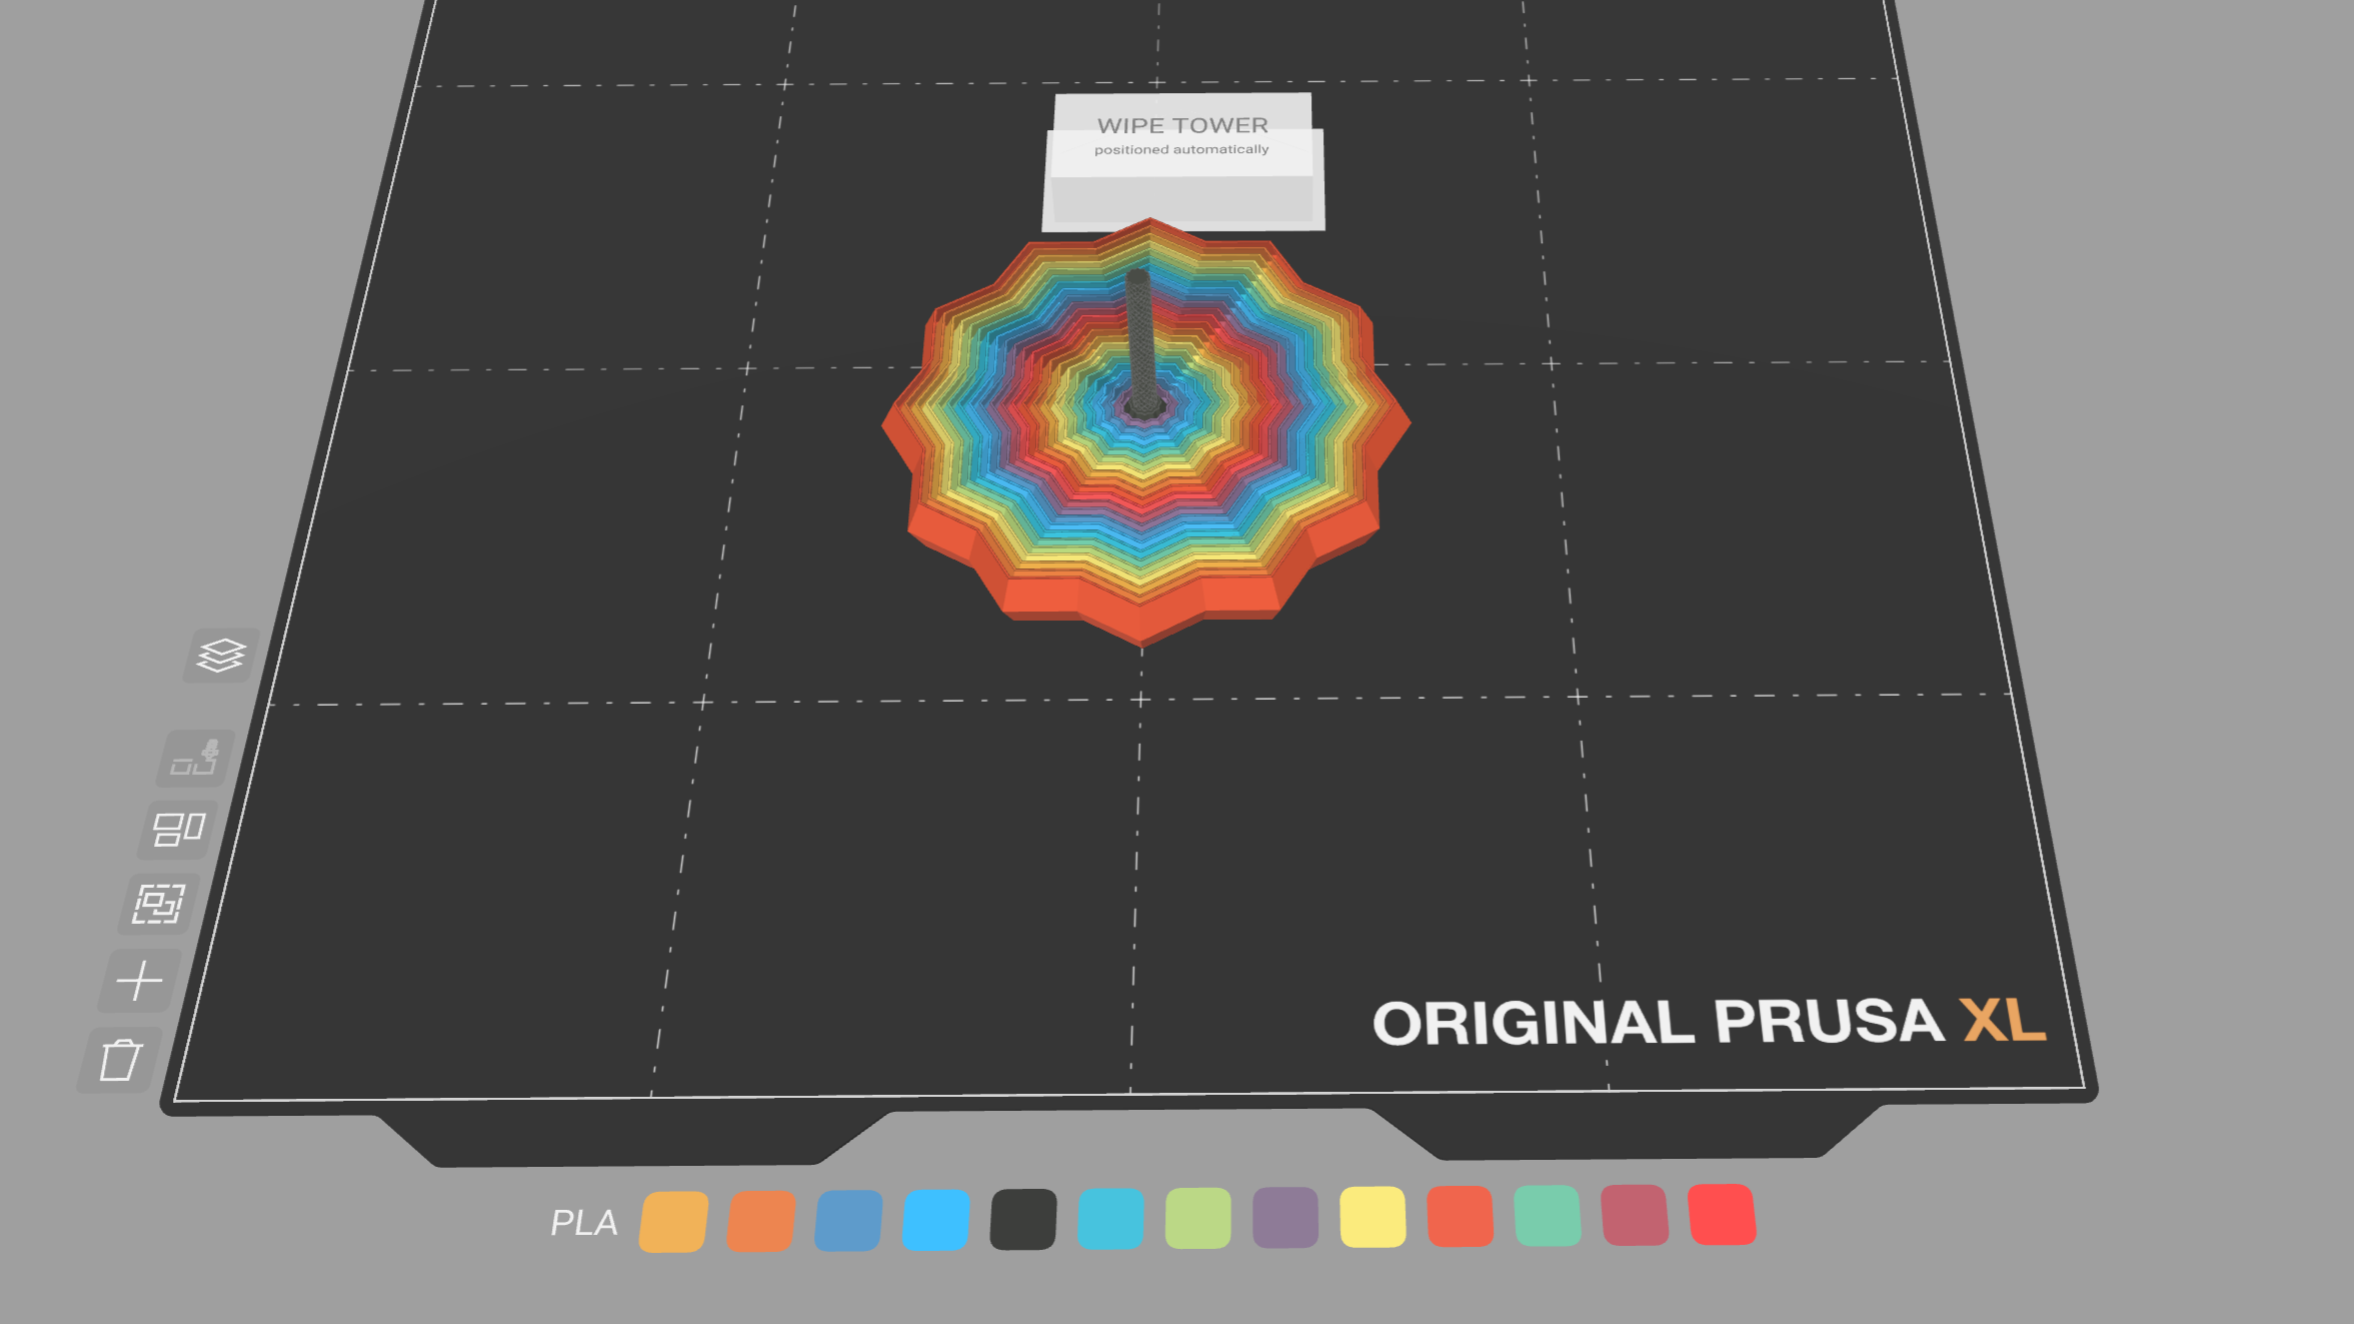
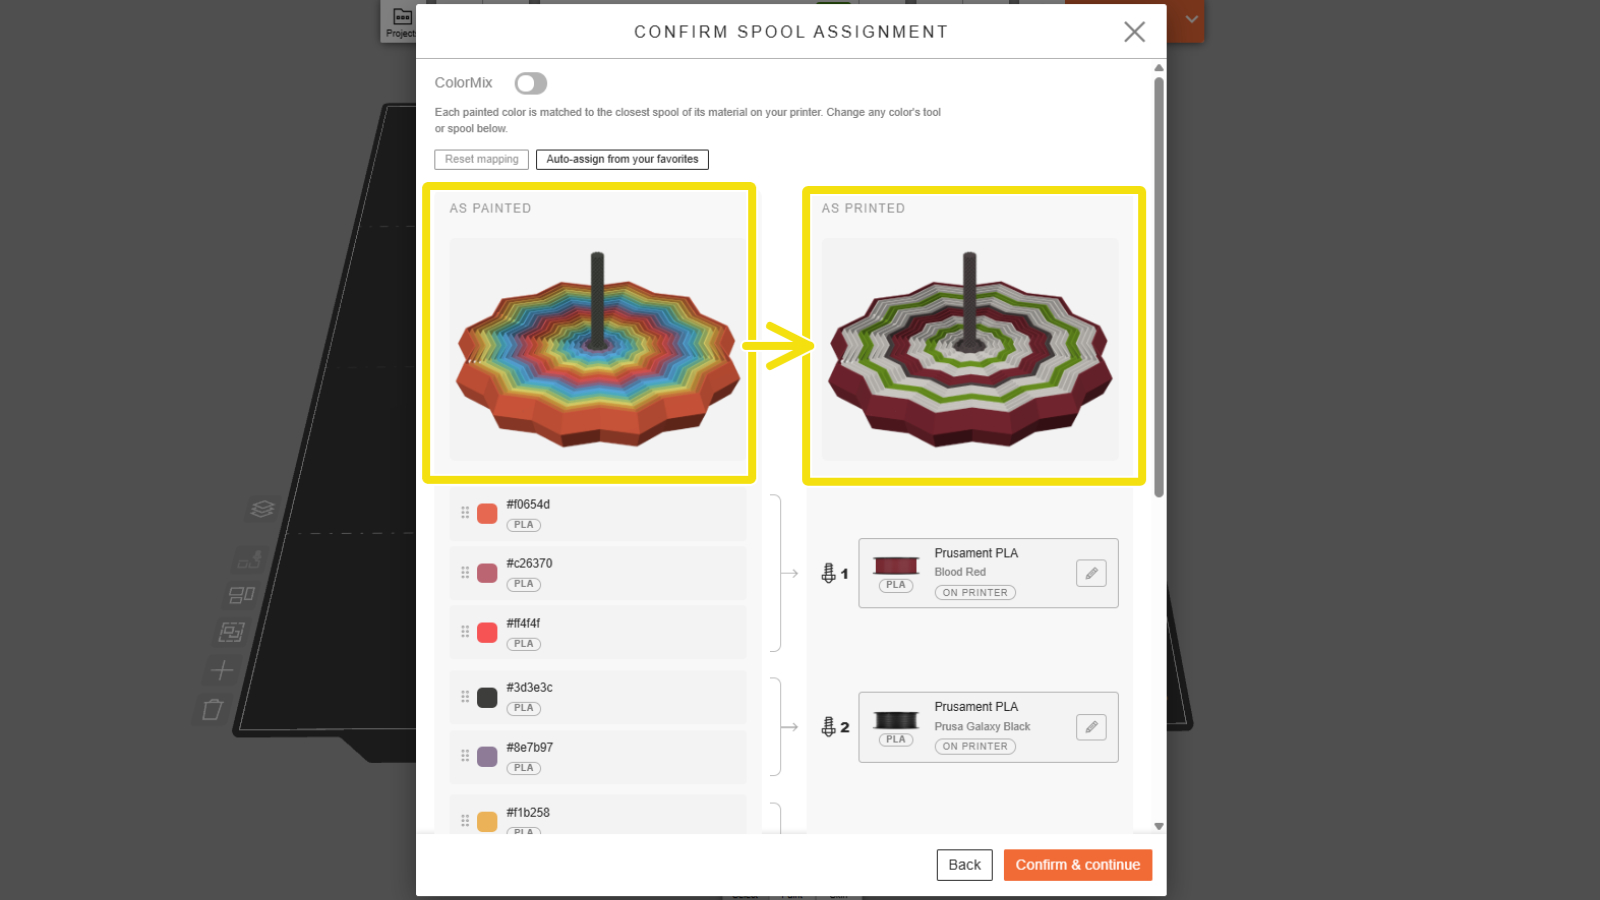
Typically, this means that the number of printed colors is reduced in the Spool assignment step before printing, because each painted color is assigned to a limited number of filaments.
However, you can increase the number of printed colors by enabling ColorMix. This is a technique that optically creates "new" shades by printing alternating layers in different filaments (e.g., printing alternating layers of black and white results in grey). Learn more about ColorMix here.
Use the ColorMix toggle in the Spool assignment screen to enable the functionality. For the best results, we recommend using it together with the "Auto-assign from your favorites" button, which will pick the best filaments for mixing from your collection. Alternatively, you can manually adjust each Base spool.
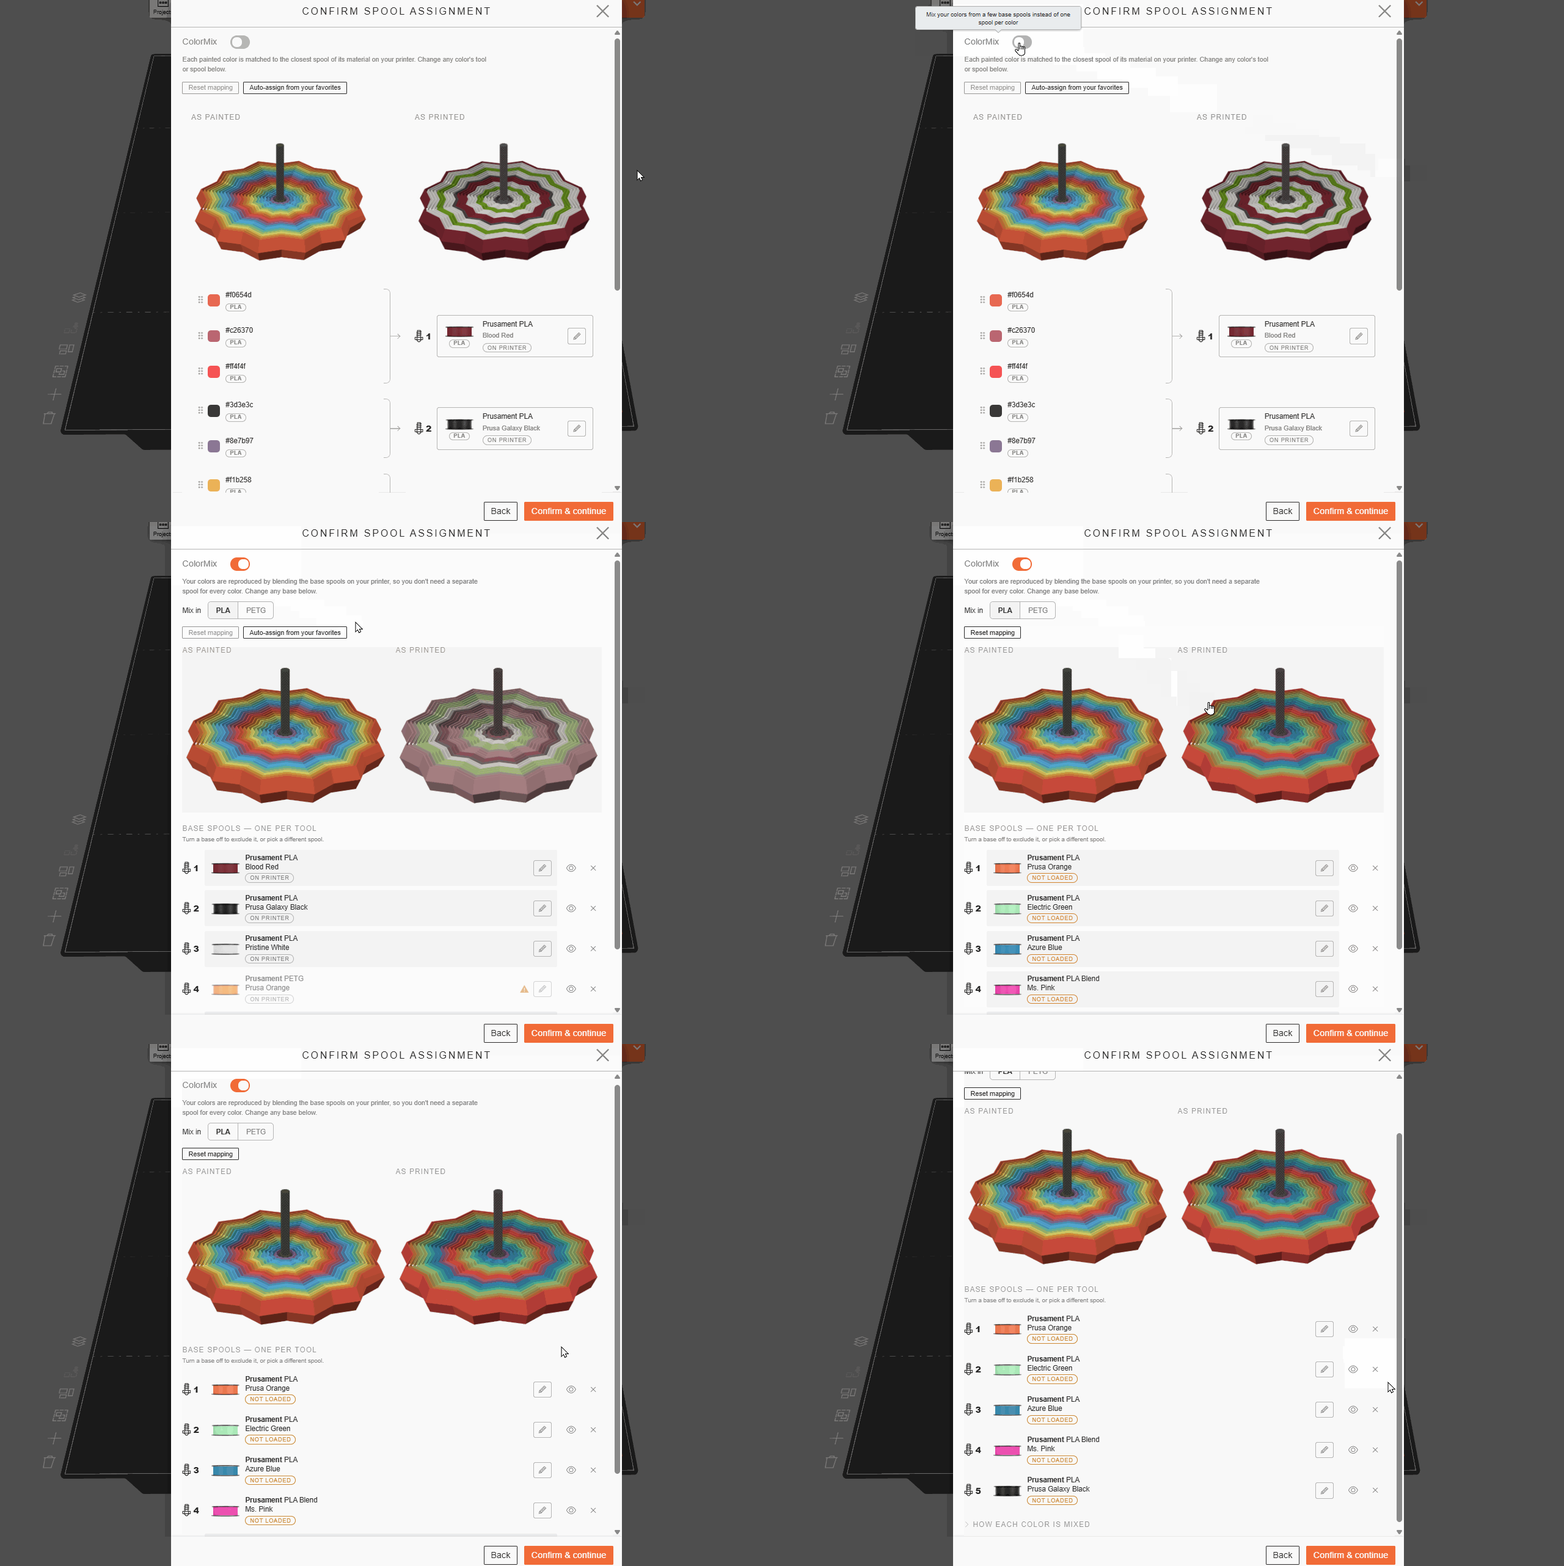
Note that enabling ColorMix usually increases the number of filament changes, which can lead to significantly longer print times and more filament waste.
EasyPrint lets you selectively apply Fuzzy Skin to objects, which creates a textured surface of the printed model. This can be used to introduce an interesting visual texture to a decorative model, or to improve grip for handles on functional tools.
Activate the Fuzzy Skin painting tools by selecting Skin in the bottom bar. Select Apply and tap the model surface to apply fuzzy skin. This works like the Smart Fill for material painting: a single click will apply fuzzy skin to all surrounding areas until it reaches a sharp angle. If you click the fuzzy skin a second time, the threshold angle will be slightly lowered, expanding it further. Remove works the same way, but removes the existing fuzzy skin instead.
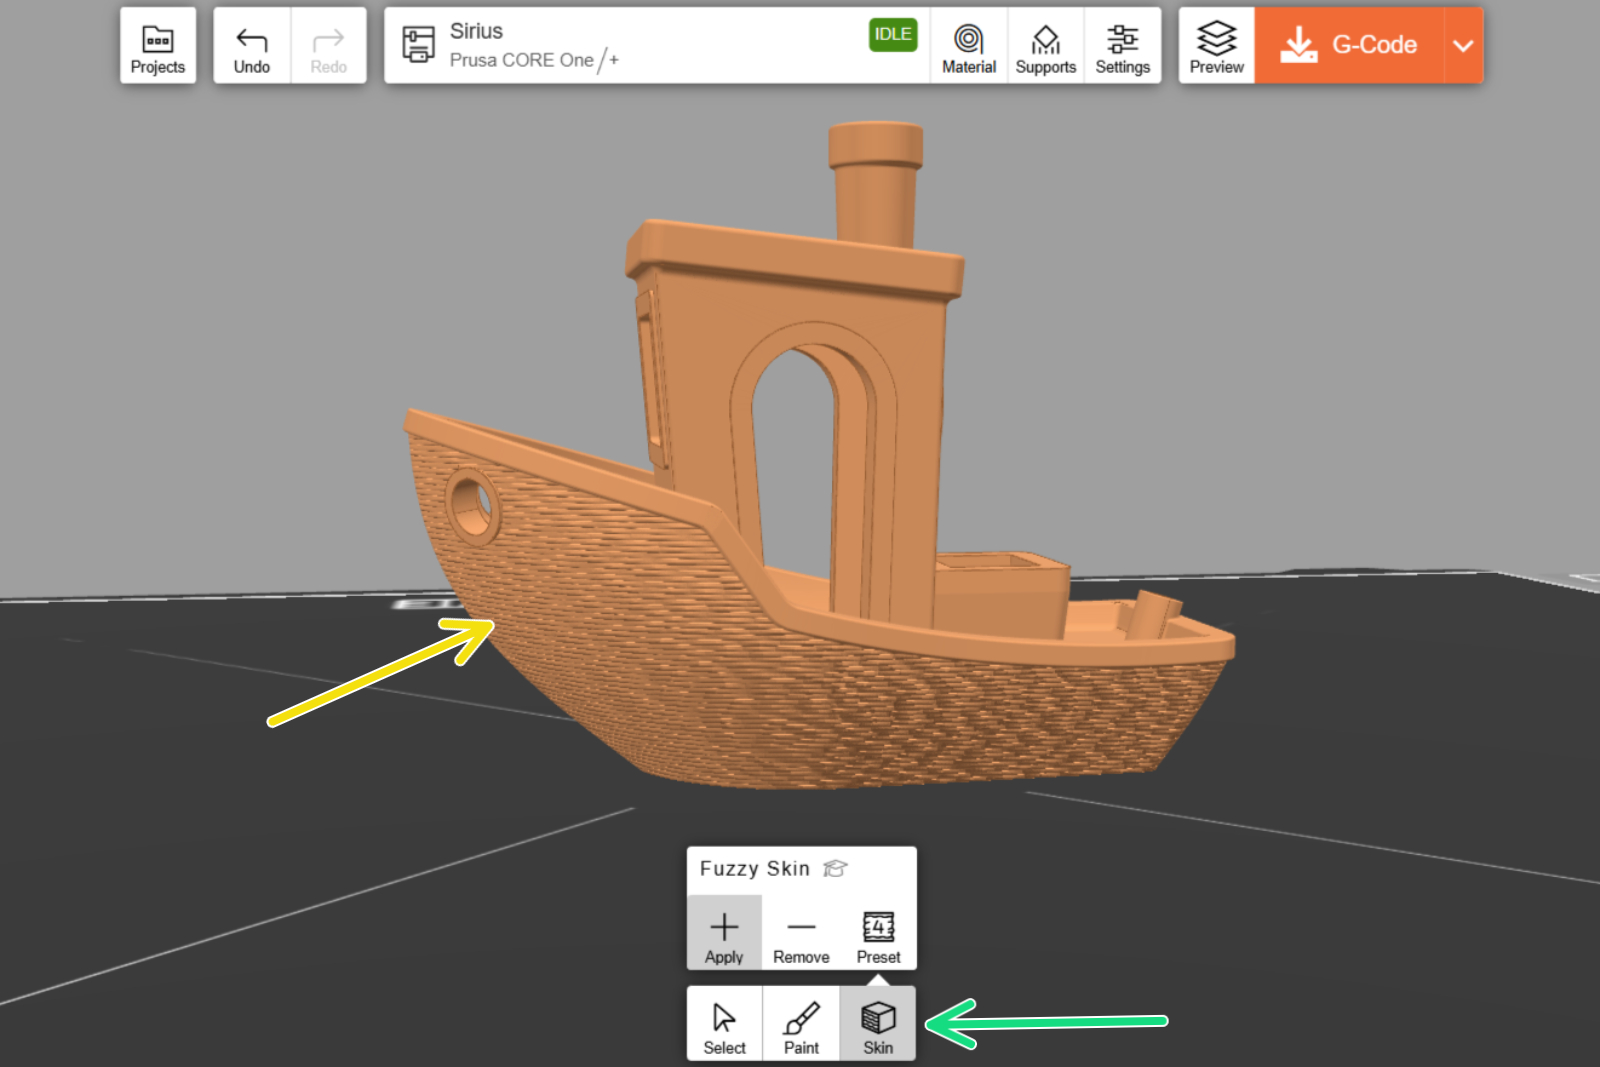
EasyPrint shows a texture visualization on the applied surfaces (see the yellow arrow in the screenshot), but the actual texture on the printed object is decided by selecting one of the Presets.
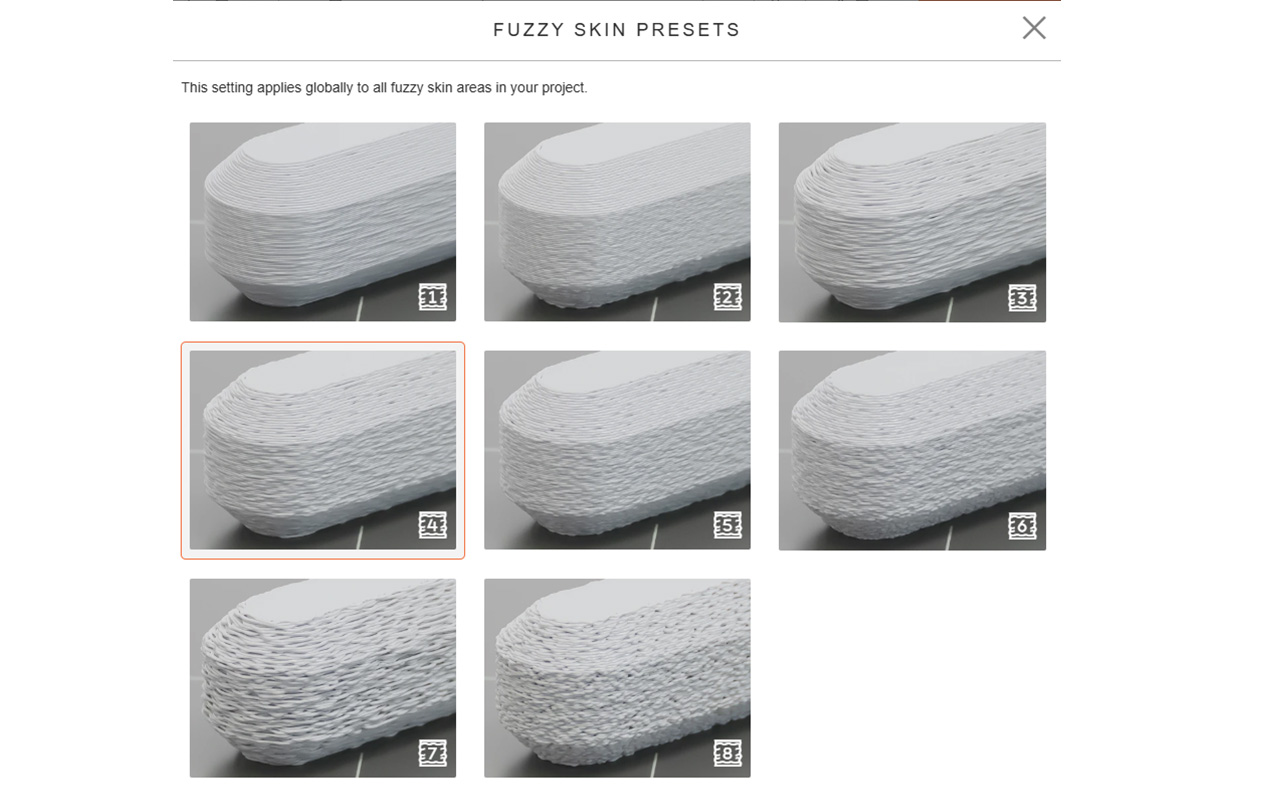
In the Fuzzy Skin tool, you can select one of 8 predefined Presets. Each preset includes a preview photo of an actual print.
The G-Code preview displays a more accurate representation of the resulting fuzzy skin.
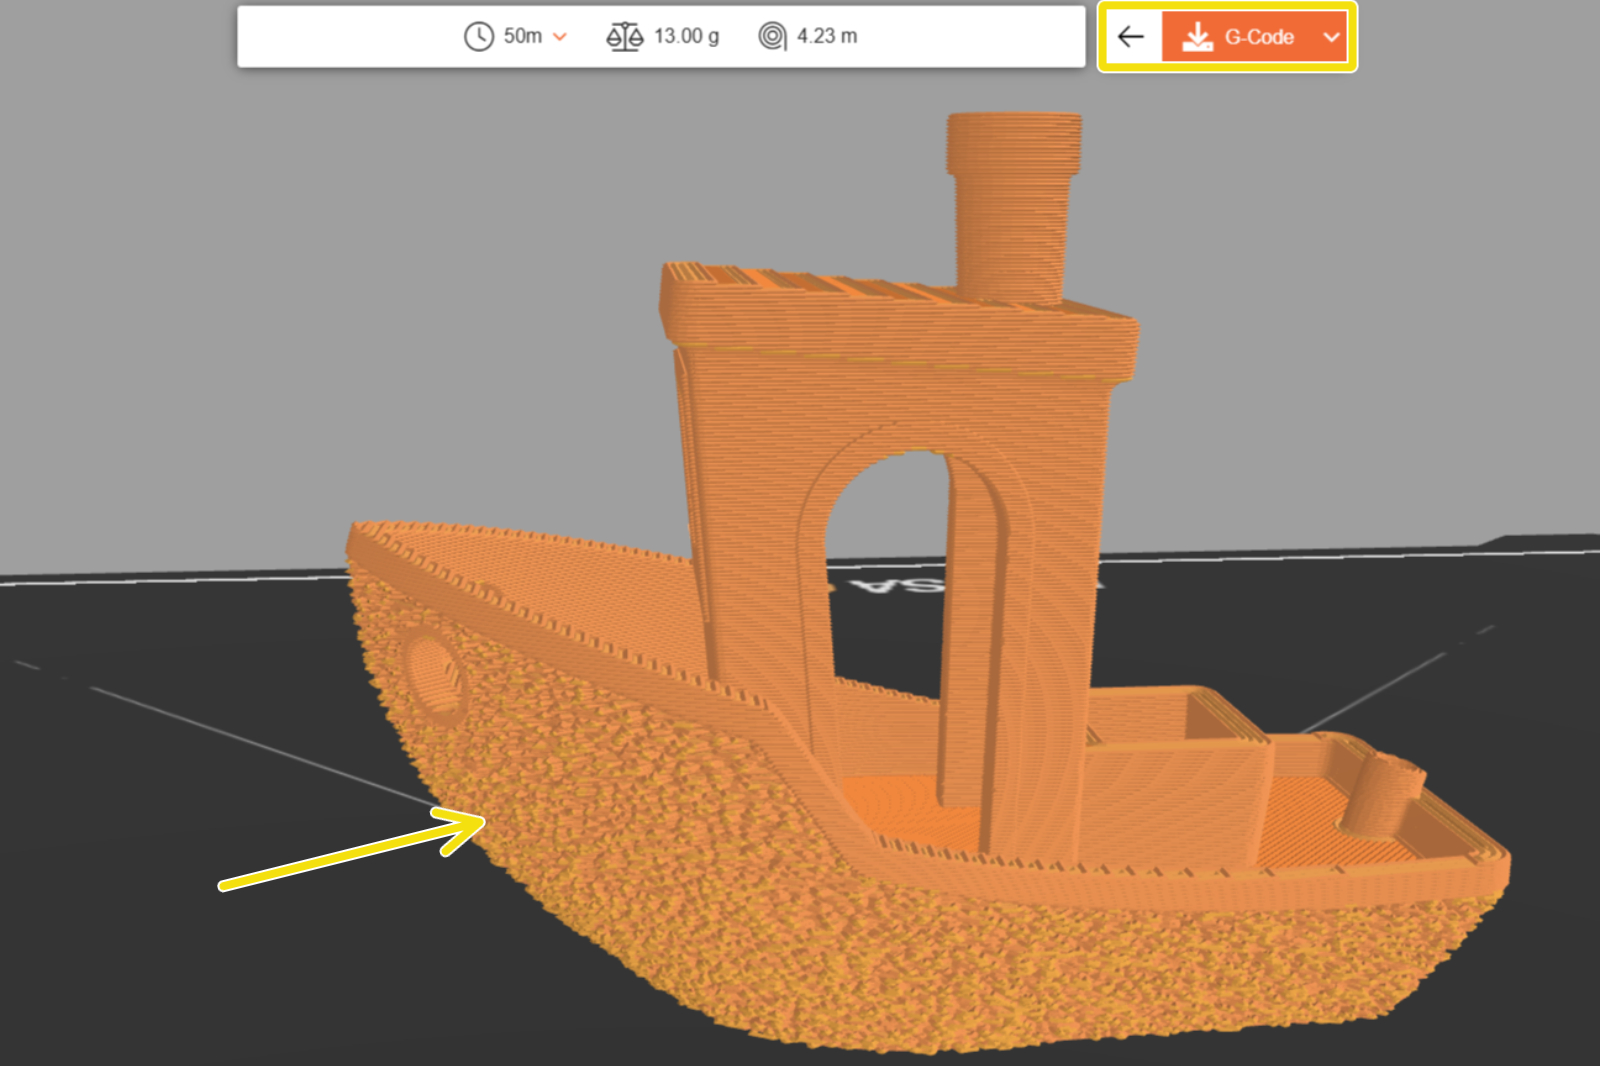
Note that fuzzy skin only works on vertical walls; it won't have any effect on flat surfaces. Fuzzy skin is also unsuitable for areas that require dimensional accuracy because the texture distorts the model surface.