Prusa
  • SHOP
    • Latest products
    BY CATEGORY
    • 3D printersnew
    • 3D printer upgradesnew
    • Materials
    • Accessories
    • Spare parts
    • Courses
    • Merch
    • Get a price quote
    QUICK LINKS
    • Shipping & delivery
    • Returns & refunds
    • Payment & financing
    • Warranty
    • VAT & Customs fees
    • FAQ

    0 item in your cartitems in your cart

    Your cart is empty

    Go to cartShop 3D printers

    My profile

    Log in to see orders, saved items

    My profile

    Signed in as

    • Orders
    • Logout
  • 3D PRINTING
    • Explore 3D printing
    FOR BEGINNERS
    • 3D printing 101
    • How FDM printing works
    • Buying your first printer
    • 3D model catalog
    BY APPLICATION
    • Rapid prototyping
    • Manufacturing
    • Engineering
    • Research
    • Arts & design
    GO DEEPER
    • Materials guide
    • Courses
    • Webinars
    • Case studies
    • Custom 3D printing
  • 3D PRINTERS
    • All 3D printers
    FOR
    • Home or garageHobbyists, tinkerers and home printing
    • BusinessIn-house production for small teams
    • EnterpriseFleets, security and scale
    • Which Prusa is right for me
    SHOP & BROWSE
    • CORE One+new
    • CORE One+ INDXnew
    • CORE One L+new
    • CORE One L+ INDXnew
    • XL+new
    • MK4S
    • Prusa Pro HT90
    • Prusa Pro AFS
    • Prusa Pro SLX
    MORE FROM PRINTERS
    • Parts & upgradesnew
    • Critical infrastructure
    • Case studies
    • Signature Oak
    • Kits
  • MATERIALS
    • All materials
    BY USE
    • Every-day & design
    • Functional engineering
    • Composites
    • Pro speciality
    • SLA resins
    PRUSAMENT
    • PLA
    • PETG
    • ASA
    • PC
    • PA11
    • Flex
    • TPU
    MORE FROM MATERIALS
    • Materials guide
    • We make material in house
    • Sustainability
    • Order on the store
  • SOFTWARE
    • All software
    PREPARE THE PRINT
    • PrusaSlicer 3.0New
    PRINT & MONITOR
    • Prusa Connect
    • EasyPrint
    • iOS & Android app
    • Prusa Farm
    GET STARTED
    • Download & install
    • Knowledge base
    MORE FROM SOFTWARE
    • 3D model catalog
  • SUPPORT
    • Explore support
    FIND ANSWERS
    • Knowledge base
    • Troubleshooting
    • Courses
    • Webinars
    GET HELP
    • Contact us
    • Livechat
    • Shipping & delivery
    • Warranty
    • Returns & refunds
    • Service & spare parts
    • Service & Repair
    COMMUNITY
    • Forum
    • Reddit
    • Printables
  • TRUST CENTER
    • Trust Center overview
    BY TOPIC
    • GDPR
    • Certificates
    • Security
    • Compliance
    COMMITMENTS
    • Sustainability report
    TALK TO US
    • Contact the security team
  • COMPANY
    • About Prusa
    GET TO KNOW US
    • Our story
    • How we make printers
    • Open source
    • Brand & media kit
    NEWS
    • Blog
    • Newsroom
    • Events
    TRUST & PARTNERS
    • Sustainability
    • Resellers & distributors
    • Affiliate program
    • Contact
    • English
    • Čeština
    • Deutsch
    • Español
    • Français
    • Italiano
    • Polski
    • 日本語
  • Signed in as

    • Orders
    • Address
    • In-stock Alerts
    • My Courses
    • Subscription
    • Edit Account
    • Logout

Log in to see orders, saved items

Signed in as
  • Orders
  • Address
  • In-stock Alerts
  • My Courses
  • Subscription
  • Edit Account
  • English
  • Čeština
  • Deutsch
  • Español
  • Français
  • Italiano
  • Polski
  • 日本語
Shop

0 item in your cartitems in your cart

Your cart is empty

Go to cartShop 3D printers

My profile

Log in to see orders, saved items

My profile

Signed in as

  • Orders
  • Logout
SHOP
  • Latest products
BY CATEGORY
  • 3D printersnew
  • 3D printer upgradesnew
  • Materials
  • Accessories
  • Spare parts
  • Courses
  • Merch
  • Get a price quote
QUICK LINKS
  • Shipping & delivery
  • Returns & refunds
  • Payment & financing
  • Warranty
  • VAT & Customs fees
  • FAQ

Featured products

    Popular categories

      Trending searches

        Articles

          Blog

            Products

              Categories

                Suggested searches

                  Searching…
                  No results
                  Something went wrong.
                  ↑↓ Select↵ OpenEsc Close search
                  1. Support
                  2. Prusa CORE One+
                  3. 3D models
                  4. Modeling with 3D printing in mind
                   

                  Contents

                  • Overhangs and support material
                  • Splitting the model into multiple parts
                  • Fillet vs chamfer
                  • How many sides does your cylinder/circle have?
                  • Thin walls and minimum feature size
                  • Tolerances
                  • Fine details and material consideration
                  • Iterations of your design
                  • Orientation on the print bed
                  • Make sure it is manifold/solid
                  • Multi-material printing and dual extruders
                  • Using PrusaSlicer for certain elements

                  Blog

                  • Print colorful and glowing Halloween decorations with our spooky offer
                  • Factorio Has Arrived on Printables
                  • Prusament PLA Lightweight: 65% lighter than regular PLA. Perfect choice for aircraft, cosplay, and more.

                  Newsletter

                  Signup and get our monthly squeeze on updates, blog, printables and much more.

                  By clicking, you agree to receive our newsletter.

                  This site is protected by reCAPTCHA Enterprise and the Google Privacy Policy and Terms of Service apply.

                  Factorio Transport Belts
                  E-shop
                  • 3D Printers
                  • Printer Upgrades
                  • Filaments
                  • Accessories
                  • Prusa Merchandise

                  © Prusa Research a.s.

                  Printables
                  • 3D Models
                  • Store
                  • Clubs
                  • 3D Design Contests
                  • Brands
                  Community
                  • World Map
                  • Forum
                  • User Groups
                  • Events
                  Help
                  • Prusa Help
                  • Prusa Academy
                  • 3D Printing Calculators
                  Software
                  • PrusaSlicer
                  • Prusa.app
                  • Prusa Connect
                  • Drivers and Software
                  Company
                  • About Us
                  • Blog
                  • Official Prusa Resellers
                  • Contact Us
                  • Certified for ISO 9001, ISO 14001, ISO 45001
                  • General Terms and Conditions
                  • General Terms and Conditions of Use of the PRUSA Websites
                  • Privacy Policy
                  • Information about cookies
                  • Customer Complaints Policy
                  • Status Page
                  • Do Not Sell or Share My Personal Information
                  • Supplemental Statements
                  • General Terms and Conditions
                  • General Terms and Conditions of Use of the PRUSA Websites
                  • Privacy Policy
                  • Information about cookies
                  • Customer Complaints Policy
                  • Status Page
                  • Do Not Sell or Share My Personal Information
                  • Supplemental Statements

                  © Prusa Research a.s.

                  JOSEF PRUSA®, PRUSA RESEARCH®, PRUSA POLYMERS®, PRUSA ORANGE®, PRUSA 3D ® AND PRUSAMENT® are registered trademarks of Prusa Development a.s. used by Prusa Research a.s. under licence from Prusa Development a.s.

                  Modeling with 3D printing in mind

                  Relevant for

                  CORE One family
                  SOFTWARE
                  MK4 family
                  XL family
                  MK3.9 family
                  +
                  1 comment
                  Article is also available in following languages
                  English
                  Čeština
                  Polski
                  Deutsch
                  Français
                  Español
                  Italiano
                  日本語

                  Modeling for 3D printing presents several interesting challenges. FFF (Fused Filament Fabrication), with its layer-by-layer manufacturing process, the orientation and geometry can greatly affect both the aesthetic and integrity of your finished print. Moreover, different 3D modeling software have different terms and methods for achieving different results, so we will go over some basic guidelines when modeling with 3D printing in mind.

                  For a small introduction to finding a 3D modeling program, see Creating your own 3D models. 
                  For a complete course on the topic, we offer a 3D Modeling in Autodesk Fusion in our Prusa Academy.

                  Overhangs and support material

                  The most important thing to keep in mind while modeling for 3D printing is the need for support material. 3D printers can’t print in mid-air, as each layer has to be laid on top of another one. When designing, keep this limitation in mind and try to avoid creating steep overhangs and extreme angles. That said, short horizontal bridges can be printed without supports.

                  A 3D printer can cleanly print overhanging structures with an angle between 45 and 60 degrees, depending on your nozzle diameter and settings.

                  Our FDM printer models with Nextruder and 360° cooling can print overhangs of up to 75° without supports. These models are the MK4S, the CORE One/+, and the CORE One L. 

                  The standard diameter for nozzles on desktop 3D printers is 0.4 mm. For smaller nozzles, like 0.25 mm, the angle might be less than 45 degrees. If you must have very steep overhangs or free-floating geometry in your design, consider if this will be visible in the final product, as surfaces above supports will not have the same finish as a side wall or a top fill. You can model in break-away supports, or split your part into multiple pieces (explained in the next section) for a better orientation.

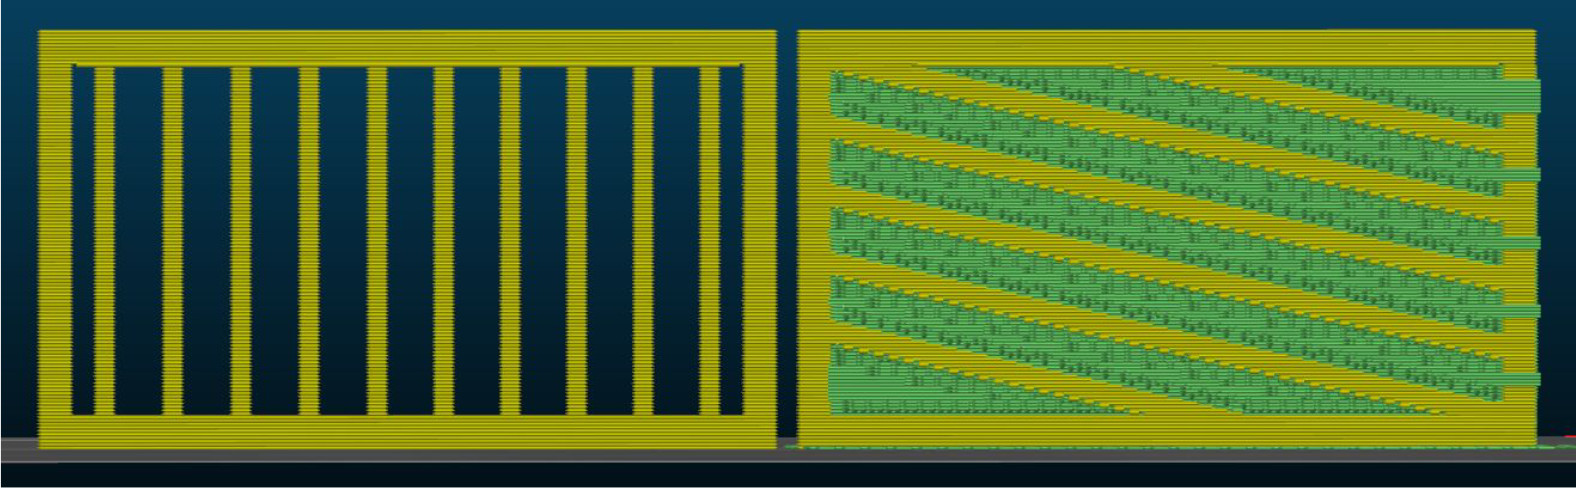
                  Let’s take a look at an example - you need to design a part of a fence, and it’s up to you how the pickets will look. In the pictures below, you can see two ways to design a fence if we want to print it in a vertical position. The best solution here will be to print the part horizontally.
                  Splitting the model into multiple parts

                  Both the visual and mechanical properties of your model can be improved by splitting it into multiple parts. This way, they can be optimized for better orientation and placement on the print platform. This way, you can minimize the number of supports required. The parts of the object can then be glued together. PrusaSlicer has a cut tool to make this easier. You can also use Meshmixer to cut the models.

                  When you glue the parts of your object together, make sure that the surfaces to be glued are smooth and free of grease or dirt, to achieve an invisible seam. The ironing feature in PrusaSlicer can also assist in this. Also, it can be helpful to lightly sand the surface to increase adhesion. The need for sanding will depend on geometry, surface finish, and the type of glue. Superglue can be very viscous, so it may not be ideal for rough surfaces. It can also leave traces of itself. When you find the right glue for your model and material, the seam should be stronger than the rest of the material, but you might want to model in some pegs for alignment and strength.
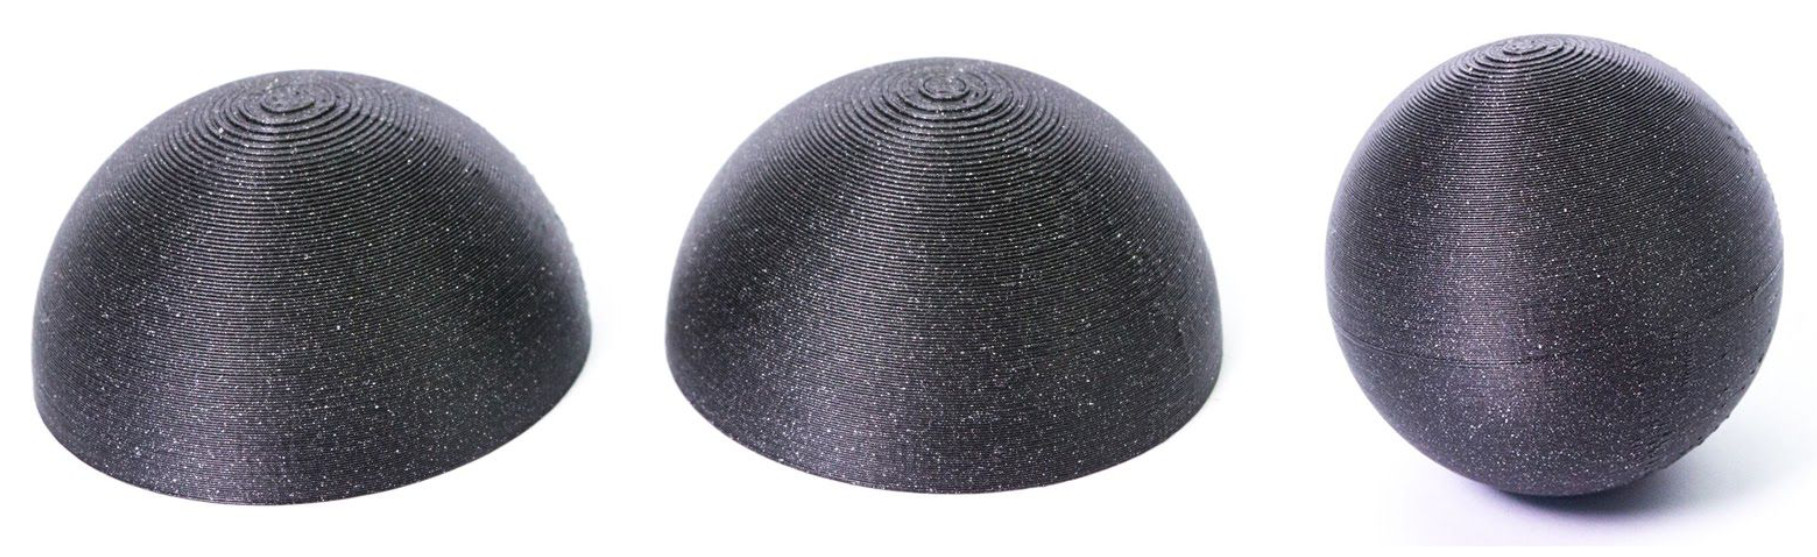
                  On smaller models, the seams from attaching parts together will be more visible than on bigger models.

                  Fillet vs chamfer

                  If oriented towards the print bed, fillets create a very steep overhang, which negatively affects the surface of the object. For this reason, ​use chamfer instead​ if a perfect part finish is a priority. However, you can improve on this using the Variable layer height function in PrusaSlicer.
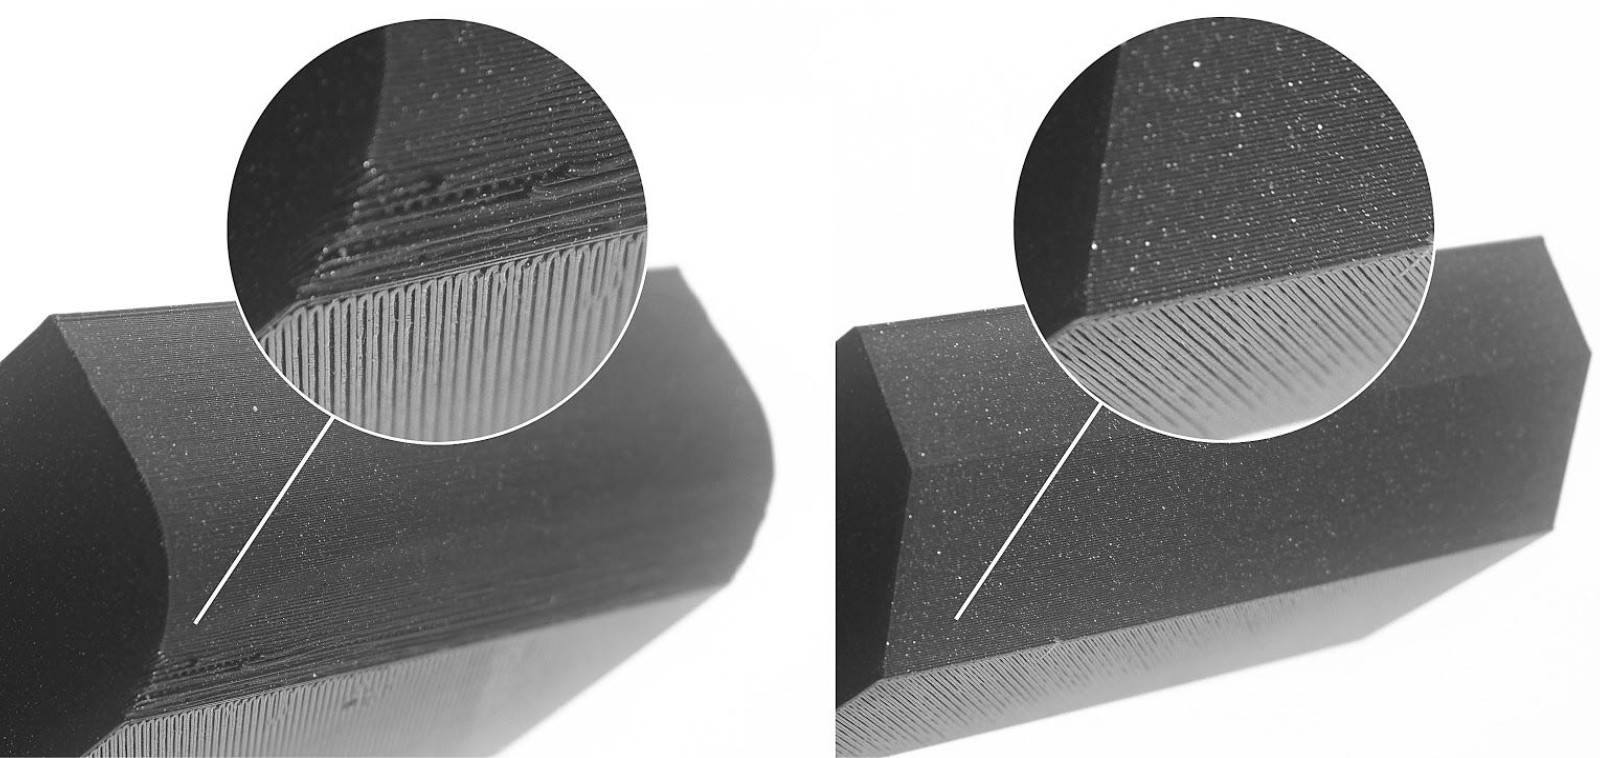
                  Using a chamfer on the edges of two parts that slot together can save you a lot of effort when assembling.

                  How many sides does your cylinder/circle have?

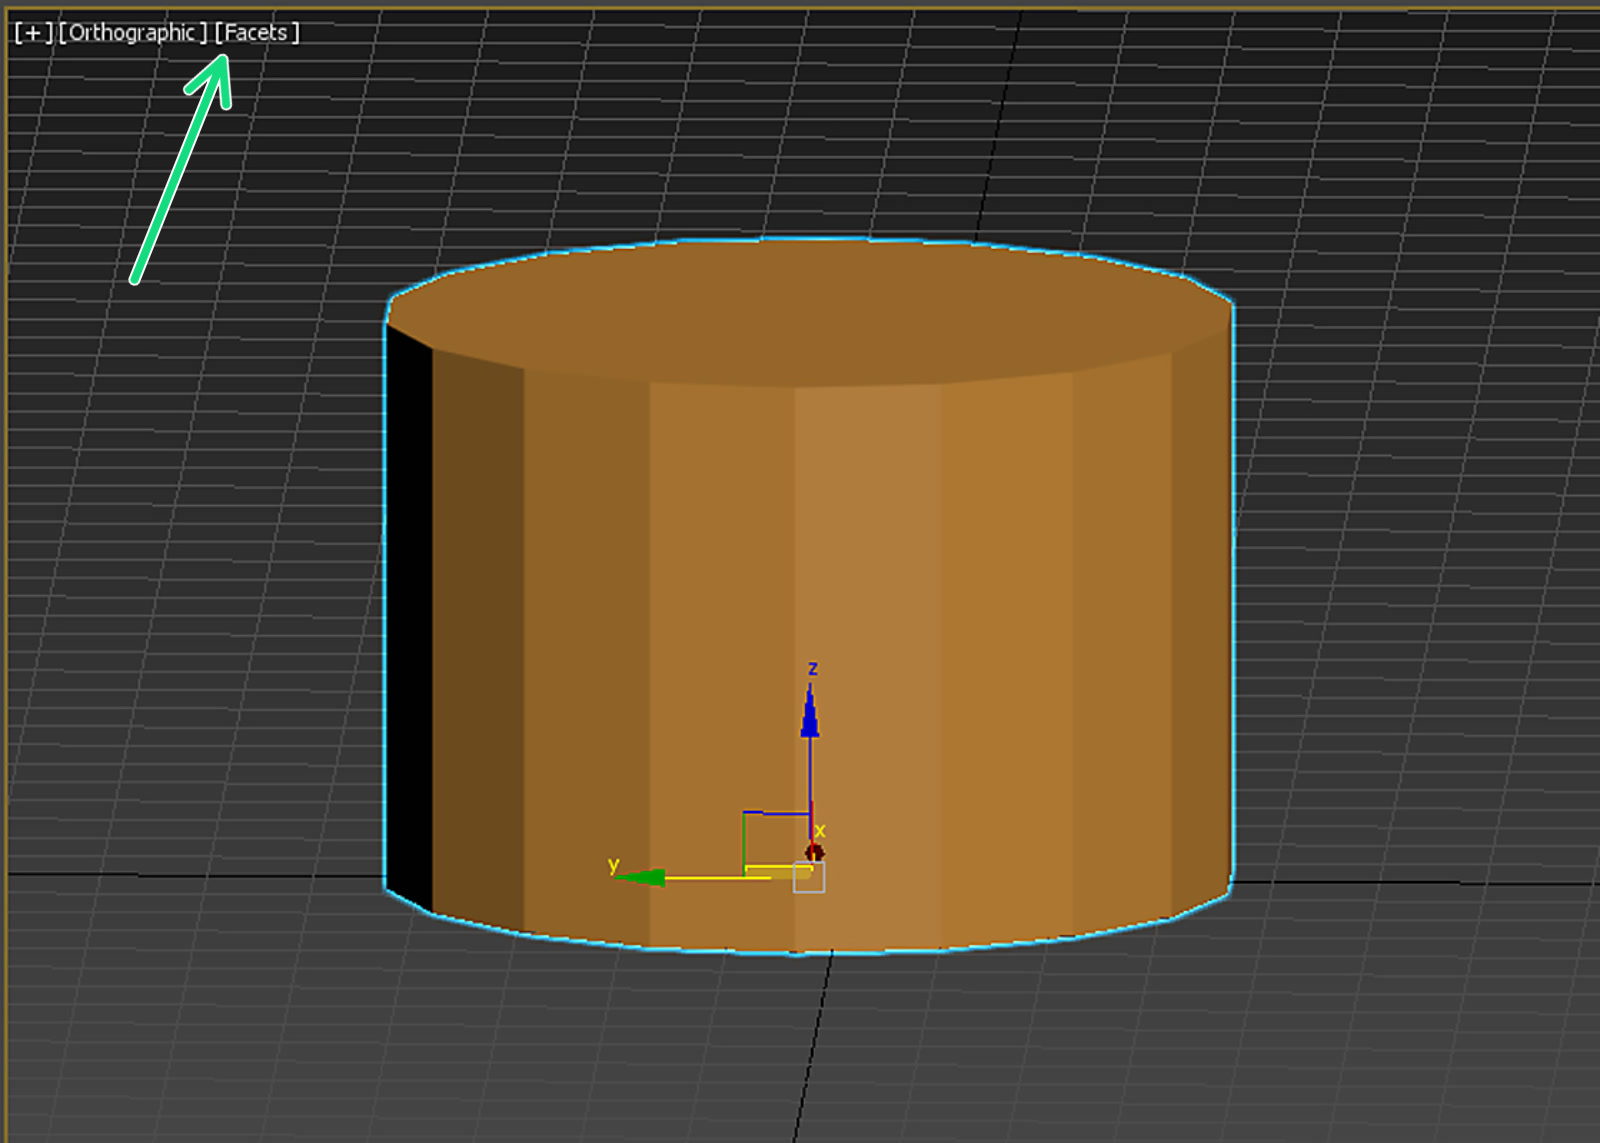
                  Bear in mind that the modeling software you are using might be showing you a curve, but pay attention to the number of sides that are actually present. When the model is being designed, the visual representation can be smoothed out by the software's shaders, and the print can turn out to be a polygon, not a circle. Make sure you have the correct number of sides/faces on your model.
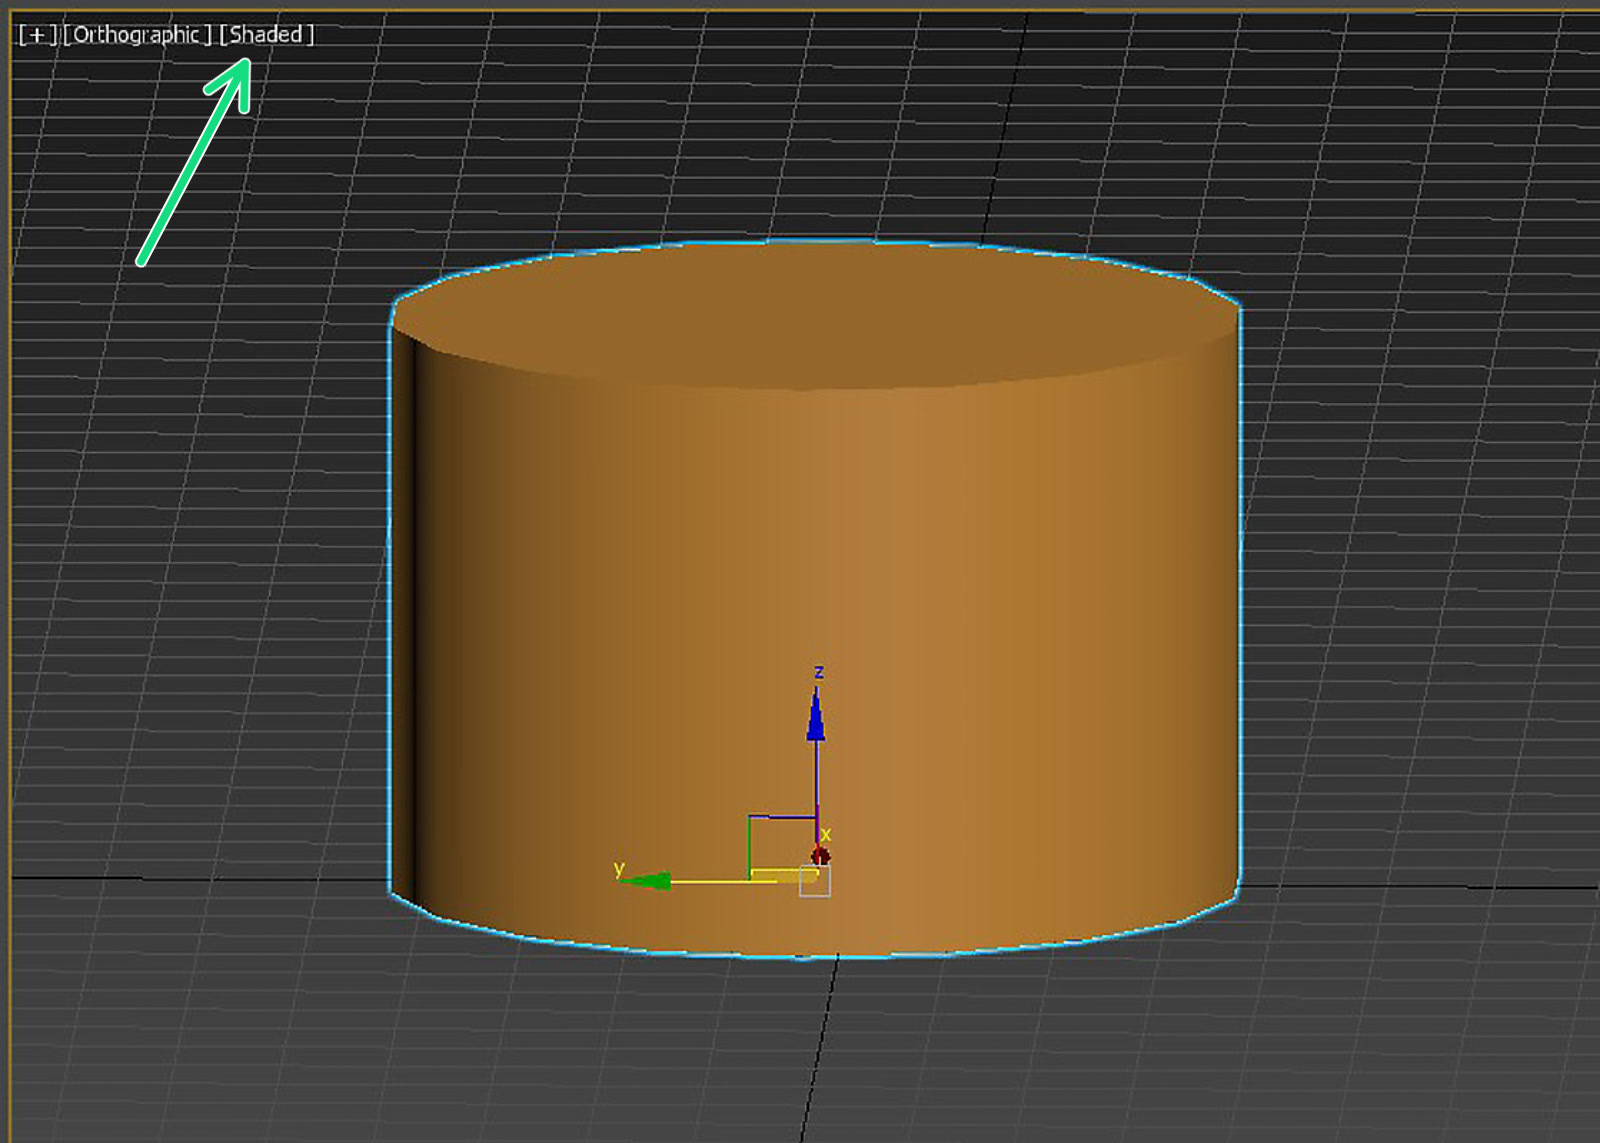
                  Notice how the look of the part changes when changing the shader (green arrow). Both pictures are of the exact same geometry. The right picture shows how it will look printed.

                  Thin walls and minimum feature size

                  Another limitation is the nozzle diameter. The most common size and stock nozzle size on MK3S is 0.4 mm, which in PrusaSlicer has​ an extrusion width of 0.45 mm​. PrusaSlicer can improve upon this in multiple ways. However, it may be wise to keep these numbers in mind, especially when you’re designing thin walls or tiny features. Walls thinner than one nozzle perimeter are not printable.

                  0.4 mm nozzleWall thickness
                  1 perimeter0.45 mm*
                  2 perimeters0.9 mm*
                  3 perimeters1.35 mm*
                  4 perimeters1.8 mm*

                  *These are approximations and may vary depending on the slicer settings.

                  As a way of improving the perimeters, you can go to the PrusaSlicer to the Print Settings tab - Layers and perimeters, and check the option "Detect thin walls". This will merge two paths into a single-pass extrusion. However, walls thinner than one perimeter can not be "repaired" this way.

                  Wall thicknessIs it printable?
                  Less than one perimeter
                  One perimeter
                  More than one perimeter, but less than two perimeters
                  More than two perimeters

                  Tolerances

                  When modeling parts that should fit together, you need to include a certain amount of tolerance. You will probably not be able to slot together two parts with zero-tolerance dimensions. You may have to tweak the tolerances until you reach an optimal result. There’s no single “universal” value - it all depends on different factors, the most common of which are:

                  • Size of the model
                  • Horizontal or vertical orientation
                  • The geometry of the parts that should interlock
                  • Calibration
                  • Settings
                  • Properties of the material

                  An Original Prusa will be accurate to at least 0.2 mm, but you also need to remember that different materials can warp or shrink during printing. Consider if two parts should move, like a hinge, or lock/snap together with a friction fit. An initial good measurement for movable parts is at least 0.3 mm.

                  The PrusaSlicer feature 'Elephant foot compensation' can improve the tolerances of some areas. You can read more about it here: Elephant foot compensation

                  Fine details and material consideration

                  If you have specific conditions for your design, like being outdoors or in a hot environment, this affects your material choice, which in turn can affect your design decisions. In short, filament properties should be taken into consideration. For example, in order to make designs/models that will need to be outdoors or have high mechanical resistance, those should be printed from PC, ASA, PETG, or similar. Those filaments may not print small details as well as PLA. So when modeling a piece that is meant to endure outdoor weather conditions or mechanical strain, you may want to avoid using small details.

                  Iterations of your design

                  You will have to make test prints before you can consider it final. While developing your design, prepare to make tweaks and adjustments to your tolerances and geometry. Having a parametric approach in CAD helps immensely, but if you are just starting out, try not to set your design in stone and save versions along the way, before you, for example, merge multiple objects together and/or create holes/cavities that should fit something else (subtractions).

                  Orientation on the print bed

                  A surface printed directly on the print bed is perfectly flat and smooth, while a surface printed above supports will look more inconsistent and rough. The picture shows the worst-case scenario for demonstration purposes. There are ways to mitigate this, but surfaces with a lower overhang angle look much better even with supports.
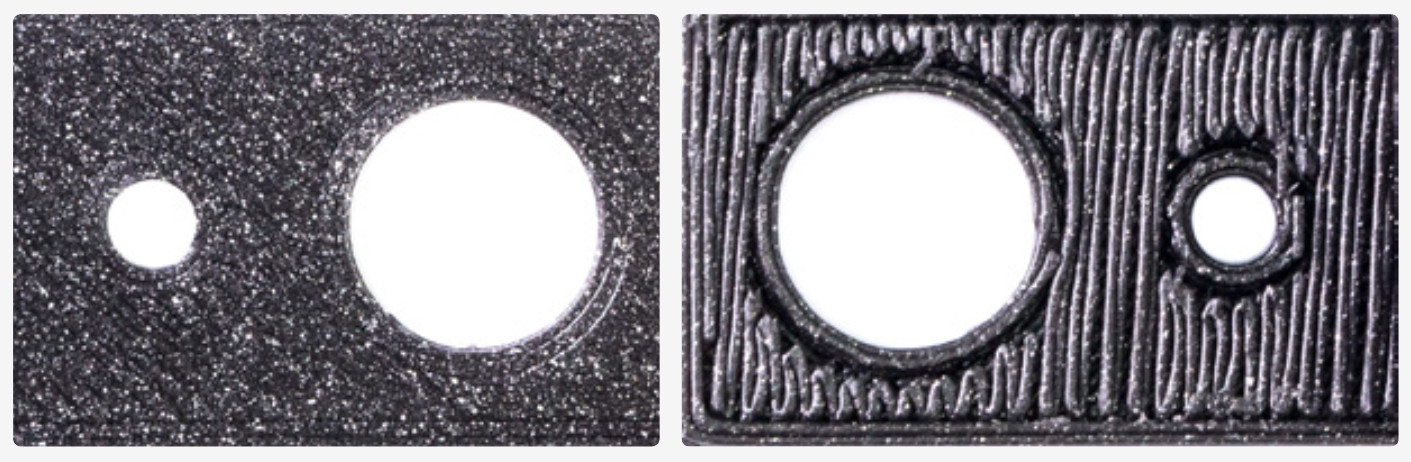
                  Like wood, FFF prints are stronger in one direction than another. Therefore, you want structural parts to be printed in an orientation that optimizes their structural integrity. 

                  Make sure it is manifold/solid

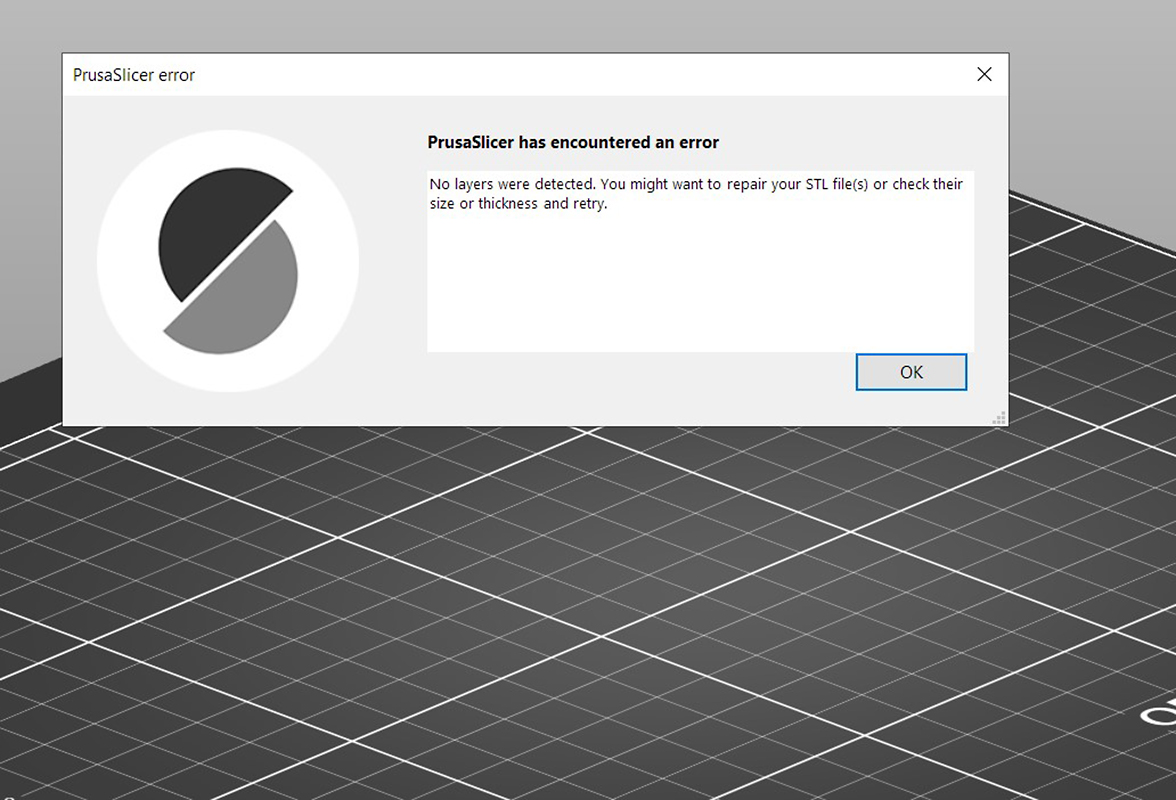
                  The model to be printed must be solid or have "manifold geometry". This is a geometry that can exist in the 3-dimensional real world. If a model has holes on the surface or internal geometry, the part will not be able to be sliced.
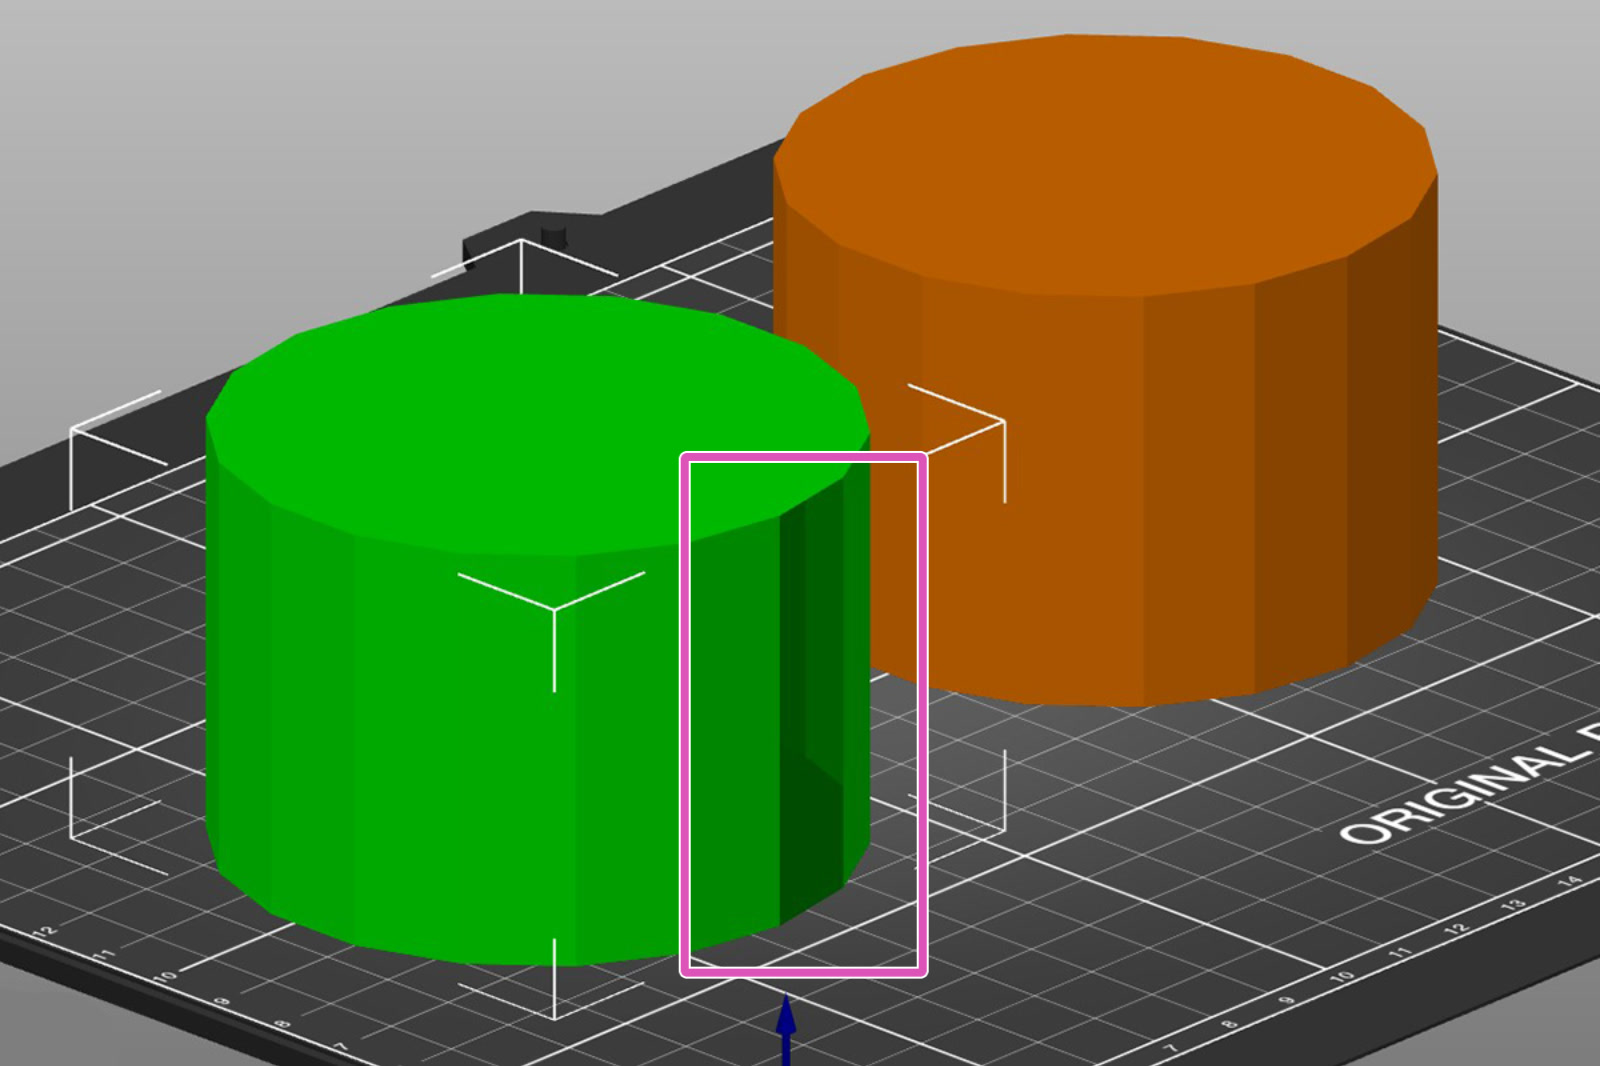
                  Most design programs have a feature dedicated to correcting this error under different terms like "make manifold" or "Cap holes". These options will most often delete excess faces, edges, and vertices, and fix or create surfaces where they are missing. You can also see our guide about Corrupted 3D models for printing.

                  Multi-material printing and dual extruders

                  In order for a model to be printed using a printer that supports multi-material printing, such as our MMU3 or our XL in the multi-tool version, several methods for its modeling can be used. 

                  That can be done by having each mesh in a separate 3D file (stl, obj). You can also have multiple meshes in an amf or 3mf file. PrusaSlicer will assign each different mesh to a different color. If you have each mesh in a different file, you will need to import all of them at the same time. We mentioned earlier, making a model manifold or solid. In this case, you will need each part of the whole to be manifold/solid.

                  It is possible to have one single mesh and split it using Meshmixer, but it can be a very long and tedious process. Therefore, this might be helpful to keep in mind during the design process. 

                  More recent methods include Multi material painting, as well as the use of Modifiers combined with tool reassigning for the modifier. 

                  Using PrusaSlicer for certain elements

                  Check how to start using PrusaSlicer.

                  As we touched upon in the part regarding the orientation of the print, a lot can be done in PrusaSlicer after the modeling process is done in your modeling/CAD software. Some operations may be quicker to just do in your slicer than editing your model for them to export it again, or if you don't have access to the original project files.

                  You can use the PrusaSlicer for small modifications in the model. You can use modifier meshes to make patterns on the model. You can also add or remove parts of the geometry.

                  Was this article helpful?
                  This action is available only to registered users. Please log-in.

                  1 comment

                  Log in  to post a comment
                  The Researcher
                  •
                  Great write-up on tolerance considerations and wall thickness. Designing for FDM usually forces a lot of design compromises early on, especially when transitioning prototypes into scalable manufacturing. We’ve been tracking how rapid prototyping across various medical and industrial sectors is shifting toward production-grade end-use parts. For anyone interested in how these design-level decisions scale across the broader industry, we recently mapped out the macro trends and forecasts in our 3D Printing Market Analysis. Appreciate the clear rules of thumb on chamfer vs. fillet overhangs!

                  reference: https://www.rootsanalysis.com/3d-printing-market
                  Reply

                  Topics

                  • Using the printer
                    • 3D models
                      • Creating your own 3D models
                      • Modeling with 3D printing in mind
                    • Material guide
                    • Slicing
                    • Printer maintenance
                    • Prusa Connect & PrusaLink