Prusa
  • SHOP
    • Latest products
    BY CATEGORY
    • 3D printersnew
    • 3D printer upgradesnew
    • Materials
    • Accessories
    • Spare parts
    • Courses
    • Merch
    • Get a price quote
    QUICK LINKS
    • Shipping & delivery
    • Returns & refunds
    • Payment & financing
    • Warranty
    • VAT & Customs fees
    • FAQ

    0 item in your cartitems in your cart

    Your cart is empty

    Go to cartShop 3D printers

    My profile

    Log in to see orders, saved items

    My profile

    Signed in as

    • Orders
    • Logout
  • 3D PRINTING
    • Explore 3D printing
    FOR BEGINNERS
    • 3D printing 101
    • How FDM printing works
    • Buying your first printer
    • 3D model catalog
    BY APPLICATION
    • Rapid prototyping
    • Manufacturing
    • Engineering
    • Research
    • Arts & design
    GO DEEPER
    • Materials guide
    • Courses
    • Webinars
    • Case studies
    • Custom 3D printing
  • 3D PRINTERS
    • All 3D printers
    FOR
    • Home or garageHobbyists, tinkerers and home printing
    • BusinessIn-house production for small teams
    • EnterpriseFleets, security and scale
    • Which Prusa is right for me
    SHOP & BROWSE
    • CORE One+new
    • CORE One+ INDXnew
    • CORE One L+new
    • CORE One L+ INDXnew
    • XL+new
    • MK4S
    • Prusa Pro HT90
    • Prusa Pro AFS
    • Prusa Pro SLX
    MORE FROM PRINTERS
    • Parts & upgradesnew
    • Critical infrastructure
    • Case studies
    • Signature Oak
    • Kits
  • MATERIALS
    • All materials
    BY USE
    • Every-day & design
    • Functional engineering
    • Composites
    • Pro speciality
    • SLA resins
    PRUSAMENT
    • PLA
    • PETG
    • ASA
    • PC
    • PA11
    • Flex
    • TPU
    MORE FROM MATERIALS
    • Materials guide
    • We make material in house
    • Sustainability
    • Order on the store
  • SOFTWARE
    • All software
    PREPARE THE PRINT
    • PrusaSlicer 3.0New
    PRINT & MONITOR
    • Prusa Connect
    • EasyPrint
    • iOS & Android app
    • Prusa Farm
    GET STARTED
    • Download & install
    • Knowledge base
    MORE FROM SOFTWARE
    • 3D model catalog
  • SUPPORT
    • Explore support
    FIND ANSWERS
    • Knowledge base
    • Troubleshooting
    • Courses
    • Webinars
    GET HELP
    • Contact us
    • Livechat
    • Shipping & delivery
    • Warranty
    • Returns & refunds
    • Service & spare parts
    • Service & Repair
    COMMUNITY
    • Forum
    • Reddit
    • Printables
  • TRUST CENTER
    • Trust Center overview
    BY TOPIC
    • GDPR
    • Certificates
    • Security
    • Compliance
    COMMITMENTS
    • Sustainability report
    TALK TO US
    • Contact the security team
  • COMPANY
    • About Prusa
    GET TO KNOW US
    • Our story
    • How we make printers
    • Open source
    • Brand & media kit
    NEWS
    • Blog
    • Newsroom
    • Events
    TRUST & PARTNERS
    • Sustainability
    • Resellers & distributors
    • Affiliate program
    • Contact
    • English
    • Čeština
    • Deutsch
    • Español
    • Français
    • Italiano
    • Polski
    • 日本語
  • Signed in as

    • Orders
    • Address
    • In-stock Alerts
    • My Courses
    • Subscription
    • Edit Account
    • Logout

Log in to see orders, saved items

Signed in as
  • Orders
  • Address
  • In-stock Alerts
  • My Courses
  • Subscription
  • Edit Account
  • English
  • Čeština
  • Deutsch
  • Español
  • Français
  • Italiano
  • Polski
  • 日本語
Shop

0 item in your cartitems in your cart

Your cart is empty

Go to cartShop 3D printers

My profile

Log in to see orders, saved items

My profile

Signed in as

  • Orders
  • Logout
SHOP
  • Latest products
BY CATEGORY
  • 3D printersnew
  • 3D printer upgradesnew
  • Materials
  • Accessories
  • Spare parts
  • Courses
  • Merch
  • Get a price quote
QUICK LINKS
  • Shipping & delivery
  • Returns & refunds
  • Payment & financing
  • Warranty
  • VAT & Customs fees
  • FAQ

Featured products

    Popular categories

      Trending searches

        Articles

          Blog

            Products

              Categories

                Suggested searches

                  Searching…
                  No results
                  Something went wrong.
                  ↑↓ Select↵ OpenEsc Close search
                  1. Support
                  2. Prusa CORE One/+ INDX
                  3. Printer description
                  4. Assemblling the Prusa INDX Core one with the Gen 2 upgrade
                   

                  Contents

                  • Securing the bed spacer - right, additional information
                  • Removing old expansion joints
                  • Removing the Bed-cable-cover-bottom
                  • Additional information and removing the belts
                  • Gantry aligner tool
                  • Mounting the side panels, PTFE and right cover
                  • Fixing the heatbed
                  • Mounting the left cover, covering the electronics

                  Blog

                  • Print colorful and glowing Halloween decorations with our spooky offer
                  • Factorio Has Arrived on Printables
                  • Prusament PLA Lightweight: 65% lighter than regular PLA. Perfect choice for aircraft, cosplay, and more.

                  Newsletter

                  Signup and get our monthly squeeze on updates, blog, printables and much more.

                  By clicking, you agree to receive our newsletter.

                  This site is protected by reCAPTCHA Enterprise and the Google Privacy Policy and Terms of Service apply.

                  Factorio Transport Belts
                  E-shop
                  • 3D Printers
                  • Printer Upgrades
                  • Filaments
                  • Accessories
                  • Prusa Merchandise

                  © Prusa Research a.s.

                  Printables
                  • 3D Models
                  • Store
                  • Clubs
                  • 3D Design Contests
                  • Brands
                  Community
                  • World Map
                  • Forum
                  • User Groups
                  • Events
                  Help
                  • Prusa Help
                  • Prusa Academy
                  • 3D Printing Calculators
                  Software
                  • PrusaSlicer
                  • Prusa.app
                  • Prusa Connect
                  • Drivers and Software
                  Company
                  • About Us
                  • Blog
                  • Official Prusa Resellers
                  • Contact Us
                  • Certified for ISO 9001, ISO 14001, ISO 45001
                  • General Terms and Conditions
                  • General Terms and Conditions of Use of the PRUSA Websites
                  • Privacy Policy
                  • Information about cookies
                  • Customer Complaints Policy
                  • Status Page
                  • Do Not Sell or Share My Personal Information
                  • Supplemental Statements
                  • General Terms and Conditions
                  • General Terms and Conditions of Use of the PRUSA Websites
                  • Privacy Policy
                  • Information about cookies
                  • Customer Complaints Policy
                  • Status Page
                  • Do Not Sell or Share My Personal Information
                  • Supplemental Statements

                  © Prusa Research a.s.

                  JOSEF PRUSA®, PRUSA RESEARCH®, PRUSA POLYMERS®, PRUSA ORANGE®, PRUSA 3D ® AND PRUSAMENT® are registered trademarks of Prusa Development a.s. used by Prusa Research a.s. under licence from Prusa Development a.s.

                  Assemblling the Prusa INDX Core one with the Gen 2 upgrade

                  Relevant for

                  CORE One INDX
                  18 comments
                  Article is also available in following languages
                  English
                  Čeština
                  Polski
                  Deutsch
                  Français
                  Español
                  Italiano
                  日本語

                  If you received your Prusa CORE One INDX conversion kit with the Prusa CORE One+ Gen 2 upgrade, or bought the Gen 2 upgrade separately and want to install both at the same time, this article will help you with the process. Read the instructions and information in this article thoroughly.

                  If you received the CORE One+ GEN 2 upgrade as part of your Prusa INDX conversion kit, note that all the GEN 2 upgrade parts (belts, Pulleys, spacers, fasteners, etc.) are included in the UPGRADE box.


                  There are some differences between the Prusa CORE One INDX and the Prusa CORE One+ Gen 2 guides. We will inform you when to switch to each guide with a handy link to the corresponding step.
                  In both guides, you will be alerted when you should switch back to this article. 

                  Securing the bed spacer - right, additional information

                  Follow the Prusa INDX guide from the start.

                  Keep following the instructions in the Prusa INDX guide until you finish step SECURING THE BED SPACER - RIGHT, then read the instructions below in this article: 

                  Before you move on to the next step in the Prusa INDX guide, we need to disconnect the X and Y motor cables and remove the left side panel and cover from the printer to accommodate the GEN 2 upgrades.

                  Follow the instructions below:
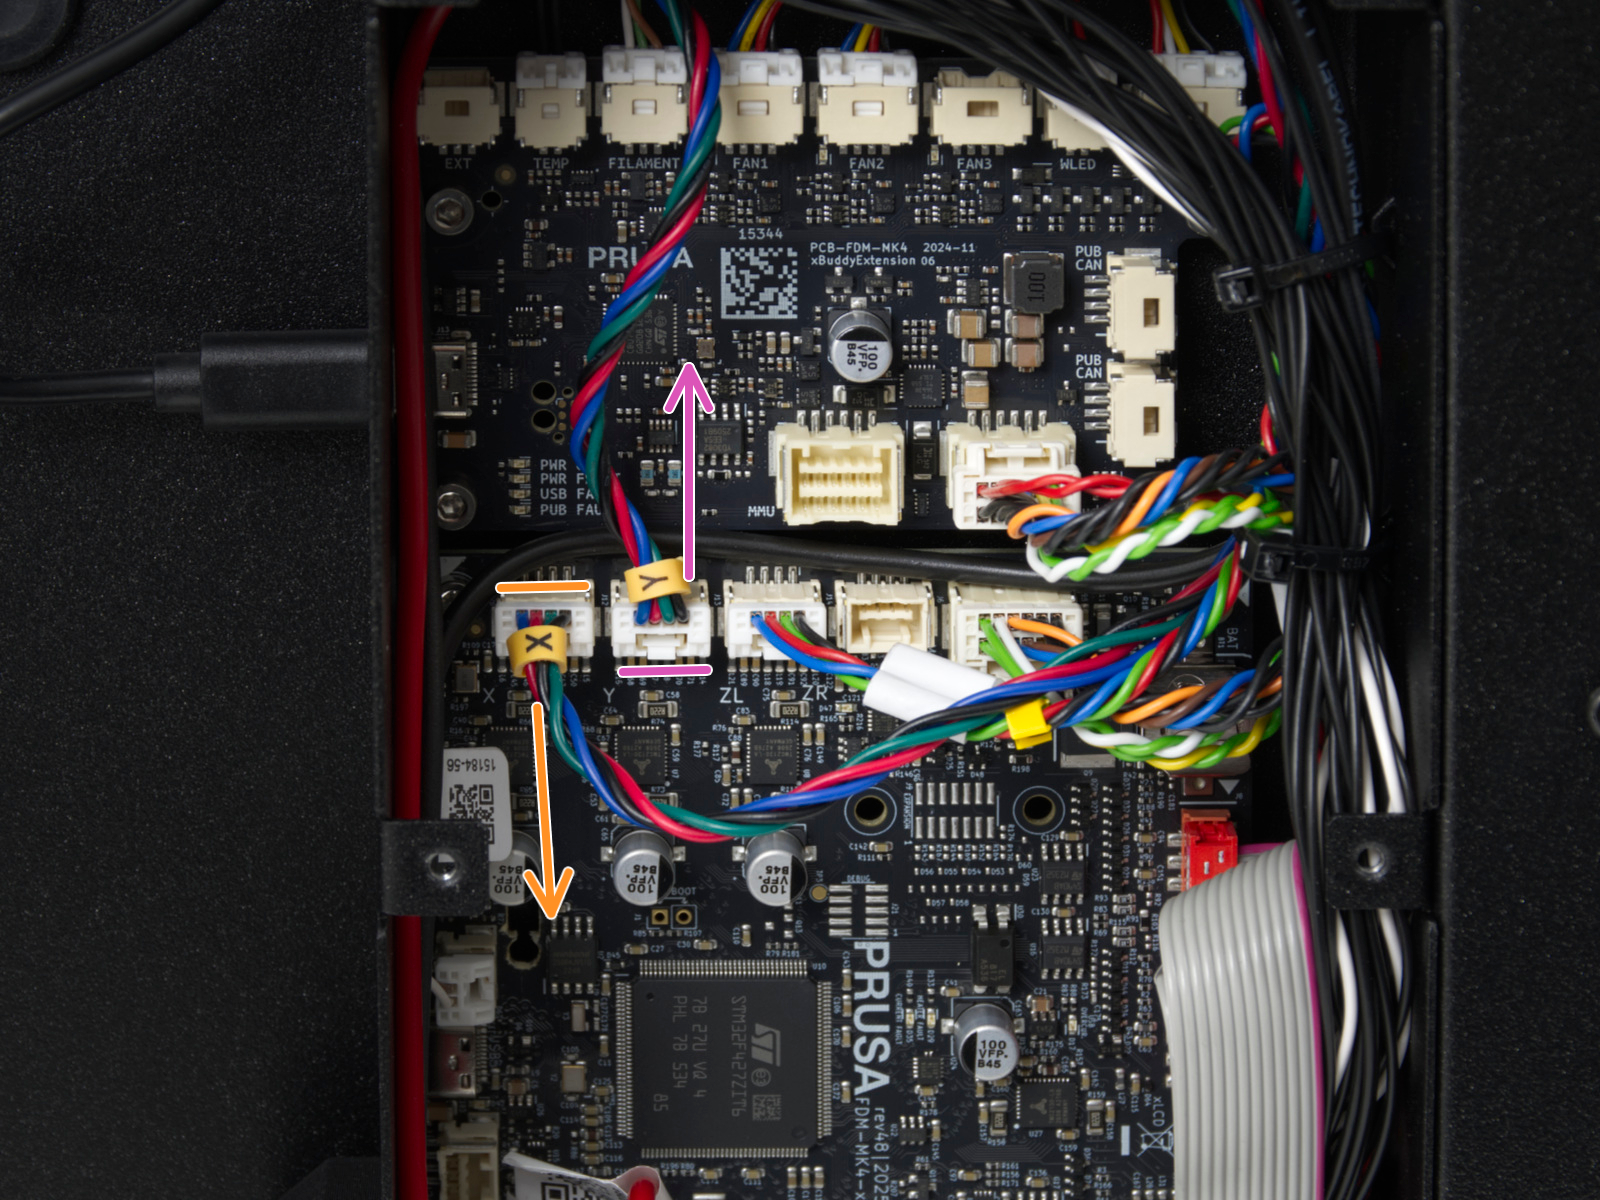
                  • Press the safety latch to disconnect the X and Y motor cables from the xBuddy board on the back of the printer.


                  • Gently pull the X and Y motor cables slightly to create some slack while keeping the connectors inside the electronics compartment.


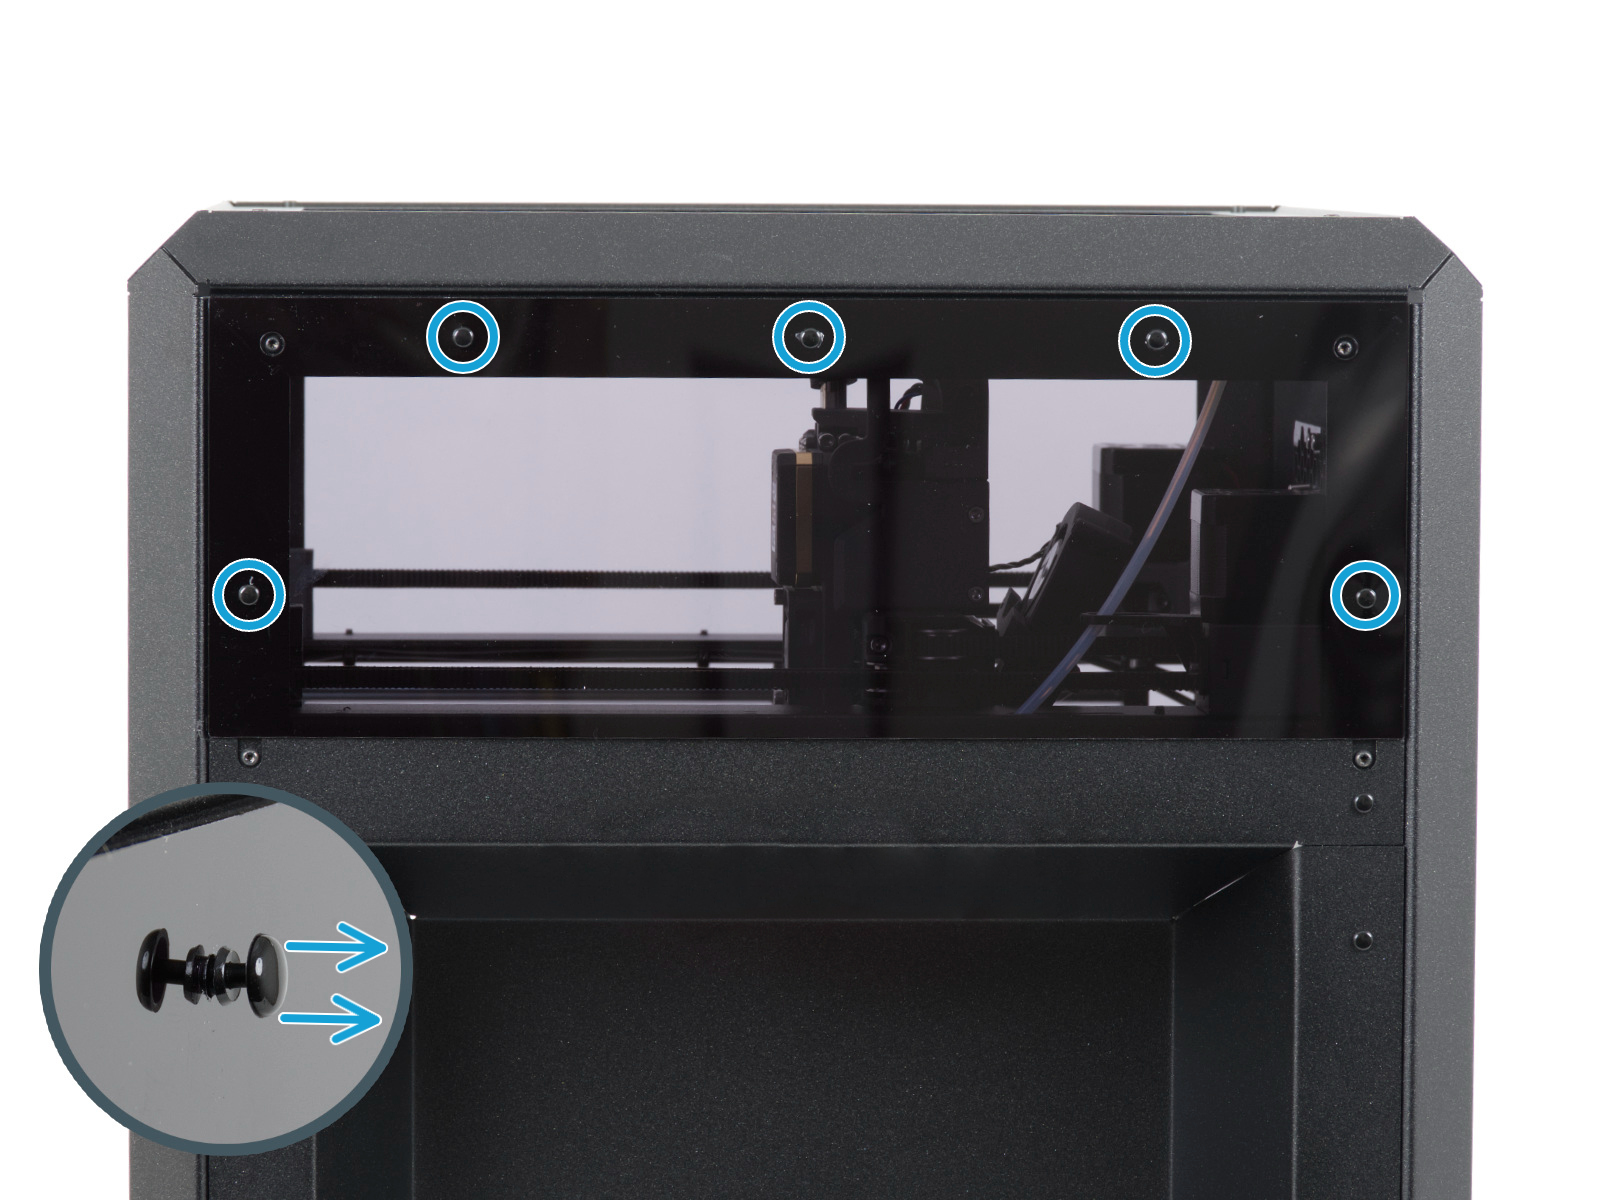
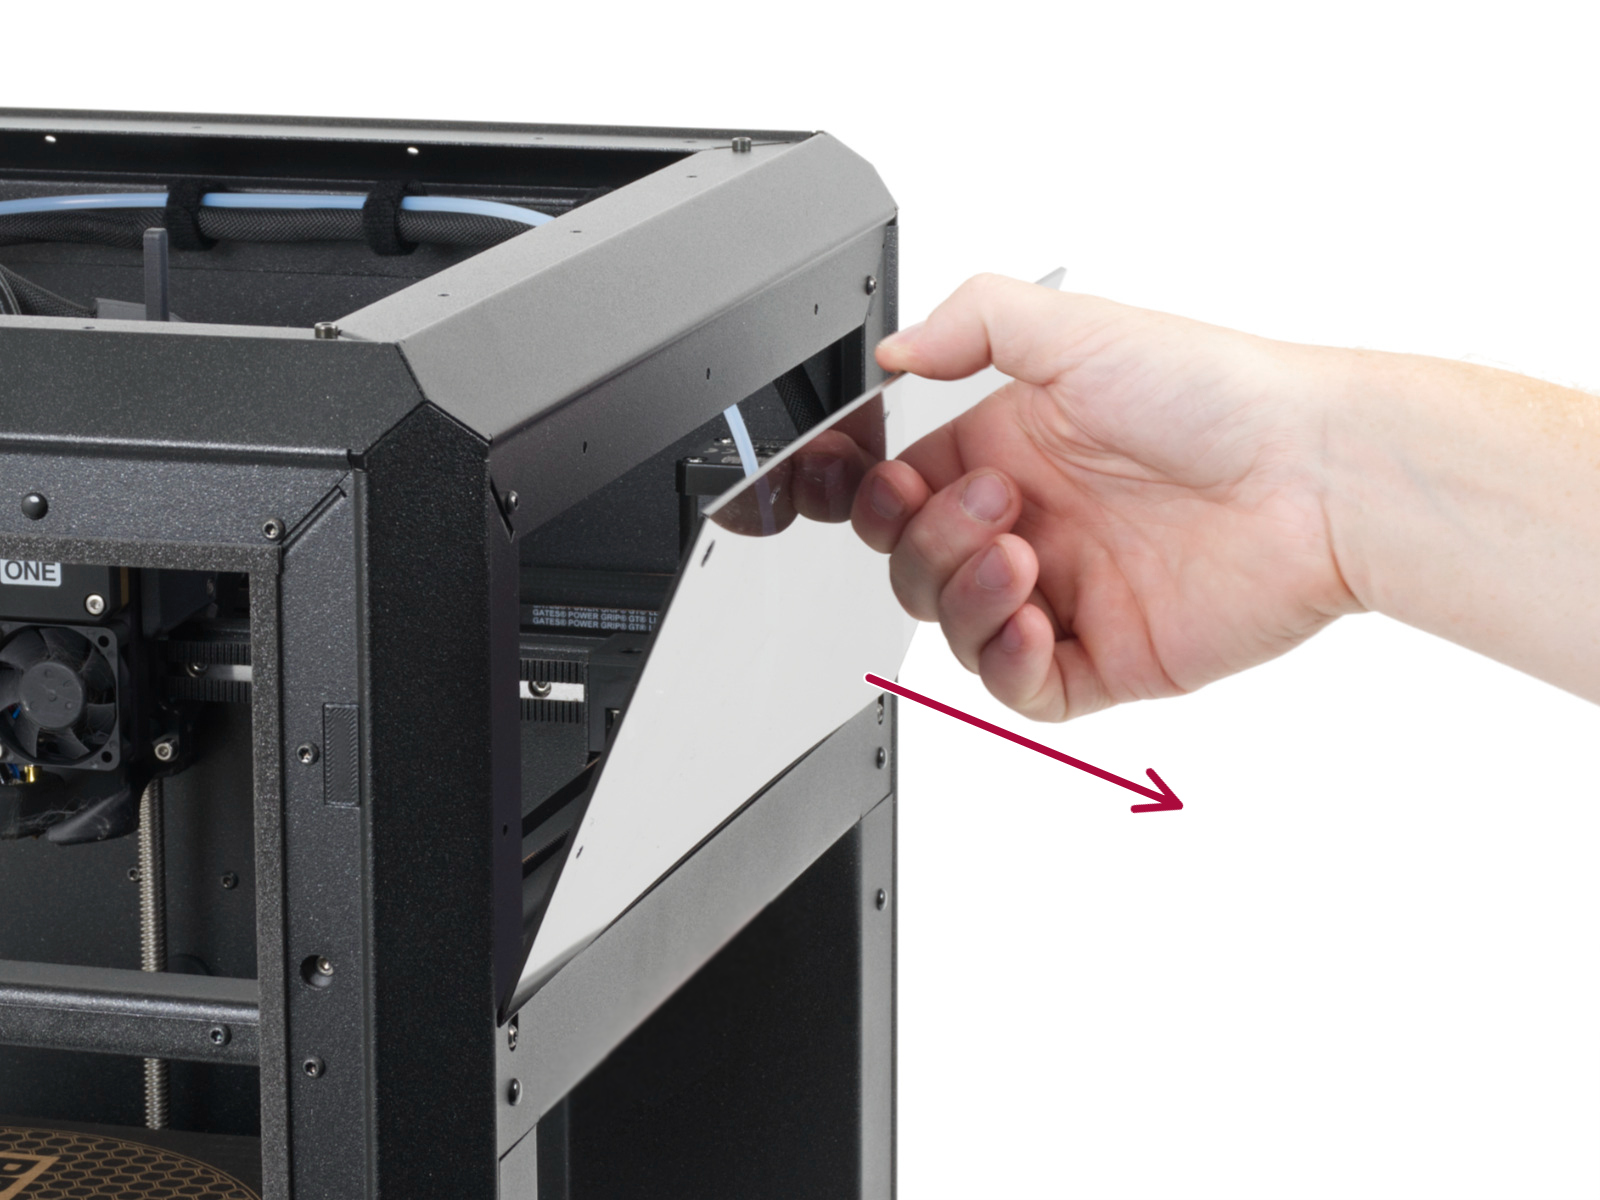
                  • Remove all five nylon rivets securing the left top see-through side cover. Support the cover by hand when removing the last rivets to prevent it from falling.


                  • Remove the side cover from the printer and set it aside in a safe, clean place.


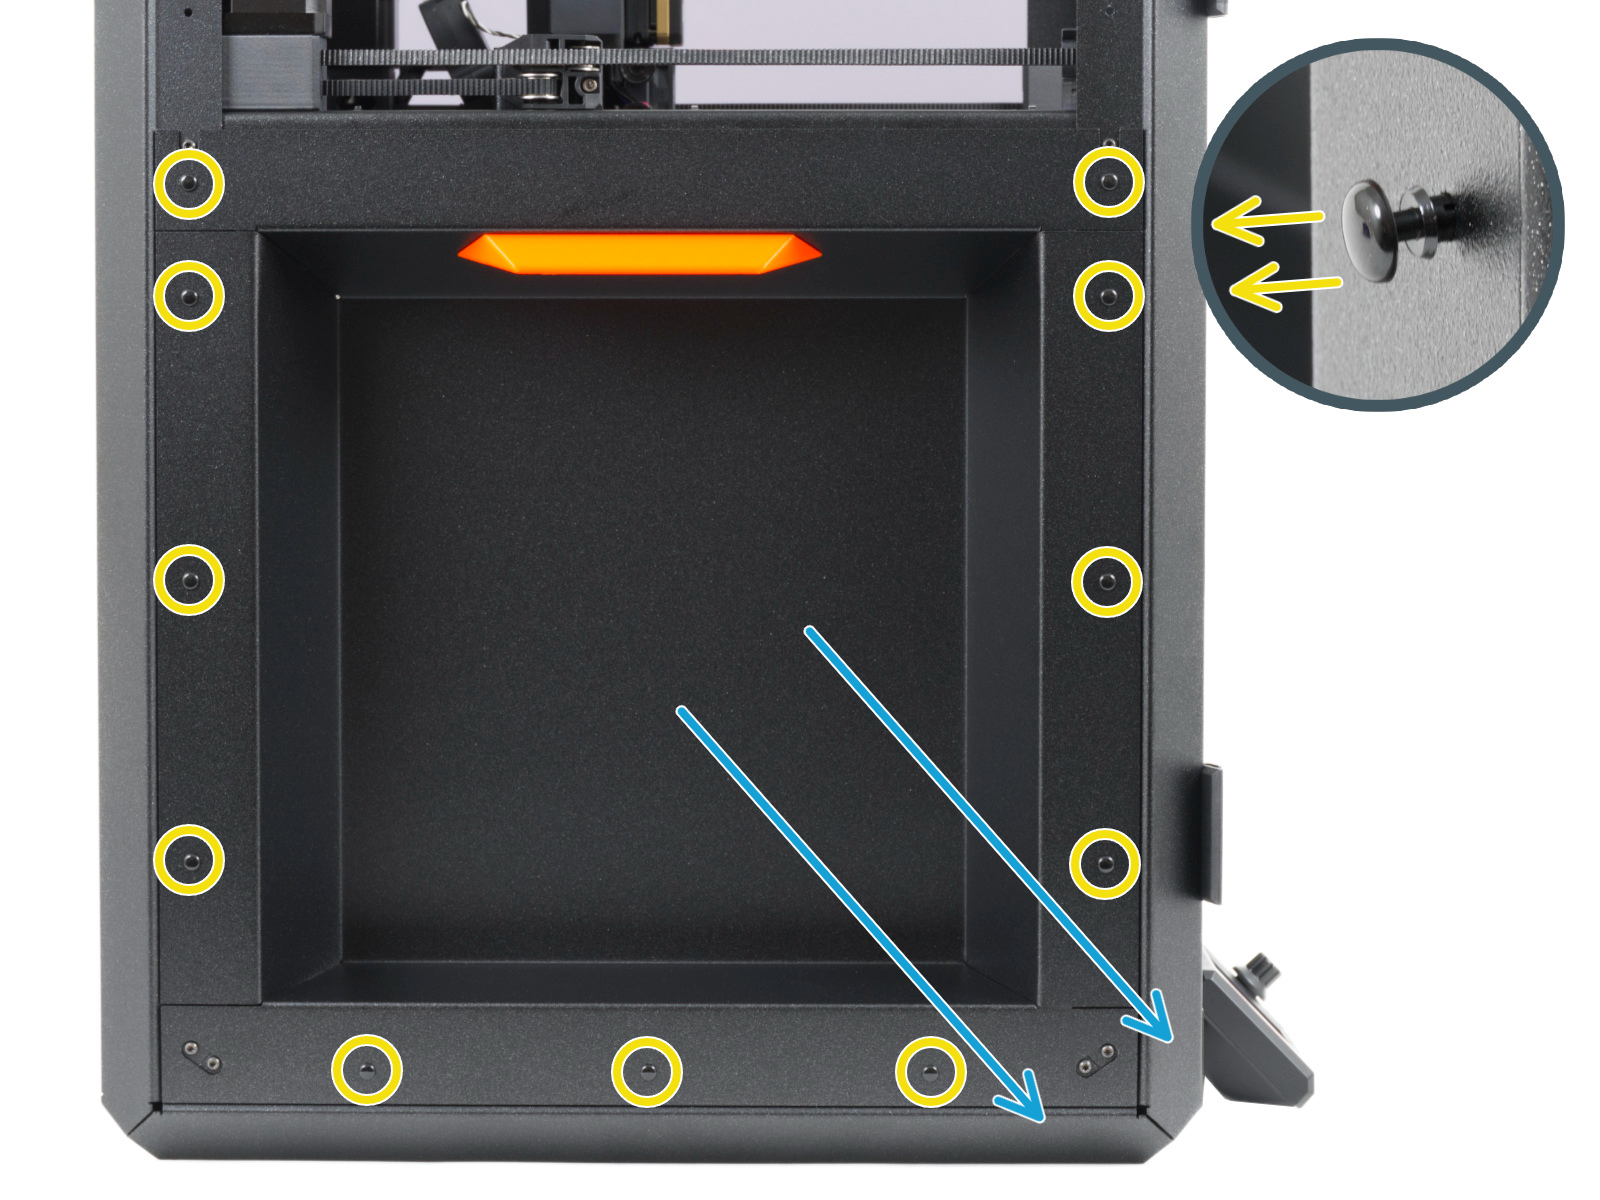
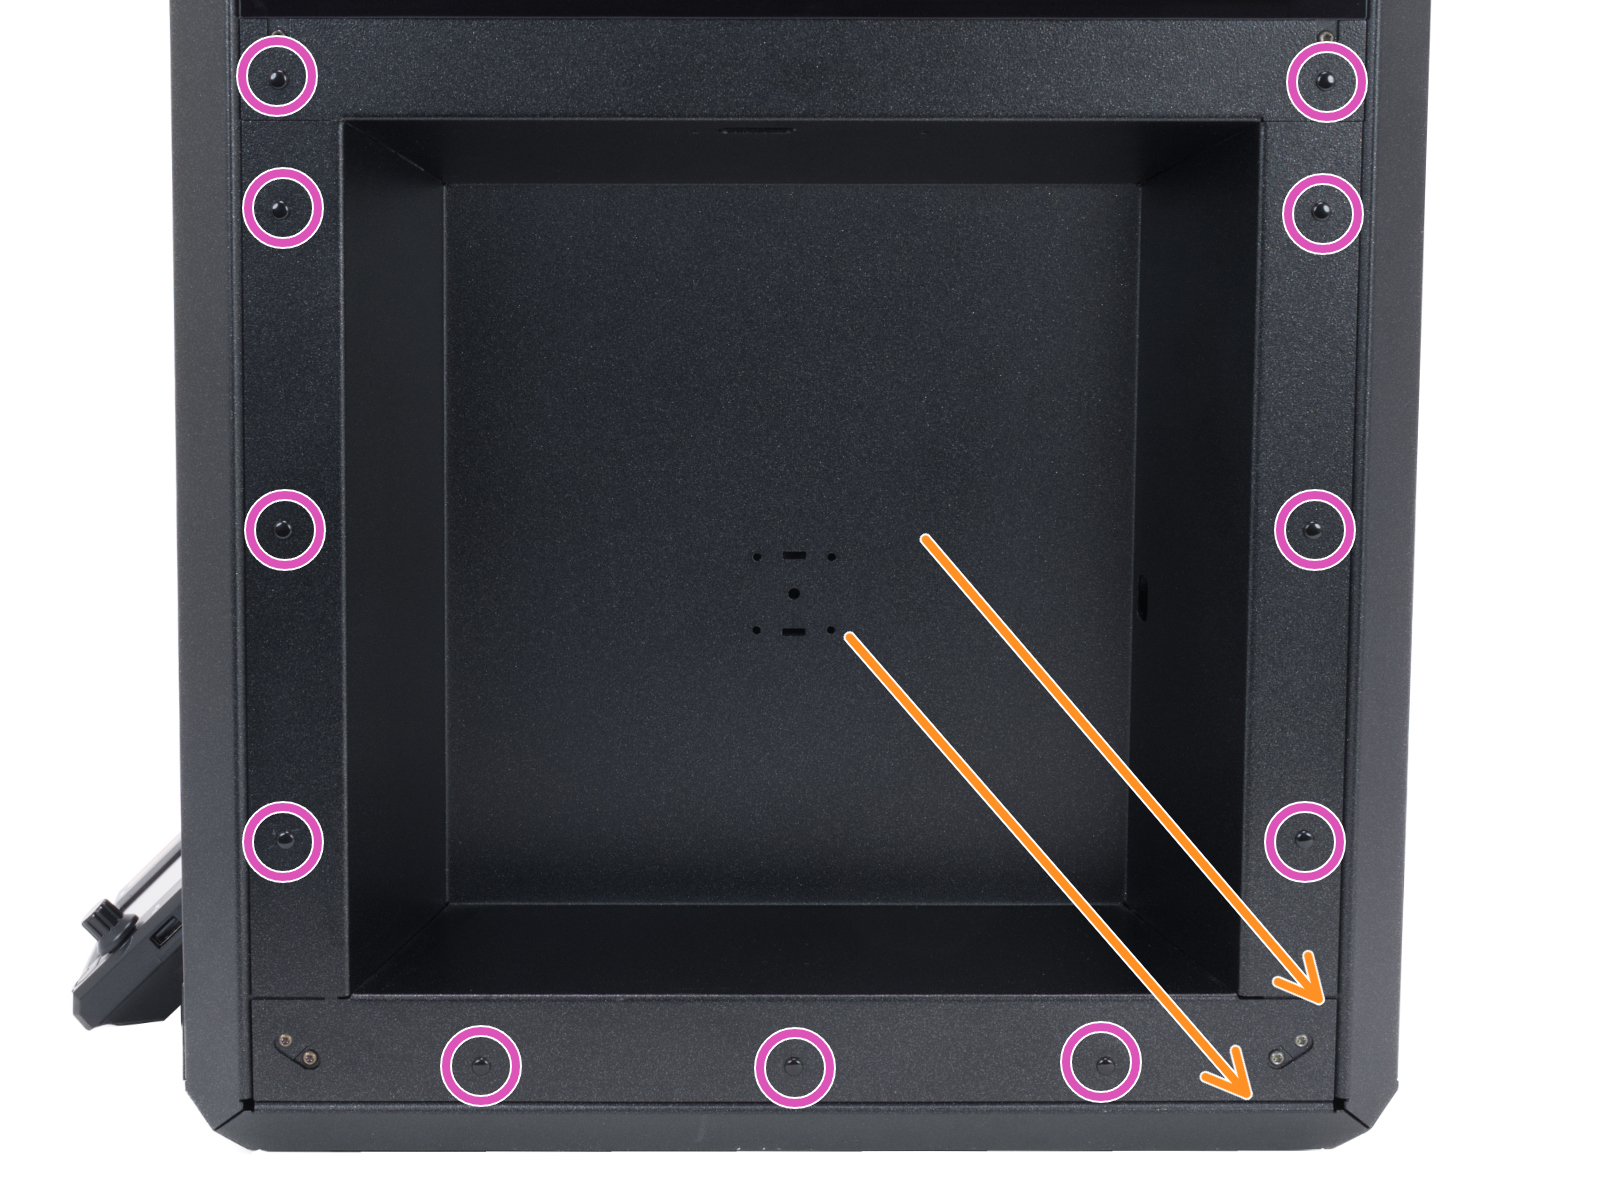
                  • Remove the eleven nylon rivets securing the left side metal panel. Support the panel by hand when removing the last rivets to prevent it from falling.


                  • Remove the metal panel from the printer.


                  Once the motors are unplugged and the left panel and cover are removed, return to the Prusa INDX guide step REMOVING THE REAR BED SPACER, and continue from there.

                  • You will notice that the left panel and side cover are still in place in the Prusa INDX conversion guide. Proceed as if the left side cover and panel were removed in the Prusa INDX guide.

                  Keep following the instructions in the Prusa INDX guide until you finish step SECURING THE OFFSET SENSOR CABLE.

                  Removing old expansion joints

                  Switch to the GEN 2 guide, step REMOVING OLD EXPANSION JOINTS, and continue from there. 

                  • You may note that the headbed in the GEN 2 guide is leaning on the back of the printer. Follow the instructions as if the heatbed assembly was removed; it does not affect the heatbed expansion joints installation. 

                  Keep following the instructions in the GEN 2 guide until you finish step INSERTING THE HEATBED SPACER.

                  Removing the Bed-cable-cover-bottom

                  Return to the Prusa INDX guide, step REMOVING THE BED-CABLE-COVER-BOTTOM, and continue from there.

                  • The old expansion joints are visible in a photo in the Prusa INDX guide. Proceed as if the expansion joints were replaced.

                  Keep following the instructions in the Prusa INDX guide all the way until you finish step RELEASING THE BELTS, then read the instructions below in this article:

                  Additional information and removing the belts

                  Before you move on to the next step, we need to remove the right side panel and side cover from the printer to implement the GEN 2 upgrades.

                  Follow the instructions below:
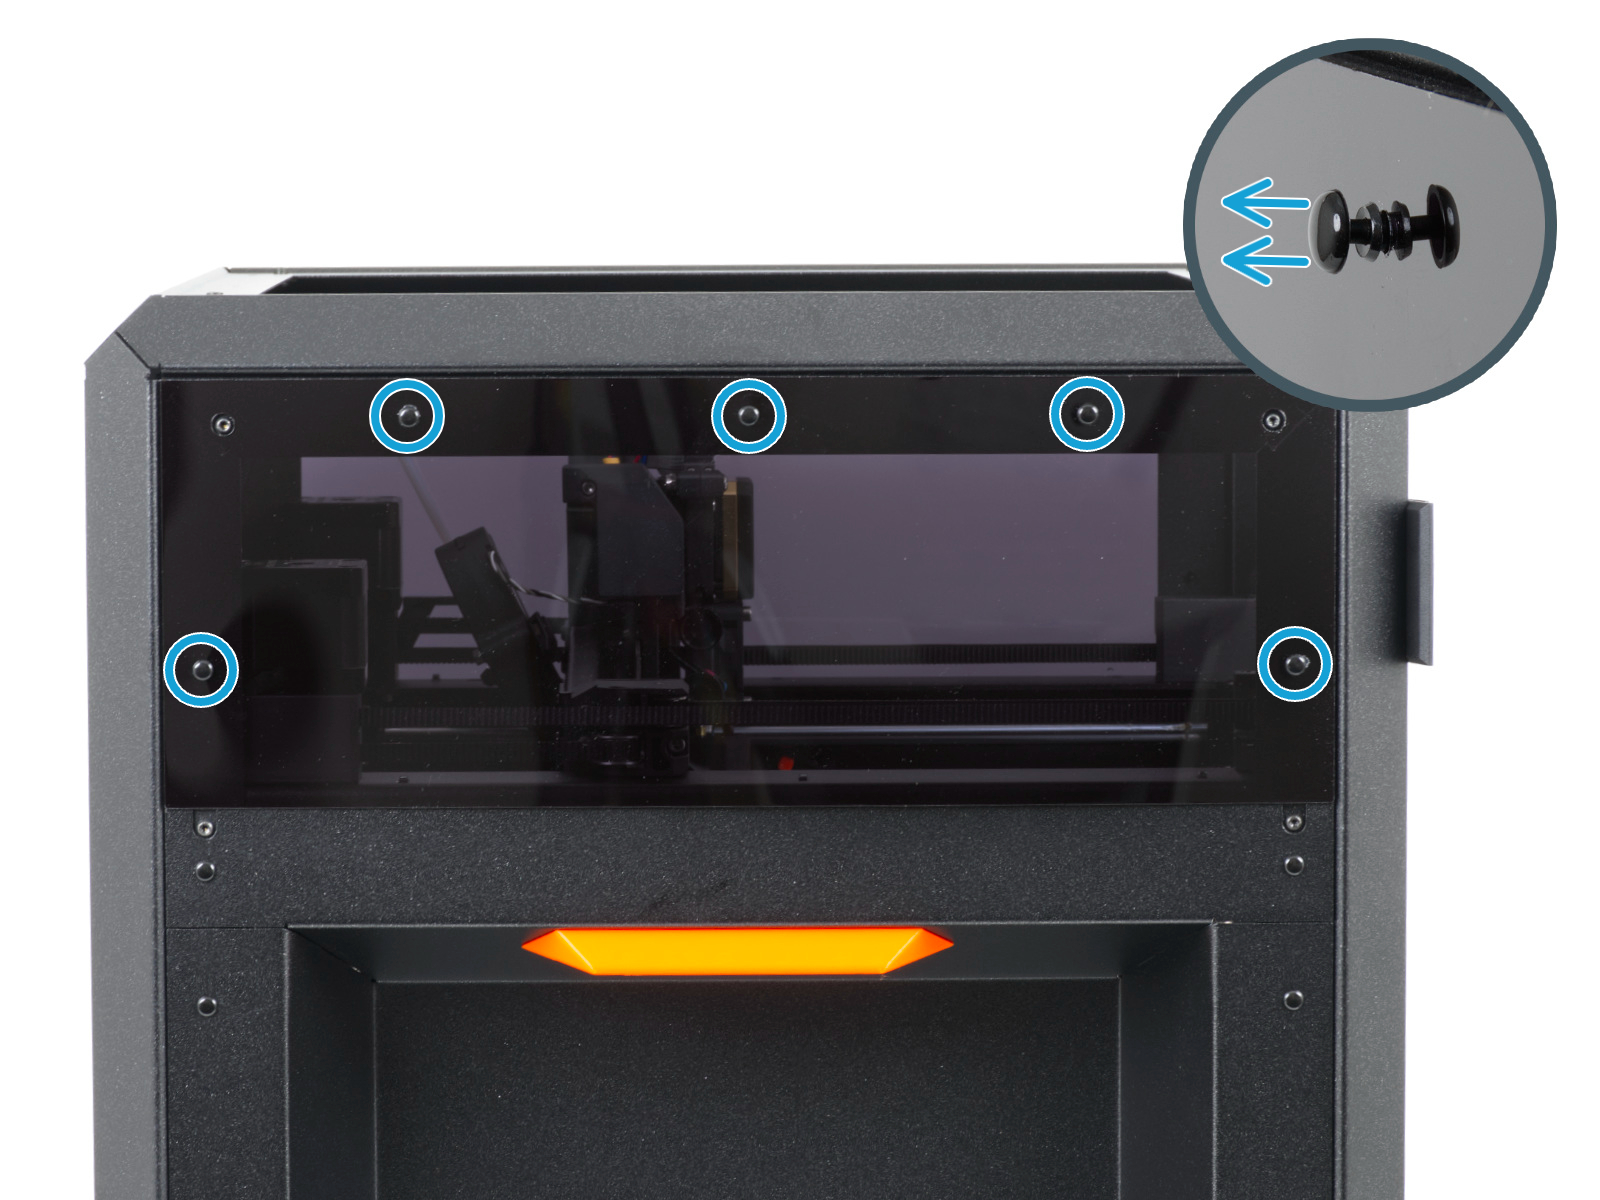
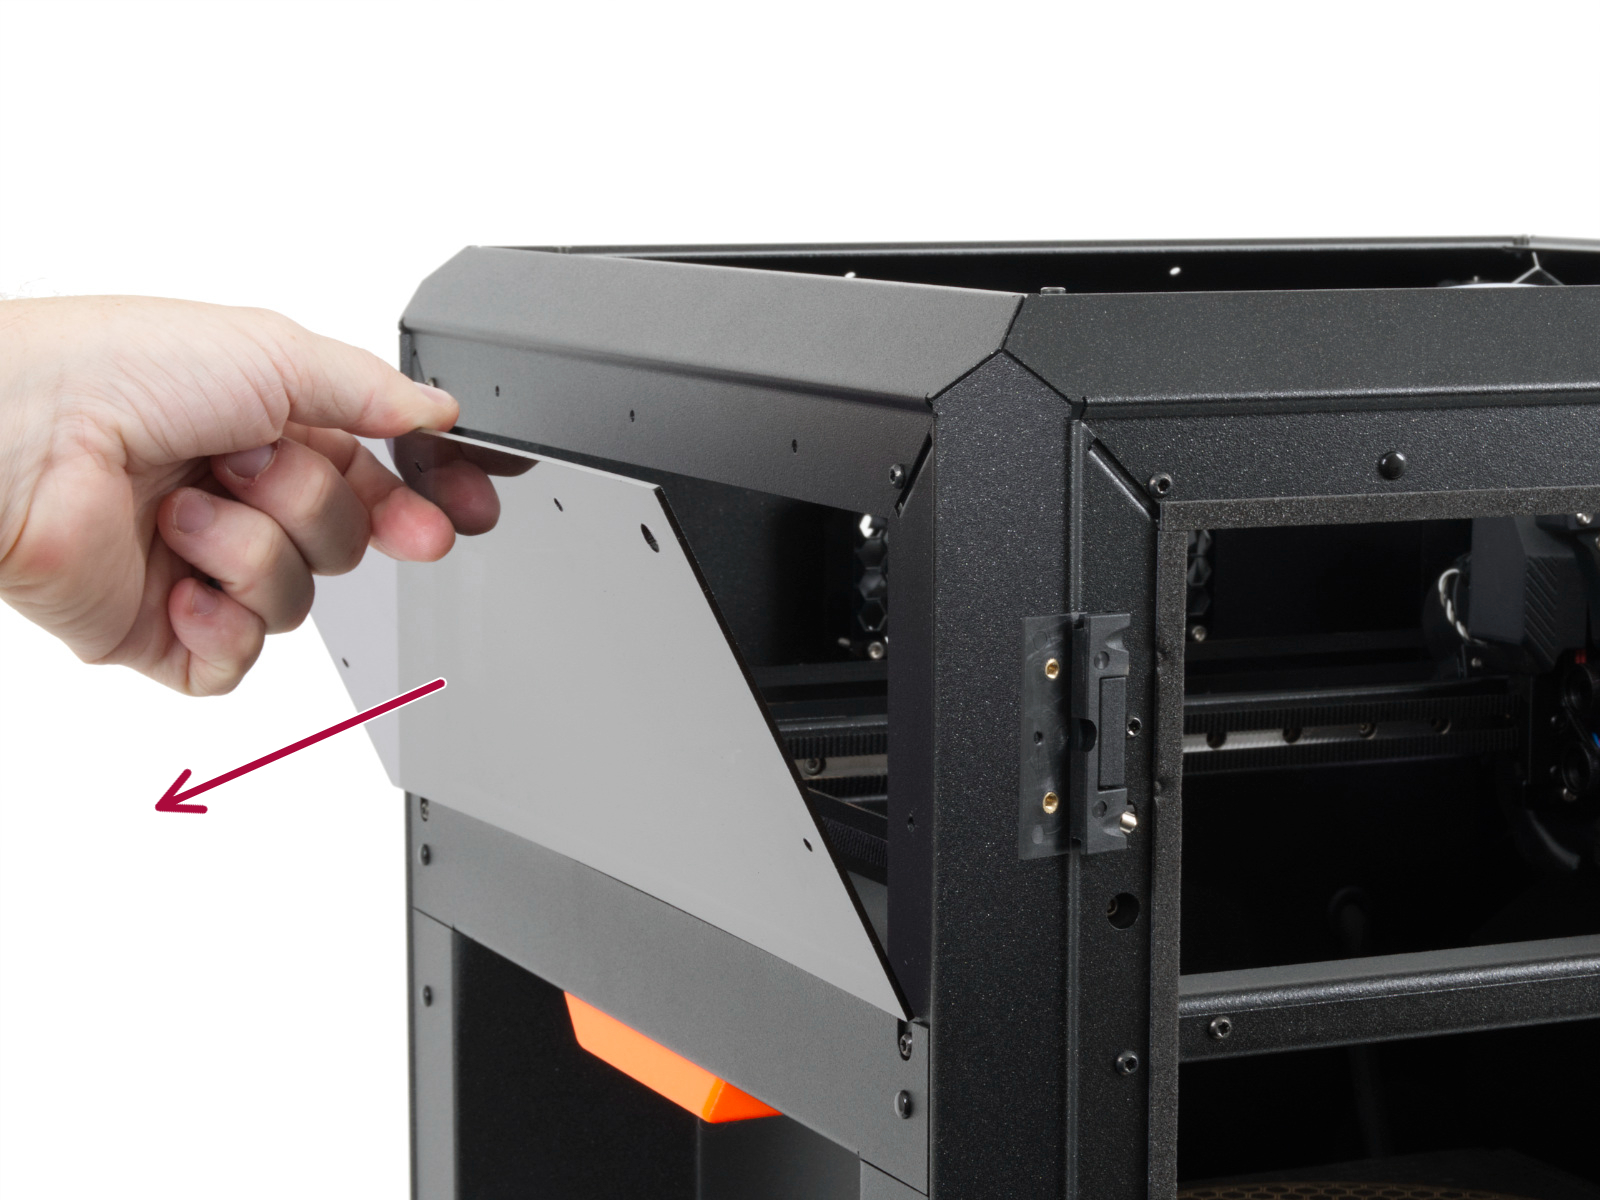
                  • Remove all five nylon rivets securing the right top see-through side cover. Support the cover by hand when removing the last rivet to prevent it from falling.


                  • Remove the side cover from the printer and set it aside in a safe, clean place.


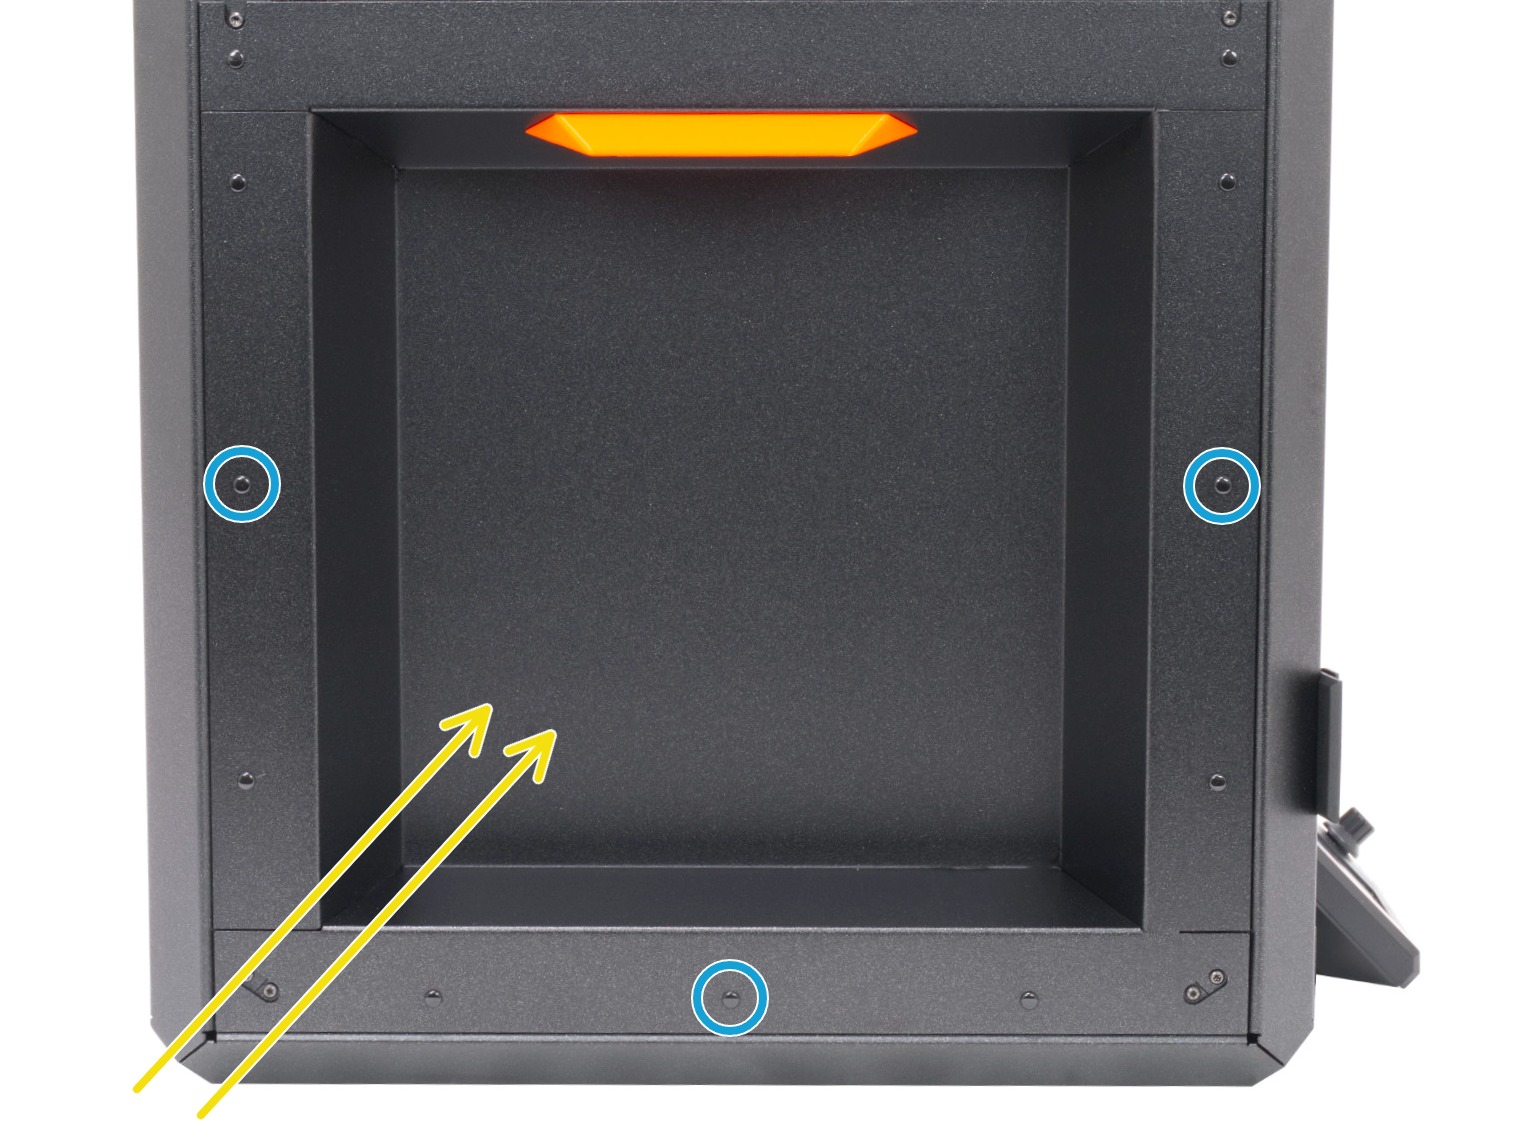
                  • Remove the eleven nylon rivets securing the right steel side panel. Support the panel by hand when removing the last rivet to prevent it from falling.


                  • Remove the metal panel from the printer.


                  With the right side panel and cover removed, read the information and instructions below in this article before proceeding:


                  In the following section, note the differences in photos and assembly process between the Prusa INDX conversion guide and the Gen 2 upgrade guide. These are listed below and do not affect the assembly process:
                   

                  The PTFE tube leading to the filament sensor is removed in the Prusa INDX guide, but is visible in the GEN 2. guide. 

                  The Bowden-guide is visible in the photos. It is also attached back onto the motor assembly in the GEN 2 guide. We will not need it for the Prusa CORE One INDX conversion process; you can remove it from the printer once it is detached from the motor mount.
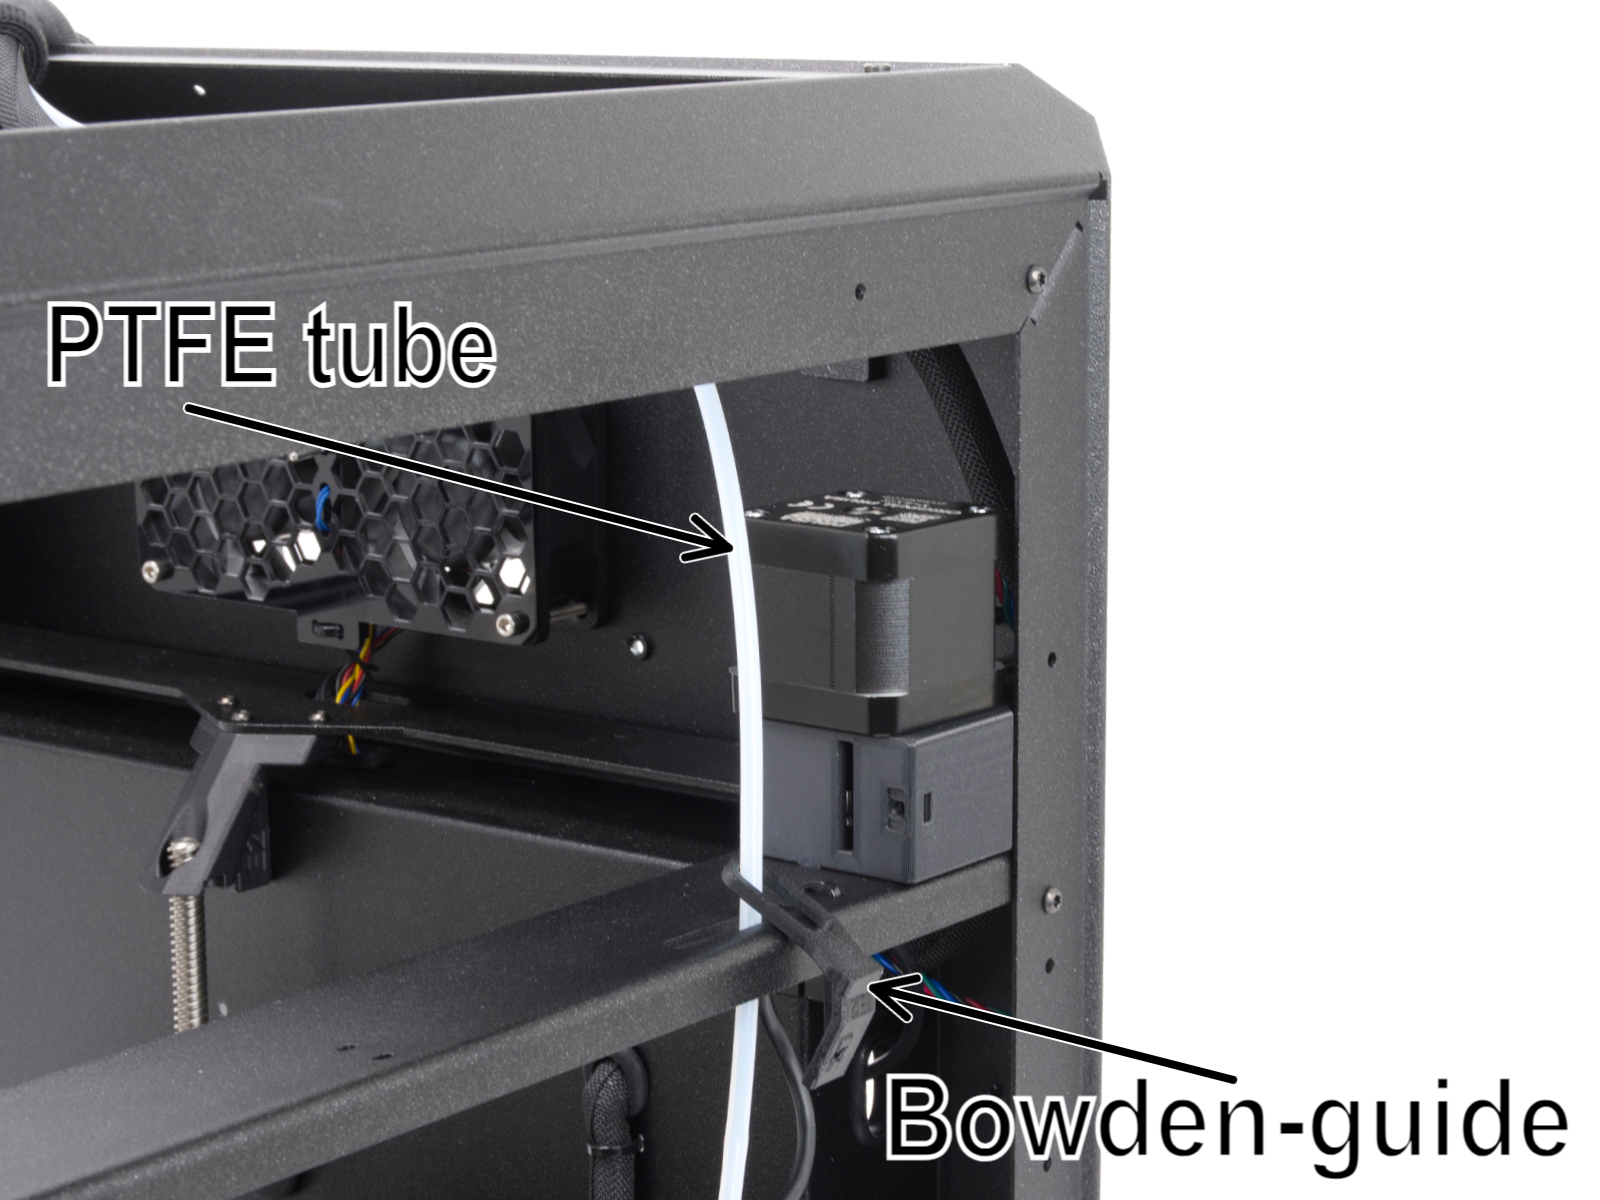
                   

                  Belt-tensioner screws:

                  During the upcoming belt exchange instructions in the GEN 2 guide, we recommend using the Prusa lubricant found in the Fasteners 2/2 bag in the Prusa CORE One/+ INDX conversion kit.
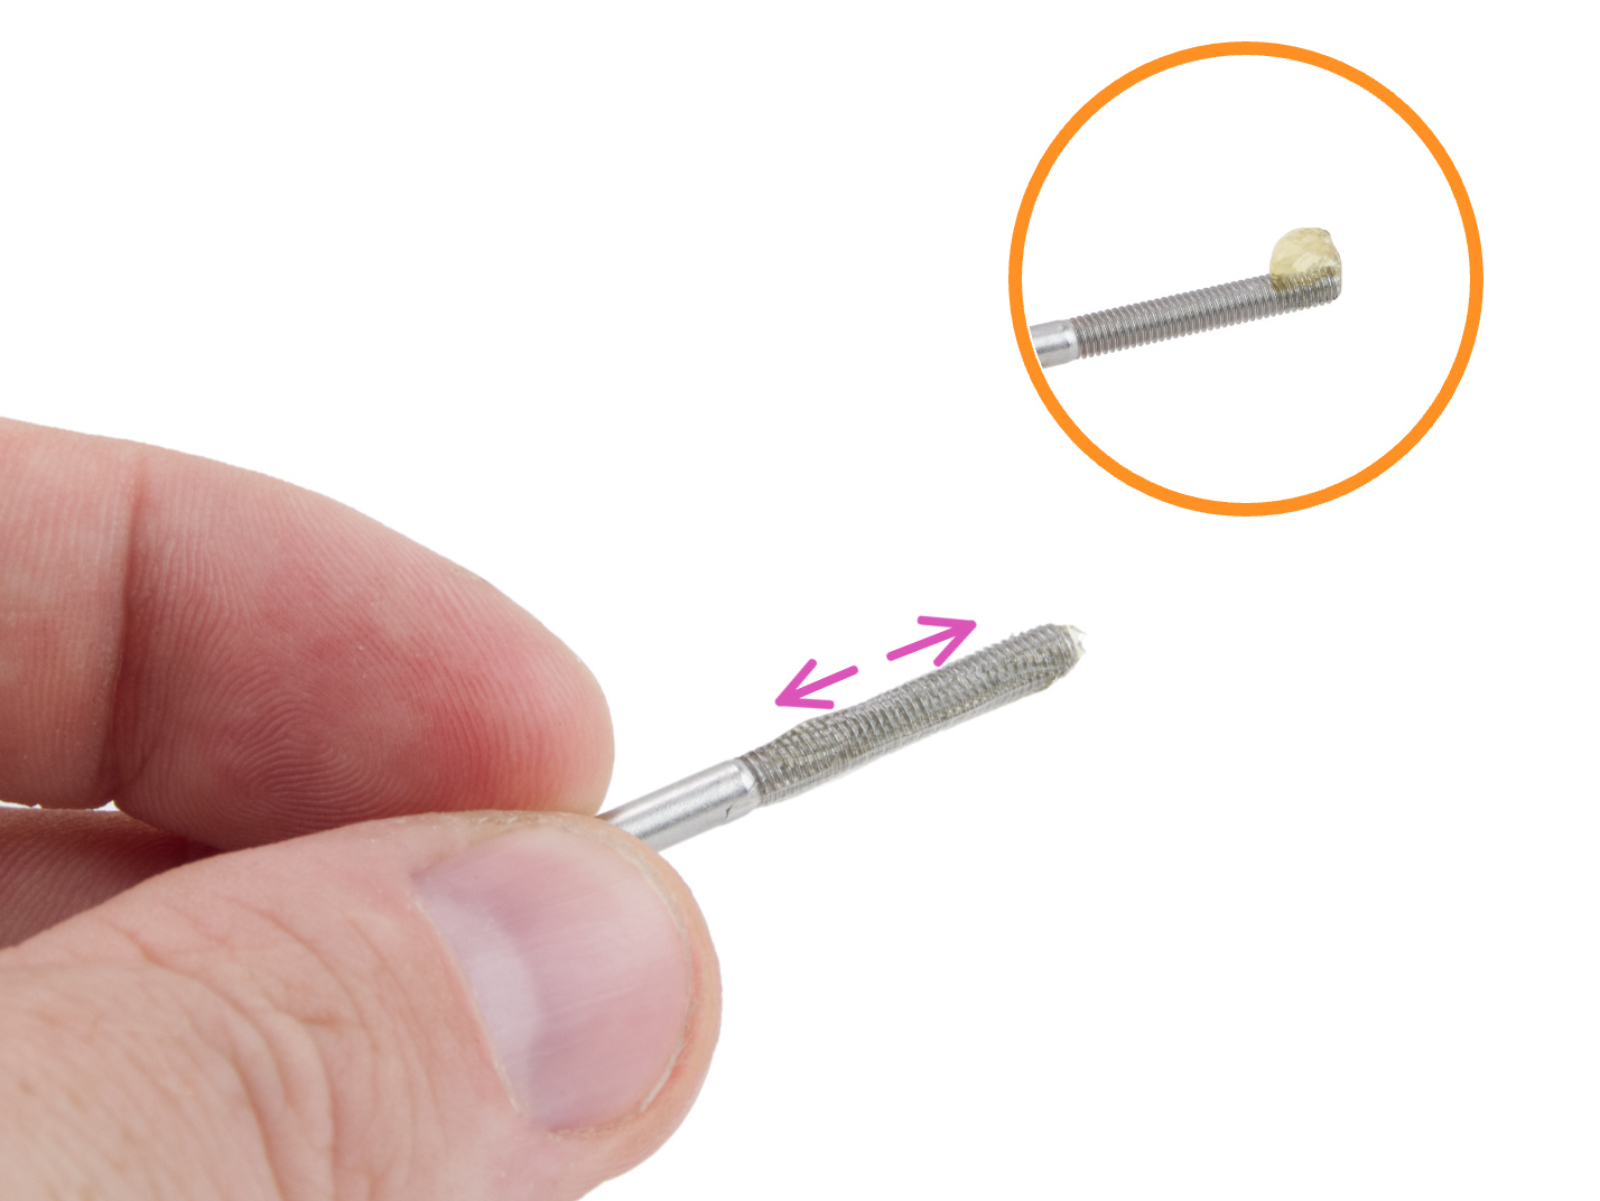
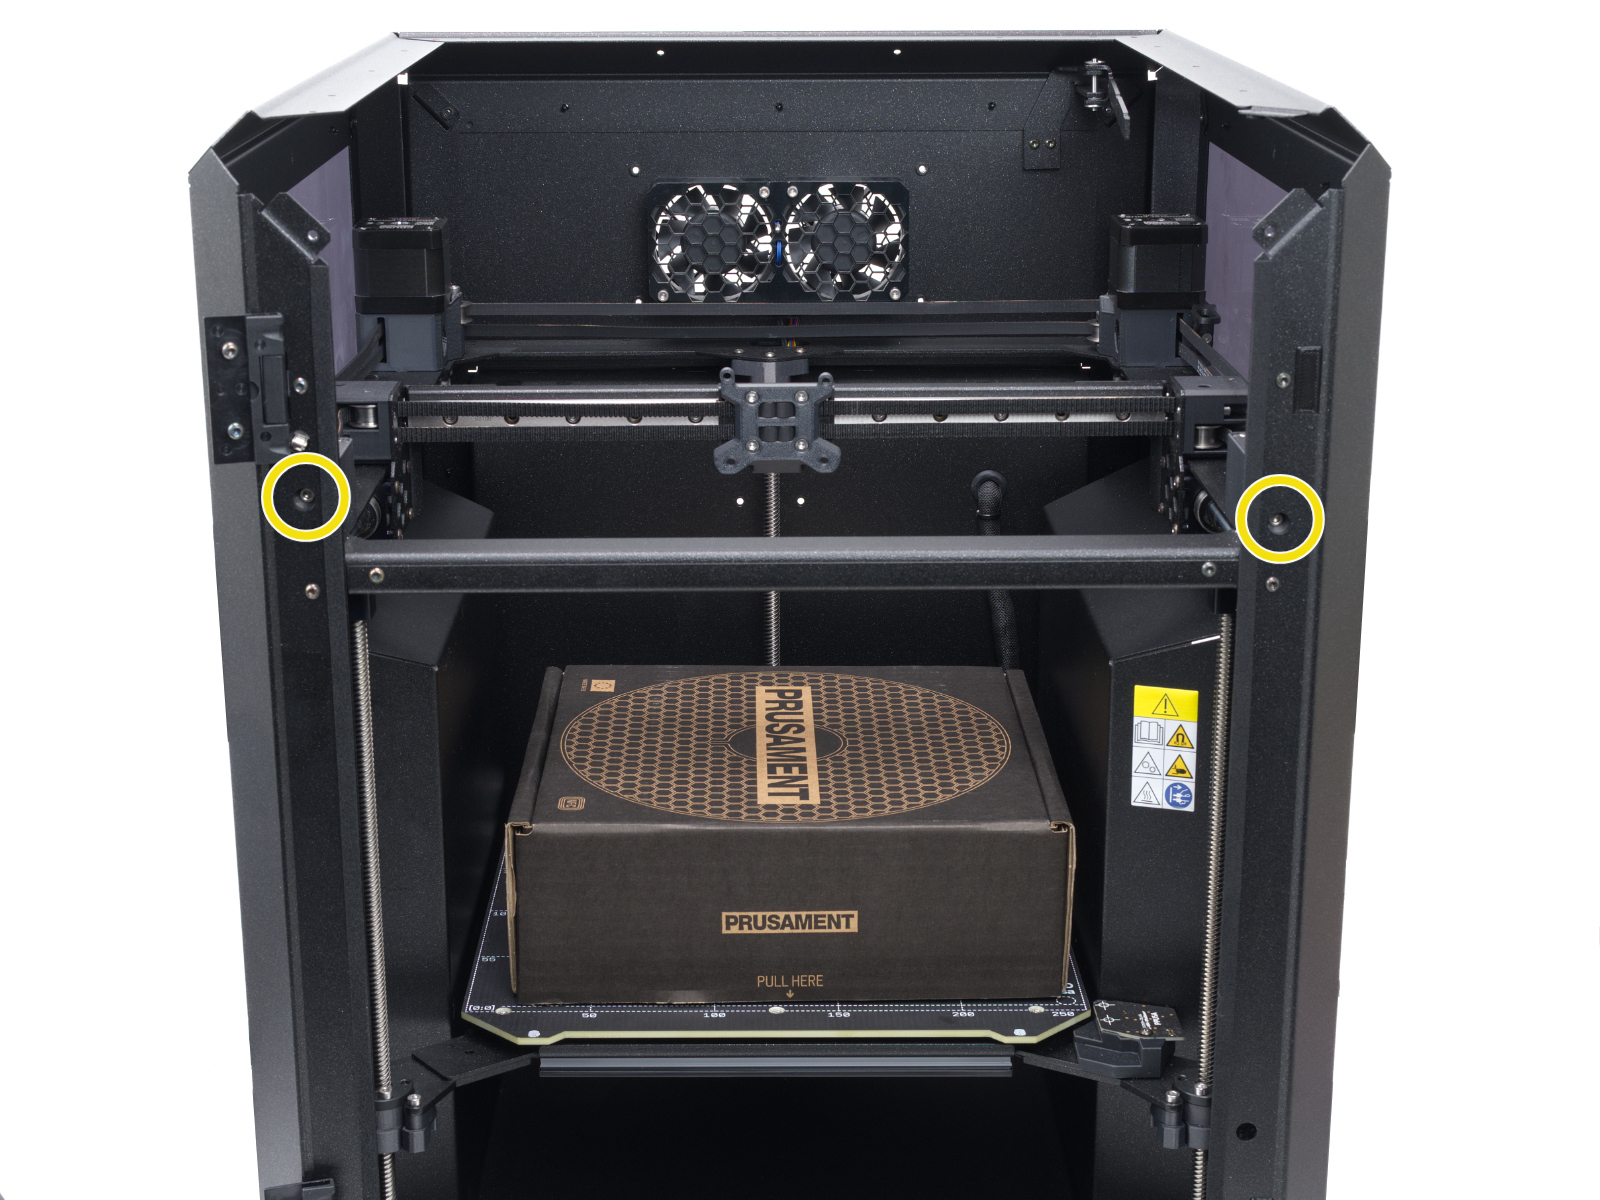
                  • Apply a small amount of Prusa lubricant to the tip of both left and right M3x30 belt tensioning screws you removed earlier.
                  • Spread the lubricant evenly around the entire thread and insert the screws back into the belt tensioner.
                  • Skip this step when it later appears in the INDX guide.


                  With the above-mentioned information in mind, let's proceed with the Prusa CORE One+ GEN 2 upgrade and the Prusa CORE One/+ INDX conversion:
                   

                  Switch to the GEN 2 guide step REMOVING THE BELTS, and continue from there.

                  Keep following the instructions in the GEN 2 guide until you finish step GUIDING THE UPPER BELT (GANTRY-RIGHT).

                  Gantry aligner tool

                  Return to the Prusa INDX guide step GANTRY ALIGNER TOOL: PARTS PREPARATION, and continue from there.

                  • You will notice that the right panel and side cover are still in place in the Prusa INDX guide for now. Proceed as if the right side cover and panel were removed in the Prusa INDX guide as well.

                  Keep following the instructions in the Prusa INDX guide all the way until you finish step COVERING THE FS - RIGHT.

                  Mounting the side panels, PTFE and right cover

                  Before you move on to the next step in the Prusa INDX guide, we need to attach both of the top see-through side panels.

                  Follow the instructions below:
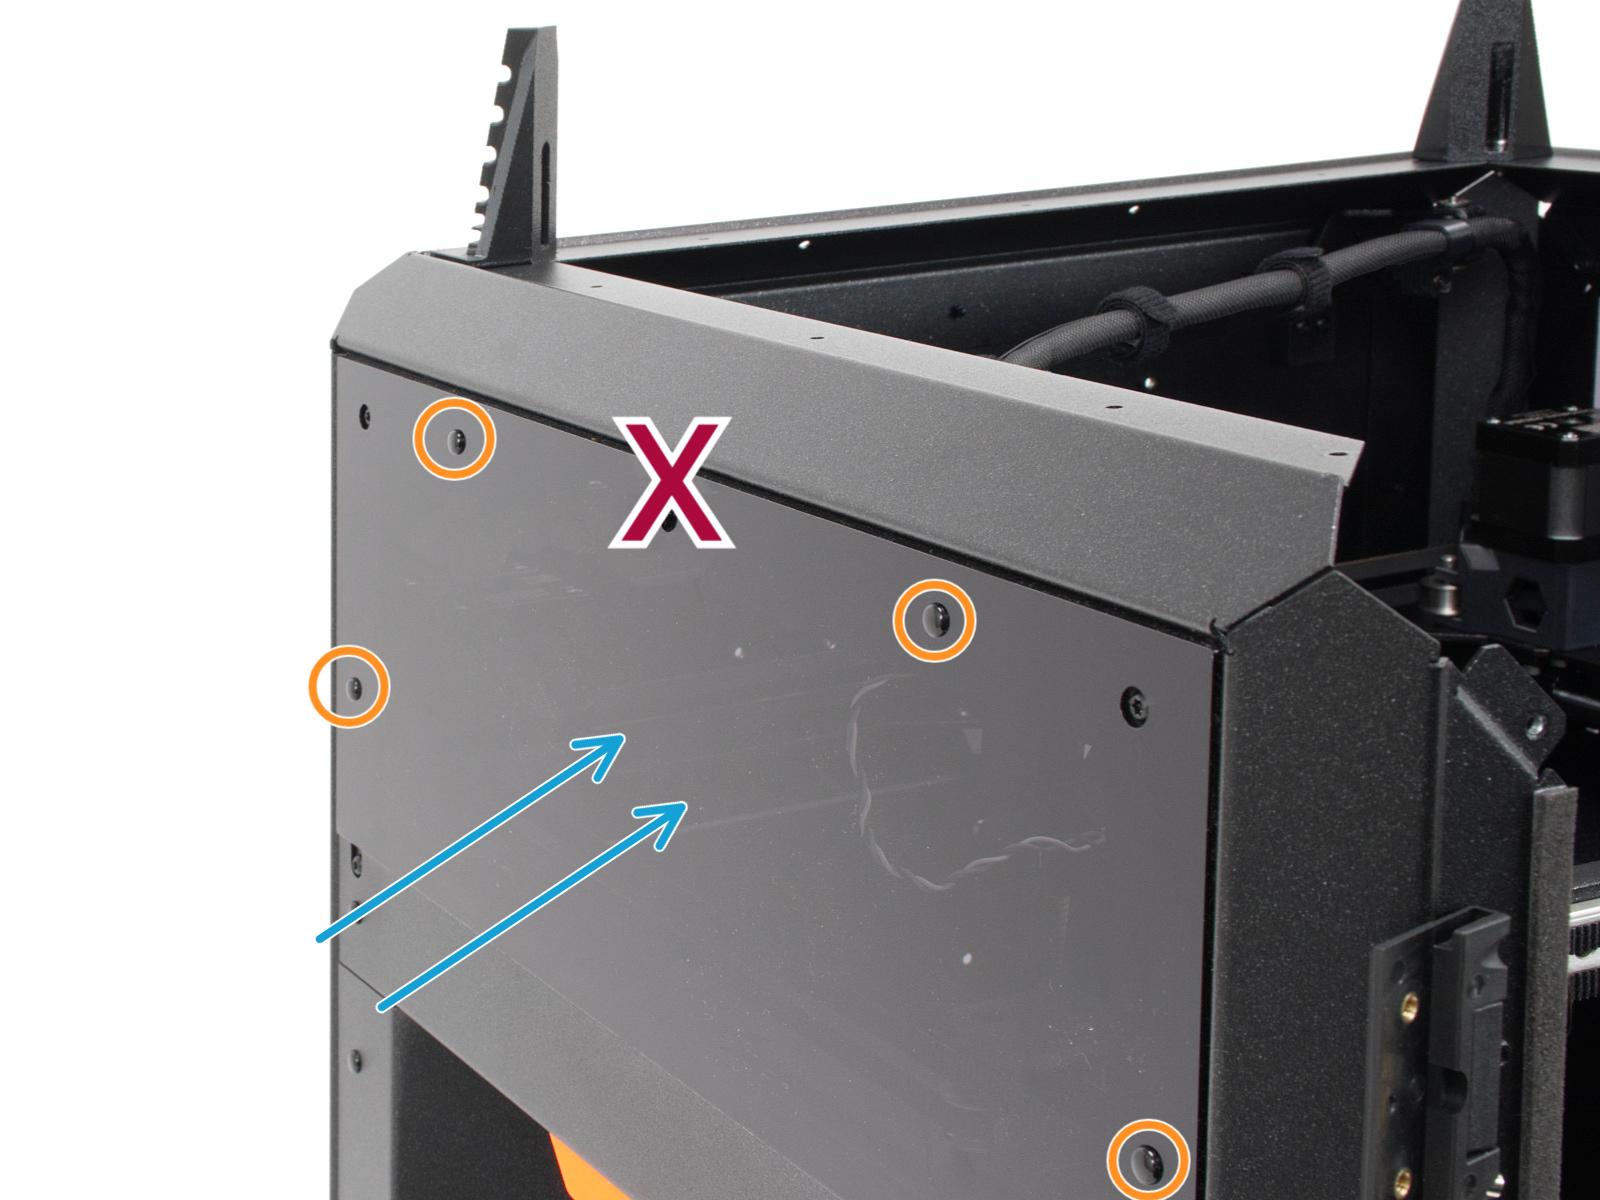
                  • Use four nylon rivets to reattach the left top see-through side cover. Do not insert a nylon rivet into the top middle hole. This is where we will mount the filament sensor in the Prusa INDX guide later.


                  • Mount the right top see-through side cover. If you have the 8-tool version of the Prusa CORE One INDX, do not insert the top-middle nylon rivet as well.


                  With both top see-through covers mounted back, continue following the Prusa INDX guide step PTFE TUBES - LEFT SIDE: PARTS PREPARATION, and continue from there.

                  Keep following the instructions in the Prusa INDX guide until you finish step SECURING THE ZIP TIES II.

                  Fixing the heatbed

                  Switch to the GEN 2 guide step: EXPANSION JOINT ALIGNER, and continue from there.

                  Keep following the instructions in the GEN 2 guide until you finish step FIXING THE HEATBED.

                  Mounting the left cover,  covering the electronics

                  Now that the expansion joints are aligned, let's return to the step we skipped in the Prusa INDX guide and secure the offset sensor assembly by tightening the M3x10 screw. 

                  The screw forms its own thread in the plastic. Do not overtighten.
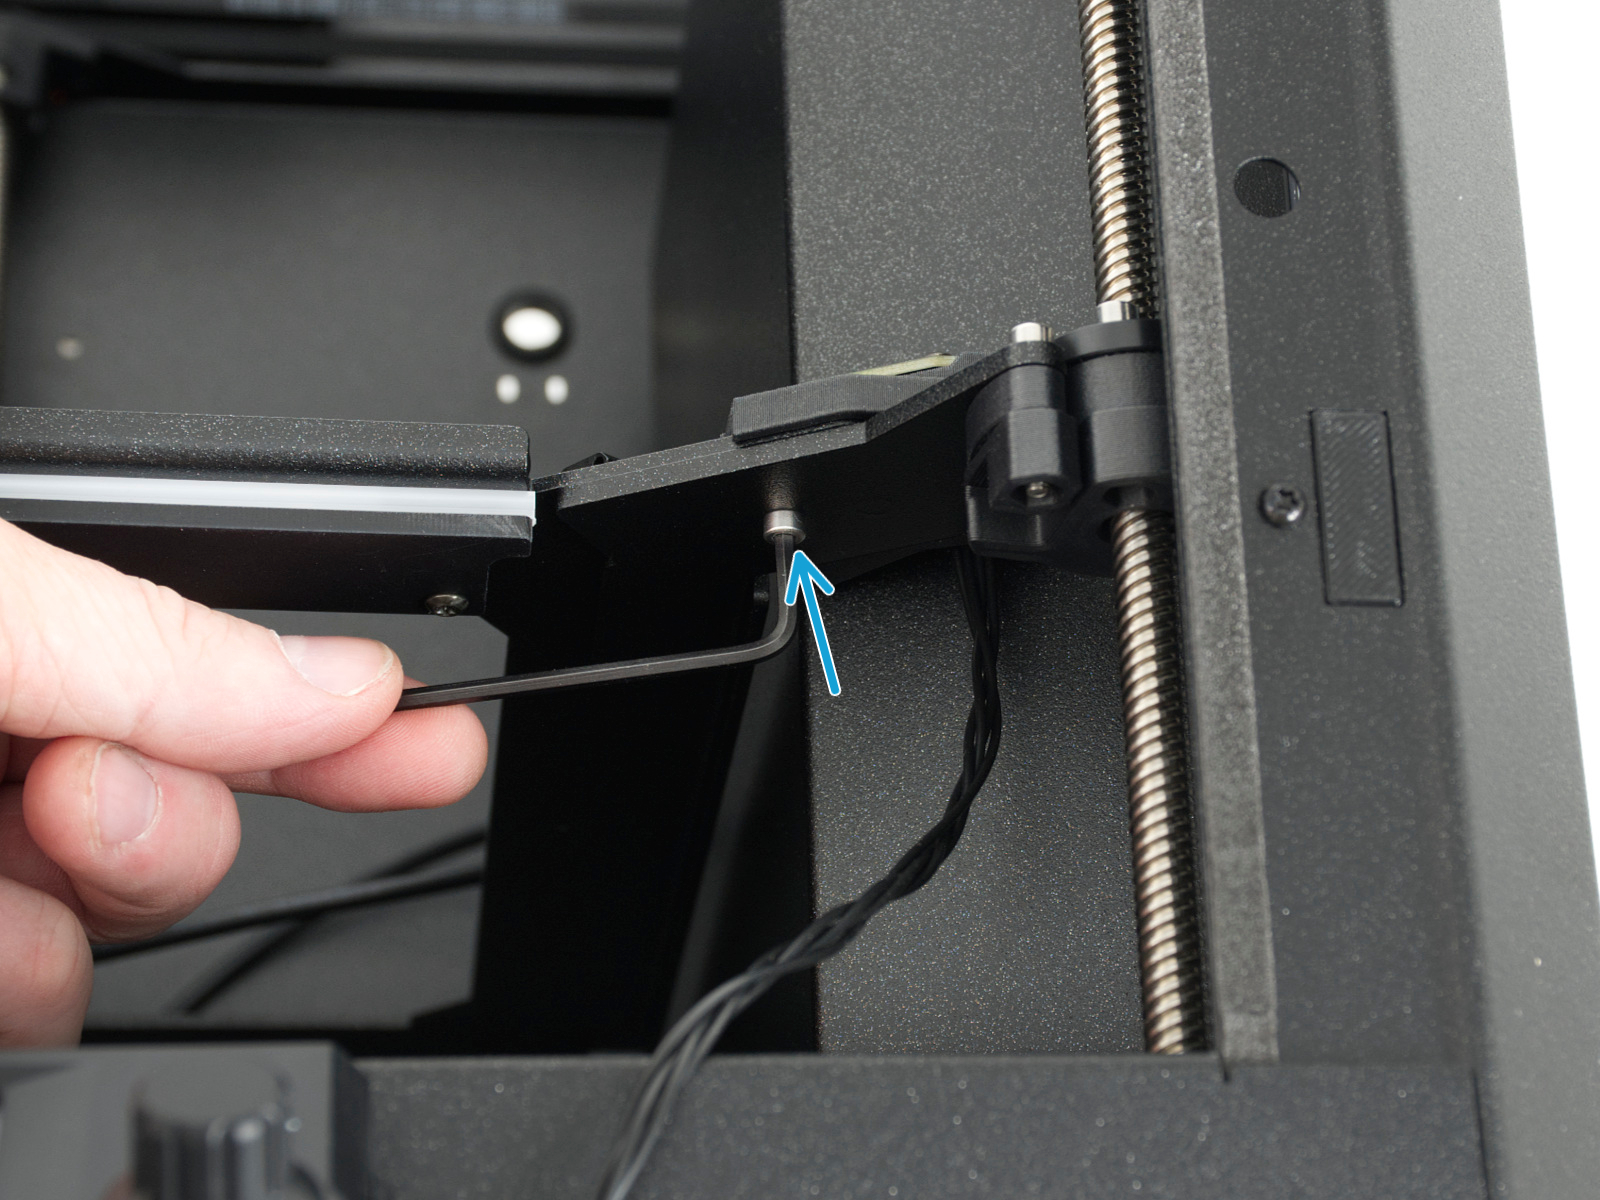
                  • You will notice that the right-side cover is still in place in the photo above. Proceed as if it were not there; it does not affect the process.

                  Once the heatbed is secured and the expansion joints are aligned, we can connect the X and Y motor cables and mount the left-side cover.

                  Follow the instructions below:
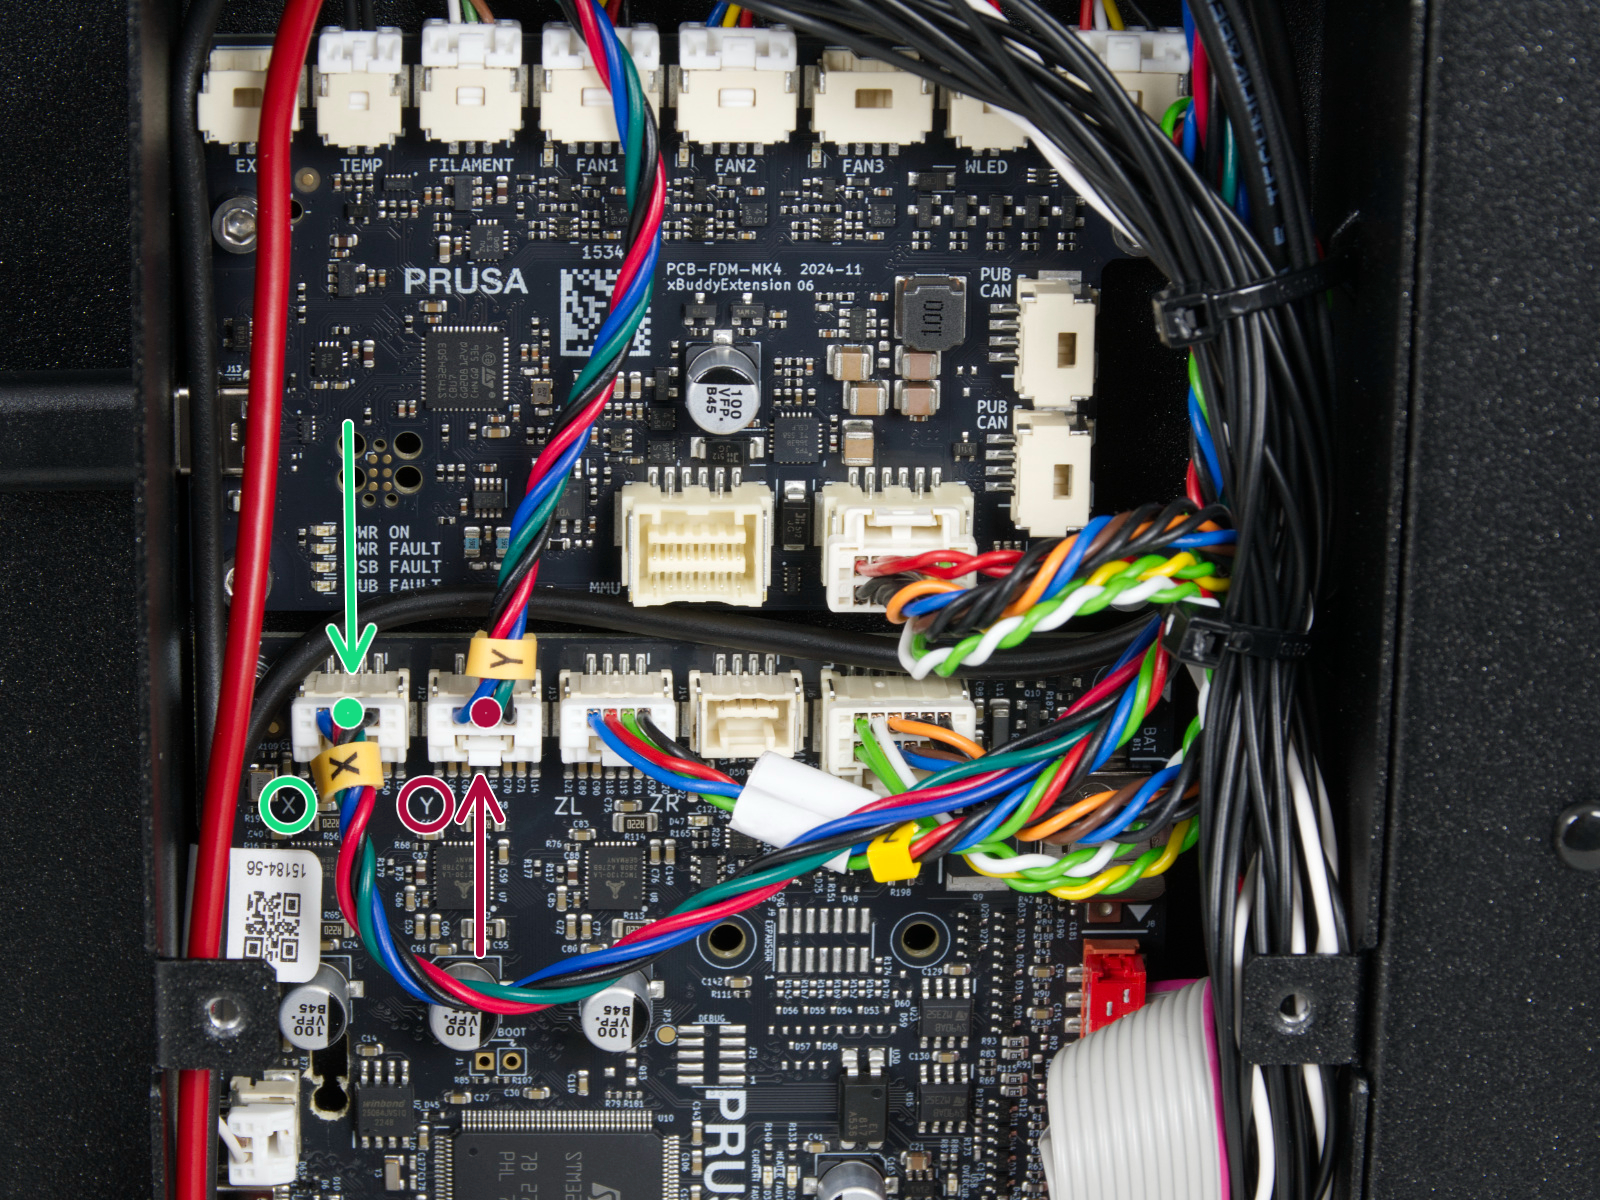
                  • Connect the left motor cable (X motor) to the left connector on the xBuddy board. It is labeled X.


                  • Connect the right motor cable (Y motor) to the right connector on the xBuddy board. It is labeled Y.


                  • Make sure that the safety latches click in place. 


                  • Mount the left side panel back onto the printer. Secure it in place with 3 nylon rivets in the highlighted positions.


                  Once the left side cover is secured in place with three nylon rivets, we are finished with the CORE One GEN 2 guide.

                  Return to the Prusa INDX guide to step ELECTRONICS COVERS: PARTS PREPARATION  and follow the rest of the Prusa INDX guide to finish the conversion. 


                  Was this article helpful?
                  This action is available only to registered users. Please log-in.

                  Topics

                  • About your printer
                    • Printer description
                      • LCD menu (CORE One INDX)
                      • Assemblling the Prusa INDX Core one with the Gen 2 upgrade
                    • Printer features
                    • General Information

                  14 comments

                  Log in  to post a comment
                  thefly
                  •
                  Upgrade "coreone+" to "coreone + gen 2 indx 8" is a mess. Hardest ever to follow. This needs more straight forward docs (step by step) instead of the current doc page puzzle adventure game.
                  Reply
                  Nicer than Triton
                  •
                  It appears the Z motor cable is plugged into the wrong connector in the picture showing where to plug the X and Y motor cables back in
                  Reply
                  CyberDoraiba
                  •
                  The assembly experience for the Prusa CORE One KIT was quite good overall. The instructions were very clear, and as long as you followed the steps one by one, there were generally no major issues.

                  In comparison, the assembly instructions for upgrading the CORE One to both GEN2 and INDX at the same time are quite poor. They require a lot of repeatedly switching between different pages, which is particularly inconvenient for users working in an offline environment.

                  Would it be possible to provide a PDF document with a complete, step-by-step guide for upgrading the CORE One to both GEN2 and INDX simultaneously? Having a comprehensive guide that can be downloaded and read offline would be greatly appreciated and is really needed.
                  Reply
                  DieserMarkus
                  •
                  As others have stated, +1 to this being a suboptimal guide and build experience.

                  I’ve been upgrading since the original MK3, including every upgrade and MMU generation, and I’ve never been this confused. Part of the Prusa experience is imho the build itself and getting to know every part of the printer while assembling it. That was always fun for me.

                  This build is not fun. It’s a constant struggle to figure out whether I’m still on track or have missed a crucial step across the multiple parallel guides.

                  I understand that setting up these guides involves a lot of work, but I’d argue that creating separate guides for separate build paths would reduce complexity for Prusa as well.

                  I would appreciate it if Prusa returned to its roots when it comes to quality and the build experience.
                  Reply
                  rmolnar
                  •
                  I am also confused. I bought and assembled a Core One with MMU and got the INDX upgrade and it seems there is the C1+ to C1+ Gen2 upgrade included. What is the best couse of actions for upgrading and installing of these? Do I have to upgrade to the plus version first? Is there a kit for this? Is the plus upgrade included in the Gen2 kit? Does the Gen2 kit happen before the INDX upgrade? I am horribly confused on the execution plan for the parts I have received. Please advise.
                  Reply