Prusa
  • SHOP
    • Latest products
    BY CATEGORY
    • 3D printersnew
    • 3D printer upgradesnew
    • Materials
    • Accessories
    • Spare parts
    • Courses
    • Merch
    • Get a price quote
    QUICK LINKS
    • Shipping & delivery
    • Returns & refunds
    • Payment & financing
    • Warranty
    • VAT & Customs fees
    • FAQ

    0 item in your cartitems in your cart

    Your cart is empty

    Go to cartShop 3D printers

    My profile

    Log in to see orders, saved items

    My profile

    Signed in as

    • Orders
    • Logout
  • 3D PRINTING
    • Explore 3D printing
    FOR BEGINNERS
    • 3D printing 101
    • How FDM printing works
    • Buying your first printer
    • 3D model catalog
    BY APPLICATION
    • Rapid prototyping
    • Manufacturing
    • Engineering
    • Research
    • Arts & design
    GO DEEPER
    • Materials guide
    • Courses
    • Webinars
    • Case studies
    • Custom 3D printing
  • 3D PRINTERS
    • All 3D printers
    FOR
    • Home or garageHobbyists, tinkerers and home printing
    • BusinessIn-house production for small teams
    • EnterpriseFleets, security and scale
    • Which Prusa is right for me
    SHOP & BROWSE
    • CORE One+new
    • CORE One+ INDXnew
    • CORE One L+new
    • CORE One L+ INDXnew
    • XL+new
    • MK4S
    • Prusa Pro HT90
    • Prusa Pro AFS
    • Prusa Pro SLX
    MORE FROM PRINTERS
    • Parts & upgradesnew
    • Spare parts
    • Critical infrastructure
    • Case studies
    • Signature Oak
    • Kits
  • MATERIALS
    • All materials
    BY USE
    • Every-day & design
    • Functional engineering
    • Composites
    • Pro speciality
    • SLA resins
    PRUSAMENT
    • PLA
    • PETG
    • ASA
    • PC
    • PA11
    • Flex
    • TPU
    MORE FROM MATERIALS
    • Materials guide
    • We make material in house
    • Sustainability
    • Order on the store
  • SOFTWARE
    • All software
    PREPARE THE PRINT
    • PrusaSlicer 3.0New
    PRINT & MONITOR
    • Prusa Connect
    • EasyPrint
    • iOS & Android app
    • Prusa Farm
    GET STARTED
    • Download & install
    • Knowledge base
    MORE FROM SOFTWARE
    • 3D model catalog
  • SUPPORT
    • Explore support
    FIND ANSWERS
    • Knowledge base
    • Troubleshooting
    • Courses
    • Webinars
    GET HELP
    • Contact us
    • Livechat
    • Shipping & delivery
    • Warranty
    • Returns & refunds
    • Service & spare parts
    • Service & Repair
    COMMUNITY
    • Forum
    • Reddit
    • Printables
  • TRUST CENTER
    • Trust Center overview
    BY TOPIC
    • GDPR
    • Certificates
    • Security
    • Compliance
    COMMITMENTS
    • Sustainability report
    TALK TO US
    • Contact the security team
  • COMPANY
    • About Prusa
    GET TO KNOW US
    • Our story
    • How we make printers
    • Open source
    • Brand & media kit
    NEWS
    • Blog
    • Newsroom
    • Events
    TRUST & PARTNERS
    • Sustainability
    • Resellers & distributors
    • Affiliate program
    • Contact
    • English
    • Čeština
    • Deutsch
    • Español
    • Français
    • Italiano
    • Polski
    • 日本語
  • Signed in as

    • Orders
    • Address
    • In-stock Alerts
    • My Courses
    • Subscription
    • Edit Account
    • Logout

Log in to see orders, saved items

Signed in as
  • Orders
  • Address
  • In-stock Alerts
  • My Courses
  • Subscription
  • Edit Account
  • English
  • Čeština
  • Deutsch
  • Español
  • Français
  • Italiano
  • Polski
  • 日本語
Shop

0 item in your cartitems in your cart

Your cart is empty

Go to cartShop 3D printers

My profile

Log in to see orders, saved items

My profile

Signed in as

  • Orders
  • Logout
SHOP
  • Latest products
BY CATEGORY
  • 3D printersnew
  • 3D printer upgradesnew
  • Materials
  • Accessories
  • Spare parts
  • Courses
  • Merch
  • Get a price quote
QUICK LINKS
  • Shipping & delivery
  • Returns & refunds
  • Payment & financing
  • Warranty
  • VAT & Customs fees
  • FAQ

Featured products

    Popular categories

      Trending searches

        Articles

          Blog

            Products

              Categories

                Suggested searches

                  Searching…
                  No results
                  Something went wrong.
                  ↑↓ Select↵ OpenEsc Close search
                  1. Support
                  2. Advanced calibration
                  3. Bed Level Correction
                   

                  Contents

                  • How to use Bed Level Correction

                  Blog

                  • Prusament Pellets: Raw material batches for large-format 3D printing or small-scale polymer research & development
                  • Print colorful and glowing Halloween decorations with our spooky offer
                  • Factorio Has Arrived on Printables

                  Newsletter

                  Signup and get our monthly squeeze on updates, blog, printables and much more.

                  By clicking, you agree to receive our newsletter.

                  This site is protected by reCAPTCHA Enterprise and the Google Privacy Policy and Terms of Service apply.

                  Heavy Duty Keyboard Holder (No Supports)
                  E-shop
                  • 3D Printers
                  • Printer Upgrades
                  • Filaments
                  • Accessories
                  • Prusa Merchandise
                  Prusa

                  © Prusa Research a.s.

                  Printables
                  • 3D Models
                  • Store
                  • Clubs
                  • 3D Design Contests
                  • Brands
                  Community
                  • World Map
                  • Forum
                  • User Groups
                  • Events
                  Help
                  • Prusa Help
                  • Prusa Academy
                  • 3D Printing Calculators
                  Software
                  • PrusaSlicer
                  • Prusa.app
                  • Prusa Connect
                  • Drivers and Software
                  Company
                  • About Us
                  • Blog
                  • Official Prusa Resellers
                  • Contact Us
                  • Certified for ISO 9001, ISO 14001, ISO 45001
                  • General Terms and Conditions
                  • General Terms and Conditions of Use of the PRUSA Websites
                  • Privacy Policy
                  • Information about cookies
                  • Customer Complaints Policy
                  • Status Page
                  • Do Not Sell or Share My Personal Information
                  • Supplemental Statements
                  Prusa
                  • General Terms and Conditions
                  • General Terms and Conditions of Use of the PRUSA Websites
                  • Privacy Policy
                  • Information about cookies
                  • Customer Complaints Policy
                  • Status Page
                  • Do Not Sell or Share My Personal Information
                  • Supplemental Statements

                  © Prusa Research a.s.

                  JOSEF PRUSA®, PRUSA RESEARCH®, PRUSA POLYMERS®, PRUSA ORANGE®, PRUSA 3D ® AND PRUSAMENT® are registered trademarks of Prusa Development a.s. used by Prusa Research a.s. under licence from Prusa Development a.s.

                  Bed Level Correction

                  Relevant for

                  MINI family
                  MK3 family
                  MK3.5 family
                  OLD PRODUCTS
                  115 comments
                  Article is also available in following languages
                  English
                  Čeština
                  Polski
                  Deutsch
                  Français
                  Español
                  Italiano
                  日本語

                  Together with the Mesh Bed Leveling, the Bed Level Correction is an important feature designed to allow users to compensate for even the slightest imperfections in the first layer. It allows to virtually raise or lower the heatbed on the Left, Right, Front and Back sides, essentially enabling you to have a different Live Adjust Z value on each of the four sides of the heatbed. This feature is most beneficial if you frequently need to use the entire area of the heatbed. 

                  Before you start the calibration, make sure there is nothing between the steel sheet and the heatbed.

                  How to use Bed Level Correction

                  The adjustment limit is +/- 100 microns (μm). However, even 20 microns can make a huge difference, so when using this function, make small incremental changes. The same way as Live-Z adjust, negative values lower the nozzle closer to the heatbed. 

                  Preliminary steps

                  1.  Ensure you recently run the XYZ calibration for MK3/S/+, and the XY axis test, part of the self test, for MK3.5/S, MINI/+. 
                  2.  Clean the entire surface of your steel sheet with 90% or higher isopropyl alcohol. 
                  3.  Have a good baseline first layer calibration. Follow the dedicated instructions for MK2.5/S, MK3/S/+, MK3.5/S, and for MINI/+.
                  4. Ensure to have checked the possible causes described in the dedicated article on first-layer issues. 

                  Test models

                  Download and slice this test model for your printer version using the Prusa Slicer's default PLA settings, 0.20 mm layer height.

                  Procedure

                  1. Print the g-code prepared in the previous step with a PLA filament (ideally light and opaque color). The print is just one layer high and takes up most of the printable surface. You do not have to print the entire file, stop the print as soon as the differences in layer height across the plate are obvious.
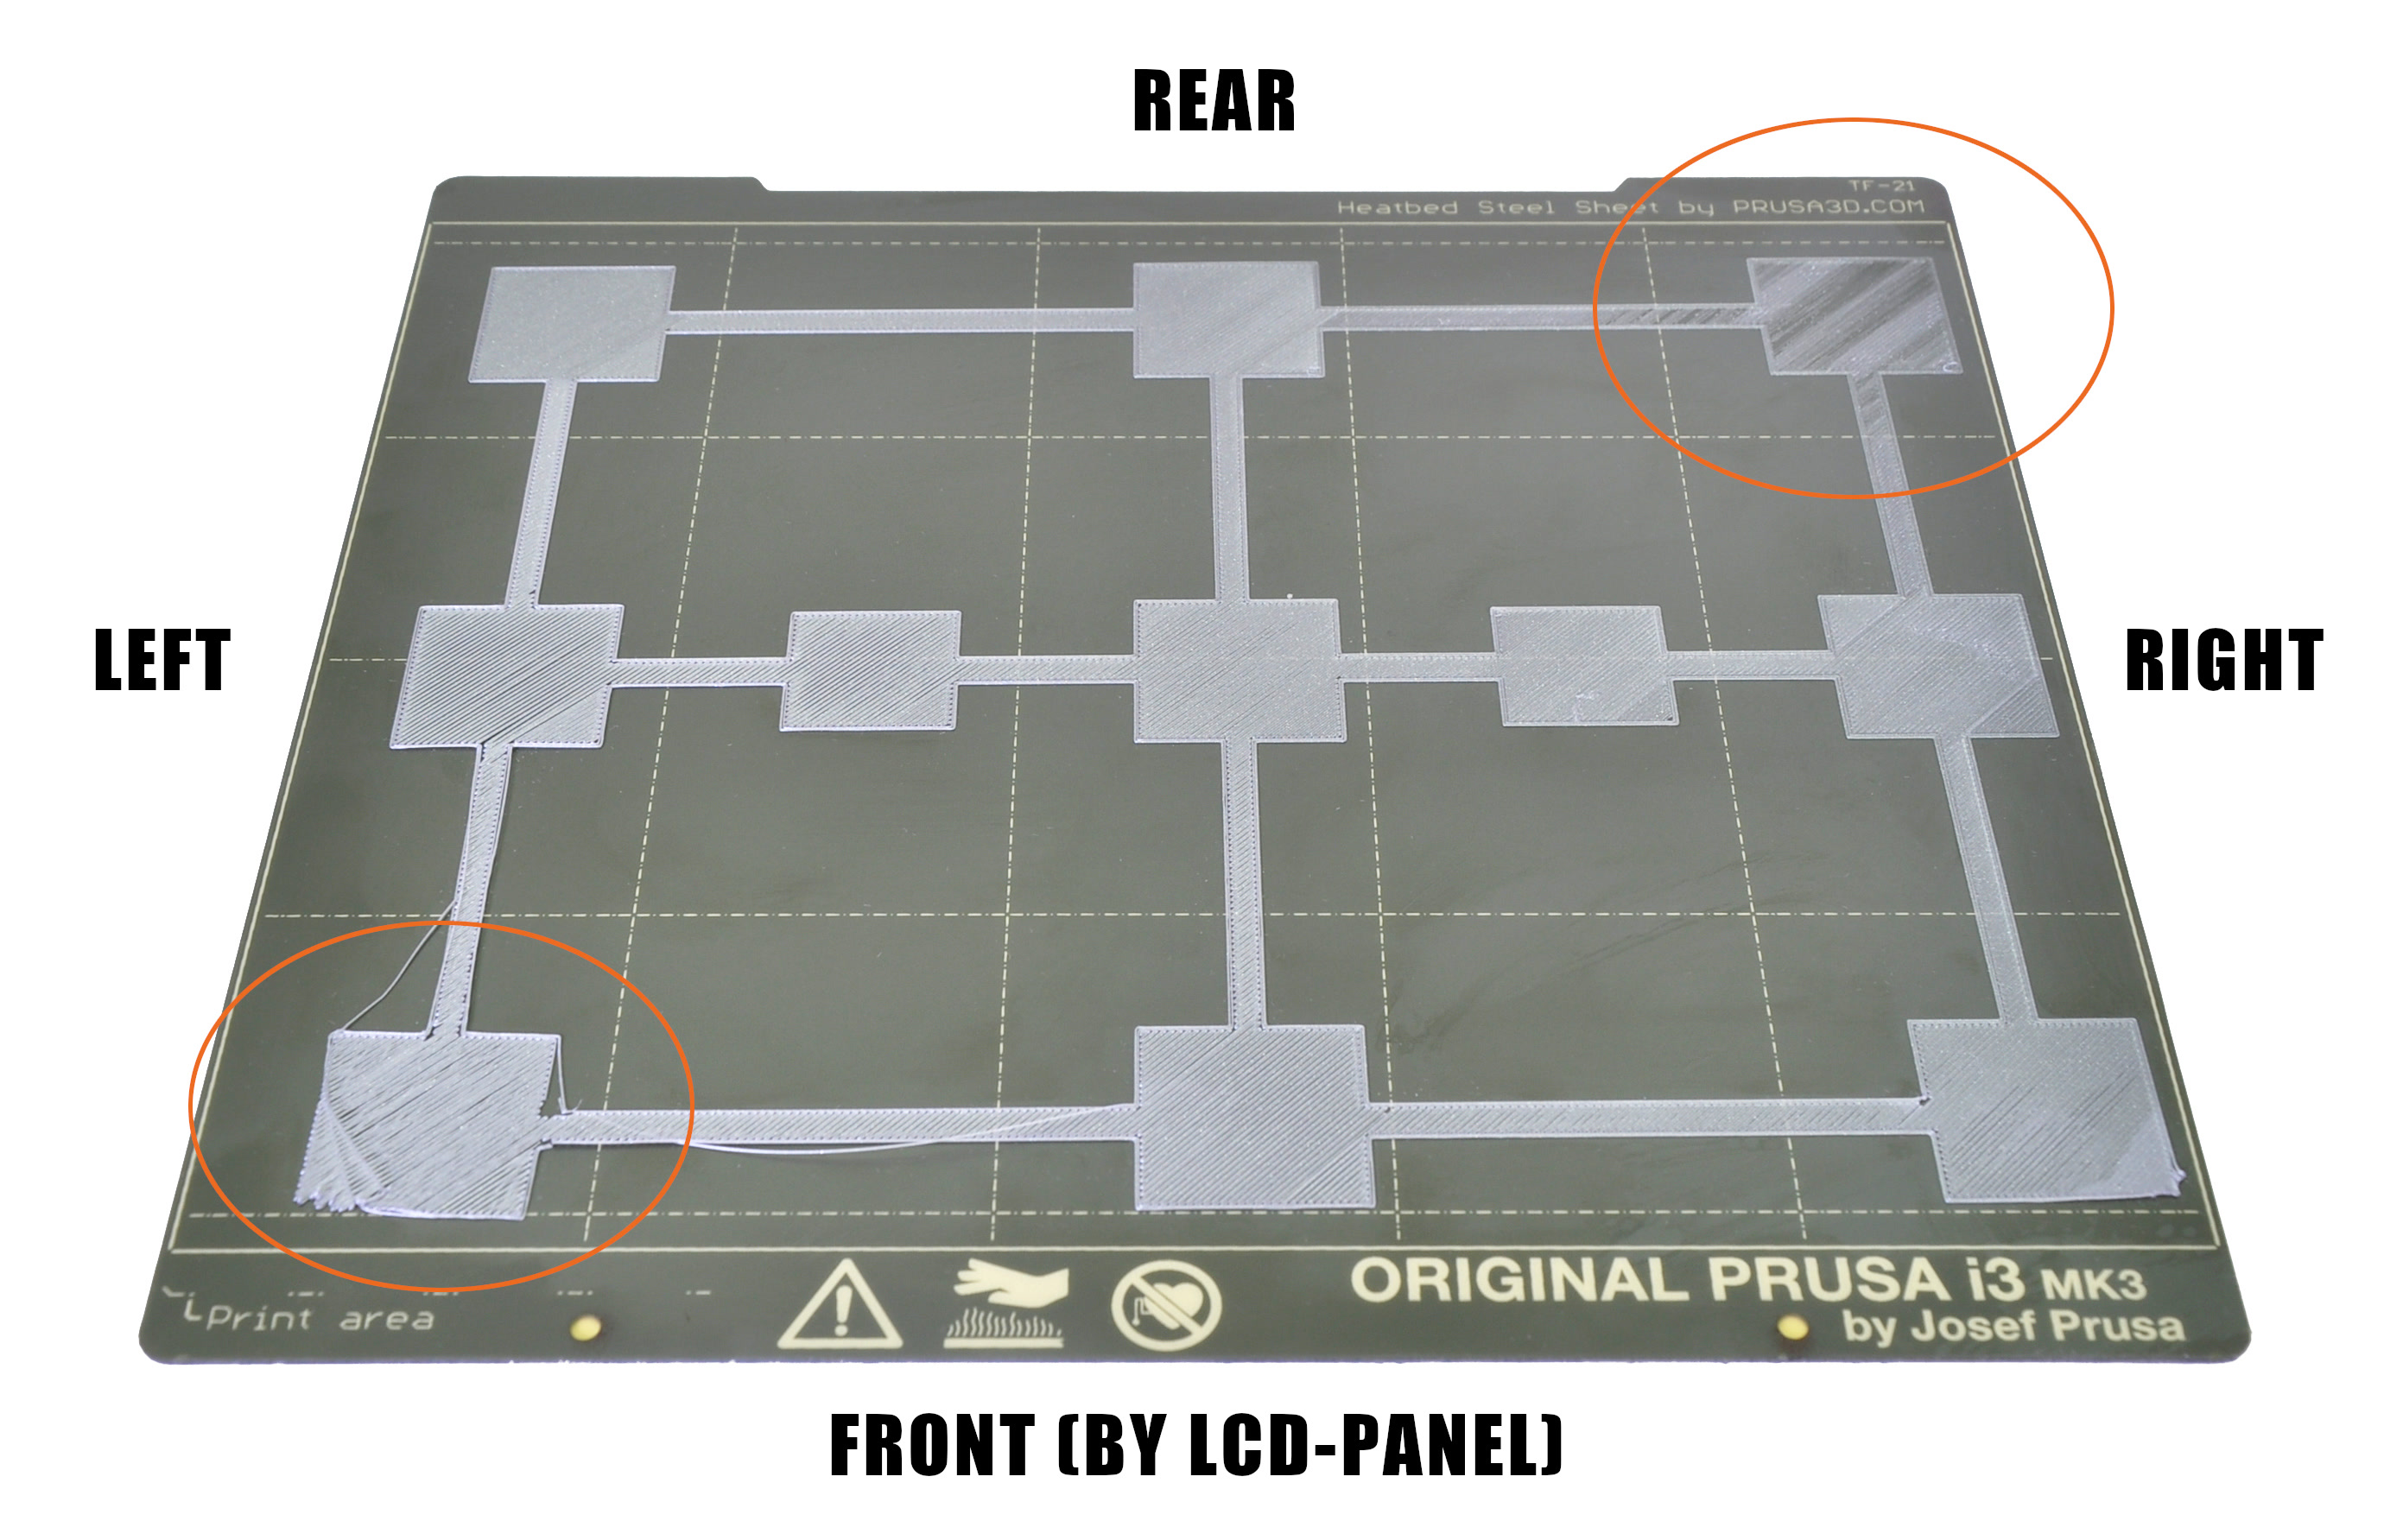
                  2. Evaluate where the layer is too squished and full of scars and where there are gaps in between the lines. In the photo below, the lines are way too squished in the top-right corner, and the nozzle is too far away in the bottom-left.

                  In the example above you want to adjust a minus-value on the left, bringing the nozzle closer and a plus-value on the right, moving the nozzle away. You may also need to adjust the distance front and back, but do a test print after adjusting the left and right side.

                  1. Go to the LCD Menu -> Calibration -> Bed level correction. There, you can adjust Left/Right/Front/Rear values (understood from your point of view, as you are looking at the printer's LCD).
                  2. Edit the values, we suggest going in steps of +/- 10. These values will be added to the baseline Live Z value set in step 1. Remember, a negative value will decrease the distance between the nozzle making the layer more squished. A positive value will increase the nozzle-bed distance, curing the scars on your first layer.
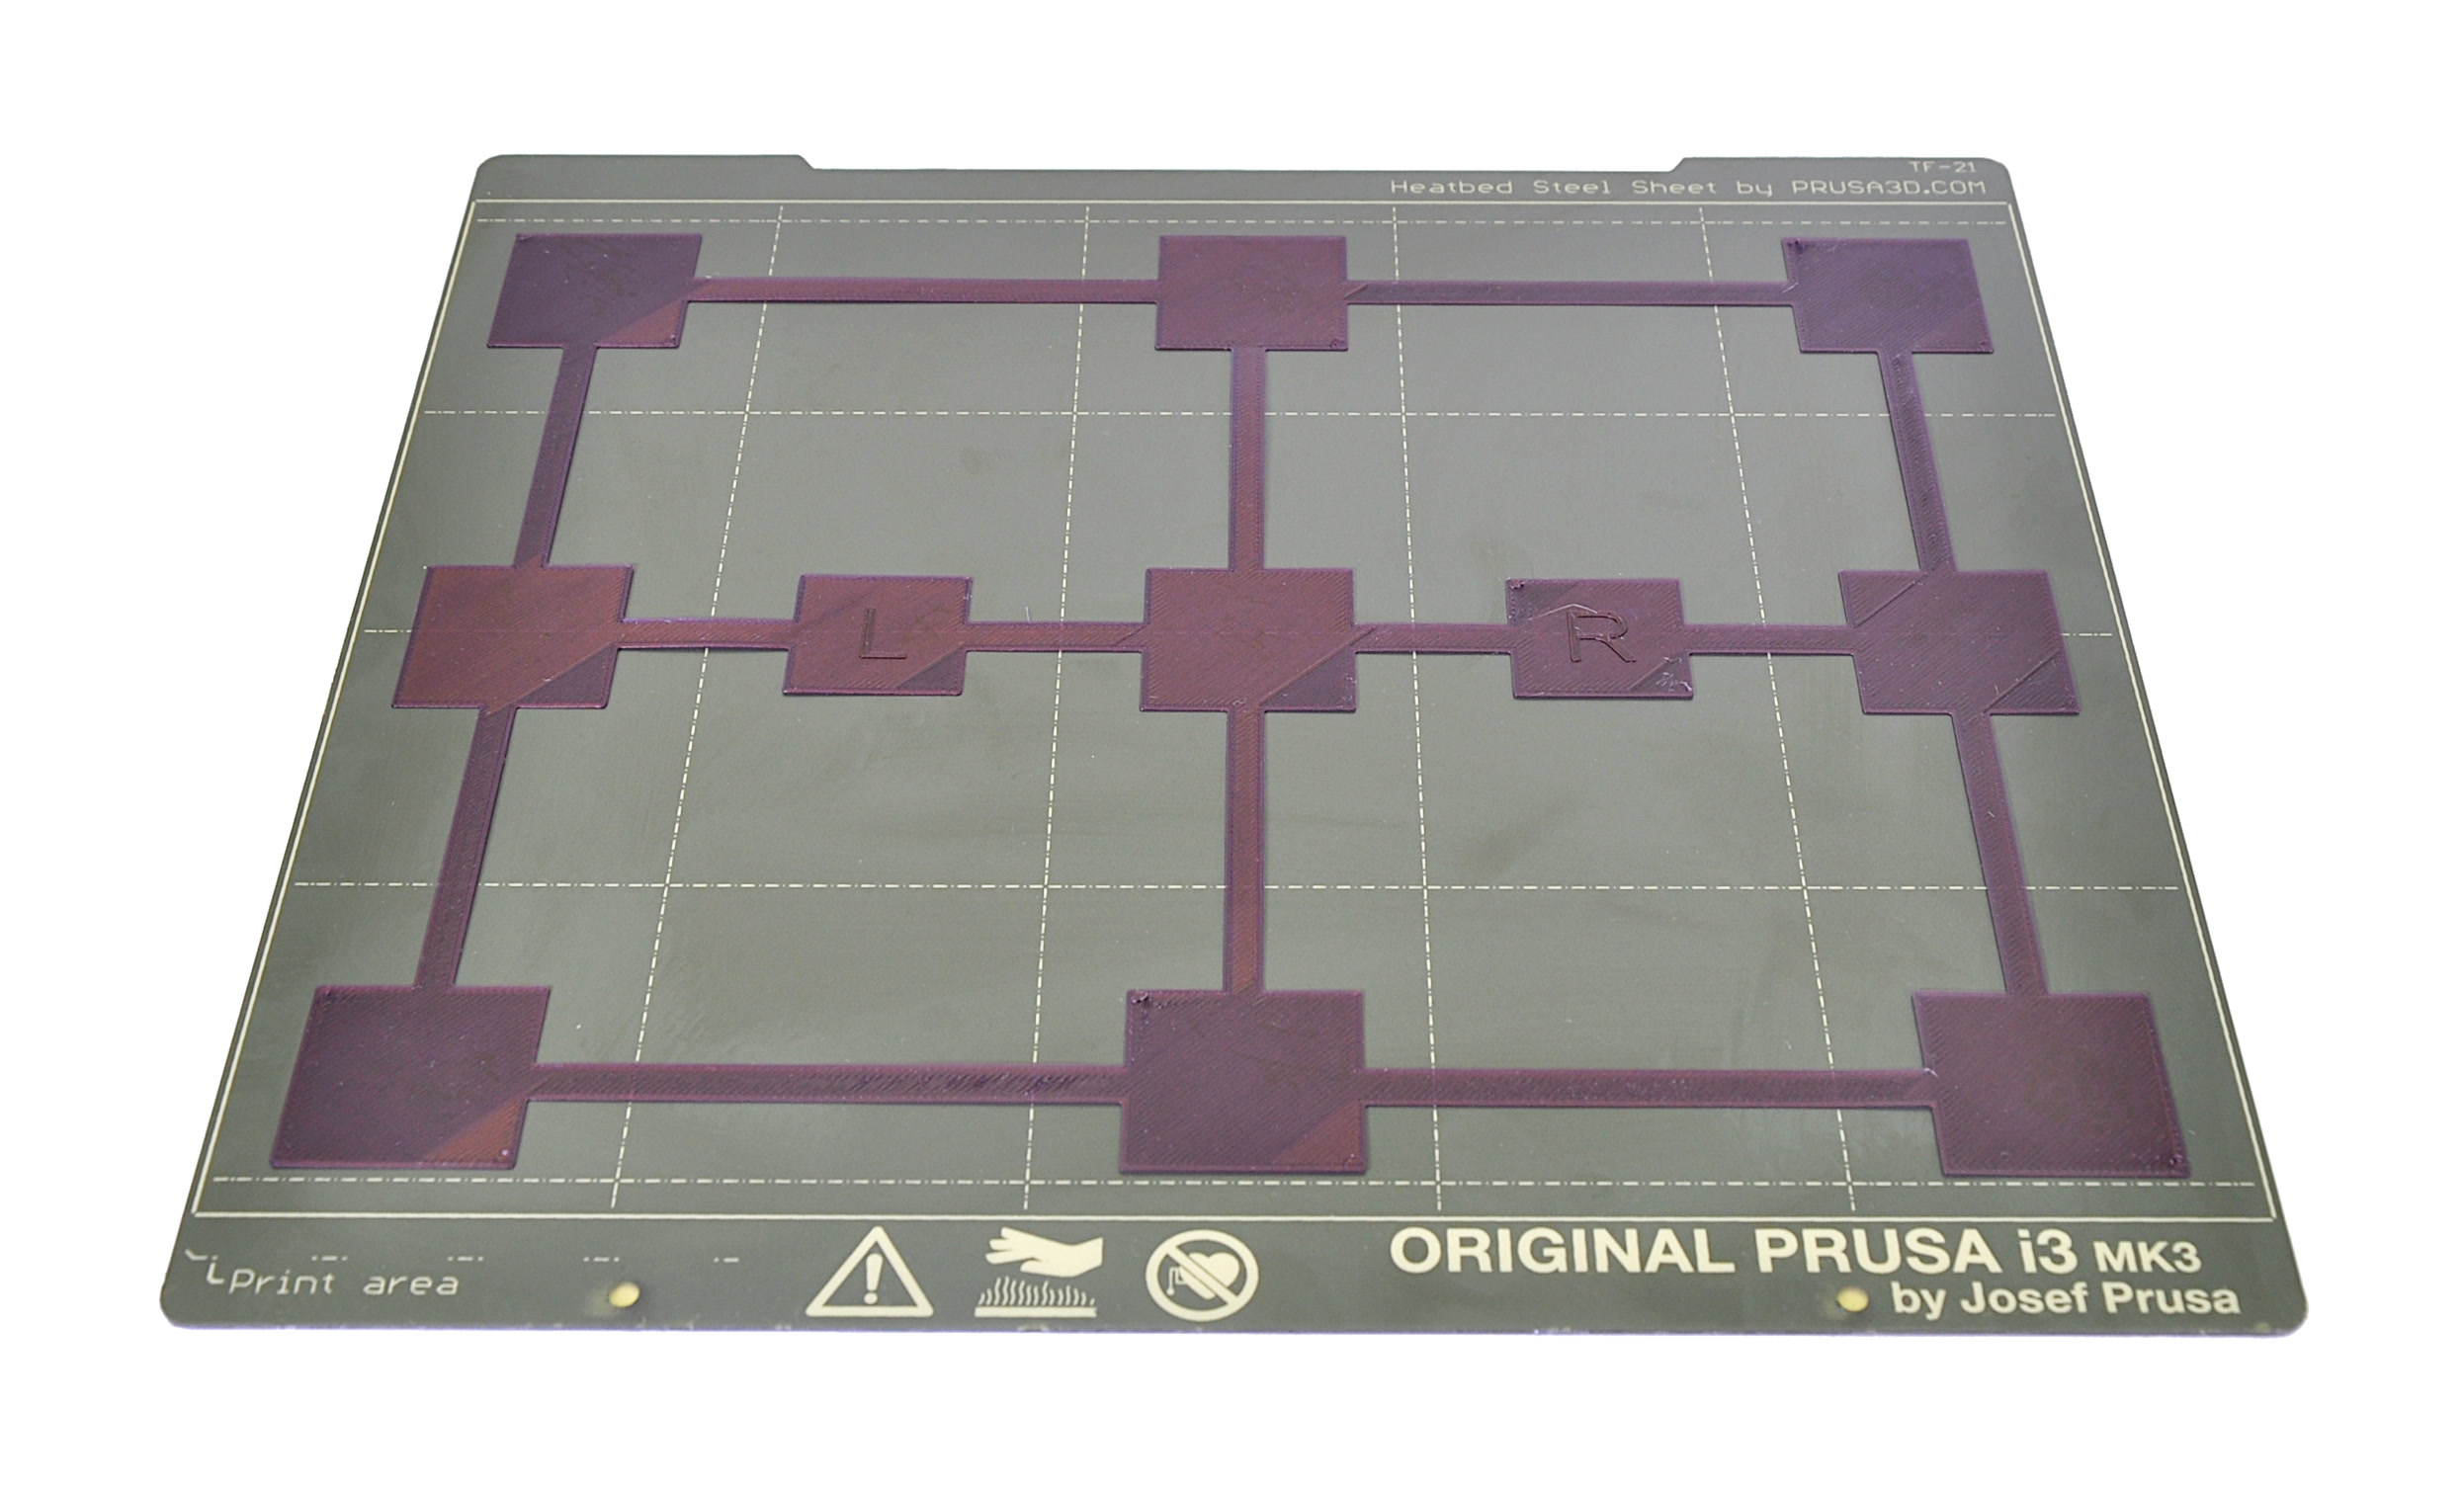
                  3. Repeat the procedure until you are satisfied with the result (photo below for inspiration).

                  For example, let's say your Live adjust Z value is -1.000, and that the layer is too squished in the rear, and that you see gaps between the lines on the right side.

                  • Rear: you need to enter a positive value (at the end it will be 25 for example) to make the layer less squished
                  • Right: you need to enter a negative value (at the end it will be -10 for example) to make the layer more squished
                  The Bed Level Correction values are reset to 0 every time you start the Calibration Wizard, or XYZ calibration/XY axes test. Once you find your ideal values, write them down as a backup.
                  Was this article helpful?
                  This action is available only to registered users. Please log-in.

                  Topics

                  • Calibration
                    • Advanced calibration
                      • Manual temperature calibration
                      • Linear Advance
                      • Extruder linearity correction calibration
                      • Extrusion multiplier calibration
                      • PID tuning
                      • Bed Level Correction
                      • Squaring your MINI
                    • Basic calibration
                    • Calibration Error Messages

                  36 comments

                  Log in  to post a comment
                  betajosh711
                  •
                  Might be misunderstanding this myself, but I think I solved it by accident. My front right corner had way more gap than the rest, and the instructions weren't clear on whether you can even adjust just one corner.

                  Turns out my whole front was slightly off, but because the right side was off too, it wasn't obvious, the left side looked fine on its own.

                  To fix the front right corner, I went with:

                  Right side: -10
                  Front: -20

                  This'll be different for everyone, but the instructions don't really explain how to approach it when it looks like only one corner is the problem.

                  You'll see other answers saying "you can't adjust just one corner," which is technically true. But your one bad corner might just be the symptom of two sides needing correction.
                  Reply
                  CovertKoala
                  •
                  So... wild... I was playing around with MS Copilot (ChatGPT based) and was able to upload a screenshot of the OctoPrint Bed Level Visualization graph and got really accurate adjustments that worked after just two rounds of Bed Level Adjustments.
                  Reply
                  Antsbug
                  •
                  This saved my sanity, I had prints that were coming loose because of an uneven first layer.
                  If I made the Z low enough for the low spots it would be too low for the high spots and ruin the print.

                  Even with new bed bearings to take out the play, and a change from the old PINDA to the Super PINDA to fix the inconsistant first layer calibration, it was still breaking prints loose because of an uneven first layer.

                  Now with a few tweaks to the bed levelling it is almost perfect.
                  Reply
                  Kortezza
                  •
                  I have the same issue...I'm about to loose my sanity too ! In the process of doing this calibration. Hope this will make a difference ! All my prints are coming loose ;-(
                  Reply
                  Mr Hot End
                  •
                  How do you adjust only the coners? The uneven nature of these beds is maddening.
                  Reply
                  CW
                  •
                  If it's only the corners and not the middles, then you might consider getting shim stock. If you're US-based, McMaster-Carr has shim washers and shim stock. You can get stock in 12.7µm (0.0005") thickness, or washers in 25.4µm (0.001") thickness. You could put those under the corner heat bed mounts.
                  Reply
                  Helder112
                  •
                  How do you make this process on MK3.5 printer. Since the sensor is still pinda and bed is fixed should have a way to do this process?
                  Best regards 
                  Reply
                  Jakub Dolezal
                  •

                  Hi, it is planned in the upcoming firmware release.

                  Reply