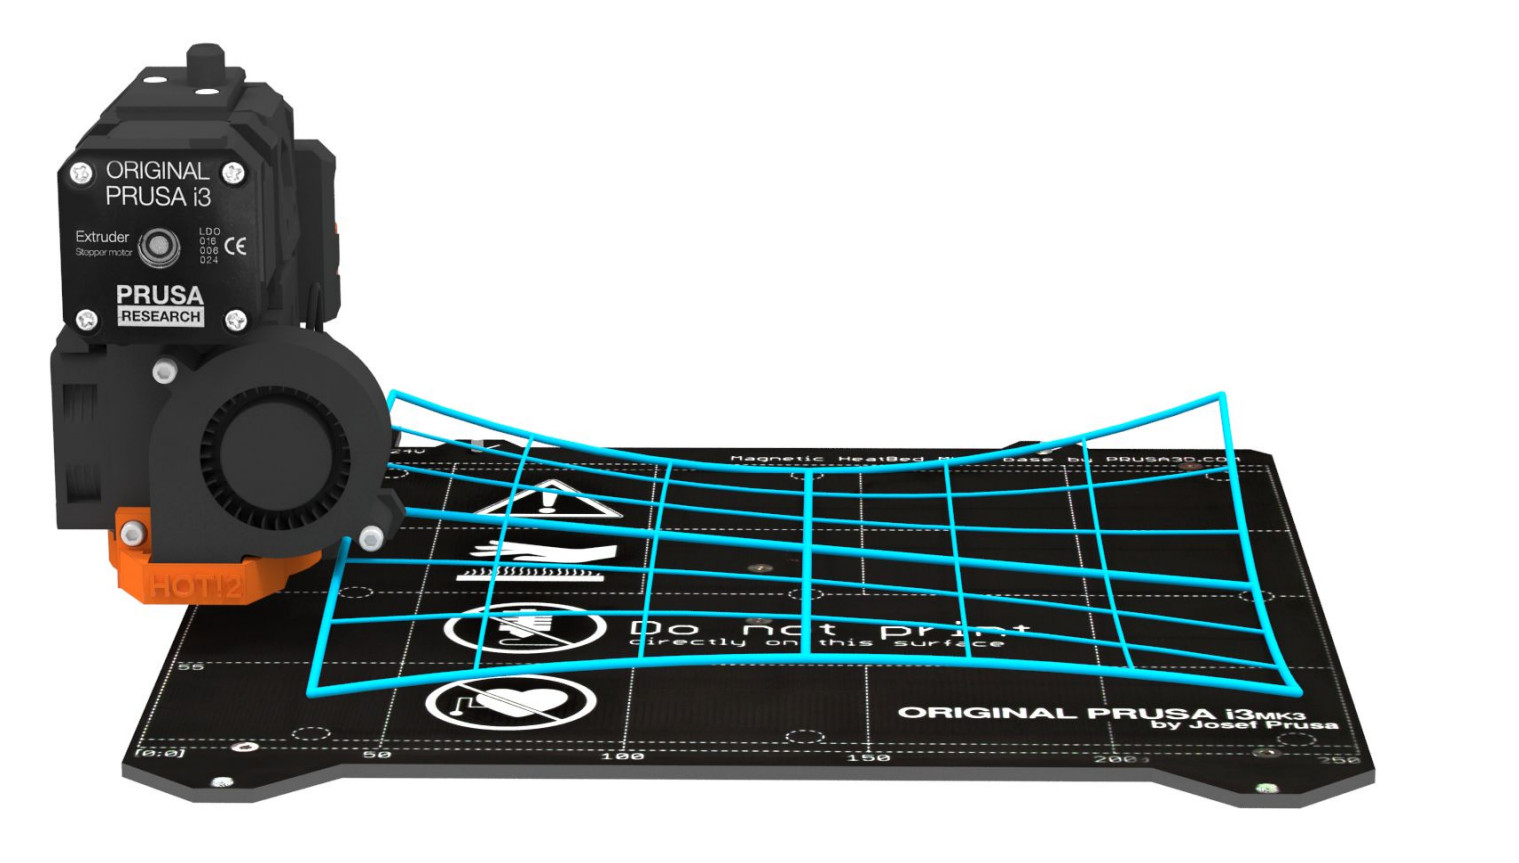
The Original Prusa FDM printers have a sensor to detect distance from the print surface. During a calibration, and before each print, the sensor will go through a number of points, in a grid pattern, spread across the build-plate (whether it is a powder-coated or smooth PEI sheet does not matter), and measures the distance to the sheet. These points are interpolated and used to create a virtual mesh of the bed. During printing, if the bed is slightly warped, the sensor will still precisely follow the surface according to its measured mesh
Original Prusa MK2/S, MK2.5/S, MK3/S/+
These printer models up to MK3S are equipped with a PINDA sensor, while the MK3S+ and MK3.5/S are equipped with a SuperPINDA sensor.
The StallGuard for the Z-axis is active during the mesh bed leveling. In case the nozzle crashes into the bed before the PINDA/SuperPINDA sensor triggers, the calibration process is interrupted and the user is asked to check the nozzle for any kind of debris.
Mesh bed leveling settings
The Mesh bed leveling settings can be found within Settings - Mesh bed Leveling, on the LCD menu. There you have the following options:
- Mesh (3x3 - 7x7)
- Z-probe nr. (1 - 3 - 5)
- Magnet comp. (ON / OFF)
Mesh: The default grid density is 3x3 (9 points). However, if you still experience uneven first layer adhesion, you can increase the density in Settings - Mesh bed leveling - Mesh to 7x7 (49 points).
Z-probe nr.: Changing the Z-sensor nr. you change how many times will each point be measured. We suggest either 3 or 5 measurements per point since the final value is calculated as an average value. Changing these settings affects how long will the Mesh bed leveling procedure takes to complete.
Magnet comp.: With 7x7 Mesh bed leveling, you can choose whether or not to use Magnets compensation. 3 of the 49 points are so close to magnets, that the reading can be off by as much as 80μm (microns). Magnet compensation ignores readings from these 3 points and calculates them from the surrounding points. We suggest leaving this function on.
Enforcing the Z-calibration
If the mesh bed leveling is interrupted during the procedure, before a print, a message will appear on the screen stating "Enforcing the Z-calibration" and the printer will re-home and run through the procedure again. This can occur if there is debris on the nozzle pushing the bed down when probing, or if you touch and press the bed while it is probing. This will bring the deviance above a certain threshold and it will simply make another attempt to run the Mesh Bed Leveling. This is to avoid starting it from the menu again if the problem was simply an accident. If the problem remains, it will repeat this procedure three times before canceling the print.
Troubleshooting
Please see our dedicated article P.I.N.D.A./SuperPINDA Sensor testing to resolve any issue.
Original Prusa MINI/+
The Original Prusa MINI is equipped with a M.I.N.D.A. sensor, while the Original Prusa MINI+ is equipped with a SuperPINDA sensor. The grid density is 4x4.
Troubleshooting
Please see our dedicated article M.I.N.D.A./SuperPINDA sensor testing (MINI/MINI+) to resolve any issue.
Original Prusa MK4/S, MK3.9/S, XL
The Original Prusa MK4/S, MK3.9/S, and XL are equipped with a LoadCell, to detect that the nozzle is close enough to the steel sheet for printing, and to avoid damage that would be caused by the nozzle digging into the steel sheet.
Before a print, the nozzle will check the distance to the print sheet in several places to create a virtual height map of the surface. The points are measured within the area of the chosen print.
24 comments
i am using the Prusa XL printer and i wanted to do a seperate calibration for the Printer including homing and MBL when i first turn on the Printer and then use these calibration data to print short consecutive prints (2 min - 3 min) without requiring any calibration before each print. changing the Start Gcode did not stop the Printer from Homing and also when i skip the MBL and run M420 S1 instead the bed is not calibrated proberly. so is there a way to calibrate and save the calibration data (MBL) for future use ?
I'm missing the 3.5 bed calibration, I cant manual change the values.
Hi, Helder, it is already being tested internally, the firmware will be out soon.
For bed level correction, you have 100 microns per region. https://help.prusa3d.com/en/article/bed-level-correction_2267
I am hearing with fw devs if I can get an exact value. Would care to give some context to your question, like an issue you might be seeing or an experiment you are doing?
It can compensate for 1-2 mm. I don't know the exact number, but from the tests we know, the printer is able to "solve" a piece of 1.75mm filament underneath the plate. However, the mesh bed leveling works as a flat plane with a certain tilt, not a wobbly mesh.