Prusa
  • SHOP
    • Latest products
    BY CATEGORY
    • 3D printersnew
    • 3D printer upgradesnew
    • Materials
    • Accessories
    • Spare parts
    • Courses
    • Merch
    • Get a price quote
    QUICK LINKS
    • Shipping & delivery
    • Returns & refunds
    • Payment & financing
    • Warranty
    • VAT & Customs fees
    • FAQ

    0 item in your cartitems in your cart

    Your cart is empty

    Go to cartShop 3D printers

    My profile

    Log in to see orders, saved items

    My profile

    Signed in as

    • Orders
    • Logout
  • 3D PRINTING
    • Explore 3D printing
    FOR BEGINNERS
    • 3D printing 101
    • How FDM printing works
    • Buying your first printer
    • 3D model catalog
    BY APPLICATION
    • Rapid prototyping
    • Manufacturing
    • Engineering
    • Research
    • Arts & design
    GO DEEPER
    • Materials guide
    • Courses
    • Webinars
    • Case studies
    • Custom 3D printing
  • 3D PRINTERS
    • All 3D printers
    FOR
    • Home or garageHobbyists, tinkerers and home printing
    • BusinessIn-house production for small teams
    • EnterpriseFleets, security and scale
    • Which Prusa is right for me
    SHOP & BROWSE
    • CORE One+new
    • CORE One+ INDXnew
    • CORE One L+new
    • CORE One L+ INDXnew
    • XL+new
    • MK4S
    • Prusa Pro HT90
    • Prusa Pro AFS
    • Prusa Pro SLX
    MORE FROM PRINTERS
    • Parts & upgradesnew
    • Critical infrastructure
    • Case studies
    • Signature Oak
    • Kits
  • MATERIALS
    • All materials
    BY USE
    • Every-day & design
    • Functional engineering
    • Composites
    • Pro speciality
    • SLA resins
    PRUSAMENT
    • PLA
    • PETG
    • ASA
    • PC
    • PA11
    • Flex
    • TPU
    MORE FROM MATERIALS
    • Materials guide
    • We make material in house
    • Sustainability
    • Order on the store
  • SOFTWARE
    • All software
    PREPARE THE PRINT
    • PrusaSlicer 3.0New
    PRINT & MONITOR
    • Prusa Connect
    • EasyPrint
    • iOS & Android app
    • Prusa Farm
    GET STARTED
    • Download & install
    • Knowledge base
    MORE FROM SOFTWARE
    • 3D model catalog
  • SUPPORT
    • Explore support
    FIND ANSWERS
    • Knowledge base
    • Troubleshooting
    • Courses
    • Webinars
    GET HELP
    • Contact us
    • Livechat
    • Shipping & delivery
    • Warranty
    • Returns & refunds
    • Service & spare parts
    • Service & Repair
    COMMUNITY
    • Forum
    • Reddit
    • Printables
  • TRUST CENTER
    • Trust Center overview
    BY TOPIC
    • GDPR
    • Certificates
    • Security
    • Compliance
    COMMITMENTS
    • Sustainability report
    TALK TO US
    • Contact the security team
  • COMPANY
    • About Prusa
    GET TO KNOW US
    • Our story
    • How we make printers
    • Open source
    • Brand & media kit
    NEWS
    • Blog
    • Newsroom
    • Events
    TRUST & PARTNERS
    • Sustainability
    • Resellers & distributors
    • Affiliate program
    • Contact
    • English
    • Čeština
    • Deutsch
    • Español
    • Français
    • Italiano
    • Polski
    • 日本語
  • Signed in as

    • Orders
    • Address
    • In-stock Alerts
    • My Courses
    • Subscription
    • Edit Account
    • Logout

Log in to see orders, saved items

Signed in as
  • Orders
  • Address
  • In-stock Alerts
  • My Courses
  • Subscription
  • Edit Account
  • English
  • Čeština
  • Deutsch
  • Español
  • Français
  • Italiano
  • Polski
  • 日本語
Shop

0 item in your cartitems in your cart

Your cart is empty

Go to cartShop 3D printers

My profile

Log in to see orders, saved items

My profile

Signed in as

  • Orders
  • Logout
SHOP
  • Latest products
BY CATEGORY
  • 3D printersnew
  • 3D printer upgradesnew
  • Materials
  • Accessories
  • Spare parts
  • Courses
  • Merch
  • Get a price quote
QUICK LINKS
  • Shipping & delivery
  • Returns & refunds
  • Payment & financing
  • Warranty
  • VAT & Customs fees
  • FAQ

Featured products

    Popular categories

      Trending searches

        Articles

          Blog

            Products

              Categories

                Suggested searches

                  Searching…
                  No results
                  Something went wrong.
                  ↑↓ Select↵ OpenEsc Close search
                  1. Support
                  2. Basic calibration
                  3. MMU3 Setup and inspection
                   

                  Contents

                  • Necessary calibrations
                  • Hardware configurations
                  • Assembly inspection
                  • Slicer settings
                  • Test prints

                  Blog

                  • Prusament Pellets: Raw material batches for large-format 3D printing or small-scale polymer research & development
                  • Print colorful and glowing Halloween decorations with our spooky offer
                  • Factorio Has Arrived on Printables

                  Newsletter

                  Signup and get our monthly squeeze on updates, blog, printables and much more.

                  By clicking, you agree to receive our newsletter.

                  This site is protected by reCAPTCHA Enterprise and the Google Privacy Policy and Terms of Service apply.

                  Factorio Transport Belts
                  E-shop
                  • 3D Printers
                  • Printer Upgrades
                  • Filaments
                  • Accessories
                  • Prusa Merchandise

                  © Prusa Research a.s.

                  Printables
                  • 3D Models
                  • Store
                  • Clubs
                  • 3D Design Contests
                  • Brands
                  Community
                  • World Map
                  • Forum
                  • User Groups
                  • Events
                  Help
                  • Prusa Help
                  • Prusa Academy
                  • 3D Printing Calculators
                  Software
                  • PrusaSlicer
                  • Prusa.app
                  • Prusa Connect
                  • Drivers and Software
                  Company
                  • About Us
                  • Blog
                  • Official Prusa Resellers
                  • Contact Us
                  • Certified for ISO 9001, ISO 14001, ISO 45001
                  • General Terms and Conditions
                  • General Terms and Conditions of Use of the PRUSA Websites
                  • Privacy Policy
                  • Information about cookies
                  • Customer Complaints Policy
                  • Status Page
                  • Do Not Sell or Share My Personal Information
                  • Supplemental Statements
                  • General Terms and Conditions
                  • General Terms and Conditions of Use of the PRUSA Websites
                  • Privacy Policy
                  • Information about cookies
                  • Customer Complaints Policy
                  • Status Page
                  • Do Not Sell or Share My Personal Information
                  • Supplemental Statements

                  © Prusa Research a.s.

                  JOSEF PRUSA®, PRUSA RESEARCH®, PRUSA POLYMERS®, PRUSA ORANGE®, PRUSA 3D ® AND PRUSAMENT® are registered trademarks of Prusa Development a.s. used by Prusa Research a.s. under licence from Prusa Development a.s.

                  MMU3 Setup and inspection

                  Relevant for

                  MMU3
                  2 comments
                  Article is also available in following languages
                  English
                  Čeština
                  Polski
                  Deutsch
                  Français
                  Español
                  Italiano
                  日本語

                  After successfully finishing the build of your Original Prusa MMU3 upgrade and going through 11. First Flight of the assembly manual you should be good to go. However, if you encounter persistent issues, we have compiled a checklist of what may be the source of the problem.
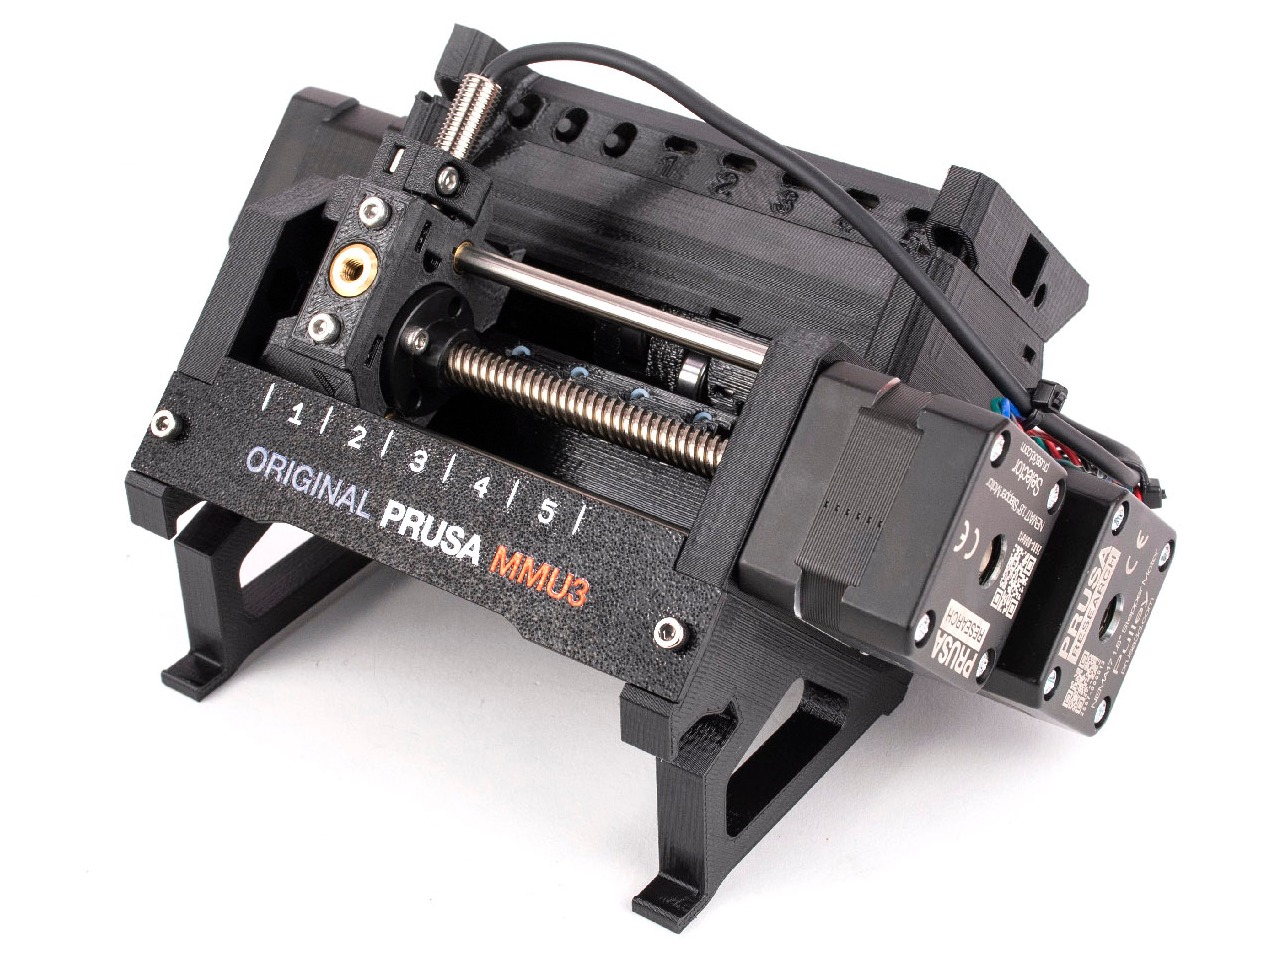
                  Necessary calibrations

                  With the hundreds of filament changes that can go into a single MMU print, the system must know where each filament is at all times. For that, there are two sensors that have to be set up properly.

                  On the MK3/S/+ and the MK3.5, you can see if they trigger correctly on the LCD menu under Support -> Sensor info. Each should trigger "1" of filament is present and "0" when it's not.

                  On the MK3.9/4, you can add the filament sensor and the superFINDA statuses on the footer by going to LCD menu -> Settings -> User interface -> Footer. They will present "OFF" when no filament is loaded, and "ON" when the filament is loaded.

                  IR filament sensor calibration

                  This is one of the two sensors on the MMU3, located on the printer's extruder.

                  For the MK3S/+ and MK3.5, ensure your IR filament sensor mechanism is properly calibrated before printing.

                  If you have any issues with the Filament sensor in the MK3.9/4, check the troubleshooting steps here: Nextruder filament sensor (CORE One, CORE One L, MK4/S, MK3.9/S, XL/+).

                  SuperFINDA sensor calibration

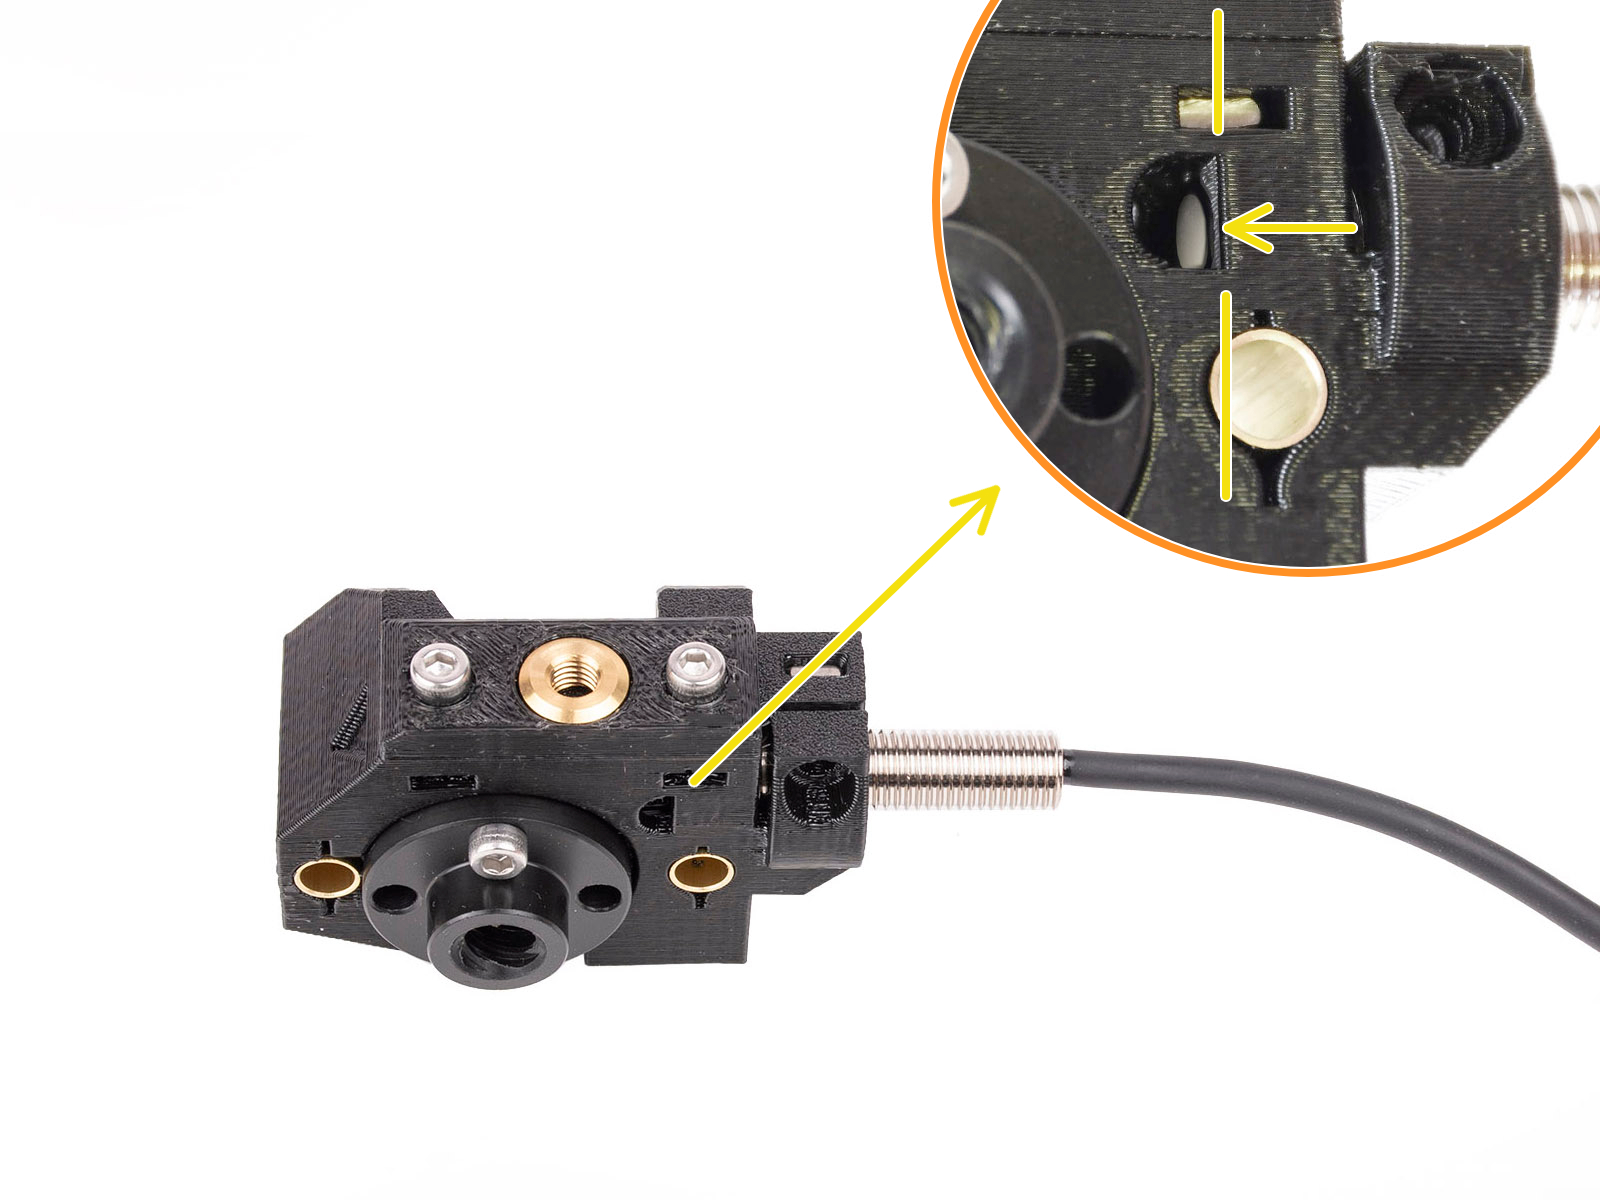
                  The SuperFINDA is the second sensor on the MMU3. Its position is crucial to ensure smooth operation. Its assembly can also collect debris or strings from filament changes. Make sure the tip of the superFINDA is aligned with the D-shaped opening as shown below.
                  Hardware configurations

                  Idler screws tension

                  Just like the extruder idler screw, its MMU3 counterparts need to be tightened just right. If the screw is overtightened, the idler will struggle with determining its home position and the MMU unit won't work properly. Over-tightening can also cause the pulleys to be "choked" by the filament. If the screws are too loose, the MMU unit might struggle with grabbing the filaments properly. To find the perfect tension, adjust both of the idler tension screws so that the top of the screw head is slightly above the top surface of the idler body.
                  Spools and buffer positioning

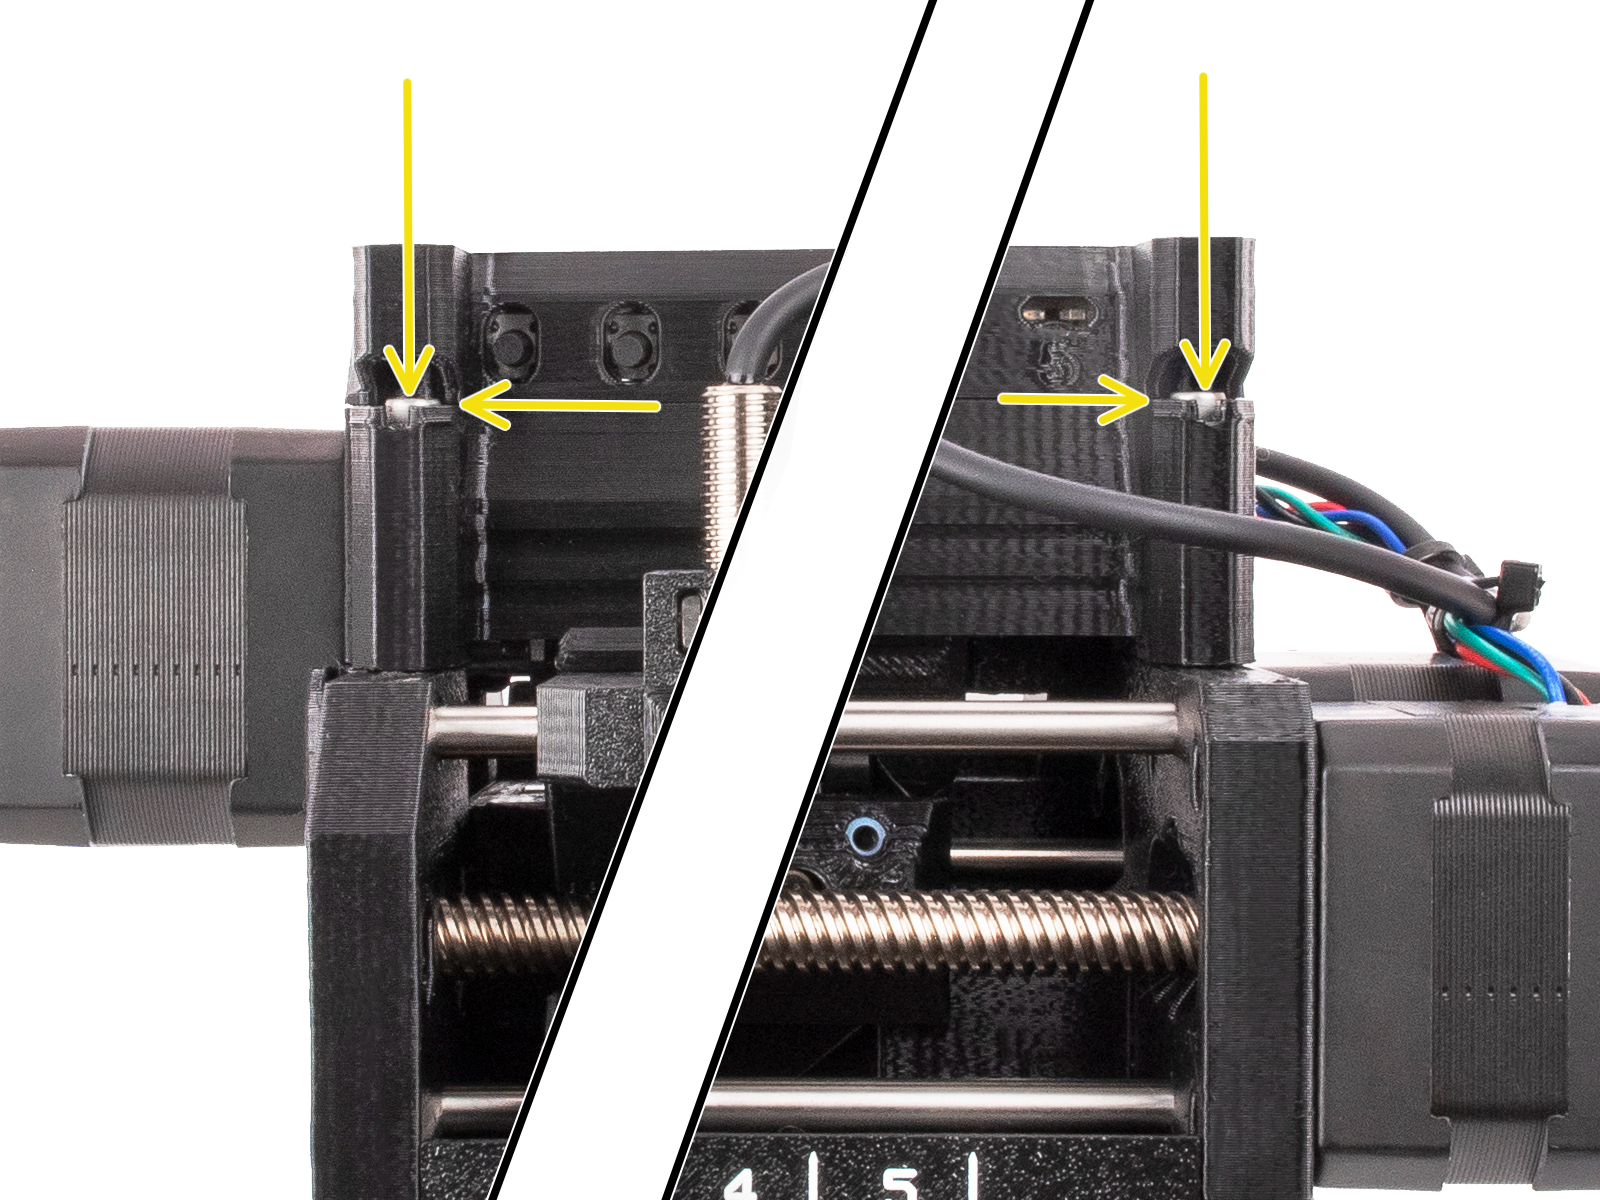
                  The spool holders shouldn't be too close to each other. Ideally, the spools should be positioned as described and shown in the handbook (picture below).
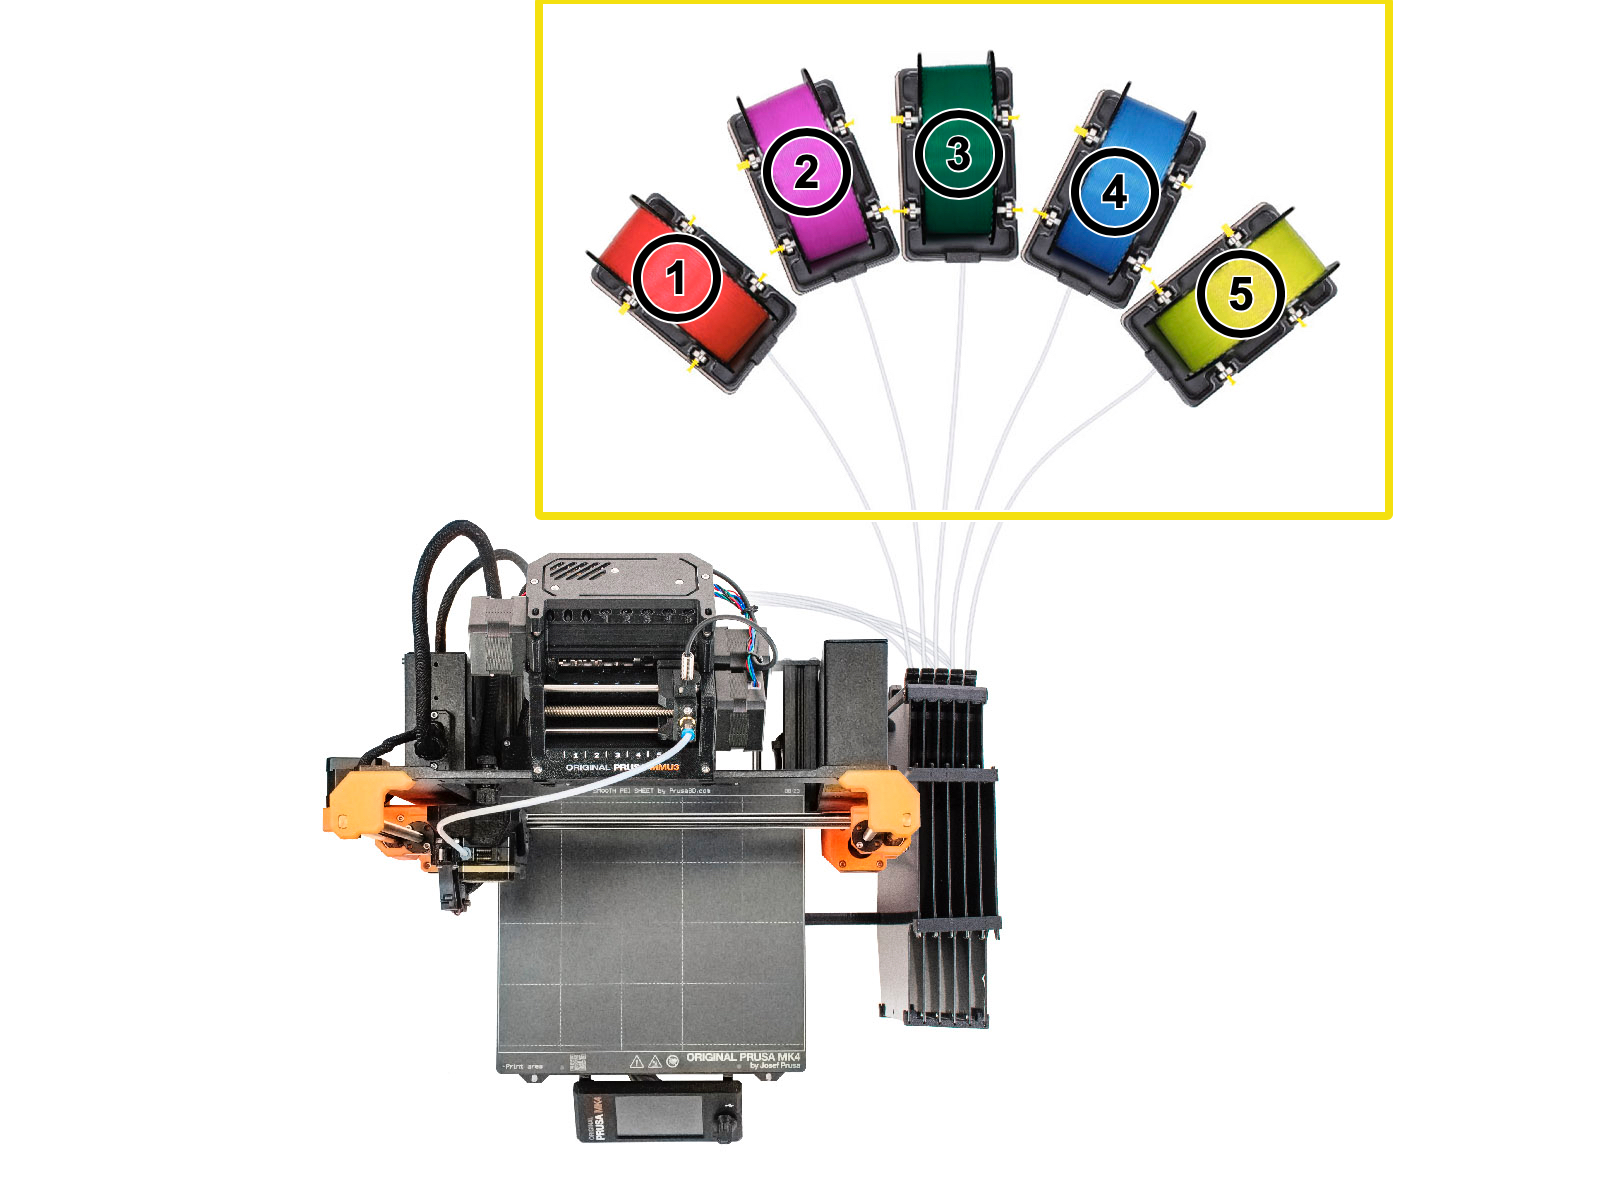
                  If you decide not to use the long PTFE tubes, or not to use the filament buffer, you have to make sure the filaments will not be tangling one into another. Also, make sure the spools are stable and won't tip over. Almost empty spools are more prone to cause problems with tangling or falling over.

                  Assembly inspection

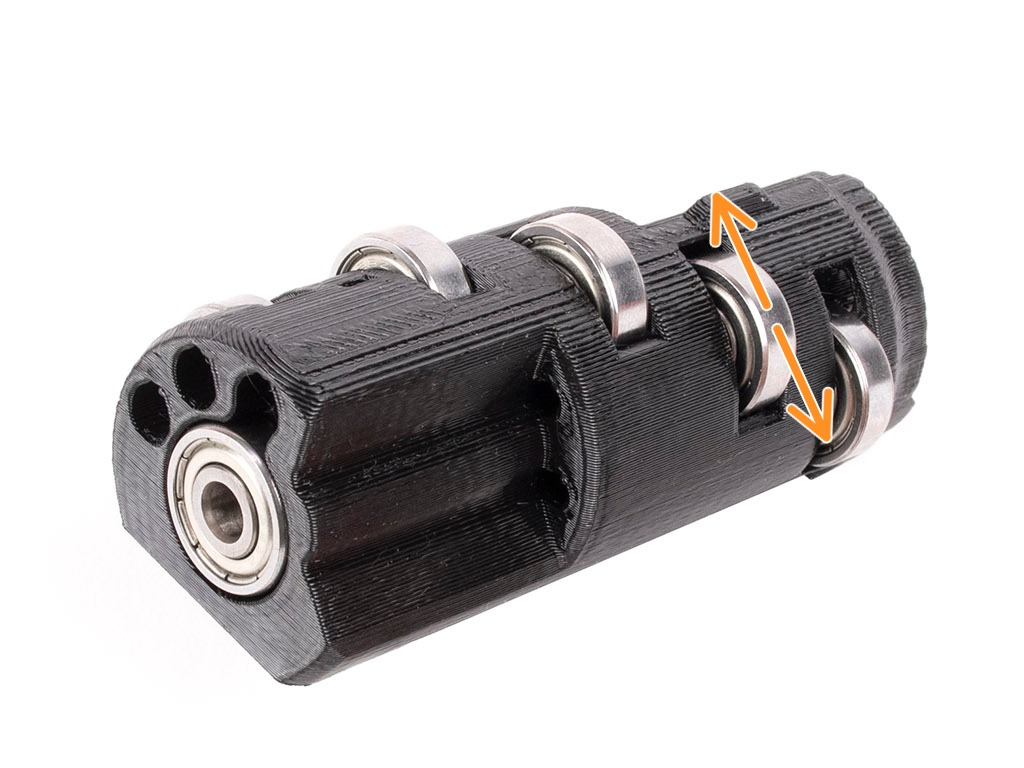
                  Idler Bearings

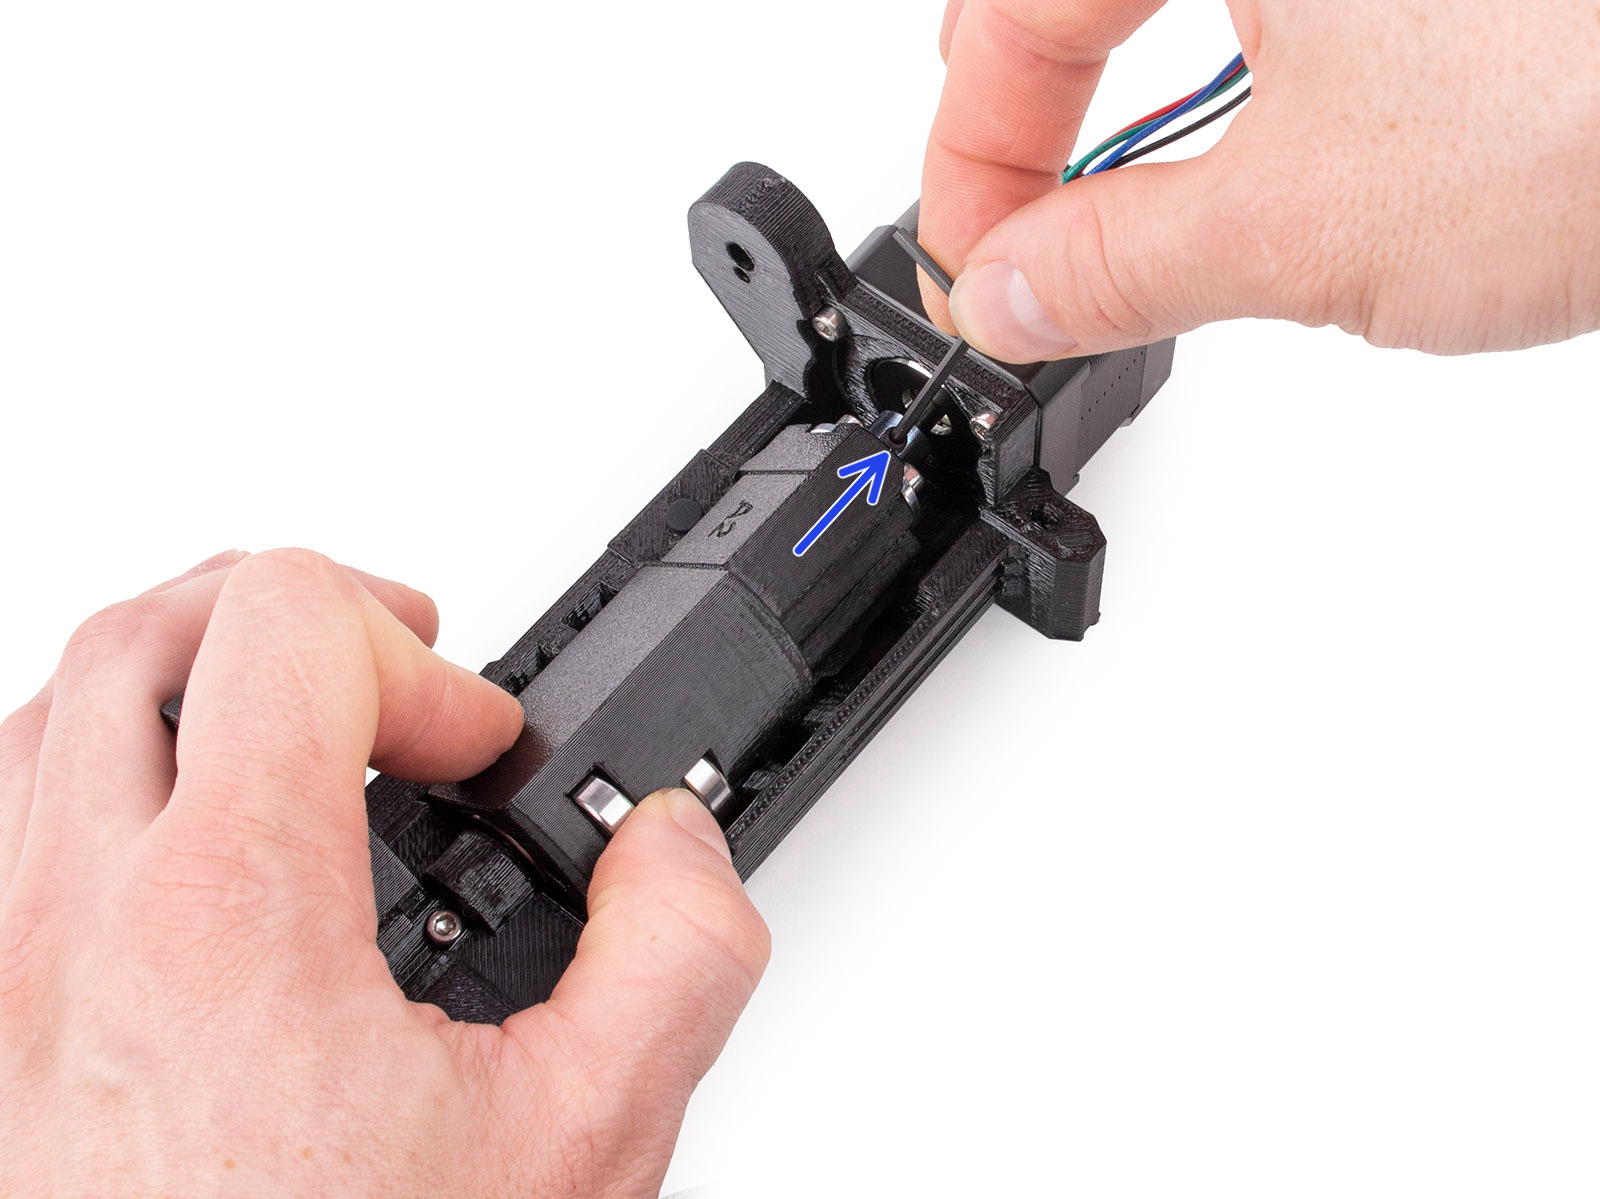
                  The five bearings protruding from the idler cylinder must be spinning freely on their shafts. If that is not the case, you can always remove and inspect the bearing by pushing out the shaft from the opposite side they are inserted. Use a rod or Allen key at least 100 mm (~4 in) long.
                  Securing the idler on the shaft

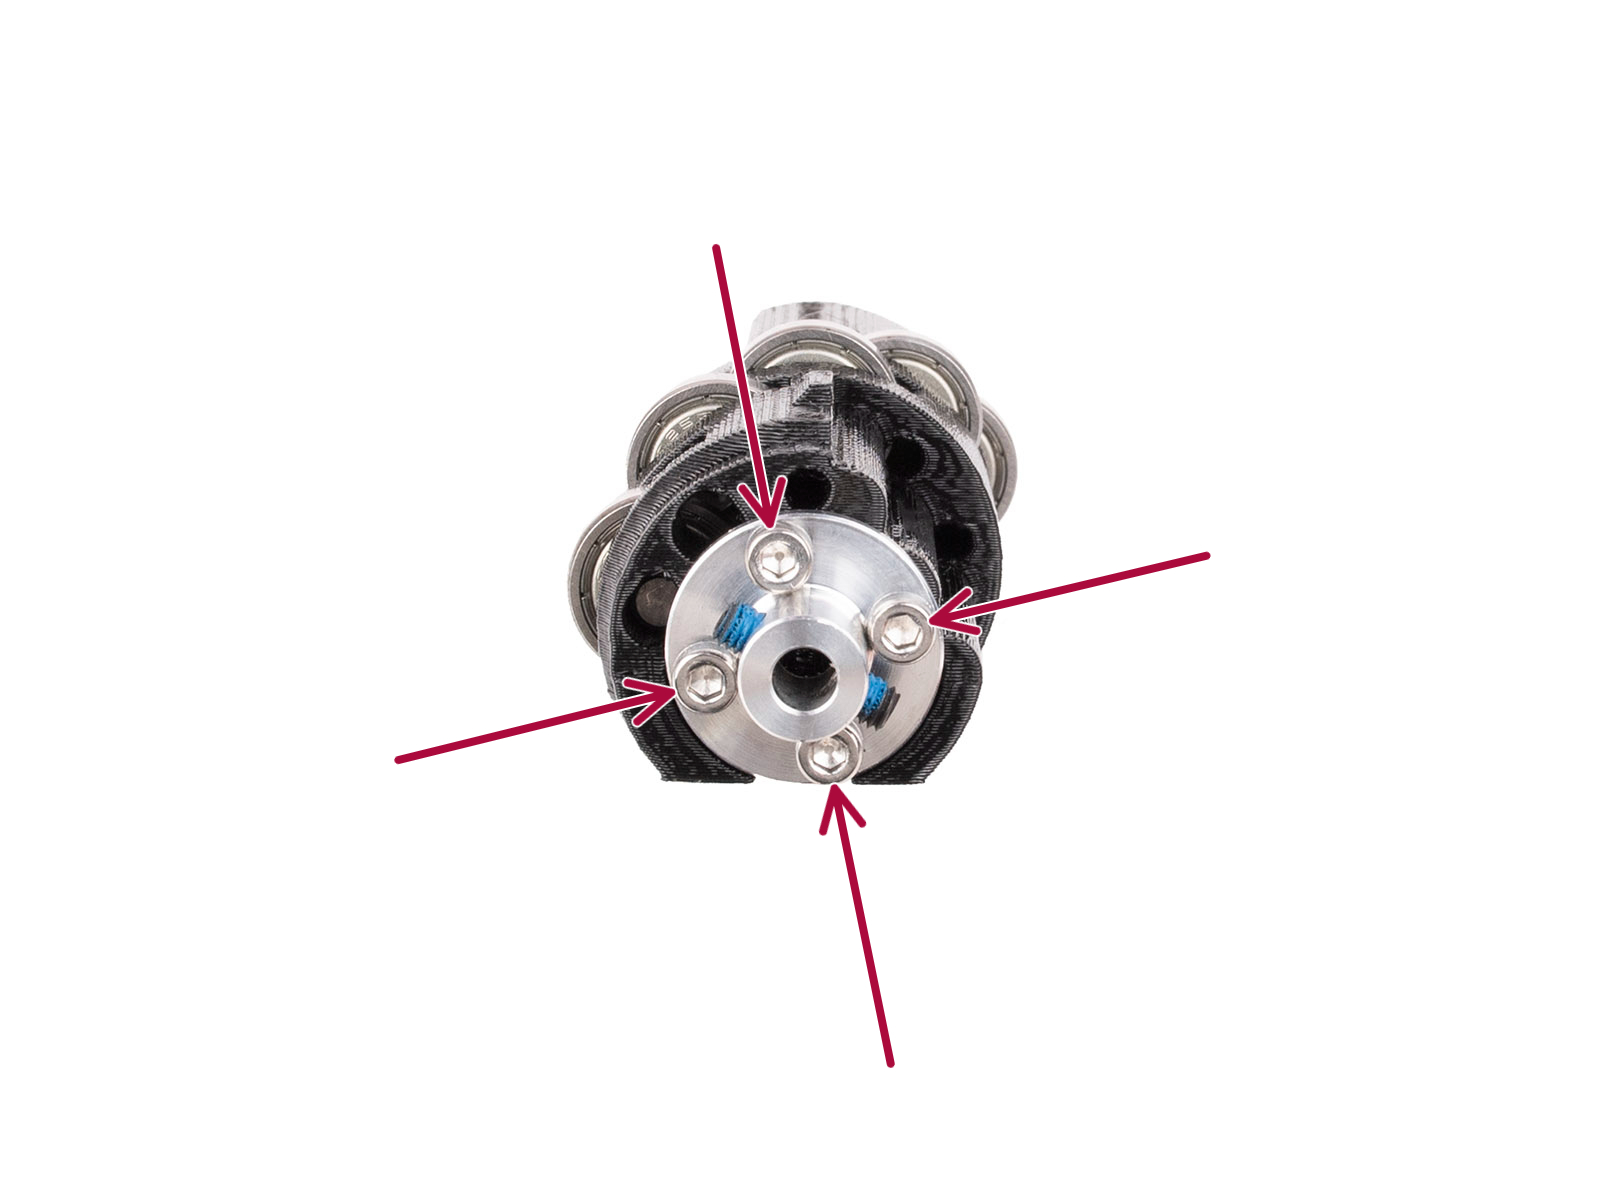
                  A metal coupler connects the idler and the idler body. Make sure that the four M3x10 screws are well-tightened. Then use a 2 mm Allen key to check if the set screw is firmly tightened on the flat part of the motor shaft. After that, make sure that the idler is rotating freely
                  Align the pulleys

                  The filaments are being pushed through the MMU3 unit using 5 hobbed pulleys, mounted on the long shaft of the pulley motor. The grub screws must be:
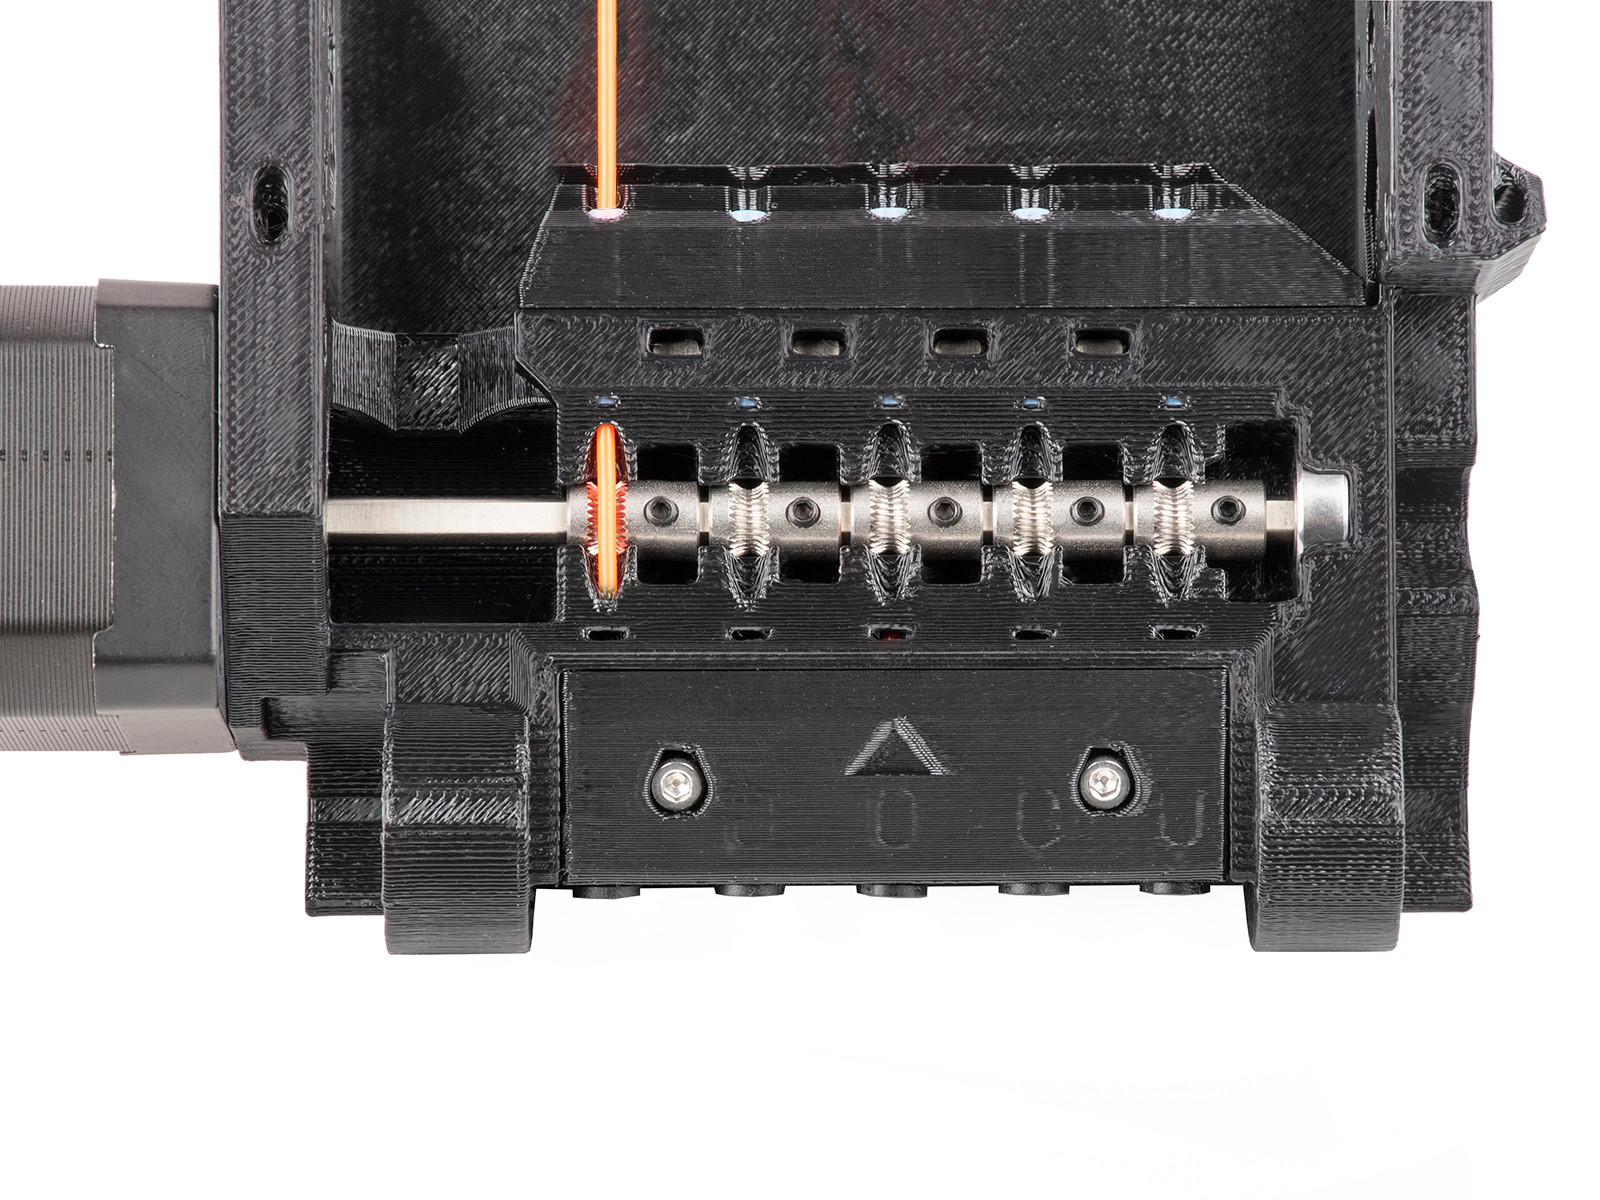
                  • Oriented on the left side of the teeth, away from the Pulley motor.
                  • Perfectly aligned with the filament holes and filament, as shown in the photo below.
                  • Secured by the small black grub screw against the flat side of the Pulley motor shaft.

                  Over time, filament dust may accumulate in the teeth of the pulleys. The best practice is regularly to clean them with a mini-brush or a similar tool.

                  Black Collets

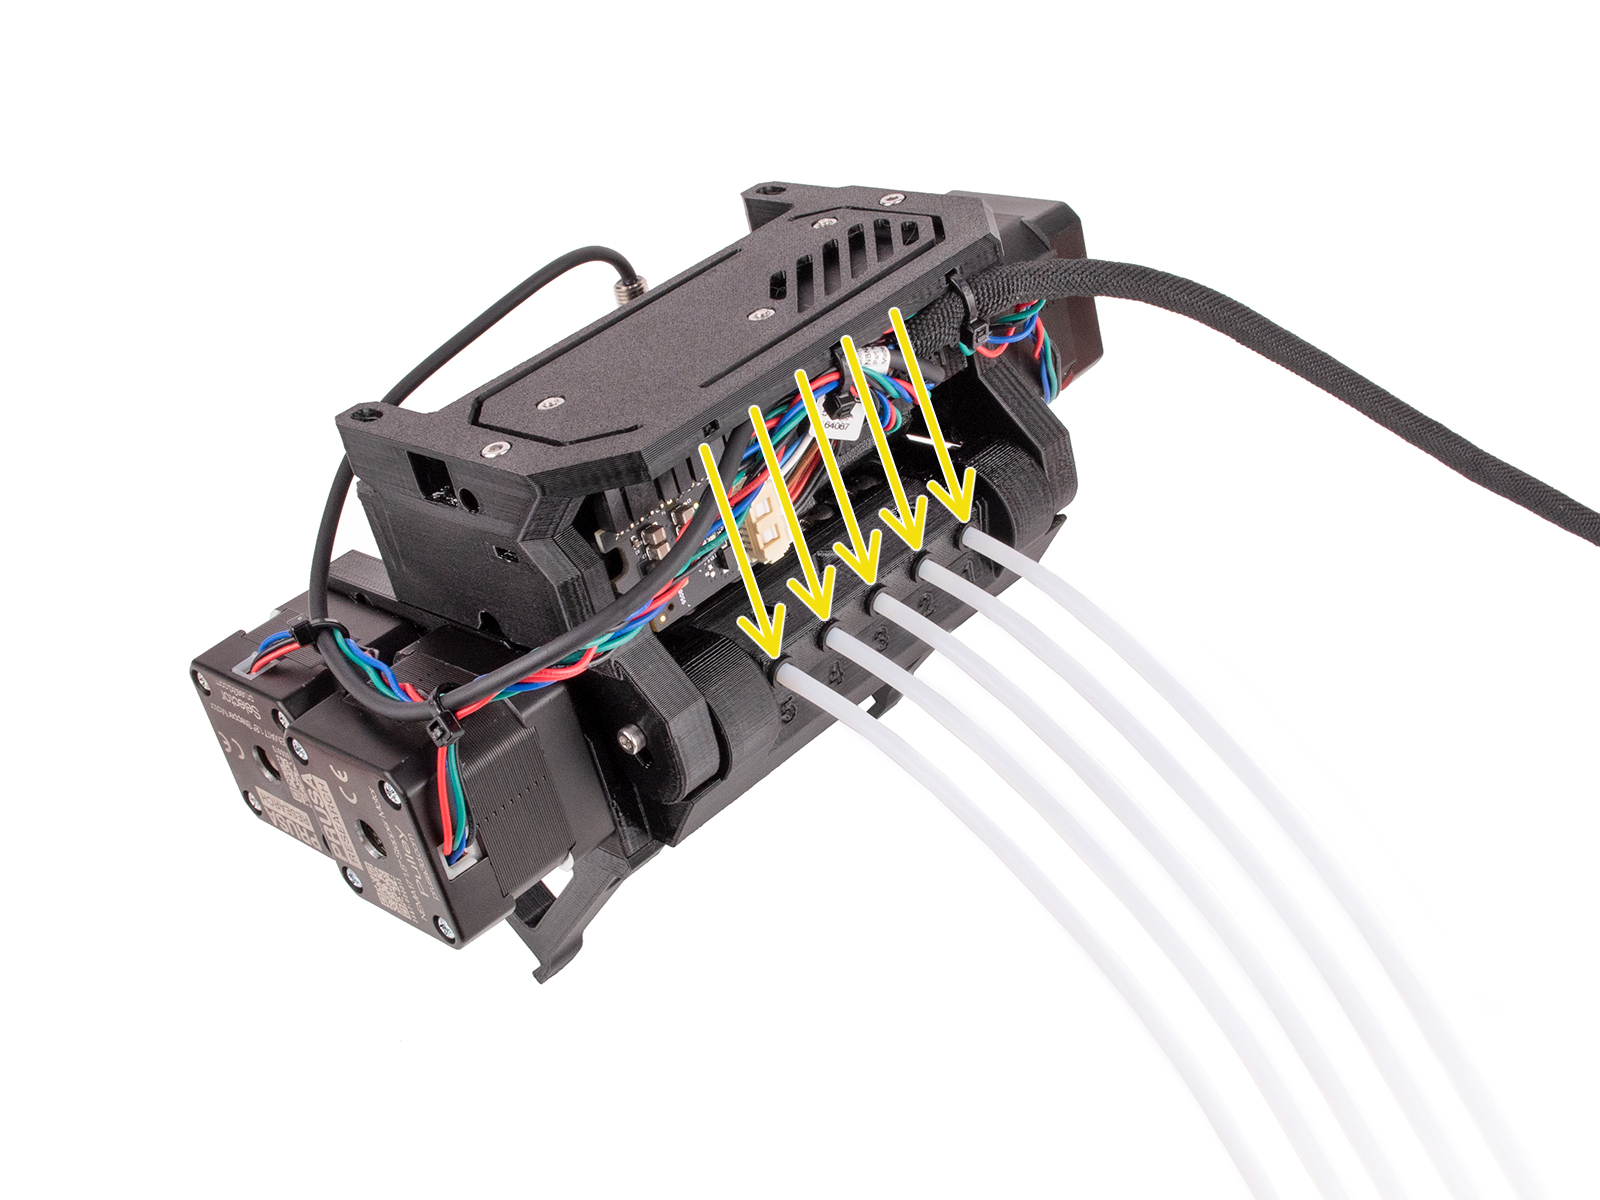
                  The PTFE tubes that lead the filaments into the MMU unit are held in place by 5 collets. The collets must be secure so the PTFE tubes do not fall during printing, the collets must be secured. Remember that the PTFE is loose when the collet is pushed in, and secured when the collet is pulled back.
                  Short PTFE tubes orientation

                  After the filament is grabbed by the hobbed pulley, it is pushed into one of the five 19 mm (0.75 inches) PTFE tubes. These tubes are chamfered on one end, which provides some extra space for the unloaded filament, as the tip might be slightly thicker than the rest of the filament. Therefore, the chamfered end must be facing out, away from the pulleys.

                  Selector blade

                  Make sure the little blade that is supposed to cut filament strings is secured in place with an M3x10 screw, and that the blade is seated nicely.

                  Slicer settings

                  The shape of the filament tip is very important for a successful MMU3 print. The tip should be pointy but without any lump or string. The diameter of the tip can be slightly bigger than the rest of the filament, but not by much.
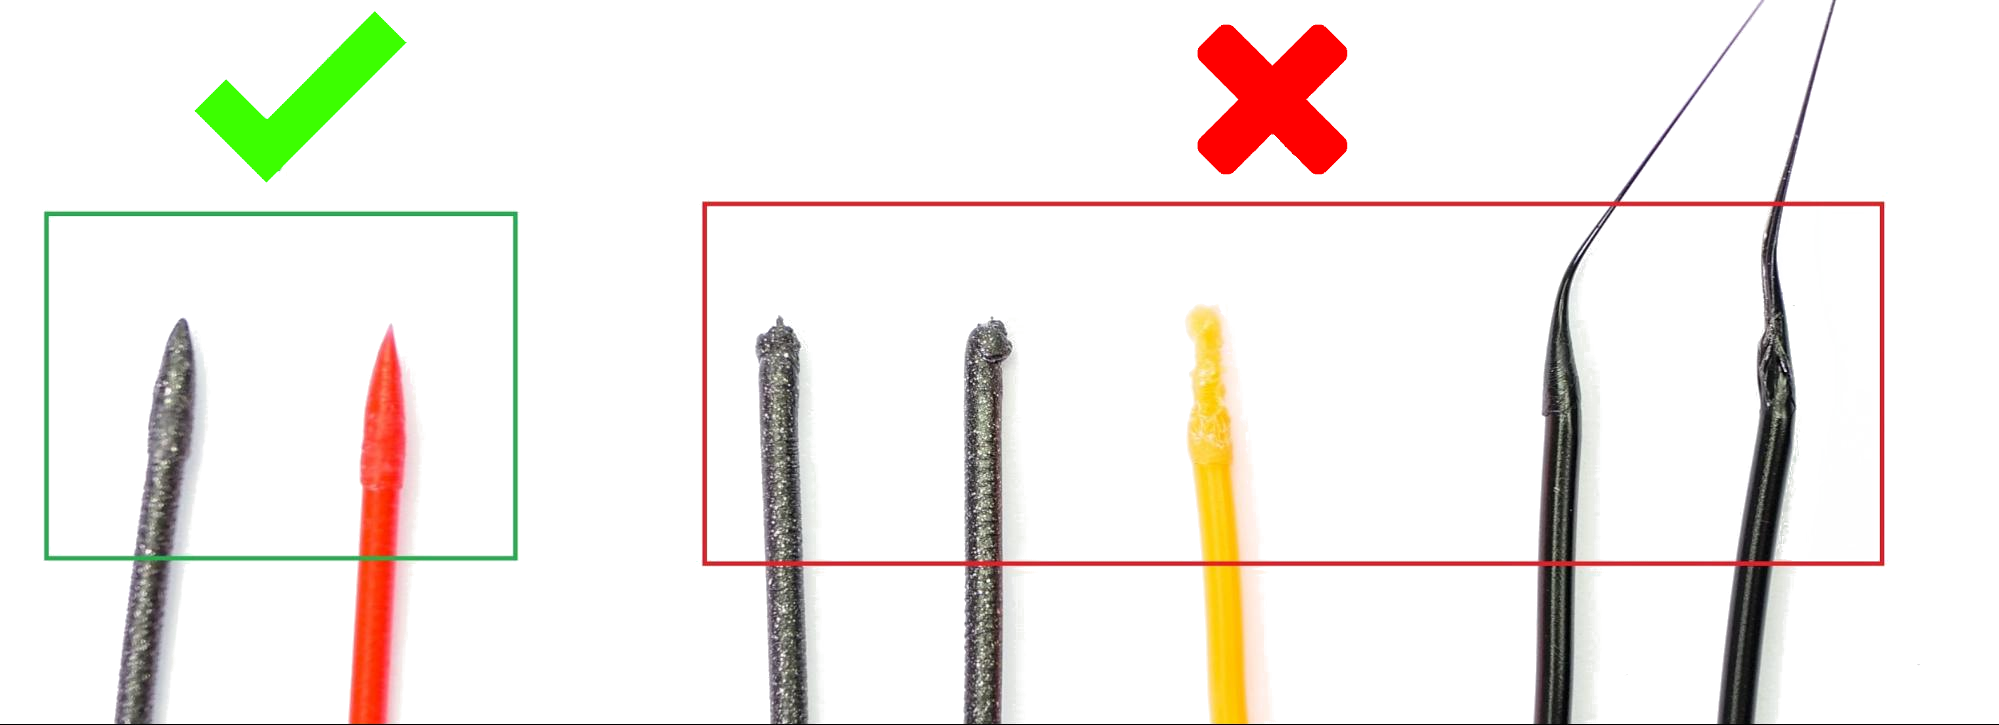
                  First of all, try to adjust the hotend temperature (increase or decrease it by increments of 2°C), which will solve the problem in most cases. You can do so during the print in the Tune menu or when slicing the model.

                  If the problem persists, head back to PrusaSlicer and increase the number of cooling moves by 2 or 3 from Filament settings -> Advanced -> Number of cooling moves). Furthermore, you can try to increase the unloading speed by increments of 10 mm/s from Filament settings -> Advanced -> Unloading speed.

                  Test prints

                  If you are sure that all potential issues mentioned above have been avoided, feel free to test one of the MMU3 Sample Objects.

                  Was this article helpful?
                  This action is available only to registered users. Please log-in.

                  2 comments

                  Log in  to post a comment
                  tom_streeter
                  •
                  Can we get a bit more explanation as to what we're looking at with the "incorrect" image under "Slicer Settings?" I'm assuming the two examples on the far right were the result of a too-hot hotend, but that's a guess and I don't guess well. A picture is worth a thousand words, but only if fth necessary words describe something in the picture.  Those are pictures of filaments, not hotends. Show the effect. Say the cause.  The overall quality of the documentation is excellent . This suggestion is meant as an incremental improvement to a well-crafted piece.
                  Reply
                  thedoctor916
                  •
                  I'm curious when a fix will be released for the Mickey Mouse cam tensioning setup. I really enjoy counting down the hours until the screws back themselves out and the cam door pops open. The problem is simple: when a screw isn’t under proper tension and a spring is part of the system, the spring causes the screws to gradually loosen. The hinge for the door should have tighter tolerances and be tightened against a hard stop, so the system stays under tension.
                   
                  Of course, this isn’t possible without a redesign because the hinge is too sloppy, and when tightened, the resulting gap is too small to allow the filament feed properly.
                   
                  This design is flawed and needs to be addressed.
                  Reply

                  Topics

                  • Calibration
                    • Basic calibration
                      • Mesh bed leveling
                      • Idler screw tension
                      • MMU3 Setup and inspection
                      • First Layer Calibration (i3)
                    • Advanced calibration
                    • Calibration Error Messages