Prusa
  • SHOP
    • Latest products
    BY CATEGORY
    • 3D printersnew
    • 3D printer upgradesnew
    • Materials
    • Accessories
    • Spare parts
    • Courses
    • Merch
    • Get a price quote
    QUICK LINKS
    • Shipping & delivery
    • Returns & refunds
    • Payment & financing
    • Warranty
    • VAT & Customs fees
    • FAQ

    0 item in your cartitems in your cart

    Your cart is empty

    Go to cartShop 3D printers

    My profile

    Log in to see orders, saved items

    My profile

    Signed in as

    • Orders
    • Logout
  • 3D PRINTING
    • Explore 3D printing
    FOR BEGINNERS
    • 3D printing 101
    • How FDM printing works
    • Buying your first printer
    • 3D model catalog
    BY APPLICATION
    • Rapid prototyping
    • Manufacturing
    • Engineering
    • Research
    • Arts & design
    GO DEEPER
    • Materials guide
    • Courses
    • Webinars
    • Case studies
    • Custom 3D printing
  • 3D PRINTERS
    • All 3D printers
    FOR
    • Home or garageHobbyists, tinkerers and home printing
    • BusinessIn-house production for small teams
    • EnterpriseFleets, security and scale
    • Which Prusa is right for me
    SHOP & BROWSE
    • CORE One+new
    • CORE One+ INDXnew
    • CORE One L+new
    • CORE One L+ INDXnew
    • XL+new
    • MK4S
    • Prusa Pro HT90
    • Prusa Pro AFS
    • Prusa Pro SLX
    MORE FROM PRINTERS
    • Parts & upgradesnew
    • Critical infrastructure
    • Case studies
    • Signature Oak
    • Kits
  • MATERIALS
    • All materials
    BY USE
    • Every-day & design
    • Functional engineering
    • Composites
    • Pro speciality
    • SLA resins
    PRUSAMENT
    • PLA
    • PETG
    • ASA
    • PC
    • PA11
    • Flex
    • TPU
    MORE FROM MATERIALS
    • Materials guide
    • We make material in house
    • Sustainability
    • Order on the store
  • SOFTWARE
    • All software
    PREPARE THE PRINT
    • PrusaSlicer 3.0New
    PRINT & MONITOR
    • Prusa Connect
    • EasyPrint
    • iOS & Android app
    • Prusa Farm
    GET STARTED
    • Download & install
    • Knowledge base
    MORE FROM SOFTWARE
    • 3D model catalog
  • SUPPORT
    • Explore support
    FIND ANSWERS
    • Knowledge base
    • Troubleshooting
    • Courses
    • Webinars
    GET HELP
    • Contact us
    • Livechat
    • Shipping & delivery
    • Warranty
    • Returns & refunds
    • Service & spare parts
    • Service & Repair
    COMMUNITY
    • Forum
    • Reddit
    • Printables
  • TRUST CENTER
    • Trust Center overview
    BY TOPIC
    • GDPR
    • Certificates
    • Security
    • Compliance
    COMMITMENTS
    • Sustainability report
    TALK TO US
    • Contact the security team
  • COMPANY
    • About Prusa
    GET TO KNOW US
    • Our story
    • How we make printers
    • Open source
    • Brand & media kit
    NEWS
    • Blog
    • Newsroom
    • Events
    TRUST & PARTNERS
    • Sustainability
    • Resellers & distributors
    • Affiliate program
    • Contact
    • English
    • Čeština
    • Deutsch
    • Español
    • Français
    • Italiano
    • Polski
    • 日本語
  • Signed in as

    • Orders
    • Address
    • In-stock Alerts
    • My Courses
    • Subscription
    • Edit Account
    • Logout

Log in to see orders, saved items

Signed in as
  • Orders
  • Address
  • In-stock Alerts
  • My Courses
  • Subscription
  • Edit Account
  • English
  • Čeština
  • Deutsch
  • Español
  • Français
  • Italiano
  • Polski
  • 日本語
Shop

0 item in your cartitems in your cart

Your cart is empty

Go to cartShop 3D printers

My profile

Log in to see orders, saved items

My profile

Signed in as

  • Orders
  • Logout
SHOP
  • Latest products
BY CATEGORY
  • 3D printersnew
  • 3D printer upgradesnew
  • Materials
  • Accessories
  • Spare parts
  • Courses
  • Merch
  • Get a price quote
QUICK LINKS
  • Shipping & delivery
  • Returns & refunds
  • Payment & financing
  • Warranty
  • VAT & Customs fees
  • FAQ

Featured products

    Popular categories

      Trending searches

        Articles

          Blog

            Products

              Categories

                Suggested searches

                  Searching…
                  No results
                  Something went wrong.
                  ↑↓ Select↵ OpenEsc Close search
                  1. Support
                  2. Basic calibration
                  3. First Layer Calibration (MINI/MINI+)
                   

                  Contents

                  • Calibration procedure
                  • Smooth Sheet
                  • Textured sheet
                  • When to run the first layer calibration
                  • Steel sheet profiles

                  Blog

                  • Prusament Pellets: Raw material batches for large-format 3D printing or small-scale polymer research & development
                  • Print colorful and glowing Halloween decorations with our spooky offer
                  • Factorio Has Arrived on Printables

                  Newsletter

                  Signup and get our monthly squeeze on updates, blog, printables and much more.

                  By clicking, you agree to receive our newsletter.

                  This site is protected by reCAPTCHA Enterprise and the Google Privacy Policy and Terms of Service apply.

                  Factorio Transport Belts
                  E-shop
                  • 3D Printers
                  • Printer Upgrades
                  • Filaments
                  • Accessories
                  • Prusa Merchandise

                  © Prusa Research a.s.

                  Printables
                  • 3D Models
                  • Store
                  • Clubs
                  • 3D Design Contests
                  • Brands
                  Community
                  • World Map
                  • Forum
                  • User Groups
                  • Events
                  Help
                  • Prusa Help
                  • Prusa Academy
                  • 3D Printing Calculators
                  Software
                  • PrusaSlicer
                  • Prusa.app
                  • Prusa Connect
                  • Drivers and Software
                  Company
                  • About Us
                  • Blog
                  • Official Prusa Resellers
                  • Contact Us
                  • Certified for ISO 9001, ISO 14001, ISO 45001
                  • General Terms and Conditions
                  • General Terms and Conditions of Use of the PRUSA Websites
                  • Privacy Policy
                  • Information about cookies
                  • Customer Complaints Policy
                  • Status Page
                  • Do Not Sell or Share My Personal Information
                  • Supplemental Statements
                  • General Terms and Conditions
                  • General Terms and Conditions of Use of the PRUSA Websites
                  • Privacy Policy
                  • Information about cookies
                  • Customer Complaints Policy
                  • Status Page
                  • Do Not Sell or Share My Personal Information
                  • Supplemental Statements

                  © Prusa Research a.s.

                  JOSEF PRUSA®, PRUSA RESEARCH®, PRUSA POLYMERS®, PRUSA ORANGE®, PRUSA 3D ® AND PRUSAMENT® are registered trademarks of Prusa Development a.s. used by Prusa Research a.s. under licence from Prusa Development a.s.

                  First Layer Calibration

                  (MINI/MINI+)

                  Relevant for

                  MINI
                  MINI+
                  15 comments
                  Article is also available in following languages
                  English
                  Čeština
                  Polski
                  Deutsch
                  Français
                  Español
                  Italiano
                  日本語

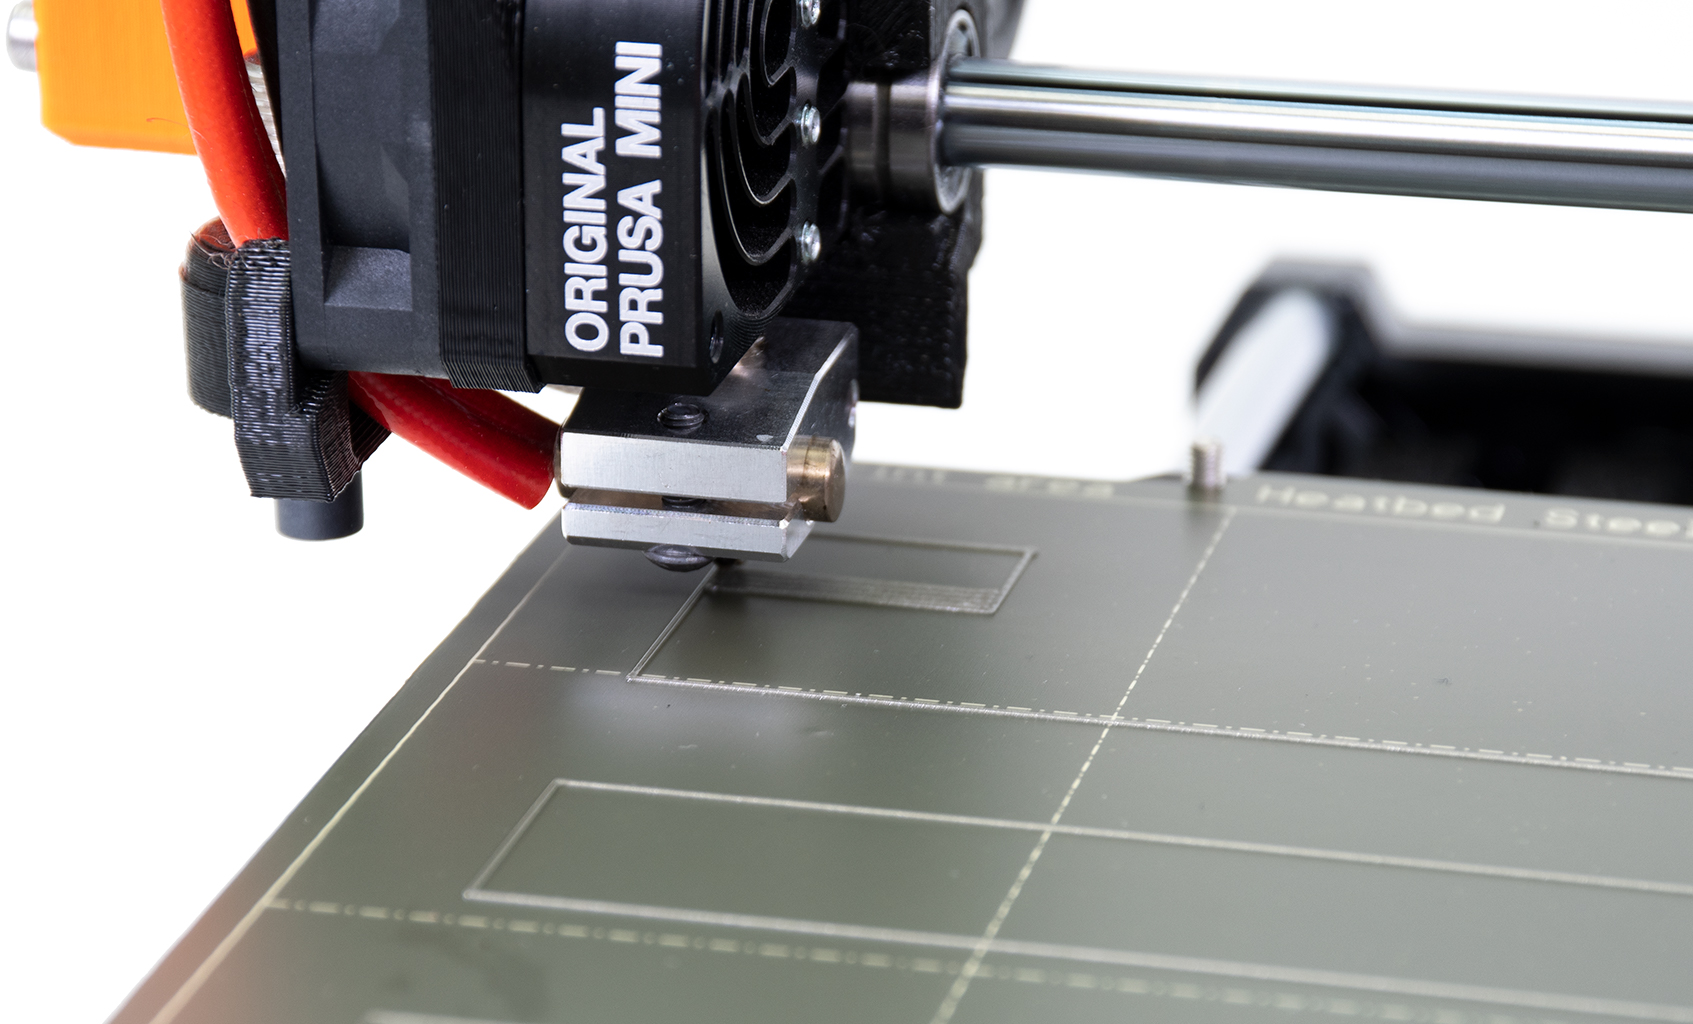
                  The First Layer Calibration is used to calibrate the distance between the tip of the nozzle and the print surface. The aim is to adjust the nozzle height until the extruded plastic sticks nicely to the bed and you can see that it is being slightly squished.
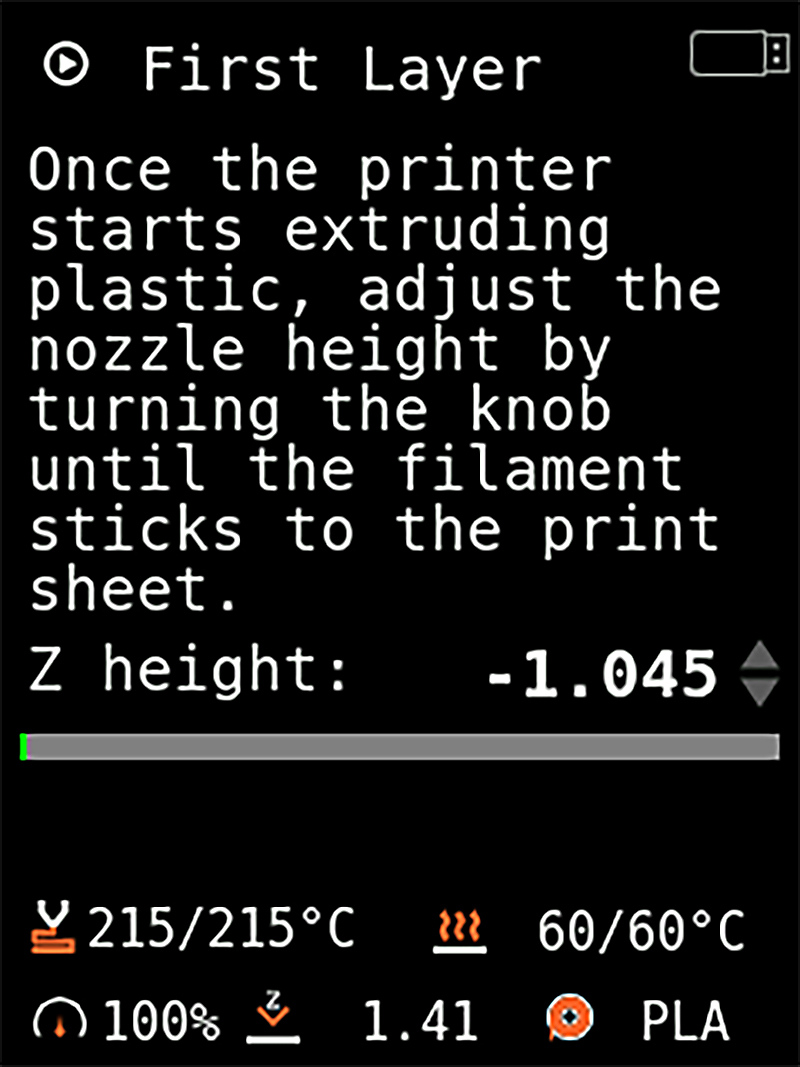
                  With a newly assembled or factory reset printer, the 'Z height' value will start at zero and move into a negative (-) value when you are reducing the distance between the nozzle and heat bed. The initial zero-value is set by the SuperPINDA/M.I.N.D.A. position. Turn the knob counter-clockwise to bring the nozzle closer to the bed and moving the value away from zero.
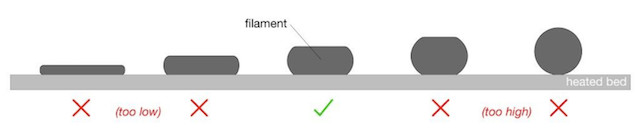
                  The value is unique to each printer and it may also slightly change with time and use. You must, therefore, check visually when adjusting the height, not by a set value. 

                  Turn the knob counter-clockwise to bring the nozzle closer to the bed.

                  Calibration procedure

                  The first layer calibration is the last part of the initial calibration. It can also be run any time from LCD-menu -> Control -> Live Adjust Z.

                  Before proceeding, ensure the print surface (smooth or textured steel sheet) is clean. You can find information on how to clean it in PEI print surface preparation. 

                  Smooth Sheet

                  Too high

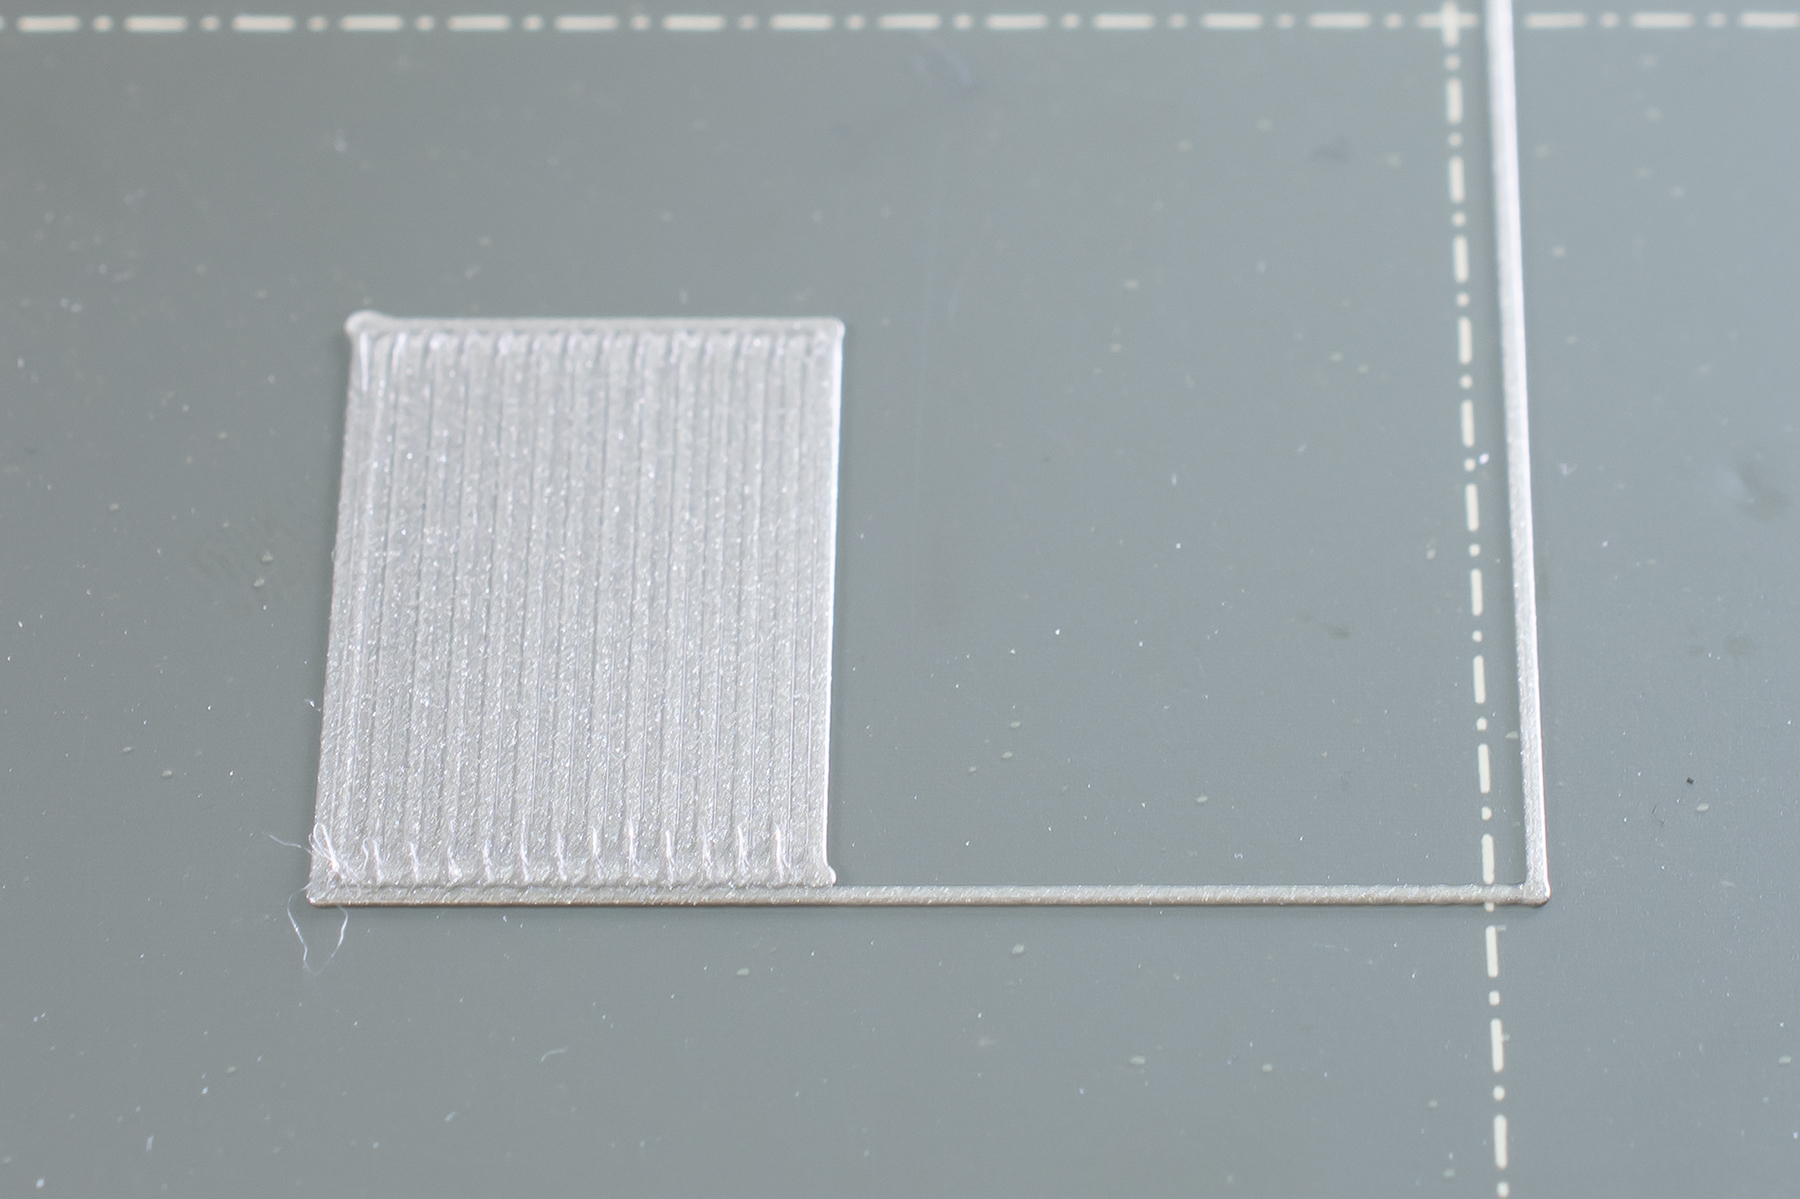
                  You want the line flattened, but not squished. On the square at the end of the test line, you do not want any gaps between the lines (left picture), which means it is too high. In that case, the value will be too close to zero. Prints will not adhere and can come loose during printing, which can, in turn, cause a blob.

                  Too low

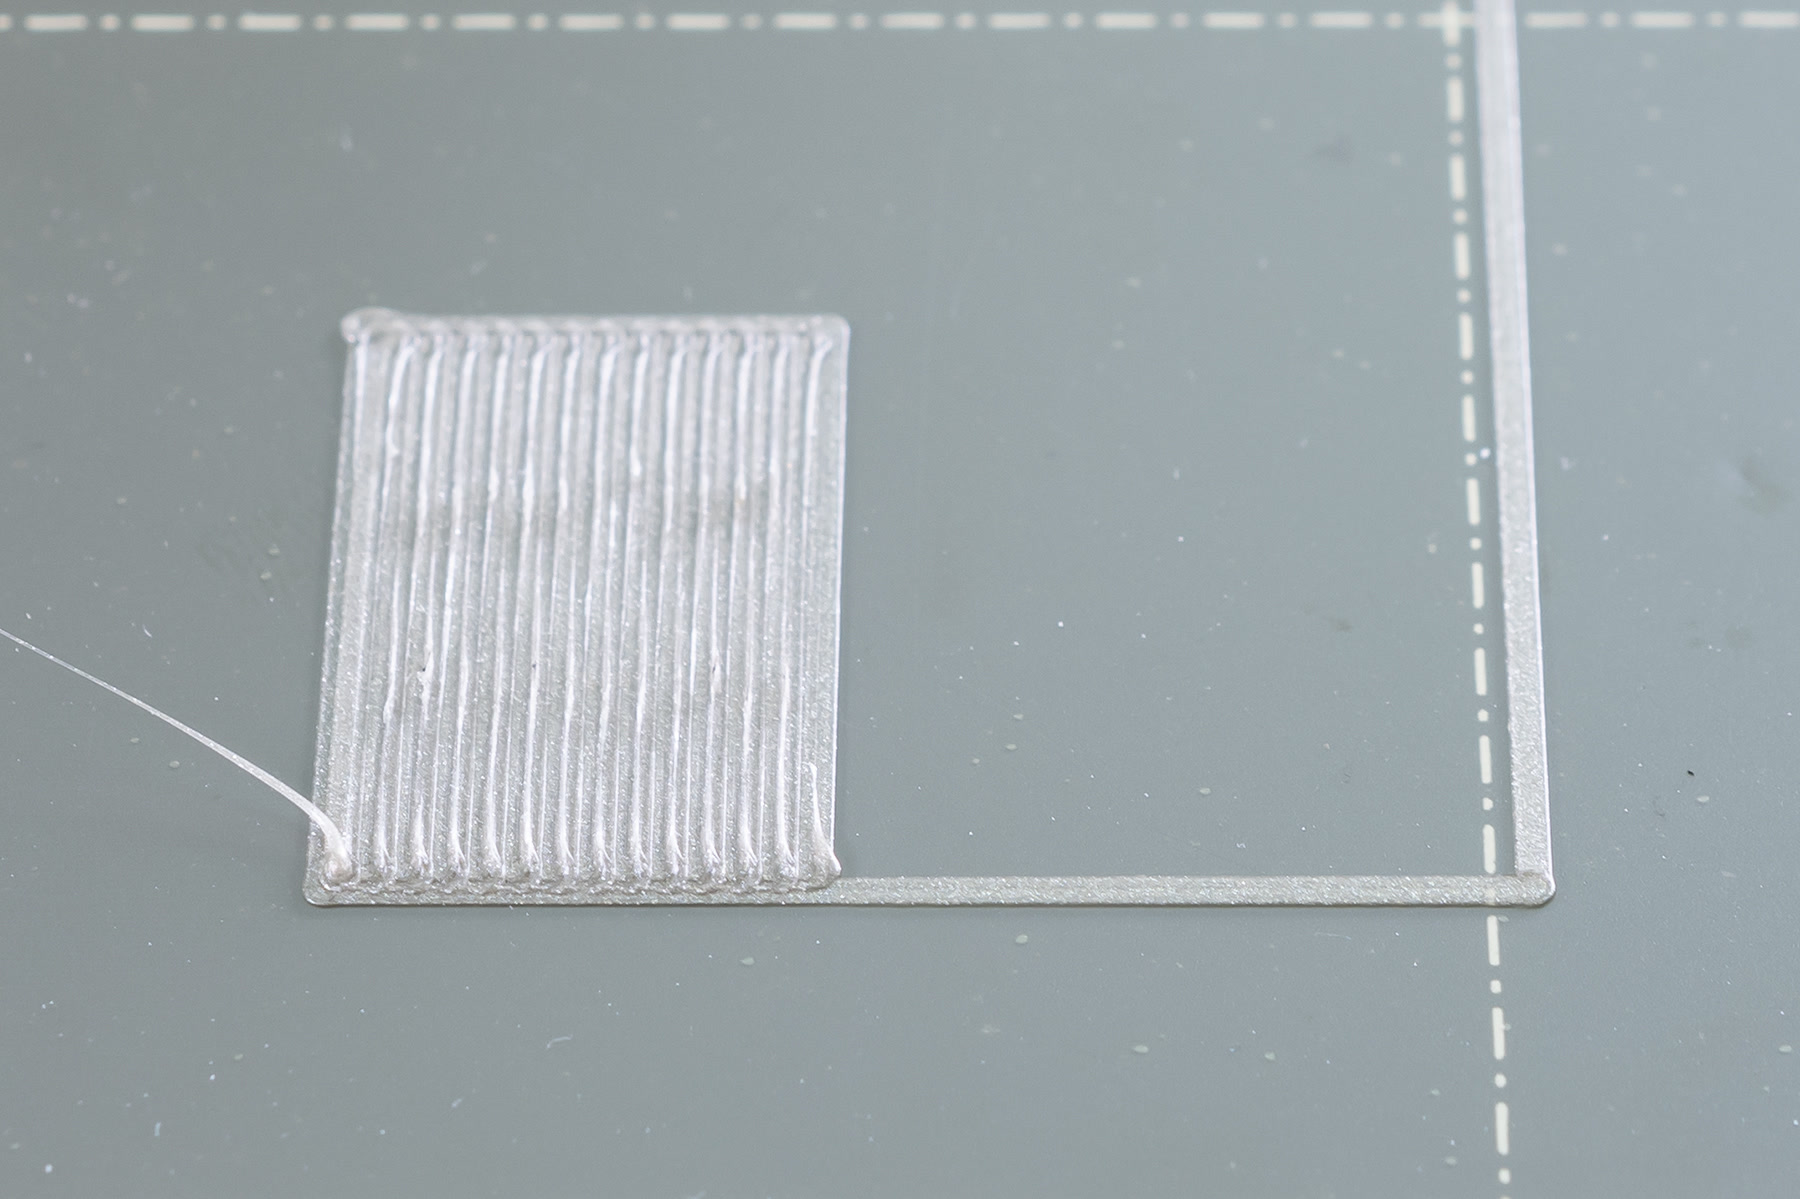
                  If the nozzle is set too low (right picture) you will see the line squished completely flat and the end square will have ridges between the lines. This is a clear sign of the nozzle being too close. The value will then be too far away from zero. When it is too low, the edges of the square can also start curling upwards. In the extreme, the filament will be spread so thin you will be able to see through the printed filament. This will clog your hotend.

                  Just right

                  A correct adjustment will show you an even surface (center picture), with no gaps, nor ridges, between the lines. As stated, the numeric value depends on the exact position of the SuperPINDA/M.I.N.D.A. sensor, which will be unique to each machine and means nothing without a visual reference. However, a common range is from -0.400 to -1.900.
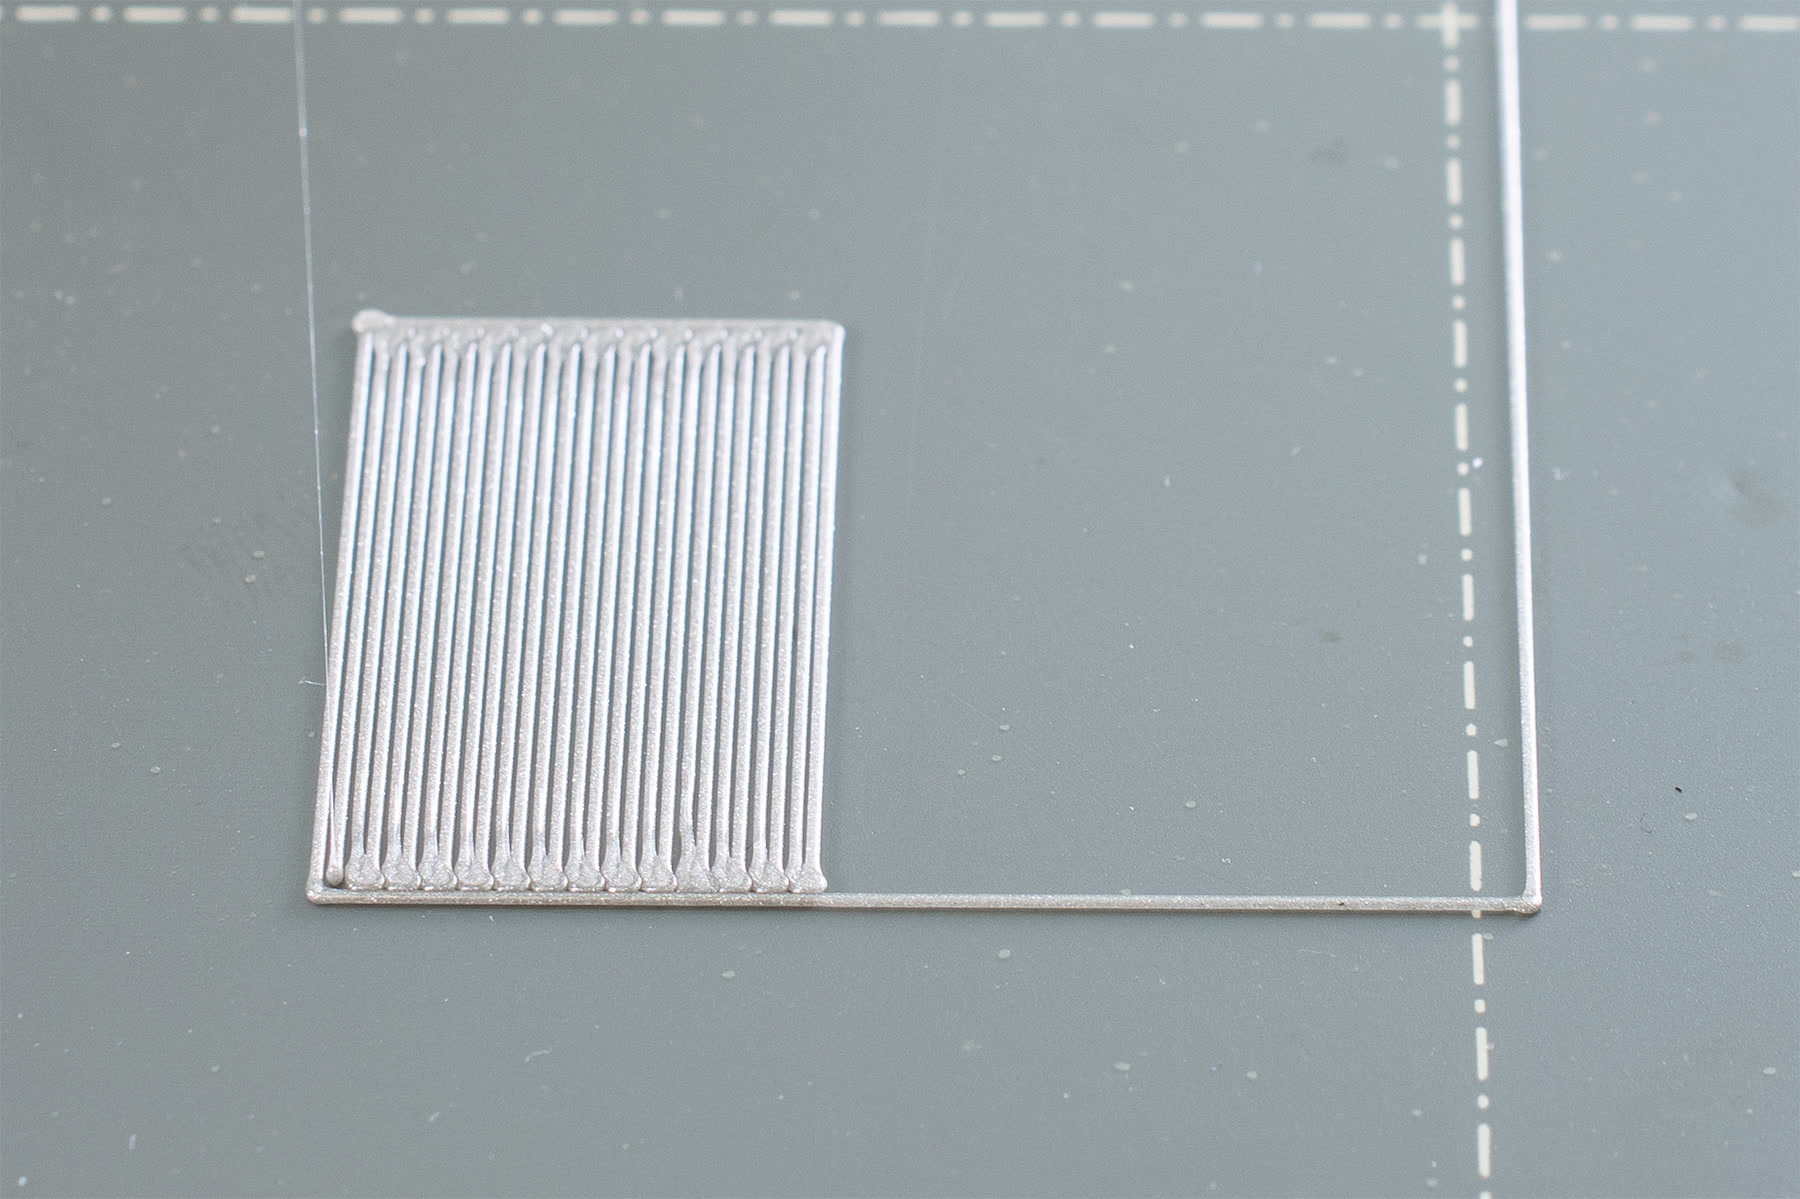
                  If you reach -2.000 and the nozzle is still not close enough to the bed, raise the SuperPINDA/M.I.N.D.A. probe slightly higher (0,5 - 1mm) in its holder and restart the first layer calibration from zero.
                  Nozzle adjusted too highNozzle adjusted perfectlyNozzle adjusted too close

                  Textured sheet

                  The textured sheets are thinner than the sheets with smooth PEI, therefore you need to move the nozzle bit closer, but you are seeking the same results as with the smooth sheet. Again, if it is set too low (right picture) the filament can start curling up around the edges like it is not adhering. The numeric value will be too far from zero and must be adjusted back.

                  If set too high, you will see the line being round, and have gaps between the lines of the end-square. In this case, the value is too close to zero.
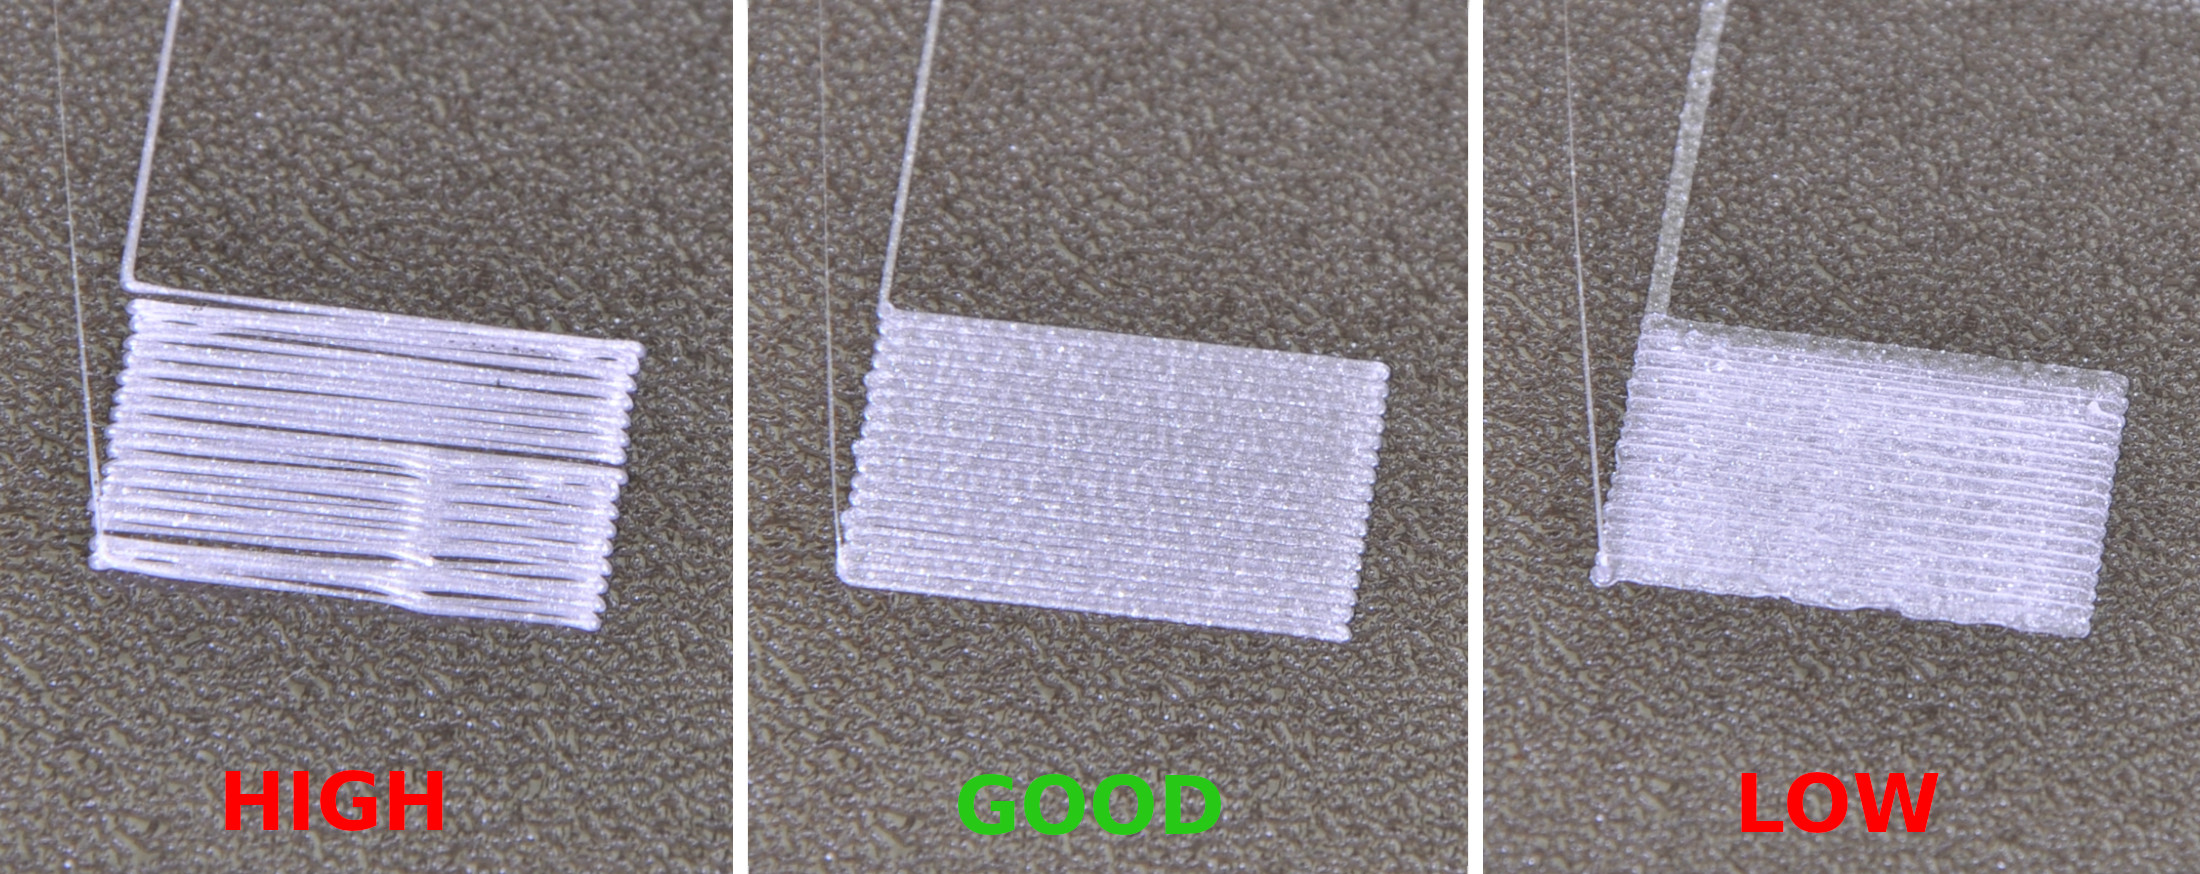
                  If you reach -2.000 and the nozzle is still not close enough to the bed, raise the SuperPINDA/M.I.N.D.A. probe slightly higher (0,5 - 1mm) in its holder and restart the first layer calibration from zero.

                  When to run the first layer calibration

                  Generally, the first layer calibration should be performed every time there is a major change in the assembly. This includes changing the nozzle, extruder upgrades, or other updates to any axis. You should also run all calibrations if you move the printer to a different location.

                  For First Layer Calibrations with other nozzle diameters than 0.4 mm, please see this article.

                  Steel sheet profiles

                  Since the thickness of the different flexible steel sheets varies with the type, you will require a separate Live Z adjustment for each sheet. Therefore the printer offers 'Steel sheet profiles', where you can set a first layer calibration for each sheet you may have. More info in Steel sheet profiles.

                  Was this article helpful?
                  This action is available only to registered users. Please log-in.

                  Topics

                  • Calibration
                    • Basic calibration
                      • Selftest failed (MINI/MINI+)
                      • Mesh bed leveling
                      • Idler screw tension
                      • First Layer Calibration (MINI/MINI+)
                    • Advanced calibration
                    • Calibration Error Messages

                  10 comments

                  Log in  to post a comment
                  Dave Schinkel
                  •
                  How do you run the wizard that runs ALL calibrations? Or is there not such a thing, because all I see is in the Control menu on my Prusa Mini a Calibrations section that makes you run each manually. I can do that but it'd be nice if it just runs them all for me with one click
                  Reply
                  NarlyB
                  •
                  During first layer calibration, my extrusion lines where thinner when the print head was moving right to left compared to the lines when the print head moves left to right.  The fix was to replace the very worn Bowden tube.  
                  Reply
                  Patronics
                  •
                  Did this process change at some point? Maybe with the 6.0 firmware update? Now, navigating to the menu and selecting "Live Adjust Z" allows height adjustment, but doesn't start the first-layer calibration procedure, instead leaving you to start another print first or try the calibration blindly.
                  Reply
                  Remy
                  •
                  Looks like it did. I had to find it in a random YouTube video. Its now under Control, Calibrations & Tests, 5 First Layer Calibration
                  Reply
                  filipdimitrov.com
                  •
                  I personally find this method inaccurate, since afterwards if I print normal rectangles their infill is printed diagonal and with large gaps between individual strings. 
                  So I put 5 rectangles 0.2 mm high (one layer) with size 20x20 at the corners and in the center and calibrate that way. Is this correct at all?
                  Calibration cube also looks way better. Also I find that dial-up "Extrusion multiplier" also play a crucial role for me. Original settings are way too low.
                  I'm using Prusament PETG and SATIN sheet.
                  Reply
                  grzego
                  •
                  If the first layer is calibreated properly, when should I calibrate it again? After a sheet change?
                  Reply