AA

Featured products

    Popular categories

      Trending searches

        Articles

          Blog

            Products

              Categories

                Suggested searches

                  Searching…
                  No results
                  Something went wrong.
                  ↑↓ Select↵ OpenEsc Close search
                  • English
                  • Čeština
                  • Deutsch
                  • Español
                  • Français
                  • Italiano
                  • Polski
                  • 日本語
                  • Orders
                  • Address
                  • In-stock Alerts
                  • My Courses
                  • Subscription
                  • Edit Account
                  • 3D printers9+▾

                    3D printersnew

                    newPrusa CORE One L+Learn more
                    newPrusa CORE One+ (Gen 2)Learn more
                    newPrusa CORE One L+ INDX 8-ToolnewPrusa CORE One+ (Gen 2) INDX 8-ToolPrusa CORE One L+: Critical InfrastructureOriginal Prusa MK4SnewOriginal Prusa XL+Original Prusa XL+: Critical Infrastructure

                    Printer upgrades

                    newINDX Conversion KitsnewPrusa CORE One L to CORE One L+ upgradenewPrusa CORE One+ to Prusa CORE One+ (Gen 2)newPrusa XL to Prusa XL+ Upgrade
                    Prusa Reward ProgramLove your Prusa printer? Share your experience and earn $30 Prusa e-shop vouchers.
                    How to Choose a 3D Printer?We’ll walk you through the basics to find the exact machine for your space, budget, and ideas.
                    Free E-bookDownload a free e-book Basics of 3D Printing with Josef Prusa and make your first steps in 3D printing world
                    Original Prusa Printable PartsCollections of printable spare parts for Original Prusa 3D printers and upgrades.
                    Shipping informationRegularly updated info about the current manufacturing capacity and delivery times of our printers.
                    Custom 3D PrintingProfessional custom 3D printing from various materials according to your requirements.
                  • Materials▾

                    Filaments

                    PrusamentPLAPETGASA / ABSPC (Polycarbonate)PA (Nylon)FlexCompositesSpecialMaterials clearance sale

                    Resin

                    Prusament ResinResin Cleaner
                    Filament GuideCheck my Prusament Spool
                    Prusament.com
                  • Parts & Accessories▾

                    Accessories

                    EnclosuresNozzlesPrint SheetsEssential AccessoriesCameras & AddonsTools & CraftingAdhesives

                    Spare parts

                    Merchandise

                    Spare parts - All PrintersCORE OneMK4/S & MK3.9/SMK3/S/+XL
                    Merch
                  • For Business▾
                    Prusa Pro HT90Prusa Pro SLXPrusa Pro AFSPrusa Pro Medical OneOriginal Prusa XLOriginal Prusa XL: Critical Infrastructure
                    Prusa CORE One+Learn more
                    Prusa CORE One LLearn more
                    Prusa CORE One L: Critical Infrastructure Edition

                    3D Printing for

                    Manufacturing and R&DAutomotive IndustryHealthcareEducation and Academic ResearchArchitects and DesignersFilm IndustryCritical Infrastructure

                    3D Printing Stories

                    • How 3D printing started: About Rep-rap and open-source with Adrian Bowyer
                    • Teaching mathematics redefined with 3D printing at JKU Linz
                    • The story behind the LTT screwdriver
                    • Victoria Hand Project: Changing Prosthetic Care with 3D Printing
                    Official Prusa Resellers
                    Sustainability
                    Prusa Education
                    Contact and Inquiry
                    Custom 3D Printing
                    ISO Certified
                  • Software▾
                    PrusaSlicer

                    PrusaSlicerPrusaSlicer

                    PrusaSlicer is an open-source, feature-rich, frequently updated tool that contains everything you need to export the perfect print files for your 3D printer.

                    WindowsMacOSLinux
                    Prusa Connect

                    Prusa Connect

                    Prusa Connect is a cloud service enabling remote control and monitoring of your 3D printers, offering secure data handling, easy setup, and support for managing multiple printers from anywhere.

                    Log in to Connect
                    Prusa.app

                    Prusa.app

                    Control your printer/s remotely from anywhere using the Prusa Connect technology behind. Prusa.app brings a new level of Prusa printer experience to Android and iOS phones.

                    Try it now!
                    Drivers & FirmwareDownload the latest firmware and drivers for your 3D printer.
                    PrusaSlicer Support
                    Prusa Connect Support
                  • 3D Models▾
                    3D PrintersArt & DesignHobby & MakersHouseholdTabletop MiniaturesToys & GamesPrintables Store

                    Popular 3D models

                    • Strong garden hose holder
                    • Prusa Spool Bot
                    • Build Tray — Modular Organizer for Assembly, Disassembly and Maintenance
                    • Broom Holder
                    • Octagon Fabric
                    • Prusa CORE One ? (Mimic Skin)

                    Design Contests

                    • Framework Laptop 12 Mainboard Re-Use9/1/2026 – 9/30/2026
                    • 🏆 Designer Challenge: Magic tricks!9/1/2026 – 9/22/2026
                    • Od prototypu k produktu: Příslušenství ke kamerám8/1/2026 – 9/14/2026
                  • Community▾

                    Upcoming Events

                    • Maker Faire Tokyo 20269/5/2026 – 9/6/2026 · Tokyo, Japan · Prusa Team
                    • IFA 20269/4/2026 – 9/8/2026 · Berlin, Germany · Prusa Team
                    • 3D Printopia 20269/26/2026 – 9/27/2026 · Pennsylvania, United States · Prusa Team
                    • Maker Faire Bay Area9/25/2026 – 9/27/2026 · Kalifornie, United States · Prusa Team

                    Prusa Forum

                    • Vent doesn't close for an ASA print
                    • Alignment tool?
                    • Is this spam?
                    Prusa World MapPrusa World MapFind local 3D printing users and explore the community around you.
                  • Help▾
                    Guides & TutorialsPrusaSlicerPrusa ConnectMaterials

                    Printer Model

                    CORE One INDXCORE One LCORE One+CORE One

                    Hardware Troubleshooting

                    • Selftest failed (CORE One/+)
                    • Clogged nozzle (CORE One, CORE One L, XL, MK4/S, MK3.9/S)
                    • Adjusting belt tension (CORE One/+, CORE One INDX, CORE One L/+)
                    • Prusa Connect and PrusaLink explained

                    Drivers & Firmware

                    INDX familyCORE One familyMK4 familyXL familyMMU familyPRO family
                  • Courses▾

                    Become an expert in 3D printing

                    Prusa Academy offers online courses on various 3D printing related topics. Each course features:

                    • easy-to-read text with many pictures and short videos
                    • links for inspiration and further study
                    • quizzes for testing your knowledge along the way
                    • certificate of completion
                    Browse all coursesMy courses library
                    • 3D Modeling in Autodesk Fusion
                    • PrusaSlicer Masterclass – Beginner to Advanced
                    • Complete Guide to 3D Print Postprocessing, Painting, and Detailing
                    • Airbrush Your 3D Prints: From Basics to Advanced Tricks
                  • Blog▾
                    • PrusaSlicer 3.0 Preview – Built for the Future of 3D Printing
                    • Prusa CORE One+ (Gen 2) INDX, Shipping Has Started, Complete Printers Open for Orders
                    • Better Prints, Easier Use: Prusa XL+, CORE One L+ and CORE One+ (Gen 2), Our Big Product Upgrade
                    E-Book: Basics of 3D Printing
                  • Company▾

                    About Prusa Research

                    We are the largest maker of 3D printers in Europe and the United States.

                    Founded as a one-man startup in 2012 by Josef Prusa, a Czech hobbyist, maker, and inventor. In just 15 years, we've grown into a company of more than 1,200 people. Every month, we design, build, and ship over 10,000 innovative and secure 3D printers from our headquarters in Prague, Czech Republic, and Delaware, USA, to users in more than 160 countries.

                    Watch a video and find out how Prusa Research was born and what we achieved within only 10 years!

                    About UsTimelineSustainabilityOpen-source
                    About Us
                    Contact Us
                    Logo and Photos
                    ISO Certified
                  1. Support
                  2. Octoprint
                  3. Octoprint - Configuration and install
                   

                  Contents

                  • Required parts
                  • Flashing the Octoprint image
                  • Connecting the RasPI
                  • Finding the IP
                  • Launching and configuring Octoprint
                  • Installing plugins
                  • Use
                  • Configure RPi Zero W GPIO
                  • Printer setting
                  • Using SSH

                  Blog

                  • PrusaSlicer 3.0 Preview – Built for the Future of 3D Printing
                  • Prusa CORE One+ (Gen 2) INDX, Shipping Has Started, Complete Printers Open for Orders
                  • Better Prints, Easier Use: Prusa XL+, CORE One L+ and CORE One+ (Gen 2), Our Big Product Upgrade

                  Newsletter

                  Signup and get our monthly squeeze on updates, blog, printables and much more.

                  By clicking, you agree to receive our newsletter.

                  This site is protected by reCAPTCHA Enterprise and the Google Privacy Policy and Terms of Service apply.

                  Strong garden hose holder
                  E-shop
                  • 3D Printers
                  • Printer Upgrades
                  • Filaments
                  • Accessories
                  • Prusa Merchandise

                  © Prusa Research a.s.

                  Printables
                  • 3D Models
                  • Store
                  • Clubs
                  • 3D Design Contests
                  • Brands
                  Community
                  • World Map
                  • Forum
                  • User Groups
                  • Events
                  Help
                  • Prusa Help
                  • Prusa Academy
                  • 3D Printing Calculators
                  Software
                  • PrusaSlicer
                  • Prusa.app
                  • Prusa Connect
                  • Drivers and Software
                  Company
                  • About Us
                  • Blog
                  • Official Prusa Resellers
                  • Contact Us
                  • Certified for ISO 9001, ISO 14001, ISO 45001
                  • General Terms and Conditions
                  • General Terms and Conditions of Use of the PRUSA Websites
                  • Privacy Policy
                  • Information about cookies
                  • Customer Complaints Policy
                  • Status Page
                  • Do Not Sell or Share My Personal Information
                  • Supplemental Statements
                  • General Terms and Conditions
                  • General Terms and Conditions of Use of the PRUSA Websites
                  • Privacy Policy
                  • Information about cookies
                  • Customer Complaints Policy
                  • Status Page
                  • Do Not Sell or Share My Personal Information
                  • Supplemental Statements

                  © Prusa Research a.s.

                  JOSEF PRUSA®, PRUSA RESEARCH®, PRUSA POLYMERS®, PRUSA ORANGE®, PRUSA 3D ® AND PRUSAMENT® are registered trademarks of Prusa Development a.s. used by Prusa Research a.s. under licence from Prusa Development a.s.

                  Octoprint - Configuration and install

                  Relevant for

                  MMU family
                  MINI family
                  MK3 family
                  OLD PRODUCTS
                  103 comments
                  Article is also available in following languages
                  English
                  Čeština
                  Polski
                  Deutsch
                  Français
                  Español
                  Italiano
                  日本語

                  This article covers how to configure your own image for any Raspberry Pi (RPi) from scratch. Following this article, you will have connected a base installation of Octoprint which you can expand upon. It will also include how to configure the Raspberry Pi Zero to be connected by its GPIO pins. However, the Raspberry Pi Zero is not powerful enough to utilize advanced Octoprint features and plugins, like video streaming, and is officially not recommended by the Octoprint project. 

                  We used to offer PrusaPrint, a custom build for the Raspberry Pi Zero. This is currently outdated and unmaintained. However, the guide soldering and connecting the RasPi is still valid for all MK3/MK3S/MK3S+ printers and can also be used not only for Octoprint, but also for the Prusa custom remote printing solutions, PrusaLink and PrusaConnect.
                  This article will cover:
                      1. Required parts/components
                      2. Flashing the image
                      3. Connecting the RasPi
                      4. Finding its IP
                      5. Launching and configuring Octoprint
                      6. Installing plugins
                      7. Configure RPi Zero W GPIO

                  Required parts

                  • A Raspberry Pi A, A+, B, B+, 2B, 3A+, 3B, 3B+, 4B 1/2/4GB, or Zero W/2 + PSU.
                  • WiFi dongle if your RasPi does not have built-in WiFi.
                  • USB Cable:
                    • Original Prusa i3: USB type-A cable.
                    • Original Prusa MINI: Micro USB cable.
                  • An SD or microSD card for your RasPi of at least 8GB.
                  • Computer with a working SSH client, like PuTTY. Mac/osX and Linux have SSH integrated into their Terminal.
                  • A (micro)SD card-reader to flash your SD-card.
                  • WiFi network.
                  If you are installing the RPi Zero over GPIO, you must have soldered the header pins before you proceed!

                  Flashing the Octoprint image

                  Since the Raspberry Pi Foundation released their "Raspberry Pi Imager", it is no longer necessary to edit config files after flashing. All can be configured in the imager, within its Advanced options menu. Raspberry Pi Imager even allows you to download images through it. Let's go through it.
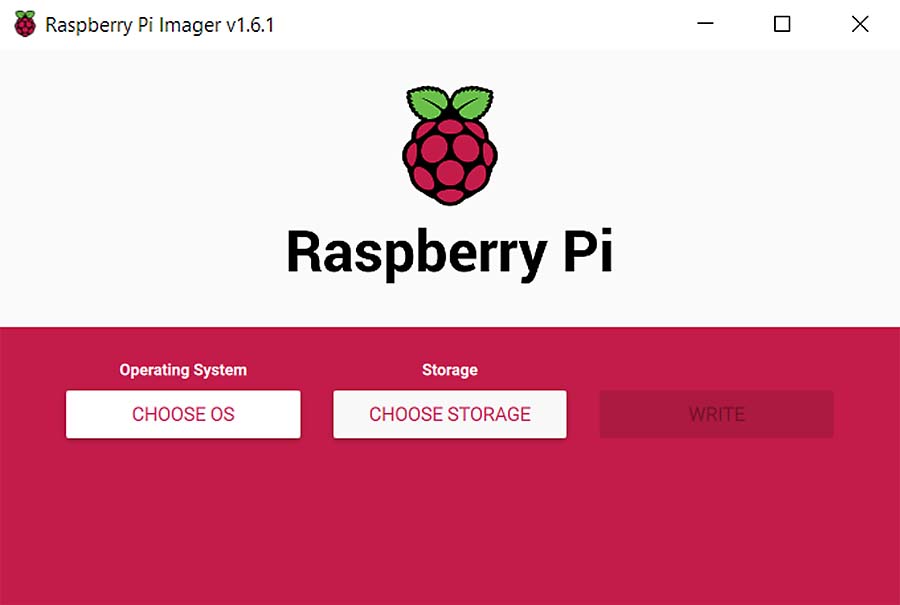
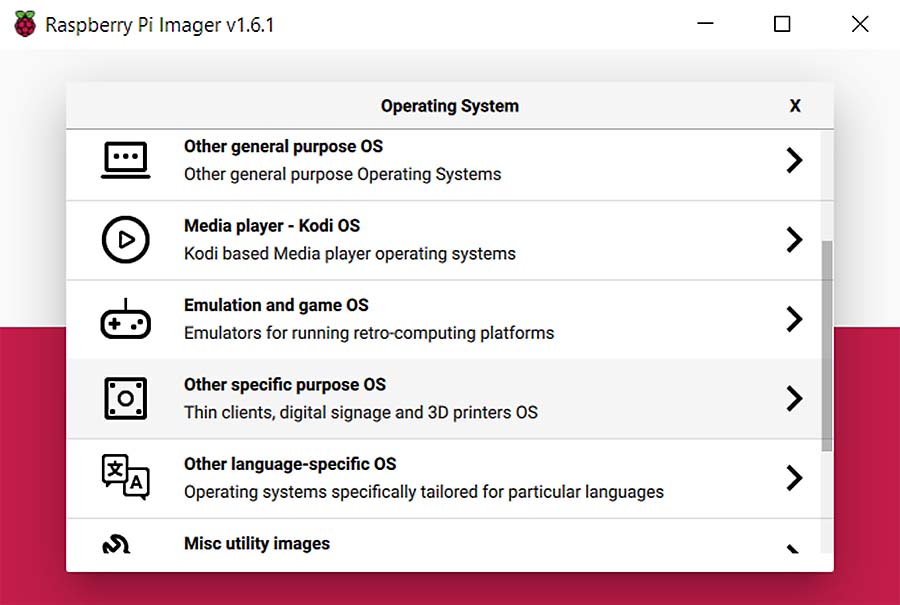
                  1. Download and install the Raspberry Pi Imager for your computer. This is found here.

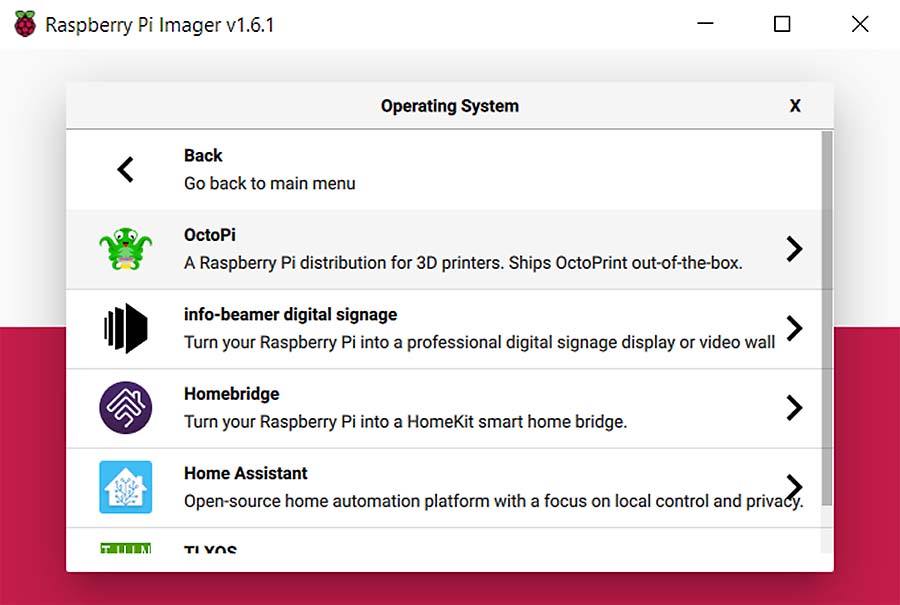
                  1. Click the 'CHOOSE OS' button and navigate to ‘Other specific purpose OS’ -> ‘OctoPi’ -> ‘stable’ version.
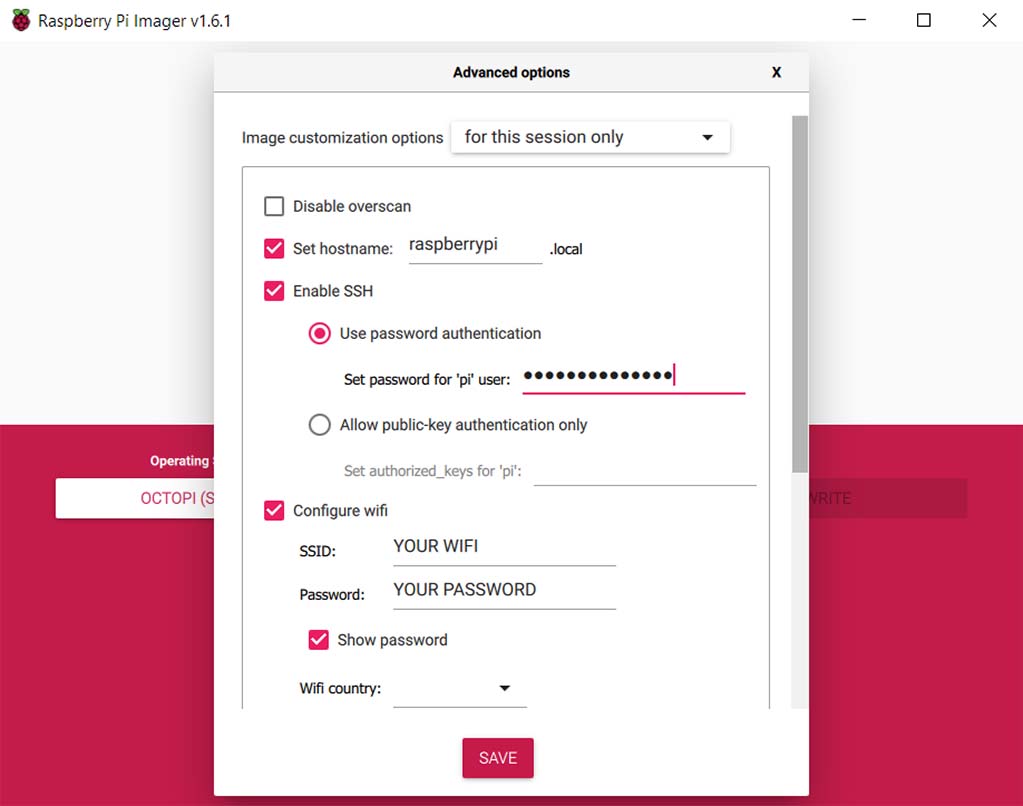
                  1. Enter the Advanced Options by pressing Shift + Ctrl + X. Enable SSH to set a hostname (name of the RPi on the network) and main password right away, as well as your WiFi network and password to connect to the Raspberry Pi later.

                  1.  After this, select your SD card under 'CHOOSE STORAGE', before clicking 'WRITE' to start the flashing process.
                  You can edit the WiFi password and network later from the file "octopi-wpa-supplicant.txt" located on the SD card or over SSH explained later in this article.

                  Connecting the RasPI

                  Insert the (micro)SD card into your RPi and connect it to the printer by USB. After this, power your RPi. The Raspberry Pi Zero W will be connected to the printer using its GPIO pins, not USB. We recommend doing this before proceeding. However, for these configurations, you can power it using a 5V phone charger and connect it later.

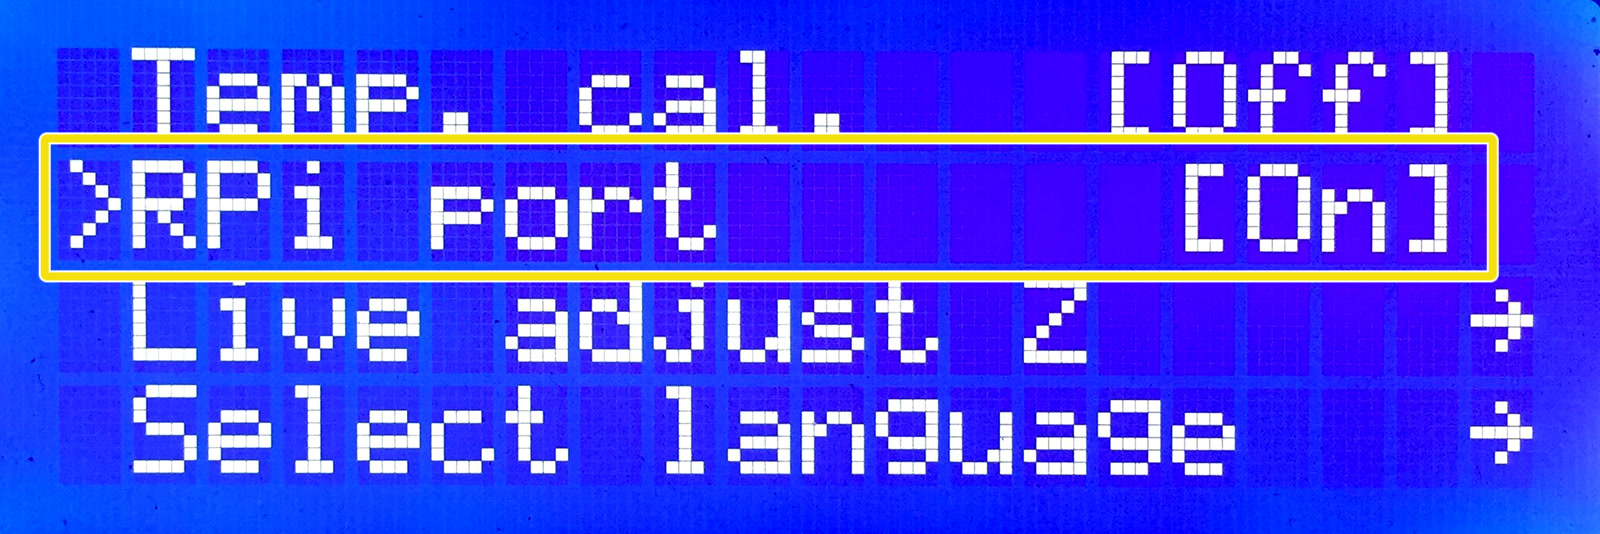
                  If you use RPi Zero over GPIO, RPi port should be 'On'. However, it also requires further configuration outlined later in this article.

                  When using USB to connect to the printer, deactivate the RPi port (LCD menu -> Settings -> RPi Port and set it to "Off").
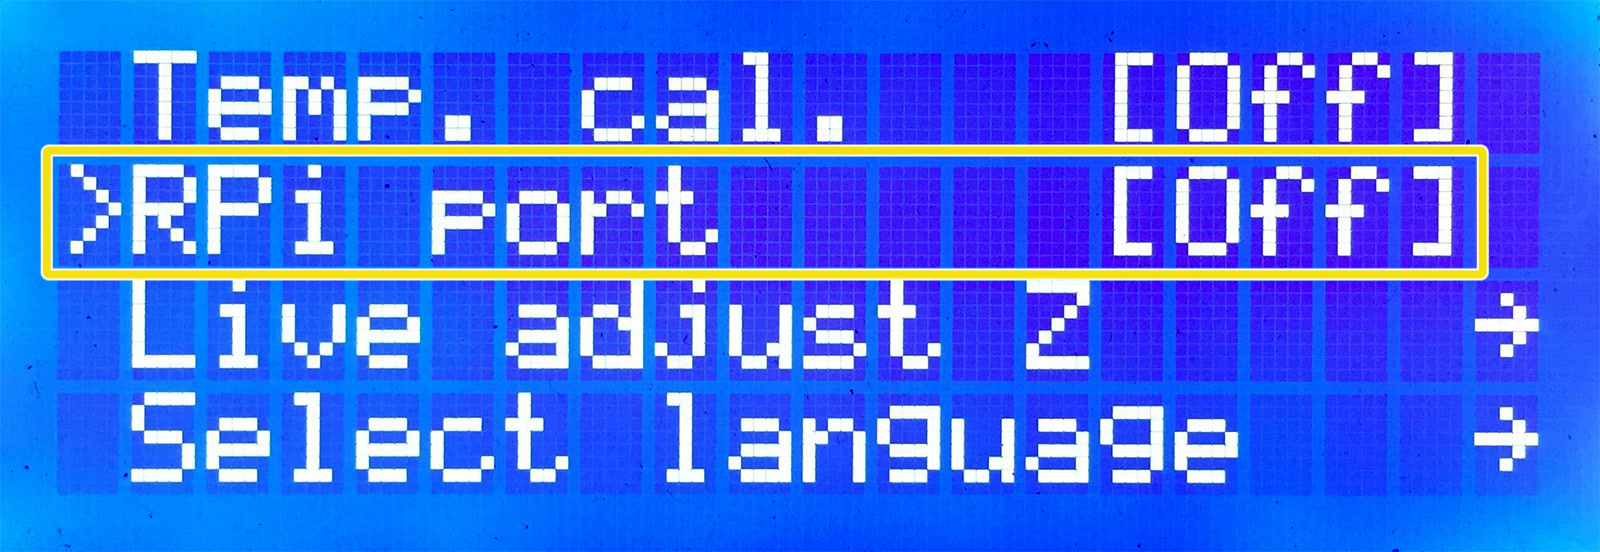
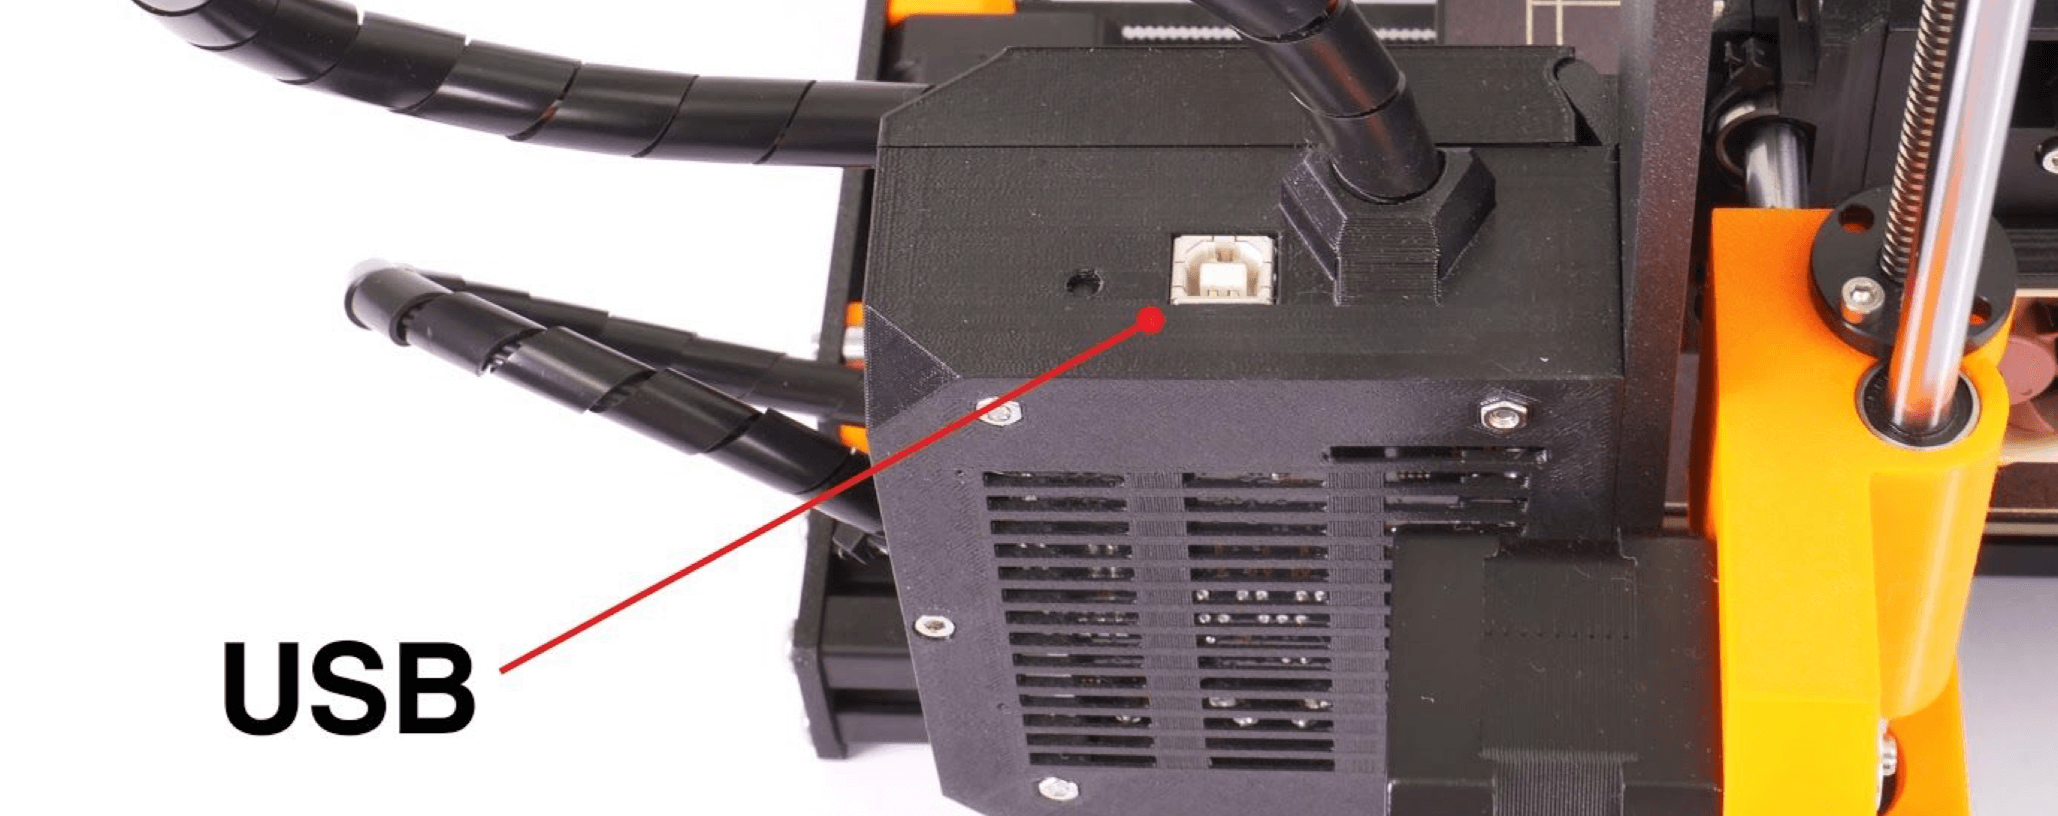
                  All Raspberry Pis can be connected by USB. The exception is the RPi Zero, which can also be connected by its GPIO pins to the MK3S' Einsy Rambo. If you intend to use the RPi Zero, you can still follow this guide to the end, where GPIO configuration is covered. Connecting the RPi Zero by USB or any other RPi by GPIO is possible, but has few if any, benefits.
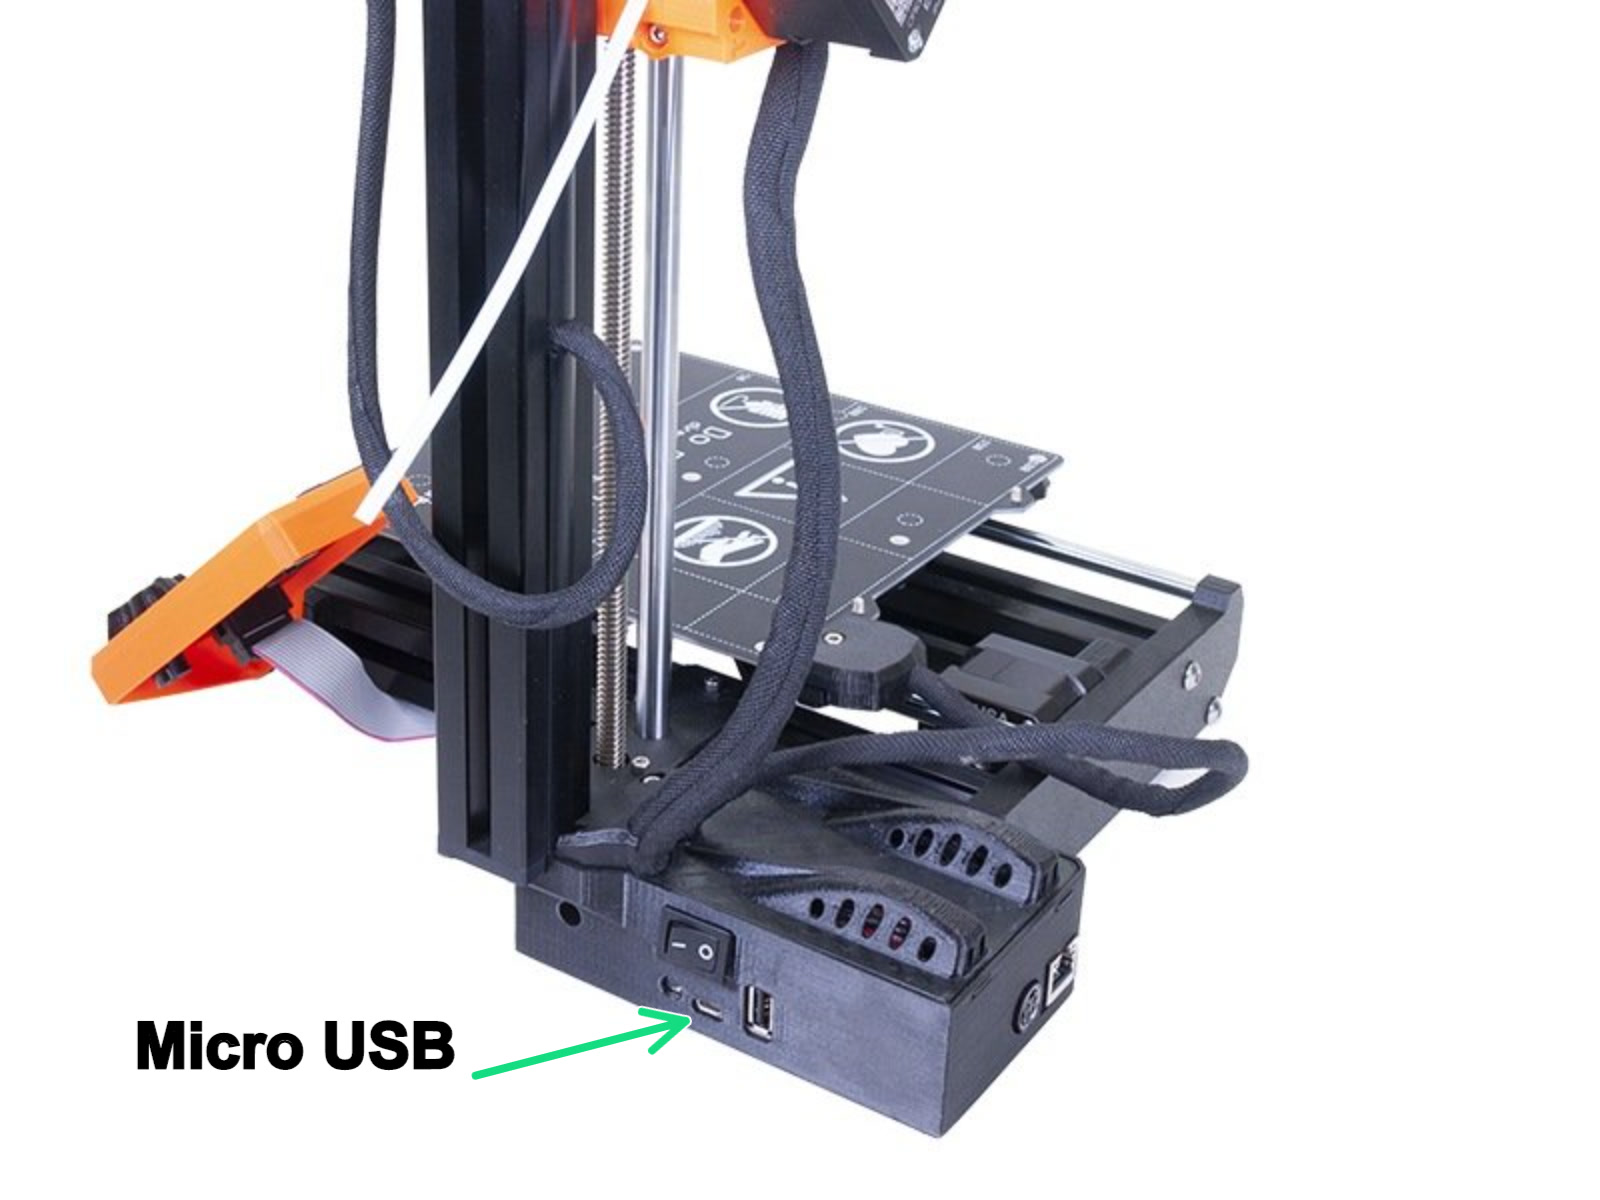
                  MK3s/MK2.5S USB Type-B USB portMINI Micro USB port

                  Finding the IP

                  The RPi will need a few minutes on its first boot before it will connect to your network. You should then be able to find the RPi IP address in a mobile app like "Fing" or a similar IP scanner. The IP address will have the same prefix as your computer, but with a different ending. It probably also be Named "Octoprint" and/or "Raspberry Pi" or a variation of this. Common local IP addresses are 10.0.0.XXX or 192.168.0.XXX.

                  We can unfortunately not cover WiFi connection issues. Please see Octoprint's own resources.

                  Launching and configuring Octoprint

                  Open your browser and type in either "octopi.local" or the IP address of the RPi. You may be greeted with a welcome wizard. Please go through it and add a printer profile. Then we need to configure the Printer profile. 

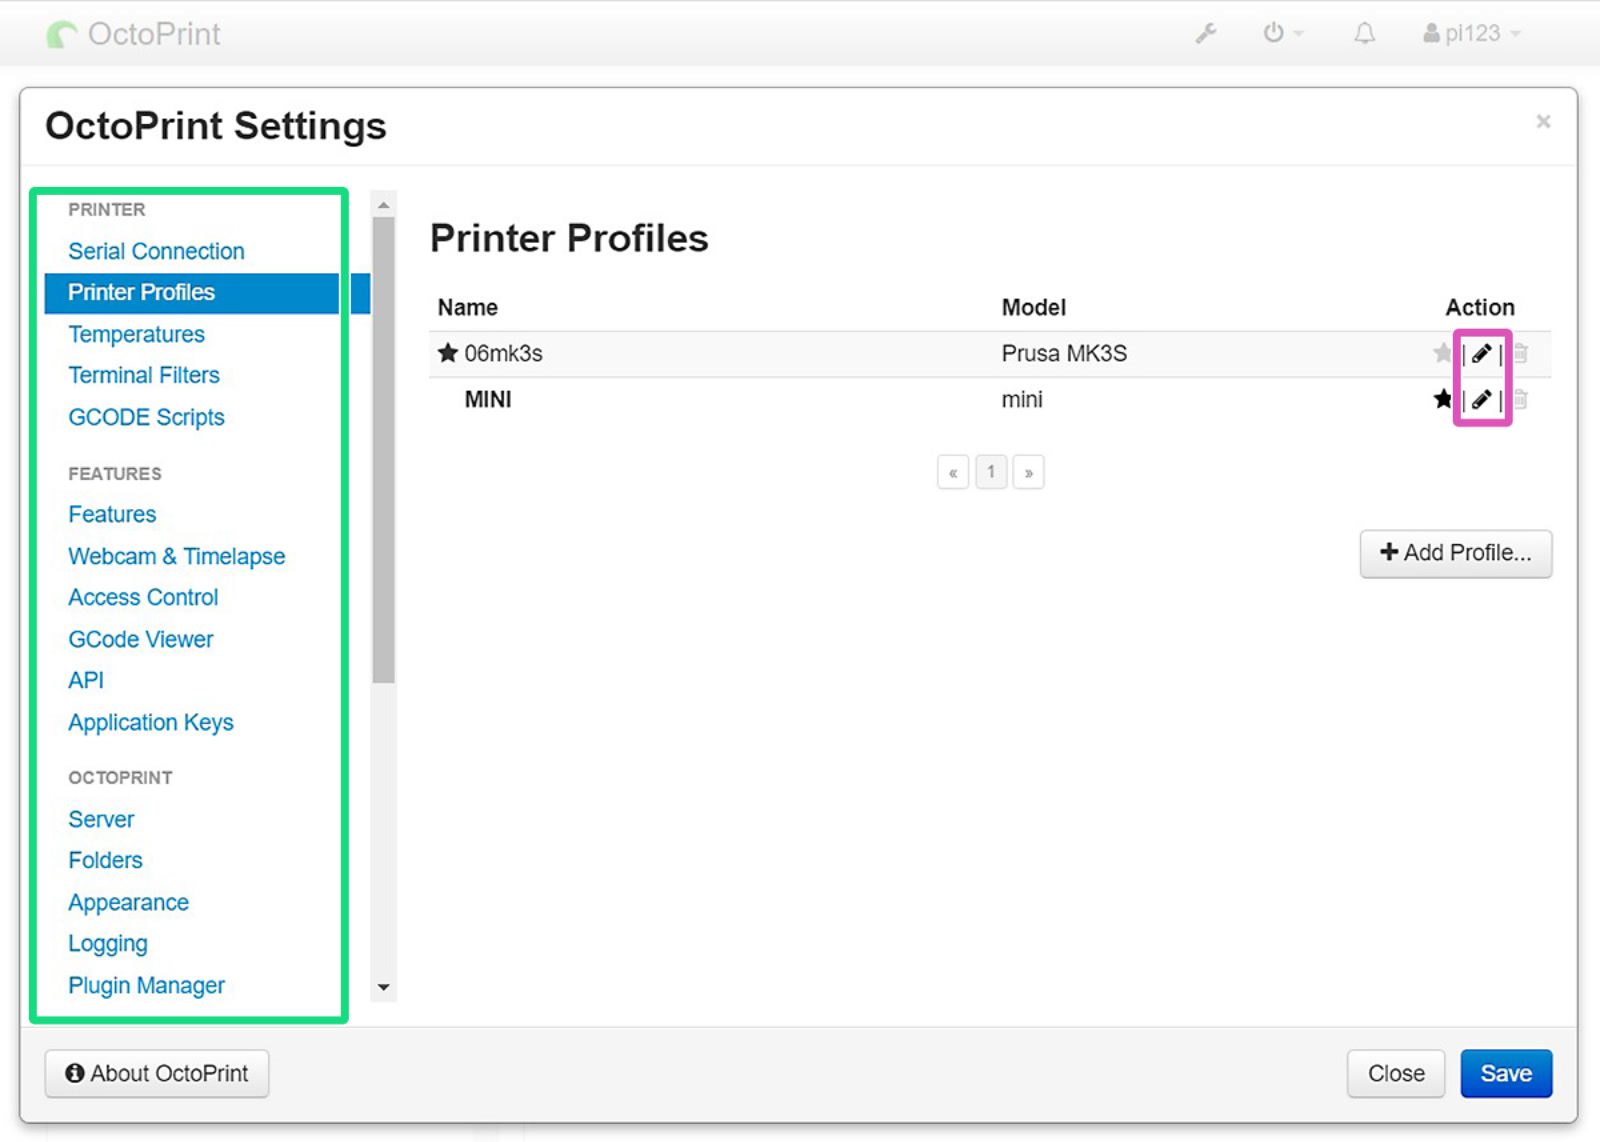
                  Click the Settings-wrench in the top right (purple arrow). Here you can configure your profile, install plugins, and other settings (green square).
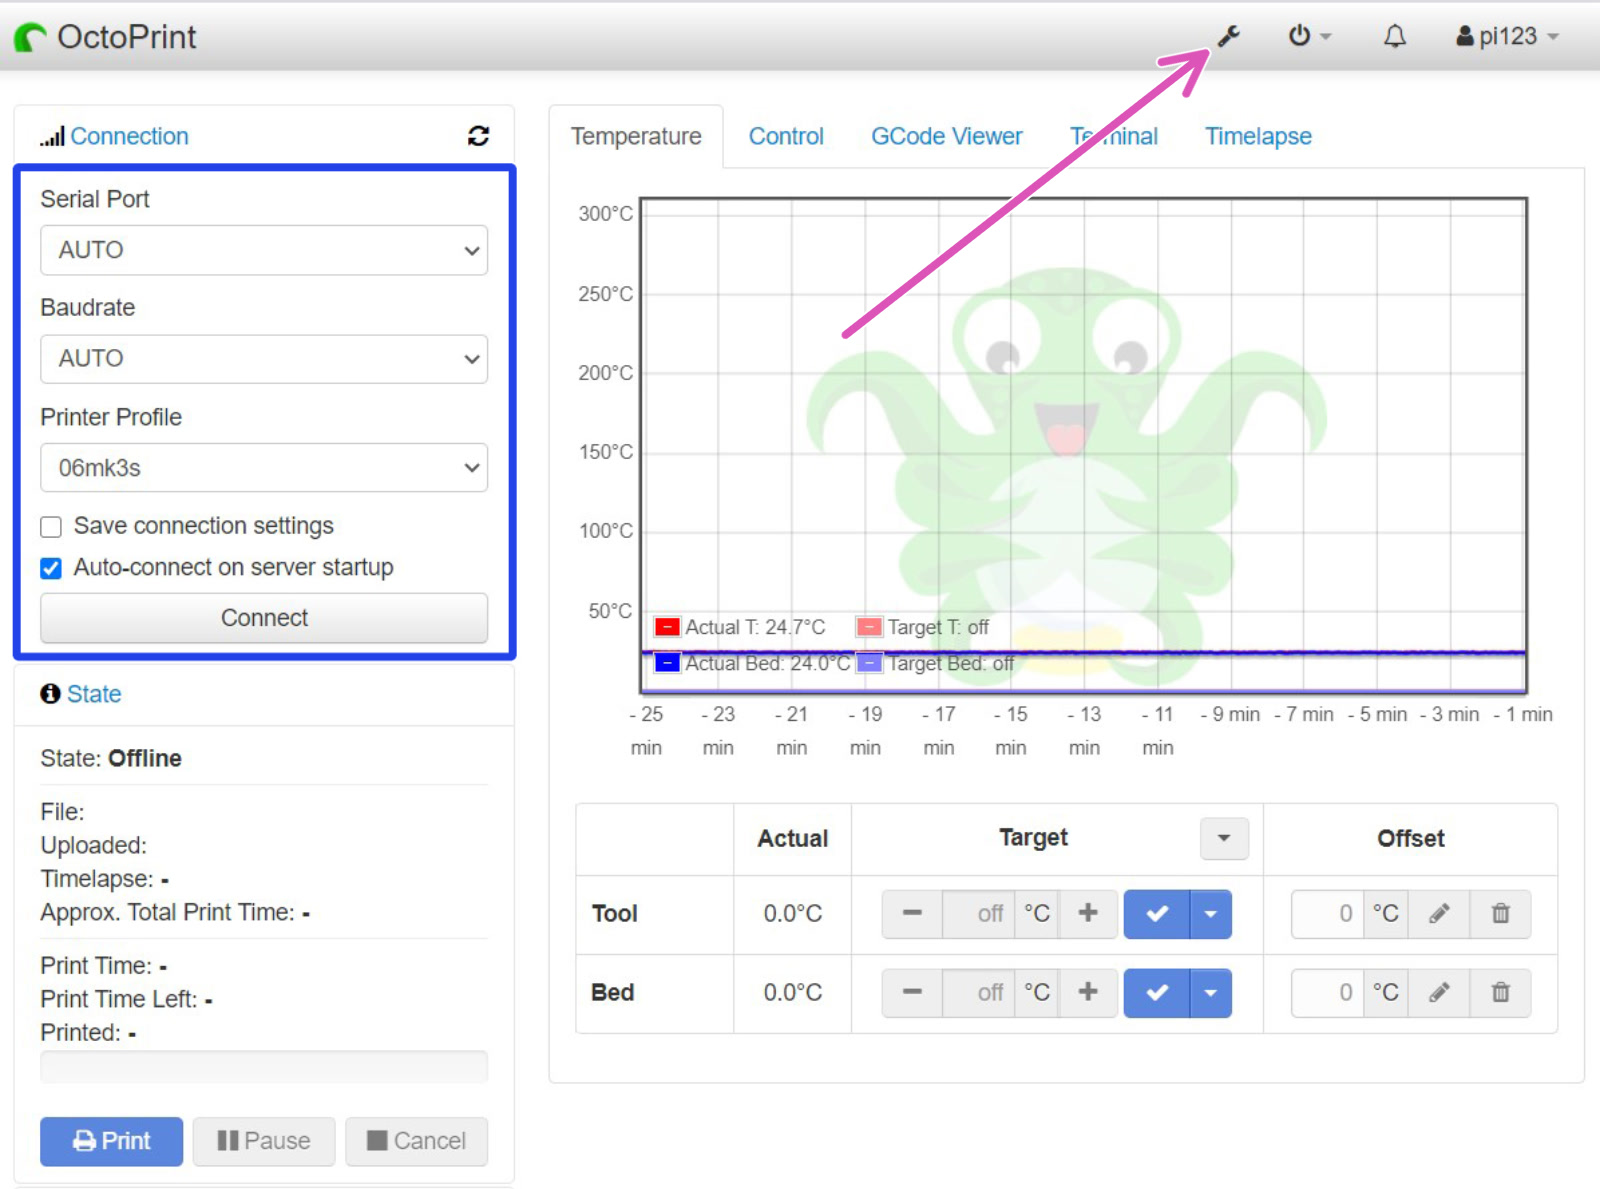
                  Select "Printer profiles" and click the pen icon (purple square) to edit. Under "Print bed & Build volume", change the values in the table below. All other values can be left to default. This will only affect Octoprint's control over your printer, and will not affect sliced G-codes.

                   Form FactorOriginHeated BedWidthDepthHeightCustom Bounding Box
                  MK3SRectangularLower leftYes250mm210mm210mmX: 0/250, Y: -4/210, Z: 0/210
                  MINIRectangularLower leftYes180mm180mm180mmX: 0/180, Y: -3/180, Z: 0/180
                  If you are using Octoprint with the Original Prusa MMU2S/MMU3 you will also have to set "Number of extruders" to 5, and tick the checkbox for "Shared nozzle".

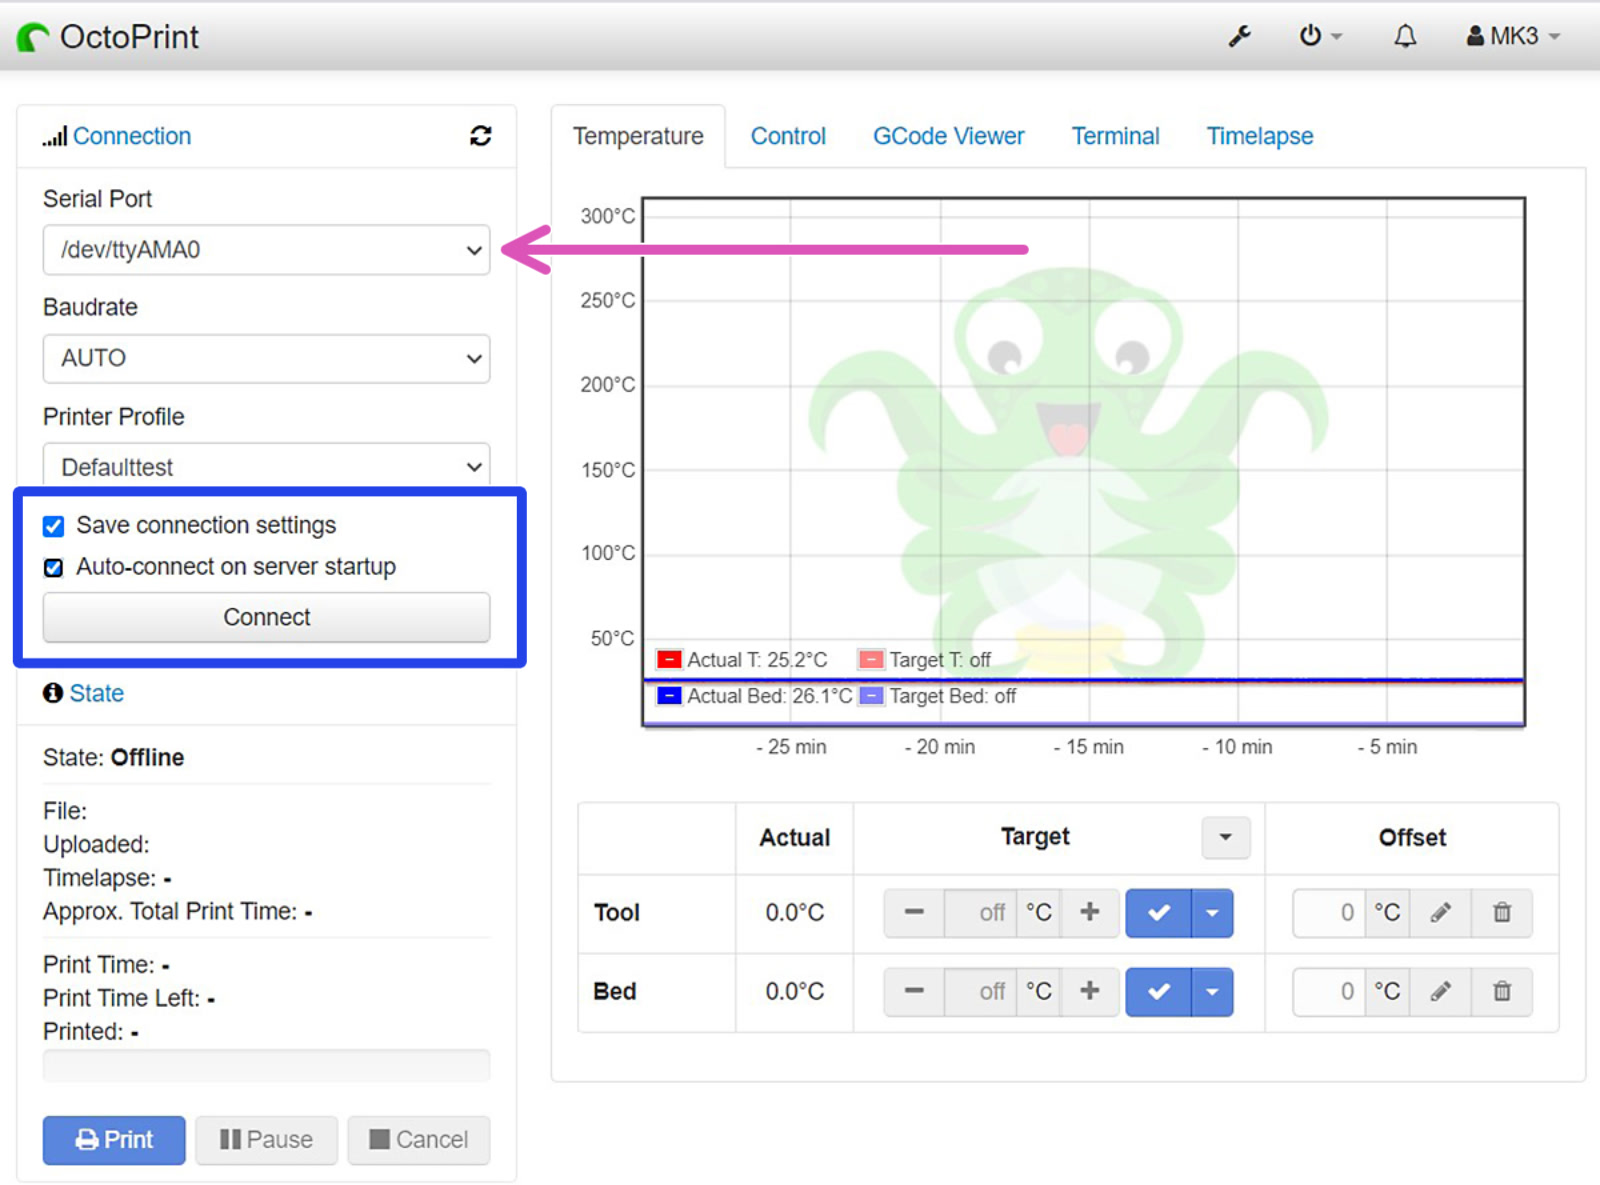
                  For RPis connected by USB, you can leave 'Serial Port' and 'Baudrate' on "AUTO" (blue square), and click the Connect button. Congratulations! You are now ready to use Octoprint with your printer. Octoprint will ask if you wish to update. Do so now, before installing any plugins.


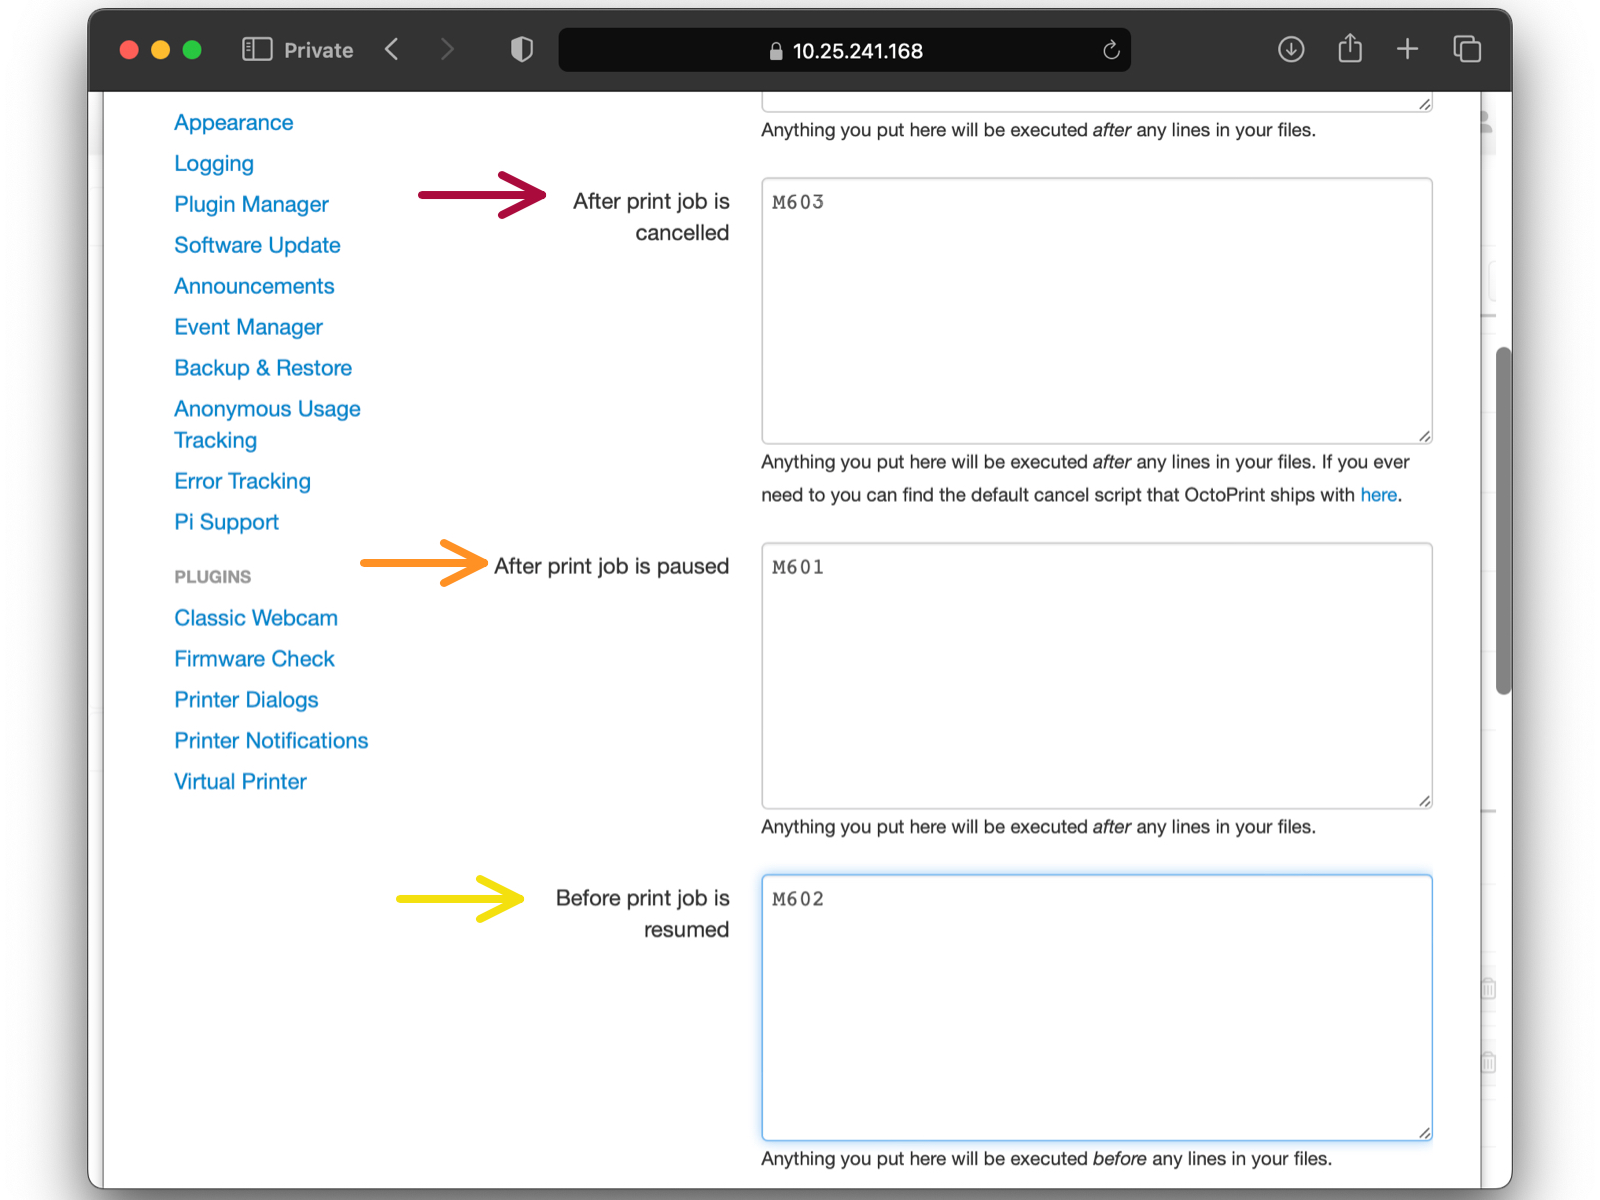
                  in GCODE Scripts section (blue arrow), edit these items: 
                  After print job is cancelled: M603  (red arrow), 
                  After print job is paused: M601 (orange arrow),
                  Before print job is resumed: M602 (yellow arrow).

                  Installing plugins

                  Running Raspberry Pi on your printer is sometimes called having a headless system, as there is no screen directly connected to the Pi board. Whenever you move your printer to a different network (and have edited octopi-wpa-supplicant.txt for the new network) or forget the printer's IP address, there is a plugin that will show the IP address on the printer's screen.
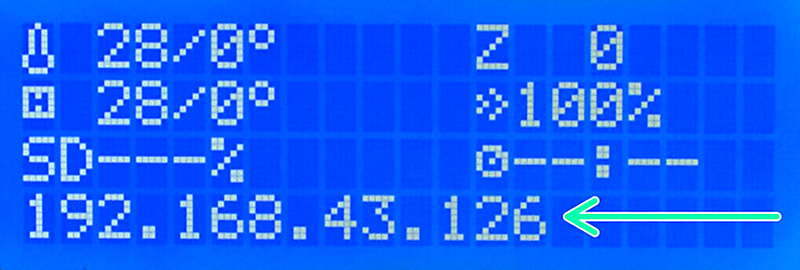
                  IpOnConnect may not work with the Original Prusa MINI.

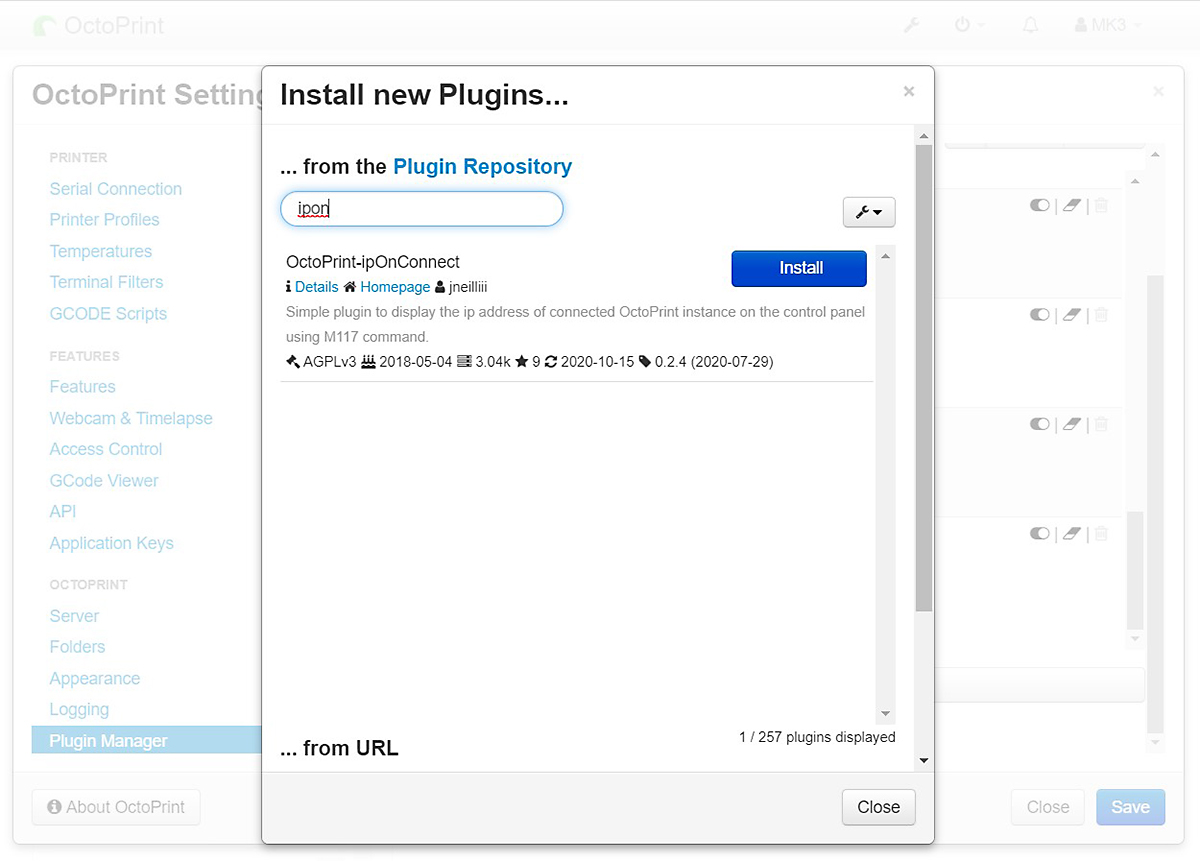
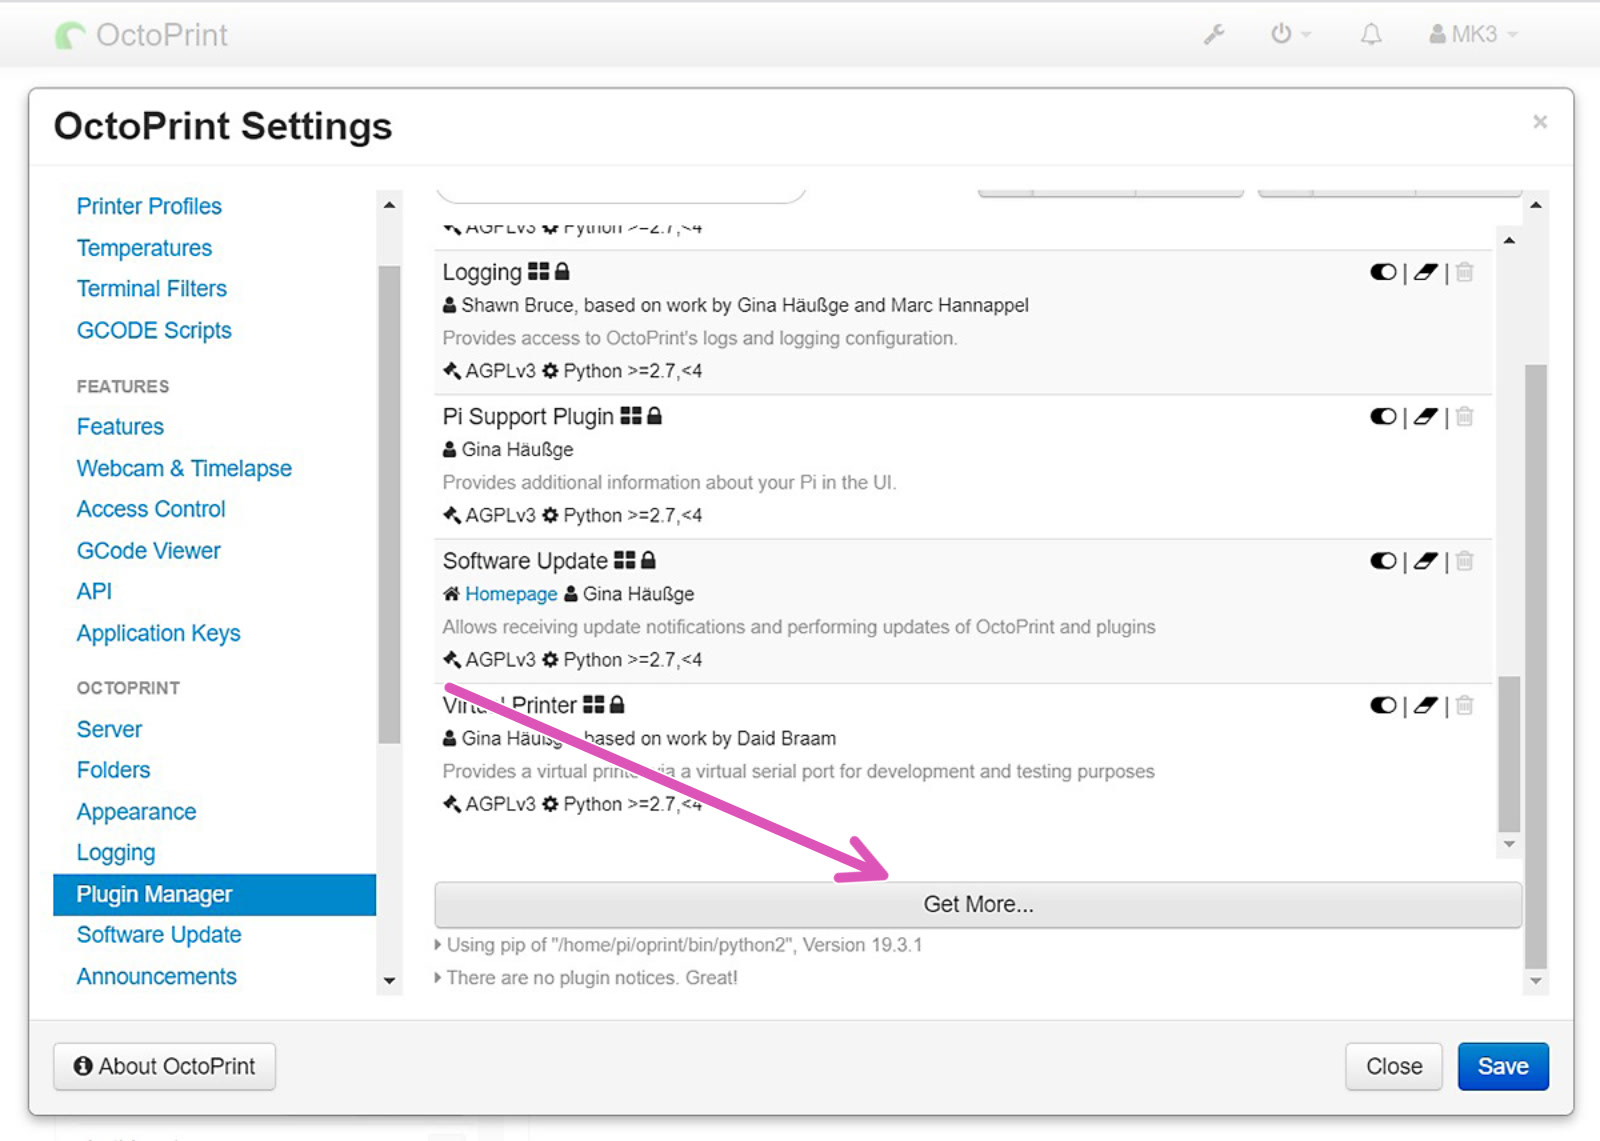
                  Open your OctoPrint's web interface. Open Settings and in the left column find "Plugin manager", Scroll down click on "Get More..." (purple arrow) and search for "IPonConnect". Click install. After installation, a pop-up will prompt you to Refresh the page. Click "Refresh".
                  Turn the printer off and on again by flipping the switch on the side. Give it a few minutes and you should see the IP address on the display. Note that if you enter the printer's menu or insert an SD card, the IP address can disappear from the screen and you have to reboot the printer to see it again.

                  A lot of Plugins are not recommended when running Octoprint from an RPi Zero, due to its weak processor. Video streaming is one such function.

                  Use

                  As we do not develop Octoprint, we can not cover all aspects of use. For that, we suggest checking out Octoprint's own resources. However, we recommend checking out our guide covering:

                  • Sending files to Octoprint/Duet

                  Below is a list of Octoprint plugins you might find useful or cool:

                  • Simple Emergency Stop - Button on UI to stop everything immediately.
                  • NavBar Temp - Temperature is shown in the navigation bar.
                  • Heater Timeout - Shuts off heaters after set duration when idle.
                  • OctoLapse - Better timelapse
                  • Themeify - Cool (mostly dark) themes for the UI.

                  Configure RPi Zero W GPIO

                  To use RPi Zero/2 W connected directly to an MK3/S+ GPIO, you must change a setting in the printer's menu and configure how the Pi handles serial communication. By default, OctoPrint does not use the Raspberry Pi GPIO pins for Serial-communication. You configure this by connecting to it over SSH. This part only applies to the Raspberry Pi Zero/2 connected by GPIO directly to the MK3S Einsy mainboard.
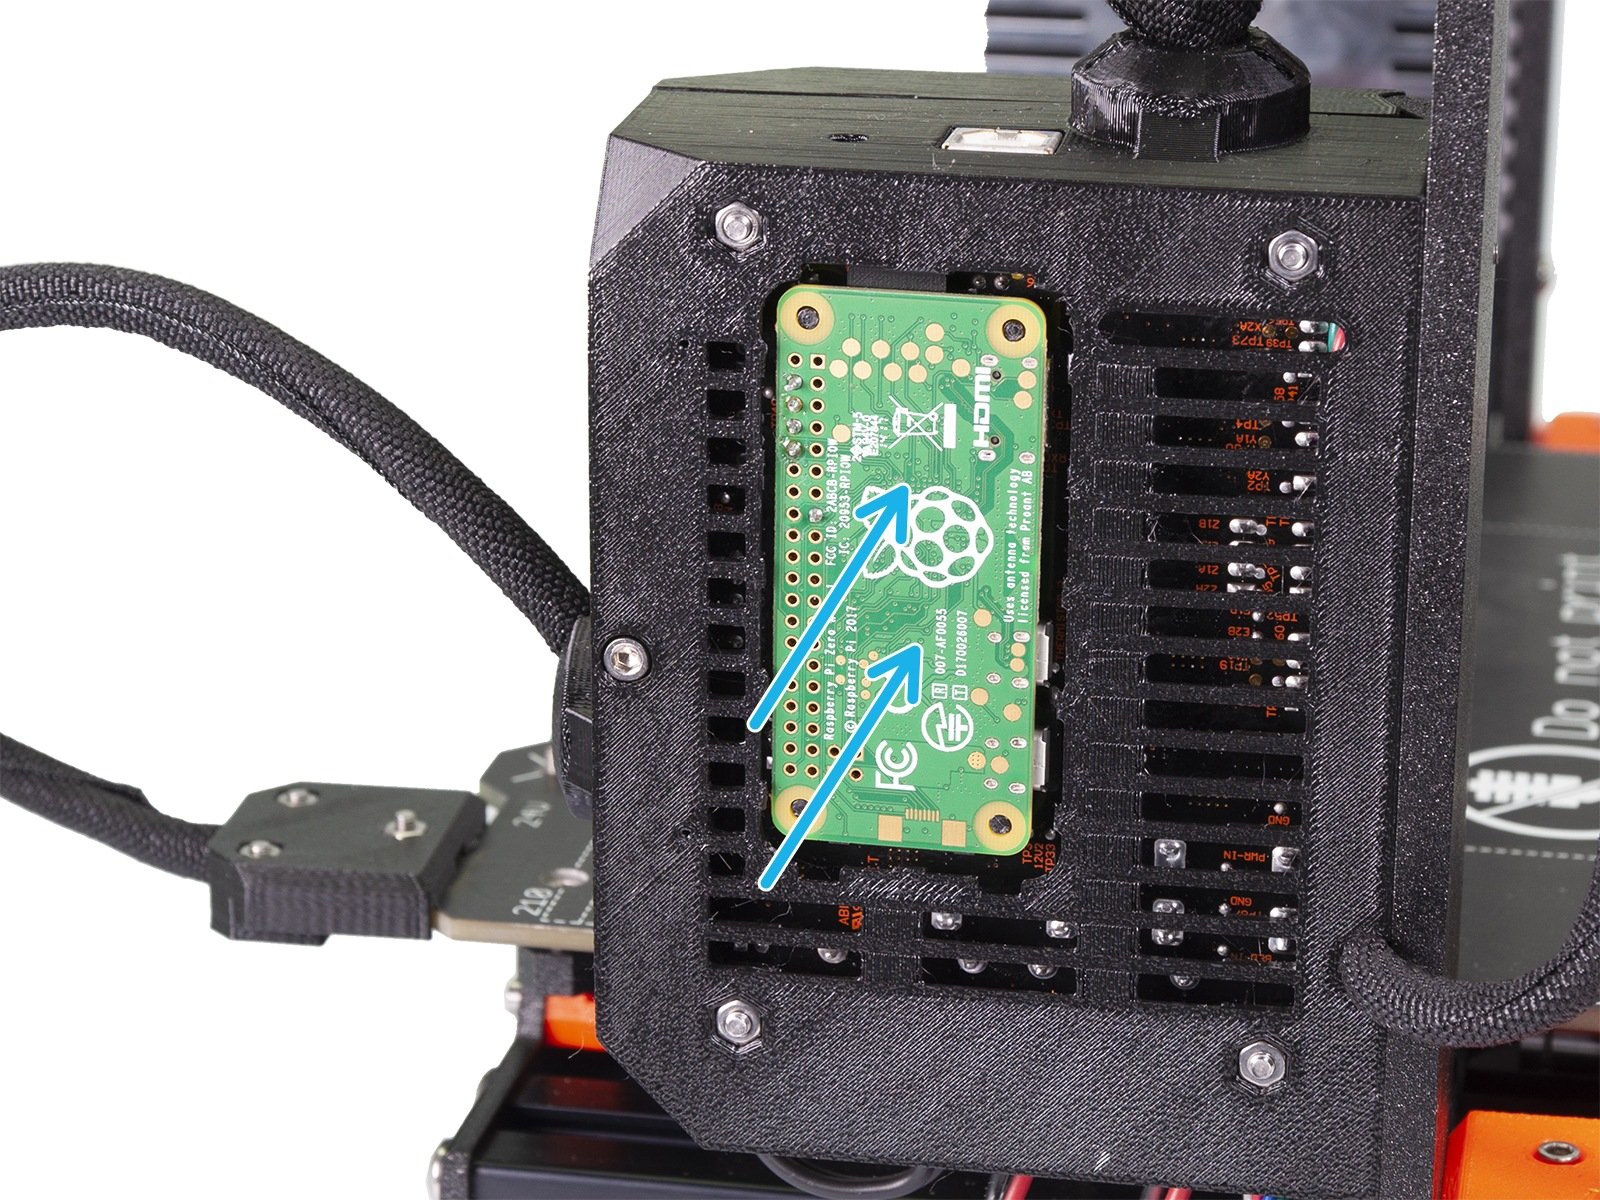
                  From now on the RPi Zero must be connected to the printer.

                  Printer setting

                  First, to use the GPIO pins for connecting to the printer, activate the RPi port (LCD menu -> Settings -> RPi port and set it to "On").
                  Using SSH

                  The Octoprint image which you flashed should have SSH (Secure SHell) enabled. SSH is a way to have remote command over a device after inputting a hostname (what you called the RPi) and password. Make sure the RPi and your computer are connected to the same network and use the credentials below.

                  On Windows:

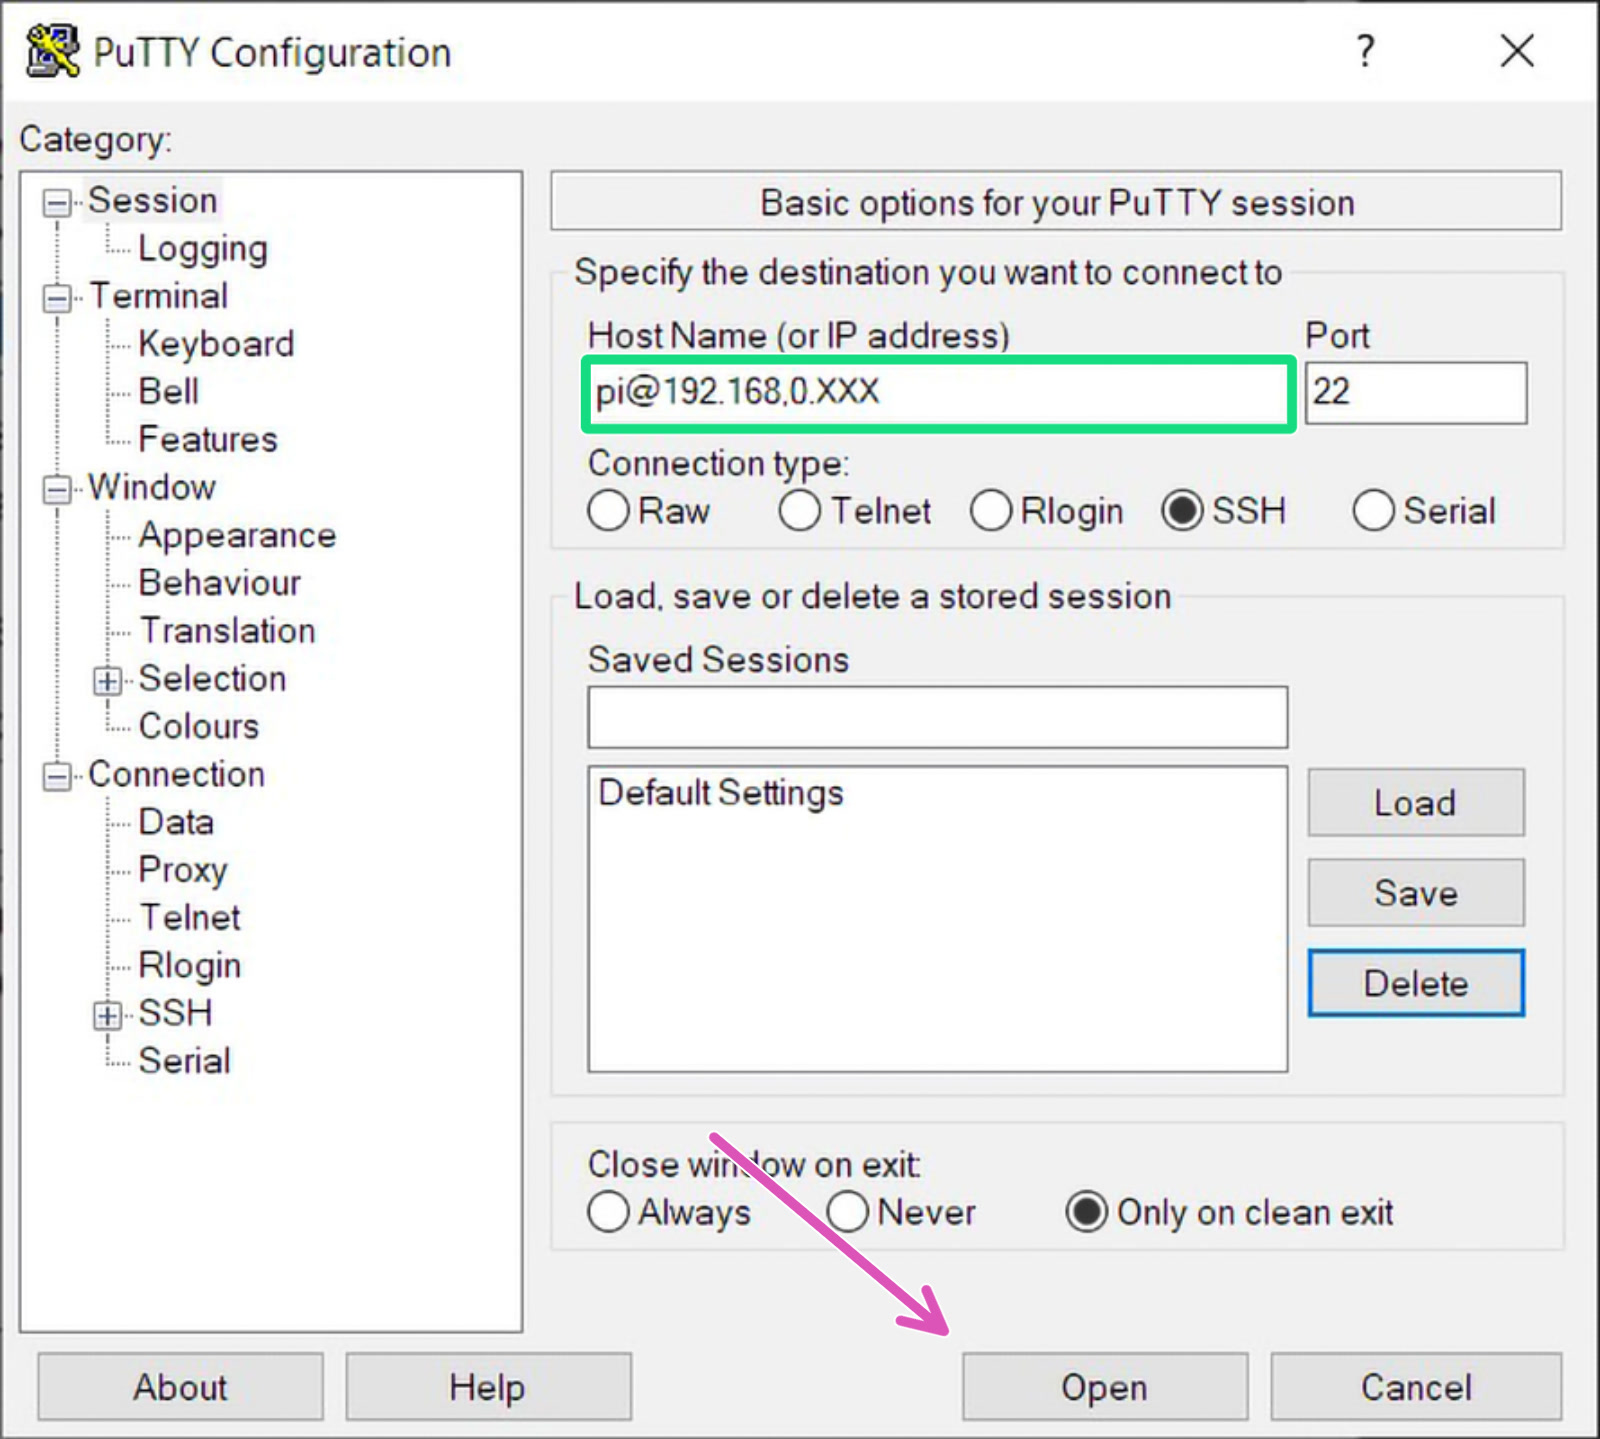
                  Open PuTTY and input "hostname@your_IP_address" (Example '[email protected]') to the Host Name field (green square). Most users can leave 'Port' number to 22. Make sure 'Connection type' is "SSH" and click Open (purple arrow).
                  On Mac:

                  An SSH client is built into Terminal. Open Terminal and type the following: 

                  In the console, you will be asked for a password. Input your password. No characters will appear as you type. Hit enter and you will have shell-command over your RPi.

                  On Linux:

                  Most popular distros also have an SSH Client installed and you connect the same way as on Mac. However, for all edits except changing the super-user password of the RPi, you can locate and edit the files using a card reader, from your desktop environment. Built-in card readers may not work on virtual machines. Use a USB card reader.

                  The first time you connect to the RPi by SSH, you may get a security warning that a "Server host key is not in cache". Make sure the IP you are connecting to is correct and accept proceeding with the connection by clicking Yes.

                  In the console, you will be asked for a password. Input your password. No characters will appear as you type. Hit enter and you will have shell-command over your RPi.

                  Using the command sudo raspi-config in the Terminal brings you a tool to change WiFi network and password, as well as the main password of the Pi.

                  Swapping ports used by GPIO and Bluetooth

                  This part only applies to the Raspberry Pi Zero connected by GPIO directly to the MK3S Einsy mainboard. From now on the RPi Zero must be connected to the printer.

                  Two config files must be updated and a serial port added, over SSH. Some of the following codes are taken from a thread in our forum (Shout out to Scott.w12:). 

                  The first thing to enable serial connection is to swap ports used by the GPIO (soldered pins) and the internal Bluetooth chip. We need to add a line in the config file on the boot partition.

                  With the down-key, move the cursor to the very end and add:

                  Press Ctrl+X to exit the Nano text editor. Press "Y" to save and hit enter to confirm the file name.

                  For Raspberry PI Zero 2:

                  If you experience connection or read/write issues, add the following line to the same file.

                  dtoverlay=disable-bt

                  For good measure you can also disable Bluetooth services globally with the following Terminal commands:

                  sudo systemctl disable hciuart.service
                  sudo systemctl disable bluetooth.service

                  Disabling the serial console

                  Moving to another config file, where part of the code must be deleted to disable the serial console.

                  Look for the following string (text) and delete it.

                  Rebooting RPi

                  For all changes to take effect, enter the following command to reboot the RPi.

                  Adding a serial port to Octoprint

                  The last part of the configuration is in the web interface. Open your browser and type either "octopi.local" or the IP address of the RPi Zero W. You might be greeted with the welcome wizard, please go through it first.

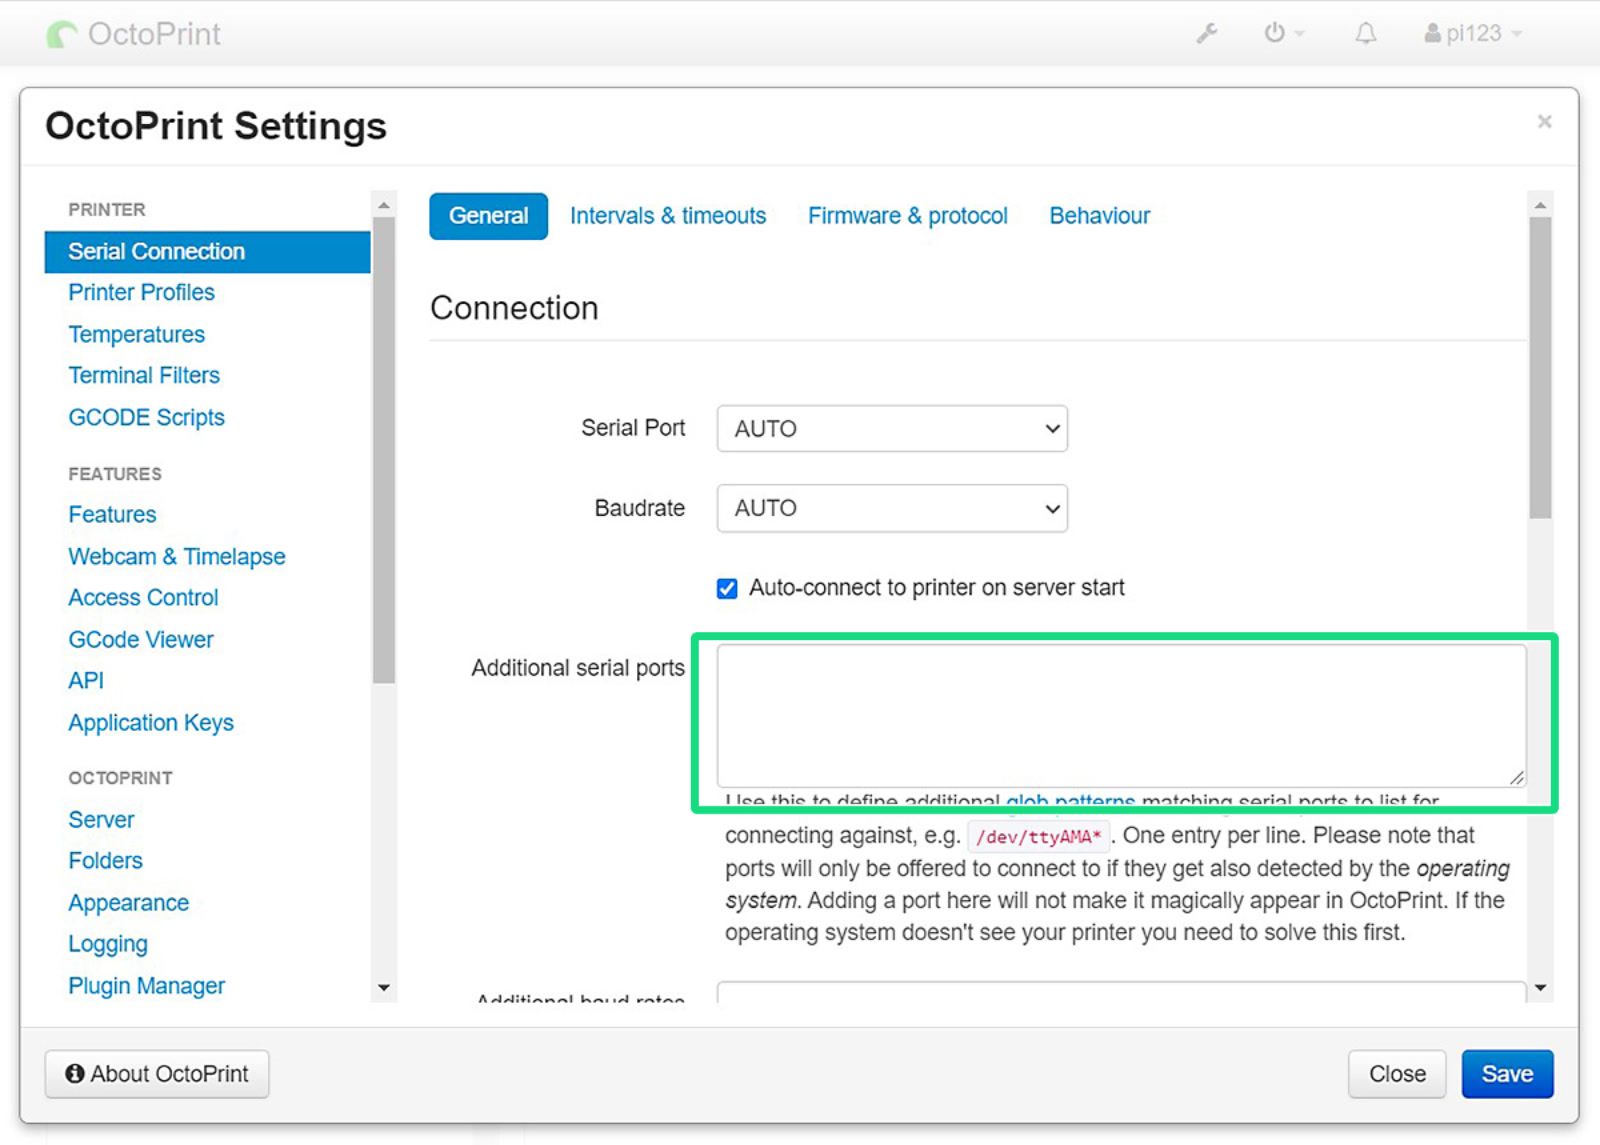
                  As soon as you arrive at the home screen, open "Settings" by clicking the wrench. Then head to "Serial Connection", and insert the line below to "Additional serial ports" (green square).

                  Save the change and reboot OctoPrint. After reboot, select the new port (purple arrow) and connect to your printer (blue box). Also, tick "Save connection settings" and "Auto-connect on server startup" for your convenience.
                  The Raspi Zero is not a powerful device! It may be advisable to now remove pre-installed plugins, like "G-Code analyzer", to improve performance and reduce CPU usage. 
                  Was this article helpful?
                  This action is available only to registered users. Please log-in.

                  Topics

                  • 3rd party accessories & Other projects
                    • Octoprint
                      • About Octoprint
                      • PrusaPrint (Rpi Zero and Octoprint)
                      • Octoprint - Configuration and install
                    • Nozzles
                    • Protective Shields

                  47 comments

                  Log in  to post a comment
                  Yastobaal
                  •
                  The link to PuTTY is to an unafilated website. I think the link should be https://www.chiark.greenend.org.uk/~sgtatham/putty/latest.html
                  Reply
                  Dan Roscigno
                  •
                  I installed Octoprint today. The first print that I tried to send from PrusaSlicer failed, I don't recall the error message, but it was related to bgcode. bgcode is not supported by default with Octoprint. I reconnfigured PrusaSlicer to send non-binary gcode and everything is fine. There is a plugin to allow bgcode:

                  https://plugins.octoprint.org/plugins/bgcode/

                  Maybe this should be added to the docs as a recommended plugin?
                  Reply
                  Aaron Johnson
                  •
                  I'm installing on a Raspberry PI Zero 2.

                  1 - The files have moved from /boot to /boot/firmware. The files still exists, but they just contain a note saying "don't edit this file, edit the one in /boot/firmware" (paraphrased).

                  2 - I followed all the instructions, but I can't connect to the printer. The status just stays at "Opening serial connection" forever.
                  Reply
                  Hobzik
                  •
                  Update - October 2025 - It still works :)
                  Longer post: I has trouble running PrusaLink, but this tutorial (Octoprint) still works with MK3S+ Raspberry Pi Zero 2W, Latest OctoPrint and firmware 3.14.0

                  Now I can easily send from PrusaSlicer to Octoprint with just a press of a button. Finally no need to fiddle with an SD card.
                  Reply
                  Dan Roscigno
                  •
                  @hobzik Are you using a camera with the Pi Zero 2W? I am about to add Octoprint to my Prusa Mini and wondering if I need a regular Pi or if I can use a Pi Zero 2W. The printer is in my basement, so a camera would be nice.

                  If you are using a camera, which one?
                  Reply
                  juckendes_Auge
                  •
                  A small remark:
                  You should shut down the RPI (Raspberry PI Zero 2), which is connected via GPIO and thus also receives its power, manually before switching off the printer. This can be done via the Octoprint menu or via SSH with "sudo poweroff".
                  Otherwise, the data still in the RPI's memory will not be written to the microSD card. In the worst case, this can lead to a corrupted operating system.
                  Reply