AA

おすすめ製品

    人気のカテゴリー

      急上昇ワード

        記事

          ブログ

            製品

              カテゴリー

                検索候補

                  検索中…
                  結果がありません
                  エラーが発生しました。
                  ↑↓ 選択↵ 開くEsc 検索を閉じる
                  • English
                  • Čeština
                  • Deutsch
                  • Español
                  • Français
                  • Italiano
                  • Polski
                  • 日本語
                  • 注文
                  • 住所
                  • 在庫ありのアラート
                  • 講座
                  • サブスクリプション
                  • アカウント編集
                  • 3Dプリンター9+▾

                    3Dプリンターnew

                    newPrusa CORE One Lさらに詳しく
                    newPrusa CORE One+さらに詳しく
                    newPrusa CORE One L+ INDX 8-ToolnewPrusa CORE One+ (Gen 2) INDX 8-ToolPrusa CORE One L: Critical InfrastructureOriginal Prusa MK4SnewOriginal Prusa XLOriginal Prusa XL:クリティカルインフラストラクチャー

                    プリンターのアップグレード

                    newCORE One/+ INDX Conversion KitnewMK3S/+ から MK4SnewXL - シリコンプリンティングツールヘッドnewMMU3 (Multi Material Upgrade)
                    Prusa 報酬プログラムシェアして、紹介して、特典をゲット。
                    3Dプリンターを選び方スペース・予算・用途に合わせて最適なマシンを選ぶための基本をご紹介します。
                    無料の電子書籍無料の電子ブック Basics of 3D Printing with Josef Prusa をダウンロードして、3Dプリンティングの世界への第一歩を踏み出しましょう。
                    Original Prusa のプリント可能なパーツOriginal Prusa 3Dプリンターとアップグレード用のプリント可能なスペアパーツコレクション。
                    配送情報プリンターの現在の生産量と納期に関する情報を定期的に更新しています。
                    カスタム3Dプリント様々な素材を使用したプロフェッショナルなカスタム3Dプリントサービス。
                  • マテリアル▾

                    フィラメント

                    PrusamentPLAPETGASA / ABSPCブレンドPA (Nylon)FlexComposites特別Materials clearance sale

                    レジン

                    Prusament Resin Tough柔軟性
                    フィラメントガイドプルサメントスプールをチェック
                    Prusament.com
                  • 部品 & アクセサリー▾

                    アクセサリー

                    エンクロージャーノズルスチールシート必須アクセサリーカメラ&アドオンツール&クラフト接着剤

                    補修部品

                    商品

                    スペアパーツ - すべてのプリンターCORE OneMK4/S & MK3.9/SMK3/MK3S/MK3S+XL
                    Merch
                  • 法人向け▾
                    Prusa Pro HT90Prusa Pro SLXPrusa Pro AFSPrusa Pro Medical OneOriginal Prusa XLOriginal Prusa XL:クリティカルインフラストラクチャー
                    Prusa CORE One+さらに詳しく
                    Prusa CORE One Lさらに詳しく
                    Prusa CORE One L: Critical Infrastructure Edition クリティカルインフラ版(高セキュリティ対応モデル)

                    3Dプリンティングの用途

                    製造と研究開発自動車産業ヘルスケア教育と学術研究建築家とデザイナー映画産業重要インフラ

                    3Dプリンティングのストーリー

                    No items yet.

                    プルサ正規販売代理店
                    サステナビリティ
                    Prusa Education
                    お問い合わせ・ご連絡
                    カスタム3Dプリント
                    ISO認証取得
                  • ソフトウェア▾
                    PrusaSlicer

                    PrusaSlicerPrusaSlicer

                    PrusaSlicer は、オープンソースで機能が豊富、頻繁に更新されるツールで、3Dプリンタ用の完璧なプリントファイルをエクスポートするために必要なものがすべて含まれています。ニュースやリリースログは Github で確認できます。

                    WindowsMacOSLinux
                    Prusa Connect

                    Prusa Connect

                    Prusa Connectは、3Dプリンターの遠隔操作と監視を可能にするクラウドサービスで、安全なデータの取り扱い、簡単なセットアップ、どこからでも複数のプリンターを管理できるサポートを提供します。

                    ログインして接続する
                    Prusa.app

                    Prusa.app

                    Prusa Connect技術を活用し、どこからでもリモートでプリンターを操作可能!Prusa.appは、AndroidおよびiOSデバイス向けに新たなPrusaプリンター体験を提供します。

                    今すぐお試しください!
                    ドライバー&ファームウェア3Dプリンタの最新のファームウェアとドライバをダウンロードしてください。
                    PrusaSlicer サポート
                    Prusa Connect サポート
                  • 3Dモデル▾
                    3Dプリンターアート&デザインホビー&メーカー日用雑貨テーブルトップミニチュアおもちゃ&ゲームPrintablesストア

                    人気の3Dモデル

                    • Strong garden hose holder
                    • Prusa Spool Bot
                    • Build Tray — Modular Organizer for Assembly, Disassembly and Maintenance
                    • Broom Holder
                    • Octagon Fabric
                    • Prusa CORE One ? (Mimic Skin)

                    デザインコンテスト

                    • Ponowne wykorzystanie płyty głównej Framework Laptop 122026/9/1 – 2026/9/30
                    • 🏆 Wyzwanie dla projektantów: Magiczne sztuczki!2026/9/1 – 2026/9/22
                    • Organizery do makijażu2026/9/4 – 2026/9/20
                  • コミュニティ▾

                    イベント情報

                    • 3D Printopia 20262026/9/26 – 2026/9/27 · Pennsylvania, United States · Prusa Team
                    • Maker Faire Bay Area2026/9/25 – 2026/9/27 · Kalifornie, United States · Prusa Team
                    • Hobby Messe2026/10/2 – 2026/10/4 · Sachsen, Germany · Prusa Team
                    • Mezinárodní strojírenský veletrh2026/10/6 – 2026/10/9 · Jihomoravský kraj, Czechia · Prusa Team

                    プルサフォーラム

                    • CoreOne with MMU upgrade to INDX
                    • Worm gear problems......how do I print it?
                    • Issues with printing on new CORE ONE +
                    プルサワールドマッププルサワールドマップ地元の3Dプリントユーザーを見つけて、あなたの周りのコミュニティを探索してみてください。
                  • ヘルプ▾
                    ガイド & チュートリアルPrusaSlicerPrusa Connectマテリアル

                    プリンターモデル

                    CORE One INDXCORE One LCORE One+CORE One

                    ハードウェアのトラブルシューティング

                    • Selftest failed (CORE One/+)
                    • ホットエンドの詰まり (MK4)
                    • ベルトテンションの調整(CORE One L/CORE One)
                    • Prusa ConnectとPrusaLink について

                    ドライバー&ファームウェア

                    INDX familyCORE One familyMK4 familyXL familyMMU familyPRO family
                  • コース一覧▾

                    3Dプリンティングのエキスパートになろう

                    Prusa アカデミーでは、3Dプリンティングに関する様々なトピックのオンラインコースを提供しています。各コースの特徴:

                    • 多くの写真と短いビデオを含む読みやすいテキスト
                    • インスピレーションやさらなる学習のためのリンク
                    • 知識を試すためのテスト
                    • 修了証明書
                    Browse all coursesMy courses library
                    • 3D Modeling in Autodesk Fusion
                    • PrusaSlicerマスタークラス – 初心者から上級者まで
                    • Complete Guide to 3D Print Postprocessing, Painting, and Detailing
                    • Beginner's Guide to Blender for 3D Printing: Edit and Remix STLs
                  • ブログ▾
                    • Prusament PLA ColorMix:わずか5巻のフィラメントで45色以上をプリント
                    • PrusaSlicer 3.0プレビュー版 — 3Dプリントの未来を見据えた仕様
                    • より高品質なプリントを、もっと簡単に:Prusa XL+、CORE One L+、CORE One+(Gen 2)― 大規模製品アップグレード
                    電子書籍: 3Dプリンティングの基礎
                  • 会社概要▾

                    Prusa Research について

                    私たちは、ヨーロッパおよびアメリカ最大の3Dプリンターメーカーです。

                    Prusa Research は、チェコ出身のホビイスト/メイカー/発明家である Josef Prusa によって 2012 年に 1 人で立ち上げられました。そこからわずか 15 年で、従業員 1,200 名を超える企業へと成長しました。毎月、チェコ共和国プラハの本社および米国デラウェア州から、160 カ国以上のユーザーに向けて 10,000 台以上の革新的で安全な 3D プリンターを設計・製造・出荷しています。

                    動画をご覧になり、Prusa Research がどのように誕生し、わずか 10 年で何を達成したかをご確認ください!

                    Prusa Research についてタイムラインサステナビリティオープンソース
                    Prusa Research について
                    お問い合わせ
                    ロゴ・写真素材
                    ISO認証取得
                  1. サポート
                  2. About Printables Clubs [進行中の翻訳]
                  3. For Creators
                   

                  内容

                  • Set up process
                  • Welcome email
                  • Members list
                  • Mass messages
                  • Earnings
                  • User profile page of the Creator
                  • Your exclusive content for supporters
                  • Exclusive models
                  • Club only Posts and Polls
                  • Tiers and Benefits
                  • Create your new tier(s)
                  • Edit tier
                  • Delete the tier
                  • Benefits
                  • Payments and Getting paid
                  • Fees
                  • How Do I Get Paid?
                  • Taxes
                  • Billing Cycle
                  • Discount codes
                  • How to export information about incoming payments?

                  ブログ

                  • Prusament PLA ColorMix:わずか5巻のフィラメントで45色以上をプリント
                  • PrusaSlicer 3.0プレビュー版 — 3Dプリントの未来を見据えた仕様
                  • より高品質なプリントを、もっと簡単に:Prusa XL+、CORE One L+、CORE One+(Gen 2)― 大規模製品アップグレード

                  ニュースレター

                  ご登録いただくと、毎月 新しいファームウェア、PrusaSlicerの新バージョン、3Dプリントプロジェクトの一般的なヒントなど、役立つ情報をお届けします。

                  クリックして、ニュースレターを受け取る。

                  このサイトはreCAPTCHA Enterpriseによって保護されており、Googleのプライバシーポリシーと利用規約が適用されます。

                  Strong garden hose holder
                  E-shop
                  • 3Dプリンター
                  • プリンターのアップグレード
                  • フィラメント
                  • アクセサリー
                  • Prusa 商品

                  © Prusa Research a.s.

                  Printables
                  • 3Dモデル
                  • Store
                  • Clubs
                  • 3Dデザインコンテスト
                  • Brands
                  コミュニティ
                  • ワールドマップ
                  • フォーラム
                  • ユーザーグループ
                  • イベント
                  ヘルプ
                  • Prusa ヘルプ
                  • Prusa アカデミー
                  • 3Dプリンティング計算機
                  ソフトウェア
                  • PrusaSlicer
                  • Prusa.app
                  • Prusa Connect
                  • ドライバーとソフトウェア
                  会社概要
                  • 私たちについて
                  • Blog
                  • プルサ正規販売代理店
                  • お問い合わせ
                  • ISO 9001・ISO 14001・ISO 45001 認証取得済み
                  • 一般利用規約
                  • PRUSAウェブサイト利用のための一般利用規約
                  • プライバシーポリシー
                  • クッキーに関する情報
                  • お客様の苦情対応に関する方針
                  • Webサイトのステータスページ
                  • Cookie 設定
                  • 一般利用規約
                  • PRUSAウェブサイト利用のための一般利用規約
                  • プライバシーポリシー
                  • クッキーに関する情報
                  • お客様の苦情対応に関する方針
                  • Webサイトのステータスページ
                  • Cookie 設定

                  © Prusa Research a.s.

                  JOSEF PRUSA®、PRUSA RESEARCH®、PRUSA POLYMERS®、PRUSA ORANGE®、PRUSA 3D ® および PRUSAMENT® は、Prusa Development a.s. の登録商標であり、Prusa Research a.s. が Prusa Development a.s. からのライセンスに基づき使用しています。

                  For Creators

                  関連するもの

                  Printables
                  記事 他の言語でもご覧になれます。
                  English
                  Čeština
                  Polski
                  Deutsch
                  Français
                  Español
                  Italiano
                  日本語

                  Set up process

                  Entry into the Club program is limited to users with a profile level of 18 and higher, as well as a follower count of 150 or more. This helps to maintain high-quality standards of exclusive models. If you're interested in setting up your Club but are on a lower level, please fill out the request form and add a link to your portfolio. We will evaluate your application for program entry on an individual basis.

                  If you want to set up your Club, go to the settings, which will guide you through the entire process.

                  1. While you are logged in, click on your avatar in the top right corner
                  2. Click on Settings
                  3. Click on Set up my Club

                  You have to fill your personal information, set up tiers and submit it for verification.

                  By submitting your Club to our approval, you get unlocked the possibility to start creating Exclusive models for your supporters.

                  Once we've approved your request, it's up to you to publish your Club.

                  Welcome email

                  You can customize the email to welcome your new Club members. 
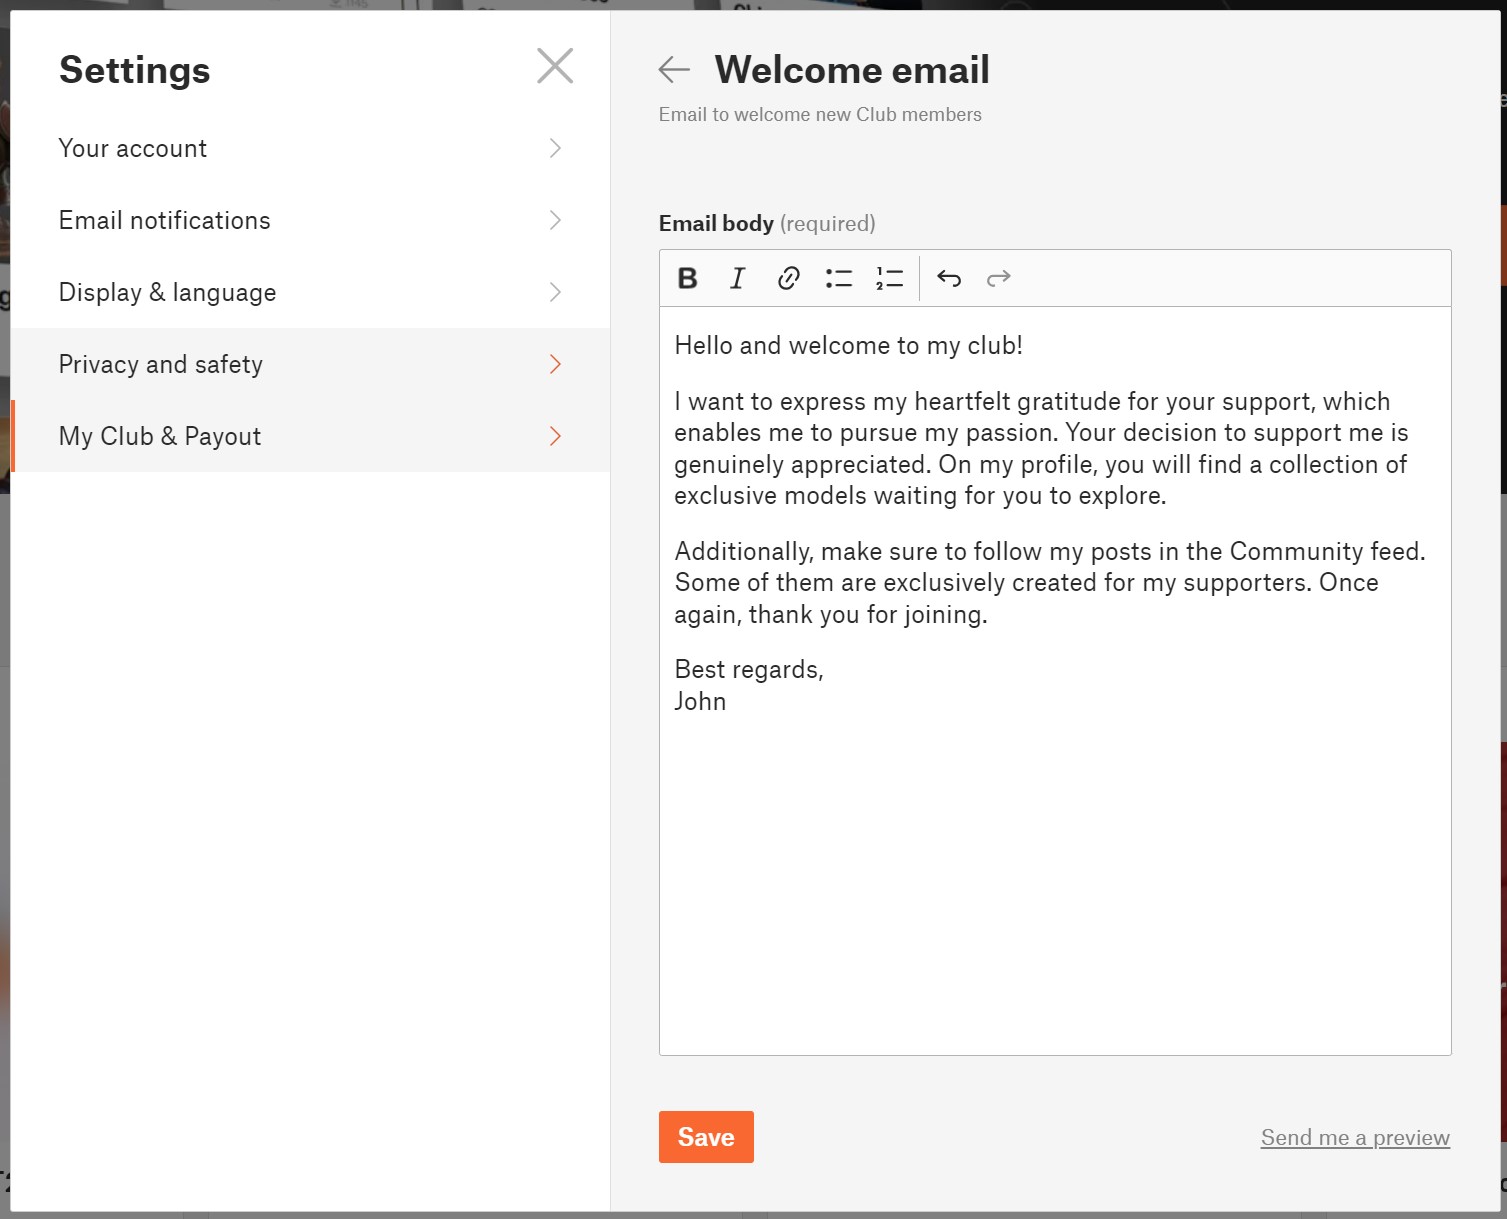
                  1. While you are logged in, and your Club is approved by us, click on your avatar in the top right corner
                  2. Click on Settings
                  3. Click on My Club & Payout
                  4. Click on Welcome email


                  If you want to review your final welcome email, you can have it sent to your email by clicking on "Send me a preview."

                  Members list

                  For an overview of your supporters, the Club Members table is provided. You will find information about the tier each user has purchased, the total amount of money they have given to you, and the date when the user first joined your Club. Clicking on the column headers allows you to sort the data.

                  To track your members across tiers over time, a graph is also available.

                  Mass messages

                  If you need to communicate something important to your supporters, you can use a mass message function.

                  1. While you are logged in, click on “My Club” in the top menu
                  2. Click on Members
                  3. Click on button Message members
                  4. Select which tiers you want to message
                  5. Click Continue and you will be redirected to the messenger, where you create the standard message and post it.

                  Note, that message will be sent to all selected supporters as a standard Message to the conversation thread.

                  Earnings

                  To monitor your monthly earnings, you have access to an earnings graph and a table displaying data categorized by months and tiers.

                  1. While logged in, navigate to “My Club” in the top menu.
                  2. Select "Earnings."

                  For more comprehensive information regarding payments and fees, please visit your Stripe Dashboard.


                  User profile page of the Creator

                  The creator's profile page is distinguished from a regular user profile by these elements:

                  • Club banner
                  • Exclusive model highlights section - where you can promote your top Exclusive models
                  • Support & Join Club button
                  • List of Club members (visible when there are 5 or more club members)

                  Your exclusive content for supporters

                  Exclusive models

                  Exclusive models are available for download only to the members of your Club, regardless of their tier. Exclusive models are one of the possible, but not necessary, benefits you can offer to your supporters.

                  Creating exclusive models is done the same way as creating a regular public model. You simply check the option "Exclusive model for my supporters only" during the model editing. 

                  Additionally, you have the option to set the model to automatically change from an exclusive model to a public model in the future. This way, you can increase your exposure and make it easier for users to find and support you.

                  You have the option to exclude this model from these benefits: Commercial use and Custom defined license terms. The restriction will be indicated on the model's detail page.

                  For users who are not members of your Club, the model details will be displayed in a limited range. They will see the first preview image, the model's name, and description. They won't be able to download the model, comment on it, or read the model comments.

                  Exclusive models must be your own designs. Reuploaded models cannot be published as exclusive models.
                  We do not provide Prusameters rewards for Exclusive models. Therefore, carefully consider which models you make publicly available and which ones you designate as exclusive. Many users will surely support you even if you publish all your models publicly, and you will also earn Prusameters for them.
                  Exclusive models will be listed in the market and in the search results only for your supporters.

                  Club only Posts and Polls

                  For your supporters, you can create unique content in the form of exclusive posts in the Community feed. It's great for sharing behind-the-scenes information about what you're currently working on, your future plans, and more.

                  You can also prepare polls specifically for your supporters, allowing them to vote exclusively. This is perfect when you want to give your supporters the opportunity to decide on the next model you will create.


                  Tiers and Benefits

                  Create your new tier(s)

                  1. While you are logged in, click on your avatar in the top right corner
                  2. Click on Settings
                  3. Click on My Club & Payout
                  4. Click on Edit tiers
                  5. Click on the “+ Add a tier”

                  You can create up to 5 tiers with different prices and benefits. For each tier, you can define a unique set of benefits to distinguish them from each other.

                  The minimum price for a tier is $3 USD. The maximum price for a tier is $100 USD. 

                  Edit tier

                  Please remember that you cannot edit the price of a tier when it has active supporters. However, you have the freedom to make changes to everything else.

                  1. While you are logged in, click on your avatar in the top right corner
                  2. Click on Settings
                  3. Click on My Club & Payout
                  4. Click on Edit tiers
                  5. Click on the tier you want to update

                  You have the flexibility to modify the tier name, description, and benefits. If there are no supporters in a tier, you can also adjust its price. However, once supporters have joined a tier, the price cannot be changed.

                  Delete the tier

                  If you want to delete a tier, go to the Settings, Edit tier and click on the "Delete tier" option.

                  If the tier has no user members, it will be deleted immediately.
                  If the tier has any active members, it will continue to exist until the end of the current month. No new users will be able to join the tier, but current members will retain access until the end of the month for which they have paid. Users who were joined to the tier that has been terminated will be notified via email about this situation. It will be up to them whether they choose another tier or decide not to continue their support.

                  Benefits

                  Each tier consists of a set of benefits. Benefits are the rewards for your supporters. The two mentioned benefits below are fixed for every tier, and you can add other benefits according to your needs.

                  Loyalty badges next to member usernames in comments (Comments from the supporters will be highlighted with the badge)
                  Access to exclusive models (Access to all of the creator's models in the Exclusive models section.)

                  So note that all members from all tiers have access to the same collection of Exclusive models. You can differentiate the tiers with other benefits and by different licensing terms.

                  Optional benefits

                  Models for commercial usage - allow your supporters to use models for commercial purposes. It means that supporters can sell printed 3D models. Redistribution of the 3D model files is not permited.

                  Members only posts -If you decide to create posts and/or polls in the Community feed that are exclusively for your supporters, mention it as one of the benefits. Supporters get access to exclusive posts in the Community feed and the ability to vote in your members-only polls.

                  Custom licensing terms - You can define completely your own licensing terms and conditions. 

                  Custom benefit - define it yourself - If you want to offer any other advantage to your supporters, here you have the opportunity to describe it and add it among the benefits of the tier.

                  Payments and Getting paid

                  Payments are processed by Stripe payment processor. Users can pay using their credit/debit card.
                  The money goes directly from the supporter to the creator Stripe account.

                  Fees

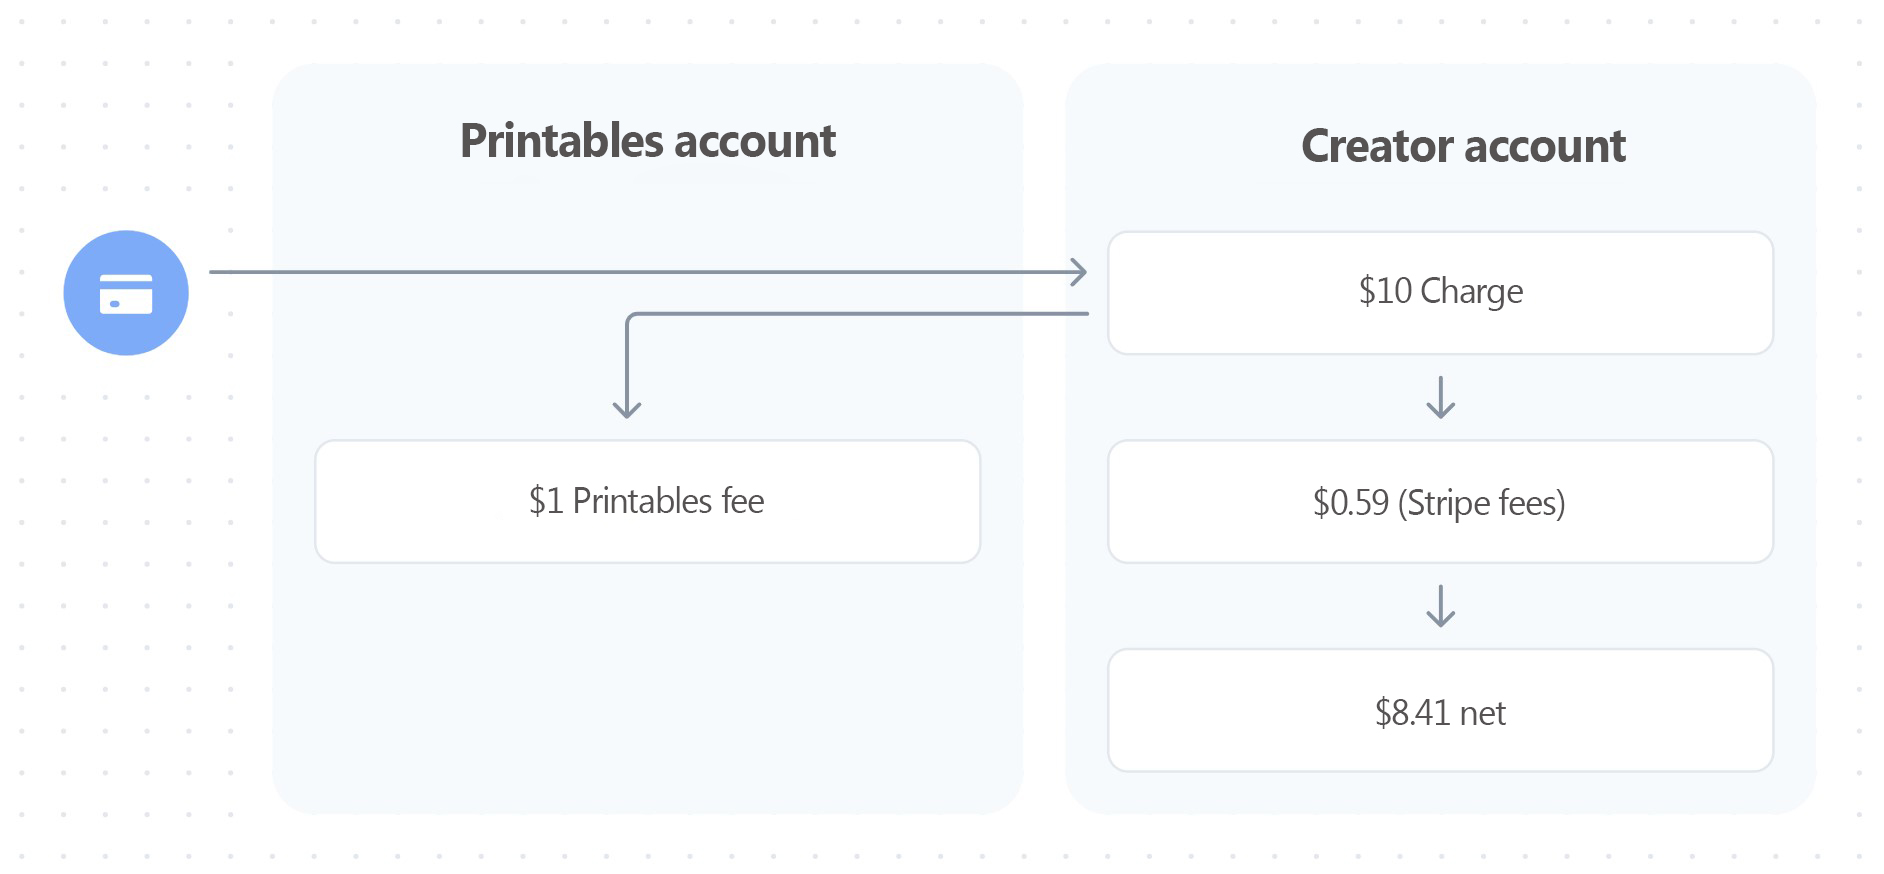
                  Printables takes 10 % fee from transactions, which will be used to help cover the costs of servers, maintenance, and development. The payment from the supporter to the creator is also subject to normal processing fees outside of our control, such as currency conversions or the Stripe payment fee based on Stripe rates.

                  For instance, if a supporter decides to pay for a $10 tier, the Printables fee will be $1 (10%). This $1 is then transferred to the Printables platform account. The net amount credited to the creator's account is $8.41 ($10 - $0.59 - $1), assuming standard US Stripe fees.
                  How Do I Get Paid?

                  Receiving payments on Printables is incredibly simple. All you need to do is connect you Stripe account to Printables Club. When someone supports you, the funds are immediately and directly transferred to your Stripe account and then sent to your bank account according to your Stripe account settings.

                  There's no minimum amount to withdraw or predefined payout schedule.

                  Taxes

                  In most situations, the money you make from Printables Club is considered income and needs to be reported for tax purposes, just like any other source of income. Right now, Printables doesn't have built-in tools to automatically include sales tax (GST) or value-added tax (VAT) when someone supports you. So, it's up to you to figure out and pay any necessary sales tax or VAT.

                  It's important to note that Printables doesn't provide advice on taxes. Tax rules can be different depending on where you live or operate. We suggest you get advice from a professional about your specific tax responsibilities before you start using Printables Clubs.

                  Billing Cycle

                  Memberships are on a monthly basis, and the recurring payment is charged at the beginning of each month.

                  If a new member joins in the middle of the month, they can choose to pay the full membership fee for the remaining part of the month or a proportional amount for the current month plus the following month. We are particularly proud of this solution, as creators expressed their frustration with people joining near the end of the month and the confusion that came with the two payments close to each other.

                  Discount codes

                  Printables supports the use of discount codes during checkout. Coupons (discount codes) are created by the creator in the Stripe account.
                  Coupons have a wide range of settings and parameters. However, Printables is not compatible with all these parameters. Therefore, it is necessary to follow the recommendations below to ensure that the coupons work as expected. Otherwise, the discount code will not function properly.
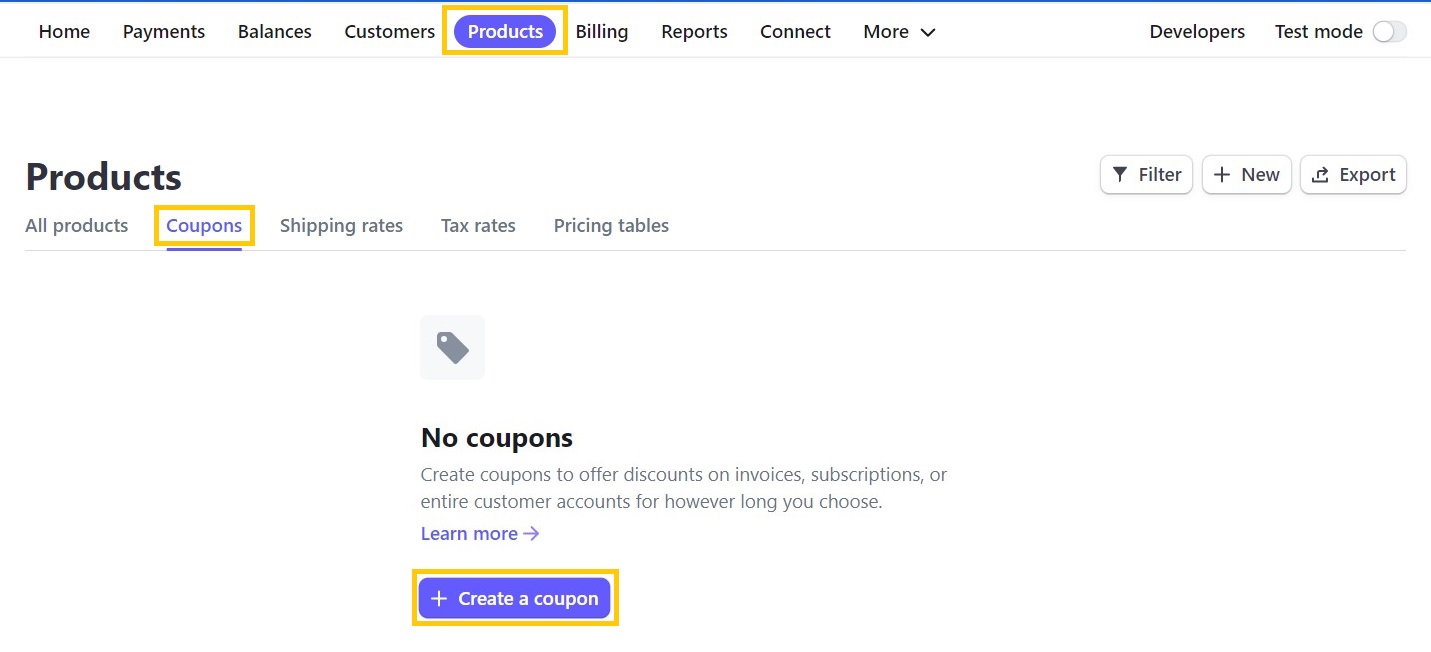
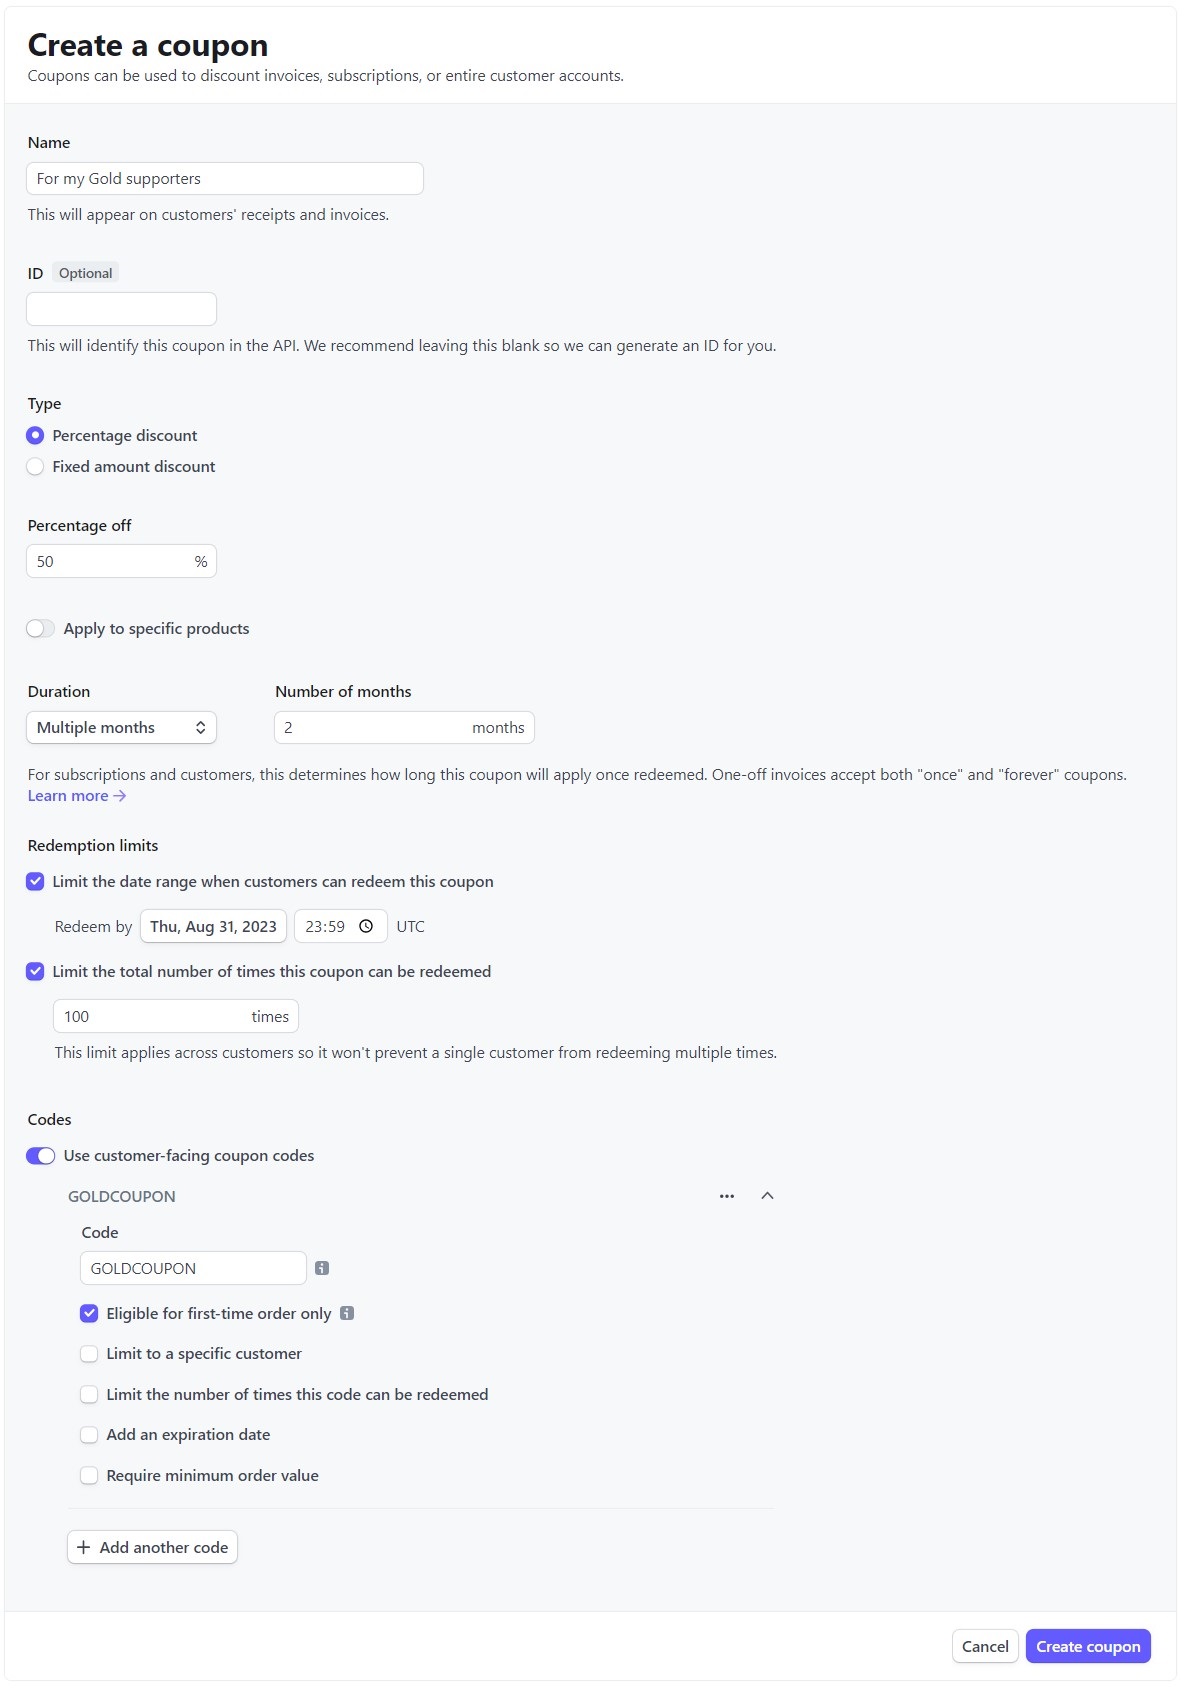
                  Creating a Coupon and Setting Parameters

                  1. Log in to your Stripe Dashboard at https://dashboard.stripe.com/
                  2. In the top bar, click on Products
                  3. Click on Coupons
                  4. Click on Create a coupon

                    Name - any name for the coupon
                    ID - do not fill in
                    Type - you can use either of the two options provided
                    Type -> Percentage discount - any value; the minimum payment amount at checkout must be $0.50 (more)
                    Type -> Fixed amount discount - you have to select USD; the minimum payment amount at checkout must be $0.50 (more)
                    Apply to specific product - do not use, as it is not compatible with Printables Clubs
                    Duration - Forever / Once / Multiple months - all three options can be used
                    Limit the date range when customers can redeem this coupon - can be used if necessary
                    Limit the total number of times this coupon can be redeemed - can be used if necessary

                    Use customer-facing coupon codes - switch it on
                    Code - any unique discount code
                    Eligible for first-time orders only - can be used if necessary
                    Limit to a specific customer - not recommended to use (must be existing customer)
                    Limit the number of times this code can be redeemed - can be used if necessary
                    Add an expiry date - can be used if necessary
                    Require minimum order value - do not use

                  Where to enter the discount code?

                  The discount code is used to provide a discount from creators to their supporters. The code is entered by clicking on "Add promotion code" on the Stripe checkout page. After entering the code, the code is validated and the discount is applied immediately.
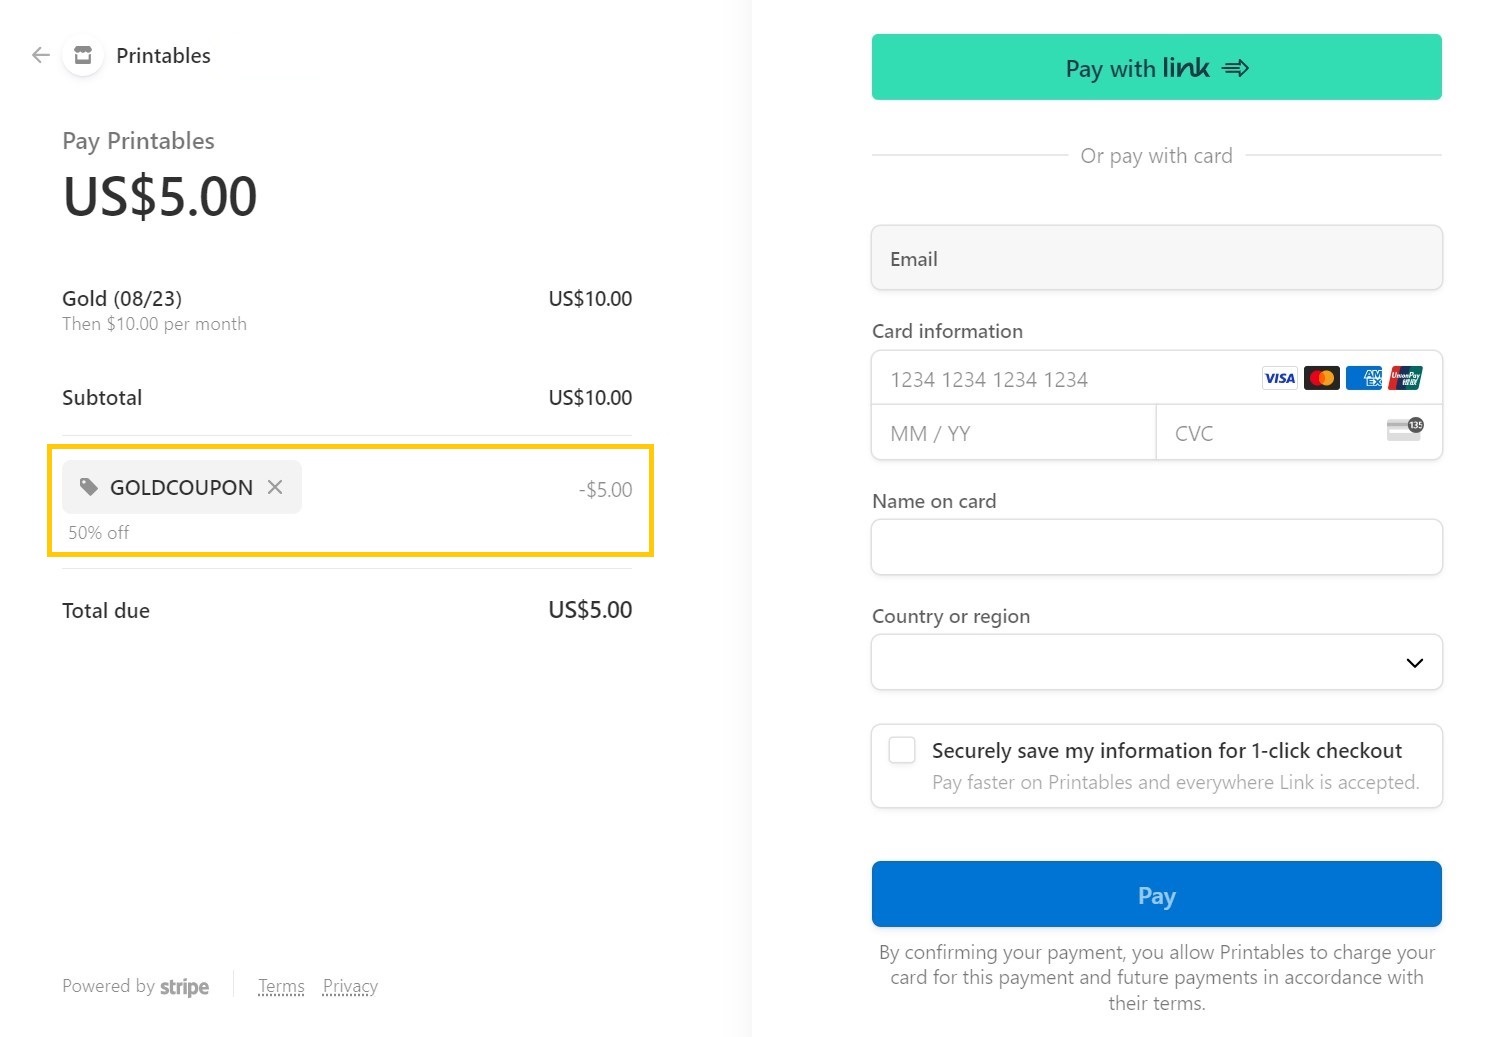
                  Both the Stripe fee and the Printables fee are calculated based on the original price without the discount code.

                  Sample Use Case

                  1. The creator has their supporters on another platform.
                  2. The creator has decided to share Exclusive content for their supporters in their Club.
                  3. The creator wants to take advantage of a unique opportunity to double their earnings as part of a bonus promotion.

                  The Creator want to motivate their supporters to the platform, so they decide to offer them a discount code in the form of XY% off the first two payments.
                  How to export information about incoming payments?

                  If you need the list of payments for tax purposes regarding all incoming payments for the sale of models and payments from Club supporters, you can export them directly from your Stripe Dashboard in .CSV format.
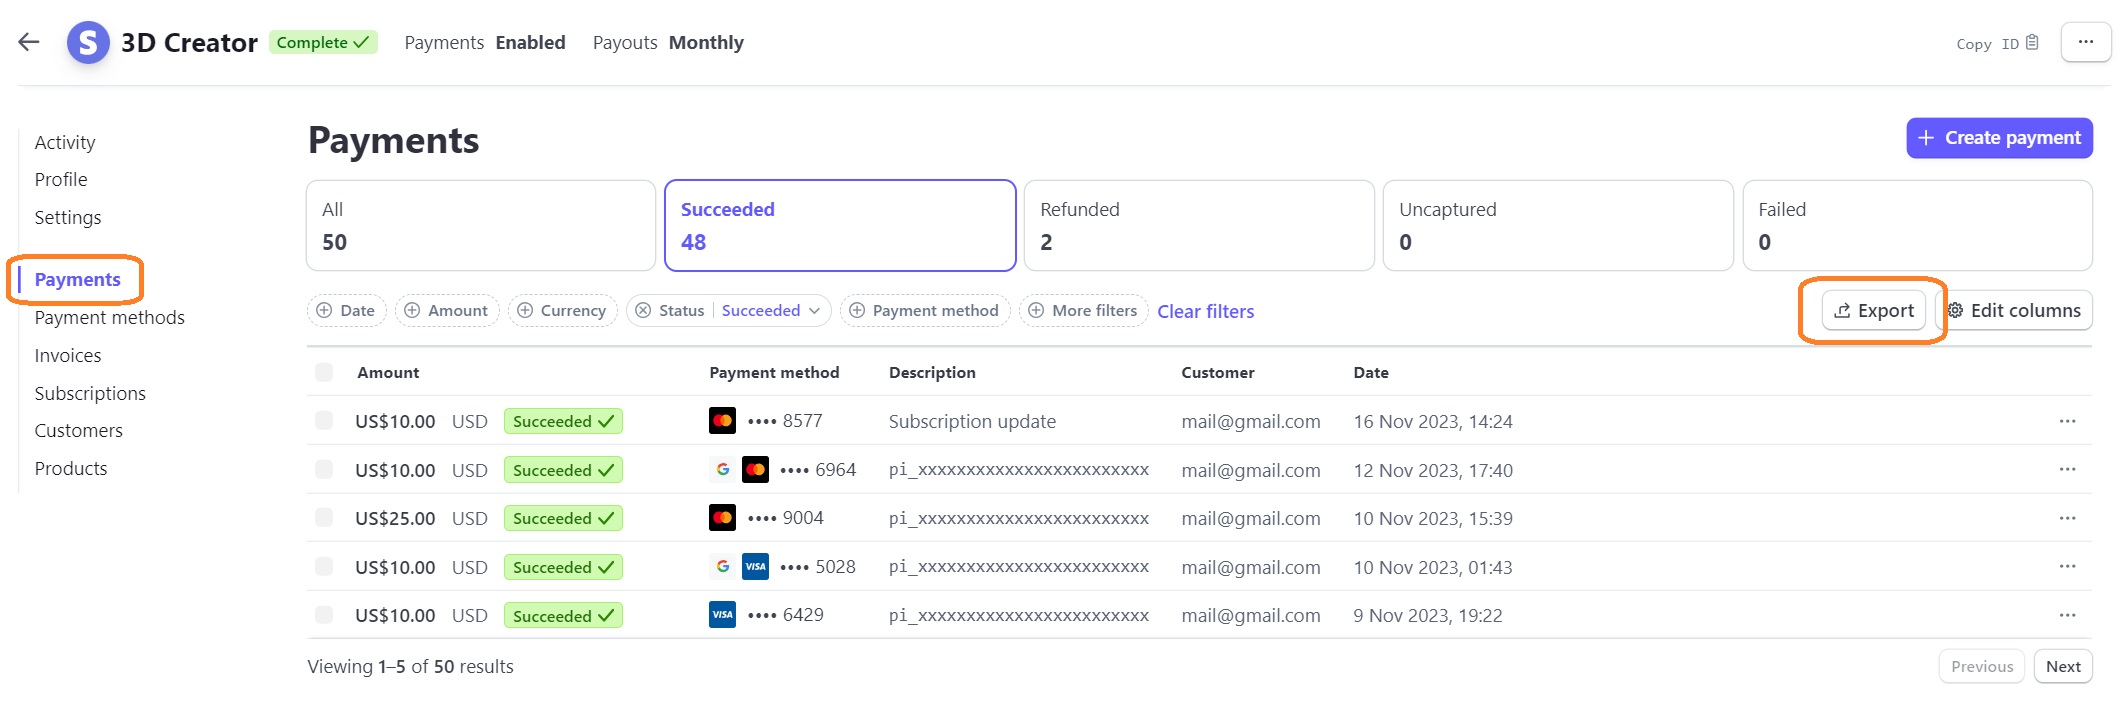
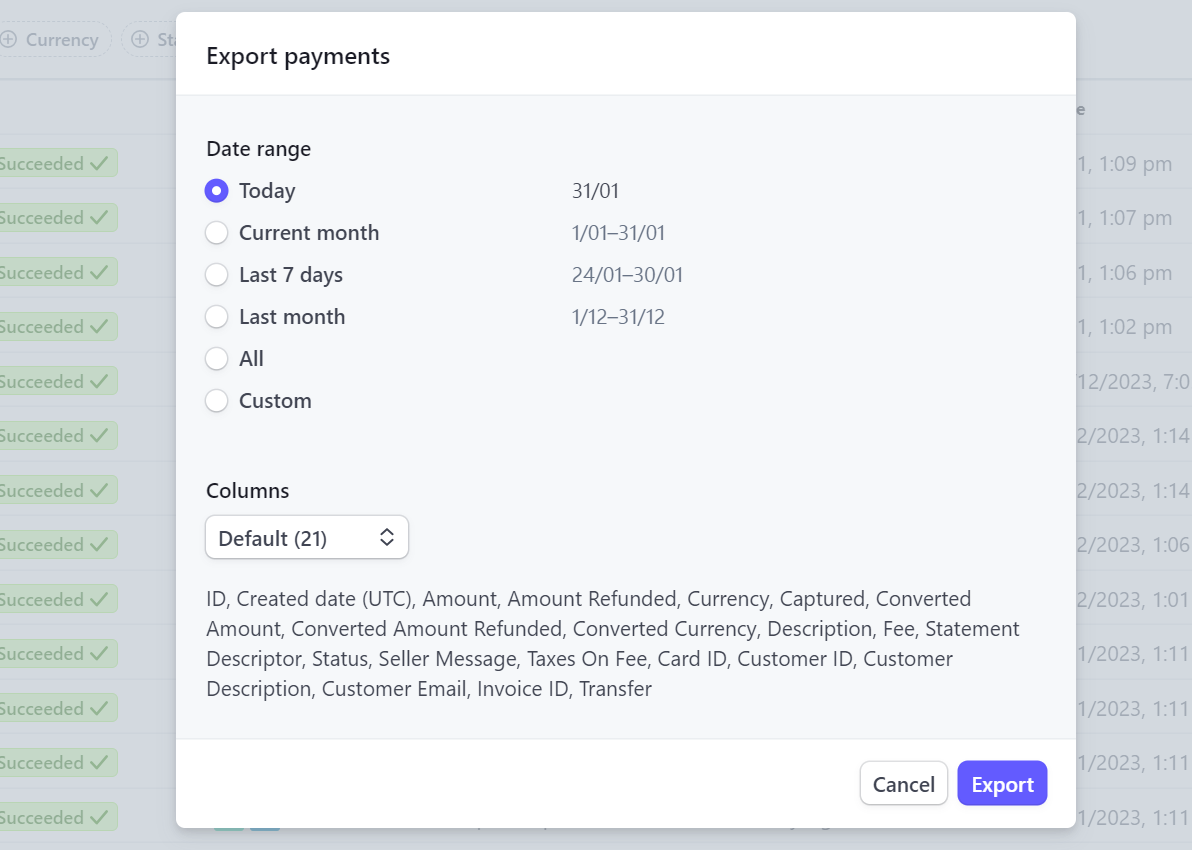
                  1. Go to https://dashboard.stripe.com/ and log in,
                  2. in the left menu, select "Payments",
                  3. click on "Export" button and choose the specific columns and time period you wish to export,
                  4. click the "Export" button and wait for the output.

                  この記事は役に立ちましたか?
                  この操作は登録ユーザーのみが利用できます。ログインしてください。
                  ログイン してコメントを投稿する
                  コメントなし

                  トピックス

                  • Printables [進行中の翻訳]
                    • About Printables Clubs [進行中の翻訳]
                      • About
                      • For Creators
                      • For Supporters
                    • Pritables Affiliate [進行中の翻訳]