AA

Productos destacados

    Categorías populares

      Búsquedas populares

        Artículos

          Blog

            Productos

              Categorías

                Búsquedas sugeridas

                  Buscando…
                  Sin resultados
                  Algo salió mal.
                  ↑↓ Seleccionar↵ AbrirEsc Cerrar búsqueda
                  • English
                  • Čeština
                  • Deutsch
                  • Español
                  • Français
                  • Italiano
                  • Polski
                  • 日本語
                  • Pedidos
                  • Dirección
                  • Alertas de Stock
                  • Cursos
                  • Subscripción
                  • Editar Cuenta
                  • Impresoras 3D9+▾

                    Impresoras 3Dnueva

                    nuevaPrusa CORE One L+Conoce más
                    nuevaPrusa CORE One+ (Gen 2)Conoce más
                    newPrusa CORE One L+ INDX 8-ToolnuevaPrusa CORE One+ (Gen 2) INDX 8 HerramientasPrusa CORE One L+: Critical InfrastructureOriginal Prusa MK4SnuevaOriginal Prusa XL+Original Prusa XL+: Critical Infrastructure

                    Actualizaciones de impresoras

                    newKit de Conversión CORE One/+ INDXnuevaActualizació Prusa CORE One L a CORE One L+nuevaPrusa CORE One+ a Prusa CORE One+ (Gen 2)nuevaActualización Prusa XL a Prusa XL+
                    Programa de Recompensas PrusaComparte. Recomienda. Gana.
                    ¿Cómo Elegir Una Impresora 3D?Te guiaremos paso a paso por los aspectos básicos para que encuentres la máquina ideal para tu espacio, presupuesto e ideas.
                    Libro electrónico gratuitoDescarga gratis el libro electrónico Fundamentos de la Impresión 3D con Josef Prusa y da tus primeros pasos en el mundo de la impresión 3D
                    Piezas Imprimibles Original PrusaColecciones de piezas de repuesto imprimibles para impresoras 3D Original Prusa y mejoras.
                    Información de envíoInformación actualizada periódicamente sobre la capacidad de fabricación actual y los plazos de entrega de nuestras impresoras.
                    Impresión 3D PersonalizadaImpresión 3D personalizada profesional con diversos materiales según sus requisitos.
                  • Materiales▾

                    Filamentos

                    PrusamentPLAPETGASA / ABSPC BlendPA (Nylon)FlexCompositesEspecialLiquidación de materiales

                    Resinas

                    ResinaLimpiador Resina
                    Guía de FilamentoComprobar Mi Bobina Prusament
                    Prusament.com
                  • Piezas y Accesorios▾

                    Accesorios

                    EnclosureBoquillasLáminas de ImpresiónAccesorios EsencialesCámaras y ComplementosHerramientas y ManualidadesAdhesivos

                    Piezas de recambio

                    Merchandising

                    Piezas de recambio - Todas las ImpresorasCORE OneMK4/S y MK3.9/SMK3/MK3S/MK3S+XL
                    Merch
                  • Para Empresas▾
                    Prusa Pro HT90Prusa Pro SLXPrusa Pro AFSPrusa Pro Medical OneOriginal Prusa XLOriginal Prusa XL: Critical Infrastructure
                    Prusa CORE One+Conoce más
                    Prusa CORE One LConoce más
                    Prusa CORE One L: Critical Infrastructure Edition

                    Impresión 3D para

                    Fabricación e I+DIndustria AutomotrizSanidadEducación e Investigación AcadémicaArquitectos y DiseñadoresIndustria del CineInfraestructuras Críticas

                    Stories de Impresión 3D

                    • Cómo comenzó la impresión 3D: Sobre Rep-rap y el código abierto con Adrian Bowyer
                    • La enseñanza de las matemáticas redefinida con la impresión 3D en JKU Linz
                    • La historia detrás del destornillador de LTT
                    • Victoria Hand Project: Cambiando la Atención Protésica con la Impresión 3D
                    Distribuidores Oficiales de Prusa
                    Sostenibilidad
                    Prusa Education
                    Contactar y Consultar
                    Impresión 3D personalizada
                    Certificado ISO
                  • Software▾
                    PrusaSlicer

                    PrusaSlicerPrusaSlicer

                    PrusaSlicer es una herramienta de código abierto, con numerosas funciones y que se actualiza con frecuencia, que incluye todo lo necesario para exportar los archivos de impresión perfectos para tu impresora 3D.

                    WindowsMacOSLinux
                    Prusa Connect

                    Prusa Connect

                    Prusa Connect es un servicio en la nube que permite controlar y supervisar de forma remota tus impresoras 3D, y que ofrece un tratamiento seguro de los datos, una configuración sencilla y la posibilidad de gestionar varias impresoras desde cualquier lugar.

                    Inicia Sesión en Connect
                    Prusa.app

                    Prusa.app

                    Controla tu(s) impresora(s) de forma remota desde cualquier lugar gracias a la tecnología Prusa Connect. Prusa.app ofrece una experiencia totalmente nueva con las impresoras Prusa en teléfonos Android e iOS.

                    ¡Pruébalo ya!
                    Controladores y firmwareDescarga el firmware y los controladores más recientes para tu impresora 3D.
                    Soporte para PrusaSlicer
                    Soporte para Prusa Connect
                  • Modelos 3D▾
                    Impresoras 3DArte y DiseñoHobby y MakersHogarMiniaturas de EscritorioJuguetes y JuegosTienda de Printables

                    Modelos 3D populares

                    • Strong garden hose holder
                    • Prusa Spool Bot
                    • Build Tray — Modular Organizer for Assembly, Disassembly and Maintenance
                    • Broom Holder
                    • Octagon Fabric
                    • Prusa CORE One ? (Mimic Skin)

                    Concursos de Diseño

                    • Framework Laptop 12 Mainboard Wiederverwendung1/9/2026 – 30/9/2026
                    • 🏆 Designer Herausforderung: Zaubertricks!1/9/2026 – 22/9/2026
                    • Make-up Aufbewahrungslösungen4/9/2026 – 20/9/2026
                  • Comunidad▾

                    Próximos eventos

                    • IFA 20264/9/2026 – 8/9/2026 · Berlin, Germany · Prusa Team
                    • Maker Faire Bay Area25/9/2026 – 27/9/2026 · Kalifornie, United States · Prusa Team
                    • 3D Printopia 202626/9/2026 – 27/9/2026 · Pennsylvania, United States · Prusa Team
                    • Hobby Messe2/10/2026 – 4/10/2026 · Sachsen, Germany · Prusa Team

                    Prusa Forum

                    • Perfil para prusaslicer de MK4 con MMU3 y boquilla de 0,25 para cuando?
                    • Casi convencido de pulsar sobre comprar... convenceme
                    • Core One+: Fallo en calibración del sensor de filamento (Valores ADC fuera de rango / Error 2147483647)
                    Mapamundi de PrusaMapamundi de PrusaEncuentra usuarios de impresión 3D de tu zona y descubre la comunidad que te rodea.
                  • Ayuda▾
                    Guías y TutorialesPrusaSlicerPrusa ConnectMateriales

                    Modelo de Impresora

                    CORE One INDXCORE One LCORE One+CORE One

                    Resolución de Problemas de Hardware

                    • Fallo Selftest (CORE One/+)
                    • Hotend atascado (MK4)
                    • Ajustando la tensión de la correa (CORE One L, CORE One)
                    • Prusa Connect y PrusaLink explicado

                    Drivers & Firmware

                    Familia INDXFamilia CORE OneFamilia MK4Familia XLFamilia MMUFamilia PRO
                  • Cursos▾

                    Conviértete en un experto en impresión 3D

                    Prusa Academy ofrece cursos en línea sobre diversos temas relacionados con la impresión 3D. Cada curso incluye: textos fáciles de leer con numerosas imágenes y vídeos breves; enlaces para inspirarse y profundizar en el tema; cuestionarios para poner a prueba tus conocimientos a lo largo del curso; y un certificado de finalización.

                    Ver todos los cursosMi biblioteca de cursos
                    • Modelado 3D en Autodesk Fusion
                    • Masterclass de PrusaSlicer – De Principiante a Experto
                    • Complete Guide to 3D Print Postprocessing, Painting, and Detailing
                    • Airbrush Your 3D Prints: From Basics to Advanced Tricks
                  • Blog▾
                    • ¡Las Ofertas de la Vuelta al Cole 2026 Han Llegado!
                    • Preview de PrusaSlicer 3.0 – Diseñado para el Futuro de la Impresión 3D
                    • Prusa CORE One+ (Gen 2) INDX, Envíos Iniciados, Impresoras Completas Abiertas a Pedidos
                    E-Book: Fundamentos de la impresión 3D
                  • Empresa▾

                    Sobre Prusa Research

                    Somos el mayor fabricante de impresoras 3D de Europa y Estados Unidos. La empresa fue fundada en 2012 como una startup unipersonal por Josef Prusa, un aficionado, creador e inventor checo. En solo 15 años, hemos crecido hasta convertirnos en una empresa con más de 1.200 empleados. Cada mes, diseñamos, fabricamos y enviamos más de 10000 impresoras 3D innovadoras y seguras desde nuestras sedes de Praga (República Checa) y Delaware (EE. UU.) a usuarios de más de 160 países. ¡Mira el vídeo y descubre cómo nació Prusa Research y lo que hemos logrado en tan solo 10 años!

                    Sobre NosotrosLínea temporalSostenibilidadOpen-source
                    Sobre nosotros
                    Contacta con Nosotros
                    Logo e Imágenes
                    Certificado ISO
                  1. Soporte
                  2. Original Prusa i3 MK2.5S
                  3. Prusa Connect y PrusaLink
                  4. Buddy3D Camera
                   

                  Contenidos

                  • How to install
                  • Installing the camera through the Prusa App
                  • Features
                  • Mounting the camera on the printer
                  • MINI, MK3, MK4, Enclosure
                  • Specifications
                  • Troubleshooting

                  Blog

                  • ¡Las Ofertas de la Vuelta al Cole 2026 Han Llegado!
                  • Preview de PrusaSlicer 3.0 – Diseñado para el Futuro de la Impresión 3D
                  • Prusa CORE One+ (Gen 2) INDX, Envíos Iniciados, Impresoras Completas Abiertas a Pedidos

                  Newsletter

                  Regístrate y obtén nuestro dosier mensual de información útil sobre nuevos firmwares, nuevas versiones de PrusaSlicer y consejos generales para proyectos de impresión 3D.

                  Al hacer clic, aceptas recibir nuestra newsletter.

                  Este sitio está protegido por reCAPTCHA Enterprise y se aplican la Política de Privacidad y los Condiciones del servicio de Google.

                  Strong garden hose holder
                  Tienda
                  • Impresoras 3D
                  • Mejoras de Impresoras
                  • Filamentos
                  • Accesorios
                  • Merchandising Prusa

                  © Prusa Research a.s.

                  Printables
                  • Modelos 3D
                  • Store
                  • Clubs
                  • Concursos de Diseño 3D
                  • Brands
                  Comunidad
                  • Mapa Mundial
                  • Foro
                  • Grupos de Usuarios
                  • Eventos
                  Ayuda
                  • Ayuda Prusa
                  • Prusa Academy
                  • Calculadoras de Impresión 3D
                  Software
                  • PrusaSlicer
                  • Prusa.app
                  • Prusa Connect
                  • Drivers y Software
                  Empresa
                  • Sobre nosotros
                  • Blog
                  • Distribuidores Oficiales de Prusa
                  • Contacto
                  • Certificado conforme a las normas ISO 9001, ISO 14001 e ISO 45001
                  • Términos y Condiciones generales
                  • Términos Generales y Condiciones de Uso de los sitios Web PRUSA
                  • Política de privacidad
                  • Información sobre las cookies
                  • Política de Reclamaciones de los Clientes
                  • Página de Estado de los Sitios Web
                  • Configuración de las cookies
                  • Términos y Condiciones generales
                  • Términos Generales y Condiciones de Uso de los sitios Web PRUSA
                  • Política de privacidad
                  • Información sobre las cookies
                  • Política de Reclamaciones de los Clientes
                  • Página de Estado de los Sitios Web
                  • Configuración de las cookies

                  © Prusa Research a.s.

                  JOSEF PRUSA®, PRUSA RESEARCH®, PRUSA POLYMERS®, PRUSA ORANGE®, PRUSA 3D ® Y PRUSAMENT® son marcas registradas de Prusa Development a.s. utilizadas por Prusa Research a.s. bajo licencia de Prusa Development a.s.

                  Buddy3D Camera

                  Relevante para

                  CORE One family
                  MK4 family
                  XL family
                  MMU family
                  PRO family
                  +
                  Artículo está también disponible en los siguientes idiomas
                  English
                  Čeština
                  Polski
                  Deutsch
                  Français
                  Español
                  Italiano
                  日本語

                  The Buddy3D camera features high-quality optics and IR illumination, allowing you to monitor your printer even in complete darkness. 

                  A USB-C connection can power the camera. The device supports the MicroSD memory card format. We recommend that the card has a maximum size of 64GB, and it must be formatted (supported formats: FAT32, exFAT) before being inserted into the camera when it is turned off.

                  Below are instructions on how to install the Buddy3D camera. Note that the printer must be powered on for the procedure.

                  How to install

                  1. Log in to Prusa Connect on your phone or computer browser.
                  2. Enter the printer you want to use with the camera.
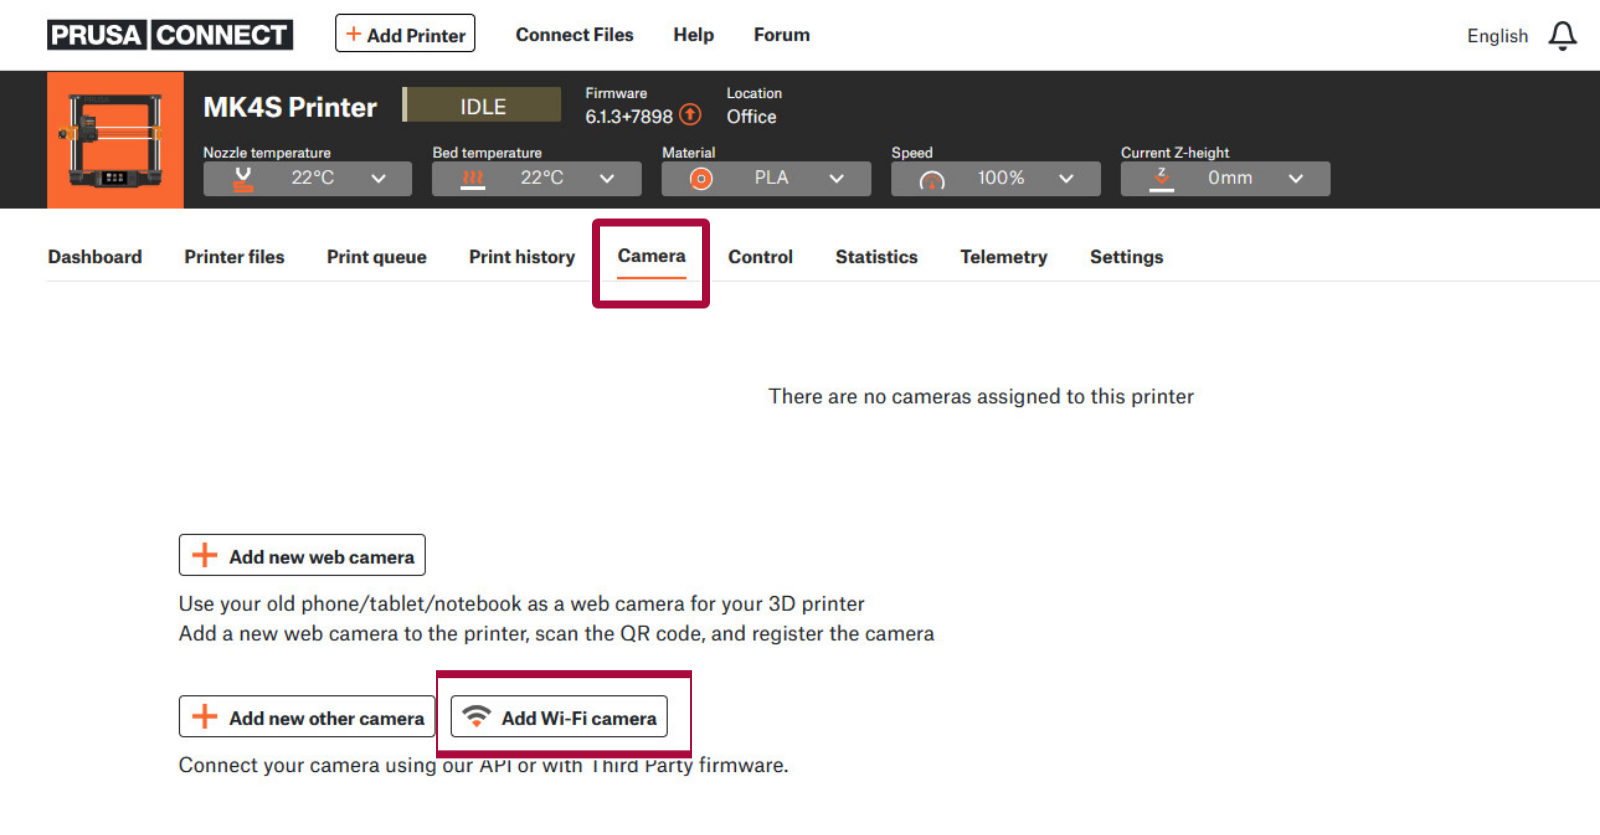
                  3. Click on the "Camera" tab.
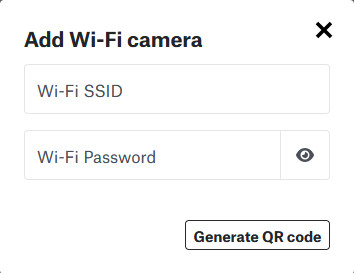
                  4. Click on "Add Wi-Fi Camera".

                  1. On the pop-up window, fill in the WiFi network name (SSID) and password the printer is connected to, and click Generate QR code. The maximum length of the Wi-Fi network name accepted is 26 characters.
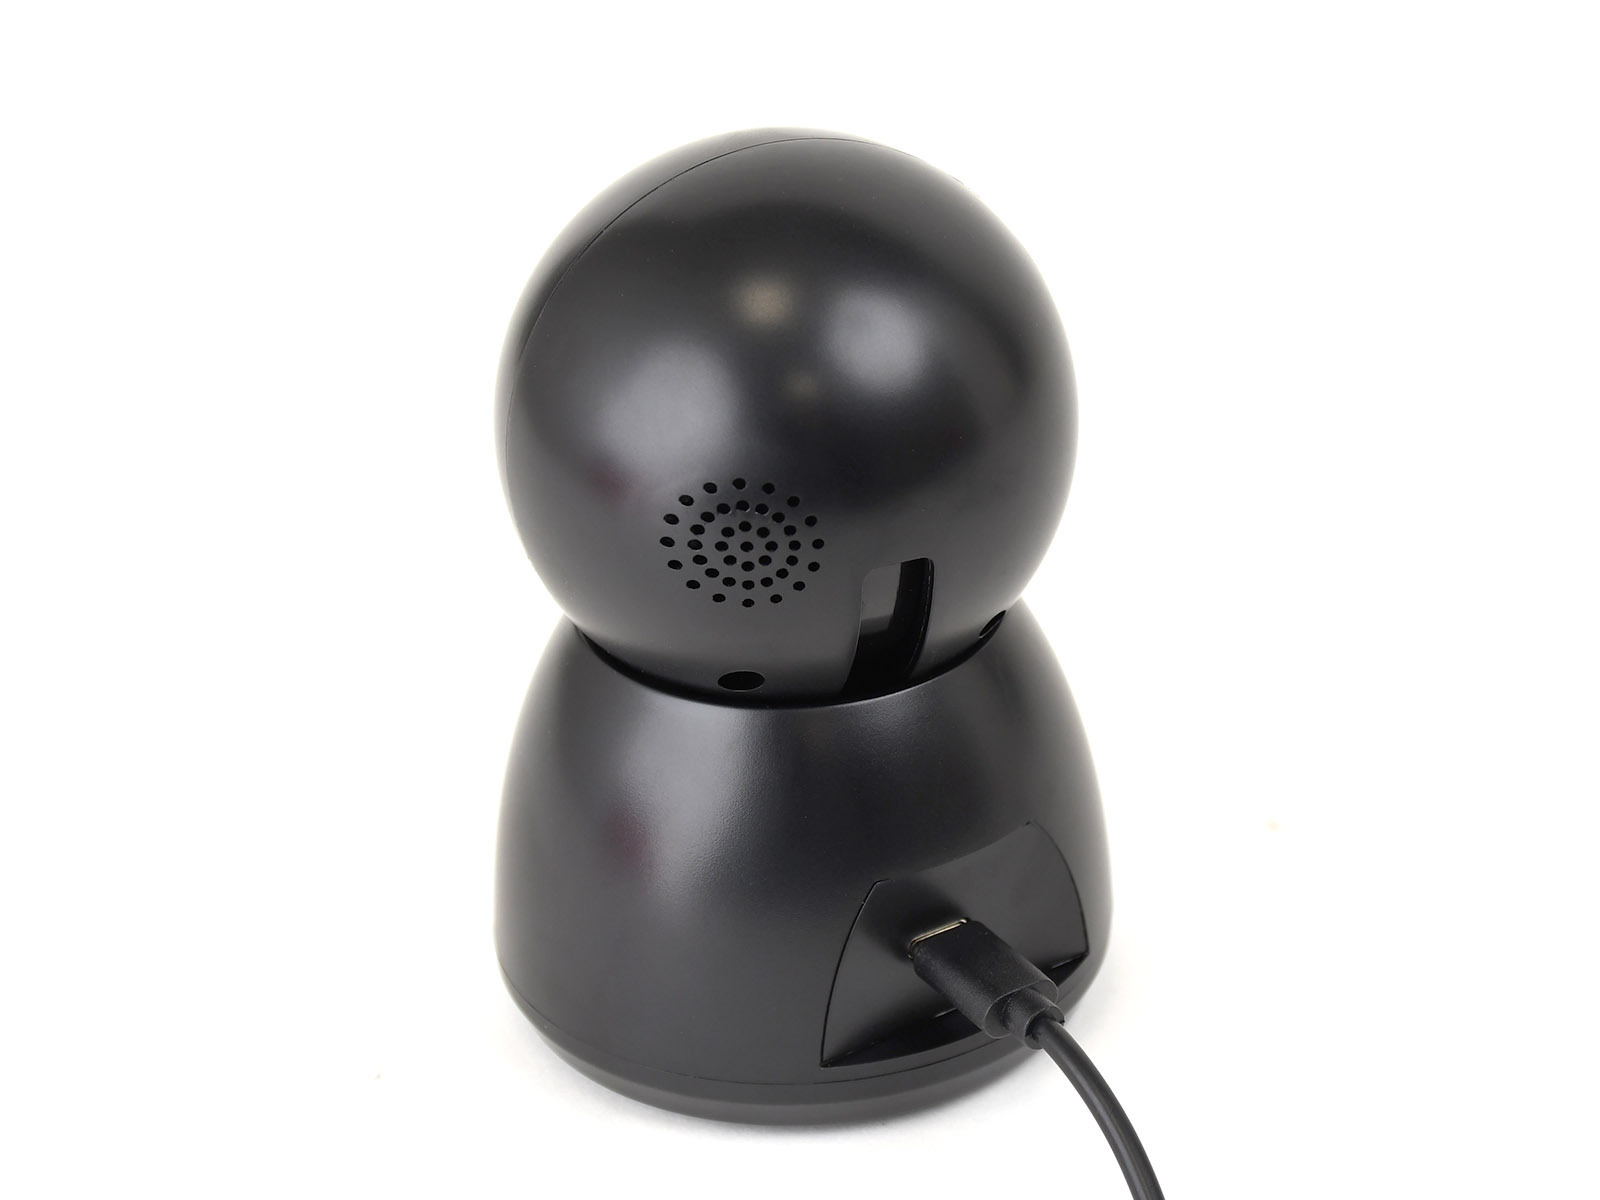
                  1. Subsequently, the camera needs to be connected to the power supply. A green LED near the camera itself will start blinking fast, showing that the camera is not paired.
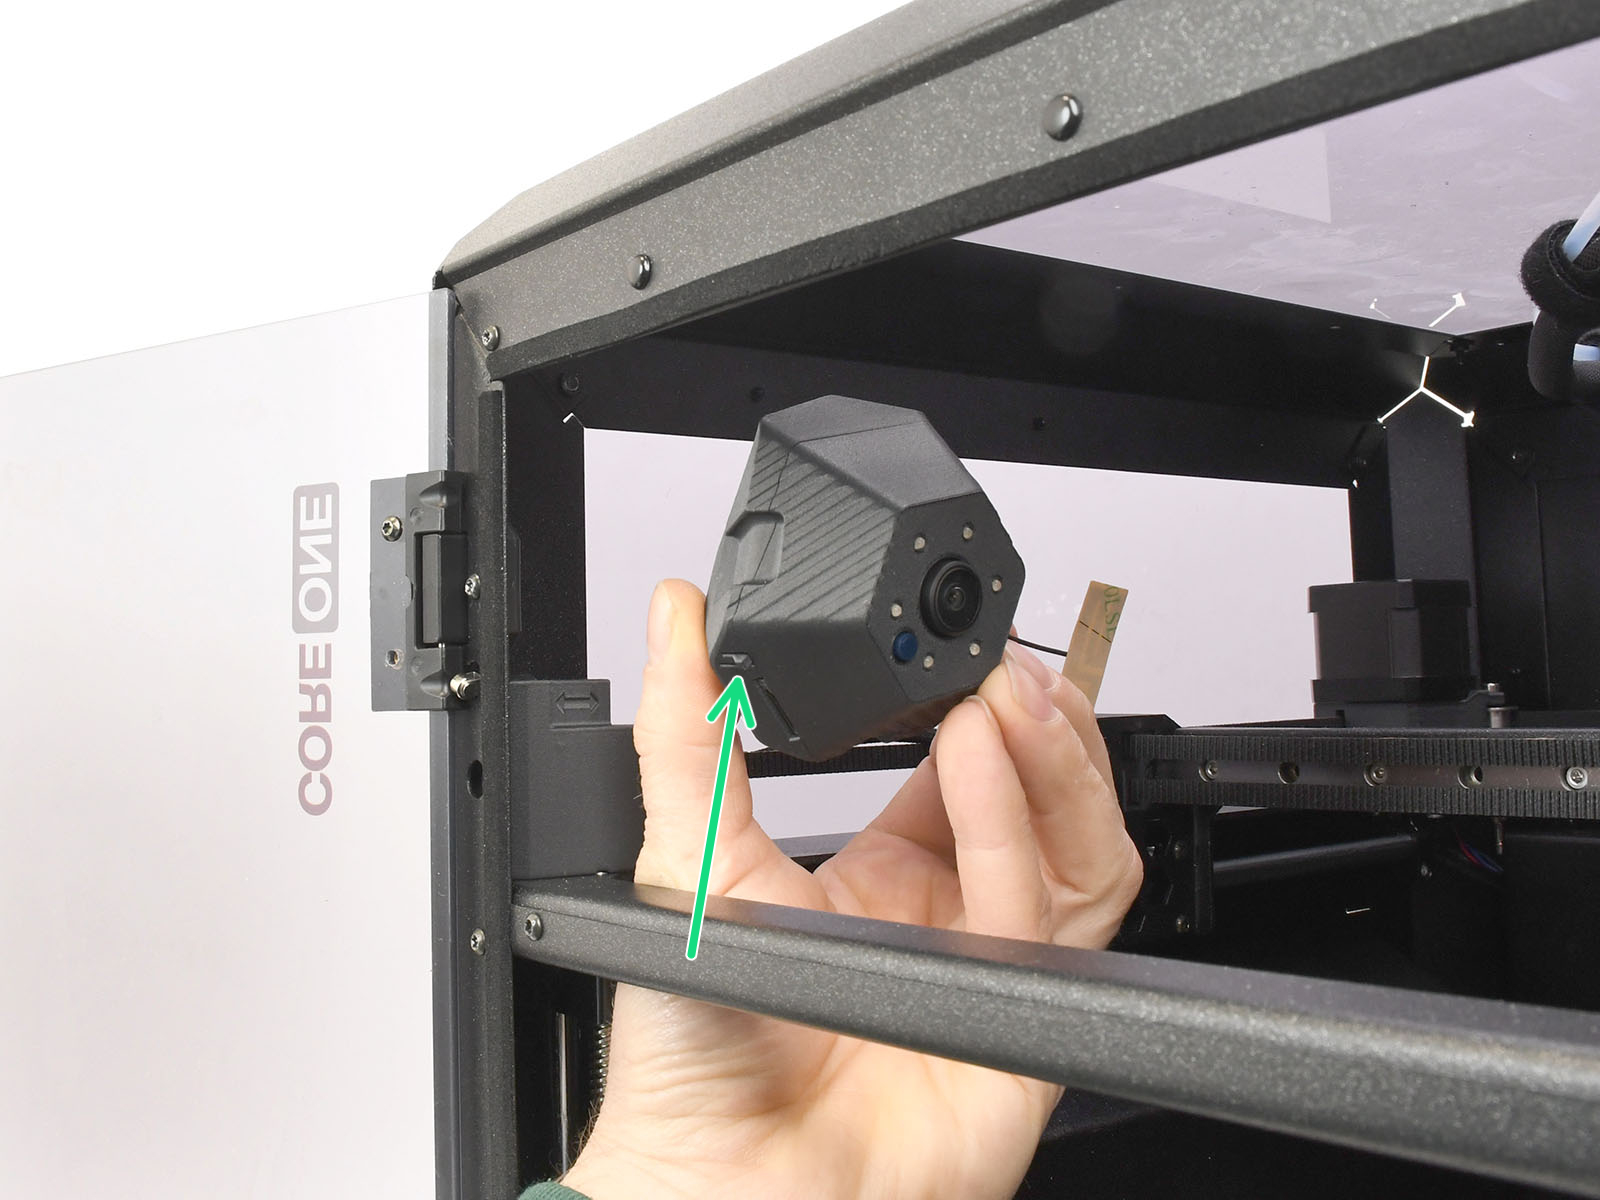
                  1. To enter pairing mode, reset the camera by pressing the reset button for 1 second. Point the camera up on the Buddy 3D camera to see the button near the Micro SD card slot. On the Buddy 3D camera for CORE One, use an Allen key to press the reset button.
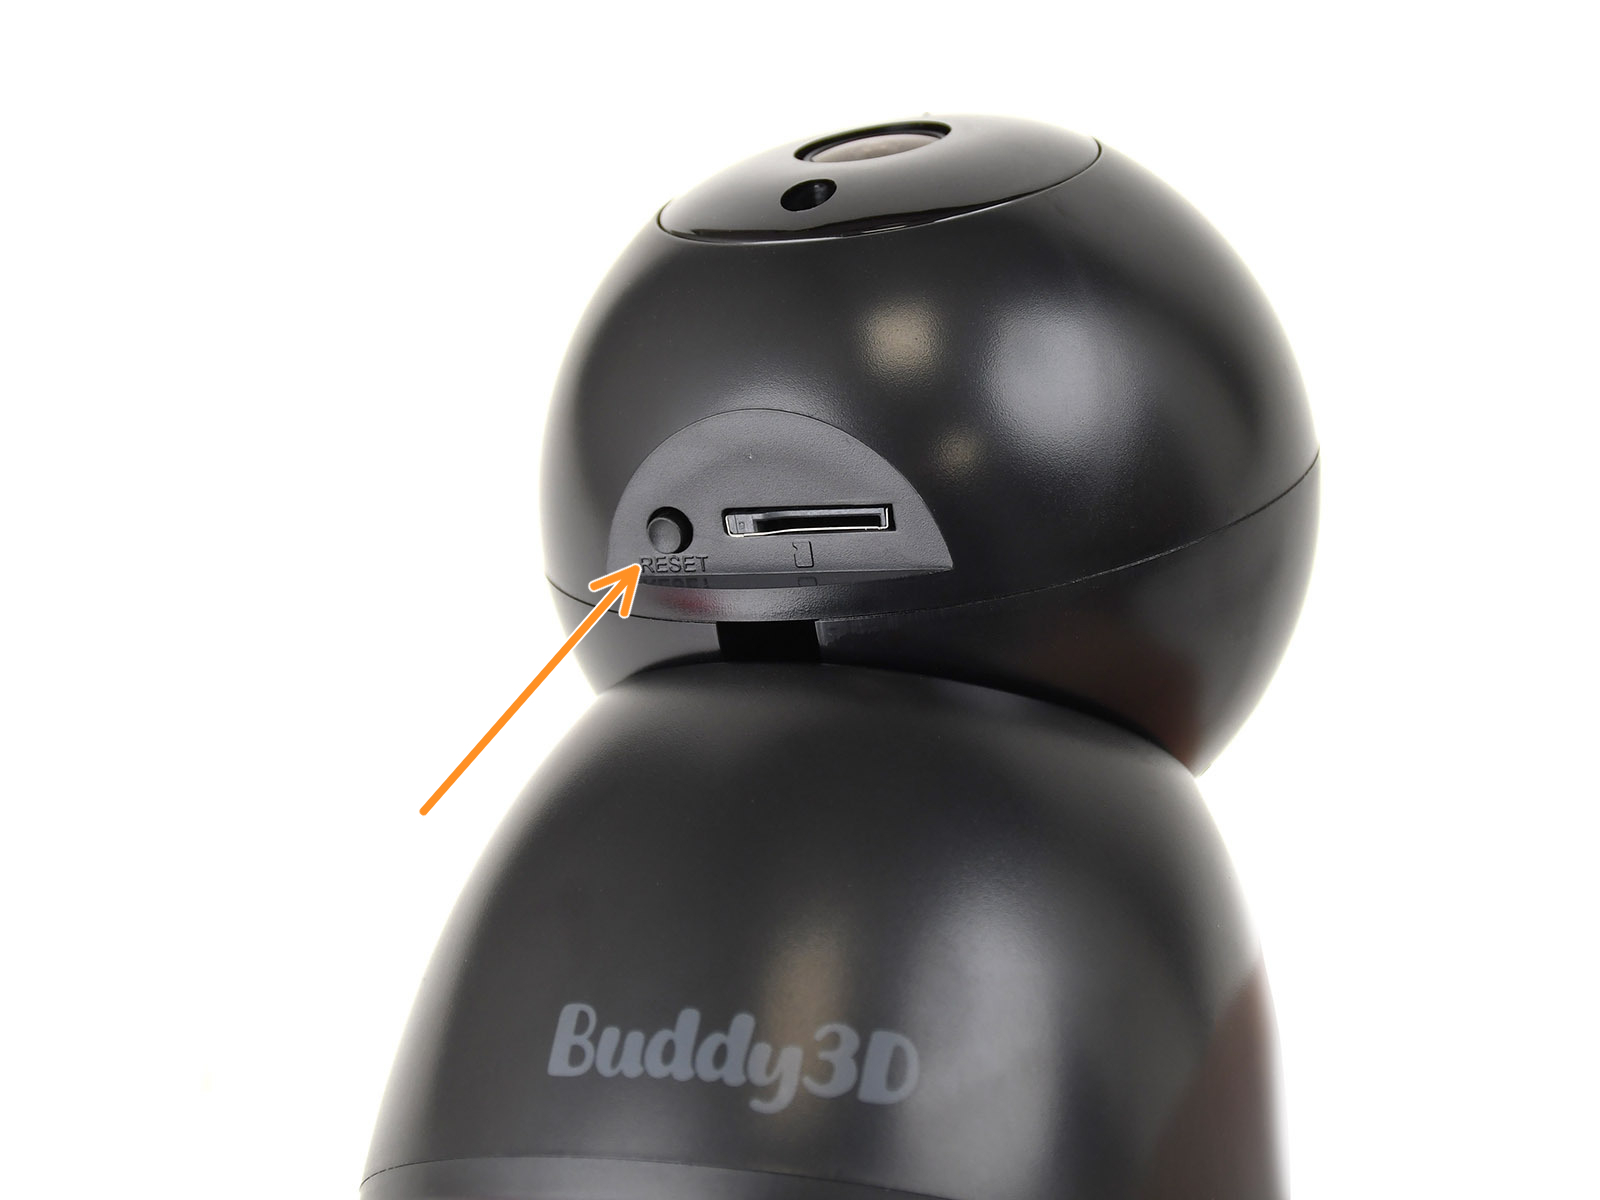
                  Buddy3D Camera reset buttonCORE One Camera reset button
                  1. When prompted, point the camera at the generated QR code. Do not use dark mode. You might need to try different distances from the camera to the code.
                  2. After some time, you will be instructed to stop scanning the QR code. You should hear another one that the QR code was scanned right before or after that message. If you do not hear this message, start the process again.
                  3. After a few seconds, you will hear a message indicating whether the connection was successful. After a successful connection, the first image in Connect will be displayed. The green LED on the camera will blink slowly, showing that it is connected. If the connection is not successful, check the troubleshooting steps below.
                  4. The camera will automatically update after connecting to the Internet for the first time. You can then start using your Buddy3D camera.
                  Note that the images will be snapshots taken every 10 seconds. The live feed only works in the Prusa App or via a network player such as VLC at the address rtsp://xx.xx.xx.xx/live.

                  For a time-lapse, insert a Micro SD card in your Buddy camera.

                  Firmware before 

                  A tone will sound after scanning the QR code. Note that the image might take a few seconds to appear.
                  Successful QR code reading = short beep
                  Unsuccessful pairing = 3 long tones
                  Successful camera network connection = "Welcome tone"

                  LED light clues

                  • Solid LED: The camera is starting. If the camera has started and the light is still solid, contact Atención al cliente.
                  • Fast blinking LED: The camera has started but is disconnected.
                  • Slow blinking LED: Camera connected.

                  Installing the camera through the Prusa App

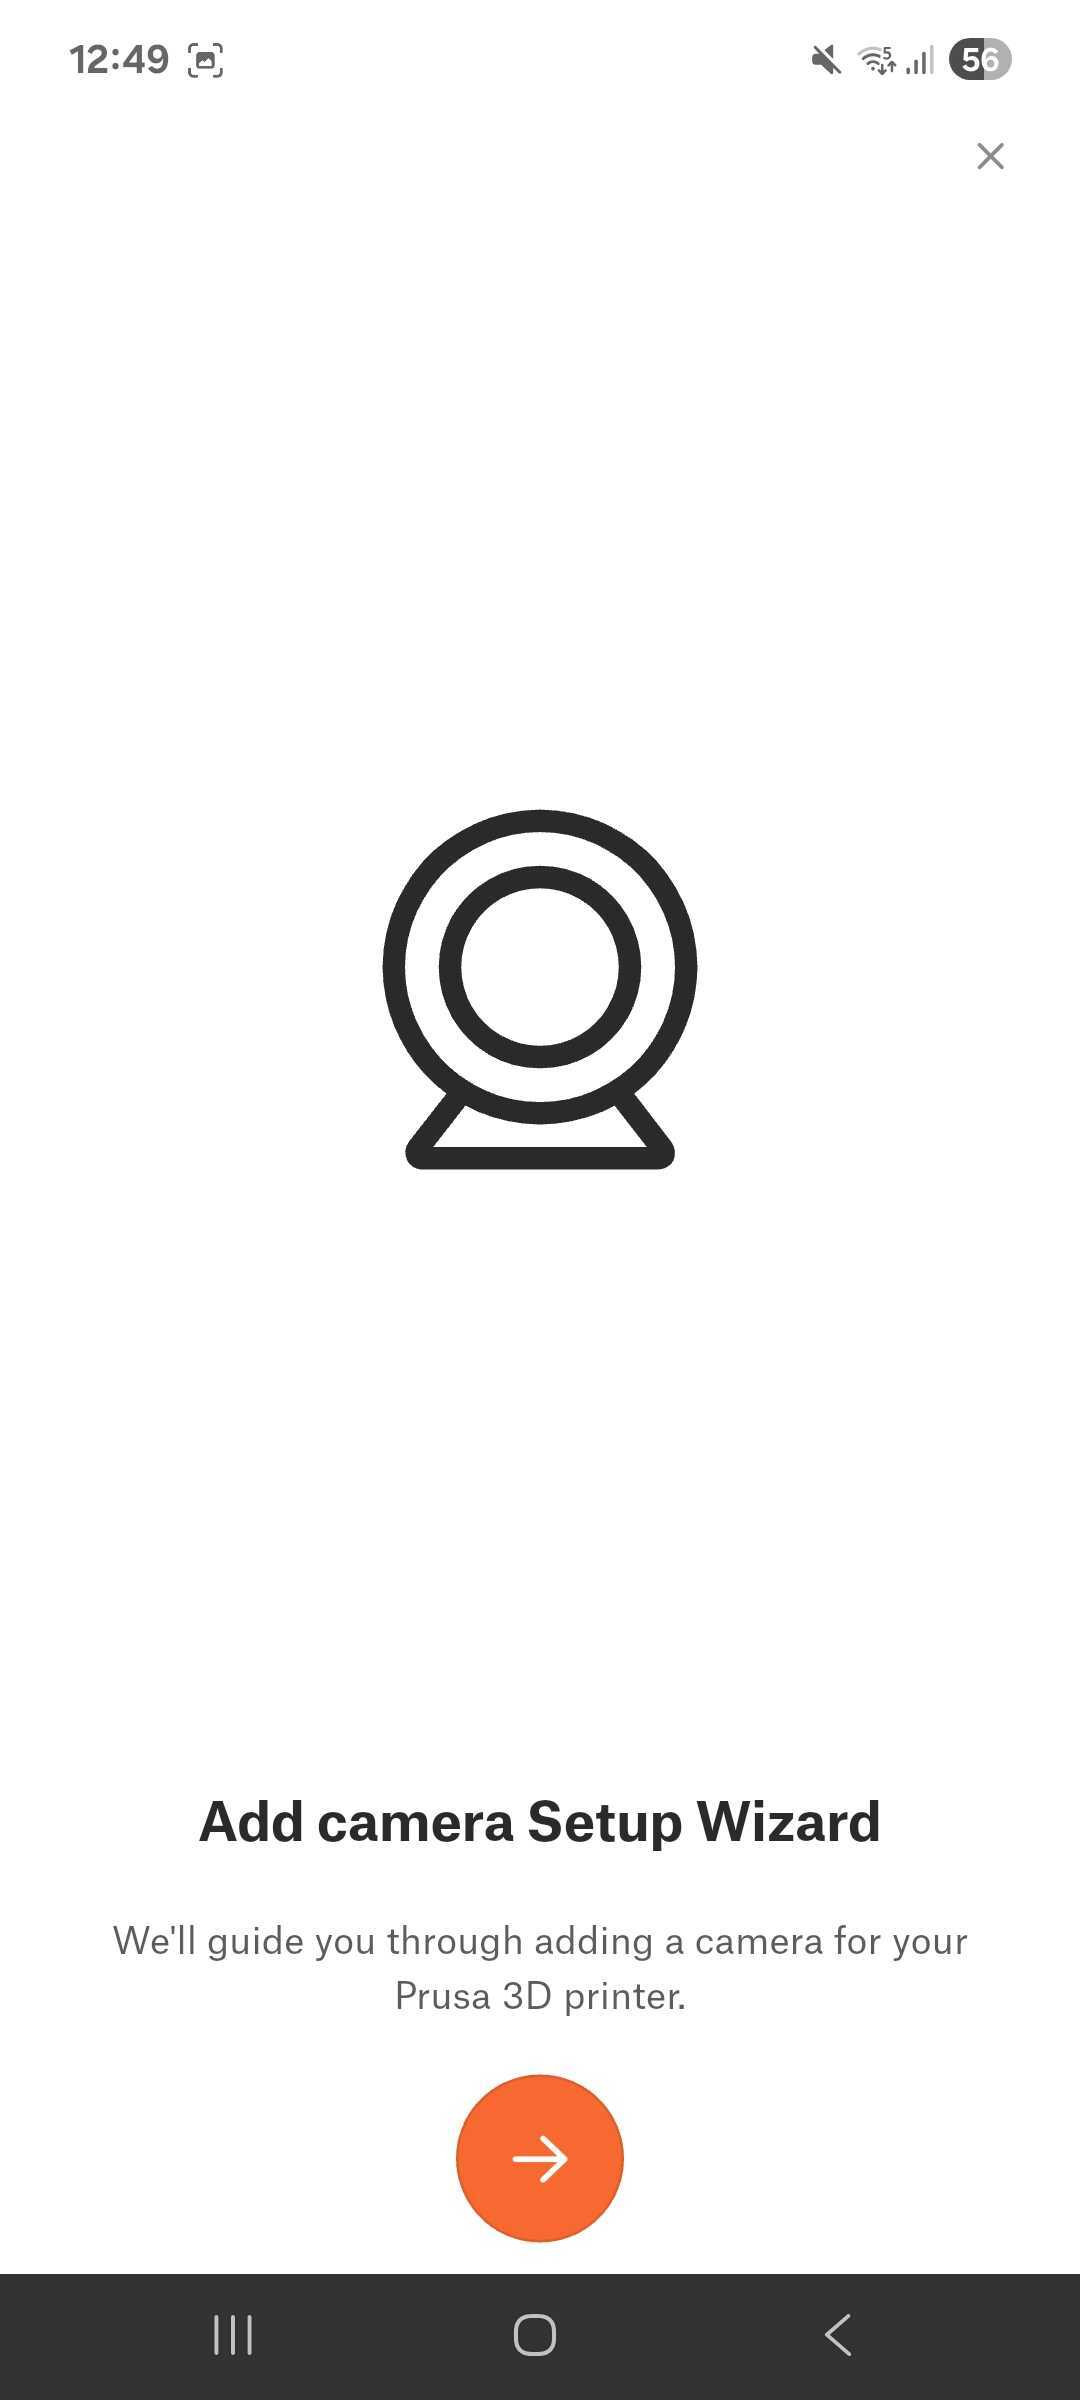
                  It is possible to generate the QR code to install the camera through the Prusa Mobile App [Traducción en desarrollo] as well. For that, follow the following steps:

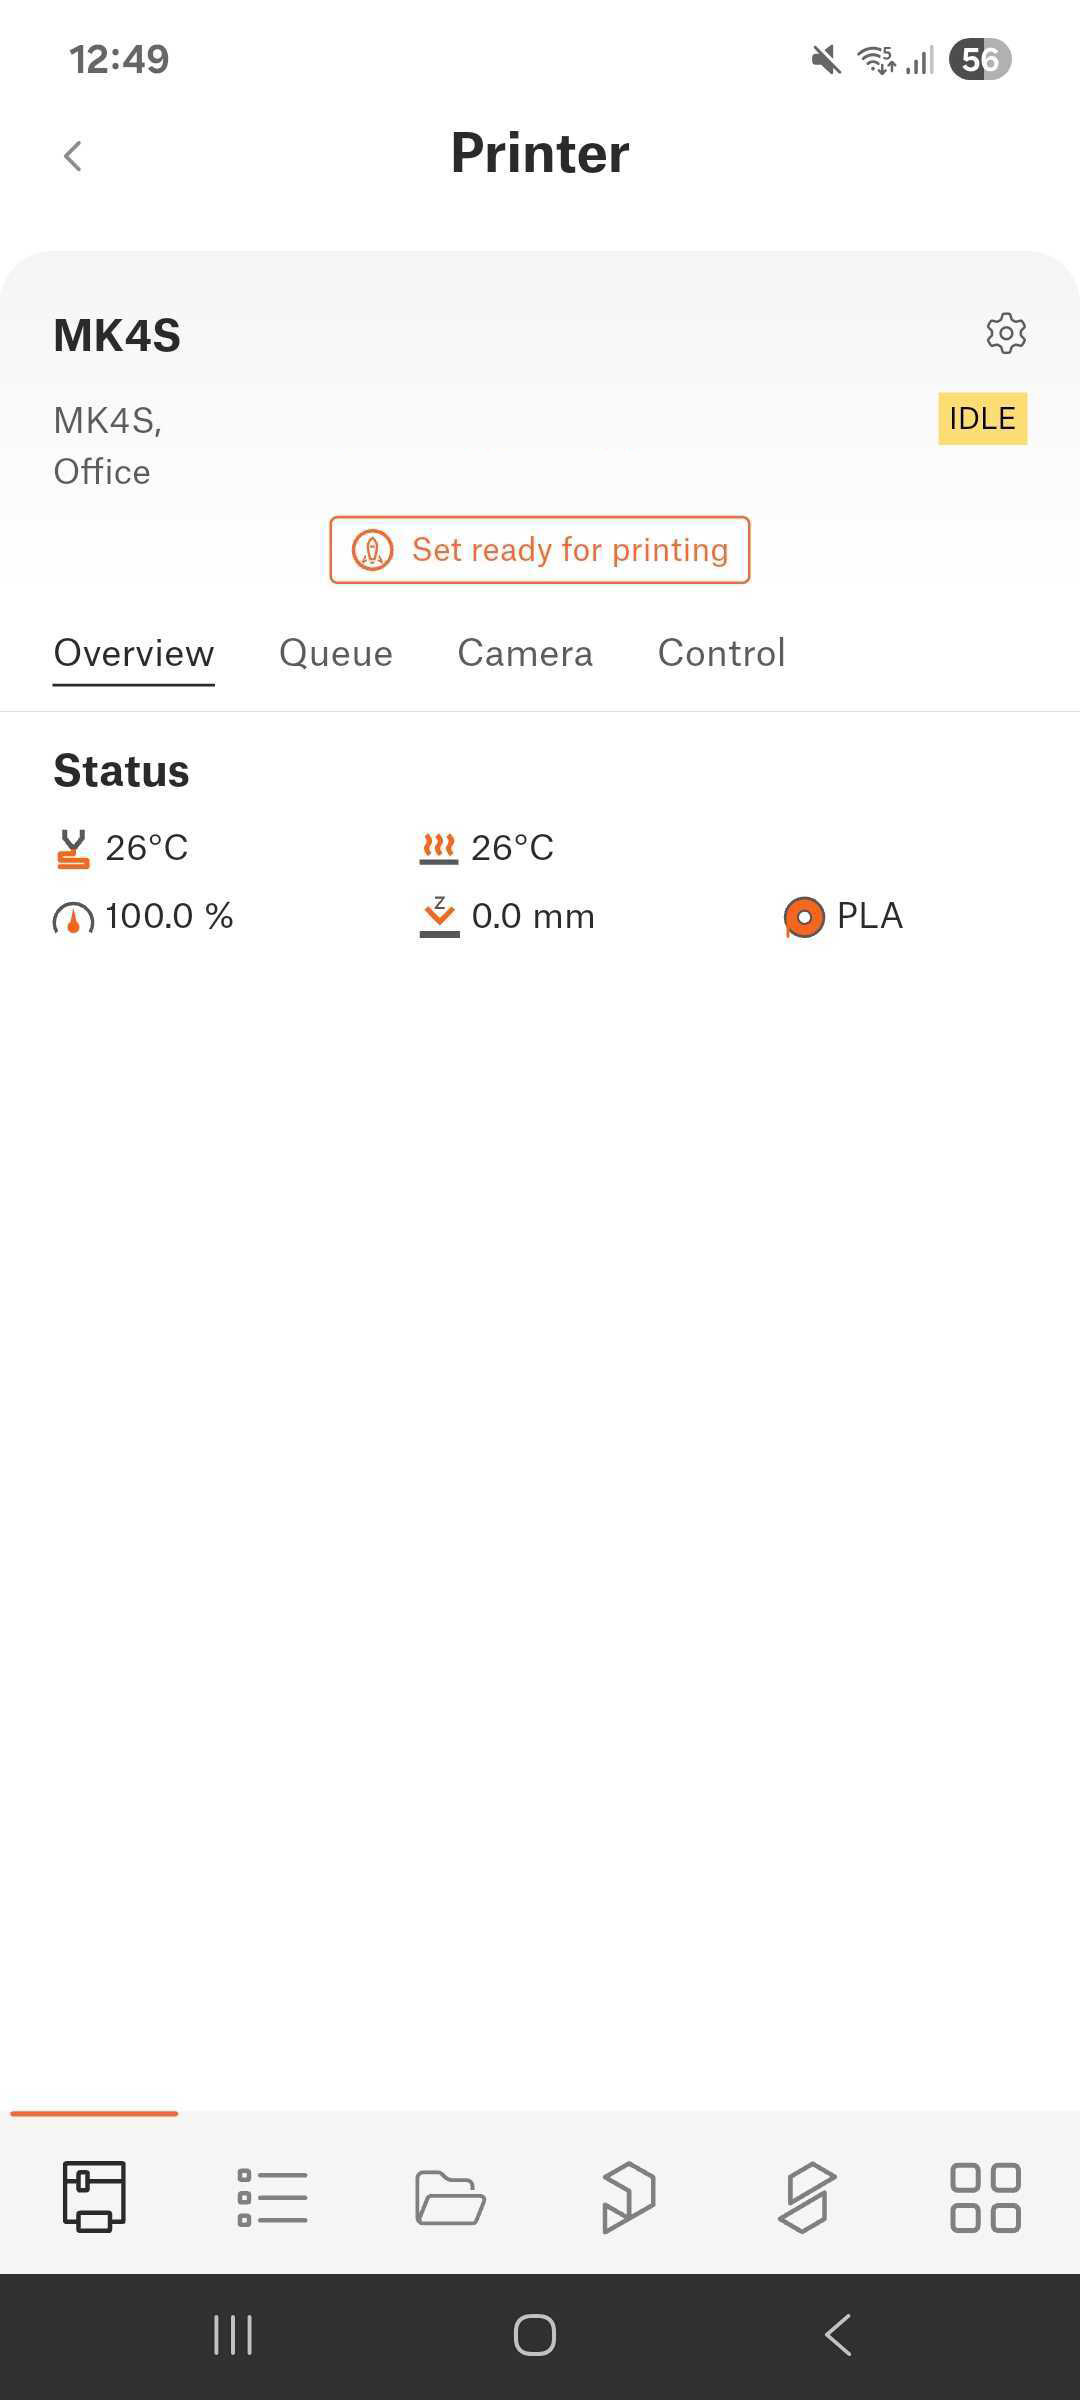
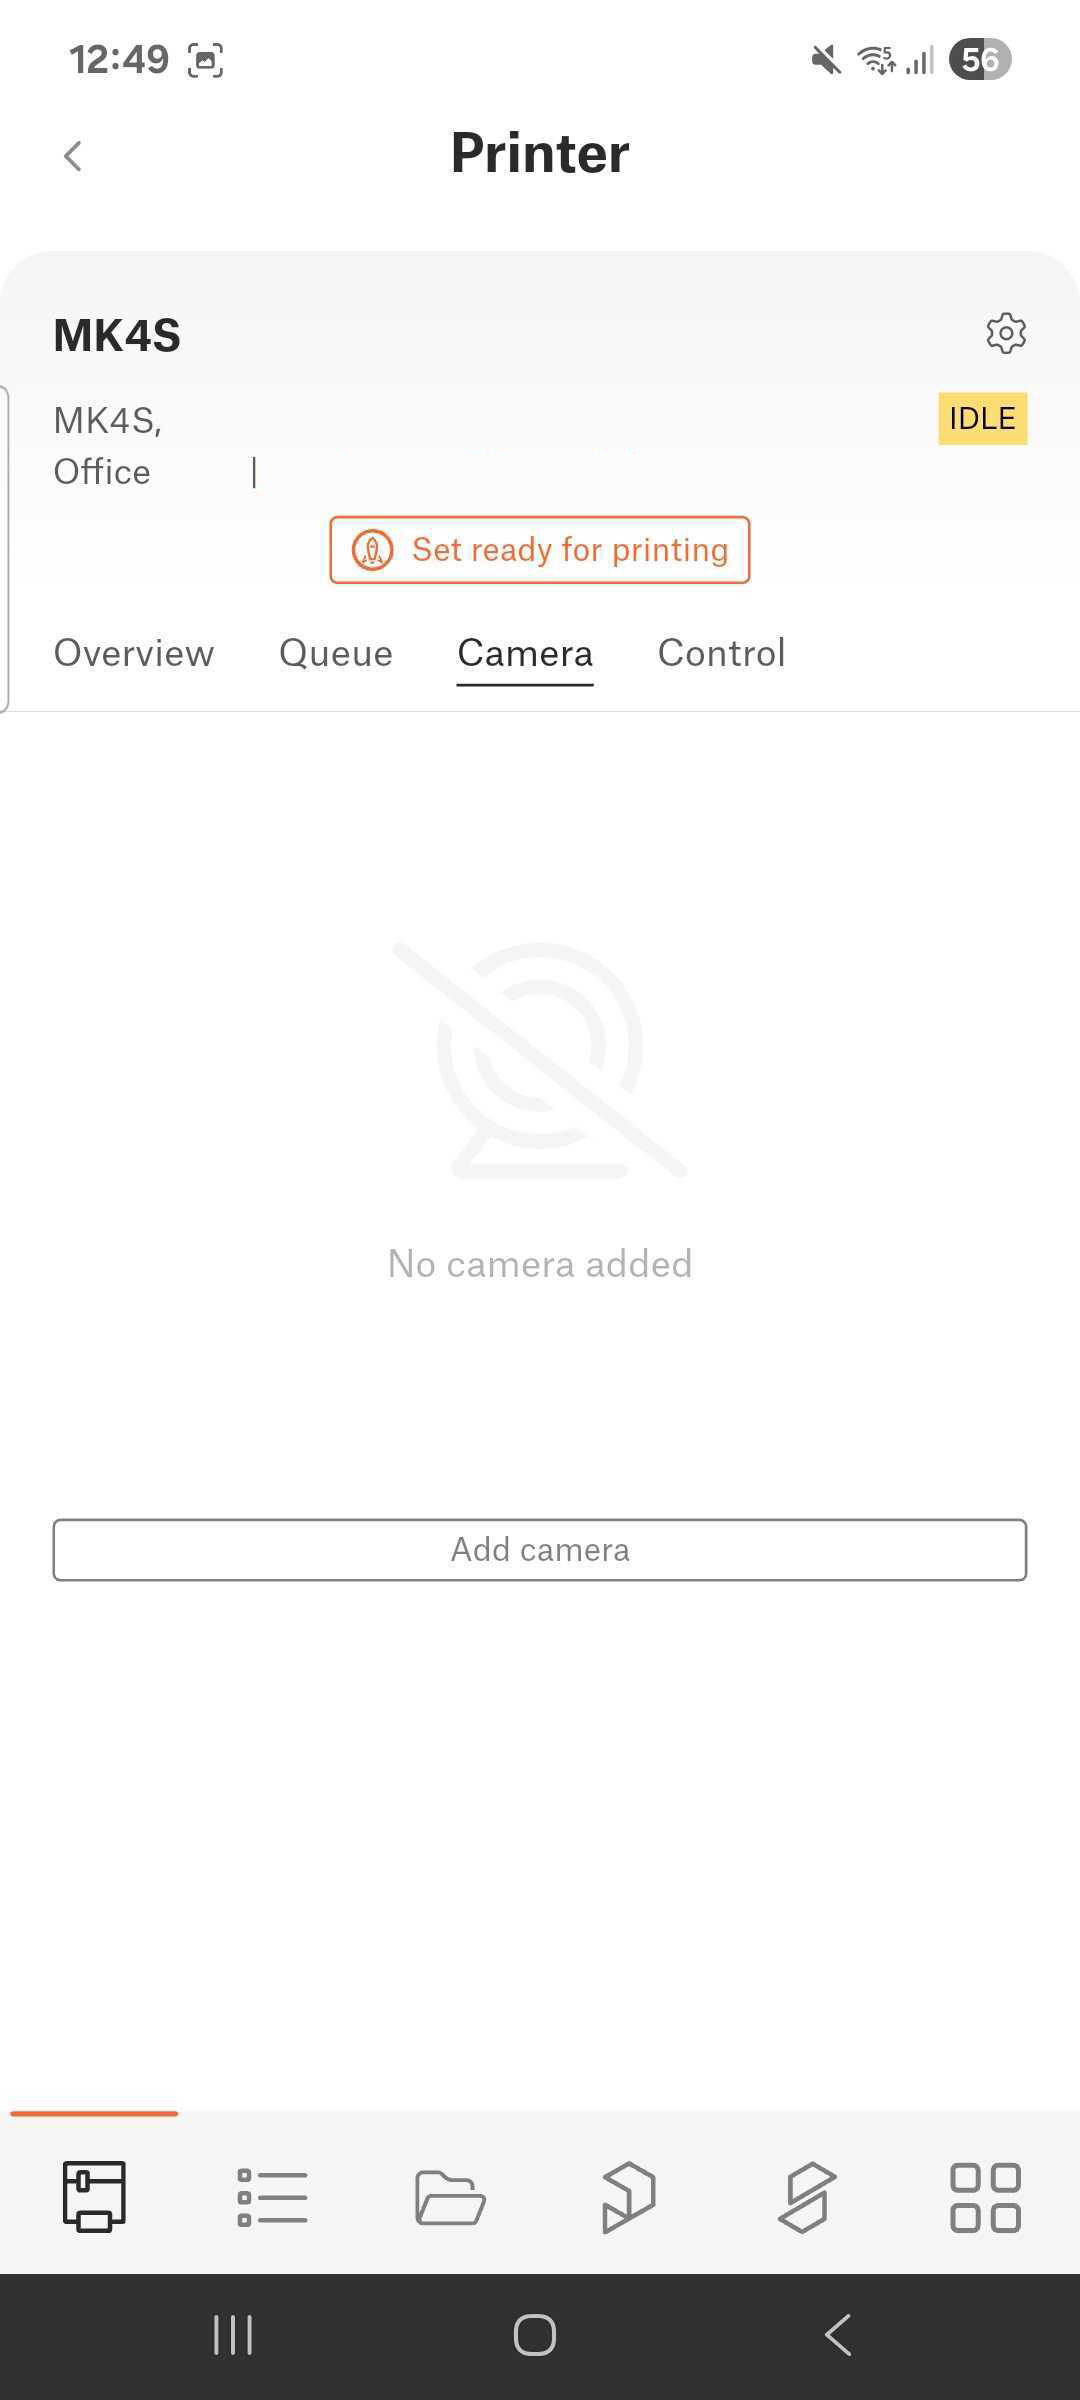
                  1. Open the Prusa App, select the printer you want to install the camera on, and go to the Camera option in the menu. Then, click to Add Camera.
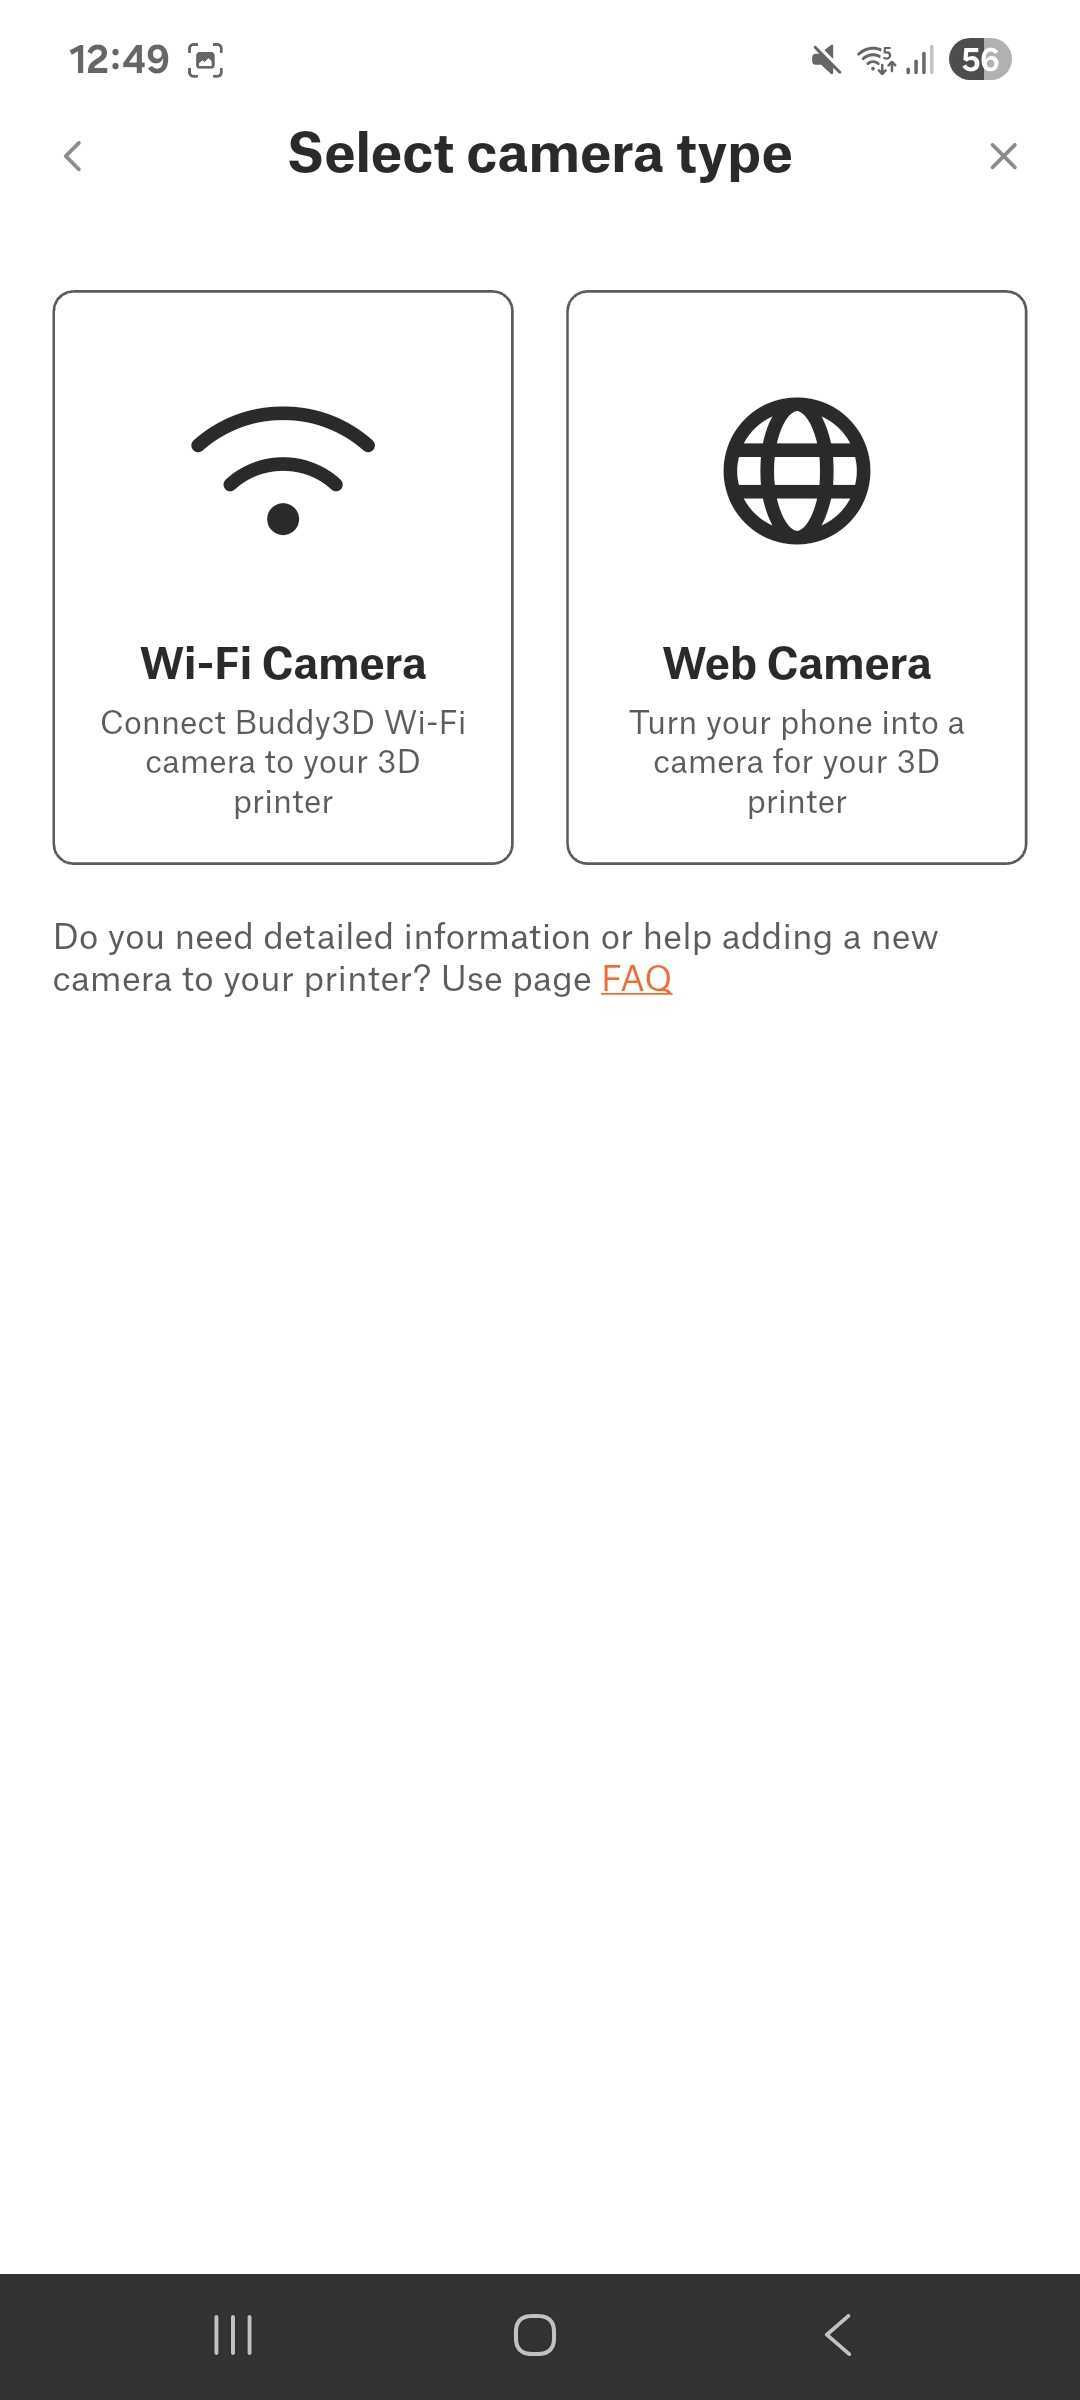
                  1. You will see the camera Setup Wizard. Click the side arrow, and choose the Wi-Fi camera option.
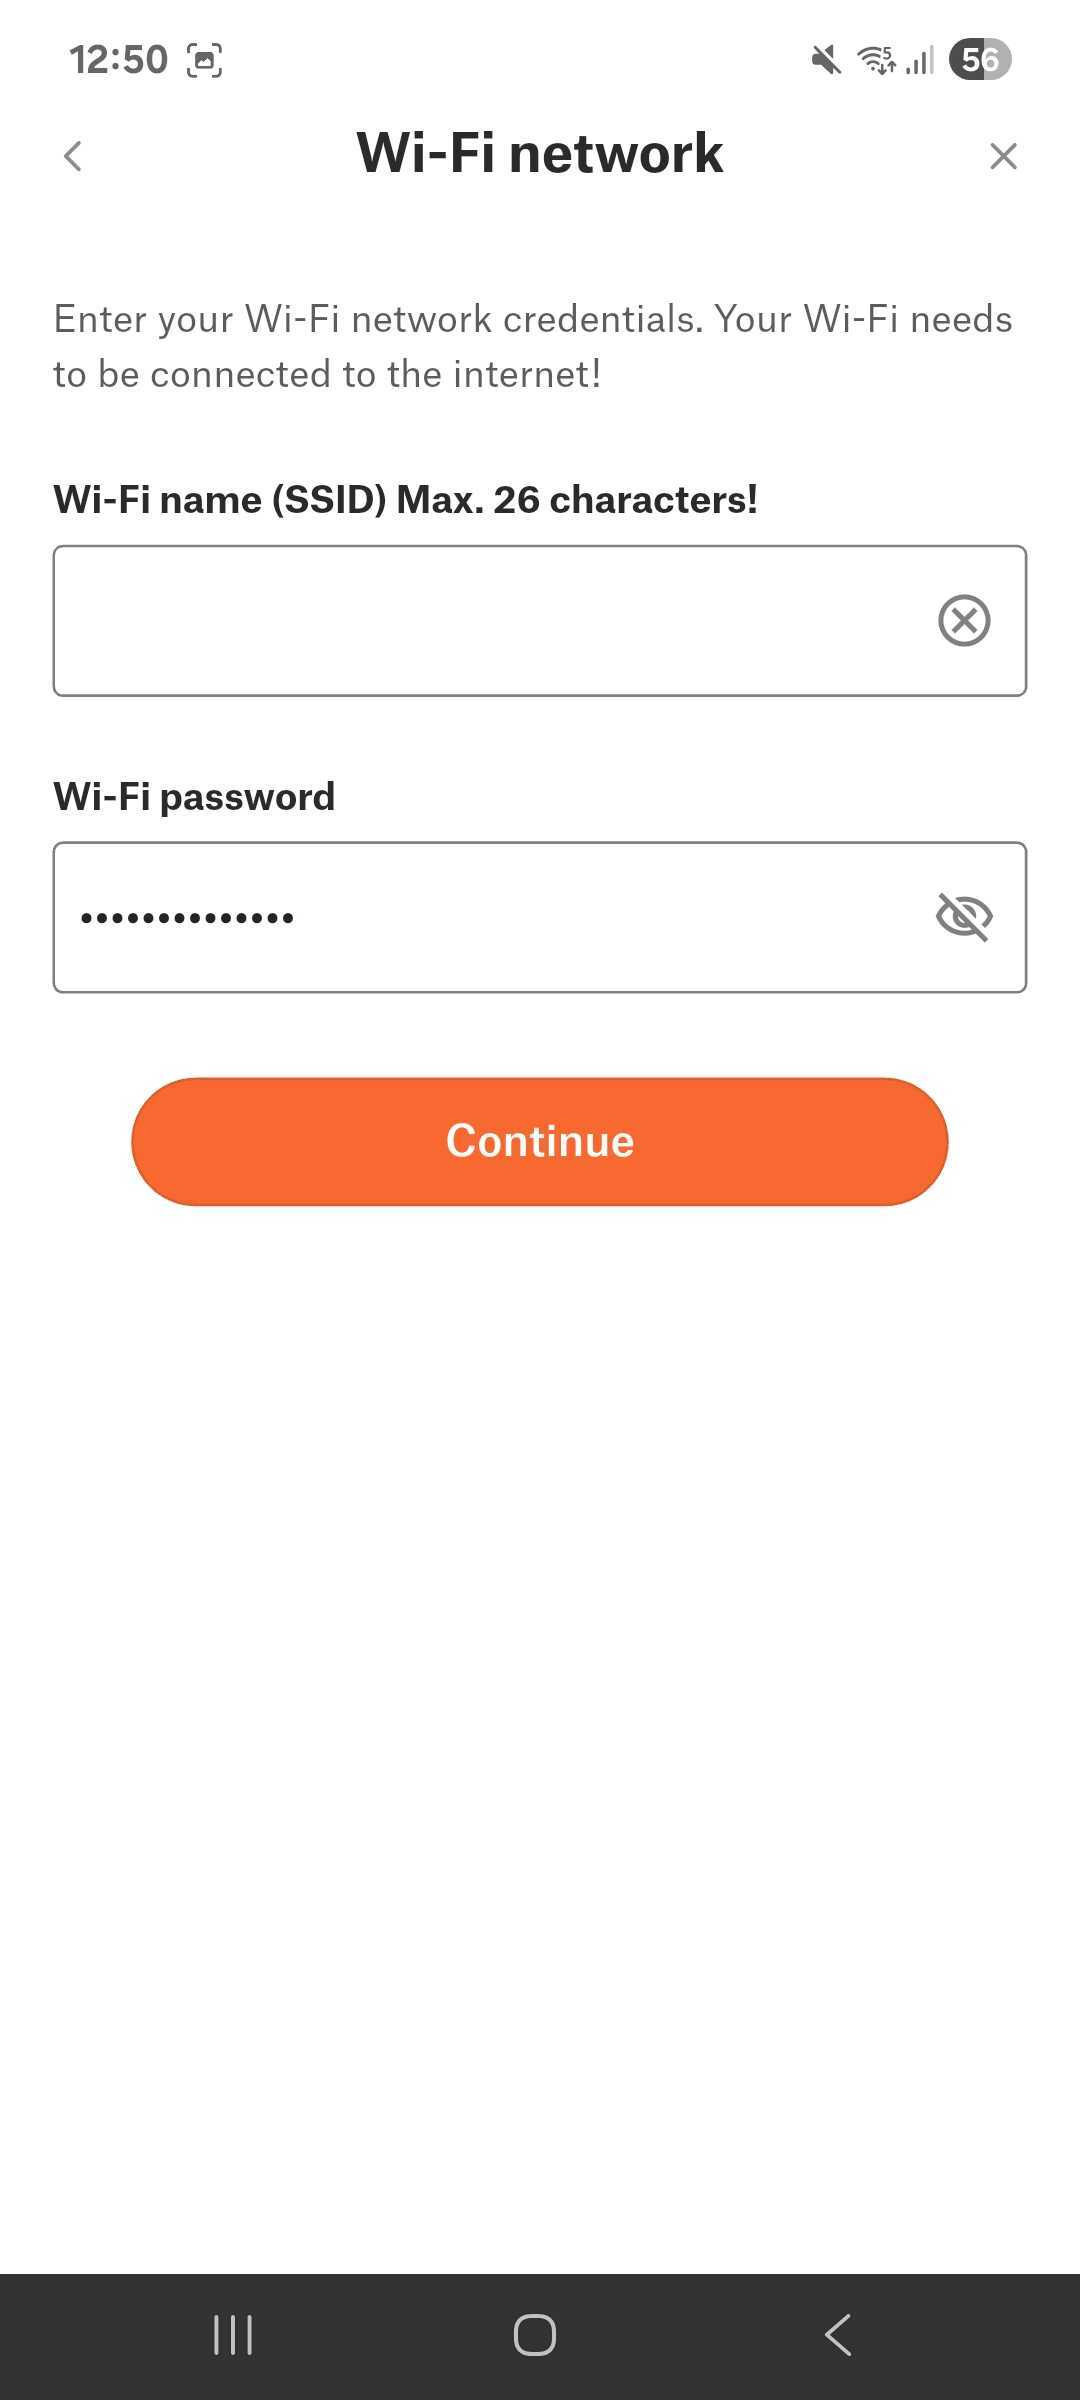
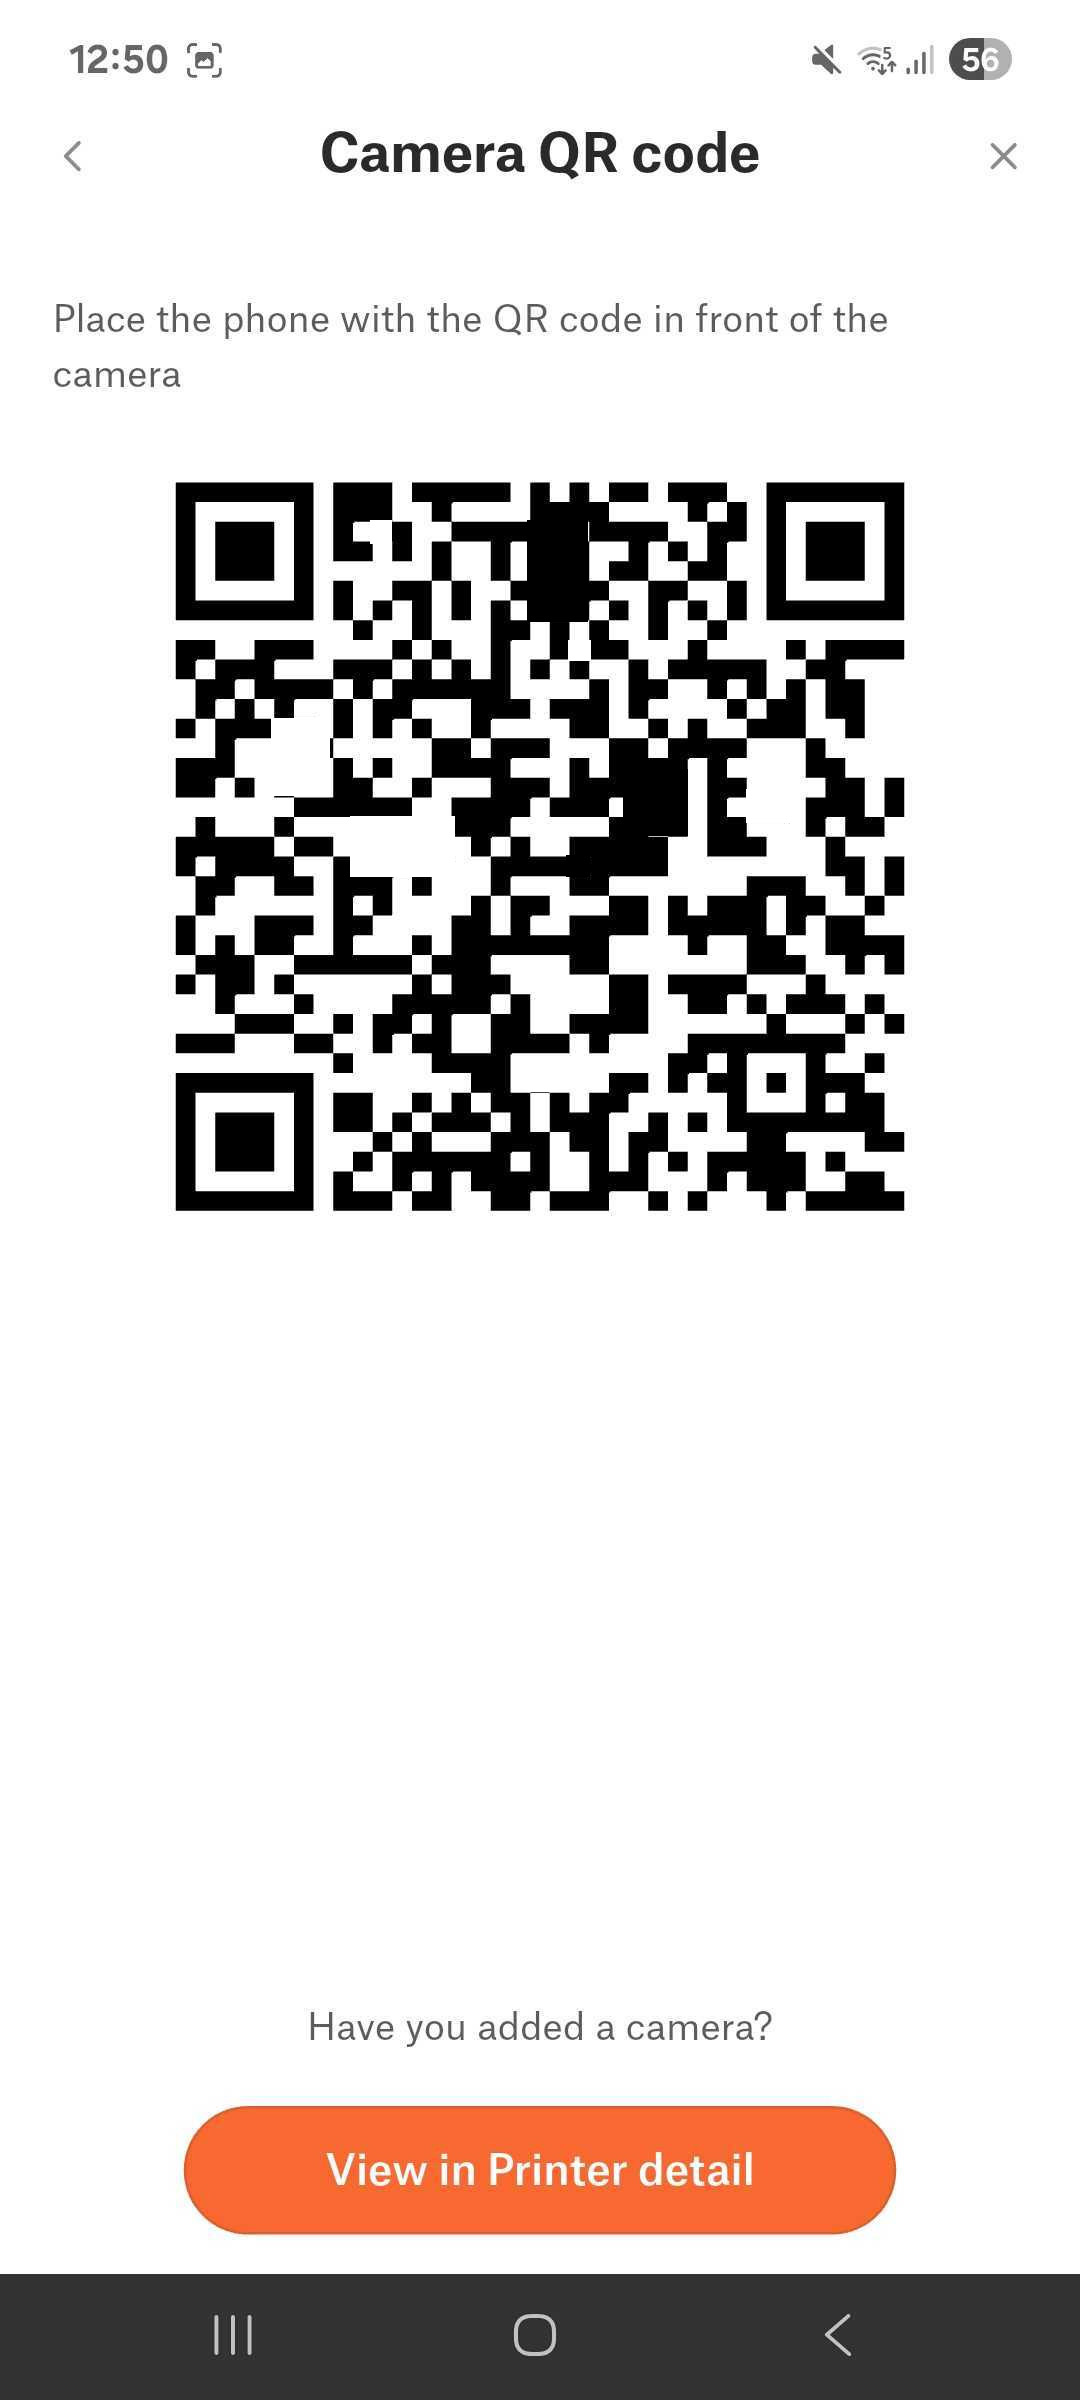
                  1. Type the name of your network and the password. Note that the network needs to be the same as the one connected to the printer. Click Continue, and you will see the QR code to be read by the camera.

                  Features

                  In addition to the standard pairing and viewing functions, the Buddy3D Camera includes a range of control, viewing, and recording features.
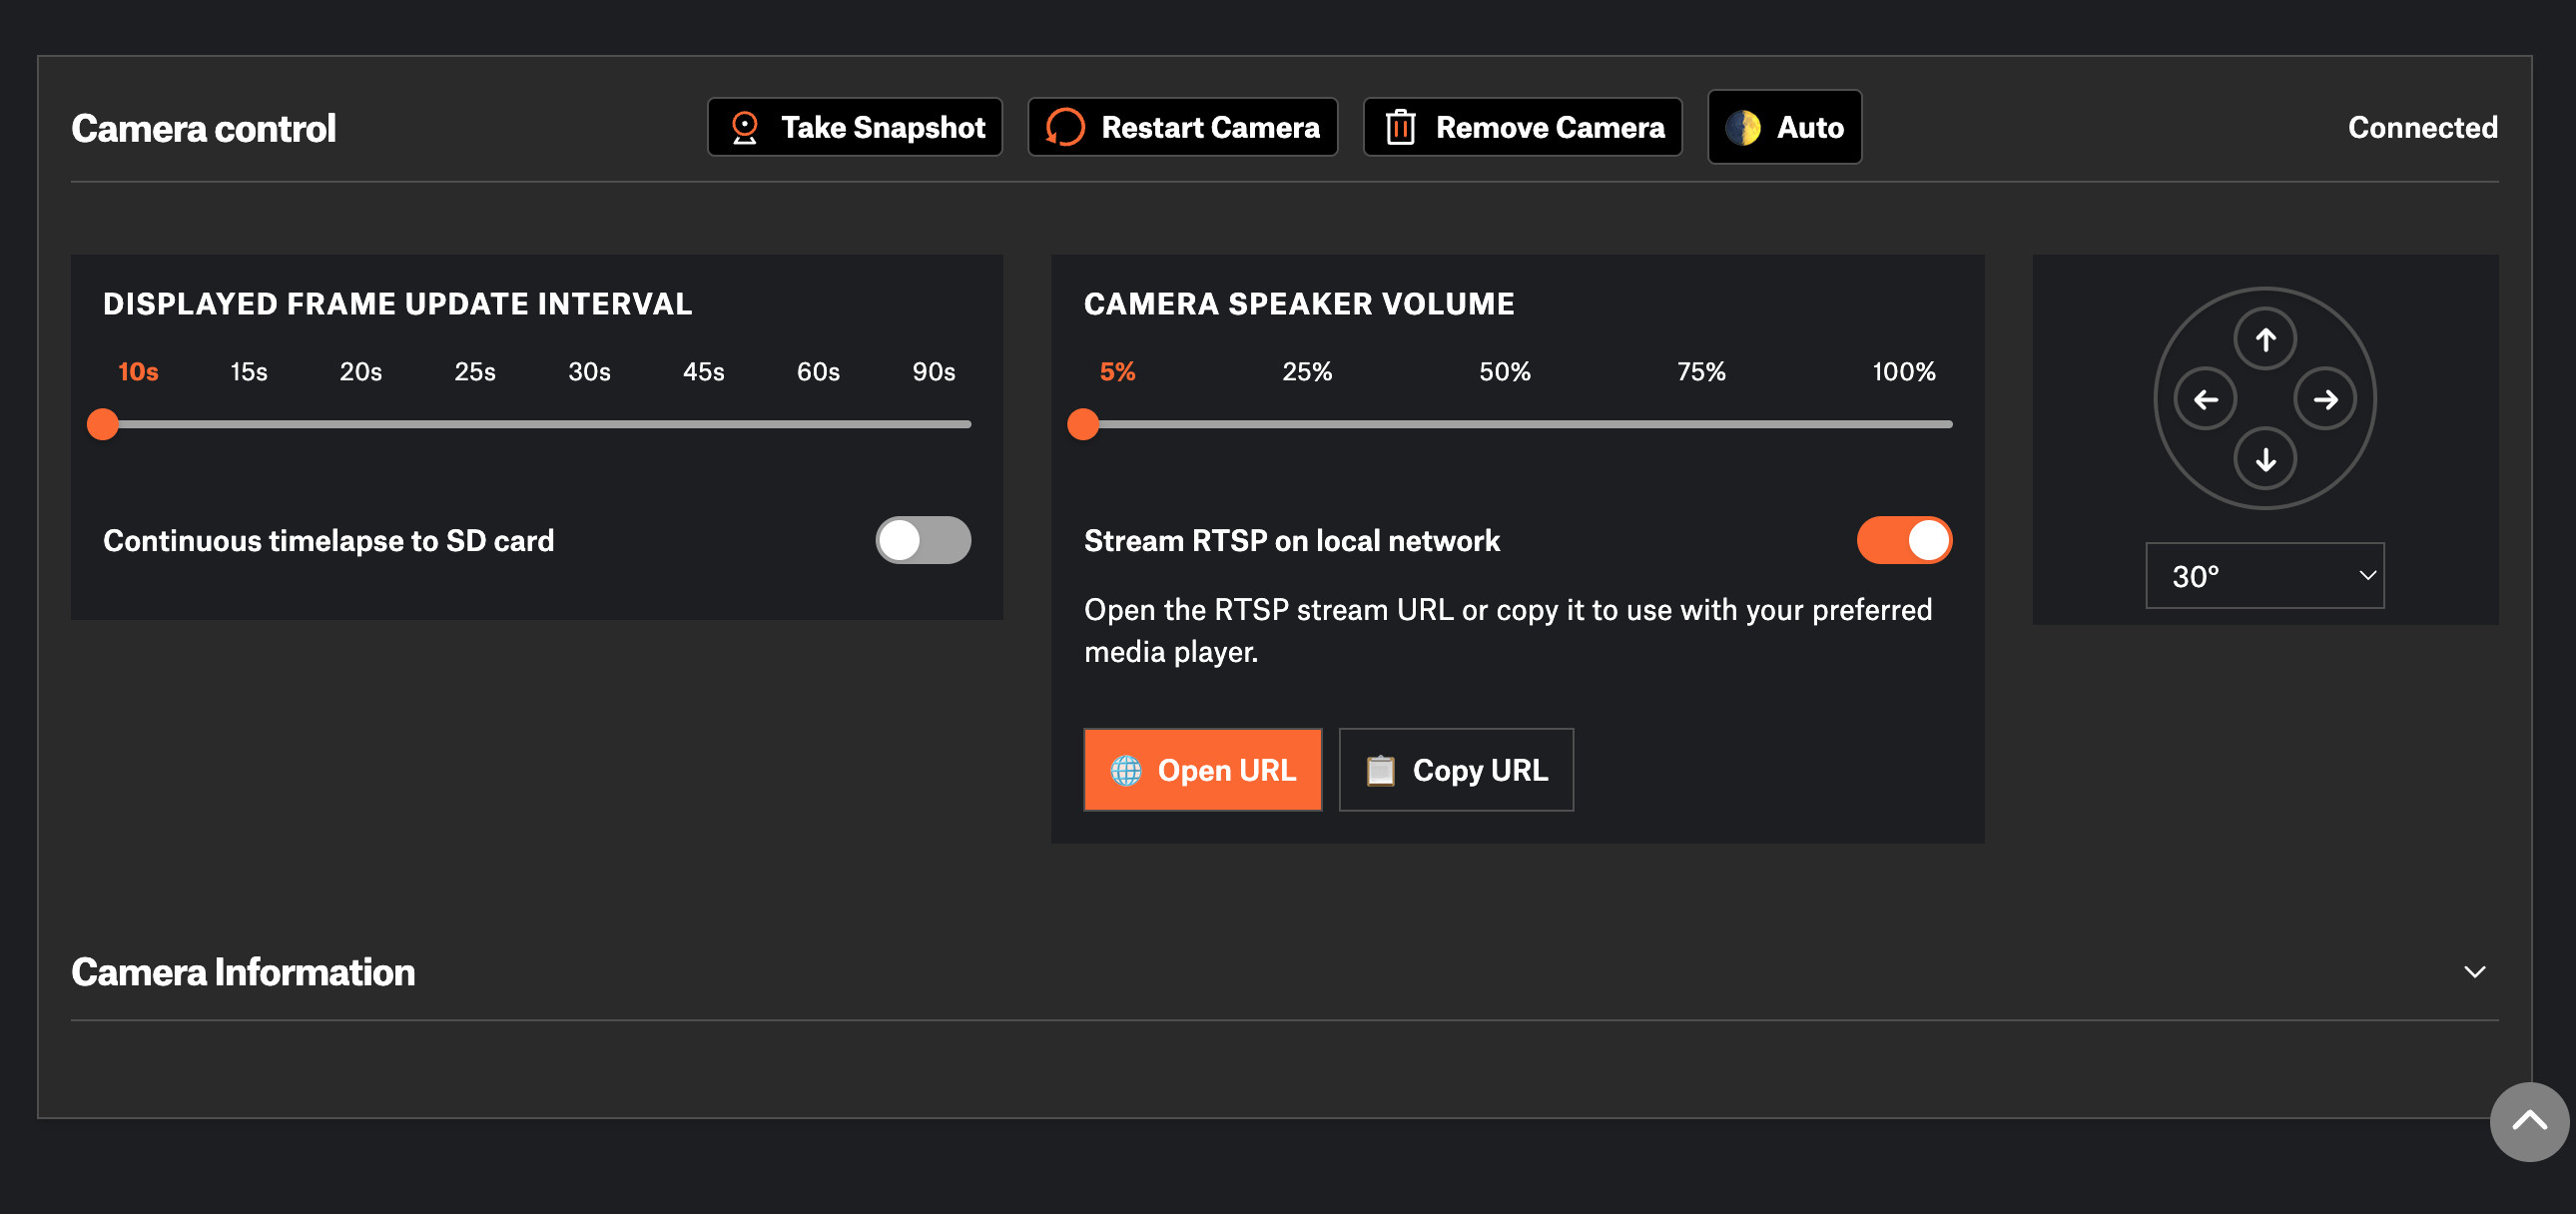
                  Screenshot taken from the main camera control screen in Prusa Connect
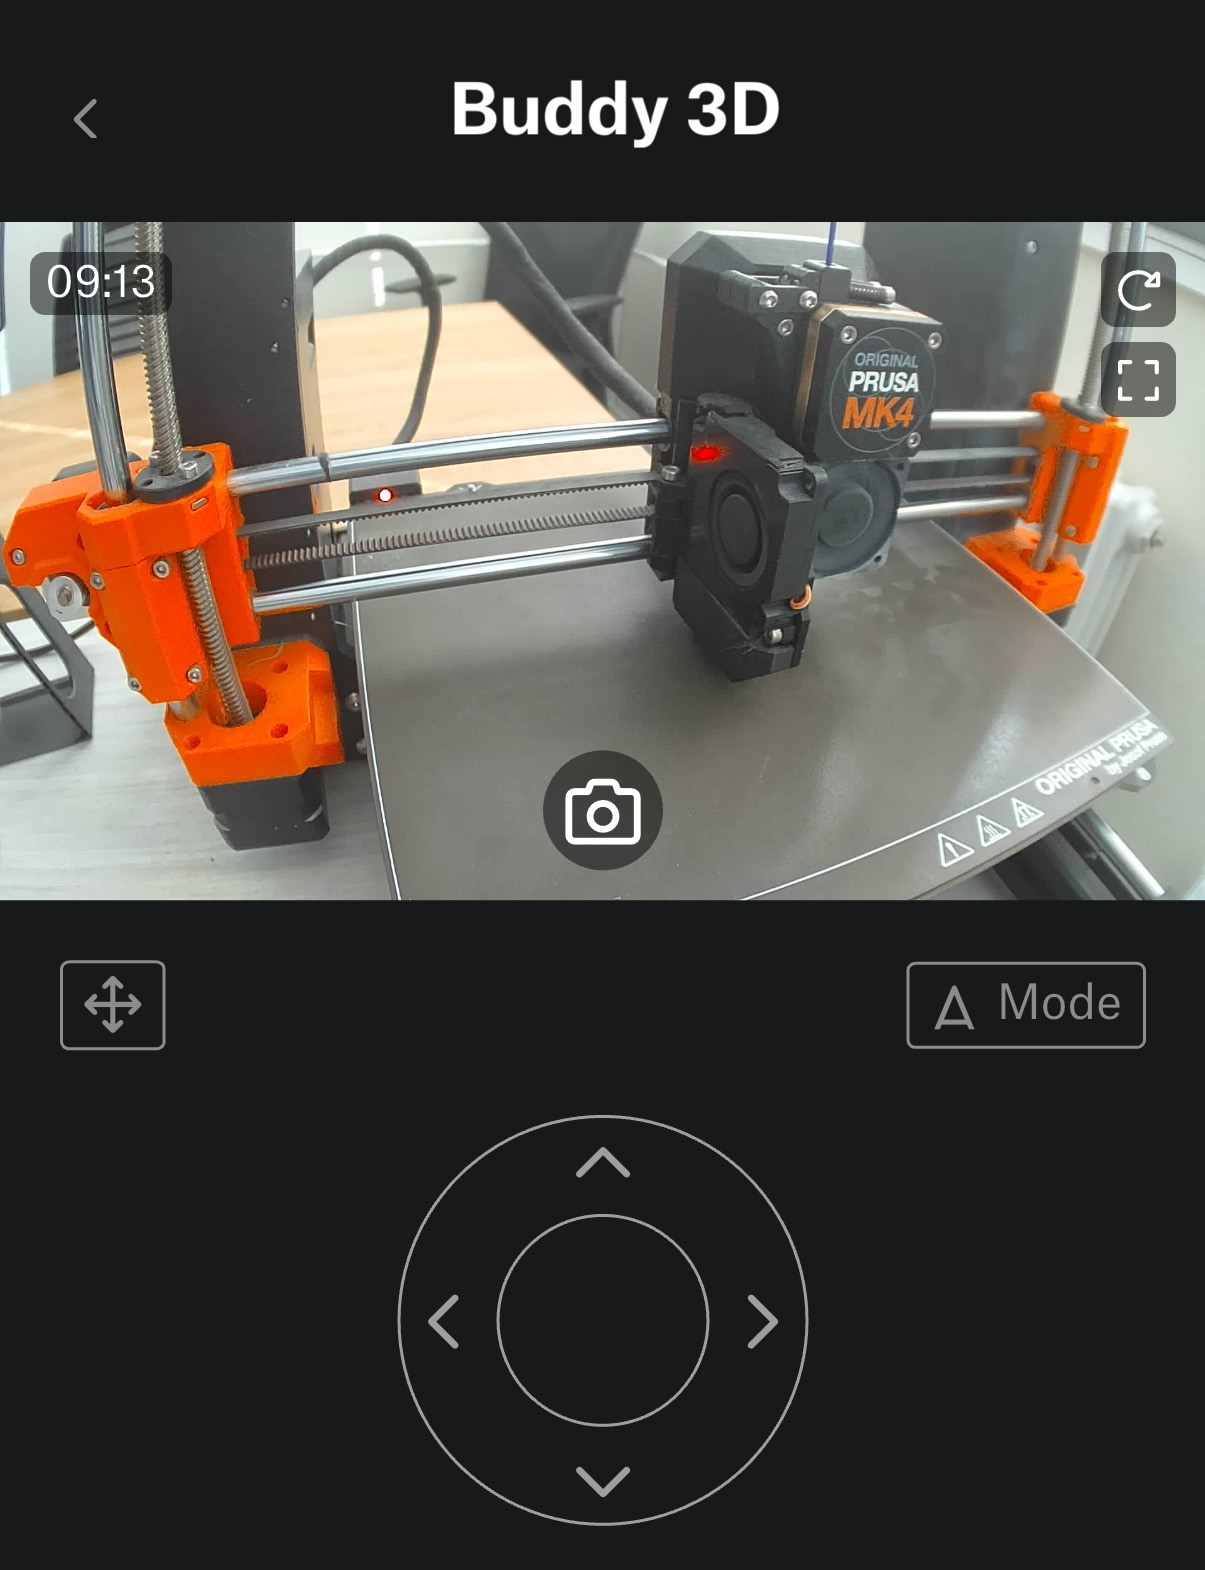
                   

                  Screenshot taken from the main camera control screen in the Prusa App

                  Local RTSP Streaming (Unencrypted)

                  Currently, streaming is only possible within the local network (phone and camera on the same Wi-Fi).

                  It uses the RTSP protocol (unencrypted), streamable via VLC (e.g., rtsp://IP/live). The default port 554 doesn't need to be specified. HD resolution (~25 FPS).

                  Local streaming is not possible in the Web Connect browser interface; it requires direct IP input into a player like VLC. WebRTC support for browser streaming is expected in the future.

                  Software Image Rotation

                  If your Buddy3D camera is mounted upside-down, sideways, or at an odd angle, you can use this feature to rotate the video image in 90° increments (or possibly flip it) so it appears correctly oriented in Prusa Connect or the Prusa App.

                  It’s purely a display adjustment, not a mechanical movement, as the physical camera stays still, but the image is transformed in software before being shown or streamed.

                  Full Screen Mode (Prusa App only)

                  It is possible to expand the Buddy3D camera’s live video feed to take up the entire display on your phone or tablet inside the Prusa App.

                  Instead of the image being shown in a smaller window with menus and controls around it, the app hides the interface so you can view the camera feed as large as your device’s screen allows.

                  This is purely a viewing option, as it doesn’t improve frame rate or resolution, but it’s more immersive and easier to monitor prints from a distance.

                  Current Time Display

                  The timestamp updates in real time, so you can see exactly when a snapshot or video frame was captured.

                  This is useful for tracking prints over time, especially when reviewing time-lapse sequences or snapshots saved to the SD card.

                  It helps correlate events in the print with exact times, which is handy for troubleshooting or logging print sessions.

                  Stream Start (Prusa App only)

                  It is possible to start a live video stream from the Buddy3D camera directly within the Prusa App.

                  • In the app, you can press a button to initiate the live feed without needing to scan QR codes or access the camera separately.
                  • When using PrusaConnect from a browser, this direct live stream isn’t available yet. Instead, you need to access the camera’s local RTSP feed using its IP address in a player like VLC (rtsp:///live).
                  • Essentially, the app simplifies starting the stream for mobile users, while web users rely on standard network streaming.

                  Request Current Snapshot

                  Request Current Snapshot is a feature that lets you manually capture a single image from the Buddy3D camera feed on demand. 

                  Buddy3D Camera (free-standing) Rotation in both horizontal and vertical axes

                  This feature refers to the physical adjustability of the free-standing model of the Buddy3D camera, not the model mounted on the Prusa CORE One. 

                  • You can pan (horizontal rotation) to swivel the camera left or right.
                  • You can tilt (vertical rotation) to move the camera up or down.
                  • This allows you to aim the camera freely at your print from any angle, giving maximum flexibility for positioning.
                  • Unlike the mounted CORE One camera, which has a fixed orientation, the free-standing camera can be rotated to suit different setups and viewpoints.

                  Camera Settings (Changeable in Camera Details)
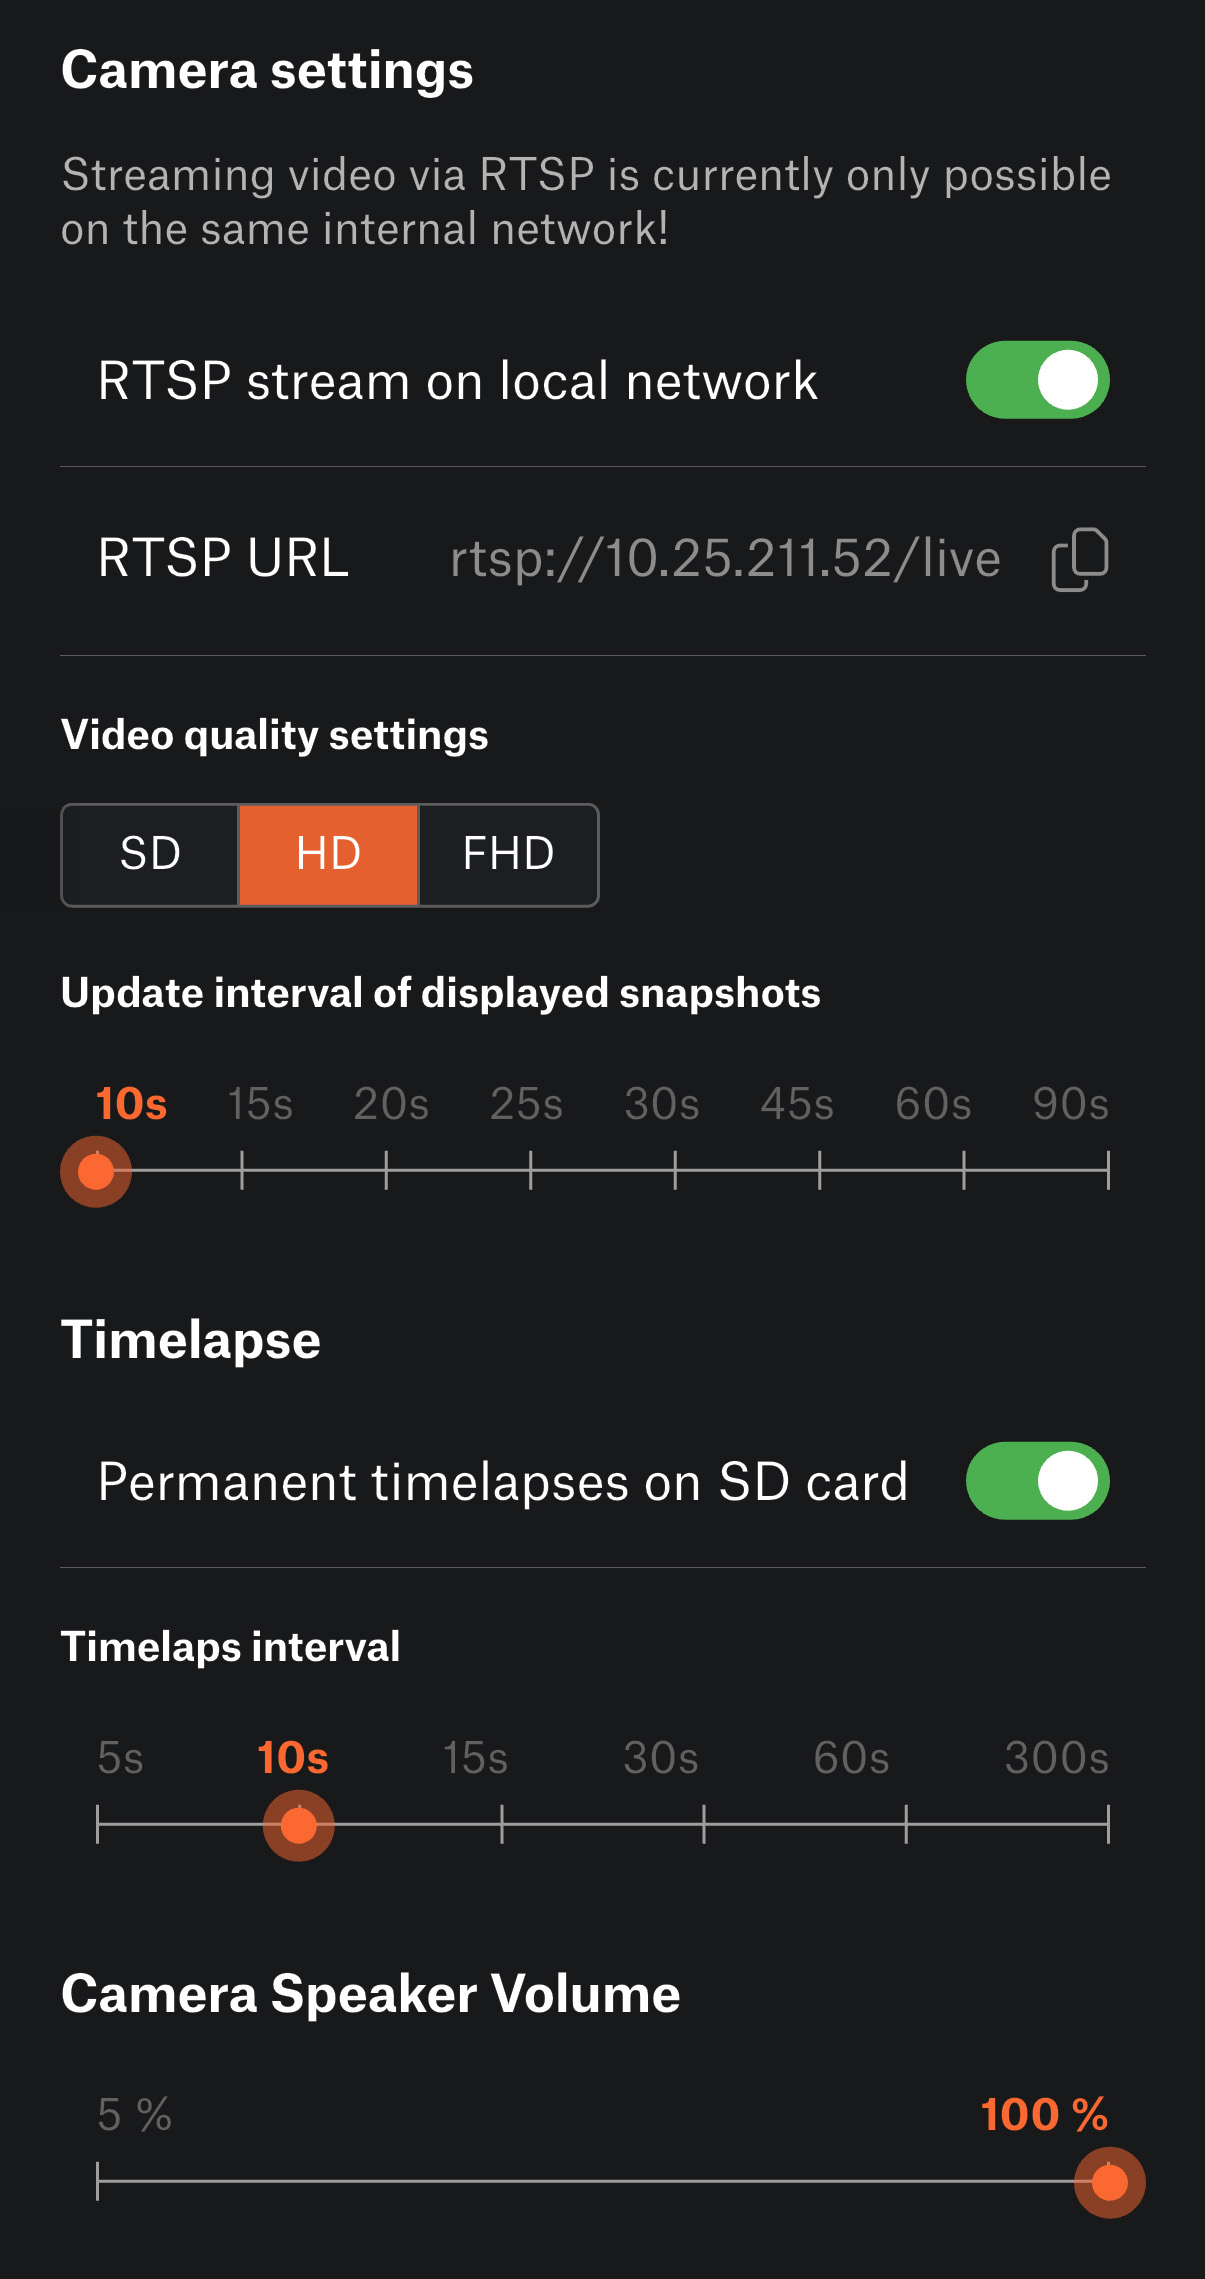
                  This section refers to settings you can adjust for the Buddy3D camera via the Prusa App or Prusa Connect:

                  • Automatic Image Capture Interval: You can set how often the camera takes snapshots automatically, from every 10 seconds up to every 90 seconds. This lets you control how frequently the updates are for monitoring prints or creating time-lapses.
                  • Local Stream Mode (Prusa.app): You can view the live camera feed directly within the Prusa App. For web users, the live stream isn’t available in the browser; instead, you can access the camera’s local RTSP feed using its IP in a player like VLC (rtsp:///live).

                  These settings allow you to customize both how the camera captures images and how you view the live feed.

                  Time-lapse Recording (to SD Card)

                  The Buddy3D camera can create time-lapse videos of your prints, but only when a MicroSD card is inserted.

                  • Interval: You can set how often the camera captures an image for the time-lapse, from every 5 seconds up to every 300 seconds.
                  • Manual Control: Time-lapse recording must be toggled on or off manually via the Prusa App.
                  • Storage: Images are saved to the SD card in directories named after the current print job. If no print is running, images go into a general directory.
                  • Playback: To view the time-lapse, the SD card must be transferred to a computer.

                  This feature is ideal for creating overview videos of your prints or documenting long prints.

                  Change Camera Name

                  The Buddy3D camera allows you to rename your device via the Prusa App or Prusa Connect.

                  • Useful for distinguishing multiple cameras if you have more than one printer or camera in your setup.
                    The name appears in the camera list and feed interface, making it easier to identify which camera you’re viewing or controlling.
                  • Can be updated at any time in the Camera Details settings without affecting the camera’s connection or functionality.

                  Camera Modes (Changeable in Camera Details)

                  The Buddy3D camera supports three modes for adjusting image capture based on lighting conditions:

                  • Day Mode: Optimized for well-lit environments.
                  • Night Mode: Uses IR illumination for low-light or dark conditions.
                  • Auto Mode: The camera automatically switches between Day and Night based on the ambient light.

                  Modes can also be physically switched by double-pressing the camera button within 1 second.

                  Camera Restart (Available from camera details)

                  It is possible to restart the Buddy3D camera remotely via the Prusa App or Prusa Connect in the Camera Details section.

                  Camera Unpairing (Available from camera details)

                  It is possible to unpair the camera from a printer directly from the Camera Details. This removes the camera’s connection to the current printer, allowing it to be paired with another printer or reset for a new setup.

                  Camera Permission Modes (Controlled by user permissions in Connect)

                  Buddy3D cameras support different permission levels to control what each user can do:

                  • Read User: can only view automatic snapshots, which refresh every 10–90 seconds. No control over camera settings or live feed.
                  • Use User: can fully control the camera, including starting/stopping streams, restarting the camera, and adjusting settings—but cannot unpair the camera from the printer.
                  • Manage User: has full control over the camera, including all settings and the ability to unpair it from the printer.

                  These modes ensure that you can safely share camera access without giving full control to all users.

                  Manual Control

                  The Buddy3D camera offers physical button controls. 

                  • QR Code Scanning: Press the camera button once. The scan starts within 1 second and is confirmed by a short sound. Useful for pairing the camera to a printer via QR code.
                  • Day/Night/Auto Mode Switch: Press the button twice quickly (within 1 second) to cycle through Day, Night, or Auto modes. Each mode change is confirmed by a sound.
                  • Reset Configuration Interval: The camera requires at least 10 seconds between consecutive configuration changes via the button to prevent accidental resets.

                  These manual controls provide a fast, convenient way to adjust key functions without needing to open the Prusa App.

                  Camera Firmware Update

                  The Buddy3D camera supports firmware updates to keep its software up to date with new features and improvements. 

                  • Manual Update: Available via the Prusa App. When an update is ready, an icon appears in the Camera Details, allowing you to start the update.
                  • Automatic Update: The camera automatically checks for and installs updates every 24 hours, ensuring it stays current without user intervention.

                  Mounting the camera on the printer

                  Prusa CORE One

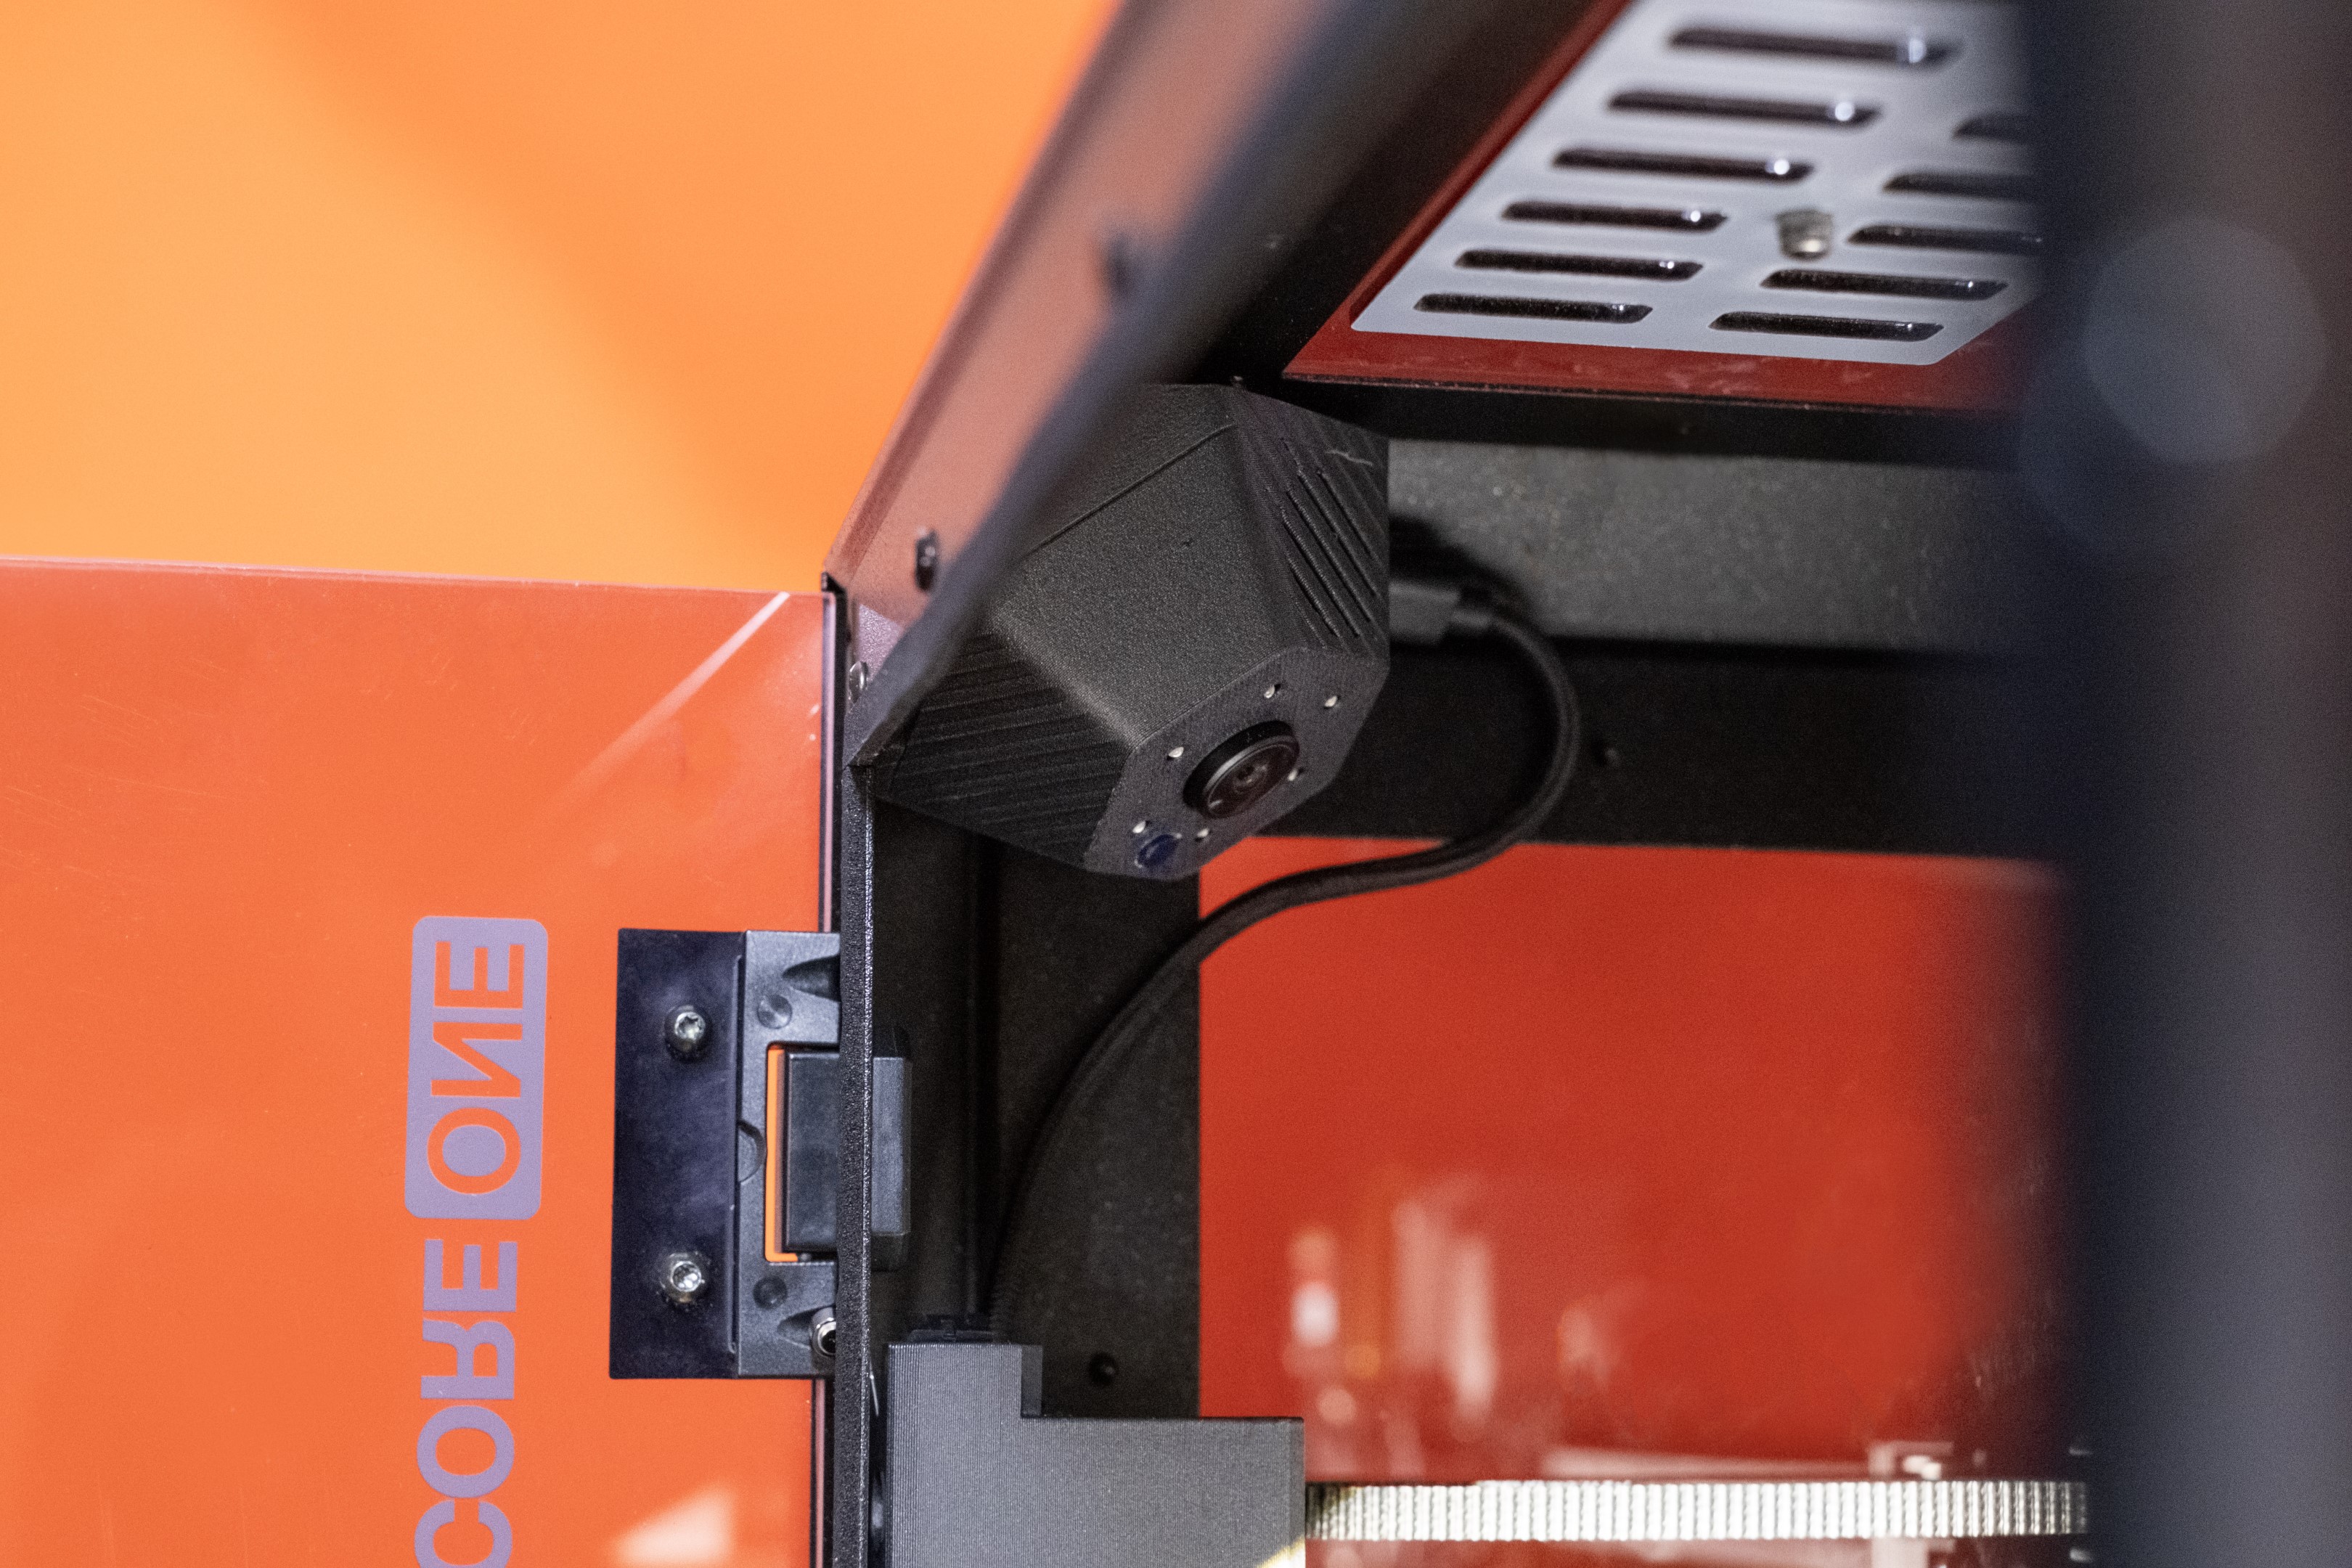
                  The camera has magnets embedded in the casing and snaps to the metal frame of the CORE One, specifically to the front corners. While you can route the cables to either of the front corners, we suggest mounting the camera in the left corner, as the cabling will be a bit neater. For installation, follow the step-by-step guide
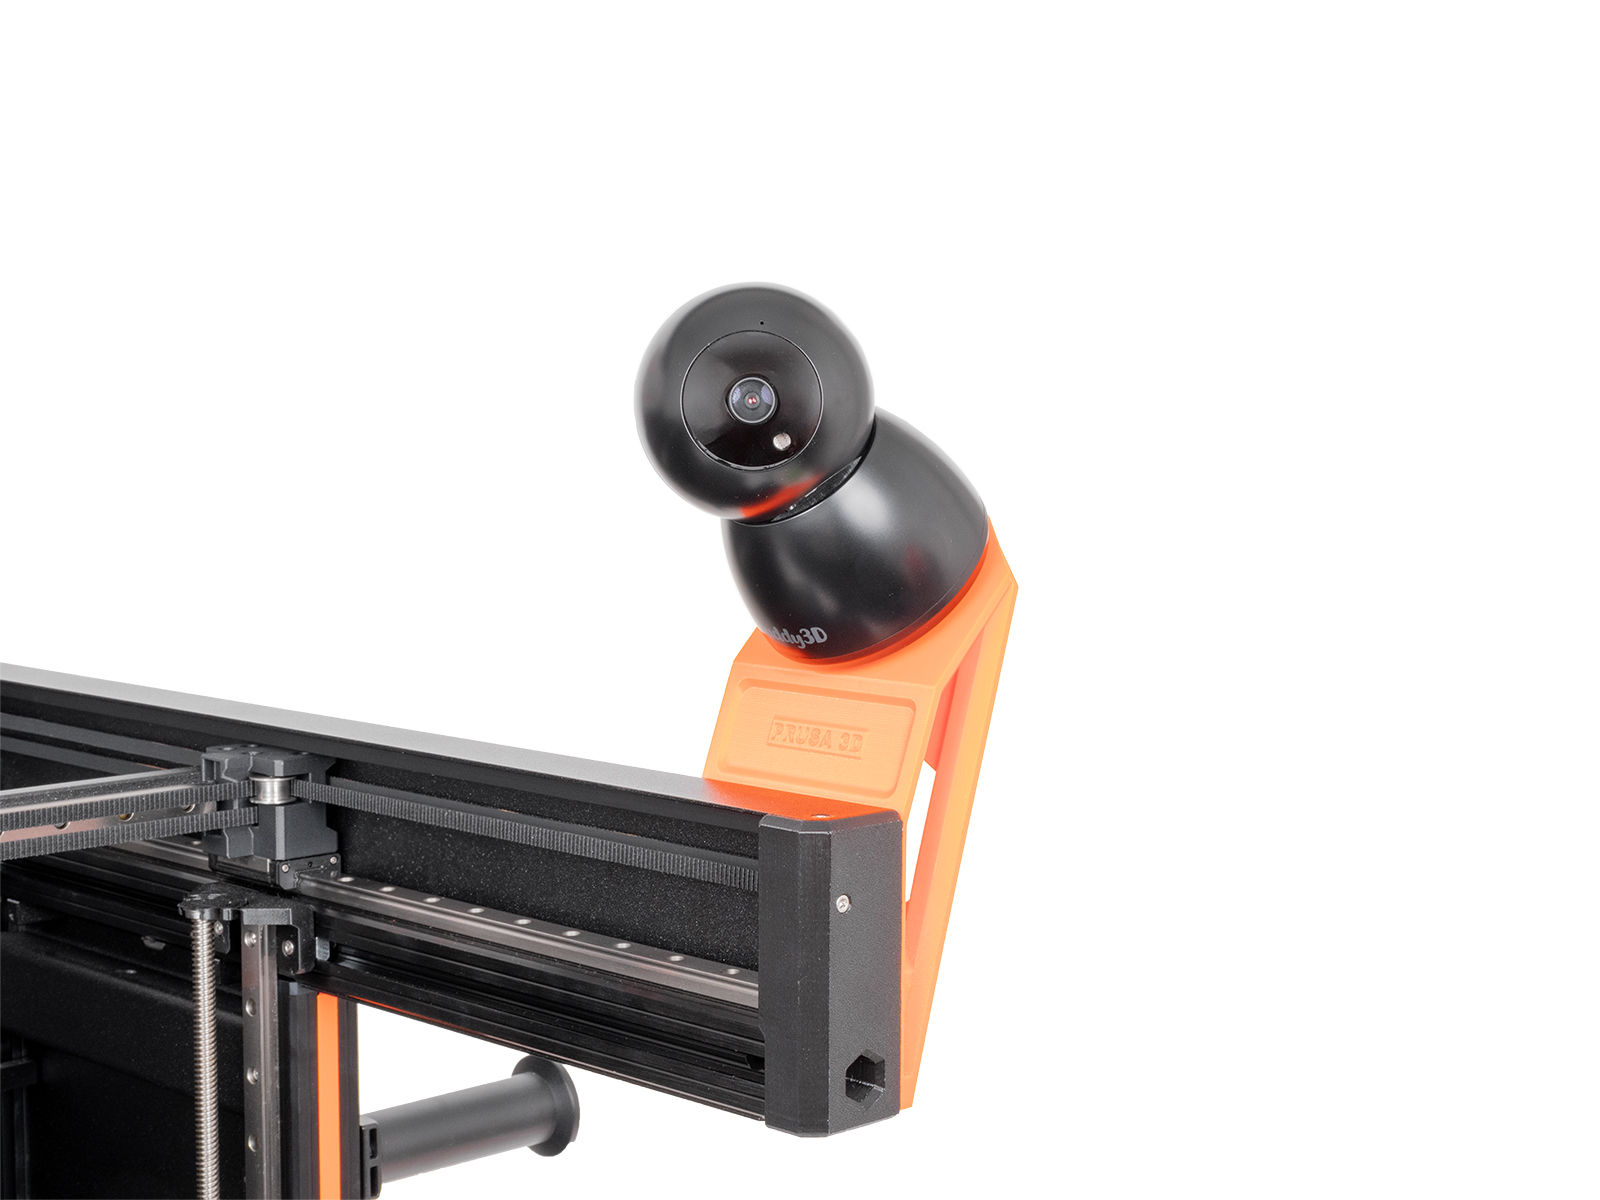
                  PrusaXL

                  You'll find step-by-step guide here.
                  MINI, MK3, MK4, Enclosure

                  You can find the printable mount here.
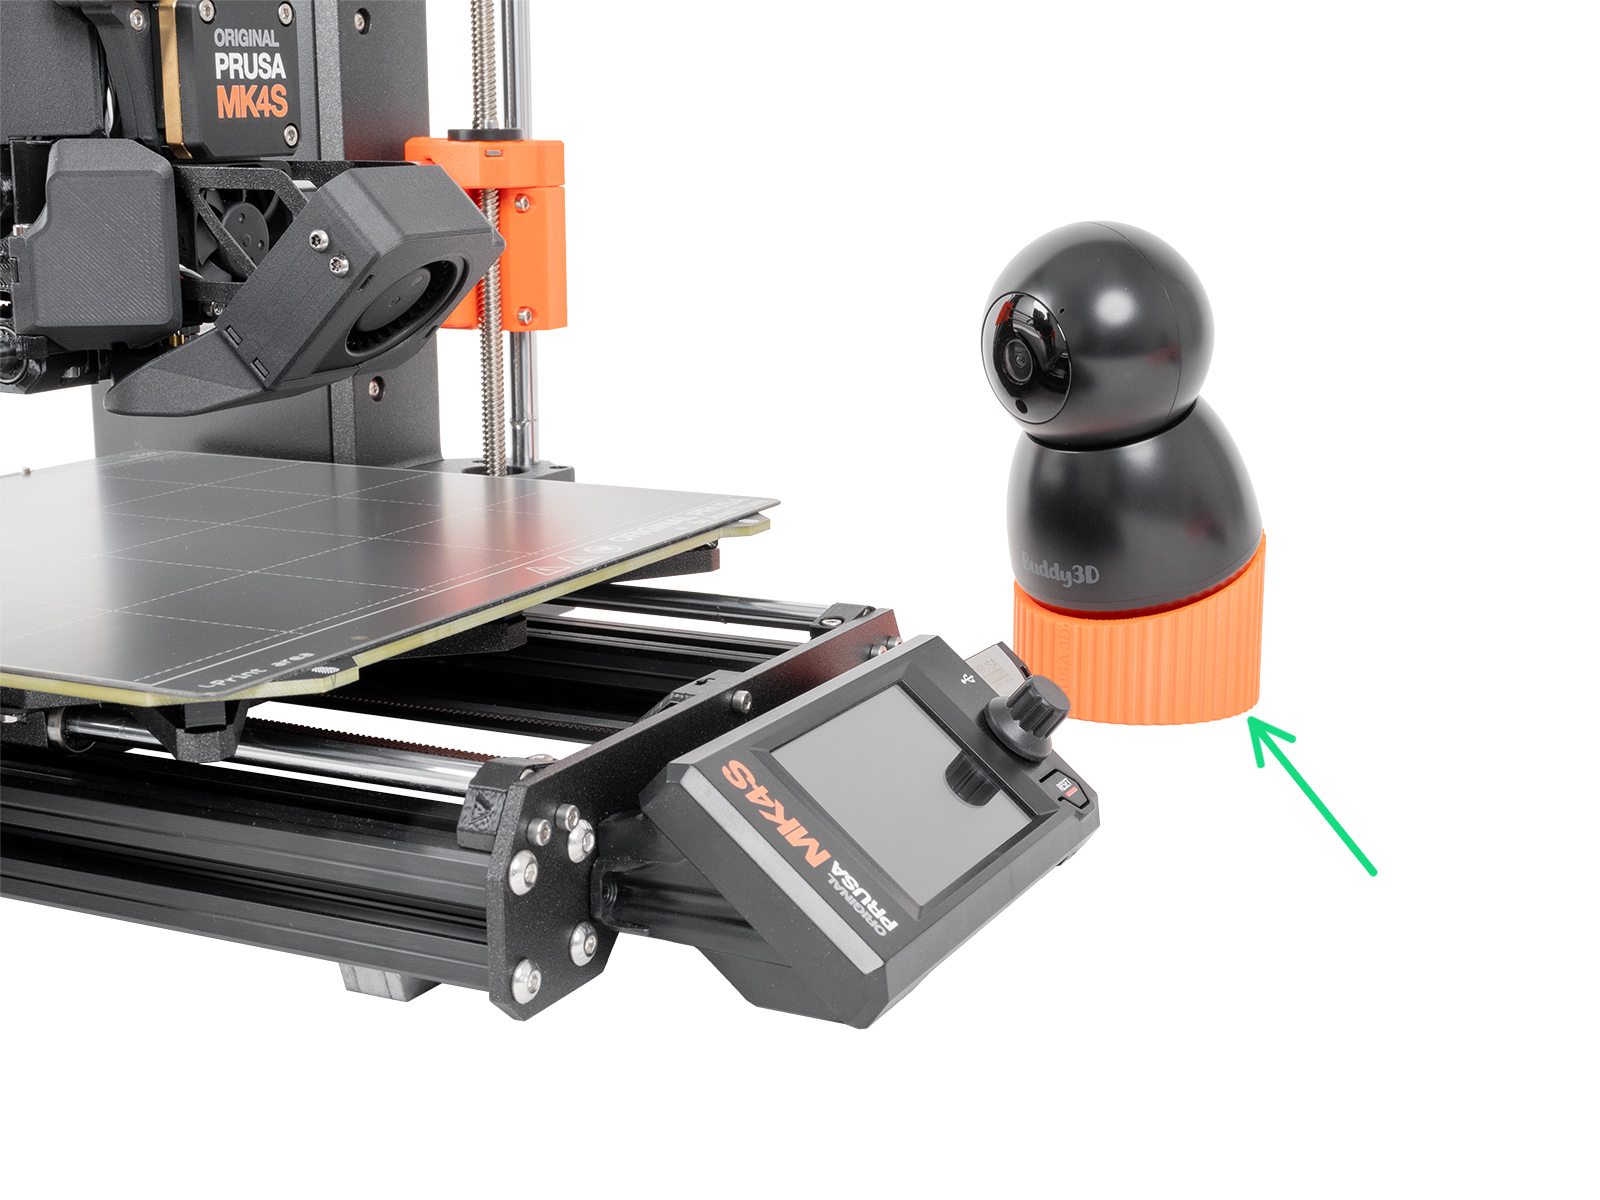
                  Specifications

                  Device: Guardian PR1
                  Resolution: 1920x1080
                  Input: 5 VDC, 1 A<br />Frequency band: 2.4 GHz
                  Connectivity: Wi-Fi 2.4 GHz

                  Troubleshooting

                  In case you have issues connecting the camera, find the issue you are having below and check the items.

                  The camera does not turn on

                  • Check if the camera has enough power. The recommended input is 5 VDC, 1 A. The only printers that can power the camera are CORE One and the HT90.
                  • Try another adapter and cable.

                  No QR code reading

                  • Move the camera or QR code during the scanning so that the camera can find the correct angle.
                  • The recommended distance between the camera and the QR code is around 20 cm.
                  • On the CORE One Camera, make sure the camera lens cover is removed.
                  • Try using a different screen to show the QR code.

                  Unsuccessful pairing

                  An unsuccessful pairing happens when the camera can detect the QR code but can't connect. When this happens, the camera will sound three beeps.

                  • Check if your network is 2.4 GHz and WEP, WPA, or WPA2. If you are not sure, create a hotspot for testing.
                  • Firmware versions before 3.1.0 do not support hidden SSID networks and special characters in the password. If your camera has one of those firmware versions, connect to a suitable network for the firmware update.
                  • Check if your Wi-Fi credentials are correct, including lowcase vs uppercase.

                  No pictures are visible in Prusa Connect

                  • Make sure that the printer is powered on and connected to Prusa Connect.
                  • Check if the camera did not accidentally connect to another printer.
                  • Clear the cache and cookies in your browser, or use another browser.
                  • Check your Wi-Fi signal strength and the camera's location.
                  • Try resetting the camera by pressing the Reset button for 4 seconds. Remove any Cameras from the "Camera" Tab in Connect, and start the process again.
                  • If the stream is choppy, this issue is always related to the local connection, so it is a result of a poor connection.

                  ¿Te resultó útil este artículo?
                  Esta acción está disponible solo para usuarios registrados. Por favor inicia sesión.
                  Inicia sesión  para publicar un comentario
                  Sin comentarios

                  Temas

                  • Usando la impresora
                    • Prusa Connect y PrusaLink
                      • Prusa Connect Local (MINI)
                      • Envío de códigos G a la impresora a través de la red (PrusaConnect, PrusaLink, Octoprint)
                      • PrusaLink y Prusa Connect - configuración (MK3/S/+)
                      • Buddy3D Camera
                      • Prusa Connect (HT90)
                      • Prusa Mobile App
                      • Instalando el Wi-Fi y PrusaLink (MINI/+)
                      • Configuración de Prusa Connect (SL1/S)
                      • Configurando el Wi-Fi y Prusa Connect/Link (CORE One, MK4/S, MK3.9, MK3.5, XL, MINI/+)
                      • Añadiendo la impresora a Prusa Connect (CORE One, MK4/S, MK3.9/S, MK3.5/S, XL, MINI/+)
                      • Configurando el Wi-Fi y PrusaLink (firmware XL hasta 4.7.5)
                      • Añadiendo la impresora a Prusa Connect (firmware XL hasta 4.7.5)
                      • PrusaLink / Prusa Connect con RPi 3/4 USB (MK2.5/S MK3/S/+)
                      • Configurar cámara para PrusaLink / Prusa Connect
                      • Prusa Connect - Configuración de las notificaciones de Telegram
                      • Prusa Connect - Configuración de las notificaciones de Discord
                      • Prusa Connect - Configuración de las notificaciones de Slack
                      • Prusa Connect - Camera API
                      • Cómo actualizar PrusaLink (MK2.5/S MK3/S/+)
                      • Compatibilidad de cámaras (RPi + PrusaLink)
                      • Connect Registration Failed
                      • How to connect to RPi via SSH
                      • Connect Registration Failed #12401 (MINI)
                      • Connect Registration Failed #21401 (MK3.9)
                      • Connect Registration Failed #23401 (MK3.5)
                      • Connect Registration Failed #17401 (XL)
                      • How to set a Static IP Address
                      • Envío de archivos desde PrusaSlicer a PrusaLink
                      • Imprimiendo en la MK3/S/+ via PrusaLink
                      • Prusa Connect y PrusaLink explicado
                      • Cámara ESP para Prusa Connect
                    • Modelos 3D
                    • Guía de materiales
                    • Laminando
                    • Mantenimiento de la impresora