Prusa
  • SHOP
    • Latest products
    BY CATEGORY
    • 3D printersnew
    • 3D printer upgradesnew
    • Materials
    • Accessories
    • Spare parts
    • Courses
    • Merch
    • Get a price quote
    QUICK LINKS
    • Shipping & delivery
    • Returns & refunds
    • Payment & financing
    • Warranty
    • VAT & Customs fees
    • FAQ

    0 item in your cartitems in your cart

    Your cart is empty

    Go to cartShop 3D printers

    My profile

    Log in to see orders, saved items

    My profile

    Signed in as

    • Orders
    • Logout
  • 3D PRINTING
    • Explore 3D printing
    FOR BEGINNERS
    • 3D printing 101
    • How FDM printing works
    • Buying your first printer
    • 3D model catalog
    BY APPLICATION
    • Rapid prototyping
    • Manufacturing
    • Engineering
    • Research
    • Arts & design
    GO DEEPER
    • Materials guide
    • Courses
    • Webinars
    • Case studies
    • Custom 3D printing
  • 3D PRINTERS
    • All 3D printers
    FOR
    • Home or garageHobbyists, tinkerers and home printing
    • BusinessIn-house production for small teams
    • EnterpriseFleets, security and scale
    • Which Prusa is right for me
    SHOP & BROWSE
    • CORE One+new
    • CORE One+ INDXnew
    • CORE One L+new
    • CORE One L+ INDXnew
    • XL+new
    • MK4S
    • Prusa Pro HT90
    • Prusa Pro AFS
    • Prusa Pro SLX
    MORE FROM PRINTERS
    • Parts & upgradesnew
    • Critical infrastructure
    • Case studies
    • Signature Oak
    • Kits
  • MATERIALS
    • All materials
    BY USE
    • Every-day & design
    • Functional engineering
    • Composites
    • Pro speciality
    • SLA resins
    PRUSAMENT
    • PLA
    • PETG
    • ASA
    • PC
    • PA11
    • Flex
    • TPU
    MORE FROM MATERIALS
    • Materials guide
    • We make material in house
    • Sustainability
    • Order on the store
  • SOFTWARE
    • All software
    PREPARE THE PRINT
    • PrusaSlicer 3.0New
    PRINT & MONITOR
    • Prusa Connect
    • EasyPrint
    • iOS & Android app
    • Prusa Farm
    GET STARTED
    • Download & install
    • Knowledge base
    MORE FROM SOFTWARE
    • 3D model catalog
  • SUPPORT
    • Explore support
    FIND ANSWERS
    • Knowledge base
    • Troubleshooting
    • Courses
    • Webinars
    GET HELP
    • Contact us
    • Livechat
    • Shipping & delivery
    • Warranty
    • Returns & refunds
    • Service & spare parts
    • Service & Repair
    COMMUNITY
    • Forum
    • Reddit
    • Printables
  • TRUST CENTER
    • Trust Center overview
    BY TOPIC
    • GDPR
    • Certificates
    • Security
    • Compliance
    COMMITMENTS
    • Sustainability report
    TALK TO US
    • Contact the security team
  • COMPANY
    • About Prusa
    GET TO KNOW US
    • Our story
    • How we make printers
    • Open source
    • Brand & media kit
    NEWS
    • Blog
    • Newsroom
    • Events
    TRUST & PARTNERS
    • Sustainability
    • Resellers & distributors
    • Affiliate program
    • Contact
    • English
    • Čeština
    • Deutsch
    • Español
    • Français
    • Italiano
    • Polski
    • 日本語
  • Signed in as

    • Orders
    • Address
    • In-stock Alerts
    • My Courses
    • Subscription
    • Edit Account
    • Logout

Log in to see orders, saved items

Signed in as
  • Orders
  • Address
  • In-stock Alerts
  • My Courses
  • Subscription
  • Edit Account
  • English
  • Čeština
  • Deutsch
  • Español
  • Français
  • Italiano
  • Polski
  • 日本語
Shop

0 item in your cartitems in your cart

Your cart is empty

Go to cartShop 3D printers

My profile

Log in to see orders, saved items

My profile

Signed in as

  • Orders
  • Logout
SHOP
  • Latest products
BY CATEGORY
  • 3D printersnew
  • 3D printer upgradesnew
  • Materials
  • Accessories
  • Spare parts
  • Courses
  • Merch
  • Get a price quote
QUICK LINKS
  • Shipping & delivery
  • Returns & refunds
  • Payment & financing
  • Warranty
  • VAT & Customs fees
  • FAQ

Featured products

    Popular categories

      Trending searches

        Articles

          Blog

            Products

              Categories

                Suggested searches

                  Searching…
                  No results
                  Something went wrong.
                  ↑↓ Select↵ OpenEsc Close search
                  1. Support
                  2. Original Prusa MK4S
                  3. Advanced calibration
                  4. Extrusion multiplier calibration
                   

                  Contents

                  • How to spot an issue
                  • How to do the calibration

                  Blog

                  • Prusament Pellets: Raw material batches for large-format 3D printing or small-scale polymer research & development
                  • Print colorful and glowing Halloween decorations with our spooky offer
                  • Factorio Has Arrived on Printables

                  Newsletter

                  Signup and get our monthly squeeze on updates, blog, printables and much more.

                  By clicking, you agree to receive our newsletter.

                  This site is protected by reCAPTCHA Enterprise and the Google Privacy Policy and Terms of Service apply.

                  Factorio Transport Belts
                  E-shop
                  • 3D Printers
                  • Printer Upgrades
                  • Filaments
                  • Accessories
                  • Prusa Merchandise

                  © Prusa Research a.s.

                  Printables
                  • 3D Models
                  • Store
                  • Clubs
                  • 3D Design Contests
                  • Brands
                  Community
                  • World Map
                  • Forum
                  • User Groups
                  • Events
                  Help
                  • Prusa Help
                  • Prusa Academy
                  • 3D Printing Calculators
                  Software
                  • PrusaSlicer
                  • Prusa.app
                  • Prusa Connect
                  • Drivers and Software
                  Company
                  • About Us
                  • Blog
                  • Official Prusa Resellers
                  • Contact Us
                  • Certified for ISO 9001, ISO 14001, ISO 45001
                  • General Terms and Conditions
                  • General Terms and Conditions of Use of the PRUSA Websites
                  • Privacy Policy
                  • Information about cookies
                  • Customer Complaints Policy
                  • Status Page
                  • Do Not Sell or Share My Personal Information
                  • Supplemental Statements
                  • General Terms and Conditions
                  • General Terms and Conditions of Use of the PRUSA Websites
                  • Privacy Policy
                  • Information about cookies
                  • Customer Complaints Policy
                  • Status Page
                  • Do Not Sell or Share My Personal Information
                  • Supplemental Statements

                  © Prusa Research a.s.

                  JOSEF PRUSA®, PRUSA RESEARCH®, PRUSA POLYMERS®, PRUSA ORANGE®, PRUSA 3D ® AND PRUSAMENT® are registered trademarks of Prusa Development a.s. used by Prusa Research a.s. under licence from Prusa Development a.s.

                  Extrusion multiplier calibration

                  Relevant for

                  MK4 family
                  MINI family
                  MK3 family
                  MK3.5 family
                  MK3.9 family
                  +
                  113 comments
                  Article is also available in following languages
                  English
                  Čeština
                  Polski
                  Deutsch
                  Français
                  Español
                  Italiano
                  日本語
                  This is an advanced calibration, recommended only to experienced users.

                  The Extrusion Multiplier allows the fine-tuning of the extrusion flow rate - simply described as how much filament comes out of the nozzle. In other words, the Extrusion Multiplier setting in PrusaSlicer and the Flow rate setting in printer firmware are two ways to adjust the same thing, however, adjusting one of those two settings will not influence the value of the other.

                  This procedure is not necessary with a new printer coming from the factory, but rather applies for specific applications and filaments. The ideal value is different for every type of material and every color. It can even differ from spool to spool. Bear this in mind if you change type and brand of filament often or use cheap no-name brands.

                  Total flow rate = Flow multiplier in firmware (M221) x Extrusion multiplier in PrusaSlicer. For those interested in diving deeper, PrusaSlicer uses the same Flow math as Slic3r.

                  How to spot an issue

                  This calibration is used to fix two common problems:
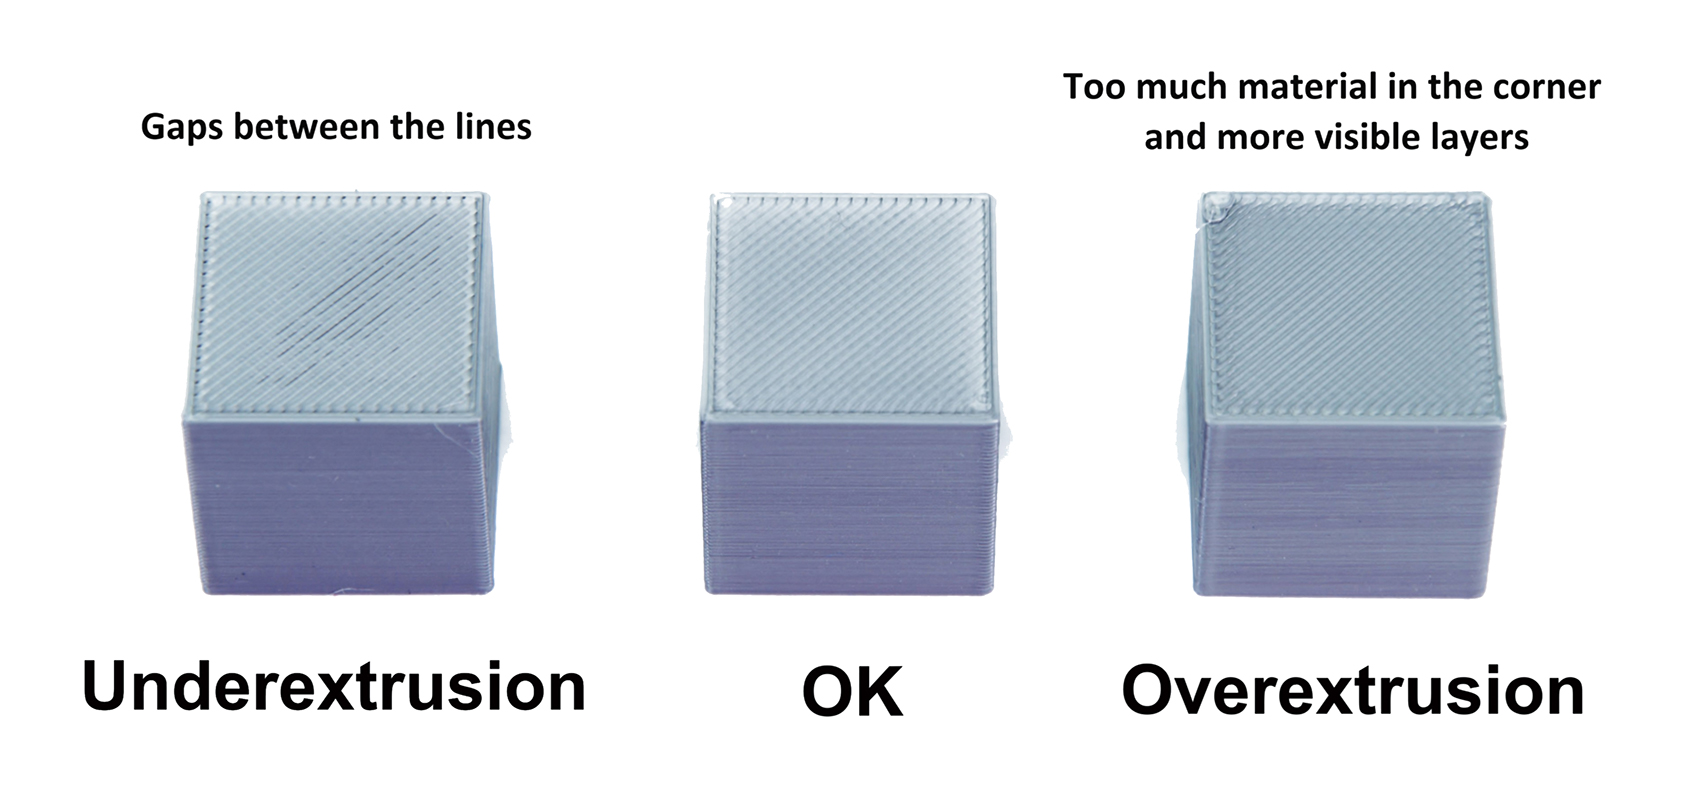
                  • Overextrusion - Too much material is extruded (flow is too high). It causes scarring of bottom layers and unnecessary material buildup on top layers.
                  • Minor under extrusion - Not enough material is extruded (flow is too low). It causes small gaps that appear between layer lines or perimeters.

                  Overextrusion is a common problem with many filament brands. It's especially problematic when you're trying to glue two parts of the model. If the top layer is over extruded, you'll end up with an uneven surface that will prevent a seamless connection between the two pieces.

                  How to do the calibration

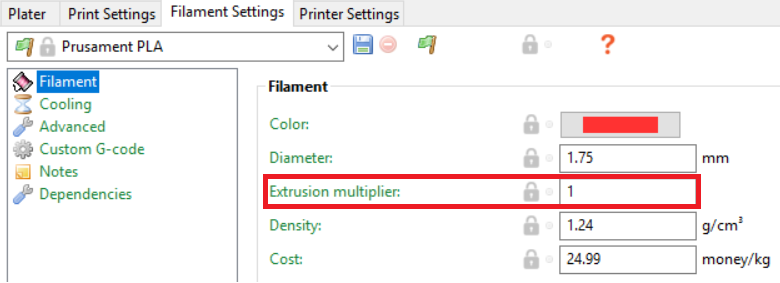
                  In PrusaSlicer, navigate to Filament Settings and look for Extrusion Multiplier. The default setting (for PLA) is 1, this value represents a percentage, 1 = 100%, 0.95 = 95% etc. Usually, the adjusted values can be between 0.9 and 1.1. To adjust it, simply rewrite the value.
                  In the printer menu, during a print, go to the Tune menu and then choose Flow. Again, the usual values can range between 90 and 110, although that does not mean you can't go above or below that.

                  Which method should I use?

                  There are two methods you can use to calibrate the Extrusion Multiplier, and we'll cover both of them in this article:

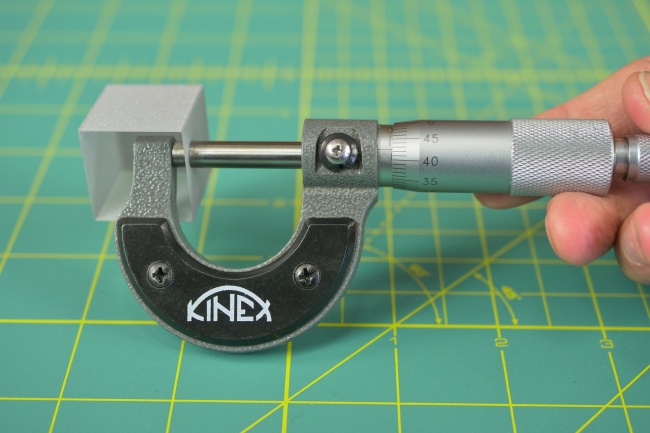
                  • Precise Method  -  using precision tools such as calipers or micrometers.
                  • Visual Method  - an easy method based on observing the visual properties of your models.

                  The choice of the method depends entirely on your preferences; in the end, both yield similar results. Even the visual method will enable you to have perfectly fitting parts with smooth & flat top layers.
                  Precise Method

                  Please note that the following guide is based on default PrusaSlicer 0.4 nozzle profiles, with a layer height of 0.1mm - 0.2mm. This means that:
                  - Nozzle size = 0.4
                  - Extrusion width = 0.45
                  - Basic materials (PLA, ABS, PETG) Extrusion Multiplier = 1
                  If you wish to calibrate the printer with a bigger/smaller nozzle or layer heights above 0.2, then you will need to adjust these values as well.
                  1. Download the Precision Method Cube STL.
                  2. Slice it using the Vase Mode and your most-often used layer height and print it. You can find Vase mode (Print Settings →  Layers and perimeters →  Spiral vase).
                  3. Make three or more measurements in the middle of each wall and calculate the overall average thickness.
                  4. Calculate the extrusion multiplier using the following formula: Extrusion multiplier = (Extrusion width (0.45) / Average measured wall thickness).
                  5. Adjust the Extrusion Multiplier in Filament Settings → Filament
                  6. Re-print the cube with new settings and go back to step 3 if necessary.

                  Please note that cheap digital calipers may not be accurate enough to make reliable measurements of a single perimeter wall.

                  Visual Method

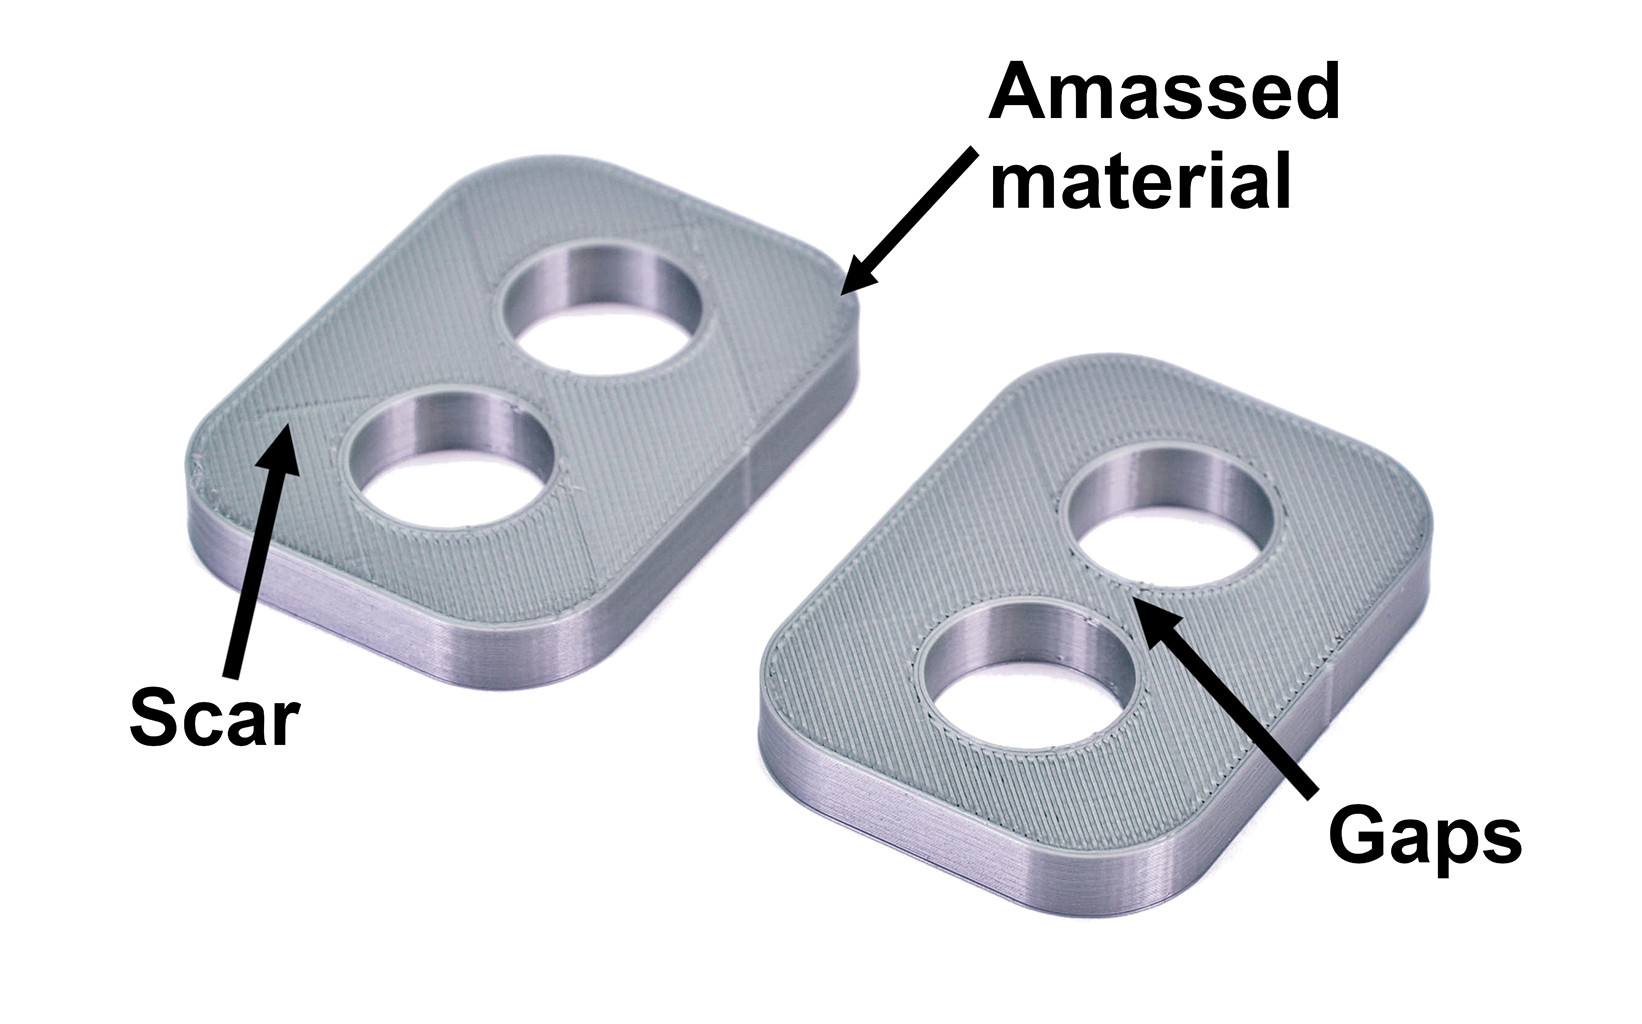
                  This method does not require any tools, only your sight. The point is to make sure your top layers are smooth, shiny, and without scarring or filament buildup near the perimeters.
                  1. Download the Visual Method Cube.stl
                  2. Slice it using the default Prusa PLA presets at 0.20mm layer height and print it.
                  3. Inspect the top layer of your cube visually and with the tip of the finger.
                  4. If the top is under extruded or not smooth, then re-adjust the Extrusion Multiplier accordingly by 1-2%.
                  5. Repeat the steps above as long as needed.

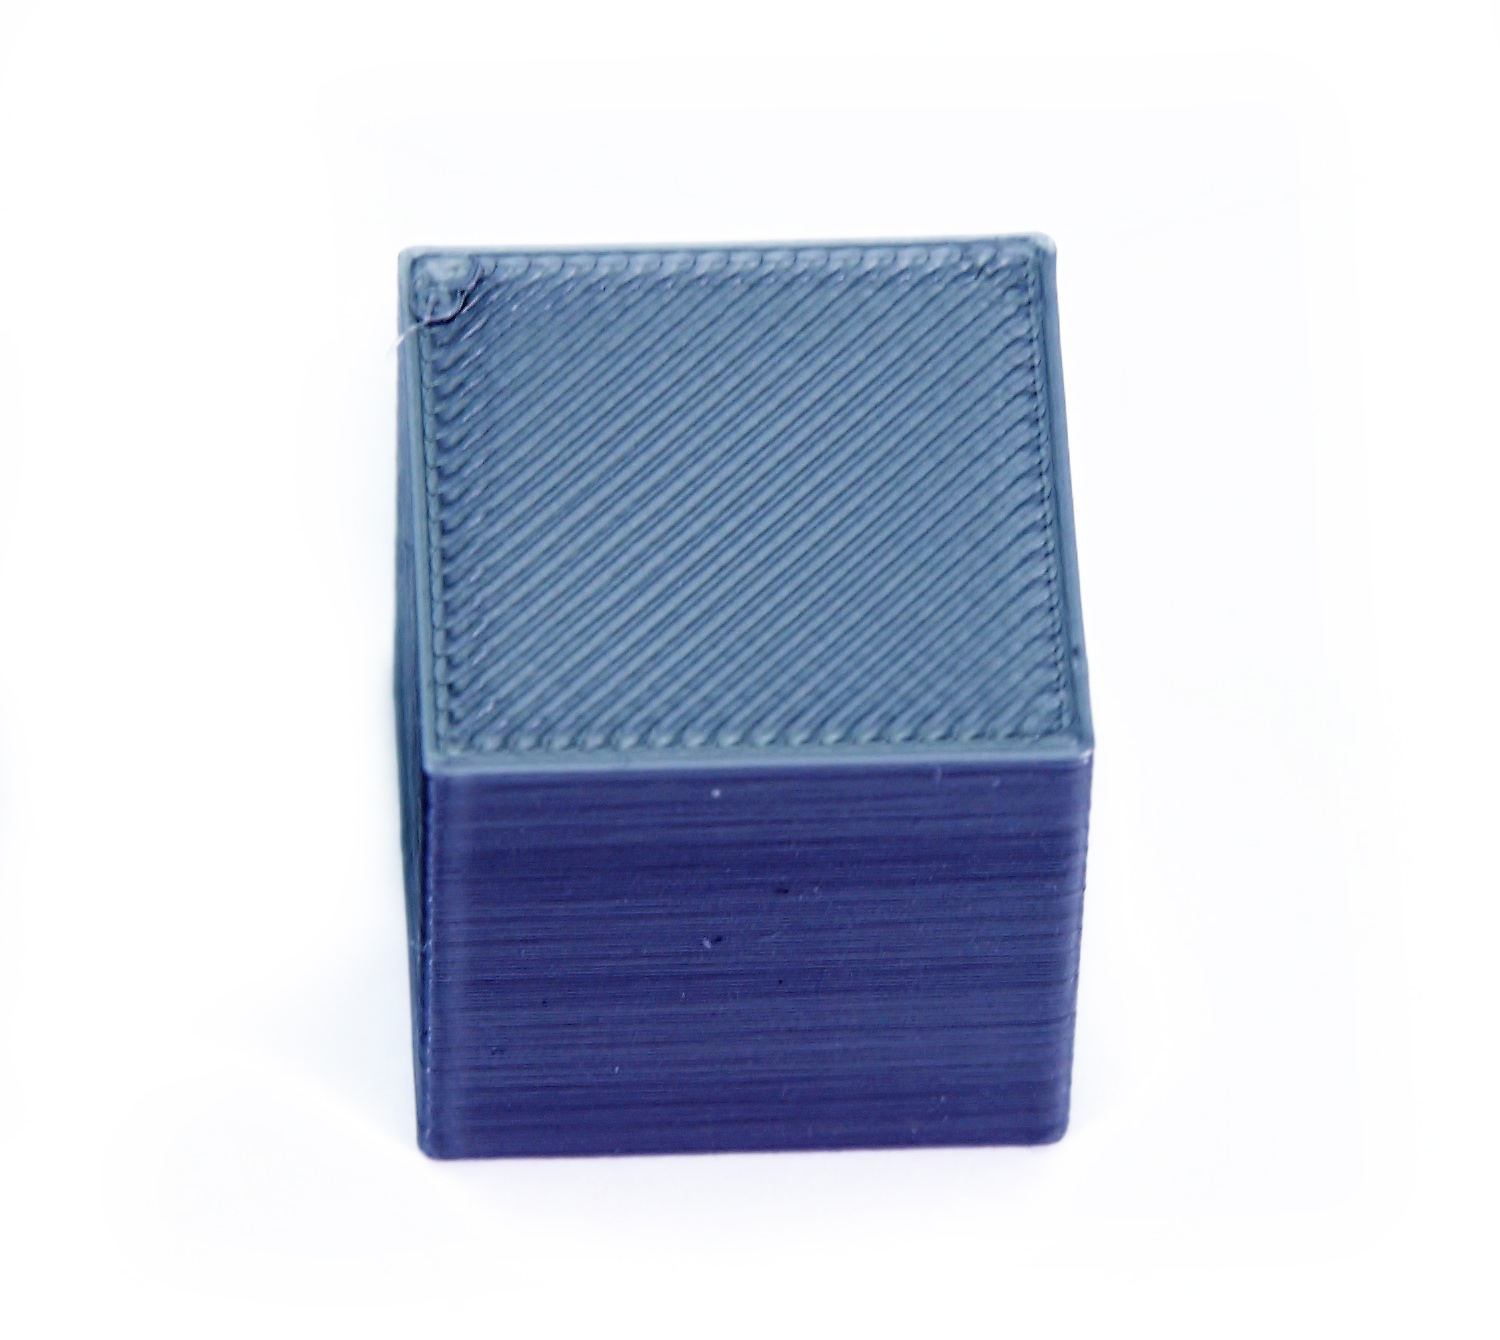
                  If there is too much material near the perimeters, decrease the Extrusion Multiplier value.
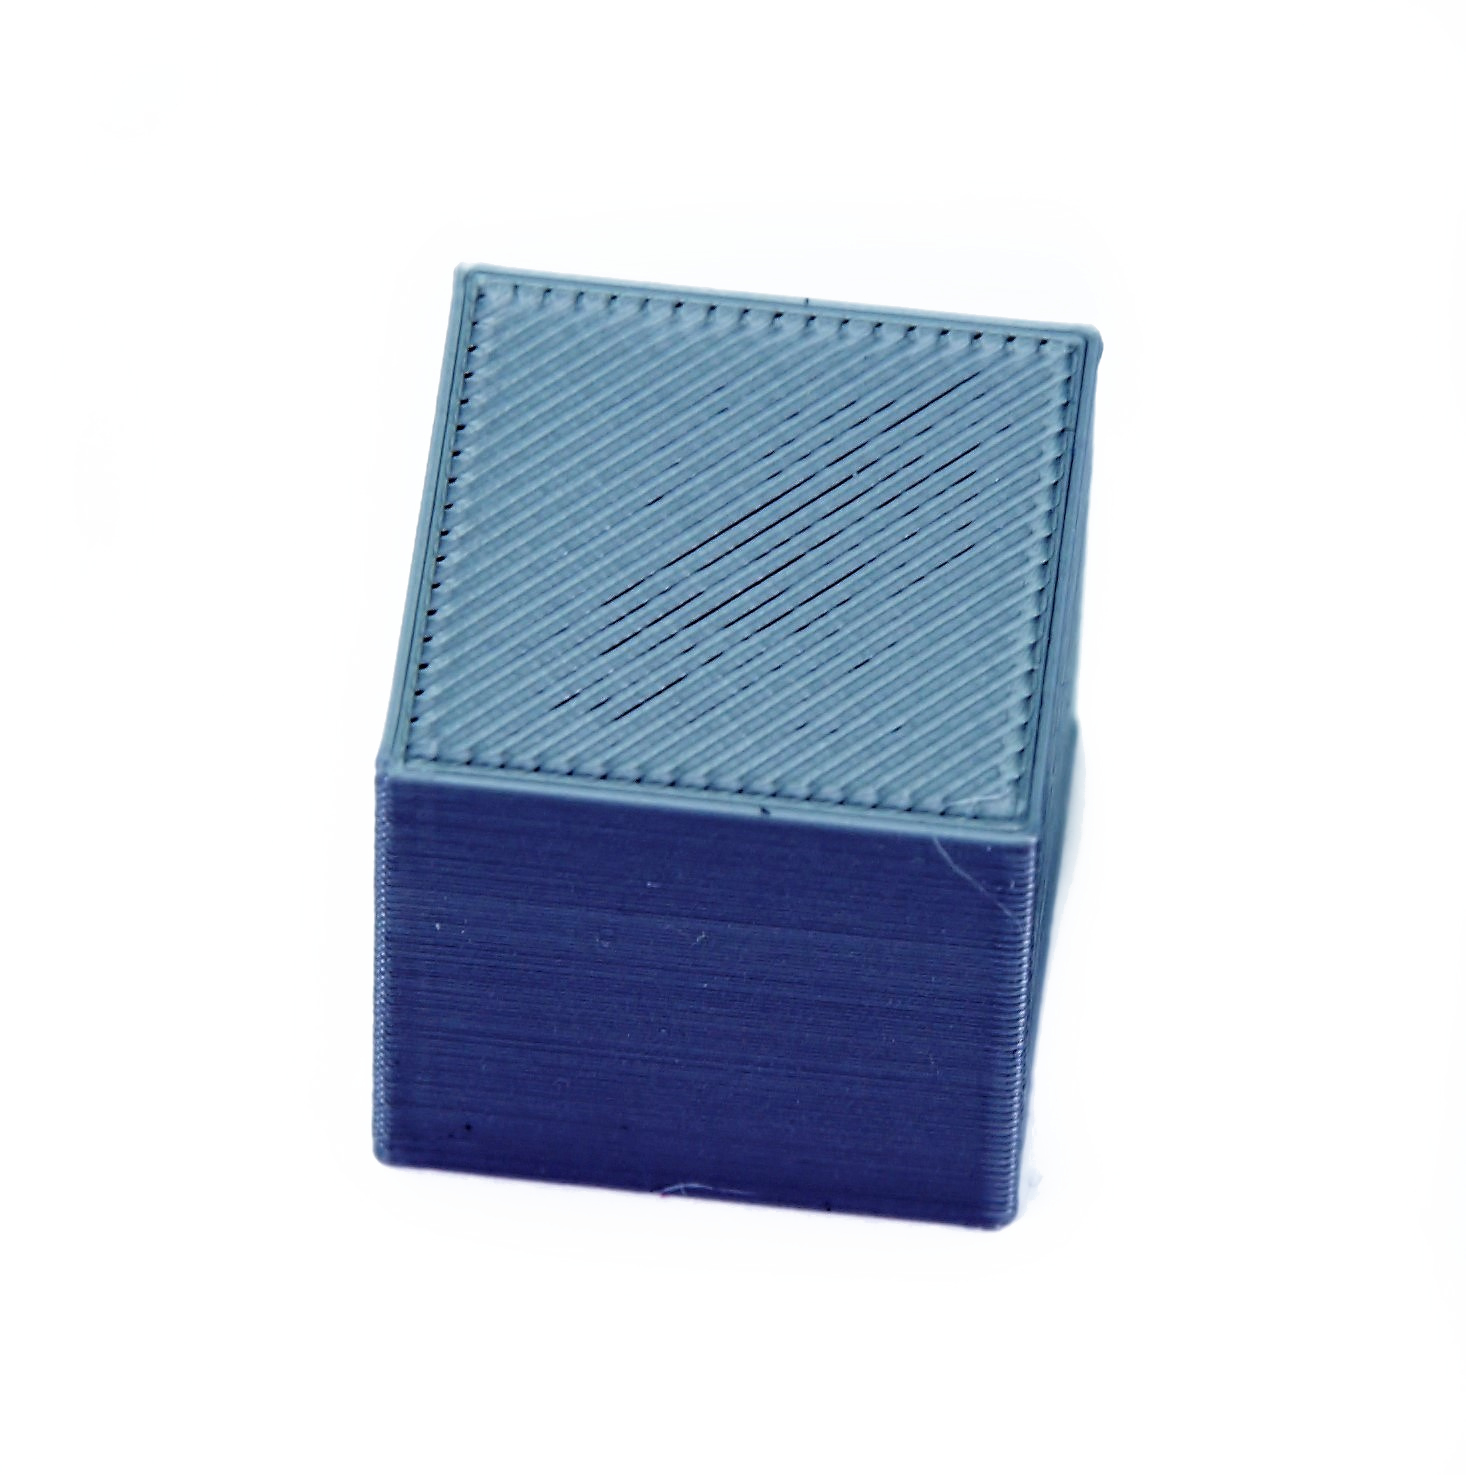
                  If there are visible gaps between layer lines, increase the Extrusion Multiplier value. (Microscopic gaps near the perimeters are OK.)
                  Was this article helpful?
                  This action is available only to registered users. Please log-in.

                  Topics

                  • Calibration
                    • Advanced calibration
                      • Manual temperature calibration
                      • Linear Advance
                      • Extruder linearity correction calibration
                      • Extrusion multiplier calibration
                      • PID tuning
                      • Bed Level Correction
                      • Squaring your MINI
                    • Basic calibration
                    • Calibration Error Messages

                  51 comments

                  Log in  to post a comment
                  thedoctor916
                  •
                  "Please note that cheap digital calipers may not be accurate enough to make reliable measurements of a single perimeter wall."

                  And yet you are use a $30 micrometer. Funny. I challenge someone to find a cheaper set.

                  Link to the model is dead, you should change the article to tell people to add shape, box, define it to be 40m cubed and then print in SPIRAL vase mode. It's not just called, 'vase mode' in the menus and new users will get confused.

                  And most people should know that you better determine if your nozzle needs to be replaced before you do this if you are looking to fix and issue and think that the printer is over/under extruding. Because dialing in the extrusion multiplier will not correct for a worn nozzle.
                  Reply
                  Brian
                  •
                  Sorry, so is the goal that the printed part, when measured, should be 0.45 wall thickness (ideally)?
                  Reply
                  MagnusVesper
                  •
                  "If you wish to calibrate the printer with a bigger/smaller nozzle or layer heights above 0.2, then you will need to adjust these values as well."
                  How? Prusa sells 5 different sizes of nozzles, so the guide should cover those scenarios.
                  I'm assuming the "extrusion width" field is the right value to replace 0.45 with. But I don't know how to account for different layer heights.
                  Reply
                  project80
                  •
                  That is depending from the preset you use. You can also change this value under layers and perimeter/layer height.
                  Reply
                  michele m
                  •
                  Generally speaking, if you are using Prusa stock profiles in Prusa Slicer, pick an average STRUCTURAL/QUALITY layer height and check 'advanced > extrusion width > external perimeters'. That parameter will be your reference value to calculate [virtual-thickness/real-thickness].
                  In the current example, the virtual thickness assigned in Prusa Slicer (external perimeters width) is 0.45 mm, so the formula is [0.45mm/real-average-thickness].

                  If you use a different nozzle (stock printer profile for the nozzle) the assigned stock external perimeter width will be different so, simply check in 'advanced > extrusion width > external perimeters'.
                  Reply
                  Lucas Lerch
                  •
                  I didn't go back to the assembly manual and check, but it would be awesome if your had a hint at the end of the kit assembly or upgrade assembly to do this and DO IT FOR EVERY FILAMENT. Because I was reeally struggling and about to shoot myself (LOL) Love you guys.

                  Lucas
                  Reply
                  Travis F.
                  •
                  I've printed every filament you can think of with all different nozzle sizes and types, line widths, you name it, and I've never changed it beyond changing profiles. IME underextrusion usually means a clog and "overextrusion" usually means your Z-level calibration is off. If it's really that life-changing I guess I'm about to find out!
                  Reply
                  BPause
                  •
                  I assume this is still a valid process for the XL?
                  I note that it's not on the list of relevant printers..
                  The note in prusa slicer suggests calibrating firmware esteps but that doesn't seem to be a thing prusa encourages for their printers.
                  I can see how this could get irritating having to calibrate each filament to each head. Am I looking in the wrong place?
                  Reply