Prusa
  • ショップ
    • 最新製品
    カテゴリー別
    • 3Dプリンター新着
    • 3Dプリンターアップグレード新着
    • 材料
    • アクセサリー
    • スペアパーツ
    • コース
    • グッズ
    • 見積もりを取得
    クイックリンク
    • 配送と配達
    • 返品と返金
    • 支払いと融資
    • 保証
    • VATと関税
    • よくある質問

    0 点の商品がカートに入っています点の商品がカートに入っています

    カートは空です

    カートを見る3Dプリンターを購入

    マイプロフィール

    ログイン すると注文や保存した商品を確認できます

    マイプロフィール

    ログイン中:

    • 注文
    • ログアウト
  • 3Dプリント
    • 3Dプリントを探る
    初心者向け
    • 3Dプリントの基礎
    • FDM印刷の仕組み
    • 初めてのプリンターを購入する
    • 3Dモデルカタログ
    用途別
    • ラピッドプロトタイピング
    • 製造
    • エンジニアリング
    • 研究
    • アートとデザイン
    さらに深く
    • 材料ガイド
    • コース
    • ウェビナー
    • 導入事例
    • カスタム3Dプリンティング
  • 3Dプリンター
    • すべての3Dプリンター
    用途
    • 自宅またはガレージ愛好家、改造愛好家、ホームプリンティング
    • ビジネス小規模チーム向けの社内生産
    • エンタープライズフリート、セキュリティ、大規模生産
    • どのPrusaが私に適していますか
    ショップと閲覧
    • CORE One+新着
    • CORE One+ INDX新着
    • CORE One L+新着
    • CORE One L+ INDX新着
    • XL+新着
    • MK4S
    • Prusa Pro HT90
    • Prusa Pro AFS
    • Prusa Pro SLX
    プリンターからさらに
    • 部品とアップグレード新着
    • Spare parts
    • 重要インフラ
    • 導入事例
    • シグネチャーオーク
    • キット
  • 材料
    • すべての材料
    用途別
    • 日常とデザイン
    • 機能工学
    • 複合材料
    • プロフェッショナル向け特殊材料
    • SLAレジン
    Prusament
    • PLA
    • PETG
    • ASA
    • PC
    • PA11
    • Flex
    • TPU
    材料からさらに
    • 材料ガイド
    • 自社製材料
    • サステナビリティ
    • ストアで注文
  • ソフトウェア
    • すべてのソフトウェア
    印刷の準備
    • PrusaSlicer 3.0新着
    印刷と監視
    • Prusa Connect
    • EasyPrint
    • iOS & Androidアプリ
    • Prusaファーム
    始める
    • ダウンロードとインストール
    • ナレッジベース
    その他のソフトウェア
    • 3Dモデルカタログ
  • サポート
    • サポートを探す
    回答を探す
    • ナレッジベース
    • トラブルシューティング
    • コース
    • ウェビナー
    ヘルプ
    • お問い合わせ
    • ライブチャット
    • 配送と配達
    • 保証
    • 返品と返金
    • サービスとスペアパーツ
    • サービスと修理
    コミュニティ
    • フォーラム
    • Reddit
    • Printables
  • トラストセンター
    • トラストセンター概要
    トピック別
    • GDPR
    • 証明書
    • セキュリティ
    • コンプライアンス
    コミットメント
    • サステナビリティレポート
    お問い合わせ
    • セキュリティチームに連絡
  • 会社
    • Prusaについて
    私たちについて
    • 私たちのストーリー
    • プリンターの製造方法
    • オープンソース
    • ブランド&メディアキット
    ニュース
    • ブログ
    • ニュースルーム
    • イベント
    信頼とパートナー
    • サステナビリティ
    • 再販業者と販売代理店
    • アフィリエイトプログラム
    • お問い合わせ
    • English
    • Čeština
    • Deutsch
    • Español
    • Français
    • Italiano
    • Polski
    • 日本語
  • ログイン中:

    • 注文
    • 住所
    • 在庫アラート
    • マイコース
    • サブスクリプション
    • アカウントを編集
    • ログアウト

ログイン すると注文や保存した商品を確認できます

ログイン中:
  • 注文
  • 住所
  • 在庫アラート
  • マイコース
  • サブスクリプション
  • アカウントを編集
  • English
  • Čeština
  • Deutsch
  • Español
  • Français
  • Italiano
  • Polski
  • 日本語
ショップ

0 点の商品がカートに入っています点の商品がカートに入っています

カートは空です

カートを見る3Dプリンターを購入

マイプロフィール

ログイン すると注文や保存した商品を確認できます

マイプロフィール

ログイン中:

  • 注文
  • ログアウト
ショップ
  • 最新製品
カテゴリー別
  • 3Dプリンター新着
  • 3Dプリンターアップグレード新着
  • 材料
  • アクセサリー
  • スペアパーツ
  • コース
  • グッズ
  • 見積もりを取得
クイックリンク
  • 配送と配達
  • 返品と返金
  • 支払いと融資
  • 保証
  • VATと関税
  • よくある質問

おすすめ製品

    人気のカテゴリー

      急上昇ワード

        記事

          ブログ

            製品

              カテゴリー

                検索候補

                  検索中…
                  結果がありません
                  エラーが発生しました。
                  ↑↓ 選択↵ 開くEsc 検索を閉じる
                  1. サポート
                  2. プリントエラーメッセージ
                  3. MMUローディング失敗
                   

                  内容

                  • What does it look like
                  • How to fix it
                  • Filament spools
                  • IR sensor is not triggering correctly
                  • Filament stuck in the PTFE tube
                  • Idler-body tension screws and idler
                  • Resuming print after repair

                  ブログ

                  • Prusament PLA ColorMix:わずか5巻のフィラメントで45色以上をプリント
                  • PrusaSlicer 3.0プレビュー版 — 3Dプリントの未来を見据えた仕様
                  • より高品質なプリントを、もっと簡単に:Prusa XL+、CORE One L+、CORE One+(Gen 2)― 大規模製品アップグレード

                  ニュースレター

                  ご登録いただくと、毎月 新しいファームウェア、PrusaSlicerの新バージョン、3Dプリントプロジェクトの一般的なヒントなど、役立つ情報をお届けします。

                  クリックして、ニュースレターを受け取る。

                  このサイトはreCAPTCHA Enterpriseによって保護されており、Googleのプライバシーポリシーと利用規約が適用されます。

                  Heavy Duty Keyboard Holder (No Supports)
                  E-shop
                  • 3Dプリンター
                  • プリンターのアップグレード
                  • フィラメント
                  • アクセサリー
                  • Prusa 商品
                  Prusa

                  © Prusa Research a.s.

                  Printables
                  • 3Dモデル
                  • Store
                  • Clubs
                  • 3Dデザインコンテスト
                  • Brands
                  コミュニティ
                  • ワールドマップ
                  • フォーラム
                  • ユーザーグループ
                  • イベント
                  ヘルプ
                  • Prusa ヘルプ
                  • Prusa アカデミー
                  • 3Dプリンティング計算機
                  ソフトウェア
                  • PrusaSlicer
                  • Prusa.app
                  • Prusa Connect
                  • ドライバーとソフトウェア
                  会社概要
                  • 私たちについて
                  • Blog
                  • プルサ正規販売代理店
                  • お問い合わせ
                  • ISO 9001・ISO 14001・ISO 45001 認証取得済み
                  • 一般利用規約
                  • PRUSAウェブサイト利用のための一般利用規約
                  • プライバシーポリシー
                  • クッキーに関する情報
                  • お客様の苦情対応に関する方針
                  • Webサイトのステータスページ
                  • Cookie 設定
                  Prusa
                  • 一般利用規約
                  • PRUSAウェブサイト利用のための一般利用規約
                  • プライバシーポリシー
                  • クッキーに関する情報
                  • お客様の苦情対応に関する方針
                  • Webサイトのステータスページ
                  • Cookie 設定

                  © Prusa Research a.s.

                  JOSEF PRUSA®、PRUSA RESEARCH®、PRUSA POLYMERS®、PRUSA ORANGE®、PRUSA 3D ® および PRUSAMENT® は、Prusa Development a.s. の登録商標であり、Prusa Research a.s. が Prusa Development a.s. からのライセンスに基づき使用しています。

                  MMUローディング失敗

                  関連するもの

                  MMU2S
                  記事 他の言語でもご覧になれます。
                  English
                  Čeština
                  Polski
                  Deutsch
                  Français
                  Español
                  Italiano
                  日本語

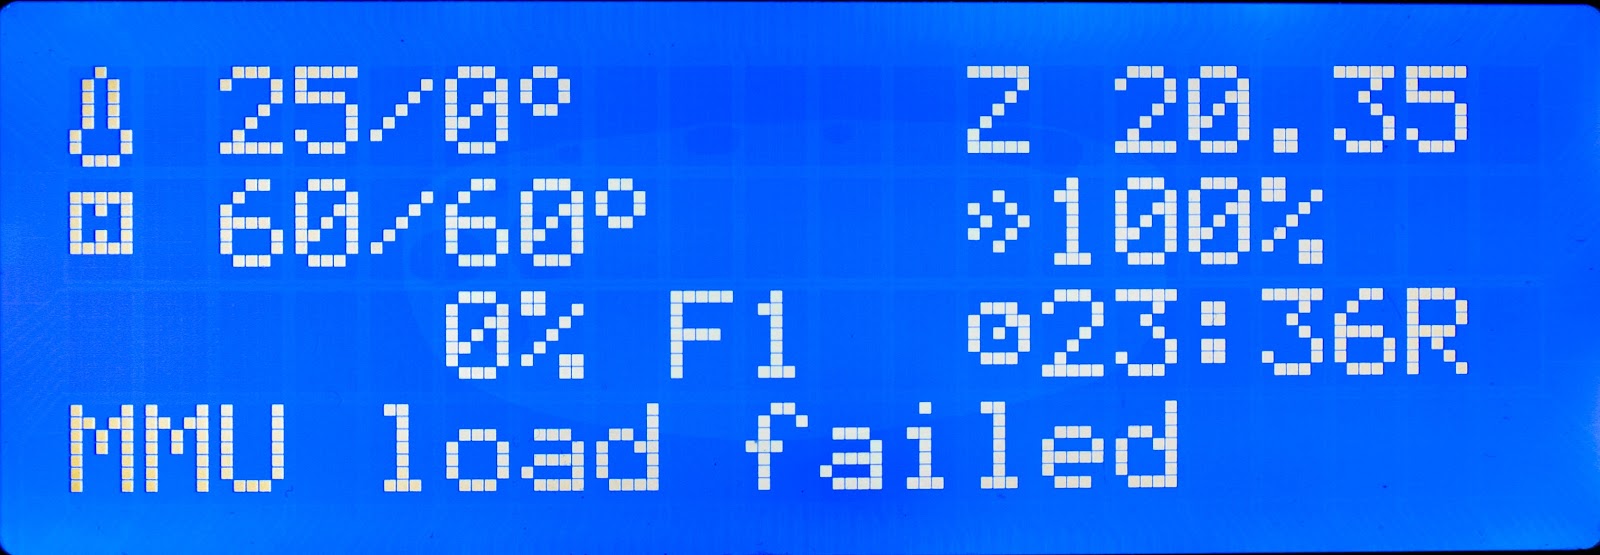
                  If you see the error message “MMU load failed” on the printer’s LCD display, it indicates that the filament went through the Original Prusa MMU2S unit (registered by the F.I.N.D.A. sensor), but it didn't reach extruder Bondtech gears. Sometimes, the filament reaches the Bondtech gears once but not for the second time. The MMU2S unit is trying to retract the filament once during the initial loading sequence to prevent possible issues during the print.

                  Any usage and troubleshooting of the MMU2S upgrade require the base printer (MK3S or MK2.5S) to be in perfect shape and working order and print without any problem when the filament is fed directly into the extruder.

                  What does it look like

                  This is what you most likely see on the LCD screen:

                  You can also open the LCD menu -> Support -> Sensor info and check the FINDA value. The F.I.N.D.A. sensor should be triggered, meaning the value should be 1.

                  The print is thus paused until the problem is resolved by user intervention followed by a successful load or unload of the given filament, after which the LCD displays the message "MMU OK, resuming print".

                  How to fix it

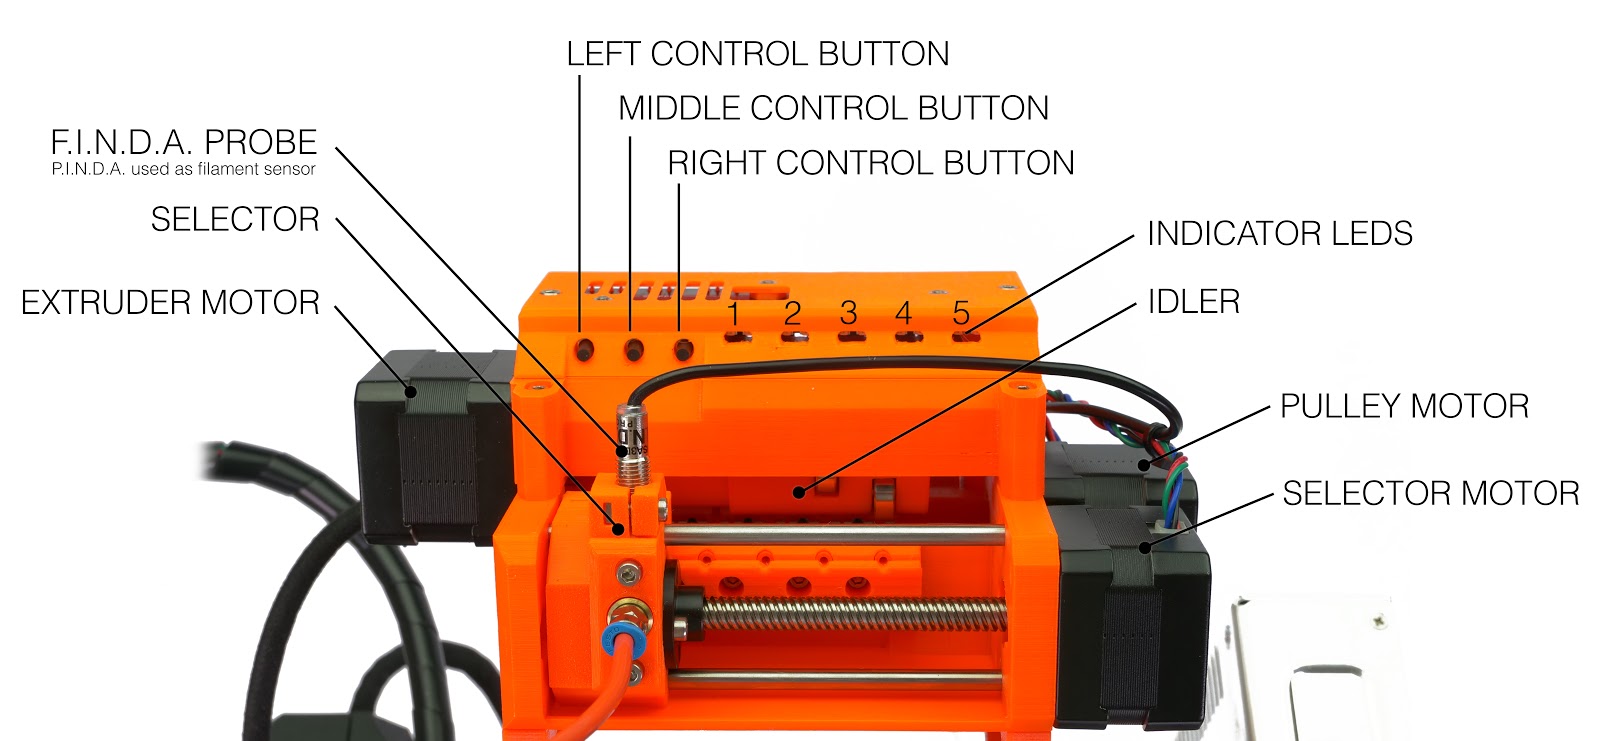
                  For future reference, see the picture below and remember the name of each part of the MMU unit. You will find this information in your printed MMU handbook as well.

                  There are multiple causes for this to happen. Let's go through all of them, ranged by their probability.

                  Filament spools

                  First of all, check the filament spools. Do they roll on the spool holders without any problem? The filament should not be tangling, neither on the spool nor in the space between the buffer and the spool holders.

                  IR sensor is not triggering correctly

                  Check that the IR sensor is working properly and calibrated correctly. Open LCD menu -> Support -> Sensor info and you will see the IR value. If the filament is not loaded, the value should be “0”. If the filament is loaded in between the Bondtech gears, you should see a steady “1”. Any flicker at any time will cause issues. Please see the article on how to perform the IRフィラメントセンサーのキャリブレーション (MMU3、MMU2S).

                  Filament stuck in the PTFE tube

                  In most cases, it’s because of filament strings or the filament retracting with a thick end. The shape of the filament tip is very important for a successful MMU print. The tip should be pointy, but there must not be any lump or string. The diameter of the tip can be slightly bigger than the rest of the filament, but not too much.
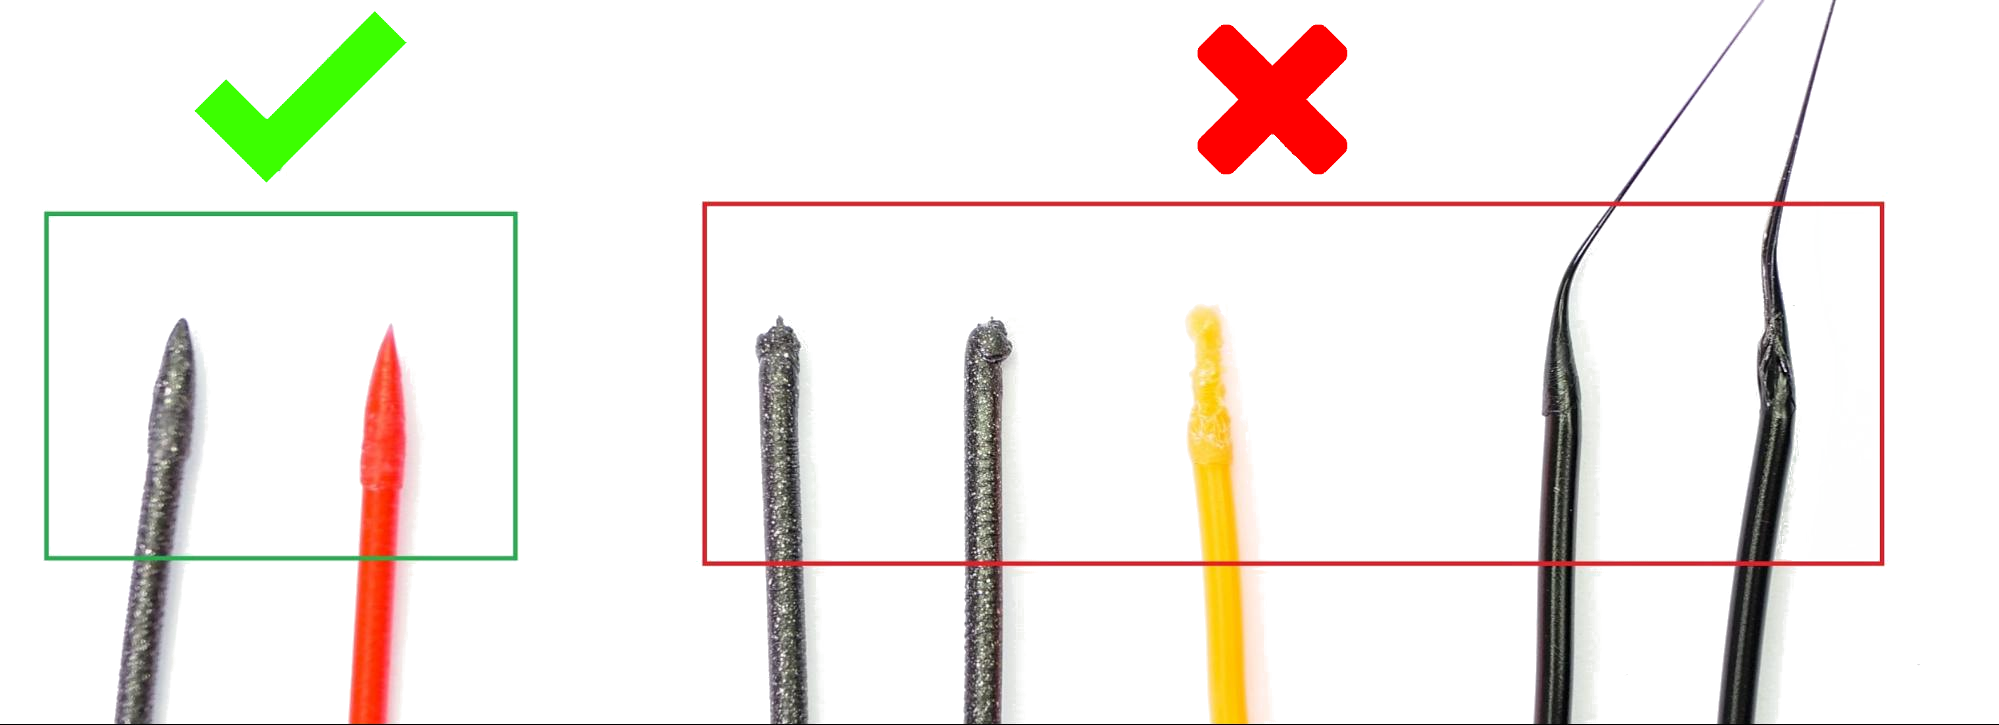
                  To solve this in the short term, unscrew both Festo fittings of the long PTFE tube connecting the MMU2S and the printer's extruder. The filament string will probably stick out of the MMU2S unit. Pull approximately 20 cm of filament out of the unit and cut it (the MMU2S gears have likely damaged part of the string, so it’s better to remove it). Make sure the filament can go freely through the tube and that the tube is clean inside. Mount everything back and resume print. Check also the short PTFE tube that is inside the printer's hotend. If its mouth is deformed, replace it with a new one.

                  In general, if your filament comes out with a long string, it is because it unloaded at too high temperature. If it unloads with a blunt end, the temperature was too low.

                  Cooling moves

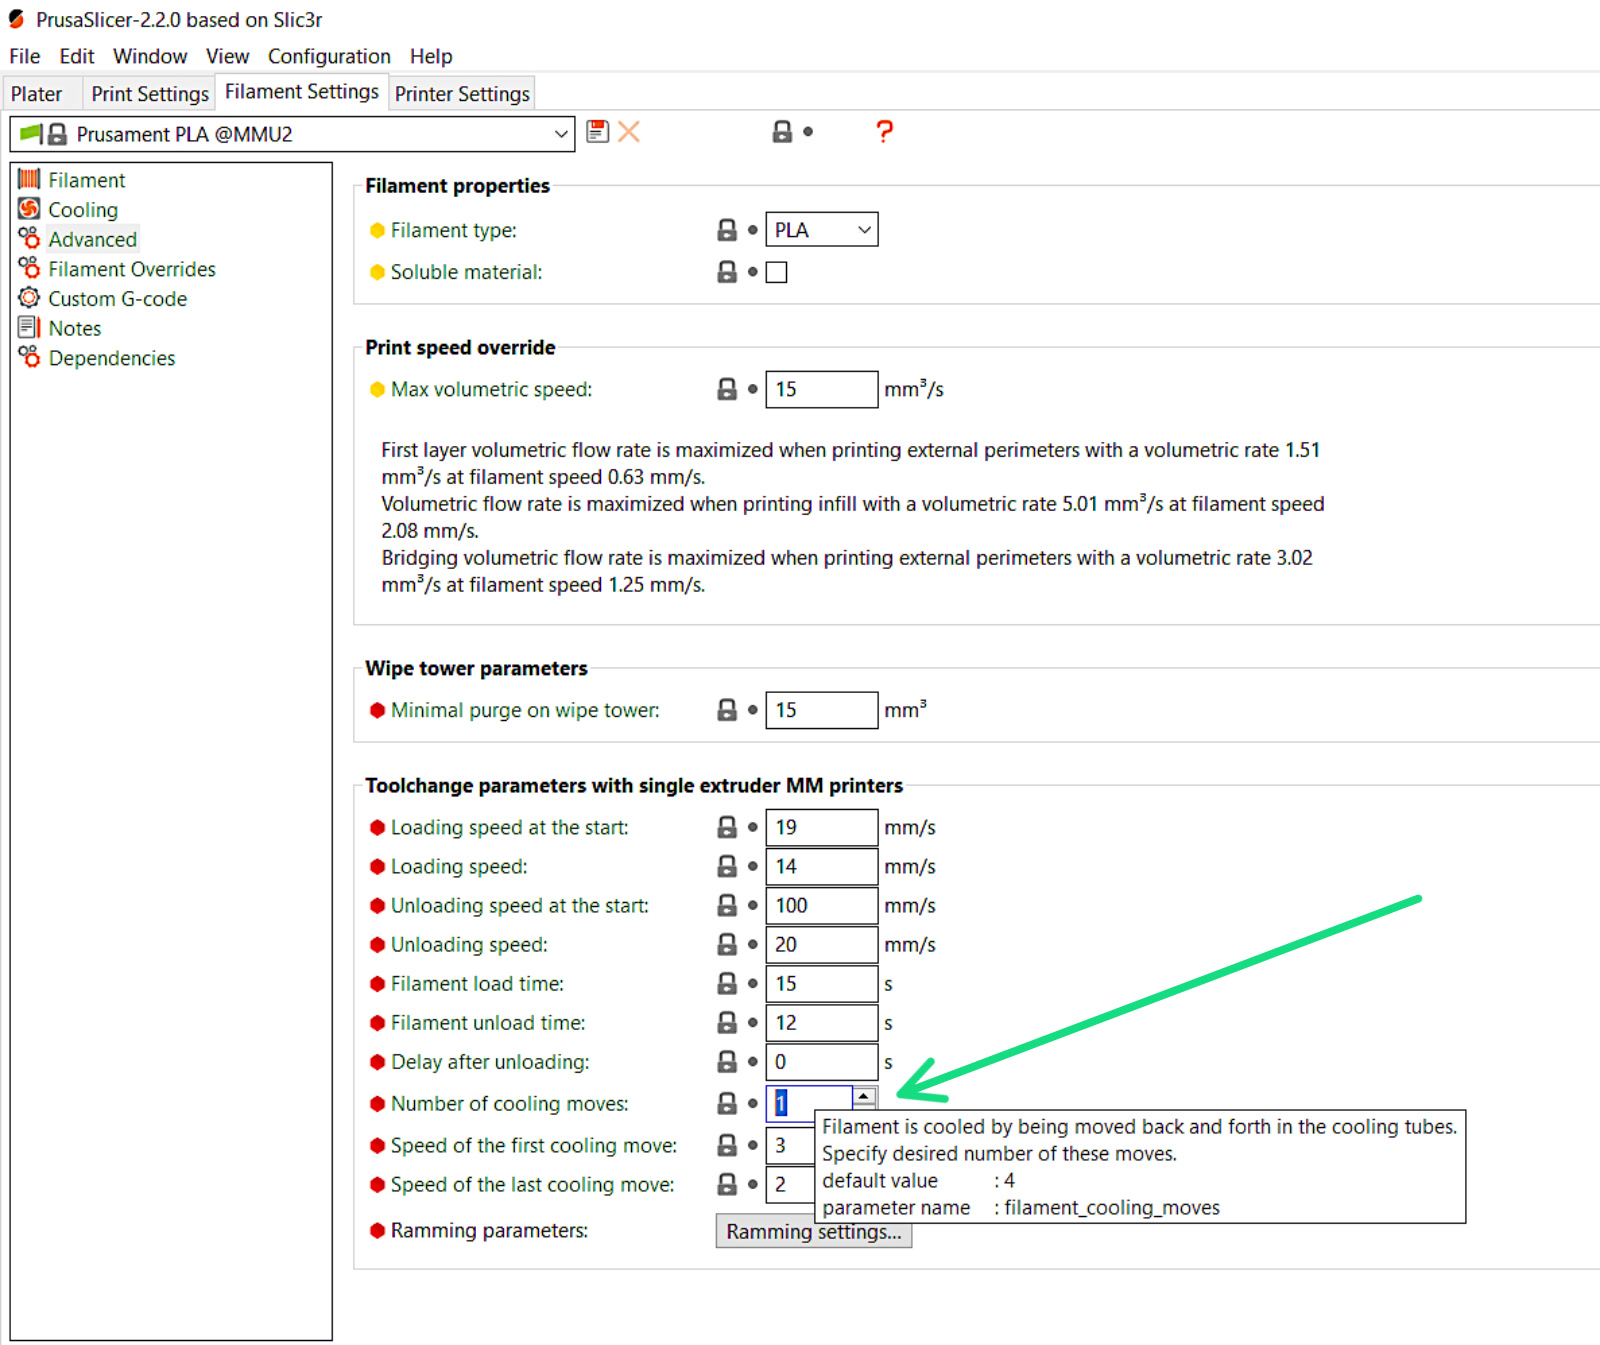
                  A good setting is to increase the number of "Cooling moves" in PrusaSlicer. This will move the filament back and forth in the cooling tube a set number of times before retraction, which can improve the tip of the Filament. The setting is found at the 'Filament Settings' tab, under Advanced (picture below). Start by increasing the number of cooling moves to 2-3. More cooling moves will increase the print time.
                  F.I.N.D.A. sensor check

                  See if the FINDA sensor is correctly calibrated as described in this article. Always keep in mind the selector must be free of any leftover filament and dust. If you have issues with the selector not moving, see MMU2Sセレクターが動かない.

                  Filament pulleys

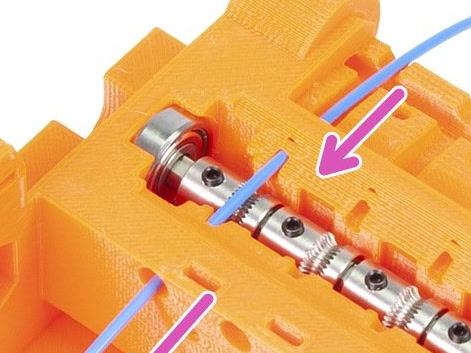
                  It is very important that the five hobbed filament pulleys are aligned with the filament and secured on the flat side of the pulley motor's shaft.
                  Silent mode

                  Sometimes, switching the MMU2S into the Stealth mode can help. In this mode, the motors are running slower and thus the filament movement is slower. You can enable the Stealth mode in LCD Menu -> Settings -> MMU Mode [] / [Stealth].

                  Idler-body tension screws and idler

                  Idler body tension screws

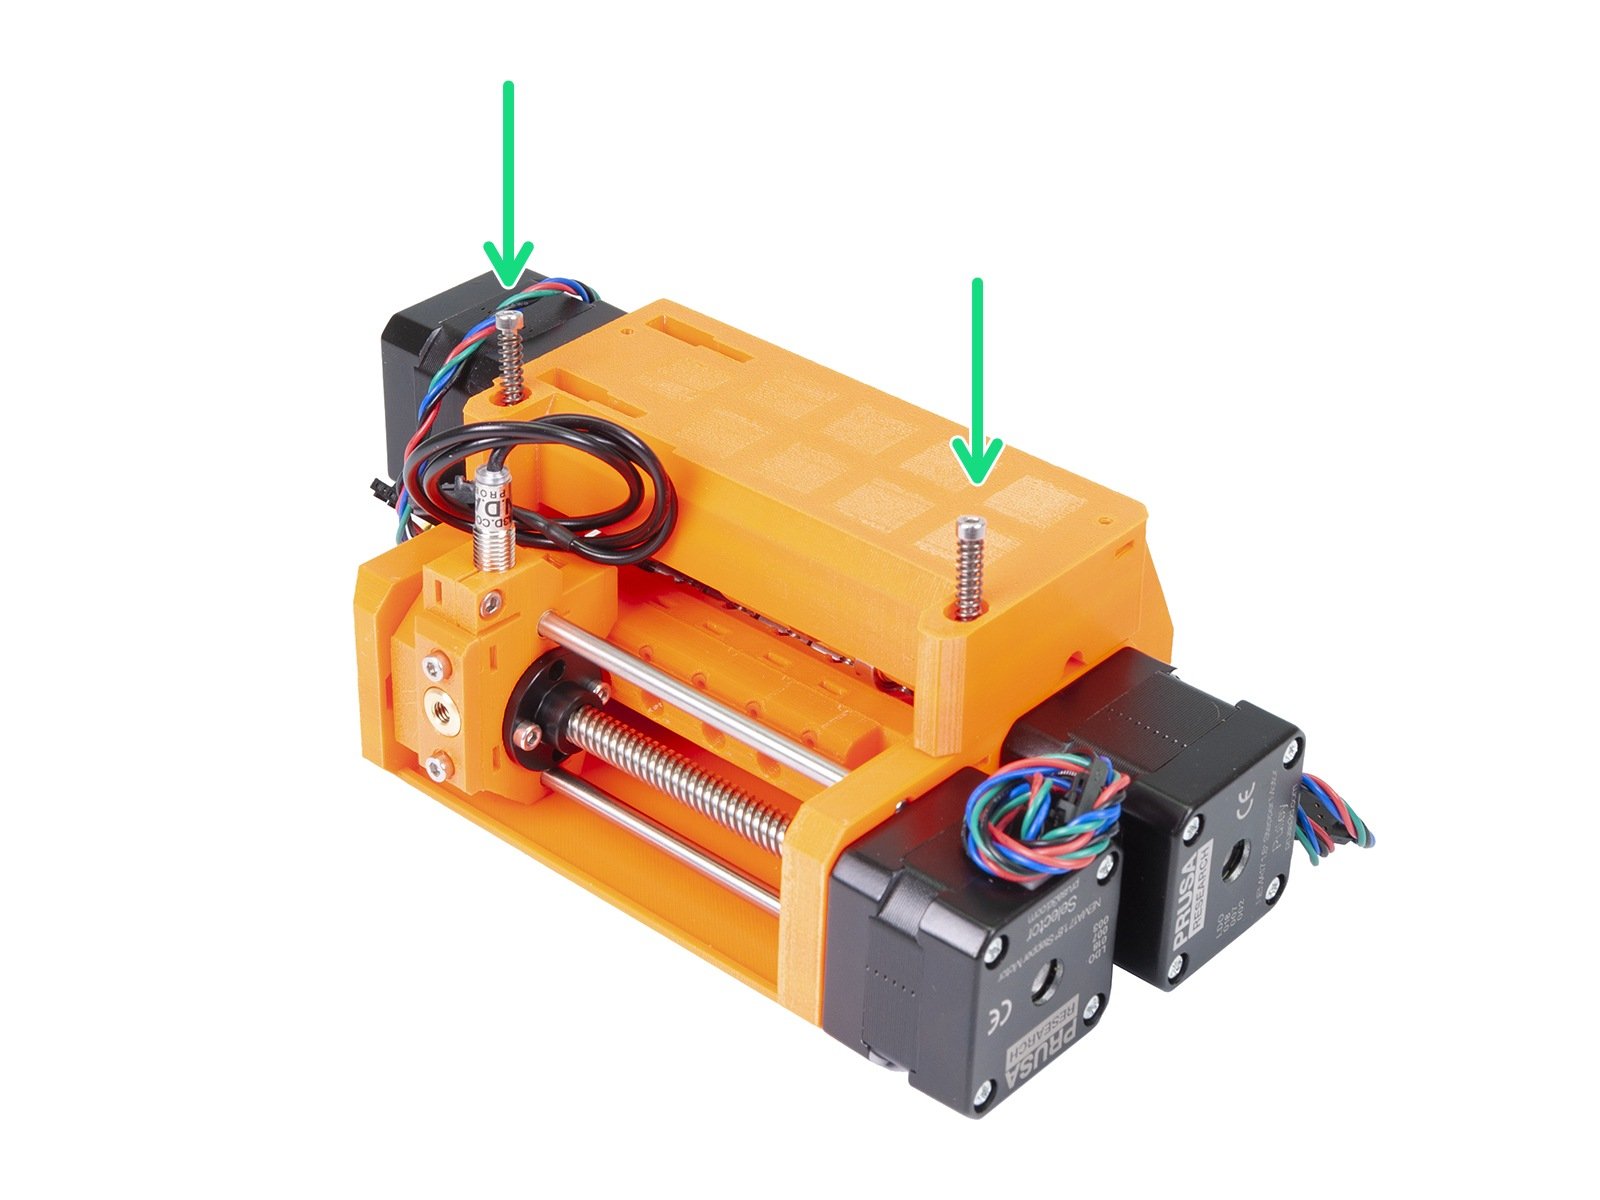
                  On the top of the MMU2S units is two tension screws, with springs, applying pressure to the filament upon load/unload. These should be slightly below the surface of the plastic part (about 1 millimeter).
                   

                  Idler tightened on the motor shaft

                  First of all, make sure the motor on the left of the MMU unit (named Extruder or Idler motor) is seated correctly and in direct contact with the idler-body. The hole in the center of the idler barrel isn't entirely round, there is a flat part that matches the shape of the motor shaft. When the idler barrel is on the shaft, it has to be tightened by two M3x10 screws.
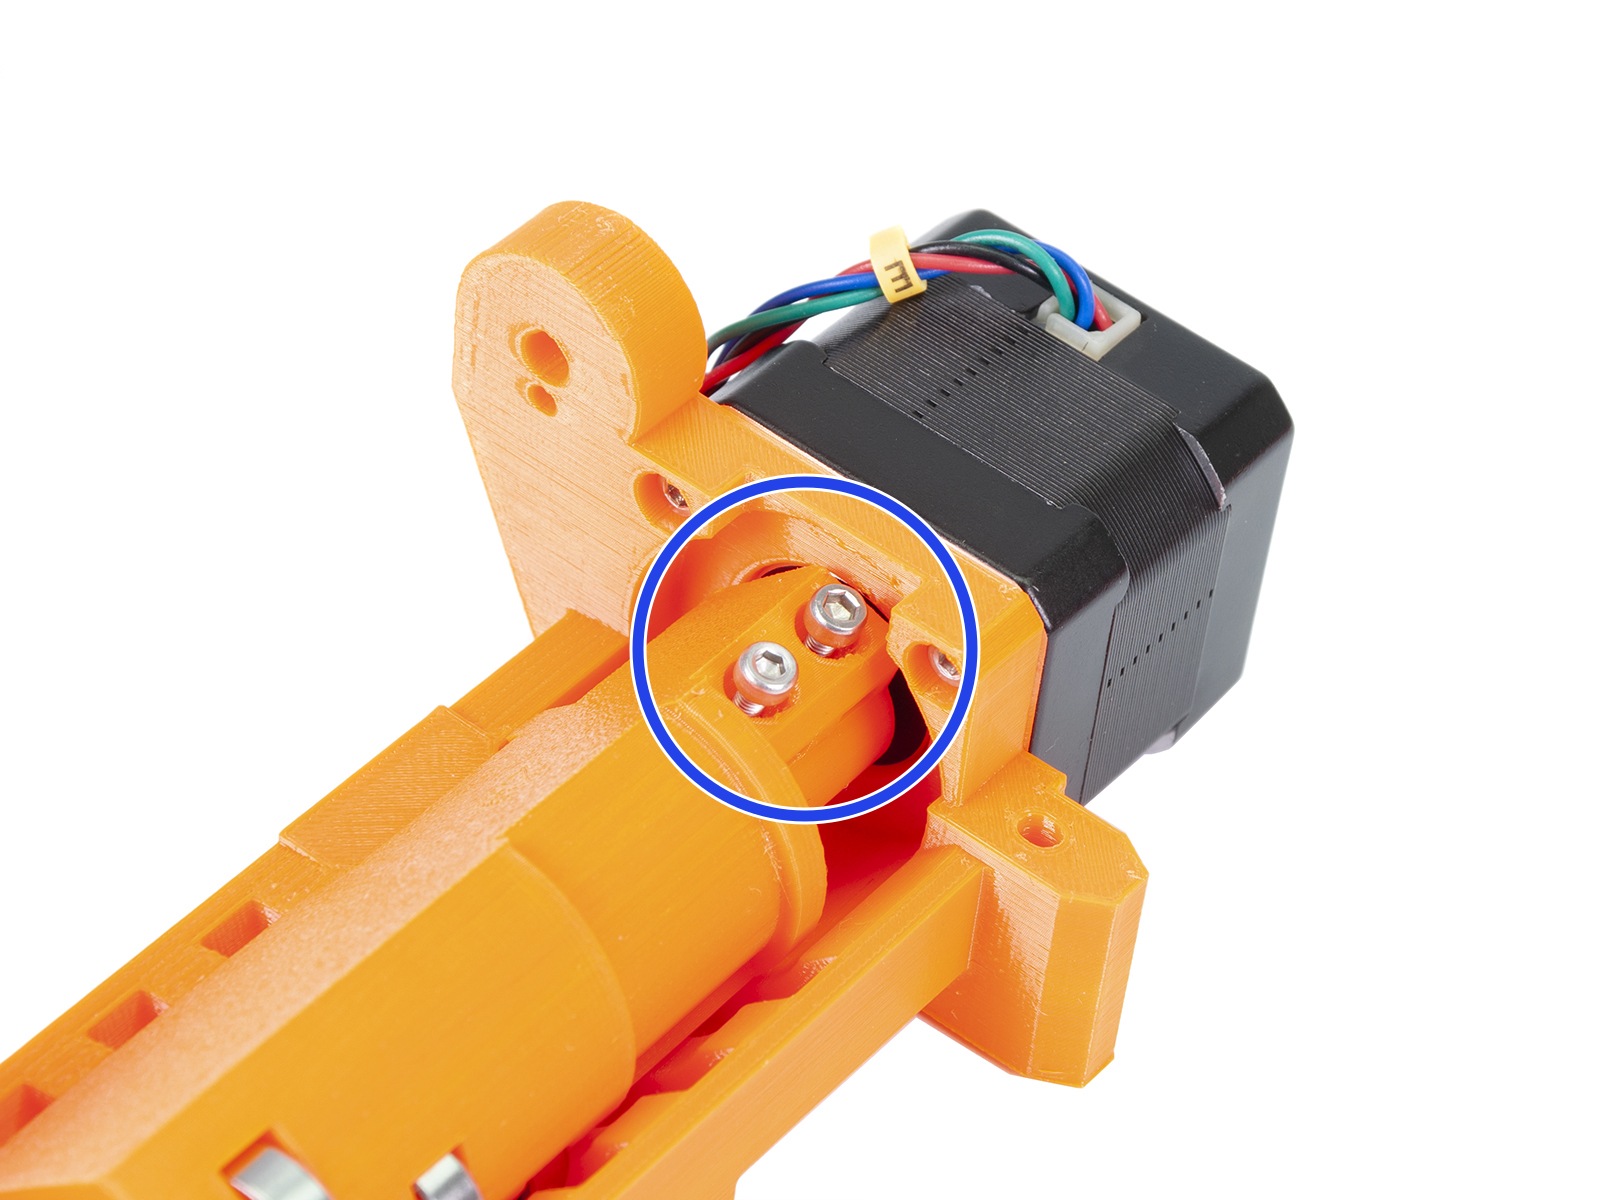
                  These screws must be tightened neither too much nor too little. If the screws were tightened too much, the plastic part will crack, in the opposite case, the idler will not be secure on the motor shaft.

                  Make sure there is a small gap between the idler barrel and the idler-body. These two parts must not be grinding on one another.

                  Rear PTFE holder too tight or too loose

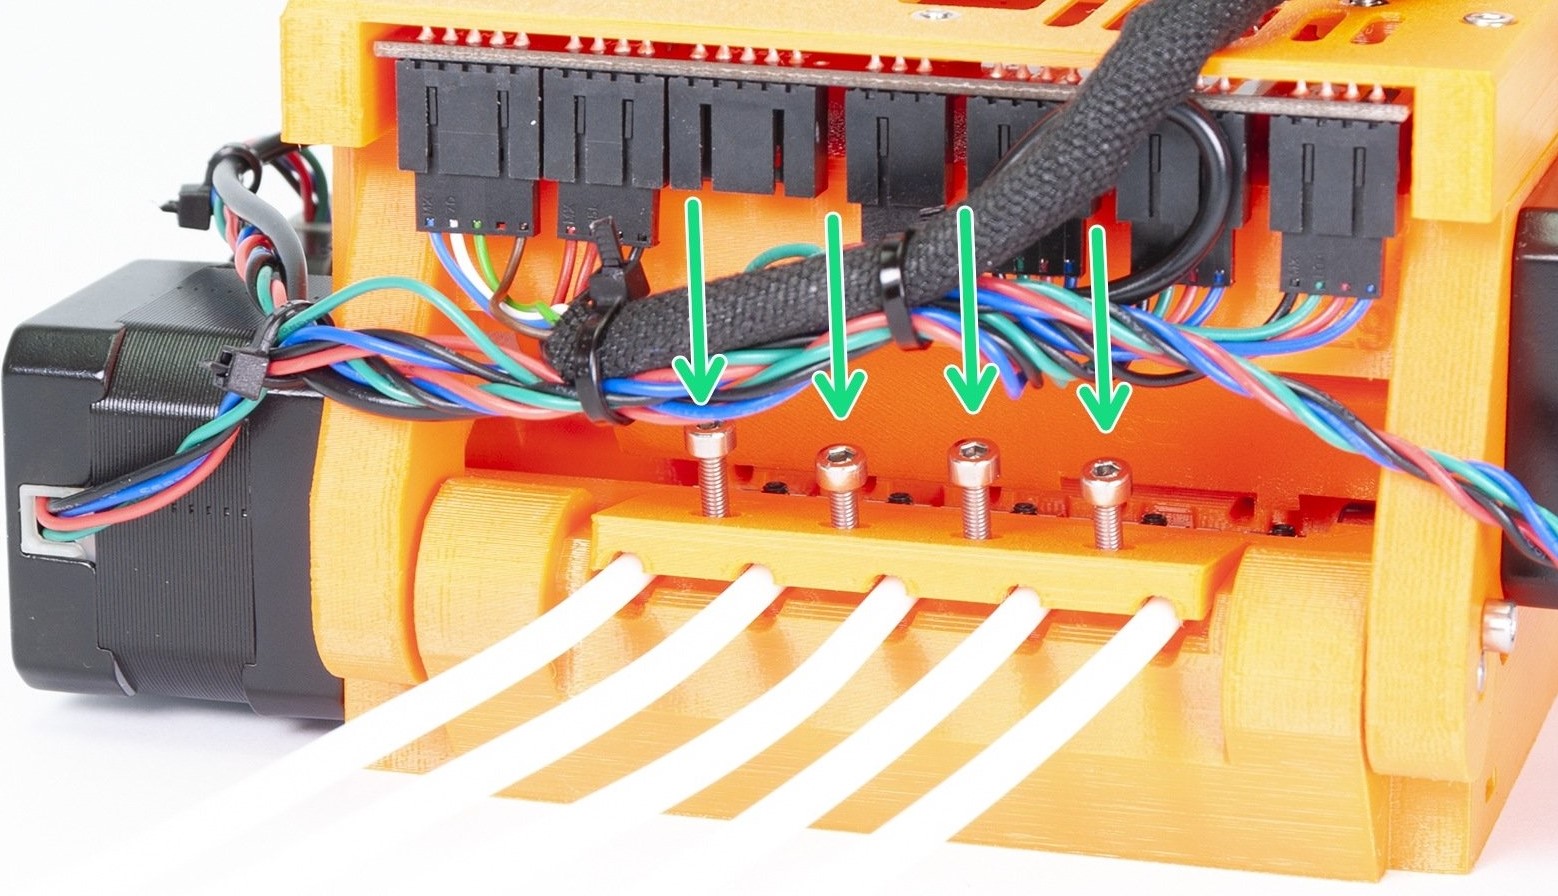
                  Check the 5 long PTFE tubes leading the filament up to the MMU unit. Make sure the mmu2-rear-PTFE-holder is not tightened too much: manually push the filament back and forth through this section, it should be passing through without any resistance. It can also be too loose, in which case the PTFE tubes might accidentally snap out.
                  Individual filament length calibration

                  On the MMU2S upgrade, both filament sensors (FINDA and the IR sensor) are cooperating, so there is no reason to do this calibration anymore. The length of the filament is measured automatically thanks to the new IR filament sensor mechanism.

                  However, if you have changed the length of the Bowden PTFE tube between the extruder and the MMU2S unit, you can still do this calibration. Please refer to this guide.

                  Resuming print after repair

                  There are two ways to do that:

                  • Select Resume print on the LCD. The printer will automatically preheat the nozzle, try to load filament and if it’s successful, it will continue.
                  • Press the middle button on the MMU2S and it will repeat the last unsuccessful operation, to test if the problem is resolved. If the repair was successful, the LED will flash an alternating red and green.  Once you’re ready, press the Right button to resume the print.

                  If the issue was not resolved you will see the red LED still on and you will have to try to resolve the issue again.
                  この記事は役に立ちましたか?
                  この操作は登録ユーザーのみが利用できます。ログインしてください。
                  ログイン してコメントを投稿する
                  コメントなし

                  トピックス

                  • トラブルシューティング
                    • プリントエラーメッセージ
                      • MMUローディング失敗
                      • MMUにはユーザーの注意が必要です
                    • Diagnostics [進行中の翻訳]
                    • プリント品質のトラブルシューティング
                    • QR Error codes [進行中の翻訳]
                    • プリンタートラブルシューティング