Quando accendi per la prima volta la stampante Original Prusa MK4/S, MK3.9/S, viene avviato un autotest per verificare i componenti più comuni della stampante.
Cosa viene testato
La stampante esegue le seguenti procedure:
- Controllo della ventola dell'Hotend
- Controllo della ventola di stampa
- Controllo ventole invertite
- Controllo cella di carico
- Controllo asse X
- Controllo asse Y
- Controllo asse Z
- Controllo riscaldatore ugello
- Controllo riscaldatore piano riscaldato
- Allineamento ingranaggi riduttore
- Test sensore di filamento
Il test del sensore a cella di carico, l'allineamento del riduttore e il test del sensore del filamento richiedono l'intervento dell'utente, quindi resta vicino alla stampante per queste parti dell'autotest.
Troubleshooting
Ventole
Durante il test delle ventole, il numero di giri di ogni ventola viene mostrato nella parte inferiore dello schermo. Controlla e prendi nota dei valori. I valori massimi previsti sono di 7500-8000 RPM per la ventola del dissipatore e 5500-5900 RPM per la ventola di stampa.
Nel caso in cui una delle ventole non superi l'autotest, verifica che non ci sia nulla che blocchi la rotazione delle ventole, poiché eventuali residui potrebbero infilarsi tra le pale. Le parti più grandi possono essere pulite con una pinzetta, mentre la polvere può essere eliminata con uno spray detergente per computer (aria compressa).
Tieni ferma con la mano la ventola mentre usi l'aria compressa. In caso contrario, potresti danneggiare le pale.
Cella di carico
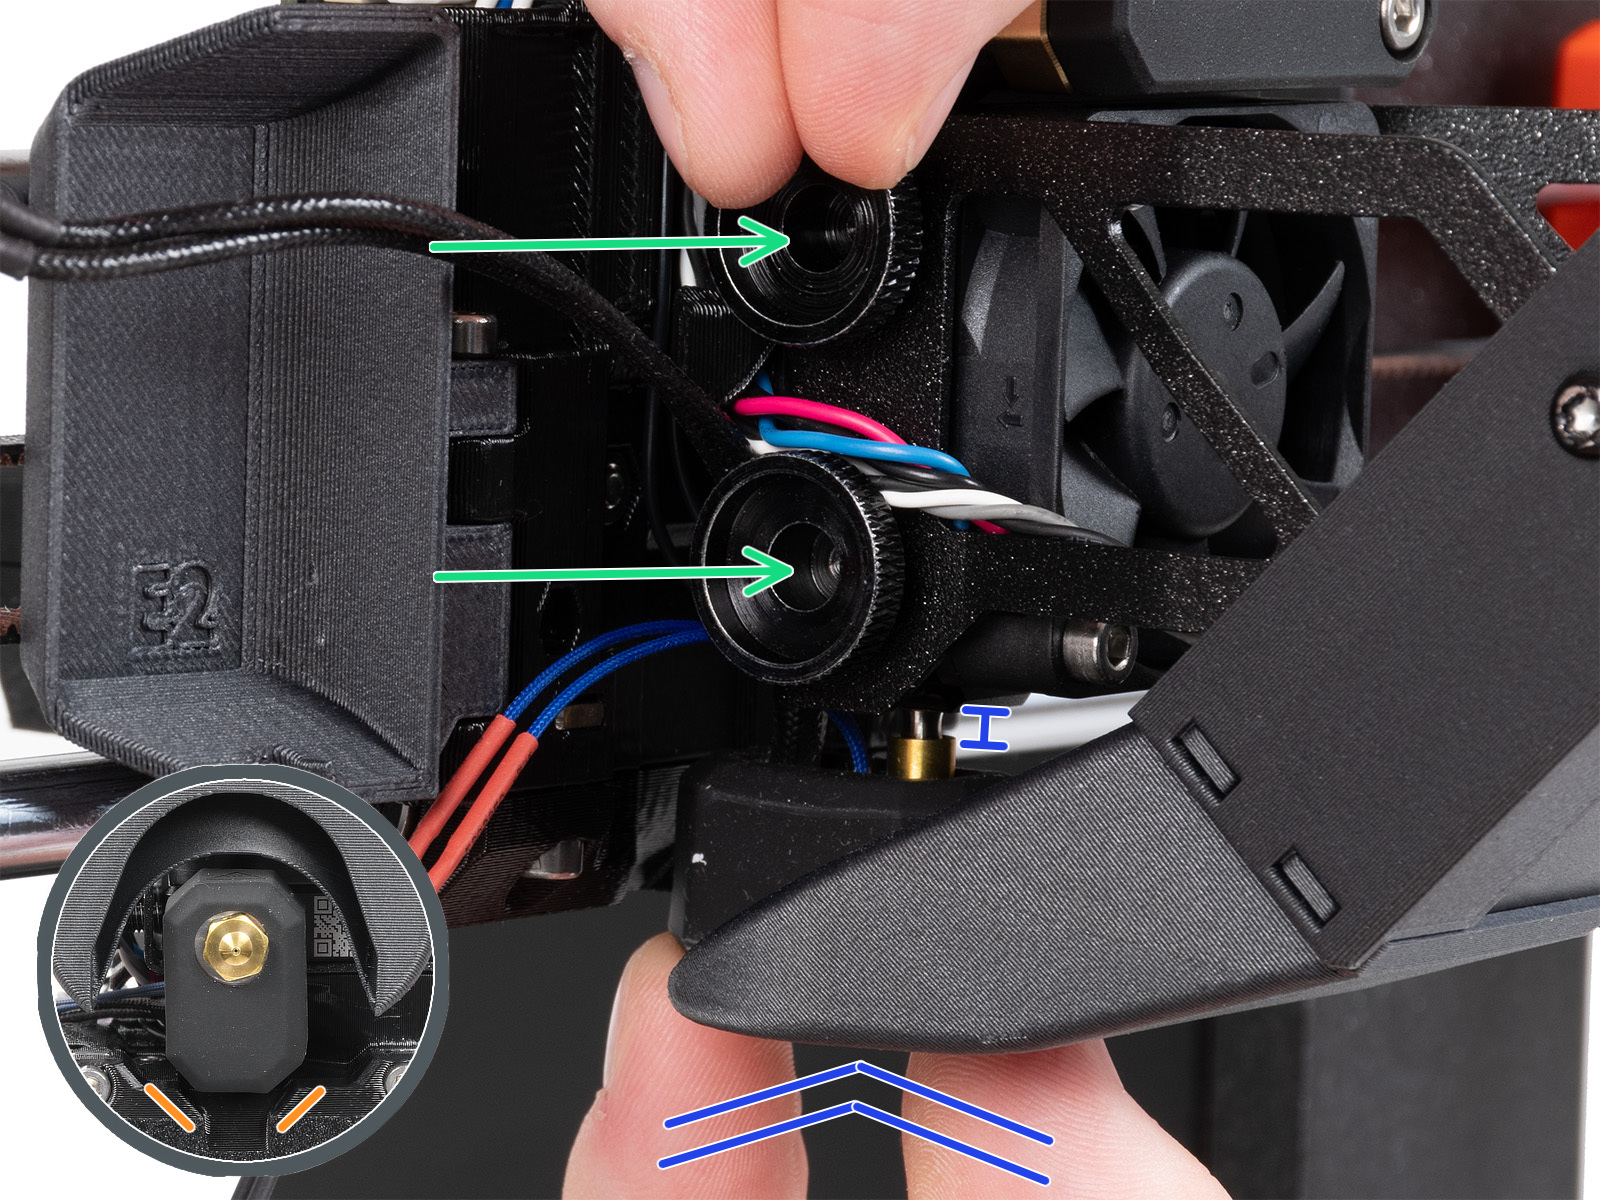
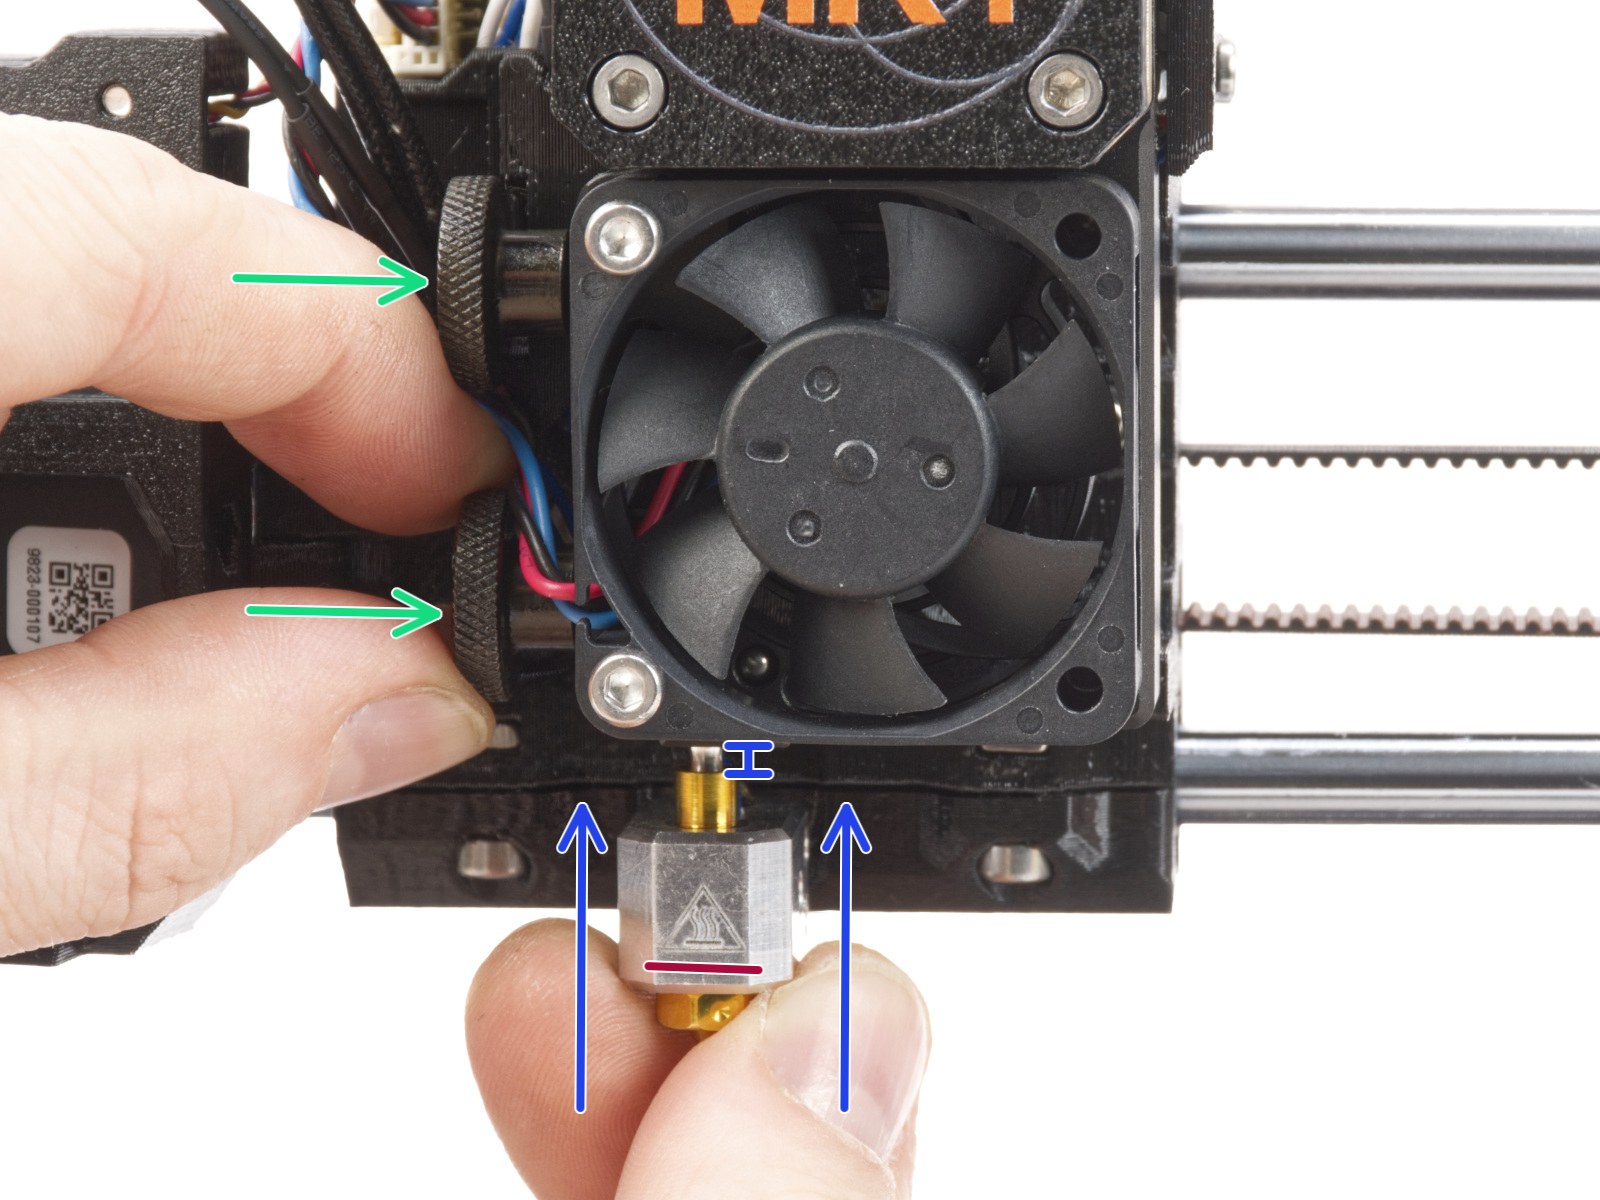
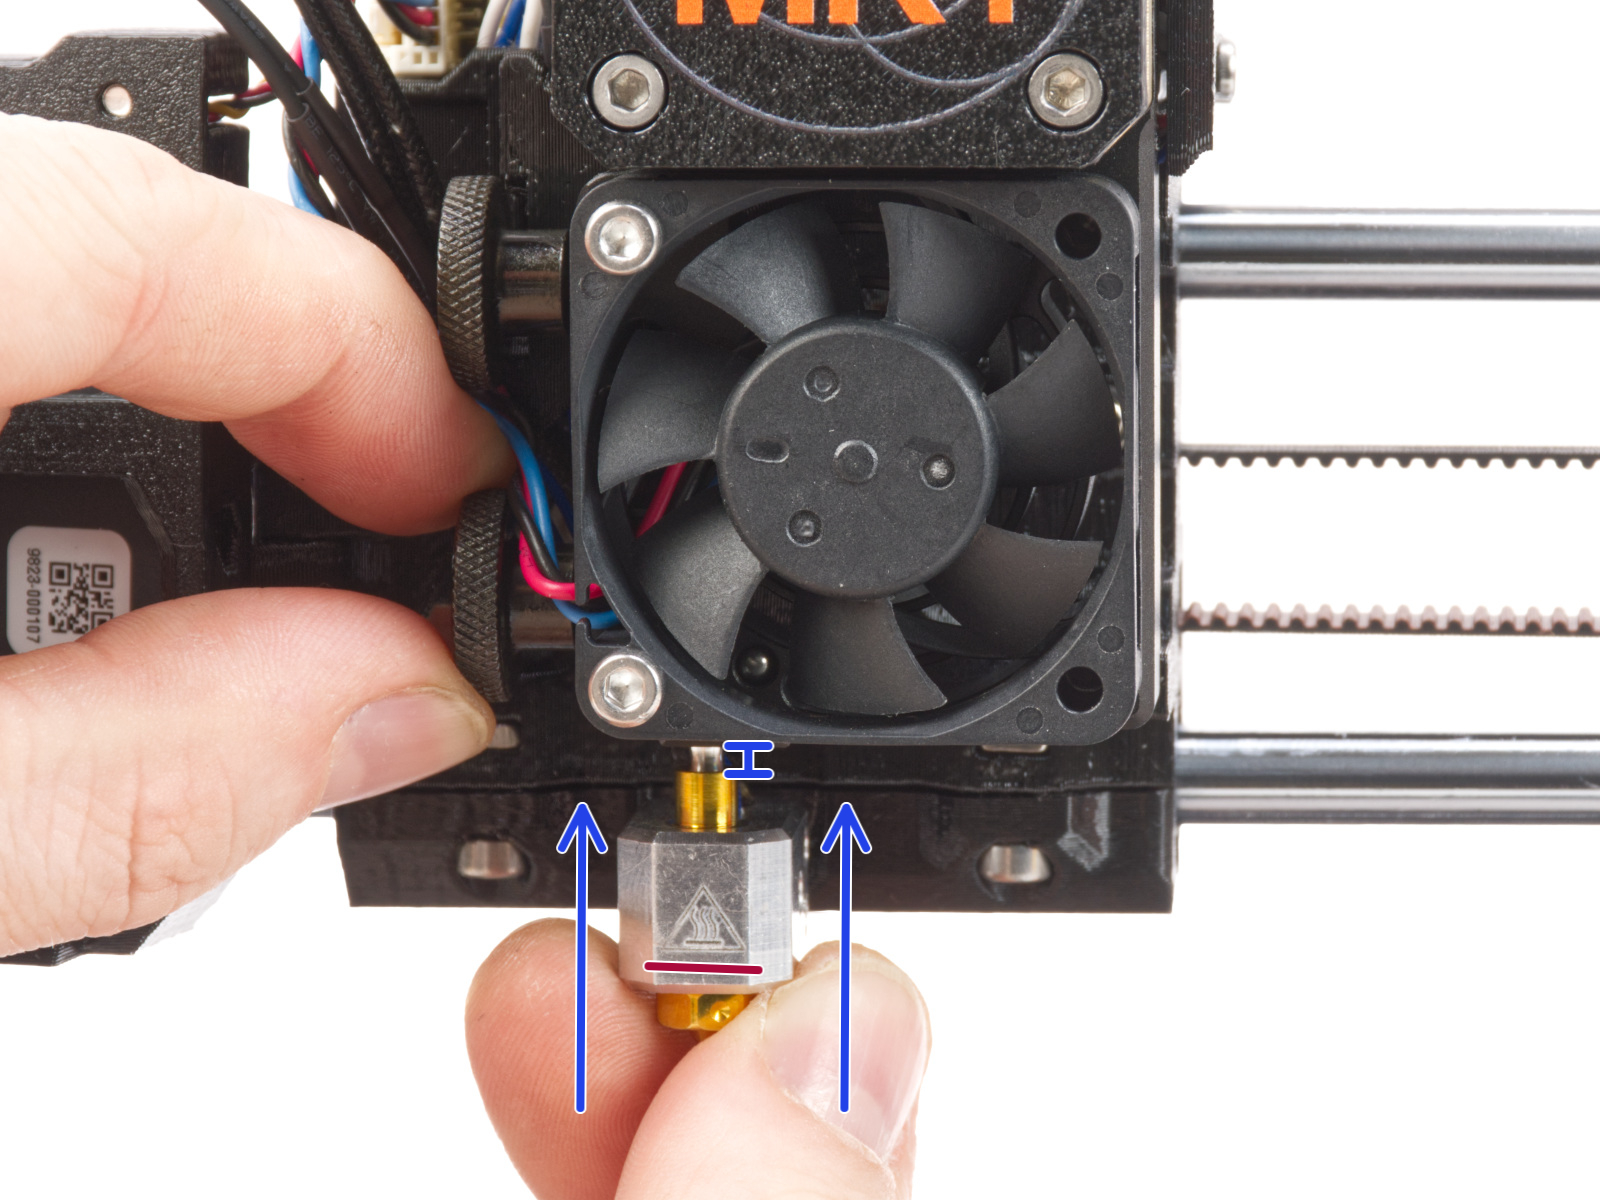
L'ugello sul Nextruder deve trovarsi all'altezza corretta e stretto. Per verificare questo aspetto, allenta le viti a testa zigrinata (non rimuovere completamente le viti, sono sufficienti pochi giri) sul lato del heatbreak, e spingi l'ugello verso l'alto. Stringi le viti a testa zigrinata a mano, senza utilizzare alcuno strumento.
Se stai utilizzando un adattatore Nozzle Adapter, ricontrolla l'installazione per assicurarti che l'ugello non si sia abbassato o allentato con l'installazione dell'adattatore.
 |  |
| Original Prusa MK4S | Original Prusa MK4, MK3.9 |
On the Original Prusa MK4 and MK3.9, alcuni dei bulloni del Nextruder, se troppo stretti, potrebbero generare ulteriori pressioni che possono essere percepite dalla cella di carico, alterando le sue letture e quindi causando potenzialmente un errore. Verifica se allentando leggermente i seguenti bulloni, pur mantenendo le parti ben salde e fissate in posizione, si risolve il problema:
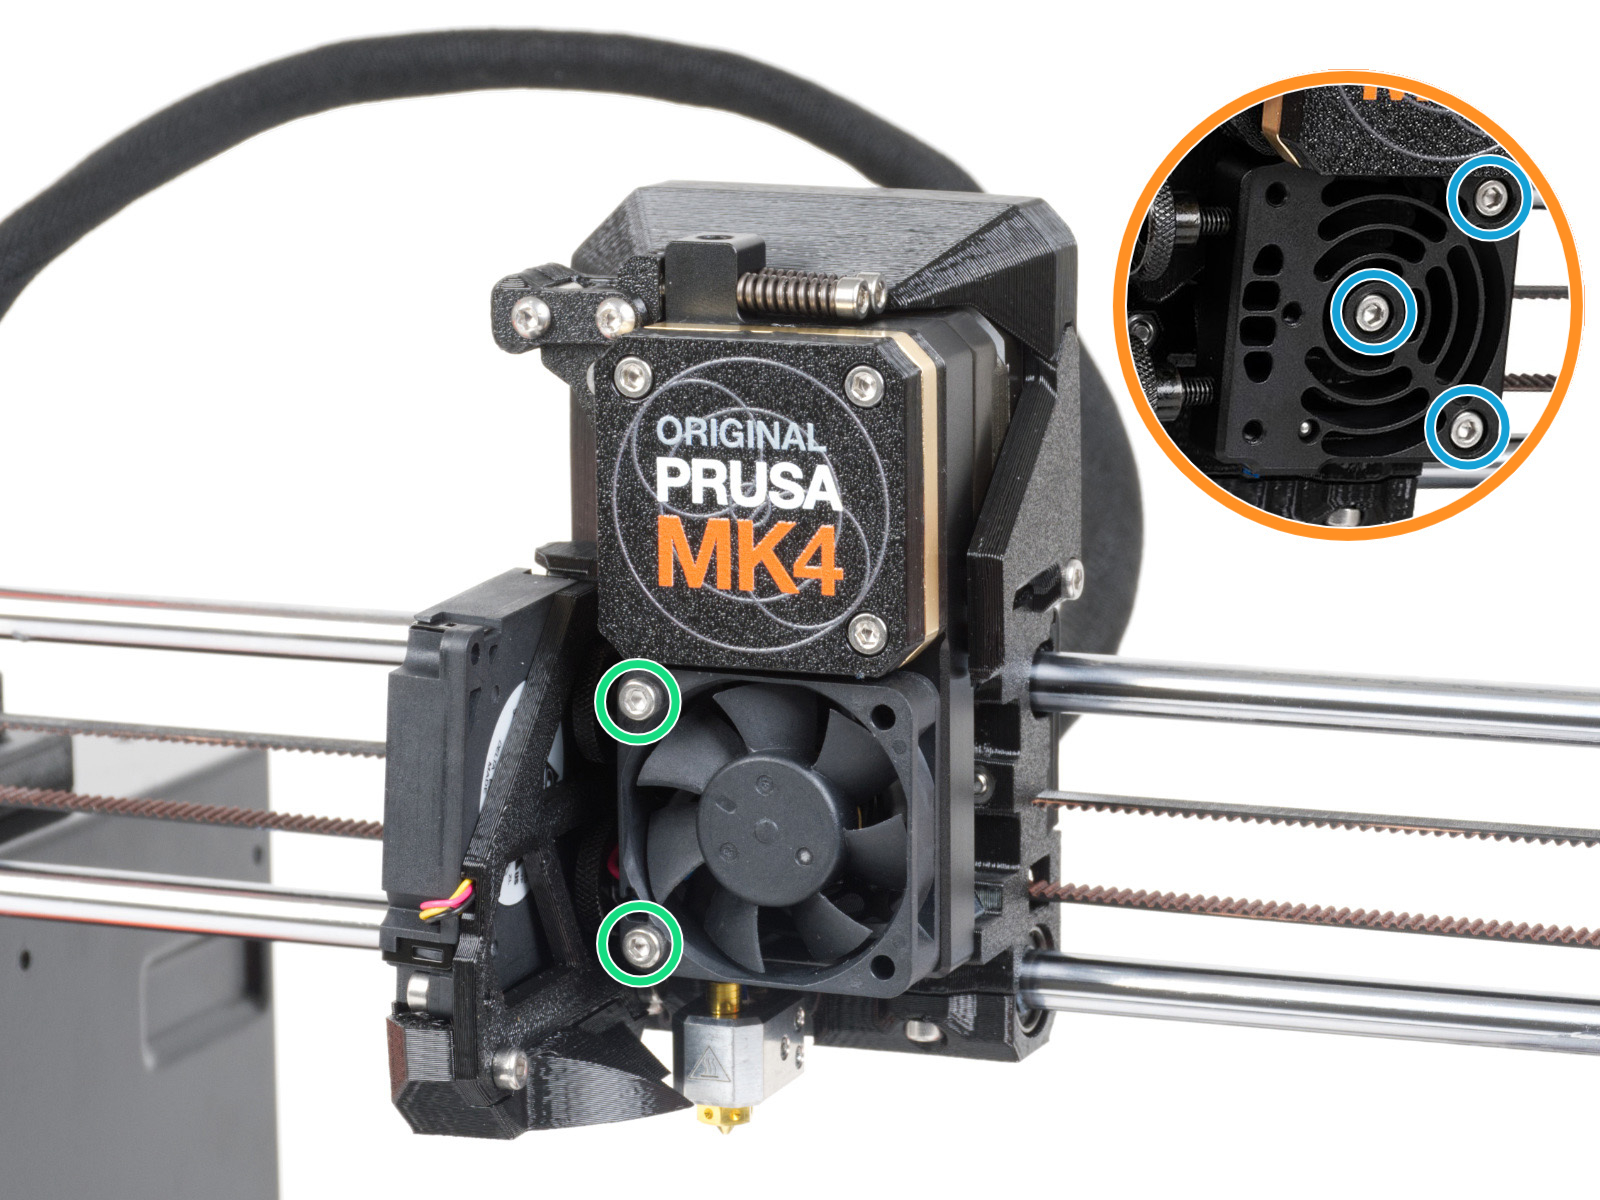
- Allenta leggermente le due viti che fissano la ventola dell'hotend. Se questo non risolve il problema, procedi con il passo successivo.
- Rimuovi temporaneamente la ventola dell'hotend rimuovendo le due viti regolate al passo precedente. Questo renderà visibile il dissipatore/cella di carico. Poi allenta leggermente le tre viti che fissano in posizione il dissipatore/cella di carico.
Durante il test della cella di carico, ti verrà chiesto di toccare l'ugello in un momento specifico. Se non tocchi l'ugello, la stampante riavvierà il test della cella di carico.
Se la cella di carico si attiva troppo presto, assicurati di non stare toccando altre parti dell'estrusore oltre all'ugello.
Assi X/Y
Nel caso di un problema sull'asse X o Y, controlla quanto segue:
- Assicurati che non ci sia nulla che blocchi il percorso dell'asse.
- Spegni la stampante e sposta l'asse a mano. Dovrebbe muoversi facilmente.
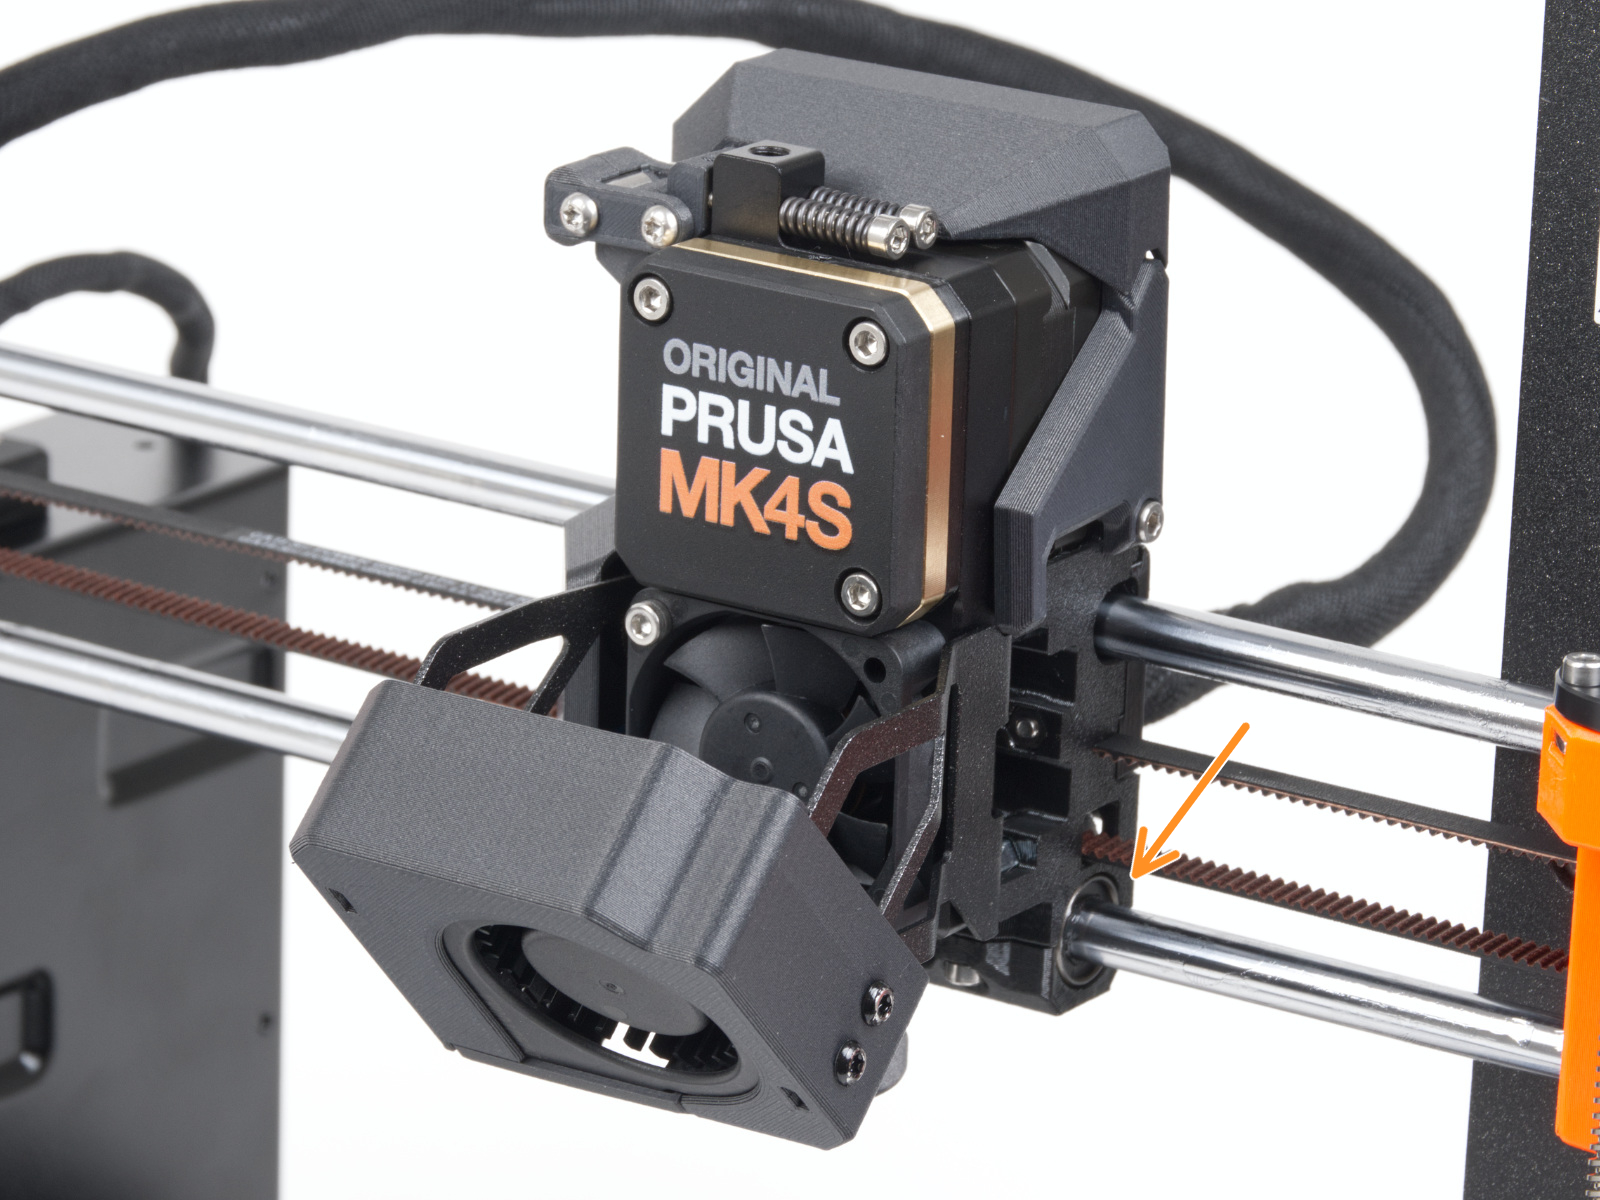
- Controlla le pulegge della cinghia sull'albero del motore X o Y. Una delle viti di blocco deve essere saldamente serrata sulla parte piatta dell'albero motore, deve esserci un piccolo spazio tra il motore e la puleggia e devono avere l'orientamento e la posizione corretti .
 | 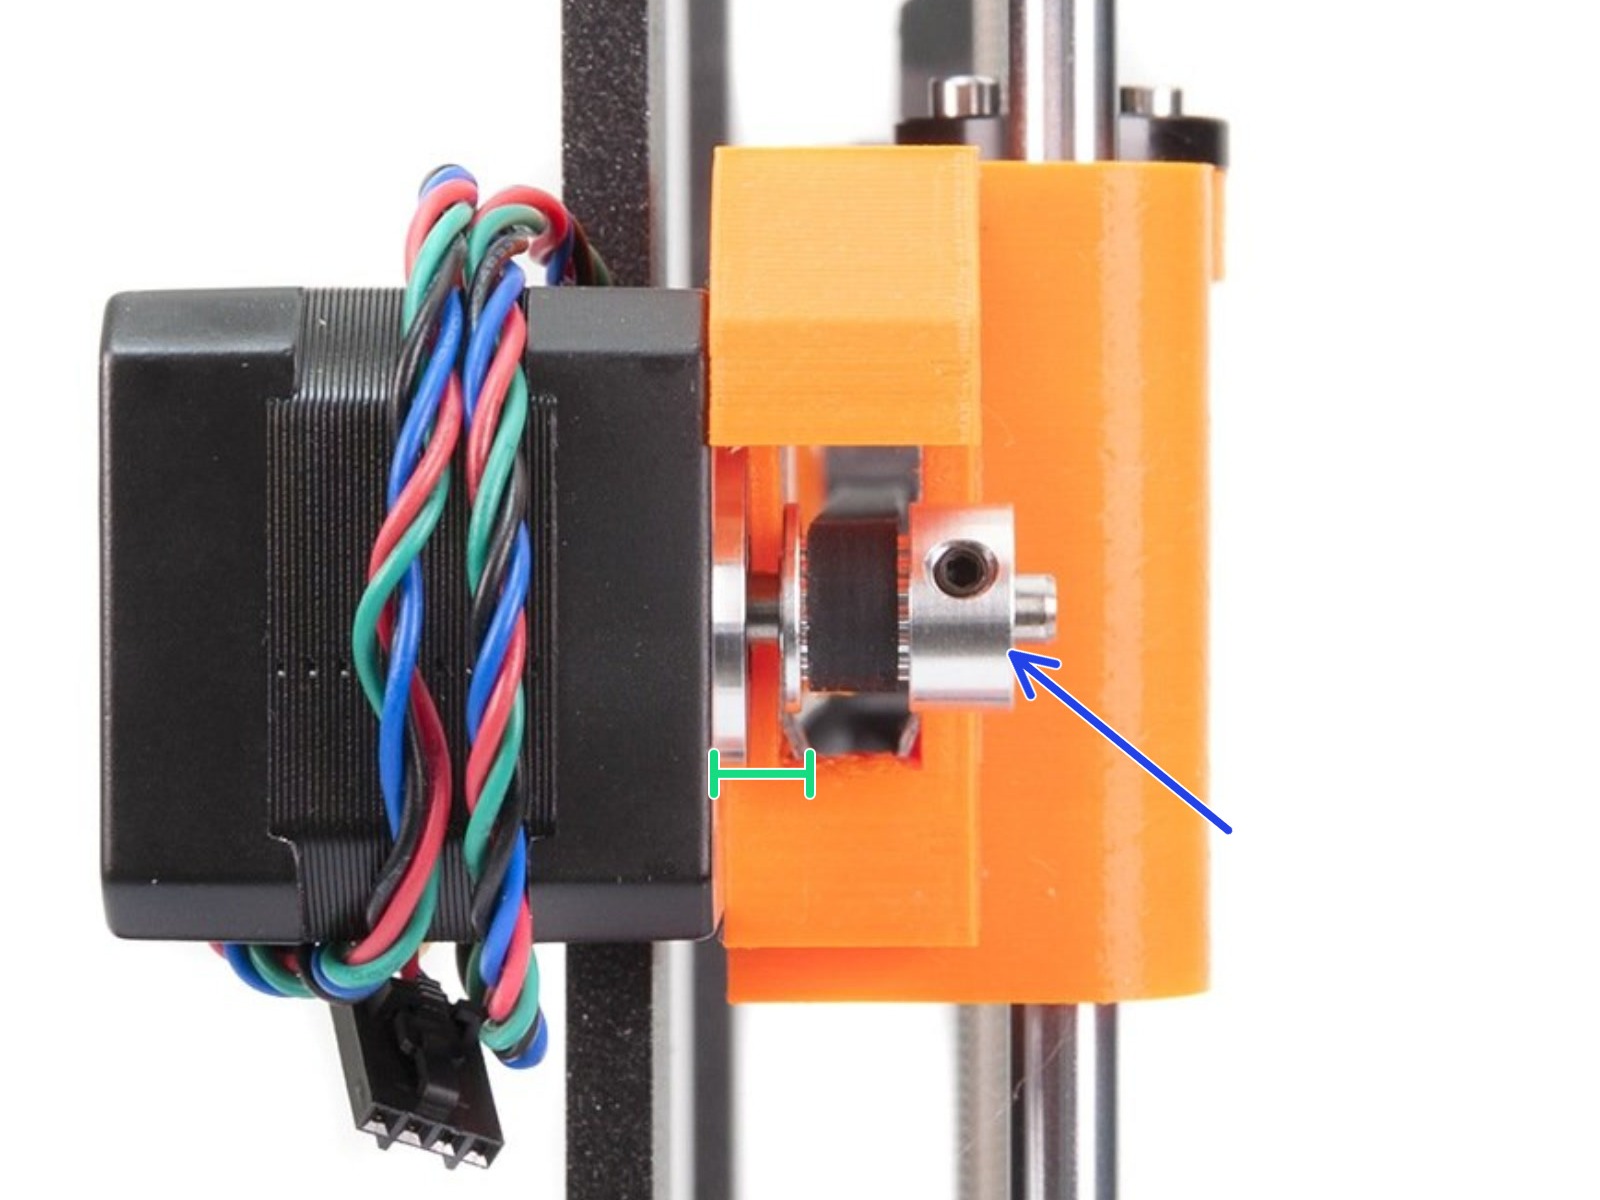 |
| Orientamento e posizione corretta della puleggia dell'asse X. | Orientamento e posizione corretta della puleggia dell'asse X. |
 | 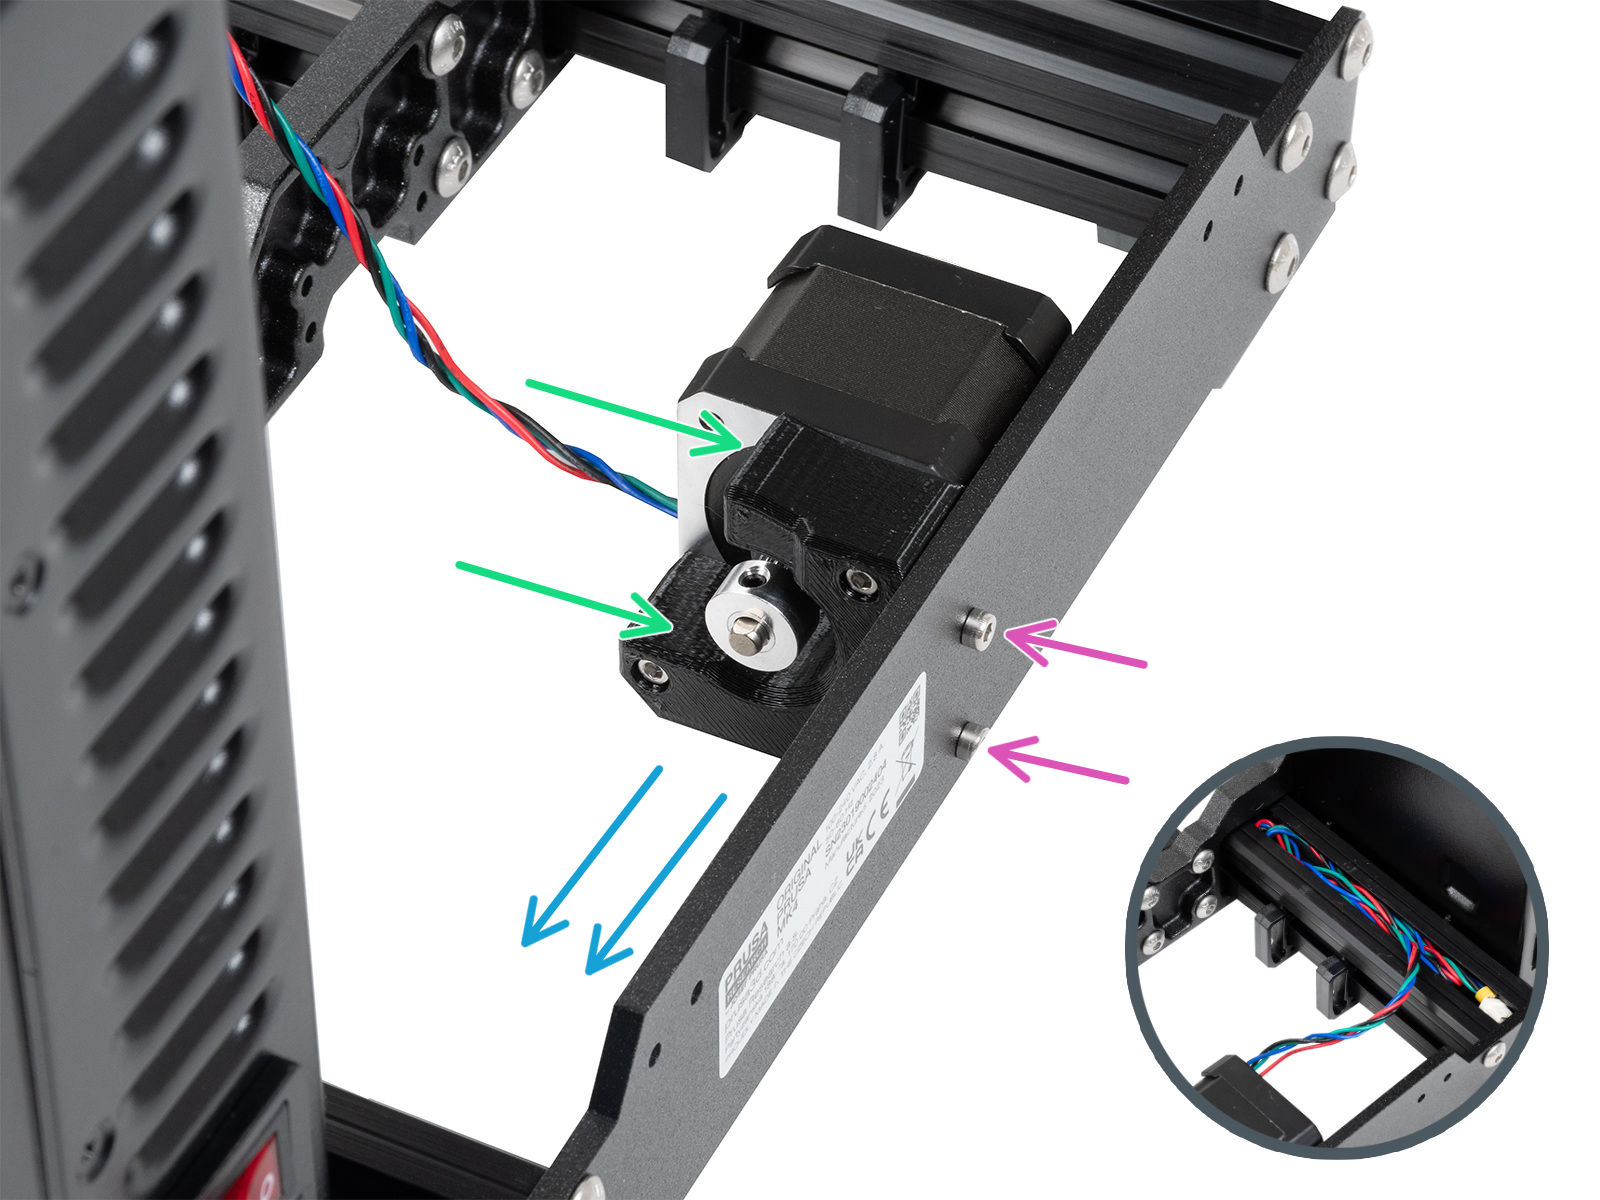 |
| Orientamento e posizione corretta della puleggia dell'asse Y. | Orientamento e posizione corretta della puleggia dell'asse Y. |
- Controlla che le cinghie non siano allentate o troppo tese, perché potrebbero saltare sui denti della puleggia.
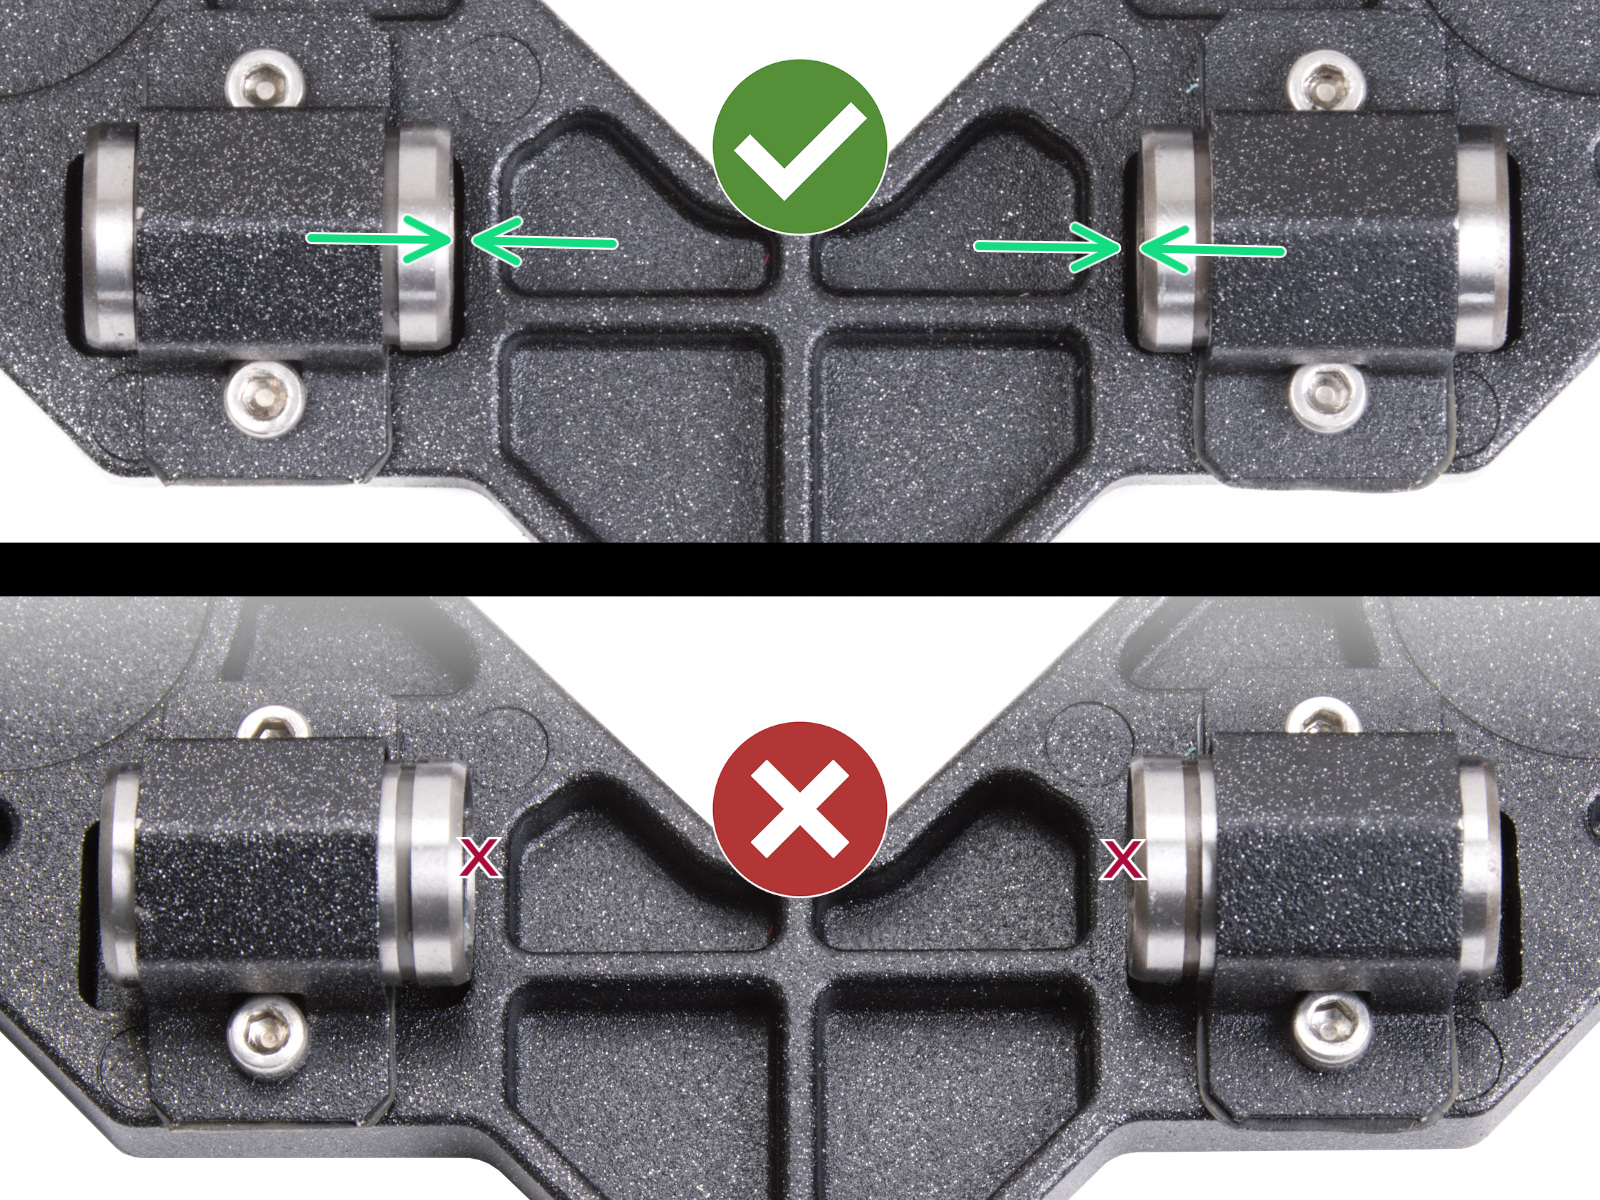
- Controlla la posizione dei cuscinetti lineari.
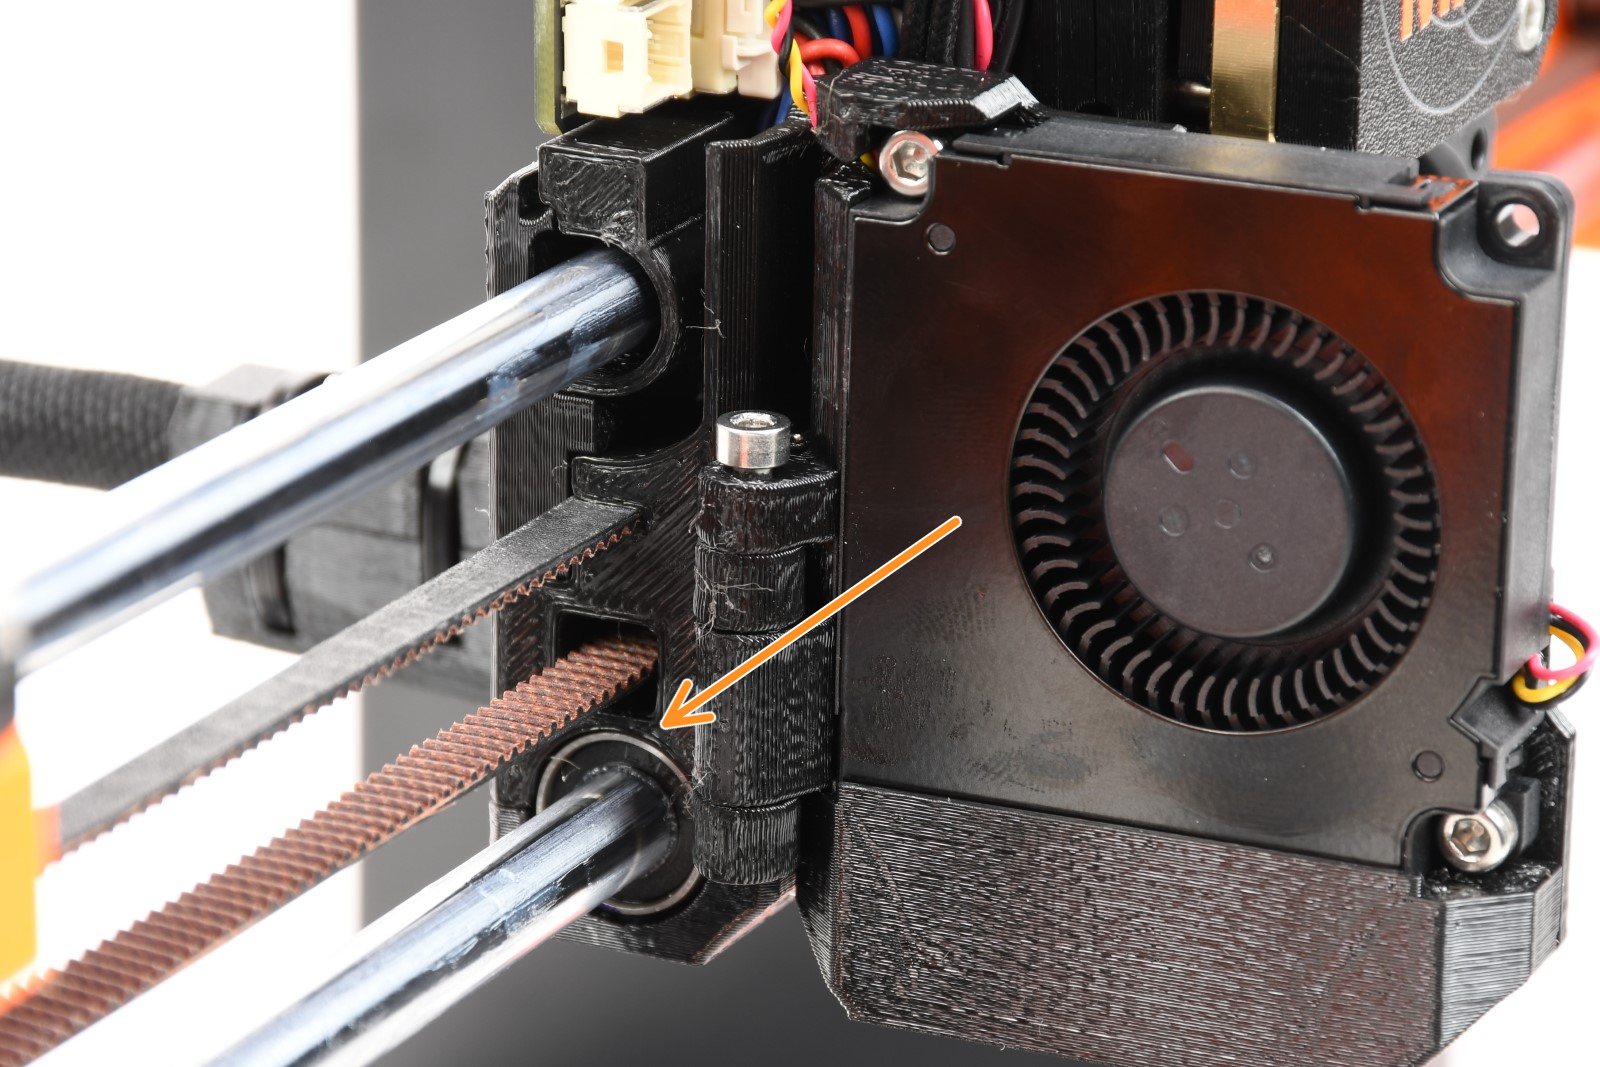
- Asse X, controlla la posizione dei cuscinetti inferiori.
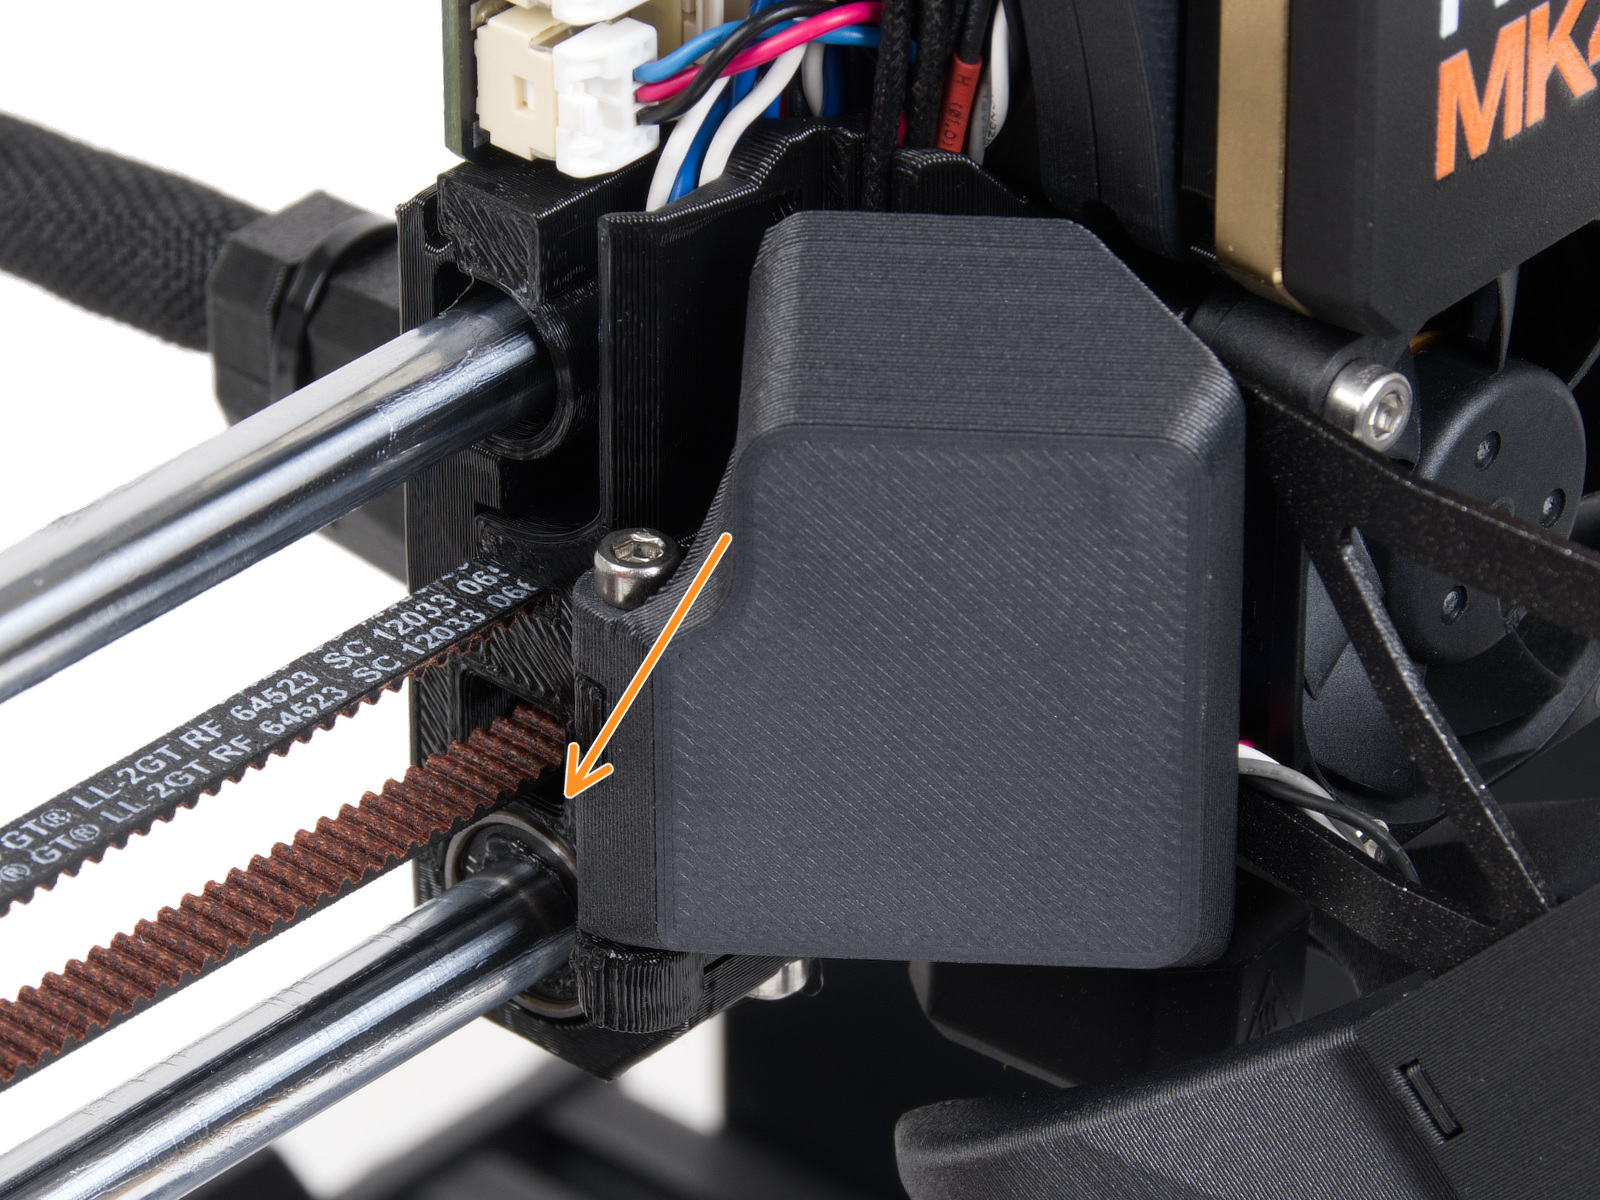 |  |
| Cuscinetto sinistro, MK4S | Cuscinetto sinistro, MK4 and MK3.9 |
 |  |
| Cuscinetto destro, MK4S | Cuscinetto destro, MK4 and MK3.9 |
-
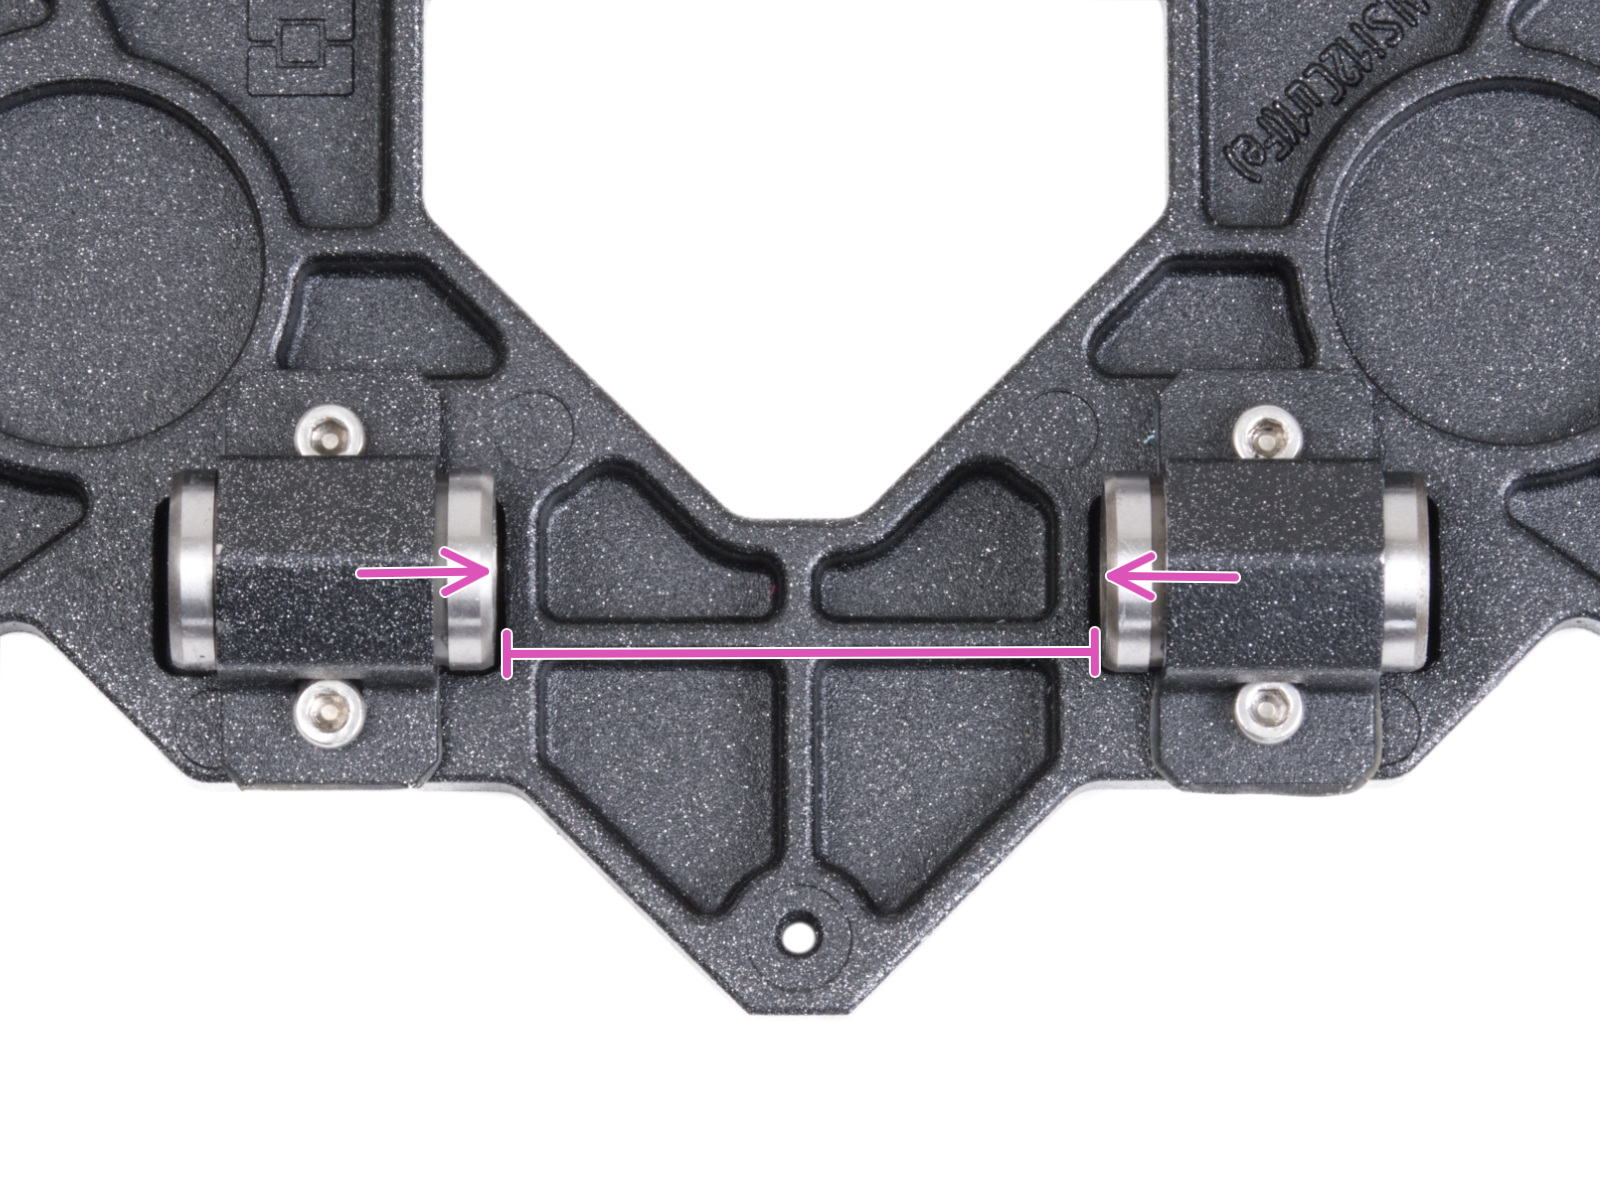
- Asse Y, controlla la posizione dei cuscinetti sul carrello Y, e che la distanza tra i cuscinetti sia di 46.5mm.
 |  |
- Pulisci e lubrifica le aste lisce, utilizzando quantità moderate di lubrificante Prusa (grasso a base di litio).
- Controlla che la vite M3x30 che tiene il coperchio dello sportello della ventola (MK4S) o lo sportello della ventola (MK4) sia ben serrata.


Original Prusa MK4S Original Prusa MK4
Asse Z
La stampante non eseguirà il test dell'asse Z se il test della cella di carico viene saltato.
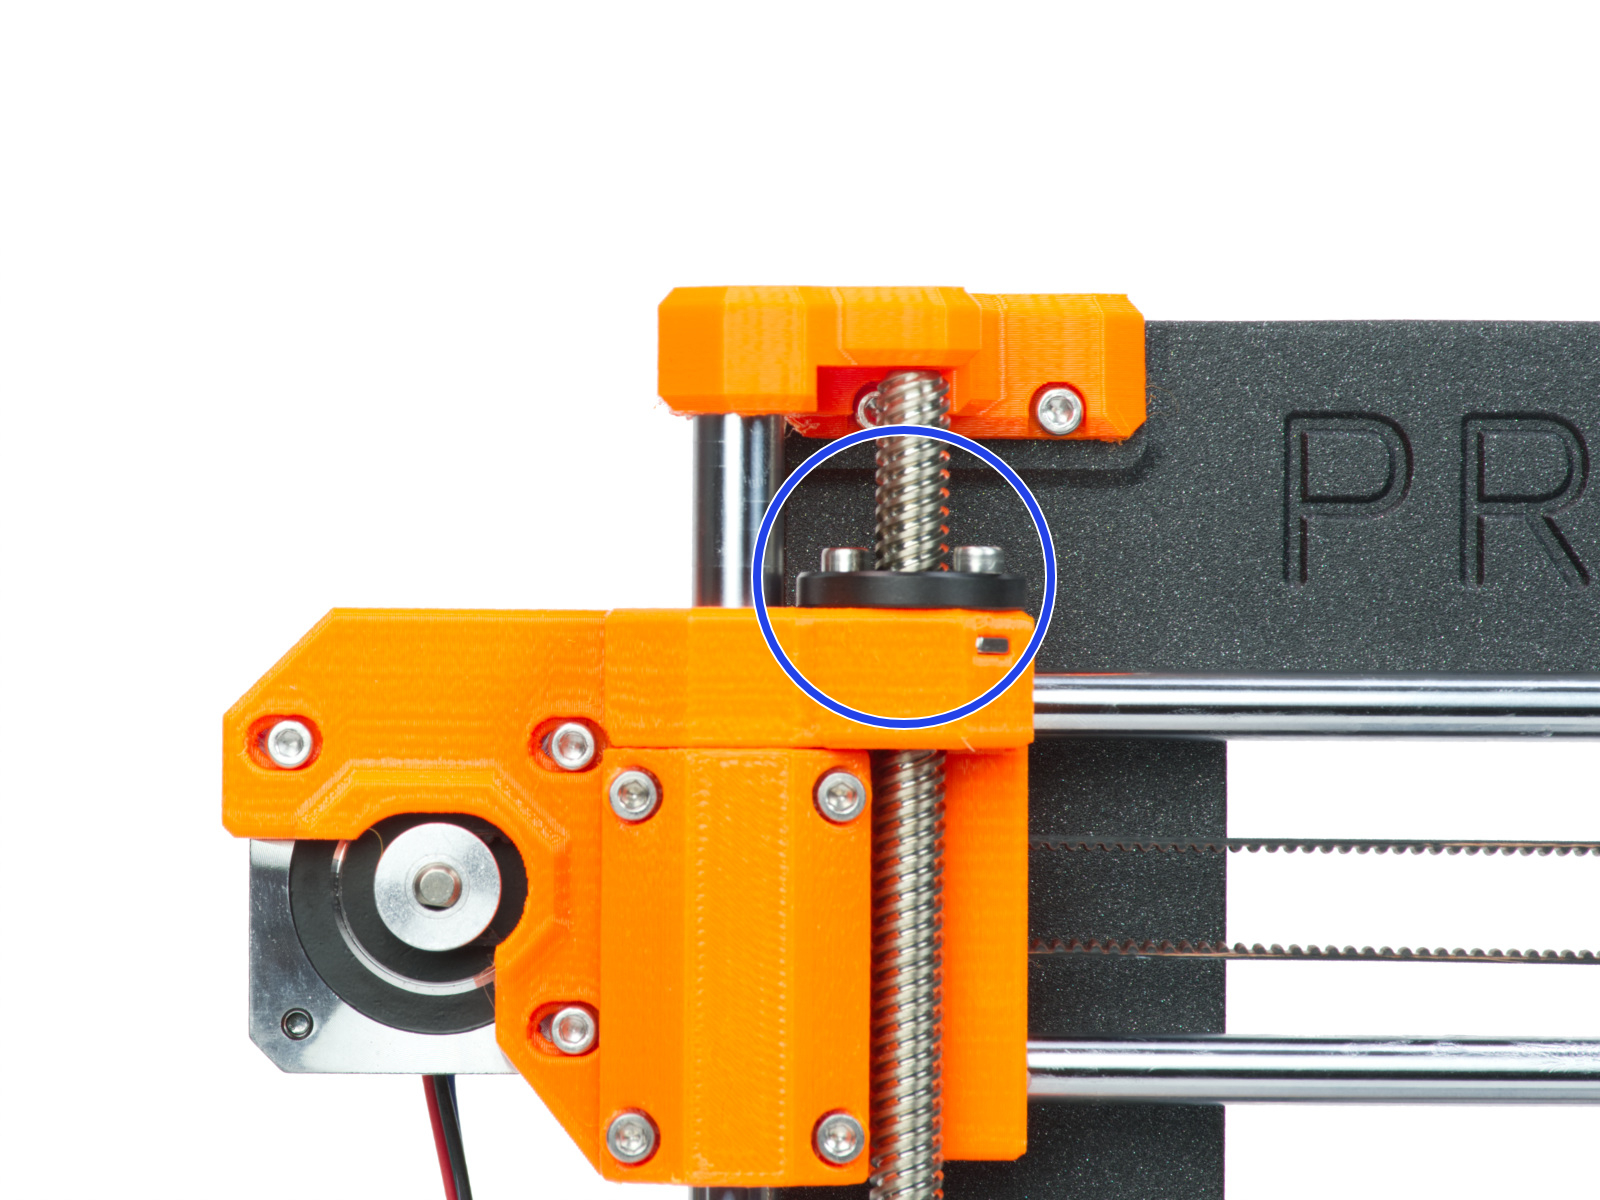
Se il test dell'asse Z non viene superato, controlla la direzione del dado trapezoidale. Assicurati che l'hotend sia posizionato correttamente nella Nextruder.
|  |
| Original Prusa MK4S | Original Prusa MK4 and MK3.9 |
Riscaldatore ugello
Nel caso in cui il test risulti in un codice QR di errore, scansiona il codice QR mostrato sullo schermo o cerca l'articolo corrispondente su questa piattaforma.
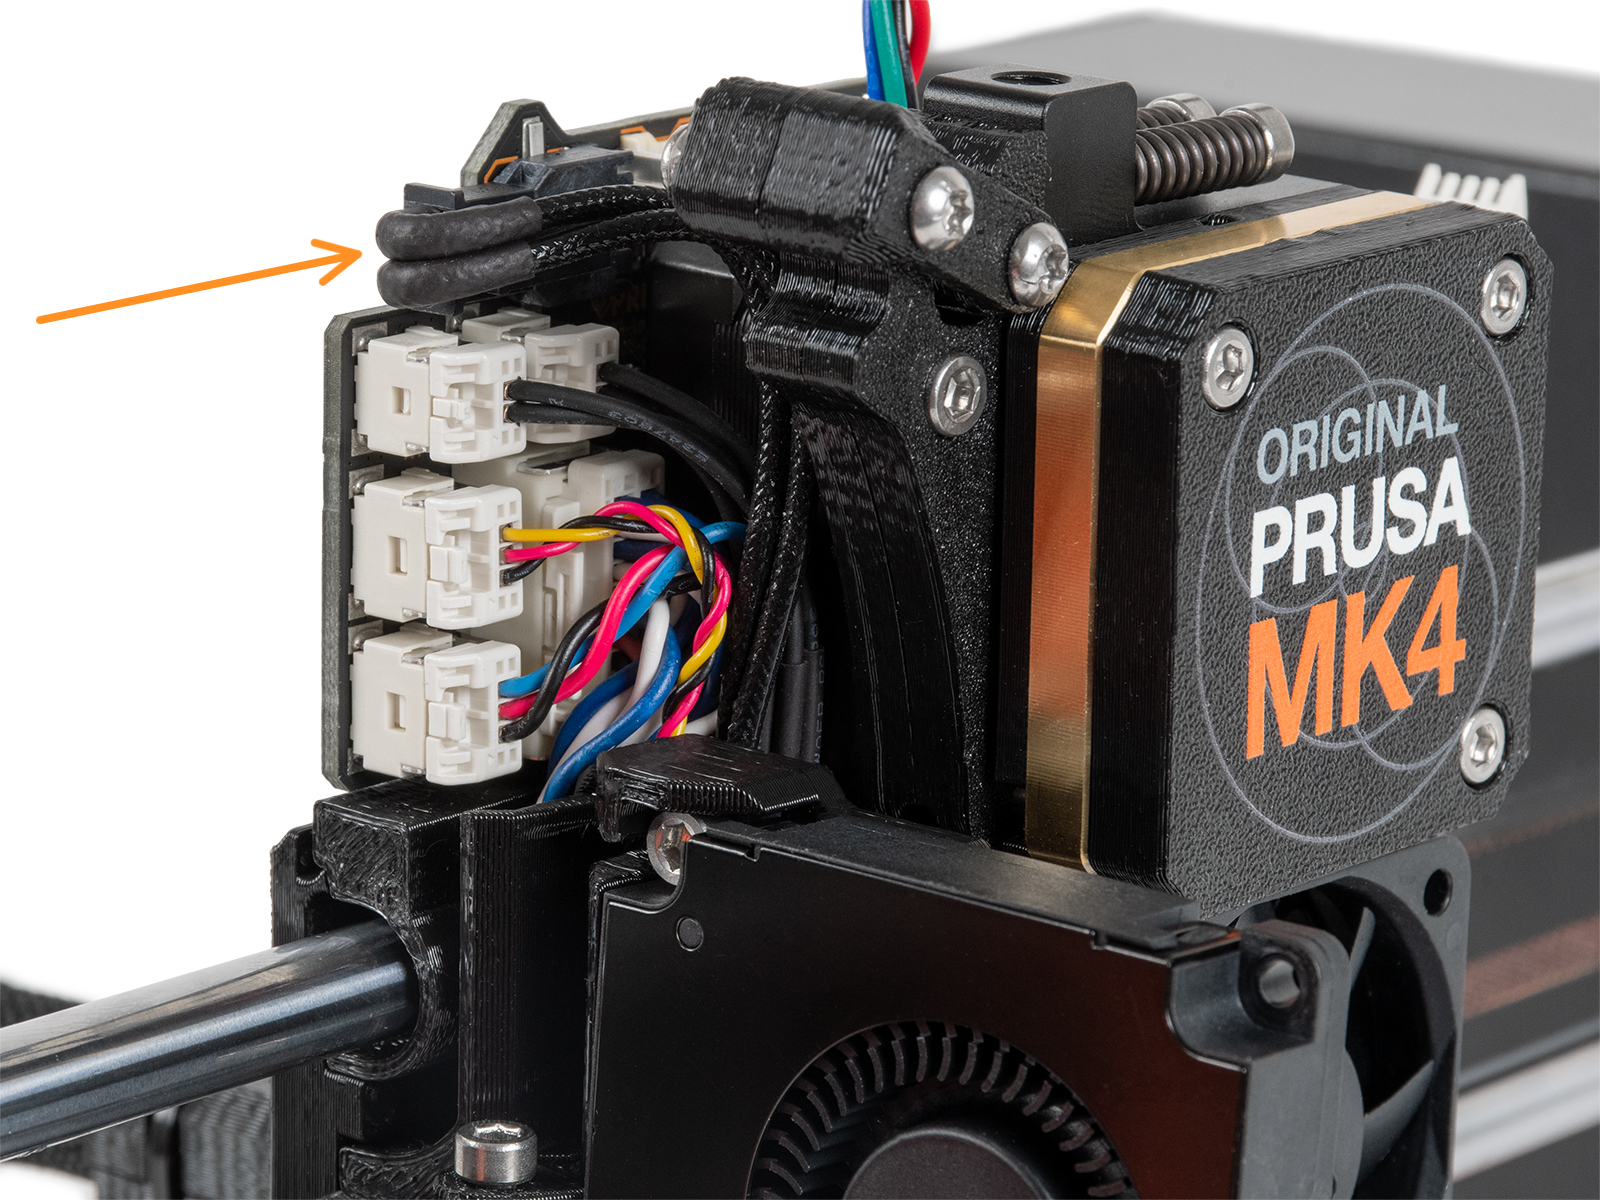
Ispeziona il cavo del riscaldatore dell'hotend. Controlla il percorso tra il riscaldatore dell'hotend e la LoveBoard e verifica se ci sono parti rotte o schiacciate.
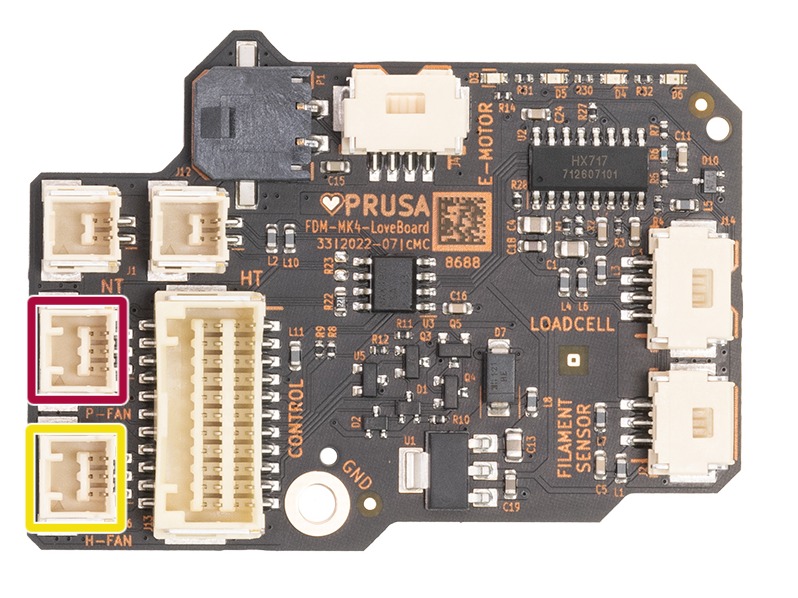
Se non si notano danni, controlla la connessione del cavo alla scheda LoveBoard. Prova a ricollegare il cavo al suo connettore.
 |  |
Riscaldatore piano riscaldato
Per questo test, la piastra di acciaio deve trovarsi sul piano riscaldato.
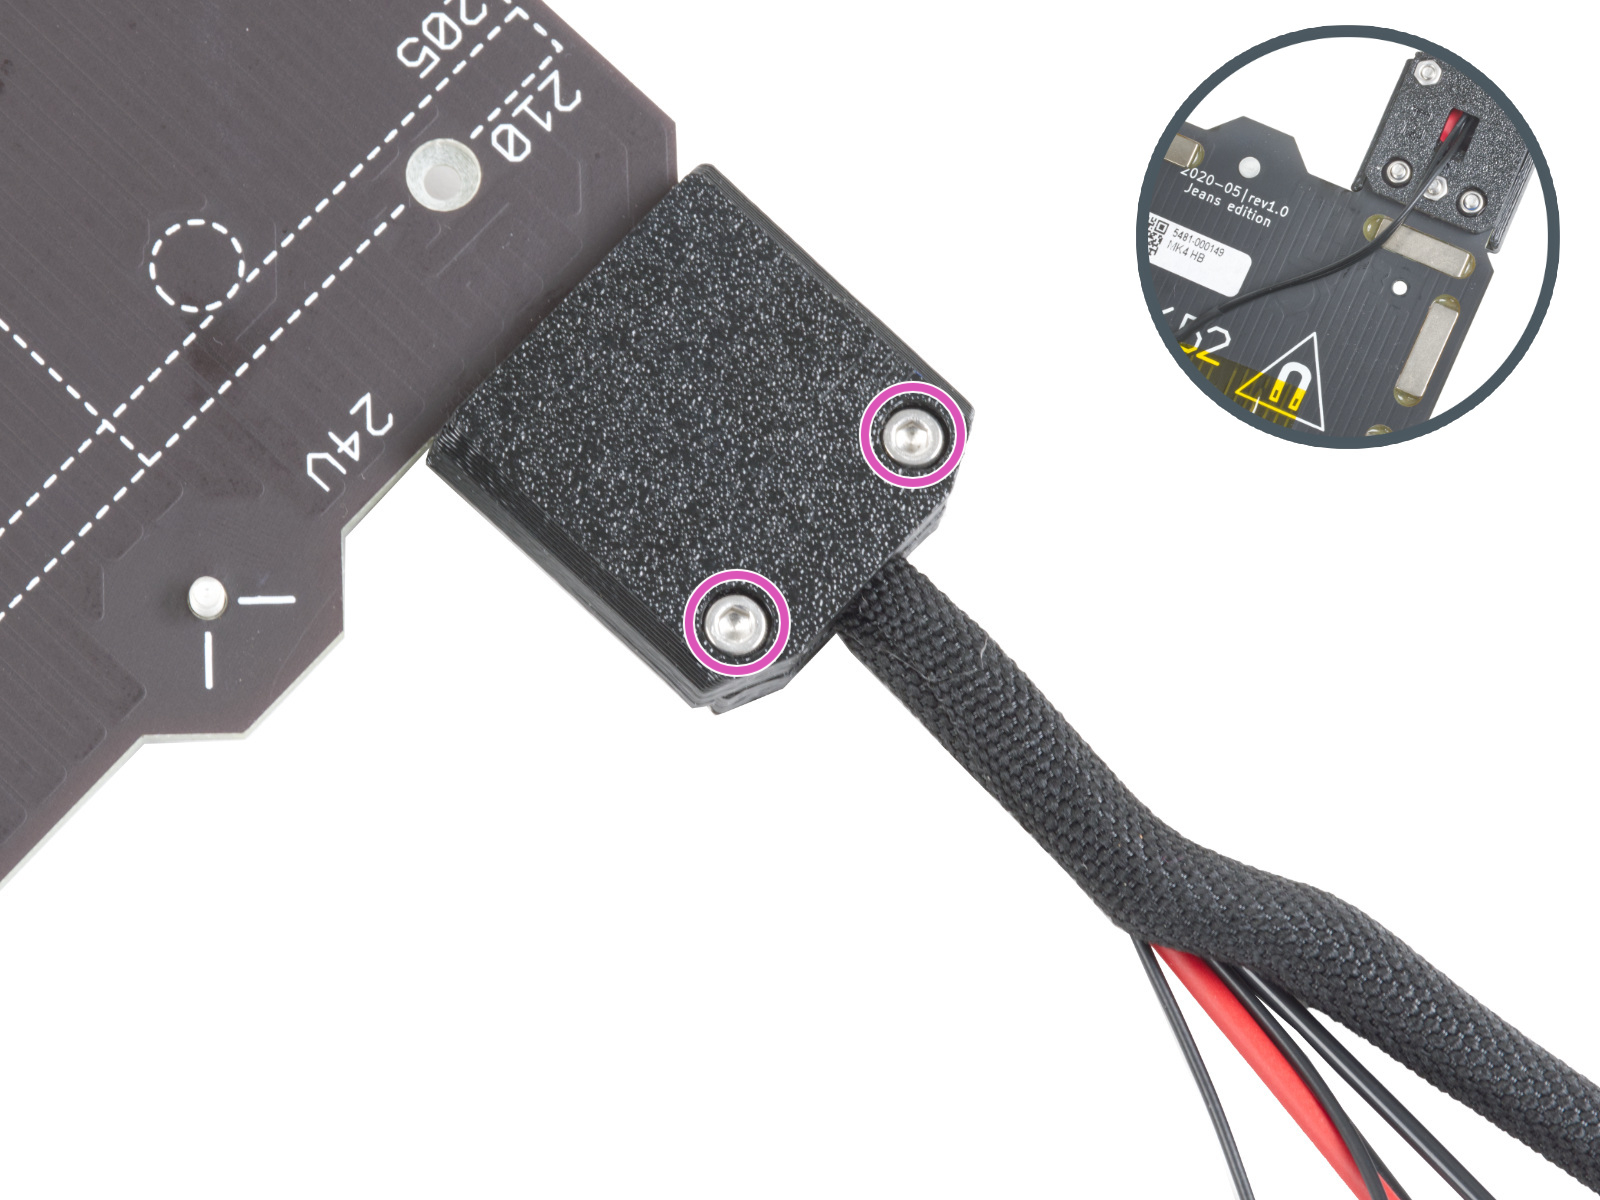
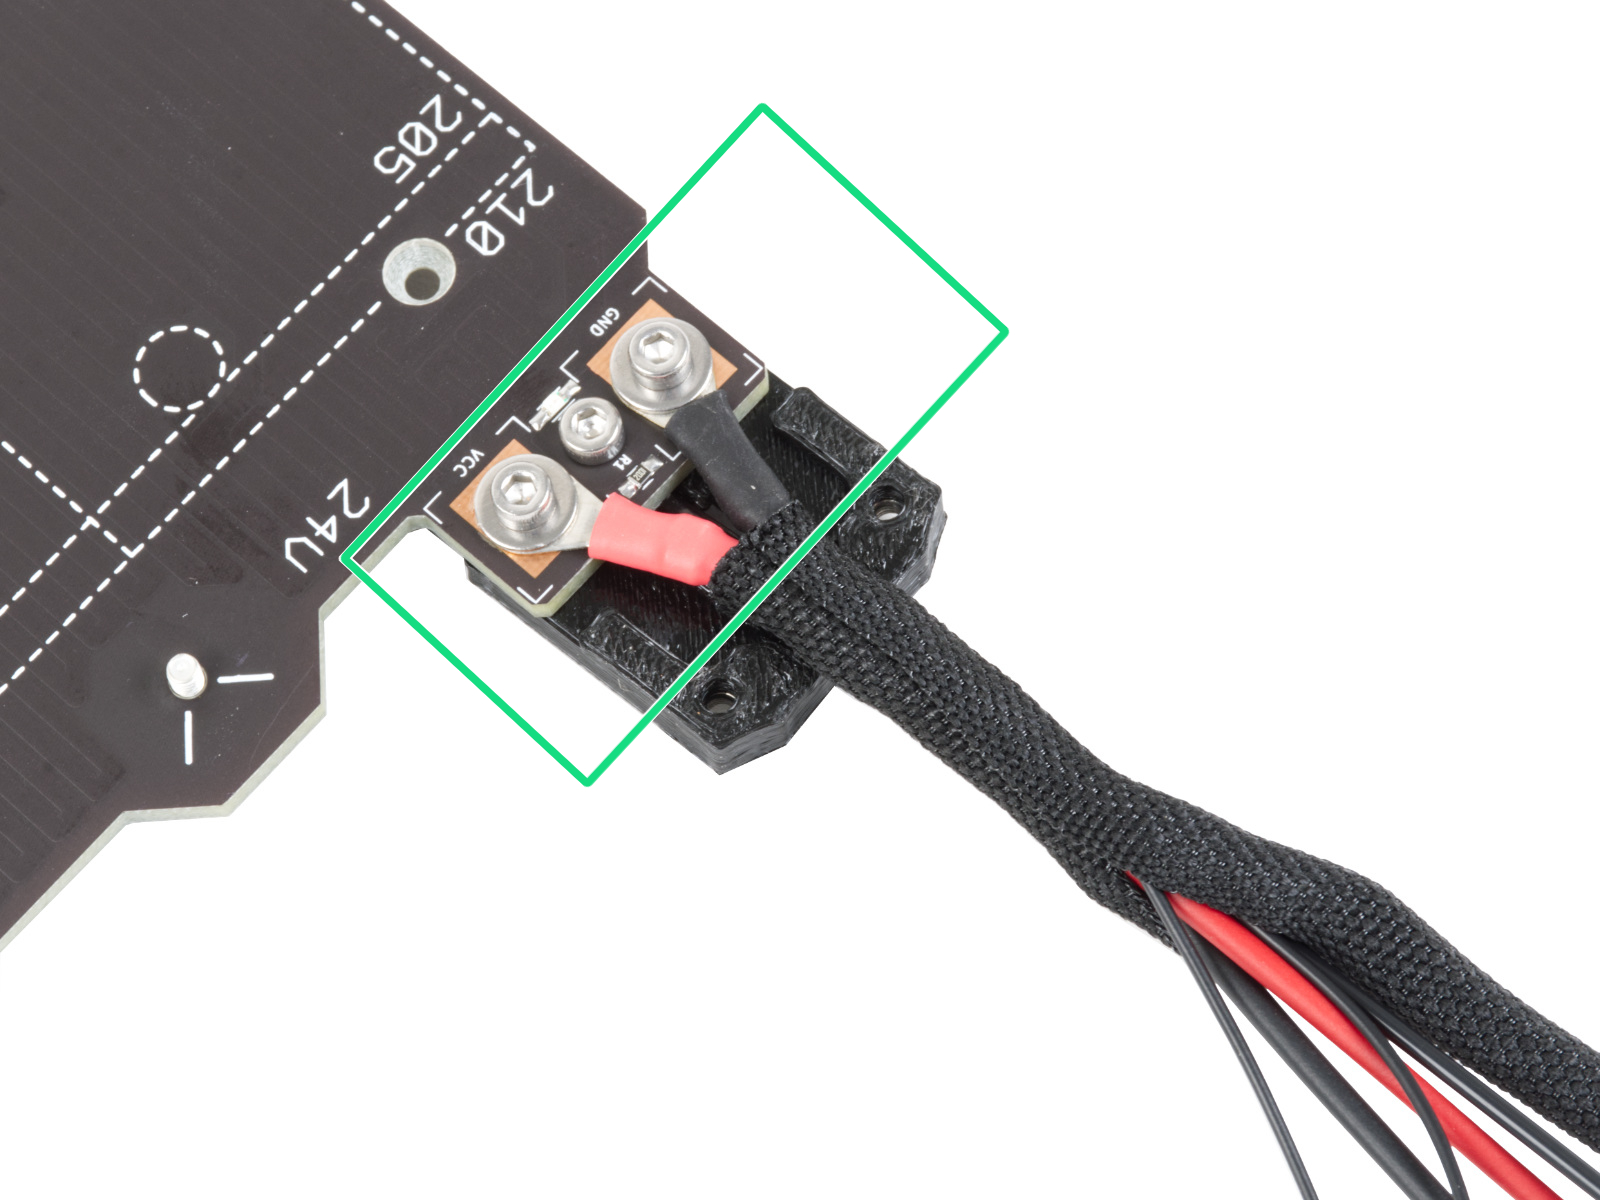
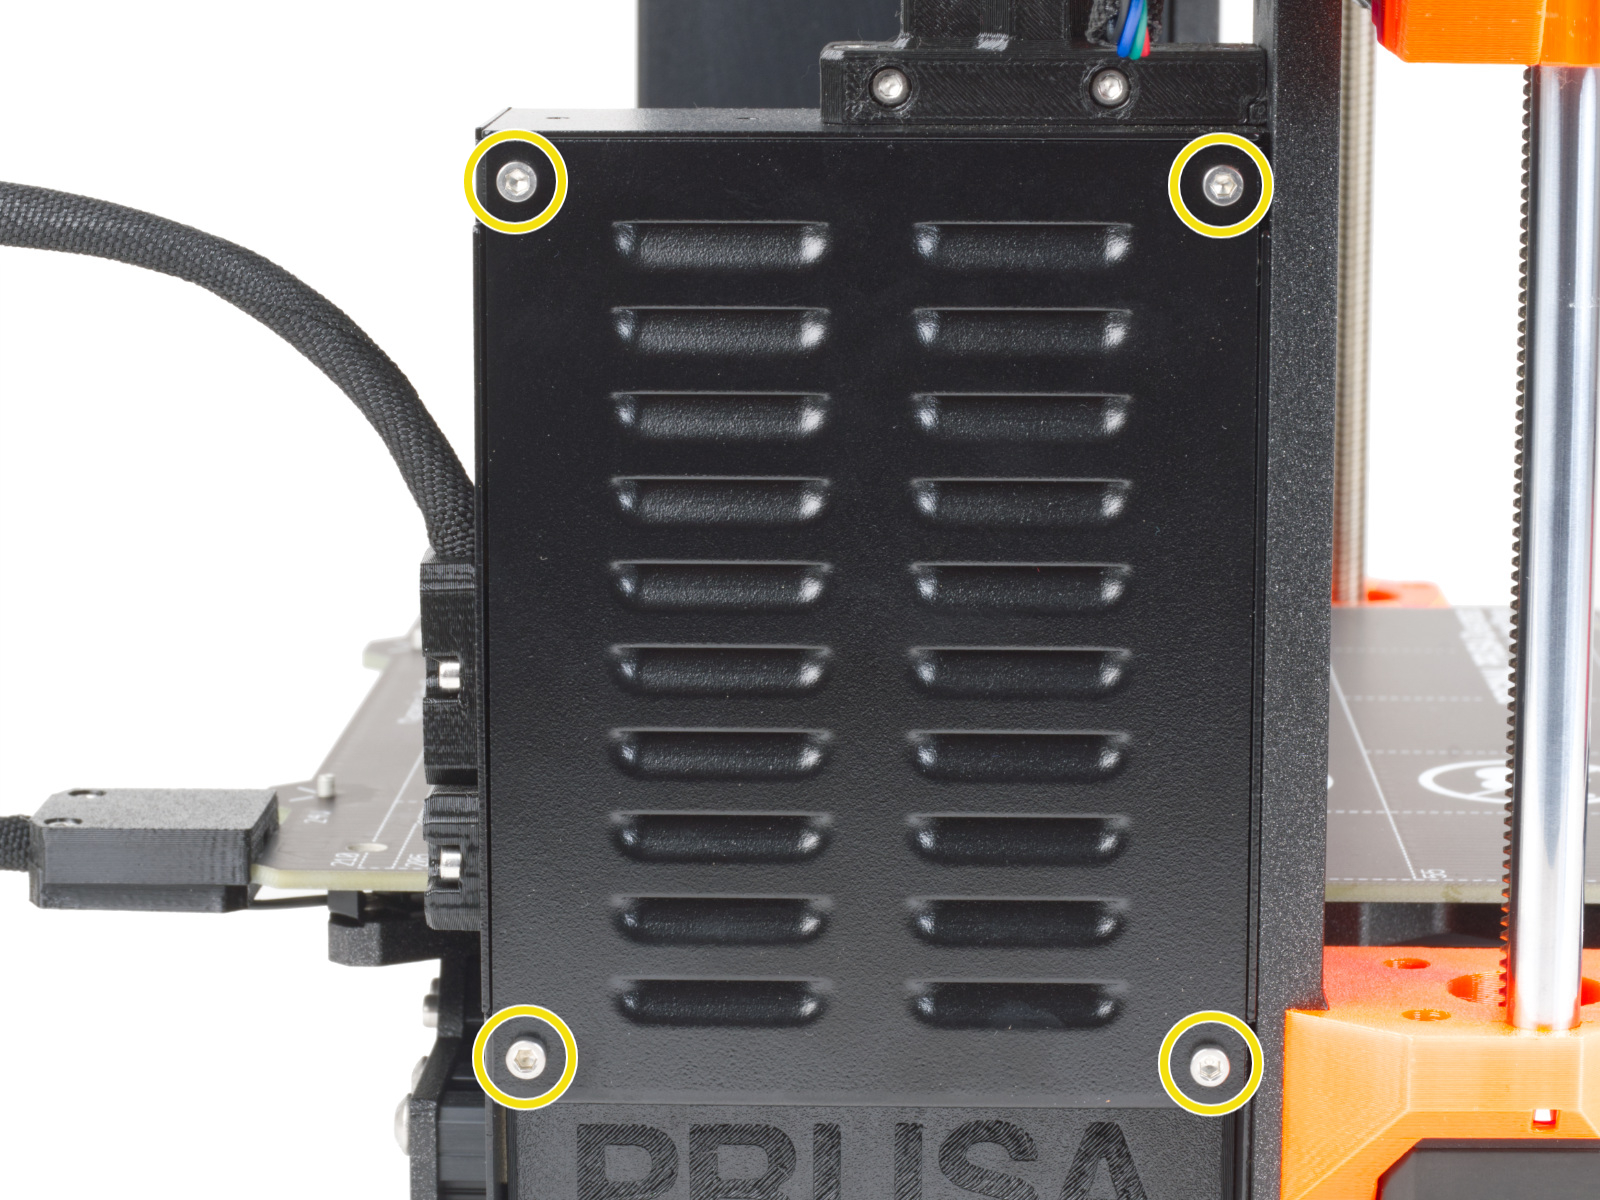
In caso di un test non riuscito, con la stampante fredda e spenta, controlla i sconnettori fissati con la vite sul lato del piano riscaldato dopo aver rimosso la copertura. Controlla la corretta polarità, il corretto posizionamento e che siano completamente serrati.
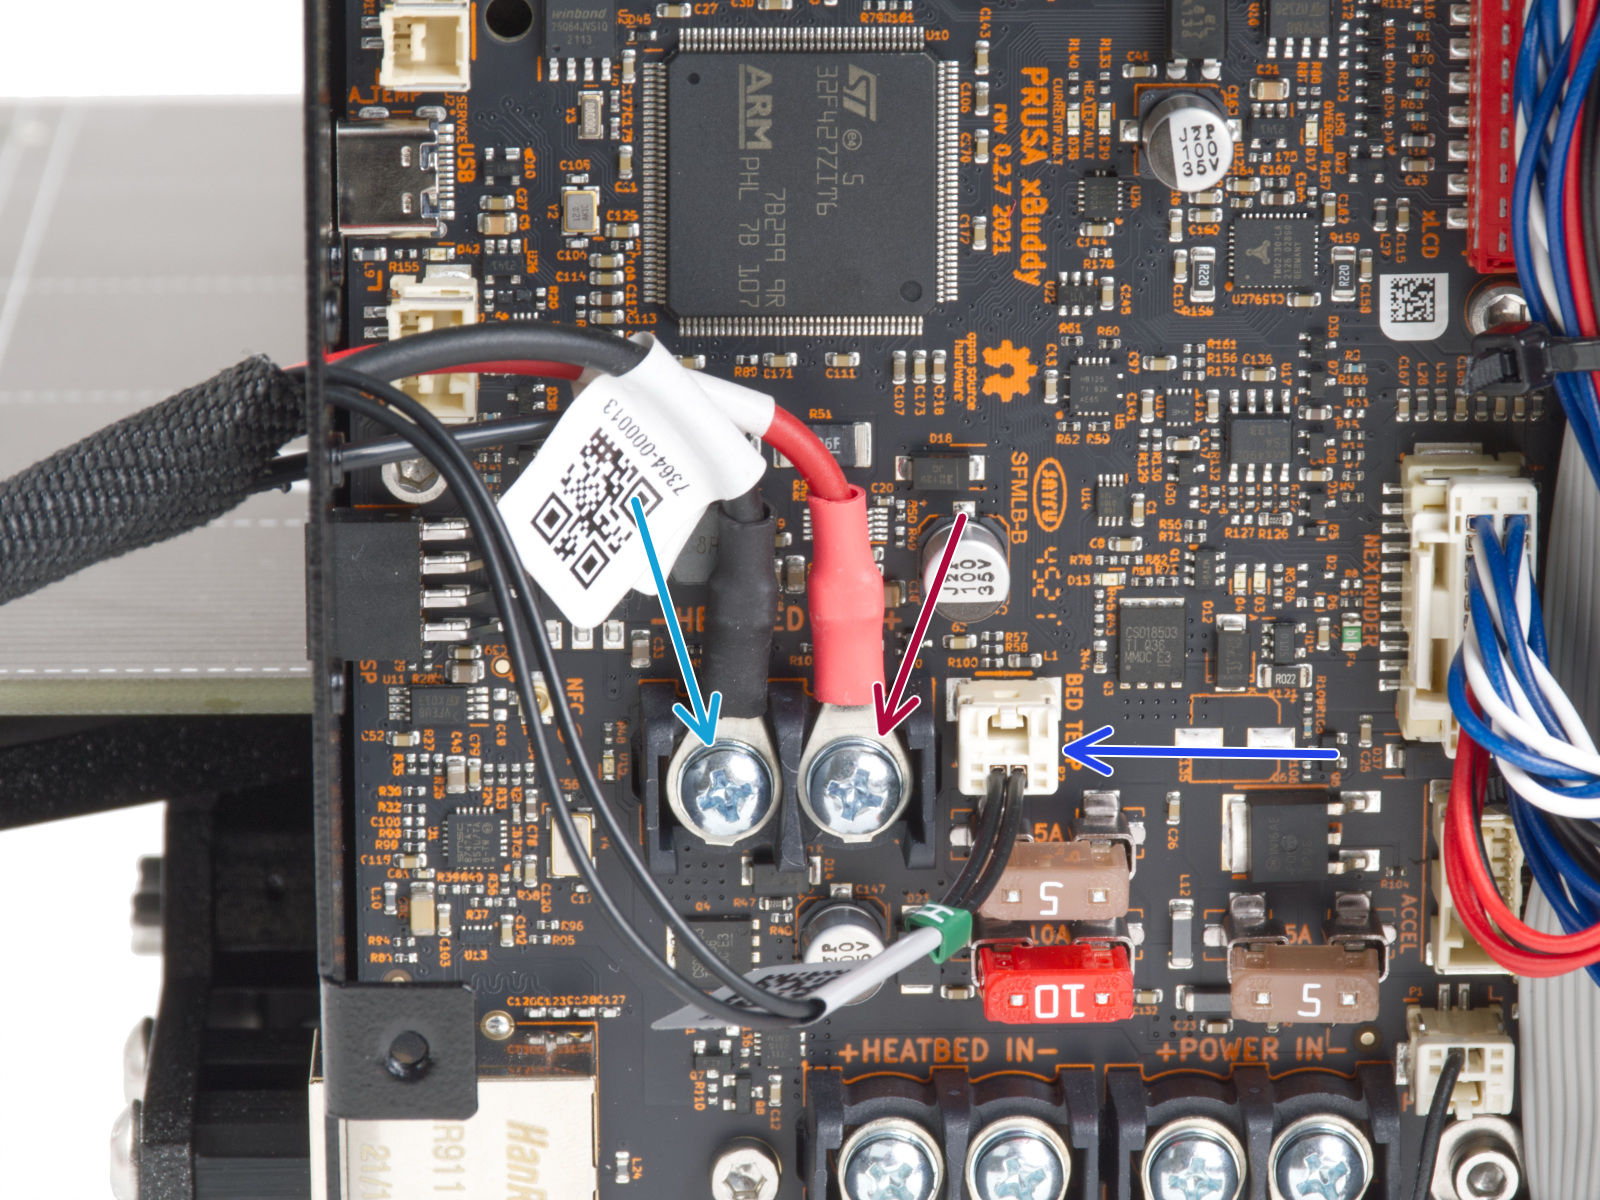
Sul lato della scheda xBuddy, esegui un controllo simile, dopo aver aperto la copertura.
 |  |
 |  |
Sensore Filamento
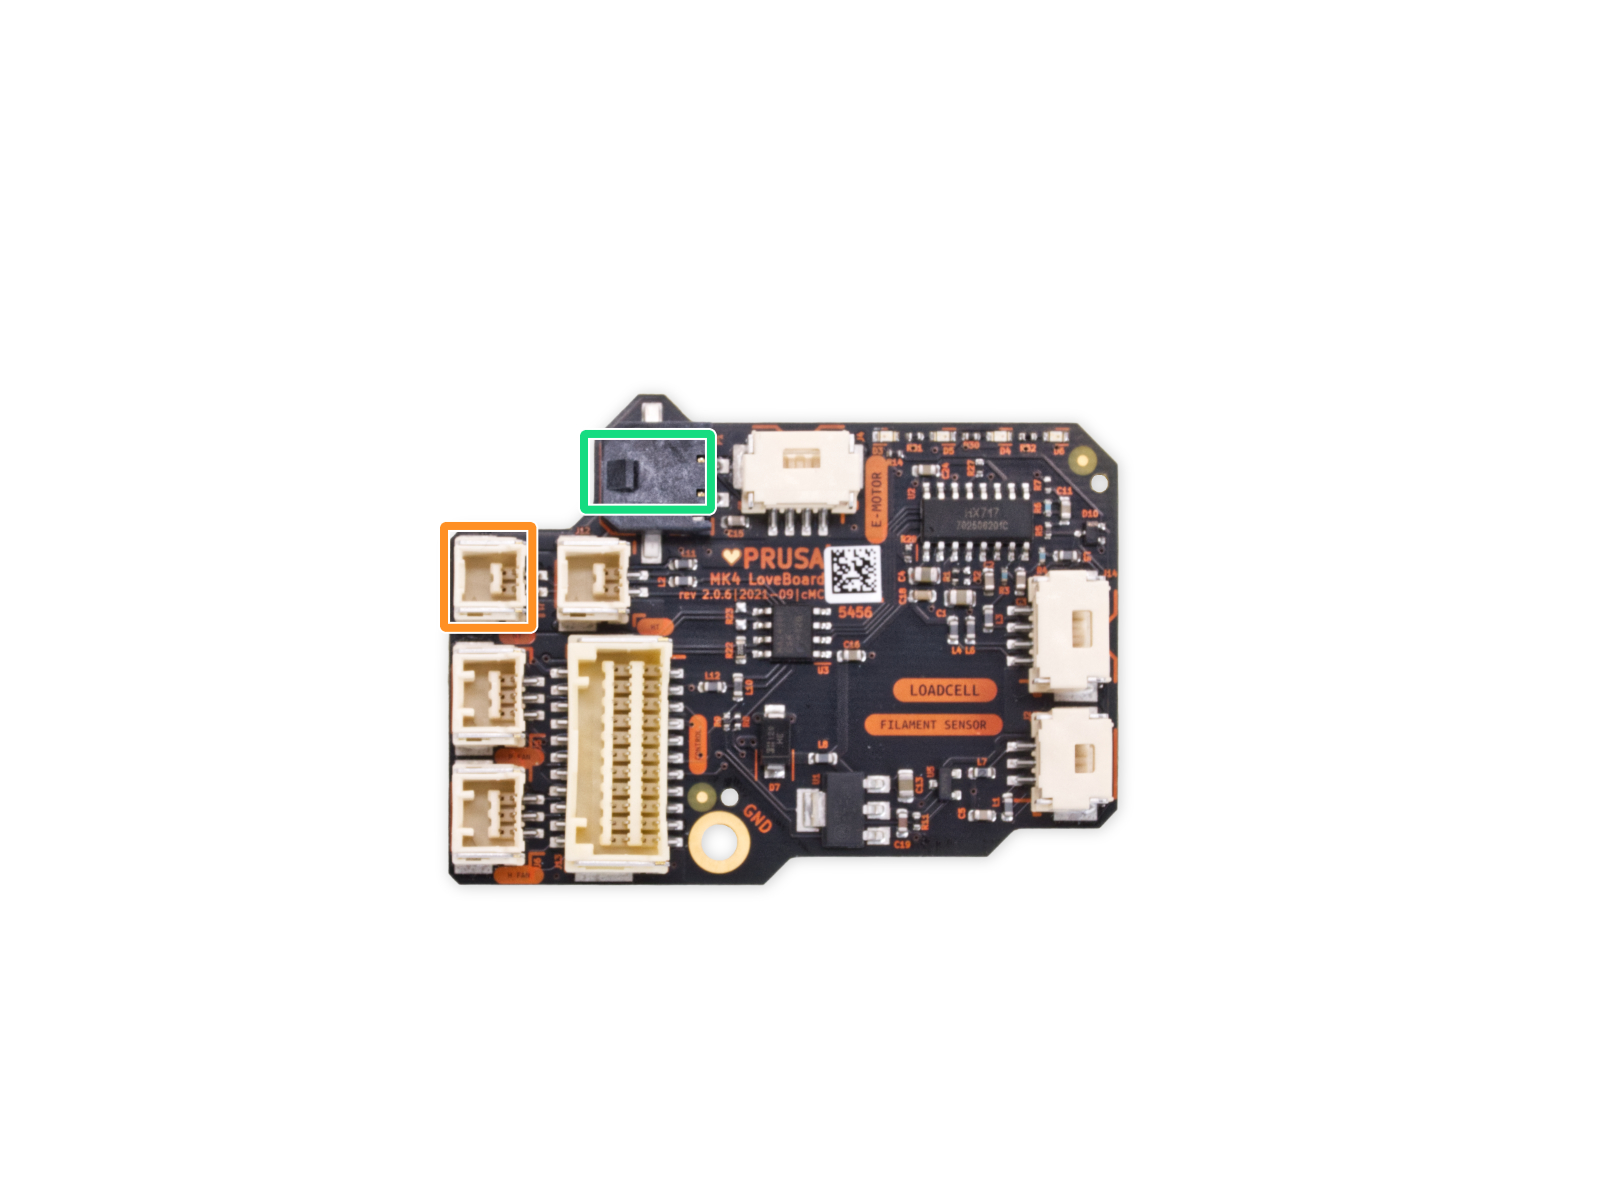
Se il sensore di filamento non rileva il filamento durante l'autotest, controlla la LoveBoard per verificare che il cavo sia collegato correttamente. Inoltre, segui l'articolo dedicato alla pulizia del sensore di filamento per assicurati che non ci siano residui nel supporto della sfera Prusa.
 | 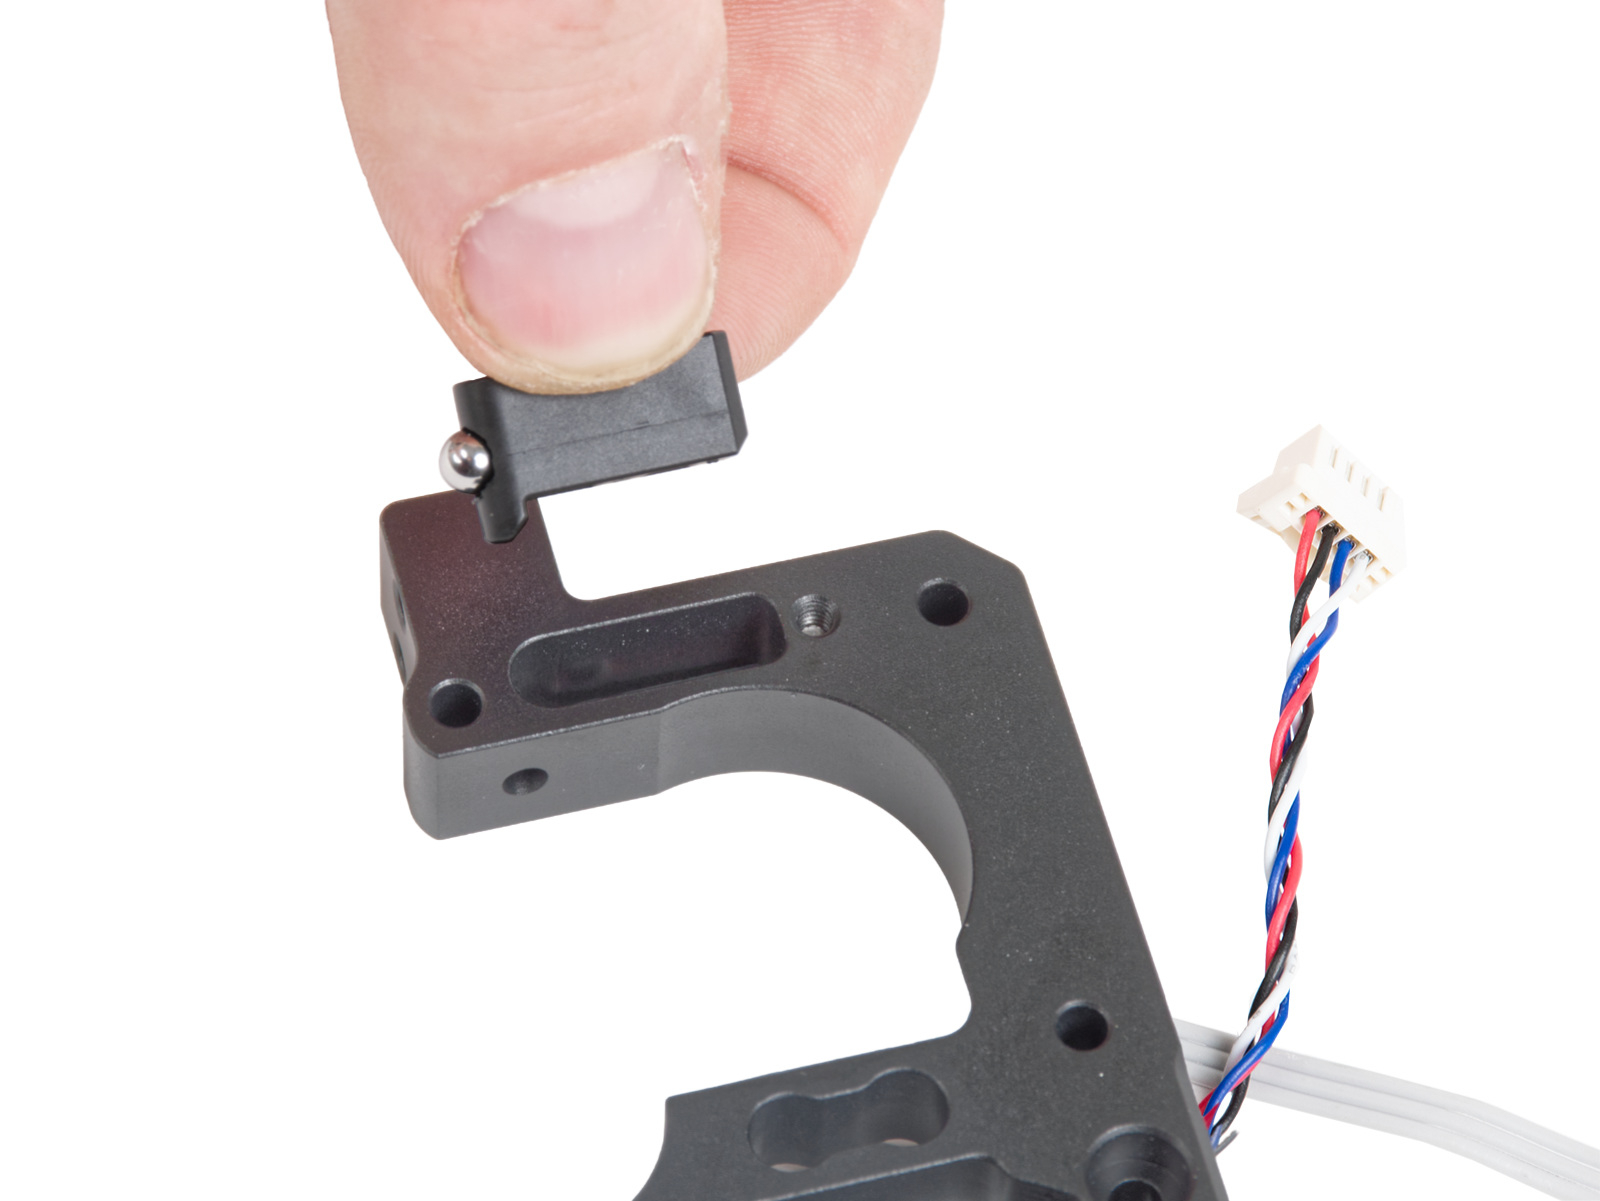 |
È possibile saltare questa parte dell'autotest, ma in questo caso le funzioni che dipendono dal sensore di filamento potrebbero non funzionare.