Se recomienda que dedique algún tiempo a realizar el mantenimiento de tu Prusa CORE One/+ con regularidad. Esto debe hacerse incluso si la impresora está funcionando perfectamente.
Herramientas útiles
Además de las herramientas habituales, como llaves Allen, alicates de punta fina e IPA (alcohol isopropílico) + toallitas de papel, es posible que necesites:
- Aire comprimido: también conocido como aire enlatado. Asegúrate de no mantenerlo boca abajo mientras pulveriza, de lo contrario podrías dañar los componentes electrónicos al intentar limpiarlos.
- Cepillo Latón Boquilla: un pequeño cepillo de latón es útil para limpiar el bloque calefactor. Si no tienes un cepillo de latón cualquier cepillo con cerdas duras hará el trabajo.
- Lubricante Prusa: Con la Prusa CORE One se incluye un tubo de Lubricante Prusa. Se utiliza para lubricar las varillas lisas con rodamientos lineales, y para lubricar los husillos del eje Z. ¡NO utilices Lubricante Prusa en la guía lineal!
- Set lubricación guía lineal: un set que incluye Microlube GL 261, Aguja dosificadora SSS15 2, Cartucho con pistón manual 2/2,5mm, y dos guantes de nitrilo.
- Limpiador sin alcohol: se utiliza para limpiar los paneles de la impresora. NO utilices productos con alcohol, incluido IPA, para limpiar los paneles.
Mantenimiento regular
Antes de cada impresión deben comprobarse los siguientes puntos.
Manteniendo limpia la impresora
Tras varias horas de impresión, pueden empezar a acumularse diversos tipos de residuos alrededor de las piezas de la impresora o bajo la base calefactable - trozos de filamento, polvo, restos, soportes rotos, etc. Asegúrate siempre de que las partes de la impresora están limpias. Puedes utilizar un cepillo, una escoba pequeña o una aspiradora para eliminar los residuos.
Limpieza del hotend
Es fundamental que el hotend esté limpio. Los residuos en la boquilla o en el bloque calefactor pueden provocar fallos en la impresora, por ejemplo, si los residuos caen sobre el modelo impreso durante la impresión.
Para limpiar la boquilla y el bloque calefactor, calienta la boquilla de tres a cinco minutos a 250 °C, ya que los restos de filamento deben calentarse ligeramente para que puedan eliminarse más fácilmente.
Utiliza un pequeño cepillo de latón para eliminar cualquier plástico viejo pegado en la boquilla y el bloque del calentador.
Evita que el cepillo entre en contacto con los cables del hotend, ya que podría provocar un cortocircuito.
Atención: ¡la impresora aún está caliente! Espera hasta que las partes calientes se enfríen a temperatura ambiente. Tarda aproximadamente 10 minutos. No la toque. Comprueba siempre los valores de la pantalla.
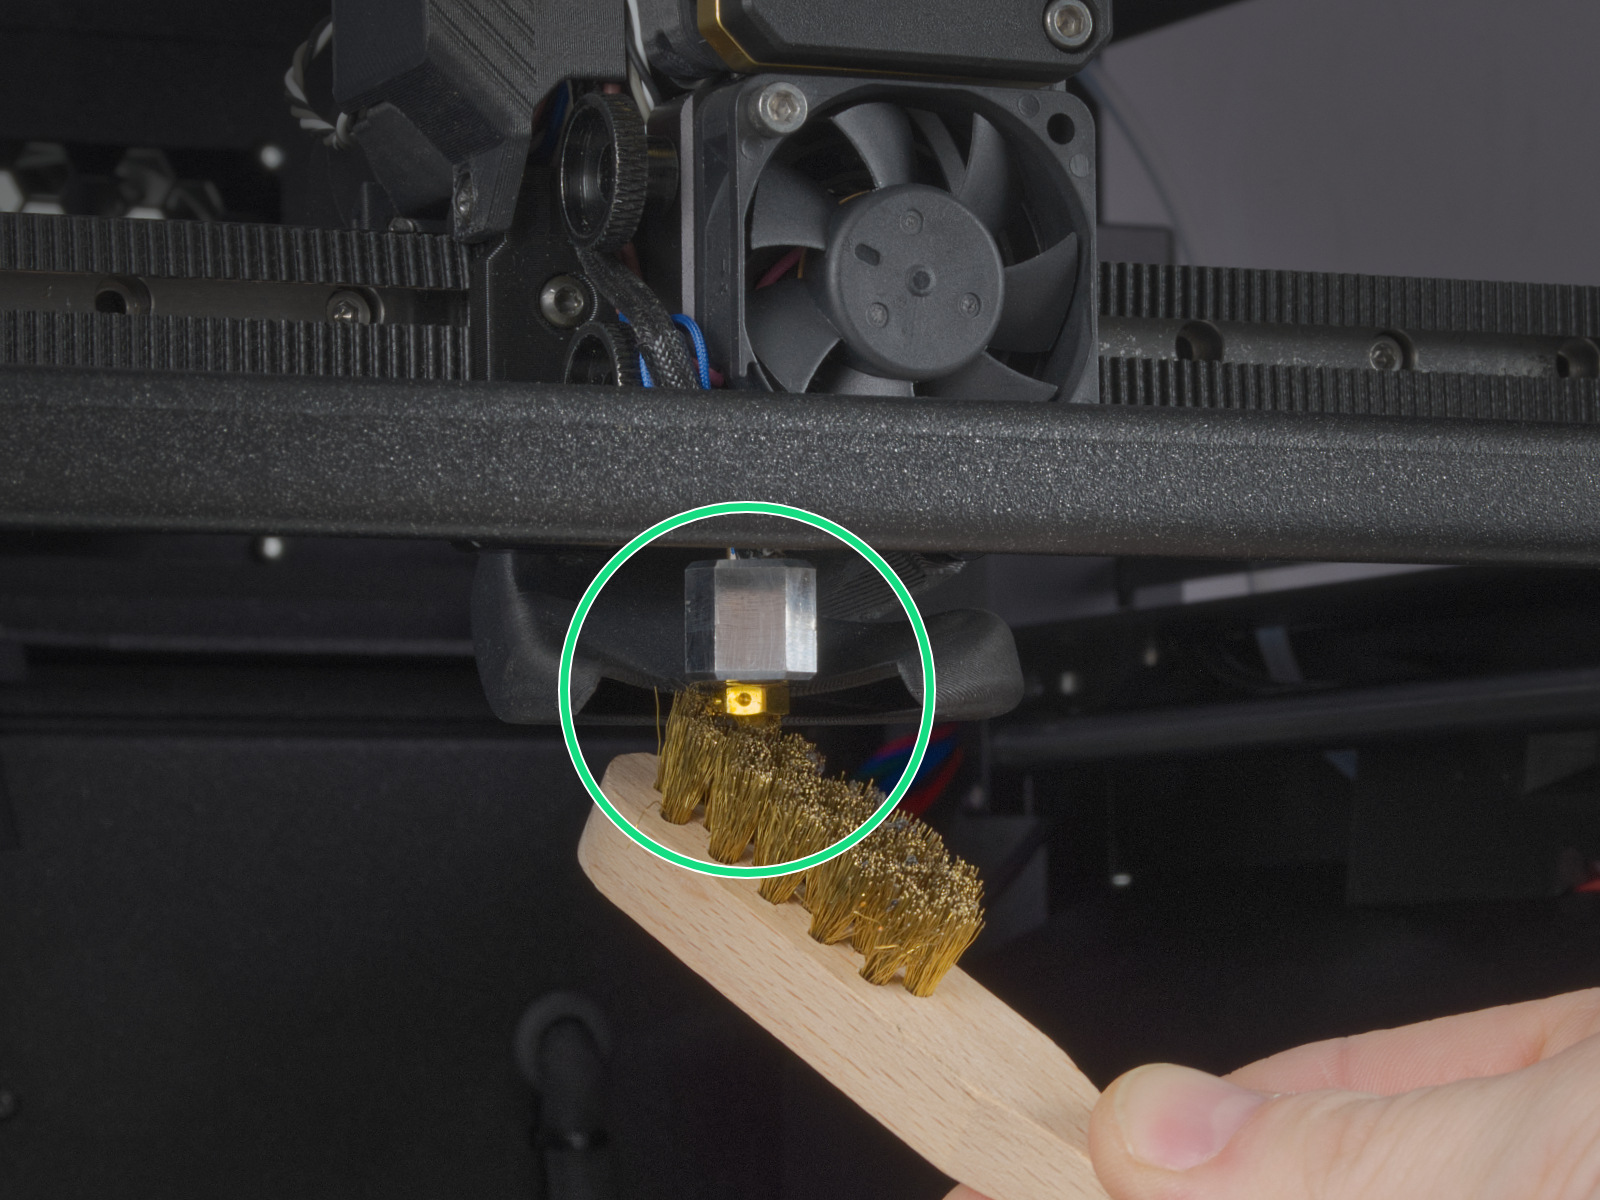
Lámina de impresión flexible
Nunca limpies la lámina de PA Nylon especial con acetona, IPA (alcohol isopropílico) u otros disolventes a base de alcohol (limpiacristales, Windex, etc.). Esto dañará la superficie.
Todas las láminas de impresión flexibles deben limpiarse periódicamente para garantizar la adherencia, pero los métodos exactos y las soluciones de lavado pueden variar en función del tipo de lámina.
Encontrarás más información sobre cómo cuidar tu lámina de impresión flexible en este artículo.
Mantenimiento esporádico
Las siguientes comprobaciones deben realizarse cada 200 horas de impresión.
Comprobación de ejes - Guía lineal (eje X)
Asegúrate de que no hay residuos ni polvo en la guía lineal (eje X). Si los hubiera, límpialos con un pañuelo de papel limpio o un paño limpio SIN desengrasante ni productos químicos, ya que podrían dañar la goma del carro.
Recomendamos lubricar el raíl lineal cada 3-6 meses, utilizando el set de lubricación para guías lineales dedicado.
En las guías lineales, NO utilices Lubricante Prusa ni otros productos que no formen parte del juego de lubricación de guías lineales.
Comprobación de ejes - Varillas Lisas y Rodamientos Lineales (eje Y)
Limpia las varillas lisas (eje Y) con un trozo de papel limpio, y lubricalo usando una pequeña cantidad de Lubricante Prusa.
Solo en caso de que sientas que el eje ya no funciona suavemente incluso después de haber limpiado y lubricado recientemente las varillas lisas, se pueden sacar los rodamientos, limpiarlos con alcohol y engrasarlos por dentro, utilizando todavía una pequeña cantidad de Lubricante Prusa.
Comprobación de ejes - Correa
Durante un largo tiempo de impresión, la correa puede aflojarse ligeramente, causando problemas como desplazamiento de capas, o mala calidad de impresión. La forma más fácil de comprobar la tensión de la correa es imprimir un objeto circular. Si el resultado no es perfectamente redondo, es necesario ajustar la correa.
Ventiladores
Las RPM (revoluciones por minuto) de ambos ventiladores se miden constantemente. Esto significa que la impresora informará de un error si el ventilador se ralentiza repentinamente, por ejemplo, debido a un trozo de filamento atascado en él.
En tal caso, comprueba y elimina la suciedad del ventilador correspondiente. ¡No intentes saltarte la comprobación de RPM, ya que podría dañar la impresora!
Ambos ventiladores deben revisarse y limpiarse cada varios cientos de horas de impresión. El polvo puede eliminarse con aire comprimido en un bote de spray, los pequeños hilos de plástico pueden retirarse con pinzas.
PRECAUCIÓN: No soples aire comprimido sobre el ventilador en marcha.
Nextruder
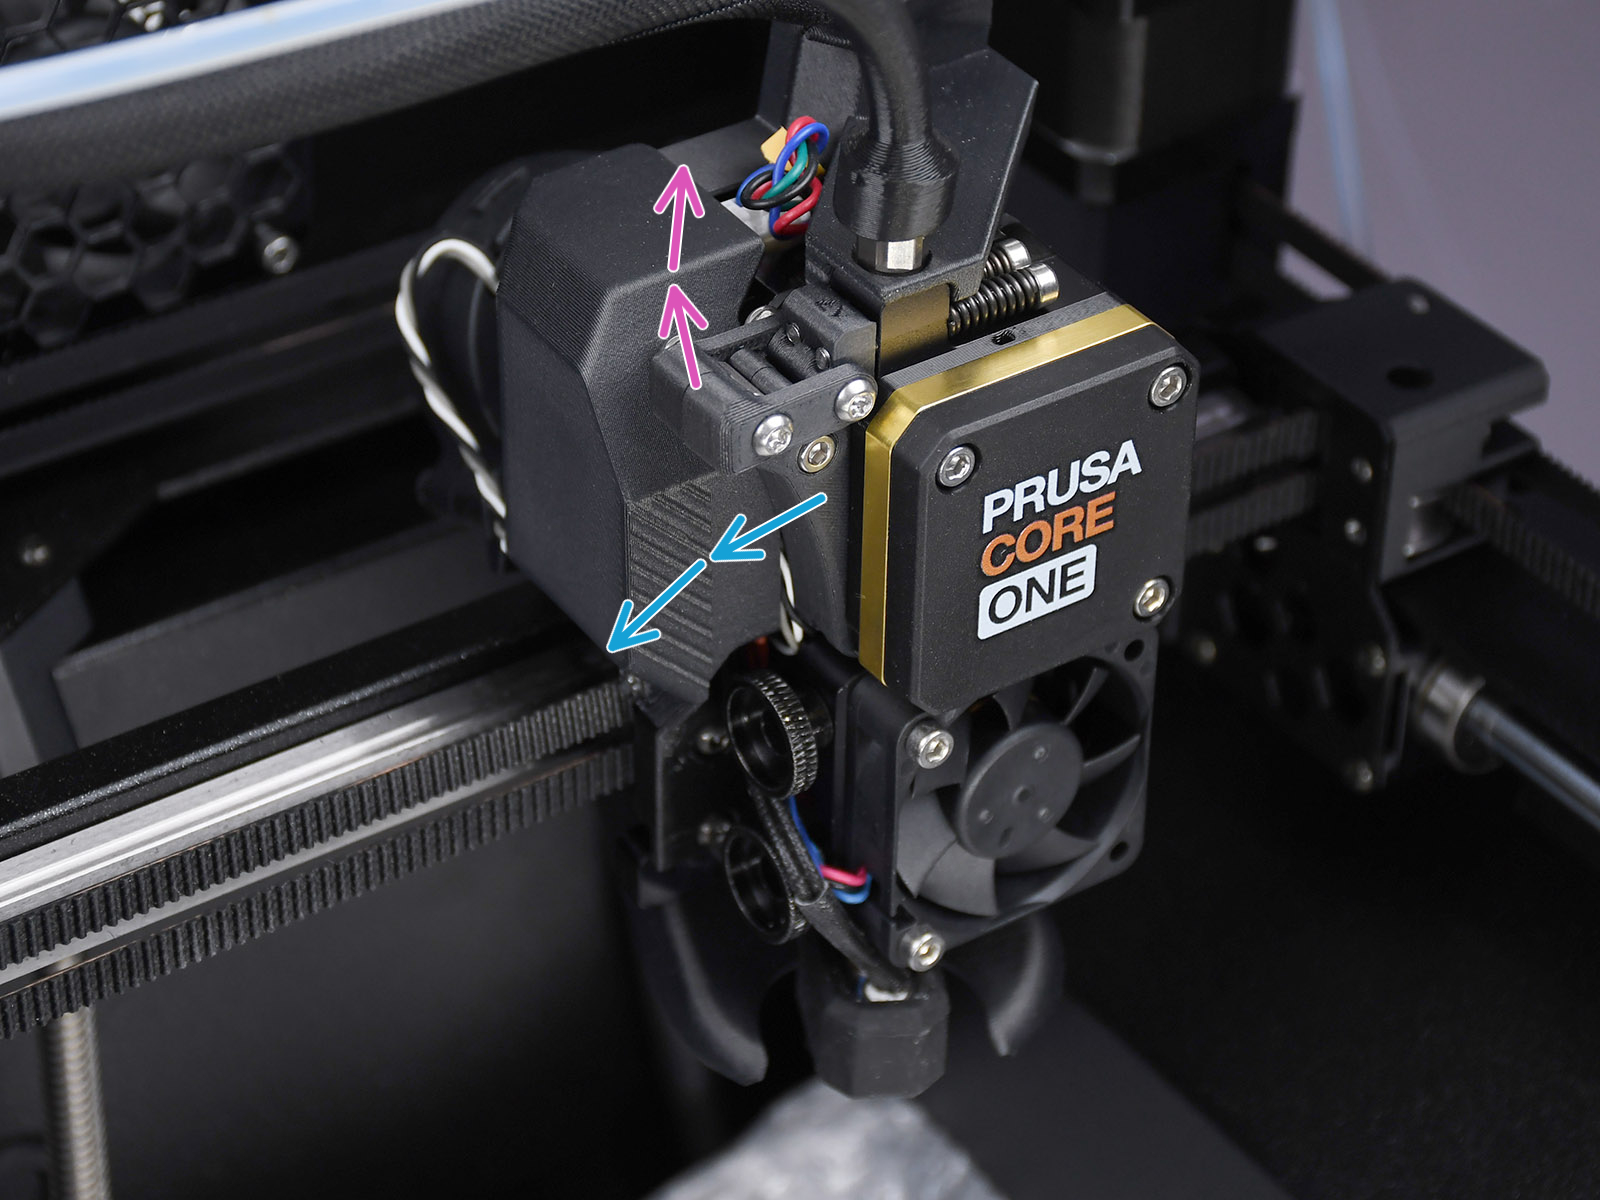
El engranaje primario y los rodamientos fijados al eje tensor del extrusor no necesitan lubricante. Con el tiempo, puede formarse un depósito de restos de filamento en las ranuras del engranaje primario, lo que provoca una extrusión insuficiente de filamento. Accede al extrusor levantando la Tuerca tensora, y luego mueve el Eje tensor. Puedes soplar la suciedad con aire comprimido, o utilizar un cepillo de latón o un palillo de dientes corriente. Utiliza el orificio de acceso situado en el lateral del extrusor.
Sensor de filamento Nextruder
Si tienes problemas con el sensor de filamento del Nextruder, como lecturas incorrectas o aleatorias, asegúrate de que todo en el Nextruder está correctamente cableado y de que no hay residuos en la trayectoria del filamento dentro del extrusor, utilizando unas pinzas o una lata de aire comprimido.
Para acceder al lado derecho de la LoveBoard, afloja dos tornillos M3x6 y retira la cubierta.
 |  |
Para limpiar el sensor de filamento Nextruder, sigue las instrucciones del artículo dedicado.
Limpieza de paneles
Utiliza un limpiador sin alcohol o agua jabonosa para limpiar los paneles de la impresora..
NO utilices productos que contengan alcohol, incluido el IPA. La exposición repetida debilitará los paneles, haciendo que se vuelvan quebradizos con el tiempo.
Mantenimiento anual
Electronica
Es una buena práctica comprobar y, opcionalmente, volver a conectar los conectores eléctricos de la placa xBuddy, Loveboard, base calefactable, fuente de alimentación y xLCD cada 600-800 horas de impresión.
En particular, asegúrate de que los conectores atornillados estén bien apretados y los conectores Molex bien conectados.
PRECAUCIÓN: en el caso de los conectores Molex, es necesario presionar la pestaña antes de desconectarlos. De lo contrario, el conector podría resultar dañado.