Original Prusa MMU3アップグレードの定期的なメンテナンスをおすすめします。下記の画像を参考に、MMU3ユニットの各部品の名称を確認してください。
 | 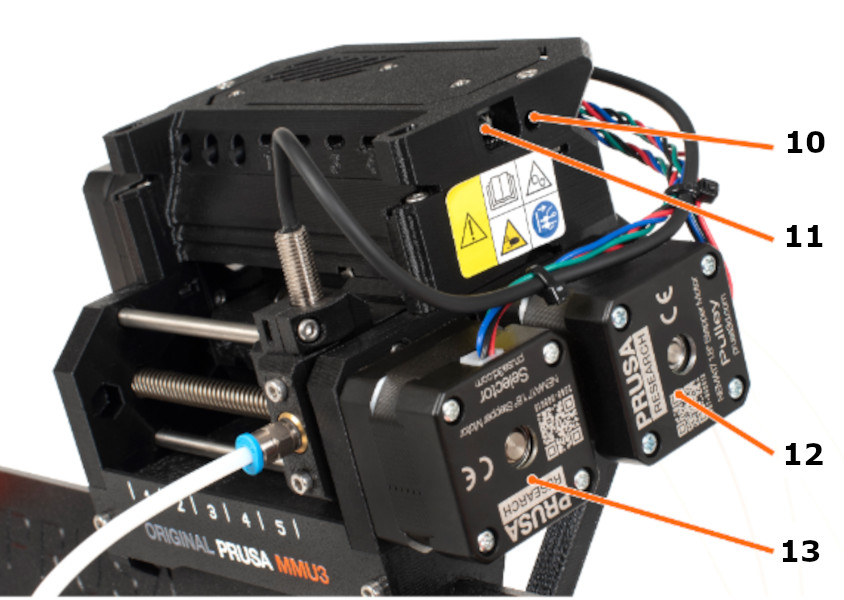 |
- アイドラーモーター:アイドラーを回転させます。
- アイドラー:5つのプーリーが内蔵されています。アイドラーを回転させることで、1つのプーリーがフィラメントに直接接触し、圧力をかけます。その後、プーリーモーターがフィラメントをセレクターに押し込みます。
- 左ハードウェアボタン:セレクターを左に動かします。
- 中央ハードウェアボタン:選択した位置にフィラメントを予備送りします。
- 右ハードウェアボタン:セレクターを右に動かします。
- LEDインジケーター:MMUの現在の状態(選択位置、エラーなど)を示します。
- SuperFINDA(またはFINDA):セレクターに内蔵されたMMU3フィラメントセンサーです。
- セレクター:指定された位置に移動してフィラメントスロットを選択します。その後、プーリーモーターによってフィラメントがセレクターを通り、ノズルに押し込まれます。
- Festoフィッティング:前面のPTFEチューブに2つあり、もう1つはエクストルーダーの上部に取り付けられています。
- リセットボタン:MMU3ユニットのみをリセットします。
- MicroUSBポート:PC経由でMMU3のファームウェアを書き込むためのものです。
- プーリーモーター:MMU3ユニット内でフィラメントを動かすプーリーを回転させます。
- セレクターモーター:セレクターを左右に動かします。
通常使用する六角レンチ、ラジオペンチ、IPA+ペーパータオル以外に、以下のものがあると便利です:
- エアダスター(圧縮空気):スプレーする際は逆さにしないでください。逆さにすると、電子部品を掃除しようとして損傷する恐れがあります。
- ブラシ:小型の真鍮ブラシがプーリーの掃除に最適です。真鍮ブラシがなければ、硬めのブラシでも代用できます。代替案として、プリンターに付属の鍼や爪楊枝も使用できます。
MMUユニット
プリンターのメンテナンスを行う際は、MMUユニットにも同様にメンテナンスを行ってください。
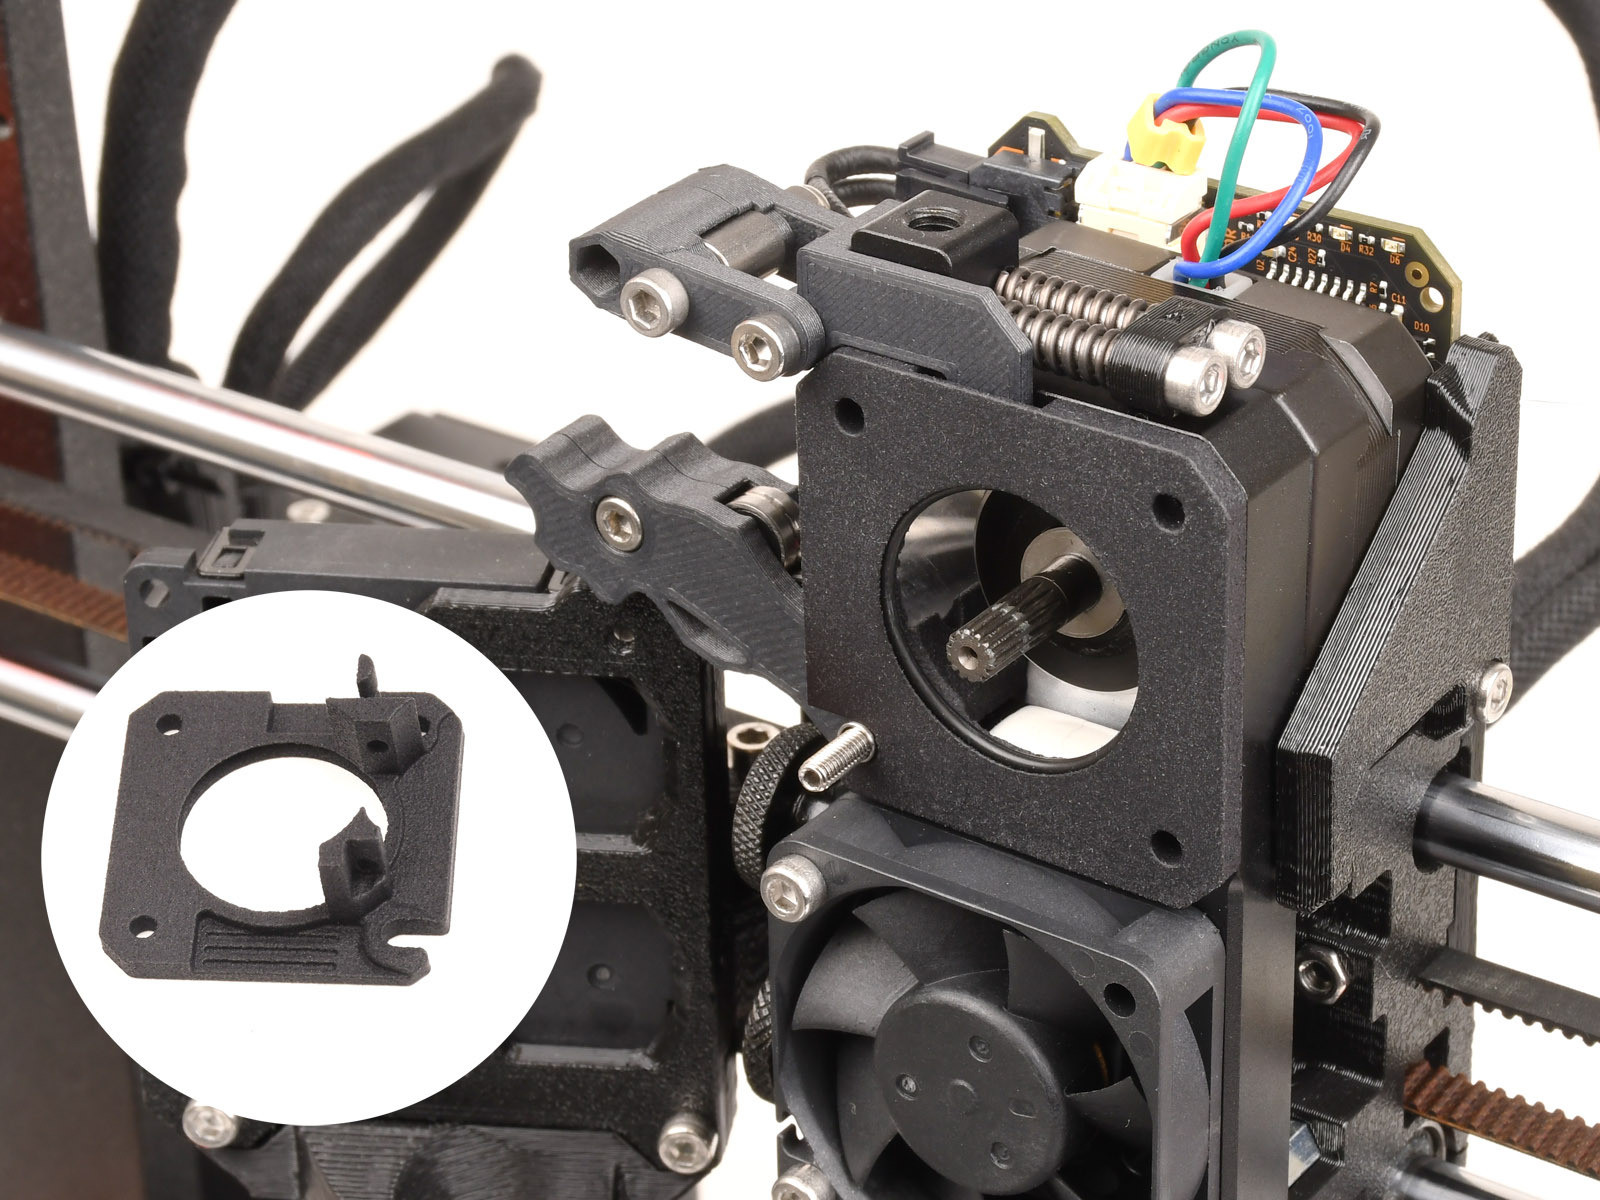
プーリー
プーリーがフィラメントを削ることがあり、その粉塵が周囲に溜まることがあります。メンテナンスのたびにミニブラシなどでプーリーを掃除するのが最善です。また、プーリーは下記写真のようにフィラメント穴と完全に一直線になるように調整し、小さな黒いイモネジでプーリーモーター軸の平らな部分にしっかり固定してください。

セレクター
適切に調整されたセレクターでも、時折フィラメントの糸くずや粉塵、折れたフィラメント片で詰まることがあります。右側のMMUボタンを押してセレクターを右端まで移動させ、歯間ブラシや細いワイヤー(直径1.5mm/0.06インチ)で詰まりを押し出してください(サービス位置のままで)。残りはエアダスターで吹き飛ばしてください。
エクストルーダー部品MMU追加時にプリンターのエクストルーダーに取り付けた部品もメンテナンスが必要です。
Nextruderメインプレート(CORE One、MK4/S、MK3.9/S)
この部品は、駆動ギアからノズルチューブへフィラメントを案内します。フィラメントの繰り返しの装填・排出により摩耗します。MMUがない場合は摩耗はほとんどありませんが、MMUプリントでは数千回のフィラメント装填・排出が発生するため、摩耗が進みます。この部品が摩耗すると、プリンターはフィラメントをノズルに正しく押し込めなくなります。他のMMU部品と異なり、この部品はMulti Jet Fusionで造形されているため、耐久性があります。
メインプレートの寿命は約3万回のフィラメント交換です。それを超えると、プリンターに「メンテナンスリマインダー:フィラメント交換回数がメインプレートの寿命に達しました。部品を点検し、予備のプレートを用意してください。」というメッセージが表示されます。MMU3アップグレードキットには予備のメインプレートが1枚付属しているか、当社オンラインショップで購入できます。
1000回中50回のフィラメント装填失敗が発生した場合、画面には「プリンターが連続したフィラメント装填エラーを検出しました。この場合、メインプレートの損傷も確認してください。」というメッセージが表示されます。
または、設定 → ハードウェア → Nextruderメンテナンスで手動でクリアすることも可能です。
 |  |
フィラメントセンサーのキャリブレーション(MK3.5/S)
MK3.5/Sプリンターで「プリンターが連続したフィラメント装填エラーを検出しました。エクストルーダーの確認をおすすめします。」というメッセージが表示された場合、短時間に複数回の装填エラーが発生しています。IRフィラメントセンサーキャリブレーションを使ってフィラメントセンサーを調整してください。
MMUでエクストルーダーへの装填が3万回に達すると、「メンテナンスリマインダー:フィラメント交換回数が3万回に達しました。エクストルーダーを点検・清掃してください。」というメッセージが表示され、プリンター定期メンテナンスの実施を促します。