AA

Prodotti in evidenza

    Categorie popolari

      Ricerche di tendenza

        Articoli

          Blog

            Prodotti

              Categorie

                Ricerche suggerite

                  Ricerca in corso…
                  Nessun risultato
                  Qualcosa è andato storto.
                  ↑↓ Seleziona↵ ApriEsc Chiudi la ricerca
                  • English
                  • Čeština
                  • Deutsch
                  • Español
                  • Français
                  • Italiano
                  • Polski
                  • 日本語
                  • Ordini
                  • Indirizzo
                  • Avvisi di disponibilità
                  • Corsi
                  • Iscrizioni
                  • Modifica Account
                  • Stampanti 3D9+▾

                    Stampanti 3Dnuovo

                    nuovoPrusa CORE One L+Maggiori informazioni
                    nuovoPrusa CORE One+ (Gen 2)Maggiori informazioni
                    newPrusa CORE One L+ INDX 8-ToolnewPrusa CORE One+ (Gen 2) INDX 8-StrumentiPrusa CORE One L+: Critical InfrastructureOriginal Prusa MK4SnuovoOriginal Prusa XL+Original Prusa XL+: Critical Infrastructure

                    Aggiornamenti stampante

                    newCORE One/+ INDX Conversion KitnuovoPrusa CORE One L to CORE One L+ upgradenuovoPrusa CORE One+ to Prusa CORE One+ (Gen 2)nuovoPrusa XL to Prusa XL+ Upgrade
                    Prusa Reward ProgramCondividi. Consiglia. Guadagna.
                    Come scegliere una stampante 3D?Ti guideremo passo dopo passo attraverso le nozioni di base per aiutarti a trovare la macchina perfetta per il tuo spazio, il tuo budget e le tue idee.
                    E-book gratuitoScarica l'e-book gratuito Fondamenti della stampa 3D con Josef Prusa e fai i tuoi primi passi nel mondo della stampa 3D
                    Parti Stampabili Original PrusaRaccolte dei componenti di ricambio stampabili per le stampanti 3D e gli aggiornamenti Original Prusa.
                    Informazioni di spedizioneInformazioni regolarmente aggiornate sull'attuale capacità produttiva e sui tempi di consegna delle nostre stampanti.
                    Stampa 3D personalizzataStampa 3D personalizzata professionale con vari materiali secondo le vostre esigenze.
                  • Materiali▾

                    Filamenti

                    PrusamentPLAPETGASA / ABSPC BlendPA (Nylon)FlexCompositesSpecialLiquidazione materiali

                    Resine

                    ResinaPulitore Resina
                    Guida ai FilamentiControlla la mia Bobina Prusament
                    Prusament.com
                  • Componenti e accessori▾

                    Accessori

                    EnclosureUgelliLastre di stampaAccessori essenzialiFotocamere & AddonStrumenti & ArtigianatoAdesivi

                    Parti di ricambio

                    Merchandising

                    Parti di ricambio - Tutte le stampantiCORE OneMK4/S & MK3.9/SMK3/MK3S/MK3S+XL
                    Merch
                  • Per le aziende▾
                    Prusa Pro HT90Prusa Pro SLXPrusa Pro AFSPrusa Pro Medical OneOriginal Prusa XLOriginal Prusa XL: Critical Infrastructure
                    Prusa CORE One+Maggiori informazioni
                    Prusa CORE One LMaggiori informazioni
                    Prusa CORE One L: Critical Infrastructure Edition

                    Stampa 3D per

                    Produzione e R&SIndustria automobilisticaAssistenza sanitariaIstruzione e ricerca accademicaArchitetti e ProgettistiIndustria CinematograficaInfrastrutture Critiche

                    Storie di Stampa 3D

                    • Come è nata la stampa 3D: Rep-rap e open-source con Adrian Bowyer
                    • L’insegnamento della matematica reinventato grazie alla stampa 3D alla JKU Linz
                    • La storia dietro al cacciavite LTT
                    • Victoria Hand Project: Cambiare l’assistenza protesica con la stampa 3D
                    Rivenditori ufficiali Prusa
                    Sostenibilità
                    Prusa Education
                    Contatti e richieste di informazioni
                    Stampa 3D personalizzata
                    Certificazione ISO
                  • Software▾
                    PrusaSlicer

                    PrusaSlicerPrusaSlicer

                    PrusaSlicer is an open-source, feature-rich, frequently updated tool that contains everything you need to export the perfect print files for your 3D printer.

                    WindowsMacOSLinux
                    Prusa Connect

                    Prusa Connect

                    Prusa Connect is a cloud service enabling remote control and monitoring of your 3D printers, offering secure data handling, easy setup, and support for managing multiple printers from anywhere.

                    Accedi a Connect
                    Prusa.app

                    Prusa.app

                    Control your printer/s remotely from anywhere using the Prusa Connect technology behind. Prusa.app brings a new level of Prusa printer experience to Android and iOS phones.

                    Provala subito!
                    Driver e firmwareScarica gli ultimi firmware e driver per la tua stampante 3D.
                    Supporto PrusaSlicer
                    Supporto Prusa Connect
                  • Modelli 3D▾
                    Stampanti 3DArte & DesignHobby & MakerDomesticoMiniature per giochi da tavoloGiochi & GiocattoliPrintables Store

                    Modelli 3D popolari

                    • Strong garden hose holder
                    • Prusa Spool Bot
                    • Build Tray — Modular Organizer for Assembly, Disassembly and Maintenance
                    • Broom Holder
                    • Octagon Fabric
                    • Prusa CORE One ? (Mimic Skin)

                    Concorso di Design

                    • Réutilisation de la carte mère Framework Laptop 1201/09/2026 – 30/09/2026
                    • 🏆 Défi du designer : Tours de magie !01/09/2026 – 22/09/2026
                    • Du prototype au produit : Accessoires pour appareils photo et caméra01/08/2026 – 14/09/2026
                  • Community▾

                    Prossimi eventi

                    • Maker Faire Tokyo 202605/09/2026 – 06/09/2026 · Tokyo, Japan · Prusa Team
                    • IFA 202604/09/2026 – 08/09/2026 · Berlin, Germany · Prusa Team
                    • 3D Printopia 202626/09/2026 – 27/09/2026 · Pennsylvania, United States · Prusa Team
                    • Maker Faire Bay Area25/09/2026 – 27/09/2026 · Kalifornie, United States · Prusa Team

                    Forum Prusa

                    • Warping con Prusament ASA su Prusa Core One
                    • SmartWiper – nuovo script per torri di spurgo stabili (MMU / PrusaSlicer)
                    • mmu3 con mk4s (montato precedentemente su mk3s)
                    Prusa World MapPrusa World MapFind local 3D printing users and explore the community around you.
                  • Aiuto▾
                    Guide e TutorialPrusaSlicerPrusa ConnectMateriali

                    Modello Stampante

                    CORE One INDXCORE One LCORE One+CORE One

                    Risoluzione dei problemi hardware

                    • Autotest fallito (CORE One/+)
                    • Ugello otturato (CORE One, CORE One L, XL, MK4/S, MK3.9/S)
                    • Regolare la tensione della cinghia (CORE One/+, CORE One INDX, CORE One L/+)
                    • Prusa Connect e PrusaLink spiegati

                    Driver & Firmware

                    INDX familyCORE One familyMK4 familyXL familyMMU familyPRO family
                  • Corsi▾

                    Diventa un esperto della stampa 3D

                    Prusa Academy offers online courses on various 3D printing related topics. Each course features:

                    • easy-to-read text with many pictures and short videos
                    • links for inspiration and further study
                    • quizzes for testing your knowledge along the way
                    • certificate of completion
                    Sfoglia tutti i corsiLa mia libreria di corsi
                    • Modellazione 3D in Auotdesk Fusion
                    • PrusaSlicer Masterclass – da principiante ad esperto
                    • Complete Guide to 3D Print Postprocessing, Painting, and Detailing
                    • Airbrush Your 3D Prints: From Basics to Advanced Tricks
                  • Blog▾
                    • Anteprima di PrusaSlicer 3.0 – Pensato per il futuro della stampa 3D
                    • Prusa CORE One+ (Gen 2) INDX, Sono iniziate le spedizioni; le stampanti Complete sono disponibili per gli ordini
                    • Stampe migliori, maggiore facilità d’uso: Prusa XL+, CORE One L+ e CORE One+ (Gen 2), il nostro grande aggiornamento della gamma
                    E-Book: Fondamenti della stampa 3D
                  • Azienda▾

                    Informazioni su Prusa Research

                    We are the largest maker of 3D printers in Europe and the United States.

                    Founded as a one-man startup in 2012 by Josef Prusa, a Czech hobbyist, maker, and inventor. In just 15 years, we've grown into a company of more than 1,200 people. Every month, we design, build, and ship over 10,000 innovative and secure 3D printers from our headquarters in Prague, Czech Republic, and Delaware, USA, to users in more than 160 countries.

                    Watch a video and find out how Prusa Research was born and what we achieved within only 10 years!

                    Chi siamoTimelineSostenibilitàOpen-source
                    Chi siamo
                    Contattaci
                    Logo e foto
                    Certificazione ISO
                  1. Supporto
                  2. Informazioni su PrusaSlicer 3.0
                  3. First print with PrusaSlicer (3.0.0)
                   

                  Contenuti

                  • PrusaSlicer modes
                  • Choose and set up your printer
                  • Choose your filament
                  • Choose a print profile
                  • Import your model
                  • Orient your model
                  • Support material
                  • Perimeters and infill
                  • Slice
                  • Check the result in Preview
                  • Export and print
                  • Handy shortcuts

                  Blog

                  • Anteprima di PrusaSlicer 3.0 – Pensato per il futuro della stampa 3D
                  • Prusa CORE One+ (Gen 2) INDX, Sono iniziate le spedizioni; le stampanti Complete sono disponibili per gli ordini
                  • Stampe migliori, maggiore facilità d’uso: Prusa XL+, CORE One L+ e CORE One+ (Gen 2), il nostro grande aggiornamento della gamma

                  Newsletter

                  Registrati e ricevi il nostro concentrato mensile di informazioni utili sui nuovi firmware, sulle nuove versioni di PrusaSlicer e consigli generici per i progetti stampati in 3D.

                  Facendo clic, si accetta di ricevere la nostra newsletter.

                  Questo sito è protetto da reCAPTCHA Enterprise e vengono applicati l'Informativa sulla Privacy e i Termini di servizio di Google.

                  Strong garden hose holder
                  E-shop
                  • Stampanti 3D
                  • Aggiornamenti Stampante
                  • Filamenti
                  • Accessori
                  • Merchandise Prusa

                  © Prusa Research a.s.

                  Printables
                  • Modelli 3D
                  • Store
                  • Clubs
                  • Concorsi di Modellazione 3D
                  • Brands
                  Comunità
                  • Mappa Mondiale
                  • Forum
                  • Gruppi di utenti
                  • Eventi
                  Aiuto
                  • Aiuto Prusa
                  • Prusa Academy
                  • Calcolatrici di Stampa 3D
                  Software
                  • PrusaSlicer
                  • Prusa.app
                  • Prusa Connect
                  • Drivers e Software
                  Azienda
                  • Chi siamo
                  • Blog
                  • Rivenditori ufficiali Prusa
                  • Contattaci
                  • Certificato secondo le norme ISO 9001, ISO 14001 e ISO 45001.
                  • Termini e Condizioni Generali
                  • Termini e condizioni generali di utilizzo dei siti web PRUSA
                  • Informativa sulla privacy
                  • Informazioni sui cookie
                  • Politica sui reclami dei clienti
                  • Pagina di stato dei siti web
                  • Impostazioni Cookie
                  • Termini e Condizioni Generali
                  • Termini e condizioni generali di utilizzo dei siti web PRUSA
                  • Informativa sulla privacy
                  • Informazioni sui cookie
                  • Politica sui reclami dei clienti
                  • Pagina di stato dei siti web
                  • Impostazioni Cookie

                  © Prusa Research a.s.

                  JOSEF PRUSA®, PRUSA RESEARCH®, PRUSA POLYMERS®, PRUSA ORANGE®, PRUSA 3D ® E PRUSAMENT® sono marchi registrati di Prusa Development a.s. utilizzati da Prusa Research a.s. su licenza di Prusa Development a.s.

                  First print with PrusaSlicer (3.0.0)

                  Rilevante per

                  PrusaSlicer
                  Articolo è anche disponibile nelle seguenti lingue
                  English
                  Čeština
                  Polski
                  Deutsch
                  Français
                  Español
                  Italiano
                  日本語

                  Before printing your 3D file, it needs to be converted into a file type called .gcode or .bgcode. That is done by a program called a slicer. The best one for your Prusa or even non-Prusa printers is PrusaSlicer. This guide will lead you through using PrusaSlicer for the first time.

                  Before starting to use PrusaSlicer, make sure you know your Printer model (including the name and nozzle size) and the filament material you will print with.

                  PrusaSlicer modes

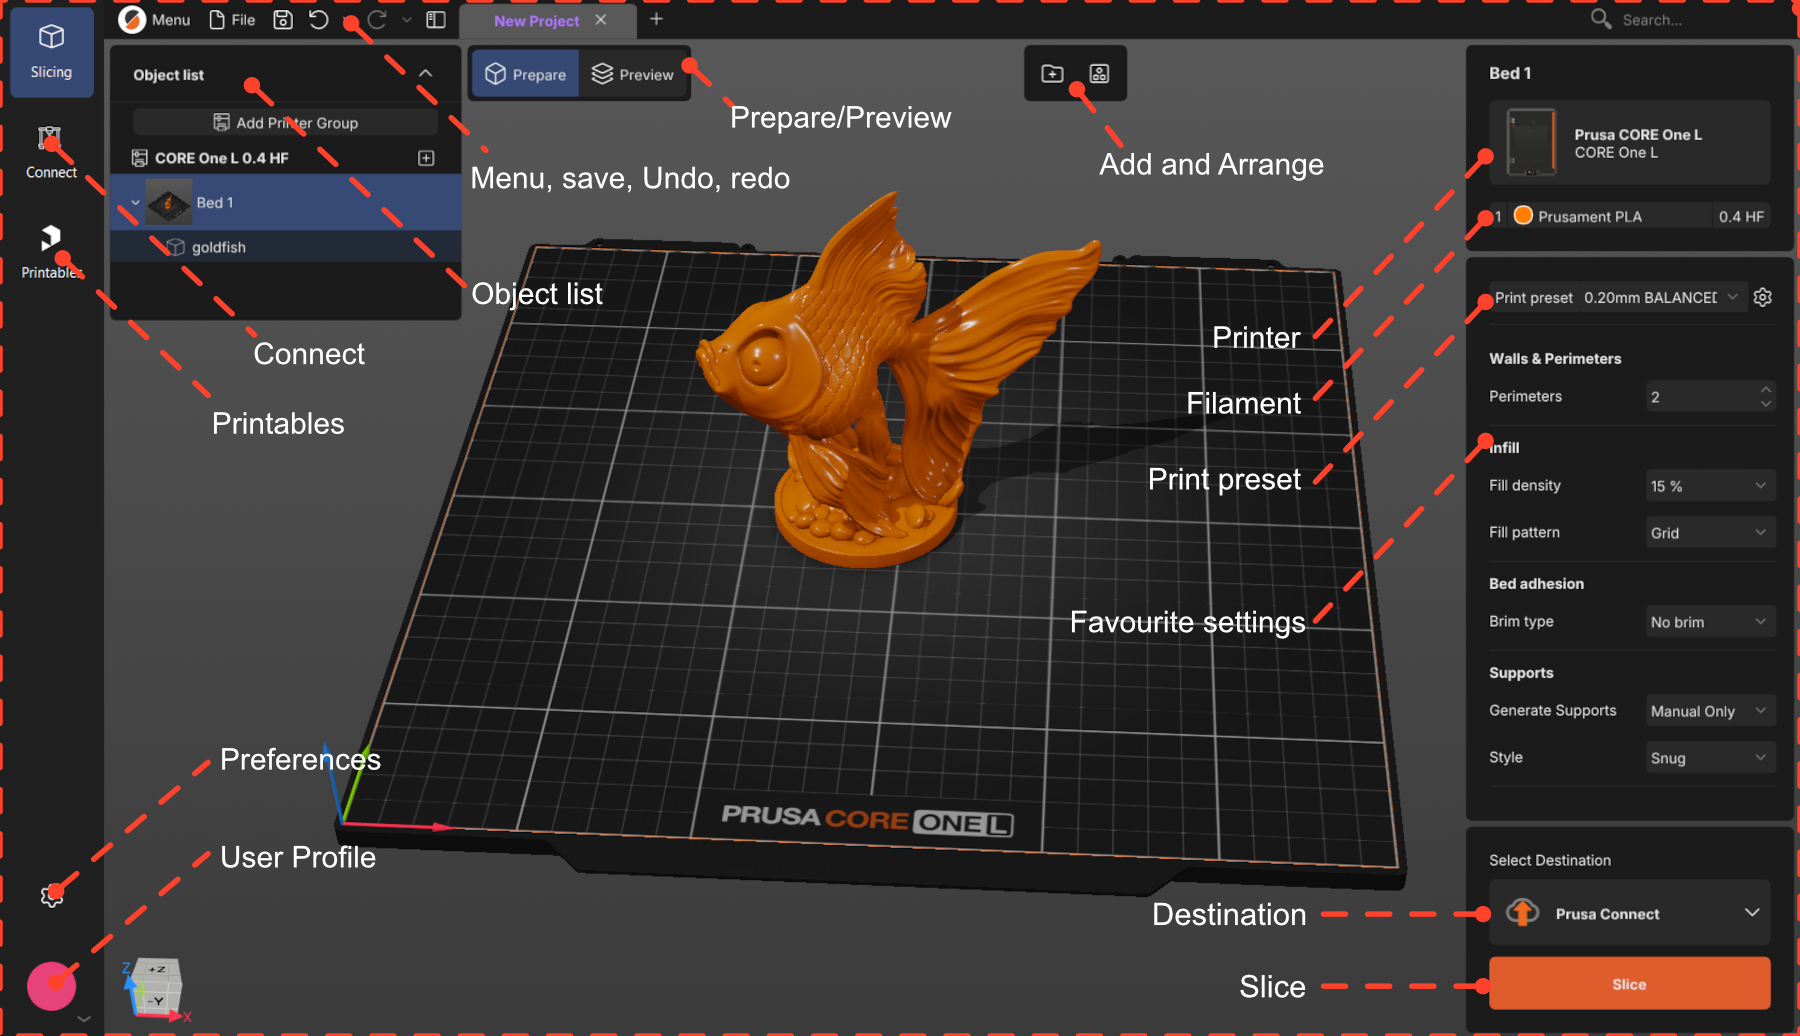
                  PrusaSlicer has two work modes: Prepare and Preview. Most of the model preparation will be done in the Prepare mode.

                  In both modes, you can see the Object list at the top right of the workspace. That will contain all the items of your project, organized as Printer -> Bed -> Object.

                  The Prepare mode is where you will arrange your model and choose your settings. There, you have the 3D scene, where you will add your model.

                  If no objects are selected, you will see the options Add and Arrange on the top menu, and the selected printer, filament, and print profile on the right-side menu.
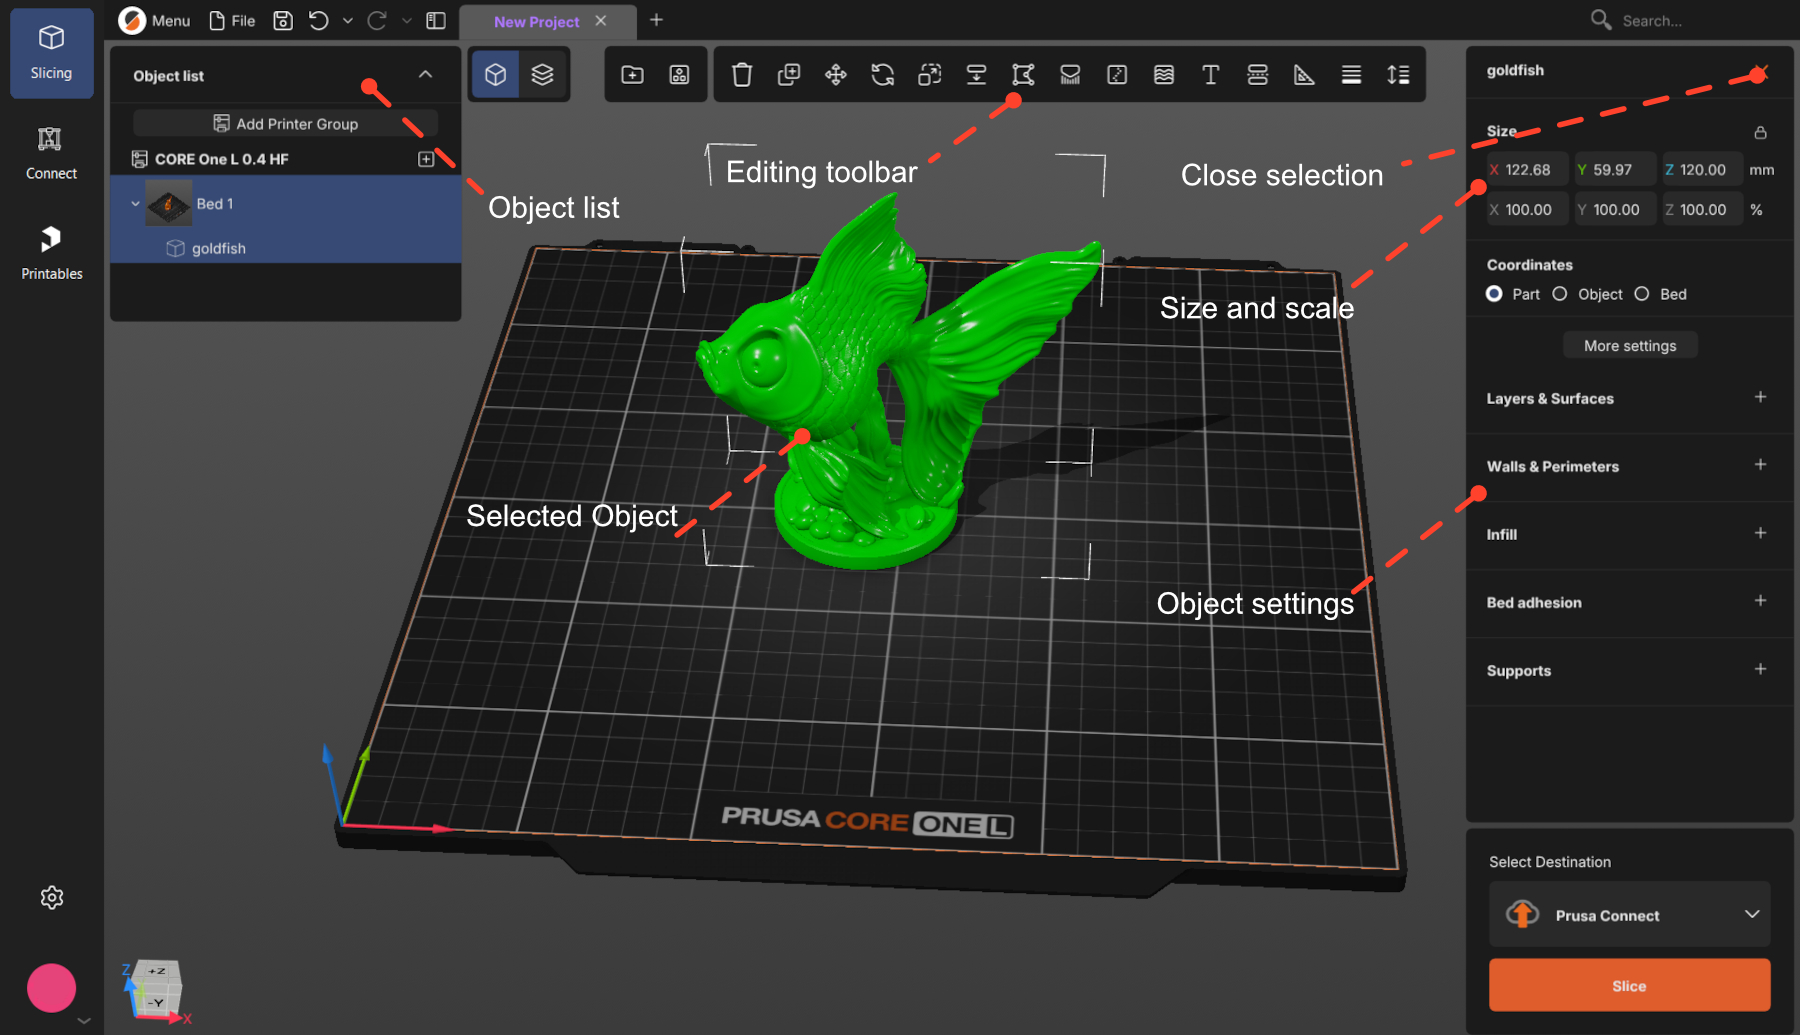
                  After an object is selected, you will see the full set of editing tools at the top menu, and the object's size and settings on the right-side menu.

                  To cancel selection, press Esc or click the close button.
                  Choose and set up your printer

                  Click to select the printer you will use. If your printer is not on the list, click Add printer at the bottom of that dialog and find your model in the catalog - there is a search box.
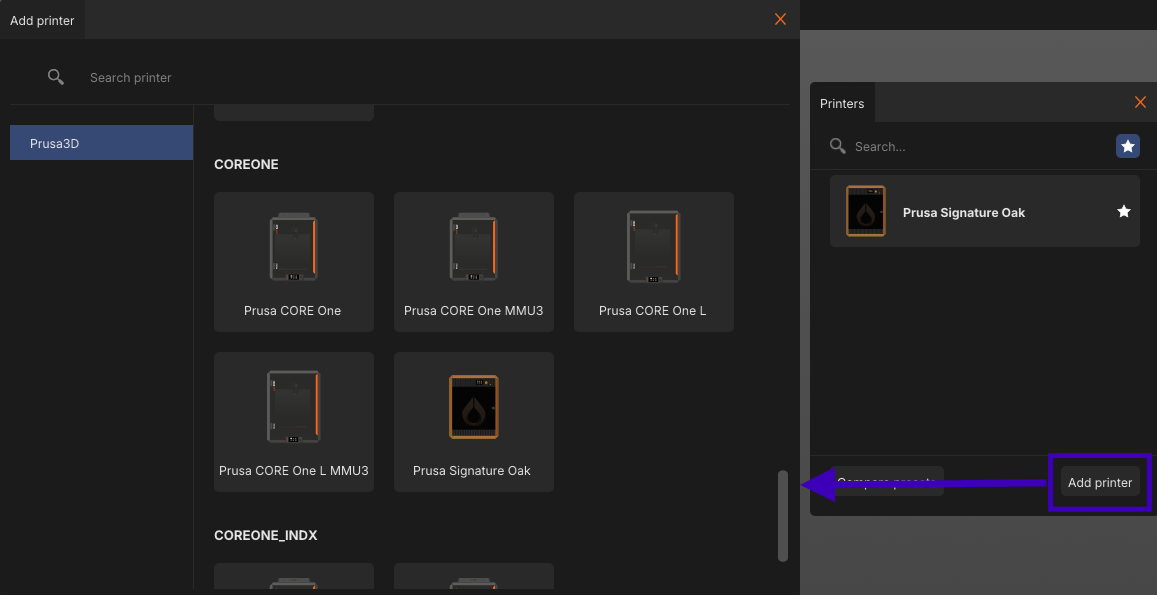
                  Set up the hardware. Always check the nozzle diameter and type, and the print sheet. The gear next to the printer name opens a menu with hardware setup

                  Choose your filament

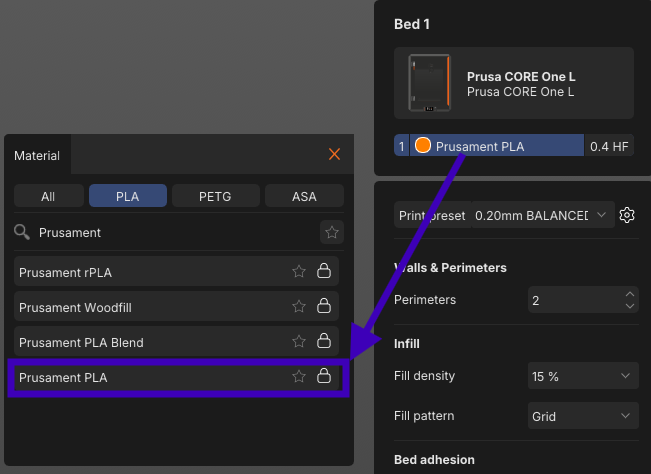
                  Click the material name to see the list of available materials and brands. You can filter by
                  material type — (the All / PLA / PETG / ASA) tabs — or search for the filament.
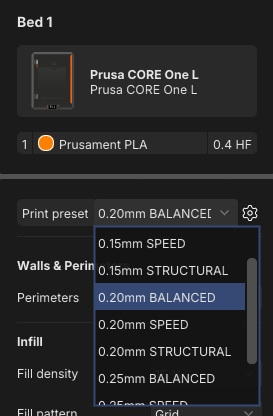
                  Choose a print profile

                  Each print profile comes with a predefined layer height — the main trade-off between quality and
                  time. Thinner layers mean more detail and a longer print.

                  To start, use 0.15 or 0.20 mm. Both give very good quality at a reasonable print time.

                  Most layer heights also come in versions tuned for a purpose, like SPEED or STRUCTURAL.
                  BALANCED is the neutral one you can start with.
                  Import your model

                  Any of these options work:

                  • Drag and drop the file onto the PrusaSlicer window
                  • Click Add above the plate or Ctrl+i
                  • File → Import STL /3mf 

                  Supported 3D formats are:  .3mf, .stl, .obj, .step / .stp, and SVG.

                  .3mf files can hold the whole project, not just models. Opening one may bring its own printer, filament, and print settings and replace yours. That is usually what you want when someone shares a ready-to-print project — just be aware it happened.

                  Orient your model

                  Your model may be oriented incorrectly after import. Four tools are very useful:

                  • Place On Face F: click one of the model's flat surfaces, and it snaps face-down onto the bed. The quickest fix for a model that imported at an angle.
                  • Move M: drag the model with the left mouse button at any time. The Move tool constrains the movement to a single axis.
                  • Rotate R: turn the model around the X, Y, or Z axis. Dragging the outer ring snaps in   45° steps, the inner ring in 5° steps.
                  • Arrange A: with several models on the plate, arrange them out on the bed without overlaps and with a safe gap between the parts.

                  Support material

                  Printers build prints upward layer by layer, so anything that overhangs with nothing beneath it has nothing to print onto. It sags or falls, ruining the print. Supports are scaffolding that holds it up, and you break them off afterwards.
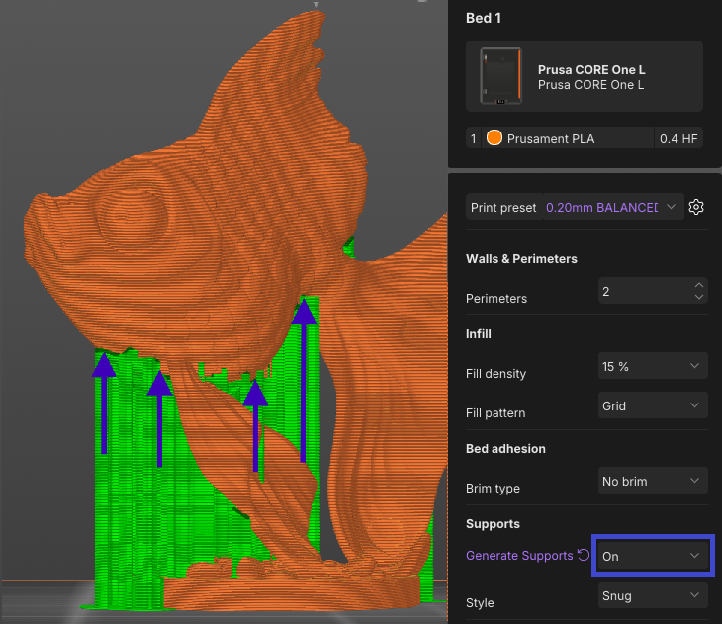
                  • Manual Only (default): only where you paint them on yourself, with the Paint-on supports tool L.
                  • On: added automatically wherever an overhang needs them. For most models, On is enough.
                  • Off: none at all.

                  Perimeters and infill

                  Perimeters and infill are the two basic settings that control the structure of the finished print.
                  Both can be easily found in the right panel: (1) Perimeters, (2) Infill density.

                  • Perimeters: the number of outer walls, which sets how thick the shell is.
                  • Infill: the internal structure. It makes the object rigid and supports the top surfaces.

                  Increasing either adds strength and rigidity and increases the print time. For a first print, the
                  profile's defaults are fine.

                  Slice

                  The Slice button is the most important in PrusaSlicer. Slicing takes the model geometry and all
                  your settings, and generates the instructions your printer follows.

                   

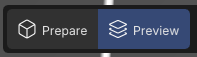
                  Clicking to Slice will bring you into Preview mode. To go back, use the < (back) button beside
                  Export.

                  or the Prepare / Preview switch above the plate.
                  Check the result in Preview

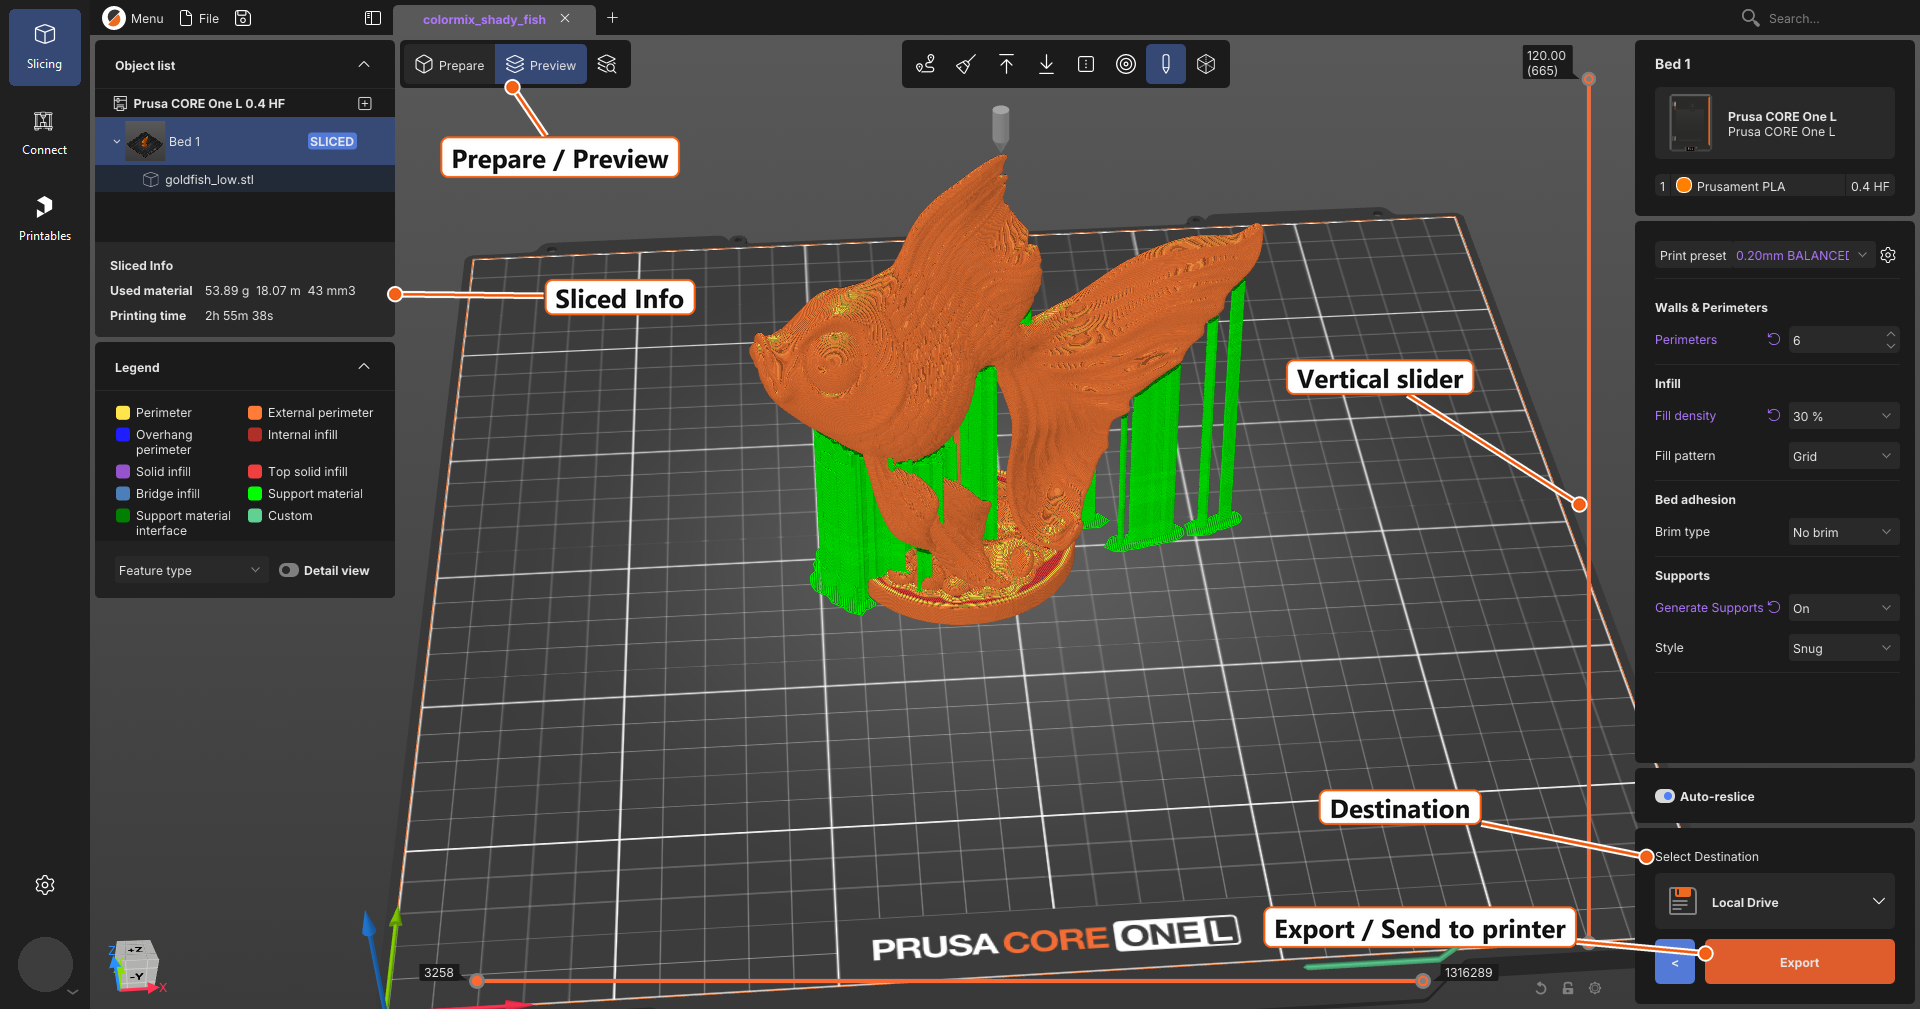
                  You can see the Used material and the Printing time on the left panel.

                  Look at the print. The vertical slicer on the side allows you to check the print layer by layer by sliding it down. The three things to check are:

                  • The shape: At the top of the slider, it should look like your model.
                  • Floating parts: Every new piece of material should sit on something below it — the bed, the
                      model, or a support.
                  • First layer: It should cover the bed. Drag the slider all the way down. This layer decides whether
                      the print sticks.

                  If something looks wrong, switch back to Prepare, fix it, and slice again.
                  Export and print

                  The select destination block above the orange button controls where the file goes. Click it to choose.

                  • A drive on your computer, or a USB stick/SD card: The button reads Export and saves the file. Take the media to the printer.
                  • Prusa Connect: The button reads Send to Connect and uploads it to your Connect account.
                  • A printer on your network: The button reads Send to Printer and sends it straight to the machine.

                  Most first prints go out on removable media. If a USB stick or SD card is plugged in, PrusaSlicer offers it as the destination, and once the file is written, a notification appears with an Eject button — use it rather than pulling the card out.

                  A note on file types: you will get either a .gcode or a .bgcode file. .bgcode is the same instructions in a compact binary form, smaller and faster for the printer to read.

                  Then start the print from the printer's own menu. Watch the first layer go down. If it sticks, the rest usually follows.

                  Handy shortcuts

                  • Ctrl + I import
                  • Ctrl + S save project · Ctrl + F search settings · 
                  • Ctrl + Z UNDO
                  • Tab switch Prepare / Preview
                  • M move
                  • R rotate
                  • S scale
                  • F place on face
                  • A arrange

                  Can't find a setting? Press Ctrl + F and type its name. It works across every settings page.

                  Questo articolo è stato utile?
                  Questa azione è disponibile solo per gli utenti registrati. Per favore accedi.
                  Accedi  per inviare un commento
                  Nessun commento

                  Argomenti

                  • PrusaSlicer 3.0 (Anteprima pubblica)
                    • Informazioni su PrusaSlicer 3.0
                      • First print with PrusaSlicer (3.0.0)
                    • Configurazione e profili
                    • Input/output