Prusa
  • TIENDA
    • Últimos productos
    POR CATEGORÍA
    • Impresoras 3Dnueva
    • Actualizaciones de impresoras 3Dnueva
    • Materiales
    • Accesorios
    • Piezas de repuesto
    • Cursos
    • Merchandising
    • Obtener un presupuesto
    ENLACES RÁPIDOS
    • Envío y entrega
    • Devoluciones y reembolsos
    • Pago y financiación
    • Garantía
    • IVA y Tasas de aduana
    • Preguntas Frecuentes

    0 artículo en tu carritoartículos en tu carrito

    Tu carrito está vacío

    Ir al carritoComprar impresoras 3D

    Mi perfil

    Iniciar sesión para ver pedidos y artículos guardados

    Mi perfil

    Sesión iniciada como

    • Pedidos
    • Cerrar Sesión
  • Impresión 3D
    • Explorar la impresión 3D
    PARA PRINCIPIANTES
    • Impresión 3D 101
    • Cómo funciona la impresión FDM
    • Comprando tu primera impresora
    • Catálogo de modelos 3D
    POR USO
    • Prototipado rápido
    • Fabricación
    • Ingeniería
    • Investigación
    • Arte y diseño
    PROFUNDIZAR
    • Guía de materiales
    • Cursos
    • Webinars
    • Casos de estudio
    • Impresión 3D personalizada
  • IMPRESORAS 3D
    • Todas las impresoras 3D
    PARA
    • Casa o garajeAficionados, manitas e impresión doméstica
    • EmpresasProducción interna para pequeños equipos
    • EmpresaFlotas, seguridad y escala
    • Qué Prusa es la adecuada para mí
    COMPRAR Y NAVEGAR
    • CORE One+nueva
    • CORE One+ INDXnueva
    • CORE One L+nueva
    • CORE One L+ INDXnueva
    • XL+nueva
    • MK4S
    • Prusa Pro HT90
    • Prusa Pro AFS
    • Prusa Pro SLX
    MÁS DE IMPRESORAS
    • Piezas y actualizacionesnueva
    • Spare parts
    • Critical infrastructure
    • Casos de estudio
    • Signature Oak
    • Kits
  • MATERIALES
    • Todos los materiales
    POR USO
    • Uso diario y diseño
    • Ingeniería funcional
    • Compuestos
    • Especialidad profesional
    • Resinas SLA
    PRUSAMENT
    • PLA
    • PETG
    • ASA
    • PC
    • PA11
    • Flexible
    • TPU
    MÁS MATERIALES
    • Guía de materiales
    • Fabricamos material nosotros mismos
    • Sostenibilidad
    • Pedir en la tienda
  • SOFTWARE
    • Todo el software
    PREPARAR LA IMPRESIÓN
    • PrusaSlicer 3.0nueva
    IMPRIMIR Y MONITORIZAR
    • PRUSA CONNECT
    • EasyPrint
    • Aplicación iOS y Android
    • Prusa Farm
    EMPEZAR
    • Descargar e instalar
    • Base de conocimientos
    MÁS SOFTWARE
    • Catálogo de modelos 3D
  • SOPORTE
    • Explorar soporte
    ENCONTRAR RESPUESTAS
    • Base de conocimientos
    • Resolución de problemas
    • Cursos
    • Webinars
    OBTENER AYUDA
    • Contacta con nosotros
    • Chat en vivo
    • Envíos y entregas
    • Garantía
    • Devoluciones y reembolsos
    • Servicio y piezas de repuesto
    • Servicio y Reparación
    COMUNIDAD
    • Foro
    • Reddit
    • Printables
  • CENTRO DE CONFIANZA
    • Resumen del Centro de confianza
    POR TEMA
    • RGPD
    • Certificados
    • Seguridad
    • Cumplimiento
    COMPROMISOS
    • Informe de sostenibilidad
    HABLA CON NOSOTROS
    • Contacta con el equipo de seguridad
  • EMPRESA
    • Acerca de Prusa
    CONÓCENOS
    • Nuestra historia
    • Cómo fabricamos impresoras
    • Código abierto
    • Kit de marca y medios
    NOTICIAS
    • Blog
    • Sala de prensa
    • Eventos
    CONFIANZA Y SOCIOS
    • Sostenibilidad
    • Distribuidores y revendedores
    • Programa de afiliados
    • Contacto
    • English
    • Čeština
    • Deutsch
    • Español
    • Français
    • Italiano
    • Polski
    • 日本語
  • Sesión iniciada como

    • Pedidos
    • Dirección
    • Alertas de Stock
    • Mis Cursos
    • Suscripción
    • Editar Cuenta
    • Cerrar Sesión

Iniciar sesión para ver pedidos y artículos guardados

Sesión iniciada como
  • Pedidos
  • Dirección
  • Alertas de Stock
  • Mis Cursos
  • Suscripción
  • Editar Cuenta
  • English
  • Čeština
  • Deutsch
  • Español
  • Français
  • Italiano
  • Polski
  • 日本語
Tienda

0 artículo en tu carritoartículos en tu carrito

Tu carrito está vacío

Ir al carritoComprar impresoras 3D

Mi perfil

Iniciar sesión para ver pedidos y artículos guardados

Mi perfil

Sesión iniciada como

  • Pedidos
  • Cerrar Sesión
TIENDA
  • Últimos productos
POR CATEGORÍA
  • Impresoras 3Dnueva
  • Actualizaciones de impresoras 3Dnueva
  • Materiales
  • Accesorios
  • Piezas de repuesto
  • Cursos
  • Merchandising
  • Obtener un presupuesto
ENLACES RÁPIDOS
  • Envío y entrega
  • Devoluciones y reembolsos
  • Pago y financiación
  • Garantía
  • IVA y Tasas de aduana
  • Preguntas Frecuentes

Productos destacados

    Categorías populares

      Búsquedas populares

        Artículos

          Blog

            Productos

              Categorías

                Búsquedas sugeridas

                  Buscando…
                  Sin resultados
                  Algo salió mal.
                  ↑↓ Seleccionar↵ AbrirEsc Cerrar búsqueda
                  1. Soporte
                  2. About PrusaSlicer 3.0 [Traducción en desarrollo]
                  3. First print with PrusaSlicer (3.0.0)
                   

                  Contenidos

                  • PrusaSlicer modes
                  • Choose and set up your printer
                  • Choose your filament
                  • Choose a print profile
                  • Import your model
                  • Orient your model
                  • Support material
                  • Perimeters and infill
                  • Slice
                  • Check the result in Preview
                  • Export and print
                  • Handy shortcuts

                  Blog

                  • Pellets de Prusament: Lotes de materia prima para la impresión 3D de gran formato o para la investigación y el desarrollo de polímeros a pequeña escala
                  • Imprime decoraciones de Halloween coloridas y brillantes con nuestra oferta espeluznante
                  • Factorio Ha Llegado a Printables

                  Newsletter

                  Regístrate y obtén nuestro dosier mensual de información útil sobre nuevos firmwares, nuevas versiones de PrusaSlicer y consejos generales para proyectos de impresión 3D.

                  Al hacer clic, aceptas recibir nuestra newsletter.

                  Este sitio está protegido por reCAPTCHA Enterprise y se aplican la Política de Privacidad y los Condiciones del servicio de Google.

                  Heavy Duty Keyboard Holder (No Supports)
                  Tienda
                  • Impresoras 3D
                  • Mejoras de Impresoras
                  • Filamentos
                  • Accesorios
                  • Merchandising Prusa
                  Prusa

                  © Prusa Research a.s.

                  Printables
                  • Modelos 3D
                  • Store
                  • Clubs
                  • Concursos de Diseño 3D
                  • Brands
                  Comunidad
                  • Mapa Mundial
                  • Foro
                  • Grupos de Usuarios
                  • Eventos
                  Ayuda
                  • Ayuda Prusa
                  • Prusa Academy
                  • Calculadoras de Impresión 3D
                  Software
                  • PrusaSlicer
                  • Prusa.app
                  • Prusa Connect
                  • Drivers y Software
                  Empresa
                  • Sobre nosotros
                  • Blog
                  • Distribuidores Oficiales de Prusa
                  • Contacto
                  • Certificado conforme a las normas ISO 9001, ISO 14001 e ISO 45001
                  • Términos y Condiciones generales
                  • Términos Generales y Condiciones de Uso de los sitios Web PRUSA
                  • Política de privacidad
                  • Información sobre las cookies
                  • Política de Reclamaciones de los Clientes
                  • Página de Estado de los Sitios Web
                  • Configuración de las cookies
                  Prusa
                  • Términos y Condiciones generales
                  • Términos Generales y Condiciones de Uso de los sitios Web PRUSA
                  • Política de privacidad
                  • Información sobre las cookies
                  • Política de Reclamaciones de los Clientes
                  • Página de Estado de los Sitios Web
                  • Configuración de las cookies

                  © Prusa Research a.s.

                  JOSEF PRUSA®, PRUSA RESEARCH®, PRUSA POLYMERS®, PRUSA ORANGE®, PRUSA 3D ® Y PRUSAMENT® son marcas registradas de Prusa Development a.s. utilizadas por Prusa Research a.s. bajo licencia de Prusa Development a.s.

                  First print with PrusaSlicer (3.0.0)

                  Relevante para

                  PrusaSlicer
                  Artículo está también disponible en los siguientes idiomas
                  English
                  Čeština
                  Polski
                  Deutsch
                  Français
                  Español
                  Italiano
                  日本語

                  Before printing your 3D file, it needs to be converted into a file type called .gcode or .bgcode. That is done by a program called a slicer. The best one for your Prusa or even non-Prusa printers is PrusaSlicer. This guide will lead you through using PrusaSlicer for the first time.

                  Before starting to use PrusaSlicer, make sure you know your Printer model (including the name and nozzle size) and the filament material you will print with.

                  PrusaSlicer modes

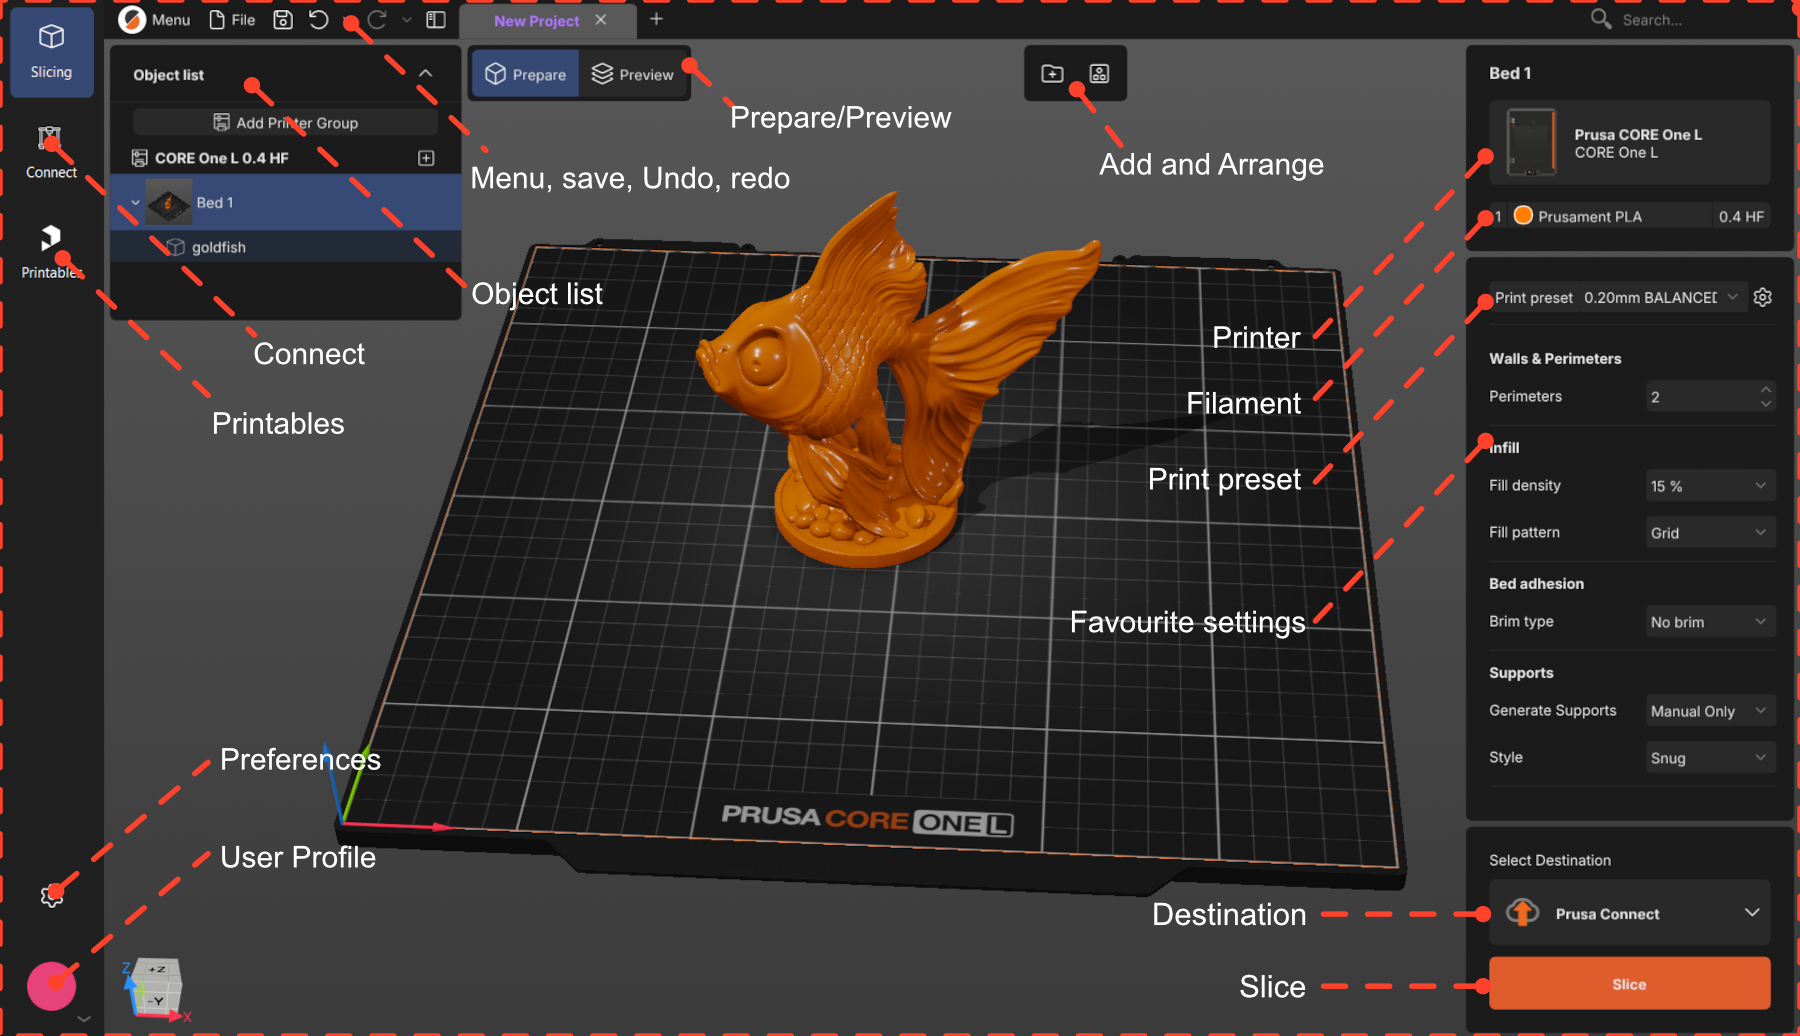
                  PrusaSlicer has two work modes: Prepare and Preview. Most of the model preparation will be done in the Prepare mode.

                  In both modes, you can see the Object list at the top right of the workspace. That will contain all the items of your project, organized as Printer -> Bed -> Object.

                  The Prepare mode is where you will arrange your model and choose your settings. There, you have the 3D scene, where you will add your model.

                  If no objects are selected, you will see the options Add and Arrange on the top menu, and the selected printer, filament, and print profile on the right-side menu.
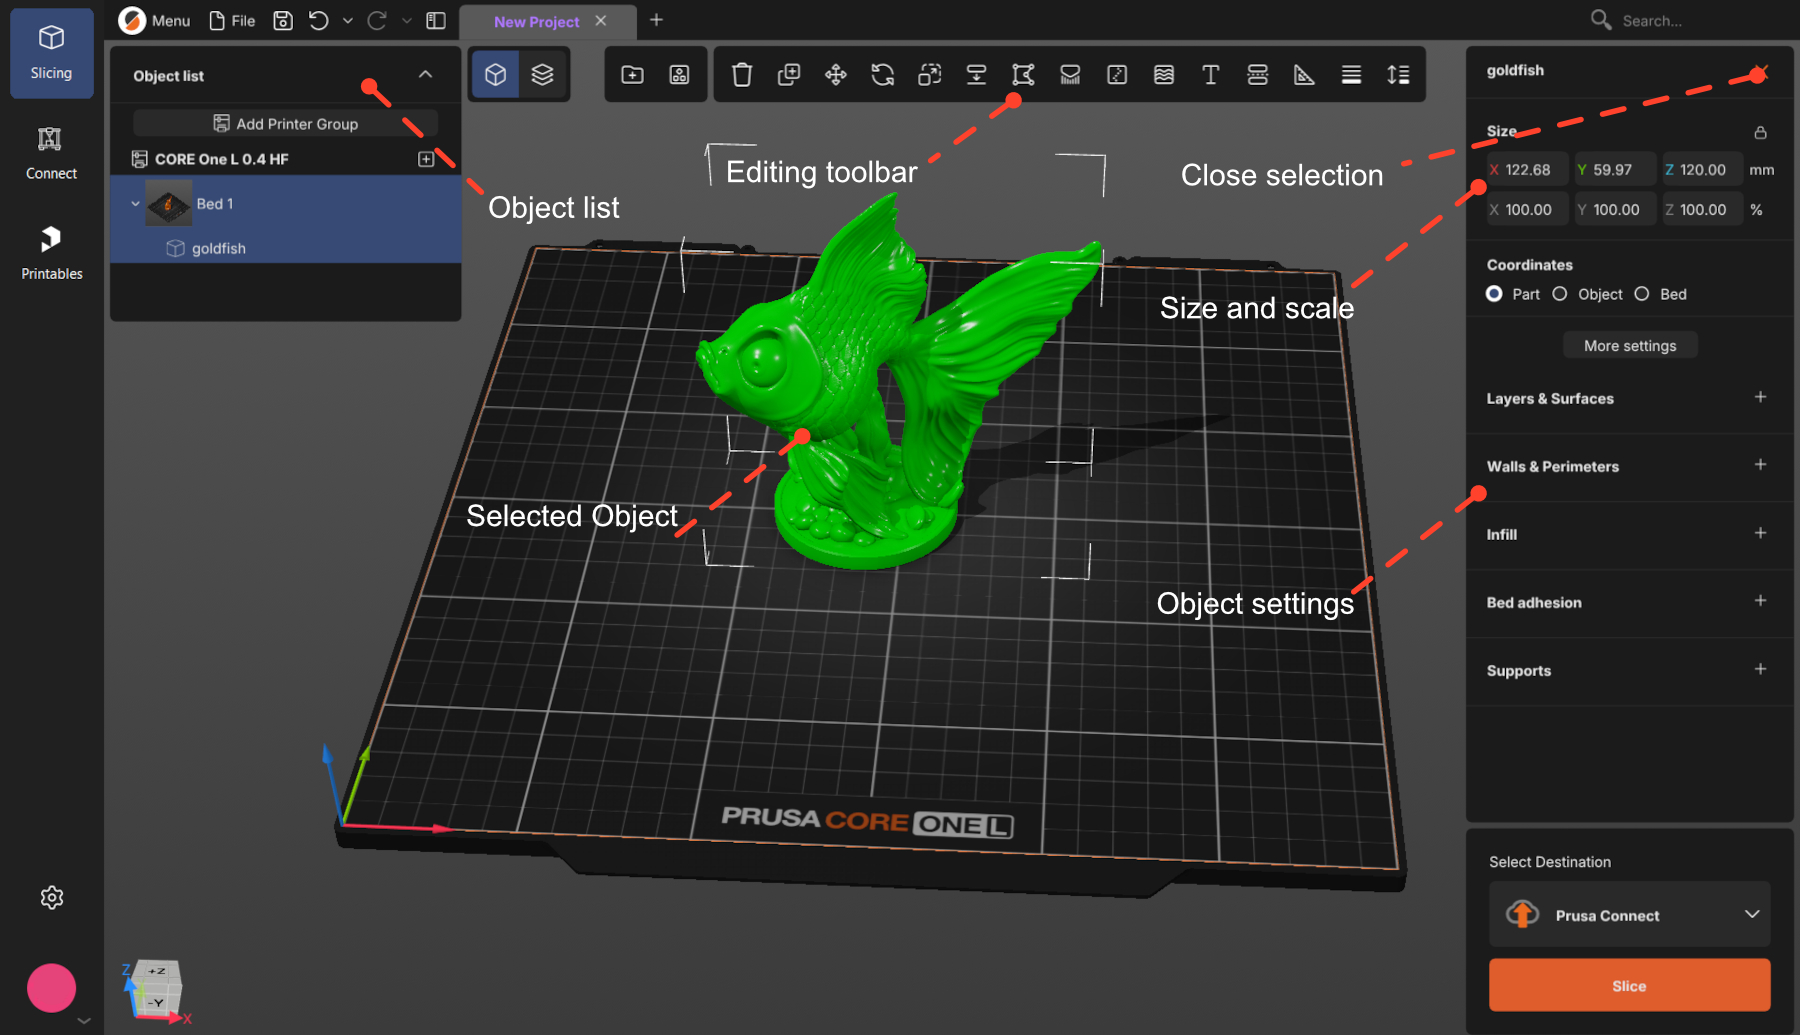
                  After an object is selected, you will see the full set of editing tools at the top menu, and the object's size and settings on the right-side menu.

                  To cancel selection, press Esc or click the close button.
                  Choose and set up your printer

                  Click to select the printer you will use. If your printer is not on the list, click Add printer at the bottom of that dialog and find your model in the catalog - there is a search box.
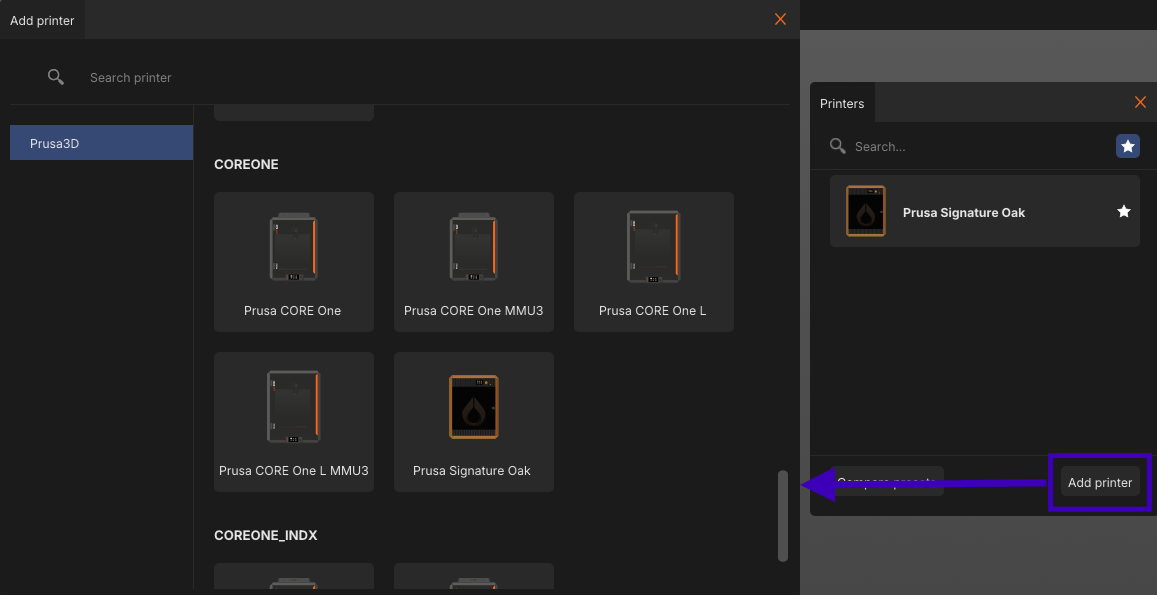
                  Set up the hardware. Always check the nozzle diameter and type, and the print sheet. The gear next to the printer name opens a menu with hardware setup

                  Choose your filament

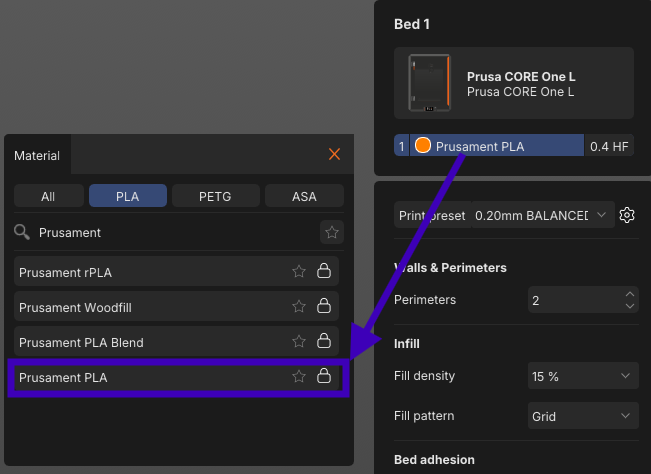
                  Click the material name to see the list of available materials and brands. You can filter by
                  material type — (the All / PLA / PETG / ASA) tabs — or search for the filament.
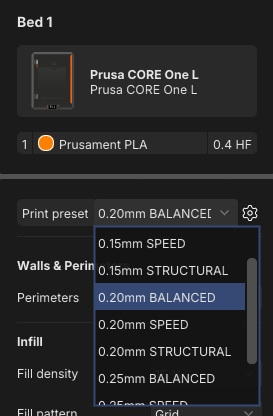
                  Choose a print profile

                  Each print profile comes with a predefined layer height — the main trade-off between quality and
                  time. Thinner layers mean more detail and a longer print.

                  To start, use 0.15 or 0.20 mm. Both give very good quality at a reasonable print time.

                  Most layer heights also come in versions tuned for a purpose, like SPEED or STRUCTURAL.
                  BALANCED is the neutral one you can start with.
                  Import your model

                  Any of these options work:

                  • Drag and drop the file onto the PrusaSlicer window
                  • Click Add above the plate or Ctrl+i
                  • File → Import STL /3mf 

                  Supported 3D formats are:  .3mf, .stl, .obj, .step / .stp, and SVG.

                  .3mf files can hold the whole project, not just models. Opening one may bring its own printer, filament, and print settings and replace yours. That is usually what you want when someone shares a ready-to-print project — just be aware it happened.

                  Orient your model

                  Your model may be oriented incorrectly after import. Four tools are very useful:

                  • Place On Face F: click one of the model's flat surfaces, and it snaps face-down onto the bed. The quickest fix for a model that imported at an angle.
                  • Move M: drag the model with the left mouse button at any time. The Move tool constrains the movement to a single axis.
                  • Rotate R: turn the model around the X, Y, or Z axis. Dragging the outer ring snaps in   45° steps, the inner ring in 5° steps.
                  • Arrange A: with several models on the plate, arrange them out on the bed without overlaps and with a safe gap between the parts.

                  Support material

                  Printers build prints upward layer by layer, so anything that overhangs with nothing beneath it has nothing to print onto. It sags or falls, ruining the print. Supports are scaffolding that holds it up, and you break them off afterwards.
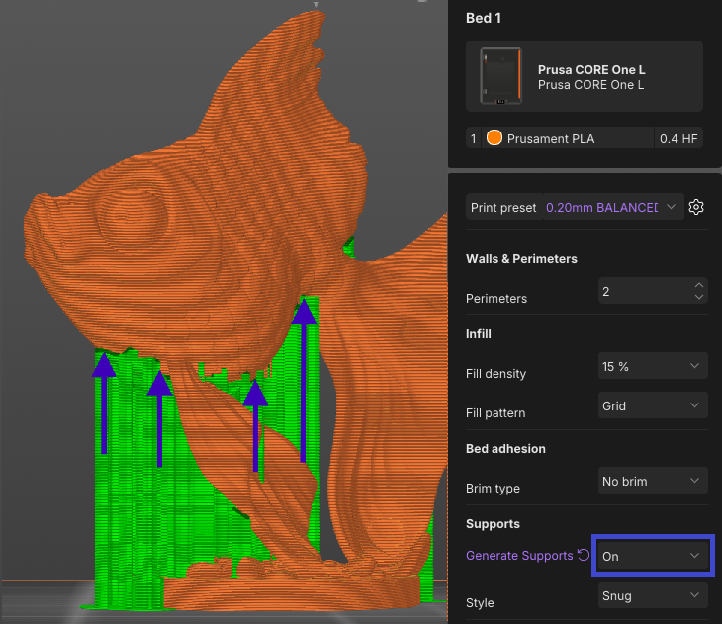
                  • Manual Only (default): only where you paint them on yourself, with the Paint-on supports tool L.
                  • On: added automatically wherever an overhang needs them. For most models, On is enough.
                  • Off: none at all.

                  Perimeters and infill

                  Perimeters and infill are the two basic settings that control the structure of the finished print.
                  Both can be easily found in the right panel: (1) Perimeters, (2) Infill density.

                  • Perimeters: the number of outer walls, which sets how thick the shell is.
                  • Infill: the internal structure. It makes the object rigid and supports the top surfaces.

                  Increasing either adds strength and rigidity and increases the print time. For a first print, the
                  profile's defaults are fine.

                  Slice

                  The Slice button is the most important in PrusaSlicer. Slicing takes the model geometry and all
                  your settings, and generates the instructions your printer follows.

                   

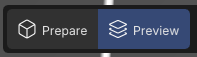
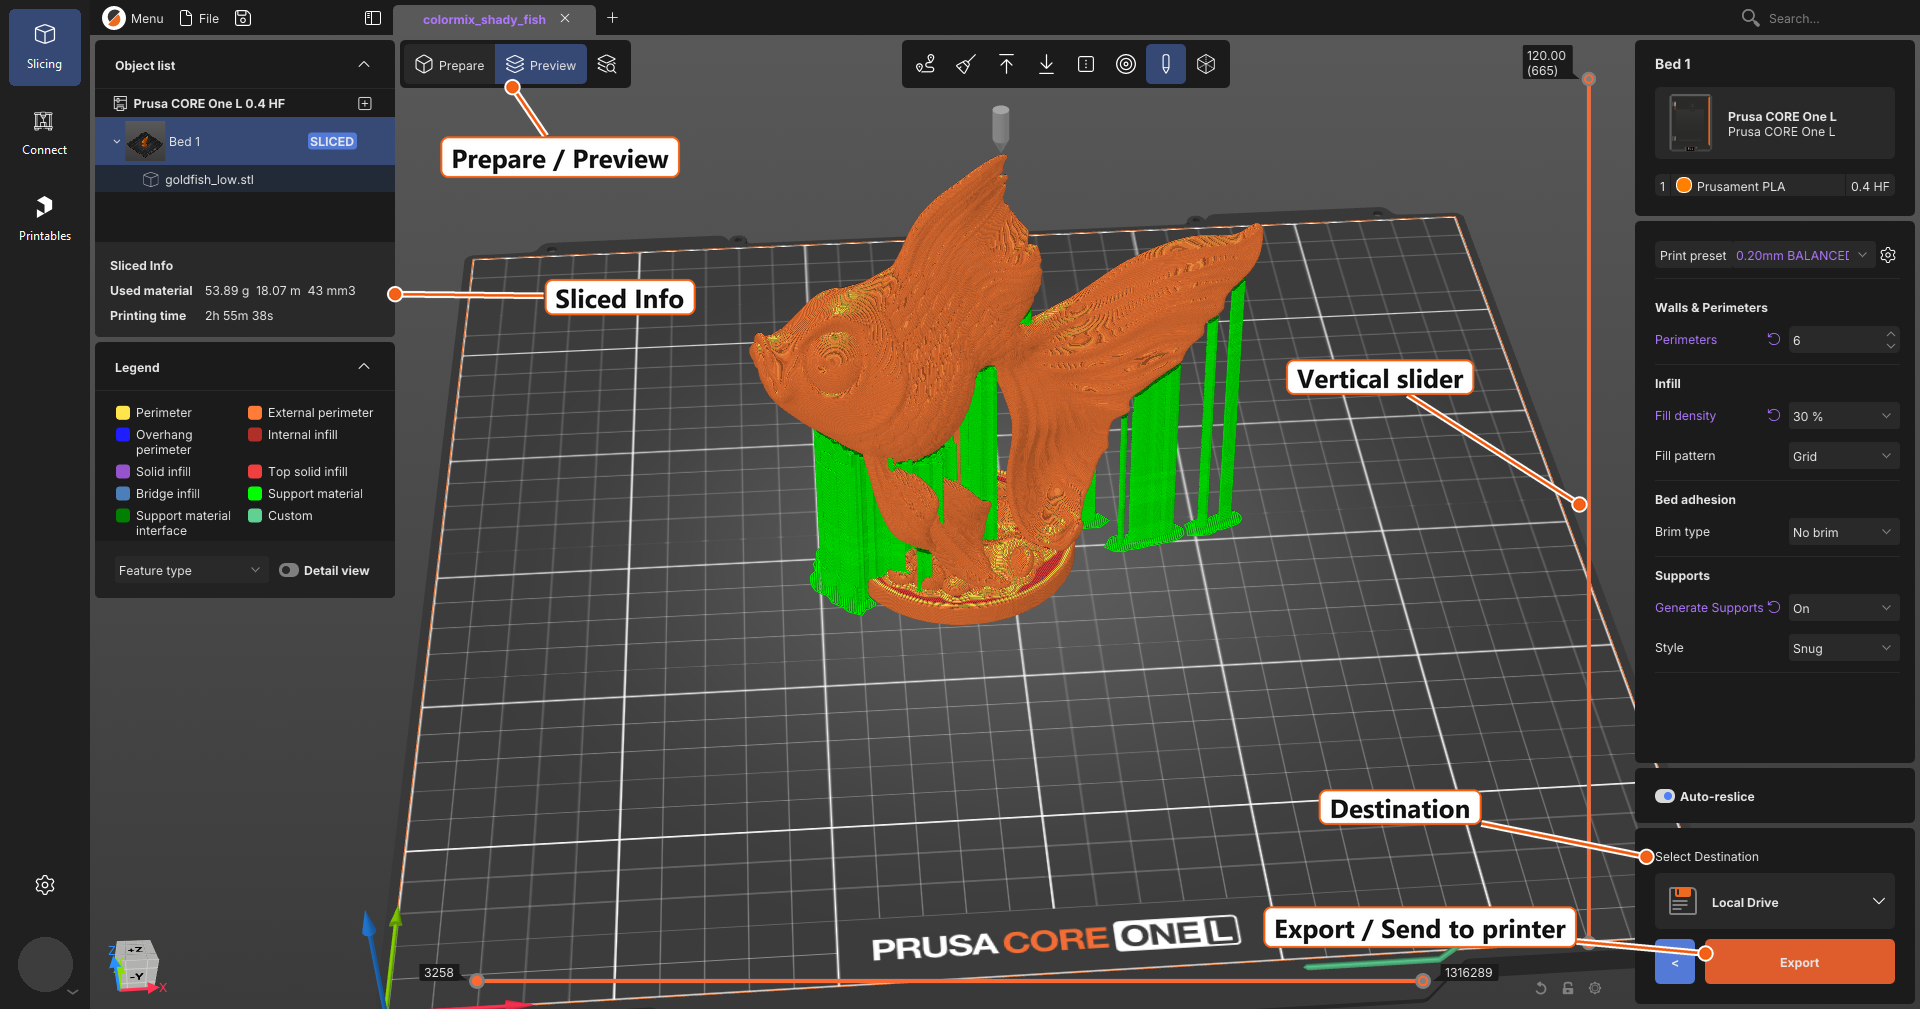
                  Clicking to Slice will bring you into Preview mode. To go back, use the < (back) button beside
                  Export.
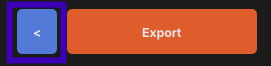
                  or the Prepare / Preview switch above the plate.
                  Check the result in Preview

                  You can see the Used material and the Printing time on the left panel.

                  Look at the print. The vertical slicer on the side allows you to check the print layer by layer by sliding it down. The three things to check are:

                  • The shape: At the top of the slider, it should look like your model.
                  • Floating parts: Every new piece of material should sit on something below it — the bed, the
                      model, or a support.
                  • First layer: It should cover the bed. Drag the slider all the way down. This layer decides whether
                      the print sticks.

                  If something looks wrong, switch back to Prepare, fix it, and slice again.
                  Export and print

                  The select destination block above the orange button controls where the file goes. Click it to choose.

                  • A drive on your computer, or a USB stick/SD card: The button reads Export and saves the file. Take the media to the printer.
                  • Prusa Connect: The button reads Send to Connect and uploads it to your Connect account.
                  • A printer on your network: The button reads Send to Printer and sends it straight to the machine.

                  Most first prints go out on removable media. If a USB stick or SD card is plugged in, PrusaSlicer offers it as the destination, and once the file is written, a notification appears with an Eject button — use it rather than pulling the card out.

                  A note on file types: you will get either a .gcode or a .bgcode file. .bgcode is the same instructions in a compact binary form, smaller and faster for the printer to read.

                  Then start the print from the printer's own menu. Watch the first layer go down. If it sticks, the rest usually follows.

                  Handy shortcuts

                  • Ctrl + I import
                  • Ctrl + S save project · Ctrl + F search settings · 
                  • Ctrl + Z UNDO
                  • Tab switch Prepare / Preview
                  • M move
                  • R rotate
                  • S scale
                  • F place on face
                  • A arrange

                  Can't find a setting? Press Ctrl + F and type its name. It works across every settings page.

                  ¿Te resultó útil este artículo?
                  Esta acción está disponible solo para usuarios registrados. Por favor inicia sesión.
                  Inicia sesión  para publicar un comentario
                  Sin comentarios

                  Temas

                  • Test no parent
                    • About PrusaSlicer 3.0 [Traducción en desarrollo]
                      • First print with PrusaSlicer (3.0.0)
                    • Configuration and profiles [Traducción en desarrollo]
                    • Input/output [Traducción en desarrollo]