Si raccomanda di dedicare del tempo alla manutenzione della Prusa CORE One/+. Questo dovrebbe essere fatto anche se la stampante funziona perfettamente.
Strumenti utili
Oltre ai soliti strumenti, come chiavi a brugola, pinze a becchi lunghi e IPA (alcool isopropilico) + carta assorbente, potresti aver bisogno di:
- Aria compressa: anche in forma di bomboletta spray. Assicurati di non tenerla capovolta mentre la spruzzi, altrimenti potresti danneggiare i componenti elettronici mentre cerchi di pulirli.
- Spazzola in ottone: una piccola spazzola in ottone è utile per pulire il blocco riscaldatore. Se non hai una spazzola in ottone, qualsiasi spazzola con setole dure andrà bene.
- Lubrificante Prusa: un tubetto di lubrificante Prusa è incluso nella Prusa CORE One. Viene utilizzato per lubrificare le aste lisce con i cuscinetti lineari e per lubrificare le viti dell'asse Z. NON utilizzare il lubrificante Prusa sulla guida lineare!
- Kit di lubrificazione per guide lineari: un set che comprende Microlube GL 261, ago dosatore SSS15 2, cartuccia con pistone manuale 2/2,5 mm e due guanti in nitrile.
- Detergente senza alcool: da utilizzare per pulire i pannelli della stampante. NON utilizzare prodotti a base di alcol, incluso l'IPA, per pulire i pannelli.
Manutenzione periodica
Prima di ogni stampa è necessario verificare i seguenti punti.
Mantenere la stampante pulita
Dopo diverse ore di stampa, potrebbero accumularsi vari tipi di residui intorno alle parti della stampante o sotto il piano riscaldato: pezzi di filamento, polvere, scarti, supporti rotti, ecc. Assicurati sempre che le parti della stampante siano pulite. Puoi usare una spazzola, una piccola scopa o un aspirapolvere per rimuovere i frammenti.
Pulizia dell'hotend
È fondamentale che l'hotend sia pulito. I residui sull'ugello o sul blocco riscaldatore possono causare guasti alla stampante, ad esempio cadendo sul modello stampato mentre la stampa è in corso.
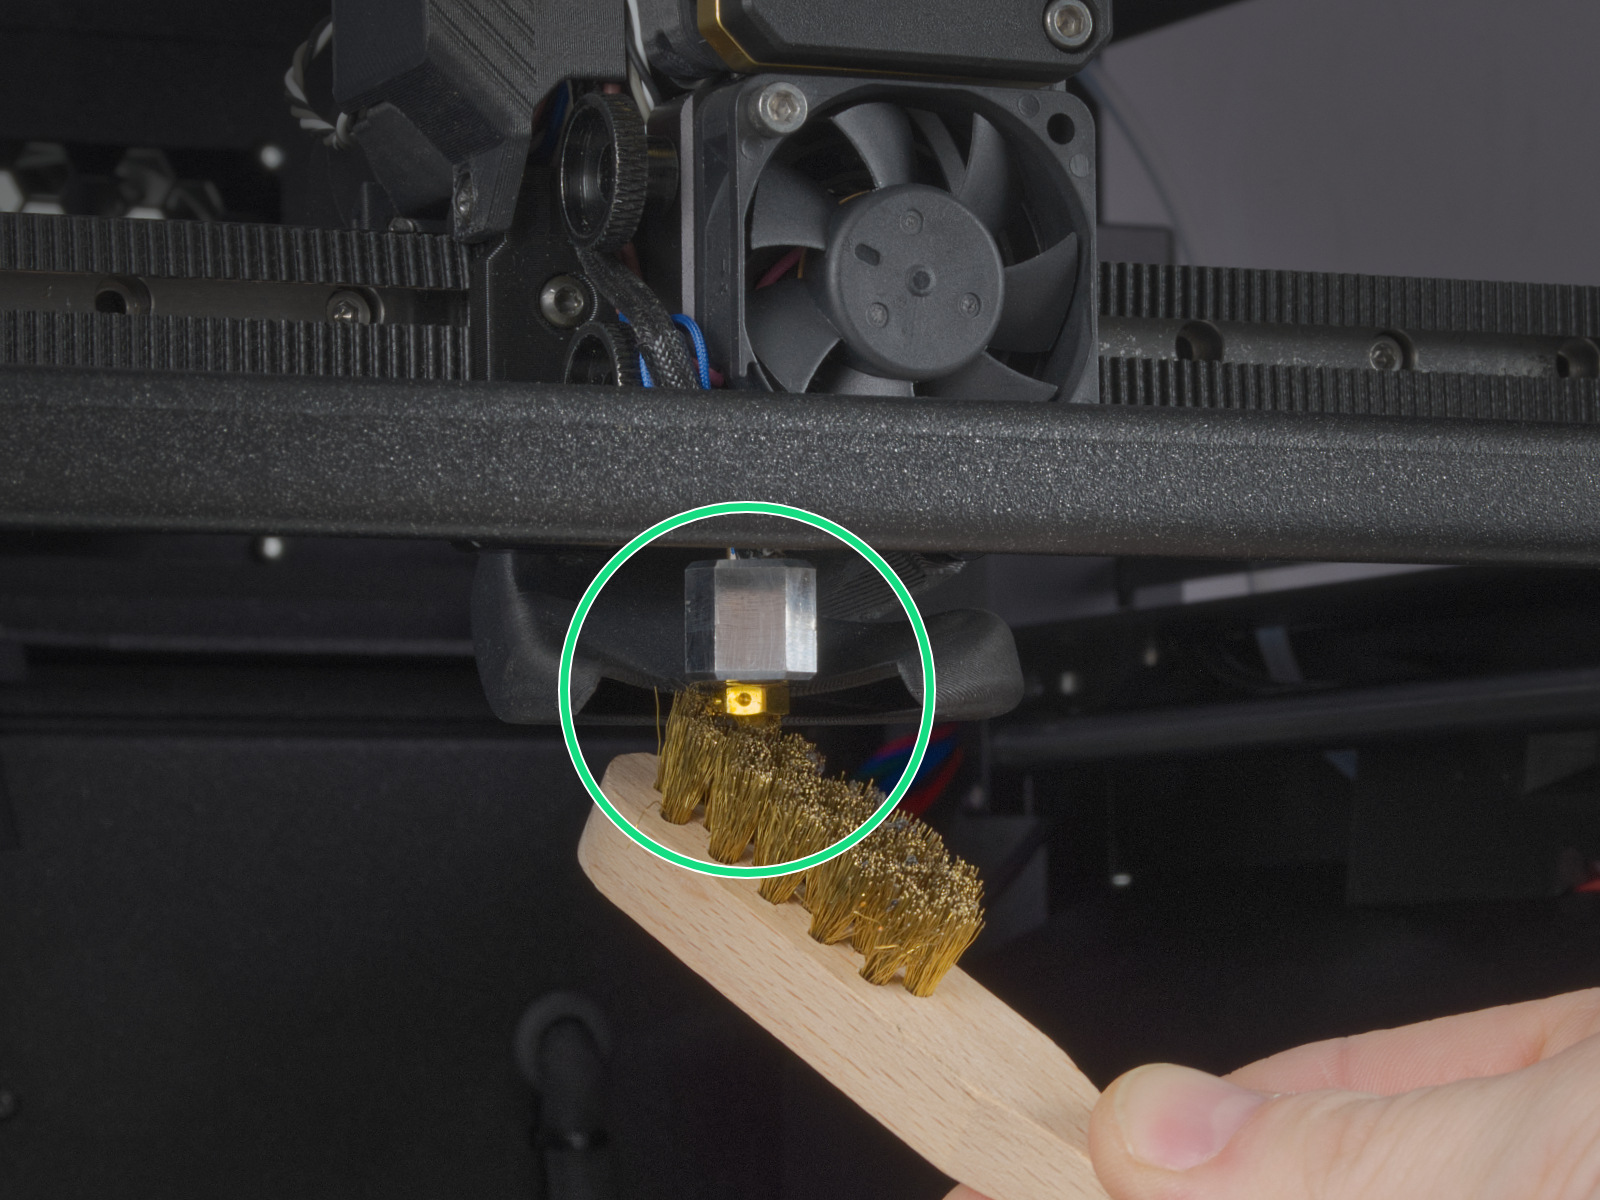
Per pulire l'ugello e il blocco riscaldatore, riscalda l'ugello per tre o cinque minuti a 250 °C, affinché i resti del filamento possano essere rimossi più facilmente.
Usa una piccola spazzola di ottone per rimuovere la plastica vecchia attaccata all'ugello e al blocco riscaldatore.
Evita che la spazzola entri in contatto con i cavi dell'hotend, perché potrebbe causare un cortocircuito.
Attenzione: la temperatura della stampante è ancora alta! Attendi che le parti calde si raffreddino a temperatura ambiente. Ci vogliono circa 10 minuti. Non toccarla! Controlla sempre i valori sul display.
Piastra di stampa flessibile
Non pulire mai la speciale piastra PA Nylon utilizzando acetone, IPA (alcol isopropilico) o altri solventi a base di alcol (detergenti per vetri, Windex, ecc.)! Questo danneggia la superficie.
Tutte le piastre di stampa flessibili devono essere pulite regolarmente per garantire l'adesione, ma i metodi esatti e le soluzioni di lavaggio possono variare a seconda del tipo di piastra.
Puoi trovare maggiori informazioni su come trattare la tua piastra di stampa flessibile in questo articolo.
Manutenzione sporadica
I seguenti controlli devono essere eseguiti ogni 200 ore di stampa.
Controllo degli assi - Guida lineare (asse X)
Assicurati che non ci siano detriti o polvere sulla guida lineare (asse X). Se presente, puliscilo con un fazzoletto o un panno pulito, senza usare sgrassatori o prodotti chimici, perché potrebbero danneggiare la gomma del carrello.
Si consiglia di lubrificare la guida lineare ogni 3-6 mesi, utilizzando il set dedicato per la lubrificazione delle guide lineari nei punti indicati qui sotto.
 |  |
Sulle guide lineari, NON utilizzare il lubrificante Prusa o altri prodotti che non fanno parte del set di lubrificazione delle guide lineari.
Controllo degli assi - Aste lisce e cuscinetti lineari (asse Y)
Pulisci le aste lisce (asse Y) con un panno di carta pulito e lubrificale con una piccola quantità di Lubrificante Prusa.
Solo nel caso in cui tu ritenga che l'asse non funzioni più in modo fluido anche dopo aver pulito e lubrificato di recente le aste lisce, i cuscinetti possono essere estratti, puliti con alcool e ingrassati all'interno, sempre utilizzando una piccola quantità di lubrificante Prusa.
Controllo degli assi - Cinghia
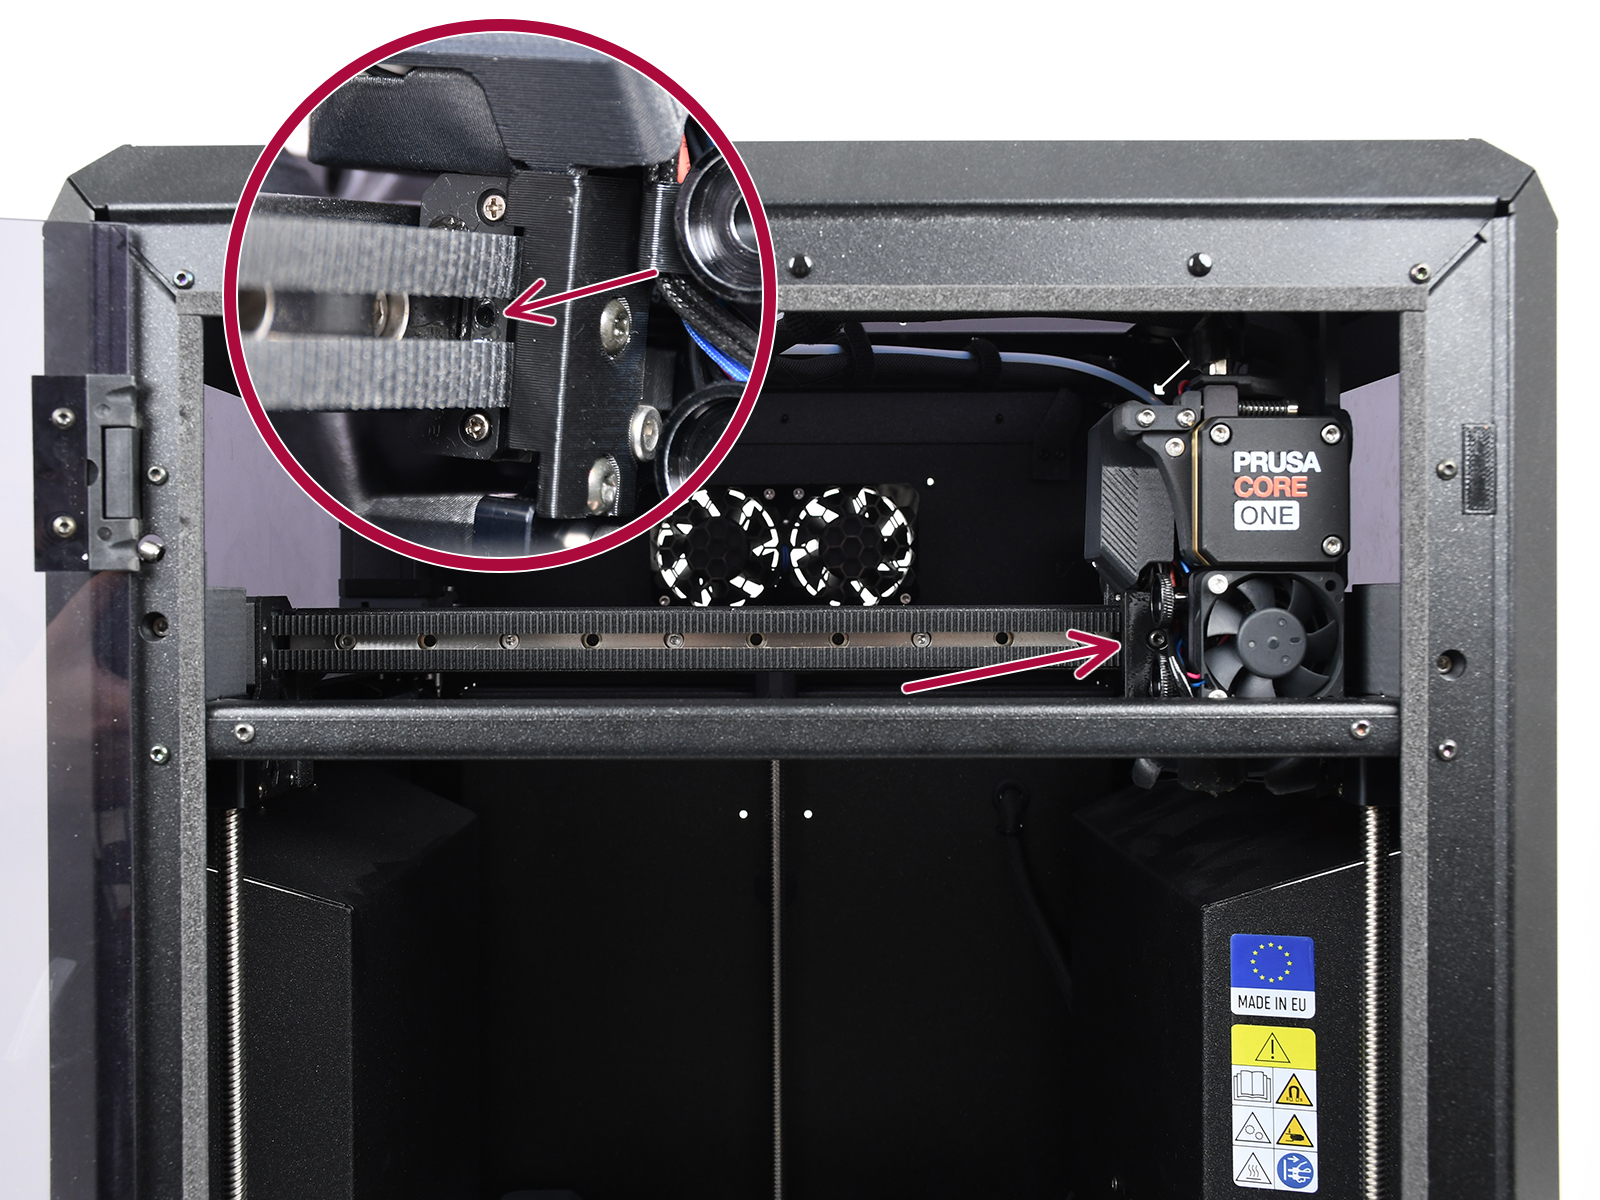
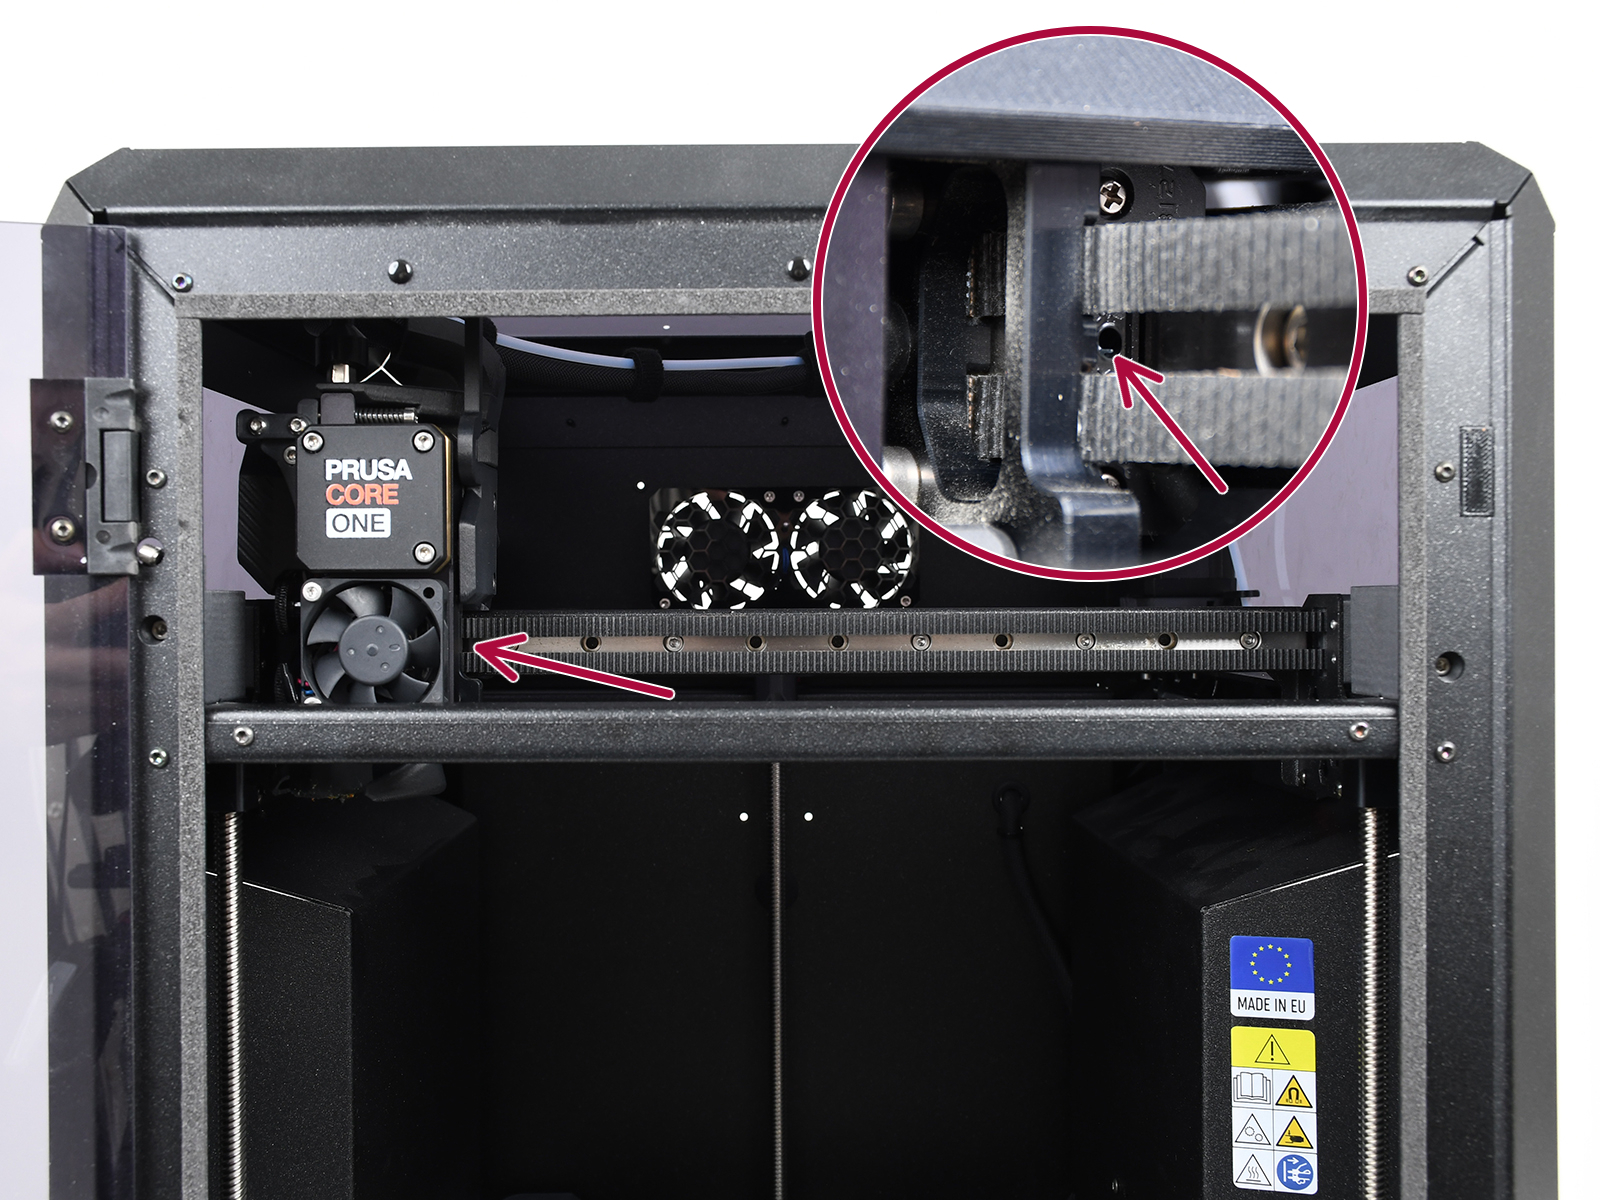
Dopo un lungo periodo di stampa, la cinghia può allentarsi leggermente, causando problemi come lo spostamento dei layer o una bassa qualità di stampa. Il modo più semplice per verificare la tensione della cinghia è stampare un oggetto circolare. Se il risultato non è perfettamente rotondo, è necessario regolare la cinghia.
Ventole
Il numero di giri al minuto (RPM) di entrambe le ventole viene misurato costantemente. Ciò significa che la stampante segnalerà un errore se la ventola rallenta improvvisamente, ad esempio a causa di un pezzo di filamento incastrato nella ventola stessa.
In tal caso, controlla e rimuovi lo sporco dalla ventola in questione. Non cercare di eludere il controllo del numero di giri, perché potrebbe danneggiare la stampante!
Entrambe le ventole devono essere controllate e pulite ogni centinaia di ore di stampa. La polvere può essere rimossa con aria compressa (anche in una bomboletta spray), mentre i piccoli fili di plastica possono essere rimossi con una pinzetta.
ATTENZIONE: non soffiare aria compressa sulla ventola in funzione.
Nextruder
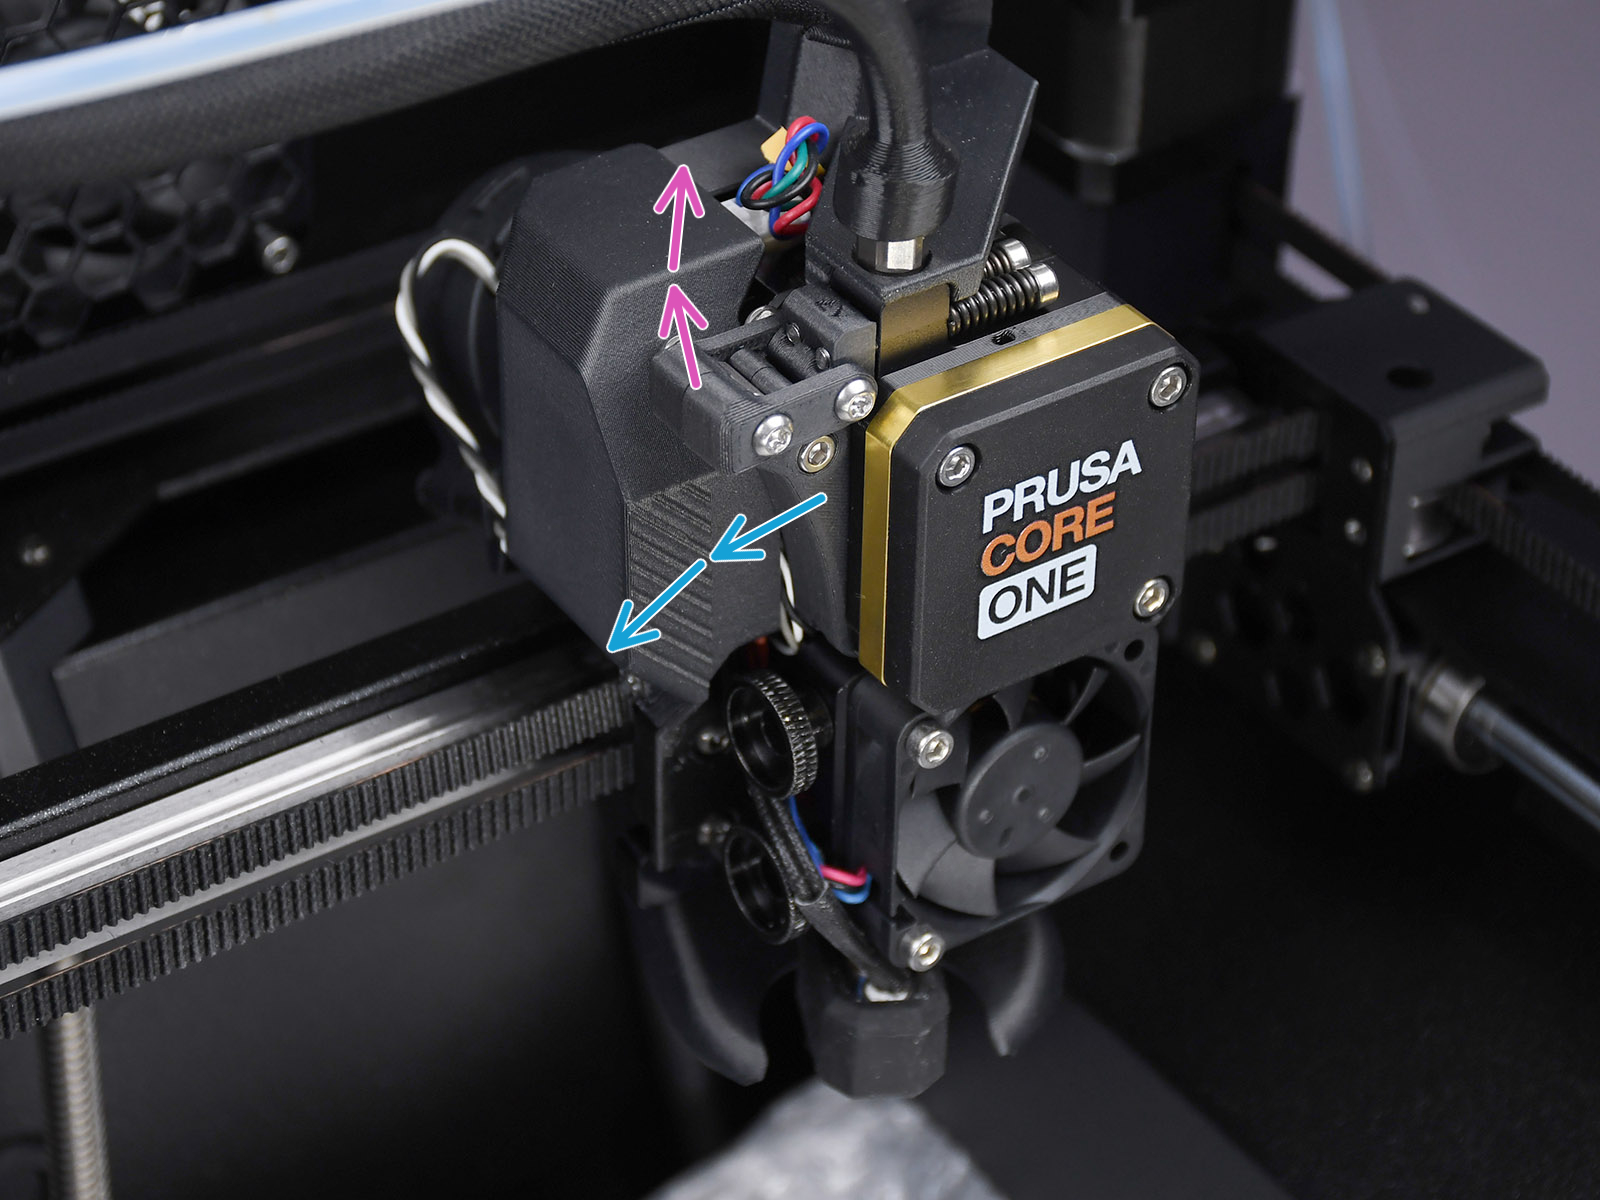
L'ingranaggio primario e i cuscinetti collegati all'albero folle dell'estrusore non necessitano di alcun lubrificante. Con il tempo, nelle scanalature dell'ingranaggio primario può formarsi un deposito di residui di filamento che causa un'estrusione insufficiente del filamento. Accedi all'estrusore sollevando il dado Idler Nut, quindi spostando l'asta Idler Shaft. Puoi soffiare via lo sporco con aria compressa, oppure utilizzare una spazzola di ottone o un normale stuzzicadenti. Usa il foro di accesso sul lato dell'estrusore.
Sensore di filamento Nextruder
Se si verificano problemi con il sensore di filamento dell'estrusore Nextruder, come letture errate o casuali, assicurarsi che tutto l'estrusore Nextruder sia cablato correttamente e che non ci siano detriti nel percorso del filamento all'interno dell'estrusore, utilizzando una pinzetta o dell'aria compressa.
Per accedere al lato destro della LoveBoard, allenta le due viti M3x6 e rimuovi il coperchio.
 |  |
Per pulire il sensore di filamento sul Nextruder consulta l'articolo dedicato.
Pulizia dei pannelli
Usa un detergente senza alcool o acqua saponata per pulire i pannelli della stampante.
NON utilizzare prodotti che contengono alcol, incluso l'IPA. L'esposizione ripetuta indebolisce i pannelli, rendendoli fragili nel tempo.
Manutenzione con cadenza annuale
Elettronica
È buona norma controllare e ricollegare i connettori elettrici della scheda xBuddy, della Loveboard, del piano riscaldato, dell'alimentatore e del display xLCD ogni 600-800 ore di stampa.
In particolare, assicurati che i connettori a vite siano completamente serrati e che i connettori Molex siano collegati correttamente.
ATTENZIONE: per i connettori Molex, è necessario premere il fermo prima di scollegarli. In caso contrario, il connettore potrebbe danneggiarsi.