AA

Featured products

    Popular categories

      Trending searches

        Articles

          Blog

            Products

              Categories

                Suggested searches

                  Searching…
                  No results
                  Something went wrong.
                  ↑↓ Select↵ OpenEsc Close search
                  • English
                  • Čeština
                  • Deutsch
                  • Español
                  • Français
                  • Italiano
                  • Polski
                  • 日本語
                  • Orders
                  • Address
                  • In-stock Alerts
                  • My Courses
                  • Subscription
                  • Edit Account
                  • 3D printers9+▾

                    3D printersnew

                    newPrusa CORE One L+Learn more
                    newPrusa CORE One+ (Gen 2)Learn more
                    newPrusa CORE One L+ INDX 8-ToolnewPrusa CORE One+ (Gen 2) INDX 8-ToolPrusa CORE One L+: Critical InfrastructureOriginal Prusa MK4SnewOriginal Prusa XL+Original Prusa XL+: Critical Infrastructure

                    Printer upgrades

                    newINDX Conversion KitsnewPrusa CORE One L to CORE One L+ upgradenewPrusa CORE One+ to Prusa CORE One+ (Gen 2)newPrusa XL to Prusa XL+ Upgrade
                    Prusa Reward ProgramLove your Prusa printer? Share your experience and earn $30 Prusa e-shop vouchers.
                    How to Choose a 3D Printer?We’ll walk you through the basics to find the exact machine for your space, budget, and ideas.
                    Free E-bookDownload a free e-book Basics of 3D Printing with Josef Prusa and make your first steps in 3D printing world
                    Original Prusa Printable PartsCollections of printable spare parts for Original Prusa 3D printers and upgrades.
                    Shipping informationRegularly updated info about the current manufacturing capacity and delivery times of our printers.
                    Custom 3D PrintingProfessional custom 3D printing from various materials according to your requirements.
                  • Materials▾

                    Filaments

                    PrusamentPLAPETGASA / ABSPC (Polycarbonate)PA (Nylon)FlexCompositesSpecialMaterials clearance sale

                    Resin

                    Prusament ResinResin Cleaner
                    Filament GuideCheck my Prusament Spool
                    Prusament.com
                  • Parts & Accessories▾

                    Accessories

                    EnclosuresNozzlesPrint SheetsEssential AccessoriesCameras & AddonsTools & CraftingAdhesives

                    Spare parts

                    Merchandise

                    Spare parts - All PrintersCORE OneMK4/S & MK3.9/SMK3/S/+XL
                    Merch
                  • For Business▾
                    Prusa Pro HT90Prusa Pro SLXPrusa Pro AFSPrusa Pro Medical OneOriginal Prusa XLOriginal Prusa XL: Critical Infrastructure
                    Prusa CORE One+Learn more
                    Prusa CORE One LLearn more
                    Prusa CORE One L: Critical Infrastructure Edition

                    3D Printing for

                    Manufacturing and R&DAutomotive IndustryHealthcareEducation and Academic ResearchArchitects and DesignersFilm IndustryCritical Infrastructure

                    3D Printing Stories

                    • How 3D printing started: About Rep-rap and open-source with Adrian Bowyer
                    • Teaching mathematics redefined with 3D printing at JKU Linz
                    • The story behind the LTT screwdriver
                    • Victoria Hand Project: Changing Prosthetic Care with 3D Printing
                    Official Prusa Resellers
                    Sustainability
                    Prusa Education
                    Contact and Inquiry
                    Custom 3D Printing
                    ISO Certified
                  • Software▾
                    PrusaSlicer

                    PrusaSlicerPrusaSlicer

                    PrusaSlicer is an open-source, feature-rich, frequently updated tool that contains everything you need to export the perfect print files for your 3D printer.

                    WindowsMacOSLinux
                    Prusa Connect

                    Prusa Connect

                    Prusa Connect is a cloud service enabling remote control and monitoring of your 3D printers, offering secure data handling, easy setup, and support for managing multiple printers from anywhere.

                    Log in to Connect
                    Prusa.app

                    Prusa.app

                    Control your printer/s remotely from anywhere using the Prusa Connect technology behind. Prusa.app brings a new level of Prusa printer experience to Android and iOS phones.

                    Try it now!
                    Drivers & FirmwareDownload the latest firmware and drivers for your 3D printer.
                    PrusaSlicer Support
                    Prusa Connect Support
                  • 3D Models▾
                    3D PrintersArt & DesignHobby & MakersHouseholdTabletop MiniaturesToys & GamesPrintables Store

                    Popular 3D models

                    • Strong garden hose holder
                    • Prusa Spool Bot
                    • Build Tray — Modular Organizer for Assembly, Disassembly and Maintenance
                    • Broom Holder
                    • Octagon Fabric
                    • Prusa CORE One ? (Mimic Skin)

                    Design Contests

                    • Framework Laptop 12 Mainboard Re-Use9/1/2026 – 9/30/2026
                    • 🏆 Designer Challenge: Magic tricks!9/1/2026 – 9/22/2026
                    • Od prototypu k produktu: Příslušenství ke kamerám8/1/2026 – 9/14/2026
                  • Community▾

                    Upcoming Events

                    • Maker Faire Tokyo 20269/5/2026 – 9/6/2026 · Tokyo, Japan · Prusa Team
                    • IFA 20269/4/2026 – 9/8/2026 · Berlin, Germany · Prusa Team
                    • 3D Printopia 20269/26/2026 – 9/27/2026 · Pennsylvania, United States · Prusa Team
                    • Maker Faire Bay Area9/25/2026 – 9/27/2026 · Kalifornie, United States · Prusa Team

                    Prusa Forum

                    • Vent doesn't close for an ASA print
                    • Alignment tool?
                    • Is this spam?
                    Prusa World MapPrusa World MapFind local 3D printing users and explore the community around you.
                  • Help▾
                    Guides & TutorialsPrusaSlicerPrusa ConnectMaterials

                    Printer Model

                    CORE One INDXCORE One LCORE One+CORE One

                    Hardware Troubleshooting

                    • Selftest failed (CORE One/+)
                    • Clogged nozzle (CORE One, CORE One L, XL, MK4/S, MK3.9/S)
                    • Adjusting belt tension (CORE One/+, CORE One INDX, CORE One L/+)
                    • Prusa Connect and PrusaLink explained

                    Drivers & Firmware

                    INDX familyCORE One familyMK4 familyXL familyMMU familyPRO family
                  • Courses▾

                    Become an expert in 3D printing

                    Prusa Academy offers online courses on various 3D printing related topics. Each course features:

                    • easy-to-read text with many pictures and short videos
                    • links for inspiration and further study
                    • quizzes for testing your knowledge along the way
                    • certificate of completion
                    Browse all coursesMy courses library
                    • 3D Modeling in Autodesk Fusion
                    • PrusaSlicer Masterclass – Beginner to Advanced
                    • Complete Guide to 3D Print Postprocessing, Painting, and Detailing
                    • Airbrush Your 3D Prints: From Basics to Advanced Tricks
                  • Blog▾
                    • PrusaSlicer 3.0 Preview – Built for the Future of 3D Printing
                    • Prusa CORE One+ (Gen 2) INDX, Shipping Has Started, Complete Printers Open for Orders
                    • Better Prints, Easier Use: Prusa XL+, CORE One L+ and CORE One+ (Gen 2), Our Big Product Upgrade
                    E-Book: Basics of 3D Printing
                  • Company▾

                    About Prusa Research

                    We are the largest maker of 3D printers in Europe and the United States.

                    Founded as a one-man startup in 2012 by Josef Prusa, a Czech hobbyist, maker, and inventor. In just 15 years, we've grown into a company of more than 1,200 people. Every month, we design, build, and ship over 10,000 innovative and secure 3D printers from our headquarters in Prague, Czech Republic, and Delaware, USA, to users in more than 160 countries.

                    Watch a video and find out how Prusa Research was born and what we achieved within only 10 years!

                    About UsTimelineSustainabilityOpen-source
                    About Us
                    Contact Us
                    Logo and Photos
                    ISO Certified
                  1. Support
                  2. Print Quality Troubleshooting
                  3. First layer issues
                   

                  Contents

                  • How to prepare your print surface
                  • The nozzle is too close/far from the sheet (MK2/S, MK2.5/S, MK3/S/+, MK3.5/S)
                  • Speed and temperature
                  • A full or partial clog
                  • Uneven surface
                  • Brim
                  • Expansion joints (CORE One, MK4/S, MK3.9/S, MK3.5/S)
                  • Nozzle conditions (CORE One, MK4/S, MK3.9/S)
                  • Nozzle conditions (XL)
                  • LoadCell check (CORE One, MK4/S, MK3.9, XL)
                  • Mechanical checks (XL)

                  Blog

                  • PrusaSlicer 3.0 Preview – Built for the Future of 3D Printing
                  • Prusa CORE One+ (Gen 2) INDX, Shipping Has Started, Complete Printers Open for Orders
                  • Better Prints, Easier Use: Prusa XL+, CORE One L+ and CORE One+ (Gen 2), Our Big Product Upgrade

                  Newsletter

                  Signup and get our monthly squeeze on updates, blog, printables and much more.

                  By clicking, you agree to receive our newsletter.

                  This site is protected by reCAPTCHA Enterprise and the Google Privacy Policy and Terms of Service apply.

                  Strong garden hose holder
                  E-shop
                  • 3D Printers
                  • Printer Upgrades
                  • Filaments
                  • Accessories
                  • Prusa Merchandise

                  © Prusa Research a.s.

                  Printables
                  • 3D Models
                  • Store
                  • Clubs
                  • 3D Design Contests
                  • Brands
                  Community
                  • World Map
                  • Forum
                  • User Groups
                  • Events
                  Help
                  • Prusa Help
                  • Prusa Academy
                  • 3D Printing Calculators
                  Software
                  • PrusaSlicer
                  • Prusa.app
                  • Prusa Connect
                  • Drivers and Software
                  Company
                  • About Us
                  • Blog
                  • Official Prusa Resellers
                  • Contact Us
                  • Certified for ISO 9001, ISO 14001, ISO 45001
                  • General Terms and Conditions
                  • General Terms and Conditions of Use of the PRUSA Websites
                  • Privacy Policy
                  • Information about cookies
                  • Customer Complaints Policy
                  • Status Page
                  • Do Not Sell or Share My Personal Information
                  • Supplemental Statements
                  • General Terms and Conditions
                  • General Terms and Conditions of Use of the PRUSA Websites
                  • Privacy Policy
                  • Information about cookies
                  • Customer Complaints Policy
                  • Status Page
                  • Do Not Sell or Share My Personal Information
                  • Supplemental Statements

                  © Prusa Research a.s.

                  JOSEF PRUSA®, PRUSA RESEARCH®, PRUSA POLYMERS®, PRUSA ORANGE®, PRUSA 3D ® AND PRUSAMENT® are registered trademarks of Prusa Development a.s. used by Prusa Research a.s. under licence from Prusa Development a.s.

                  First layer issues

                  Relevant for

                  MK4 family
                  XL family
                  MK3.9 family
                  MK3.5 family
                  MINI family
                  +
                  95 comments
                  Article is also available in following languages
                  English
                  Čeština
                  Polski
                  Deutsch
                  Français
                  Español
                  Italiano
                  日本語

                  This is by far the most common 3D printing problem, and probably the first one you may encounter. The first layer is the essential one because it is the base of the printed object. Therefore, if it isn’t perfect, the chance of print failure increases. Many common 3D printing problems stem from a poor first layer. There are a couple of things that can go wrong when printing your first layer, so let’s take a look at what can be done to avoid these problems.

                  The print surface should be regularly maintained to achieve optimal printing quality and minimize the chance of failed prints. It's an easy procedure, so let's take a look at our tips and recommendations.

                  How to prepare your print surface

                  If you don't touch the print surface with your hands or dirty tools, then you don't have to clean it before every print. Clean your tools the same way you would the bed, and you will be able to start your next print right away.

                  Isopropyl alcohol - smooth, satin, textured sheets

                  To achieve the best adhesion of the print surface, it is vital to keep it clean. The best option when printing with ABS, PLA, and many other materials is 90% Isopropyl alcohol, which can usually be sourced locally at drugstores or hardware stores. Denatured alcohol is also an option. We recommend always using 90% IPA. Solutions with lower percentages may contain unsuitable chemicals and oils.

                  PETG, ABS, ASA, XT, and CPH filaments are an exception - the adhesion may be too strong, and you can damage your Smooth PEI sheet. We recommend using a separating agent (e.g. a glue stick). For more information on how to print with these materials, check out our Material guides.

                  Any cleaning agent (e.g. IPA) that is dermal/cosmetic, i.e. for skin or nails, may contain additives like moisturizers and oils which are not suitable.

                  Dish soap and water

                  If the adhesion seems to decrease over time even when using IPA, you can clean the steel sheet with a few drops of dish soap and warm water (not hot!). This should not be done often, and do not submerge the sheet completely in hot water, but it will dissolve some oils and sugars that gather over time and that IPA does not remove. Make sure to use only dish soap and dry the sheet well before using it.

                  Acetone

                  PEI can lose its adhesive powers after a couple of hundred hours. When you see models coming loose regularly, wipe the surface thoroughly with acetone to restore the adhesion. This should only be used in the smooth PEI sheet and only around once per month. Do not overuse acetone. Extended use makes PEI surface brittle. Also, do not use acetone before printing with PETG.

                  For the textured and the satin steel sheets, do not use acetone at all! Other chemical solvents, like Nail polish remover or brake-cleaner, can also contain acetone (acetates).

                  Glue

                  Glue is a great, easy-to-use tool to increase adhesion. It also creates a protective separation layer. No need for glue specially made for 3D printing. You can use a basic (PVA-based) glue stick. From our experience, it is not needed when printing PLA, but may it be advisable when printing:

                  • Polyamide (Nylon)
                  • PETG
                  • Polycarbonate (PC)
                  • PET-based materials
                  • ABS
                  • ASA
                  • Other more exotic materials
                  • Flexible materials
                  You can easily wipe off PVA glue with dish soap and water.
                  Other types of glue should not be used as a substitute. Don't put Superglue on your sheet! When removing prints with a large surface area, you may have to assist the process using a spatula. Be gentle when flexing the sheet and removing the print as the smooth PEI foil can tear.
                  In case you are using ABS juice, do not use it on the textured and satin steel sheets at all!

                  Resurface it

                  It can happen that you will leave some small marks on the print surface with your nozzle or tools. Typically, they will be shinier than the rest of the pad. It does not affect functionality or adhesion. However, if you want to have the same surface look on the whole print bed, you can resurface it.

                  The easiest way is to take the hard side of a dry kitchen sponge and gently wipe the affected area in a circular motion a few times. Another option is to use fine-grit sandpaper (400-600) and lightly give the sheet a rub. Wipe over with IPA after doing so.
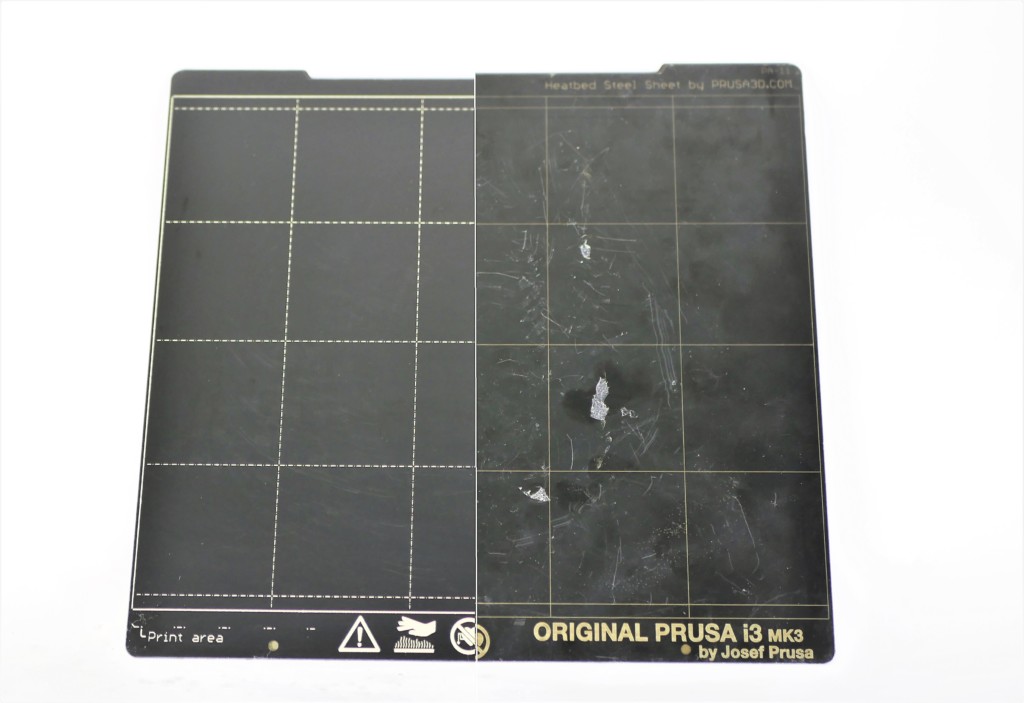
                  steelsheet comparison

                  Smooth PEI sheet
                  • Isopropyl alcohol 90%+ (IPA) -best degreaser
                  • Warm water + few drops with
                    dish soap (in case IPA doesn’t
                    remove sugar residue on the
                    sheet)
                  • Acetone - once in a while to
                    rejuvenate the sheet
                  Use glue stick when printing FLEX, PETG, and other PET-based materials, as well as ABS and ASA.
                  IPA + PETG will cause the print to adhere very strongly to the sheet. Removing it could be extremely difficult.
                  Textured powder-coated
                  sheet
                  • Isopropyl alcohol 90%+ (IPA) -
                    best degreaser
                  Never use acetone!
                  Satin powder-coated sheet
                  • Isopropyl alcohol 90%+ (IPA) -
                    best degreaser
                  Never use acetone!
                  For more information on the different properties and guidelines of each flexible steel sheet, please see Flexible steel sheets (guidepost).

                  Special print sheets

                  For print sheets that are NOT smooth, satin, or textured, the surface preparation procedure can differ from sheet to sheet. Follow the procedures outlined in their dedicated articles. 

                  • Special PA Nylon steel sheet
                  • PP steel sheet

                  The nozzle is too close/far from the sheet (MK2/S, MK2.5/S, MK3/S/+, MK3.5/S)

                  If the nozzle is too close to the printing bed, there won’t be enough room for the plastic to come out of the extruder. By having the nozzle too close to the print surface, you will essentially block its opening, so that no plastic can be extruded. You can easily recognize this issue when the printer does not extrude plastic for the first layer or two. Use the Live Adjust Z function and First Layer Calibration (i3) options to tweak the height of the nozzle. You perform the calibration from LCD Menu –> Calibration –> First layer calibration. For more information on this procedure, please see the dedicated article First Layer Calibration (i3).
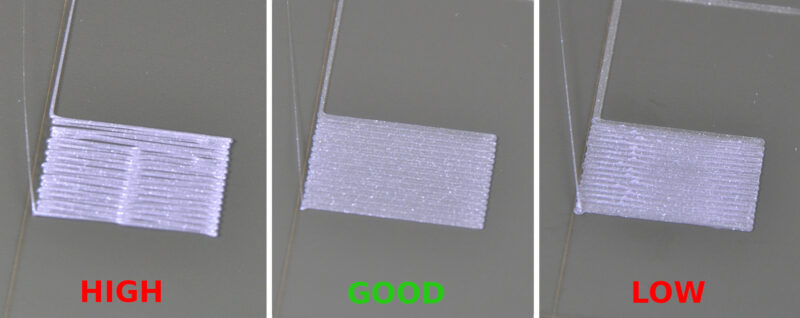
                  Avoid compensating for a lack of adhesion by setting a lower Live Adjust Z (squishing the first layer). If lowered too much, the nozzle can damage the steel sheet and cause excessive vibrations. Any damage caused by incorrect Live Adjust Z value is not covered by the warranty.

                  Speed and temperature

                  Decrease the printing speed

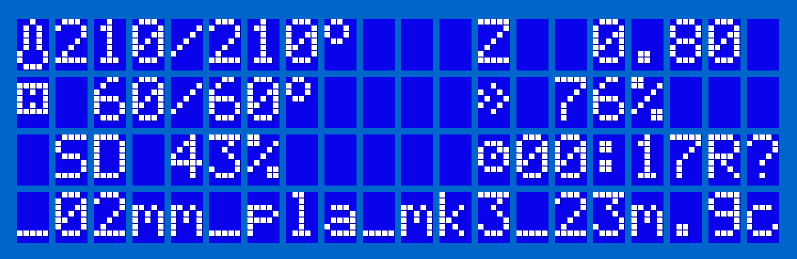
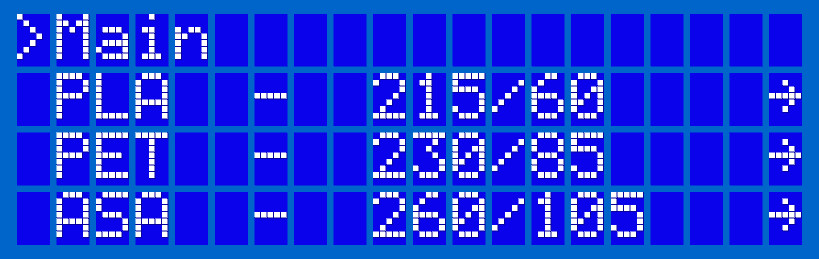
                  If the steps described above didn’t help, then try decreasing the printing speed. The easiest way how to do it is by rotating the knob during the printing process, lowering the percentage. Counterclockwise = decrease speed, Clockwise = increase speed. We suggest decreasing the speed to about 75% for the first three layers, and then returning it to normal.
                  Use recommended printing temperatures

                  Make sure to use the recommended nozzle and heatbed temperatures. PrusaSlicer will configure them correctly based on the selected material, so you don’t need to adjust the temperatures manually on the printer itself. If you are experimenting with new materials that don’t adhere well, you can try to increase the heatbed temperature by 5-10 °C. This way the plastic will stick a bit better.
                  A full or partial clog

                  The extruder could be clogged. This can happen either when excessive debris gets stuck inside the nozzle, when hot plastic is kept inside the extruder for too long, or when the thermal cooling for the extruder is not sufficient and the filament begins to soften outside of the desired melt zone. Please see our dedicated article Clogged nozzle/hotend (MK3.5/S, MK3S+, MK2.5S).

                  Uneven surface

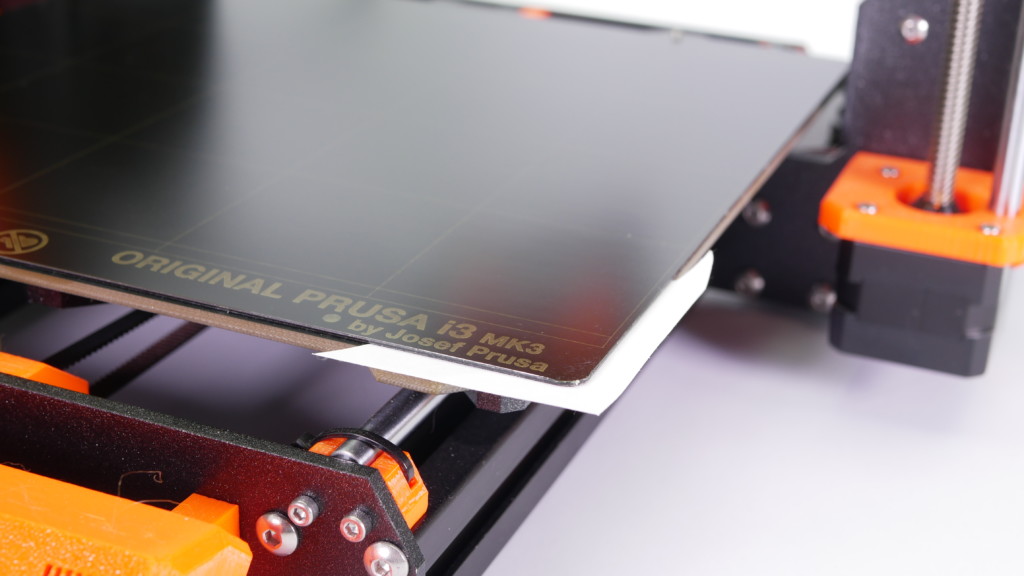
                  If your print surface is not flat and the alignment of the mesh does not help, to achieve a flat print surface, a temporary solution is to add a piece of paper under the uneven area of the steel sheet. A more permanent solution would be to perform the firmware Bed Level Correction.
                  uneven sheet

                  Correctly placed sheet

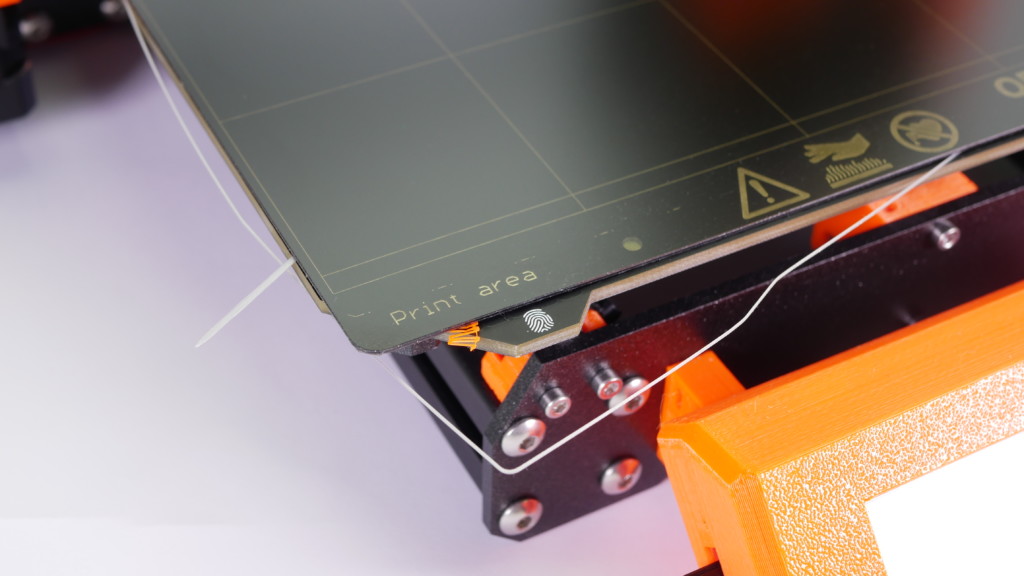
                  Before printing, make sure that you have the print plate properly installed, and that there are no leftovers from the previous print or a piece of loose filament that could affect the sheet position. Also, make sure that the sheet is straight and not bent or damaged.
                  correctly placed sheet

                  Brim

                  Before you consider applying extra adhesion materials onto the bed, consider using the Brim option in PrusaSlicer, which increases the surface area of the first layer. See our dedicated article Skirt and Brim.

                  Expansion joints (CORE One, MK4/S, MK3.9/S, MK3.5/S)

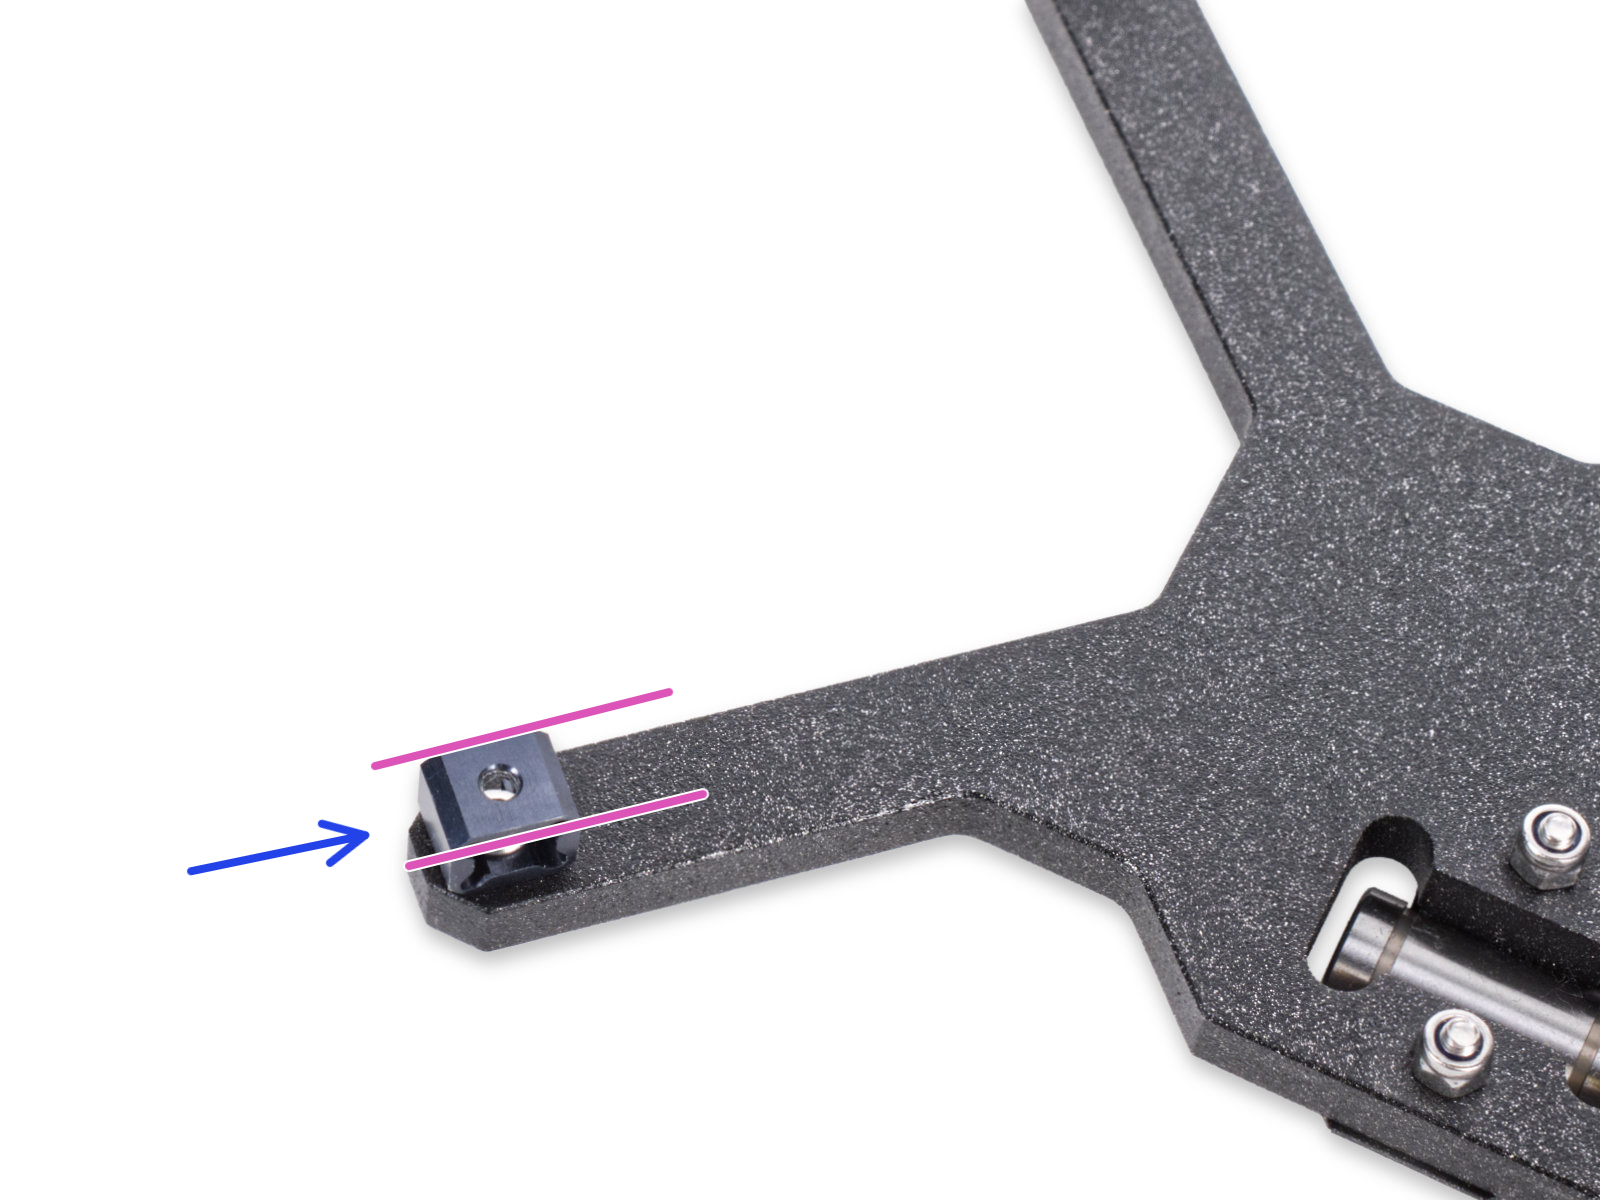
                  Having the expansion joints in the wrong orientation can cause an uneven first layer. Make sure that all of them have the full side facing the center of the carriage.
                   

                  Nozzle conditions (CORE One, MK4/S, MK3.9/S)

                  Before proceeding further, make sure that the printer is FULLY COOLED DOWN AT ROOM TEMPERATURE, and OFF! 

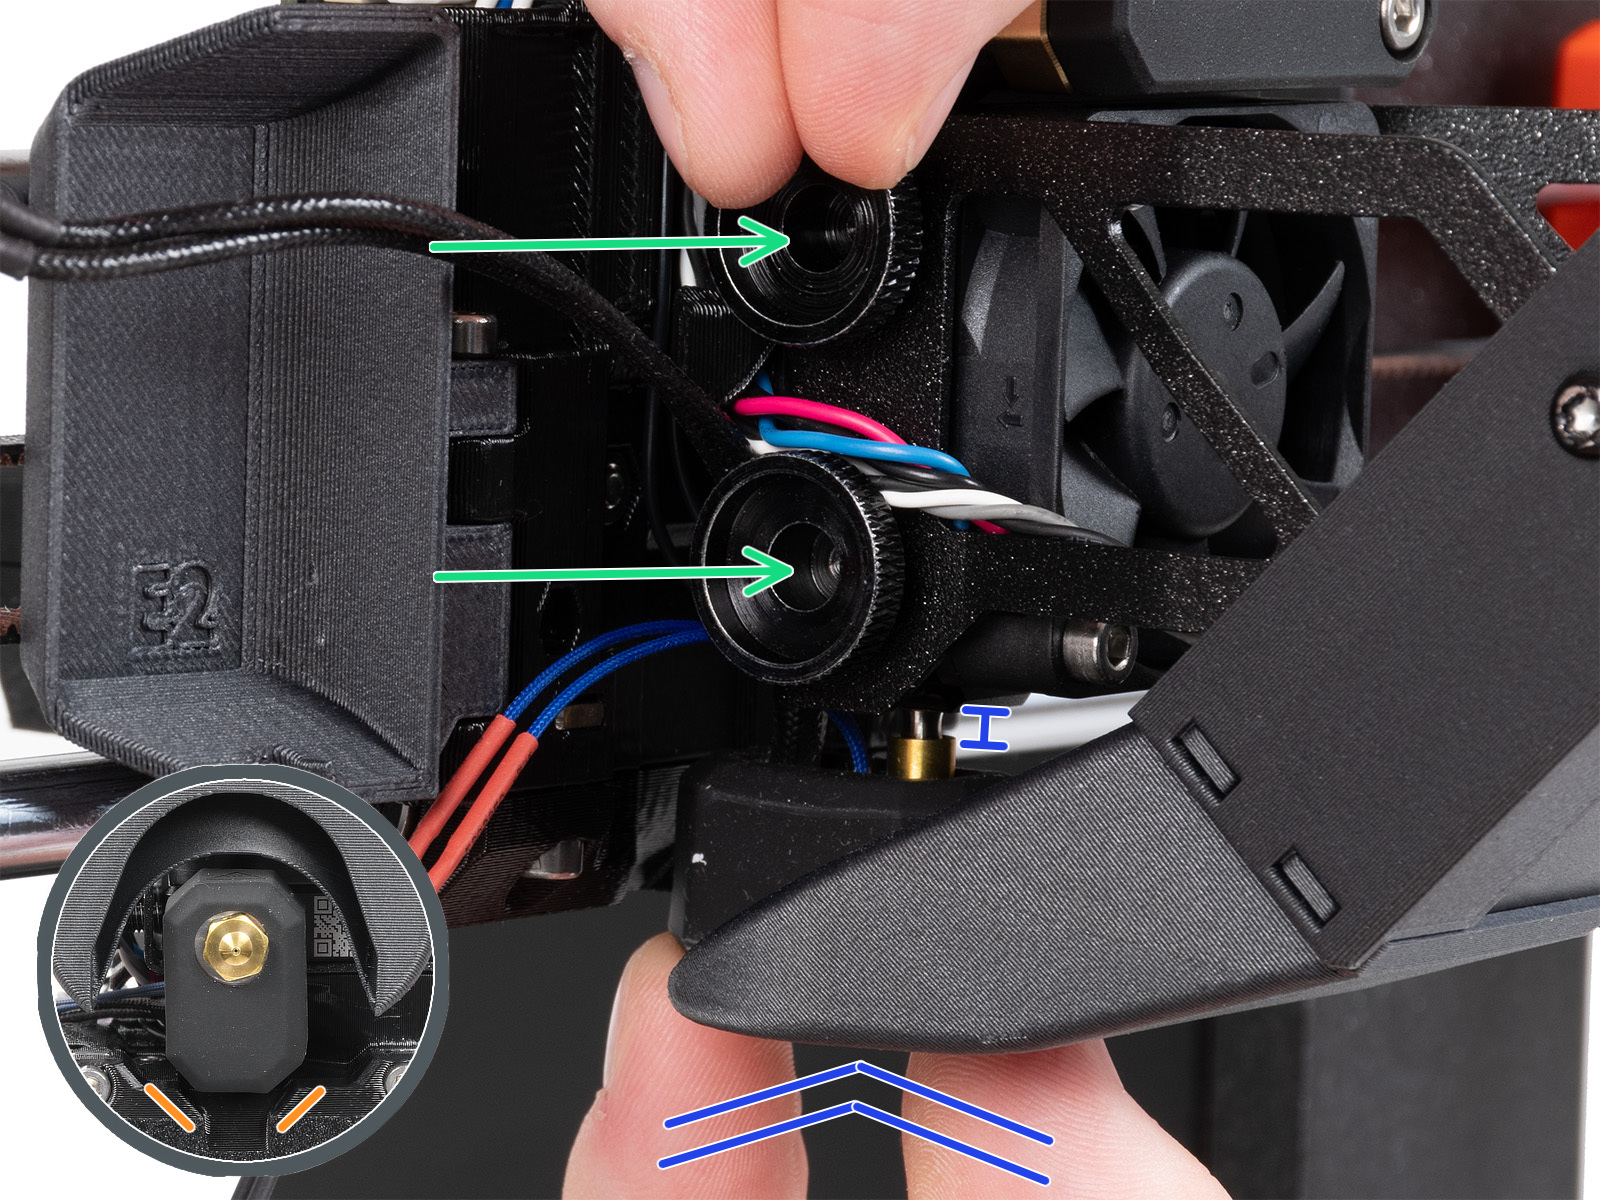
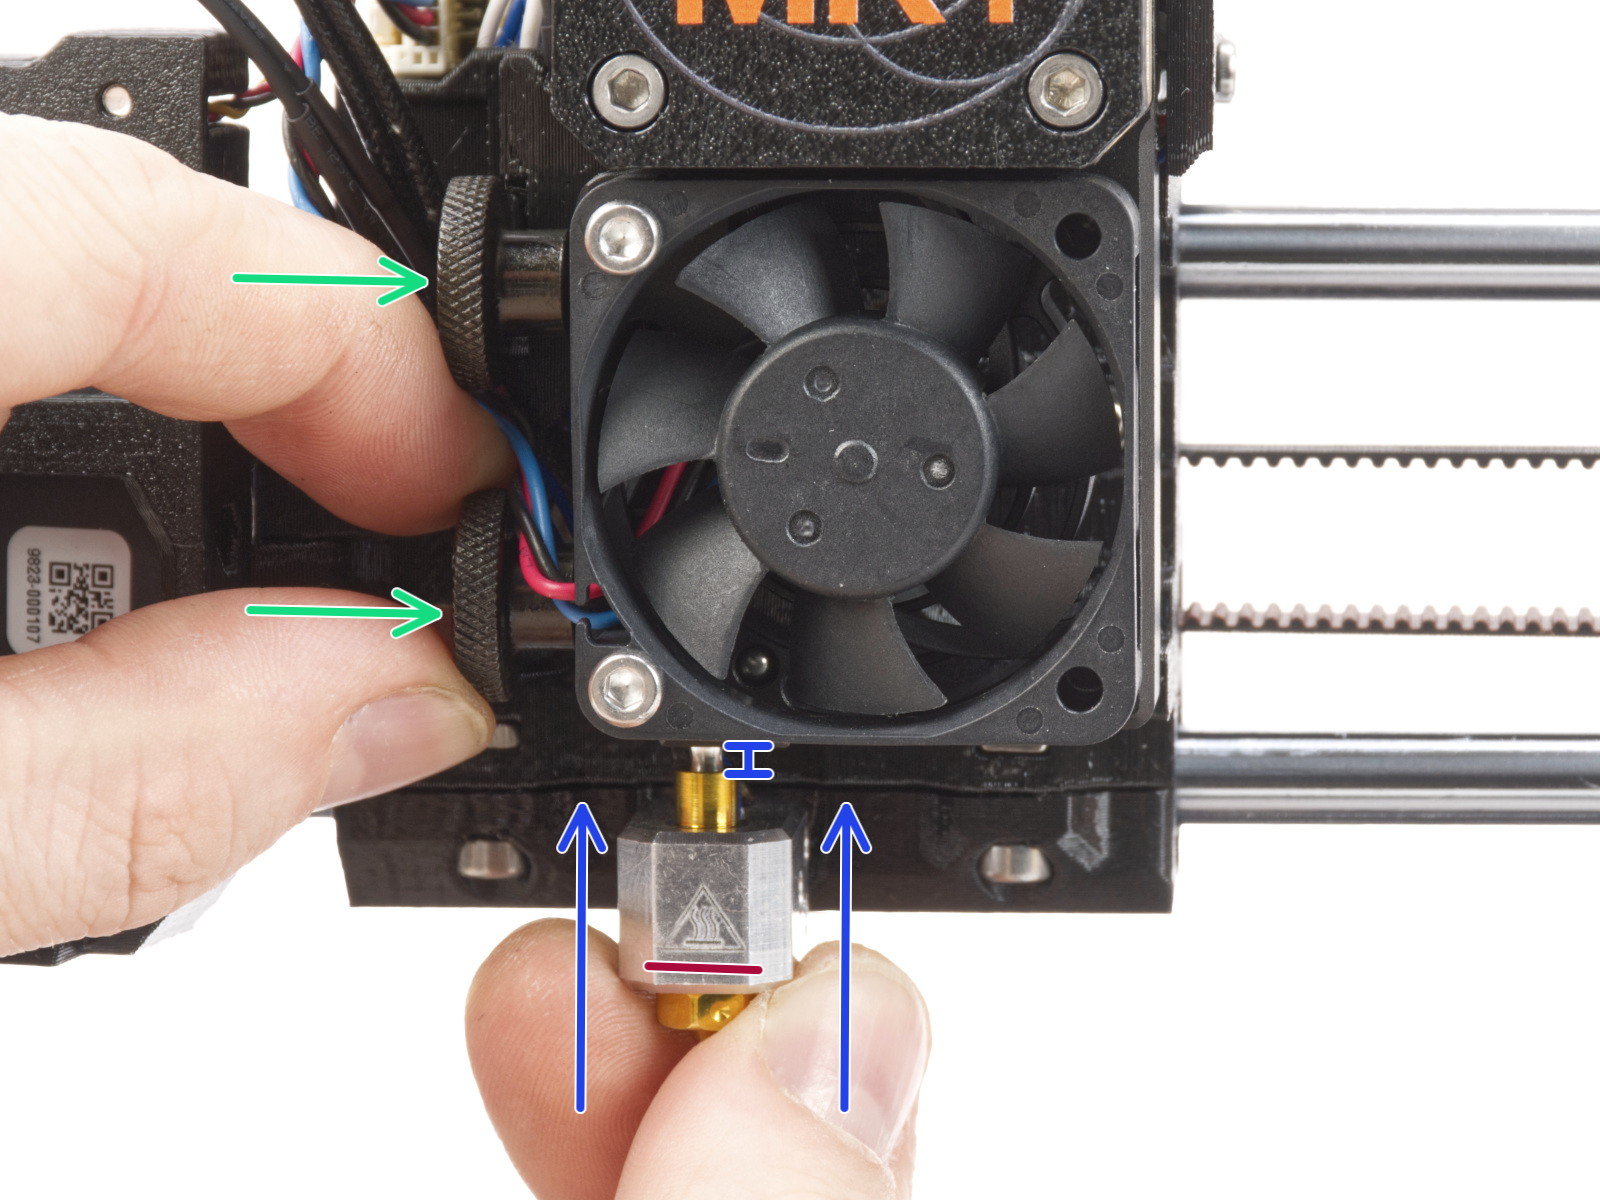
                  The nozzle on the Nextruder has to be at the correct height. If you are not sure if the height is correct, open the thumb screws on the side of the heatbreak, and push the nozzle up. Tighten the thumb screws just by hand, do not use any tools.

                  If you have a Nozzle Adapter, check the installation again to make sure that the nozzle has not been lowered with the installation of the adapter. 
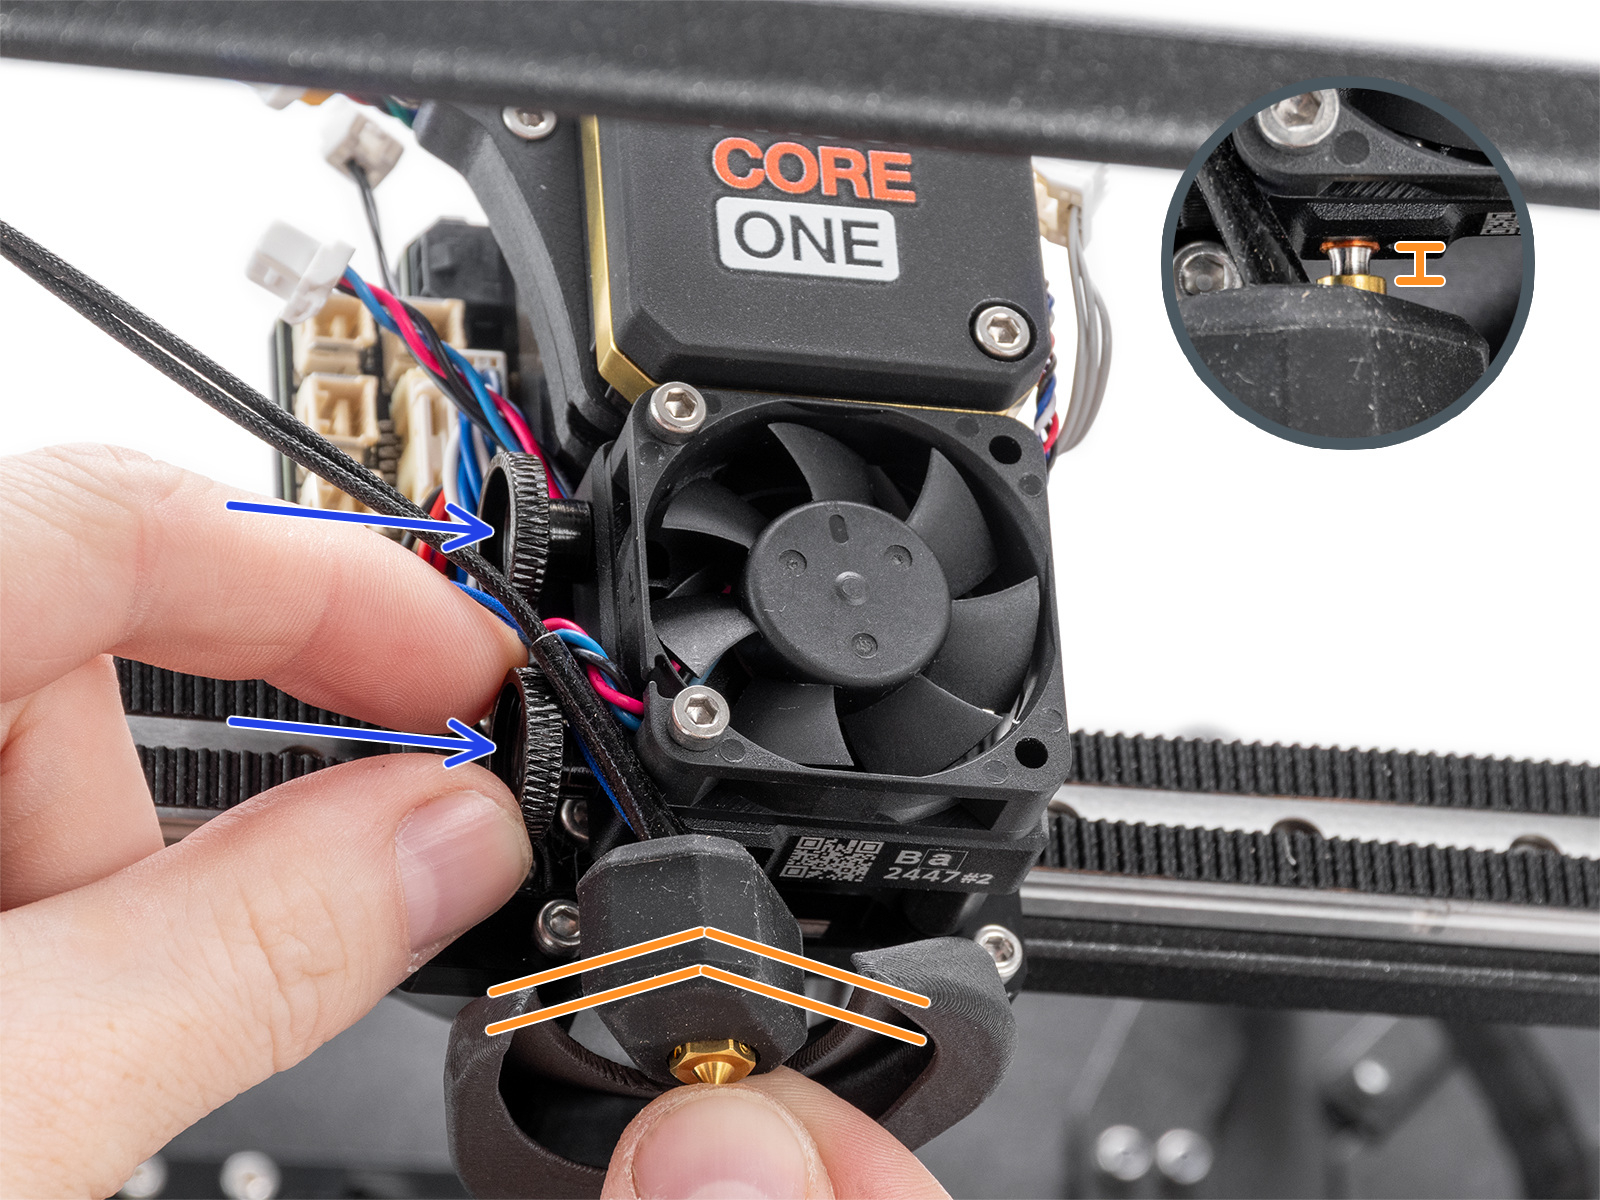
                  Prusa CORE One

                  Original Prusa MK4S, MK3.9SOriginal Prusa MK4, MK3.9

                  Nozzle conditions (XL)

                  Before proceeding further, make sure that the printer is FULLY COOLED DOWN AT ROOM TEMPERATURE, and OFF! 

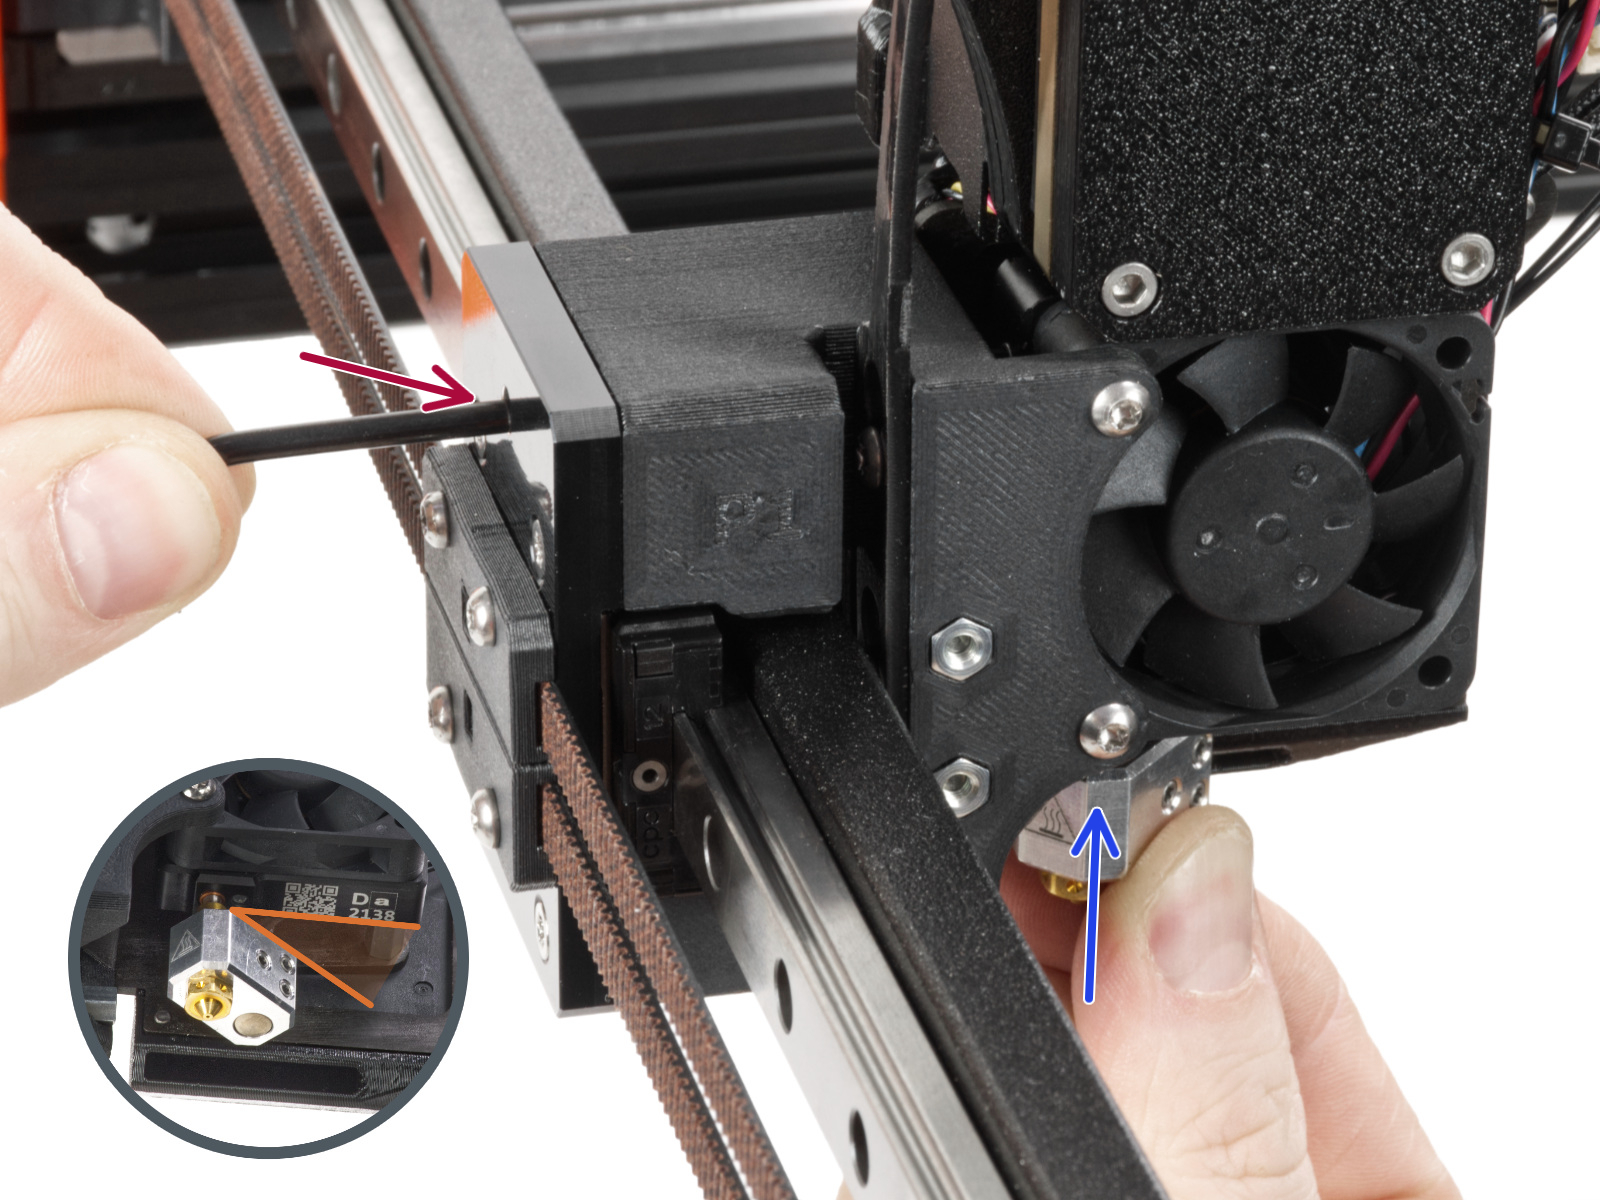
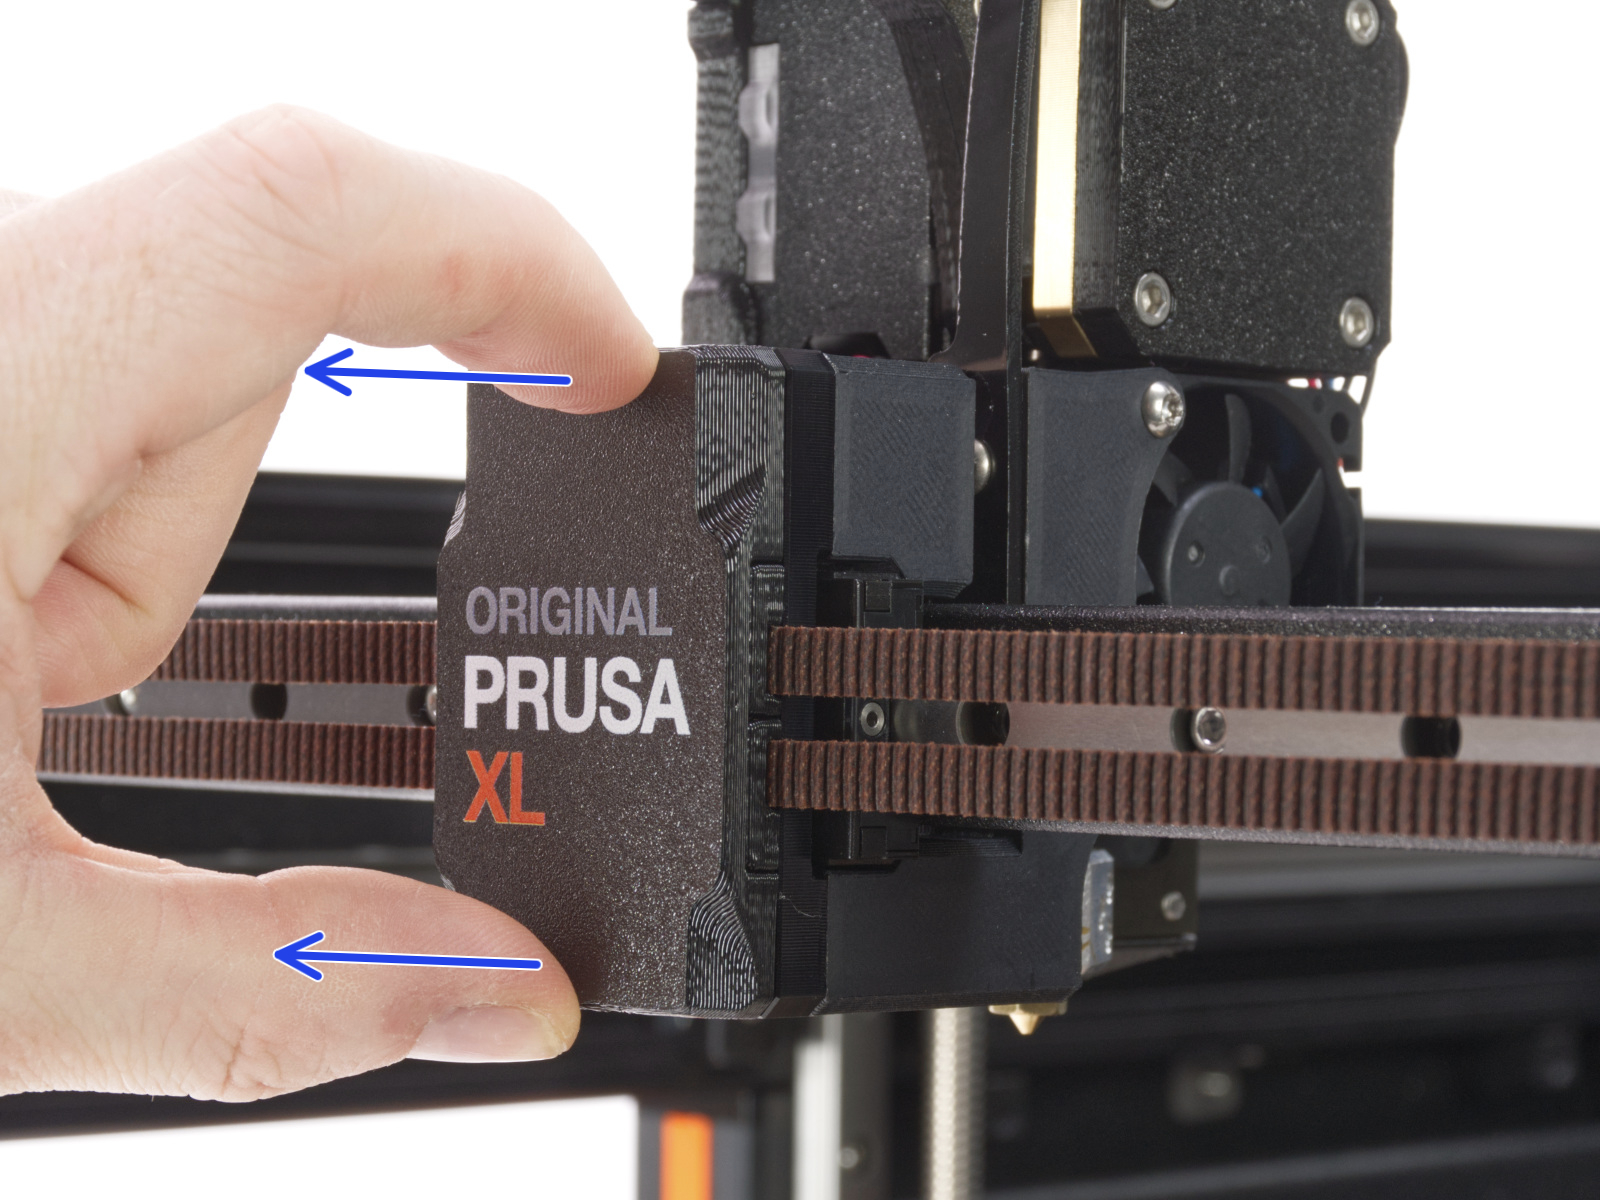
                  On single-tool XL, after removing the x-carriage cover, hold the heater block (make sure that the nozzle is not heated!), and use the Torx TX8 key as shown in the picture to tighten the set screw. Do not use extra force while tightening, it may damage the hotend tube. The nozzle must be approximately at a 35°-40° angle to avoid damaging the hotend cables.
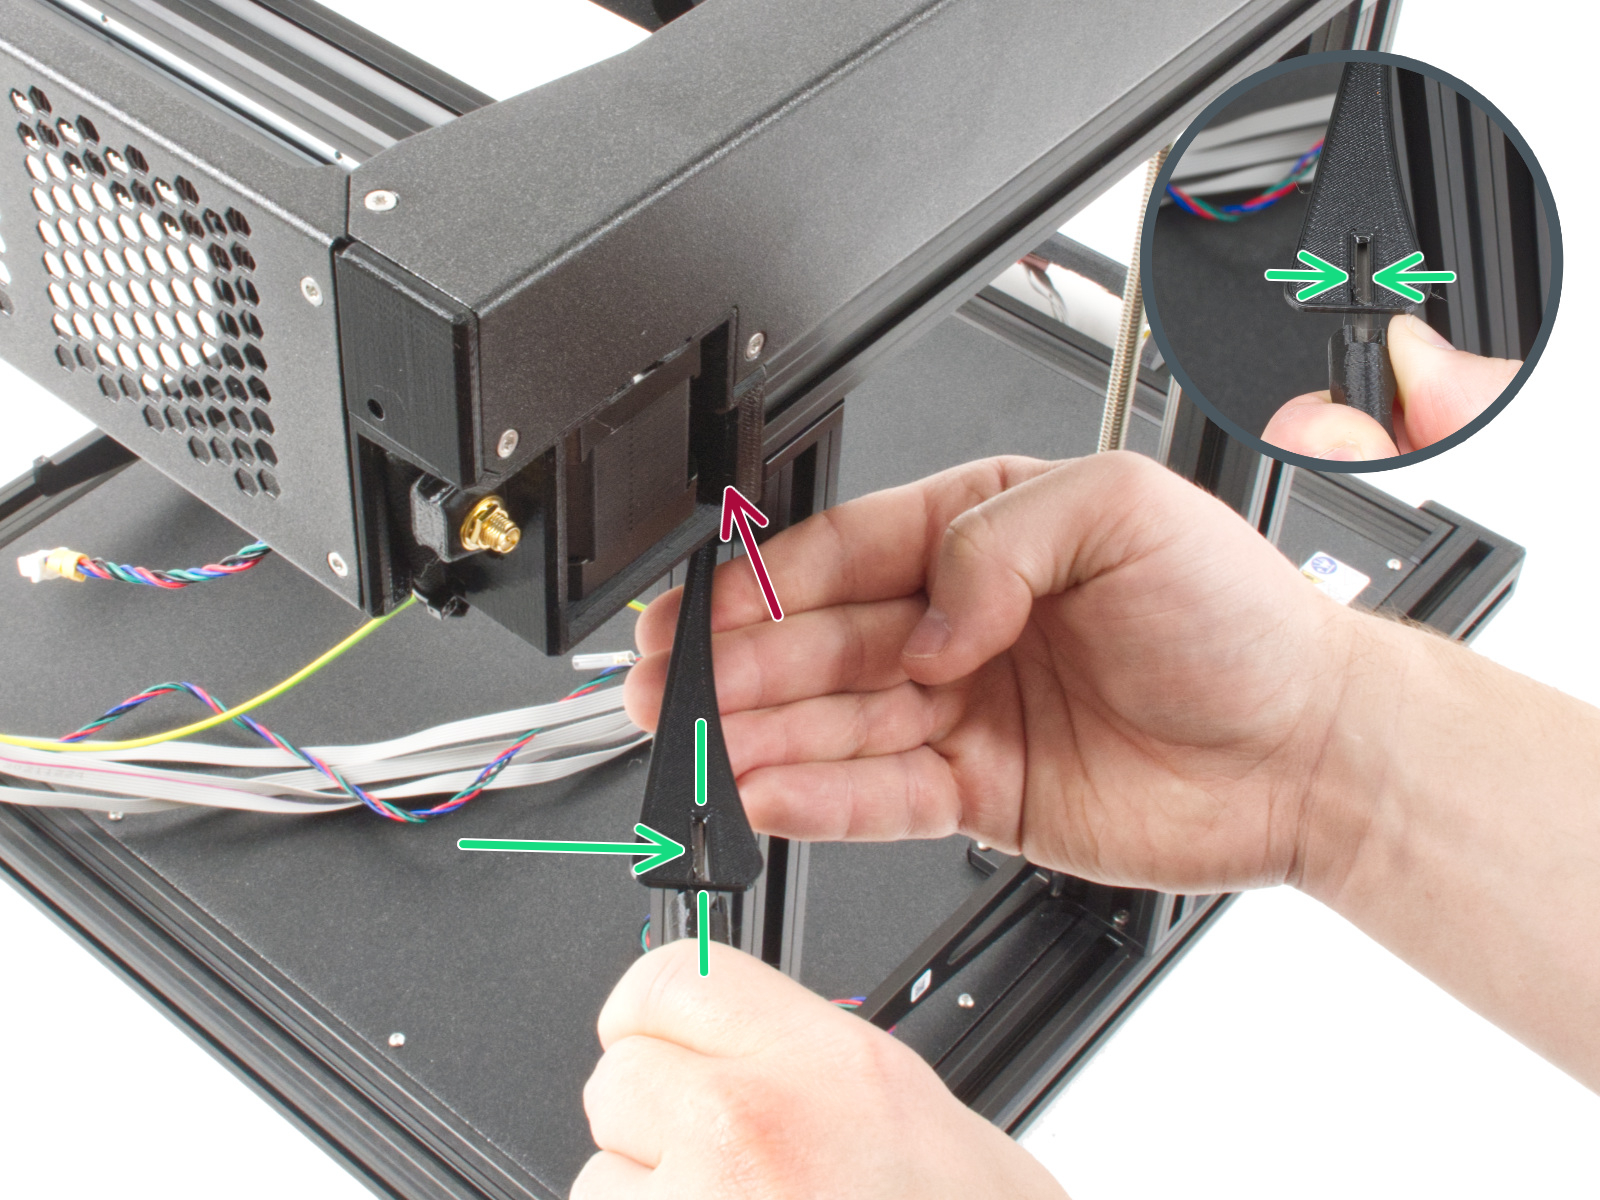
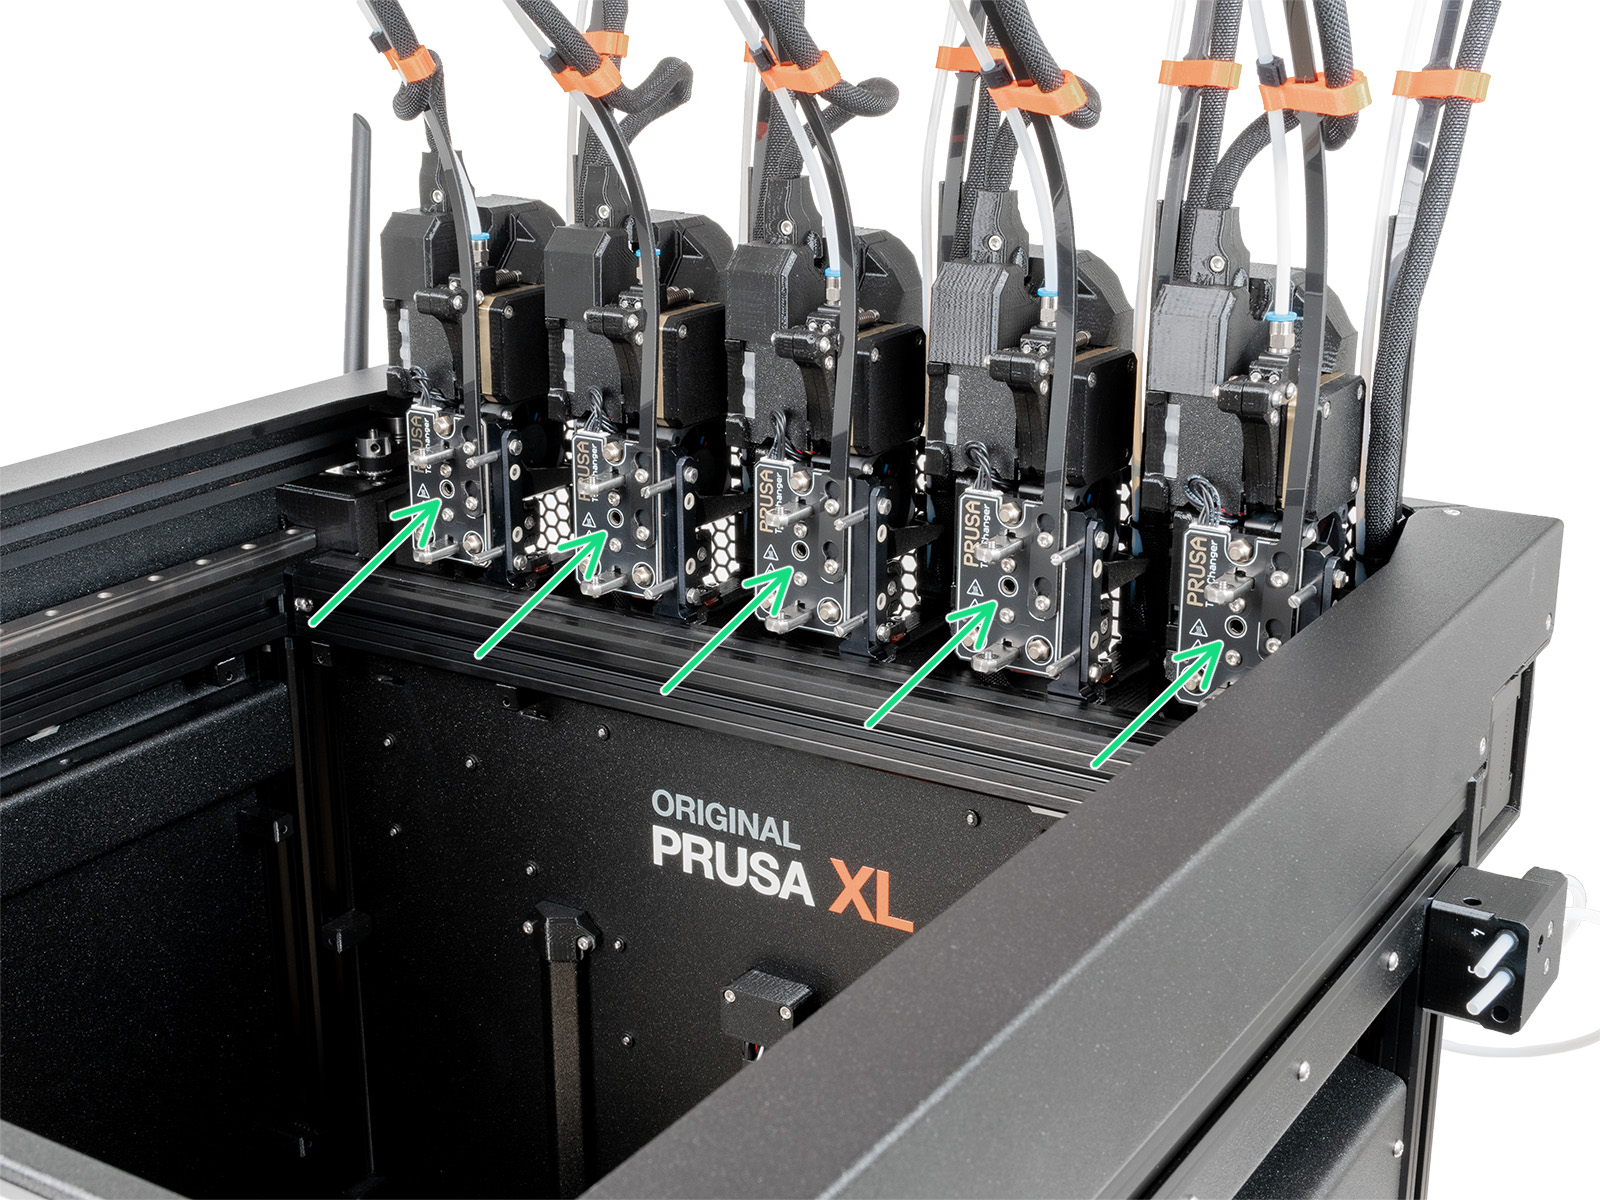
                  On multi-tool XL, identify the tool that has the nozzle to be checked, and park it. Hold the heater block (make sure that the nozzle is not heated!), and use the Torx TX8 key in the part shown in the picture to tighten the set screw. Do not use extra force while tightening, it may damage the hotend tube. The nozzle must be approximately at a 35°-40° angle to avoid damaging the hotend cables.
                  LoadCell check (CORE One, MK4/S, MK3.9, XL)

                  If the filament is loaded while the printer is doing the leveling at the start of a print, check if the extruder is not pulling the filament down by loosening the filament spool a little. If you have the filament being fed by a PTFE tube, make sure that the tube is not short.

                  After the previous checks, go into the printer menu to Control -> Calibrations & tests -> Loadcell test, and make the LoadCell test per screen instructions.

                  Mechanical checks (XL)

                  Core XY

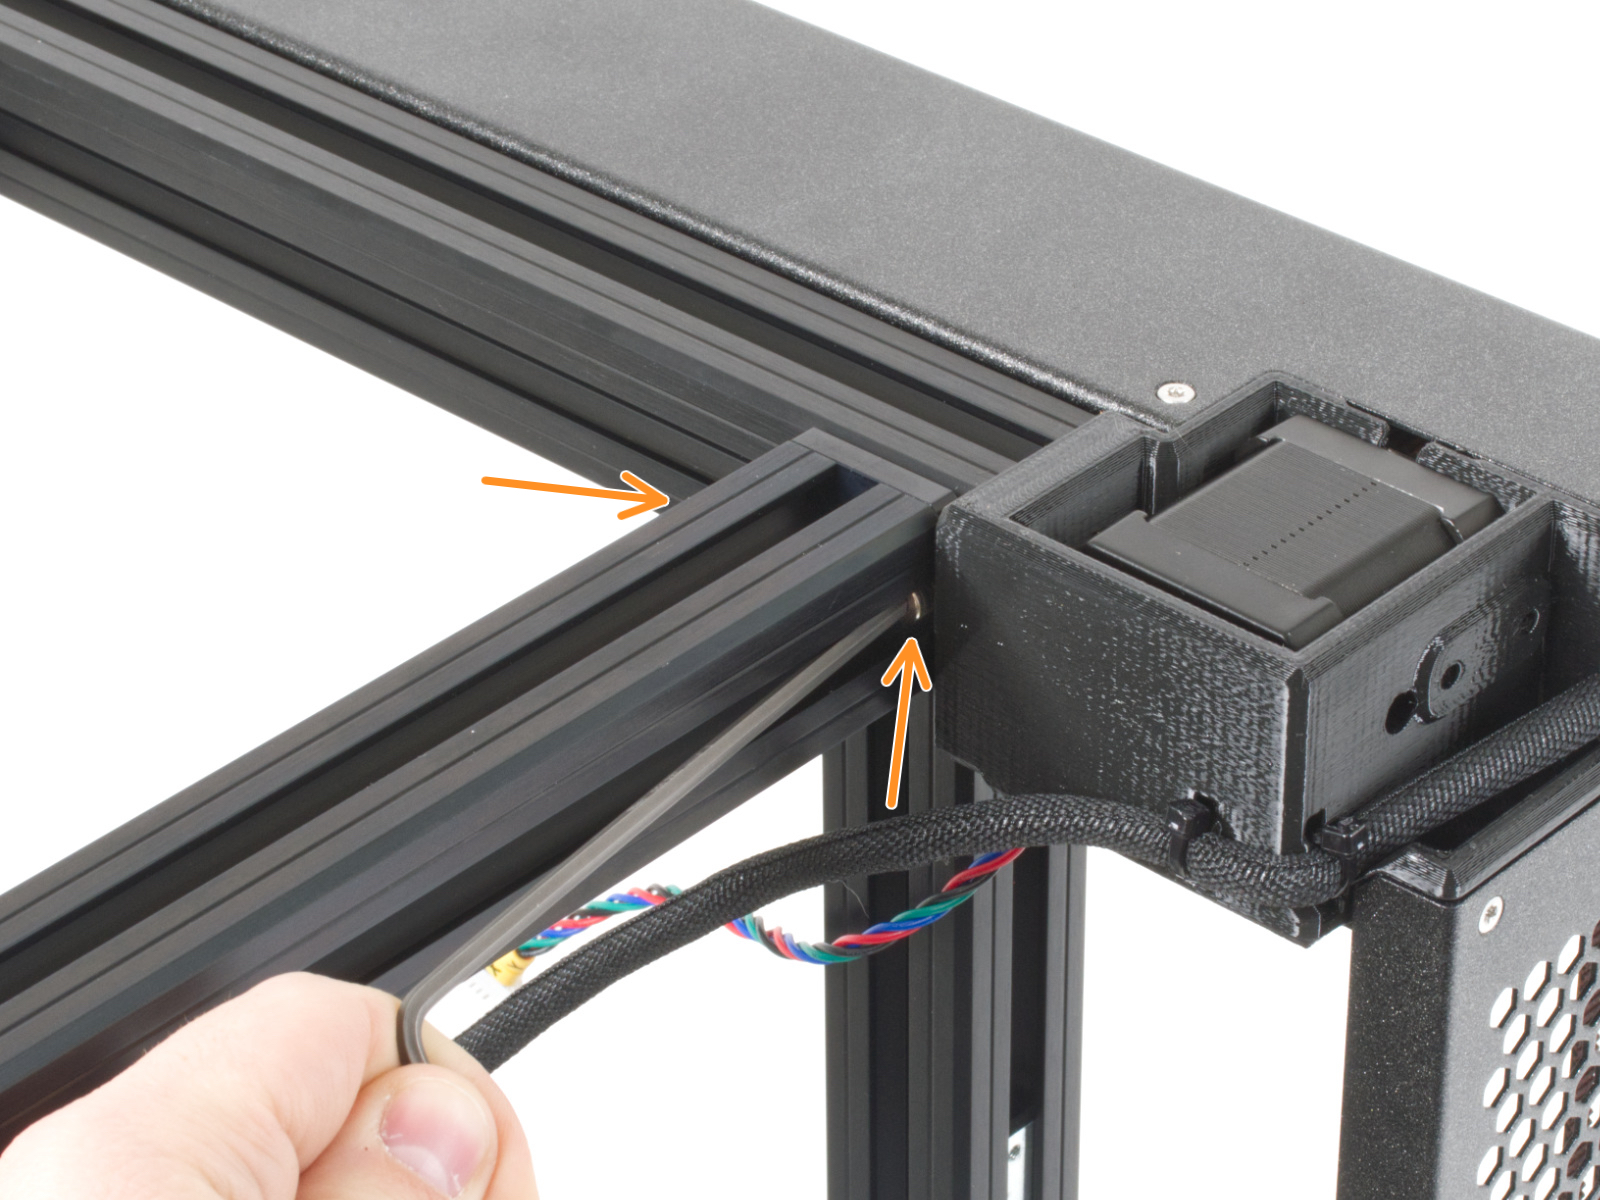
                  If your first layer is showing one side higher than the others on the Original Prusa XL, check the assembly of the Core for any loose screws which hold the Core to the four extrusions. Also, use the torque indicator, available for printing in the XL printable parts page, in the Others folder, to make sure the screws are tightened correctly.
                  Heatbed Tiles

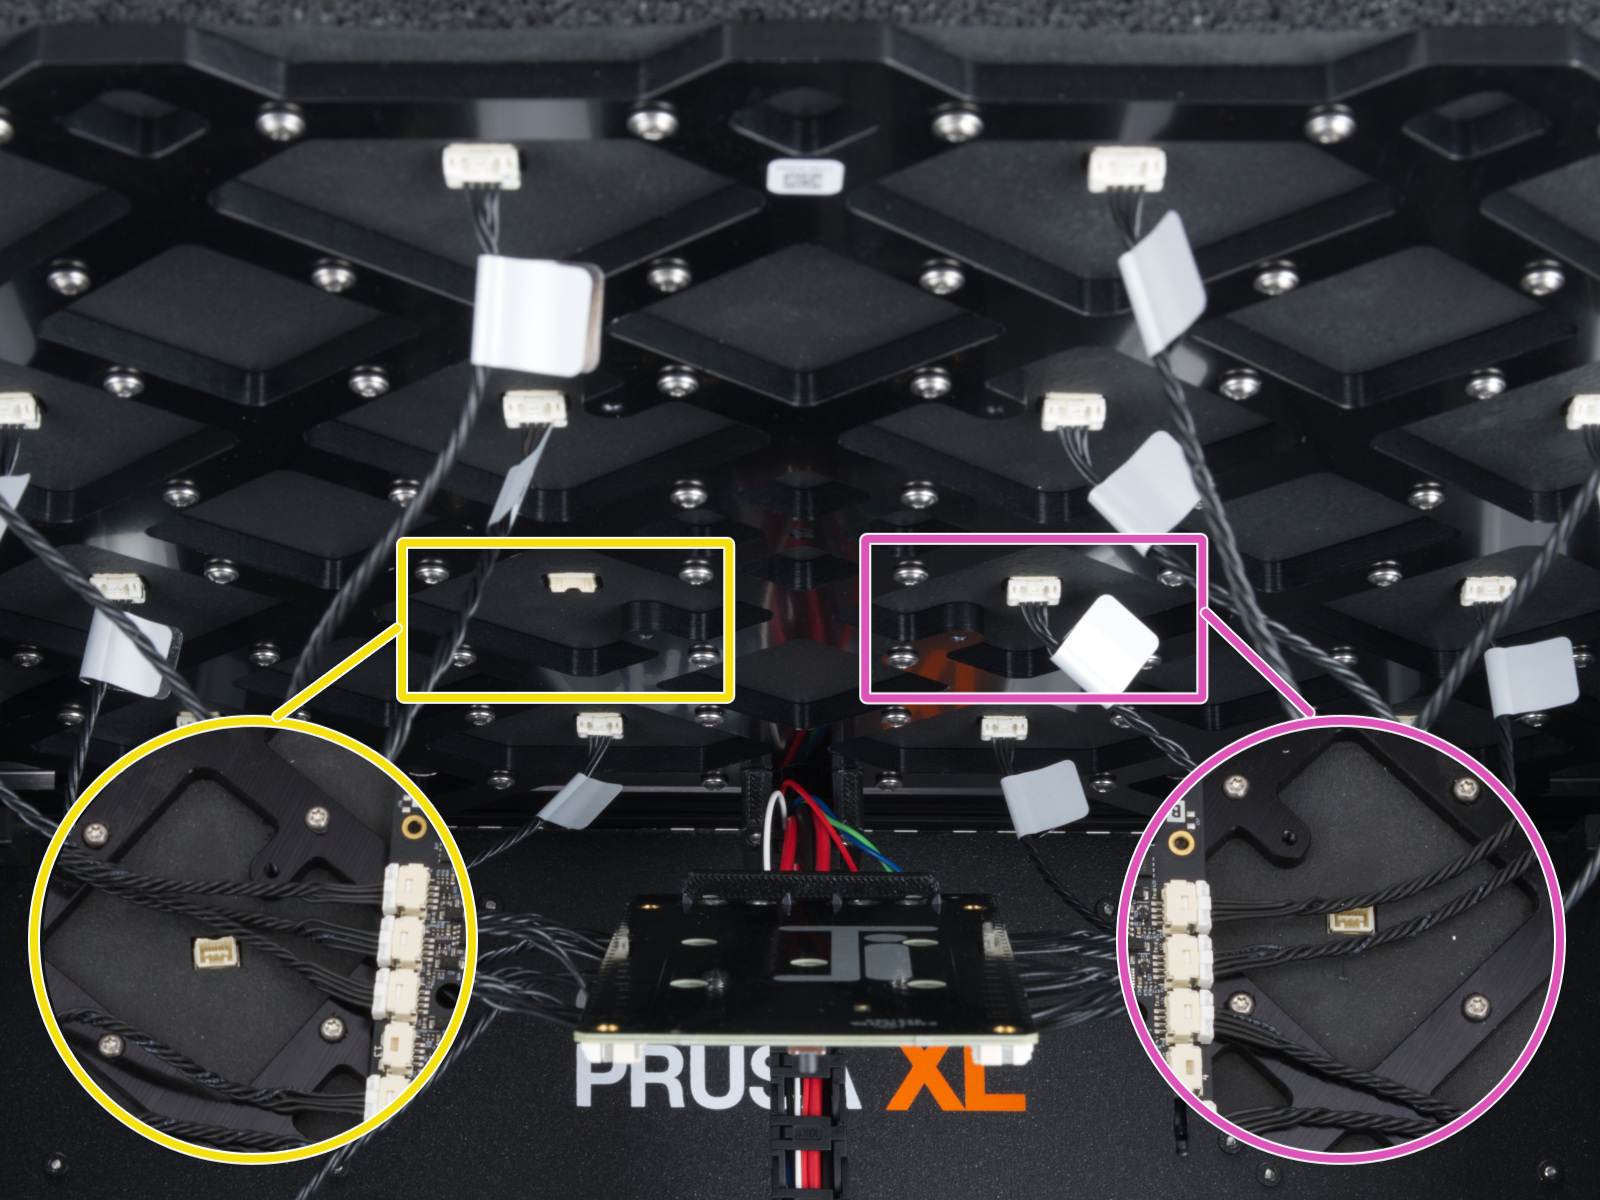
                  Check if any of the screws under each heatbed tiles are loose. You can refer to the heatbed tile replacement guide to access the parts and check them. 
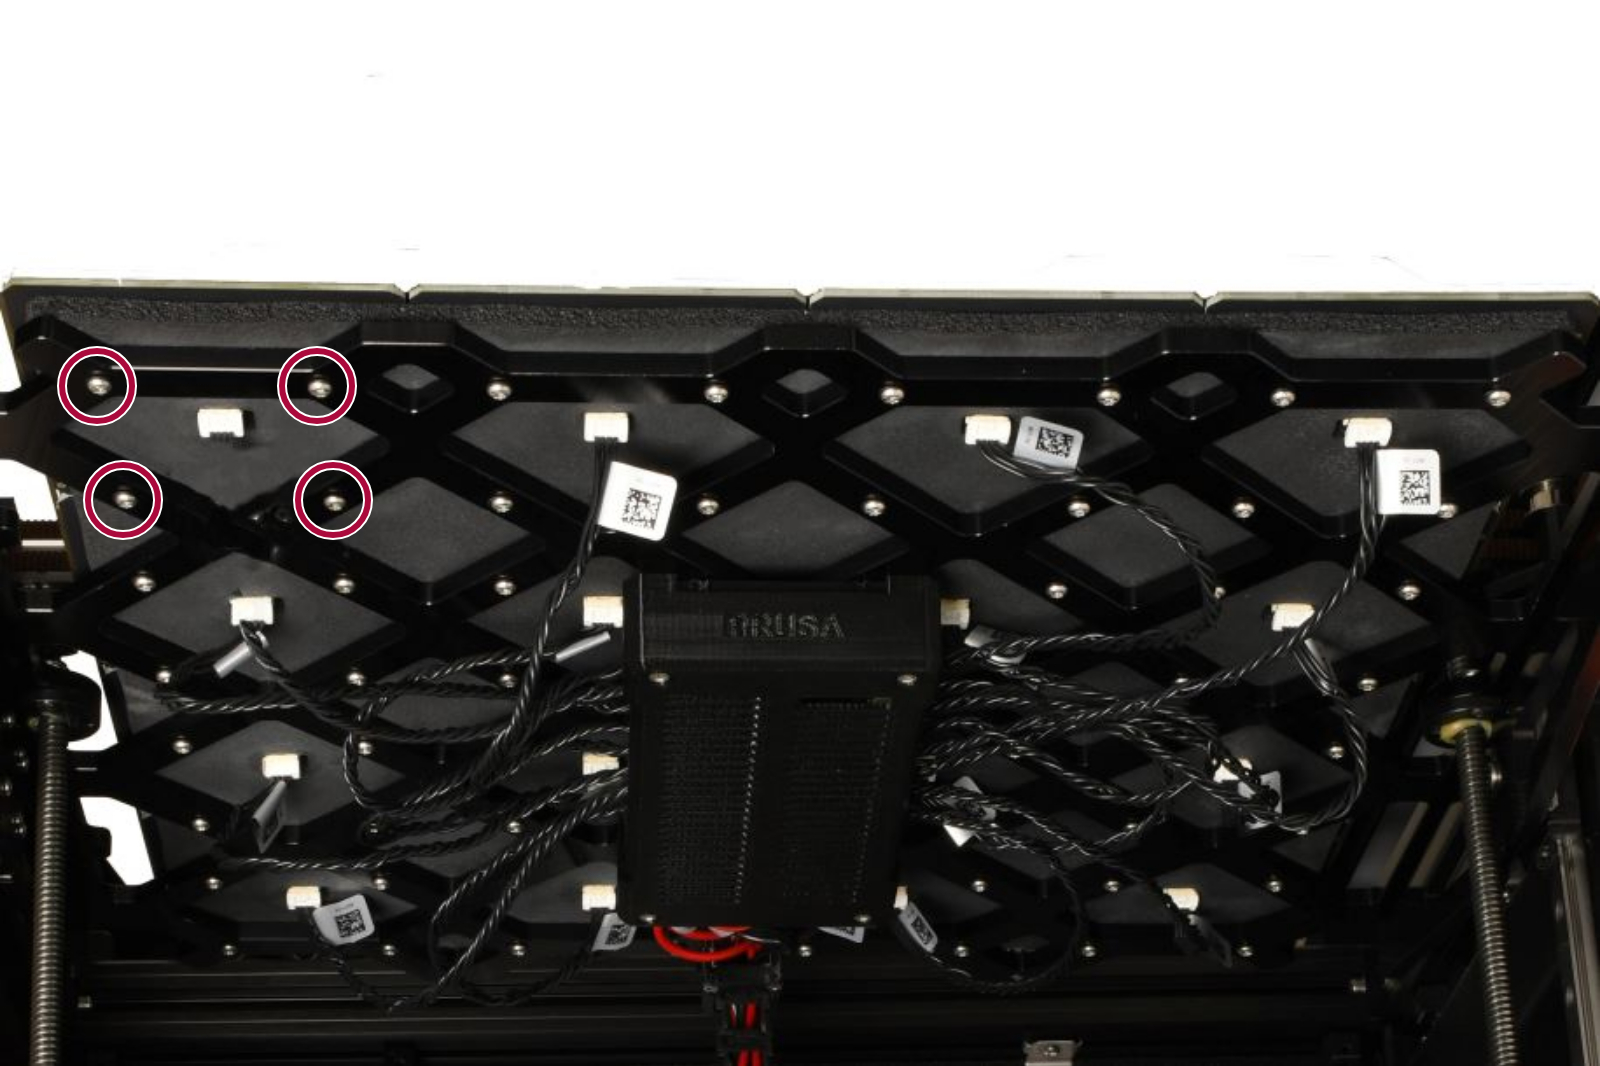
                  Tiles excluding 4, 5, 12, and 13 can be checked without disassembly. Tiles 4, 5, 12, and 13 require removal of the modular bed board or its cover to access its bolts. 

                  Z-axis bearing housing

                  The Z-axis bearing housings are the end-stop for the Z-axis. It is important to have a small clearance between the Z-axis bearing housings and the heatbed frame when the printer is at the top position.

                  This way, during the mesh bed leveling and the autohome procedures, there can be an ideal amount of small contact between the nozzle and the print surface. 

                  Too small of a clearance can cause the Nozzle Cleaning Failed warning message to appear. In this case, in order to achieve the ideal clearance, slightly loosen the bolts holding the bearing housings in place. 

                  If the warning message still appears, slightly loosen the mentioned bolts once again, keeping in mind to still have the Z-axis bearing housings reasonably tight and held in place. 

                  Once you find an ideal tightness for the bolts that works and holds the Z-axis bearing housings in place, keep the change permanent. 
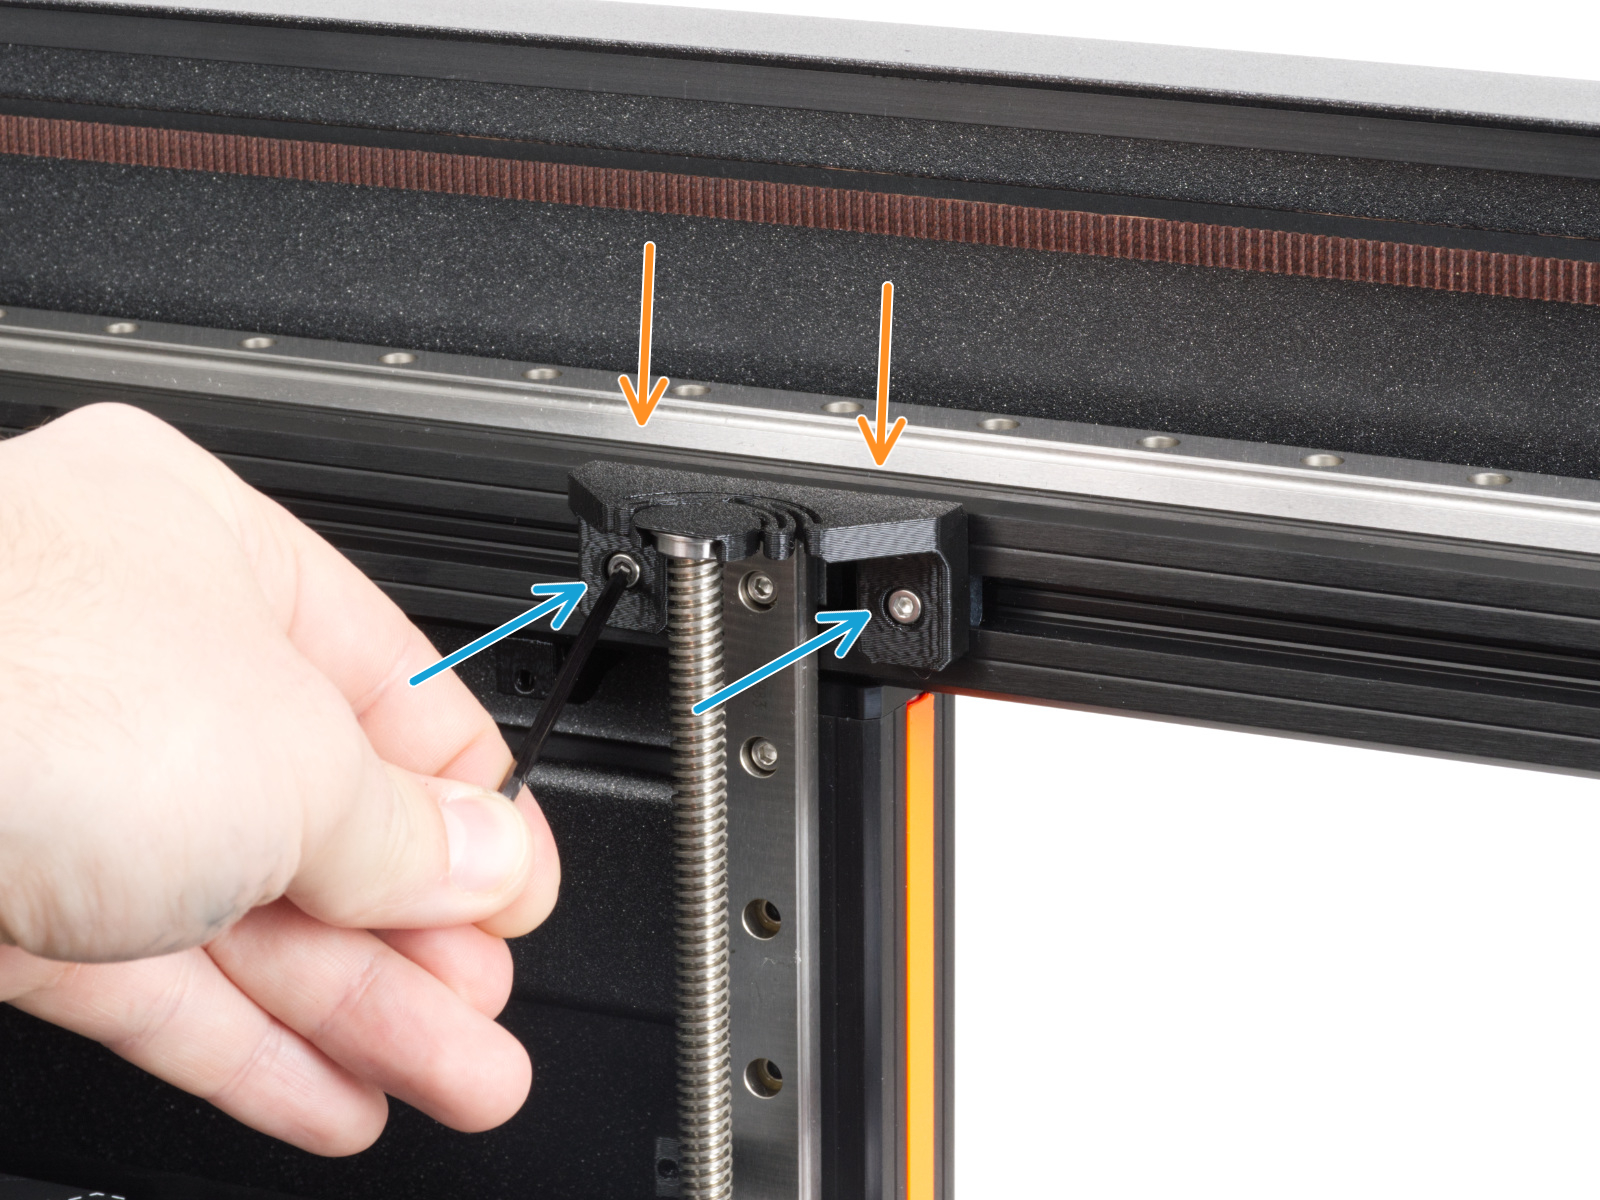
                  Do not remove the bearing housings from their place! This will cause damage to the printer. 
                   
                  Was this article helpful?
                  This action is available only to registered users. Please log-in.

                  Topics

                  • Troubleshooting
                    • Print Quality Troubleshooting
                      • First layer issues
                      • Stringing and oozing
                      • Layer shifting
                    • QR Error codes
                    • Printer troubleshooting
                    • Print Error Messages

                  40 comments

                  Log in  to post a comment
                  philippe cante
                  •
                  j'ai acheter il y a quelques mois une mk4s en kit, j'ai effectuer l'assemblage comme décrit dans le manuel ,après vérification que tout était bien câblé , j'ai éffectué le selftest tout était ok.Je me suis servi des fichiers d'exemple qui se sont imprimés correctement.Ensuite j'ai téléchargé ma propre impression avec prusa slicer (j'utilise cura 5.10.0 ) lors du lancement la machine n'a pas exécuté la purge sur le côté gauche ,et pas le Mesh bed leveling, mais a démmaré directement l'impression en déposant le filament autour de la pièce ! Ou est le problème ? serait il possible d'obtenir des règlages de base dans prusa slicer !
                  merci pour votre réponse .
                  Reply
                  Douglas - Prusa Research
                  •
                  Bonjour,

                  veuillez s'il vous plait contacter notre service de support si vous avez toujours des difficultés avec ce problème.

                  https://help.prusa3d.com/fr/article/support-client_2287
                  Reply
                  thomasa и philip
                  •
                  First time building a 3D printer, and also brand new to 3D printing.
                  Building and self testing the MK4S was flawless, no issues at all.
                  trying the first print I was not able to get the layer to stick.
                  Following closely while it printed I noticed it looked like the hot end was dragging.  I ensured everything was in place and tried again, same result.
                  Watcinng extremely close I noticed and then heard something drag accross the hot newly printed PLA layer.The cooling fan shroud would just catch it enough to knock everything off track.
                  I loosened the fan, repositioned it holding it "up" as far as it would go and retightened.
                  3 prints in now with absolutely no issues.
                  Reply
                  Hellreaver
                  •
                  Weird that a first layer issue is barely considered on the mk4. I have a 3.9 and all of my expansion joints are correctly oriented, yet I have inconsistent first layers with varying thickness across the bed. 
                  Reply
                  Jan Kratochvíl
                  •

                  Hello. MK3.9 and MK4 should have automatic first layer calibration, therefore no user interaction is needed. If you are having issues on your MK 3.9, please contact our support team.

                  Reply
                  Florian Castellane
                  •
                  you should not use face tissues to wipe the bed, they contain fabric softener which will cause bad adhesion.
                  Reply
                  Oliver
                  •
                  One word of caution: "PETG, ABS, ASA, XT, and CPH filaments are an exception - the adhesion may be too strong, and you can damage your Smooth PEI sheet." This is buried WAY to deep in the documention. It should be written as a clear warning: DO NOT print on Smooth PEI sheet with PETG (Original Prusa Prusament PETG!) with the Prusament settings in Prusa Slicer. The larger your model, the stronger the ahesion. Anything above 5x10 cm, in my experience, is almost inseparable. By flexing the bed you actually achieve it, but strong force on a still warm model may ruin the model anyway... Now I ordered the glue, which contrary to this help page is NOT shipped with the printer...
                  Reply
                  Tiergarten
                  •
                  What helped me once with a PETG print that stuck to the printsheet was dropping a few drops of IPA on the corner of the model. Maybe that helps someone else once
                  Reply