AA

Productos destacados

    Categorías populares

      Búsquedas populares

        Artículos

          Blog

            Productos

              Categorías

                Búsquedas sugeridas

                  Buscando…
                  Sin resultados
                  Algo salió mal.
                  ↑↓ Seleccionar↵ AbrirEsc Cerrar búsqueda
                  • English
                  • Čeština
                  • Deutsch
                  • Español
                  • Français
                  • Italiano
                  • Polski
                  • 日本語
                  • Pedidos
                  • Dirección
                  • Alertas de Stock
                  • Cursos
                  • Subscripción
                  • Editar Cuenta
                  • Impresoras 3D9+▾

                    Impresoras 3Dnueva

                    nuevaPrusa CORE One L+Conoce más
                    nuevaPrusa CORE One+ (Gen 2)Conoce más
                    newPrusa CORE One L+ INDX 8-ToolnuevaPrusa CORE One+ (Gen 2) INDX 8 HerramientasPrusa CORE One L+: Critical InfrastructureOriginal Prusa MK4SnuevaOriginal Prusa XL+Original Prusa XL+: Critical Infrastructure

                    Actualizaciones de impresoras

                    newKit de Conversión CORE One/+ INDXnuevaActualizació Prusa CORE One L a CORE One L+nuevaPrusa CORE One+ a Prusa CORE One+ (Gen 2)nuevaActualización Prusa XL a Prusa XL+
                    Programa de Recompensas PrusaComparte. Recomienda. Gana.
                    ¿Cómo Elegir Una Impresora 3D?Te guiaremos paso a paso por los aspectos básicos para que encuentres la máquina ideal para tu espacio, presupuesto e ideas.
                    Libro electrónico gratuitoDescarga gratis el libro electrónico Fundamentos de la Impresión 3D con Josef Prusa y da tus primeros pasos en el mundo de la impresión 3D
                    Piezas Imprimibles Original PrusaColecciones de piezas de repuesto imprimibles para impresoras 3D Original Prusa y mejoras.
                    Información de envíoInformación actualizada periódicamente sobre la capacidad de fabricación actual y los plazos de entrega de nuestras impresoras.
                    Impresión 3D PersonalizadaImpresión 3D personalizada profesional con diversos materiales según sus requisitos.
                  • Materiales▾

                    Filamentos

                    PrusamentPLAPETGASA / ABSPC BlendPA (Nylon)FlexCompositesEspecialLiquidación de materiales

                    Resinas

                    ResinaLimpiador Resina
                    Guía de FilamentoComprobar Mi Bobina Prusament
                    Prusament.com
                  • Piezas y Accesorios▾

                    Accesorios

                    EnclosureBoquillasLáminas de ImpresiónAccesorios EsencialesCámaras y ComplementosHerramientas y ManualidadesAdhesivos

                    Piezas de recambio

                    Merchandising

                    Piezas de recambio - Todas las ImpresorasCORE OneMK4/S y MK3.9/SMK3/MK3S/MK3S+XL
                    Merch
                  • Para Empresas▾
                    Prusa Pro HT90Prusa Pro SLXPrusa Pro AFSPrusa Pro Medical OneOriginal Prusa XLOriginal Prusa XL: Critical Infrastructure
                    Prusa CORE One+Conoce más
                    Prusa CORE One LConoce más
                    Prusa CORE One L: Critical Infrastructure Edition

                    Impresión 3D para

                    Fabricación e I+DIndustria AutomotrizSanidadEducación e Investigación AcadémicaArquitectos y DiseñadoresIndustria del CineInfraestructuras Críticas

                    Stories de Impresión 3D

                    • Cómo comenzó la impresión 3D: Sobre Rep-rap y el código abierto con Adrian Bowyer
                    • La enseñanza de las matemáticas redefinida con la impresión 3D en JKU Linz
                    • La historia detrás del destornillador de LTT
                    • Victoria Hand Project: Cambiando la Atención Protésica con la Impresión 3D
                    Distribuidores Oficiales de Prusa
                    Sostenibilidad
                    Prusa Education
                    Contactar y Consultar
                    Impresión 3D personalizada
                    Certificado ISO
                  • Software▾
                    PrusaSlicer

                    PrusaSlicerPrusaSlicer

                    PrusaSlicer es una herramienta de código abierto, con numerosas funciones y que se actualiza con frecuencia, que incluye todo lo necesario para exportar los archivos de impresión perfectos para tu impresora 3D.

                    WindowsMacOSLinux
                    Prusa Connect

                    Prusa Connect

                    Prusa Connect es un servicio en la nube que permite controlar y supervisar de forma remota tus impresoras 3D, y que ofrece un tratamiento seguro de los datos, una configuración sencilla y la posibilidad de gestionar varias impresoras desde cualquier lugar.

                    Inicia Sesión en Connect
                    Prusa.app

                    Prusa.app

                    Controla tu(s) impresora(s) de forma remota desde cualquier lugar gracias a la tecnología Prusa Connect. Prusa.app ofrece una experiencia totalmente nueva con las impresoras Prusa en teléfonos Android e iOS.

                    ¡Pruébalo ya!
                    Controladores y firmwareDescarga el firmware y los controladores más recientes para tu impresora 3D.
                    Soporte para PrusaSlicer
                    Soporte para Prusa Connect
                  • Modelos 3D▾
                    Impresoras 3DArte y DiseñoHobby y MakersHogarMiniaturas de EscritorioJuguetes y JuegosTienda de Printables

                    Modelos 3D populares

                    • Strong garden hose holder
                    • Prusa Spool Bot
                    • Build Tray — Modular Organizer for Assembly, Disassembly and Maintenance
                    • Broom Holder
                    • Octagon Fabric
                    • Prusa CORE One ? (Mimic Skin)

                    Concursos de Diseño

                    • Framework Laptop 12 Mainboard Re-Use1/9/2026 – 30/9/2026
                    • 🏆 Designer Challenge: Magic tricks!1/9/2026 – 22/9/2026
                    • Od prototypu k produktu: Příslušenství ke kamerám1/8/2026 – 14/9/2026
                  • Comunidad▾

                    Próximos eventos

                    • Maker Faire Tokyo 20265/9/2026 – 6/9/2026 · Tokyo, Japan · Prusa Team
                    • IFA 20264/9/2026 – 8/9/2026 · Berlin, Germany · Prusa Team
                    • 3D Printopia 202626/9/2026 – 27/9/2026 · Pennsylvania, United States · Prusa Team
                    • Maker Faire Bay Area25/9/2026 – 27/9/2026 · Kalifornie, United States · Prusa Team

                    Prusa Forum

                    • Casi convencido de pulsar sobre comprar... convenceme
                    • Core One+: Fallo en calibración del sensor de filamento (Valores ADC fuera de rango / Error 2147483647)
                    • Problemas de Warping con Core one +
                    Mapamundi de PrusaMapamundi de PrusaEncuentra usuarios de impresión 3D de tu zona y descubre la comunidad que te rodea.
                  • Ayuda▾
                    Guías y TutorialesPrusaSlicerPrusa ConnectMateriales

                    Modelo de Impresora

                    CORE One INDXCORE One LCORE One+CORE One

                    Resolución de Problemas de Hardware

                    • Fallo Selftest (CORE One/+)
                    • Hotend atascado (MK4)
                    • Ajustando la tensión de la correa (CORE One L, CORE One)
                    • Prusa Connect y PrusaLink explicado

                    Drivers & Firmware

                    Familia INDXFamilia CORE OneFamilia MK4Familia XLFamilia MMUFamilia PRO
                  • Cursos▾

                    Conviértete en un experto en impresión 3D

                    Prusa Academy ofrece cursos en línea sobre diversos temas relacionados con la impresión 3D. Cada curso incluye: textos fáciles de leer con numerosas imágenes y vídeos breves; enlaces para inspirarse y profundizar en el tema; cuestionarios para poner a prueba tus conocimientos a lo largo del curso; y un certificado de finalización.

                    Ver todos los cursosMi biblioteca de cursos
                    • Modelado 3D en Autodesk Fusion
                    • Masterclass de PrusaSlicer – De Principiante a Experto
                    • Complete Guide to 3D Print Postprocessing, Painting, and Detailing
                    • Airbrush Your 3D Prints: From Basics to Advanced Tricks
                  • Blog▾
                    • Preview de PrusaSlicer 3.0 – Diseñado para el Futuro de la Impresión 3D
                    • Prusa CORE One+ (Gen 2) INDX, Envíos Iniciados, Impresoras Completas Abiertas a Pedidos
                    • Mejores Impresiones, Mayor Sencillez: Prusa XL+, CORE One L+ y CORE One+ (Gen 2), Nuestra Gran Mejora de los Productos
                    E-Book: Fundamentos de la impresión 3D
                  • Empresa▾

                    Sobre Prusa Research

                    Somos el mayor fabricante de impresoras 3D de Europa y Estados Unidos. La empresa fue fundada en 2012 como una startup unipersonal por Josef Prusa, un aficionado, creador e inventor checo. En solo 15 años, hemos crecido hasta convertirnos en una empresa con más de 1.200 empleados. Cada mes, diseñamos, fabricamos y enviamos más de 10000 impresoras 3D innovadoras y seguras desde nuestras sedes de Praga (República Checa) y Delaware (EE. UU.) a usuarios de más de 160 países. ¡Mira el vídeo y descubre cómo nació Prusa Research y lo que hemos logrado en tan solo 10 años!

                    Sobre NosotrosLínea temporalSostenibilidadOpen-source
                    Sobre nosotros
                    Contacta con Nosotros
                    Logo e Imágenes
                    Certificado ISO
                  1. Soporte
                  2. Calibración básica
                  3. MMU3 Setup and inspection
                   

                  Contenidos

                  • Necessary calibrations
                  • Hardware configurations
                  • Assembly inspection
                  • Slicer settings
                  • Test prints

                  Blog

                  • Preview de PrusaSlicer 3.0 – Diseñado para el Futuro de la Impresión 3D
                  • Prusa CORE One+ (Gen 2) INDX, Envíos Iniciados, Impresoras Completas Abiertas a Pedidos
                  • Mejores Impresiones, Mayor Sencillez: Prusa XL+, CORE One L+ y CORE One+ (Gen 2), Nuestra Gran Mejora de los Productos

                  Newsletter

                  Regístrate y obtén nuestro dosier mensual de información útil sobre nuevos firmwares, nuevas versiones de PrusaSlicer y consejos generales para proyectos de impresión 3D.

                  Al hacer clic, aceptas recibir nuestra newsletter.

                  Este sitio está protegido por reCAPTCHA Enterprise y se aplican la Política de Privacidad y los Condiciones del servicio de Google.

                  Strong garden hose holder
                  Tienda
                  • Impresoras 3D
                  • Mejoras de Impresoras
                  • Filamentos
                  • Accesorios
                  • Merchandising Prusa

                  © Prusa Research a.s.

                  Printables
                  • Modelos 3D
                  • Store
                  • Clubs
                  • Concursos de Diseño 3D
                  • Brands
                  Comunidad
                  • Mapa Mundial
                  • Foro
                  • Grupos de Usuarios
                  • Eventos
                  Ayuda
                  • Ayuda Prusa
                  • Prusa Academy
                  • Calculadoras de Impresión 3D
                  Software
                  • PrusaSlicer
                  • Prusa.app
                  • Prusa Connect
                  • Drivers y Software
                  Empresa
                  • Sobre nosotros
                  • Blog
                  • Distribuidores Oficiales de Prusa
                  • Contacto
                  • Certificado conforme a las normas ISO 9001, ISO 14001 e ISO 45001
                  • Términos y Condiciones generales
                  • Términos Generales y Condiciones de Uso de los sitios Web PRUSA
                  • Política de privacidad
                  • Información sobre las cookies
                  • Política de Reclamaciones de los Clientes
                  • Página de Estado de los Sitios Web
                  • Configuración de las cookies
                  • Términos y Condiciones generales
                  • Términos Generales y Condiciones de Uso de los sitios Web PRUSA
                  • Política de privacidad
                  • Información sobre las cookies
                  • Política de Reclamaciones de los Clientes
                  • Página de Estado de los Sitios Web
                  • Configuración de las cookies

                  © Prusa Research a.s.

                  JOSEF PRUSA®, PRUSA RESEARCH®, PRUSA POLYMERS®, PRUSA ORANGE®, PRUSA 3D ® Y PRUSAMENT® son marcas registradas de Prusa Development a.s. utilizadas por Prusa Research a.s. bajo licencia de Prusa Development a.s.

                  MMU3 Setup and inspection

                  Relevante para

                  MMU3
                  Artículo está también disponible en los siguientes idiomas
                  English
                  Čeština
                  Polski
                  Deutsch
                  Français
                  Español
                  Italiano
                  日本語

                  After successfully finishing the build of your Original Prusa MMU3 upgrade and going through 11. Primer comienzo of the assembly manual you should be good to go. However, if you encounter persistent issues, we have compiled a checklist of what may be the source of the problem.
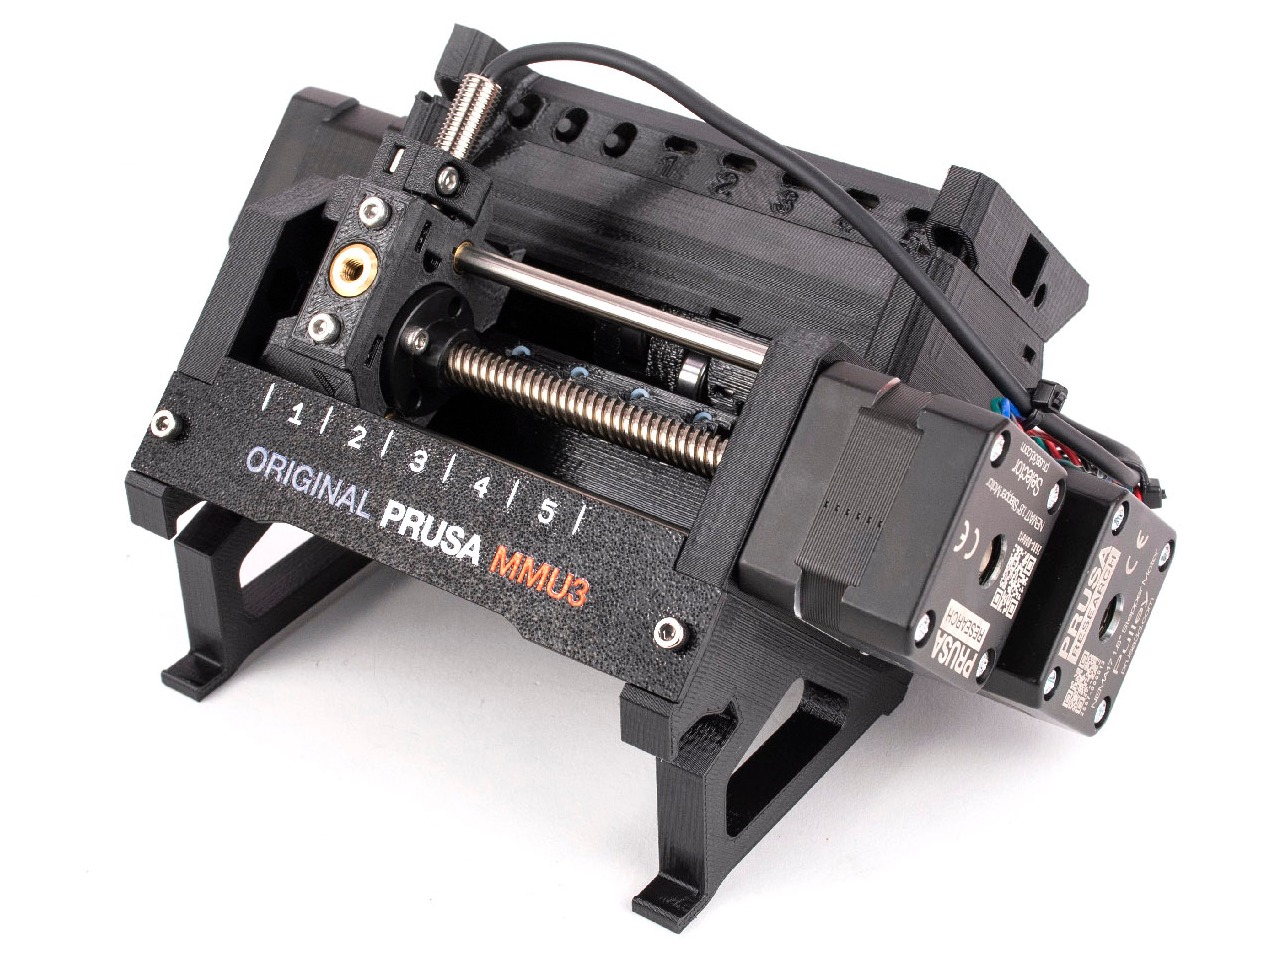
                  Necessary calibrations

                  With the hundreds of filament changes that can go into a single MMU print, the system must know where each filament is at all times. For that, there are two sensors that have to be set up properly.

                  On the MK3/S/+ and the MK3.5, you can see if they trigger correctly on the LCD menu under Support -> Sensor info. Each should trigger "1" of filament is present and "0" when it's not.

                  On the MK3.9/4, you can add the filament sensor and the superFINDA statuses on the footer by going to LCD menu -> Settings -> User interface -> Footer. They will present "OFF" when no filament is loaded, and "ON" when the filament is loaded.

                  IR filament sensor calibration

                  This is one of the two sensors on the MMU3, located on the printer's extruder.

                  For the MK3S/+ and MK3.5, ensure your IR filament sensor mechanism is properly calibrated before printing.

                  If you have any issues with the Filament sensor in the MK3.9/4, check the troubleshooting steps here: Sensor de filamento Nextruder (CORE One, MK4/S, MK3.9/S, XL).

                  SuperFINDA sensor calibration

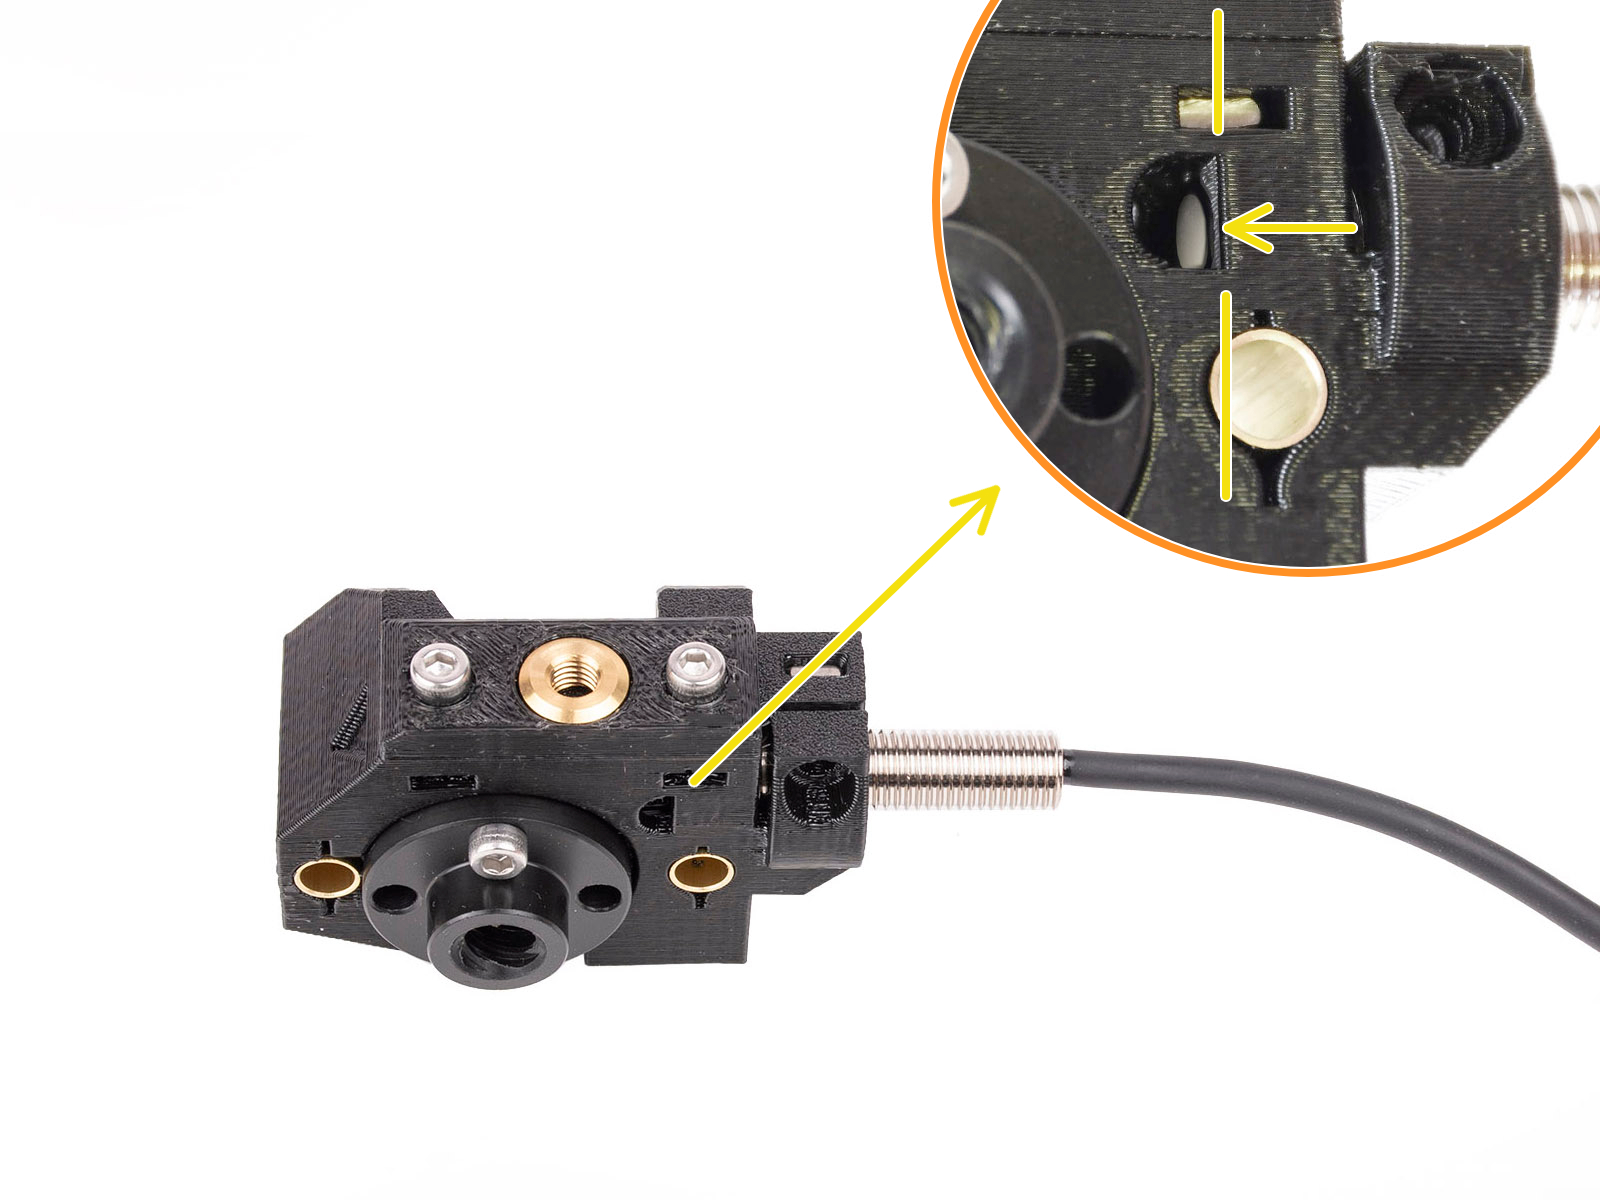
                  The SuperFINDA is the second sensor on the MMU3. Its position is crucial to ensure smooth operation. Its assembly can also collect debris or strings from filament changes. Make sure the tip of the superFINDA is aligned with the D-shaped opening as shown below.
                  Hardware configurations

                  Idler screws tension

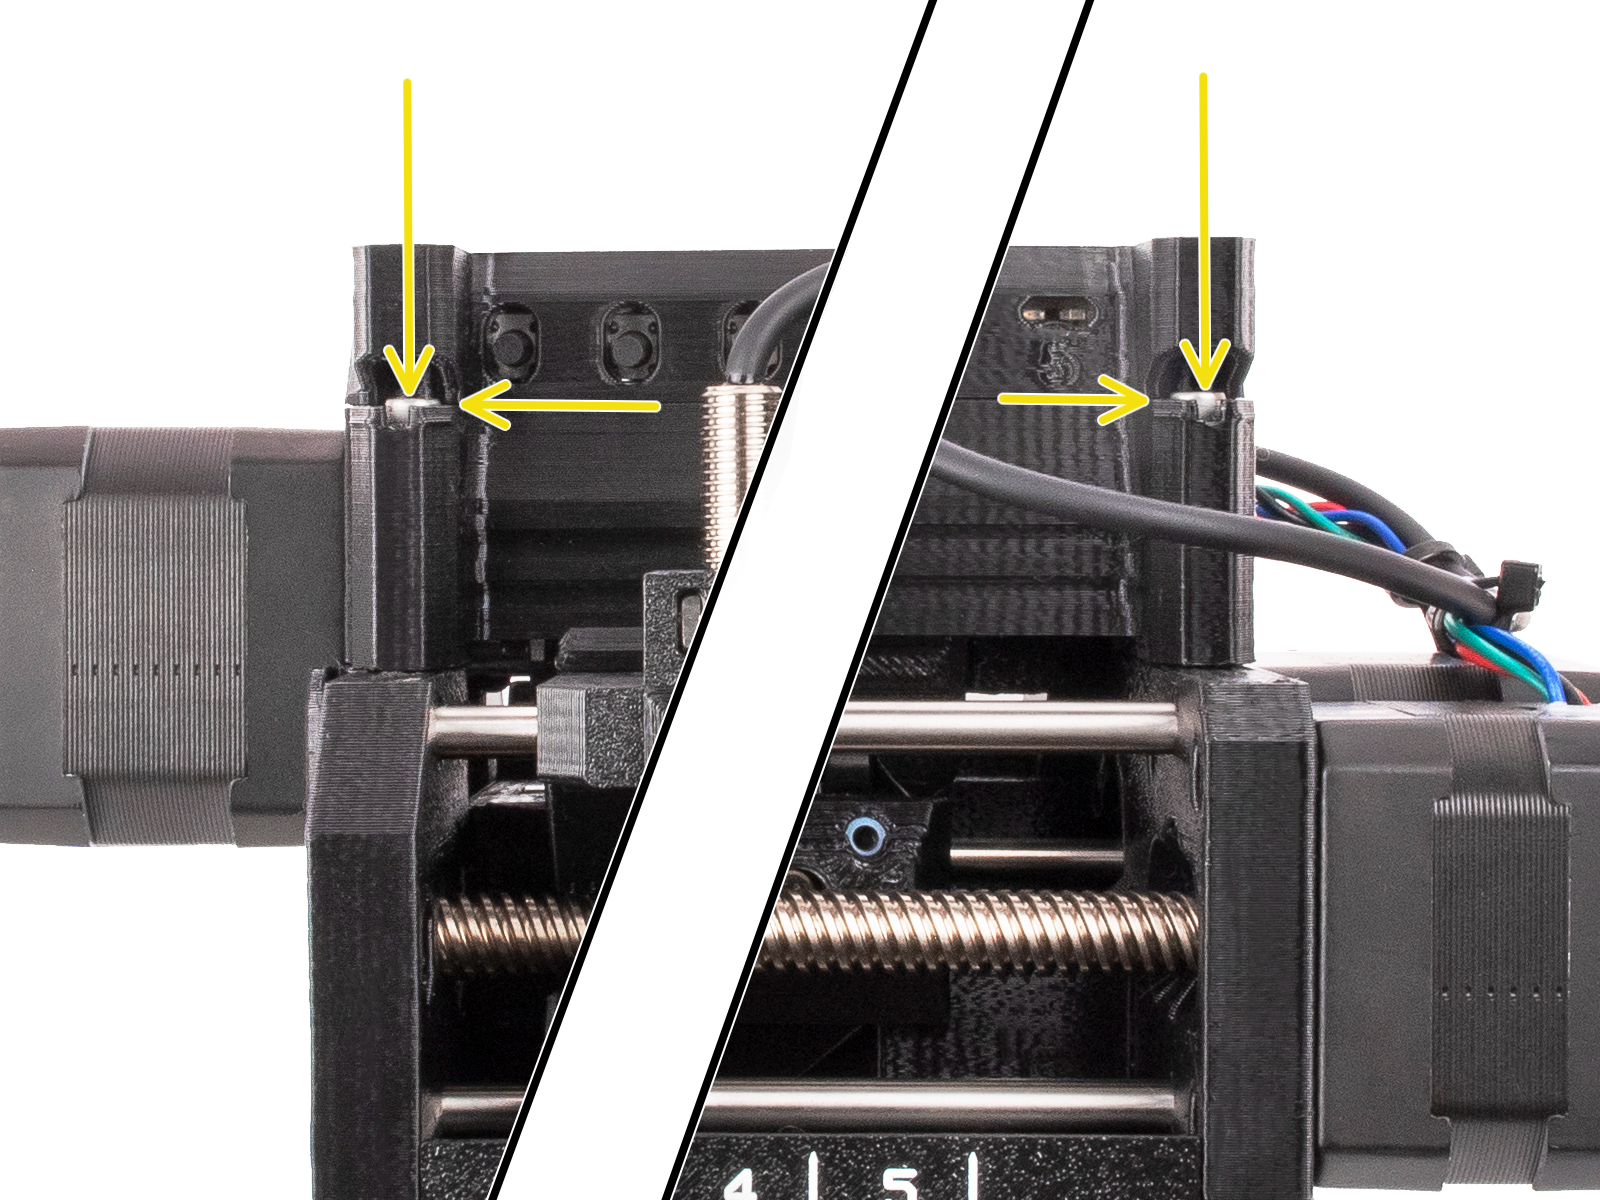
                  Just like the extruder idler screw, its MMU3 counterparts need to be tightened just right. If the screw is overtightened, the idler will struggle with determining its home position and the MMU unit won't work properly. Over-tightening can also cause the pulleys to be "choked" by the filament. If the screws are too loose, the MMU unit might struggle with grabbing the filaments properly. To find the perfect tension, adjust both of the idler tension screws so that the top of the screw head is slightly above the top surface of the idler body.
                  Spools and buffer positioning

                  The spool holders shouldn't be too close to each other. Ideally, the spools should be positioned as described and shown in the handbook (picture below).
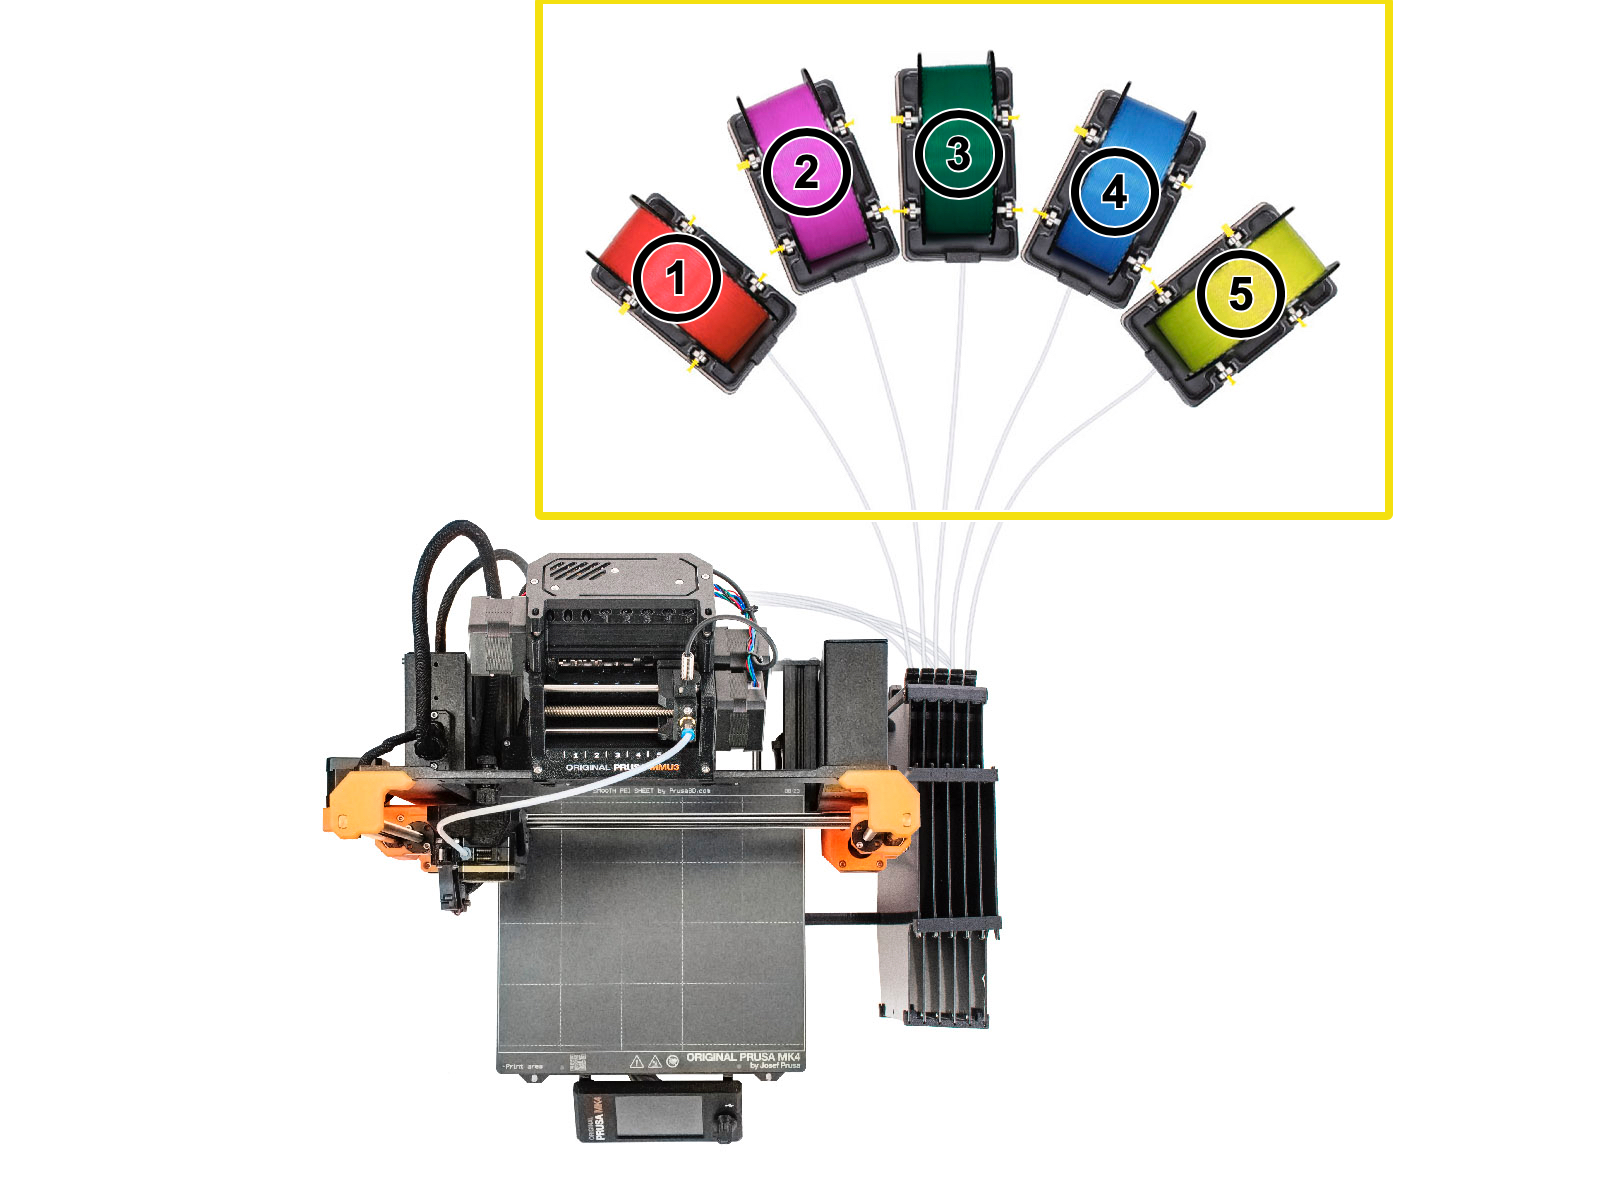
                  If you decide not to use the long PTFE tubes, or not to use the filament buffer, you have to make sure the filaments will not be tangling one into another. Also, make sure the spools are stable and won't tip over. Almost empty spools are more prone to cause problems with tangling or falling over.

                  Assembly inspection

                  Idler Bearings

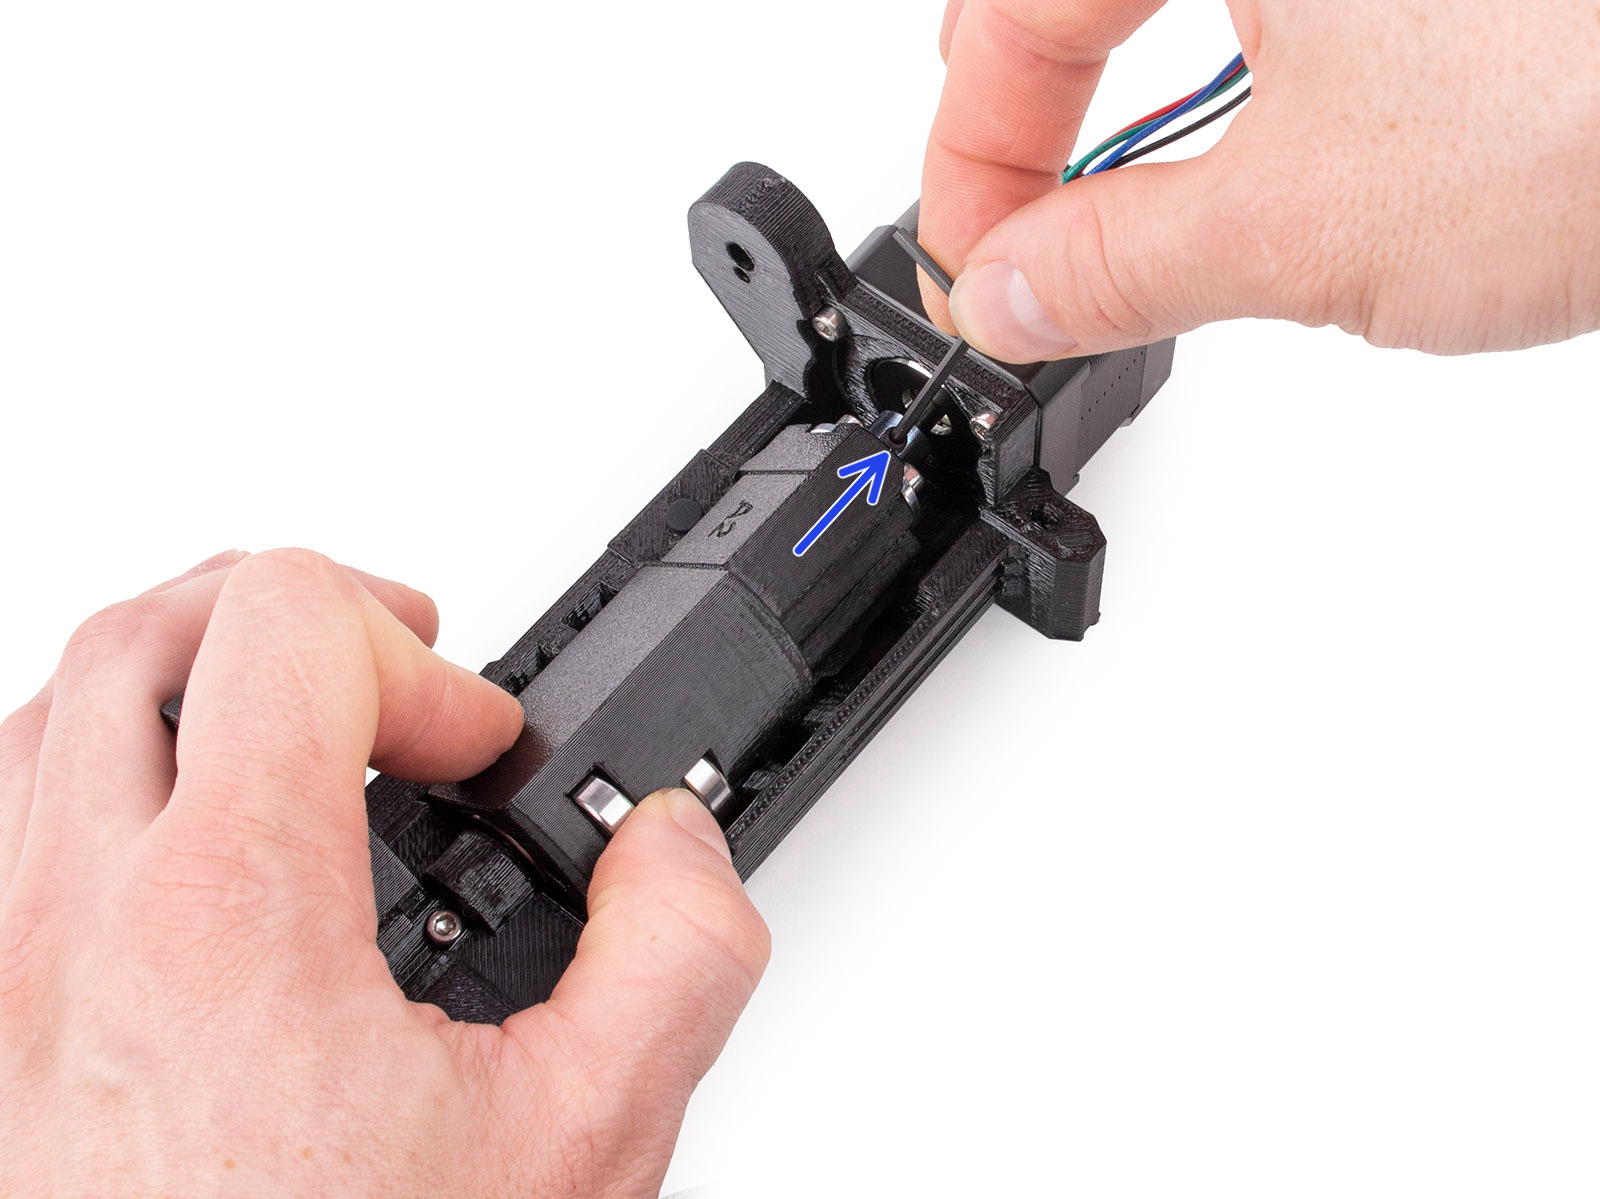
                  The five bearings protruding from the idler cylinder must be spinning freely on their shafts. If that is not the case, you can always remove and inspect the bearing by pushing out the shaft from the opposite side they are inserted. Use a rod or Allen key at least 100 mm (~4 in) long.
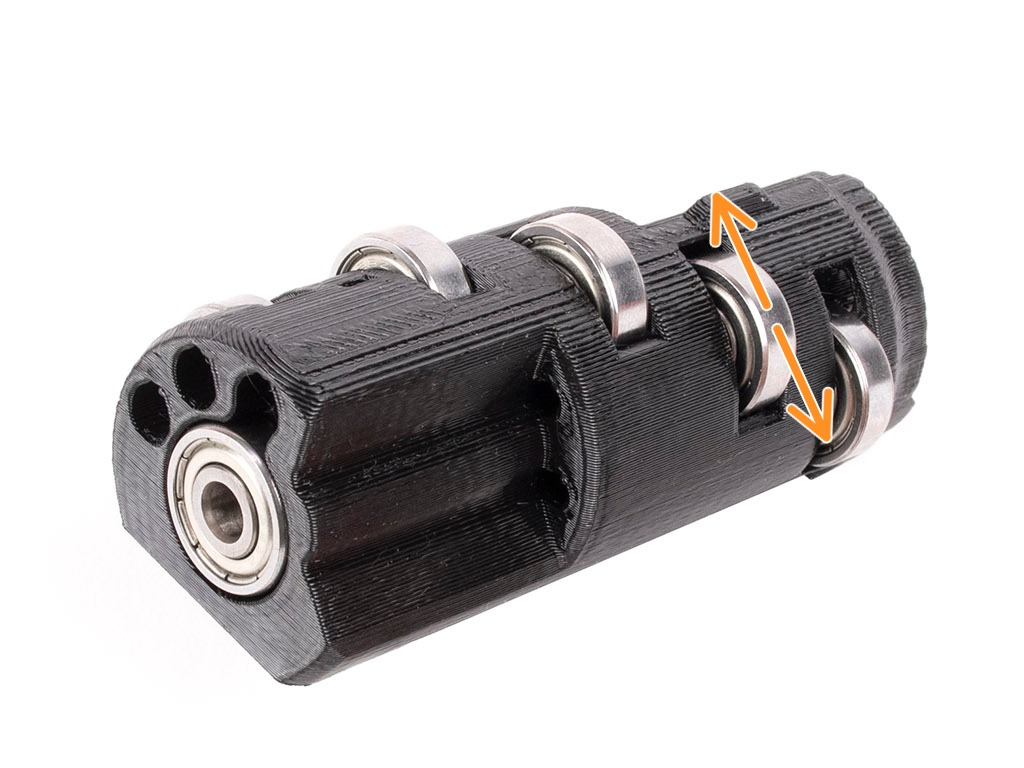
                  Securing the idler on the shaft

                  A metal coupler connects the idler and the idler body. Make sure that the four M3x10 screws are well-tightened. Then use a 2 mm Allen key to check if the set screw is firmly tightened on the flat part of the motor shaft. After that, make sure that the idler is rotating freely
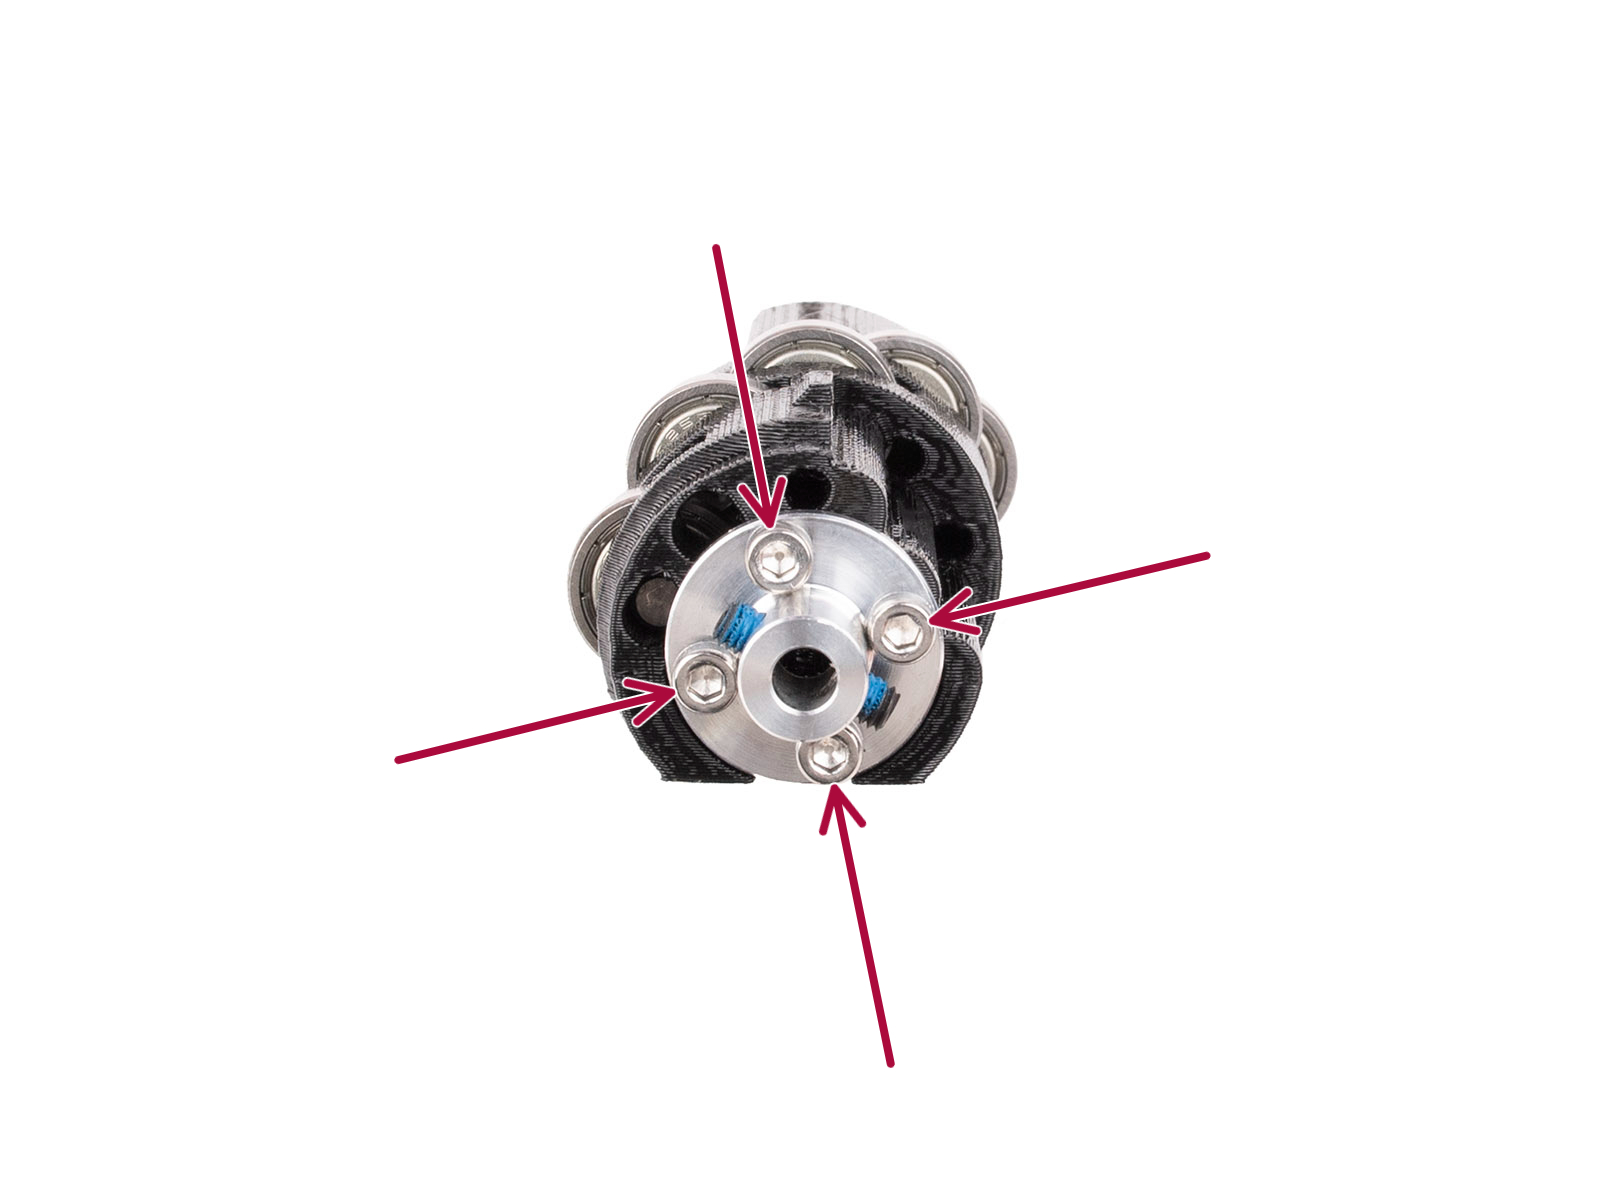
                  Align the pulleys

                  The filaments are being pushed through the MMU3 unit using 5 hobbed pulleys, mounted on the long shaft of the pulley motor. The grub screws must be:
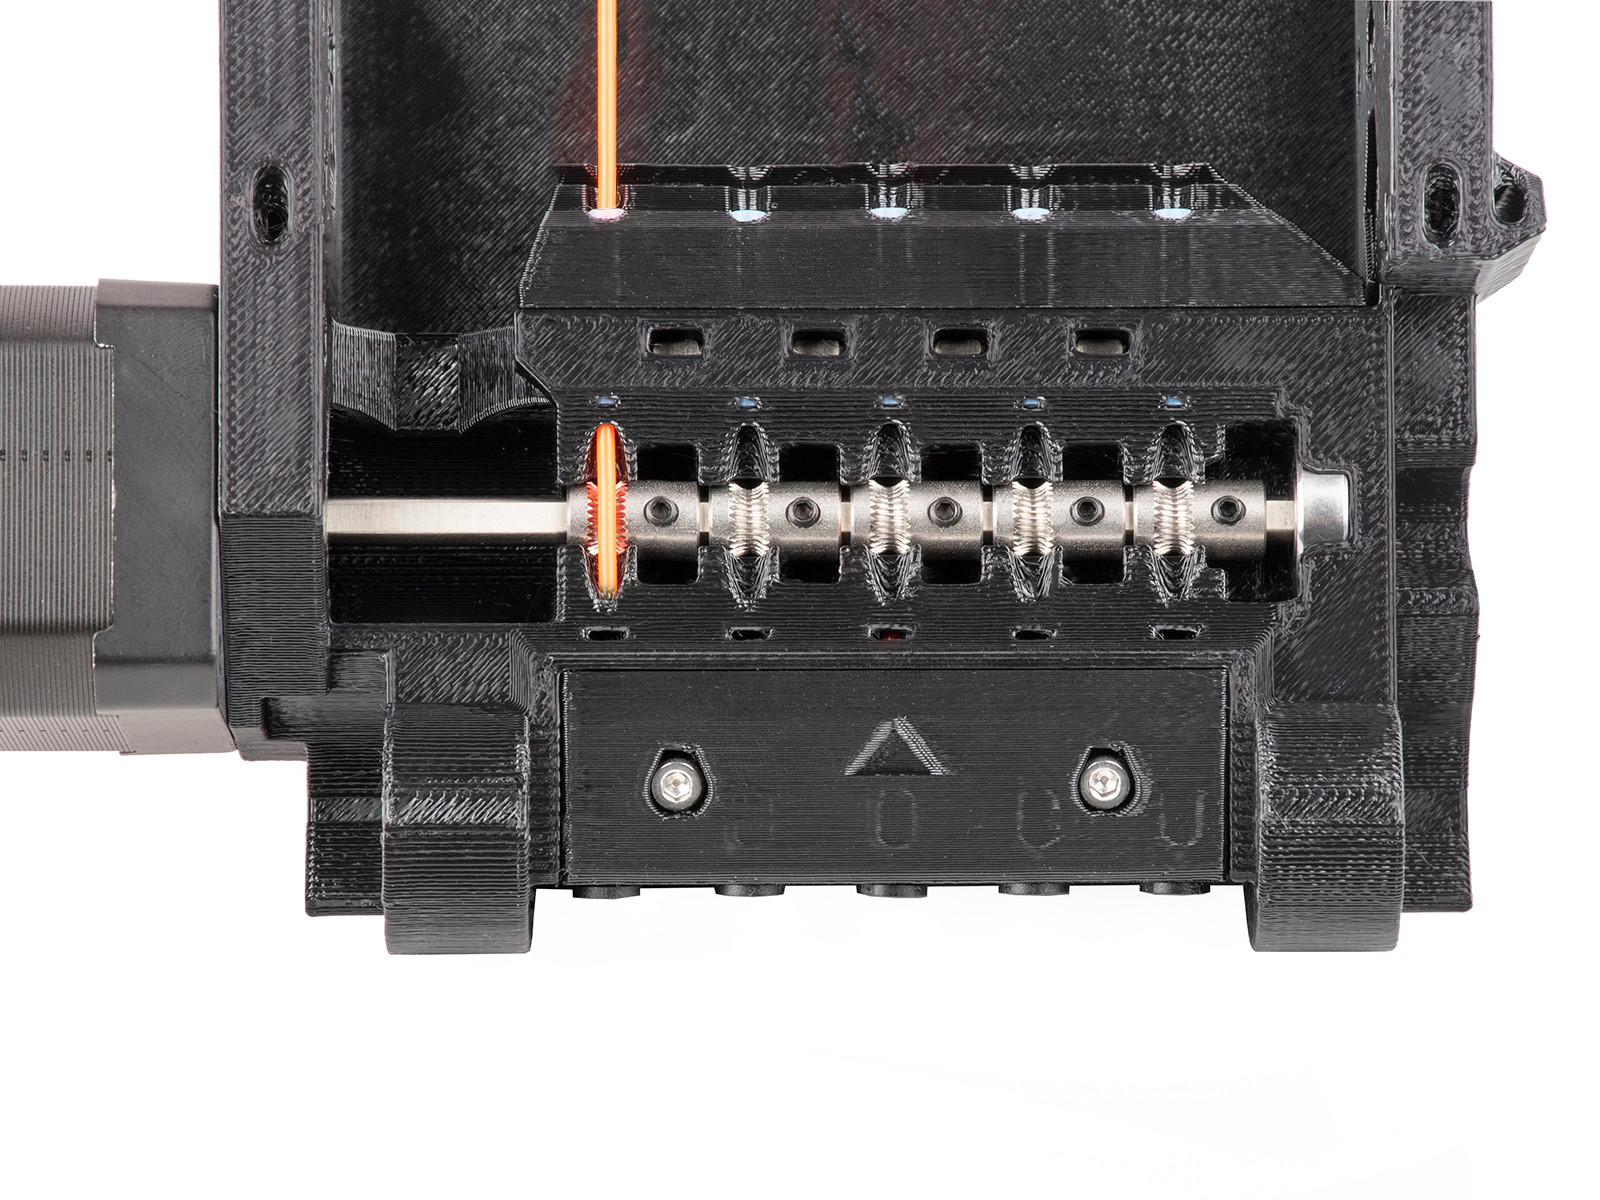
                  • Oriented on the left side of the teeth, away from the Pulley motor.
                  • Perfectly aligned with the filament holes and filament, as shown in the photo below.
                  • Secured by the small black grub screw against the flat side of the Pulley motor shaft.

                  Over time, filament dust may accumulate in the teeth of the pulleys. The best practice is regularly to clean them with a mini-brush or a similar tool.

                  Black Collets

                  The PTFE tubes that lead the filaments into the MMU unit are held in place by 5 collets. The collets must be secure so the PTFE tubes do not fall during printing, the collets must be secured. Remember that the PTFE is loose when the collet is pushed in, and secured when the collet is pulled back.
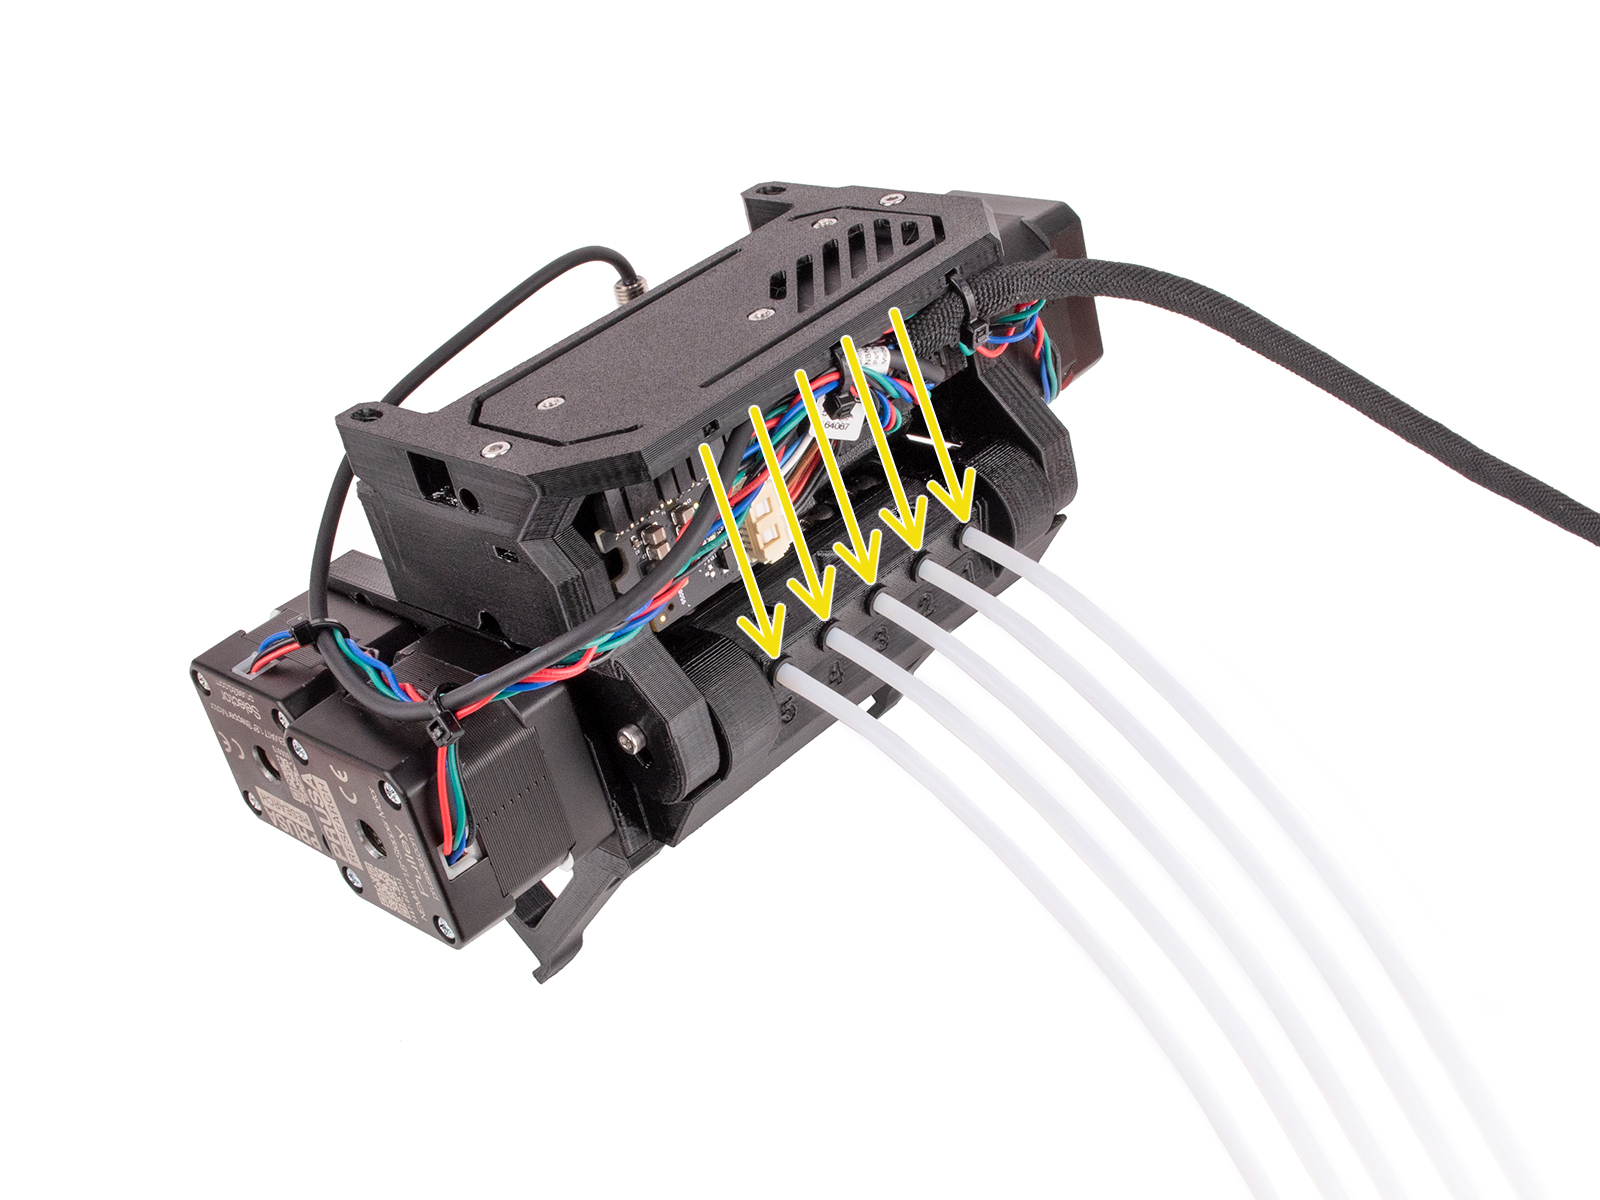
                  Short PTFE tubes orientation

                  After the filament is grabbed by the hobbed pulley, it is pushed into one of the five 19 mm (0.75 inches) PTFE tubes. These tubes are chamfered on one end, which provides some extra space for the unloaded filament, as the tip might be slightly thicker than the rest of the filament. Therefore, the chamfered end must be facing out, away from the pulleys.

                  Selector blade

                  Make sure the little blade that is supposed to cut filament strings is secured in place with an M3x10 screw, and that the blade is seated nicely.

                  Slicer settings

                  The shape of the filament tip is very important for a successful MMU3 print. The tip should be pointy but without any lump or string. The diameter of the tip can be slightly bigger than the rest of the filament, but not by much.
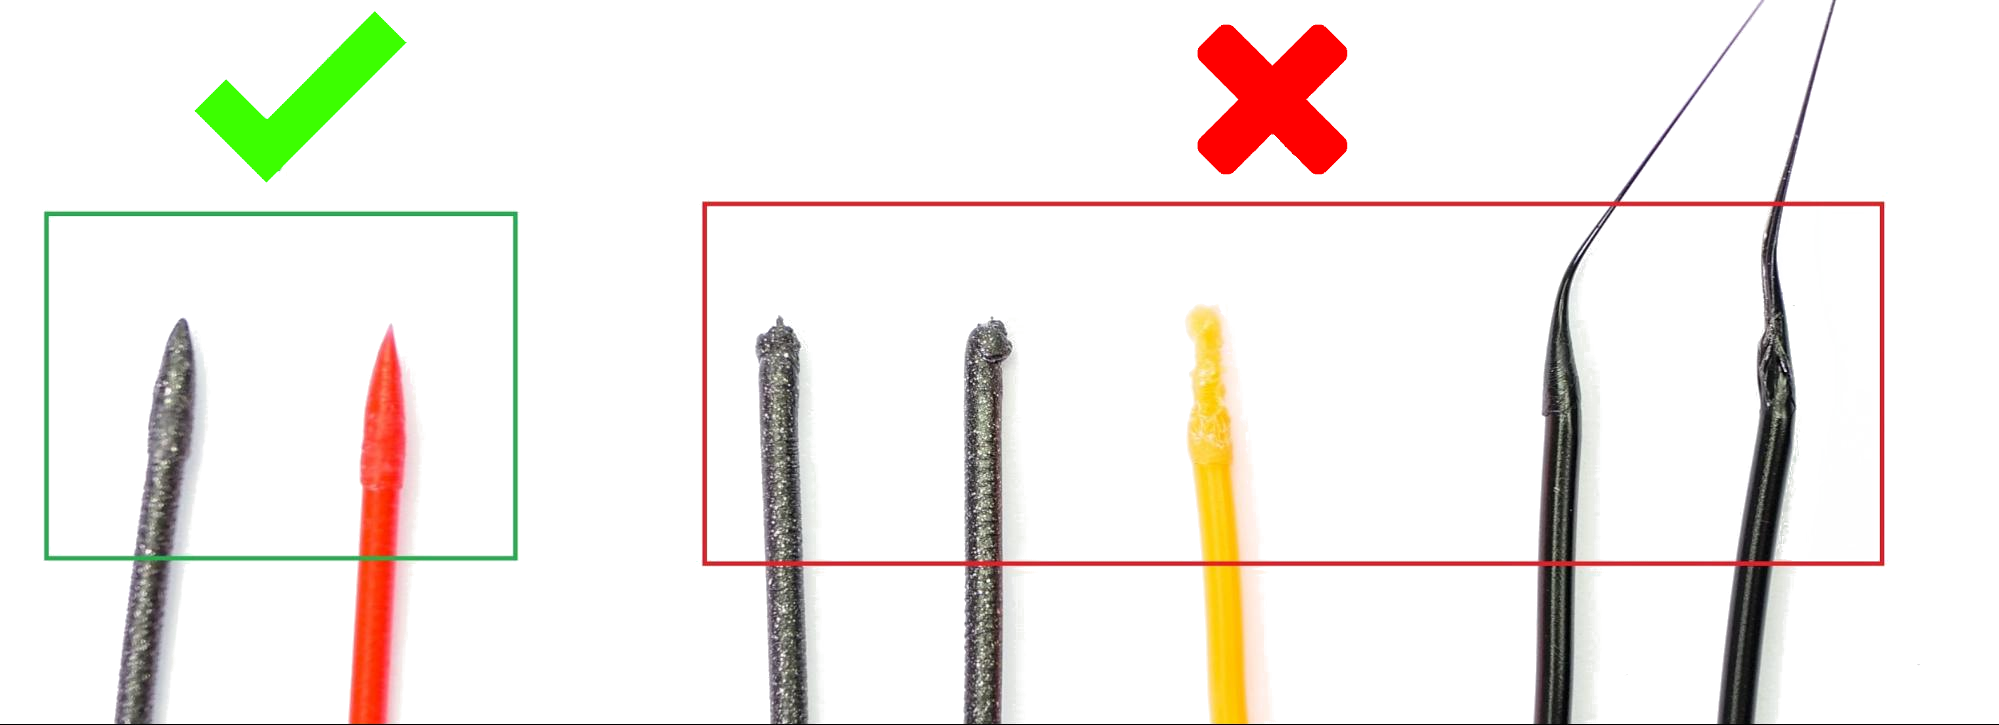
                  First of all, try to adjust the hotend temperature (increase or decrease it by increments of 2°C), which will solve the problem in most cases. You can do so during the print in the Tune menu or when slicing the model.

                  If the problem persists, head back to PrusaSlicer and increase the number of cooling moves by 2 or 3 from Filament settings -> Advanced -> Number of cooling moves). Furthermore, you can try to increase the unloading speed by increments of 10 mm/s from Filament settings -> Advanced -> Unloading speed.

                  Test prints

                  If you are sure that all potential issues mentioned above have been avoided, feel free to test one of the MMU3 Sample Objects.

                  ¿Te resultó útil este artículo?
                  Esta acción está disponible solo para usuarios registrados. Por favor inicia sesión.
                  Inicia sesión  para publicar un comentario
                  Sin comentarios

                  Temas

                  • Calibración
                    • Calibración básica
                      • Nivelación mallada de la base de impresión
                      • Tornillo de ajuste del rodillo de presión
                      • MMU3 Setup and inspection
                      • Calibración de la Primera Capa (i3)
                    • Calibrado avanzado
                    • Mensajes de Error de Calibración