AA

Doporučené produkty

    Oblíbené kategorie

      Populární vyhledávání

        Články

          Blog

            Produkty

              Kategorie

                Navrhovaná hledání

                  Vyhledávám…
                  Žádné výsledky
                  Něco se pokazilo.
                  ↑↓ Vybrat↵ OtevřítEsc Zavřít hledání
                  • English
                  • Čeština
                  • Deutsch
                  • Español
                  • Français
                  • Italiano
                  • Polski
                  • 日本語
                  • Objednávky
                  • Adresa
                  • Skladové upozornění
                  • Kurzy
                  • Předplatné
                  • Upravit účet
                  • 3D tiskárny9+▾

                    3D tiskárnynovinka

                    novinkaPrusa CORE One L+Zjistit více
                    novinkaPrusa CORE One+ (Gen 2)Zjistit více
                    newPrusa CORE One L+ INDX 8-ToolnovinkaPrusa CORE One+ (Gen 2) INDX 8-ToolPrusa CORE One L+: Critical InfrastructureOriginal Prusa MK4SnovinkaOriginal Prusa XL+Original Prusa XL+: Critical Infrastructure

                    Upgrady tiskáren

                    newCORE One/+ INDX Conversion KitnovinkaCORE One L+ upgradenovinkaPrusa CORE One+ to Prusa CORE One+ (Gen 2)novinkaPrusa XL to Prusa XL+ Upgrade
                    Věrnostní program PrusaDoporučte nás a získejte odměnu
                    Jak si vybrat 3D tiskárnu?Provede vás základy, abychom společně našli tiskárnu, která odpovídá vašemu prostoru, rozpočtu i nápadům.
                    Elektronická kniha zdarmaStáhněte si zdarma elektronickou knihu Základy 3D tisku s Josefem Průšou a vykročte do světa 3D tisku.
                    Tisknutelné části tiskáren Original PrusaKolekce tisknutelných náhradních dílů pro tiskárny Original Prusa a jejich upgrady.
                    Informace o dodacích lhůtáchPravidelně aktualizované informace o výrobních kapacitách a dodacích lhůtách našich tiskáren.
                    Zakázkový 3D tiskProfesionální zakázkový 3D tisk z různých materiálů dle vašich požadavků.
                  • Materiály▾

                    Filamenty

                    PrusamentPLAPETGASA / ABSPC (Polykarbonát)PA (Nylon)FlexKompozitní materiálySpeciální materiályVýprodej Materiálů

                    Resiny

                    ResinResin Cleaner
                    Průvodce filamentyZkontroluj svou cívku Prusamentu
                    Prusament.com
                  • Díly & příslušenství▾

                    Příslušenství

                    EnclosureTryskyTiskové plátyZákladní příslušenstvíKamery a doplňkyNářadí a CraftingLepidla

                    Náhradní díly

                    Merch

                    Náhradní díly - všechny tiskárnyCORE OneMK4/S a MK3.9/SMK3/MK3S/MK3S+XL
                    Merch
                  • Pro firmy▾
                    Prusa Pro HT90Prusa Pro SLXPrusa Pro AFSPrusa Pro Medical OneOriginal Prusa XLOriginal Prusa XL: Critical Infrastructure
                    Prusa CORE One+Zjistit více
                    Prusa CORE One LZjistit více
                    Prusa CORE One L: Critical Infrastructure Edition

                    Využití 3D tisku

                    Výroba a vývojAutomobilový průmyslZdravotnictvíVzdělávání a výzkumArchitektura a designFilmový průmyslKritická Infrastruktura

                    3D tiskařské příběhy

                    • Jak začal 3D tisk: o RepRapu a open-source s Adrianem Bowyerem
                    • Jak 3D tisk mění výuku matematiky na univerzitě v rakouském Linci
                    • Jak pomocí 3D tisku vznikal šroubovák LTT
                    • Victoria Hand Project: Jak 3D tisk mění protetiku
                    Oficiální prodejci Prusa
                    Udržitelnost
                    Prusa Education
                    Kontakt a poptávky
                    Zakázkový 3D tisk
                    Certifikace ISO
                  • Software▾
                    PrusaSlicer

                    PrusaSlicerPrusaSlicer

                    PrusaSlicer je open-source software plný užitečných funkcí s častými aktualizacemi. Obsahuje vše, co potřebujete k exportu dokonalých tiskových souborů pro vaši 3D tiskárnu.

                    WindowsMacOSLinux
                    Prusa Connect

                    Prusa Connect

                    Prusa Connect je snadno nastavitelná cloudová služba pro vzdálené ovládání a monitorování vašich 3D tiskáren, která umožňuje bezpečné nakládání s daty a správu více tiskáren, ať už jste kdekoliv.

                    Přihlásit se do Connectu
                    Aplikace Prusa

                    Aplikace Prusa

                    Ovládejte svou tiskárnu vzdáleně odkudkoliv pomocí technologie Prusa Connect běžící na pozadí. Aplikace Prusa přináší novou úroveň zážitku z tiskáren Prusa na mobilních zařízeních s operačními systémy Android a iOS.

                    Vyzkoušet!
                    Ovladače a firmwareStáhněte si nejnovější firmware a ovladače pro svou 3D tiskárnu.
                    Podpora k PrusaSliceru
                    Podpora k Prusa Connectu
                  • 3D modely▾
                    3D tiskárnyUmění & designKutilství & koníčkyDomácnostMiniatury do stolních herHry & hračkyObchod na Printables

                    Oblíbené 3D modely

                    • Strong garden hose holder
                    • Prusa Spool Bot
                    • Build Tray — Modular Organizer for Assembly, Disassembly and Maintenance
                    • Broom Holder
                    • Octagon Fabric
                    • Prusa CORE One ? (Mimic Skin)

                    Designové soutěže

                    • Framework Laptop 12 Mainboard Re-Use1. 9. 2026 – 30. 9. 2026
                    • 🏆 Designer Challenge: Magic tricks!1. 9. 2026 – 22. 9. 2026
                    • Od prototypu k produktu: Příslušenství ke kamerám1. 8. 2026 – 14. 9. 2026
                  • Komunita▾

                    Nadcházející akce

                    • Maker Faire Tokyo 20265. 9. 2026 – 6. 9. 2026 · Tokyo, Japan · Prusa Team
                    • IFA 20264. 9. 2026 – 8. 9. 2026 · Berlin, Germany · Prusa Team
                    • 3D Printopia 202626. 9. 2026 – 27. 9. 2026 · Pennsylvania, United States · Prusa Team
                    • Maker Faire Bay Area25. 9. 2026 – 27. 9. 2026 · Kalifornie, United States · Prusa Team

                    Prusa Forum

                    • 6.8.1 Zamrzání obrazovky
                    • Reklamace tvrzené trysky
                    • Core one - čištění trysky G-kód
                    Mapa Prusa WorldMapa Prusa WorldVyhledejte lokální uživatele 3D tiskáren a prozkoumejte komunitu kolem sebe
                  • Podpora▾
                    Manuály & návodyPrusaSlicerPrusa ConnectMateriály

                    Model tiskárny

                    CORE One INDXCORE One LCORE One+CORE One

                    Řešení problémů s hardwarem

                    • Selftest selhal (CORE One/+)
                    • Ucpaná tryska (CORE One, CORE One L, XL, MK4/S, MK3.9/S)
                    • Úprava napnutí řemenů (CORE One/+, CORE One INDX, CORE One L/+)
                    • Co jsou PrusaLink a PrusaConnect

                    Ovladače a firmware

                    Rodina INDXRodina CORE OneRodina MK4Rodina XLRodina MMURodina PRO
                  • Kurzy▾

                    Staňte se expertem na 3D tisk

                    Prusa Academy nabízí online kurzy na nejrůznější témata týkající se 3D tisku. Každý kurz obsahuje:

                    • srozumitelný text s mnoha obrázky a krátkými videi
                    • odkazy pro inspiraci a další studium
                    • kvízy pro ověření vašich znalostí
                    • certifikát o dokončení
                    Procházet všechny kurzy"Moje knihovna kurzů
                    • 3D modelování v Autodesk Fusion
                    • PrusaSlicer Masterclass – Pro začátečníky až pokročilé
                    • Kompletní průvodce postprocesováním a barvením 3D výtisků
                    • Airbrush Your 3D Prints: From Basics to Advanced Tricks
                  • Blog▾
                    • Akce Zpátky do školy 2026 je tady!
                    • PrusaSlicer 3.0 Preview – Vše je připraveno na budoucnost 3D tisku
                    • Prusa CORE One+ (Gen 2) INDX, odesílání prvních kusů a objednávky kompletních tiskáren
                    E-book Základy 3D tisku
                  • O nás▾

                    Volná místa

                    • Commercial Operations specialista/ka
                    • Operátor/ka expedice filamentů
                    • Obsluha elektroerozivního obráběcího stroje - hloubičky - PD Tool
                    • Operátor/ka výroby průmyslových 3D tiskáren v Hradci Králové

                    O Prusa Research

                    Jsme největším výrobcem 3D tiskáren v Evropě a Spojených státech. Společnost byla založena v roce 2012 nadšencem, kutilem a vynálezcem Josefem Průšou. Během pouhých 15 let jsme vyrostli ve společnost s více než 1200 zaměstnanci. Každý měsíc navrhujeme, vyrábíme a odesíláme přes 10 000 inovativních a zabezpečených 3D tiskáren z naší centrály v Praze a pobočky v americkém Delaware do více než 160 zemí světa. Podívejte se na video, ve kterém se dozvíte, jak firma Prusa Research vznikla a čeho jsme dosáhli během pouhých 10 let!

                    O násČasová osaUdržitelnostOpen-source
                    O nás
                    Kontaktujte nás
                    Logo a fotografie
                    Průša pro školy
                    Volná místa
                    Certifikace ISO
                  1. Podpora
                  2. About PrusaSlicer 3.0 [Překládá se]
                  3. First print with PrusaSlicer (3.0.0)
                   

                  Obsah

                  • PrusaSlicer modes
                  • Choose and set up your printer
                  • Choose your filament
                  • Choose a print profile
                  • Import your model
                  • Orient your model
                  • Support material
                  • Perimeters and infill
                  • Slice
                  • Check the result in Preview
                  • Export and print
                  • Handy shortcuts

                  Blog

                  • Akce Zpátky do školy 2026 je tady!
                  • PrusaSlicer 3.0 Preview – Vše je připraveno na budoucnost 3D tisku
                  • Prusa CORE One+ (Gen 2) INDX, odesílání prvních kusů a objednávky kompletních tiskáren

                  Novinky e-mailem

                  Přihlaste se k odběru našeho měsíčního přehledu užitečných informací o novém firmware, nových verzích PrusaSliceru a zajímavých tipů na 3D tiskařské projekty.

                  Kliknutím udělujete souhlas se zasíláním newsletteru.

                  Tato stránka je chráněna pomocí reCAPTCHA Enterprise a uplatňuje tedy Ochranu osobních údajů a Podmínky použití společnosti Google.

                  Strong garden hose holder
                  E-shop
                  • 3D tiskárny
                  • Upgrady tiskáren
                  • Filamenty
                  • Příslušenství
                  • Prusa Merch

                  © Prusa Research a.s.

                  Printables
                  • 3D modely
                  • Store
                  • Clubs
                  • Designerské soutěže
                  • Brands
                  Komunita
                  • Mapa světa
                  • Fórum
                  • Uživatelské skupiny
                  • Výstavy a akce
                  Podpora
                  • Prusa Help
                  • Prusa Academy
                  • Kalkulačky
                  Software
                  • PrusaSlicer
                  • Prusa.app
                  • Prusa Connect
                  • Ovladače a software
                  Firma
                  • O nás
                  • Blog
                  • Oficiální prodejci Prusa
                  • Kontakty
                  • Certifikováno podle norem ISO 9001, ISO 14001 a ISO 45001
                  • Volná místa
                  • Všeobecné obchodní podmínky
                  • Obecné podmínky používání internetových stránek PRUSA
                  • Zásady ochrany soukromí
                  • Informace o cookies
                  • Proces řešení stížností zákazníků
                  • Stavová stránka webu
                  • Nastavení cookies
                  • Recyklace 3D tiskárny
                  • Všeobecné obchodní podmínky
                  • Obecné podmínky používání internetových stránek PRUSA
                  • Zásady ochrany soukromí
                  • Informace o cookies
                  • Proces řešení stížností zákazníků
                  • Stavová stránka webu
                  • Nastavení cookies
                  • Recyklace 3D tiskárny

                  © Prusa Research a.s.

                  JOSEF PRUSA®, PRUSA RESEARCH®, PRUSA POLYMERS®, PRUSA ORANGE®, PRUSA 3D ® A PRUSAMENT® jsou registrované ochranné známky společnosti Prusa Development a.s., které používá společnost Prusa Research a.s. na základě licence od společnosti Prusa Development a.s.

                  First print with PrusaSlicer (3.0.0)

                  Relevantní pro

                  PrusaSlicer
                  Článek Tento článek je také dostupný v následujících jazycích:
                  English
                  Čeština
                  Polski
                  Deutsch
                  Français
                  Español
                  Italiano
                  日本語

                  Before printing your 3D file, it needs to be converted into a file type called .gcode or .bgcode. That is done by a program called a slicer. The best one for your Prusa or even non-Prusa printers is PrusaSlicer. This guide will lead you through using PrusaSlicer for the first time.

                  Before starting to use PrusaSlicer, make sure you know your Printer model (including the name and nozzle size) and the filament material you will print with.

                  PrusaSlicer modes

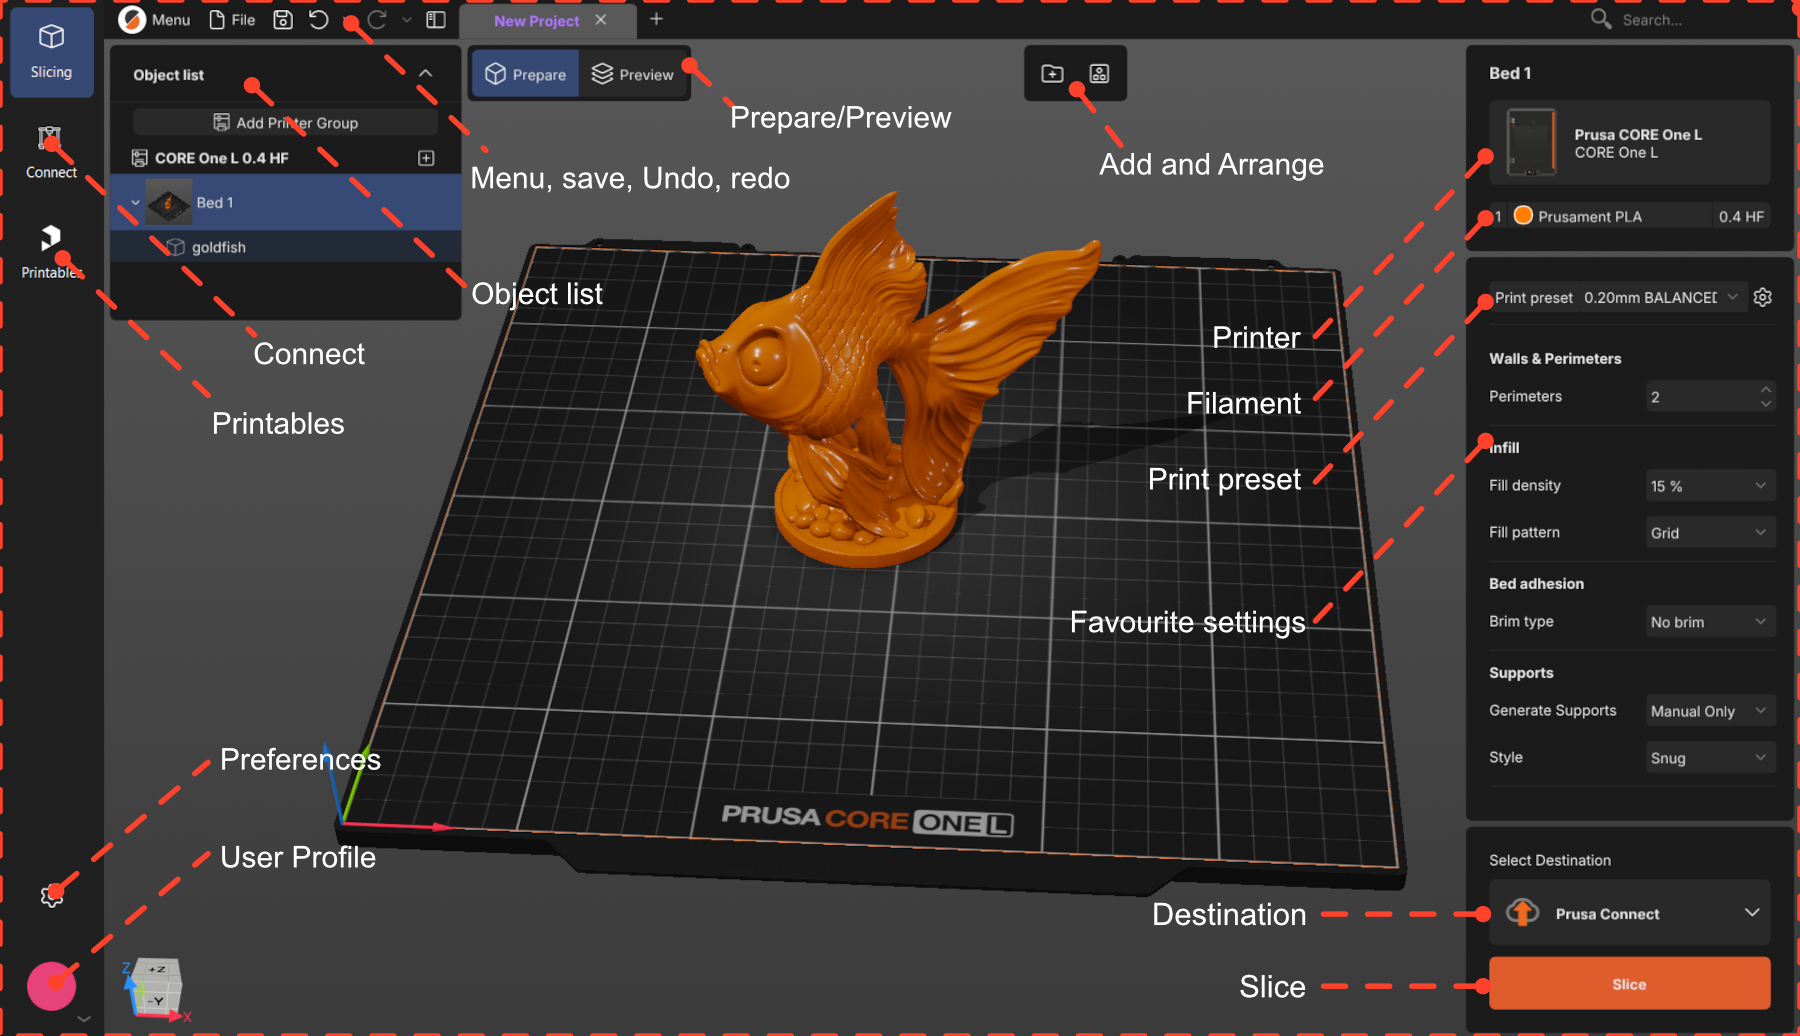
                  PrusaSlicer has two work modes: Prepare and Preview. Most of the model preparation will be done in the Prepare mode.

                  In both modes, you can see the Object list at the top right of the workspace. That will contain all the items of your project, organized as Printer -> Bed -> Object.

                  The Prepare mode is where you will arrange your model and choose your settings. There, you have the 3D scene, where you will add your model.

                  If no objects are selected, you will see the options Add and Arrange on the top menu, and the selected printer, filament, and print profile on the right-side menu.
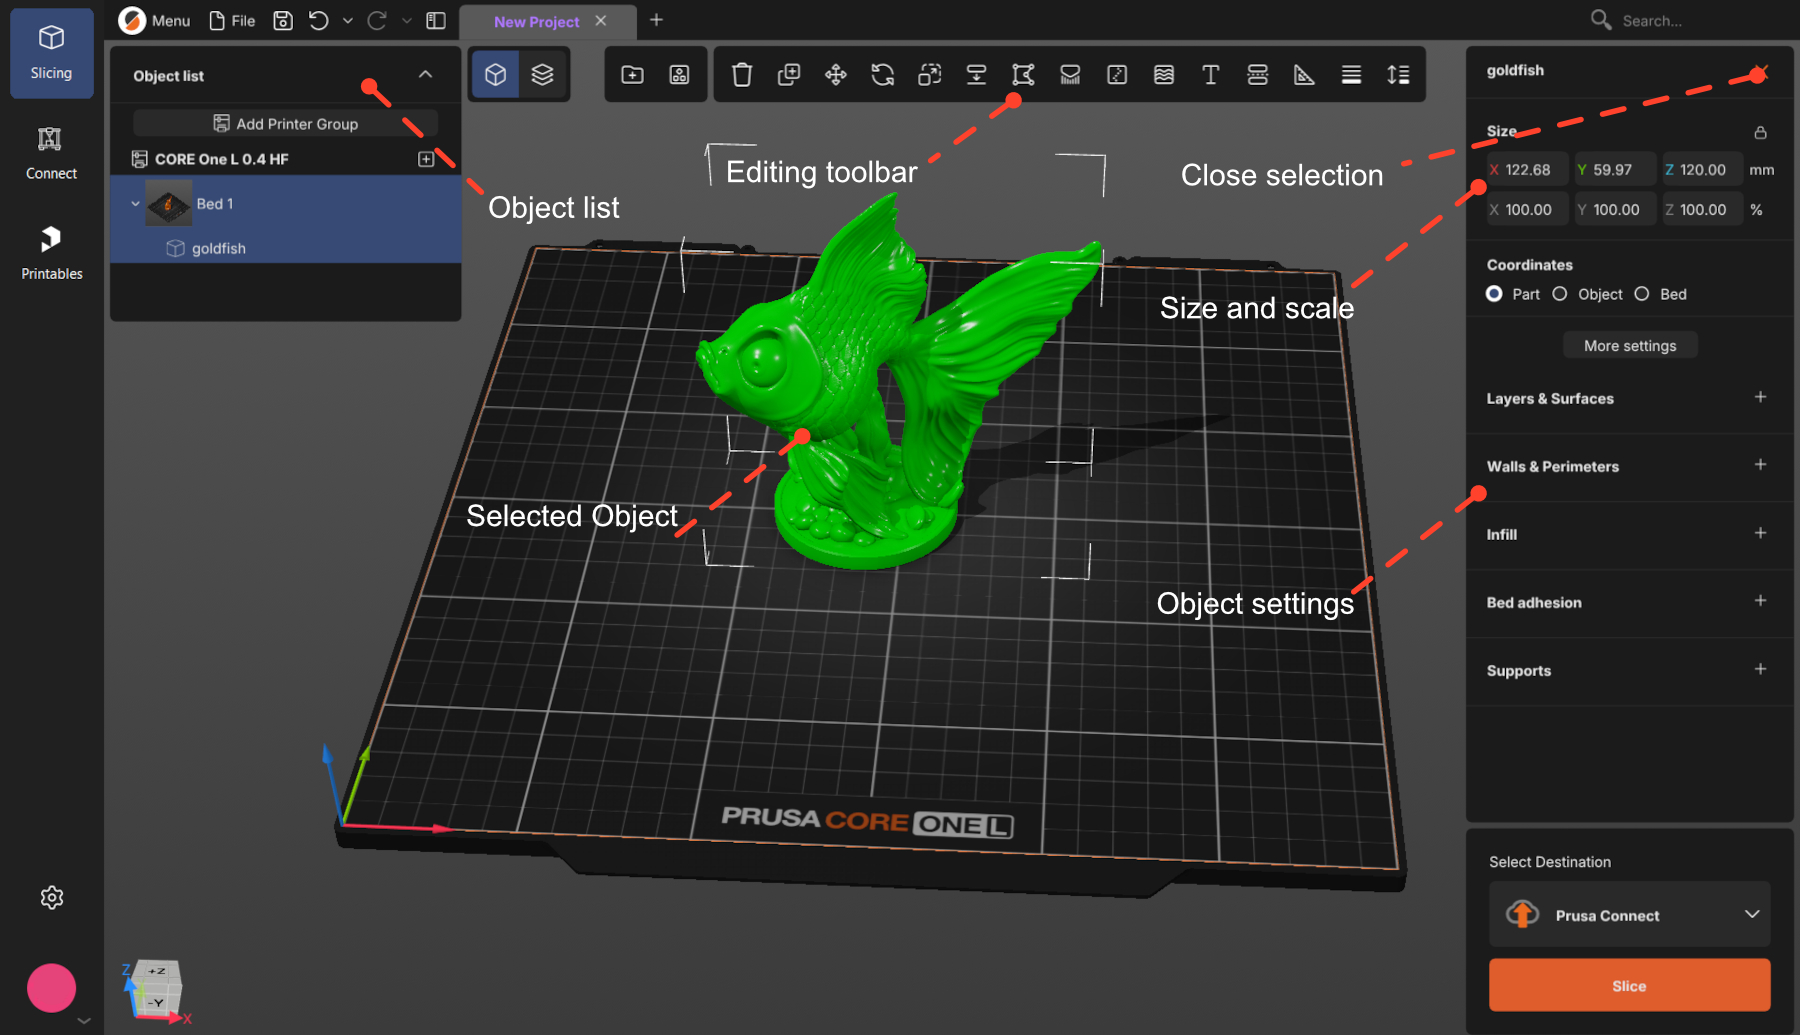
                  After an object is selected, you will see the full set of editing tools at the top menu, and the object's size and settings on the right-side menu.

                  To cancel selection, press Esc or click the close button.
                  Choose and set up your printer

                  Click to select the printer you will use. If your printer is not on the list, click Add printer at the bottom of that dialog and find your model in the catalog - there is a search box.
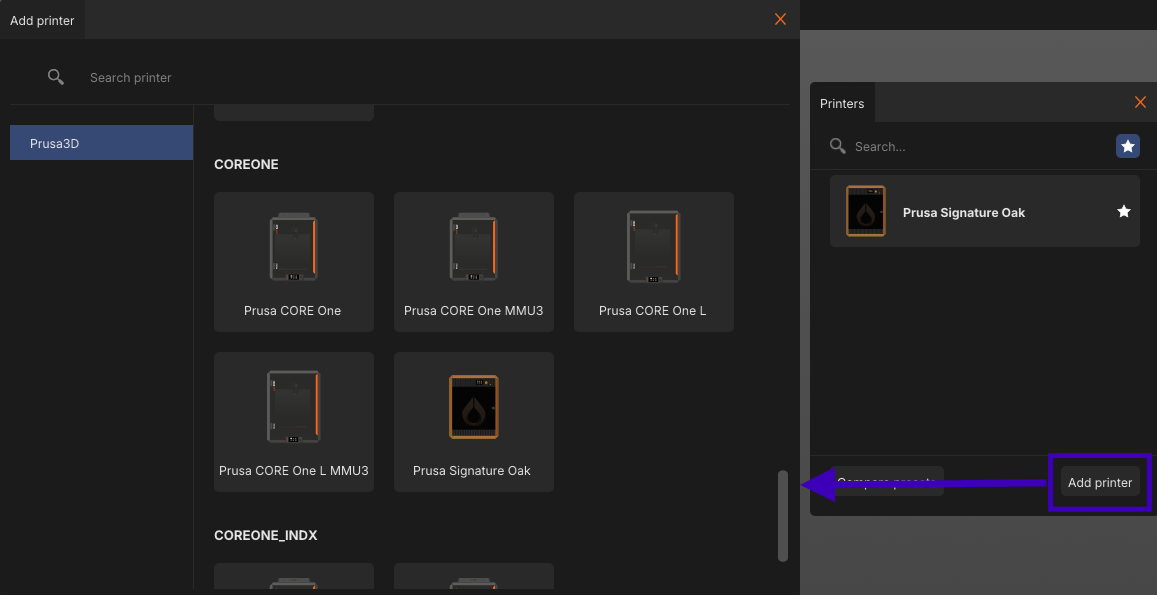
                  Set up the hardware. Always check the nozzle diameter and type, and the print sheet. The gear next to the printer name opens a menu with hardware setup

                  Choose your filament

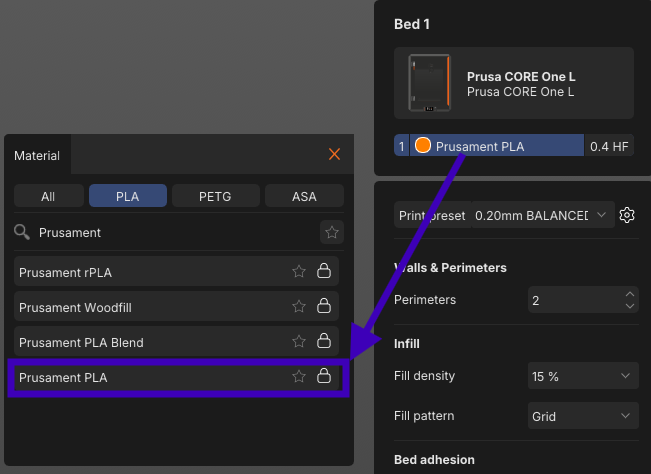
                  Click the material name to see the list of available materials and brands. You can filter by
                  material type — (the All / PLA / PETG / ASA) tabs — or search for the filament.
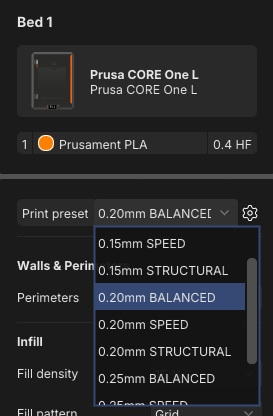
                  Choose a print profile

                  Each print profile comes with a predefined layer height — the main trade-off between quality and
                  time. Thinner layers mean more detail and a longer print.

                  To start, use 0.15 or 0.20 mm. Both give very good quality at a reasonable print time.

                  Most layer heights also come in versions tuned for a purpose, like SPEED or STRUCTURAL.
                  BALANCED is the neutral one you can start with.
                  Import your model

                  Any of these options work:

                  • Drag and drop the file onto the PrusaSlicer window
                  • Click Add above the plate or Ctrl+i
                  • File → Import STL /3mf 

                  Supported 3D formats are:  .3mf, .stl, .obj, .step / .stp, and SVG.

                  .3mf files can hold the whole project, not just models. Opening one may bring its own printer, filament, and print settings and replace yours. That is usually what you want when someone shares a ready-to-print project — just be aware it happened.

                  Orient your model

                  Your model may be oriented incorrectly after import. Four tools are very useful:

                  • Place On Face F: click one of the model's flat surfaces, and it snaps face-down onto the bed. The quickest fix for a model that imported at an angle.
                  • Move M: drag the model with the left mouse button at any time. The Move tool constrains the movement to a single axis.
                  • Rotate R: turn the model around the X, Y, or Z axis. Dragging the outer ring snaps in   45° steps, the inner ring in 5° steps.
                  • Arrange A: with several models on the plate, arrange them out on the bed without overlaps and with a safe gap between the parts.

                  Support material

                  Printers build prints upward layer by layer, so anything that overhangs with nothing beneath it has nothing to print onto. It sags or falls, ruining the print. Supports are scaffolding that holds it up, and you break them off afterwards.
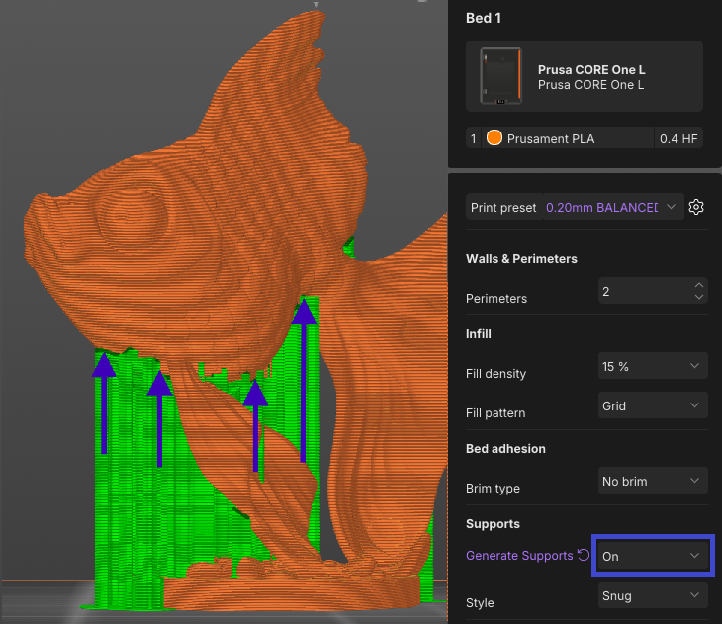
                  • Manual Only (default): only where you paint them on yourself, with the Paint-on supports tool L.
                  • On: added automatically wherever an overhang needs them. For most models, On is enough.
                  • Off: none at all.

                  Perimeters and infill

                  Perimeters and infill are the two basic settings that control the structure of the finished print.
                  Both can be easily found in the right panel: (1) Perimeters, (2) Infill density.

                  • Perimeters: the number of outer walls, which sets how thick the shell is.
                  • Infill: the internal structure. It makes the object rigid and supports the top surfaces.

                  Increasing either adds strength and rigidity and increases the print time. For a first print, the
                  profile's defaults are fine.

                  Slice

                  The Slice button is the most important in PrusaSlicer. Slicing takes the model geometry and all
                  your settings, and generates the instructions your printer follows.

                   

                  Clicking to Slice will bring you into Preview mode. To go back, use the < (back) button beside
                  Export.
                  or the Prepare / Preview switch above the plate.
                  Check the result in Preview

                  You can see the Used material and the Printing time on the left panel.

                  Look at the print. The vertical slicer on the side allows you to check the print layer by layer by sliding it down. The three things to check are:

                  • The shape: At the top of the slider, it should look like your model.
                  • Floating parts: Every new piece of material should sit on something below it — the bed, the
                      model, or a support.
                  • First layer: It should cover the bed. Drag the slider all the way down. This layer decides whether
                      the print sticks.

                  If something looks wrong, switch back to Prepare, fix it, and slice again.
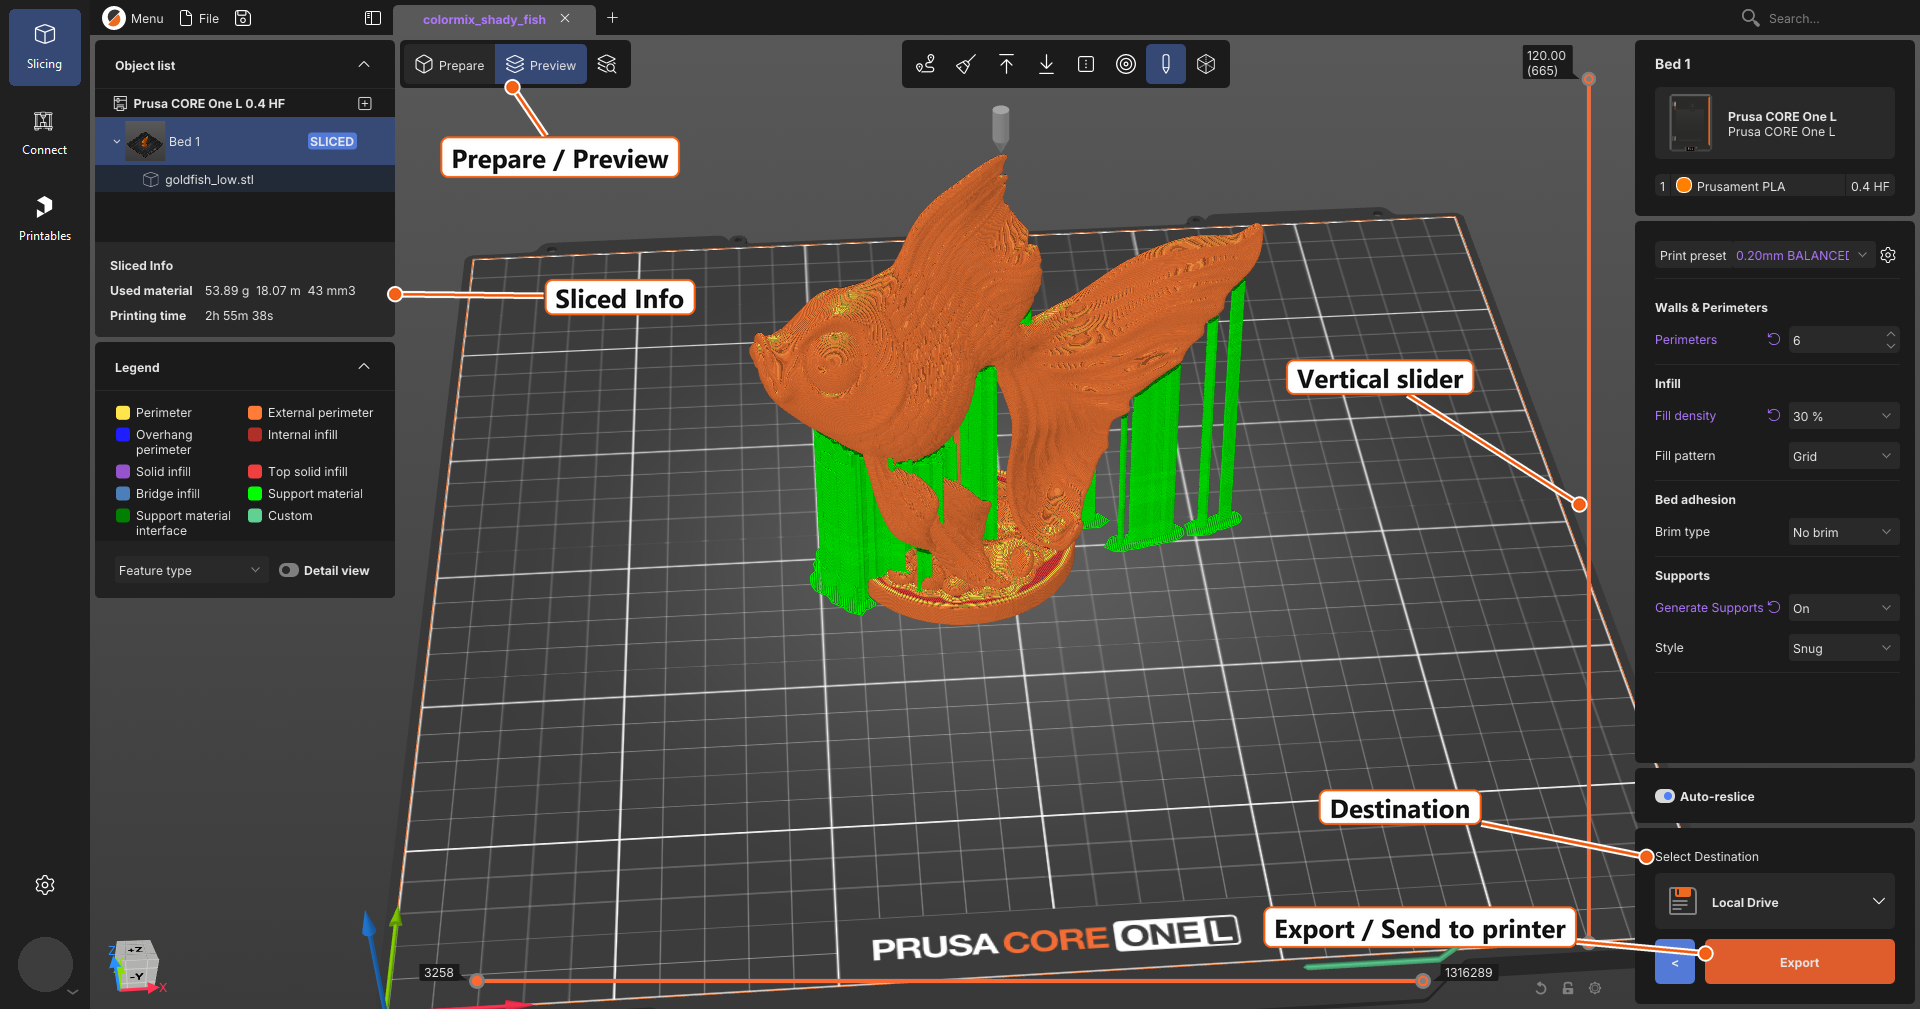
                  Export and print

                  The select destination block above the orange button controls where the file goes. Click it to choose.

                  • A drive on your computer, or a USB stick/SD card: The button reads Export and saves the file. Take the media to the printer.
                  • Prusa Connect: The button reads Send to Connect and uploads it to your Connect account.
                  • A printer on your network: The button reads Send to Printer and sends it straight to the machine.

                  Most first prints go out on removable media. If a USB stick or SD card is plugged in, PrusaSlicer offers it as the destination, and once the file is written, a notification appears with an Eject button — use it rather than pulling the card out.

                  A note on file types: you will get either a .gcode or a .bgcode file. .bgcode is the same instructions in a compact binary form, smaller and faster for the printer to read.

                  Then start the print from the printer's own menu. Watch the first layer go down. If it sticks, the rest usually follows.

                  Handy shortcuts

                  • Ctrl + I import
                  • Ctrl + S save project · Ctrl + F search settings · 
                  • Ctrl + Z UNDO
                  • Tab switch Prepare / Preview
                  • M move
                  • R rotate
                  • S scale
                  • F place on face
                  • A arrange

                  Can't find a setting? Press Ctrl + F and type its name. It works across every settings page.

                  Byl tento článek užitečný?
                  Tato akce je dostupná pouze registrovaným uživatelům. Prosím přihlaste se.
                  Pro přidání kometáře se prosím přihlaste 
                  Zatím žádné komentáře

                  Témata

                  • PrusaSlicer 3.0
                    • About PrusaSlicer 3.0 [Překládá se]
                      • First print with PrusaSlicer (3.0.0)
                    • Konfigurace a profily
                    • Input/output [Překládá se]