AA

Featured products

    Popular categories

      Trending searches

        Articles

          Blog

            Products

              Categories

                Suggested searches

                  Searching…
                  No results
                  Something went wrong.
                  ↑↓ Select↵ OpenEsc Close search
                  • English
                  • Čeština
                  • Deutsch
                  • Español
                  • Français
                  • Italiano
                  • Polski
                  • 日本語
                  • Orders
                  • Address
                  • In-stock Alerts
                  • My Courses
                  • Subscription
                  • Edit Account
                  • 3D printers9+▾

                    3D printersnew

                    newPrusa CORE One L+Learn more
                    newPrusa CORE One+ (Gen 2)Learn more
                    newPrusa CORE One L+ INDX 8-ToolnewPrusa CORE One+ (Gen 2) INDX 8-ToolPrusa CORE One L+: Critical InfrastructureOriginal Prusa MK4SnewOriginal Prusa XL+Original Prusa XL+: Critical Infrastructure

                    Printer upgrades

                    newINDX Conversion KitsnewPrusa CORE One L to CORE One L+ upgradenewPrusa CORE One+ to Prusa CORE One+ (Gen 2)newPrusa XL to Prusa XL+ Upgrade
                    Prusa Reward ProgramLove your Prusa printer? Share your experience and earn $30 Prusa e-shop vouchers.
                    How to Choose a 3D Printer?We’ll walk you through the basics to find the exact machine for your space, budget, and ideas.
                    Free E-bookDownload a free e-book Basics of 3D Printing with Josef Prusa and make your first steps in 3D printing world
                    Original Prusa Printable PartsCollections of printable spare parts for Original Prusa 3D printers and upgrades.
                    Shipping informationRegularly updated info about the current manufacturing capacity and delivery times of our printers.
                    Custom 3D PrintingProfessional custom 3D printing from various materials according to your requirements.
                  • Materials▾

                    Filaments

                    PrusamentPLAPETGASA / ABSPC (Polycarbonate)PA (Nylon)FlexCompositesSpecialMaterials clearance sale

                    Resin

                    Prusament ResinResin Cleaner
                    Filament GuideCheck my Prusament Spool
                    Prusament.com
                  • Parts & Accessories▾

                    Accessories

                    EnclosuresNozzlesPrint SheetsEssential AccessoriesCameras & AddonsTools & CraftingAdhesives

                    Spare parts

                    Merchandise

                    Spare parts - All PrintersCORE OneMK4/S & MK3.9/SMK3/S/+XL
                    Merch
                  • For Business▾
                    Prusa Pro HT90Prusa Pro SLXPrusa Pro AFSPrusa Pro Medical OneOriginal Prusa XLOriginal Prusa XL: Critical Infrastructure
                    Prusa CORE One+Learn more
                    Prusa CORE One LLearn more
                    Prusa CORE One L: Critical Infrastructure Edition

                    3D Printing for

                    Manufacturing and R&DAutomotive IndustryHealthcareEducation and Academic ResearchArchitects and DesignersFilm IndustryCritical Infrastructure

                    3D Printing Stories

                    • How 3D printing started: About Rep-rap and open-source with Adrian Bowyer
                    • Teaching mathematics redefined with 3D printing at JKU Linz
                    • The story behind the LTT screwdriver
                    • Victoria Hand Project: Changing Prosthetic Care with 3D Printing
                    Official Prusa Resellers
                    Sustainability
                    Prusa Education
                    Contact and Inquiry
                    Custom 3D Printing
                    ISO Certified
                  • Software▾
                    PrusaSlicer

                    PrusaSlicerPrusaSlicer

                    PrusaSlicer is an open-source, feature-rich, frequently updated tool that contains everything you need to export the perfect print files for your 3D printer.

                    WindowsMacOSLinux
                    Prusa Connect

                    Prusa Connect

                    Prusa Connect is a cloud service enabling remote control and monitoring of your 3D printers, offering secure data handling, easy setup, and support for managing multiple printers from anywhere.

                    Log in to Connect
                    Prusa.app

                    Prusa.app

                    Control your printer/s remotely from anywhere using the Prusa Connect technology behind. Prusa.app brings a new level of Prusa printer experience to Android and iOS phones.

                    Try it now!
                    Drivers & FirmwareDownload the latest firmware and drivers for your 3D printer.
                    PrusaSlicer Support
                    Prusa Connect Support
                  • 3D Models▾
                    3D PrintersArt & DesignHobby & MakersHouseholdTabletop MiniaturesToys & GamesPrintables Store

                    Popular 3D models

                    • Strong garden hose holder
                    • Prusa Spool Bot
                    • Build Tray — Modular Organizer for Assembly, Disassembly and Maintenance
                    • Broom Holder
                    • Octagon Fabric
                    • Prusa CORE One ? (Mimic Skin)

                    Design Contests

                    • Réutilisation de la carte mère Framework Laptop 129/1/2026 – 9/30/2026
                    • 🏆 Défi du designer : Tours de magie !9/1/2026 – 9/22/2026
                    • Organisateurs de maquillage9/4/2026 – 9/20/2026
                  • Community▾

                    Upcoming Events

                    • Maker Faire Tokyo 20269/5/2026 – 9/6/2026 · Tokyo, Japan · Prusa Team
                    • IFA 20269/4/2026 – 9/8/2026 · Berlin, Germany · Prusa Team
                    • Maker Faire Bay Area9/25/2026 – 9/27/2026 · Kalifornie, United States · Prusa Team
                    • 3D Printopia 20269/26/2026 – 9/27/2026 · Pennsylvania, United States · Prusa Team

                    Prusa Forum

                    • How to turn on the heatbed fans?
                    • Core One L+ wiper.
                    • Where is a Bag?
                    Prusa World MapPrusa World MapFind local 3D printing users and explore the community around you.
                  • Help▾
                    Guides & TutorialsPrusaSlicerPrusa ConnectMaterials

                    Printer Model

                    CORE One INDXCORE One LCORE One+CORE One

                    Hardware Troubleshooting

                    • Selftest failed (CORE One/+)
                    • Clogged nozzle (CORE One, CORE One L, XL, MK4/S, MK3.9/S)
                    • Adjusting belt tension (CORE One/+, CORE One INDX, CORE One L/+)
                    • Prusa Connect and PrusaLink explained

                    Drivers & Firmware

                    INDX familyCORE One familyMK4 familyXL familyMMU familyPRO family
                  • Courses▾

                    Become an expert in 3D printing

                    Prusa Academy offers online courses on various 3D printing related topics. Each course features:

                    • easy-to-read text with many pictures and short videos
                    • links for inspiration and further study
                    • quizzes for testing your knowledge along the way
                    • certificate of completion
                    Browse all coursesMy courses library
                    • 3D Modeling in Autodesk Fusion
                    • PrusaSlicer Masterclass – Beginner to Advanced
                    • Complete Guide to 3D Print Postprocessing, Painting, and Detailing
                    • Airbrush Your 3D Prints: From Basics to Advanced Tricks
                  • Blog▾
                    • Back-to-School 2026 Deals Are Here!
                    • PrusaSlicer 3.0 Preview – Built for the Future of 3D Printing
                    • Prusa CORE One+ (Gen 2) INDX, Shipping Has Started, Complete Printers Open for Orders
                    E-Book: Basics of 3D Printing
                  • Company▾

                    About Prusa Research

                    We are the largest maker of 3D printers in Europe and the United States.

                    Founded as a one-man startup in 2012 by Josef Prusa, a Czech hobbyist, maker, and inventor. In just 15 years, we've grown into a company of more than 1,200 people. Every month, we design, build, and ship over 10,000 innovative and secure 3D printers from our headquarters in Prague, Czech Republic, and Delaware, USA, to users in more than 160 countries.

                    Watch a video and find out how Prusa Research was born and what we achieved within only 10 years!

                    About UsTimelineSustainabilityOpen-source
                    About Us
                    Contact Us
                    Logo and Photos
                    ISO Certified
                  1. Support
                  2. Printer features
                  3. Thermal model calibration
                   

                  Contents

                  • How it works
                  • Calibration
                  • Troubleshooting
                  • Limitations
                  • Disabling the Thermal model protection

                  Blog

                  • Back-to-School 2026 Deals Are Here!
                  • PrusaSlicer 3.0 Preview – Built for the Future of 3D Printing
                  • Prusa CORE One+ (Gen 2) INDX, Shipping Has Started, Complete Printers Open for Orders

                  Newsletter

                  Signup and get our monthly squeeze on updates, blog, printables and much more.

                  By clicking, you agree to receive our newsletter.

                  This site is protected by reCAPTCHA Enterprise and the Google Privacy Policy and Terms of Service apply.

                  Strong garden hose holder
                  E-shop
                  • 3D Printers
                  • Printer Upgrades
                  • Filaments
                  • Accessories
                  • Prusa Merchandise

                  © Prusa Research a.s.

                  Printables
                  • 3D Models
                  • Store
                  • Clubs
                  • 3D Design Contests
                  • Brands
                  Community
                  • World Map
                  • Forum
                  • User Groups
                  • Events
                  Help
                  • Prusa Help
                  • Prusa Academy
                  • 3D Printing Calculators
                  Software
                  • PrusaSlicer
                  • Prusa.app
                  • Prusa Connect
                  • Drivers and Software
                  Company
                  • About Us
                  • Blog
                  • Official Prusa Resellers
                  • Contact Us
                  • Certified for ISO 9001, ISO 14001, ISO 45001
                  • General Terms and Conditions
                  • General Terms and Conditions of Use of the PRUSA Websites
                  • Privacy Policy
                  • Information about cookies
                  • Customer Complaints Policy
                  • Status Page
                  • Do Not Sell or Share My Personal Information
                  • Supplemental Statements
                  • General Terms and Conditions
                  • General Terms and Conditions of Use of the PRUSA Websites
                  • Privacy Policy
                  • Information about cookies
                  • Customer Complaints Policy
                  • Status Page
                  • Do Not Sell or Share My Personal Information
                  • Supplemental Statements

                  © Prusa Research a.s.

                  JOSEF PRUSA®, PRUSA RESEARCH®, PRUSA POLYMERS®, PRUSA ORANGE®, PRUSA 3D ® AND PRUSAMENT® are registered trademarks of Prusa Development a.s. used by Prusa Research a.s. under licence from Prusa Development a.s.

                  Thermal model calibration

                  Relevant for

                  MK3
                  MK3S
                  MK3S+
                  53 comments
                  Article is also available in following languages
                  English
                  Čeština
                  Polski
                  Deutsch
                  Français
                  Español
                  Italiano
                  日本語

                  Starting from firmware 3.12.0, the Original Prusa MK3/S/+ has Thermal model protection. This results in better operation when dealing with thermal errors.

                  How it works

                  During the print, the printer is constantly comparing the temperature measured by the thermistors to a thermal model of what is expected from the printer. In case the measured temperature does not follow the model, the printer will beep and show the warning THERMAL ANOMALY, but the print will continue. If the anomaly disappears the warning goes away after 20 seconds. In case the anomaly continues, the printer will turn off the heating and activate an error. If you choose to continue the print after it stops, it is recommended to stay near the printer.

                  This will help in cases where the temperature issue is temporary, like when a window is opened near the printer. Also, in case the printer has a blob that wraps around the hotend, the thermal model should be able to stop the print before any damage is done to the hotend cables.

                  If you're interested in further details of how the thermal model works, check the Dev diary blog.

                  The printer knows only that something is wrong, i.e., when the system is not performing as expected. It is up to the user to inspect the printer and check for issues.

                  Calibration

                  When installing the new firmware, the printer will start the calibration. In case it does not go in the printer menu to Calibration -> Temp Model cal. It takes around 12 minutes, after which your printer profile is automatically saved.

                  The Thermal model also works for third-party components. Note that if you switch components in your printer often, the Thermal Anomaly error might start to appear more often. If this happens, run the calibration again.

                  If you are using an enclosure, the Einsy-board needs to be inside the enclosure for the Thermal model to work, or it will cause false triggers.

                  Troubleshooting

                  In case the Thermal anomaly message keeps showing, try the following steps. 
                  A visual inspection

                  Ensure that the printer is completely cooled down and switched off before proceeding with any of the next steps. Heated parts can cause severe burns! 
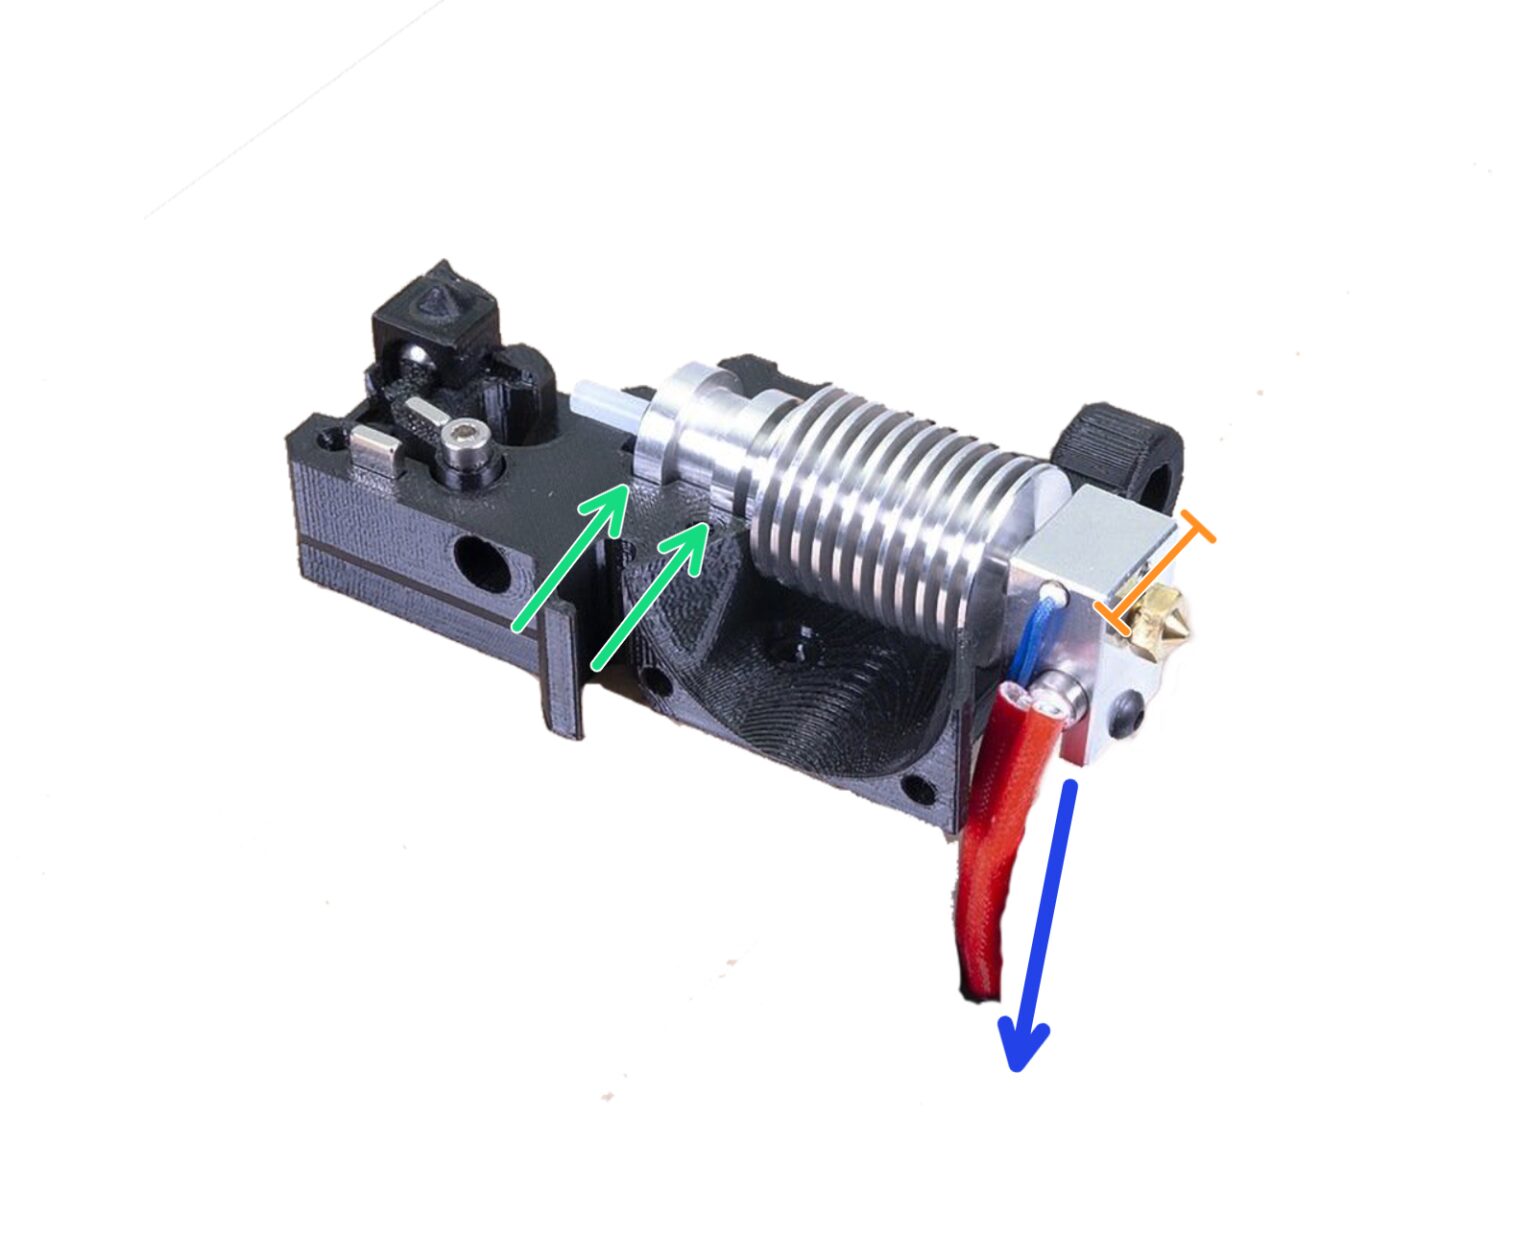
                  • Make sure that the hotend is perfectly inserted in the extruder. Make sure the heatsink is slotted into both slots, the short side of the heaterblock is facing forward, with its wires running back alongside the left side of the heaterblock.
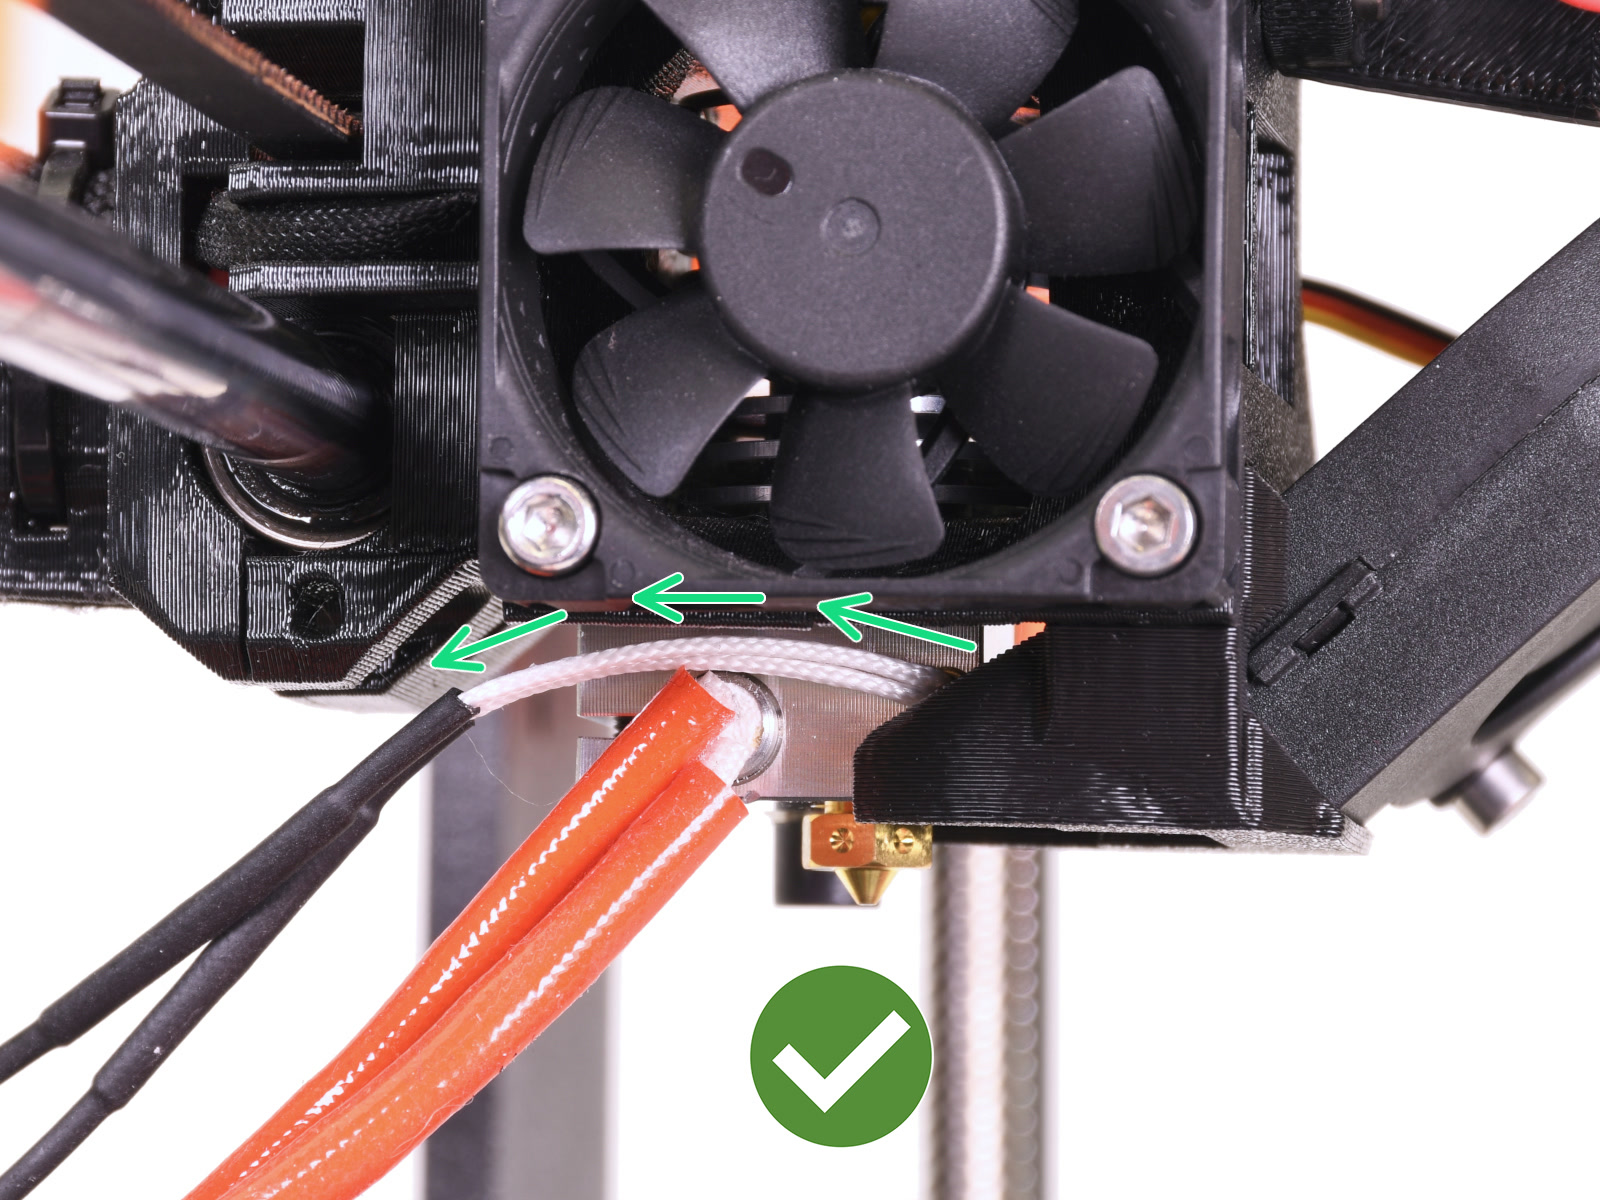
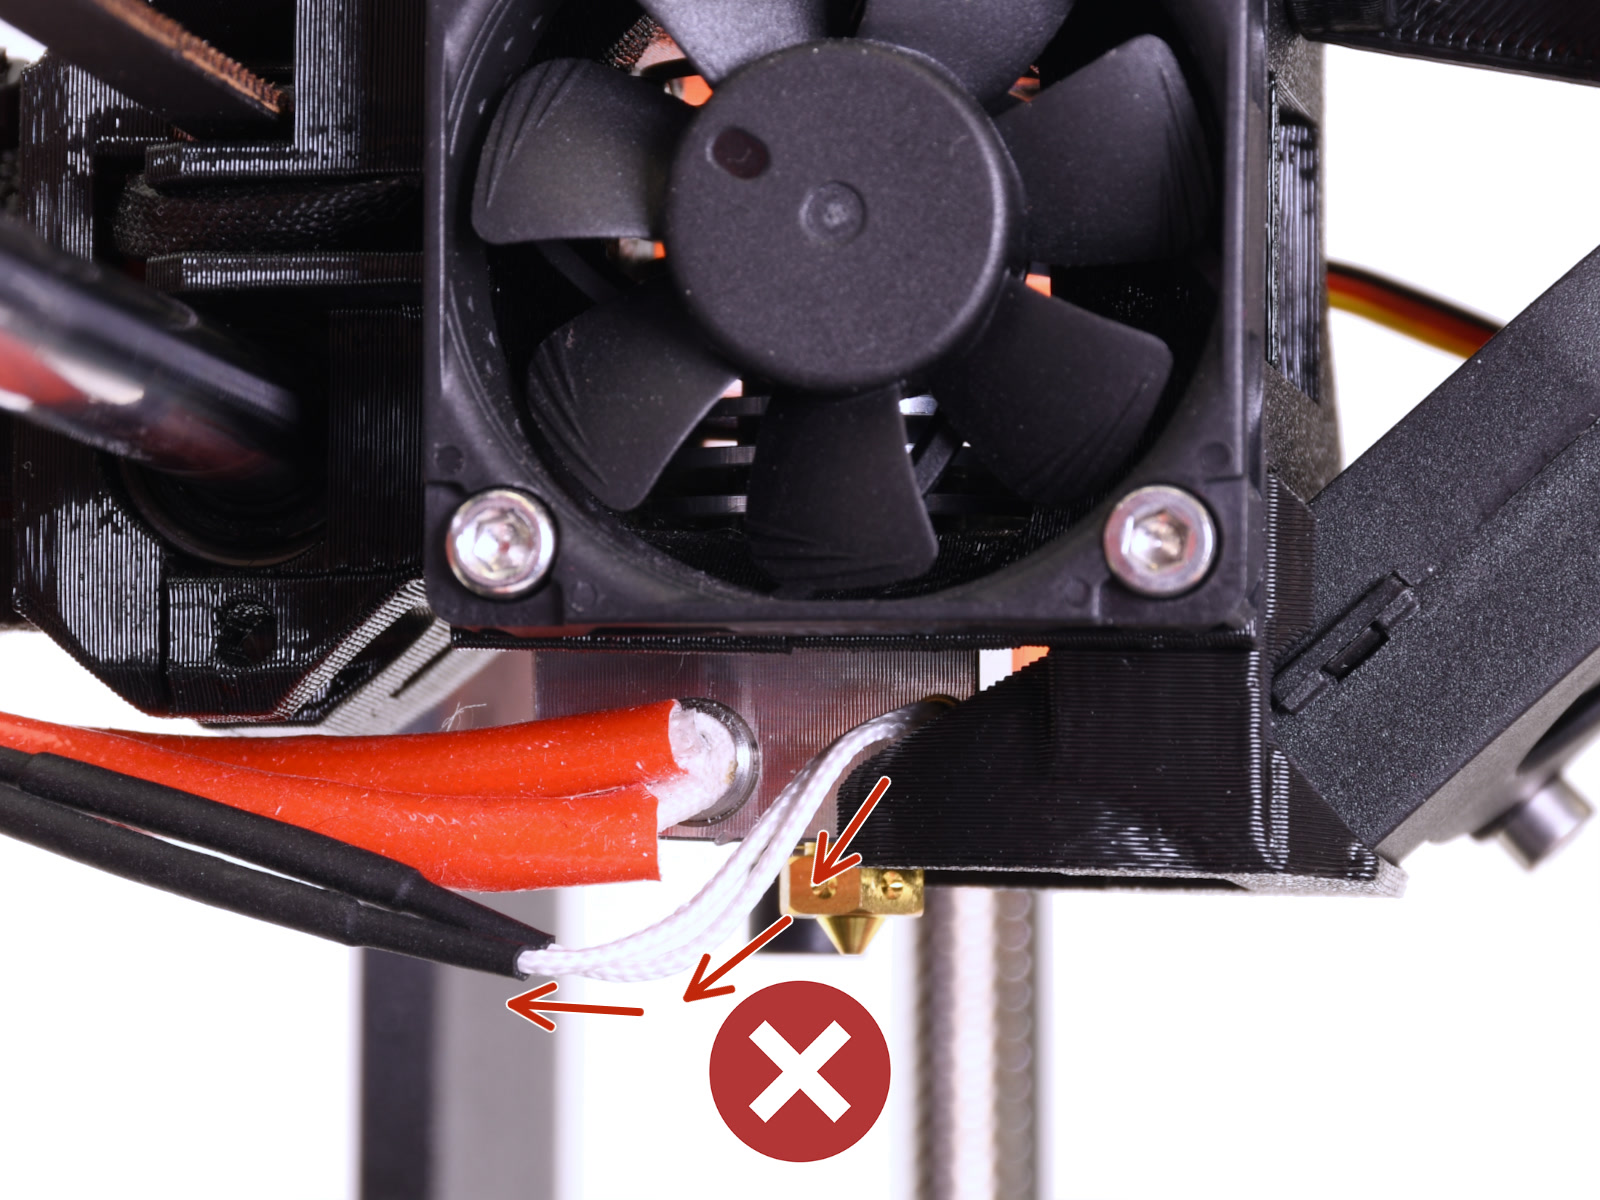
                  • Inspect the hotend thermistor and hotend heater for any visible damage, especially on the part closest to the heaterblock. Make sure the hotend thermistor cables are going above the heater cables. 
                  • Inspect the nozzle position compared to the rest of the hotend. There must always be a gap (~0.5 mm) between the nozzle and the heater block. The nozzle must be tightened and secured in the heater block, and is locked against the heatbreak while heated. Among other issues, such as filament leaking, an incorrectly positioned nozzle can cause thermal anomalies. For more details on nozzle installation, please check the dedicated nozzle replacement article. 
                  • Inspect the heaterblock, especially its lower part. To raise the print head, navigate to LCD Menu -> Settings -> Move axis -> Z. Filament residue on the heaterblock is a cause for thermal anomalies. To clean it, heat the nozzle for 5 minutes, then disable heating by pressing the Reset button. Immediately after that, use a small brass brush to clear away any old plastic stuck on the nozzle and heater block. Be extra careful around the hotend heater and thermistor wires, avoid touching them with metal tools, as there is a risk of damaging them irreversibly. 

                  PID tuning followed by another temp model calibration

                  1. Perform a PID tuning, using the temperature you use most often for printing. 
                  2. In the printer menu, navigate to Calibration -> Temp Model cal., and perform the calibration again. 

                  Measuring resistance with a multimeter

                  Ensure that the printer is completely cooled down, and switched off before the next step. 

                  It is possible to test the hotend thermistor, and hotend heater resistance values using a multimeter. Please check the dedicated guide for multimeter usage. 

                  At room temperature, the hotend thermistor should have a resistance in the range of 80 kΩ - 125 kΩ.The hotend heater has an expected resistance in the range of 12.3 Ω - 15.1Ω. 

                  Limitations

                  Since the thermal model was developed on a model of a factory-assembled extruder, it may not work correctly on some modified or after-market extruders. 

                  Starting from Firmware 3.13.0, it is possible to use a printer equipped with a Revo hotend with the thermal model enabled. This requires a dedicated Revo firmware that is located on our GitHub i3 firmware page. 

                  If you experience issues during the calibration process, start the process described in Crash dump (MK3/S/+, MK2.5/S), and after the logging starts, reset the printer and enter the sequence:

                  In case you run into issues during the printing process, use the process described in Crash dump (MK3/S/+, MK2.5/S), and after the logging starts run the sequence:

                  Disabling the Thermal model protection

                  The thermal model protection can be disabled by connecting the printer to your computer (Octoprint, PuTTY...), and sending M310 S0. An additional M500 will save the setting and the Thermal model protection will remain disabled after the next restart.

                  Was this article helpful?
                  This action is available only to registered users. Please log-in.

                  Topics

                  • About your printer
                    • Printer features
                      • HW setup (MK2.5/S & MK3/S/+)
                      • Steel sheet profiles
                      • Crash detection
                      • Filament sensor MK3 (non-S)
                      • Flexible steel sheets (guidepost)
                      • Print statistics
                      • Power-modes
                      • SD card sorting
                      • Pronterface and USB cable
                      • Prusa firmware-specific G-code commands
                      • IR Filament Sensor (MK2.5S, MK3S/+, MK3.5/S)
                      • LCD brightness adjustment (MK3S)
                      • Tune Menu
                      • LCD screen contrast adjustment (i3)
                      • IR Filament sensor detection (MK3S)
                      • Experimental menu (MK3/S/+)
                      • Support menu (MK3/S/+)
                      • Dump memory (MK3/S/+ and MK2.5/S)
                      • Crash dump (MK3/S/+, MK2.5/S)
                      • Thermal model calibration
                    • Printer description
                    • General Information

                  31 comments

                  Log in  to post a comment
                  roland tollenaar
                  •
                  I have a variation of the thermal anomaly problem that I cannot find any reference to in any post or anywhere on the internet. So far it has made my machine useless.

                  I have changed multiple hotends and thermistors even heads I know to be good. All give the same problem.

                  When I preheat to 215 (anything above 170 will give the problem) then at about 170 to 180 degrees the preheating aborts with a thermal anomaly.

                  At room temperature the thermistor indicates a temperature corresponding with room temperature so that seems fine.

                  However, if I turn of the thermal model with M310, then I CAN get the head to heat up to 215 degrees. BUT the temperature in fact is much higher because the filament is liquid and smoking.

                  Clearly the thermal model is indeed detecting something is not correct and it appears as though at higher temperatures the thermistor is reporting lower temperatures than the hoteind is in fact at.

                  I have no idea why, all plugs, cables connections in heaterblock and so on have been checked and some of the complete hotends were working just fine.

                  What caused the problem to start off with was a failed print that made a blob I had to remove using a soldering iron. I damaged the thermistor during removal (electrically or mechanically) and since then have been having this issue.

                  Is my einsy board damaged? Does anyone have any tips?
                  Reply
                  ian dunne
                  •
                  I had this problem: the machine would not do anything, as it could not even heat the nozzle to the required temperature. I checked the wire run of the heater and thermister and the resistances. The heater was right at the top end of the values, and the thermister was at 200kohms.

                  I ordered a new hot end assembly, and it turned up quickly. Fitted it and the machine recalibrated first go. Did a couple of test prints and a 36 hour print. I have noticed that the back part of the extruder surround has melted slightly, so the pid sensor is not sitting parallel to the print plate. Also the hot end when printing does not hold a steady temp as well as it did, occasionally going 15C out of range. The print still looks good.
                  Reply
                  Ludo B
                  •
                  Ik denk dat Prusa er expres een bug heeft ingestoken zo dat je niet verder kan en een nieuwe moet kopen????? Ik heb alles vernieuwd en nog steeds een THERMAL ANOMALY.
                  Ik heb de PID op verschillende temperaturen gezet maat ook dat help niet. Ik kan niet meer verder. Ja zolang ik niet boven de 220 graden ga kan ik nog printen.

                  I think Prusa deliberately put a bug in it so that you can't go any further and have to buy a new one????? I have renewed everything and still a THERMAL ANOMALY.
                  I have set the PID to different temperatures but that doesn't help either. I can't go any further. Yes, as long as I don't go above 220 degrees I can still print.
                  Reply
                  Jan Kratochvíl
                  •
                  Hello. Please contact our support team for help.
                  Reply
                  Yaroslav
                  •
                  I am using Prusa MK3S+ with all original parts and I faced the same issue, during 3 hour print I recieved  THERMAL ANOMALY error around 50 times. I checked wiring as was proposed, but then found that turning off fan reducing number of errors(it is not helping, but number of errors really decreasing).  I faced error at 270C for nozzle and 100C for table. Problem starts once I tried to use Specrtum PET-G HT100, that requier 250-280 temperature of hotend and 100-110 temperature of the table. Before I was working with lower temperature fillaments (nozzle up to 240 and table up to 80) and never faced that issue.  My bottom part of hotend and plastic around had white frost-like sediment, I removed it, but it didn`t help. Then I start First layer calibration and it was absolutley the same as I saw in official Guide. As for me - it happened cause of temperature sensor and sofware (I updated 3.13.1-6876 after a week it was released), it is lagging at high temperatures. Theory: when fan blows on sensor with cold air from the room  - temperature decrease extreamly and your soft think something happened. But in next 20 sec nozzle trying to reach set temperature and jump +- 7C around set temperature, but still continue the process and it happens cause of huge difference between temperature in the room and temperature of the nozzle, looks like 265C is very close to the critical temperature and senors value becomes less accurate.  So what I did: -I set temperature to 255 for first layer and 260 for other instead of 270 for all  -I decided to set automatic fan mode (30-70%) After that I didn`t heard beeping. Additionally after sucsess I did full service as lubricating, cleaning, checking wires, etc...
                  I am going to make more test with different high temperature fillaments and will get back to you with new results
                  Reply
                  Alessandro Pantaleo
                  •

                  Hello, thank you for your comment and for the detailed feedback. With this aspect of print fan speed, it's also possible that there might be a very slight issue with the positioning of hotend components, or it's possible that the fan shroud might be pointing too much toward the heater block (the cool air should point towards the print, not the block), which could be also due to a misshape on the fan shroud. 

                  This doesn't fully exclude some other possible hardware causes or at least contributors, for example on hotend thermistor, hotend heater, or the combination of the two, or possible residue on heater block. 

                  I'd recommend checking these aspects in more detail with our Technical Support, that way we can better evaluate it on your specific printer with pictures and videos and tackle the specific cause. 

                  Reply
                  Yaroslav
                  •
                  I made few more test. May be it is not connected, but my models unstuck from the bed (with and without special 3D print glue). I am trying to prevent it (change z axis position and increasing temperature).
                  I think you are right, cause I faced error even at 260 degrees during one of the test. But it was only one error during 4 hoursIn the same time I have no any issues with low temperature PETG, its printing well without errors.
                  Also last time I faced error - temperature was stable, so visually it was really strange 
                  I will contact Technical Support, thanks
                  Reply
                  Lawyer_layer
                  •
                  Lots of complaining, not so much fixing :)
                  Here's a list of things to check + try/consider (MK3S+):
                  Firmware - Check your firmware version and make sure it's the current one (https://help.prusa3d.com/downloads) --> update firmware to the latest version This seems to have helped some folk. Downgrade to a pre-13.10.X version. This seems to have helped other folk.
                  Wiring. Check the wiring. Turn on "Preheat" then gently move the wires in textile wrap that run from the hot end to the Einsy door. If the get an error and wild fluctuations in temp, it's probably wiring. -->
                  Sleeve) Open the textile sleeve and see that all wiring is intact. Try rearranging it and replacing the sleeve.
                  Hotend wiring) Take off the cable ties, arrange the 4 hotend wires exactly like shown in Step 14 (https://help.prusa3d.com/guide/how-to-replace-a-hotend-mk3s-mk3s_161575). Note especially i) how the wires sit in the groove of the cable holder, ii) length of wire exposed before it is wrapped in the sleeve and iii) spacing of the two red hotend wires on the side of the hotend.
                  Einsy box wiring) Check that the sleeve bundle is correctly installed as in Step 15 (https://help.prusa3d.com/guide/how-to-replace-a-hotend-mk3s-mk3s_161575). Or try without the holder altogether.
                  Hotend. Visually inspect the hotend like it matters. Check the hard-to-see spots for anything --> Clean the hot end very thoroughly. Use a microfibe cloth or toothbrush (when cold). Use cardboard or a brass brush (when hot).
                  Calibrations. Once done, do all the calibrations to jiggle the wires. Self test, belt test, PID calibration, thermal model calibration - do them all.
                   
                  Reply
                  Andrej Šándor
                  •
                  i try a lot of things... but check for the correct instalation of the sleeve. so ... i said to my self. lets just try it. and you know what ? .... it fixes all the thermal anomalies. newer ever knew that this might be the problem! after several hours on support . trying checking the amp with multimeter. all those things. PIM and MT ... no luck with those. just to adjust your sleeve.... thanks for help mate.
                  the way how i try it is just as you discribed. preheat - move the cables - had anomaly. reinstal the sleeve and everything was ok again.
                  Reply