AA

Polecane produkty

    Popularne kategorie

      Popularne wyszukiwania

        Artykuły

          Blog

            Produkty

              Kategorie

                Sugerowane wyszukiwania

                  Wyszukiwanie…
                  Brak wyników
                  Coś poszło nie tak.
                  ↑↓ Wybierz↵ OtwórzEsc Zamknij wyszukiwanie
                  • English
                  • Čeština
                  • Deutsch
                  • Español
                  • Français
                  • Italiano
                  • Polski
                  • 日本語
                  • Zamówienia
                  • Adres
                  • Powiadomienia o dostępności
                  • Kursy
                  • Subskrypcja
                  • Edytuj konto
                  • Drukarki 3D9+▾

                    Drukarki 3Dnowość

                    nowośćPrusa CORE One L+Więcej
                    nowośćPrusa CORE One+ (Gen 2)Więcej
                    newPrusa CORE One L+ INDX 8-ToolnowośćPrusa CORE One+ (Gen 2) INDX 8-narzędziowaPrusa CORE One L+: Critical InfrastructureOriginal Prusa MK4SnowośćOriginal Prusa XL+Original Prusa XL+: Critical Infrastructure

                    Aktualizacje drukarek

                    newCORE One/+ INDX Conversion KitnowośćModernizacja Prusa CORE One L do CORE One L+nowośćPrusa CORE One+ do Prusa CORE One+ (Gen 2)nowośćModernizacja Prusa XL do Prusa XL+
                    Program lojalnościowy Prusa Reward ProgramUdostępniaj. Polecaj. Zarabiaj.
                    Jak wybrać drukarkę 3D?Omówimy podstawowe kwestie, żeby pomóc Ci znaleźć urządzenie idealnie dopasowane do Twojej przestrzeni, budżetu i pomysłów.
                    Darmowy E-bookPobierz darmowy e-book Podstawy Druku 3D z Josefem Prusą i postaw pierwsze kroki w świecie druku 3D.
                    Części Drukowane Original PrusaKolekcje drukowalnych części zamiennych do drukarek 3D Original Prusa oraz modernizacji.
                    Informacje o wysyłkachRegularnie aktualizowane informacje o aktualnej wydajności produkcji i terminach dostaw naszych drukarek.
                    Druk 3D na zamówienieProfesjonalny druk 3D na zamówienie z różnych materiałów zgodnie z Twoimi wymaganiami.
                  • Materiały▾

                    Filamenty

                    PrusamentPLAPETGASA / ABSPC BlendPA (Nylon)FlexCompositesSpecialWyprzedaż materiałów

                    Żywice

                    Prusament ResinResin Cleaner
                    Przewodnik po filamentachSprawdź swoją szpulę Prusamentu
                    Prusament.com
                  • Części i akcesoria▾

                    Akcesoria

                    ObudowyDyszePłyty drukarskieNiezbędne akcesoriaKamery i dodatkiNarzędzia i rzemiosłoŚrodki adhezyjne

                    Części zamienne

                    Gadżety z logo

                    Części zamienne do wszystkich drukarekCORE OneMK4/S & MK3.9/SMK3/MK3S/MK3S+XL
                    Merch
                  • Dla biznesu▾
                    Prusa Pro HT90Prusa Pro SLXPrusa Pro AFSPrusa Pro Medical OneOriginal Prusa XLOriginal Prusa XL: Critical Infrastructure
                    Prusa CORE One+Więcej
                    Prusa CORE One LWięcej
                    Prusa CORE One L: Critical Infrastructure Edition

                    Druk 3D dla

                    Produkcja i rozwójPrzemysł motoryzacyjnySłużba zdrowiaEdukacja i badania naukoweArchitekci i projektanciBranża filmowaInfrastruktury Krytycznej

                    Historie z drukiem 3D

                    • Jak powstało drukowanie 3D: o Rep-rap i open source z Adrianem Bowyerem
                    • Nauczanie matematyki na nowo z wykorzystaniem druku 3D na JKU w Linzu
                    • Historia śrubokręta LTT
                    • Victoria Hand Project: rewolucja w opiece protetycznej dzięki drukowaniu 3D
                    Oficjalni dystrybutorzy Prusa
                    Zrównoważony rozwój
                    Prusa Education
                    Kontakt i zapytanie
                    Druk 3D na zamówienie
                    Certyfikat ISO
                  • Oprogramowanie▾
                    PrusaSlicer

                    PrusaSlicerPrusaSlicer

                    PrusaSlicer is an open-source, feature-rich, frequently updated tool that contains everything you need to export the perfect print files for your 3D printer.

                    WindowsMacOSLinux
                    Prusa Connect

                    Prusa Connect

                    Prusa Connect is a cloud service enabling remote control and monitoring of your 3D printers, offering secure data handling, easy setup, and support for managing multiple printers from anywhere.

                    Zaloguj się do Connect
                    Prusa.app

                    Prusa.app

                    Control your printer/s remotely from anywhere using the Prusa Connect technology behind. Prusa.app brings a new level of Prusa printer experience to Android and iOS phones.

                    Wypróbuj!
                    Sterowniki i firmwarePobierz najnowsze wersje firmware i sterowniki dla swojej drukarki 3D.
                    Wsparcie dla PrusaSlicera
                    Wsparcie dla Prusa Connect
                  • Modele 3D▾
                    Drukarki 3DSztuka i designHobby i majsterkowanieGospodarstwo domoweFigurki do planszówekZabawki i gryPrintables Store

                    Popularne modele 3D

                    • Strong garden hose holder
                    • Prusa Spool Bot
                    • Build Tray — Modular Organizer for Assembly, Disassembly and Maintenance
                    • Broom Holder
                    • Octagon Fabric
                    • Prusa CORE One ? (Mimic Skin)

                    Konkursy projektowe

                    • Framework Laptop 12 Mainboard Re-Use1.09.2026 – 30.09.2026
                    • 🏆 Designer Challenge: Magic tricks!1.09.2026 – 22.09.2026
                    • Od prototypu k produktu: Příslušenství ke kamerám1.08.2026 – 14.09.2026
                  • Społeczność▾

                    Nadchodzące wydarzenia

                    • Maker Faire Tokyo 20265.09.2026 – 6.09.2026 · Tokyo, Japan · Prusa Team
                    • IFA 20264.09.2026 – 8.09.2026 · Berlin, Germany · Prusa Team
                    • 3D Printopia 202626.09.2026 – 27.09.2026 · Pennsylvania, United States · Prusa Team
                    • Maker Faire Bay Area25.09.2026 – 27.09.2026 · Kalifornie, United States · Prusa Team

                    Forum Prusa

                    • Gdy Prusa Connect i chat 24h/7 są nie dostępne...
                    • Wiązka przewodów opada i blokuje się za karetką
                    • Problem z wydrukiem po 20 minutach druku
                    Mapa świata PrusaMapa świata PrusaFind local 3D printing users and explore the community around you.
                  • Pomoc▾
                    Instrukcje i tutorialePrusaSlicerPrusa ConnectMateriały

                    Model drukarki

                    CORE One INDXCORE One LCORE One+CORE One

                    Rozwiązywanie problemów sprzętowych

                    • Selftest nieudany (CORE One/+)
                    • Zatkana dysza (CORE One, CORE One L, XL, MK4/S, MK3.9/S)
                    • Regulacja naciągnięcia pasków (CORE One/+, CORE One INDX, CORE One L/+)
                    • Różnice między Prusa Connect i PrusaLink

                    Sterowniki i firmware

                    INDX familyCORE One familyMK4 familyXL familyMMU familyPRO family
                  • Kursy▾

                    Zostań ekspertem od druku 3D

                    Prusa Academy offers online courses on various 3D printing related topics. Each course features:

                    • easy-to-read text with many pictures and short videos
                    • links for inspiration and further study
                    • quizzes for testing your knowledge along the way
                    • certificate of completion
                    Przeglądaj wszystkie kursyMoja biblioteka kursów
                    • Modelowanie 3D w Fusion
                    • PrusaSlicer Masterclass - dla początkujących i zaawansowanych
                    • Complete Guide to 3D Print Postprocessing, Painting, and Detailing
                    • Airbrush Your 3D Prints: From Basics to Advanced Tricks
                  • Blog▾
                    • PrusaSlicer 3.0 Preview – stworzony z myślą o przyszłości druku 3D
                    • Prusa CORE One+ (Gen 2) INDX: start wysyłek i otwarcie zamówień na kompletne drukarki
                    • Lepsze wydruki, łatwiejsza obsługa: Prusa XL+, CORE One L+ oraz CORE One+ (Gen 2) – wielka modernizacja naszych produktów
                    E-book: Podstawy Druku 3D
                  • Firma▾

                    O Prusa Research

                    We are the largest maker of 3D printers in Europe and the United States.

                    Founded as a one-man startup in 2012 by Josef Prusa, a Czech hobbyist, maker, and inventor. In just 15 years, we've grown into a company of more than 1,200 people. Every month, we design, build, and ship over 10,000 innovative and secure 3D printers from our headquarters in Prague, Czech Republic, and Delaware, USA, to users in more than 160 countries.

                    Watch a video and find out how Prusa Research was born and what we achieved within only 10 years!

                    O nasOś czasuZrównoważony rozwójOpen-source
                    O nas
                    Skontaktuj się z nami
                    Logo i zdjęcia
                    Certyfikat ISO
                  1. Wsparcie
                  2. About PrusaSlicer 3.0 [Tłumaczenie w toku]
                  3. First print with PrusaSlicer (3.0.0)
                   

                  Spis treści

                  • PrusaSlicer modes
                  • Choose and set up your printer
                  • Choose your filament
                  • Choose a print profile
                  • Import your model
                  • Orient your model
                  • Support material
                  • Perimeters and infill
                  • Slice
                  • Check the result in Preview
                  • Export and print
                  • Handy shortcuts

                  Blog

                  • PrusaSlicer 3.0 Preview – stworzony z myślą o przyszłości druku 3D
                  • Prusa CORE One+ (Gen 2) INDX: start wysyłek i otwarcie zamówień na kompletne drukarki
                  • Lepsze wydruki, łatwiejsza obsługa: Prusa XL+, CORE One L+ oraz CORE One+ (Gen 2) – wielka modernizacja naszych produktów

                  Newsletter

                  Zapisz się i otrzymuj nasz miesięczny newsletter zawierający przydatne informacje o nowym firmware, nowych wersjach PrusaSlicer i ogólne wskazówki dotyczące projektów do druku 3D.

                  Klikając, zgadzasz się na otrzymywanie naszego newslettera.

                  Ta strona jest chroniona przez reCAPTCHA Enterprise i obowiązują na niej zasady Polityki prywatności Google oraz Warunkami korzystania z usług.

                  Strong garden hose holder
                  Sklep internetowy
                  • Drukarki 3D
                  • Modernizacje drukarek
                  • Filamenty
                  • Akcesoria
                  • Gadżety Prusa

                  © Prusa Research a.s.

                  Printables
                  • Modele 3D
                  • Store
                  • Clubs
                  • Konkursy na projekty 3D
                  • Brands
                  Społeczność
                  • Mapa świata
                  • Forum
                  • Grupy użytkowników
                  • Wydarzenia
                  Pomoc
                  • Pomoc Prusa
                  • Prusa Academy
                  • Kalkulatory druku 3D
                  Oprogramowanie
                  • PrusaSlicer
                  • Prusa.app
                  • Prusa Connect
                  • Sterowniki i oprogramowanie
                  Firma
                  • O nas
                  • Blog
                  • Oficjalni dystrybutorzy Prusa
                  • Kontakt
                  • Certyfikowane zgodnie z normami ISO 9001, ISO 14001 i ISO 45001.
                  • Ogólne warunki i zasady
                  • Ogólne warunki i zasady korzystania z witryn internetowych PRUSA
                  • Polityka Prywatności
                  • Informacja o plikach Cookie
                  • Polityka Reklamacji
                  • Status witryn
                  • Ustawienia plików cookie
                  • Ogólne warunki i zasady
                  • Ogólne warunki i zasady korzystania z witryn internetowych PRUSA
                  • Polityka Prywatności
                  • Informacja o plikach Cookie
                  • Polityka Reklamacji
                  • Status witryn
                  • Ustawienia plików cookie

                  © Prusa Research a.s.

                  JOSEF PRUSA®, PRUSA RESEARCH®, PRUSA POLYMERS®, PRUSA ORANGE®, PRUSA 3D ® ORAZ PRUSAMENT® są zastrzeżonymi znakami towarowymi firmy Prusa Development a.s. używanymi przez Prusa Research a.s. na podstawie licencji firmy Prusa Development a.s.

                  First print with PrusaSlicer (3.0.0)

                  Dotyczy

                  PrusaSlicer
                  Artykuł jest dostępny również w językach:
                  English
                  Čeština
                  Polski
                  Deutsch
                  Français
                  Español
                  Italiano
                  日本語

                  Before printing your 3D file, it needs to be converted into a file type called .gcode or .bgcode. That is done by a program called a slicer. The best one for your Prusa or even non-Prusa printers is PrusaSlicer. This guide will lead you through using PrusaSlicer for the first time.

                  Before starting to use PrusaSlicer, make sure you know your Printer model (including the name and nozzle size) and the filament material you will print with.

                  PrusaSlicer modes

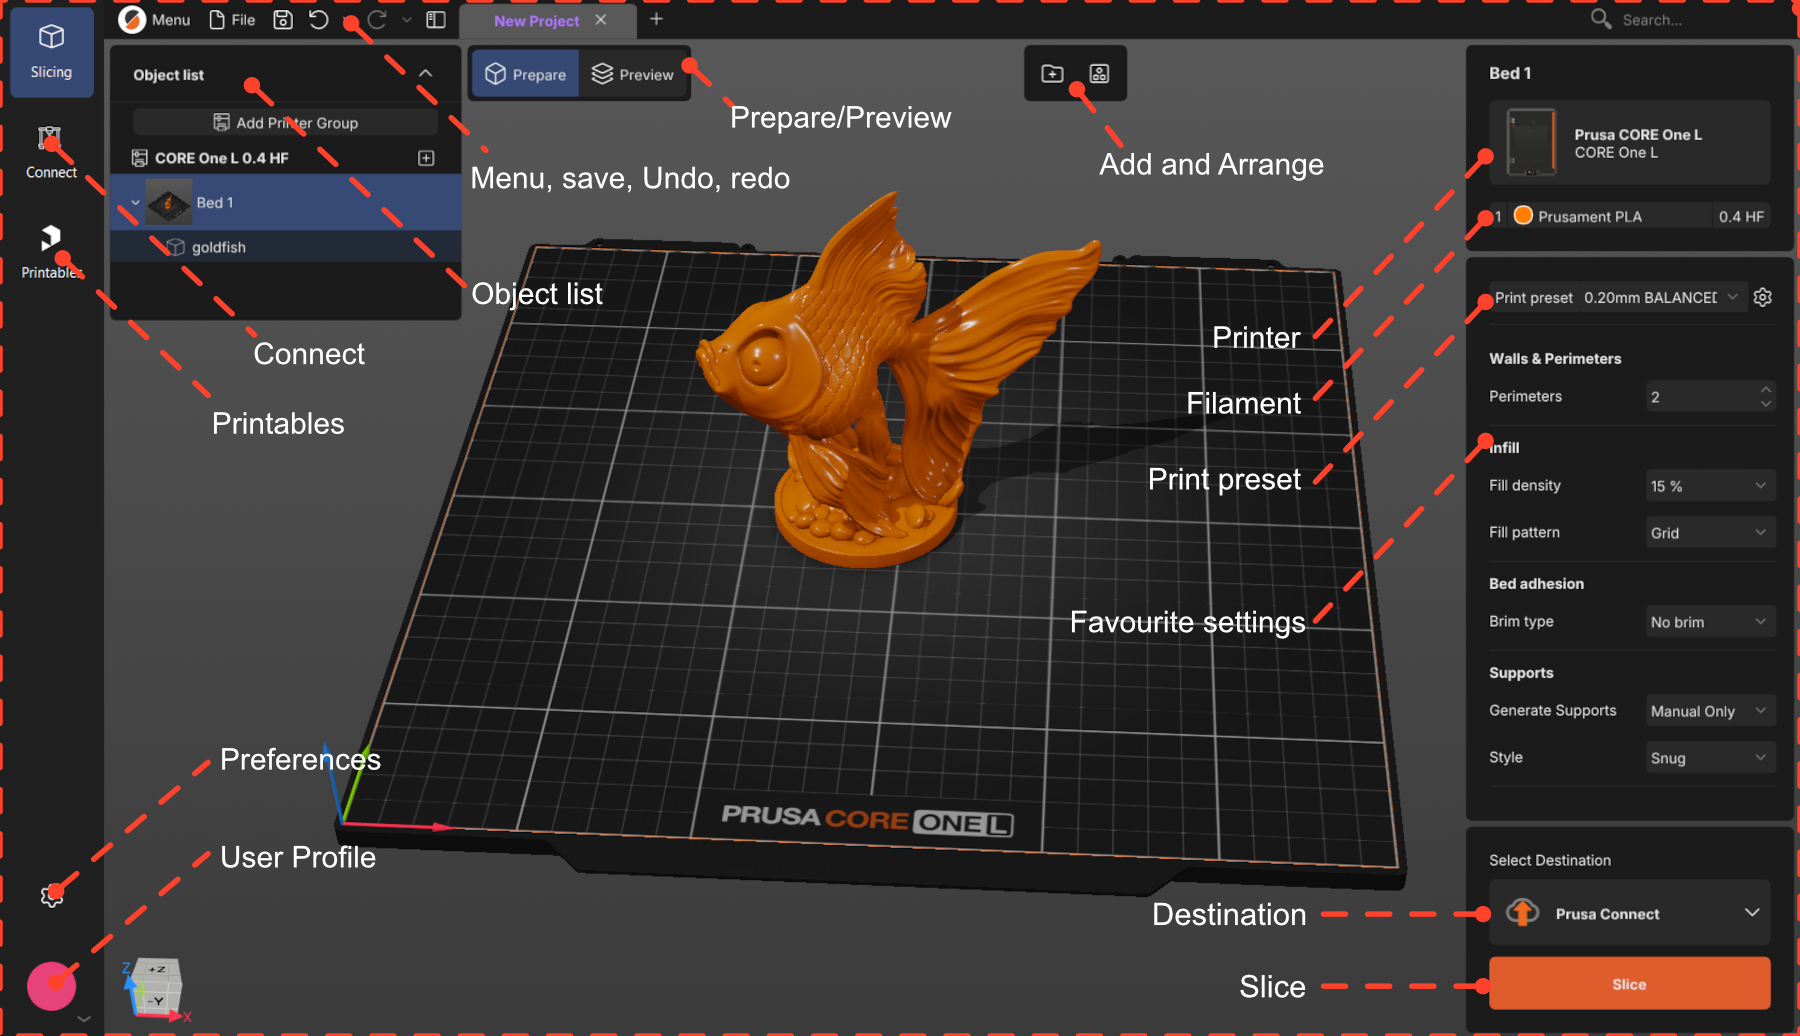
                  PrusaSlicer has two work modes: Prepare and Preview. Most of the model preparation will be done in the Prepare mode.

                  In both modes, you can see the Object list at the top right of the workspace. That will contain all the items of your project, organized as Printer -> Bed -> Object.

                  The Prepare mode is where you will arrange your model and choose your settings. There, you have the 3D scene, where you will add your model.

                  If no objects are selected, you will see the options Add and Arrange on the top menu, and the selected printer, filament, and print profile on the right-side menu.
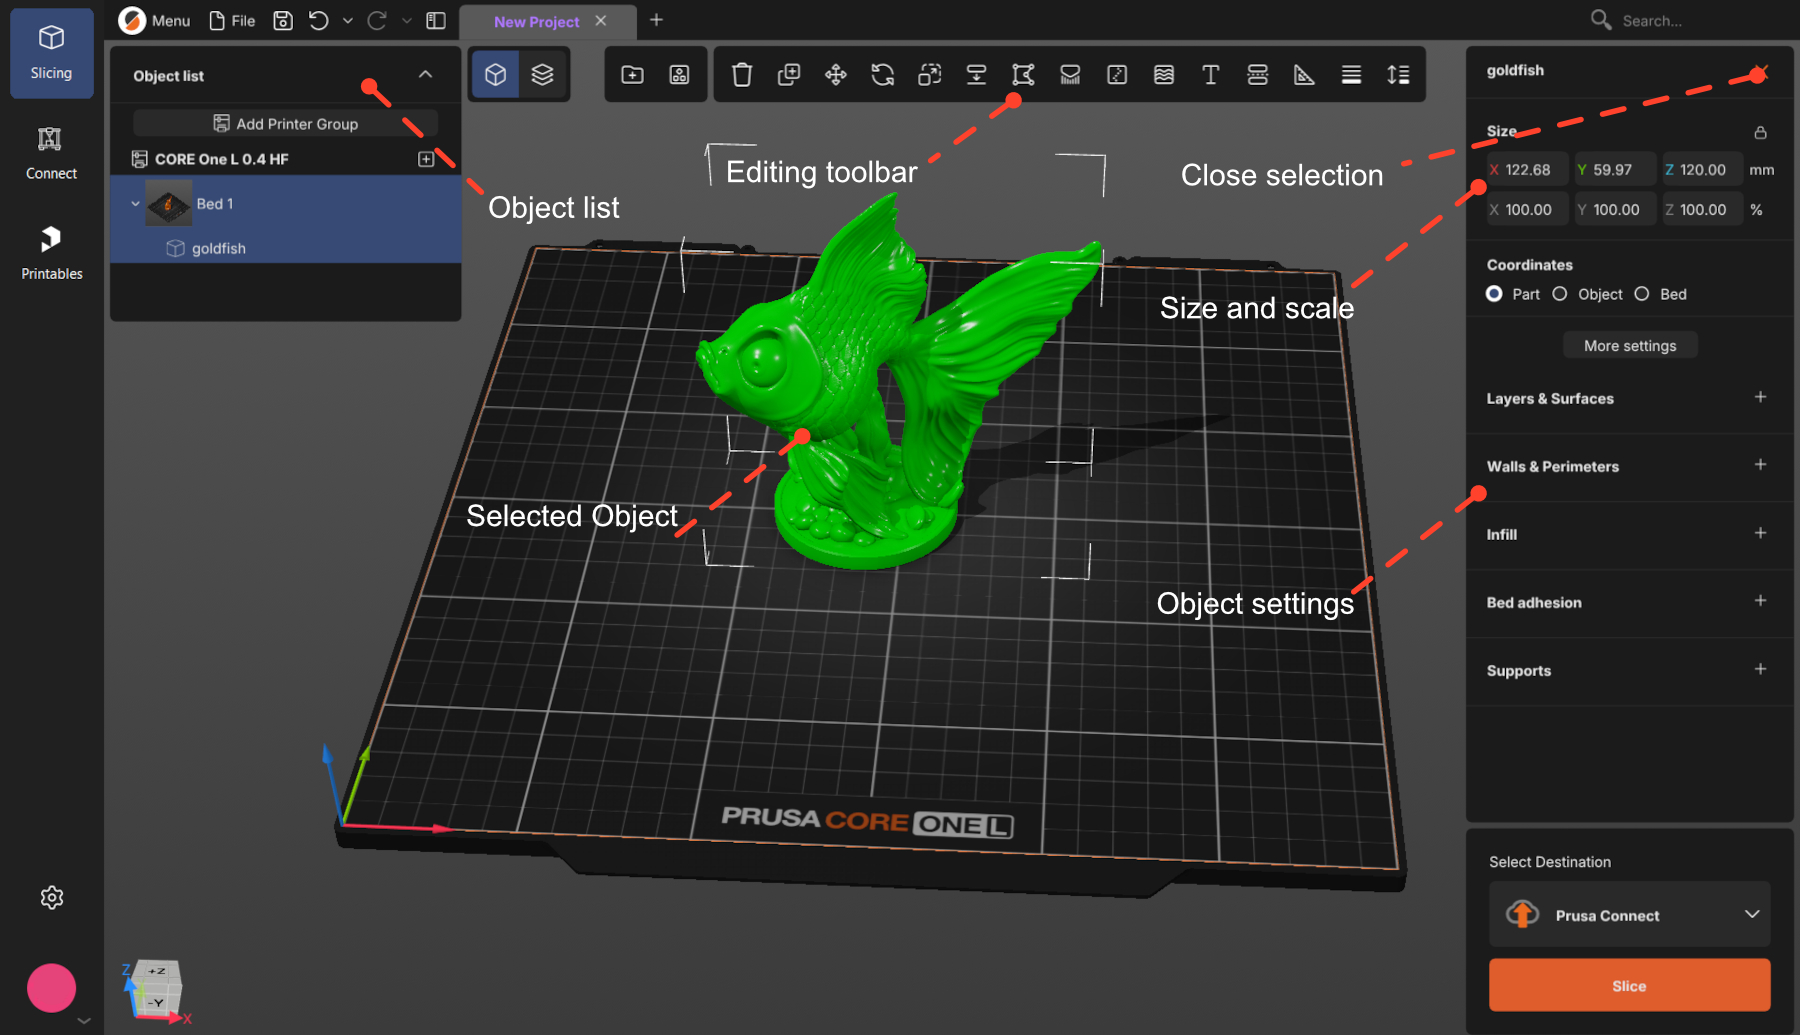
                  After an object is selected, you will see the full set of editing tools at the top menu, and the object's size and settings on the right-side menu.

                  To cancel selection, press Esc or click the close button.
                  Choose and set up your printer

                  Click to select the printer you will use. If your printer is not on the list, click Add printer at the bottom of that dialog and find your model in the catalog - there is a search box.
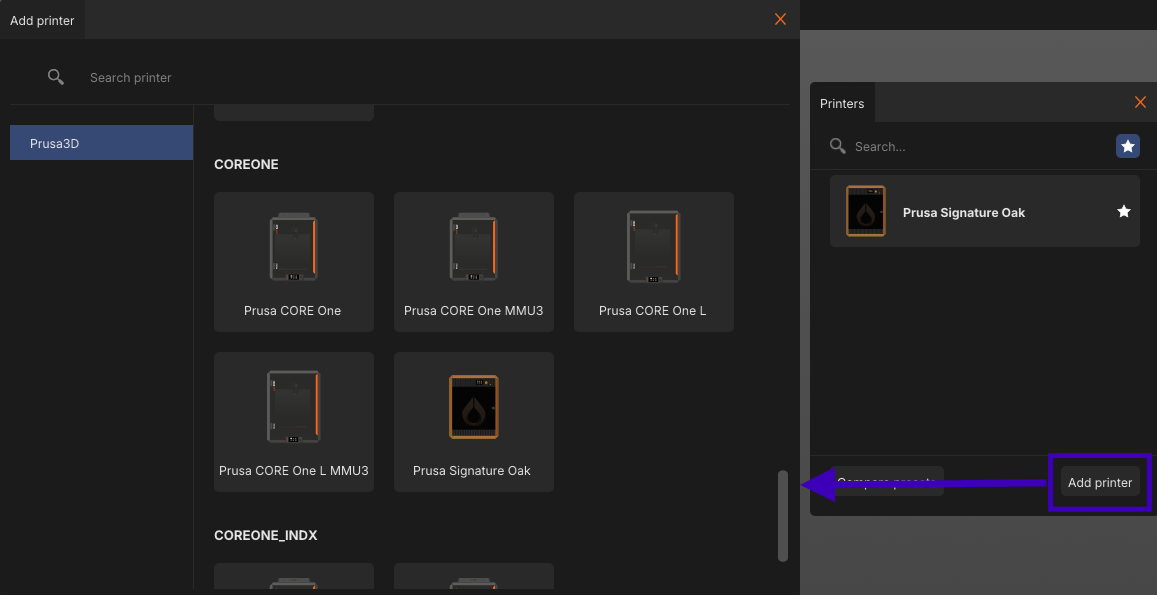
                  Set up the hardware. Always check the nozzle diameter and type, and the print sheet. The gear next to the printer name opens a menu with hardware setup

                  Choose your filament

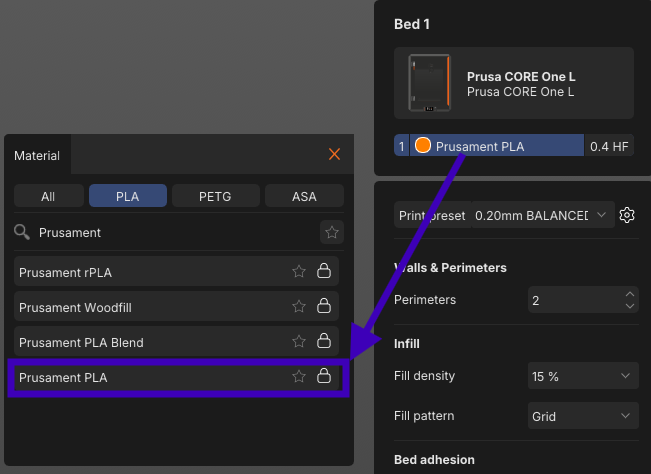
                  Click the material name to see the list of available materials and brands. You can filter by
                  material type — (the All / PLA / PETG / ASA) tabs — or search for the filament.
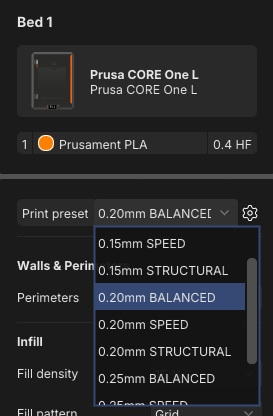
                  Choose a print profile

                  Each print profile comes with a predefined layer height — the main trade-off between quality and
                  time. Thinner layers mean more detail and a longer print.

                  To start, use 0.15 or 0.20 mm. Both give very good quality at a reasonable print time.

                  Most layer heights also come in versions tuned for a purpose, like SPEED or STRUCTURAL.
                  BALANCED is the neutral one you can start with.
                  Import your model

                  Any of these options work:

                  • Drag and drop the file onto the PrusaSlicer window
                  • Click Add above the plate or Ctrl+i
                  • File → Import STL /3mf 

                  Supported 3D formats are:  .3mf, .stl, .obj, .step / .stp, and SVG.

                  .3mf files can hold the whole project, not just models. Opening one may bring its own printer, filament, and print settings and replace yours. That is usually what you want when someone shares a ready-to-print project — just be aware it happened.

                  Orient your model

                  Your model may be oriented incorrectly after import. Four tools are very useful:

                  • Place On Face F: click one of the model's flat surfaces, and it snaps face-down onto the bed. The quickest fix for a model that imported at an angle.
                  • Move M: drag the model with the left mouse button at any time. The Move tool constrains the movement to a single axis.
                  • Rotate R: turn the model around the X, Y, or Z axis. Dragging the outer ring snaps in   45° steps, the inner ring in 5° steps.
                  • Arrange A: with several models on the plate, arrange them out on the bed without overlaps and with a safe gap between the parts.

                  Support material

                  Printers build prints upward layer by layer, so anything that overhangs with nothing beneath it has nothing to print onto. It sags or falls, ruining the print. Supports are scaffolding that holds it up, and you break them off afterwards.
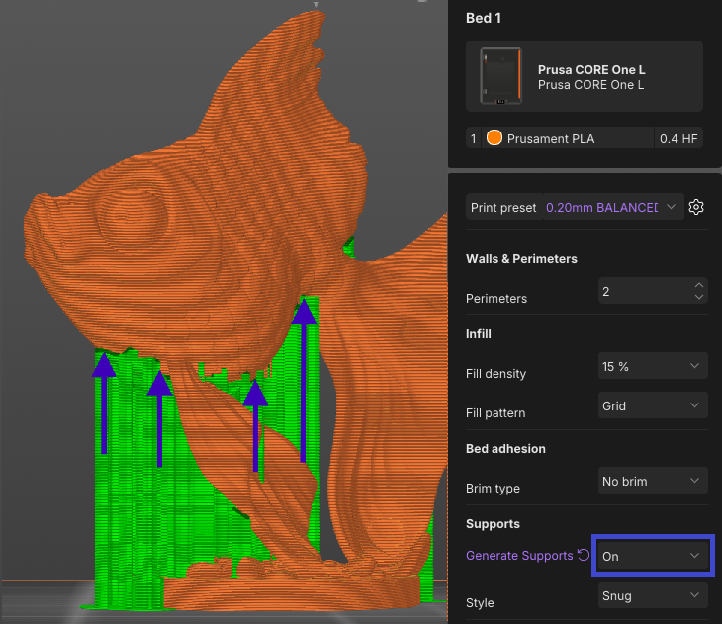
                  • Manual Only (default): only where you paint them on yourself, with the Paint-on supports tool L.
                  • On: added automatically wherever an overhang needs them. For most models, On is enough.
                  • Off: none at all.

                  Perimeters and infill

                  Perimeters and infill are the two basic settings that control the structure of the finished print.
                  Both can be easily found in the right panel: (1) Perimeters, (2) Infill density.

                  • Perimeters: the number of outer walls, which sets how thick the shell is.
                  • Infill: the internal structure. It makes the object rigid and supports the top surfaces.

                  Increasing either adds strength and rigidity and increases the print time. For a first print, the
                  profile's defaults are fine.

                  Slice

                  The Slice button is the most important in PrusaSlicer. Slicing takes the model geometry and all
                  your settings, and generates the instructions your printer follows.

                   

                  Clicking to Slice will bring you into Preview mode. To go back, use the < (back) button beside
                  Export.

                  or the Prepare / Preview switch above the plate.
                  Check the result in Preview

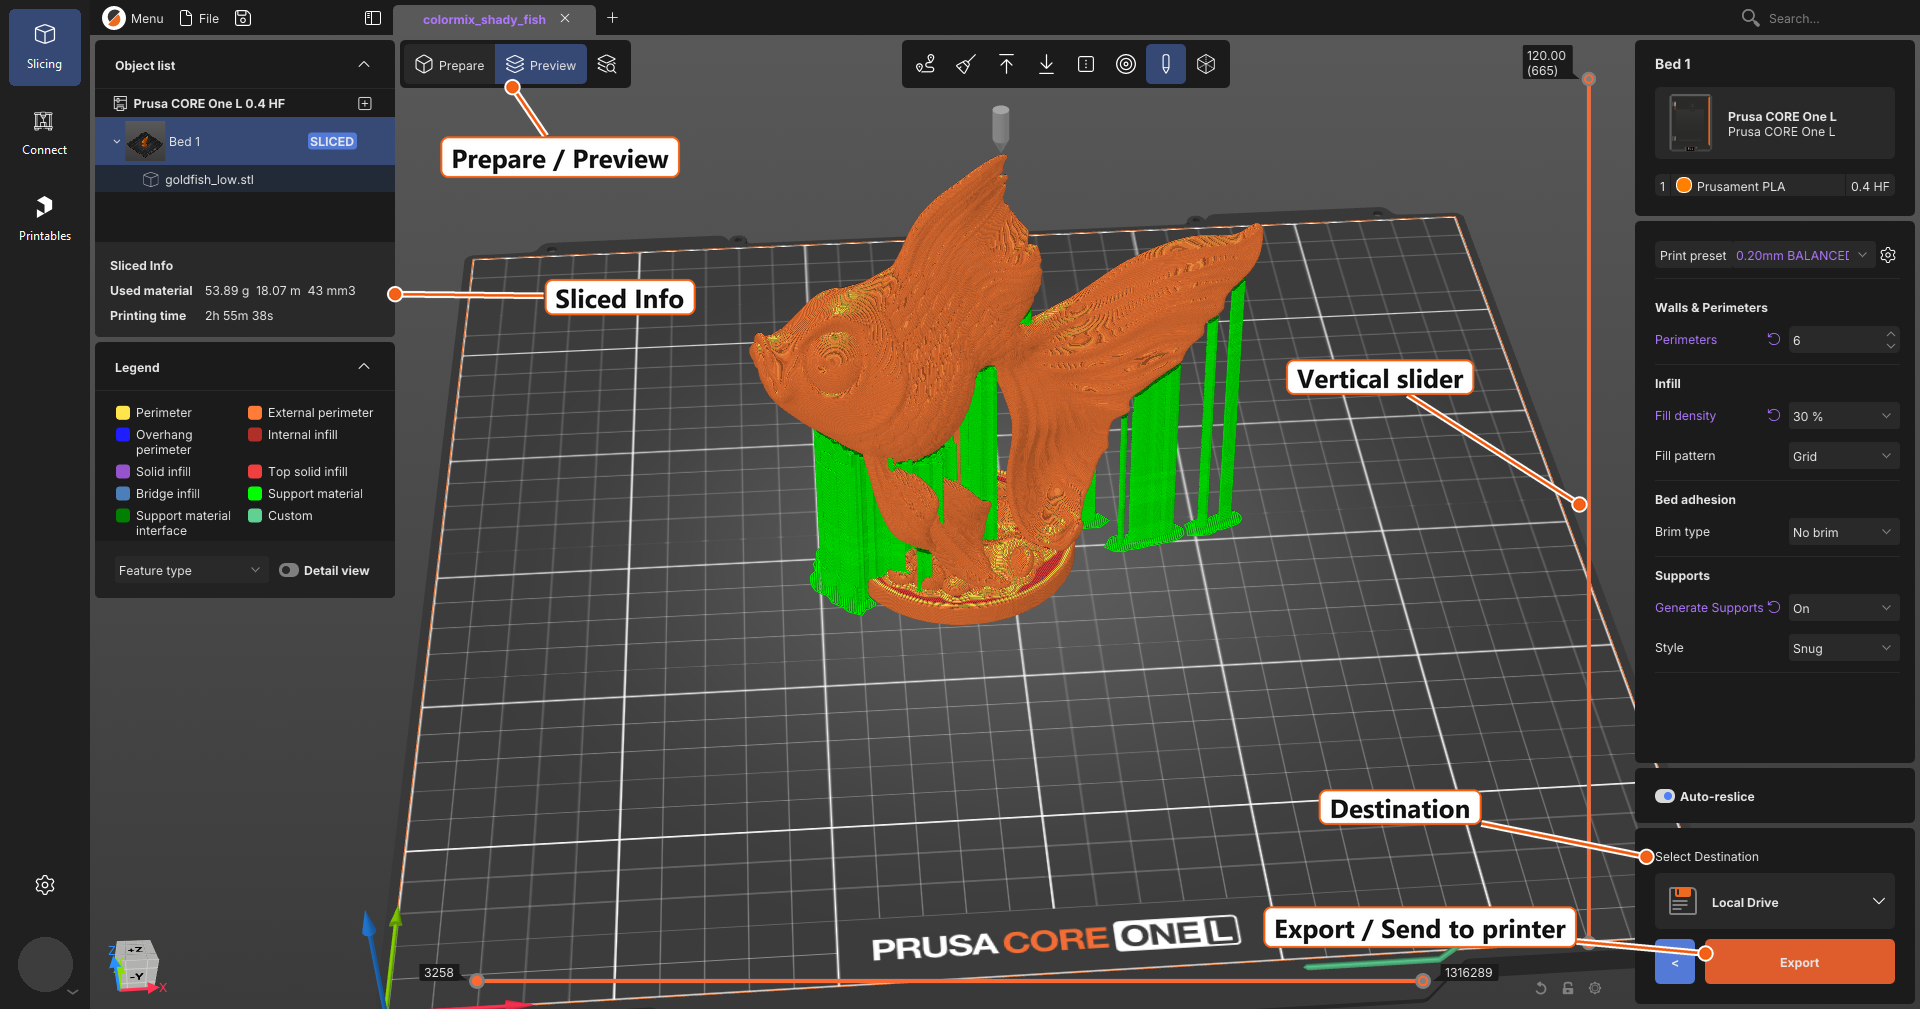
                  You can see the Used material and the Printing time on the left panel.

                  Look at the print. The vertical slicer on the side allows you to check the print layer by layer by sliding it down. The three things to check are:

                  • The shape: At the top of the slider, it should look like your model.
                  • Floating parts: Every new piece of material should sit on something below it — the bed, the
                      model, or a support.
                  • First layer: It should cover the bed. Drag the slider all the way down. This layer decides whether
                      the print sticks.

                  If something looks wrong, switch back to Prepare, fix it, and slice again.
                  Export and print

                  The select destination block above the orange button controls where the file goes. Click it to choose.

                  • A drive on your computer, or a USB stick/SD card: The button reads Export and saves the file. Take the media to the printer.
                  • Prusa Connect: The button reads Send to Connect and uploads it to your Connect account.
                  • A printer on your network: The button reads Send to Printer and sends it straight to the machine.

                  Most first prints go out on removable media. If a USB stick or SD card is plugged in, PrusaSlicer offers it as the destination, and once the file is written, a notification appears with an Eject button — use it rather than pulling the card out.

                  A note on file types: you will get either a .gcode or a .bgcode file. .bgcode is the same instructions in a compact binary form, smaller and faster for the printer to read.

                  Then start the print from the printer's own menu. Watch the first layer go down. If it sticks, the rest usually follows.

                  Handy shortcuts

                  • Ctrl + I import
                  • Ctrl + S save project · Ctrl + F search settings · 
                  • Ctrl + Z UNDO
                  • Tab switch Prepare / Preview
                  • M move
                  • R rotate
                  • S scale
                  • F place on face
                  • A arrange

                  Can't find a setting? Press Ctrl + F and type its name. It works across every settings page.

                  Czy ten artykuł był przydatny?
                  Ta akcja jest dostępna tylko dla zarejestrowanych użytkowników. Proszę zaloguj się.
                  Zaloguj się , aby dodać komentarz
                  Brak komentarzy

                  Tematy

                  • PrusaSlicer 3.0 (Public Preview)
                    • About PrusaSlicer 3.0 [Tłumaczenie w toku]
                      • First print with PrusaSlicer (3.0.0)
                    • Configuration and profiles [Tłumaczenie w toku]
                    • Input/output [Tłumaczenie w toku]