Set up process
Entry into the Club program is limited to users with a profile level of 18 and higher, as well as a follower count of 150 or more. This helps to maintain high-quality standards of exclusive models. If you're interested in setting up your Club but are on a lower level, please fill out the request form and add a link to your portfolio. We will evaluate your application for program entry on an individual basis.
If you want to set up your Club, go to the settings, which will guide you through the entire process.
- While you are logged in, click on your avatar in the top right corner
- Click on Settings
- Click on Set up my Club
You have to fill your personal information, set up tiers and submit it for verification.
By submitting your Club to our approval, you get unlocked the possibility to start creating Exclusive models for your supporters.
Once we've approved your request, it's up to you to publish your Club.
Welcome email
You can customize the email to welcome your new Club members.
- While you are logged in, and your Club is approved by us, click on your avatar in the top right corner
- Click on Settings
- Click on My Club & Payout
- Click on Welcome email
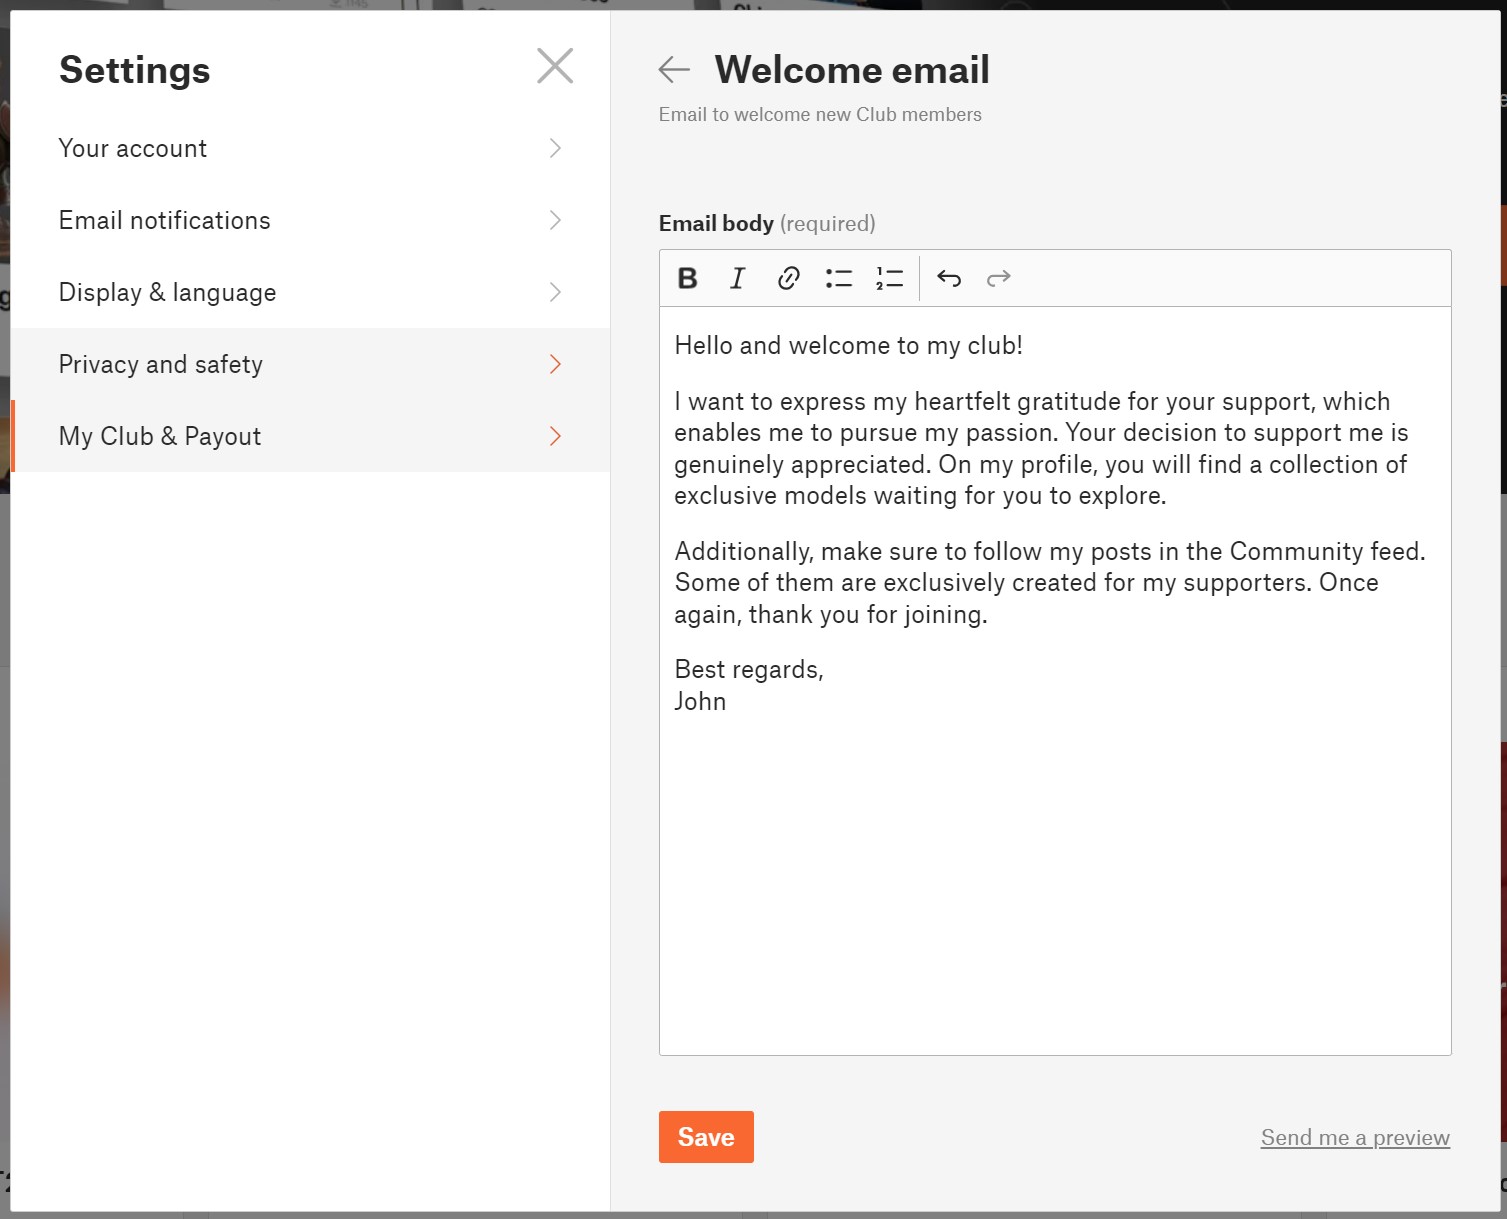
If you want to review your final welcome email, you can have it sent to your email by clicking on "Send me a preview."
Members list
For an overview of your supporters, the Club Members table is provided. You will find information about the tier each user has purchased, the total amount of money they have given to you, and the date when the user first joined your Club. Clicking on the column headers allows you to sort the data.
To track your members across tiers over time, a graph is also available.
Mass messages
If you need to communicate something important to your supporters, you can use a mass message function.
- While you are logged in, click on “My Club” in the top menu
- Click on Members
- Click on button Message members
- Select which tiers you want to message
- Click Continue and you will be redirected to the messenger, where you create the standard message and post it.
Note, that message will be sent to all selected supporters as a standard Message to the conversation thread.
Earnings
To monitor your monthly earnings, you have access to an earnings graph and a table displaying data categorized by months and tiers.
- While logged in, navigate to “My Club” in the top menu.
- Select "Earnings."
For more comprehensive information regarding payments and fees, please visit your Stripe Dashboard.
User profile page of the Creator
The creator's profile page is distinguished from a regular user profile by these elements:
- Club banner
- Exclusive model highlights section - where you can promote your top Exclusive models
- Support & Join Club button
- List of Club members (visible when there are 5 or more club members)
Your exclusive content for supporters
Exclusive models
Exclusive models are available for download only to the members of your Club, regardless of their tier. Exclusive models are one of the possible, but not necessary, benefits you can offer to your supporters.
Creating exclusive models is done the same way as creating a regular public model. You simply check the option "Exclusive model for my supporters only" during the model editing.
Additionally, you have the option to set the model to automatically change from an exclusive model to a public model in the future. This way, you can increase your exposure and make it easier for users to find and support you.
You have the option to exclude this model from these benefits: Commercial use and Custom defined license terms. The restriction will be indicated on the model's detail page.
For users who are not members of your Club, the model details will be displayed in a limited range. They will see the first preview image, the model's name, and description. They won't be able to download the model, comment on it, or read the model comments.
Club only Posts and Polls
For your supporters, you can create unique content in the form of exclusive posts in the Community feed. It's great for sharing behind-the-scenes information about what you're currently working on, your future plans, and more.
You can also prepare polls specifically for your supporters, allowing them to vote exclusively. This is perfect when you want to give your supporters the opportunity to decide on the next model you will create.
Tiers and Benefits
Create your new tier(s)
- While you are logged in, click on your avatar in the top right corner
- Click on Settings
- Click on My Club & Payout
- Click on Edit tiers
- Click on the “+ Add a tier”
You can create up to 5 tiers with different prices and benefits. For each tier, you can define a unique set of benefits to distinguish them from each other.
The minimum price for a tier is $3 USD. The maximum price for a tier is $100 USD.
Edit tier
Please remember that you cannot edit the price of a tier when it has active supporters. However, you have the freedom to make changes to everything else.
- While you are logged in, click on your avatar in the top right corner
- Click on Settings
- Click on My Club & Payout
- Click on Edit tiers
- Click on the tier you want to update
You have the flexibility to modify the tier name, description, and benefits. If there are no supporters in a tier, you can also adjust its price. However, once supporters have joined a tier, the price cannot be changed.
Delete the tier
If you want to delete a tier, go to the Settings, Edit tier and click on the "Delete tier" option.
If the tier has no user members, it will be deleted immediately.
If the tier has any active members, it will continue to exist until the end of the current month. No new users will be able to join the tier, but current members will retain access until the end of the month for which they have paid. Users who were joined to the tier that has been terminated will be notified via email about this situation. It will be up to them whether they choose another tier or decide not to continue their support.
Benefits
Each tier consists of a set of benefits. Benefits are the rewards for your supporters. The two mentioned benefits below are fixed for every tier, and you can add other benefits according to your needs.
Loyalty badges next to member usernames in comments (Comments from the supporters will be highlighted with the badge)
Access to exclusive models (Access to all of the creator's models in the Exclusive models section.)
So note that all members from all tiers have access to the same collection of Exclusive models. You can differentiate the tiers with other benefits and by different licensing terms.
Optional benefits
Models for commercial usage - allow your supporters to use models for commercial purposes. It means that supporters can sell printed 3D models. Redistribution of the 3D model files is not permited.
Members only posts -If you decide to create posts and/or polls in the Community feed that are exclusively for your supporters, mention it as one of the benefits. Supporters get access to exclusive posts in the Community feed and the ability to vote in your members-only polls.
Custom licensing terms - You can define completely your own licensing terms and conditions.
Custom benefit - define it yourself - If you want to offer any other advantage to your supporters, here you have the opportunity to describe it and add it among the benefits of the tier.
Payments and Getting paid
Payments are processed by Stripe payment processor. Users can pay using their credit/debit card.
The money goes directly from the supporter to the creator Stripe account.
Fees
Printables takes 10 % fee from transactions, which will be used to help cover the costs of servers, maintenance, and development. The payment from the supporter to the creator is also subject to normal processing fees outside of our control, such as currency conversions or the Stripe payment fee based on Stripe rates.
For instance, if a supporter decides to pay for a $10 tier, the Printables fee will be $1 (10%). This $1 is then transferred to the Printables platform account. The net amount credited to the creator's account is $8.41 ($10 - $0.59 - $1), assuming standard US Stripe fees.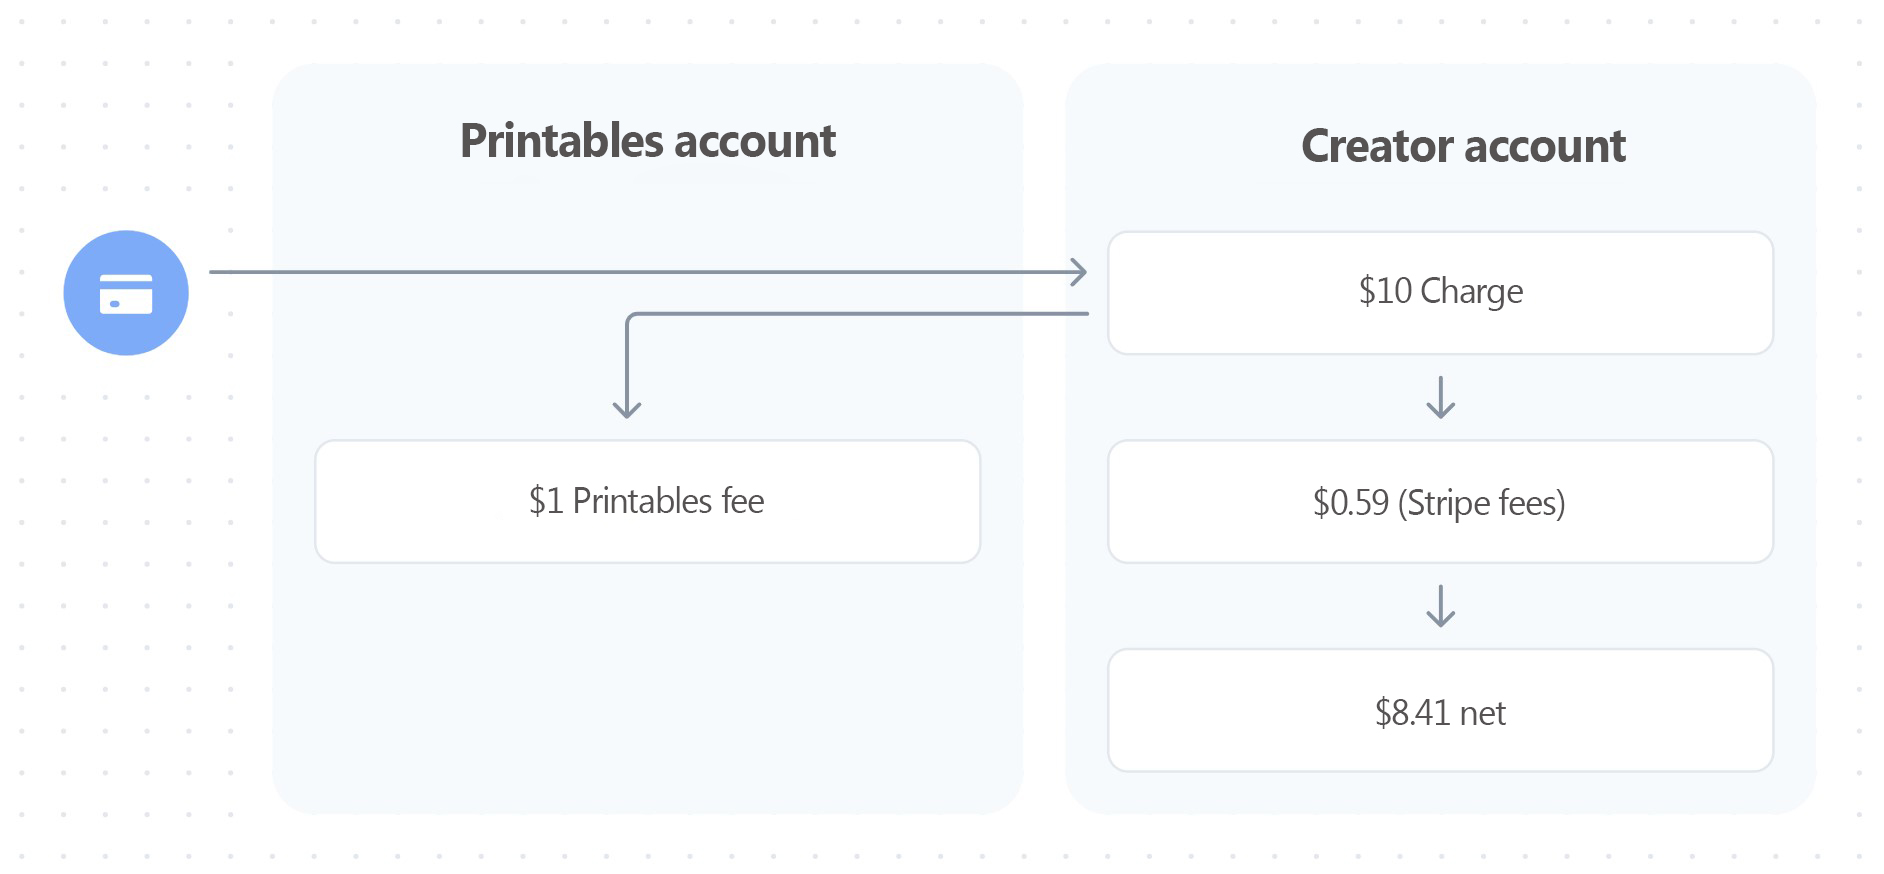
How Do I Get Paid?
Receiving payments on Printables is incredibly simple. All you need to do is connect you Stripe account to Printables Club. When someone supports you, the funds are immediately and directly transferred to your Stripe account and then sent to your bank account according to your Stripe account settings.
There's no minimum amount to withdraw or predefined payout schedule.
Taxes
In most situations, the money you make from Printables Club is considered income and needs to be reported for tax purposes, just like any other source of income. Right now, Printables doesn't have built-in tools to automatically include sales tax (GST) or value-added tax (VAT) when someone supports you. So, it's up to you to figure out and pay any necessary sales tax or VAT.
It's important to note that Printables doesn't provide advice on taxes. Tax rules can be different depending on where you live or operate. We suggest you get advice from a professional about your specific tax responsibilities before you start using Printables Clubs.
Billing Cycle
Memberships are on a monthly basis, and the recurring payment is charged at the beginning of each month.
If a new member joins in the middle of the month, they can choose to pay the full membership fee for the remaining part of the month or a proportional amount for the current month plus the following month. We are particularly proud of this solution, as creators expressed their frustration with people joining near the end of the month and the confusion that came with the two payments close to each other.
Discount codes
Printables supports the use of discount codes during checkout. Coupons (discount codes) are created by the creator in the Stripe account.
Coupons have a wide range of settings and parameters. However, Printables is not compatible with all these parameters. Therefore, it is necessary to follow the recommendations below to ensure that the coupons work as expected. Otherwise, the discount code will not function properly.
Creating a Coupon and Setting Parameters
- Log in to your Stripe Dashboard at https://dashboard.stripe.com/
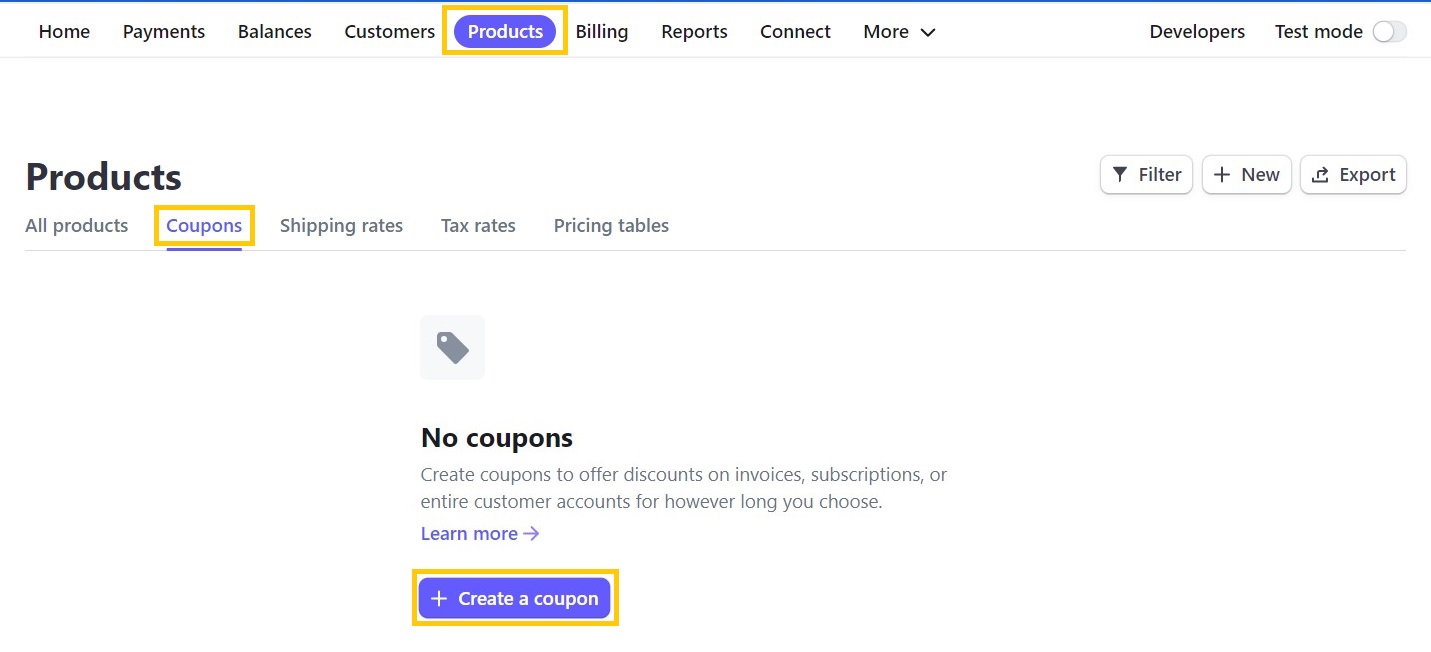
- In the top bar, click on Products
- Click on Coupons
- Click on Create a coupon
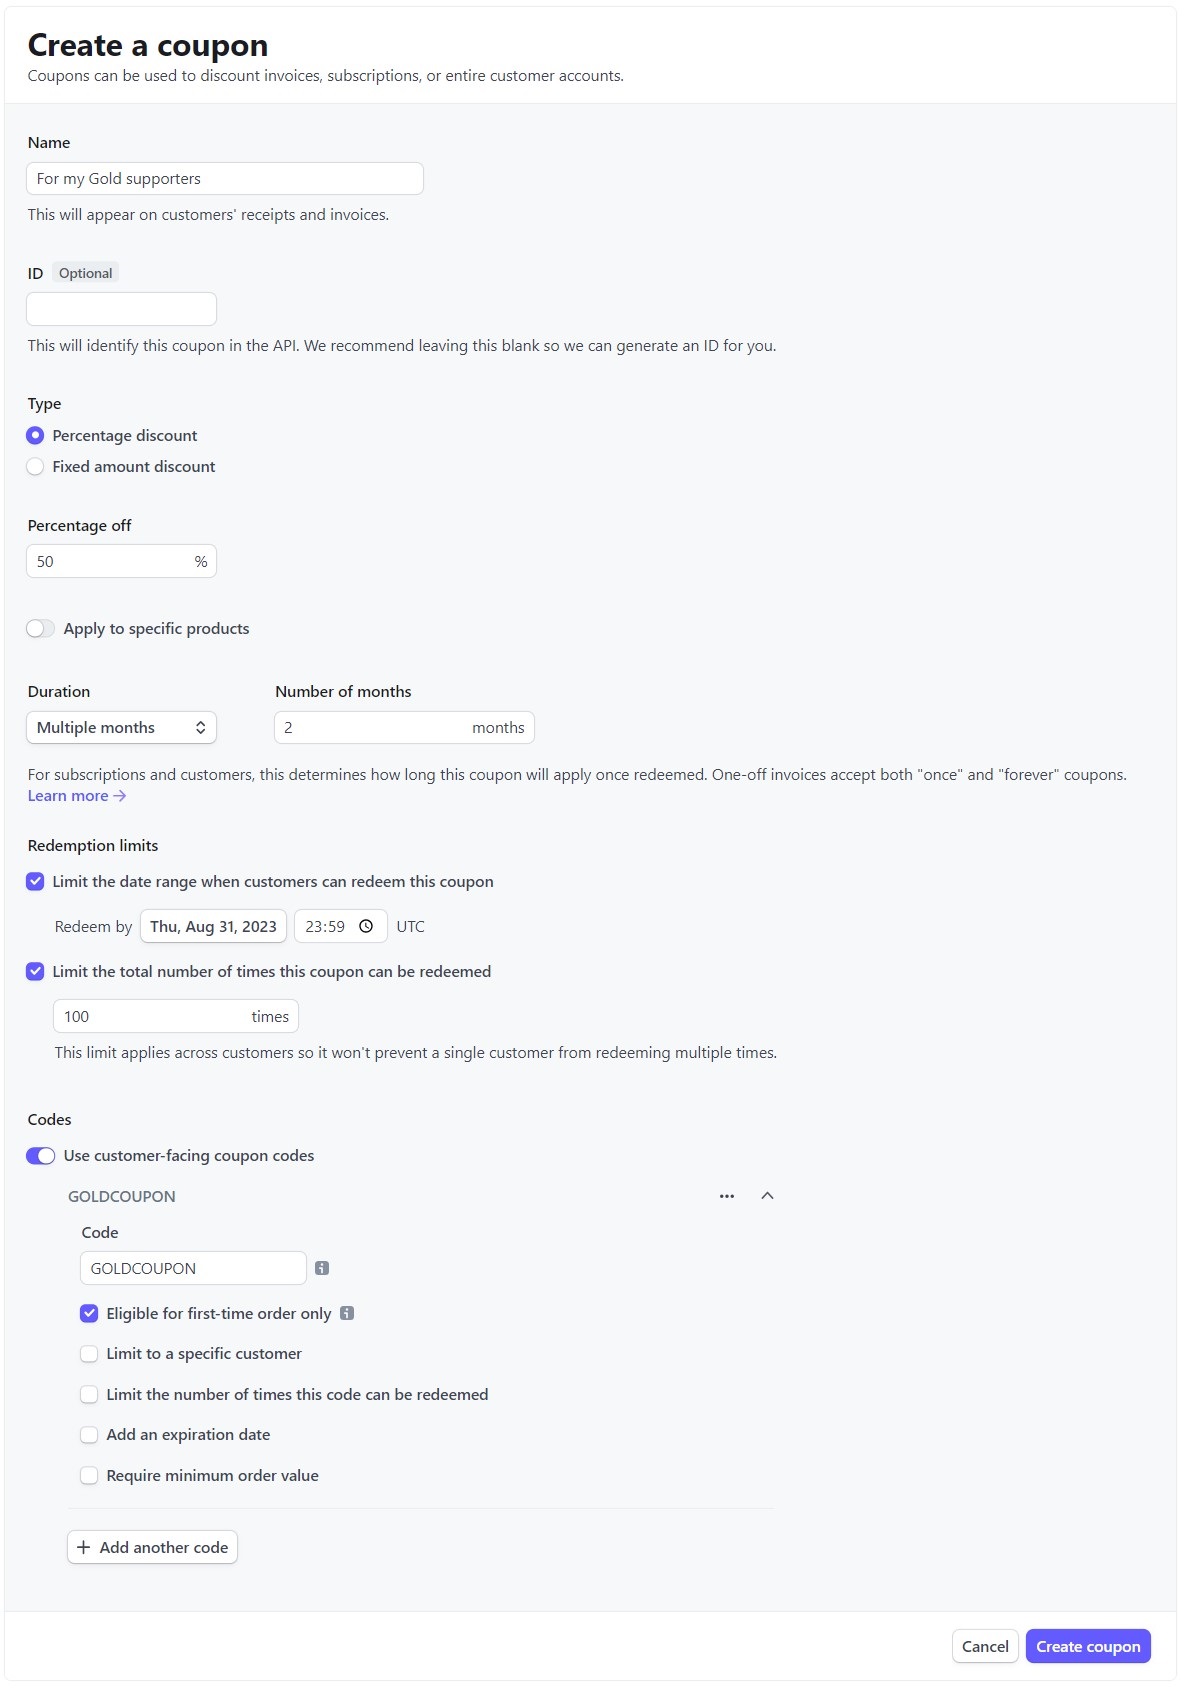
Name - any name for the coupon
ID - do not fill in
Type - you can use either of the two options provided
Type -> Percentage discount - any value; the minimum payment amount at checkout must be $0.50 (more)
Type -> Fixed amount discount - you have to select USD; the minimum payment amount at checkout must be $0.50 (more)
Apply to specific product - do not use, as it is not compatible with Printables Clubs
Duration - Forever / Once / Multiple months - all three options can be used
Limit the date range when customers can redeem this coupon - can be used if necessary
Limit the total number of times this coupon can be redeemed - can be used if necessaryUse customer-facing coupon codes - switch it on
Code - any unique discount code
Eligible for first-time orders only - can be used if necessary
Limit to a specific customer - not recommended to use (must be existing customer)
Limit the number of times this code can be redeemed - can be used if necessary
Add an expiry date - can be used if necessary
Require minimum order value - do not use
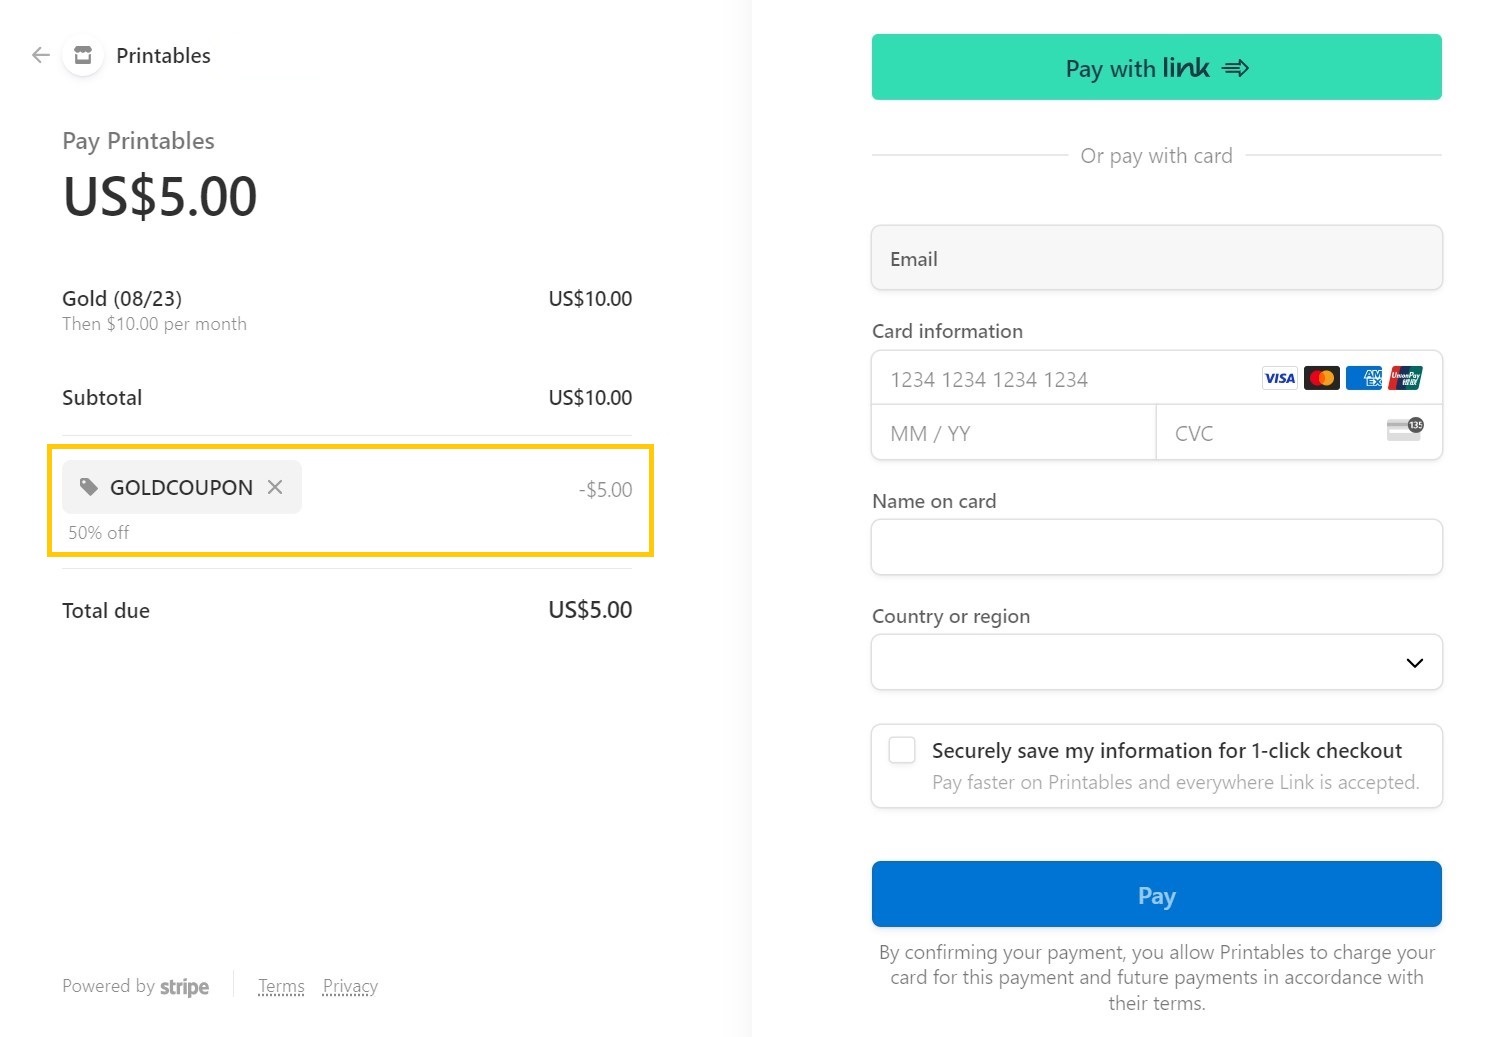
Where to enter the discount code?
The discount code is used to provide a discount from creators to their supporters. The code is entered by clicking on "Add promotion code" on the Stripe checkout page. After entering the code, the code is validated and the discount is applied immediately.
Sample Use Case
- The creator has their supporters on another platform.
- The creator has decided to share Exclusive content for their supporters in their Club.
- The creator wants to take advantage of a unique opportunity to double their earnings as part of a bonus promotion.
The Creator want to motivate their supporters to the platform, so they decide to offer them a discount code in the form of XY% off the first two payments.
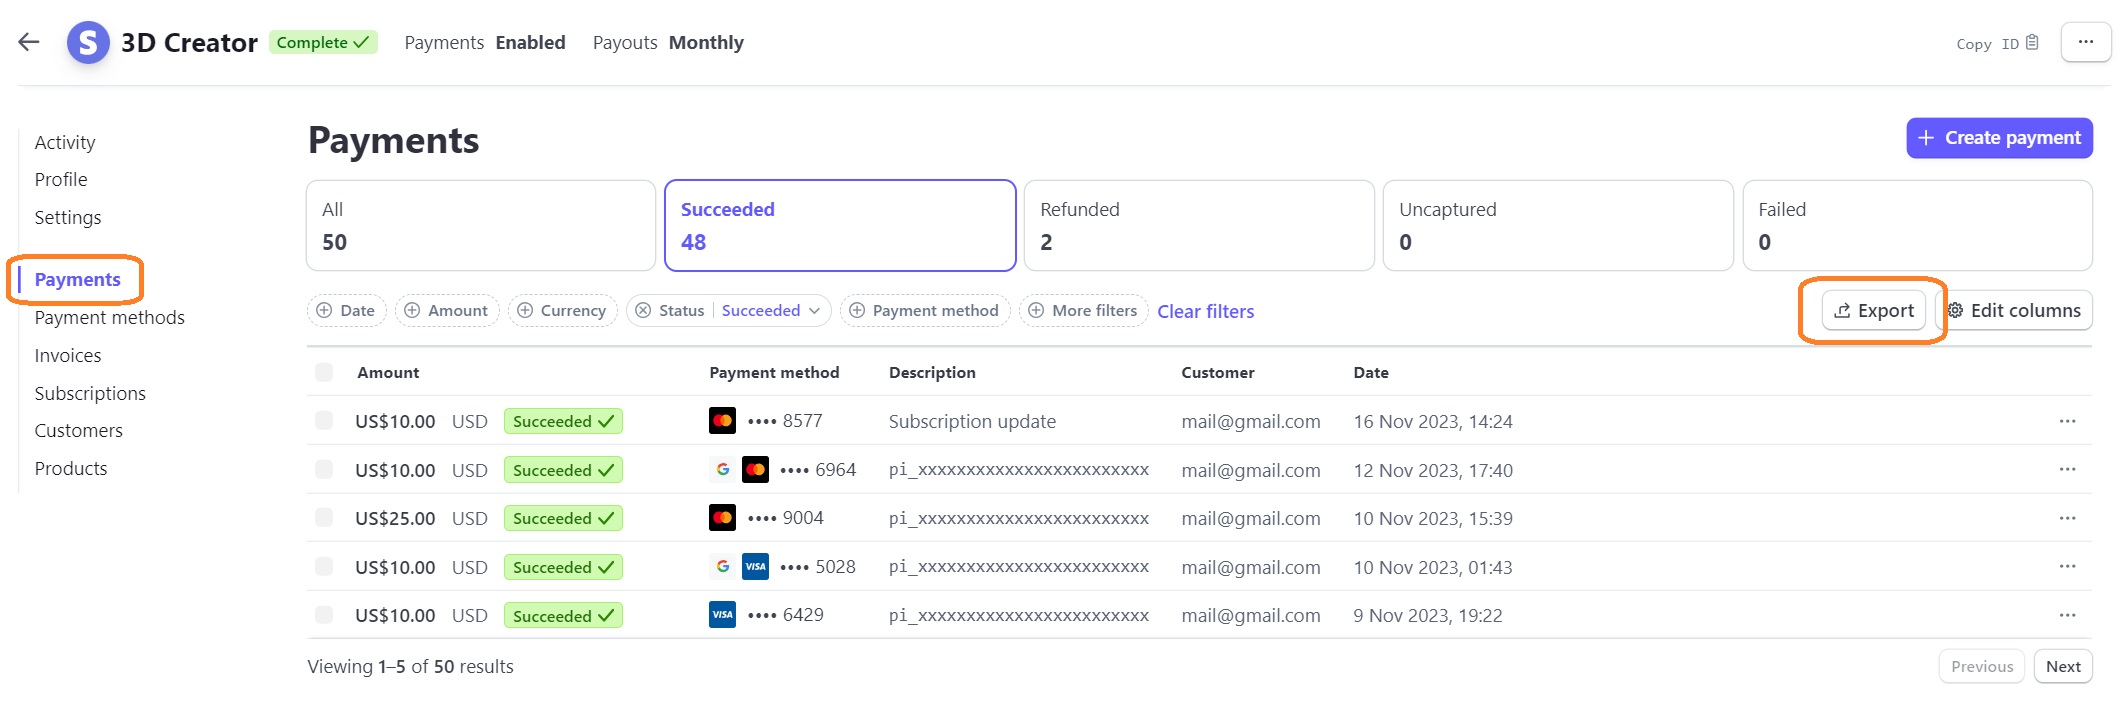
How to export information about incoming payments?
If you need the list of payments for tax purposes regarding all incoming payments for the sale of models and payments from Club supporters, you can export them directly from your Stripe Dashboard in .CSV format.
- Go to https://dashboard.stripe.com/ and log in,
- in the left menu, select "Payments",
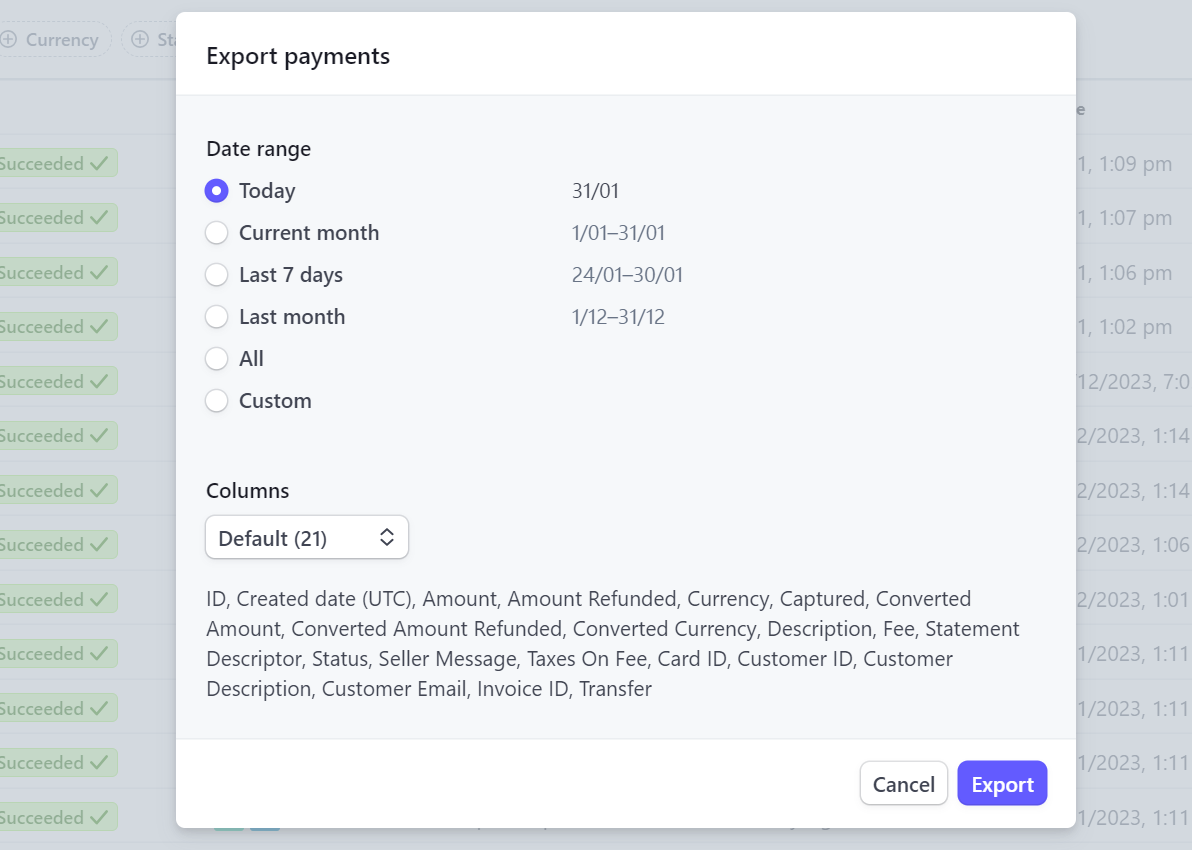
- click on "Export" button and choose the specific columns and time period you wish to export,
- click the "Export" button and wait for the output.