Polski
Login
Drukarki 3D
Materiały
Części i akcesoria
Dla biznesu
Oprogramowanie
Modele 3D
Społeczność
Pomoc
Kursy
Blog
Firma
Wsparcie
Prusa CORE One+
Prusa CORE One+ conversion kit (1.00)
7. Bodywork & Electronics | Narzędzia niezbędne w tym rozdziale
1. Narzędzia niezbędne w tym rozdziale
Krok 1 z 44 (Rozdział 10 z 13)
Spis treści
Komentarze
⬢
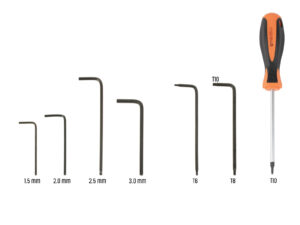
Do kolejnych etapów przygotuj:
⬢
Klucz imbusowy 2,5 mm
⬢
Klucz imbusowy 1,5 mm
⬢
Klucz Torx T10
⬢
Szczypce spiczaste
⬢
Obcinaczki boczne (opcjonalnie)
Loading...
Dalej
Spis treści
Prusa CORE One+ conversion kit
1A. Wprowadzenie
1B. Przegląd MK4S
1C. Demontaż drukarki
1D. Przygotowanie komponentów
2. Montaż podstawy
3. Montaż tylnej części
4. Montaż stołu grzewczego
5. Montaż CoreXY
6. Montaż Nextrudera
7. Panele i elektronika
Narzędzia niezbędne w tym rozdziale
Przednie profile: przygotowanie części
Montaż przedniego prawego profilu
Montaż przedniego lewego profilu
Górne profile: przygotowanie części
Montaż górnych profili I
Montaż górnych profili II
Wyrównanie górnych profili
Montaż górnych profili
Śruby mocujące CoreXY: przygotowanie części
Przymocowanie zespołu CoreXY
Podstawa bocznego czujnika: przygotowanie części
Montaż podstawy bocznego czujnika
Test dźwigni
Montaż przełącznika
Czujnik IR: przygotowanie części
Podłączenie czujnika IR
Montaż czujnika IR
Montaż pokrywy bocznego czujnika
Boczny czujnik filamentu: przygotowanie części
Montaż bocznego czujnika filamentu
Ułożenie przewodu czujnika filamentu
Podłączenie bocznego czujnika filamentu
Antena NFC: przygotowanie części
Przyklejenie taśmy dwustronnej
Montaż cewki NFC
Podłączenie cewki NFC
Kontrola okablowania
Przygotowanie pokrywy elektroniki
Montaż pokrywy elektroniki
Informacja o kamerze Buddy3D
Obudowa xBuddy: przygotowanie części
Montaż pokrywy xBuddy
Montaż tylnej pokrywy
Prawa strona: przygotowanie części
Montaż krążka uchwytu szpuli
Prawy uchwyt: przygotowanie części
Montaż tulei zaciskowej
Montaż uchwytu
Montaż przedniej prawej strony
Lewa strona: przygotowanie części
Montaż lewego panelu
Czas na Haribo
Gotowe
8. Listwy, drzwi i xLCD
9. Kalibracja i pierwsze uruchomienie
Lista zmian w instrukcji
Komentarze
Zaloguj się
, aby dodać komentarz
Brak komentarzy