How to replace the CoreXY plastic parts
Cómo instalalar el Adaptador Nextruder a boquilla V6 (XL monocabezal)
Como reemplazar la boquilla Prusa (XL monocabezal)
Cómo sustituir el conjunto del Hotend (XL monocabezal)
Embalaje de la impresora para devolución - Material de embalaje original (XL)
Cómo reemplazar la boquilla Prusa (XL multicabezal)
Cómo sustituir un motor del eje Z (XL)
Embalaje de la XL Multicabezal para devolución - Material de embalaje original
Cómo sustituir un azulejo de la base calefactable y un cable del azulejo (XL)
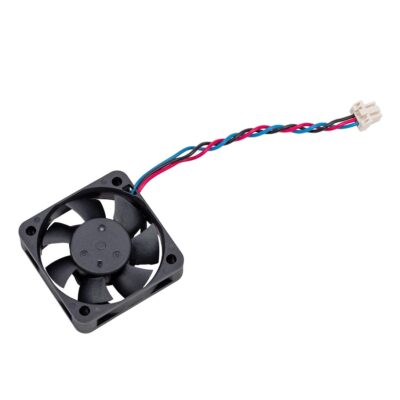
Cómo reemplazar un ventilador de impresión (XL de un cabezal)
How to fix Modular bed error (HW solution)
Como reemplazar las tuercas trapezoidales (XL)
Cómo limpiar el sensor de filamento lateral (XL)
Cómo cambiar el xLCD y el cable del xLCD (XL monocabezal)
Cómo reemplazar la placa Dwarf (XL multicabezal)
How to replace Nextruder heatsink (XL Multi-tool)
Cómo reemplazar la placa Dwarf (XL monocabezal)
Cómo sustituir el conjunto del Hotend (XL multicabezal)
Como reemplazar un termistor del fusor (XL monocabezal)
Cómo sustituir una guía lineal del eje Z (XL)
Cómo reemplazar el inserto del perfil (XL)
How to replace the hotend fan (XL Multi-tool) [Traducción en desarrollo]
- Comenzar el montaje
- Introduction
- Tools necessary for this guide
- Unloading filament
- Protecting the heatbed
- Preparing the printer
- Undocking the Nextruder
- Disconnecting the Nextruder
- Removing the toolchanger board
- Accessing the Dwarf board
- Unplugging the hotend fan
- Retirando el ventilador del hotend
- Mounting the hotend fan - preparation
- Mounting the new hotend fan
- Conectando los cables del Nextruder
- Reattaching the toolchanger
- Covering the Dwarf board
- Securing the toolchanger and the hotend
- Connecting the nextruder
- Docking the tool
- Well done!
Cómo reemplazar una fuente de alimentación (XL)
Como reemplazar un calentador del fusor (XL Mono Cabezal)
Cómo lubricar los pasadores de acoplamiento de la Original Prusa XL (MultiCabezal)
How to replace the tch-profile-insert (XL)
Cómo reemplazar la Placa Sandwich (XL)
Cómo reemplazar la goma elástcia en la Original Prusa (XL multicabezal)
Como reemplazar la Cubierta Trasera CoreXY (Original Prusa XL)
Cómo instalalar el Adaptador Nextruder a boquilla V6 (XL Multi Cabezal)
How to replace a XY motor (XL)
Packing the XL Enclosure for return - Original Packing material
How to change the belt (XL)
Cómo sustituir la cubierta del conector del cable principal (XL)
How to replace the PDU splitter (XL)
Cómo reemplazar un ventilador de impresión (XL multi cabezal)
Como reemplazar las tuercas trapezoidales (XL)
How to lubricate linear bearing rails (XL)
How to change the xLCD (XL)
How to set up a Buddy3D Cam
How to replace Nextruder heatsink (XL Single-tool)
Como reemplazar un Nextruder (XL de un cabezal)