Español
Login
Impresoras 3D
Materiales
Piezas y accesorios
Software
Modelos 3D
Aplicaciones
Comunidad
Ayuda
Academy
Blog
Empresa
Soporte
Prusa CORE One
Kit conversión CORE One (1.00)
5. CoreXY assembly | Herramientas necesarias para este capitulo
1. Herramientas necesarias para este capitulo
Step 1 of 80 (Chapter 8 of 13)
Contenidos
Comentarios
⬢
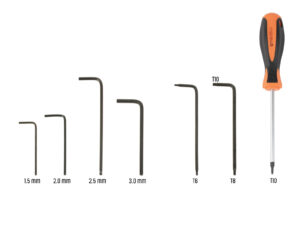
Para este capítulo, prepara por favor:
⬢
Needle-nose pliers
⬢
2.0mm Allen key
⬢
2.5mm Allen key
⬢
Llave Torx T10 / Destornillador T10 torx
Loading...
Siguiente
Contenidos
Kit conversión CORE One (1.00)
1A. Introduction
1B. MK4S Inspection
1C. Printer Disassembly
1D. Component Prep
2. Base assembly
3. Back assembly
4. Heatbed assembly
5. CoreXY assembly [Traducción en desarrollo]
Herramientas necesarias para este capitulo
Rod holders: parts preparation
Assembling the rod holders
Preparing the front rod holders
Installing the front rod holders
XY carriage: parts preparation
Assembling the XY-carriages
Assembling the linear holder left
Assembling the linear holder right
Attaching the linear holder assemblies
Smooth rods INFO
Mounting the smooth rods
Securing the rear rod holders
Securing the front rod holders
Motor mounts: parts preparation
Motor mounts: part preparation
Assembling the XY-motor-mount-right I.
Assembling the XY-motor-mount-right II.
Assembling the XY-motor-mount-left I.
Assembling the XY-motor-mount-left II.
Belt tensioners: parts preparation I.
Belt tensioners: parts preparation II.
Assembling the belt tensioner left I.
Assembling the belt tensioner left II.
Assembling the belt tensioner right
Installing the belt tensioners: parts preparation
Installing the motor mount right
Installing the motor mount left
Installing the belt-tensioner-left
Installing the belt-tensioner-right
Linear rail: parts preparation
Attaching the linear rail
Securing the linear rail
Installing the linear rail: parts preparation
Installing the linear rail assembly
Linear rail: removing the safety pins
Bed-stop: parts preparation
Assembling the bed-stop
Mounting the bed-stop
X&Y motors: parts preparation
Installing the X-axis pulley
Installing the Y-axis pulley
XY belts: parts preparation
XY belts INFO
Y belt guiding: Y motor pulley
Securing the Y-axis motor
Y belt guiding: Y motor mount
Y belt guiding: belt tensioner
Y belt guiding: X motor mount
Y belt guiding: securing the belt
X belt guiding: X motor pulley
Securing the X-axis motor
Y belt guiding: X motor mount
X belt guiding: belt tensioner
X belt guiding: Y motor mount
X belt guiding: securing the belt
Checking the belt guidance
Bowden guide: parts preparation
Securing the Nextruder holder
Securing the Y motor cable
Securing the X motor cable
Installing the bowden guide
White LED strip: parts preparation
Sticking the White LED strip
Installing the white LED assembly
Door sensor & White LED strip: parts preparation
Inserting the zip ties
Installing the door sensor
Securing the door sensor cable
Guiding the cables: LED and door sensor
Smooth rods: parts preparation
Instalación del conjunto CoreXY
Securing the smooth rods
Aligning the linear rail
Guiding the corexy cables
Guiding the cooling fan cables
Fixing the bed-stop
Connecting the cooling fans cables
Connecting the corexy cables
Done
6. Nextruder assembly
7. Estructura y Electrónica
8. Embellecedor, Puerta y xLCD
9. Calibración y Primer uso
Manual changelog
Comentarios
Inicia sesión
para publicar un comentario
Sin comentarios