ES
  • English
  • Čeština
  • Italiano
  • Deutsch
  • Polski
  • Français
  • 日本語
Iniciar sesión

1. Introducción

1. Introducción
Relevante para :
Ultima actualización 6 days ago
1. Introducción
 Dificultad
Muy fácil
 Pasos
12
 Idiomas disponibles
ENCSPLDEITFRJA
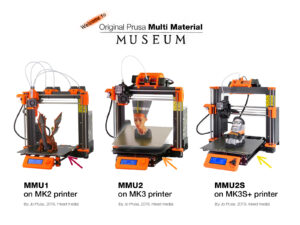
MMU History and Printer Compatibility

Welcome to the MMU3 guide! There were several generations of the Original Prusa Multi-Material printing solution. Verify you are looking at the correct guide for your MMU unit and your printer.

MMU1 for MK2 and MK2S printers (introduced in 2016-2018)

It used four separate extruders feeding one nozzle.

MMU2 for MK2.5 and MK3 (2018-2019) Five filaments feeding one direct-drive extruder.

MMU2S for MK2.5S, MK3S, MK3S+ (2019-2023)

Introduced a chimney on the extruder with the IR-filament sensor.

And finally, the current model:
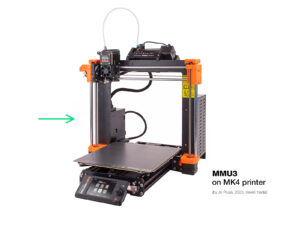
MMU3 for MK3S+, MK3.5/S, MK3.9/S and MK4/S.

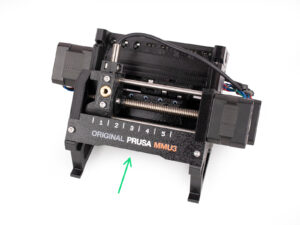
MMU3 is the one we will be dealing with in this guide.
Supported printers
Supported printers
Supported printers
Original Prusa Multi-Material MMU3 is currently officially supported only in combination with these printer models:
Original Prusa i3 MK3S+
Original Prusa MK3.5/S
Original Prusa MK4/S or MK3.9/S

If you have an older machine like the MK3 or MK3S, it is recommended to upgrade it to at least MK3S+ first.

For more info on Printer compatibility, visit the MMU3 Compatibility article.

MMU3 + Enclosure
MMU3 + Enclosure
MMU3 + Enclosure

The MMU3 is also supported with the Original Prusa Enclosure.

If you plan to use this combination, install the MMU3 onto the assembled printer using this guide.

Once you’ve completed the MMU3 installation, continue to the Enclosure assembly guide.

Disclaimer
Disclaimer
Disclaimer
Make sure your printer is fully assembled and works perfectly before you proceed to attach the MMU3 onto it. Make a few single material prints. If it has any issues, fix the issues first. Diagnosing printer issues can be harder with the MMU attached.
As you embark upon the assembly process, we cannot stress enough the importance of carefully following each and every step.
Tools required
Tools required
Tools required
Tools required
The tools needed for the MMU3 Kit assembly are available as an optional bundle.
Needle-nose pliers (1x)
Universal wrench (1x)
Philips PH2 screwdriver (1x)
Allen key 1.5mm (2x) the short and long one
Allen key 2mm (1x)
Allen key 2.5mm (1x) the short and ball-end long one.

Para algunos capítulos, como extra, aconsejamos considerar:

- una herramienta de medición; lo mejor sería un calibre o un pie de rey digital. También puedes imprimir una.

- Los alicates de corte plano también pueden ser útiles durante el montaje.

Ver imágenes de alta resolución
Cuando utilizes el manual en la web help.prusa3d.com, puedes ver las imágenes originales en mayor resolución para mejor claridad.
Just hover your cursor over the image and click the Magnifier icon ("View original") in the top left corner.
Labels guide
Labels guide
Labels guide
Labels guide
All the boxes and bags containing the parts for the build are labeled.
Most of the part drawings on the labels are scaled 1:1 and can be used to identify a part.
You can download and 2D print a Prusa Cheatsheet with the 1:1 scaled fastener drawings. help.prusa3d.com/cheatsheet. Print it at 100 %, don't rescale it, otherwise, it won't work.
¡Estamos aquí para atenderte!
¿Estás perdido en las instrucciones, falta el tornillo o la pieza impresa está rota? ¡Háznoslo saber!
Puedes contactar con nosotros empleando los siguientes medios:
Using our 24/7 live chat
Or by writing an email to [email protected]
Or, you can use the comments under each step.
Consejo pro: introduciendo las tuercas

During the MMU3 kit assembly, some screws require tightening with an angled Allen key. Ensure the screw stays perfectly perpendicular to the thread. If it’s difficult to turn, fully release it, realign, and start again to avoid cross-threading.

For deep openings, use a long screw like the M3x30 as a handle to help position the nut.

If a hex nut won't fit, use a fully threaded screw (e.g., M3x10, M3x18) and insert it from the opposite side to drive the nut into place.

Printed parts
Printed parts
Si has pedido la MMU3 sin piezas de plástico, tendrás que imprimirlas utilizando los códigos G prelaminados antes de proceder al montaje.

Las piezas deben estar impresas perfectamente para que la MMU3 funcione correctamente: sin deformaciones ni esquinas levantadas, hilos u otras irregularidades.

Si no puedes garantizar que las piezas estén impecables, adquiere en su lugar el kit MMU3 con las piezas de plástico impresas en fábrica.

En caso de que algunas piezas se rompan durante el montaje, puede volver a imprimirlas. Verifica todas las piezas de plástico antes de comenzar su construcción para asegurarse de que no haya problemas.

The MMU3 printable parts are available at Prusa3D.com Printables profile

More info is available at: Prusa3D.com/prusa-i3-printable-parts/


Prepare your desk
Prepare your desk
¡Ordena tu escritorio! Ordenar disminuye la probabilidad de perder piezas pequeñas.
Clear your workspace. Make sure you have enough room. A nice clear flat workbench will get you the results you are aiming for.
¡Que haya luz! Asegúrate de que estás en un entorno bien iluminado. Otra lámpara o incluso una linterna adicional probablemente te resulten útiles.
Prepara algo para guardar las bolsas de plástico y los materiales de embalaje retirados para poder reciclarlos después. Asegúrate de que no se desecha ninguna pieza importante.
OK, we are ready. Let's start!
¿Fue útil esta guía?

Comentarios

¿Todavía tienes preguntas?

¿Todavía tienes preguntas?

Si tienes alguna pregunta sobre algo que no se ha tratado aquí, comprueba nuestros recursos adicionales.
Y si eso no lo soluciona, puedes enviar una petición a [email protected] o mediante el botón que hay más abajo.

Contacta con nosotros