Probablemente ya lo habrás adivinado, pero el PEI 1010 no es exactamente un material "plug and print" como nuestros Prusaments básicos (PLA, PETG...). Aunque hacemos todo lo posible para que nuestros filamentos sean tan fáciles de imprimir como sea posible, todavía hay ciertas limitaciones físicas.
Hardware necesario
El punto de fusión de este material es muy alto y también lo es la temperatura de impresión, por lo que necesitas una impresora 3D cerrada y con calefacción activa como la Prusa Pro HT90.
La absorción de humedad es extremadamente rápida y difícil de deshacer - necesitarás un secador profesional (horno) y una suitable dry box, o un secador que puede conectarse directamente a una impresora. La bobina colocada en el exterior sin una dry box absorbe la humedad en decenas de minutos. En una dry box pasiva (solo con gel de sílice) la diferencia se nota al cabo de medio día más o menos y al cabo de varios días el filamento se vuelve prácticamente inimprimible.
Finalmente, la adherencia de la superficie de impresión también es muy alta - aquí necesitará una capa de separación especial como el MagiGoo HT. Para garantizar una buena imprimibilidad, hemos diseñado y elegido el siguiente hardware, que debería funcionar perfectamente, aunque también puede utilizar otros equipos con propiedades similares:
- Prusa Pro HT90 con el hotend HT - Impresora capaz de trabajar a 410 °C para la boquilla, 150 °C para la base calefactable y al menos 90 °C para la cerramiento.
- Memmert UF30 Filament Dryer capaz de mantener una temperatura estable de 150 °C durante 6-8 horas
- Prusa Pro Filament Drybox capaz de conectarse a la impresora 3D mientras imprime
- Lámina flexible con recubrimiento de polvo texturizado HT90 o Lámina flexible con recubrimiento de polvo PA Nylon HT90
- MagiGoo HT - capa de separación especializada resistente a altas temperaturas aplicada sobre la superficie de impresión antes de imprimir (necesaria solo para la lámina texturizada)
Proceso de impresión paso a paso
Ahora, aquí está un proceso que debe hacer para imprimir con Prusament PEI 1010 con éxito:
- Precalienta la secadora (horno) a 150 °C e introduce la bobina de PEI 1010. Seca el filamento a 150 °C durante 6-8 horas.
- Prepare la dry box: el desecante del interior no debe estar agotado (vea el color del desecante). Si está agotado, sécalo bien en el horno o sustitúyelo por desecante fresco.
- Después de secar el filamento, pásalo inmediatamente a la dry box. ¡Esto es crucial, ya que el PEI puede absorber humedad después de decenas de minutos!
- Prepara la impresora HT90. La impresora debe tener montado un cabezal de impresión HT - sustituye el cabezal de impresión si está montado el de alto flujo. Compruebe la lámina de impresión - el PEI 1010 debe imprimirse solo en la lámina de impresión con recubrimiento en polvo texturizado y en la lámina de impresión PA Nylon.
- Si imprime en la lámina de impresión con revestimiento en polvo texturizado, esparce una capa fina y uniforme de MagiGoo HT sobre la superficie de impresión. No es necesario aplicar el MagiGoo en la lámina de impresión PA Nylon.
- Precalienta la HT90 (Boquilla: 410 °C, Base Calefactable: 150 °C, Cámara: 90 °C) y carga el filamento. Ten en cuenta que el filamento debe permanecer cerrado en la dry box. Solo debe conectarse a la impresora a través del tubo de PTFE.
- Lamina el modelo con el perfil original de PrusaSlicer. Es posible que otros perfiles no funcionen correctamente.
- ¡Imprime!
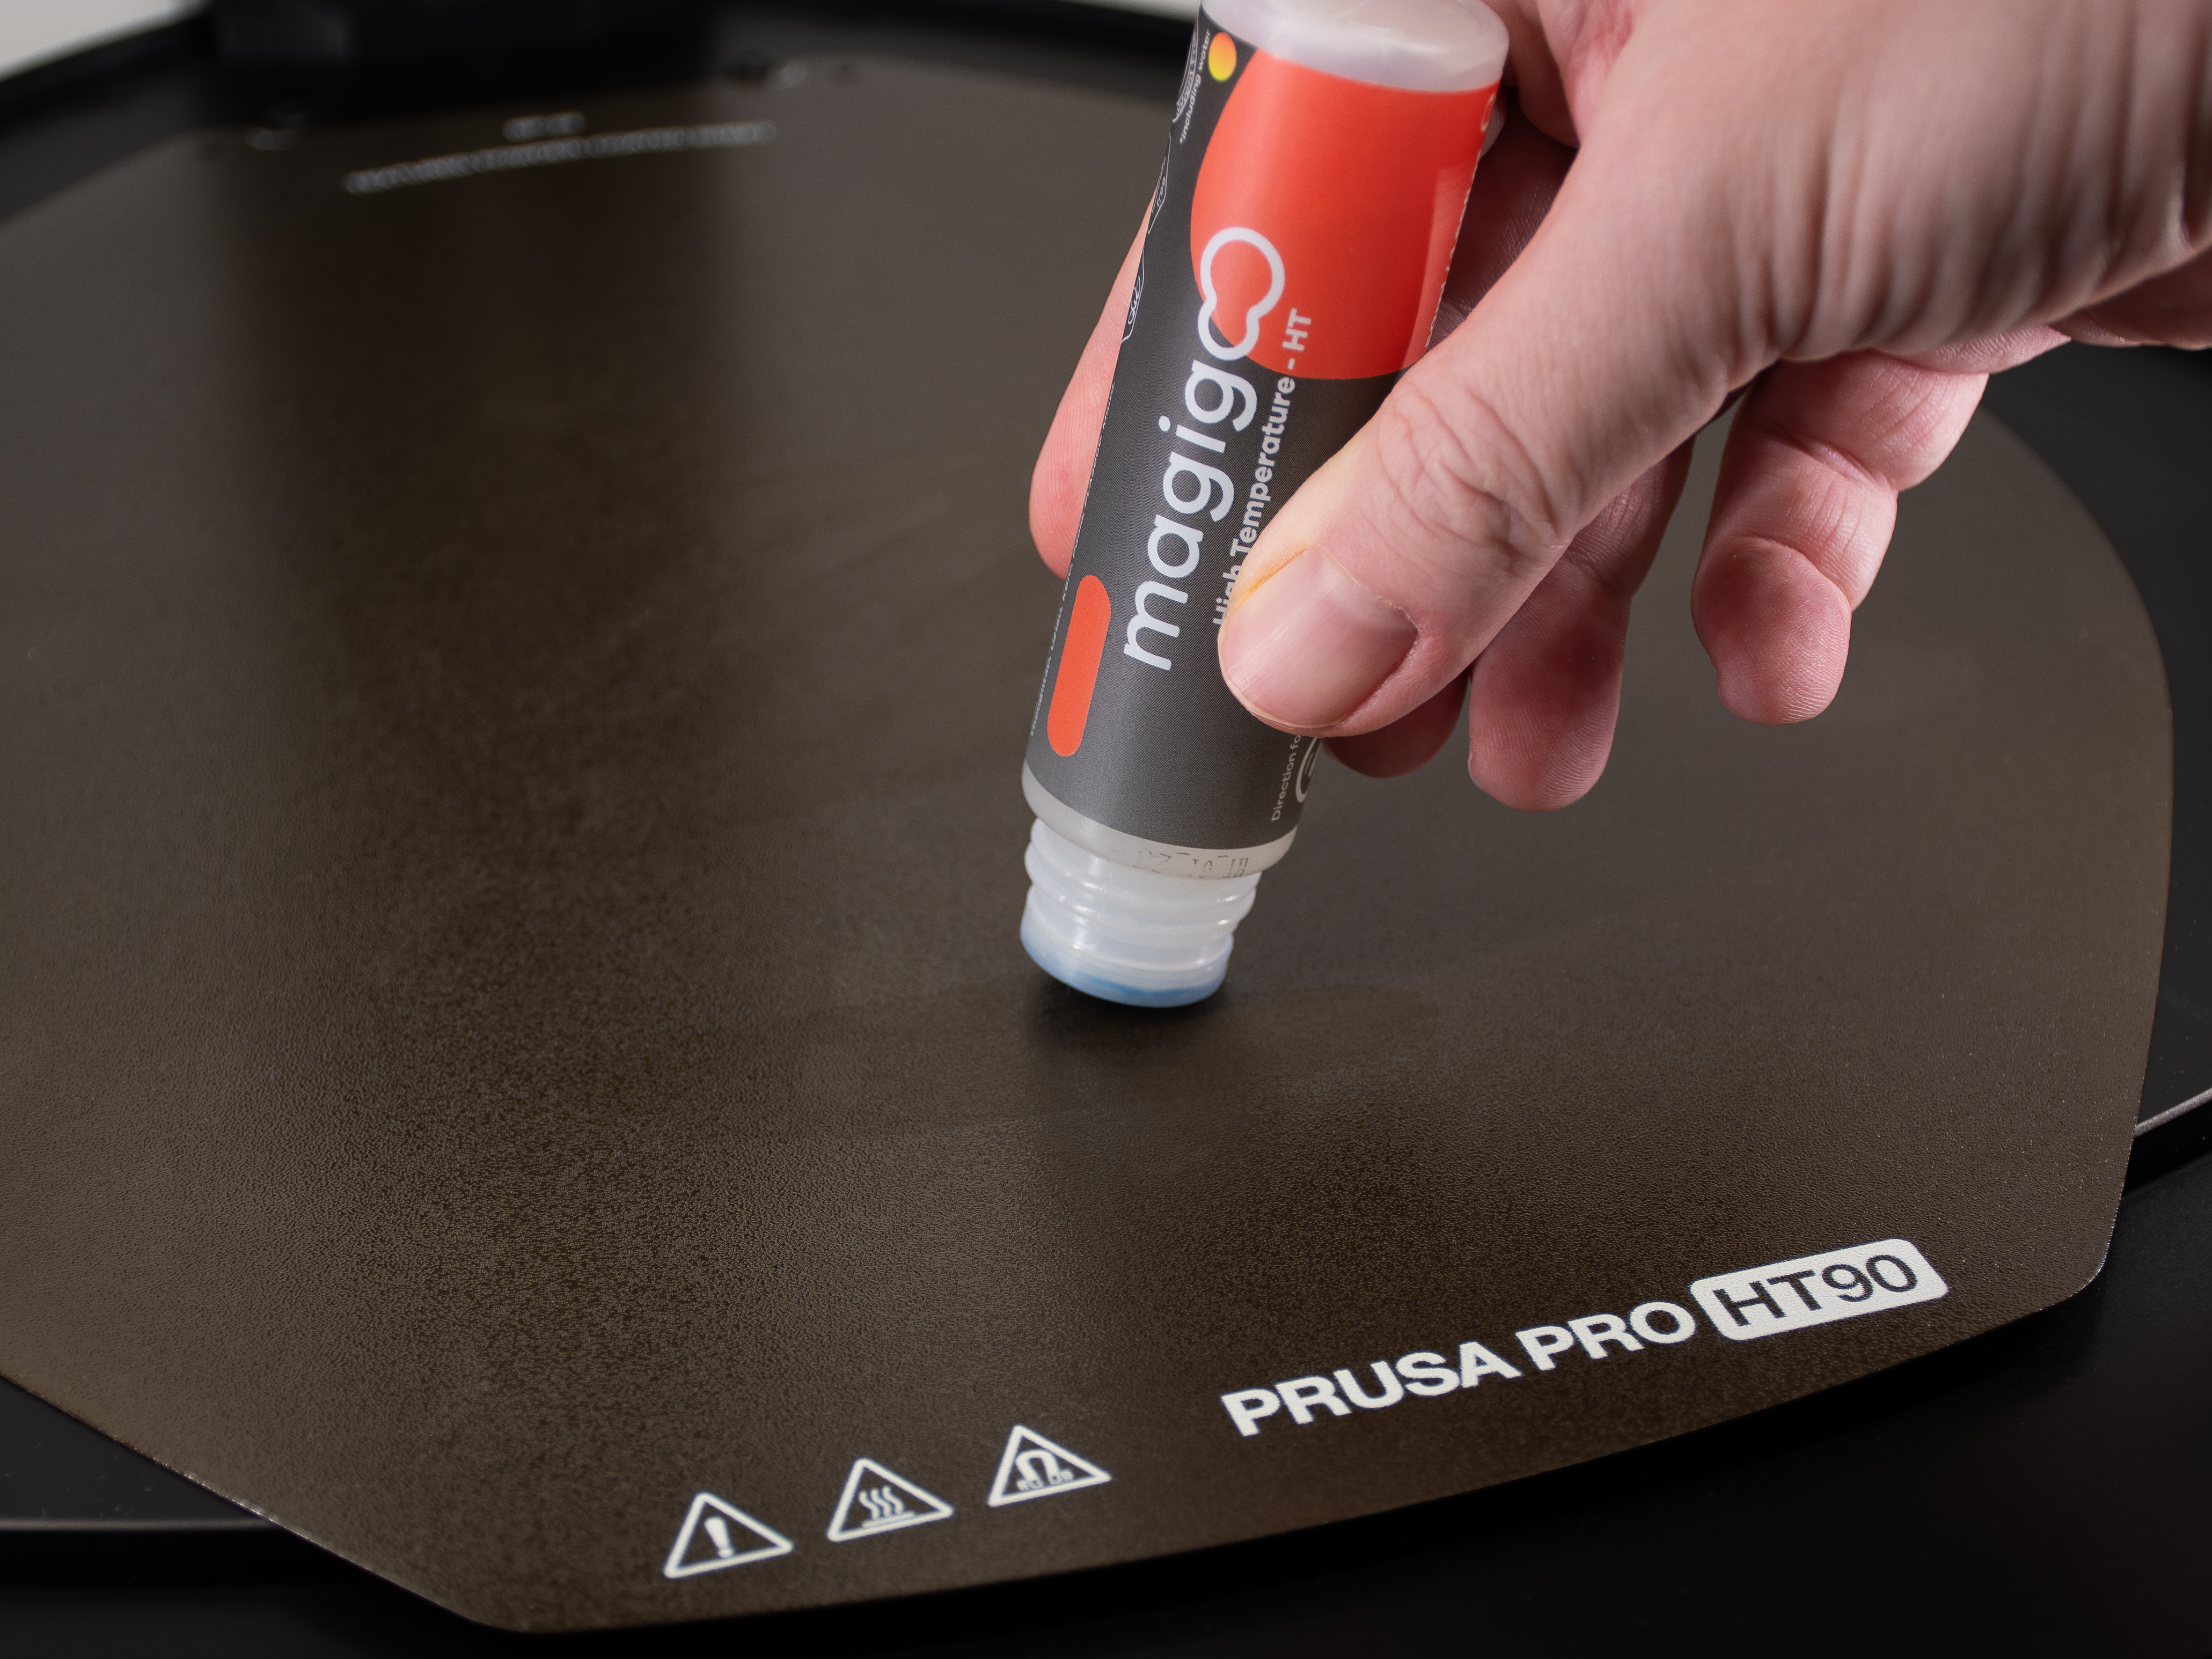
Solo es necesaria una fina capa de MagiGoo HT
Si todo se hace correctamente, la impresión debe tener un bonito aspecto de ámbar transparente brillante, sin hilos ni rezuma.
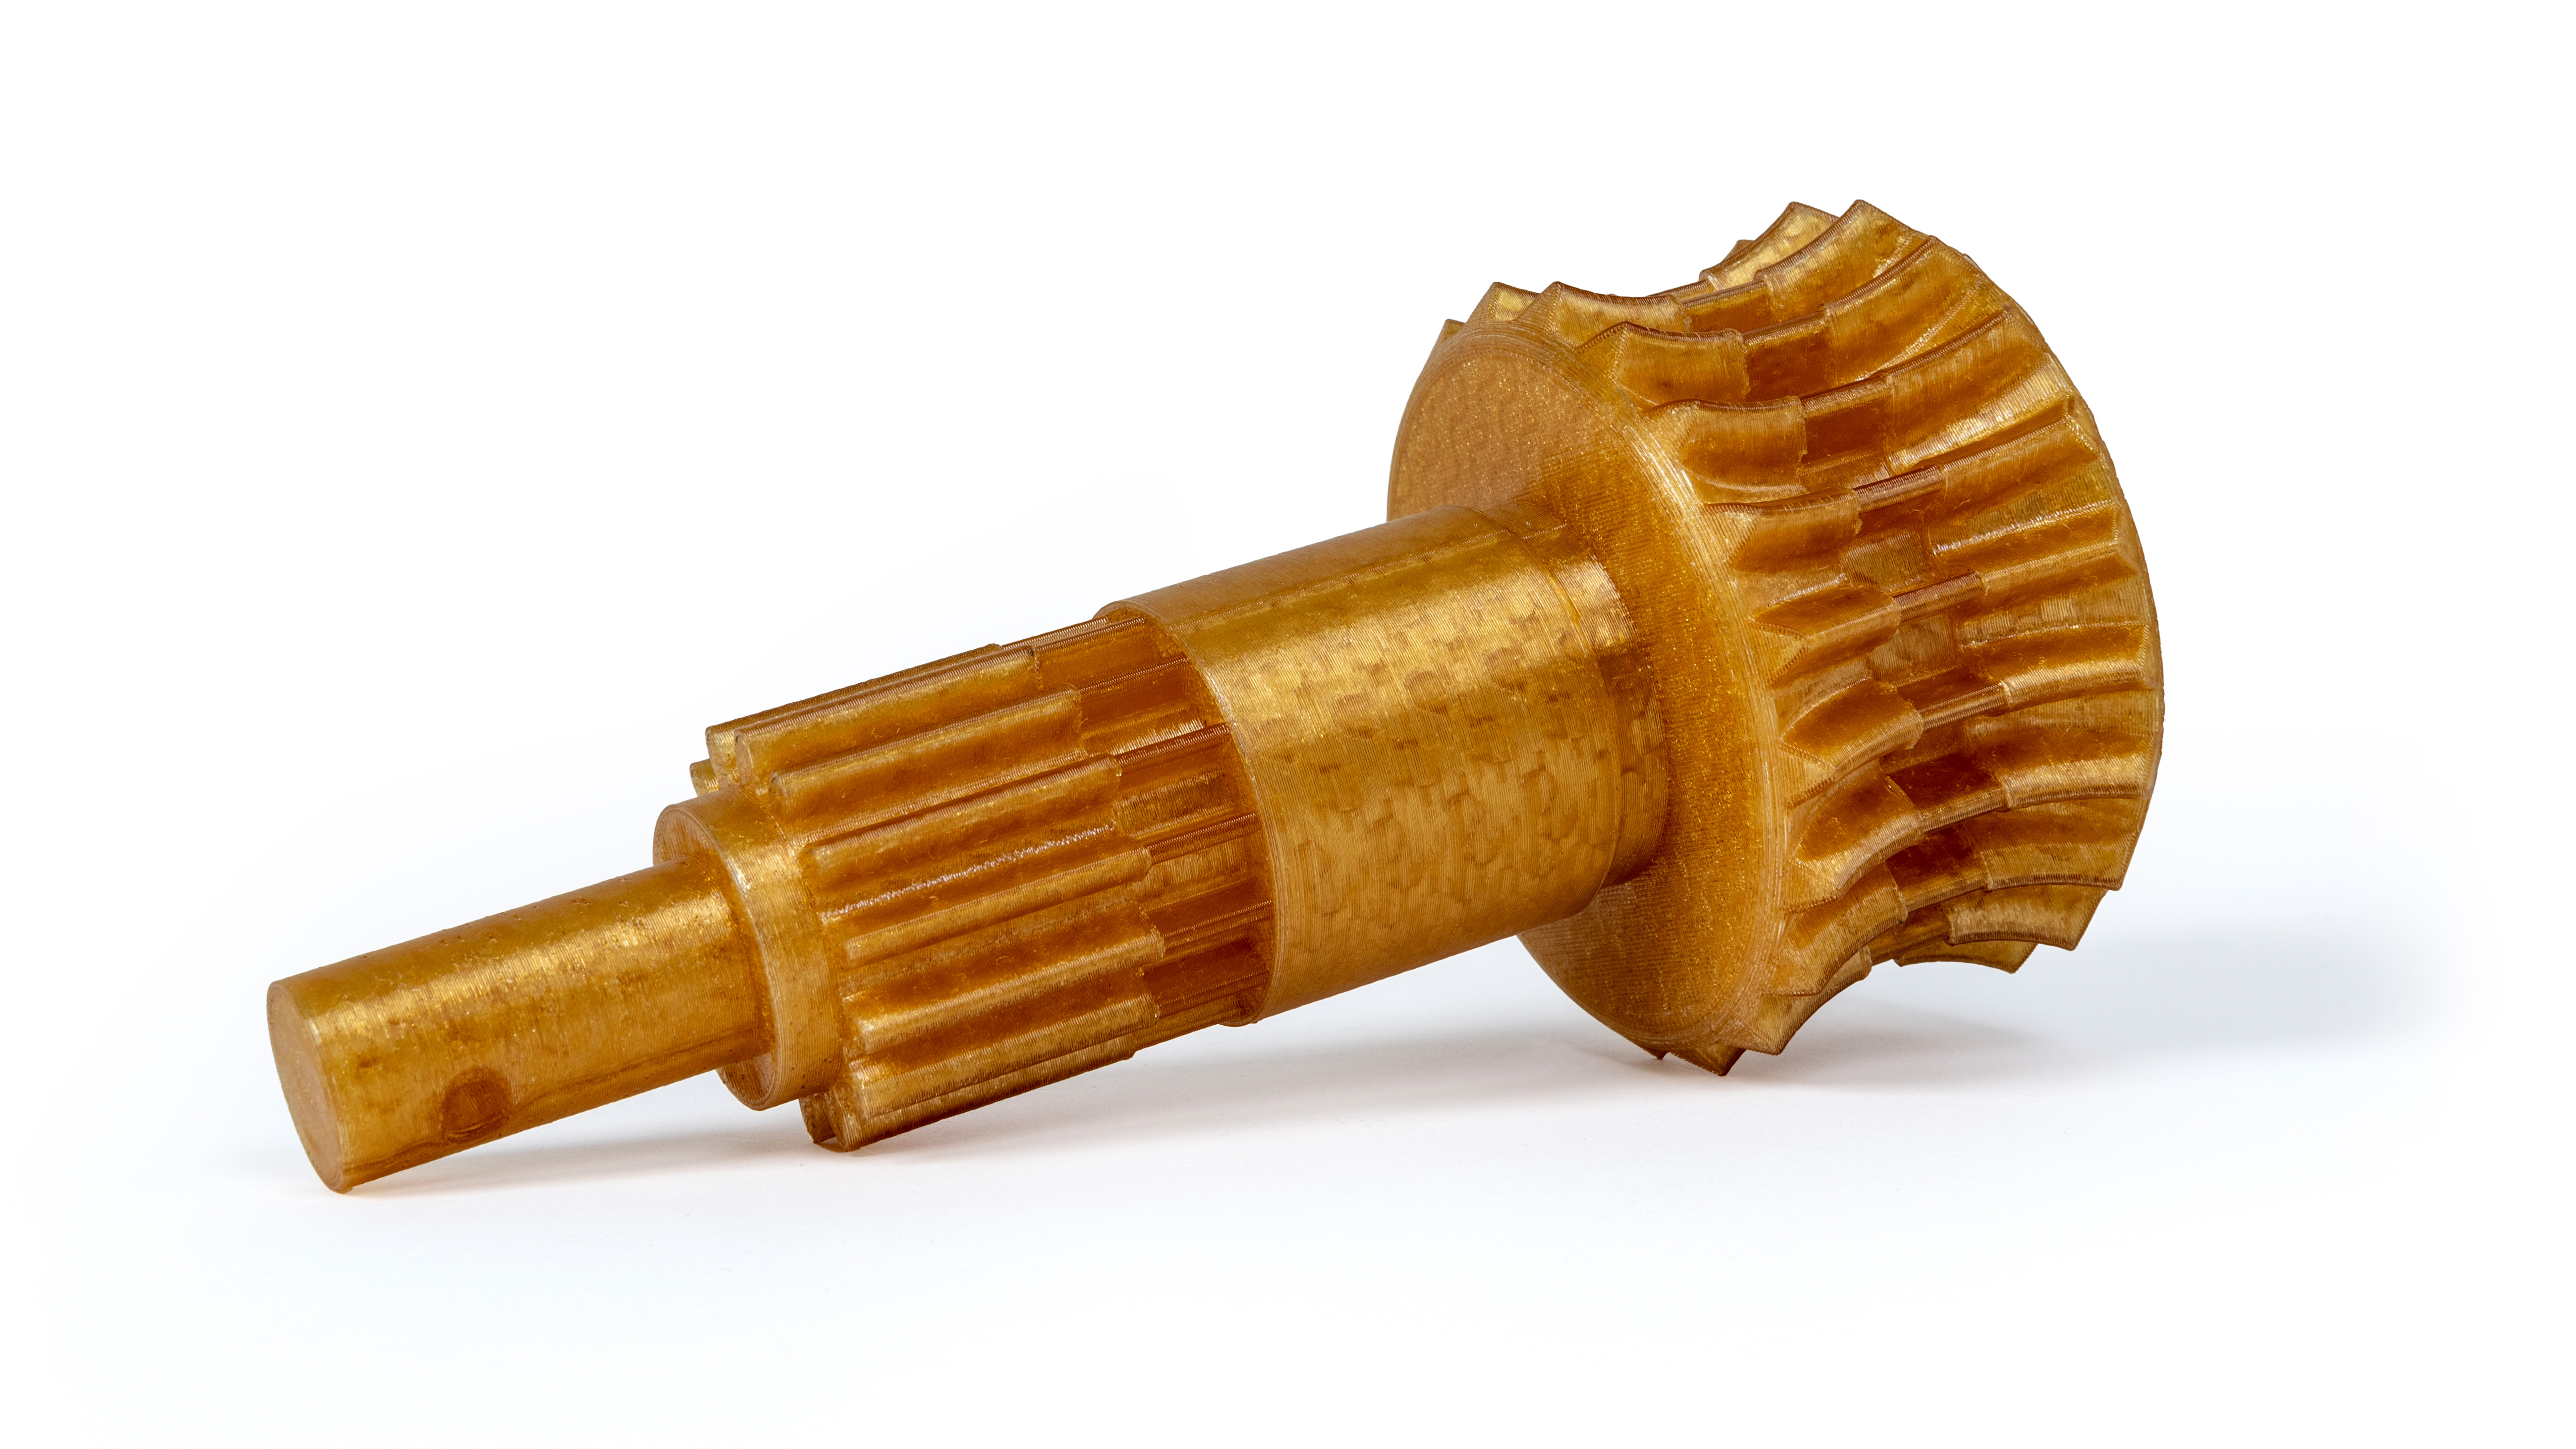
Ejemplo de una bonita pieza de PEI impresa en 3D sin errores evidentes.
Elegir el modelo adecuado
Por último, debes saber que el Prusament PEI 1010 tiende a deformarse mucho durante la impresión. Esto no significa que debas imprimir solo las piezas más pequeñas posibles, pero es algo que deberías tener en cuenta a la hora de diseñar y laminar los modelos. Hemos hecho todo lo posible para que el filamento sea lo más fácil de imprimir, pero aun así, trabajar con este tipo de filamentos requiere cierta experiencia y conocimientos. En cuanto a esto último, aquí tienes algunos consejos para sacarle el máximo partido:
- Considera el tamaño del objeto impreso. La deformación es más significativa en las impresiones más grandes. Esto significa que imprimir un objeto que tiene dimensiones de la base completa puede no ser la mejor opción. Recomendamos imprimir piezas de tamaño pequeño a mediano para obtener los mejores resultados.
- Las bases de impresión con ángulos estrechos, como las formas cuadradas (o más estrechas) tienden a deformarse mucho más que las redondas. El mejor modelo es el que tiene una base circular plana colocada sobre la superficie de impresión. No olvides tenerlo en cuenta a la hora de diseñar y cortar un modelo.
- No importa el tamaño, siempre recomendamos imprimir el PEI 1010 con una balsa. Esto reduce significativamente el problema de la deformación.
Errores más comunes
Finally, let's show some of the most common errors visible on the following 3D printed part:
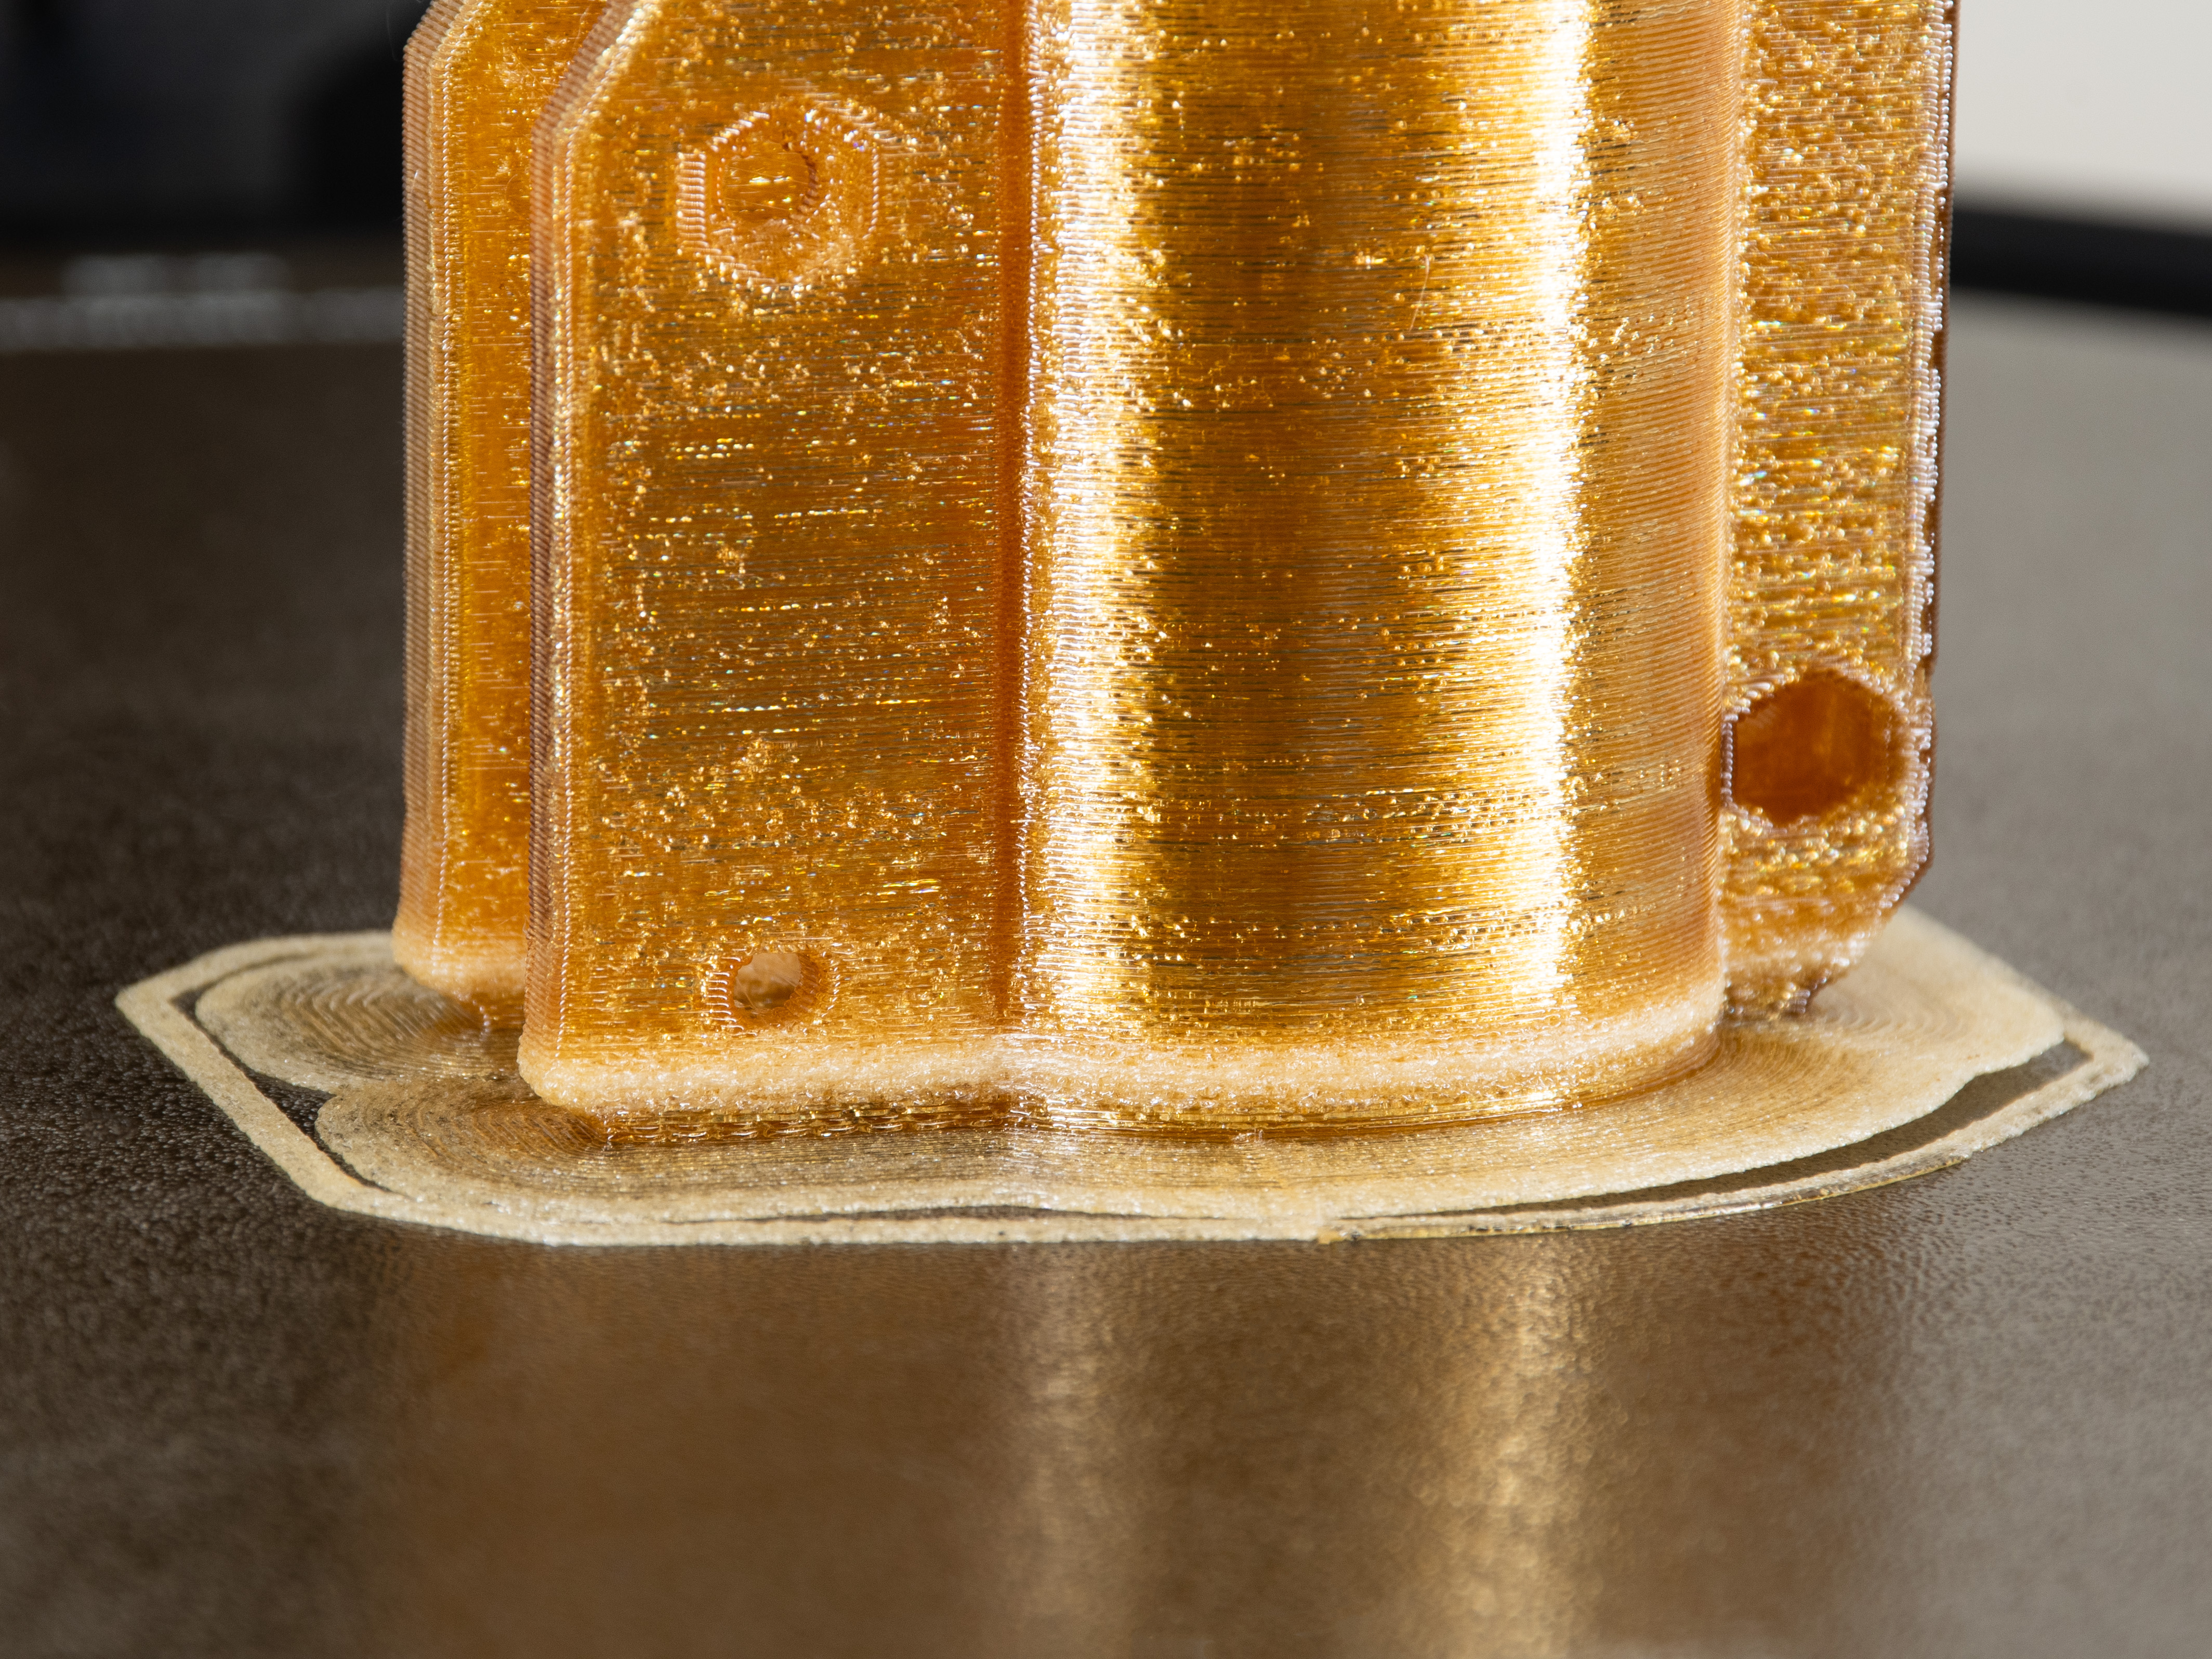
- El filamento no está seco - esto se nota sobre todo en la parte inferior, donde el material extruido tiene una estructura "espumosa", el modelo pierde sus propiedades dimensionales deseadas y también la resistencia mecánica.
- Este modelo se imprimió con un perfil de PrusaSlicer distinto al recomendado. Por eso el modelo está lleno de cavidades (burbujas) apreciables en cada capa, que afectan significativamente a las propiedades mecánicas del modelo.
- Este modelo también estaba lleno de hilos (no visibles en la foto de arriba) debido a los errores mencionados anteriormente.
- Observa la deformación: el modelo se despegó de la lámina de impresión incluso con la balsa. Esto fue causado por tres razones. En primer lugar, el modelo no es exactamente redondo y compacto. La forma no es ideal, pero un borde más grande podría ayudar. En segundo lugar, el filamento húmedo tiende a deformarse más y a pegarse menos a la superficie de impresión que el seco. Por último, aplicamos demasiado MagiGoo HT en la superficie.