Starting from PrusaSlicer version 2.3, it is possible to paint on seams on your model. The seam painting tool provides more detailed control over the seam placement. The tool is accessible from the left toolbar, and it is only shown in Advanced and Expert modes. After clicking on the icon, the user can paint 'Seam enforcers' or 'Seam blockers' on the model.
Seam placement logic
If there is a seam enforcer, it always places seams into the enforcer area.
If there is a blocker, its area is excluded from possible seam candidates.
The Nearest, Rear, and Random Seam position options are still respected. When the Aligned option is active and enforcers are used, the seam is placed in the middle of the enforcer area. This allows drawing smooth seams over the model.
Seam painting
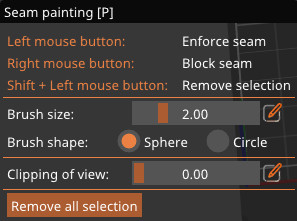
Left mouse button: Enforce seam
Right mouse button: Block seam
Shift + Left moue button: Erase selection
Brush size: Can also be accessed by the shortcut Alt + Mousewheel. Click the "Edit" icon on the side to add a specific number.
Cursor type
Spherical cursor (default)
Paints everything inside the sphere, regardless of whether it is visible or not from the current view. The preferred method for most cases.
Circular cursor
Paints all visible places inside the circle from the current view, possibly leaving unpainted areas, but never painting behind corners.
Clipping of view
You can use the clipping plane tool to hide a part of the object, so that difficult to reach areas can be easily painted. Move the slider from left to right to move the clipping plane. Click the "Edit" icon on the side to add a specific number.
8 comments
https://forum.prusaprinters.org/forum/prusaslicer/pro-tips-the-brush-tool-by-swiss_cheese/
Hi Tim! The painted line is just an approximate point of where the seam should be located. Anyway, you can report a bug/ request a feature at github.com/prusa3d/PrusaSlicer
EDIT: or, several actually, but they're mostly duped to that one.
The problem might be even if you paint a straight line, the seams are not perfectly aligned. By the way for painting a straight line, you can sort of utilize another bug, you start painting a seam and while holding the left mouse button, you hit escape. then you enter the seam painting mode again and just click the end destination.