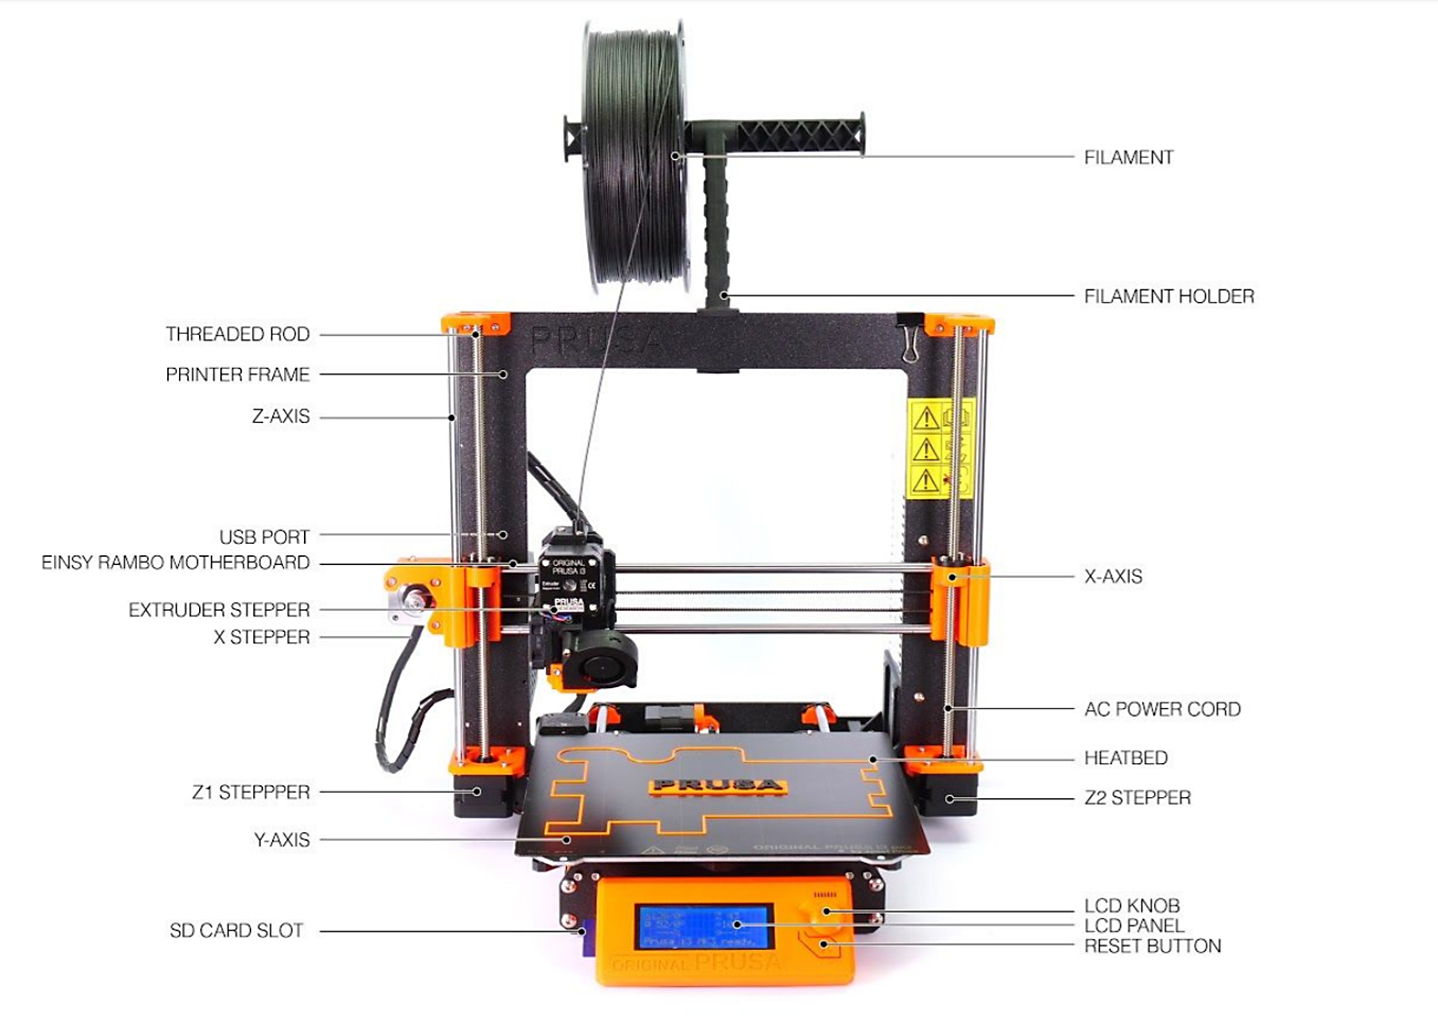
It is recommended to regularly take some time to maintain your printer. This should be done even if the printer is working perfectly. The inspection and maintenance of its various components should be done every couple of hundred hours of print-time. This guide is valid for all the Original Prusa i3 printers, i.e. MK3S+, MK3s, MK3, MK2.5S, MK2.5, MK2S, and Plus 1.75 mm.
Useful tools:
Besides the usual tools, such as Allen keys, needle-nose pliers, and IPA + paper towels, you might need:
- Lubricant: the best option is the Prusa lubricant. One is sent with the printer, but it can also be found in our e-shop. Other recommended lubricants are Super Lube 210XX, GLEIT-µ HF 400, and Mogul LV 2-EP. We do not recommend lubricants with a very high viscosity.
- Compressed air: also known as canned air. Be sure to not hold it upside down while spraying - otherwise, you could damage any electronic components while trying to clean them.
- Brush: a small brass brush is an ideal tool for cleaning the Bondtech filament pulleys. If you don't have a brass brush any brush with hard bristles will do the job. Alternative: You can use the acupuncture needle that comes with the printer or a toothpick.
Axes check
What to check on your printer:
- Smooth rods: scratches/grooves - take each rod between two/three fingers and move them slowly from one end of the rod to another, while rotating the fingers around the rod. If you notice any scratch, verify it with your fingernail.
- Bearings: Clean and lubricate the bearings and rods as shown this guide. Despite cleaning and lubricating the smooth rods, it can happen that the axes' movement is still not smooth. In this case, please remove the bearings from the printer and lubricate them from the inside with a pea-sized amount of lubricant.
- Belt pulleys: any debris around the belt pulleys and belts should be immediately removed to ensure smooth operations. Also, check if the set screw of the belt pulley is firmly secured on the flat side of the motor shaft.
- Idler screw (M3x40 with the spring on it) is not overtightened or too loose. Generally, the head of the screw, on the left side, should be about flush with the printed parts of the extruder. Details on the ideal tension of the idler screw can be found in Idler screw tension.
- Y- and X-axis belts: Both of the belts should be tight enough to sound like a low bass note when plucked. On the MK3/S/+, the belt status can be checked in the LCD menu - Support - Belt status. Recommended values are between 260 and 290. For details on adjusting the belt tension please see this article.
Flexible steel sheet
You can find more information on how to take care of your flexible steel sheet in this article.
Fans
The Original Prusa i3 MK3/S/+ can spot if any of the fans stop spinning. However, that does not mean you should not check them during maintenance. Dust or plastic build-up can decrease their efficiency or even damage them.
A cotton swab can also be used to clean off dust and debris from the propeller or canned air will clear the dust. Tweezers can be used to take out any plastic strands. Hold the propeller of the fan to prevent it from spinning while cleaning it with canned air. Otherwise, it can get damaged. Clear away any debris that may be stuck and check that it can rotate freely.
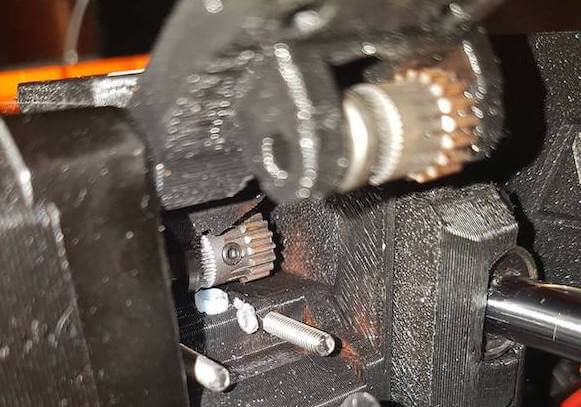
Extruder driver gear
The MK2.5/S and MK3/S/+ printers are equipped with two Bondtech gears, made of hardened carbon steel. One is the pulley gear, secured on the extruder's motor shaft by a set screw. The other is the idler gear, which spins freely mounted on the idler door. If you have had a clog, they can also have collected residue grinding the filament which will, in turn, reduce their grabbing force on the filament.
Regular cleaning and lubrication will:
- Reduce wear and noise.
- Increase the grabbing force on the filament.
- Lower friction between the two pulley gears.
- Protect against rust.
If you're cleaning the gear inside the extruder without removing the extruder motor first, be sure to cover the PTFE tube to avoid any debris falling in. You can use a cotton swab - it will reliably cover the tube without damaging it). After you're done cleaning, give it a good puff of air to clear any remains, while the PTFE tube is still covered.
Open the Extruder idler door by releasing the screw(s) on the left side of your extruder.
- The MK3, and MK2.5 extruders have two idler screws.
- The MK3S/+ and MK2.5S extruders have one idler screw.
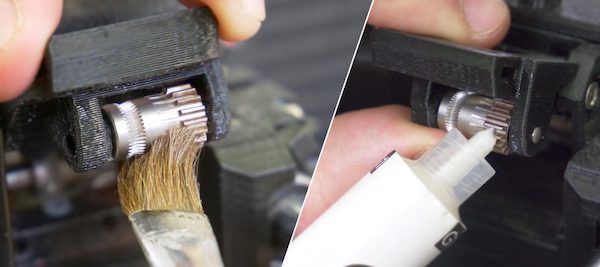
Both hobbed gears can have a build-up of filament shavings stuck in the grooves. Using a brass brush, clean what you can, then rotate the gear a few degrees and repeat until you do a full turn. They can also be cleaned one at a time using the acupuncture needle that comes with the printer.
The gears can be covered by rust. There is no need to worry. The gears themselves should not be damaged. Remove any problematic bits of filament and clean them with a brush.
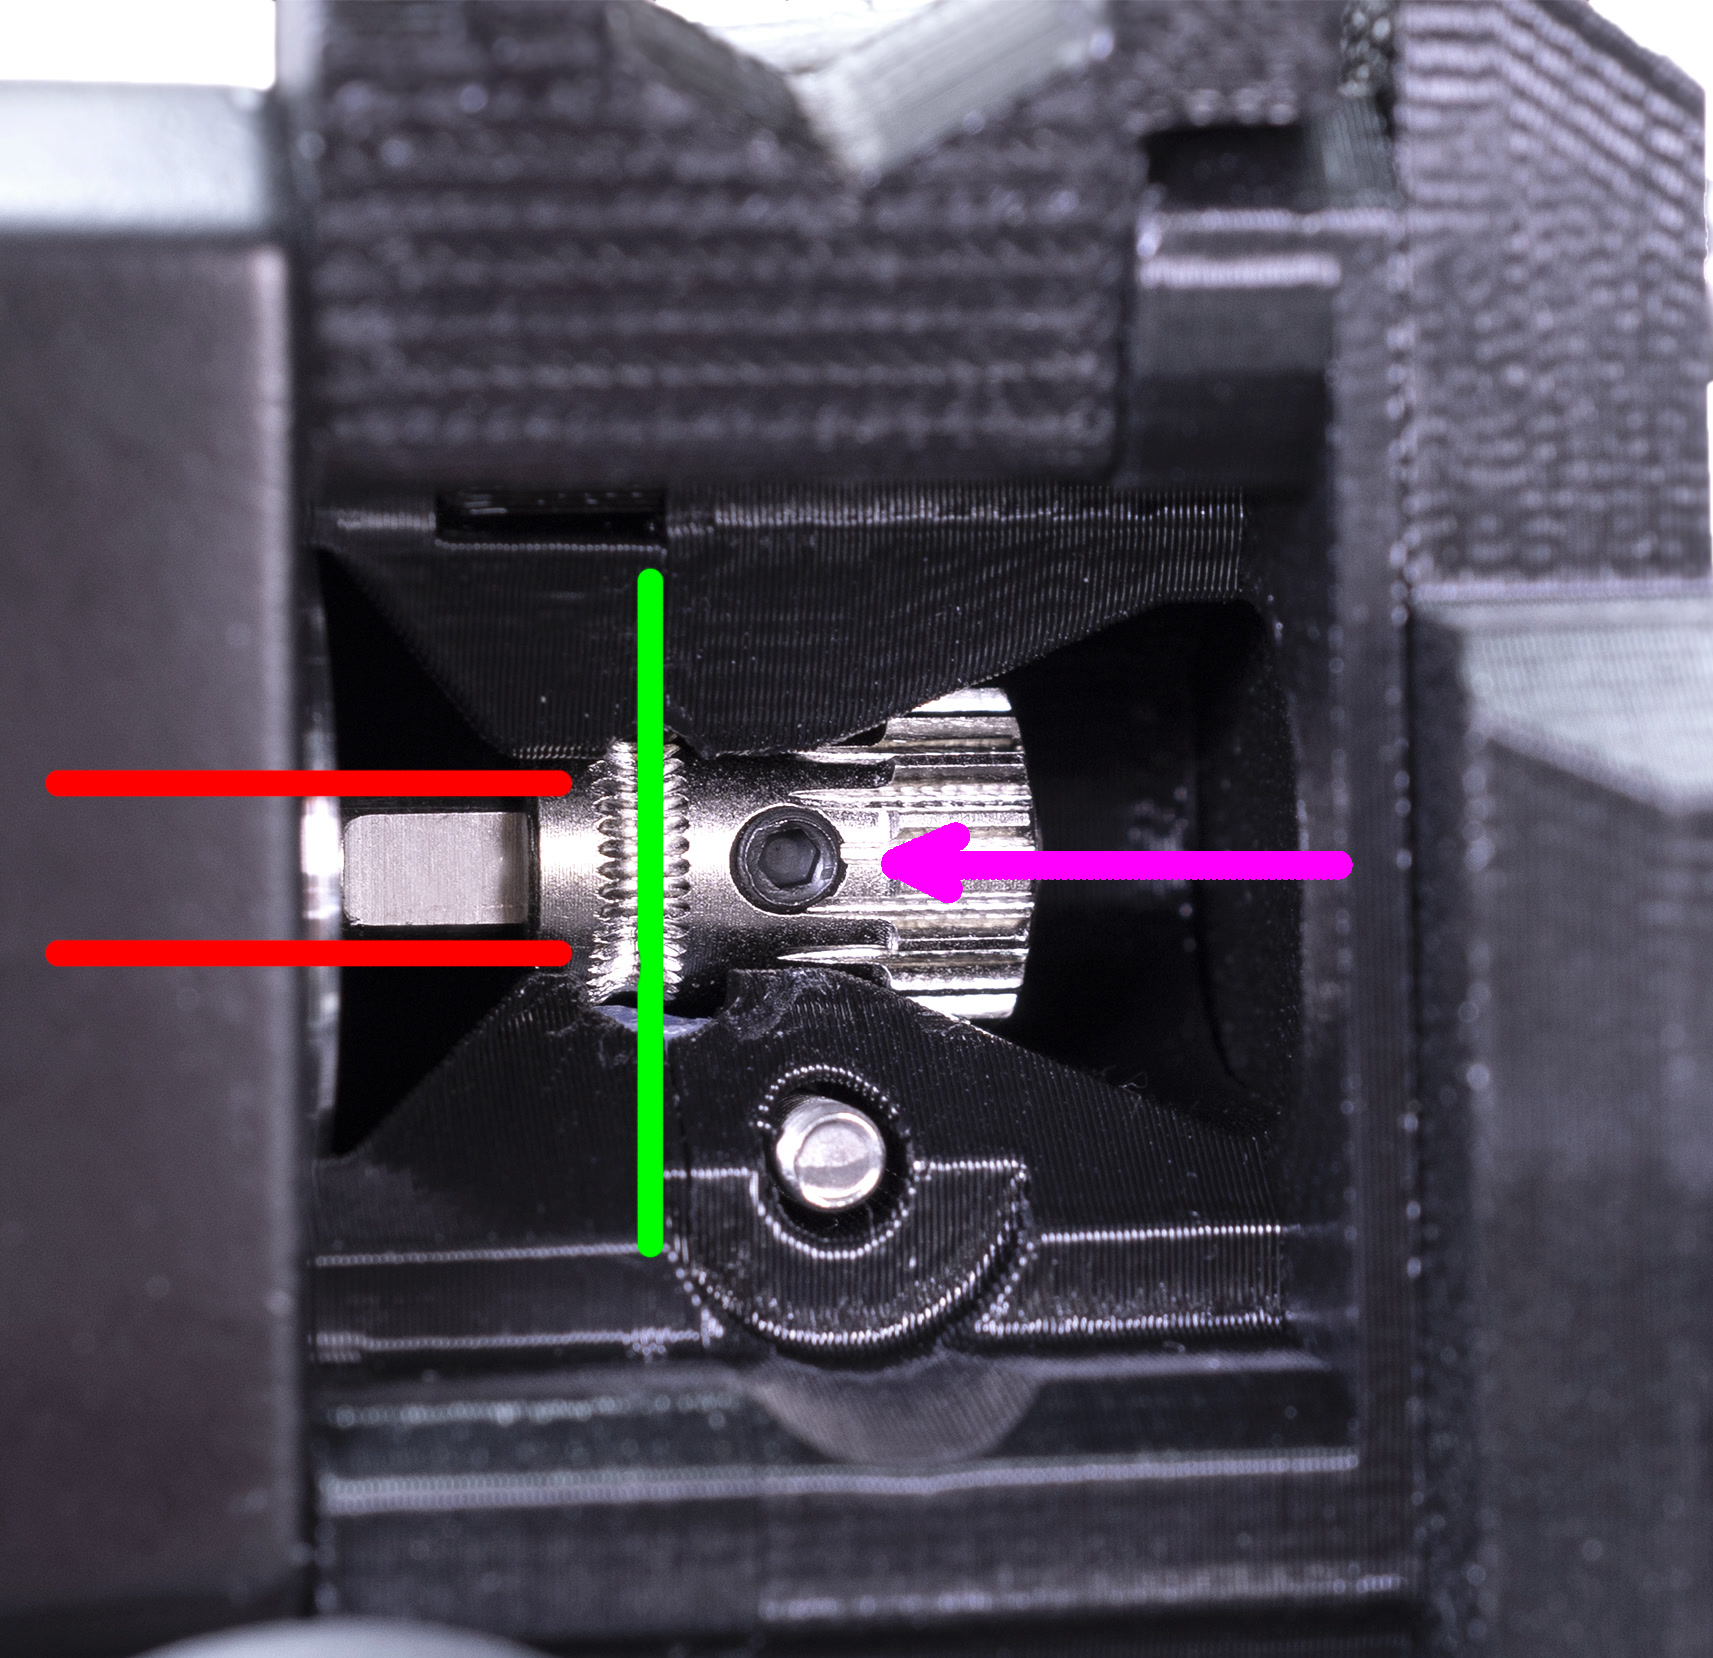
Make sure the Bondtech pulley gear is aligned with the path of the filament and secured on the flat side of the motor shaft. Also, check that the shaft of the idler gear goes through both "ears" of the Extruder-Idler-door plastic part and spins freely. You can find a more detailed guide in Checking/re-aligning the Bondtech gear (MK3.5/S, MK3S/+, MK2.5S).
Apply a tiny amount of the grease only to the teeth protruding outwards from the gear. Make sure that the lubricant never gets in contact with the filament teeth. Do not use oil-based lubricant as it may spread to unwanted sections, like where the filament is fed into the hotend.
Electronics
On the MK2/S and MK2.5/S - Check and reconnect the electrical connectors on the miniRAMBo board after the first 50 hours of printing and then every 150-200 hours.
On the MK3/S/+ - Check and reconnect the electrical connectors on the EinsyRAMBo board every 600 - 800 hours of printing.
- Check if there are any pinched or worn cables on the printer.
- Open the electronics casing and blow compressed air in between the cables to get rid of dust.
- Check the connection of all of the wires on the mini RAMBo board or EINSY RAMBo board. Especially pay attention to the cables from the PSU (power source) and heaters. Make sure they are inserted all the way in and well-tightened.
- Users of the Original Prusa i3 MK2/S and MK2.5/S need to pay special attention to the printer's power-input and heatbed's power connectors. Make sure both the connector and socket are not damaged in any way.
- Users of the Original Prusa i3 MK3/S/+ should lightly tug the power and heatbed connectors. If any movement is felt, then re-tighten the screws.
Nozzle change
Putting an exact number on how long a nozzle will last is very difficult, as it depends on how much you print, what types of filament you use, and how often you change between filament types. It is not the first thing you should look to if you are experiencing extrusion issues, but if the printer has been in use for more than 3-6 months and you are getting poor print quality, even after doing the mentioned maintenance, you may want to consider replacing the nozzle.
Firmware and software
You should always be using the latest stable firmware version that we have published for your specific printer model. You can check the firmware version you have in the LCD menu - Support.
- See this article to flash the fimware on your MK3/S/+.
- See this article to flash the firmware of your MK2/S or MK2.5/S
We also recommend using the latest version of our PrusaSlicer, as it enables you to enjoy all the features of your printer. It even saves information about the printer model, nozzle diameter, and firmware version directly into the g-code file so that the printer can warn you if anything is out of date or incompatible.
16 comments
Help please.
http://help.prusa3d.com/guide/maintenance-tips_23200
leads to an error page: "Application error: a client-side exception has occurred (see the browser console for more information)"
Yes, that is the correct link. It has been fixed, thank you.