Prusa
  • SHOP
    • Latest products
    BY CATEGORY
    • 3D printersnew
    • 3D printer upgradesnew
    • Materials
    • Accessories
    • Spare parts
    • Courses
    • Merch
    • Get a price quote
    QUICK LINKS
    • Shipping & delivery
    • Returns & refunds
    • Payment & financing
    • Warranty
    • VAT & Customs fees
    • FAQ

    0 item in your cartitems in your cart

    Your cart is empty

    Go to cartShop 3D printers

    My profile

    Log in to see orders, saved items

    My profile

    Signed in as

    • Orders
    • Logout
  • 3D PRINTING
    • Explore 3D printing
    FOR BEGINNERS
    • 3D printing 101
    • How FDM printing works
    • Buying your first printer
    • 3D model catalog
    BY APPLICATION
    • Rapid prototyping
    • Manufacturing
    • Engineering
    • Research
    • Arts & design
    GO DEEPER
    • Materials guide
    • Courses
    • Webinars
    • Case studies
    • Custom 3D printing
  • 3D PRINTERS
    • All 3D printers
    FOR
    • Home or garageHobbyists, tinkerers and home printing
    • BusinessIn-house production for small teams
    • EnterpriseFleets, security and scale
    • Which Prusa is right for me
    SHOP & BROWSE
    • CORE One+new
    • CORE One+ INDXnew
    • CORE One L+new
    • CORE One L+ INDXnew
    • XL+new
    • MK4S
    • Prusa Pro HT90
    • Prusa Pro AFS
    • Prusa Pro SLX
    MORE FROM PRINTERS
    • Parts & upgradesnew
    • Critical infrastructure
    • Case studies
    • Signature Oak
    • Kits
  • MATERIALS
    • All materials
    BY USE
    • Every-day & design
    • Functional engineering
    • Composites
    • Pro speciality
    • SLA resins
    PRUSAMENT
    • PLA
    • PETG
    • ASA
    • PC
    • PA11
    • Flex
    • TPU
    MORE FROM MATERIALS
    • Materials guide
    • We make material in house
    • Sustainability
    • Order on the store
  • SOFTWARE
    • All software
    PREPARE THE PRINT
    • PrusaSlicer 3.0New
    PRINT & MONITOR
    • Prusa Connect
    • EasyPrint
    • iOS & Android app
    • Prusa Farm
    GET STARTED
    • Download & install
    • Knowledge base
    MORE FROM SOFTWARE
    • 3D model catalog
  • SUPPORT
    • Explore support
    FIND ANSWERS
    • Knowledge base
    • Troubleshooting
    • Courses
    • Webinars
    GET HELP
    • Contact us
    • Livechat
    • Shipping & delivery
    • Warranty
    • Returns & refunds
    • Service & spare parts
    • Service & Repair
    COMMUNITY
    • Forum
    • Reddit
    • Printables
  • TRUST CENTER
    • Trust Center overview
    BY TOPIC
    • GDPR
    • Certificates
    • Security
    • Compliance
    COMMITMENTS
    • Sustainability report
    TALK TO US
    • Contact the security team
  • COMPANY
    • About Prusa
    GET TO KNOW US
    • Our story
    • How we make printers
    • Open source
    • Brand & media kit
    NEWS
    • Blog
    • Newsroom
    • Events
    TRUST & PARTNERS
    • Sustainability
    • Resellers & distributors
    • Affiliate program
    • Contact
    • English
    • Čeština
    • Deutsch
    • Español
    • Français
    • Italiano
    • Polski
    • 日本語
  • Signed in as

    • Orders
    • Address
    • In-stock Alerts
    • My Courses
    • Subscription
    • Edit Account
    • Logout

Log in to see orders, saved items

Signed in as
  • Orders
  • Address
  • In-stock Alerts
  • My Courses
  • Subscription
  • Edit Account
  • English
  • Čeština
  • Deutsch
  • Español
  • Français
  • Italiano
  • Polski
  • 日本語
Shop

0 item in your cartitems in your cart

Your cart is empty

Go to cartShop 3D printers

My profile

Log in to see orders, saved items

My profile

Signed in as

  • Orders
  • Logout
SHOP
  • Latest products
BY CATEGORY
  • 3D printersnew
  • 3D printer upgradesnew
  • Materials
  • Accessories
  • Spare parts
  • Courses
  • Merch
  • Get a price quote
QUICK LINKS
  • Shipping & delivery
  • Returns & refunds
  • Payment & financing
  • Warranty
  • VAT & Customs fees
  • FAQ

Featured products

    Popular categories

      Trending searches

        Articles

          Blog

            Products

              Categories

                Suggested searches

                  Searching…
                  No results
                  Something went wrong.
                  ↑↓ Select↵ OpenEsc Close search
                  1. Support
                  2. Using the printer
                  3. Resin Calibration (SL1/SL1S)
                   

                  Contents

                  • What you need
                  • Calibration Process
                  • Creating a PrusaSlicer preset
                  • Video

                  Blog

                  • Prusament Pellets: Raw material batches for large-format 3D printing or small-scale polymer research & development
                  • Print colorful and glowing Halloween decorations with our spooky offer
                  • Factorio Has Arrived on Printables

                  Newsletter

                  Signup and get our monthly squeeze on updates, blog, printables and much more.

                  By clicking, you agree to receive our newsletter.

                  This site is protected by reCAPTCHA Enterprise and the Google Privacy Policy and Terms of Service apply.

                  Heavy Duty Keyboard Holder (No Supports)
                  E-shop
                  • 3D Printers
                  • Printer Upgrades
                  • Filaments
                  • Accessories
                  • Prusa Merchandise
                  Prusa

                  © Prusa Research a.s.

                  Printables
                  • 3D Models
                  • Store
                  • Clubs
                  • 3D Design Contests
                  • Brands
                  Community
                  • World Map
                  • Forum
                  • User Groups
                  • Events
                  Help
                  • Prusa Help
                  • Prusa Academy
                  • 3D Printing Calculators
                  Software
                  • PrusaSlicer
                  • Prusa.app
                  • Prusa Connect
                  • Drivers and Software
                  Company
                  • About Us
                  • Blog
                  • Official Prusa Resellers
                  • Contact Us
                  • Certified for ISO 9001, ISO 14001, ISO 45001
                  • General Terms and Conditions
                  • General Terms and Conditions of Use of the PRUSA Websites
                  • Privacy Policy
                  • Information about cookies
                  • Customer Complaints Policy
                  • Status Page
                  • Do Not Sell or Share My Personal Information
                  • Supplemental Statements
                  Prusa
                  • General Terms and Conditions
                  • General Terms and Conditions of Use of the PRUSA Websites
                  • Privacy Policy
                  • Information about cookies
                  • Customer Complaints Policy
                  • Status Page
                  • Do Not Sell or Share My Personal Information
                  • Supplemental Statements

                  © Prusa Research a.s.

                  JOSEF PRUSA®, PRUSA RESEARCH®, PRUSA POLYMERS®, PRUSA ORANGE®, PRUSA 3D ® AND PRUSAMENT® are registered trademarks of Prusa Development a.s. used by Prusa Research a.s. under licence from Prusa Development a.s.

                  Resin Calibration

                  (SL1/SL1S)

                  Relevant for

                  SL1
                  SL1S SPEED
                  41 comments
                  Article is also available in following languages
                  English
                  Čeština
                  Polski
                  Deutsch
                  Français
                  Español
                  Italiano
                  日本語

                  Both Original Prusa SL1 and SL1S SPEED have a growing library of resin print profiles in the PrusaSlicer, which were tested and verified by Prusa Research. However, the printers are also open to any other 3rd-party resins. The material has to be compatible with MSLA technology and cured with 405nm UV light. To achieve the best results with any compatible resin you need to find its exact exposure time.

                  For this reason, both SL1 and SL1S include a resin calibration feature. This helps you evaluate your resin using a set of printed objects, where each object from the set is cured with a different exposure time. Throughout this article, you will learn the procedure, and how to select the best object and exposure time.

                  This procedure is as follows:

                  • Prepare the printer.
                  • Download the calibration projects.
                  • Print the calibration projects.
                  • Evaluate the printed objects.
                  • Create a PrusaSlicer resin profile (preset).
                  This feature is implemented from version 1.3.0 on the SL1 and 1.7.0 on SL1S SPEED.

                  Use a FEP film that is almost brand new, with no significant scratches or dirt. This is to ensure there are no defects that might affect the light passing through.

                  What you need

                  • A fully functional and calibrated SL1 or SL1S SPEED printer.
                  • Latest firmware installed: Navigate the menu to System -> Firmware -> and select Check for updates. Alternatively, the firmware file can be downloaded from our Downloads page and flashed using a memory stick. Please see Firmware updating (SL1/SL1S) for details.

                  Calibration Process

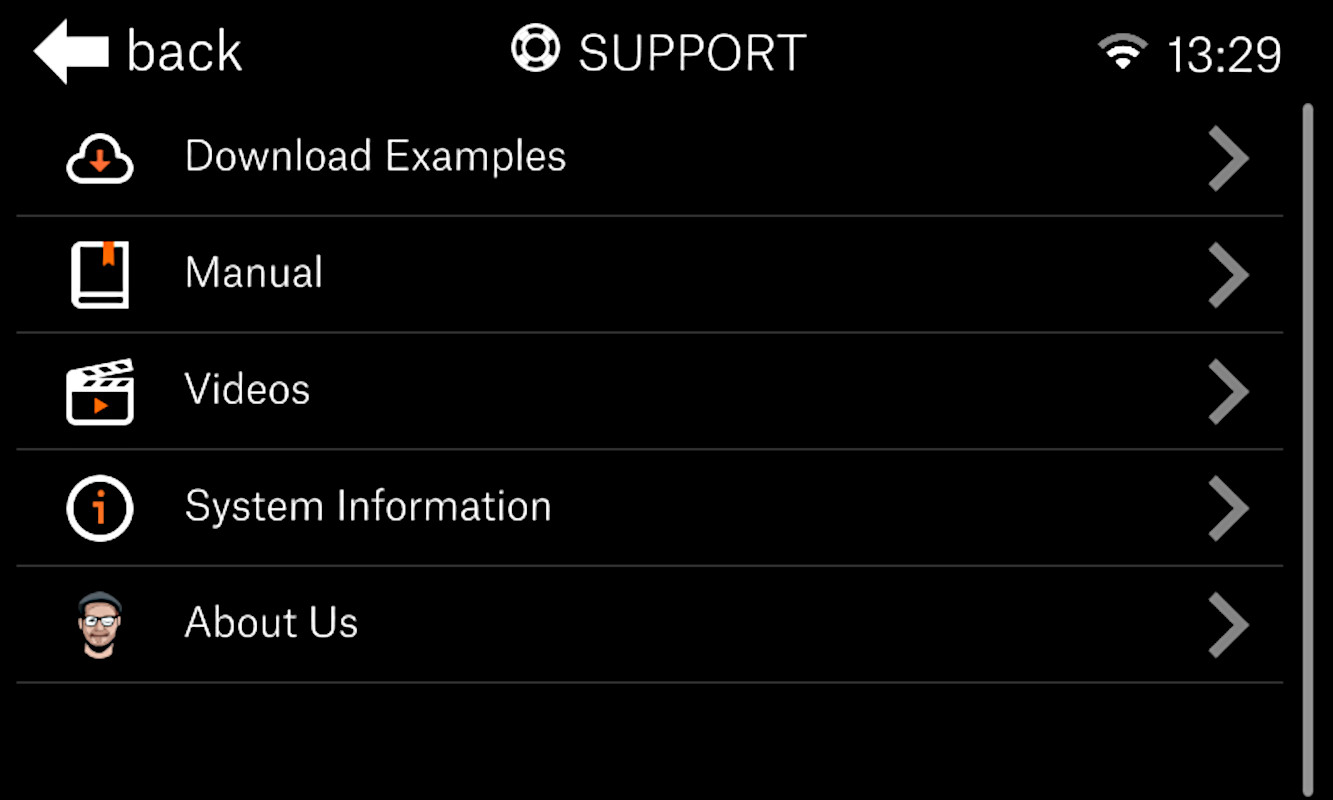
                  1. From the Home screen, enter Settings -> Support -> Download Examples.

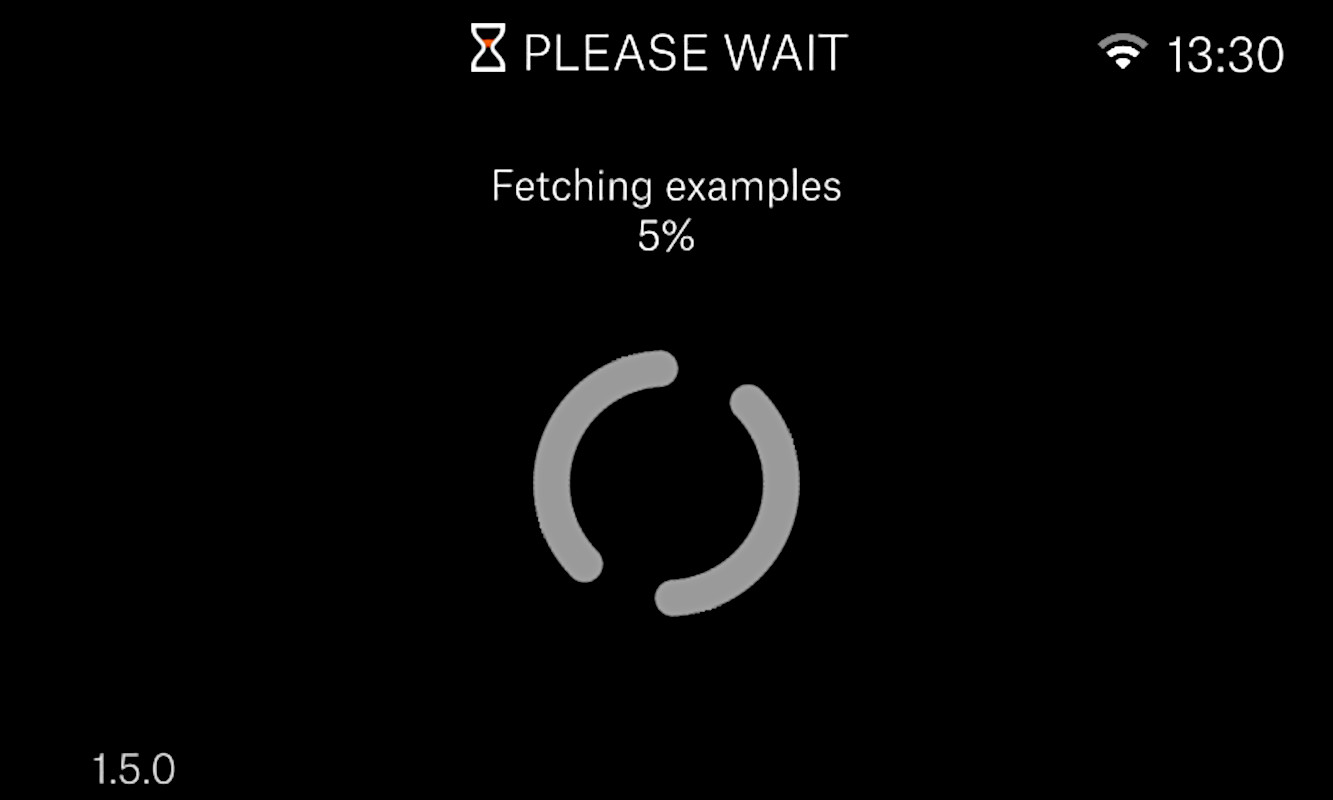
                  1. Allow your SL1/SL1S to download and extract the example files. This can take a minute depending on your internet connection.

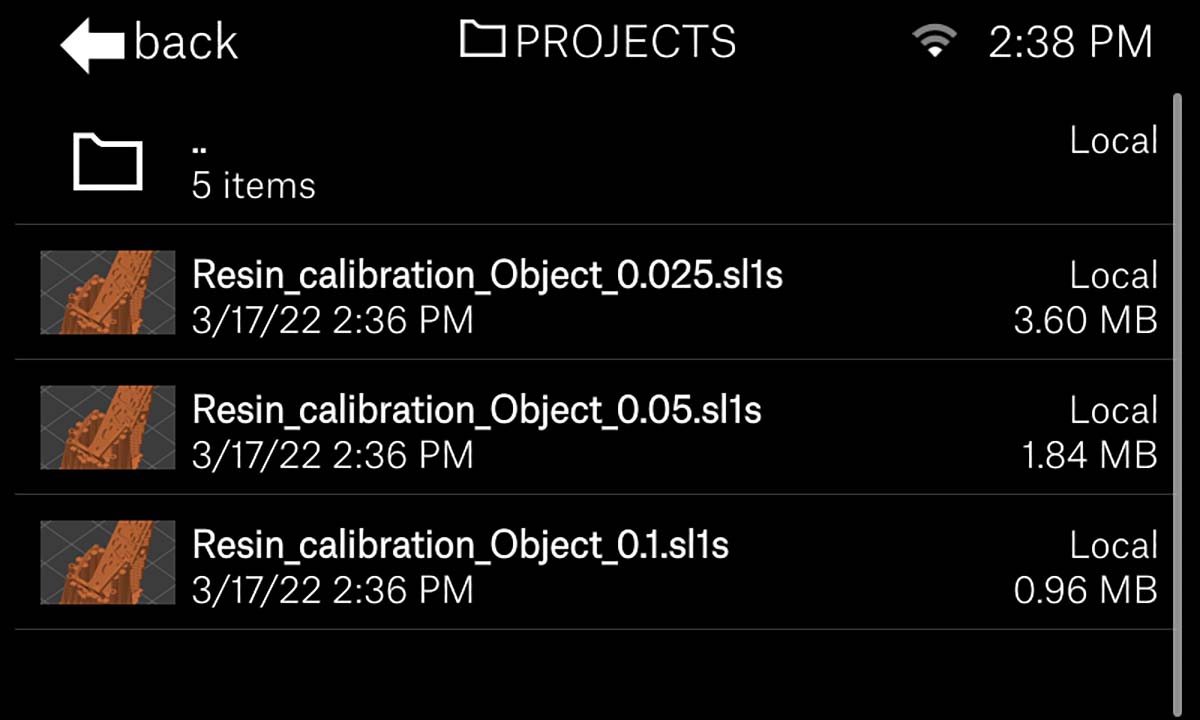
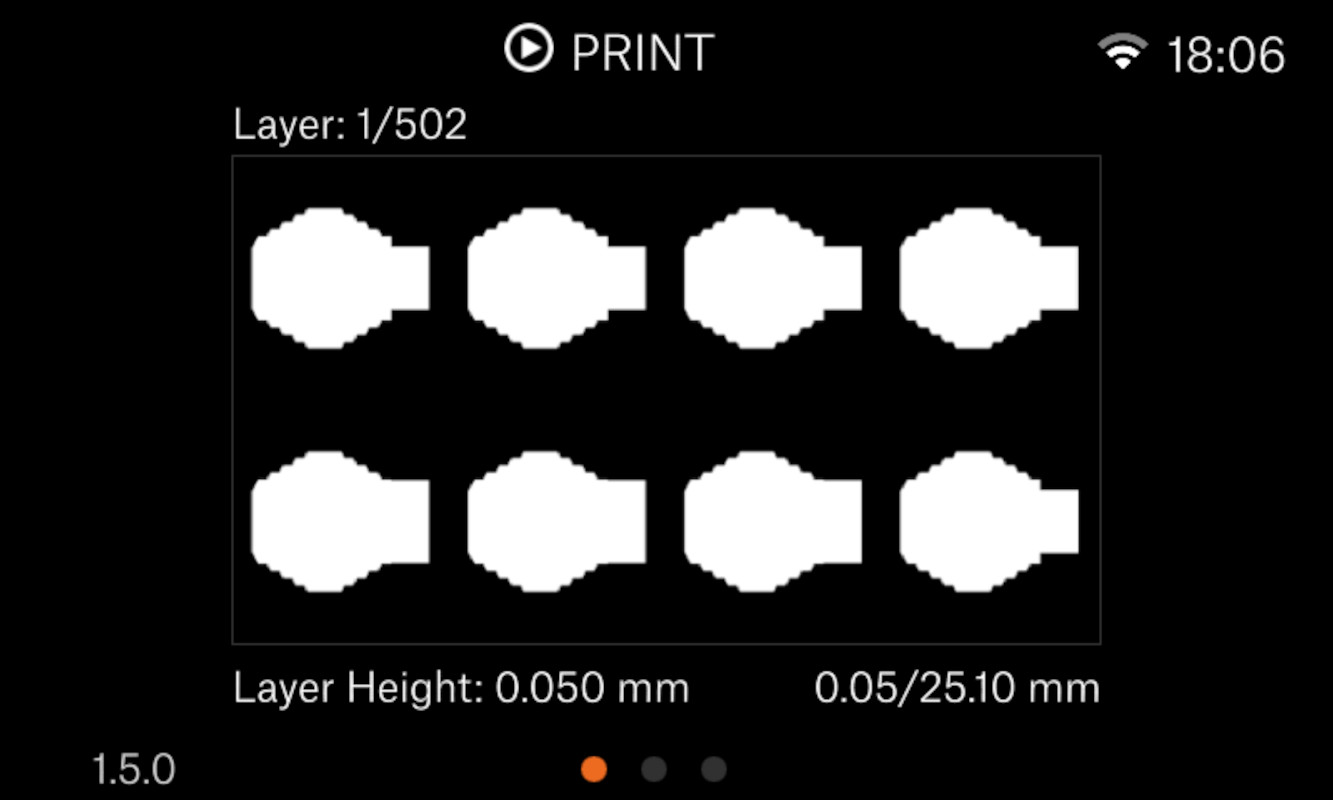
                  1. Navigate back to the Home-screen and select Print -> Local -> Examples -> Calibration Objects. Here you will find a list of files for calibrating for different layer heights [0.025 mm - 0.05 mm - 0.1 mm]. Select the layer height you want to calibrate for. If unsure, we recommend using the 0.05 mm layer height object.

                  Not all resins are suitable for all layer heights. Pigment content and viscosity can impact how deep the UV light will penetrate. Read your resin's documentation or check with the manufacturer to be sure.
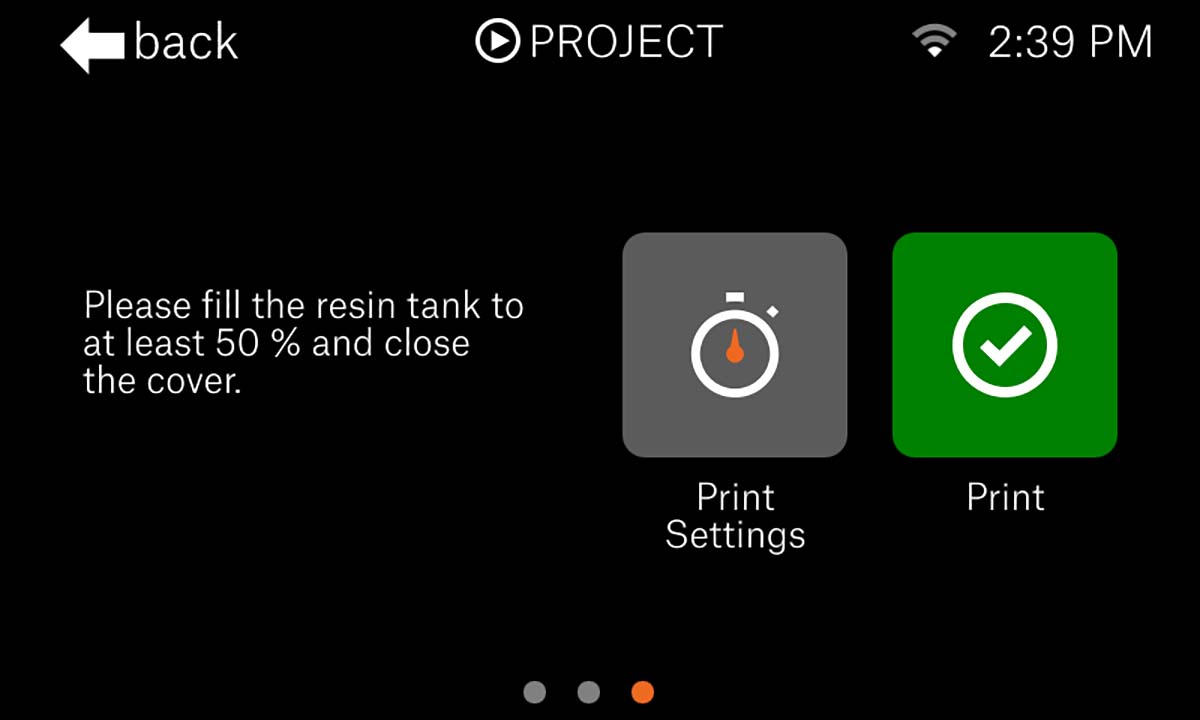
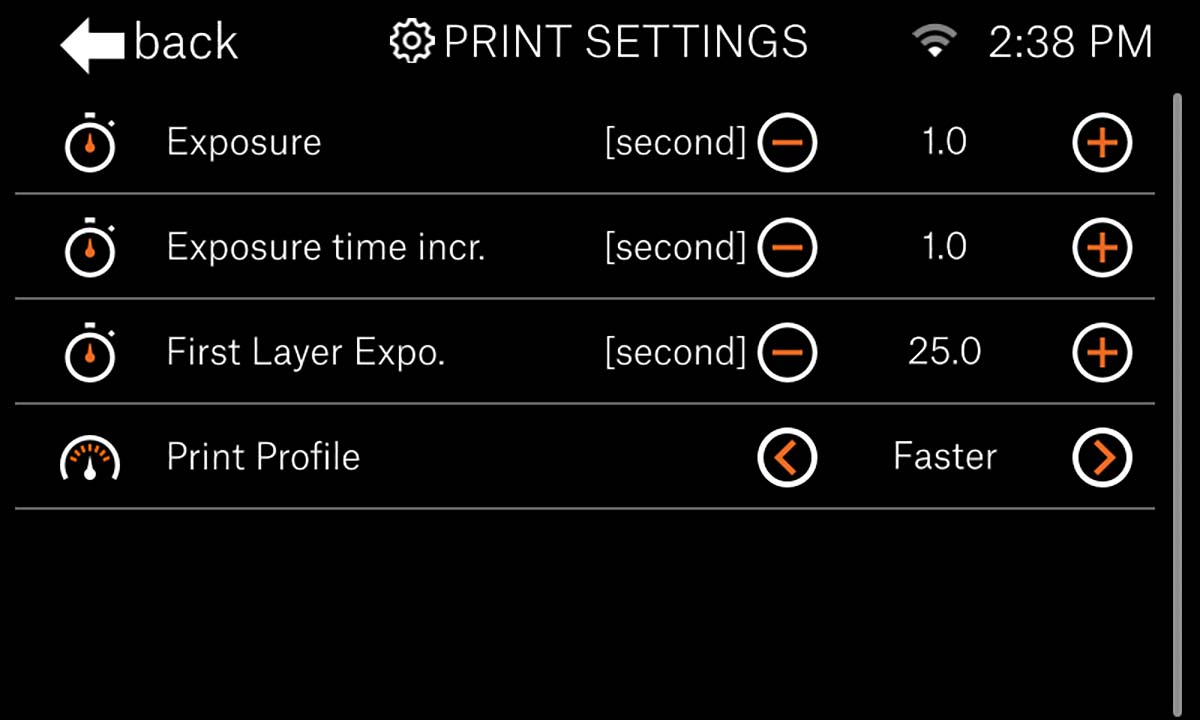
                  1. When you swipe to the right, the screen will have two choices - Print Settings and Print. If you press Print Settings you will see that you have 4 options: Exposure [second], Exposure time incr. [second] and First Layer Expo. [second]. Here you can set the exposure time in and incremented time per object printed. Additionally, you can also change the speed profile for the print (Faster/Slower/High Viscosity).

                  For exotic resins or types/brands that you do not know anything about, it is a good idea to explore the exposure times from a wide to a narrow range. Some industrial resins can require a very long exposure time (around 10s for SL1S or 30s for SL1). A good practice is starting with an increment of 1s for SL1S SPEED or 3s for SL1, to cover a wide range of exposure times. From the best-looking calibration objects, you can determine the more narrow range, before repeating the process with a shorter exposure increment to get more accurate results.

                  To have an idea about approximate exposure time we recommend checking what the manufacturer of the resin state for similar types of printers. Take into account that the SL1 is RGB MSLA and SL1S SPEED is Mono MSLA technology. If you have any such comparable exposure times, you can narrow in the range of exposure times and incremented time.

                  The SL1S SPEED, with its monochrome display, will cure most resins 2-3 times faster than the Original Prusa SL1.
                  1. At the fourth layer, the actual exposure times per object will be included as part of the model. Being physically printed with the object it makes the evaluation after the print is finished easier.

                  1. As soon as the print is finished, wash and cure your print as normal, then take a closer look at the printed objects. You should look for:
                      • Missing elements/geometry
                      • Deformations
                      • Holes
                      • Merged parts of geometry
                      • Any other flaws
                    •  
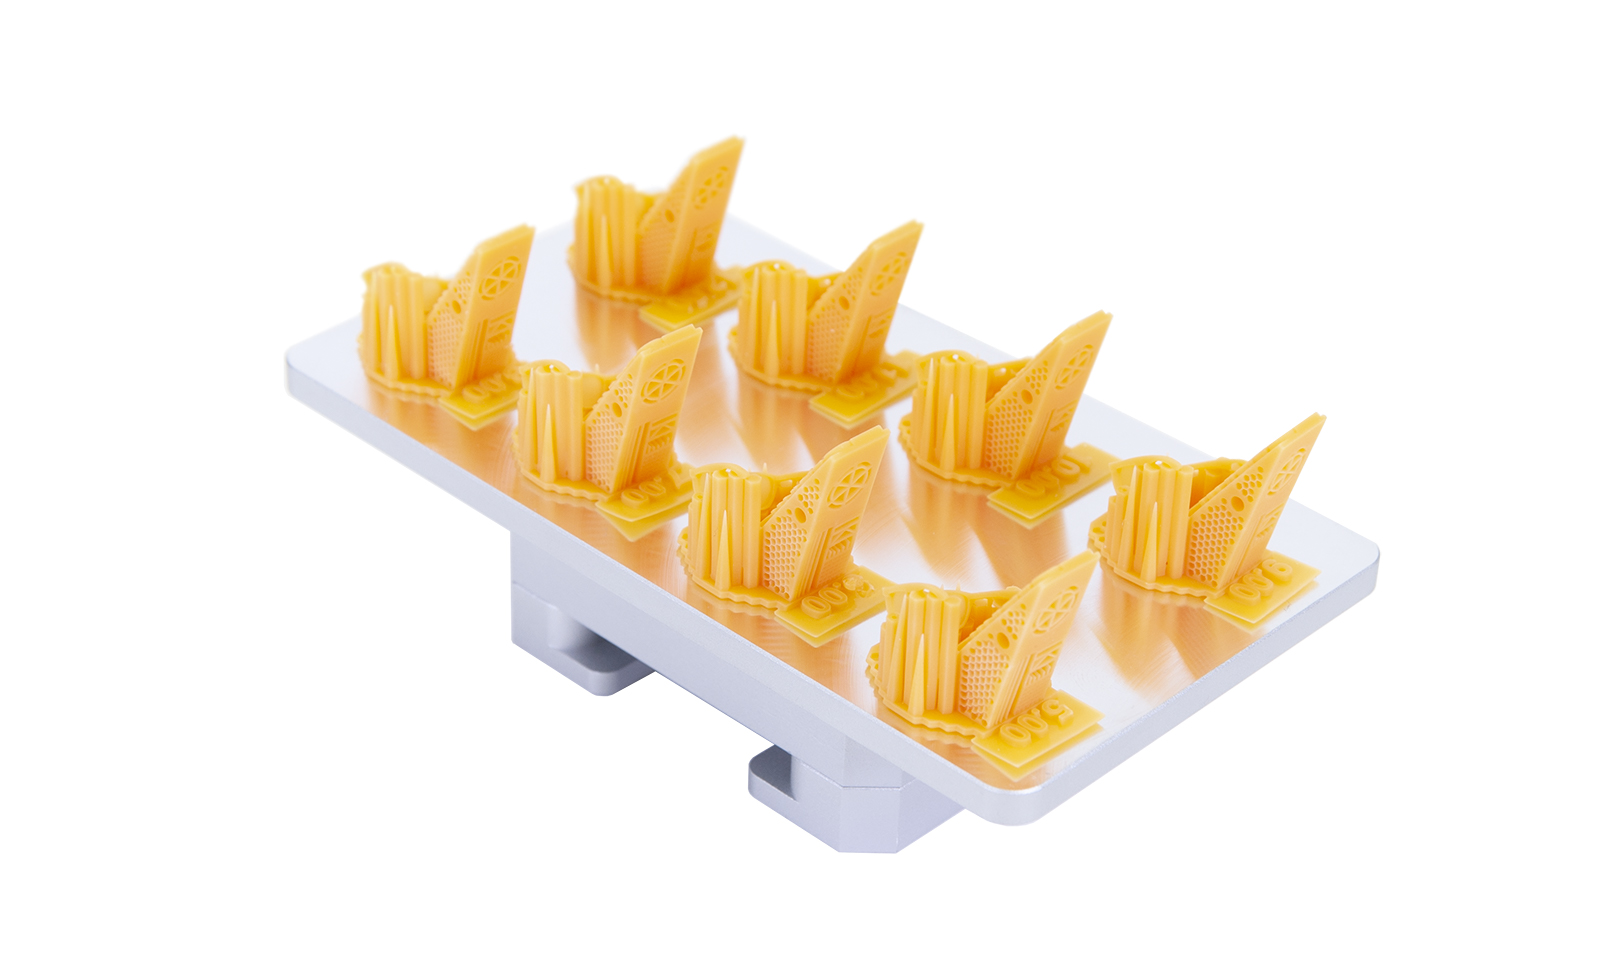
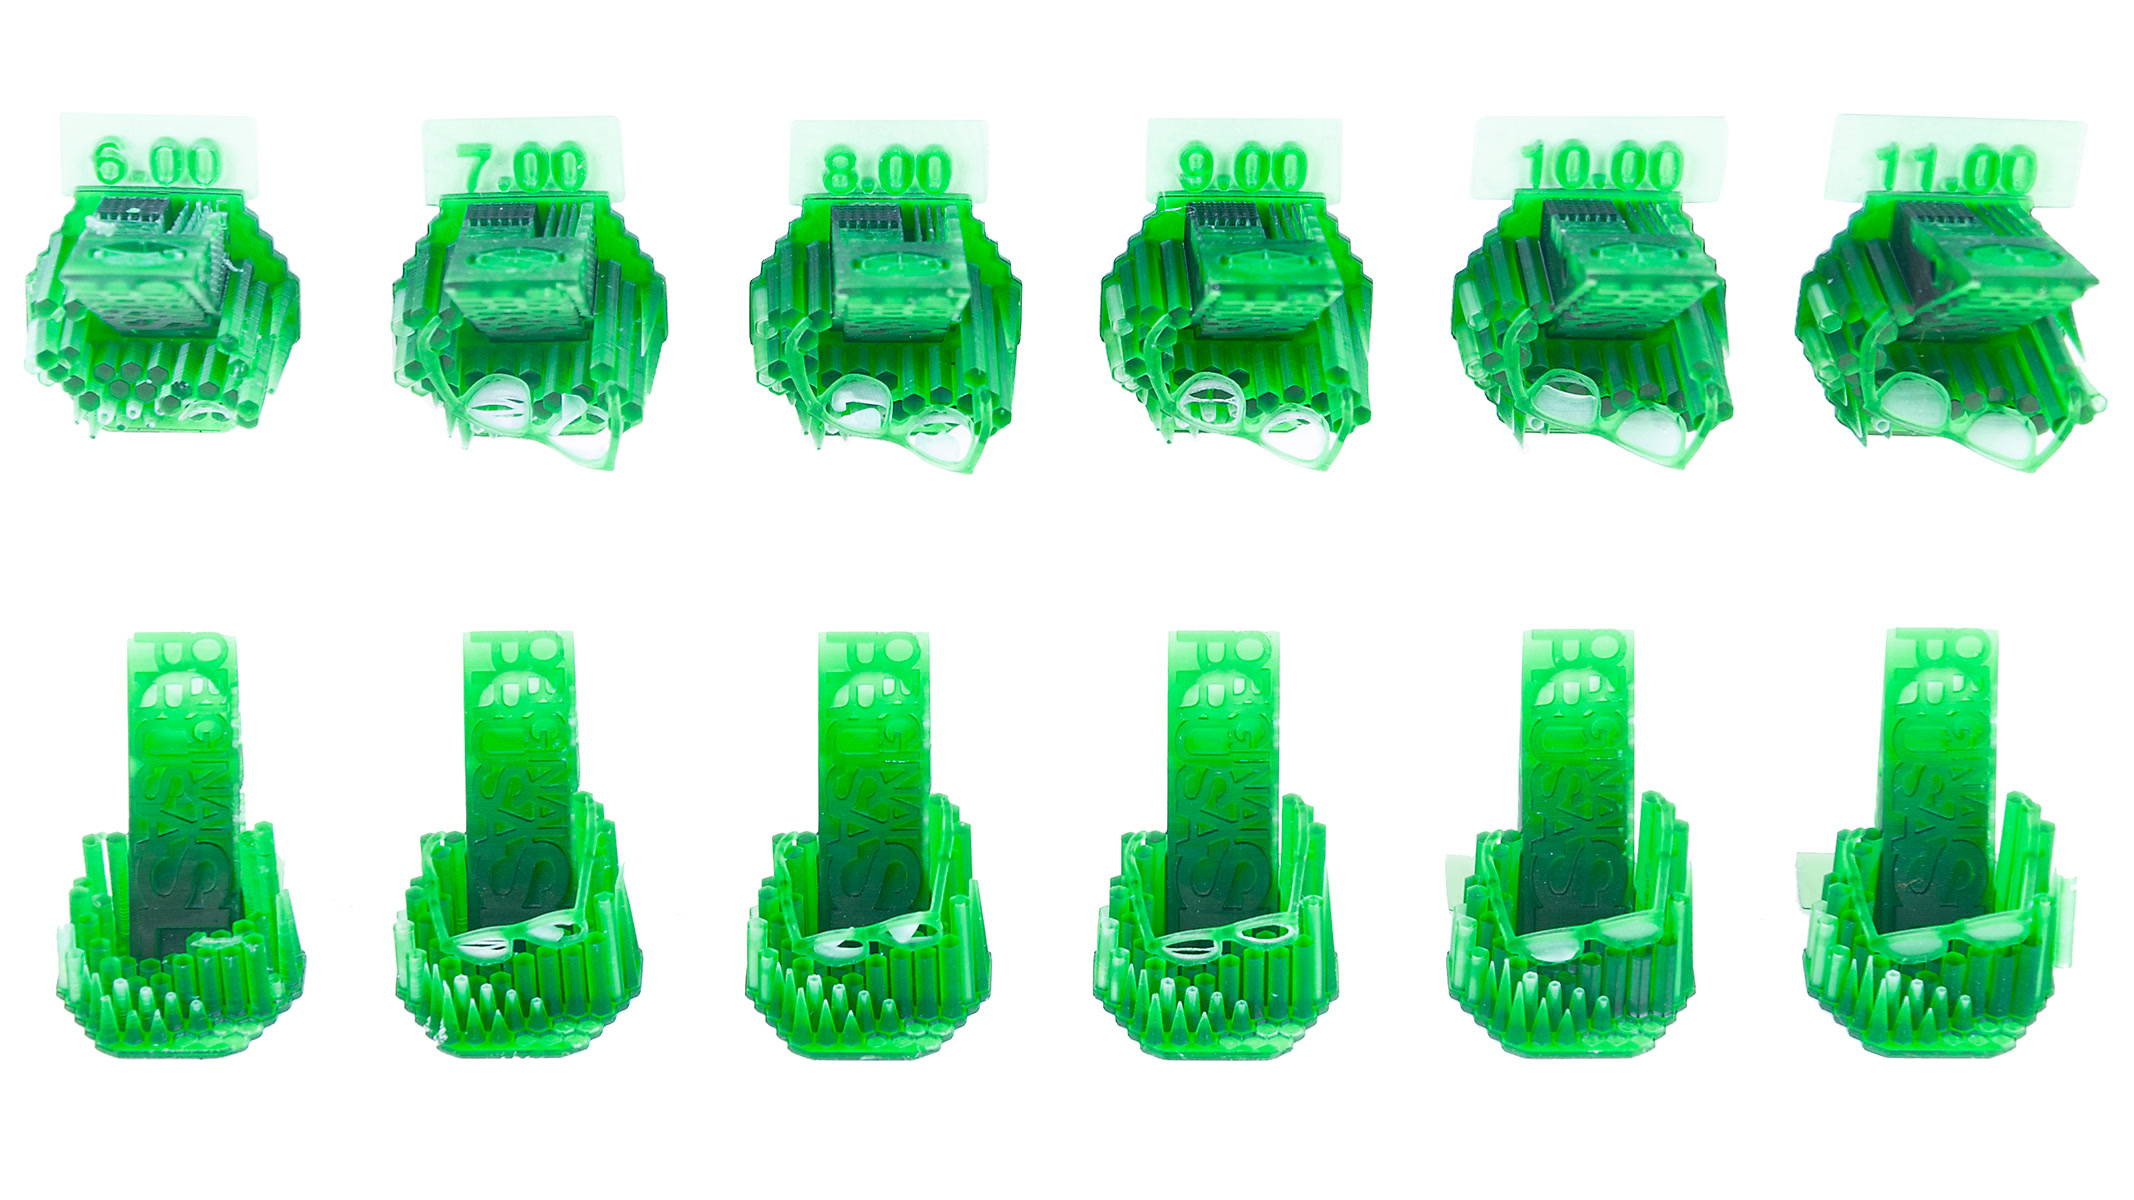
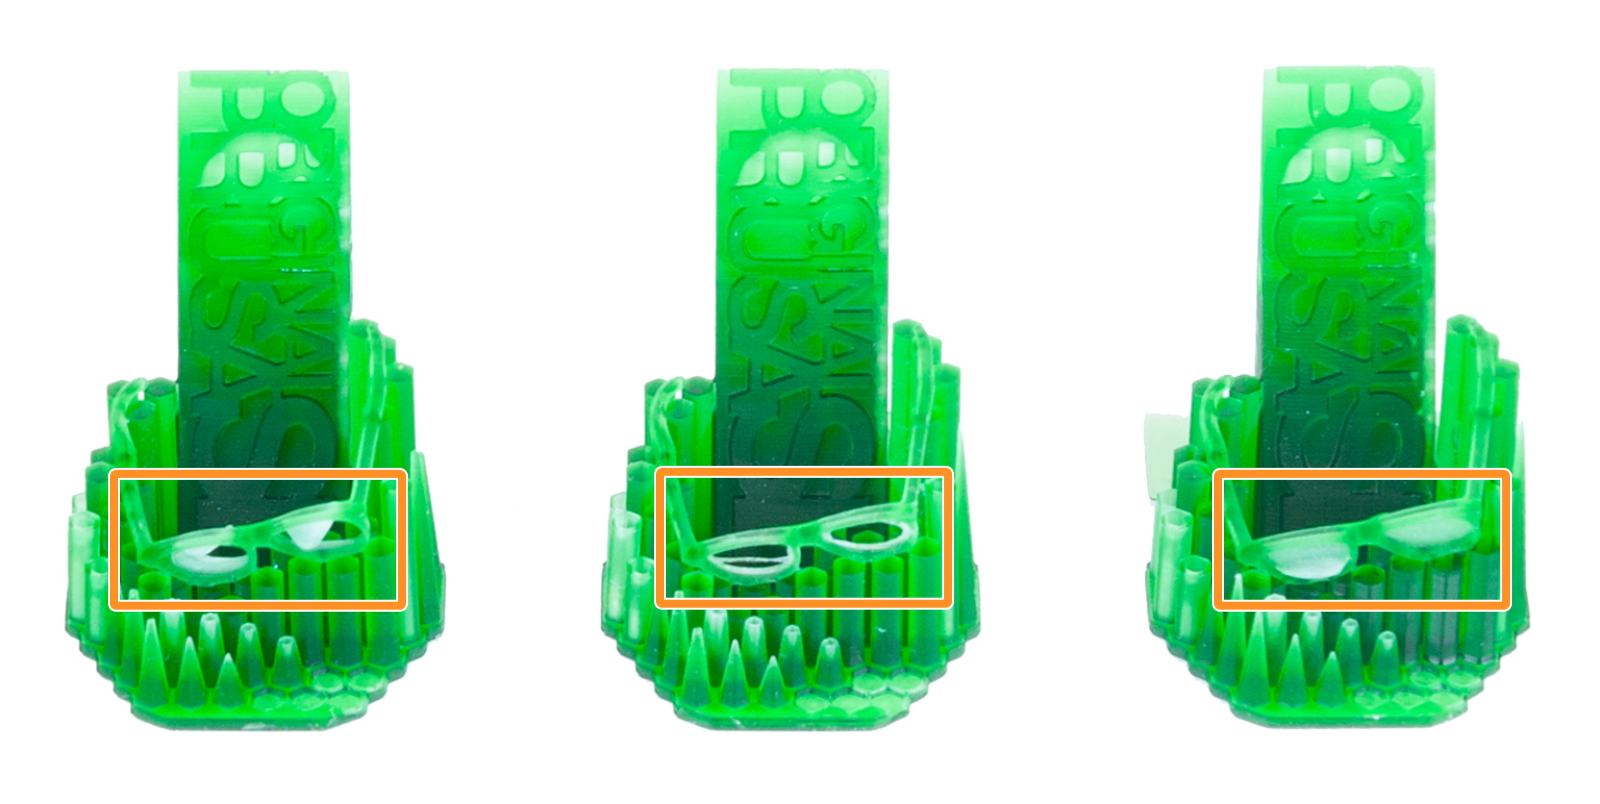
                  • Take a look at the picture below used as an example. Notice that the frame of the glasses and the lenses are damaged or completely missing with an interval between 6 to 9 seconds. The first useable exposure time is 10 and 11 seconds.

                  Letters/digits are a good indicator of overexposure - they will be too thick and melt together.
                  An example of how geometry forms can be found in the calibration object's glasses, where the actual glass within the frame will not be printed if exposure duration is set too low.

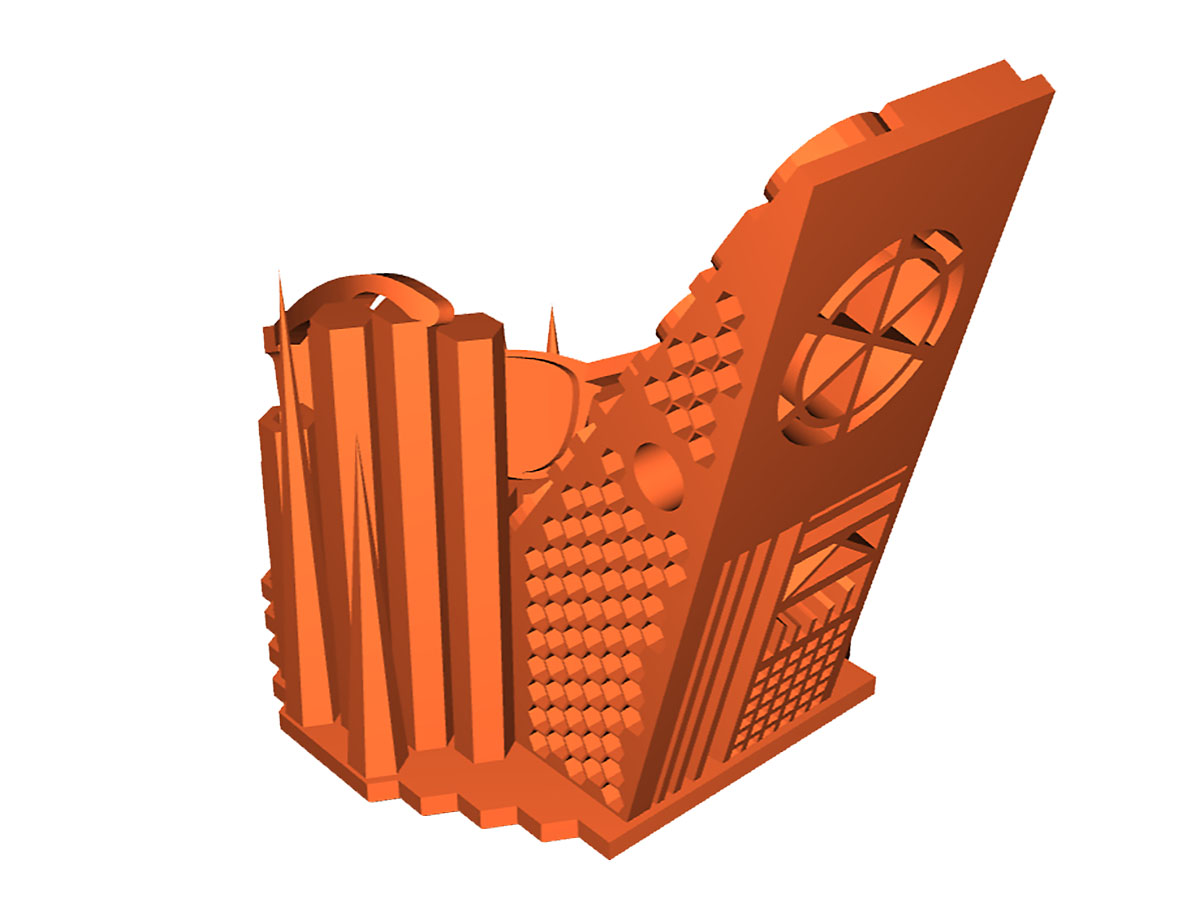
                  You can also use the 3D view of the 3D model itself at Printables.com (formerly PrusaPrinters.org), or download it to your computer and open it there for inspection. Here you will see all the tiny details that this model has. However, not all resins are made to print fine details. Undefined details are not always a sign of underexposure.

                  3D view of the calibration object at Printables.com

                  Creating a PrusaSlicer preset

                  Did you find the best exposure time for your resin? Great! You can start a normal print right away, adjusting the exposure time on the printer's display before the print or you can create your own resin profile:

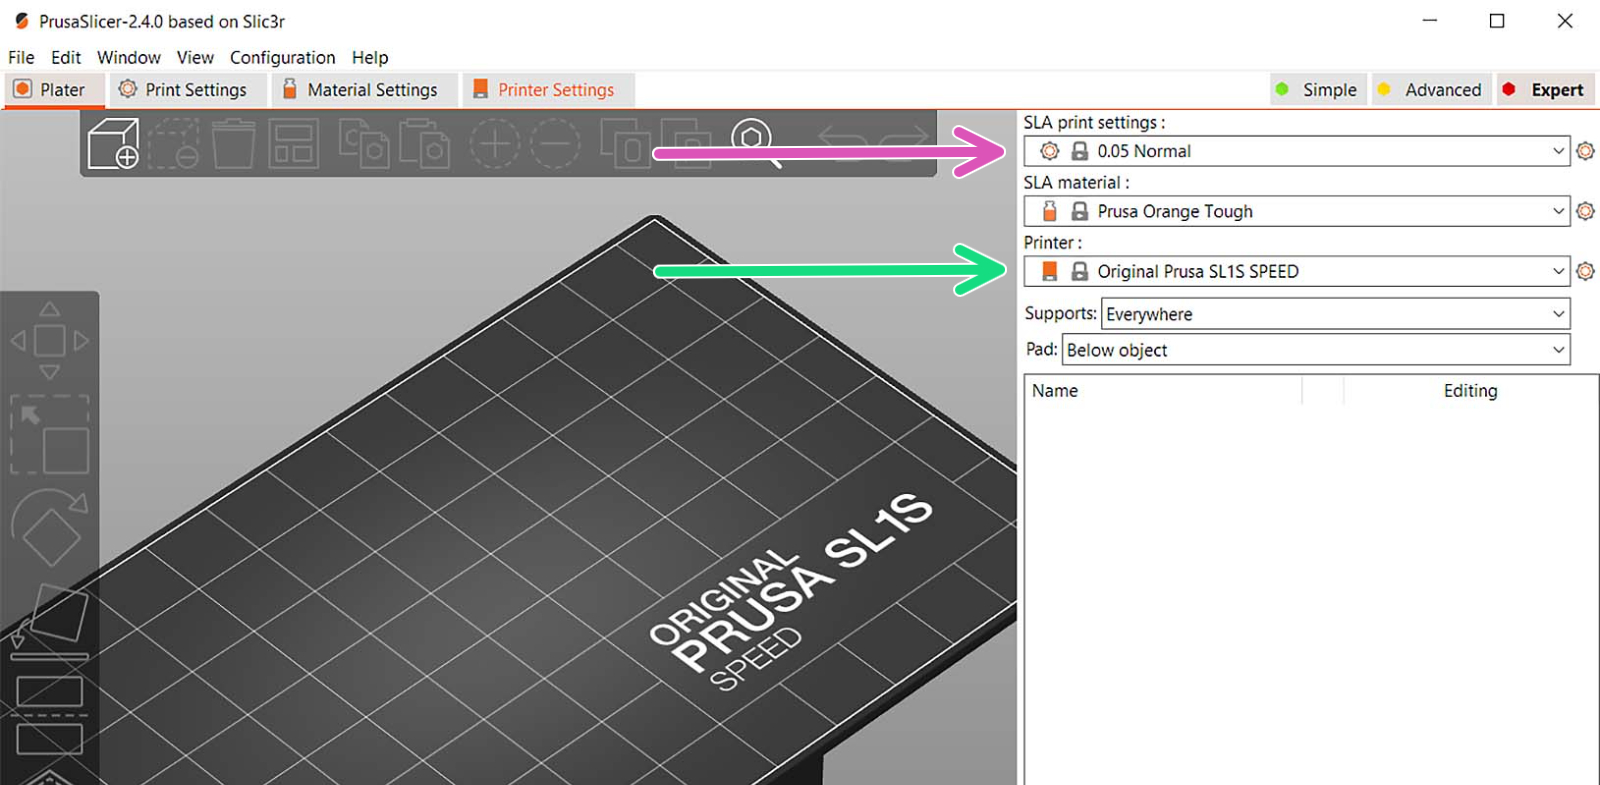
                  1. Open PrusaSlicer and in the Plater view, select from the list of the printers (green arrow), Original Prusa SL1/SL1S SPEED, depending on which you have.
                  2. From SLA print settings (purple arrow), select the layer height you want to calibrate the resin for. This will load all the available resins.

                  1. Click on the "Material settings" tab on top.
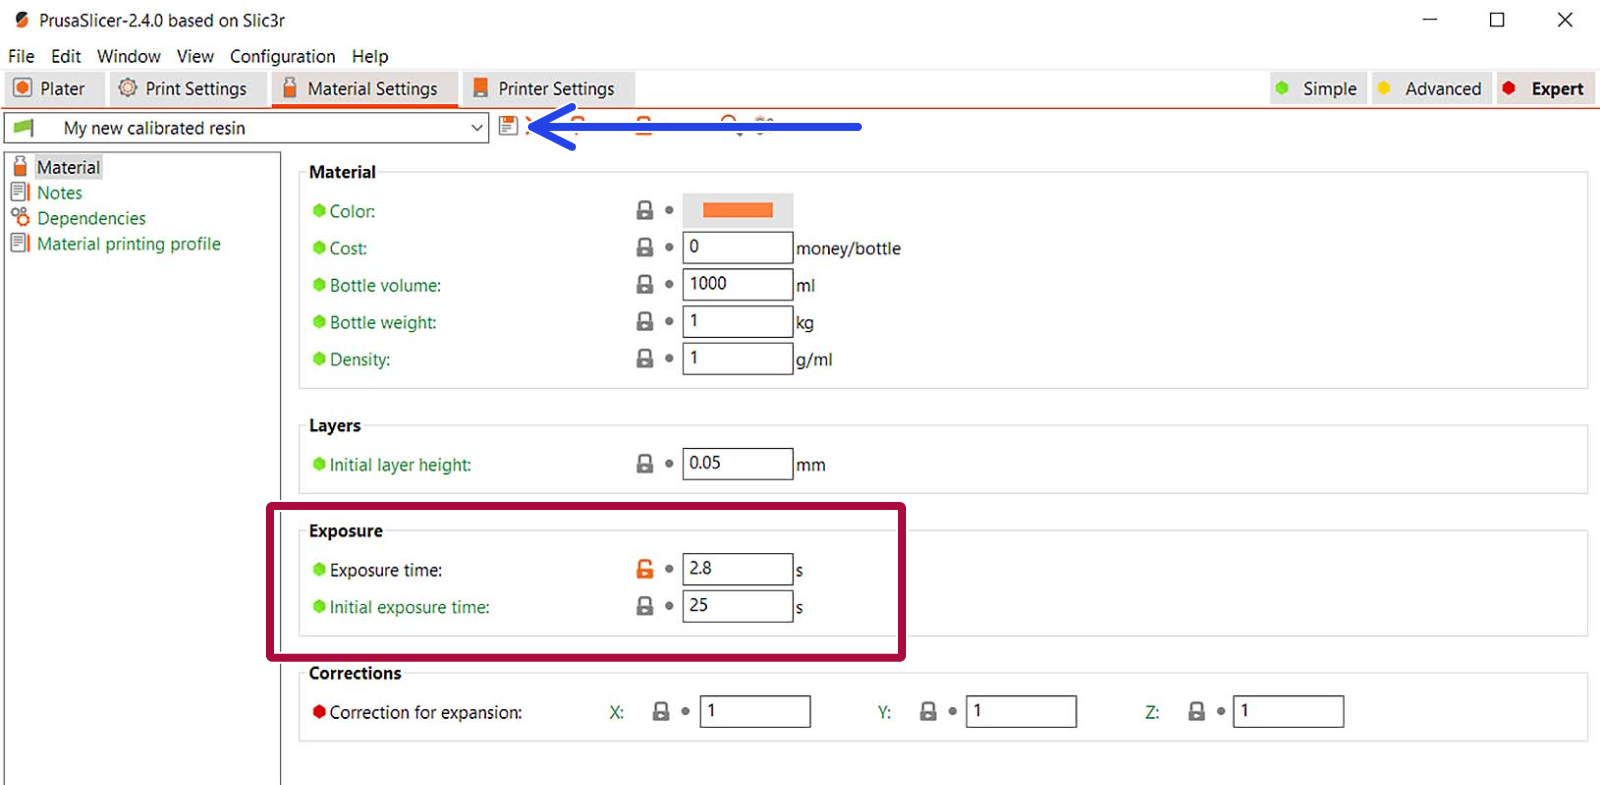
                  2. Select any resin from the dropdown list with the layer height you intend to calibrate for. It will be used as a base for your new profile. Then click on the "Save" icon (?) next to the list (blue arrow).
                  3. A dialogue will open up where you name the preset (e.g. "My new calibrated resin") and hit "OK".
                  4. In the new resin, the profile adjusts the fields "Initial Exposure time" and "Exposure time" (red square), which sets the time for which each layer of the sliced object is exposed to the UV light.
                  5. Now, you are good to go. Slice your next model and Happy Printing!

                  Video

                  The video below covers the procedure on the Original Prusa SL1, but the procedure for the SL1S SPEED is almost the same.

                  Was this article helpful?
                  This action is available only to registered users. Please log-in.

                  Topics

                  • Using the printer
                    • Resin Calibration (SL1/SL1S)
                    • Printable parts for Original Prusa
                    • Where can you get 3D models?
                    • Tested resins
                    • Resins
                    • Resin yellowing and how to reduce it
                    • Prusament Resin Model Color Kit
                    • PrusaLink (SL1/SL1S)
                    • Prusa Connect setup (SL1/S)
                    • How to import profiles to Cura 4.x (Windows & macOS)
                    • How to import profiles to Simplify3D 4.x (Windows & macOS)
                    • Prusa Connect and PrusaLink explained
                    • ESP Camera for Prusa Connect
                    • How to remove a stripped screw
                    • Firmware updating (SL1/SL1S)
                    • How to replace a blower fan (SL1)
                    • How to replace an optical sensor (SL1)
                    • How to replace the print display (SL1)
                    • How to replace the power button (SL1/SL1S)
                    • How to replace the A64 board (SL1)
                    • How to replace the USB connector (SL1/SL1S)
                    • How to replace the FEP film (SL1S)
                    • How to replace the print display (SL1S)
                    • How to replace a blower fan (SL1S)
                    • How to replace a UV LED fan (SL1S)
                    • How to post-process the printed parts
                    • How to replace UV LED assembly (SL1S)
                    • How to replace a UV LED assembly (SL1)
                    • How to replace a filter (SL1/SL1S)
                    • SL1/SL1S print removing
                    • FEP film replacement (SL1)
                    • SL1/SL1S maintenance
                  • Assembly manuals
                  • About your printer
                  • Calibration
                  • Troubleshooting
                  • PrusaSlicer 2.9 (Legacy)
                  • Printables
                  • 3rd party accessories & Other projects
                  • PrusaSlicer 3.0 (Public Preview)

                  14 comments

                  Log in  to post a comment
                  Stephen Brown
                  •
                  Really glad this feature exists. I was struggling with a particular bargain brand resin. This test instantly dialed it in for me, 5 seconds was spot on for high detail and reliability. Thanks!
                  Reply
                  BenjaminC
                  •
                  My printer is not conected to internet. Can I download the .sl1s file elsewhere?
                  Reply
                  Same Old Shane
                  •
                  the file is located on printables.com :)https://www.printables.com/model/17577-sl1-resin-calibration-object
                  Reply
                  BenjaminC
                  •
                  This is the link to the .stl file for one calibration object, not the .sl1s file with 8 calibration object with different exposure time. Is there a way I recreat the 8 object file with different exposure time with the link you have sent? 
                  Reply
                  Giuliano - Official Prusa CS
                  •
                  Hello. There is a dedicated article for this purpose: https://help.prusa3d.com/article/creating-a-resin-calibration-object-sl1-sl1s_235292
                  Reply
                  Mr P
                  •
                  I'm with you , very frustrating and time consuming calibrating new resins. 
                  Reply
                  ndawghoodstar
                  •
                  Can we please get an update on when this is coming for SL1S? Please please please..........
                  Reply
                  mibauer
                  •
                  Don't beg. Write a complaint and stop buying Prusa equipment and tell everyone you know who is interested in 3D printers.
                  Let Prusa beg us to buy their half-finished stuff.
                  Reply
                  William H. - Official Prusa
                  •

                  It's here:D

                  Reply
                  LukasWegmann
                  •
                  It disappoints me that this test is still not available for the SL1S. 2000€ is a lot of money for a resin printer and for that money i think you can expect a good service. i see here that this test was requested half a year ago and is still not available. this is not the kind of prusa i know
                  Reply
                  mibauer
                  •
                  Why? They advertised this feature and sold us the devices. They are not interested in anything else.
                  They don't care whether we want the promised feature or not.
                  It's simple: BUY NO MORE PRUSA DEVICES, then they will surely wake up...
                  Reply
                  David
                  •

                  Hi! Have you tried the 1.7.0 beta firmware?

                  Reply