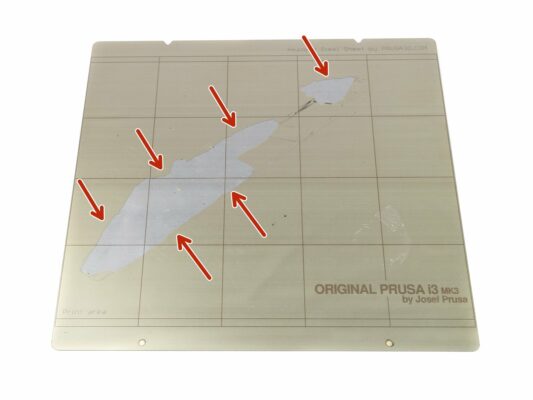
EN
  • Čeština
  • Español
  • Italiano
  • Deutsch
  • Polski
  • Français
  • 日本語
Login

Replacing the PEI sheet on the (MK3S/MK3/MK2.5S/MK2.5)

Menu

Replacing the PEI sheet on the (MK3S/MK3/MK2.5S/MK2.5)

Replacing the PEI sheet on the (MK3S/MK3/MK2.5S/MK2.5)
Last updated 2 years ago
Replacing the PEI sheet on the (MK3S/MK3/MK2.5S/MK2.5)
 Difficulty
Difficult
 Steps
20
 Available languages
CSPLESDEITFRJA
Damaged PEI surface
Damaged PEI surface
Damaged PEI surface
The PEI surface is very durable, however, it is possible to damage it.
Make sure you always wait a while after bigger prints are finished. Before you try to remove the printed objects.
Have a look in the 3D Printing Handbook for materials, which need special treatment of the PEI surface to avoid future damage to your printer.
If your printing surface is damaged severely, let's move to the next step.
As soon as you remove the damaged PEI sheet, please apply a new one. The PEI sheet works also as protection against atmospheric corrosion.
Shopping list (part 1)
Please prepare following tools and equipment before you start:
Kitchen freezer
New PEI sheet (order here, you must be logged in)
Slotted screwdriver for PEI sheet removal
Limonene (Lemonesol, D-limonene or something similar)
Nitrile gloves (more than one pair)
Paper towels (on a roll)
Disposable fabric towels (on a roll)
Shopping list (part 2)
Sharp knife for PEI sheet trimming
Plastic scraper (ice scraper will do fine)
Microfibre cloth to prevent scratches to the new PEI surface
Plastic bag bigger than the steel sheet
Surface to work on - best is sturdy foam board, ideally at least twice the size of the steel sheet. A thin plastic sheet isn't recommended.
Glass of clean tap water
IPA or acetone
Get all those items in advance, it is very complicated to stop or even pause in the middle of the process.
Other compatible products

This guide works also for Original Prusa MINI/MINI+ smooth PEI steel sheets.

Since these are a little bit smaller, the difference is that after applying a new PEI sheet you have to trim more material from its sides.

The same new uni-size replacement MK3S+ PEI sheet can also be used for older MK2S printer heatbed. Compared to the discontinued MK2S PEI sheet, the MK3S+ PEI is a bit larger and more material has to be trimmed after applying.

After you get the new PEI sheet and all the other necessary materials, please follow the older guide for MK2S printer.

Freezing the damaged PEI surface
For easier removal of the damaged PEI surface, we need to place it in the freezer.
Set the temperature below -20°C (-4°F) or lower if your freezer allows it.
The more you freeze the steel sheet the more time you get to remove the PEI sheet before the glue starts to stick again.
Place the steel sheet in at least for 30 minutes.
Don't place the new PEI sheet in the freezer as well ;)
Removing the PEI sheet
Time is of the essence here! As soon as the temperature increases, the glue between the PEI sheet and surface of the steel sheet activates again!
Take the steel sheet out from the freezer and using a sharp tool (e.g. screwdriver) lift one edge of the PEI sheet.
Peel the entire PEI sheet off. The frozen glue will remain on the steel sheet. Proceed quickly!
Be careful, you can easily scratch the steel sheet or hurt yourself!
If your PEI surface is damaged from the other side as well, you can remove it now.
Glue removal - placing the PAPER towels
As stated in the previous step, the glue will remain on the sheet and we need to remove it.
First, take the board or any sturdy disposable underlay and place the steel sheet on it. Don't take the board away until you finish the glue removal process.
Place the paper towels on the steel sheet as shown in the picture. The whole glue surface has to be covered.
The red line represents the steel sheet under the towels.
Glue removal - it is Limonene time
IMPORTANT: this step requires you to work the cleaning solvent (e.g. Limonene). Use the nitrile gloves and don't leave the bottle unattended. Read the safety instructions first!!!
Pour the Limonene on the paper towels until they are completely soaked with it.
Keep in mind that Limonene can be extremely toxic for your pets, keep them out!
Place the steel sheet with towels in a plastic bag to slow down Limonene evaporation.
Seal the bag to prevent the Limonene evaporating out. You can use the plastic bubble bag your steel sheet originally arrived in or any other plastic bag, which can be reasonably sealed.
Glue removal - letting the Limonene work
Let the Limonene do its magic for at least 40 minutes.
Make sure no child or your house pet can reach plastic bag during this period.
Open window(s) and let new fresh air in the room, however, don't allow the room temperature drop too much.
Glue removal - scrapping the glue
Proceed carefully and with patience. You might damage the scraper or the steel sheet.
Get a plastic scraper and start peeling the glue from one corner.
Try concentrating the glue in one place, it will be easier to remove it as one piece.
Sheet looks almost clean, but we need to make sure all the glue is out. Proceed to the next step.
Now, use the fabric towels to clean the scraper. Paper ones tend to tear up easily.
Glue removal - looking for "dirty" spots
Take a closer look at the sheet, there might be spots with the remaining glue.
Soak them with Limonene again, let it interact for few seconds and start removing the glue with the scraper again.
This is how the steel sheet should look like. No bumps or spots with the glue.
Apply this procedure on the entire sheet and repeat it until the steel sheet is completely "glue-free". Clean your scraper after each round, so you won't spread the previously removed glue.
Use the fabric towels to clean the scraper. Paper ones tend to tear up easily.
Cleaning the steel sheet (water)
Limonene tends to evaporate, but we need to make sure, there is none of it left including the smallest particles of the glue.
Use distilled or clean tap water and pour (or spray) a reasonable amount on the surface.
Wipe the entire sheet with a towel (paper or fabric).
Cleaning the steel sheet (IPA)
Clean the steel sheet using IPA (or something similar that can remove grease marks) and a fabric towel.
After doing this, make sure no dust or fibres remain on the steel sheet surface! Also, avoid touching the sheet with your bare hands!
The cleaning process is finished, now you can close the Limonene and get rid of the board below the steel sheet. Make your workspace clean.
If you removed the PEI sheet from both sides, turn the sheet to the other side, go back to the Step 6 and repeat the glue removal process.
The PEI sheet preparation
WARNING: Read all the instructions first and proceed carefully. Once you glue the PEI sheet wrong, there is NO WAY BACK !!!
The PEI sheet is NOT SQUARE, compare it to the steel sheet to find proper orientation

Properly oriented PEI sheet must stick out 1-2 mm on each side.   

There may be a larger overhang if you´re replacing the PEI sheet on Prusa MINI/MINI+ steel sheet or your MK2/MK2S

DO NOT try to peel out the PEI sheet when it's glued, even in small area, it'll ruin the glue at that place!
Gluing the new PEI sheet
Peel out about 2 cm (1 inch) of glue protector from the SHORTER side of PEI sheet as shown in the picture.
Make sure the PEI sheet is placed as shown in the picture. The edges of the PEI sheet have to be aligned with the edges of the steel sheet. The PEI sheet can slightly overlap the steel sheet edges, we will trim it later.
Take a closer look to ensure both the PEI sheet and the steel sheet edges are aligned (parallel).
Bonding the PEI and steel sheet
Wrap the plastic scraper in the microfibre cloth and start pressing the PEI sheet against the steel sheet.
Proceed by 2-3 cm strips at MAX!!! Larger strips might trap air inside and cause an uneven surface.
Cover the entire surface of the steel sheet, use the scraper in all directions, BUT BE CAREFUL around the edges! See the next step for more.
Applying the PEI sheet near the edges
BE EXTRA CAREFUL while working near the edges. ALWAYS swipe only out from the sheet, NEVER back. You might accidentally lift the PEI sheet up and let some air under it.
Swipe across the entire surface and be careful around the edges.
When ready, leave the glue do its work for a few minutes. You can clean most of the tools, leave just the knife, IPA and towels with you.
Trimming the edges
Trimming the edges
Trimming the edges
Trimming the edges
Trim the extra PEI sheet using a sharp knife you prepared earlier. ALWAYS cut from the side of the applied PEI sheet.
No need to perforate the circular openings. Those are used to hang the steel sheet during the manufacturing process.
Be careful while cutting out the V-shaped openings, ALWAYS cut towards the steel sheet, NEVER outwards. Again, you might lift the PEI sheet.
ALL DONE!
ALL DONE!
Congratulations! Your printing surface is like brand new!
Place the steel sheet on the printer, clean it with IPA and give it a test print ;)
Was this guide helpful?

Comments

Still have questions?

Still have questions?

If you have a question about something that isn't covered here, check out our additional resources.
And if that doesn't do the trick, you can send an inquiry to [email protected] or through the button below.

Contact us