Français
Login
Imprimantes 3D
Matériaux
Pièces & accessoires
Logiciel
Modèles 3D
Applications
Communauté
Aide
Academy
Blog
Entreprise
Support
Original Prusa i3 MK2S
Assemblage du kit Original Prusa i3 MK2
8. Electronics assembly | Getting the necessary tools
1. Getting the necessary tools
Step 1 of 22 (Chapter 8 of 9)
Mode plein écran
Contenu
Commentaires
⬢
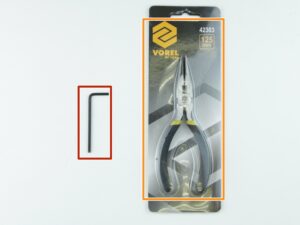
2.5mm Allen key
⬢
Needle-nose pliers
Loading...
Suivant
Contenu
Assemblage du kit Original Prusa i3 MK2
1. Introduction
2. Y-axis assembly
3. X-axis assembly
4. Z-axis assembly
5. Extruder Assembly
6. LCD assembly
7. PSU & Heatbed assembly
8. Electronics assembly [Traduction en cours]
Getting the necessary tools
3D printed parts
Preparing the Rambo cover base
Mounting the Rambo cover base on the frame
Identifying mounting holes
Finalizing the Rambo cover base
Identifying mount hole
Mounting Rambo cover hinge bottom
Preparing electronics
Connecting electronics - part 1
Heatbed and extruder cables guide
Securing heat bed cables to the Rambo cover base
Extruder cables guide
Securing extruder cables to the Rambo cover base
Connecting electronics - part 2
Connecting electronics - part 3
Connecting electronics - part 4
Verify electronics connection
Identifying mounting hole
Preparing Rambo cover upper hing
Finalizing Rambo cover
Hooray!
9. Preflight check
Commentaires
Se connecter
pour poster un commentaire
Aucun commentaire