JA
  • English
  • Čeština
  • Español
  • Italiano
  • Deutsch
  • Polski
  • Français
Login

4. Electronics assembly

4. Electronics assembly
Relevant for:
Last updated 2 years ago
4. Electronics assembly
 Difficulty
Moderate
 Steps
6
 Available languages
ENCSPLDEESITFR
エクストルーダーのケーブル束を接続する
エクストルーダーのケーブル束を接続する
エクストルーダーのケーブル束を接続する
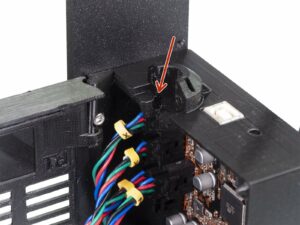
Find the slot for the NYLON filament on the Einsy-base. You will need it in the next step.
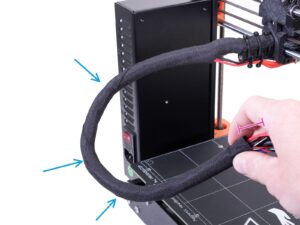
先に進む前に、ケーブルスリーブをひねる必要があります。この作業により、プリント中に中のケーブルが飛び出てきてしまうのを防ぐことができます。
Using your fingers, gently twist the sleeve (not the cables) and create several wraps.
Twisting the sleeve will effectively shorten its length. In the following steps, you might need to untwist the sleeve slightly to elongate it.
エクストルーダーのケーブル束を接続する
エクストルーダーのケーブル束を接続する
エクストルーダーのケーブル束を接続する
エクストルーダーのケーブル束を接続する
ナイロンフィラメントを穴に差し込みます。
ナイロンがテキスタイルスリーブの内側に隠れている場合は、次のステップの手順をみてください。
Make sure the filament isn't pushing into the X-axis motor cable. This would indicate it is too long and you need to slightly unwrap the sleeve and push the filament back.
スリーブをホルダーの中にずらします。このとき、ホルダーの中にスリーブが最低でも ホルダーの高さの 3/4 だけ入っていることを確認してください。
Again, ensure the filament isn't pushing the cables and if needed slightly unwrap the sleeve and push the filament up.
Extruder-cable-clip と 2本 の M3x10 ネジ を使って、ケーブルの束を固定します。
Older MK3 units may have a zip tie cable harness mounting. Use a zip tie to secure the textile sleeve. Do not overtighten the zip tie, you can damage the cables!
Connecting the cables (MK3 to MK3S+ upgrade)
If you are upgrading from MK3S to MK3S+,please skip this step.
Connect all unplugged cables according to the wiring diagram.
Some units may be without a plug-aligner (orange frame in the filament sensor slot). It has no effect on the function of the printer.
フィラメントセンサーの配線全てがしっかりとピンに接続されていることを再度確認してください! コネクターがずれてしまっていると、センサーに修理不能なダメージを与えることがあります。
Check your electronics connection according to the wiring diagram.
Connecting SuperPINDA cable (MK3S to MK3S+ upgrade)
If you are upgrading from MK3 to MK3S+, please skip this step.
Connect the SuperPINDA sensor to the Einsy board.
Check your electronics connections according to the wiring diagram.
To make sure, check the correct connection of the filament sensor cable. The connector must be plugged into the bottom row of the slot. Misalignment might lead to permanently damaging the sensor.
Cable management
Cable management
Arrange the cable management according to the last picture and attach the cable bundle to the Einsy case with two zip ties.
Early MK3 units do not have protrusions on the Einsy case for attaching a zip tie.
It's done
It's done
Close the Einsy-door and secure it with the M3x40 screw.
You're almost there... follow the next chapter.
Was this guide helpful?

Comments

Still have questions?

Still have questions?

If you have a question about something that isn't covered here, check out our additional resources.
And if that doesn't do the trick, you can send an inquiry to [email protected] or through the button below.

Contact us